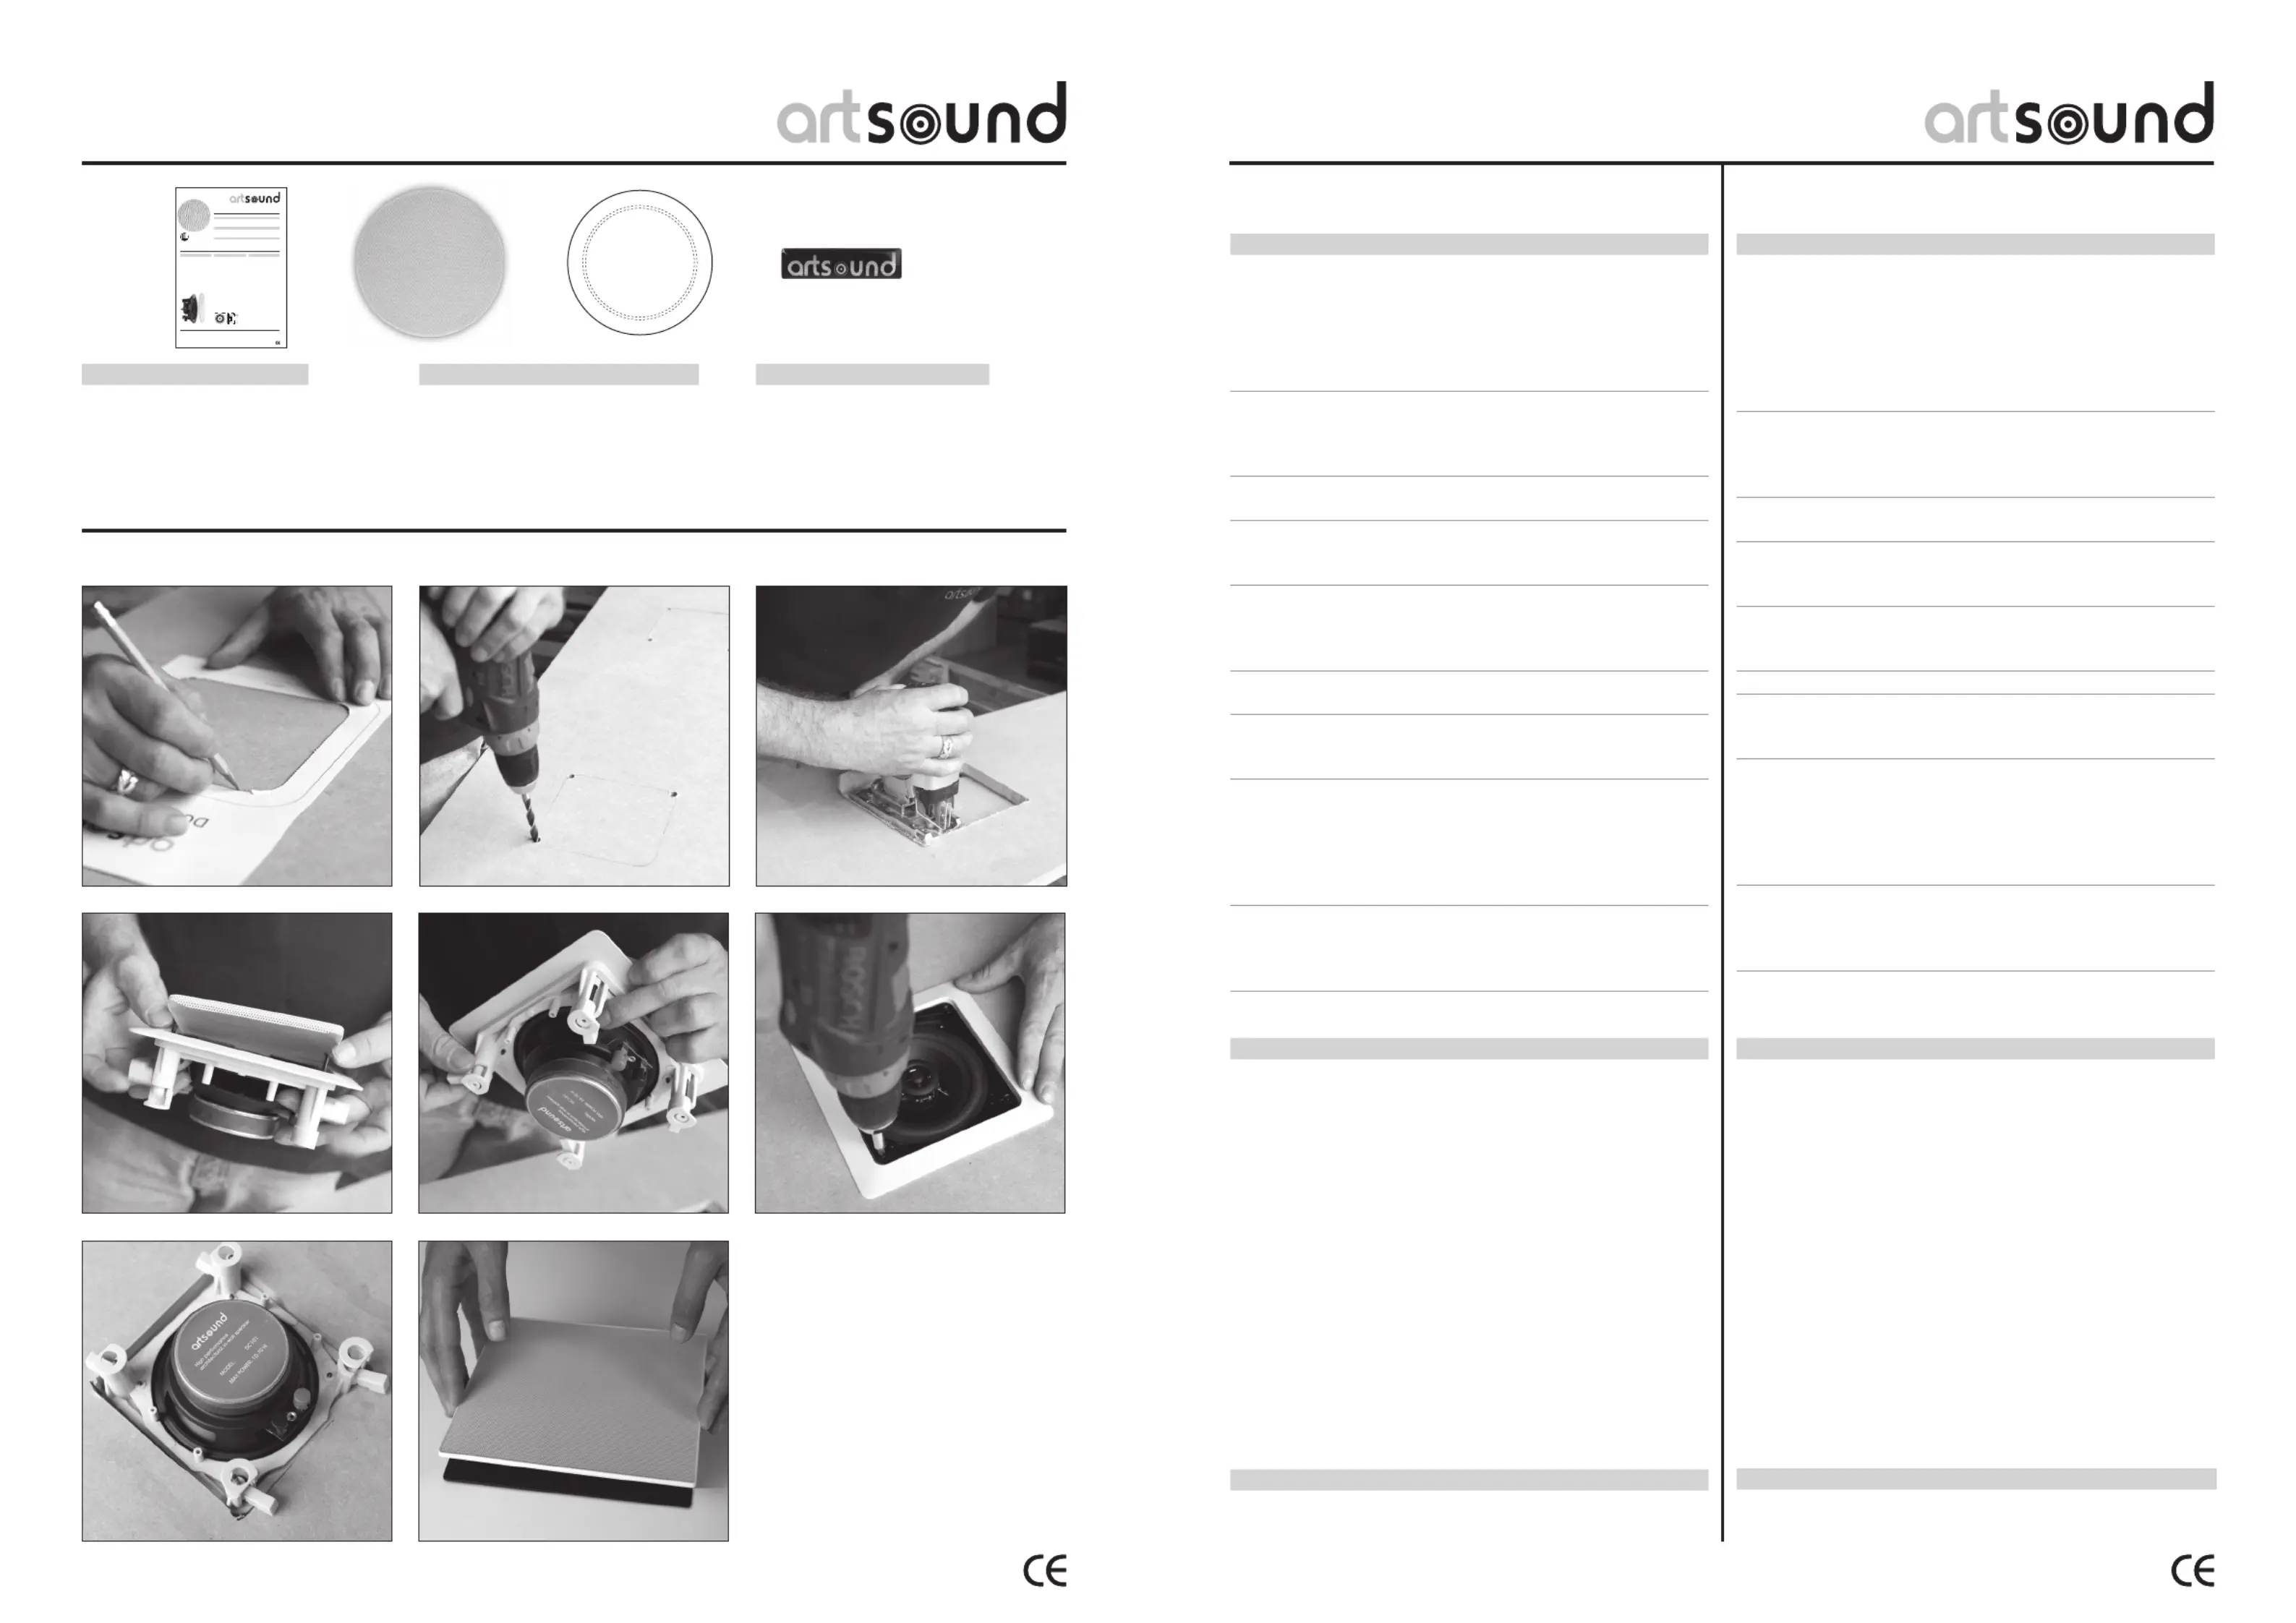
Artsound FL620 Manual


Læs nedenfor 📖 manual på dansk for Artsound FL620 (2 sider) i kategorien Speaker. Denne guide var nyttig for 3 personer og blev bedømt med 4.5 stjerner i gennemsnit af 2 brugere

Side 1/2
2 32 3
2x1x 2x 2x
NL EN
Montage (fi g 2 pag.2)
1 Haal de inbouwluidspreker uit zijn doos. In de doos
vind je een sjabloon. Kijk goed welke lijn van de
sjabloon je nodig hebt, en knip het binnenste er dan
uit. Gooi het binnenste niet weg, je hebt het later nog
nodig! Teken met een potlood af langs de rand, op de
plaats waar je de luidspreker wil monteren.
2 Boor een of meerdere gaatjes langs de binnenrand van
de potloodlijn. Bij een vierkante of rechthoekige luid-
spreker is het handiger vier gaatjes te boren, bij een
ronde is één gaatje misschien voldoende.
3 Zaag met de decoupeerzaag langs de rand, zodat er
een mooi rond, vierkant of rechthoekig gat overblijft.
4 Neem nu de inbouwluidspreker vast. Je kan de grille
eenvoudig verwijderen door eraan te trekken. Enkel de
magneet houdt hem vast.
5 Trek nu de klemmetjes terug naar het uiteinde en
draai ze allemaal naar binnen. Sluit de luidsprekerka-
bel aan. Vergeet dit niet, anders moet je hem er straks
weer uithalen!
6 Stop de inbouwluidspreker in het gat. Draai de schroe-
ven vast.
7 Hierdoor zullen de klemmetjes aan de achterkant
automatisch terug naar buiten draaien, zodat de luid-
spreker zichzelf vastklemt.
8 Als je wil, kan je de luidspreker ook verven. Als je de
binnenkant van de sjabloon (opgelet, je moet er eerst
nog een randje afhalen) op de luidspreker legt, kan je
de rand van de luidspreker gewoon meeverven met de
rol, tegelijk met het plafond. De grille zelf kan je beter
met een jne borstel of met een spuitbus verven.
9 Als je de luidspreker eruit wil halen, of als je de grille
wil verven, moet je eerst de grille verwijderen. Dit doe
je door er eenvoudig aan te trekken. Enkel de mag-
neet houdt hem vast.
Problemen
Bij problemen neemt u contact op met uw erkende dealer
die u een aantal gerichte vragen zal stellen. Als voorbe-
reiding kunt u alvast deze dingen nagaan:
U hoort niks meer, m.a.w. de luidspreker speelt niet
meer, of geeft enkel nog de lage of hoge tonen weer.
Speelt de andere luidspreker nog? Of zijn ze beide
stuk? In dit geval kijkt u best uw versterker na.
De luidspreker(s) kraakt (kraken).
Als u de luidspreker driver (woofer) zachtjes indrukt,
schuurt deze of niet?
Op die manier kan u uw dealer gericht verder helpen bij
het stellen van de diagnose. Dank voor uw medewerking.
Troubleshooting
Should you experience problems, please contact your
certifi ed dealer. He or she will ask you several specifi c
questions. In order to be able to answer these questions,
please check the following in advance:
You can’t hear any sound; in other words, the loud-
speaker is either no longer producing sound, or is only
playing the high or low tones.
Is the other loudspeaker still producing sound? Or are
both of them defective? If so, it is best to check your
amplifi er.
The loudspeaker(s) is (are) cracking.
If you lightly press the loudspeaker driver (woofer), is
there any friction?
If you know the answers to these questions in advance,
your dealer will be better able to help you in diagnosing
the problem. Thank you in advance for your cooperation.
Installation (fi g 2 pag.2)
1 Remove the inwall speaker from the box. In the box,
you will find a stencil. Check carefully to make sure
which line on the stencil you need, and cut the inside
of this out. Do not discard this inside piece; you will
need it again later! Hold the stencil to the spot where
you want to mount the loudspeaker, and using the
pencil, draw an outline along the edge of the stencil.
2 Drill one or more holes along the inside edge of the
pencilled-in line. For square or rectangular speak-
ers, it is easier to drill four holes, whereas for a round
speaker one hole is probably sufficient.
3 Using the jig saw, saw along the edge so that you are
left with a nice, round, square or rectangular hole.
4 Now hold the inwall speaker tight. You can remove the
grille by simply pulling on it. Only the magnet holds it
in place.
5 Pull the clamps back in and turn them all inward. Con-
nect the loudspeaker cable. If you forget to do this,
you will have to remove it again later!
6 Place the inwall speaker in the hole. Tighten the screws.
7 This will cause the clamps at the back to automatically
turn back outwards so that the loudspeaker will lock in
place.
8 If you like, you can also paint the loudspeaker. If you
put the inside of the stencil (important: you have to
remove the edge first) on the loudspeaker, you can
simply paint the edge of the loudspeaker with a roller,
at the same time you paint the ceiling. It is best to
paint the grill with a fine brush or spray paint.
9 If you would like to remove the loudspeaker or paint
the grill, you must remove the grill first. You can do
this by simply pulling on it. Only the magnet holds it in
place.
Inhoud verpakking Contenu de l’emballage Packaging contents
Handleiding
2 luidsprekers
Installatiesjabloon /
schilderschabloon
Afzonderlijke ArtSoundlogos
Notice d'utilisation
2 enceintes
Gabarit d'installation / de peinture
Logos ArtSound séparés
Manual
2 loudspeakers
Installation / Painting template
Separate ArtSound logos
Fig 1
Fig 2
Garantie
2 jaar na aankoop datum bij normaal gebruik.
Factuurvoorwaarden zijn van toepassing.
Warranty
2 years after date of purchase for normal use.
Invoice terms and conditions apply.
FL620
1
House of Music nv
Kruishoutem, Belgium
www.artsound.be
Tel. +32 9 380 81 80 - Fax. +32 9 386 12 35
info@artsound.be
NL
Geachte kl ant, bedankt en profi ciat met de aankoop va n uw luidsprek er(s).
Gelie ve deze instructies aan dachtig te lezen en ze te bewar en.
FR
Cher clien t, merci d'a voir acheté ces ence intes.
Veuille z lire attentiveme nt ce s instructions et les conserver.
EN
Dear Custom er, Congratulations on the purchase of your loudspe aker(s).
Please read these instructions care fully and kee p them for future re ference.
p
a
i
n
t
a
b
l
e
FL620
Technisc he fi che
systeem: 2-weg coaxi aal
woofer: 6,5” pol ypropyl een carbon
tweeter: 0,5” polyca rbonaat
max. vermog en: 80 W
• nominaal v ermogen (RMS): 40 W
dB: 92 dB
impedantie: 8 ohm
frequentiebe reik: 63 H z - 20 kHz
• afmetingen mm (Ø x d): 205 x 70
• gewicht: 1,75 kg / stuk
kleur: wit
extra:ove rschilde rbaar
• opties : MOKIT RO238
Fiche tec hniq ue
système : 2 voies coax ial
woofer : 6,5” carbo ne
poly propylè ne
tweeter : 0,5” polycar bonate
puissance max. : 80 W
• puissance nominal e (RMS) : 40 W
dB : 92 dB
impédance : 8 oh m
plage de fré quences :
63 Hz - 20 kHz
• dimensions mm (Ø x p) : 205 x 70
• poids : 1,75 kg / piè ce
coleur : bla nc
compléments : peut être pe int
• options : MOKIT RO238
Technical s pecifi c at ions
system : 2-way coaxia l
woofer : 6,5” poly propyle ne
carbo n
tweeter : 0.5” polycar bonate
max. power : 80 W
• nominal powe r (RMS) : 40 W
dB : 92 dB
impedance : 8 oh m
frequency ra nge : 63 Hz - 20 kHz
• dimensions mm (Ø x d) : 205 x 70
• weight : 1,75 kg / piece
colour : white
extra : paintab le
• options : MOKIT RO238
230 70
230 205
FL620


Produkt Specifikationer

Mærke: Artsound
Kategori: Speaker
Model: FL620

Har du brug for hjælp?

Hvis du har brug for hjælp til Artsound FL620 stil et spørgsmål nedenfor, og andre brugere vil svare dig


Speaker Artsound Manualer

Artsound

Artsound PWR04 Manual

9 September 2024
Artsound

Artsound RE2080 Manual

4 September 2024
Artsound

Artsound SQ2060 Manual

4 September 2024
Artsound

Artsound RO2060 Manual

4 September 2024
Artsound

Artsound RO2040 Manual

4 September 2024
Artsound

Artsound ROCK Manual

4 September 2024
Artsound

Artsound FL502BT SET Manual

4 September 2024
Artsound

Artsound UNI30T Manual

4 September 2024
Artsound

Artsound SQ2040 Manual

4 September 2024

Speaker Manualer

Nyeste Speaker Manualer

OSD Audio

OSD Audio ICE630ST Manual

18 September 2024
OSD Audio

OSD Audio LS2 Manual

18 September 2024
TOA

TOA PC-2668 Manual

18 September 2024
TOA

TOA PC-3WR-L Manual

18 September 2024
TOA

TOA BS-1120W Manual

18 September 2024
TOA

TOA TZ-105 Manual

18 September 2024
TOA

TOA BS-1110W Manual

18 September 2024
Anchor Audio

Anchor Audio AN-130U1BK Manual

18 September 2024
Pyle

Pyle PPHP127B Manual

17 September 2024
Lenco

Lenco BTS-5 Manual

17 September 2024