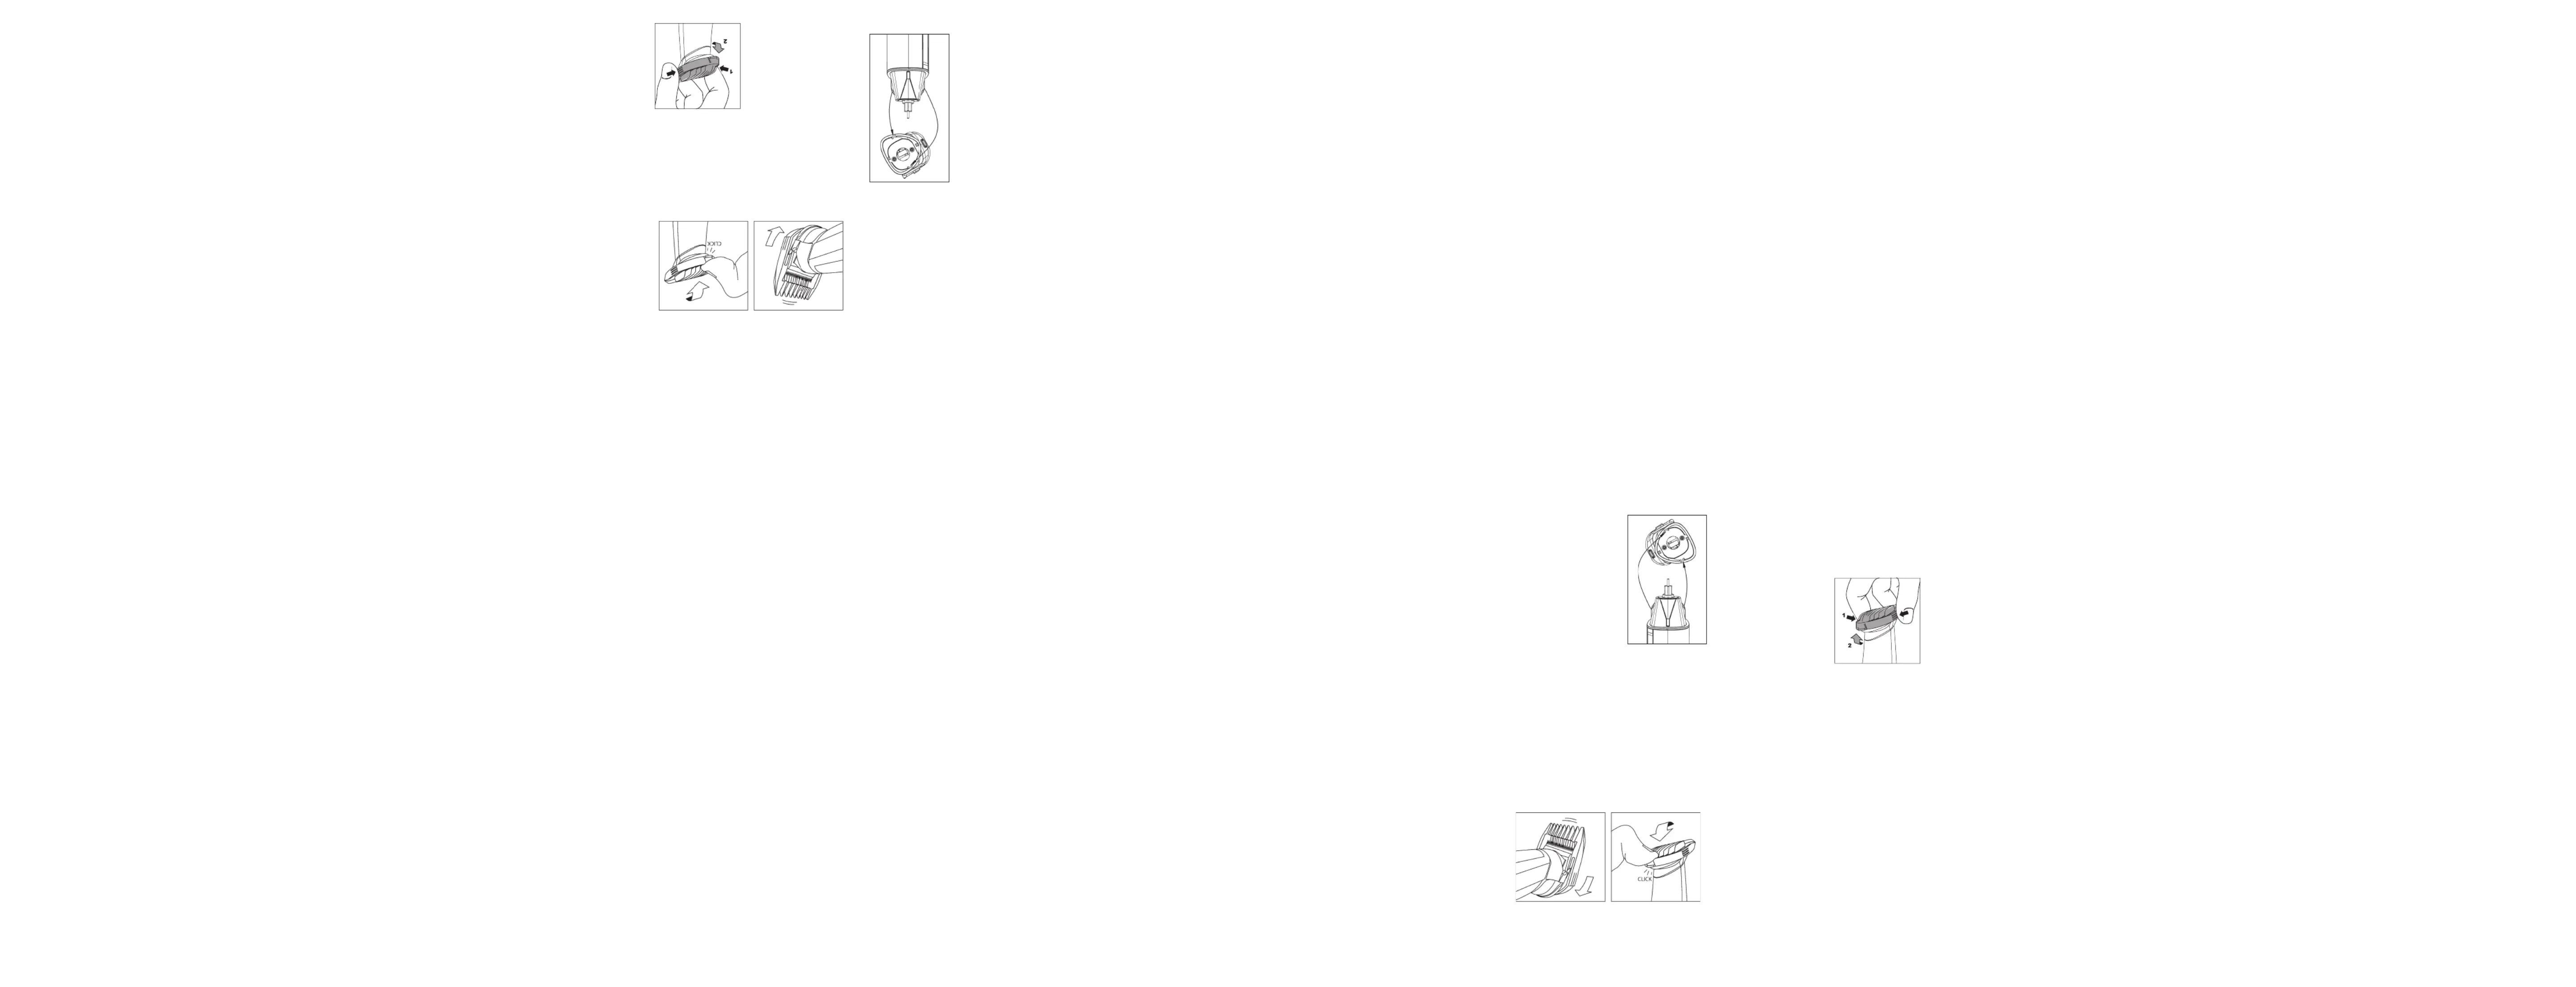
3. The comb guide should click under the back of
USING THE TRIMMER WITHOUT
will release the back from
Using the Precision Trimmer with 6-Position
1. Attach the 6-position comb guide and select
the required length (1-3.5mm).
2. Switch the trimmer on.
3. Hold the trimmer with the teeth pointing
upward and flat against the skin.
4. Move the trimmer upward and outward through
the hair, against the direction of hair growth.
5. The trimmer will work most efficiently when
cutting through hair at its own speed.
6. Never switch the appliance off while trimming
Using the Precision Trimmer with the Beard
1. Attach one of the four comb guides (5mm,
2. If the cut requires more than one cutting
length, start with the longest guide first.
3. Switch the trimmer on.
4. Hold the trimmer with the teeth pointing
upward and flat against the skin.
heads, ensure the appliance
2. To remove the head, hold
the handle of the appliance
simply pull up to release the
3. To attach a head, align
the slots on the head with the ribs on both sides
of the trimmer unit as shown below, until it meets
the magnet and is securely held in place.
This appliance is supplied with 11 comb guides
for use with the Precision Trimmer and Power
NOTE: The Precision Trimmer and Power Trimmer
can be used without any comb guides and will cut
ATTACHING THE COMB GUIDES TO
1. Slide the trimmer teeth and the top of the
blades into the space under the comb guide
2. Click the guide into position by gently pressing
the back of the guide down onto the back of the
5. Move the trimmer upward and outward through
the hair you wish to trim.
6. To blend-in a shorter length use a shorter
length comb guide and use in the same way as
7. The trimmer will work most efficiently when
cutting through hair at its own speed.
8. Never switch the appliance off while trimming
Using the Precision Trimmer with the Body
1. Attach one of the two comb guides (3mm or
2. If you require more than one cutting length,
start with the longest guide first.
3. Switch the trimmer on.
4. Hold the trimmer with the teeth pointing
upward and flat against the skin.
5. Move the trimmer upward and outward through
the hair, against the direction of hair growth.
6. Make sure to be particularly careful when
trimming sensitive areas.
7. The trimmer will work most efficiently when
cutting through hair at its own speed.
8. Never switch the appliance off while trimming
Using the Precision Trimmer with 2-Position
1. Attach the 2-position comb guide and select
the required length (3mm or 5mm).
2. Switch the trimmer on.
3. Move the comb guide through the hair you wish
to remove following the direction of hair growth
until you reach the desired length.
4. The trimmer will work most efficiently when
cutting through hair at its own speed.
5. Never switch the appliance off while trimming
When using electrical appliances, especially when
children are present, basic safety precautions
should always be taken, including the following:
DANGER – To reduce the risk of
death or serious injury from electrical shock:
1. Except when charging, always unplug this
appliance from the electrical outlet immediately
2. Unplug this appliance before cleaning.
WARNING – To reduce the risk of
burns, electric shock, fire, or injury to persons:
1. Except when charging, never leave a
plugged-in appliance unattended.
2. This appliance is not intended for use by
persons (including children) with reduced
physical, sensory or mental capabilities, or lack of
experience and knowledge, unless they have been
given supervision or instruction concerning the use
of the appliance by a person responsible for their
safety. Children should be supervised to ensure
that they do not play with the appliance.
3. Use appliance only for its intended use as
described in this manual. Do not use attachments
not recommended by the manufacturer.
4. Never operate the appliance if it has a
damaged cord or plug, is not working properly,
or has been dropped or damaged. Return
the appliance to a Conair Service Center for
5. Keep the appliance cord away from
6. Keep air openings free of lint, hair and
7. Never drop or insert any object into any opening
8. Always attach plug to the appliance first, then
to an outlet. To disconnect, turn all controls to the
OFF position and then remove plug from outlet.
9. Do not use the appliance if it has a damaged or
broken comb or teeth missing from the blades, as
injury may result. Before each use, make certain
the blades are aligned properly and oiled.
10. Do not use the appliance outdoors or where
aerosol (spray) products are being used or where
oxygen is being administered.
11. Detach the appliance from the supply cord
before cleaning it in water.
12. This appliance is not a toy. Keep away from
13. THIS PRODUCT IS FOR HOUSEHOLD
WARNING: Changes or modifications
to this unit not expressly approved by the party
responsible for compliance could void the user’s
authority to operate the equipment.
NOTE: This equipment has been tested and found
to comply with the limits for a Class B digital
device, pursuant to Part 15 of the FCC Rules.
These limits are designed to provide reasonable
protection against harmful interference in a
residential installation. This equipment generates,
uses and can radiate radio frequency energy and,
if not installed and used in accordance with the
instructions, may cause harmful interference to
However, there is no guarantee that interference
will not occur in a particular installation. If this
equipment does cause harmful interference
to radio or television reception, which can be
determined by turning the equipment off and
on, the user is encouraged to try to correct the
interference by one or more of the following
• Reorient or relocate the receiving antenna.
• Increase the separation between the equipment
• Connect the equipment into an outlet on a
circuit different from that to which the receiver is
• Consult the dealer or an experienced radio/TV
Responsible Party: Conair LLC,
Stamford, CT 06902 (203) 351-9000
Standards: FCC Part 15 Subpart B,
This device complies with Part 15 of the FCC
Rules. Operation is subject to the following
(1) This device may not cause harmful
interference, and (2) This device must accept any
interference received, including interference that
may cause undesirable operation.
DATE OF ISSUE: 09/29/2022
Before using the Class 2 Power Supply,
read these instructions carefully.
100–240V AC, 50/60Hz 0.3A
Rated output: 5.0V DC 1000mA
1. Ensure jack is plugged into the trimmer unit before
plugging the adapter into the outlet.
2. Do not operate any appliance that has a damaged
3. Always unplug the unit before cleaning or when
4. This power unit is intended to be correctly
oriented in a vertical or floor-mount position.
5. Be sure voltage is correct before plugging in.
For connection to a power supply not in the U.S.A,
use an attachment plug adapter of the proper
configuration for power outlet. The adapter included
automatically adjusts to the input voltage. DO NOT
USE WITH A VOLTAGE CONVERTER.
This trimmer has a built-in rechargeable battery.
Do not throw into fire, apply heat, or charge, use
or leave in a high-temperature environment.
CAUTION: Any changes or modifications not
expressly approved by the Conair LLC, the
manufacturer of this product and the party
responsible for compliance, could void the user’s
authority to operate the equipment.
If your rechargeable trimmer does not seem to be
taking a charge, take the following troubleshooting
steps before returning it for repair:
1. Be sure the electrical outlet is working by
plugging in another appliance to test the outlet.
2. Make sure the electrical plug is not connected
to a switch that turns power off when lights are
3. Make sure the adapter is inserted into the trimmer
properly and all the connections are secure.
1. Before using the trimmer for the first time,
charge continuously for 3 hours. Maximum
battery capacity will be reached only after 3
charging and discharging cycles.
2. To charge the trimmer, first make sure it is
switched off. Insert the Micro USB plug into the
bottom of the trimmer, then insert the USB cable
into the USB adapter with output 5.0V DC, 100mA.
Plug the adapter into any wall outlet at the voltage
listed on the label affixed to the adapter. Unplug
3. The adapter may become warm while charging.
4. Plug the charging adapter into a wall outlet and
switch unit on. A blue LED light will continuously
run up the side of the trimmer indicating that it is
charging. When fully charged, the 5 LED lights will
5. A full charge will supply 4 hours of cordless
6. When the trimmer is running low on a charge,
the bottom LED charging light will flash as a
warning that there is approximately 15 minutes of
7. When charging, the unit will not operate.
8. To maintain optimum capacity of the
rechargeable battery, it is highly recommended to
fully discharge and then recharge the trimmer for
WARNING: If all 5 charging lights start
to flash rapidly (4 flashes per second), the
appliance is faulty. If this happens, stop charging,
immediately remove the adapter from the
outlet and contact our Customer Care Center at
• Avoid charging the battery at temperatures
below 41°F (5°C) or above 95°F (35°C).
• Avoid charging the battery in direct sunlight or
near a radiating heat source.
• Charge the trimmer. First, make sure it is
switched off. Insert the Micro USB plug into the
bottom of the trimmer, then the USB cable into
the USB adapter with output 5.0V DC, 100mA.
Plug the adapter into any wall outlet at the voltage
listed on the label affixed to the adapter. The LED
light will appear when the adapter is correctly
inserted into the appliance and connected to the
• Once the appliance is fully charged, all 5
charging lights will stop flashing, but remain
on. Unplug the adapter from the outlet, then the
appliance and prepare for use.
Note: as an extra safety feature, this trimmer
is designed to not operate while charging.
This device is waterproof only when unplugged
from a wall outlet. Once it is unplugged, it can
be safely used and cleaned under water. Always
allow the trimmer to dry thoroughly after each use
IMPORTANT! Only use the adapter and
attachments supplied with this appliance.
1. Always inspect the appliance before use to
ensure the trimmer blades are free from hair,
2. Use on clean, dry hair that has been combed
1. For optimal cutting performance, we highly
recommend oiling the blades after every use.
2. When using the oil for the first time, unscrew
the cap and cut off the very end of the plastic
tube with a pair of scissors.
3. Remove the blade guard and switch the
4. Holding the trimmer at a 45 degree angle,
gently squeeze the oil tube and apply 2 drops
directly onto the blades.
5. Leave the unit on for several seconds to allow
the oil to thoroughly spread along the length of
6. Switch off the unit and remove any excess oil
by gently dabbing with a cloth before using on
7. KEEP OIL AWAY FROM CHILDREN.
Using the Power Trimmer with the Hair Comb
For an all-over even cut:
1. Attach one of the three comb guides (9mm,
2. Switch the trimmer on.
3. Starting at the nape of the neck, hold the
trimmer with the teeth pointing upward, ensuring
that the comb guide is resting flat against the
4. Slowly move the trimmer upward and outward
through the hair towards your crown, against the
direction of the hair growth. The comb guide will
help to lift the hair and the blades will cut the hair
5. Once the desired length is achieved at the back
of the hair, start cutting the top and sides.
6. Hold the trimmer to the front of your hair
with the teeth pointing towards the back of your
head, and move the trimmer towards your crown.
Repeat as necessary, moving in rows from the
front and the sides of your head to the back.
7. You should achieve an even-length cut all over
For a shorter back and sides with length on
1. Attach one of the three comb guides (9mm,
2. Use a longer length comb guide for the top of
3. Switch the trimmer on.
4. Hold the trimmer to the front of your hair
with the teeth pointing towards the back of your
head and move the trimmer towards your crown.
Repeat as necessary, moving in rows from the
front and the sides of your head to the back.
5. To make the back and sides of your hair a
shorter length, switch off the appliance and
attach a shorter comb guide.
6. Starting at the nape of the neck, with the comb
guide flat against the head, move the trimmer
upward and outward over the area you want to
7. Repeat on each side of the head, starting with
the trimmer teeth pointing upward and the comb
guide laying flat against the area above the ear.
Move the trimmer upward and outward.
Using the Precision Trimmer
1. To clean up the edges around your cut (e.g.,
neckline and sideburns), detach the comb guides.
2. Hold the appliance upside down, so the front of
the trimmer is facing towards your head.
3. Hold the trimmer blade straight on your
sideburns or neckline and move the trimmer
blades downward. This will give you a clean,
USING THE DETAIL FOIL SHAVER
1. Finish edges with a smooth, close shave with
the detail foil shaver head attachment.
2. Always ensure the foil is not damaged before
3. Switch the trimmer on.
4. Move the shaver gently over the skin, applying
minimal pressure and shave in the direction of
5. Make sure to be particularly careful when
6. Never switch the appliance off while shaving
3. Para instalar un cabezal, alinee las muescas en
el cabezal con los resaltos en ambos costados del
aparato, como se muestra a continuación, hasta
que se pegue al imán y quede bien sujeto en su
Este aparato incluye 11 guías de corte,
especialmente diseñadas para su uso con él y sus
cabezales intercambiables.
NOTA: El aparato y sus cabezales intercambiables
se pueden usar sin ninguna guía; el aparato cortará
el vello/pelo/cabello a una longitud de 0.2 mm.
1. Deslice las cuchillas en el espacio debajo de los
dientes de la guía (Fig. 1).
2. Presione suavemente la parte trasera de la guía
hasta que se bloquee (Fig. 2).
3. La guía debe encajar (escuchará un “clic”)
debajo de la parte trasera de la cuchilla de metal.
cabezales intercambiables
contorneo y los cortes de
el vello/pelo/cabello muy
1. Revise el aparato antes del uso para asegurarse
de que las cuchillas estén limpias y libres vellos y
2. Úselo en vello/cabello limpio, seco y
1. Para lograr un rendimiento de corte óptimo, se
recomienda lubricar las cuchillas después de cada
2. Al usar el aceite lubricante por primera vez,
desenrosque la tapa y corte el extremo de la punta
del tubo de plástico con tijeras.
3. Retire el protector de cuchillas y encienda el
4. Sosteniendo el aparato a un ángulo de 45
grados, apriete suavemente el tubo de aceite y
aplique 2 gotas directamente en las cuchillas.
5. Deje el aparato encendido por unos segundos
para que el aceite se esparza a lo largo de las
6. Luego, apague el aparato y quite suavemente el
exceso de aceite con un paño.
7. MANTENGA EL ACEITE FUERA DEL ALCANCE
apagado está en la posición
2. Para retirar un cabezal,
sostenga el aparato con una
mano y el cabezal en otra, y
simplemente jale el cabezal
2. Para quitar una guía, simplemente presione
ambos costados de la misma para liberarla de la
Cómo usar el aparato con la guía para barba
1. Instale la guía de 6 posiciones en las cuchillas y
seleccione la longitud deseada, desde 1 mm hasta
3. Sostenga el aparato de manera que los dientes
de la guía apunten hacia arriba, pero que estén
4. Corte moviendo el aparato hacia arriba y hacia
fuera, en dirección opuesta al crecimiento del pelo.
5. El aparato funciona mejor a su propia velocidad.
6. Nunca apague el aparato mientras las cuchillas
Cómo usar el aparato con las guías para barba
1. Instale la guía para barba deseada: 5 mm, 6 mm,
2. Si el corte requiere más de una longitud de
corte, empiece con la guía más larga.
4. Sostenga el aparato de manera que los dientes
de la guía apunten hacia arriba, pero que estén
5. Corte el pelo, moviendo el aparato hacia arriba
6. Para crear un fundido (borrar las líneas) en el
pelo más corto, instale una guía más corta y repita
7. El aparato funciona mejor a su propia velocidad.
8. Nunca apague el aparato mientras las cuchillas
Al usar aparatos eléctricos, especialmente en
presencia de niños, siempre se deben tomar
precauciones básicas de seguridad, entre ellas las
PELIGRO – Para reducir el riesgo
de electrocución o lesiones por descarga
1. Siempre desenchufe el aparato inmediatamente
después del uso (a menos que lo esté cargando).
2. Desenchufe el aparato antes de limpiarlo.
Para reducir el riesgo de quemaduras, descarga
eléctrica, incendio o lesiones personales:
1. Nunca descuide/deje el aparato sin
vigilancia mientras esté enchufado, excepto
2. Los niños o las personas que carezcan de la
experiencia o de los conocimientos necesarios
para manipular el aparato, o aquellas cuyas
capacidades físicas, sensoriales o mentales
estén limitadas, no deben usar el aparato sin
la supervisión o la dirección de una persona
responsable por su seguridad. No permita que los
niños jueguen con este aparato.
3. Use este producto solo para el uso previsto
y como se describe en este manual. Solo use
accesorios/aditamentos recomendados por el
4. No use este aparato si el cable o el enchufe
están dañados, si no funciona correctamente,
si está dañado, o después de una caída;
devuélvalo a un centro de servicio autorizado
para su revisión y reparación.
5. Mantenga el cable lejos de las superficies
6. Mantenga orificios de ventilación libres de
pelusas, cabellos y elementos similares.
7. Nunca deje caer ni inserte ningún objeto en
ninguna de las aberturas.
8. Siempre conecte el cable al aparato antes
de enchufarlo en la toma de corriente. Para
desconectar, ponga todos los controles en la
posición de apagado “OFF” y luego desenchufe
9. Para evitar las lesiones, no use este aparato con
guías o rotas o dañadas, o si les faltan dientes a
las cuchillas. Compruebe que las cuchillas están
correctamente alineadas y lubricadas antes de
10. No lo use en exteriores, ni lo haga funcionar
donde se estén usando productos en aerosol
(spray) o donde se esté administrando oxígeno.
11. Desconecte el cable del aparato antes de
12. Este aparato no es un juguete; manténgalo
fuera del alcance de los niños.
13. PARA USO DOMÉSTICO SOLAMENTE.
AVISO DE LA COMISIÓN FEDERAL
Se advierte que las modificaciones no aprobadas
expresamente por la autoridad competente en
materia de conformidad pueden rescindir el permiso
del usuario para operar el equipo.
NOTA: Este equipo ha sido probado y se ha
determinado que cumple con los límites de un
dispositivo digital de Clase B, según la Sección 15
de la Normativa FCC. Estos límites están diseñados
para proporcionar una protección razonable contra
las interferencias perjudiciales en una instalación
residencial. Este equipo genera, usa y puede irradiar
energía de radiofrecuencia (RF) y, si no ha sido
instalado o usado conforme a las instrucciones,
puede ocasionar interferencias perjudiciales para las
comunicaciones por radio.
No obstante, no hay garantía de que aquellas
interferencias no ocurran en una instalación
particular. Si este equipo produce alguna
interferencia perjudicial en la recepción de radio o
televisión, lo que podrá determinarse encendiendo
y apagando el equipo, se recomienda tratar de
corregir la interferencia, adoptando una o más de
• Reorientar o reubicar la antena receptora.
• Aumentar la distancia entre el equipo y el
• Conectar el equipo a un circuito distinto al que
esté conectado el receptor.
• Consultar con el distribuidor o un técnico
especializado en radio/TV.
DECLARACIÓN DE CONFORMIDAD
Descripción: Recortadora todo en uno
Parte responsable: Conair LLC
Normas: Normas de la FCC,
Este artefacto cumple con la Sección 15 de la
Normativa FCC. Su funcionamiento está sujeto a
las dos condiciones siguientes:
(1) Este artefacto no debe causar ninguna
interferencia perjudicial, y (2) Este artefacto debe
aceptar cualquier interferencia recibida, incluso
aquellas que puedan causar un funcionamiento no
FECHA DE PUBLICACIÓN: 29/9/2022
Lea atentamente estas instrucciones antes de usar
Use solamente el adaptador provisto (CA92).
Tensión de entrada nominal:
100–240 V AC; 50/60 Hz; 0.3 A
Tensión de salida nominal: 5 V DC; 1000 mA
1. Siempre conecte el cable al aparato antes de
enchufar el adaptador en la toma de corriente.
2. No use el aparato si la carcasa o el cable están
3. Siempre desenchufe el aparato antes de la limpieza
4. El adaptador siempre debe usarse en posición
vertical, o en una toma de corriente de piso.
5. Nunca enchufe el aparato en una toma de corriente
que no sea del voltaje adecuado.
Puede que sea necesario usar un adaptador de viaje
fuera de los EE.UU. El adaptador provisto se ajusta
automáticamente al voltaje adecuado. NO USE ESTE
APARATO CON UN CONVERTIDOR DE VOLTAJE.
Este aparato contiene una batería recargable. No
lo incinere/tire al fuego, no lo caliente, y no lo
cargue, use o almacene en un ambiente de alta
PRECAUCIÓN: Se advierte que las modificaciones
no aprobadas expresamente por Conair LLC, el
fabricante o la autoridad competente en materia
de conformidad pueden rescindir el permiso del
usuario para operar el equipo.
Si el aparato no se carga, siga los pasos siguientes
antes de devolverlo a un centro de servicio:
1. Enchufe otro aparato en la toma de corriente
para comprobar que la toma de corriente está
2. Compruebe que la toma de corriente no esté
conectada a un interruptor que corta el suministro
eléctrico cuando la luz está apagada.
3. Compruebe que el adaptador está debidamente
conectado al aparato, que todas las conexiones
1. Cargue el aparato continuamente por 3 horas
antes del primer uso. La batería recargable
alcanzará su capacidad máxima después de 3
ciclos de carga/descarga.
2. Antes de cargar el aparato, compruebe que está
apagado. Enchufe el mini enchufe USB en la parte
inferior del aparato, luego conecte el cable USB al
adaptador USB provisto (salida de 5 V DC, 1000 mA).
Enchufe el adaptador (compruebe el voltaje
indicado en la etiqueta del adaptador antes de
enchufarlo) en la toma de corriente. Desenchufe el
adaptador cuando no esté en uso.
3. Puede que el adaptador se caliente ligeramente
durante la carga; esto es normal.
4. Enchufe el adaptador en una toma de corriente
y encienda el aparato; una luz LED azul subirá
continuamente por el costado del aparato para
indicar que se está cargando. Una vez cargado
el aparato, las 5 luces LED permanecerán
5. Una carga completa proporcionará 4 horas de
6. Si el indicador LED de abajo empieza a
parpadear durante el uso, esto indica que la
batería está baja y que quedan aprox. 15 minutos
7. El aparato no podrá usarse mientras se está
8. Para mantener la capacidad óptima de la
batería recargable, es muy recomendable dejar
que el aparato se descargue completamente, y
luego cargarlo por 3 horas cada 6 meses.
ADVERTENCIA: Si de repente las 5 luce
LED empiezan a parpadear rápidamente (más de 4
parpadeos por segundo), esto significa que aparato
es defectuoso. En caso de que esto suceda,
desenchufe el adaptador de la toma de corriente
y llame a nuestro centro de atención al cliente, al
• Evite cargar el aparato en temperaturas
inferiores a 41°F (5°C) o superiores a 95 °F
• Evite cargar el aparato en la luz directa del sol o
cerca de una fuente de calor.
• Cargue el aparato. Primero, cerciórese de que
esté apagado. Enchufe el mini enchufe USB en la
parte inferior del aparato, luego conecte el cable
USB al adaptador USB provisto (salida de 5 V DC,
1000 mA). Enchufe el adaptador (compruebe
el voltaje indicado en la etiqueta del adaptador
primero) en la toma de corriente; el indicador
luminoso se encenderá, lo que indica que el
aparato está correctamente conectado y que se
• Una vez cargada la batería, las 5 luces LED
azules permanecerán encendidas sin parpadear.
Desenchufe el adaptador de la toma de corriente,
y luego desconéctelo del aparato. El aparato está
Nota: Como medida de seguridad, este aparato
ha sido diseñado para no poder encenderse
Cuando está desenchufado, este aparato es a
prueba de agua y puede usarse y limpiarse en
agua. Permita que se seque por completo antes de
¡IMPORTANTE! Use solamente el adaptador
y los accesorios provistos con este aparato.
1. Instale la guía para vello corporal deseada:
2. Si el corte requiere más de una longitud de
corte, empiece con la guía más larga.
4. Sostenga el aparato de manera que los dientes
de la guía apunten hacia arriba, pero que estén
5. Corte moviendo el aparato hacia arriba y hacia
fuera, en dirección opuesta al crecimiento del
6. Tenga mucho cuidado al cortar el vello en las
7. El aparato funciona mejor a su propia velocidad.
8. Nunca apague el aparato mientras las cuchillas
1. Instale la guía para cejas en las cuchillas y
seleccione la longitud deseada: 3 mm o 5 mm.
3. Pase la guía repetidamente por la ceja, en
dirección del crecimiento del vello, hasta obtener
4. El aparato funciona mejor a su propia velocidad.
5. Nunca apague el aparato mientras las cuchillas
Para conseguir un corte uniforme:
1. Instale la guía para el cabello deseada: 9 mm,
3. Empezando en la nuca, sostenga el aparato de
tal manera que los dientes de la guía apunten hacia
arriba y que la guía esté plana contra la cabeza.
4. Mueva el aparato lentamente hacia arriba y
hacia fuera, en dirección opuesta al crecimiento
del cabello. La guía ayudará a levantar el cabello
mientras las cuchillas lo cortarán a la longitud
5. Una vez alcanzada la longitud deseada en la
parte posterior de la cabeza, comience a cortar el
cabello en la parte superior y en los costados.
6. Sostenga el aparato de tal manera que los
dientes de la guía apunten hacia la parte trasera
de la cabeza, y muévalo lentamente hacia arriba
y hacia fuera, en dirección opuesta al crecimiento
del cabello. Repita, sección por sección, desde la
parte delantera de la cabeza y los costados hasta
la parte trasera de la cabeza.
7. Obtendrá un corte uniforme en toda la cabeza.
Para dejar el cabello más largo en la parte
superior y en los costados de la cabeza:
1. Instale la guía deseada: 9 mm, 12 mm o 16
2. Use una guía más larga para cortar el cabello en
la parte superior de la cabeza.
4. Sostenga el aparato de tal manera que los
dientes de la guía apunten hacia la parte trasera
de la cabeza y muévalo lentamente hacia arriba y
hacia fuera, en dirección opuesta al crecimiento
del cabello. Repita, sección por sección, desde la
parte delantera de la cabeza y los costados hasta
la parte trasera de la cabeza.
5. Para acortar el cabello en la parte trasera de
la cabeza y en los costados, apague el aparato e
instale una guía más corta.
6. Empezando en la nuca, sostenga la cortadora de
tal manera que la guía esté plana contra la cabeza.
Corte el cabello en la parte trasera, pasando el
aparato gradualmente hacia arriba y hacia fuera.
7. Repita en cada costado de la cabeza, siempre
con los dientes de la guía apuntando hacia arriba y
planos contra la piel. Mueva el aparato hacia arriba


