Using the NITECORE NBP100R Li-ion Battery Pack:
FL1 STANDARD TURBO HIGH MID STROBE BEACON SOSLOW
3,500 Lumens 1,300 Lumens 400 Lumens 80 Lumens 3,500 Lumens 3,500 Lumens 3,500 Lumens
*45min 4h 15min 13h 62h – – –
1,300m 920m 490m 220m – – –
423,000cd 214,000cd 60,490cd 12,530cd – – –
IP68, 2m (Waterproof and Submersible)
Note: The stated data is measured in accordance with the international ashlight testing standards ANSI/PLATO FL 1-2019, using NITECORE
NBP100R (10,000mAh) under laboratory conditions. The data may vary in real world use due to dierent battery usage or environmental
*The runtime of TURBO is tested without the temperature regulation.
Using 2 x 21700 Li-ion Batteries:
FL1 STANDARD TURBO HIGH MID STROBE BEACON SOSLOW
2,000 Lumens 1,200 Lumens 400 Lumens 80 Lumens 2,000 Lumens 2,000 Lumens 2,000 Lumens
*1h 4h 15min 15h 65h – – –
203,000cd 160,000cd 60,490cd 12,530cd – – –
IP68, 2m (Waterproof and Submersible)
Note: The stated data is measured in accordance with the international ashlight testing standards ANSI/PLATO FL 1-2019, using 2 x 21700
Li-ion batteries (6,000mAh) under laboratory conditions. The data may vary in real world use due to dierent battery usage or environmental
*The runtime of TURBO is tested without the temperature regulation.
Type Nominal Voltage Compatibility
NITECORE NBP100R Rechargeable Li-ion Battery Pack (Discharge Current of 30A) –Y (Recommended)3.6V/3.7V
21700 Rechargeable Li-ion Battery (Discharge Current Over 8A) 21700 3.6V/3.7V Y (Compatible)
21700 Rechargeable Li-ion Battery (Discharge Current Below 8A) 21700 3.6V/3.7V N (Incompatible)
18650 Rechargeable Li-ion Battery 3.6V/3.7V18650 N (Incompatible)
Primary Lithium Battery CR123 3V N (Incompatible)
Rechargeable Li-ion Battery 3.6V/3.7VRCR123 N (Incompatible)
Note: DO NOT use at top batteries.
THIS PRODUCT CONTAINS A BUTTON BATTERY
If swallowed, a lithium button battery can cause severe or
fatal injuries within 2 hours.
Keep batteries out of reach of children.
If you think batteries may have been swallowed or placed
inside any part of the body, seek immediate medical attention.
The included NBP100R rechargeable Li-ion battery pack is
equipped with a USB-C charging port. Please charge the
Recharging the Battery Pack:
Power Connection: Use the USB cable to connect an external
power supply (e.g. a USB adapter or other USB charging
devices) to the charging port to begin the charging process. The
charging time is approx. 3 hours 40 minutes. (Charged via the
Charging Indication: During the charging process, the red
indicator will ash to inform the user. When the battery pack is
fully charged, the red indicator will become steadily turned on.
Charging an External Device:
Equipped with a USB output, the NBP100R can be used as a
power supply to charge external devices.
Output Indication: When the battery pack is discharging,
the green indicator will remain on to inform the user. (Output:
Note: If the battery voltage is too low during discharging,
the NBP100R will automatically turn o the output to prolong
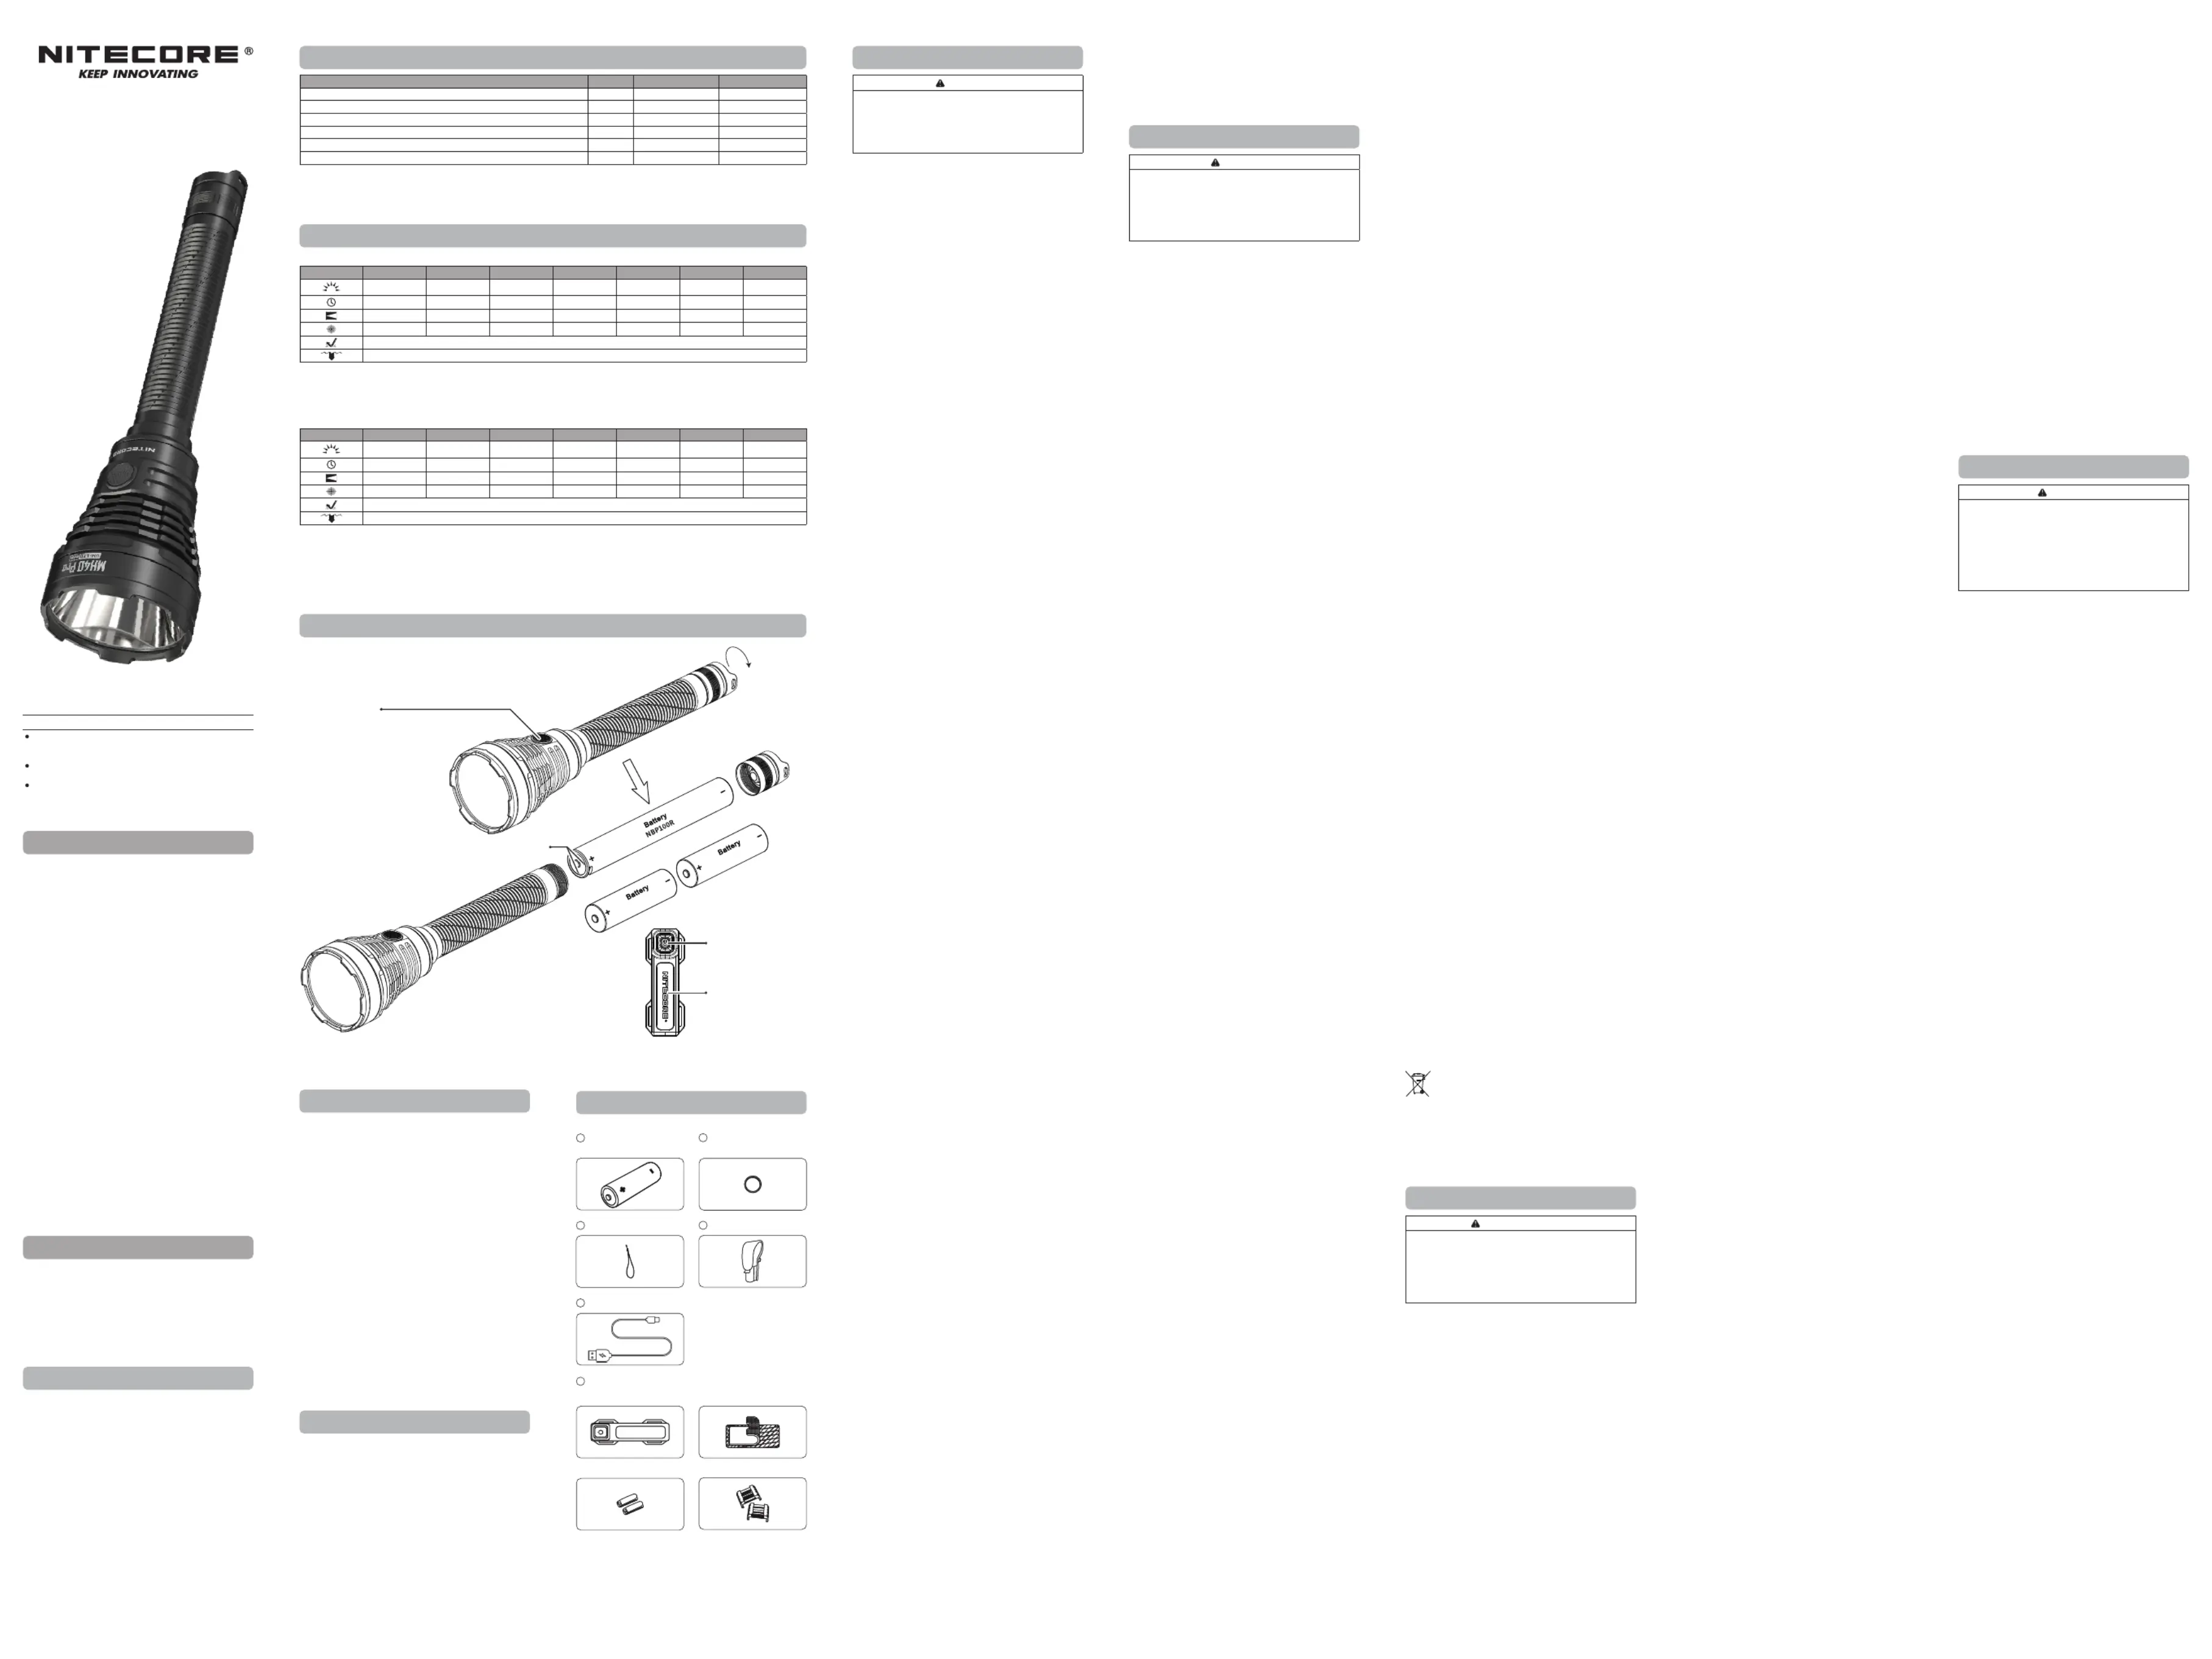
Battery Installation / Removal
As illustrated, after unscrewing the battery cap, insert / remove
the battery(s) and screw to tighten the battery cap.
1. Ensure the battery(s) is/are inserted with the positive end
facing towards the head. The product will not work if the
battery(s) is/are incorrectly inserted.
2. The output will appear to be dim or the ashlight will become
unresponsive due to low power. At this point, please stop
using the ashlight and recharge or replace the battery(s) to
Tactical Momentary Illumination
When the light is o, half press and hold the Tail Switch to turn
on the light momentarily. Release to turn it o.
On: When the light is o, short press the Tail Switch until a
click sound is heard to turn it on.
O: When the light is on, short press the Tail Switch until a
click sound is heard to turn it o.
The MH40 Pro has a memory function. When reactivated, the
ashlight will automatically access the previous memorized
brightness level or STROBE Mode (SOS and BEACON excluded).
When the light is on, short press the Mode Button to cycle through
the following brightness levels: LOW – MID – HIGH – TURBO.
Special Modes (STROBE / BEACON / SOS)
When the light is on, keep holding the Mode Button to cycle
through the following special modes: STROBE – BEACON – SOS.
Release to select the desired special mode. Short press the
Mode Button to return to the previous status; or short press the
Tail Switch to turn o the light.
The MH40 Pro is equipped with a specialized Wireless Remote
Switch, which enables it to be controlled wirelessly. After
pairing, the buttons on the Wireless Remote Switch have the
same functions as those on the ashlight. The pairing is preset
• The Wireless Remote Switch is powered by 1 x 3V CR1632
button cell battery which enables approx. 4,000 presses. The
standby time is approx. 12 months for a new battery.
• The maximum signal range between the ashlight and the
Wireless Remote Switch is 1m (39.37") when there are no
obstacles blocking the path.
• To replace the button cell battery, remove the battery cap of
the Wireless Remote Switch with a ngernail or a key.
Pairing the Wireless Remote Switch
Please follow the steps below if you need to re-pair the Wireless
Remote Switch with the ashlight.
1. When the light is o, short press the Tail Switch while holding
the Mode Button until the light ashes quickly to indicate the
access to the pair pending status.
2. When the ashlight accesses the pair pending status, press
both Button A and Button B of the Wireless Remote Switch
until the ashlight becomes steadily turned on.
1. When the ashlight accesses the pair pending status, turning
on the ashlight will exit the status.
2. Make sure the distance between the ashlight and the
Wireless Remote Switch is within 1m during the pairing
3. When the ashlight is low on power, please replace the
battery pack promptly. Changing the battery pack does not
remove the pairing between the ashlight and the Wireless
Only when the MH40 Pro is turned on can it be controlled with
the Wireless Remote Switch.
On: When the light is o, full press the Button A to turn it on.
O: When the light is on, full press the Button A to turn it o.
Note: When the light is o, the power indicator beneath the
Mode Button will ash every 5 seconds to inform the user that
the Wireless Remote Switch has been paired with the ashlight.
If there is no operation in 2 hours, the Wireless Remote Switch
will automatically disconnect from the ashlight.
Brightness Level Adjustment
When the light is on, half press the Button A to cycle through
the following brightness levels: LOW – MID – HIGH – TURBO.
When the light is on, press and hold the Button B to access
TURBO. Release to return to the previous status.
When the light is on, half press and hold the Button A to access
STROBE. Then half press the Button A to cycle through the
following special modes: STROBE – BEACON – SOS. Half press
and hold the Button A again to exit the special mode.
When the light is o, press the Tail Switch while holding the
Mode Button and then quickly release both buttons to access
Power Indication. The power indicator beneath the Mode
Button will ash to show the remaining battery power. Once the
ashing stops, the ashlight will turn on.
• Flashing 3 times indicates that the power is no less than 50%.
• Flashing 2 times indicates that the power is below 50%.
• Flashing 1 time indicates that the power is below 25%.
Low Power Vibration Indication
When the light is on and the remaining power is below 10%,
the MH40 Pro will vibrate every 10 seconds to inform the user.
ATR (Advanced Temperature Regulation)
The integrated ATR technology regulates the output of the
MH40 Pro according to the working condition and ambient
environment to maintain the optimal performance.
DIESES PRODUKT ENTHÄLT EINE KNOPFBATTERIE
Eine Lithium-Knopfbatterie kann beim Verschlucken innerhalb
von 2 Stunden zu schweren oder tödlichen Verletzungen führen.
Bewahren Sie Batterien außerhalb der Reichweite von
Wenn Sie glauben, dass Batterien verschluckt wurden oder sich
in einem Körperteil benden, suchen Sie sofort einen Arzt auf.
1. Dieses Produkt ist für den Gebrauch durch Erwachsene ab
18 Jahren bestimmt. Bitte bewahren Sie dieses Produkt
außerhalb der Reichweite von Kindern auf.
2. VORSICHT! Mögliche gefährliche Strahlung! Blicken Sie
NICHT direkt in den Lichtstrahl und richten Sie das Licht
nicht direkt in die Augen von Personen!
3. Das Produkt erzeugt bei längerem Betrieb große Hitze. Bitte
seien Sie bei der Verwendung vorsichtig. Es wird empfohlen,
hohe Helligkeitsstufen nicht über längere Zeit zu verwenden,
um Verbrennungen und Produktschäden zu vermeiden.
4. Decken Sie das Gerät NICHT ab und platzieren Sie keine
Gegenstände in der Nähe des Lampenkopfes, da dies
zu Schäden am Gerät oder Unfällen aufgrund der hohen
Temperaturen führen kann.
5. Verwenden Sie das Produkt NICHT zur Beleuchtung von
brennbaren oder explosiven Materialien, da die hohe Hitze
zu Verbrennungen oder Explosionen führen kann.
6. Bitte verwenden Sie das Produkt in einer handelsüblichen
Weise, um Unfälle im Falle eines Produktausfalls zu vermeiden.
7. Tauchen Sie das Produkt NICHT in Flüssigkeiten ein, wenn
es heiß ist. Dies kann zu irreparablen Schäden an der
Lampe führen, da der Luftdruck innerhalb und außerhalb
des Gehäuses unterschiedlich ist.
8. Wenn das Produkt in einer geschlossenen oder entammbaren
Umgebung, wie z.B. einem Rucksack, platziert wird, oder
wenn es über einen längeren Zeitraum nicht benutzt wird,
lösen Sie bitte die Heckkappe, um eine versehentliche
Aktivierung und Gefahren durch übermäßige Hitze zu
vermeiden. Alternativ können Sie auch die Batterie entfernen,
um Schäden durch auslaufende Batterien zu vermeiden.
9. Setzen Sie das Produkt NICHT über einen längeren
Zeitraum Temperaturen über 60°C aus, da sonst die Gefahr
einer Explosion oder Verbrennung der Batterie besteht.
10. Bitte laden Sie den Akku mit dem Original-Ladekabel auf,
um die Lebensdauer des Akkus nicht zu verkürzen.
11. Bitte laden Sie den Akku alle 6 Monate auf, wenn das
Produkt über einen längeren Zeitraum nicht benutzt wird.
12. Dieses Produkt darf NICHT zerlegt oder modiziert werden,
da dies zu Schäden führt und die Produktgarantie ungültig
wird. Vollständige Informationen zur Garantie nden Sie im
Abschnitt „Garantie“ in dieser Anleitung.
⚠ Sicherheit der Batterie
Die unsachgemäße Verwendung des Akkus kann zu schweren
Akkuschäden oder Sicherheitsrisiken wie Verbrennung oder
Explosion führen. Verwenden Sie den Akku NICHT, wenn seine
Verpackung beschädigt ist oder wenn sein Entladestrom nicht
zu Ihrem Produkt passt. Zerlegen, durchstechen, zerschneiden,
zerquetschen, verbrennen oder schließen Sie den Akku NICHT
kurz. Mischen Sie NICHT die Batterien/Akkus verschiedener Marken
oder Typen. Wenn Sie ein Auslaufen, einen ungewöhnlichen Geruch
oder eine Verformung feststellen, stellen Sie die Verwendung
der Batterie sofort ein und entsorgen Sie sie ordnungsgemäß.
Entsorgen Sie das Gerät/die Batterien in Übereinstimmung mit den
geltenden örtlichen Gesetzen und Vorschriften.
Der im Lieferumfang enthaltene Li-Ionen-Akku NBP100R ist mit
einem USB-C-Ladeanschluss ausgestattet. Bitte laden Sie das
Akku-Pack vor der Verwendung auf.
Stromanschluss: Verwenden Sie das USB-Kabel, um eine
externe Stromversorgung (z. B. einen USB-Adapter oder andere
USB-Ladegeräte) an den Ladeanschluss anzuschließen, um den
Ladevorgang zu starten. Die Ladezeit beträgt ca. 3 Stunden und
40 Minuten (aufgeladen über den 5V/3A-Adapter).
Anzeige des Ladevorgangs: Während des Ladevorgangs
blinkt die rote Anzeige. Wenn der Akku vollständig aufgeladen
ist, leuchtet die rote Anzeige konstant.
Auaden eines externen Geräts:
Das NBP100R ist mit einem USB-Ausgang ausgestattet und kann
so als Netzteil zum Auaden externer Geräte verwendet werden.
Ausgangsanzeige: Wenn sich der Akku entlädt, leuchtet die
grüne Anzeige. (Ausgang: 5V/3A)
Hinweis: Wenn die Batteriespannung während des Entladens
zu niedrig ist, schaltet der NBP100R den Ausgang automatisch
ab, um die Lebensdauer des Akkus zu verlängern.
Legen Sie den Akku/die Akkus ein - wie dargestellt - und drehen
Vor dem Einlegen der Batterien bitte den Silikat-Beutel
entnehmen! Nach dem Einsetzen zeigt die Betriebsanzeige die
verbleibende Akkuleistung an. Lesen Sie dazu den Abschnitt
1. Legen Sie die Batterien mit dem positiven (+) Ende in
Richtung des Lampenkopfes ein. Mit falsch eingesetzten
Batterien/Akkus wird die MH40 Pro nicht funktionieren!
2. Wenn die Leistung schwach erscheint oder die Taschenlampe
nicht mehr reagiert, weil die Leistung zu gering ist, stellen
Sie die Nutzung ein und laden Sie die Akkus / den Akku auf
oder tauschen Sie sie / ihn aus, um Schäden zu vermeiden.
Taktische Moment-Beleuchtung
Wenn das Licht ausgeschaltet ist, halten Sie den Heckschalter
halb gedrückt, um das Licht kurzzeitig einzuschalten. Loslassen,
um es wieder auszuschalten.
Ein: Wenn das Licht ausgeschaltet ist, drücken Sie den
Heckschalter kurz, bis ein Klickgeräusch zu hören ist, um es
Aus: Wenn die Leuchte eingeschaltet ist, drücken Sie den
Heckschalter kurz, bis ein Klickgeräusch zu hören ist, um sie
Die MH40 Pro verfügt über eine Speicherfunktion. Bei erneuter
Aktivierung ruft die Taschenlampe automatisch die zuvor
gespeicherte Helligkeitsstufe oder den STROBE-Mode auf (außer
Wenn die Lampe eingeschaltet ist, drücken Sie kurz auf die
Mode-Taste, um zwischen den folgenden Helligkeitsstufen zu
wechseln: „LOW“ – „MID“ – „HIGH“ – „TURBO“.
Spezial-Modi (STROBE / BEACON / SOS)
Wenn das Licht eingeschaltet ist, halten Sie die Mode-Taste
gedrückt, um zwischen den folgenden Sondermodi zu wechseln:
„STROBE“ – „BEACON“ – „SOS“. Lassen Sie die Taste los, um
den gewünschten Spezial-Mode auszuwählen. Drücken Sie kurz
auf die Mode-Taste, um zum vorherigen Status zurückzukehren,
oder drücken Sie kurz auf den Heckschalter, um das Licht
• Utilizes a UHi 40 MAX LED with a max output of 3,500 lumens
• Max peak beam intensity of 423,000cd and max throw of
• An optical system combined with crystal coating and "Precision
Digital Optics Technology" (PDOT)
• Includes a NITECORE rechargeable Li-ion battery pack
(NBP100R 10,000mAh) with a built-in USB-C charging port,
oering a runtime up to 62 hours
• Compatible with 2 x 21700 batteries for power supply
• Low power vibration indication
• The tactical tail switch and the mode button control 4
brightness levels and 3 special modes
• STROBE Mode uses randomly changing frequencies for
• A power indicator beneath the mode button indicates the
• Highly ecient constant current circuit provides a stable
• Incorporated Advanced Temperature Regulation (ATR) module
(Patent No. ZL201510534543.6)
• Optical lenses with double-sided scratch resistant coating
• Constructed from aero grade aluminum alloy
• HA III military grade hard-anodized nish
• Waterproof and dustproof rating in accordance with IP68 (2
Head Diameter: 65.0mm (2.56")
Tube Diameter: 26.2mm (1.03")
Tail Diameter: 27.0mm (1.06")
Weight: 270g / 9.52 oz (Battery Pack Not Included)
417g / 14.71 oz (Battery Pack Included)
Improper use of the battery may result in severe battery damage
or safety hazards such as combustion or explosion. DO NOT use
the battery if its wrapper is damaged or if its discharge current
does not match your product. DO NOT disassemble, puncture,
cut, crush, incinerate or short-circuit the battery. DO NOT
mix the batteries of dierent brands or types. If any leakage,
abnormal odor, or deformation is noticed, stop using the battery
immediately and dispose of it properly. Dispose of the device/
batteries in accordance with applicable local laws and regulations.
products are warranted for quality. Any DOA /
defective product can be exchanged for a replacement through
a local distributor/dealer within 15 days of purchase. After
that, all defective / malfunctioning NITECORE
be repaired free of charge within 60 months from the date
of purchase. Beyond 60 months, a limited warranty applies,
covering the cost of labor and maintenance, but not the cost of
accessories or replacement parts.
The warranty will be nullied if
1. the product(s) is/are broken down, reconstructed and/or
modied by unauthorized parties;
2. the product(s) is/are damaged due to improper use (e.g.
reversed polarity installation);
3. the product(s) is/are damaged due to battery leakage.
For the latest information on NITECORE
please contact a local NITECORE
distributor or send an email
※ All images, text and statements specied herein this
user manual are for reference purpose only. Should any
discrepancy occur between this manual and information
specied on www.nitecore.com, Sysmax Innovations Co., Ltd.
reserves the rights to interpret and amend the content of this
document at any time without prior notice.
1. This product is intended for use by adults aged 18 and over.
Please keep this product out of the reach of children.
2. CAUTION! Possible dangerous radiation! DO NOT stare
directly into the light beam or shine the light directly into
3. The product will generate massive heat during prolonged
operation. Please exercise caution during use. It is
recommended not to use high brightness levels for
extended periods to prevent burns and product damage.
4. DO NOT cover or place objects near the head of the
product, as this may cause damage to the product or
accidents due to high temperatures.
5. DO NOT use the product to illuminate ammable or
explosive materials, as the high heat may lead to
6. Please use the product in a standard handheld manner to
avoid accidents in the event of product failure.
7. DO NOT submerge the product into any liquid when it is
hot. Doing so may cause irreparable damage to the light
due to the dierence of air pressure inside and outside of
8. When the product is placed in an enclosed or ammable
environment such as a backpack, or when it is left unused
for an extended period, please loosen the tail cap to avoid
accidental activation and dangers caused by excessive heat.
Alternatively, remove the battery to prevent damage from
9. DO NOT expose the product to temperatures above 60°C
(140°F) for prolonged time, as this poses a risk of battery
10. Please recharge the battery with the original charging cable
to avoid shortening the lifespan of the battery.
11. Please recharge the battery every 6 months when the
product is left unused for a prolonged time.
12. DO NOT disassemble or modify this product as doing so
will cause damage to it and render the product warranty
invalid. Please refer to the warranty section in the manual
for complete warranty information.
Thanks for purchasing NITECORE!
Please read this manual carefully before using the product
and follow the instructions.
This manual contains important safety information and
operating instructions. Please keep it for future reference.
In case of updates, please refer to the latest version
available on the ocial website.
Wireless Remote Switch Set
Picatinny Rail Mount x 2 (optional)
Every 6 months, threads should be wiped with a clean cloth
followed by a thin coating of silicon-based lubricant.
Drahtloser Fernbedienungsschalter
Die MH40 Pro ist mit einem speziellen drahtlosen
Fernbedienungsschalter ausgestattet, mit dem sie kabellos
gesteuert werden kann. Nach dem Pairing haben die Tasten des
Wireless Remote Switches die gleichen Funktionen wie die der
Taschenlampe. Die Kopplung ist werksseitig voreingestellt.
• Der drahtlose Fernbedienungsschalter wird mit 1 x 3V
CR1632 Knopfzellenbatterie betrieben, die ca. 4000
Betätigungen ermöglicht. Die Standby-Zeit beträgt ca. 12
Monate mit einer neuen Batterie.
• Die maximale Signalreichweite zwischen der Taschenlampe
und dem drahtlosen Fernbedienungsschalter beträgt 1 m,
wenn keine Hindernisse den Weg versperren.
• Um die Knopfzellenbatterie zu ersetzen, entfernen Sie den
Batteriedeckel des drahtlosen Fernbedienungsschalters mit
einem Fingernagel oder einem Schlüssel.
Pairing des drahtlosen Fernbedienungsschalters
Bitte befolgen Sie die folgenden Schritte, wenn Sie den
drahtlosen Fernbedienungsschalter erneut mit der Taschenlampe
1. Drücken Sie bei ausgeschaltetem Licht kurz auf den
Heckschalter, während Sie die Mode-Taste gedrückt halten,
bis das Licht schnell blinkt, um den Status „Pairing wird
durchgeführt“ anzuzeigen.
2. Wenn die Taschenlampe den Pairing-Status erreicht, drücken
Sie sowohl die Taste A als auch die Taste B des drahtlosen
Fernbedienungsschalters, bis sich die Taschenlampe
1. Wenn die Taschenlampe auf den Status „Pairing wird
durchgeführt“ zugreift, wird dieser Status durch ein
Einschalten der Taschenlampe beendet.
2. Vergewissern Sie sich, dass der Abstand zwischen der
Taschenlampe und dem drahtlosen Fernbedienungsschalter
während des Kopplungsvorgangs nicht mehr als 1 m beträgt.
3. Wenn die Taschenlampe nur noch wenig Strom hat, wechseln
Sie bitte umgehend die Batterie. Das Auswechseln der
Batterie hebt die Kopplung zwischen der Taschenlampe und
dem drahtlosen Fernbedienungsschalter nicht auf.
Nur wenn die MH40 Pro eingeschaltet ist, kann sie mit dem
drahtlosen Fernbedienungsschalter gesteuert werden.
Ein: Wenn die Lampe ausgeschaltet ist, drücken Sie die Taste A
ganz durch, um sie einzuschalten.
Aus: Wenn das Licht eingeschaltet ist, drücken Sie die Taste A
ganz durch, um es auszuschalten.
Hinweis: Wenn das Licht ausgeschaltet ist, blinkt die Anzeige
unter der Mode-Taste alle 5 Sekunden, um anzuzeigen, dass
der drahtlose Fernbedienungsschalter mit der Taschenlampe
gekoppelt wurde. Wenn innerhalb von 2 Stunden keine
Betätigung erfolgt, wird der drahtlose Fernbedienungsschalter
automatisch von der Taschenlampe getrennt.
Einstellen der Helligkeitsstufen
Wenn das Licht eingeschaltet ist, drücken Sie die Taste A halb,
um zwischen den folgenden Helligkeitsstufen zu wechseln:
„LOW“ – „MID“ – „HIGH“ – „TURBO“.
Drücken Sie bei eingeschaltetem Licht die Taste B und halten
Sie sie gedrückt, um den TURBO-Mode aufzurufen. Lassen Sie
sie los, um zum vorherigen Status zurückzukehren.
Wenn das Licht leuchtet, halten Sie die Taste A halb gedrückt,
um auf „STROBE“ zuzugreifen. Drücken Sie dann die Taste A
halb, um zwischen den folgenden Sonder-Modi zu wechseln:
„STROBE“ – „BEACON“ – „SOS“. Halten Sie die Taste A erneut
halb gedrückt, um die Sonder-Modi zu verlassen.
Wenn das Licht ausgeschaltet ist, drücken Sie den Heckschalter,
während Sie die Mode-Taste gedrückt halten, und lassen Sie
dann beide Schalter schnell los, um die Anzeige aufzurufen.
Die Anzeige unter der Mode-Taste blinkt, um die verbleibende
Batterieleistung anzuzeigen. Sobald das Blinken aufhört,
schaltet sich die Taschenlampe ein.
• Dreimaliges Blinken zeigt an, dass die Batterieleistung
• Zweimaliges Blinken zeigt an, dass die Leistung unter 50 % liegt.
• 1-maliges Blinken zeigt an, dass die Leistung unter 25 % liegt.
Anzeige für schwache Leistung durch Vibration
Wenn das Licht leuchtet und die verbleibende Leistung unter 10
% liegt, vibriert die MH40 Pro alle 10 Sekunden.
ATR (Erweiterte Temperaturregulierung)
Die integrierte ATR-Technologie regelt die Leistung des MH40
Pro entsprechend den Arbeitsbedingungen und der Umgebung,
um eine optimale Leistung zu gewährleisten.
Alle 6 Monate sollte das Gewinde mit einem sauberen Tuch
abgewischt und anschließend mit einer dünnen Schicht
Silikonfett geschmiert werden.
Entsorgung von Elektro- und
Die durchgestrichene Mülltonne bedeutet, dass Sie
gesetzlich verpichtet sind, diese Geräte einer vom
unsortierten Siedlungsabfall getrennten Erfassung
zuzuführen. Die Entsorgung über die Restmülltonne oder die gelbe
Tonne ist untersagt. Enthalten die Produkte Batterien oder Akkus,
die nicht fest verbaut sind, müssen diese vor der Entsorgung
entnommen und getrennt als Batterie entsorgt werden.
CE PRODUIT CONTIENT UNE PILE BOUTON
En cas d’ingestion, une pile bouton au lithium peut causer des
blessures graves ou mortelles dans les 2 heures.
Gardez les piles hors de portée des enfants.
Si vous pensez que les piles ont pu être avalées ou placées à
l’intérieur d’une partie du corps, consultez immédiatement un
1. Ce produit est destiné à être utilisé par des adultes âgés de
18 ans et plus. Veuillez le tenir hors de portée des enfants.
2. ATTENTION ! Risque de rayonnements dangereux ! Ne xez
pas directement le faisceau lumineux et ne projetez pas la
lumière directement dans les yeux de quelqu'un !
3. Le produit génère une chaleur importante en cas de
fonctionnement prolongé. Veuillez faire preuve de prudence
pendant l'utilisation. Il est recommandé de ne pas utiliser des
niveaux de luminosité élevés pendant des périodes prolongées
an d'éviter les brûlures et les dommages au produit.
4. NE PAS couvrir ou placer des objets près de la tête du
produit, car cela pourrait endommager le produit ou
provoquer des accidents dus à des températures élevées.
5. NE PAS utiliser le produit pour éclairer des matériaux
inammables ou explosifs, car la chaleur élevée peut
entraîner une combustion ou une explosion.
6. Veuillez utiliser le produit de manière appropriée an d'éviter
tout accident en cas de dysfonctionnement du produit.
7. NE PAS immerger le produit dans un liquide lorsqu'il est
chaud. La diérence de pression de l'air à l'intérieur et à
l'extérieur du tube risque d'endommager irrémédiablement
8. Lorsque le produit est placé dans un environnement clos
ou inammable, tel qu'un sac à dos, ou lorsqu'il n'est pas
utilisé pendant une période prolongée, veuillez desserrer la
base de la lampe an d'éviter une activation accidentelle et
les dangers causés par une chaleur excessive. Vous pouvez
également retirer la batterie an d'éviter tout dommage dû
à une fuite de la batterie.
ПРОДУКТ СОДЕРЖИТ КНОПОЧНУЮ БАТАРЕЙКУ
Литиевая батарейка содержит опасные вещества и
при проглатывании может вызвать тяжёлые или даже
смертельные травмы в течение двух часов. Храните
батарейки в месте, недоступном для детей. Если вы
подозреваете, что ребенок или кто-либо другой мог
проглотить батарейку или поместить её в какую-либо
часть тела, срочно обратитесь за медицинской помощью к
1. Устройство предназначено для использования
взрослыми, достигшими 18 лет. Пожалуйста, храните
его в недоступном для детей месте.
2. ВНИМАНИЕ! Возможно опасное излучение! НЕ смотрите
непосредственно на луч фонаря и не направляйте луч
3. При длительной работе устройство сильно нагревается.
Пожалуйста, соблюдайте осторожность при
эксплуатации. Рекомендуется не использовать фонарь
на высоких уровнях яркости в течение длительного
времени во избежание потенциальных ожогов и
4. НЕ накрывайте чем-либо устройство, а также не
размещайте предметы рядом с его головной частью,
так как это может привести к его повреждению или
несчастным случаям из-за воздействия высоких
5. НЕ используйте устройство для освещения
легковоспламеняющихся или взрывоопасных
материалов, так как высокие температуры могут
привести к возгоранию или взрыву.
6. Пожалуйста, используйте устройство стандартным
образом во избежание несчастных случаев при его
7. НЕ погружайте фонарь в жидкость, когда он нагрет.
Это может привести к его необратимому повреждению
вследствие разницы между давлением воздуха внутри и
8. Если вы планируете поместить устройство в закрытое
пространство или в среду, в которой возможно
возгорание, например, в рюкзак, или если вы планируете
не пользоваться фонарем в течение длительного
периода времени, ослабьте его заднюю крышку во
избежание случайной активации и, как следствие,
несчастных случаев в результате перегрева. Также
вы можете извлечь из устройства элемент питания во
избежание его повреждения в результате утечки.
9. НЕ подвергайте устройство воздействию температур
выше 60°C (140°F) в течение длительного времени,
так как это может стать причиной взрыва, а также
10. Пожалуйста, заряжайте устройство при помощи
оригинального зарядного кабеля во избежание
сокращения срока службы аккумулятора.
11. Пожалуйста, не забывайте перезаряжать устройство
каждые 6 месяцев, если оно не используется в течение
длительного периода времени.
12. НЕ разбирайте устройство и НЕ вносите какие-либо
изменения в его конструкцию, так как это приведет к
его повреждению и аннулирует гарантию на продукт.
Полную информацию о гарантии можно найти в разделе
«Гарантийного обслуживания» текущего руководства.
⚠ Безопасность аккумулятора
Неправильная эксплуатация аккумулятора может привести
к его серьезному повреждению или возникновению
угроз безопасности, таких как возгорание или взрыв. НЕ
ИСПОЛЬЗУЙТЕ элемент питания, если его упаковка была
повреждена или если его ток разряда не подходит для
вашего устройства. ЗАПРЕЩЕНО разбирать, прокалывать,
резать, раздавливать и поджигать аккумулятор, а также
подвергать его короткому замыканию. НЕ используйте
вместе элементы питания разных типов и от разных
брендов. При обнаружении утечки, необычного запаха или
деформации аккумулятора немедленно прекратите его
использование и утилизируйте его надлежащим образом.
Утилизируйте устройство / элементы питания в соответствии
с действующим в вашем регионе законодательством и
Использование аккумуляторного блока
Входящий в комплект литий-ионный аккумуляторный
блок NBP100R оснащён зарядным USB-C портом. Перед
использованием, пожалуйста, не забудьте его зарядить.
Зарядка аккумуляторного блока:
Подключение к источнику питания: для зарядки
аккумуляторного блока используйте USB-кабель.
Подключите с его помощью аккумуляторный блок к
внешнему источнику питания, например, USB-адаптеру или
иному зарядному USB-устройству. Время зарядки составляет
приблизительно 3 часа 40 минут (при использовании
Сообщение уровня заряда: во время зарядки красный
индикатор будет мигать, а когда аккумуляторный блок
полностью зарядится, красный индикатор начнет гореть
Зарядка внешних устройств:
NBP100R также может использоваться как источник питания
для зарядки внешних устройств. Аккумуляторный блок оснащён
USB-выходом, который позволяет заряжать другие устройства.
Сообщение уровня разряда: во время зарядки внешнего
устройства зелёный индикатор будет непрерывно гореть
Примечание. Когда напряжение аккумуляторного блока
во время разряда станет слишком низким, NBP100R
автоматически прекратит подачу питания для продления
срока службы аккумуляторного блока.
9. N'exposez PAS le produit à des températures supérieures à
60°C (140°F) pendant une période prolongée, car cela pose
un risque d'explosion ou de combustion de la batterie.
10. Veuillez recharger la batterie avec le câble de chargement
d'origine pour éviter de réduire la durée de vie de la batterie.
11. Veuillez recharger la batterie tous les 6 mois lorsque le
produit n'est pas utilisé pendant une période prolongée.
12. NE PAS démonter ou modier ce produit, car cela
l'endommagerait et rendrait la garantie du produit invalide.
Veuillez-vous référer à la section garantie du manuel pour
des informations complètes sur la garantie.
⚠ Sécurité de la batterie
Une utilisation incorrecte de la batterie peut entraîner de graves
dommages ou des risques de sécurité tels que la combustion
ou l'explosion. NE PAS utiliser la batterie si son emballage est
endommagé ou si son courant de décharge ne correspond pas à
votre produit. NE PAS démonter, percer, couper, écraser, incinérer
ou court-circuiter la batterie. NE PAS mélanger des piles de
marques ou de types diérents. En cas de fuite, d'odeur anormale
ou de déformation, cessez immédiatement d'utiliser la batterie et
mettez-la au rebut de manière appropriée. Recyclez l'appareil/les
piles conformément aux lois et réglementations locales en vigueur.
Utilisation de la batterie
La batterie Li-ion rechargeable NBP100R incluse est équipée d'un
port de charge USB-C. Veuillez charger la batterie avant de l'utiliser.
Rechargement la batterie :
Connexion à une source d'alimentation : Utilisez le câble
USB pour connecter une source d'alimentation externe (par
exemple, un adaptateur USB ou d'autres dispositifs de charge
USB) au port de charge pour commencer le processus de
charge. Le temps de charge est d'environ 3 heures 40 minutes
(charge via l'adaptateur 5V/3A).
Indication de charge : Pendant le processus de charge,
l'indicateur rouge clignote pour informer l'utilisateur. Lorsque
la batterie est entièrement chargée, l'indicateur rouge s'allume
Chargement d'un appareil externe :
Équipé d'une sortie USB, le NBP100R peut être utilisé comme
source d'alimentation pour charger des appareils externes.
Indication de sortie : Lorsque la batterie se décharge, l'indicateur
vert reste allumé pour informer l'utilisateur. (Sortie : 5V/3A)
Remarque : Si la tension de la batterie est trop faible pendant
la décharge, le NBP100R éteint automatiquement la sortie pour
prolonger la durée de vie de la batterie.
Utilisation de la lampe torche
Installation / désinstallation de la pile
Comme illustré, après avoir dévissé la base de la lampe, insérez
/ retirez la ou les batterie(s) et revissez a base.
1. Veillez à ce que la ou les piles soient insérées avec l'extrémité
positive orientée vers la tête. Le produit ne fonctionnera pas
si la/les batterie(s) est/sont mal insérée(s).
2. La sortie semble être faible ou la lampe torche ne répond
plus en raison d'une faible puissance. Cessez alors d'utiliser
la lampe torche et rechargez ou remplacez la ou les piles an
Éclairage tactique momentané
Lorsque la lumière est éteinte, appuyez à moitié sur l'interrupteur
à la base de la lampe et maintenez-le enfoncé pour allumer la
lumière momentanément. Relâcher pour l'éteindre.
On : Lorsque la lumière est éteinte, appuyer brièvement sur
l'interrupteur d’alimentation jusqu'à ce qu'un clic se fasse
O : Lorsque la lumière est allumée, appuyez brièvement
sur l'interrupteur d’alimentation jusqu'à ce qu'un clic se fasse
entendre pour l'éteindre.
La MH40 Pro possède une fonction mémoire. Lorsqu'elle est
réactivée, la lampe torche accède automatiquement au niveau
de luminosité précédemment mémorisé ou au mode STROBE
Lorsque la lumière est allumée, appuyez brièvement sur le
bouton Mode pour faire déler les niveaux de luminosité suivants
: LOW (FAIBLE) – MID (MOYENNE) – HIGH (ÉLEVÉE) – TURBO.
Modes spéciaux (STROBE / BALISE / SOS)
Lorsque la lumière est allumée, maintenez le bouton Mode
enfoncé pour faire déler les modes spéciaux suivants : STROBE
- BALISE - SOS. Relâchez le bouton pour sélectionner le mode
spécial souhaité. Appuyez brièvement sur le bouton de mode
pour revenir à l'état précédent ; ou appuyez brièvement sur
l'interrupteur d’alimentation pour éteindre la lumière.
Interrupteur déporté sans fil
La MH40 Pro est équipée d’un interrupteur déporté sans l, qui
permet de la contrôler sans l. Après appairage, les boutons de
l’interrupteur déporté sans l ont les mêmes fonctions que ceux
de la lampe torche. L'appairage est préréglé en usine.
• L’interrupteur déporté sans l est alimenté par une pile bouton
CR1632 de 3V qui permet d'eectuer environ 4 000 pressions.
L'autonomie en veille est d'environ 12 mois pour une pile neuve.
• La portée maximale du signal entre la lampe torche
et l'interrupteur déporté sans l est de 1 m (39,37")
lorsqu'aucun obstacle ne bloque le chemin.
• Pour remplacer la pile bouton, retirez le couvercle de
l'interrupteur déporté sans l à l'aide d'un ongle ou d'une clé.
Appairage de l’interrupteur déporté sans l
Veuillez suivre les étapes ci-dessous si vous devez appairer
l’interrupteur déporté sans l avec la lampe torche.
1. Lorsque la lumière est éteinte, appuyez brièvement sur
l'interrupteur à la base de la lampe tout en maintenant le
bouton de mode enfoncé jusqu'à ce que la lumière clignote
rapidement pour indiquer l'accès à l'état d'appairage en attente.
2. Lorsque la lampe torche accède à l'état d'attente d'appairage,
appuyez à la fois sur le bouton A et le bouton B de
l’interrupteur déporté sans l jusqu'à ce que la lampe torche.
1. Lorsque la lampe torche accède à l'état d'appairage en
attente, le fait d'allumer la lampe de poche permet de sortir
2. Assurez-vous que la distance entre la lampe torche et
l’interrupteur déporté sans l est inférieure à 1 m pendant le
3. Lorsque la lampe torche n'est plus alimentée, remplacez
rapidement le/les piles. Ce remplacement ne supprime pas le
couplage entre la lampe torche et l’interrupteur déporté sans l.
Le MH40 Pro ne peut être contrôlé à l'aide de l’interrupteur
déporté sans l que lorsqu'elle est allumée.
On : Lorsque la lumière est éteinte, appuyez à fond sur le
O : Lorsque la lumière est allumée, appuyez à fond sur le
bouton A pour l'éteindre.
Remarque : lorsque la lampe est éteinte, le voyant
d'alimentation situé sous le bouton de mode clignote toutes les
5 secondes pour informer l'utilisateur que l’interrupteur déporté
sans l a été couplé à la lampe torche. Si aucune opération n'est
eectuée dans les 2 heures, l’interrupteur déporté sans l se
déconnecte automatiquement de la lampe torche.
Réglage du niveau de luminosité
Lorsque la lumière est allumée, appuyez à moitié sur le bouton
A pour faire déler les niveaux de luminosité suivants : LOW
(FAIBLE) – MID (MOYENNE) – HIGH (ÉLEVÉE) – TURBO.
Lorsque le voyant est allumé, appuyez sur le bouton B et
maintenez-le enfoncé pour accéder au mode TURBO. Relâchez
le bouton pour revenir à l'état précédent.
Lorsque la lumière est allumée, appuyez à moitié sur le bouton
A et maintenez-le enfoncé pour accéder au mode STROBE.
Ensuite, appuyez à moitié sur le bouton A pour faire déler les
modes spéciaux suivants : STROBE - BALISE - SOS. Appuyez à
nouveau à moitié sur le bouton A et maintenez-le enfoncé pour
Lorsque la lumière est éteinte, appuyez sur l'interrupteur
d’alimentation tout en maintenant le bouton de mode, puis
relâchez rapidement les deux boutons pour accéder à l'indicateur
d'alimentation. L'indicateur d'alimentation situé sous le bouton
de mode clignote pour indiquer la charge restante de la batterie.
Une fois que le clignotement s'arrête, la lampe torche s'allume.
• Le fait de clignoter 3 fois indique que la puissance est d'au
• 2 clignotements indiquent que la charge est inférieure à 50 %.
• Le fait de clignoter 1 fois indique que la puissance est
Indication par vibration de la faible puissance
Lorsque le voyant est allumé et que la puissance restante est
inférieure à 10 %, le MH40 Pro vibre toutes les 10 secondes
pour informer l'utilisateur.
ATR (régulation avancée de la température)
La technologie ATR intégrée régule la puissance du MH40 Pro
en fonction des conditions de travail et de l'environnement
ambiant an de maintenir des performances optimales.
Tous les 6 mois, les letages doivent être nettoyés à l'aide d'un
chion propre, puis recouverts d'une ne couche de lubriant à


