ACTi ZNR-120P Manual
Læs nedenfor 📖 manual på dansk for ACTi ZNR-120P (113 sider) i kategorien VCR. Denne guide var nyttig for 14 personer og blev bedømt med 4.5 stjerner i gennemsnit af 2 brugere
Side 1/113

User’s Manual
ZNR
2017/08/30

www.acti.com
www.acti.com
User s Manual’
1
Table of Contents
Preface ............................................................................... 5
Safety Information 5.....................................................................................
Regulatory Compliance ............................................................................ 6
LVD/EMC Directive ................................................................................... 6
WEEE Directive 2012/19/EU –................................................................... 6
Part I Local Operations ..................................................... 7
Before You Begin .............................................................. 8
Disk Installation 8.........................................................................................
Ports, Interfaces and LEDs ......................................................................10
Startup .....................................................................................................11
Live View .................................................................................................11
Playback ..................................................................................................11
Access Using a Web Browser ................................................................. 11
Shutdown .................................................................................................12
Login ........................................................................................................12
Local Operations......................................................................................12
Initial Configuration ........................................................ 16
Preparation ..............................................................................................16
Wizard .....................................................................................................16
Live View .......................................................................... 19
Live View Status ......................................................................................19
Live View Window Icons ................................................. 19
Window Toolbar .......................................................................................20
Screen Toolbar ........................................................................................21
Shortcut Menu .........................................................................................22
Sequence Operation ................................................................................23
Zoom .......................................................................................................24
Image Configuration ................................................................................24
Preview Configuration ..............................................................................25
Channel Configuration ...................................................27
Channel Management .............................................................................27
OSD Configuration ...................................................................................31

www.acti.com
www.acti.com
User s Manual’
2
Image Configuration ................................................................................31
Privacy Mask Configuration .....................................................................35
PTZ Control ...................................................................... 36
PTZ Control Window and PTZ Management Window .............................36
Setting and Calling a Preset ....................................................................37
Setting a Preset Patrol .............................................................................38
Setting a Recorded Patrol ........................................................................39
Setting Auto Guard ..................................................................................39
Recording and Snapshot ................................................ 40
Encoding Settings ....................................................................................40
Draw or Edit a Schedule ..........................................................................43
Scheduled Recording and Snapshot .......................................................44
Motion Detection Recording and Snapshot .............................................45
Alarm Triggered Recording and Snapshot ...............................................47
Manual Recording and Snapshot.............................................................48
Holiday Recording and Snapshot ............................................................49
Other Recording and Snapshot Types .....................................................50
Playback ........................................................................... 51
Instant Playback ......................................................................................51
Playback Toolbar .....................................................................................51
Playback by Camera and Date ................................................................52
Playback in Corridor Mode ......................................................................53
Playback by Tag ......................................................................................53
Playback by Event ...................................................................................54
Playback by Smart Search ......................................................................54
Playback by External File ........................................................................55
Playback by Image ..................................................................................55
Playback by POS .....................................................................................55
File Management .....................................................................................56
Backup ............................................................................. 57
Recording Backup ...................................................................................57
Image Backup ..........................................................................................58
Alarm ................................................................................ 59
Alarm Input and Output ............................................................................59
Motion Detection ......................................................................................61
Tampering Detection ...............................................................................62
Video Loss ...............................................................................................62

www.acti.com
www.acti.com
User s Manual’
3
VCA .........................................................................................................63
Alert .........................................................................................................68
Buzzer .....................................................................................................68
Alarm-Triggered Actions ..........................................................................69
Manual Alarm ..........................................................................................69
VCA Search ...................................................................... 70
Behavior Search ......................................................................................70
Face Search ............................................................................................71
People Counting ......................................................................................72
Network Configuration ................................................... 73
Basic Configuration ..................................................................................73
PPPoE .....................................................................................................74
P2P ..........................................................................................................75
DDNS ......................................................................................................76
3G/4G ......................................................................................................77
Port ..........................................................................................................77
Port Mapping ...........................................................................................78
Email ........................................................................................................80
FTP ..........................................................................................................81
Multicast ..................................................................................................82
Disk Configuration .......................................................... 83
Disk Management ....................................................................................83
Array Configuration ..................................................................................84
Disk Group ...............................................................................................86
Space Allocation ......................................................................................86
Advanced Configuration ..........................................................................87
Hard Disk Detection .................................................................................87
System Configuration ..................................................... 89
Basic Configuration ..................................................................................89
Time Configuration ..................................................................................89
Transaction Configuration ........................................................................91
Serial Port Configuration ..........................................................................91
User Configuration ...................................................................................92
Security Configuration .............................................................................93
Hot Spare Configuration ..........................................................................95
System Maintenance ....................................................... 96
System Information ..................................................................................96

www.acti.com
www.acti.com
User s Manual’
4
Network Information .................................................................................98
Log Query ..............................................................................................100
Import/Export .........................................................................................101
System Restoration ...............................................................................101
Automatic Maintenance .........................................................................101
System Upgrade ....................................................................................102
Shutdown ....................................................................... 103
Part II Web-Based Operations ...................................... 104
Before You Begin .......................................................... 104
Login .............................................................................. 105
Live View ........................................................................ 106
Playback ......................................................................... 112
Configuration ................................................................. 112
Appendix A Typical Applications ................................ 113
Typical Application 1 ..............................................................................113
Typical Application 2 ..............................................................................113
Appendix B Acronyms .................................................. 114
Appendix C FAQs .......................................................... 115

www.acti.com
www.acti.com
User s Manual’
5
Preface
This manual describes how to use your NVR locally or the Web interface.on
In this manual, the terms IP camera and IPC refer to the same thing: network camera, which
requires a connection to the network. And the IP device mentioned in this manual refers to an IP
camera (also known as network camera) or a Digital Video Server (DVS).
Thank you for purchasing our product. Contact your local dealer if you have any questions or
feedback. No part of this manual may be copied, reproduced, translated, or distributed in any
form or by any means without prior consent in writing from our company. Contents of this manual
are subject to change without prior notice. No statement, information, or recommendation in this
manual shall constitute formal guarantee of any kind, expressed or implied.
Safety Information
Read through the instructions carefully before starting installation and operation.
Installation and maintenance must be performed by qualified personnel.
This device is a class A product and may cause radio interference. Take measures if
necessary.
Disconnect power before installation and cable connection. Wear antistatic gloves
during installation. Use the manufacturer recommended battery. Improper use or
replacement of the battery may cause risk of explosion. Dispose of the used battery
according to local regulations or the battery manufacturer's instructions. Never dispose
of the battery in fire.
The device is intended for indoor use only. Ensure a proper operating environment,
including temperature, humidity, ventilation, power supply, and lightning protection.
The device must always be properly grounded. Keep the device from dust, excessive
vibration, liquid of any kind, and strong electromagnetic radiation. A sudden power
failure may cause device damage or loss of data.
Take necessary measures to ensure data security and protect from network attack and
hacking (when connected to Internet).

www.acti.com
www.acti.com
User s Manual’
6
Regulatory Compliance
FCC Part 15
This equipment has been tested and found to comply with the limits for digital device, pursuant
to part 15 of the FCC Rules. These limits are designed to provide reasonable protection against
harmful interference when the equipment is operated in a commercial environment. This
equipment generates, uses, and can radiate radio frequency energy and, if not installed and
used in accordance with the instruction manual, may cause harmful interference to radio
communications. Operation of this equipment in a residential area is likely to cause harmful
interference in which case the user will be required to correct the interference at his own
expense.
This product complies with Part 15 of the FCC Rules. Operation is subject to the following two
conditions:
This device may not cause harmful interference.
This device must accept any interference received, including interference that may
cause undesired operation.
LVD/EMC Directive
This product complies with the European Low Voltage Directive 2014/35/EU and
EMC Directive 2014/30/EU.
WEEE Directive– /EU2012/19
The product this manual refers to is covered by the Waste Electrical & Electronic
Equipment (WEEE) Directive and must be disposed of in a responsible manner.

www.acti.com
www.acti.com
User s Manual’
7
Part I Local Operations
An NVR supports two types of operations: local operations and w based remote operations. eb-
With local operations you connect a monitor and a mouse to the NVR and use the mouse to
operate. If your NVR has buttons on the front panel or is delivered with a remote control, you
may also control your NVR by pressing the front panel buttons or using the remote control.
The NVR has an embedded web server and allows web based operations. To do this, you need -
a PC that has a network connection to the NVR and is installed with a web browser. You just
need to navigate to the NVR IP address and log in to the Web interface like you log in to the 's
system locally.
This section describes local operations.

www.acti.com
www.acti.com
User s Manual’
8
Before You Begin
Please be aware that the parameters that are grayed out on the system user interface (UI)
cannot be modified. The parameters and values displayed may vary with device model, and the
figures in this manual are for illustration purpose only.
Disk Installation
Choose an option. Use a #1 or #2 screwdriver as needed. All photos are only for illustration.
Option 1 (for 1 or 2 disks)
1. Remove the cover, connect data and power cables to disk(s), and then secure disk(s) with
screws.
2. Connect data and power cables to the motherboard and then install the cover.
Option 2 (for more than 2 disks)
Open the cover and install hard disks on mounting plate(s).
1. Remove the cover and then secure disks to mounting plate(s) with screws.
2. Connect data and power cables to disks. Secure mounting plate(s) to the device, and then
install the cover.

www.acti.com
www.acti.com
User s Manual’
9
Option 3 (for more than 2 disks)
Open the front panel and install hard disks on mounting brackets.
1. Secure the disk to a pair of mounting brackets (L means left and R means right).
2. Press the latches on both sides (1) and then detach the front panel (2).
3. Align the disk at the slot and then insert the disk gently.
4. Push the disk slowly until it clicks. Repeat the steps to install all disks and then close the
front panel.

www.acti.com
www.acti.com
User s Manual’
10
Ports, Interfaces and LEDs
The ports, interfaces, connectors, power on/off switch and LED indicators may vary with device
model. See the following two examples.
LED
Description
PWR(Power)
Steady on: Connected to power.
RUN(Operation)
Steady on: Normal.
Blinks: Starting up.
NET(Network)
Steady on: Connected to network.
GUARD(Arming)
Steady on: Arming is enabled.
IR
Steady on: Activated for remote control.
Blinks: Authenticating device code.
ALM(Alarm)
Steady on: Device alarm occurred.
Power on/o
Audio output
DC power
PoE ports
Audio input
Network
VGA output
HDMI output
USB
Grounding
AC power
USB
Alarm input/output
Power on/o
Grounding
Network
HDMI output
VGA output
Audio out/input RS485
RS232 (for maintenance)
HDMI output
12V DC output
CVBS output
eSATA interface

www.acti.com
www.acti.com
User s Manual’
11
LED
Description
HD(Hard disk)
One HD LED only:
Steady on: No disk; or disk is abnormal.
Blinks: Reading or writing data.
One HD LED for each disk:
Steady green: Normal.
Blinks green: Reading or writing data.
Steady red: Abnormal.
Blinks red: Rebuilding array.
Startup
Verify installation and cable connection are correct. Connect to power and then turn on the
power on/off switch (if applicable). Follow the wizard to complete the basic setup after the NVR
starts up.
Live View
Click . The discovered cameras are listed. Click to add a camera. Menu > Camera > Camera
To search a network segment, click . If a camera is added but live video is not available, Search
check network connection and make sure the correct camera username and password are set in
the system. Modify if necessary.
Playback
Right click a preview window and then choose to view video recorded on the current -Playback
day. A 7×24 recording schedule is enabled at delivery and can be edited under Menu > Storage
> Recording.
Access Using a Web Browser
Access the NVR using a Web browser (e.g., Internet Explorer) from a connected computer.
Enter the NVR's IP address in the address bar and then press . Install the plugin as prompted. Close Enter
all Web browsers when the installaon starts.
Open the Web browser and log in with the correct username and password.

www.acti.com
www.acti.com
User s Manual’
13
Front Panel Buttons
The front panel buttons may vary with NVR model.
Front Panel Buttons 1
Button
Description
Display main menu.the
Switch to the next tab on the screen or switch the input method.
Auxiliary function button.
Exit the current window.
, , , : Switch windows or menu items; or control rotation
directions of a PTZ camera when the PTZ toolbar is closed. PTZ
stands for pan, tilt, and zoom.
, : Rewind or forward 30 seconds in full screen.
, : Variable speed forward or rewind in full screen.-
Confirm an operation, or start/pause the playback.
Press this button to start up or shut down the NVR.
To shut down, press this button and hold for at least 3 seconds till a
message appears on your monitor. Click Yes.
NOTE: This shutdown operation can be performed only when you
have logged in to the system.
Front Panel Buttons 2
Button
Description
Press this button to start up or shut down the NVR.
To shut down, press this button and hold for at least 3 seconds till a
message appears on your monitor. Click Yes.
NOTE: This shutdown operation can be performed only when you
have logged in to the system.
Enter 1 or display the main menu.;
Enter 2, A B, or C; or start instant playback.,
Enter 3, D, E, or F; or start manual recording.
Enter 4, G, H, or I; or enter the PTZ control interface.
Enter 5, J, K, or L; or switch the screen layout in live view or playback
mode.

www.acti.com
www.acti.com
User s Manual’
14
Button
Description
Enter 6, M, N, or O; or enable or disable arming.
Enter 7, P, Q, R, or S; or take a snapshot.
Enter 8, T, U, or V.
Enter 9, W, X, Y, or Z.
Enter 0 or a space.
Delete
Switch the input method.
Auxiliary function button.
Exit the current window.
Switch to the next tab.
, , , : Switch windows or menu items; or control rotation
directions of a PTZ camera when the PTZ toolbar is closed
, : Rewind or forward seconds in full screen.30
, : Variable speed forward or rewind in full screen.-
: ; Confirm an operation or start or pause playback.

www.acti.com
www.acti.com
User s Manual’
15
Remote Control
Functions of the Buttons on the Remote Control
Button
Function
Power
Press this button to start up or shut down the NVR.
To shut down, press this button and hold for at least 3 seconds till a
message appears on your monitor. Click Yes.
NOTE: This shutdown operation can be performed only when you
have logged in to the system.
DEV
This button is for reserved functions.
Toolbar
In live view mode, press this button to show the toolbar for the
currently selected window.
In playback mode, press this button to display windows
according to the configured screen layout.
Menu
Press this button to display the main menu.
Iris+/Iris-
Adjust the iris, focus and zoom of the PTZ camera in PTZ control
mode.
Focus+/Focus-
Zoom+/Zoom-
UP, DOWN, LEFT,
RIGHT, ENTER
Press UP, DOWN, LEFT and RIGHT to navigate between menu
items or shift focus.
In PTZ control mode, press UP, DOWN, LEFT, and RIGHT
buttons to select the corresponding buttons on the screen, and
then press ENTER to activate the selection.
In live view mode, press UP to start sequence in full screen.
Pressing UP again starts sequence with three windows on the
screen. Press DOWN to open the playback window.
Press ENTER to confirm an operation or to display a selected
drop down list. In playback mode, press ENTER to play or pause -
in full screen mode.
UP and DOWN: Variable speed forward or rewind in full screen.
LEFT and RIGHT: Rewind or forward seconds in full screen.30
Fn
Press to navigate to the next window when multiple windows are
displayed.
Esc
Exit.
Alphanumeric buttons
Switch to the corresponding channel in live view mode.
Input numbers and characters in edit mode.
Shift
Switch menu items.
Del
Remove characters or spaces on the left of the cursor.

www.acti.com
www.acti.com
User s Manual’
16
Initial Configuration
Preparation
Make sure that at least one monitor is correctly connected to the VGA or HDMI
interface on the rear panel of the NVR.
Verify that the hard disk(s) are correctly installed. For detailed steps to install a hard
disk, please refer to the quick guide shipped with your NVR.
Wizard
The wizard can guide you to complete the most basic setup. The wizard may vary with device
model and other factors. The following shows an example.
1. Enable or disable the wizard as needed and then click .Next
NOTE:
You may change the setting under .System > Basic
If a QR code is displayed, you may scan the code to download an app and use the
app to control your NVR.
2. Enter the default admin password and then click .123456 Next
The default password is intended only for the first login and should be changed CAUTION:
to a strong one containing at least eight characters including uppercase and lowercase letters,
digits and symbols after your first login to ensure account security.
NOTE: For RAID models, a window appears following this step for RAID configuration.

www.acti.com
www.acti.com
User s Manual’
17
3. Complete time information and then click .Next
4. Set the IP address, subnet mask, and default gateway. Use the default settings for other
parameters unless modification is necessary. Review the settings and then click .Next
NOTE:
For some NVR models, is selected by default.Enable DHCP
If your NVR has more than one Network Interface Card (NIC), you may configure the
NICs and choose one for default route.
An internal IPv4 address can be configured if your NVR has PoE ports or switching
ports.
5. Click . The detected IP devices are listed. Select the device(s) to add and then click Search
Add.
6. Click .Next

www.acti.com
www.acti.com
User s Manual’
18
7. Set a recording/snapshot schedule and then click .OK
NOTE: You may also edit wizard settings by clicking under .Wizard System > Basic

www.acti.com
www.acti.com
User s Manual’
19
Live View
Live View Status
The following icons are used to indicate alarms, recording status, and audio status in live view a
window.
Live View Window Icons
Icon
Description
Tampering alarm
Motion detection alarm
Recording
Two way audio-
Turn on audio
Normally, live video is displayed, but other situations are also possible.
No.
Description
1
The IP device is online, and live video is displayed.
2
The IP device is online, but the NVR has insufficient capacity to decode streams
from the IP device.
3
No permission to view live video from the IP device.
4
The IP device is offline.
5
No IP device is linked to the window.
12
4
3
5
www.acti.com
www.acti.com
User s Manual’
20
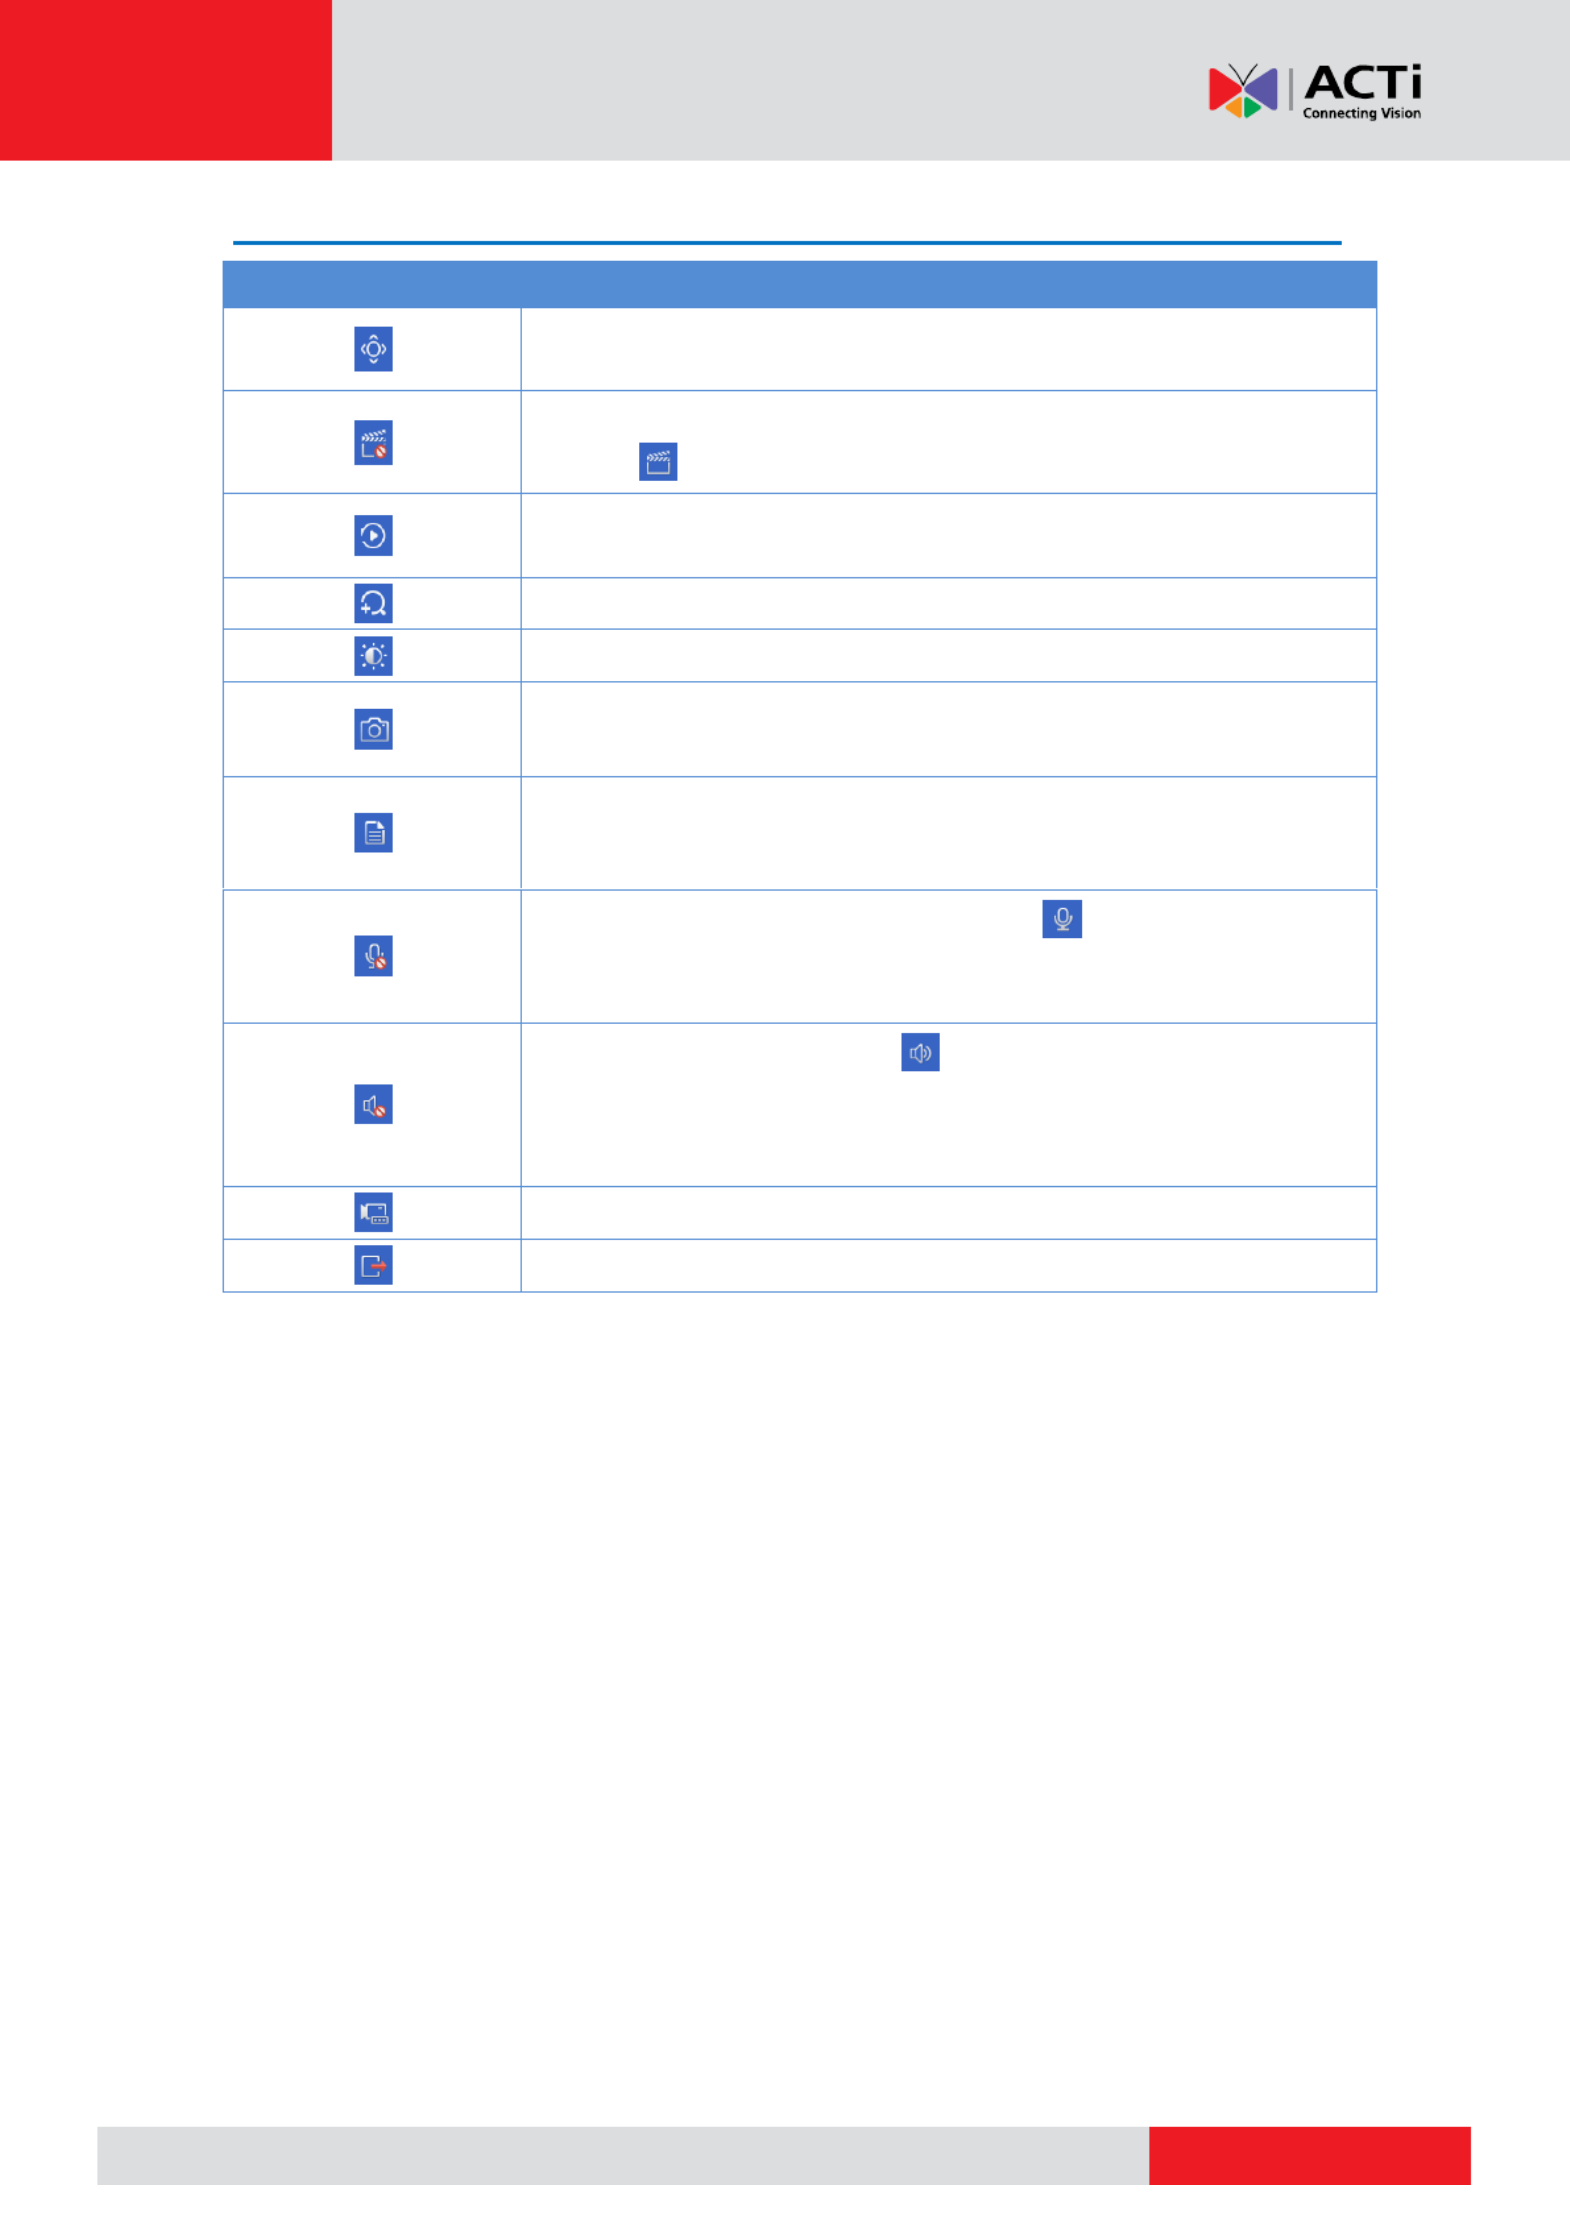
Window Toolbar
Icon
Description
Available for PTZ cameras only. Click to display the PTZ control
window.
Record live video in the window to the hard disk.
Clicking stops recording.
Click to play video recorded during the past 5 minutes and 30
seconds.
Zoom in on an area of interest.
Click to edit image settings.
Click to take a snapshot. The window borders will flash white.
You may view and back up snapshots under . Backup > Image
Rest your mouse pointer on the icon to view live video information. Or
click it to view the channel number, camera name, IP address,
connection status and recording status.
Start two-way audio with the camera. Click stop. The sound to
volume is adjustable.
NOTE: Correct audio input and output connections are required.
Click to turn on audio. Clicking turns off audio. The sound volume
is adjustable.
NOTE: When you turn on audio in the current window, audio of the
previous window is turned off.
Click to link the window to another IP device.
Exit
Produkt Specifikationer
| Mærke: | ACTi |
| Kategori: | VCR |
| Model: | ZNR-120P |
Har du brug for hjælp?
Hvis du har brug for hjælp til ACTi ZNR-120P stil et spørgsmål nedenfor, og andre brugere vil svare dig
VCR ACTi Manualer

19 August 2024
19 August 2024
16 August 2024
14 August 2024
14 August 2024
13 August 2024
13 August 2024
12 August 2024
8 August 2024
6 August 2024
VCR Manualer
- VCR Bosch
- VCR Sony
- VCR Canon
- VCR Samsung
- VCR TP-Link
- VCR Philips
- VCR Daewoo
- VCR Grundig
- VCR D-Link
- VCR Motorola
- VCR Toshiba
- VCR Abus
- VCR Planet
- VCR DataVideo
- VCR TRENDnet
- VCR Blaupunkt
- VCR JVC
- VCR Hitachi
- VCR Linksys
- VCR EZVIZ
- VCR Elro
- VCR Seagate
- VCR Digitus
- VCR Imou
- VCR Foscam
- VCR Vivotek
- VCR Zoom
- VCR Synology
- VCR Hikvision
- VCR Monacor
- VCR Reolink
- VCR Grandstream
- VCR Navitel
- VCR Hanwha
- VCR Provision-ISR
- VCR Axis
- VCR Dahua Technology
- VCR Speco Technologies
- VCR Blackmagic Design
- VCR Kunft
- VCR Geovision
- VCR UniView
- VCR Ernitec
- VCR AVer
- VCR A.C.Ryan
- VCR Airlive
- VCR Aristona
- VCR Sylvania
- VCR Magnum
- VCR Digital Watchdog
- VCR DirecTV
- VCR Skytronic
- VCR Magnavox
- VCR Inkovideo
- VCR Mach Power
- VCR HiLook
- VCR Avigilon
- VCR Milesight
Nyeste VCR Manualer

15 Januar 2025
11 Januar 2025
30 December 2025
30 December 2025

8 December 2024
9 Oktober 2024
7 Oktober 2024

7 Oktober 2024
2 Oktober 2024
23 September 2024