Asus N750JK Manual
Læs nedenfor 📖 manual på dansk for Asus N750JK (136 sider) i kategorien Laptop. Denne guide var nyttig for 12 personer og blev bedømt med 4.5 stjerner i gennemsnit af 2 brugere
Side 1/136

Notebook PC
E-Manual

2
Notebook PC E-Manual
COPYRIGHT INFORMATION
No part of this manual, including the products and software described in it, may be reproduced,
transmitted, transcribed, stored in a retrieval system, or translated into any language in any form or by
any means, except documentation kept by the purchaser for backup purposes, without the express
written permission of ASUSTeK COMPUTER INC. (“ASUS”).
ASUS PROVIDES THIS MANUAL “AS IS” WITHOUT WARRANTY OF ANY KIND, EITHER EXPRESS OR IMPLIED,
INCLUDING BUT NOT LIMITED TO THE IMPLIED WARRANTIES OR CONDITIONS OF MERCHANTABILITY OR
FITNESS FOR A PARTICULAR PURPOSE. IN NO EVENT SHALL ASUS, ITS DIRECTORS, OFFICERS, EMPLOYEES
OR AGENTS BE LIABLE FOR ANY INDIRECT, SPECIAL, INCIDENTAL, OR CONSEQUENTIAL DAMAGES
(INCLUDING DAMAGES FOR LOSS OF PROFITS, LOSS OF BUSINESS, LOSS OF USE OR DATA, INTERRUPTION
OF BUSINESS AND THE LIKE), EVEN IF ASUS HAS BEEN ADVISED OF THE POSSIBILITY OF SUCH DAMAGES
ARISING FROM ANY DEFECT OR ERROR IN THIS MANUAL OR PRODUCT.
Products and corporate names appearing in this manual may or may not be registered trademarks or
copyrights of their respective companies, and are used only for identication or explanation and to the
owners’ benet, without intent to infringe.
SPECIFICATIONS AND INFORMATION CONTAINED IN THIS MANUAL ARE FURNISHED FOR INFORMATIONAL
USE ONLY, AND ARE SUBJECT TO CHANGE AT ANY TIME WITHOUT NOTICE, AND SHOULD NOT BE
CONSTRUED AS A COMMITMENT BY ASUS. ASUS ASSUMES NO RESPONSIBILITY OR LIABILITY FOR ANY
ERRORS OR INACCURACIES THAT MAY APPEAR IN THIS MANUAL, INCLUDING THE PRODUCTS AND
SOFTWARE DESCRIBED IN IT.
Copyright © 2013 ASUSTeK COMPUTER INC. All Rights Reserved.
LIMITATION OF LIABILITY
Circumstances may arise where because of a default on ASUS’ part or other liability, you are entitled to
recover damages from ASUS. In each such instance, regardless of the basis on which you are entitled to
claim damages from ASUS, ASUS is liable for no more than damages for bodily injury (including death)
and damage to real property and tangible personal property; or any other actual and direct damages
resulted from omission or failure of performing legal duties under this Warranty Statement, up to the
listed contract price of each product.
ASUS will only be responsible for or indemnify you for loss, damages or claims based in contract, tort or
infringement under this Warranty Statement.
This limit also applies to ASUS’ suppliers and its reseller. It is the maximum for which ASUS, its suppliers,
and your reseller are collectively responsible.
UNDER NO CIRCUMSTANCES IS ASUS LIABLE FOR ANY OF THE FOLLOWING: (1) THIRD-PARTY CLAIMS
AGAINST YOU FOR DAMAGES; (2) LOSS OF, OR DAMAGE TO, YOUR RECORDS OR DATA; OR (3) SPECIAL,
INCIDENTAL, OR INDIRECT DAMAGES OR FOR ANY ECONOMIC CONSEQUENTIAL DAMAGES (INCLUDING
LOST PROFITS OR SAVINGS), EVEN IF ASUS, ITS SUPPLIERS OR YOUR RESELLER IS INFORMED OF THEIR
POSSIBILITY.
SERVICE AND SUPPORT
Visit our multi-language web site at http://support.asus.com
First Edition
April 2013
E8108

Notebook PC E-Manual
3
Table of Contents
About this manual .....................................................................................................7
Conventions used in this manual ............................................................................. 8
Icons .................................................................................................................................... 8
Typography ....................................................................................................................... 8
Safety precautions.....................................................................................................9
Using your Notebook PC .............................................................................................. 9
Caring for your Notebook PC .....................................................................................10
Proper disposal ................................................................................................................ 11
Chapter 1: Hardware Setup
Getting to know your Notebook PC ...................................................................14
Top View ............................................................................................................................. 14
Bottom ................................................................................................................................19
Right Side .......................................................................................................................... 21
Left Side ............................................................................................................................. 23
Front Side .......................................................................................................................... 25
Chapter 2: Using your Notebook PC
Getting started ...........................................................................................................28
Charge your Notebook PC. ..........................................................................................28
Lift to open the display panel. .................................................................................... 30
Press the power button. ............................................................................................... 30
Gestures for the touchpad .....................................................................................31
Using the keyboard ...................................................................................................38
Function keys ................................................................................................................... 38
Function keys for ASUS Apps ..................................................................................... 39
Windows®8 keys ............................................................................................................. 40
Multimedia control keys* ............................................................................................ 40
Numeric keypad* ............................................................................................................ 41
Using the optical drive .............................................................................................42

4
Notebook PC E-Manual
Chapter 3: Working with Windows® 8
Starting for the first time .........................................................................................46
Windows® 8 lock screen ...........................................................................................46
Windows® UI ................................................................................................................47
Start screen .......................................................................................................................47
Windows® Apps ..............................................................................................................47
Hotspots ............................................................................................................................. 48
Working with Windows ® apps ...............................................................................51
Launching apps ...............................................................................................................51
Customizing apps ...........................................................................................................51
Accessing the Apps screen ..........................................................................................53
Charms bar ........................................................................................................................ 55
Snap feature .....................................................................................................................58
Other keyboard shortcuts ......................................................................................60
Connecting to wireless networks ........................................................................62
Wi-Fi ..................................................................................................................................... 62
Bluetooth ..........................................................................................................................64
Airplane mode .................................................................................................................66
Connecting to wired networks .............................................................................67
Configuring a dynamic IP/PPPoE network connection .................................... 67
Configuring a static IP network connection .........................................................69
Turning your Notebook PC off ..............................................................................70
Putting your Notebook PC to sleep .........................................................................70
Chapter 4: ASUS apps
Featured ASUS Apps .................................................................................................72
Power4Gear Hybrid ........................................................................................................72
USB Charger+ ...................................................................................................................76
ASUS Instant Key Menu ................................................................................................78
ASUS Console ...................................................................................................................81

Notebook PC E-Manual
5
Chapter 5: Power-on Self Test (POST)
The Power-on Self Test (POST) ..............................................................................90
Using POST to access BIOS and Troubleshoot......................................................90
BIOS ................................................................................................................................90
Accessing BIOS ................................................................................................................ 90
BIOS Settings ....................................................................................................................91
Troubleshoot ...............................................................................................................101
Refresh your PC ............................................................................................................... 101
Reset your PC ...................................................................................................................102
Advanced options .......................................................................................................... 103
FAQs (Frequently Asked Questions)
Useful tips for your Notebook PC ........................................................................106
Hardware FAQs ...........................................................................................................107
Software FAQs .............................................................................................................110
Appendices
DVD-ROM Drive Information (on selected models) ........................................... 114
Blu-ray ROM Drive Information (on selected models) ....................................... 116
Internal Modem Compliancy......................................................................................116
Overview ............................................................................................................................117
Network Compatibility Declaration .........................................................................117
Non-Voice Equipment .................................................................................................. 117
Federal Communications Commission Interference Statement ................... 119
FCC Radio Frequency (RF) Exposure Caution Statement ................................. 120
Declaration of Conformity (R&TTE directive 1999/5/EC) .................................. 121
CE Marking ........................................................................................................................ 121
IC Radiation Exposure Statement for Canada ...................................................... 122
Déclaration d’Industrie Canada relative à l’exposition aux ondes radio ... 123
Wireless Operation Channel for Different Domains ........................................... 124

Notebook PC E-Manual
7
About this manual
This manual provides information about the hardware and software
features of your Notebook PC, organized through the following
chapters:
Chapter 1: Hardware Setup
This chapter details the hardware components of your Notebook
PC.
Chapter 2: Using your Notebook PC
This chapter shows you how to use the dierent parts of your
Notebook PC.
Chapter 3: Working with Windows® 8
This chapter provides an overview of using Windows® 8 in your
Notebook PC.
Chapter 4: ASUS Apps
This chapter features the ASUS apps included with your Notebook
PC’s Windows® 8 operating system.
Chapter 5: Power-on Self-test (POST)
This chapter shows you how to use POST to change the settings
of your Notebook PC.
Frequently Asked Questions (FAQs)
This section shows hardware and software FAQs you can refer to
for xing common issues or problems with your Notebook PC.
Appendices
This section includes notices and safety statements for your
Notebook PC.

8
Notebook PC E-Manual
Conventions used in this manual
To highlight key information in this manual, some text are presented as
follows:
IMPORTANT! This message contains vital information that must be
followed to complete a task.
NOTE: This message contains additional information and tips that can
help complete tasks.
WARNING! This message contains important information that must be
followed to keep you safe while performing tasks and prevent damage to
your Notebook PC's data and components.
Icons
The icons below indicate the devices you can use for completing a
series of tasks or procedures on your Notebook PC.
= Use the touchpad.
= Use the keyboard.
Typography
Bold = This indicates a menu or an item that must be selected.
Italic = This indicates sections that you can refer to in this manual.

Notebook PC E-Manual
9
Safety precautions
Using your Notebook PC
This Notebook PC should only be used in
environments with ambient temperatures between
5°C (41°F) and 35°C (95°F).
Refer to the rating label on the bottom of your
Notebook PC and ensure that your power adapter
complies with this rating.
Do not leave your Notebook PC on your lap or near
any part of your body to prevent discomfort or
injury from heat exposure.
Do not use damaged power cords, accessories, and
other peripherals with your Notebook PC.
While powered on, ensure that you do not carry or
cover your Notebook PC with any materials that can
reduce air circulation.
Do not place your Notebook PC on uneven or
unstable work surfaces.
You can send your Notebook PC through x-ray
machines (used on items placed on conveyor belts),
but do not expose them to magnetic detectors and
wands.
Contact your airline provider to learn about related
inight services that can be used and restrictions
that must be followed when using your Notebook
PC in-ight.

Notebook PC E-Manual
11
Proper disposal
Do not throw your Notebook PC in municipal waste.
This product has been designed to enable proper
reuse of parts and recycling. The symbol of the
crossed out wheeled bin indicates that the product
(electrical, electronic equipment and mercury-
containing button cell battery) should not be
placed in municipal waste. Check local regulations
for disposal of electronic products.
Do not throw the battery in municipal waste. The
symbol of the crossed out wheeled bin indicates
that the battery should not be placed in municipal
waste.

12
Notebook PC E-Manual

Notebook PC E-Manual
13
Chapter 1:
Hardware Setup

14
Notebook PC E-Manual
Getting to know your Notebook PC
Top View
NOTE: The keyboard's layout may vary per region or country. The top
view may also vary in appearance depending on the Notebook PC model.

Notebook PC E-Manual
15
Array microphones
The array microphones feature echo canceling, noise
suppression, and beam forming functions for better voice
recognition and audio recording.
Camera
The built-in camera allows you to take pictures or record videos
using your Notebook PC.
Camera indicator
The camera indicator lights up when the built-in camera is in use.
Display panel
This high-denition display panel provides excellent viewing
features for photos, videos, and other multimedia les on your
Notebook PC.
Instant Key button
This preset button is a unique feature of your Notebook PC. By
default, quickly pressing this button launches the ASUS Console
app. To create a new preset, press and hold this button to launch
the ASUS Instant Key Menu then congure the settings.
NOTE:
• For more details on creating presets, refer to the ASUS
Instant Key Menu section in this manual.
• For more details on using the ASUS Console app, refer
to the section in this manual. ASUS Console

16
Notebook PC E-Manual
Power button
Press the power button to turn your Notebook PC on or o. You
can also use the power button to put your Notebook PC to sleep
or hibernate mode and wake it up from sleep or hibernate mode.
In the event that your Notebook PC becomes unresponsive,
press and hold the power button for about four (4) seconds until
your Notebook PC shuts down.
Numeric keypad*
The numeric keypad toggles between these two functions: for
numeric input and as pointer direction keys.
NOTE: For more details, refer to the Numeric keypad (on selected
models) section in this manual.
Keyboard
The keyboard provides full-sized QWERTY keys with a
comfortable travel depth for typing. It also enables you to use
the function keys, allows quick access to Windows®, and controls
other multimedia functions.
NOTE: The keyboard layout diers by model or territory.
Touchpad
The touchpad allows the use of multi-gestures to navigate
onscreen, providing an intuitive user experience. It also simulates
the functions of a regular mouse.
NOTE: For more details, refer to the Gestures for the touchpad
section in this manual.

18
Notebook PC E-Manual
Drive activity indicator
This indicator lights up when your Notebook PC is
accessing the internal storage drives.
Bluetooth / Wireless indicator
This indicator lights up when your Notebook PC’s
wireless function (Bluetooth or Wi-Fi) is enabled.
Capital lock indicator
This indicator lights up when the capital lock
function is activated. Using capital lock allows you
to type capitalized letters (such as A, B, C) using your
Notebook PC’s keyboard.
* on selected models only

20
Notebook PC E-Manual
Air vents
The air vents allow cool air to enter and warm air to exit the
Notebook PC.
WARNING! Ensure that paper, books, clothing, cables, or other
objects do not block any of the air vents or else overheating may
occur.
Audio speakers
The built-in audio speaker allows you to hear audio straight from
the Notebook PC. The audio features of this Notebook PC are
software-controlled.
Notebook PC E-Manual
21
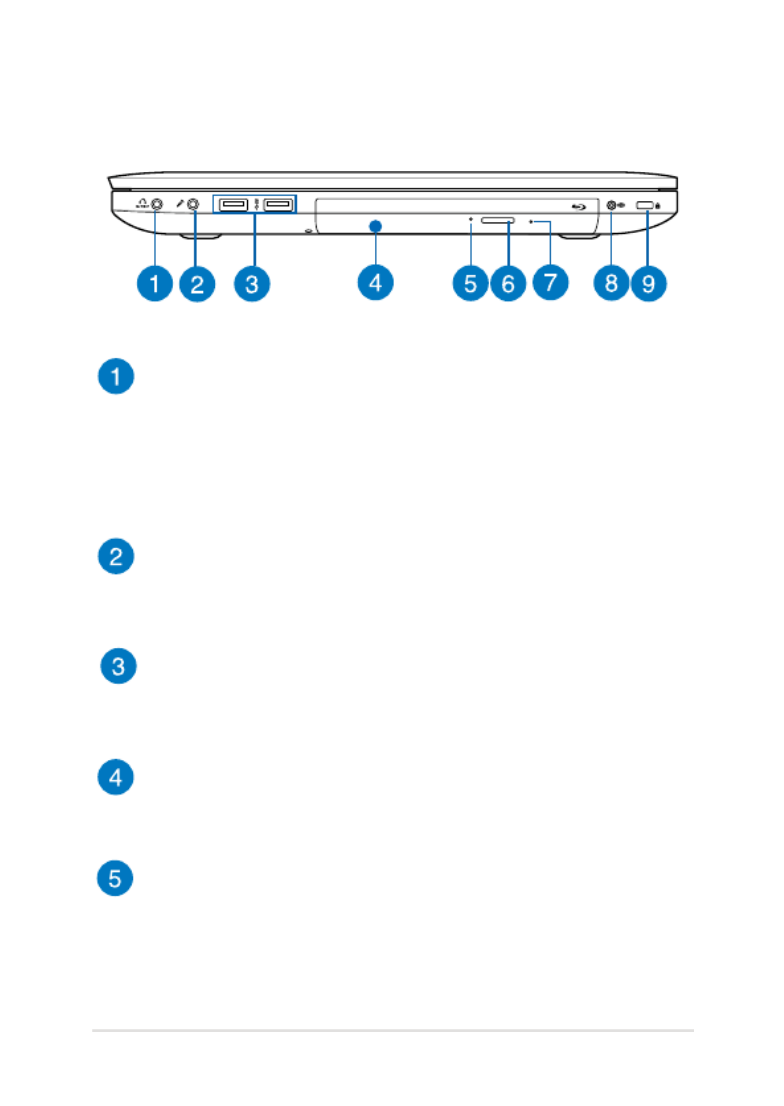
Right Side
Headphone output and S/PDIF output combo jack port (on
selected models)
This port allows you to connect your Notebook PC to amplied
speakers or headphones. You can also use this port to connect
your Notebook PC to S/PDIF (Sony/Philips Digital Interconnect
Format) compliant devices.
Microphone input combo jack port
The microphone input jack port is used to connect your
Notebook PC to an external microphone.
USB 3.0 ports
These USB (Universal Serial Bus) 3.0 ports provide a transfer rate
of up to 5 Gbit/s and are backward compatible to USB 2.0.
Optical drive
Your Notebook PC’s optical drive may support several disc
formats such as CDs, DVDs, recordable discs, or rewritable discs.
Optical drive indicator
This indicator lights up when the optical drive electronic eject
button is pressed while the Notebook PC is powered on. This
indicator also lights up when the optical drive is currently
reading data from or writing data to a disc.

22
Notebook PC E-Manual
Optical disc drive eject button
Press this button to eject the optical drive tray.
Manual eject hole
The manual eject hole is used to eject the drive tray in case the
electronic eject button does not work.
WARNING! Use the manual eject hole only when the electronic
eject button does not work.
NOTE: For more details, refer to the section Using the optical drive
in this manual.
Subwoofer jack port
The subwoofer jack port is used to connect the subwoofer
(optional) to your Notebook PC.
Kensington® security slot
The Kensington® security slot allows you to secure your
Notebook PC using Kensington® compatible Notebook PC
security products.
Notebook PC E-Manual
23
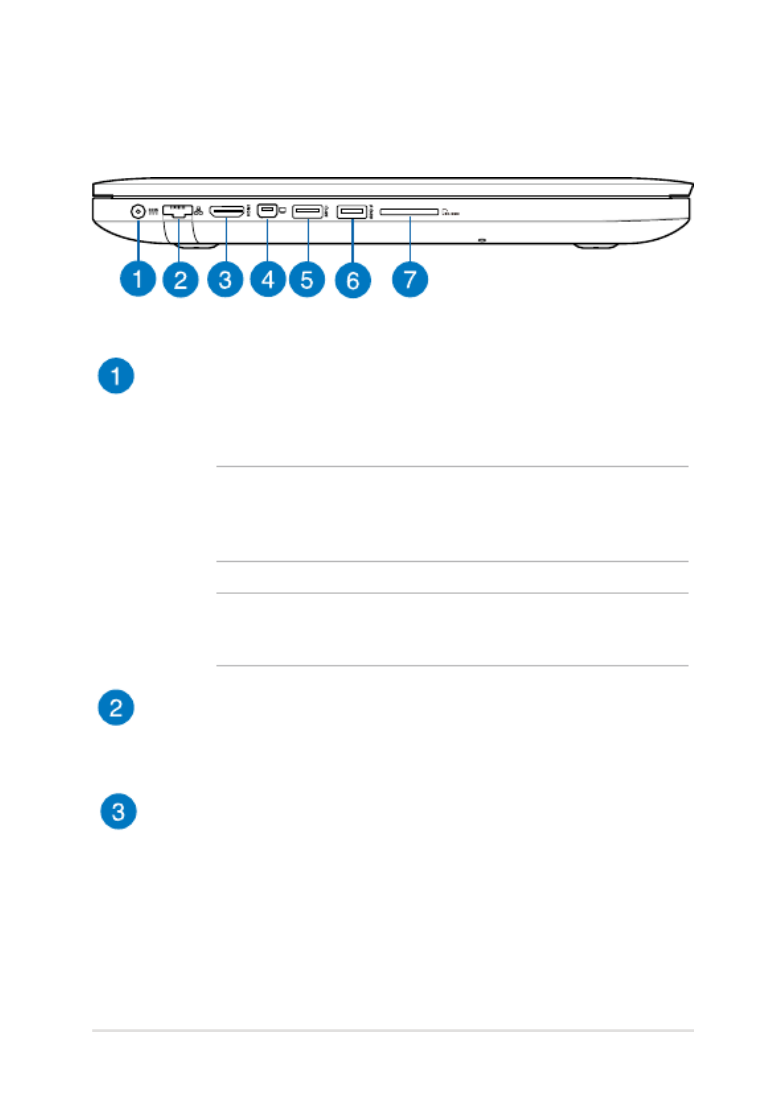
Left Side
Power (DC) input port
Insert the bundled power adapter into this port to charge the
battery pack and supply power to your Notebook PC.
WARNING! The adapter may become warm to hot while in use.
Do not cover the adapter and keep it away from your body while
it is connected to a power source.
IMPORTANT! Use only the bundled power adapter to charge
the battery pack and supply power to your Notebook PC.
LAN port
Insert the network cable into this port to connect to a local area
network.
HDMI port
This port is for the HDMI (High-Denition Multimedia Interface)
connector and is HDCP compliant for HD DVD, Blu-ray, and
other protected content playback.

24
Notebook PC E-Manual
Mini DisplayPort port
Use this port to connect your Notebook PC to a DisplayPort or
VGA, DVI, or HDMI external display.
USB 3.0 port
This USB (Universal Serial Bus) 3.0 port provides a transfer rate
of up to 5 Gbit/s and is backward compatible to USB 2.0.
USB 3.0 port with USB Charger+
This USB 3.0 port with the icon comes with the USB Charger+
feature. USB Charger+ allows you to quick-charge mobile
devices and can be used even while your Notebook PC is on
sleep, hibernate, or shutdown mode*.
Memory card reader
This Notebook PC has a single built-in memory card reader slot
that supports MMC, SD, and SDHC card formats.
* on selected models only

Notebook PC E-Manual
25
Status indicators
The status indicators help identify the current hardware status
of your Notebook PC.
Front Side
NOTE: The front side may vary in appearance depending on model.

26
Notebook PC E-Manual

Notebook PC E-Manual
27
Chapter 2:
Using your Notebook PC
28
Notebook PC E-Manual
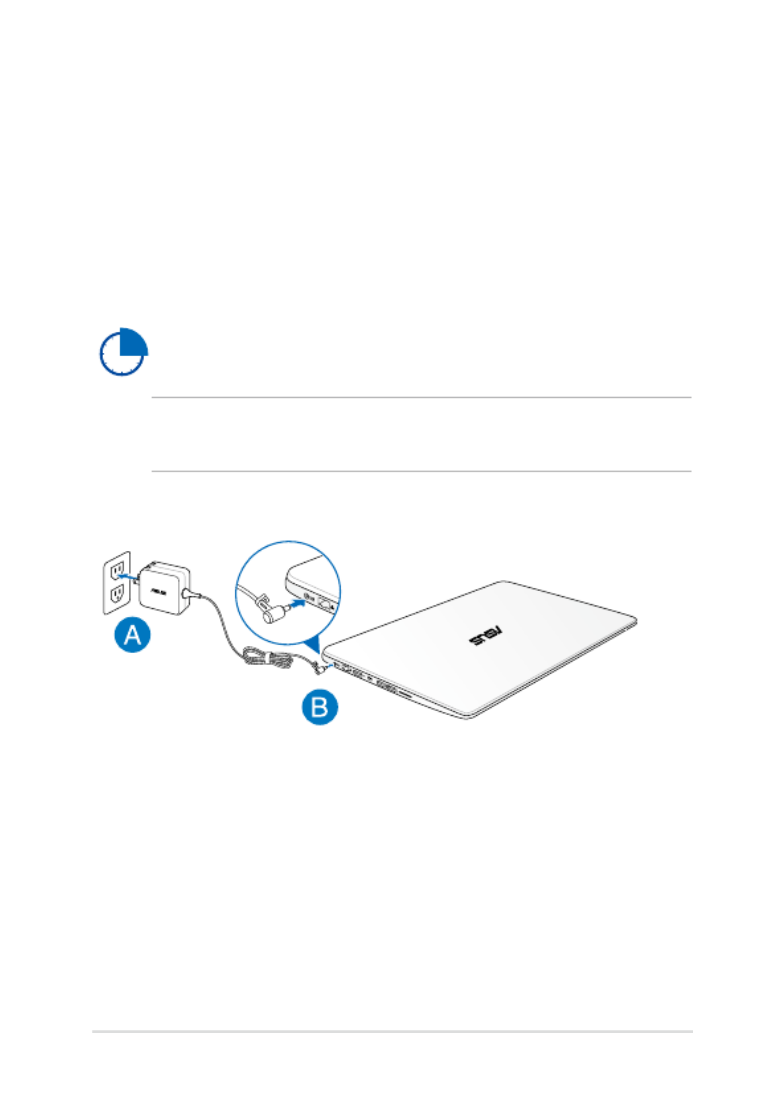
Getting started
Charge your Notebook PC.
A. Plug the AC power adapter into a 100V~240V power source.
B. Connect the DC power connector into your Notebook PC’s power
(DC) input.
Charge the Notebook PC for before using it in 3 hours
battery mode for the rst time.
NOTE: The power adapter may vary in appearance, depending on models
and your region.

Notebook PC E-Manual
29
IMPORTANT!
• Ensure that your Notebook PC is connected to a grounded
power adapter before turning it on for the rst time.
• When using your Notebook PC on power adapter mode, the
socket outlet must be near to the unit and easily accessible.
• Locate the input/output rating label on your Notebook
PC and ensure that it matches the input/output rating
information on your power adapter. Some Notebook PC
models may have multiple rating output currents based on
the available SKU.
• Power adapter information:
- Input voltage: 100-240Vac
- Input frequency: 50-60Hz
- Rating output current: 4.74A(90W), 6.32A(120W)
- Rating output voltage: 19V
30
Notebook PC E-Manual
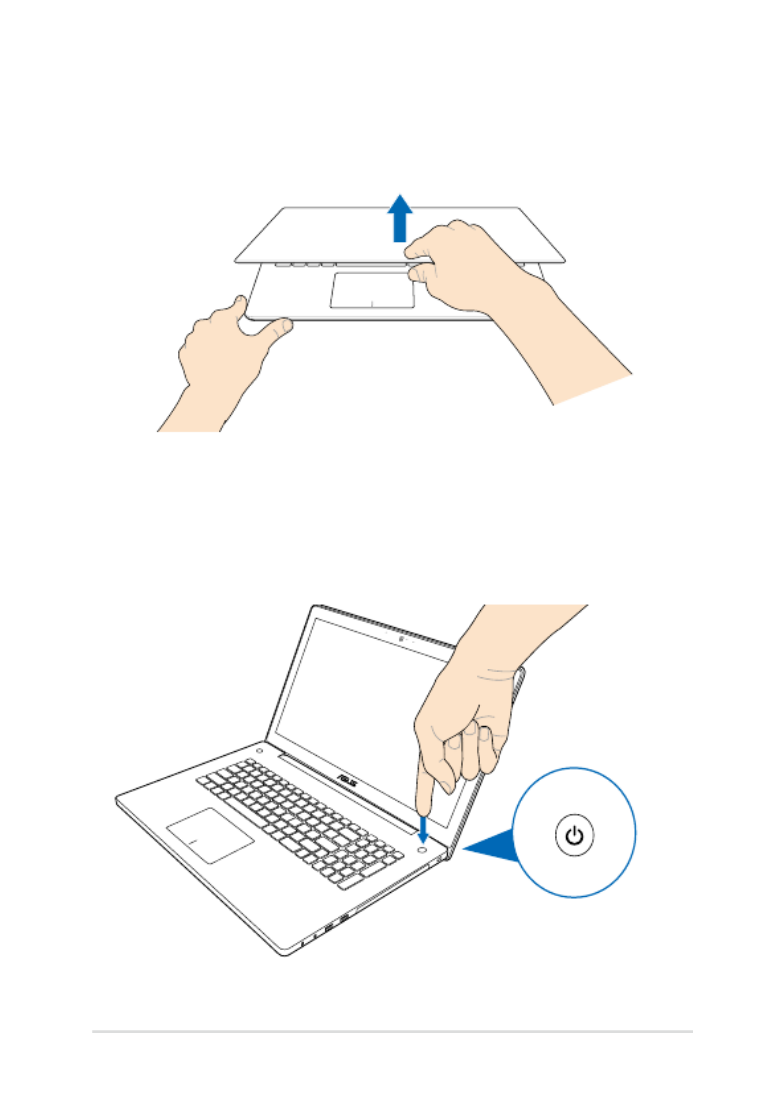
Lift to open the display panel.
Press the power button.

32
Notebook PC E-Manual
One-nger gestures
Click/Double click
• In the Start screen, click an app to launch it.
• In Desktop mode, double-click an application to launch it.
Drag and drop
Double-click an item, then slide the same nger without lifting it o
the touchpad. To drop the item to its new location, lift your nger from
the touchpad.
Notebook PC E-Manual
33
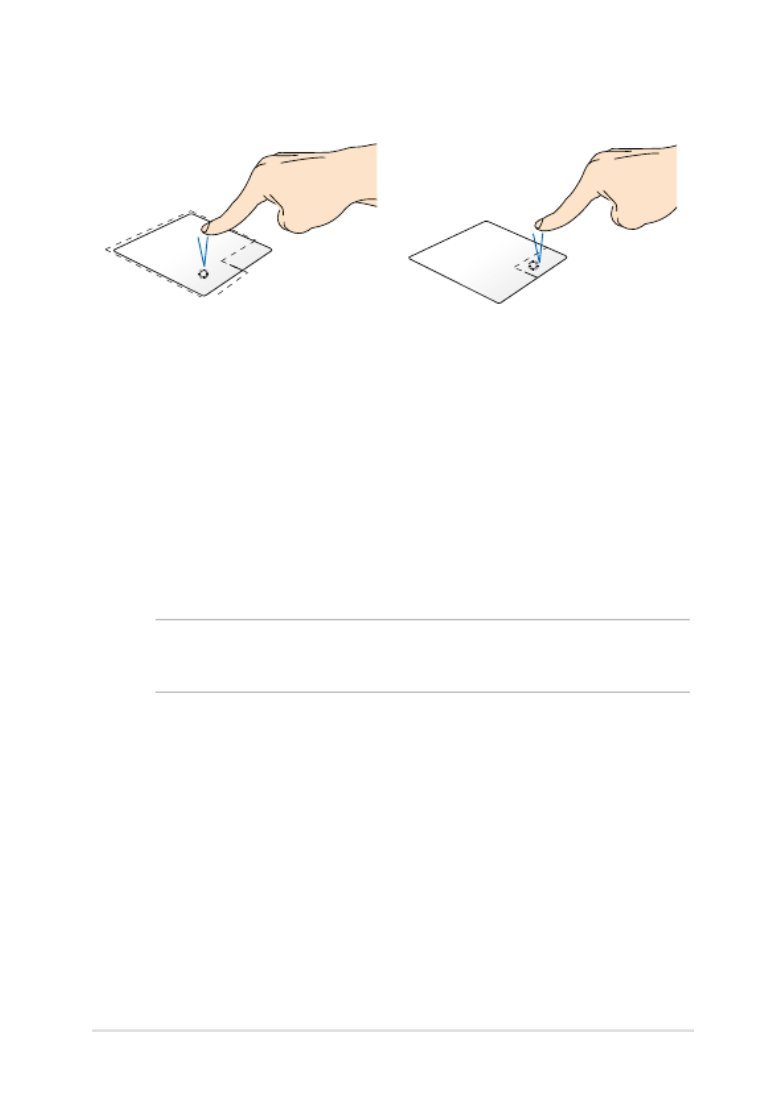
Left-click Right-click
• In the Start screen, click an
app to launch it.
• In Desktop mode, double-
click an application to
launch it.
• In the Start screen, click an
app to select it and launch
the settings bar. You can also
press this button to launch
the bar.All Apps
• In Desktop mode, use this
button to open the right-
click menu.
NOTE: The areas inside the dotted line represent the locations of the left
mouse button and the right mouse button on the touchpad.

34
Notebook PC E-Manual
Top edge swipe
• In the Start screen, swipe from the top edge to launch the All
Apps bar.
• In a running app, swipe from the top edge to view its menu.
Left edge swipe Right edge swipe
Swipe from the left edge to shue
your running apps.
Swipe the right edge to launch
the Charms bar.

Notebook PC E-Manual
35
Two-nger gestures
Click Rotate
Click two ngers on the touchpad
to simulate the right-click
function.
To rotate an image, place two
ngers on the touchpad then
turn one nger clockwise or
counterclockwise while the other
stays still.
Two-nger scroll (up/down) Two-nger scroll (left/right)
Slide two ngers to scroll up or
down.
Slide two ngers to scroll left or
right.
38
Notebook PC E-Manual
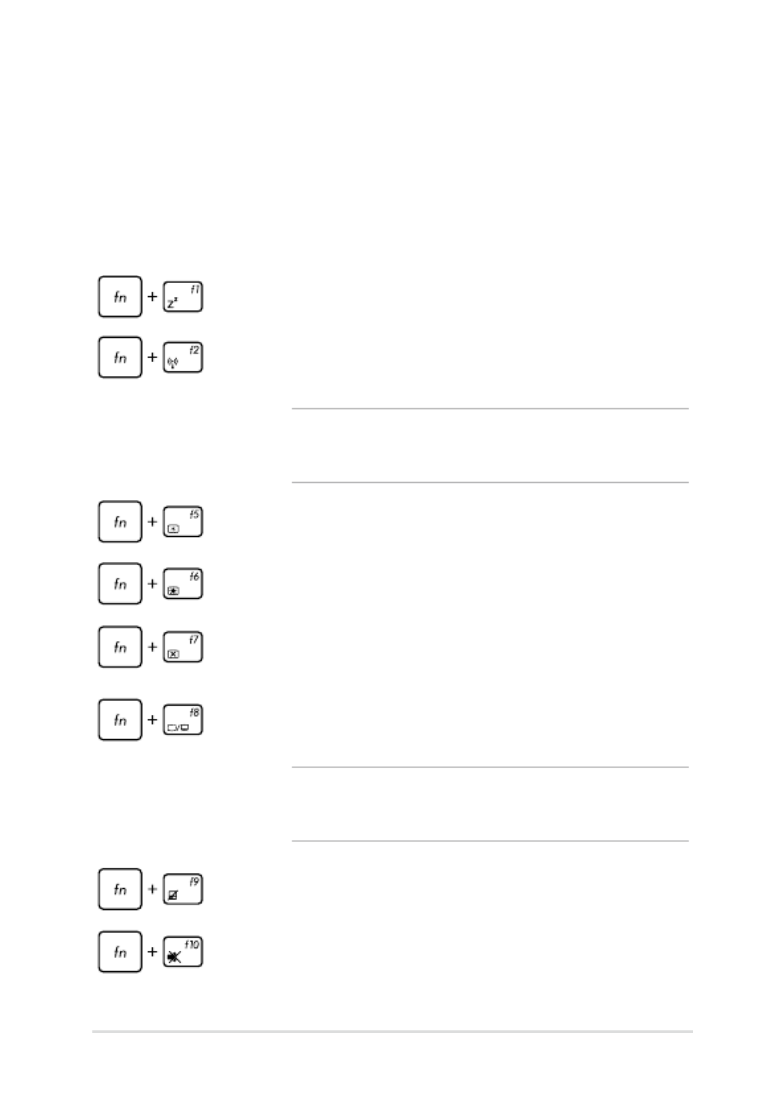
Function keys
The function keys on your Notebook PC’s keyboard can trigger the
following commands:
Using the keyboard
Puts the Notebook PC into Sleep mode
Turns on or oAirplane mode
NOTE: When enabled, the disables all Airplane mode
wireless connectivity.
Decreases display brightness
Increases display brightness
Turns the display panel o
Activates the second screen
NOTE: Ensure that the second display is connected to
your Notebook PC.
Enables or disables the touchpad
Turns the speaker on or o

Notebook PC E-Manual
39
Function keys for ASUS Apps
Your Notebook PC also comes with a special set of function keys that
can be used to launch ASUS apps.
Toggles the ASUS Splendid Video Enhancement
Technology app to switch between these display
color enhancement modes: Gamma Correction, Vivid
Mode, Theater Mode, Soft Mode, My Prole, and
Normal.
Launches the ASUS Power4Gear Hybrid app
Turns the speaker volume down
Turns the speaker volume up

40
Notebook PC E-Manual
Windows®8 keys
There are two special Windows® keys on your Notebook PC’s keyboard
used as below:
Press this key to go back to the Start screen. If you are
already in the Start screen, press this key to go back to
the last app you opened.
Press this key to simulate the right-click functions.
Multimedia control keys*
The multimedia control keys allow you to control multimedia les, such
as audios and videos, when played in your Notebook PC.
Press in combination with the arrow keys on your Notebook PC,
illustrated as below.
Stop
Play or
pause
Skip to
previous
track or
rewind
Skip to
next track
or fast
forward

Notebook PC E-Manual
41
Numeric keypad*
A numeric keypad is available on
selected Notebook PC models. You
can use this keypad for numeric
input or as pointer direction keys.
Press
to
toggle between using
the keypad as number
keys or as pointer
direction keys.
* on selected models only

42
Notebook PC E-Manual
Using the optical drive
NOTE: The actual location of the electronic eject button may vary
depending on your Notebook PC model.
Inserting an optical disc
1. While the Notebook PC is
on, press the electronic eject
button to partially eject the
optical drive tray.
2. Gently pull out the drive tray.
IMPORTANT! Be careful not
to touch the optical drive lens.
Ensure that there are no objects
that may get jammed under the
drive tray.
3. Hold the disc by the edge,
with its printed side up, then
gently place it inside the hub.

Notebook PC E-Manual
43
4. Push down the disc’s plastic
hub until it snaps onto the
optical drive hub.
5. Push the drive tray gently to
close the optical drive.
NOTE: While data is being
read, it is normal to hear some
spinning and vibrating in the
optical drive.
Manual eject hole
The manual eject hole is located on the optical drive door and is used to
eject the optical drive tray in case the electronic eject button does not
work.
To manually eject the optical drive tray, insert a straightened paper clip
into the manual eject hole until the drive tray opens.
WARNING! Use the manual eject hole only when the electronic eject
button does not work.

44
Notebook PC E-Manual

Notebook PC E-Manual
45
Chapter 3:
Working with Windows® 8

46
Notebook PC E-Manual
Starting for the rst time
When you start your computer for the rst time, a series of screens
appear to guide you in conguring the basic settings of your Windows®
8 operating system.
To start your Notebook PC for the rst time:
1. Press the power button on your Notebook PC. Wait for a few
minutes until the setup screen appears.
2. From the setup screen, pick a language to use on your Notebook
PC.
3. Carefully read the License Terms. Tick I accept the terms for
using Windows Accept.then click
4. Follow the onscreen instructions to congure the following basic
items:
• Keep your PC secure
• Personalize
• Wireless
• Settings
• Sign in to your PC
5. After conguring the basic items, the Windows®8 tutorial appears.
Watch this to learn more about Windows®8 functionalities.
Windows® 8 lock screen
The Windows®8 lock screen may appear when your Notebook PC enters
the Windows®8 operating system. To proceed, click on the lock screen
or press any key on your Notebook PC's keyboard.

Notebook PC E-Manual
47
Windows® UI
Windows® 8 comes with a tile-based user interface (UI) which allows
you to organize and easily access Windows® apps from the Start screen.
It also includes the following features that you can use while working
on your Notebook PC.
Start screen
The Start screen appears after successfully signing in to your user
account. It helps organize all the applications you need in just one
place.
Zoom in/out button
Windows® Apps
These are apps pinned on the Start screen and displayed on tiled-format
for easy access.
NOTE: Some apps require signing in to your Microsoft account before
they are fully launched.

48
Notebook PC E-Manual
Hotspots
Onscreen hotspots allow you to launch programs and access the
settings of your Notebook PC. The functions in these hotspots can be
activated using the touchpad.
Hotspots on a running app
Hotspots on the Start screen

Notebook PC E-Manual
49
Hotspot Action
upper left corner Hover your mouse pointer on the upper
left corner then click on the recent app’s
thumbnail to revert back to that running app.
If you launched more than one app, slide
down to show all running apps.
lower left corner From a running app screen:
Hover your mouse pointer on the lower
left corner then click on the Start screen’s
thumbnail to go back to the Start screen.
NOTE: You can also press the Windows key
on your keyboard to go back to the
Start screen.
From the Start screen:
Hover your mouse pointer on the lower
left corner then click on the running app’s
thumbnail to go back to that app.

50
Notebook PC E-Manual
Hotspot Action
top side Hover your mouse pointer on the top side
until it changes to a hand icon. Drag then
drop the app to a new location.
NOTE: This hotspot function only works on
a running app or when you want to use the
Snap feature. For more details, refer to the
Snap feature under Working with Windows®
apps.
upper or lower right
corner
Hover your mouse pointer on the upper or
lower right corner to launch the Charms bar.

Notebook PC E-Manual
51
Working with Windows® apps
Use your Notebook PC’s touchpad, or keyboard to launch, customize,
and close apps.
Launching apps
Moving apps
Customizing apps
You can move, resize, unpin, or close apps from the Start screen using
the following steps:
Position your mouse pointer over the app then left-click
or click once to launch it.
Press twice then use the arrow keys to browse
through the apps. Press to launch an app.
Double-click on the app then drag and drop the app to
a new location.
Right-click on the app to activate its settings bar then
click or .
Resizing apps

52
Notebook PC E-Manual
Right-click on the app to activate the settings bar then
click .
Unpinning apps
1. Move your mouse pointer on the top side of the
launched app then wait for the pointer to change
to a hand icon.
2. Drag then drop the app to the bottom of the
screen to close it.
From the running app’s screen, press .
Closing apps
Notebook PC E-Manual
53
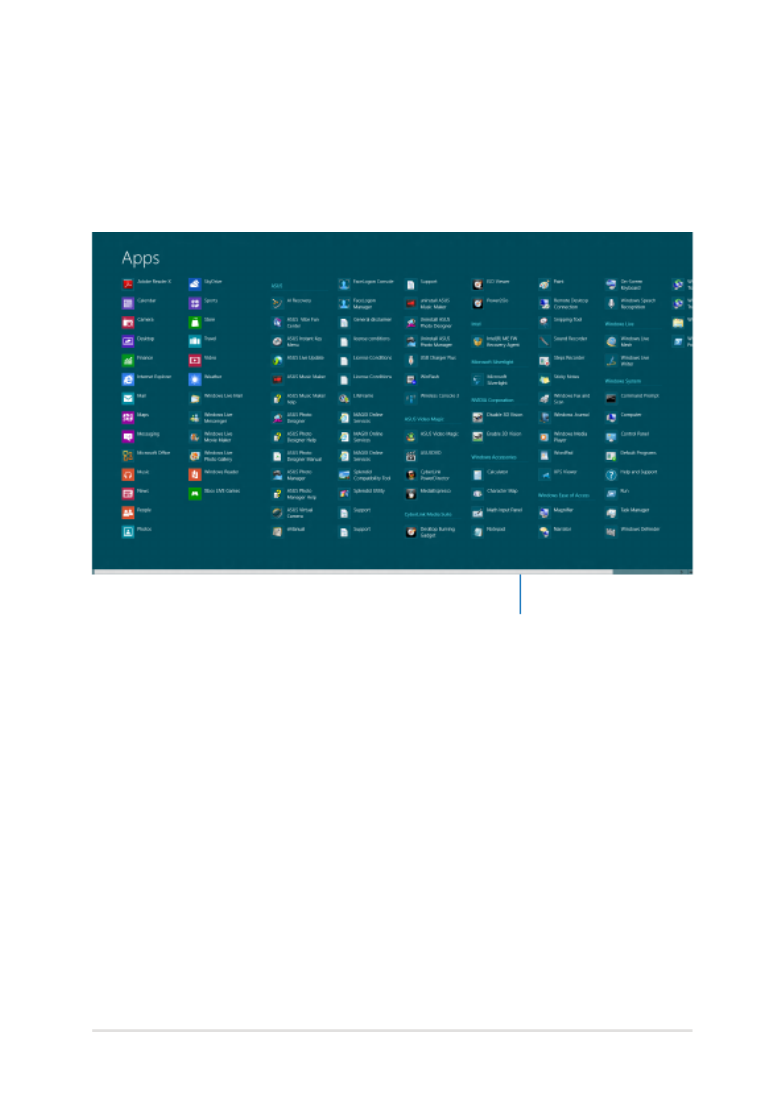
Accessing the Apps screen
Aside from the apps already pinned on your Start screen, you can also
open other applications through the Apps screen.
Horizontal scroll bar

54
Notebook PC E-Manual
Launching the Apps screen
Launch the Apps screen using your Notebook PC's touch screen (on
selected models), touchpad, or keyboard.
Swipe from the top edge to launch the All Apps bar.
From the Start screen, press to select the
All Apps icon then press .
Pinning more apps on the Start screen
You can pin more apps on the Start screen using your touch screen (on
selected models) or touchpad.
1. Position the mouse pointer over the app you want
to pin on the Start screen.
2. Right-click on the app to activate its settings.
3. Click on the icon.

56
Notebook PC E-Manual
Launching the Charms bar
NOTE: When called out, the Charms bar initially appears as a set of
white icons. The image above shows how the Charms bar looks like once
activated.
Use your Notebook PC’s touch screen (on selected models), touchpad,
or keyboard to launch the Charms bar.
Move your mouse pointer on the upper or lower right
corner of the screen.
Press .

Notebook PC E-Manual
57
Search
This charm allows you to look for les, applications, or
programs in your Notebook PC.
Share
This charm allows you to share applications via social
networking sites or email.
Start
This charm reverts the display back to the Start screen.
From the Start screen, you can also use this to revert back
to a recently opened app.
Devices
This charm allows you to access and share les with the
devices attached to your Notebook PC such as an external
display or printer.
Settings
This charm allows you to access the PC settings of your
Notebook PC.
Inside the Charms bar

58
Notebook PC E-Manual
Snap feature
The Snap feature displays two apps side-by-side, allowing you to work
or switch between apps.
IMPORTANT! Ensure that your Notebook PC’s screen resolution is set to
1366 x 768 pixels or higher before using the Snap feature.
Snap bar

62
Notebook PC E-Manual
Connecting to wireless networks
Wi-Fi
Access emails, surf the Internet, and share applications via social
networking sites using your Notebook PC’s Wi-Fi connection.
IMPORTANT! Airplane mode The disables this feature. Ensure that
Airplane mode is turned o before enabling the Wi-Fi connection of your
Notebook PC.
Enabling Wi-Fi
Activate Wi-Fi in your Notebook PC using the following steps on your
touchpad.
1. Launch the .Charms bar
2. Click and click .
3. Select an access point from the list of available Wi-Fi connections.

64
Notebook PC E-Manual
Bluetooth
Use Bluetooth to facilitate wireless data transfers with other Bluetooth-
enabled devices.
IMPORTANT! Airplane mode The disables this feature. Ensure that
Airplane mode is turned o before enabling the Bluetooth connection of
your Notebook PC.
Pairing with other Bluetooth-enabled devices
You need to pair your Notebook PC with other Bluetooth-enabled
devices to enable data transfers. To do this, use your touchpad as
follows:
1. Launch the .Charms bar
2. Click then click Change PC Settings.
3. Under select then click PC Settings, Devices Add a Device to
search for Bluetooth-enabled devices.
Notebook PC E-Manual
67
Connecting to wired networks
You can also connect to wired networks, such as local area networks
and broadband Internet connection, using your Notebook PC’s LAN
port.
NOTE: Contact your Internet Service Provider (ISP) for details or
your network administrator for assistance in setting up your Internet
connection.
To congure your settings, refer to the following procedures.
IMPORTANT! Ensure that a network cable is connected between your
Notebook PC’s LAN port and a local area network before performing the
following actions.
Conguring a dynamic IP/PPPoE network
connection
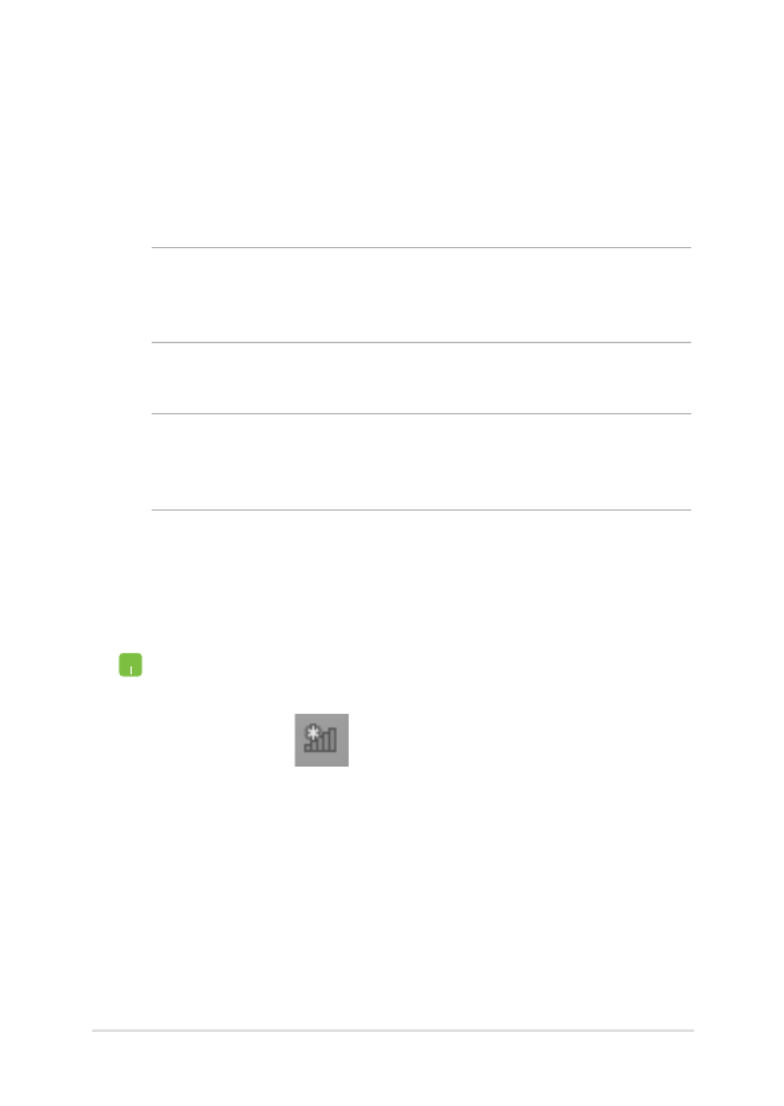
1. LaunchLaunch Desktop.
2. From the Windows ® taskbar, right-click the network
icon then click Open Network and Sharing
Center.
3. In the Network and Sharing Center window, click
Change adapter settings.
4. Right-click on your LAN then select .Properties
70
Notebook PC E-Manual
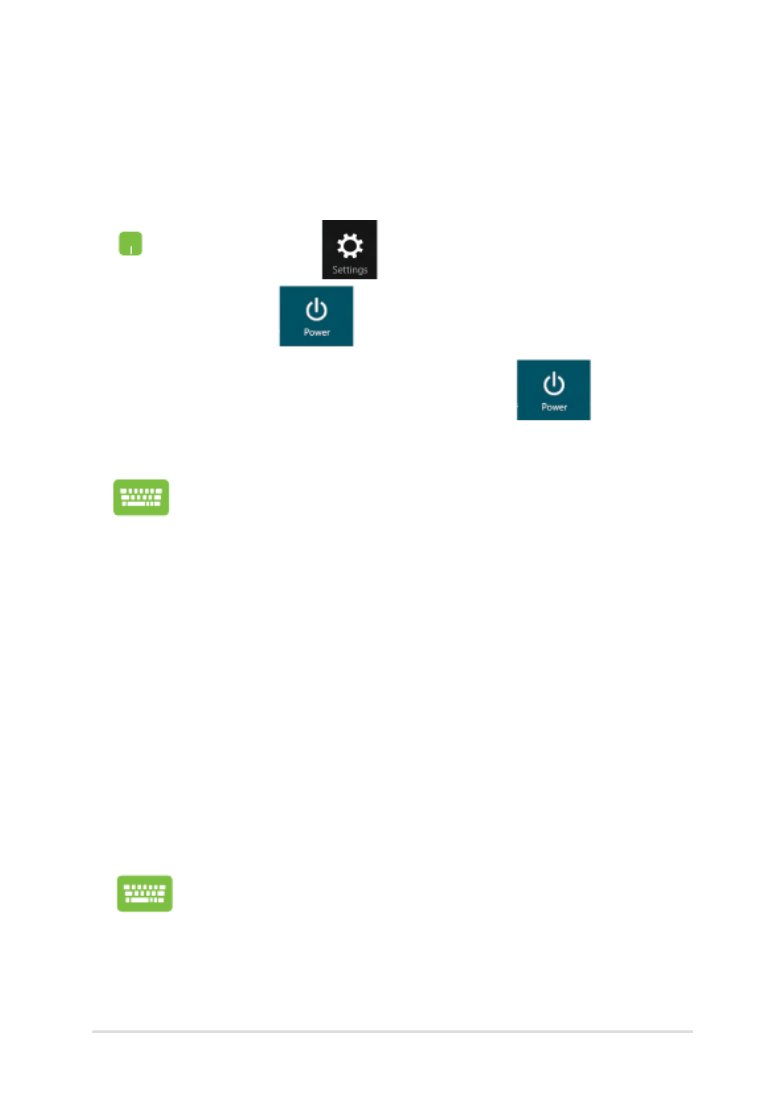
Turning your Notebook PC off
You can turn o your Notebook PC by doing either of the following
procedures:
Putting your Notebook PC to sleep
To put your Notebook PC on Sleep mode, press the power button once.
• Click from the then click Charms bar
> Shut down to do a normal shutdown.
• From the log-in screen, click > Shut
down.
• You can also shut down your Notebook PC using
Desktop mode. To do this, launch the desktop
then press to launch the Shut Down alt + f4
window. Select from the drop-down Shut Down
list then select OK.
• If your Notebook PC is unresponsive, press
and hold the power button for at least four (4)
seconds until your Notebook PC turns o.
You can also put your Notebook PC to sleep mode using
Desktop mode. To do this, launch the desktop then press
alt + f4 to launch the Shut Down window. Select Sleep
from the drop-down list then select OK.

Notebook PC E-Manual
77
3. Move the percentage slider to the left or to the
right to set the limit for charging devices.
NOTE: The default limit is set to 40% but you can set
the quick-charge limit from 20% to 99%.
4. Click to save and exit.OK
Produkt Specifikationer
| Mærke: | Asus |
| Kategori: | Laptop |
| Model: | N750JK |
Har du brug for hjælp?
Hvis du har brug for hjælp til Asus N750JK stil et spørgsmål nedenfor, og andre brugere vil svare dig
Laptop Asus Manualer

30 December 2025
4 Oktober 2024
30 September 2024
29 September 2024
18 September 2024
17 September 2024
13 September 2024
10 September 2024
8 September 2024
6 September 2024
Laptop Manualer
- Laptop Acer
- Laptop Sony
- Laptop Samsung
- Laptop Panasonic
- Laptop LG
- Laptop Apple
- Laptop HP
- Laptop Gigabyte
- Laptop Toshiba
- Laptop Lenovo
- Laptop Thomson
- Laptop Hannspree
- Laptop Razer
- Laptop Medion
- Laptop Haier
- Laptop Huawei
- Laptop Tripp Lite
- Laptop Packard Bell
- Laptop Microsoft
- Laptop Fellowes
- Laptop Xiaomi
- Laptop Viewsonic
- Laptop Dell
- Laptop Fujitsu
- Laptop MSI
- Laptop Honor
- Laptop ECS
- Laptop Prixton
- Laptop SPC
- Laptop GoClever
- Laptop VIZIO
- Laptop Atdec
- Laptop Hercules
- Laptop Airis
- Laptop EMachines
- Laptop Oregon Scientific
- Laptop Lexibook
- Laptop Kogan
- Laptop ADATA
- Laptop Micromax
- Laptop TechBite
- Laptop Alienware
- Laptop Sylvania
- Laptop Coby
- Laptop Evga
- Laptop Mpman
- Laptop Targa
- Laptop Peaq
- Laptop Ematic
- Laptop XPG
- Laptop Inovia
- Laptop Aplic
- Laptop Odys
- Laptop Ibm
- Laptop Compaq
- Laptop SIIG
- Laptop Getac
- Laptop Jay-tech
- Laptop Vulcan
- Laptop System76
- Laptop General Dynamics Itronix
- Laptop CTL
- Laptop Everex
- Laptop Olidata
- Laptop Dynabook
- Laptop Hamilton Buhl
- Laptop AORUS
- Laptop Humanscale
- Laptop Schenker
Nyeste Laptop Manualer

5 Februar 2025

12 Januar 2025
12 Januar 2025

12 Januar 2025

12 Januar 2025
12 Januar 2025
11 Januar 2025
11 Januar 2025
11 Januar 2025
10 Januar 2025