Atdec TH-3070-CTW Manual
Atdec
Flad panel støtte
TH-3070-CTW
Læs nedenfor 📖 manual på dansk for Atdec TH-3070-CTW (2 sider) i kategorien Flad panel støtte. Denne guide var nyttig for 13 personer og blev bedømt med 4.5 stjerner i gennemsnit af 2 brugere
Side 1/2
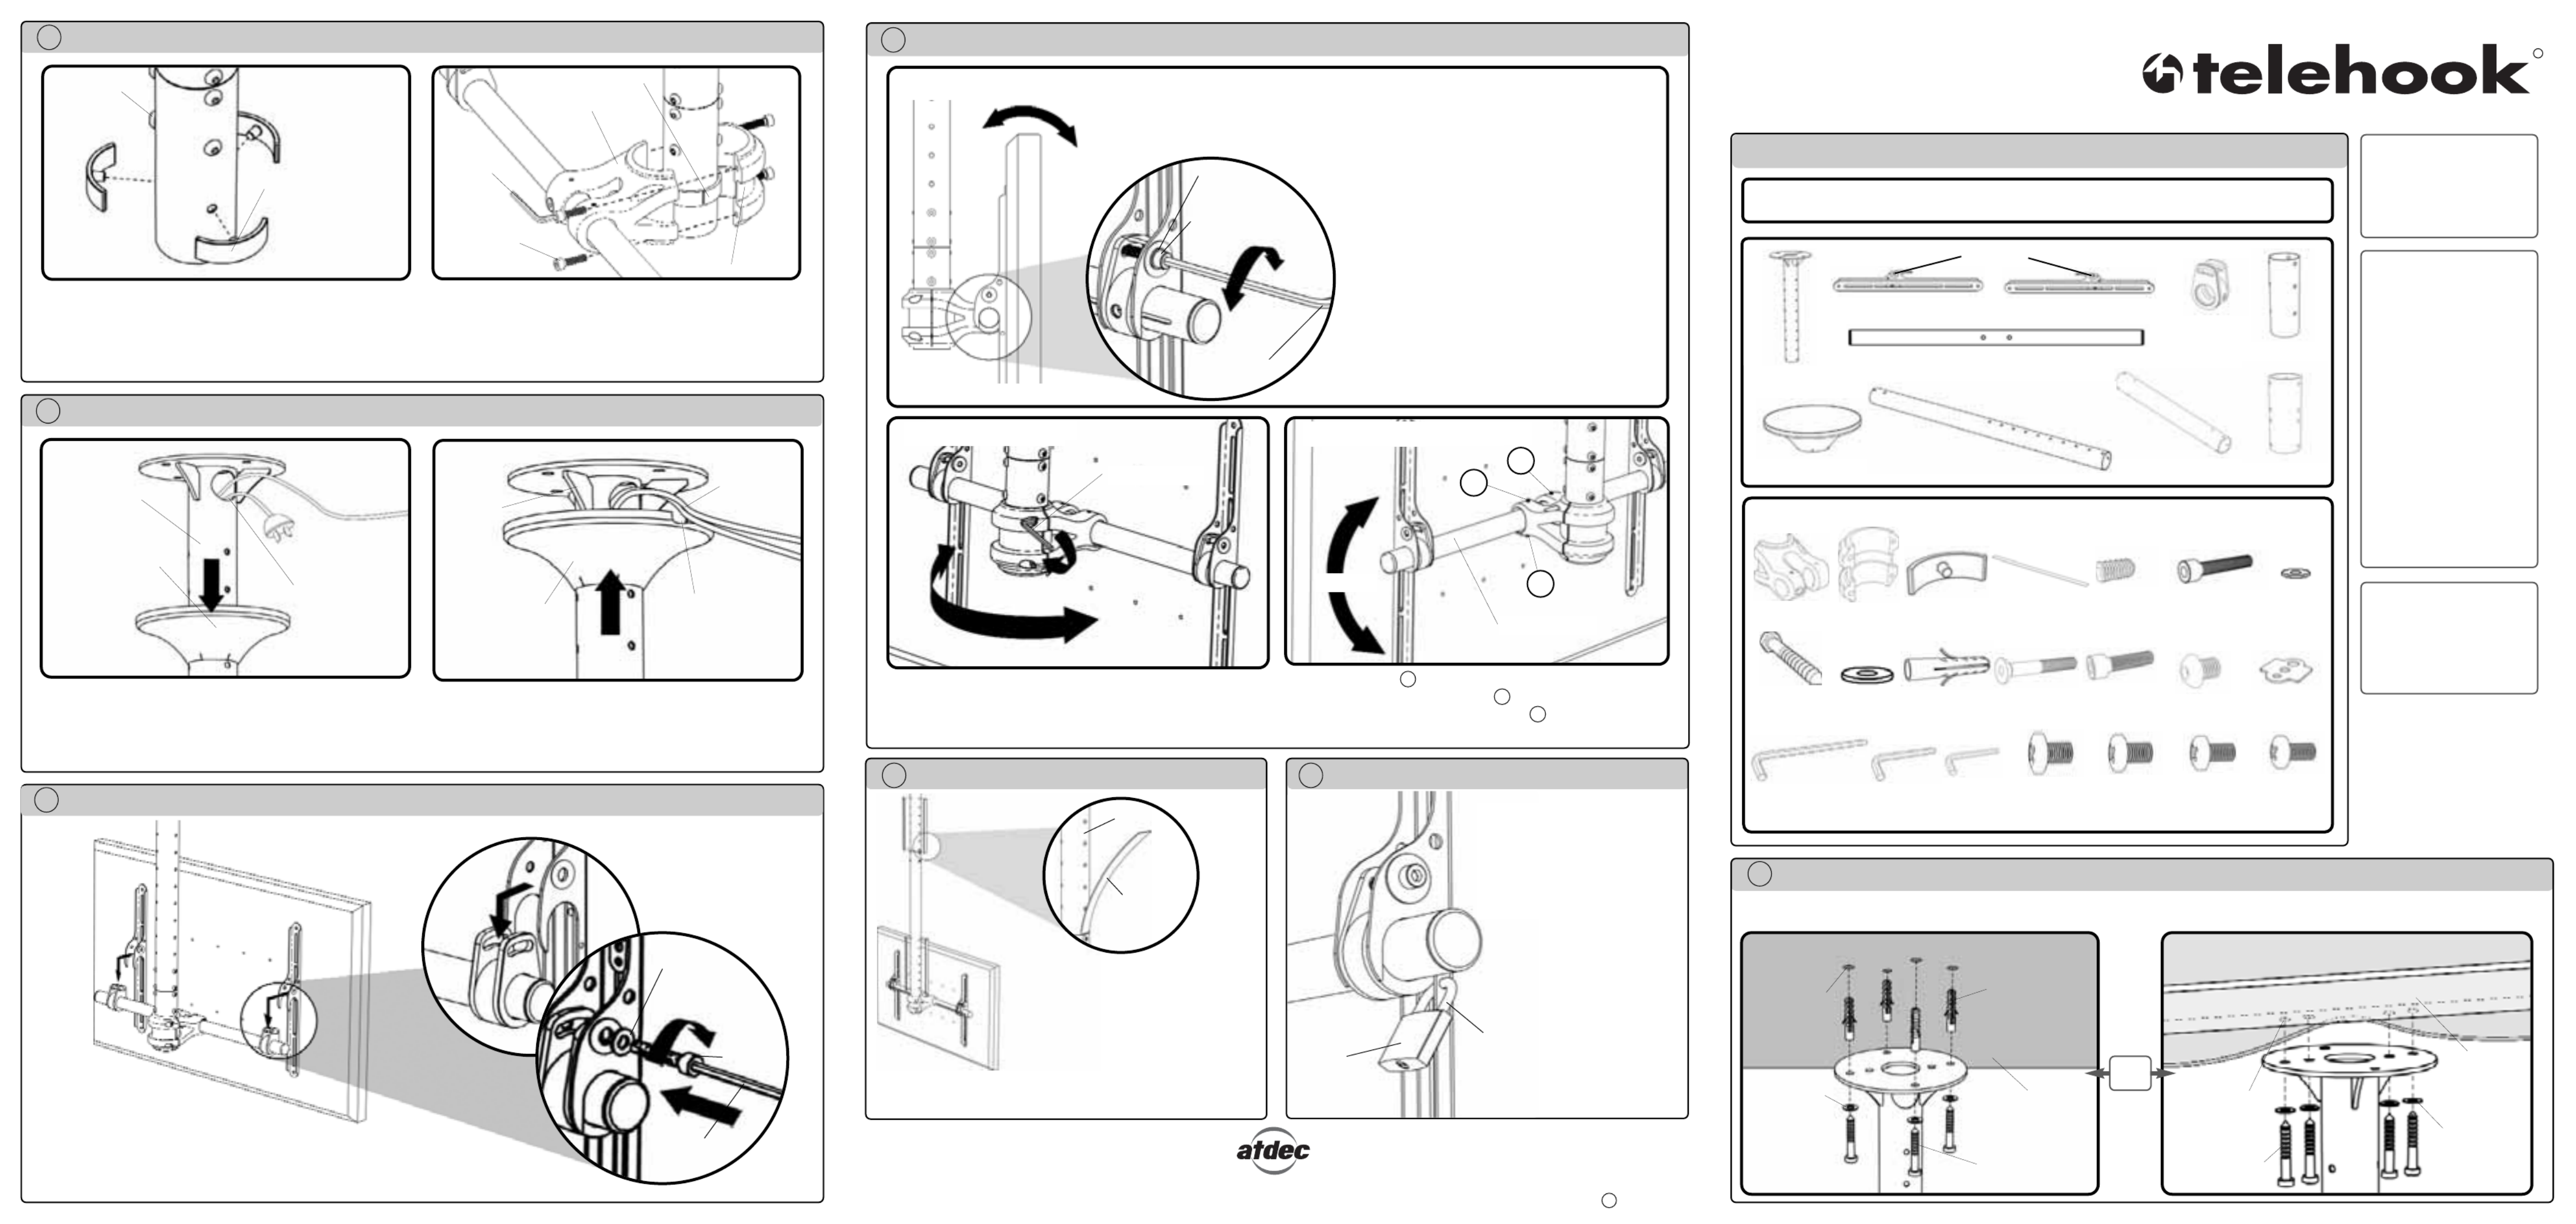
G Attaching the Mount to the Ceiling Hanger
M8x10mm
Screw
Swivel Insert
Step 1
Attach the three Swivel Inserts to the hanger in the height that
you have chosen for the mounting of the display.
Step 2
Attach the front and rear Hanger Pole Collar so that it sits on
the swivel collars as shown above. Tighten the M8x30mm
screws so that the hanger pole collars is secure, however do
not over tighten.
Note: This operation will require two persons.
Lift the display with brackets attached and hook the brackets over the
sliders. Hold the display firmly and insert the two M8x45mm screws
and tighten by using the Long 6mm Allen Key.
Note: The brackets
should rest on the
horizontal bar with the
slider between the
bracket.
I Mounting the Display
Swivel Insert
Collar Front
Collar Rear
H Attaching the Mount to the Ceiling Hanger
Ceiling
Mount
Cables
Step 1
To use the in-built cable management, remove the Ceiling
Mount Cover and feed the cables through the cable hole.
Step 2
Cut out enough space in the Ceiling Mount Cover to allow
the cables to exit from, then push the Ceiling Mount Cover
up, until in sits flush with ceiling.
Ceiling Mount
Cover
Ceiling Mount
Cover
Cables
Ceiling
Mount
Cut Out
M8x30mm
Screws
No portion of this document or any artwork contained herein should be reproduced in any way without the express written consent of Atdec Pty Ltd.
Due to continuing product development, the manufacturer reserves the right to alter specifications without notice. Published: 11.09.08 C
J Adjusting the Viewing Position of your Display
Step 1
Loosen the two M8x45mm screws, and adjust the
tilt angle of the display to the required position.
Tighten the two locking screws with the Long
6mm Allen Key provided.
WARNING: Do not attempt to adjust tilt
angle without firstly loosening locking
screws.
Doing so may damage the product.
6mm Allen Key
To adjust the pan position of the display, rotate the Hanger Pole
Collar to the desired position. Once in position, tighten all 4
M8x30mm screws as tight as possible to lock the display in
position.
Adjust grub screw 1 until the display sits level. Once the
display is level, tighten grub screw 2 until it firmly tightens onto
the horizontal bar. Tighten grub screw 3 firmly until it firmly
tightens onto the horizontal bar and prevents it from moving.
360° Rotation
Tighten
1
2
3
-5° to 5°
K Attaching the Adhesive Vinyl
Adhesive
Vinyl
M8 Small
Washer
M8x45mm
Screw
Long 6mm
Allen Key
Tighten
Loosen
-5° to 25°
Tilt
Hanger
Horizontal Bar
1. Tilt Adjust
Component Checklist
M10 Steel
Washer (x4)
Nylon Plug
(x4)
M8 x55mm
Screw
M10 Coach
Screw (x4)
A Mounting the Ceiling Mount
NOTE:
The manufacturer
does not accept
responsibility for
incorrect installation.
The installer should
satisfy himself that the
ceiling is strong
enough to support the
Telehook Flat Panel
Ceiling Mount unit of
14kgs (31lbs) plus the
maximum allowable
monitor weight of
91kgs (200lbs).
Total of 105kgs
(231lbs).
Telehook Flat Panel
Ceiling Mount
supports a maximum
weight of 91kgs
(200lbs)
TOOLS REQUIRED:
zPower Drill
z12mm (1/2”) Drill Bit
z7mm (9/32”) Drill Bit
zAdjustable wrench
Ceiling Mount
IMPORTANT:
Ensure you have received all parts against the component checklist prior to installing.
Bits Box
12mm (1/2”)
Hole
Nylon Plug
M10 Coach
Screw
Masonry
Ceiling
Masonry Mounting Option
OR
Timber Beam Mounting Option
Timber
Beam
M10 Coach
Screw
7mm (9/32”)
Hole
Inner Hanger
M8 x10mm
Screw (x24)
M6 x12mm
Grub Screw
(x3)
M10 Washer
M10 Washer
Collar Front Collar Rear Swivel Insert
(x3)
Adhesive Vinyl
Strip (x6)
M8x30mm
Screw (x4)
NOTE: Ensure all four M10 Coach Screws are used when mounting the Ceiling Mount.
Note: The Vinyl Strips may need to be cut to length
depending on the hanger configuration chosen.
The Telehook Flat Panel Ceiling Mount’s
set up is now complete. The remaining
unused holes can be covered using the
6 white adhesive vinyl strips for improved
aesthetics. Peel the backing from the
strip and apply the adhesive side onto
the hanger(s) so that they cover the
unused holes. Padlock
(not supplied)
5mm (3/16”)
diameter shackle
For added security you may
choose to attach a padlock to
one or both brackets to prevent
the theft of the display. It is
recommended that the padlock
should have a shackle diameter
of 5mm (3/16”).
L Security Option
2. Pan Adjust 3. Horizontal Adjust
Wall Mount Horizontal Bar
Slider (x2)
Hanger Joiner
Extension Hanger
Collar Joiner
TM
Installation Instructions
Flat Panel Ceiling Mount
M8 x45mm
Locking Screws
(x2)
Multi
Washer (x6)
M5 x16mm
Mounting
Screws (x6)
M6 x16mm
Mounting
Screws (x6)
M8 x16mm
Mounting
Screws (x6)
M4 x16mm
Mounting
Screws (x6)
Long 6mm
Allen Key
M8 Small
Washer
(x2)
3mm
Allen Key
5mm
Allen Key
M8 Small
Washer
M8x45mm
Screw
Long 6mm
Allen Key
Tighten
6mm Allen
Key
TH-3070- CTW
Ceiling Mount Cover
Wall Mount Bracket (Left) Wall Mount Bracket (Right)
Clinch Nuts
Produkt Specifikationer
| Mærke: | Atdec |
| Kategori: | Flad panel støtte |
| Model: | TH-3070-CTW |
Har du brug for hjælp?
Hvis du har brug for hjælp til Atdec TH-3070-CTW stil et spørgsmål nedenfor, og andre brugere vil svare dig
Flad panel støtte Atdec Manualer

30 Januar 2025
30 Januar 2025
30 Januar 2025
7 December 2024
7 December 2024
7 December 2024
7 December 2024
7 December 2024
7 December 2024
7 December 2024
Flad panel støtte Manualer
- Flad panel støtte Samsung
- Flad panel støtte HP
- Flad panel støtte One For All
- Flad panel støtte Da-Lite
- Flad panel støtte AKAI
- Flad panel støtte Zaor
- Flad panel støtte Blaupunkt
- Flad panel støtte Hitachi
- Flad panel støtte König
- Flad panel støtte Gembird
- Flad panel støtte B-Tech
- Flad panel støtte Barkan
- Flad panel støtte NewStar
- Flad panel støtte Sanus
- Flad panel støtte Luxor
- Flad panel støtte 3M
- Flad panel støtte BlueBuilt
- Flad panel støtte Tripp Lite
- Flad panel støtte Fellowes
- Flad panel støtte Digitus
- Flad panel støtte Cabstone
- Flad panel støtte HQ
- Flad panel støtte Techly
- Flad panel støtte Peerless-AV
- Flad panel støtte Dell
- Flad panel støtte NEC
- Flad panel støtte Atlantic
- Flad panel støtte Sven
- Flad panel støtte Vogel's
- Flad panel støtte Manhattan
- Flad panel støtte APart
- Flad panel støtte Ergotron
- Flad panel støtte Bretford
- Flad panel støtte BakkerElkhuizen
- Flad panel støtte Valueline
- Flad panel støtte V7
- Flad panel støtte Vision
- Flad panel støtte Panduit
- Flad panel støtte Proaim
- Flad panel støtte Iiyama
- Flad panel støtte GPX
- Flad panel støtte Chief
- Flad panel støtte My Wall
- Flad panel støtte StarTech.com
- Flad panel støtte Rocstor
- Flad panel støtte Crimson
- Flad panel støtte Kogan
- Flad panel støtte Insignia
- Flad panel støtte Konig & Meyer
- Flad panel støtte LC-Power
- Flad panel støtte AMX
- Flad panel støtte Ultimate
- Flad panel støtte CTA Digital
- Flad panel støtte Silverstone
- Flad panel støtte SunBriteTV
- Flad panel støtte Multibrackets
- Flad panel støtte Planar
- Flad panel støtte Equip
- Flad panel støtte Speaka
- Flad panel støtte Heckler
- Flad panel støtte Icy Box
- Flad panel støtte Kensington
- Flad panel støtte Nabo
- Flad panel støtte Ematic
- Flad panel støtte Ewent
- Flad panel støtte Unicol
- Flad panel støtte Wentronic
- Flad panel støtte Peerless
- Flad panel støtte Monoprice
- Flad panel støtte Gabor
- Flad panel støtte Premier
- Flad panel støtte SIIG
- Flad panel støtte Bell'O
- Flad panel støtte Premier Mounts
- Flad panel støtte Elite Screens
- Flad panel støtte Kondator
- Flad panel støtte SmartMetals
- Flad panel støtte Alogic
- Flad panel støtte Dataflex
- Flad panel støtte Anthro
- Flad panel støtte Amer
- Flad panel støtte Walker Edison
- Flad panel støtte Mount-It!
- Flad panel støtte LTN Technologies
- Flad panel støtte Helder
- Flad panel støtte NeoMounts
- Flad panel støtte DQ
- Flad panel støtte Adicam
- Flad panel støtte Ateca
Nyeste Flad panel støtte Manualer
26 Februar 2025
26 Februar 2025
26 Februar 2025
26 Februar 2025
26 Februar 2025
26 Februar 2025
26 Februar 2025
26 Februar 2025
26 Februar 2025
26 Februar 2025