BEKO DN161230DX Manual
Læs nedenfor 📖 manual på dansk for BEKO DN161230DX (189 sider) i kategorien Køleskab. Denne guide var nyttig for 12 personer og blev bedømt med 4.5 stjerner i gennemsnit af 2 brugere
Side 1/189

DN161230DX
EN DE

EN
1
Please read this user manual first!
Dear Customer,
We hope that your product, which has been produced in modern plants and checked
under the most meticulous quality control procedures, will provide you an effective service.
Therefore, read this entire user manual carefully before using the product and keep it as
a reference. If you handover the product to someone else, give the user manual as well.
The user manual will help you use the product in a fast and safe way.
• Read the manual before installing and operating the product.
• Make sure you read the safety instructions.
• Keep the manual in an easily accessible place as you may need it later.
• Read the other documents given with the product.
Remember that this user manual is also applicable for several other models. Differences
between models will be identified in the manual.
Explanation of symbols
Throughout this user manual the following symbols are used:
CImportant information or useful tips.
AWarning against dangerous conditions for life and property.
BWarning against electric voltage.

EN
2
CONTENTS
1 Your Refrigerator 3
2 Important Safety
Warnings 4
Intended use .....................................4
General safety ...................................5
For products with a ..........................9
water dispenser; ................................9
Child safety ........................................9
Compliance with WEEE Directive and
Disposing of the Waste Product: .....10
Package information ........................10
HC warning .....................................10
Things to be done for energy saving 10
Recommendations for the fresh food
compartment ...................................11
3 Installation 12
Points to be paid attention to when the
relocation of the refrigerator .............12
Electrical connection ........................12
Disposing of the packaging .............13
Disposing of your old refrigerator .....13
Placing and Installation ....................13
Adjusting the legs ............................14
Changing the illumination lamp .......14
Door Open Warning .........................14
4 Preparation 15
5 Using your refrigerator 16
Indicator Panel .................................16
Temperature setting button ..............27
Setting the temperature of your
refrigerator .......................................27
Dual cooling system ........................27
Recommendations for preservation of
frozen food ......................................28
Defrosting ........................................28
Placing the food ..............................28
Deep-freeze information ..................29
Description and cleaning of odor
filter ................................................30
Water Dispenser ..............................31
Blue light .........................................33
Sliding storage container .................33
Rotary storage container .................34
Auto Icematic .................................35
Icematic and ice storage container ..36
Making ice .......................................37
Humidity-controlled crisper (Ever
Fresh) ..............................................37
Ice-cream machine ..........................39
6 Maintenance and
cleaning 41
Protection of plastic surfaces ..........41
7 Troubleshooting 42

EN
3
1 Your Refrigerator
1. Door shelves of the freezer compartment
2. Temperature setting indicator
3. Egg section
4. Water dispenser filling tank
5. Water dispenser reservoir
6. Door shelves of fridge compartment
7. Sliding and rotary storage containers
8. Blue light
9. Adjustable legs
10. Crisper
11. Crisper cover
12. Breakfast compartment
13. Key
14. Bottle shelf
C Figures in this user manual are schematic and may not correspond exactly to you product. If
the subject parts are not included in the product you have purchased, then it is valid for other
models.
15. Odor filter
16. Glass shelves of fridge compartment
17. Illumination glass
18. Impeller
19. Automatic Icematic water tank
20. Icebox
21. Ice storage container
22. Freezer compartment glass shelf
23. Ice-cream making machine / Quick Freeze
compartment
24. Freezer compartment
25. Fridge compartment
*optional
1
4*
3
17
*16
18
2*
16
5*
*6
*6
*6
*8
*7
9
*10
*12
11
*14
*13
*13
*15
*19
*20
*21
*23
22
24
25

EN
4
2 Important Safety Warnings
Please review the
following information.
Failure to observe this
information may cause
injuries or material
damage. Otherwise, all
warranty and reliability
commitments will become
invalid.
Original spare parts will
be provided for 10 years,
following the product
purchasing date.
Intended use
A
WARNING:
Keep ventilation
openings, in the
appliance enclosure
or in the built-in
structure, clear of
obstruction.
A
WARNING:
Do not use
mechanical devices
or other means
to accelerate the
defrostingprocess,
other than those
recommended by
the manufacturer.
A
WARNING:
Do not damage the
refrigerant circuit.
A
WARNING :
Do not use electrical
appliances inside
the food storage
compartments of the
appliance, unless
they are of the type
recommended by
the manufacturer.
A
WARNING:
Do not store
e x p l o s i v e
substances such
as aerosol cans
with a flammable
propellant in this
appliance.
This appliance is intended
to be used in household
and similar applications
such as
– staff kitchen areas in
shops, offices and other
working environments;
– farm houses and by
clients in hotels, motels
and other residential type

EN
5
environments;
– bed and breakfast type
environments;
– catering and similar
non-retail applications.
General safety
• When you want to
dispose/scrap the
product, we recommend
you to consult the
authorized service
in order to learn the
required information and
authorized bodies.
• Consult your authorized
service for all your
questions and problems
related to the refrigerator.
Do not intervene or let
someone intervene to
the refrigerator without
notifying the authorised
services.
• For products with a
freezer compartment;
Do not eat cone ice
cream and ice cubes
immediately after you
take them out of the
freezer compartment!
(This may cause frostbite
in your mouth.)
• For products with a
freezer compartment;
Do not put bottled
and canned liquid
beverages in the
freezer compartment.
Otherwise, these may
burst.
• Do not touch frozen food
by hand; they may stick
to your hand.
• Unplug your refrigerator
before cleaning or
defrosting.
• Vapor and vaporized
cleaning materials should
never be used in cleaning
and defrosting processes
of your refrigerator. In
such cases, the vapor
may get in contact with
the electrical parts and
cause short circuit or
electric shock.
• Never use the parts on
your refrigerator such as
the door as a means of
support or step.
• Do not use electrical
devices inside the
refrigerator.
• Do not damage the
parts, where the
refrigerant is circulating,
with drilling or cutting
tools. The refrigerant

EN
6
that might blow out
when the gas channels
of the evaporator, pipe
extensions or surface
coatings are punctured
causes skin irritations
and eye injuries.
• Do not cover or block
the ventilation holes on
your refrigerator with any
material.
• Electrical devices must
be repaired by only
authorised persons.
Repairs performed by
incompetent persons
create a risk for the user.
• In case of any failure or
during a maintenance or
repair work, disconnect
your refrigerator’s mains
supply by either turning
off the relevant fuse
or unplugging your
appliance.
• Do not pull by the cable
when pulling off the plug.
• Ensure highly alcoholic
beverages are stored
securely with the lid
fastened and placed
upright.
• Never store spray
cans containing
flammable and explosive
substances in the
refrigerator.
• Do not use mechanical
devices or other means
to accelerate the
defrosting process,
other than those
recommended by the
manufacturer.
• This product is not
intended to be used by
persons with physical,
sensory or mental
disorders or unlearned
or inexperienced people
(including children) unless
they are attended by
a person who will be
responsible for their
safety or who will instruct
them accordingly for use
of the product
• Do not operate a
damaged refrigerator.
Consult with the service
agent if you have any
concerns.
• Electrical safety of your
refrigerator shall be
guaranteed only if the
earth system in your
house complies with
standards.

EN
7
• Exposing the product
to rain, snow, sun and
wind is dangerous with
respect to electrical
safety.
• Contact authorized
service when there is a
power cable damage to
avoid danger.
• Never plug the
refrigerator into the wall
outlet during installation.
Otherwise, risk of death
or serious injury may
arise.
• This refrigerator is
intended for only storing
food items. It must not
be used for any other
purpose.
• Label of technical
specifications is located
on the left wall inside the
refrigerator.
• Never connect your
refrigerator to electricity-
saving systems; they
may damage the
refrigerator.
• If there is a blue light on
the refrigerator, do not
look at the blue light with
optical tools.
• For manually controlled
refrigerators, wait for at
least 5 minutes to start
the refrigerator after
power failure.
• This operation manual
should be handed in to
the new owner of the
product when it is given to
others.
• Avoid causing damage
on power cable when
transporting the
refrigerator. Bending cable
may cause fire. Never
place heavy objects on
power cable. Do not
touch the plug with wet
hands when plugging the
product
• Do not plug the
refrigerator if the wall
outlet is loose.
• Water should not be
sprayed on inner or outer
parts of the product for
safety purposes.

EN
8
• Do not spray substances
containing inflammable
gases such as propane
gas near the refrigerator
to avoid fire and explosion
risk.
• Never place containers
filled with water on top of
the refrigerator; in the event
of spillages, this may cause
electric shock or fire.
• Do not overload the
refrigerator with food. If
overloaded, the food items
may fall down and hurt you
and damage refrigerator
when you open the door.
• Never place objects on
top of the refrigerator;
otherwise, these objects
may fall down when
you open or close the
refrigerator’s door.
• As they require a precise
temperature, vaccines,
heat-sensitive medicine
and scientific materials and
etc. should not be kept in
the refrigerator.
• If not to be used for a long
time, refrigerator should
be unplugged. A possible
problem in power cable
may cause fire.
• Refrigerator may move
if adjustable legs are not
properly secured on the
floor. Properly securing
adjustable legs on the
floor can prevent the
refrigerator to move.
• When carrying the
refrigerator, do not hold
it from door handle.
Otherwise, it may be
snapped.
• When you have to place
your product next to
another refrigerator or
freezer, the distance
between devices
should be at least 8cm.
Otherwise, adjacent side
walls may be humidified.
• The product shall never
be used while the
compartment which is
located at the top or
back of your product
and in which electronic
boards are available
(electronic board box
cover) (1) is open.

EN
9
1
1
For products with a
water dispenser;
• Pressure for cold water
inlet shall be maximum
90 psi (6.2 bar). If your
water pressure exceeds
80 psi (5.5 bar), use a
pressure limiting valve
in your mains system. If
you do not know how
to check your water
pressure, ask for the
help of a professional
plumber.
• If there is risk of water
hammer effect in your
installation, always
use a water hammer
prevention equipment
in your installation.
Consult Professional
plumbers is you are not
sure that there is no
water hammer effect in
your installation.
• Do not install on the
hot water inlet. Take
precautions against
of the risk of freezing
of the hoses. Water
temperature operating
interval shall be 33°F
(0.6°C) minimum
and 100°F (38°C)
maximum.
• Use only potable water.
Child safety
• If the door has a lock, the
key should be kept away
from reach of children.
• Children must be
supervised to prevent
them from tampering
with the product.

EN
10
Compliance with WEEE
Directive and Disposing of
the Waste Product:
This product complies with
EU WEEE Directive (2012/19/
EU). This product bears a
classification symbol for
waste electrical and electronic
equipment (WEEE).
This product has been
manufactured with high quality parts and
materials which can be reused and are
suitable for recycling. Therefore, do not
dispose the product with normal domestic
waste at the end of its service life. Take
it to a collection point for the recycling of
electrical and electronic equipment. Please
consult your local authorities to learn the
nearest collection point. Help protect the
environment and natural resources by
recycling used products. For children’s
safety, cut the power cable and break the
locking mechanism of the door, if any, so
that it will be non-functional before disposing
of the product.
Package information
Packaging materials of the product
are manufactured from recyclable
materials in accordance with our National
Environment Regulations. Do not dispose
of the packaging materials together with
the domestic or other wastes. Take them
to the packaging material collection points
designated by the local authorities.
Do not forget...
Any recycled substance is an indispensable
matter for nature and our national asset
wealth.
If you want to contribute to the re-
evaluation of the packaging materials,
you can consult to your environmentalist
organizations or the municipalities where
you are located.
HC warning
If your product's cooling system
contains R600a:
This gas is flammable. Therefore, pay
attention to not damaging the cooling
system and piping during usage and
transportation. In the event of damage,
keep your product away from potential fire
sources that can cause the product catch a
fire and ventilate the room in which the unit
is placed.
Ignore this warning if your product's
cooling system contains R134a.
Type of gas used in the product is stated in
the type label which is on the left wall inside
the refrigerator.
Never throw the product in fire for disposal.
Things to be done for
energy saving
• Do not leave the doors of your refrigerator
open for a long time.
• Do not put hot food or drinks in your
refrigerator.
• Do not overload your refrigerator so
that the air circulation inside of it is not
prevented.
• Do not install your refrigerator under direct
sunlight or near heat emitting appliances
such as ovens, dishwashers or radiators.
Keep your refrigerator at least 30cm away
from heat emitting sources and at least
5cm from electrical ovens.
• Pay attention to keep your food in closed
containers.

EN
11
• For products with a freezer compartment;
You can store maximum amount of
food items in the freezer when you
remove the shelf or drawer of the freezer.
Energy consumption value stated for
your refrigerator has been determined
by removing freezer shelf or drawer and
under maximum load. There is no harm
to use a shelf or drawer according to the
shapes and size of food to be frozen.
• Thawing frozen food in fridge
compartment will both provide energy
saving and preserve the food quality.
Recommendations for the
fresh food compartment
*May not be available in all models
Do not allow the food to touch the
temperature sensor in fresh food
compartment. To allow the fresh food
compartment keep its ideal storage
temperature, sensor must not be hindered
by food.
Do not place hot foods in the product.
EN
12
3 Installation
B In case the information which are given
in the user manual are not taken into
account, manufacturer will not assume
any liability for this.
Points to be paid attention
to when the relocation of the
refrigerator
1. Your refrigerator should be
unplugged.Before transportation of your
refrigerator, it should be emptied and
cleaned.
2. Before it is re-packaged, shelves,
accessories, crisper, etc. inside your
refrigerator should be fixed with adhesive
tape and secured against impacts.
Package should be bound with a thick
tape or sound ropes and the transportation
rules on the package should be strictly
observed.
3. Original packaging and foam
materials should be kept for future
transportations or moving.
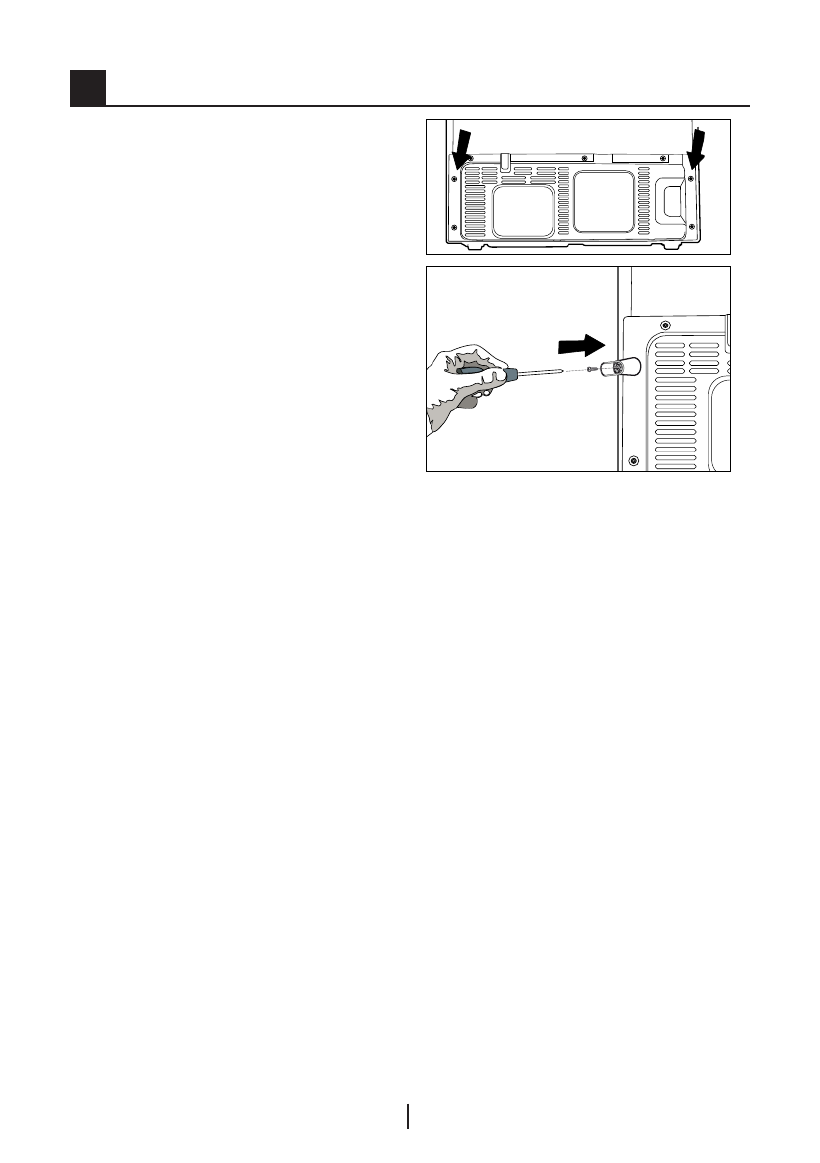
Before you start the refrigerator,
Check the following before you start to
use your refrigerator:
1. Attach 2 plastic wedges as
illustrated below. Plastic wedges are
intended to keep the distance which will
ensure the air circulation between your
refrigerator and the wall. (The picture is
drawn up as a representation and it is not
identical with your product.)
2. Clean the interior of the refrigerator
as recommended in the “Maintenance and
cleaning” section.
3. Connect the plug of the refrigerator
to the wall socket. When the fridge door is
opened, fridge internal lamp will turn on.
4. When the compressor starts to
operate, a sound will be heard. The liquid
and gases sealed within the refrigeration
system may also give rise to noise, even if
the compressor is not running and this is
quite normal.
5. Front edges of the refrigerator
may feel warm. This is normal. These
areas are designed to be warm to avoid
condensation.
Electrical connection
Connect your product to a grounded
socket which is being protected by a fuse
with the appropriate capacity.
Important:
The connection must be in compliance
with national regulations.
• The power plug must be easily accessible
after installation.
• Electrical safety of your refrigerator shall be
guaranteed only if the earth system in your
house complies with standards.

EN
13
• The voltage stated on the label located at
left inner side of your product should be
equal to your network voltage.
• Extension cables and multi plugs must not
be used for connection.
B A damaged power cable must be
replaced by a qualified electrician.
B Product must not be operated before it is
repaired! There is the risk of electric shock!
Disposing of the packaging
The packing materials may be dangerous
for children. Keep the packing materials out
of the reach of children or dispose of them
by classifying them in accordance with
the waste instructions stated by your local
authorities. Do not throw away with regular
house waste, throw away on packaging
pick up spots designated by the local
authorities.
The packing of your refrigerator is
produced from recyclable materials.
Disposing of your old
refrigerator
Dispose of your old refrigerator without
giving any harm to the environment.
• You may consult your authorized dealer
or waste collection center of your
municipality about the disposal of your
refrigerator.
Before disposing of your refrigerator, cut
out the electric plug and, if there are any
locks on the door, make them inoperable in
order to protect children against any danger.
Placing and Installation
A If the entrance door of the room where
the refrigerator will be installed is not wide
enough for the refrigerator to pass through,
then call the authorized service to have
them remove the doors of your refrigerator
and pass it sideways through the door.
1. Install your refrigerator to a place
that allows ease of use.
2. Keep your refrigerator away from
heat sources, humid places and direct
sunlight.
3. There must be appropriate air
ventilation around your refrigerator in
order to achieve an efficient operation. If
the refrigerator is to be placed in a recess
in the wall, there must be at least 5 cm
distance with the ceiling and at least 5 cm
with the wall. Do not place your product on
the materials such as rug or carpet.
4. Place your refrigerator on an even
floor surface to prevent jolts.

EN
14
Adjusting the legs
If your refrigerator is unbalanced;
You can balance your refrigerator by
turning its front legs as illustrated in the
figure. The corner where the leg exists is
lowered when you turn in the direction of
black arrow and raised when you turn in
the opposite direction. Taking help from
someone to slightly lift the refrigerator will
facilitate this process.
Changing the illumination
lamp
To change the Bulb/LED used for
illumination of your refrigerator, call your
AuthorisedService.
The lamp(s) used in this appliance is not
suitable for household room illumination.
The intended purpose of this lamp is to
assist the user to place foodstuffs in the
refrigerator/freezer in a safe and comfortable
way.The lamps used in this appliance have
to withstand extreme physical conditions
such as temperatures below -20 °C.
(only chest and upright freezer)
Door Open Warning
*May not be available in all models
An audio warning signal will be given when
the door of your product is left open for at
least 1 minute. This warning will be muted
when the door is closed or any of the display
buttons (if any) are pressed.

EN
15
4 Preparation
• Your cooler/freezer should be installed at
least 30 cm away from heat sources such
as hobs, ovens, central heater and stoves
and at least 5 cm away from electrical
ovens and should not be located under
direct sunlight.
• Please make sure that the interior of your
cooler/freezer is cleaned thoroughly.
• If two coolers are to be installed side
by side, there should be at least 2 cm
distance between them.
• When you operate your cooler/freezer for
the first time, please observe the following
instructions during the initial six hours.
• Its door should not be opened frequently.
• It must be operated empty without placing
any food in it.
• Do not unplug your cooler/freezer.
If a power failure occurs out of your
control, please see the warnings in
the “Recommended solutions for the
problems” section.
• The baskets/drawers that are provided
with the chill compartment must always
be in use for low energy consumption and
for better storage conditions.
• Food contact with the temperature sensor
in the freezer compartment may increase
energy consumption of the appliance.
Thus any contact with the sensor(s) must
be avoided.
• This product has been designed to
function at ambient temperatures up to
43 °C (90 SDgrF). Even if the ambient
temperature falls to -15 °C, frozen food
in the freezer does not thaw thanks to its
Advanced Electronic Temperature Control
System. For the first installation, the
product should NOT be placed under low
ambient temperatures. This is because
the freezer cannot go down to standard
operation temperature. When reaching
continuous operation, the product can be
moved to another place. Thus, later you
can place your product in the garage or
an unheated room without the concern
of causing frozen food to get rotten.
However, it is likely that above mentioned
low temperatures may cause the freezing
of the food in the fridge compartment;
thus, please consume the food items in
the fridge in a controlled way as needed.
When ambient temperature goes back to
normal, you may change button setting
according to your need.
• If the ambient temperature is below 0°C,
the food in fridge compartment will freeze.
Therefore, we recommend not using the
fridge compartment in such low ambient
temperatures. You may continue to use
the freezer compartment as usual.
• In some models, the instrument panel
automatically turns off 5 minutes after
the door has closed. It will be reactivated
when the door has opened or pressed on
any key.
• Due to temperature change as a result of
opening/closing the product door during
operation, condensation on the door/
body shelves and the glass containers is
normal.

EN
16
Indicator Panel
Indicator panels may vary depending on your product's model.
The Indicator panel aids in using your refrigerator with its audio and visual functions.
(in some models)
5 Using your refrigerator
1 7 3
45*62
1. Freezer Compartment Temperature
Setting Indicator
2. Freezer Compartment Temperature
Setting Button
3. Fridge Compartment Temperature
Setting Indicator
4. Fridge Compartment Temperature
Setting Button
5. Economy Mode Indicator
6. Ionizer Indicator
7. Error Status Indicator
*optional
C Figures in this user manual are schematic and may not correspond exactly to you
product. If the subject parts are not included in the product you have purchased, then
it is valid for other models.

EN
17
1. Freezer Compartment Temperature
Setting Indicator
Indicates the temperature set for freezer
compartment.
2. Freezer Compartment Temperature
Setting Button
Press this button to set the temperature of
the freezer compartment to -18, -20, -22,
-24, -18... respectively. Press this button to
set the desired temperature for the freezer
compartment.
3. Fridge Compartment Temperature
Setting Indicator
Indicates the temperature set for Fridge
compartment.
4. Fridge Compartment Temperature
Setting Button
Press this button to set the temperature
of the fridge compartment to 8, 6, 4, 2,
8... respectively. Press this button to set
the desired temperature for the fridge
compartment.
5. Economy Mode Indicator
Indicates that the refrigerator is running in
energy-efficient mode.
6- Ionizer Indicator
Indicator light lights up continuously.
This light indicates that your refrigerator is
protected against the bacteria.
7. Error Status Indicator
If your refrigerator does not cool
adequately or if there is a sensor failure,
this indicator will be activated. When this
indicator is active, Freezer Compartment
Temperature indicator will display "e" and
Fridge Compartment Temperature Indicator
will display numbers such as "1,2,3…".
These numbers on the indicator provide
information about the error to the service
personnel.

EN
18
Indicator panels may vary depending on the model of your product.
Audial and visual functions of the indicator panel will assist in using the product.
45
76
8
9
1 2 3
1. Cooler compartment indicator
2. Error status indicator
3. Temperature indicator
4. Vacation function button
5. Temperature adjustment button
6. Compartment selection button
7. Cooler compartment indicator
8. Economy mode indicator
9. Vacation function indicator
*optional
C Figures in this user manual are schematic and may not correspond exactly to you product. If
the subject parts are not included in the product you have purchased, then it is valid for other
models.

EN
19
1. Cooler compartment indicator
The freezer compartment light will turn on
when adjusting the cooler compartment
temperature.
2. Error status indicator
This sensor will activate if the refrigerator is
not cooling adequately or in case of sensor
fault. When this indicator is active, the
freezer compartment temperature indicator
will display "E" and the cooler compartment
temperature indicator will display "1, 2, 3..."
etc. numbers.
The numbers on the indicator serve to
inform the service personnel about the fault.
( )
3. Temperature indicator
Indicates the temperature of the freezer
and cooler compartments.
4.Vacation function button
To activate this function, press and hold
the Vacation button for 3 seconds. When
the Vacation function is active, the cooler
compartment temperature indicator displays
the inscription "- -" and no cooling process
will be active in the cooling compartment.
This function is not suitable to keep
food in the cooler compartment. Other
compartments will remain cooled with
the respective temperature set for each
compartment.
Push the vacation function button again to
cancel this function. ( )
5. Temperature adjustment button
Respective compartment's temperature
varies in -24°C..... -18°C and 8°C...1°C
ranges.( )
6. Compartment selection button
Use the refrigerator compartment selection
button to toggle between the cooler and
freezer compartments.( )
7. Cooler compartment indicator
The cooler compartment light will turn on
when adjusting the cooler compartment
temperature.
8. Economy mode indicator
Indicates the refrigerator is running on
energy-saving mode. This indicator will be
active when the temperature in the freezer
compartment is set to -18°C. ( )
9.Vacation function indicator
Indicates the vacation function is active.(
)

EN
20
1. Freezer Compartment Temperature
Setting Button
2. Fridge Compartment Temperature Setting
Button
3. Error Status Indicator
4. Key Lock indicator
5. Eco Extra Function Indicator
6. Eco Extra / Vacation Button
7. Vacation Function Indicator
8. Energy saving function (display off)
9. Icematic Off Indicator (*in some models)
10. Economic Usage Indicator
11. Quick Fridge Function Indicator
12. Quick Fridge Function Button
13. Fridge Compartment Temperature Setting
Indicator
14. Quick Freeze Function Button Icematic
On-Off Button (3")
15. Freezer Compartment Temperature
Setting Indicator
16. Quick Freeze Function Indicator
C Figures in this user manual are schematic and may not correspond exactly to you product. If
the subject parts are not included in the product you have purchased, then it is valid for other
models.
*optional
15
14
1
2
3
4
5
13
12
11
10
9
8*
*
7
6

EN
21
1. Freezer Compartment Temperature
Setting Button
This function allows you to set the
temperature of freezer compartment. Press
this button to set the temperature of the
freezer compartment to -18, -19, -20, -21
-22, -23 and -24, respectively.
2. Fridge Compartment Temperature
Setting Button
function allows you to set the fridge
compartment’s temperature. Press this
button to set the temperature of the fridge
compartment to 8, 7, 6, 5, 4, 3, 2 degrees,
respectively.
3. Error Status Indicator
If your refrigerator does not cool
adequately or if there is a sensor failure,
this indicator will be activated. When this
indicator is active, Freezer Compartment
Temperature indicator will display "E" and
Fridge Compartment Temperature Indicator
will display numbers such as "1,2,3…".
These numbers on the indicator provide
information about the error to the service
personnel.
When you place hot food into the freezer
compartment or if you leave the door open
for a long time, exclamation mark can
illuminate for some time. This is not a failure;
this warning will disappear when the food
cools down.
4. Key Lock Indicator
Use this function if you do not want your
refrigerator temperature setting changed.
Press Fridge compartment temperature
setting button and Freezer compartment
temperature setting button simultaneously
for a long time (3 sec) to activate this
function.
5. Eco Extra Function Indicator
It indicates that the Eco-Extra function is
active.
If this function is active, your refrigerator
will automatically detect the least usage
periods and energy-efficient cooling will be
performed during those times. Economy
indicator will be active while energy-efficient
cooling is performed.
Press the relevant button again to
deactivate this function.
6. Eco Extra/Vacation Button
Press this button briefly to activate the Eco
Extra function. Press and hold this button
for 3 sec. to activate the Vacation function.
Press this button again to deactivate the
selected function.
7. Vacation Function Indicator
Indicates that the vacation function is
active. If this function is active, "- -" appears
on the indicator of the fridge compartment
and no cooling is performed in the fridge
compartment. Other compartments will
continue to be cooled in accordance with
the temperature set for them.
Press the relevant button again to
deactivate this function.
8. Energy saving function (display off)
If the product doors are kept closed
for a long time energy saving function is
automatically activated and energy saving
symbol is illuminated.When energy saving
function is activated, all symbols on the
display other than energy saving symbol will
turn off. When the Energy Saving function
is activated, if any button is pressed or the
door is opened, energy saving function will
be canceled and the symbols on display will
return to normal.
Energy saving function is activated
during delivery from factory and cannot be
canceled.
9. Icematic Off Indicator
Icematic will not run when the indicator of
this function is active.
To activate the ice off function, you need
to press and hold the quick freeze button
for 3 seconds.
10. Economic Usage Indicator
Indicates that the refrigerator is running
in energy-efficient mode. This indicator
will be active if the Freezer Compartment
temperature is set to -18 or the energy
efficient cooling is being performed due to
Eco-Extra function.

EN
22
11. Quick Fridge Function Indicator
This symbol flashes in an animated style
when the Quick Fridge function is active.
12. Quick Fridge Function Button
When you press the Quick Fridge button,
the temperature of the compartment will be
colder than the adjusted values.
This function can be used for food placed
in the fridge compartment and required to
be cooled down rapidly.
If you want to cool large amounts of fresh
food, it is recommended to activate this
feature before putting the food into the
fridge.
Quick Fridge indicator turns on when the
Quick Fridge function is on. To cancel this
function, press Quick Fridge button again.
If you do not cancel it, Quick Fridge will
cancel itself automatically after 4 hours or
when the fridge compartment reaches to
the required temperature.
This function is not recalled when power
restores after a power failure.
13. Fridge Compartment Temperature
Setting Indicator
Indicates the temperature set for the
Fridge Compartment.
14. Quick Freeze Function Button
Icematic On-Off Button (3")
Indicates the temperature set for the
Freezer Compartment.
To stop ice formation, press Icematic on-
off button for 3 seconds. Water flow from
water tank will stop when this function is
selected. However, ice made previously can
be taken from the Icematic. To restart ice
formation, press Icematic on-off button for
3 seconds.
15. Freezer Compartment Temperature
Setting Indicator
Fast Freeze indicator turns on when the
Fast Freeze function is active. To cancel
this function, press Fast Freeze button
again. Quick Freeze indicator will turn off
and return to its normal settings. If you
do not cancel it, Fast Freeze will cancel
itself automatically after 8 hours or when
the freezer compartment reaches to the
required temperature.
If you want to freeze large amounts of
fresh food, press the Fast Freeze button
before putting the food into the freezer
compartment.
If you press the Fast Freeze button
repeatedly with short intervals, the electronic
circuit protection will be activated and the
compressor will not start up immediately.
This function is not recalled when power
restores after a power failure.
16. Quick Freeze Function Indicator
This symbol flashes in an animated style
when the Fast Freeze function is active.

EN
23
4
2
1
20
19
6
5
22
18
16
21
10
11
9
3
13
15
7
17
*8
14
12
1. Freezer Compartment Temperature
Setting Indicator
2. Freezer Compartment Temperature
Setting Function
3. Quick Freeze Function Button Icematic
On-Off Button (3")
4. Quick Freeze Function Indicator
5. Fridge Compartment Temperature Setting
Indicator
6. Fridge Compartment Temperature Setting
Function
7. Quick Fridge Function Button
8. Icematic Off Indicator (*in some models)
9. Eco-Fuzzy (Special Economic Usage)
Function
10. Eco-Fuzzy (Special Economic Usage)
Indicator
11. Vacation Function
12. Vacation Function Indicator
13. Energy Efficiency Function
14. Energy Efficiency Indicator
15. Key Lock Function
16. Key Lock indicator
17. Economic Usage Indicator
18. High Temperature/Error Warning Indicator
19. Ice Cream Mode Selection Function
20. Ice Cream Mode Selection Indicator
21. Ice Cream Indicator
22. Quick Fridge Indicator
*optional
C Figures in this user manual are schematic and may not correspond exactly to you product. If
the subject parts are not included in the product you have purchased, then it is valid for other
models.

EN
24
1. Freezer Compartment Temperature
Indicator
Indicates the temperature set for Freezer
Compartment.
2.Freezer Compartment Temperature
Setting Function
This function allows you to set the
temperature of freezer compartment. Press
this button to set the temperature of the
freezer compartment to -18, -19, -20, -21
-22, -23 and -24, respectively.
3. Quick Freeze Function Button
Icematic On-Off Button (3”)
Quick Freeze indicator is illuminated when
the Quick Freeze function is active. To
cancel this function, press Quick Freeze
button again. Quick Freeze indicator will
turn off and return to its normal settings.
If you do not cancel it, Quick Freeze will
cancel itself automatically after 4 hours or
when the freezer compartment reaches
the required temperature. If you want to
freeze large amounts of fresh food, press
the Quick Freeze button before putting the
food into the freezer compartment. If you
press the Quick Freeze button repeatedly
with short intervals, the electronic circuit
protection will be activated and the
compressor will not start up immediately.
This function is not recalled when power
restores after a power failure!
4. Quick Freeze Function Indicator
This symbol flashes in an animated style
when the Quick Freeze function is active.
5. Fridge Compartment Temperature
Setting Indicator
Indicates the temperature set for the
Fridge Compartment.
6. Fridge Compartment Temperature
Setting Function
function allows you to set the fridge
compartment’s temperature. Press this
button to set the temperature of the fridge
compartment to 8, 7, 6, 5, 4, 3, 2 degrees,
respectively.
7. Quick Fridge Function Button
When you press the Quick Fridge button,
the temperature of the compartment will
be colder than the adjusted values. This
function can be used for food required
to be cooled down rapidly in the fridge
compartment. If you want to cool large
amounts of fresh food, it is recommended
to activate this function before putting the
food into the fridge. Quick Fridge indicator is
illuminated when the Quick Fridge function
is active. To cancel this function, press Quick
Fridge button again. Quick Fridge indicator
will turn off and return to its normal settings.
If you do not cancel it, Quick Fridge function
will cancel itself automatically after 2 hours
or when the fridge compartment reaches
the required temperature.
This function is not recalled when power
restores after a power failure.
8. Icematic Off Indicator
Icematic will not run when the indicator of
this function is active.
To activate the ice off function, you need
to press and hold the quick freeze button
for 3 seconds.
9. Eco-Fuzzy (Special Economic
Usage) Function
When you press Eco-Fuzzy button, Eco
Fuzzy Function will be activated and Eco-
Fuzzy Indicator will illuminate. Refrigerator
will start operating in the most economic
mode at least 6 hours later and the
economic usage indicator will turn on when
the function is active. To deactivate the Eco
Fuzzy function, You need to press on the
Eco-Fuzzy button again.
10. Eco-Fuzzy (Special Economic
Usage) Indicator
This symbol illuminates when the Eco-
Fuzzy Function is active.

EN
25
11. Vacation Function
Press and hold Eco Fuzzy button for 3
seconds to activate Vacation Function and
illuminate Vacation Indicator. The cooling
of Fridge Compartment is stopped and
temperature of Fridge Compartment is fixed
to 15 degrees to prevent bad odors. When
this function is active, Fridge Compartment
Temperature Indicator will not display
the temperature. To deactivate Vacation
Function, press and hold Eco-Fuzzy button
for 3 seconds.
12. Vacation Function Indicator
This indicator illuminates when Vacation
Function is active.
13. Energy Saving Function
When you press Energy Efficiency button,
Energy Efficiency Function will be activated
and Energy Efficiency Indicator will illuminate.
When Energy Efficiency Function is active,
all indicators, except for Energy Efficiency
Indicator, will turn off. This function will be
deactivated when any button is pressed
or door is opened; display indicators will
return normal settings and Energy Efficiency
Indicator will stay illuminated. If you do not
press any button or open the door within 5
minutes when Energy Efficiency Indicator is
still illuminated, Energy Efficiency Function
will be activated again and display indicators
will turn off. If you press Energy Efficiency
button when the function is not active but
the indicator is still illuminated, this will
deactivate Energy Efficiency function and
turn off Energy Efficiency Indicator.
14. Energy Saving Indicator
This indicator illuminates when Energy
Efficiency Function is selected.
15. Key Lock Function
When you press and hold Key Lock
button for 3 seconds, Key Lock Function
will be activated and Key Lock Indicator will
illuminate. No button will operate when this
function is active. Press and hold Key Lock
button for 3 seconds again to deactivate
this function.
16. Key Lock Indicator
This indicator will illuminate when Key
Lock Function is active.
17. Economic Usage Indicator
Economic Usage Indicator turns on when
the Freezer Compartment is set to -18 C. °
When Quick Freeze or Quick Fridge is
selected, Economic Usage Indicator will not
illuminate.
18. High Temperature/Error Warning
Indicator
This light illuminates during high
temperature failures and error warnings.
19. Ice Cream Mode Selection
Function
When the Ice Cream button is pressed for
3 seconds; it will flash.
If this button is not pressed again in 30
seconds, display will return to its previous
view, Ice Cream mode selection indicators
will turn off.
With every short press of the Ice Cream
button, the number will increase by one.
When the Ice Cream button is pressed
again for 3 seconds, Ice Cream symbol
on the display will turn on again. Thus, Ice
Cream mode is selected and the number
will turn on solid while the symbols on the
left side will illuminate with animations.
When the Ice Cream process is completed,
the symbols start to flash and an audio
warning is given. All Ice Cream symbols will
turn off after this 5-minute warning.
Just press the Ice Cream button briefly
to terminate the audio warning; Ice Cream
buttons will turn off too.
If the Ice Cream button is pressed briefly
when the Ice Cream process is in progress,
no change will take place on the display.

EN
26
When the Ice Cream Function is active,
if a power cut occurs and then power is
resumed again, Ice Cream process will be
maintained from where it is interrupted.
If the Ice Cream function is tried to be
activated when the freezer compartment is
at a temperature higher than -10 °C, ‘E’ and
the warning symbol on the display will flash
for 30 seconds. If the user presses the Ice
Cream function selection button briefly (for
3 seconds), display will return to its normal
Ice Cream view, Ice Cream symbol and
warning symbol will turn off.
20. Ice Cream Mode Selection
Function
It shows the set Ice Cream mode.
21. Ice Cream Indicator
It turns on when the Ice Cream mode is
activated.
22. Quick Fridge Indicator
This symbol flashes in an animated style
when the Quick Fridge function is active.

EN
27
Temperature setting button
Temperature Setting button allows you
to make the temperature setting of your
refrigerator.
Setting the temperature of
your refrigerator
The overall temperature setting of your
refrigerator is made by means of the
temperature setting button on the right wall
of the fridge compartment. This button has
5 different temperature setting position.
Select the position suitable to your needs.
Level number 1 shows when the fridge is
at its hottest and the max position shows its
coldest setting.
*Optional Dual cooling system
Your refrigerator is equipped with two
separate cooling systems to cool the
fresh food compartment and freezer
compartment. Thus, air in the fresh food
compartment and freezer compartment
do not get mixed. Thanks to these two
separate cooling systems, cooling speed is
much higher than other refrigerators. Odors
in the compartments do not get mixed.
Also additional power saving is provided
since the automatic defrosting is performed
individually.
C Figures in this user manual are schematic and may not correspond exactly to you product. If
the subject parts are not included in the product you have purchased, then it is valid for other
models.
•Hotfoodmustcooldowntotheroom
temperature before putting them in the
refrigerator.
•Thefoodstuffthatyouwanttofreeze
must be fresh and in good quality.
•Foodstuffmustbedividedintoportions
according to the family’s daily or meal
based consumption needs.
•Foodstuffmustbepackagedinan
airtight manner to prevent them from
drying even if they are going to be kept for
a short time.
•Materialstobeusedforpackagings
must be resistant to cold and humidity
and they must be airtight. The packaging
material of the food must be at a sufficient
thickness and durability. Otherwise the
food hardened due to freezing may
puncture the packaging. It is important for
the packaging to be closed securely for
safe storage of the food.

EN
28
•Frozenfoodmustbeusedimmediately
after they are thawed and they should
never be re-frozen.
•Pleaseobservethefollowinginstructions
to obtain the best results.
1. If the fridge has a quick freeze function,
activate the quick freeze function when
you want to freeze the food.
2. Do not freeze too large quantities of
food at one time. The quality of the food
is best preserved when it is frozen right
through to the core as quickly as possible.
3. Take special care not to mix already
frozen food and fresh food.
4. Make sure raw foods are not in contact
with cooked foods in the fridge.
F r e e z e r
Compartment
Setting
F r i d g e
Compartment
Setting
Remarks
-18°C 4°C This is the normal recommended setting.
-20, -22 or
-24°C 4°C These settings are recommended when the
ambient temperature exceeds 30°C.
Quick Freeze 4°C
Use when you wish to freeze your food in a short
time. If is recommended to be used to maintain the
quality of meat and fish products.
-18°C or colder 2°C
If you think that your fridge compartment is not
cold enough because of the hot conditions or
frequent opening and closing of the door.
-18°C or colder Quick Fridge
You can use it when your fridge compartment is
overloaded or if you wish to cool down your food
rapidly. It is recommended that you activate the
quick freeze function 4-8 hours before placing the
food.
Recommendations for
preservation of frozen food
•Pre-packedcommerciallyfrozenfood
should be stored in accordance with the
frozen food manufacturer's instructions in
a frozen food storage compartment.
•Toensurethatthehighqualitysupplied
by the frozen food manufacturer and the
food retailer is maintained, following points
should be noted:
1.Put packages in the freezer as quickly as
possible after purchase.
2.Ensure that contents of the package are
labeled and dated.
3. Do not exceed "Use By", "Best Before"
dates on the packaging.
Defrosting
The freezer compartment defrosts
automatically.
Placing the food
Freezer
compartment
shelves
Various frozen food
such as meat, fish, ice
cream, vegetables and
etc.

EN
29
Egg section Egg
Fridge
compartment
shelves
Food in pans,
covered plates and
closed containers
Door shelves
of fridge
compartment
Small and packaged
food and drinks (such
as milk, fruit juice and
beer)
Crisper Vegetables and fruits
Freshzone
compartment
Delicatessen
products (cheese,
butter, salami and etc.)
Deep-freeze information
Food must be frozen as rapidly as possible
when they are put in the freezer in order to
keep them in good quality.
It is possible to preserve the food for a long
time only at -18°C or lower temperatures.
You can keep the freshness of food
for many months (at -18°C or lower
temperatures in the deep freeze).
WARNING! A
•Foodstuffmustbedividedintoportions
according to the family’s daily or meal based
consumption needs.
• Foodstuff must be packaged in an
airtight manner to prevent them from drying
even if they are going to be kept for a short
time.
Materials necessary for packaging:
•Coldresistantadhesivetape
•Self-adhesivelabel
•Rubberrings
•Pen
Materials to be used for packaging the
foodstuff must be tear-proof and resistant
to cold, humidity, dour, oils and acids.
Foodstuff to be frozen should not be
allowed to come in contact with the
previously frozen items to prevent their
partial thawing. Thawed out food must
be consumed and must not be frozen again.

EN
30
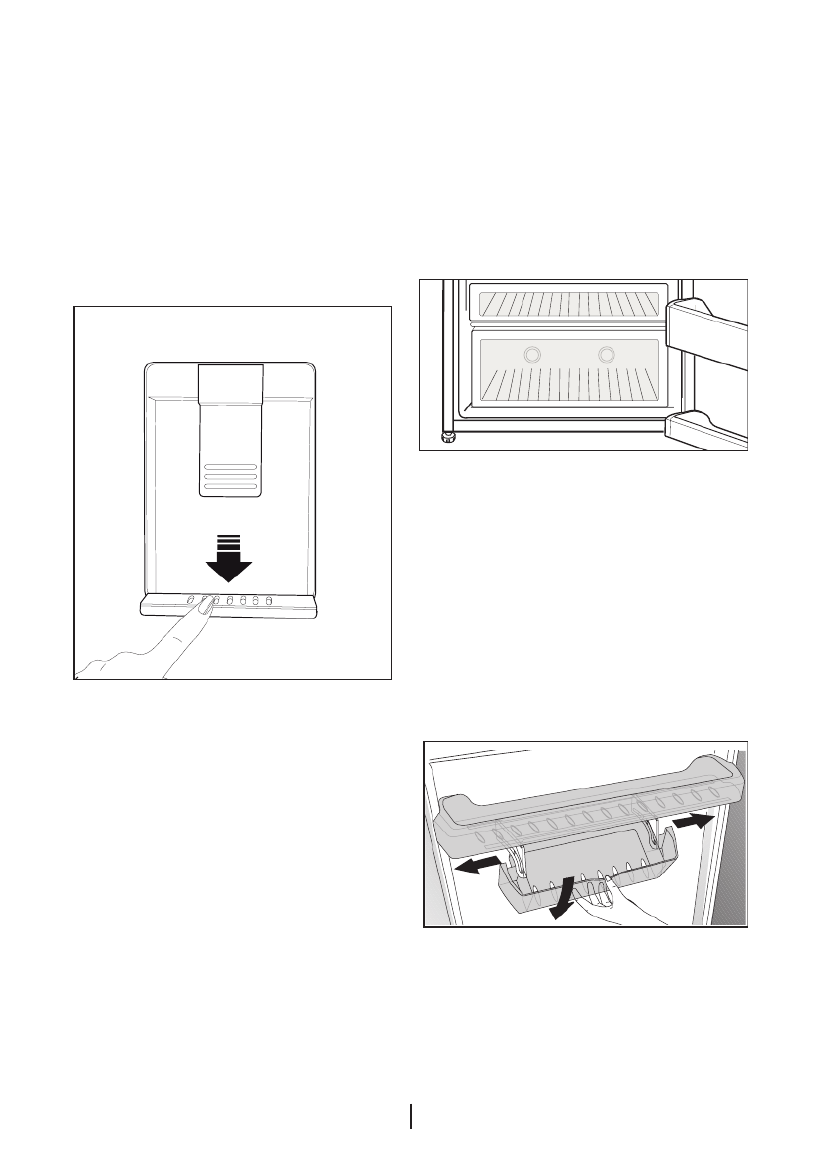
Description and cleaning of
odor filter
*optional
Odor filter prevents unpleasant odor build-
up in your refrigerator.
Pull the cover into which the odor filter is
installed downwards from the front section
and remove as illustrated. Leave the filter
under sunlight for one day. Filter will be
cleaned during this time. Install the filter
back to its place.
Odor filter must be cleaned once in a year.
Breakfast Compartment
Because products such as fish, red
meat, chicken mean, and dairy products
such as cheese, yoghurt and milk need
to be kept in an ambient a few degrees
cooler than the fridge compartment, it
is recommended to store these goods
in the breakfast compartment. It is not
recommended to place fruit and vegetables
in the breakfast compartment. Especially
tomatoes, eggplants, zucchinis, cucumbers
and lemons are sensitive to the cold. They
should not be stored in the breakfast
compartment.
You can increase the inner volume of
your refrigerator by removing the breakfast
compartment.
1. Pull the compartment towards yourself
until it rests and stops against the stopper.
2. Lift the front section and pull towards
yourself to remove the compartment from
its seating.

EN
31
Water Dispenser
*optional
Water dispenser is a very useful feature
based on reaching cold water without
opening the door of your refrigerator. As you
will not have to open your refrigerator door
frequently, you will have saved energy.
Filling the water dispenser's tank
Water tank filling reservoir is located inside
the door rack. You can open the reservoir
cover and fill it with potable water. And then,
close the lid.
Using the water dispenser
Push the arm of the water dispenser
with your glass. The dispenser will cease
operating once you release the arm.
When operating the water dispenser,
maximum flow can be obtained by pressing
the arm fully. Please remember that the
amount of flow from the dispenser is subject
to the degree you press the arm.
As the level of the water in your glass/
container rises, slightly lessen the pressure
on the arm to prevent the overspill. If you
slightly press the arm, the water will drip;
this is quite normal and not a failure.
Warning!
• Donotfillthewatertankwithanyliquid
other than water, such as fruit juices,
milk, carbonated beverages or alcoholic
drinks which are not suitable to use in
the water dispenser. Water dispenser will
be irreparably damaged if these kinds of
liquids are used. Warranty does not cover
such usages. Some chemical substances
and additives contained in these kinds of
drinks/liquids may damage the water tank
and its materials.

EN
32
• Usecleandrinkingwateronly.
• Capacityofthewatertankis3liters;do
not overfill.
• Pushthearmofthewaterdispenserwith
a rigid glass. If you are using disposable
plastic glasses, push the arm with your
fingers from behind the glass.
Cleaning the water tank
• Removethewaterfillingreservoirinside
the door rack.
• Removethedoorrackbyholdingfrom
both sides.
• Grabthewatertankfrombothsidesand
remove it with an angle of 45°C.
• Cleanthewatertankbyremovingitslid.
Important:
Components of the water tank and
water dispenser should not be washed in
dishwasher.
EN
33
Water tray
Water that dripped while using the water
dispenser accumulates in the spillage tray.
Take out the plastic strainer as shown in
the figure.
With a clean and dry cloth, remove the
water that has accumulated.
Sliding storage container
*optional
This accessory is designed to increase the
usage volume of the door shelves. It allows
you to easily place the tall bottles, jars and
tins to the lower bottle shelf thanks to its
ability to move right or left.
(The illustrated figure is only an example
and does not match exactly with your
product.)
Blue light
*optional
Foodstuff stored in the crispers that are
enlightened with a blue light continue their
photosynthesis by means of the wavelength
effect of blue light and thus, preserve
their freshness and increase their vitamin
content.

EN
34
Rotary storage container
(in some models)
Sliding body shelf can be moved to left
or right in order to allow you place the tall
bottles, jars or boxes to the lower shelf (Fig.
1)
You can reach the food that you have
placed into the shelf by grabbing and
turning it from its right edge (Fig.2).
When you want to load or remove it to
clean, turn it by 90 degrees, raise it up and
pull towards yourself (Fig. 3-4).
3
1
2
4

EN
36
Icematic and ice storage
container
*May not be available in all models
Using the Icematic
Fill the Icematic with water and place it into
its seat. Your ice will be ready approximately
in two hours. Do not remove the Icematic
from its seating to take ice.
Turn the knobs on the ice reservoirs
clockwise by 90 degrees.
Ice cubes in the reservoirs will fall down
into the ice storage container below.
You may take out the ice storage container
and serve the ice cubes.
If you wish, you may keep the ice cubes in
the ice storage container.
Ice storage container
Ice storage container is only intended for
accumulating the ice cubes. Do not put
water in it. Otherwise, it will break.

EN
37
Making ice
*optional
Fill the ice container with water and place
it into the freezer compartment. Your ice will
be ready approximately in two hours.
You can remove the ice in the ice container
by removing it from the freezer and twisting
it.
Humidity-controlled crisper
(Ever Fresh)
*optional
Humidity rates of the vegetables and fruit
are kept under control with the feature of
humidity-controlled crisper and the food is
ensured to stay fresh for longer.
Never leave the vegetables inside the
crisper in their bags. If the vegetables are
left inside their bags, this will cause them
to decompose in a short period of time.
When a high level of humidity is set, your
vegetables keep their humidity content
and can be preserved for a reasonable
period of time without needing to leave
them inside their bags. In case contacting
with other vegetables is not preferred for
hygiene concerns, use a perforated paper,
foam and other similar packaging materials
instead of a bag.
While the vegetables are being placed,
specific gravity of the vegetables should be
taken into consideration. Heavy and hard
vegetables should be put at the bottom
of the crisper and the lightweight and soft
vegetables should be placed over.

EN
38
Do not place together the pear, apricot,
peach, etc. and apple in particular
which have a high level of generation of
ethylene gas in the same crisper with the
other vegetables and fruit. The ethylene
gas which is emitted by these fruit may
cause the other fruit to ripen faster and
decompose in a shorter time.
Do not take the crisper main body out
of the refrigerator apart from the drawers
unless you have to, and call for technical
service if necessary. Before removing the
crisper main body from its place, wipe and
clean it with a wet piece of cloth.

EN
39
Ice-cream machine
*optional
• Openthefreezercompartmentofthe
refrigerator,
• Pushandreleaseopenthecoverofthe
ice-cream making compartment in the
freezer compartment,
• Placethefreshfreezetrayinsidethebase
cover and slide it into the highest shelf
inside the compartment,
• Taketheice-creammixwhichiscooled
to room temperature to the ice-cream
making container,
• Theice-creammixwhichwillbeplacedin
the ice cream boxes must not exceed the
amount stated in the ice cream recipes. If
more ice cream mix is placed in the boxes
than indicated in the recipe, it will overflow.
• Placethecontainerintothehousingatthe
bottom of the compartment towards the
left side.
• Turnthecontainertotherightsideand
lock it into its place.

EN
42
7 Troubleshooting
Please review this list before calling the service. It will save your time and money. This list
includes frequent complaints that are not arising from defective workmanship or material
usage. Some of the features described here may not exist in your product.
The refrigerator does not operate.
• The plug is not inserted into the socket correctly. >>>Insert the plug into the socket
securely.
• The fuse of the socket which your refrigerator is connected to or the main fuse have blown
out. >>>Check the fuse.
Condensation on the side wall of the fridge compartment (MULTIZONE, COOL
CONTROL and FLEXI ZONE).
• Door has been opened frequently. >>>Do not open and close the door of refrigerator
frequently.
• Ambient is very humid. >>>Do not install your refrigerator into highly humid places.
• Food containing liquid is stored in open containers. >>>Do not store food with liquid
content in open containers.
• Door of the refrigerator is left ajar. >>>Close the door of the refrigerator.
• Thermostat is set to a very cold level. >>>Set the thermostat to a suitable level.
• Compressor is not running
• Protective thermic of the compressor will blow out during sudden power failures or plug-
out plug-ins as the refrigerant pressure in the cooling system of the refrigerator has not
been balanced yet. The refrigerator will start running approximately after 6 minutes. Please
call the service if the refrigerator does not startup at the end of this period.
• The fridge is in defrost cycle. >>>This is normal for a full-automatically defrosting
refrigerator. Defrosting cycle occurs periodically.
• The refrigerator is not plugged into the socket. >>>Make sure that the plug is fit into the
socket.
• Temperature settings are not made correctly. >>>Select the suitable temperature value.
• There is a power outage. >>>Refrigerator returns to normal operation when the power
restores.
The operation noise increases when the refrigerator is running.
• The operating performance of the refrigerator may change due to the changes in the
ambient temperature. It is normal and not a fault.
The refrigerator is running frequently or for a long time.

EN
43
• New product may be wider than the previous one. Larger refrigerators operate for a longer
period of time.
• The room temperature may be high. >>>It is normal that the product operates for longer
periods in hot ambient.
• The refrigerator might be plugged in recently or might be loaded with food. >>>When the
refrigerator is plugged in or loaded with food recently, it will take longer for it to attain the set
temperature. This is normal.
• Large amounts of hot food might be put in the refrigerator recently. >>>Do not put hot
food into the refrigerator.
• Doors might be opened frequently or left ajar for a long time. >>>The warm air that has
entered into the refrigerator causes the refrigerator to run for longer periods. Do not open
the doors frequently.
• Freezer or fridge compartment door might be left ajar. >>>Check if the doors are closed
completely.
• The refrigerator is adjusted to a very low temperature. >>>Adjust the refrigerator
temperature to a warmer degree and wait until the temperature is achieved.
• Door seal of the fridge or freezer may be soiled, worn out, broken or not properly seated.
>>>Clean or replace the seal. Damaged/broken seal causes the refrigerator to run for a
longer period of time in order to maintain the current temperature.
Freezer temperature is very low while the fridge temperature is sufficient.
• The freezer temperature is adjusted to a very low value. >>>Adjust the freezer temperature
to a warmer degree and check.
Fridge temperature is very low while the freezer temperature is sufficient.
• The fridge temperature is adjusted to a very low value. >>>Adjust the fridge temperature to
a warmer degree and check.
Food kept in the fridge compartment drawers is frozen.
• The fridge temperature is adjusted to a very high value. >>>Adjust the fridge temperature
to a lower value and check.
Temperature in the fridge or freezer is very high.

EN
44
• The fridge temperature is adjusted to a very high value. >>>Fridge compartment
temperature setting has an effect on the temperature of the freezer. Change the
temperatures of the fridge or freezer and wait until the relevant compartments attain a
sufficient temperature.
• Doors are opened frequently or left ajar for a long time. >>>Do not open the doors
frequently.
• Door is ajar. >>>Close the door completely.
• The refrigerator is plugged in or loaded with food recently. >>>This is normal. When the
refrigerator is plugged in or loaded with food recently, it will take longer for it to attain the set
temperature.
• Large amounts of hot food might be put in the refrigerator recently. >>>Do not put hot
food into the refrigerator.
• Vibrations or noise.
• The floor is not level or stable. >>> If the refrigerator rocks when moved slowly, balance it
by adjusting its feet. Also make sure that the floor is strong enough to carry the refrigerator,
and level.
• The items put onto the refrigerator may cause noise. >>>Remove the items on top of the
refrigerator.
There are noises coming from the refrigerator like liquid flowing, spraying, etc.
• Liquid and gas flows occur in accordance with the operating principles of your refrigerator.
It is normal and not a fault.
Whistle comes from the refrigerator.
• Fans are used in order to cool the refrigerator. It is normal and not a fault.
Condensation on the inner walls of refrigerator.
• Hot and humid weather increases icing and condensation. It is normal and not a fault.
• Doors are opened frequently or left ajar for a long time. >>>Do not open the doors
frequently. Close them if they are open.
• Door is ajar. >>>Close the door completely.
Humidity occurs on the outside of the refrigerator or between the doors.
• There might be humidity in the air; this is quite normal in humid weather. When the humidity
is less, condensation will disappear.
Bad odour inside the refrigerator.

EN
45
• No regular cleaning is performed. >>>Clean the inside of the refrigerator regularly with a
sponge, lukewarm water or carbonate dissolved in water.
• Some containers or package materials may cause the smell. >>>Use a different container
or different brand packaging material.
• Food is put into the refrigerator in uncovered containers. >>>Keep the food in closed
containers. Microorganisms spreading out from uncovered containers can cause
unpleasant odours.
• Remove the foods that have expired best before dates and spoiled from the refrigerator.
The door is not closing.
• Food packages are preventing the door from closing. >>>Replace the packages that are
obstructing the door.
• The refrigerator is not completely even on the floor. >>>Adjust the feet to balance the
refrigerator.
• The floor is not level or strong. >>>Make sure that the floor is level and capable to carry the
refrigerator.
Crispers are stuck.
• The food is touching the ceiling of the drawer. >>>Rearrange food in the drawer.

DE
Gefrierschrank
Bedienungsanleitung

DE
1
Bitte lesen Sie zuerst diese Anleitung!
Liebe Kundin, lieber Kunde,
Wir sind sicher, dass Ihnen dieses Produkt, das in modernsten Fertigungsstätten
hergestellt und strengsten Qualitätsprüfungen unterzogen wurde, lange Zeit gute Dienste
leisten wird.
Lesen Sie bitte die gesamte Bedienungsanleitung gründlich durch, bevor Sie das Gerät
benutzen.Bewahren Sie die Anleitung auf, damit Sie später darin nachlesen können. Falls Sie
das Gerät an jemand anderen weitergeben, vergessen Sie nicht, diese Bedienungsanleitung
ebenfalls beizulegen.
Diese Bedienungsanleitung hilft Ihnen, Ihr neues Gerät schnell und sicher zu
bedienen.
• Lesen Sie die Anleitung, bevor Sie Ihr Gerät aufstellen und bedienen.
• Beachten Sie die Sicherheitshinweise.
• Bewahren Sie die Anleitung an einem leicht zugänglichen Ort auf, damit Sie jederzeit darin
nachschlagen können.
• Lesen Sie auch weitere mit dem Gerät gelieferte Dokumente.
Beachten Sie, dass diese Bedienungsanleitung für verschiedene Modelle geschrieben
wurde. Unterschiede zwischen den verschiedenen Modellen werden natürlich in der
Anleitung erwähnt.
Die Symbole
In der Bedienungsanleitung verwenden wir folgende Symbole:
C Wichtige Informationen oder nützliche Tipps.
A Warnung vor Verletzungen oder Beschädigungen.
B Warnung vor elektrischem Strom.

DE
2
INHALT
1 Ihr Kühlschrank 3
2 Wichtige
Sicherheitshinweise 4
Bestimmungsgemäßer Einsatz...........4
Allgemeine Hinweise zu Ihrer
Sicherheit ..........................................5
Bei Geräten mit Wasserspender: .....10
Kinder – Sicherheit ..........................10
Erfüllung von WEEE-Vorgaben zur
Entsorgung von Altgeräten: ............11
Hinweise zur Verpackung ................11
HC-Warnung ...................................11
Tipps zum Energiesparen ................11
Empfehlungen zum Kühlbereich (für
frische Lebensmittel) ........................12
3 Installation 13
Wenn Sie den Kühlschrank versetzen
möchten: .........................................13
Vor dem Einschalten ........................13
Elektrischer Anschluss .....................13
Verpackungsmaterialien entsorgen ..14
Altgeräte entsorgen .........................14
Aufstellung und Installation ..............14
Füße einstellen .................................15
Beleuchtung auswechseln ..............15
Tür-offen-Warnung ...........................15
4 Vorbereitung 16
5 So nutzen Sie Ihren
Kühlschrank 17
Anzeigefeld ......................................17
Temperatureinstelltaste ....................28
Temperatur einstellen .......................28
Doppeltes Kühlsystem .....................28
Empfehlungen zur Konservierung
gefrorener Lebensmittel ...................29
Abtauen ...........................................29
Lebensmittel platzieren ....................29
Hinweise zum Tiefkühlen .................30
Eierbehälter .....................................30
Beschreibung und Hinweise zur
Reinigung des Geruchsfilters: ..........31
Wasserspender ...............................32
Blaue Beleuchtung ..........................34
Verschiebbarer Vorratsbehälter ........34
Drehbarer Behälter ..........................35
Auto-Eisbereiter ..............................36
Eisbereiter und Eisbehälter ..............37
Eis herstellen ...................................38
Gemüsefach mit Feuchtigkeitsregelung
(ImmerFrisch) ...................................38
Eiscremebereiter ..............................40
6 Wartung und Reinigung 42
Schutz der Kunststoffflächen ..........42
7
Problemlösung 43

DE
3
1 Ihr Kühlschrank
1. Tiefkühlbereich-Türablagen
2. Temperatureinstellungsanzeige
3. Eierbehälter
4. Wasserspendertank
5. Wasserspenderbehälter
6. Kühlbereich-Türablagen
7. Verschiebbare und drehbare Vorratsbehälter
8. Blaue Beleuchtung
9. Einstellbare Füße
10. Gemüsefach
11. Gemüsefachabdeckung
12. Frühstücksfach
13. Schlüssel
C Abbildungen und Angaben in dieser Anleitung sind schematisch und können etwas von
Ihrem Gerät abweichen. Falls Teile nicht zum Lieferumfang des erworbenen Gerätes zählen,
gelten sie für andere Modelle.
14. Flaschenablage
15. Geruchsfilter
16. Kühlbereich-Glasablagen
17. Beleuchtungsglas
18. Impeller
19. Eisbereiter-Wassertank
20. Eisbehälter
21. Eisbehälter
22. Tiefkühlbereichglasablage
23. Eiscremebereiter/Schnellgefrierfach
24. Tiefkühlbereich
25. Kühlbereich
* optional
1
4*
3
17
*16
18
2*
16
5*
*6
*6
*6
*8
*7
9
*10
*12
11
*14
*13
*13
*15
*19
*20
*21
*23
22
24
25

DE
5
Arbeitsumgebungen;
- In Bauernhöfen,
Hotels, Motels und
anderen Unterkünften,
für den Gebrauch der
Kunden;
- Umgebungen mit
Übernachtung und
Frühstück;
- Bei Catering und
ähnlichen Non-Retail-
Anwendungen.
Allgemeine Hinweise
zu Ihrer Sicherheit
• Wenn Sie das
Gerät entsorgen
möchten, wenden
Sie sich am besten
an den autorisierten
Kundendienst. Hier
erhalten Sie notwendige
Informationen und
erfahren, welche Stellen
für die Entsorgung
zuständig sind.
• Bei Problemen und
Fragen zum Gerät
wenden Sie sich
grundsätzlich an
den autorisierten
Kundendienst. Ziehen
Sie keine Dritten zu Rate,
versuchen Sie nichts
in Eigenregie, ohne den
autorisierten Kundendienst
davon in Kenntnis zu setzen.
• Bei Geräten mit
Tiefkühlbereich: Der
Verzehr von Speiseeis
und Eiswürfeln unmittelbar
nach der Entnahme aus
dem Tiefkühlbereich ist
nicht ratsam. (Dies kann zu
Erfrierungen führen.)
• Bei Geräten mit
Tiefkühlbereich: Bewahren
Sie Getränke in Flaschen
sowie Dosen niemals im
Tiefkühlbereich auf. Diese
platzen.
• Berühren Sie gefrorene
Lebensmittel nicht mit der
Hand; sie können festfrieren.
• Trennen Sie Ihren
Kühlschrank vor dem
Reinigen oder Abtauen vom
Stromnetz.
• Verwenden Sie niemals
Dampf- oder Sprühreiniger
zum Reinigen und Abtauen
Ihres Kühlschranks. Die
Dämpfe oder Nebel
können in Kontakt mit
stromführenden Teilen
geraten und Kurzschlüsse
oder Stromschläge
auslösen.

DE
6
• Missbrauchen Sie niemals
Teile Ihres Kühlschranks (z.
B. Tür) als Befestigungen
oder Kletterhilfen.
• Nutzen Sie keine
elektrischen Geräte
innerhalb des
Kühlschranks.
• Achten Sie darauf,
den Kühlkreislauf
keinesfalls mit Bohr- oder
Schneidwerkzeugen
zu beschädigen.
Das Kühlmittel kann
herausspritzen, wenn
die Gaskanäle des
Verdunsters, Rohr- und
Schlauchleitungen oder
Oberflächenversiegelungen
beschädigt werden. Dies
kann zu Hautreizungen und
Augenverletzungen führen.
• Decken Sie keinerlei
Belüftungsöffnungen des
Kühlschranks ab.
• Elektrische Geräte dürfen
nur von autorisierten
Fachkräften repariert
werden. Reparaturen
durch weniger kompetente
Personen können
erhebliche Gefährdungen
des Anwenders
verursachen.
• Sollten Fehler oder
Probleme während
der Wartung oder
Reparaturarbeiten
auftreten, so trennen Sie
den Kühlschrank von der
Stromversorgung, indem
Sie die entsprechende
Sicherung abschalten
oder den Netzstecker
ziehen.
• Ziehen Sie niemals am
Netzkabel – ziehen Sie
direkt am Stecker.
• Achten Sie darauf,
hochprozentige Getränke
stehend und mit fest
verschlossenem Deckel
zu lagern.
• Bewahren Sie
niemals Sprühdosen
mit brennbaren und
explosiven Substanzen
im Kühlschrank auf.
• Nutzen Sie keine
mechanischen oder
anderen Hilfsmittel, um
das Gerät abzutauen
– es sei denn, solche
Hilfsmittel werden
ausdrücklich vom
Hersteller empfohlen.
• Dieses Produkt darf
nicht von Personen

DE
7
(einschließlich Kindern)
mit eingeschränkten
physischen,
sensorischen oder
geistigen Fähigkeiten
bedient werden, sofern
sie nicht durch eine
Person, die für ihre
Sicherheit verantwortlich
ist, in der Bedienung
des Produktes angeleitet
werden.
• Nehmen Sie einen
beschädigten
Kühlschrank nicht
in Betrieb. Wenden
Sie sich bei jeglichen
Zweifeln an einen
Kundendienstmitarbeiter.
• Die elektrische Sicherheit
des Gerätes ist nur
dann gewährleistet,
wenn das hausinterne
Erdungssystem den
zutreffenden Normen
entspricht.
• Setzen Sie das Gerät
keinem Regen, Schnee,
direktem Sonnenlicht
oder Wind aus; dies
kann die elektrische
Sicherheit gefährden.
• Wenden Sie sich
zur Vermeidung
von Gefahren an
den autorisierten
Kundendienst, falls das
Netzkabel beschädigt ist.
• Stecken Sie während
der Installation niemals
den Netzstecker ein.
Andernfalls kann es zu
schweren bis tödlichen
Verletzungen kommen.
• Dieser Kühlschrank dient
nur der Aufbewahrung
von Lebensmitteln. Für
andere Zwecke sollte er
nicht verwendet werden.
• Das Etikett mit den
technischen Daten
befindet sich an der
linken Innenwand des
Kühlschranks.
• Schließen Sie Ihren
Kühlschrank niemals
an energiesparende
Systeme an; dies
kann den Kühlschrank
beschädigen.
• Falls sich ein blaues
Licht am Kühlschrank
befindet, blicken Sie nicht
längere Zeit mit bloßem
Augen oder optischen
Werkzeugen hinein.
• Bei manuell gesteuerten
Kühlschränken warten
Sie mindestens 5

DE
8
Minuten, bevor Sie den
Kühlschrank nach einem
Stromausfall wieder
einschalten.
• Falls Sie das Gerät
an einen anderen
Besitzer weitergeben,
vergessen Sie nicht, die
Bedienungsanleitung
ebenfalls auszuhändigen.
• Achten Sie darauf,
dass das Netzkabel
beim Transport des
Kühlschranks nicht
beschädigt wird.
Übermäßiges Biegen des
Kabels birgt Brandgefahr.
Platzieren Sie keine
schweren Gegenstände
auf dem Netzkabel.
• Berühren Sie den
Netzstecker niemals
mit feuchten oder gar
nassen Händen.
• Schließen Sie den
Kühlschrank nicht an
lose Steckdosen an.
• Sprühen Sie aus
Sicherheitsgründen
niemals Wasser auf die
Innen- und Außenflächen
des Gerätes.
• Sprühen Sie keine
Substanzen mit
brennbaren Gasen, wie
z. B. Propangas, in die
Nähe des Kühlschranks;
andernfalls bestehen
Brand- und
Explosionsgefahr.
• Stellen Sie keine mit
Wasser gefüllten
Gegenstände auf
den Kühlschrank;
dies birgt Brand- und
Stromschlaggefahr.
• Überladen Sie das
Gerät nicht mit
Lebensmitteln. Wenn
das Gerät überladen
ist, können beim Öffnen
der Kühlschranktür
Lebensmittel herausfallen
und Verletzungen
verursachen.
• Stellen Sie keinesfalls
Gegenstände auf
den Kühlschrank;

DE
9
sie könnten beim
Öffnen oder Schließen
der Kühlschranktür
herunterfallen.
• Materialien wie
beispielsweise Impfstoffe,
wärmeempfindliche
Arznei, wissenschaftliche
Proben usw. sollten
nicht im Kühlschrank
aufbewahrt werden, da
sie bei exakt festgelegten
Temperaturen gelagert
werden müssen.
• Trennen Sie den
Kühlschrank vom
Stromnetz, wenn er
längere Zeit nicht benutzt
wird. Ein mögliches
Problem im Netzkabel
kann einen Brand
auslösen.
• Wenn die
höhenverstellbaren Füße
nicht sicher auf dem
Boden stehen, kann
sich der Kühlschrank
bewegen. Die
angemessene Sicherung
der höhenverstellbaren
Füße am Boden kann
eine Bewegung des
Kühlschranks verhindern.
• Halten Sie den
Kühlschrank beim
Tragen nicht am Türgriff.
Andernfalls könnte er
abbrechen.
• Wenn Sie Ihr Produkt
neben einem
anderen Kühl- oder
Gefrierschrank
aufstellen möchten,
sollte der Abstand
zwischen beiden
Geräten mindestens
8 cm betragen.
Andernfalls können
die benachbarten
Seitenwände feucht
werden.
• Benutzen Sie das
Gerät niemals, wenn
die sich auf der
Oberseite bzw. auf der
Rückseite befindlichen
Bereiche mit den
elektronischen Leitern
im Inneren geöffnet
sind (Abdeckung
der elektronischen
Leiterplatten) (1).

DE
11
Erfüllung von WEEE-
Vorgaben zur Entsorgung
von Altgeräten:
Dieses Produkt erfüllt die
Vorgaben der EU-WEEE-
Direktive (2012/19/EU).
Das Produkt wurde mit
einem Klassifizierungssymbol
für elektrische und
elektronische Altgeräte
(WEEE) gekennzeichnet.
Dieses Gerät wurde aus hochwertigen
Materialien hergestellt, die wiederverwendet
und recycelt werden können. Entsorgen
Sie das Gerät am Ende seiner Einsatzzeit
nicht mit dem regulären Hausmüll; geben
Sie es stattdessen bei einer Sammelstelle
zur Wiederverwertung von elektrischen
und elektronischen Altgeräten ab. Ihre
Stadtverwaltung informiert Sie gerne über
geeignete Sammelstellen in Ihrer Nähe.
Hinweise zur Verpackung
Die Verpackungsmaterialien des
Gerätes wurden gemäß nationalen
Umweltschutzbestimmungen aus
recyclingfähigen Materialien hergestellt.
Entsorgen Sie Verpackungsmaterialien
nicht mit dem regulären Hausmüll
oder anderen Abfällen. Bringen Sie
Verpackungsmaterialien zu geeigneten
Sammelstellen; Ihre Stadtverwaltung berät
Sie gern.
Nicht vergessen!
Recycelte Materialien leisten einen
wichtigen Beitrag zu einer schönen und
gesunden Umwelt.
Wenn Sie zur Wiederverwertung von
Verpackungsmaterialien beitragen
möchten, informieren Sie sich bei
Ihren Umweltschutzbehörden oder der
Stadtverwaltung, wo entsprechende
Sammelstellen zu finden sind.
HC-Warnung
Falls das Kühlsystem Ihres Produktes
R600a enthält:
Dieses Gas ist leicht entflammbar.
Achten Sie also darauf, Kühlkreislauf und
Leitungen während Betrieb und Transport
nicht zu beschädigen. Bei Beschädigungen
halten Sie das Produkt von potenziellen
Zündquellen (z. B. offenen Flammen) fern
und sorgen für eine gute Belüftung des
Raumes, in dem das Gerät aufgestellt
wurde.
Ignorieren Sie diese Warnung, falls das
Kühlsystem Ihres Produktes R134a
enthält.
Die Art des im Gerät eingesetzten Gases
wird auf dem Typenschild an der linken
Innenwand des Kühlschranks angegeben.
Entsorgen Sie das Produkt keinesfalls
durch Verbrennen.
Tipps zum Energiesparen
• Halten Sie die Kühlschranktüren nur
möglichst kurz geöffnet.
• Geben Sie keine warmen Speisen oder
Getränke in den Kühlschrank.
• Überladen Sie den Kühlschrank nicht; die
Luft muss frei zirkulieren können.
• Stellen Sie den Kühlschrank nicht im
direkten Sonnenlicht oder in der Nähe von
Wärmequellen wie Öfen, Spülmaschinen
oder Heizkörpern auf. Halten Sie den
Kühlschrank mindestens 30 cm von
Wärmequellen und mindestens 5 cm von
elektrischen Öfen entfernt.
• Achten Sie darauf, Ihre Lebensmittel in
verschlossenen Behältern aufzubewahren.

DE
12
• Bei Geräten mit Tiefkühlbereich: Sie
können noch mehr Lebensmittel
einlagern, wenn Sie die Ablage oder
Schublade aus dem Tiefkühlbereich
herausnehmen. Der für Ihren Kühlschrank
angegebene Energieverbrauch wurde
nach dem Entfernen der Ablage oder
Schublade und bei maximaler Beladung
bestimmt. Ansonsten ist es Ihnen
freigestellt, die Ablage oder Schublade zu
verwenden.
• Das Auftauen von gefrorenen
Lebensmitteln im Kühlbereich ist
energiesparend und bewahrt die Qualität
der Lebensmittel.
Empfehlungen zum
Kühlbereich (für frische
Lebensmittel)
* optional
•AchtenSiedarauf,dassdieLebensmittel
nicht den Temperatursensor im Kühlbereich
berühren. Damit frische Lebensmittel bei
optimalen Temperaturen gelagert werden,
darf der Sensor nicht durch Lebensmittel
blockiert oder beeinflusst werden.
•GebenSiekeineheißenSpeisenindas
Gerät.
temperature
sensor
food
MILK
juice
etc.
temperature
sensor

DE
15
Füße einstellen
Wenn Ihr Kühlschrank nicht absolut
gerade steht:
Sie können den Kühlschrank – wie in
der Abbildung gezeigt – durch Drehen
der Frontfüße ausbalancieren. Wenn Sie
in Richtung des schwarzen Pfeils drehen,
senkt sich die Ecke, an der sich der Fuß
befindet. Beim Drehen in Gegenrichtung
wird die Ecke angehoben. Diese Arbeit fällt
erheblich leichter, wenn ein Helfer das Gerät
etwas anhebt.
Beleuchtung auswechseln
Die Innenbeleuchtung Ihres Kühlschranks
sollte ausschließlich vom autorisierten
Kundendienst ausgetauscht werden.
Die Glühbirnen für dieses Haushaltsgerät
sind für Beleuchtungszwecke nicht
geeignet. Die beabsichtigte Aufgabe dieser
Lampe ist es den Benutzer zu ermöglichen
die Plazierung der Lebensmittel in den
Kühlschrank / Eiskühltruhe sicher und
bequem vorzunehmen.
Die in diesem Gerät verwendeten
Lampen müssen extremen physikalischen
Bedingungen, wie z. B. Temperaturen von
-20 °C, standhalten.
Tür-offen-Warnung
(Funktion nicht bei sämtlichen
Geräten vorhanden.)
Ein Tonsignal erklingt, wenn die Tür länger
als eine Minute offen steht. Die Warnung
verstummt, sobald Sie die Tür schließen
oder eine Anzeigetaste (sofern vorhanden)
betätigen.

DE
16
4 Vorbereitung
• Ihr Kühlschrank sollte mindestens 30
cm von Hitzequellen wie Kochstellen,
Öfen, Heizungen, Herden und ähnlichen
Einrichtungen aufgestellt werden.
Halten Sie mindestens 5 cm Abstand
zu Elektroöfen ein, vermeiden Sie die
Aufstellung im direkten Sonnenlicht.
• Sorgen Sie dafür, dass das Innere Ihres
Kühlschranks gründlich gereinigt wird.
• Falls zwei Kühlschränke nebeneinander
aufgestellt werden sollen, achten Sie
darauf, dass mindestens 2 cm Abstand
zwischen den Geräten verbleibt.
• Wenn Sie den Kühlschrank zum ersten
Mal in Betrieb nehmen, halten Sie sich
bitte an die folgenden Anweisungen für die
ersten sechs Betriebsstunden.
• Die Kühlschranktür sollte nicht zu häufig
geöffnet werden.
• Der Kühlschrank muss zunächst
vollständig leer arbeiten.
• Ziehen Sie nicht den Netzstecker. Falls
der Strom ausfallen sollte, beachten
Sie die Warnhinweise im Abschnitt
„Empfehlungen zur Problemlösung“.
• FüreinenenergieeffizientenBetrieb
und die qualitätsgerechte Lagerung
des Gefriergut sind stets die mit dem
Gefrierschrank gelieferten Körbe/Schübe
zu verwenden.
• EindirekterKontaktdesGefriergutsmit
dem Temperatursensor im Gefrierschrank
kann zu einem erhöhten Energieverbrauch
des Geräts führen. Daher muss solch
ein Kontakt mit einem oder mehreren
Sensoren vermieden werden.
• Das Gerät wurde zum Betrieb
bei Umgebungstemperaturen
bis 43 °C ausgelegt. Auch falls
die Umgebungstemperatur unter
-15 °C abfallen sollte, tauen
Lebensmittel im Gefrierfach dank
des verbesserten elektronischen
Temperaturregelungssystems
nicht auf. Bei der ersten Installation
sollte das Gerät NICHT bei
geringen Umgebungstemperaturen
aufgestellt werden. Dies liegt
daran, dass der Tiefkühlbereich die
Standardbetriebstemperatur nicht
erreichen kann. Sobald das Gerät im
Normalbetrieb arbeitet, können Sie es
auch an einer anderen Stelle aufstellen.
Somit können Sie Ihr Gerät später in der
Garage oder einem unbeheizten Raum
aufstellen, ohne sich Sorgen machen
zu müssen, dass Ihre eingefrorenen
Lebensmittel verderben könnten. Es ist
jedoch durchaus wahrscheinlich, dass die
oben erwähnten niedrigen Temperaturen
dazu führen, dass die Lebensmittel im
Kühlbereich gefrieren; daher verbrauchen
Sie die Lebensmittel im Kühlbereich
bitte auf eine bedarfsgerechte,
kontrollierte Weise. Sobald sich
die Umgebungstemperatur wieder
normalisiert, können Sie die Einstellung
wie erforderlich anpassen.
• Bei Umgebungstemperaturen unter 0 °C
gefrieren die Lebensmittel im Kühlbereich.
Daher empfehlen wir, den Kühlbereich an
Orten mit derart niedrigen Temperaturen
nicht zu nutzen. Den Tiefkühlbereich
können Sie jedoch ganz normal weiter
nutzen.
• Bei einigen Modellen schaltet sich das
Armaturenbrett 5 Minuten nach dem
Schließen der Tür automatisch ab. Es
schaltet sich wieder an, wenn die Tür
geöffnet wurde oder indem man auf einen
beliebigen Schalter drückt.
• Temperaturschwankungen aufgrund des
Öffnens/Schließens der Kühlschranktür
können zur Kondensation an den Böden
in der Tür und im Kühlschrankinnern sowie
an den Glasbehältern führen.

DE
18
1. Tiefkühlbereich-
Temperatureinstellungsanzeige
Zeigt die für den Tiefkühlbereich
eingestellte Temperatur an.
2. Tiefkühltemperaturtaste
Durch mehrmaliges Drücken dieser Taste
stellen Sie die Tiefkühlbereichtemperatur
auf -18 °, -20 °, -22 °, -24 °, -18 °C, ... ein.
Mit dieser Taste stellen Sie die gewünschte
Temperatur des Tiefkühlbereiches ein.
3. Kühlbereich-
Temperatureinstellungsanzeige
Zeigt die für den Kühlbereich eingestellte
Temperatur an.
4. Kühltemperaturtaste
Durch mehrmaliges Drücken dieser Taste
stellen Sie die Kühlbereichtemperatur auf 8
°, 6 °, 4°, 2 °, 8 °C ... ein. Mit dieser Taste
stellen Sie die gewünschte Temperatur des
Kühlbereiches ein.
5. Energiesparmodus-Anzeige
Zeigt an, dass das Kühlgerät besonders
energiesparend arbeitet.
7. Ionisatoranzeige
Die Anzeige leuchtet ständig. Diese
Leuchte zeigt an, dass Ihr Kühlschrank
gegen Bakterienbefall geschützt ist.
7. Fehlerstatusanzeige
Diese Anzeige leuchtet auf, wenn das Gerät
nicht richtig kühlt oder ein Sensor ausgefallen
sein sollte. Wenn diese Anzeige aktiv ist,
zeigt die Tiefkühlbereichtemperaturanzeige
„e“, die Kühlbereichtemperaturanzeige
Zahlen an; z. B. „1, 2, 3, ...“. Anhand dieser
Zahlen kann der Kundendienst wertvolle
Informationen über den jeweiligen Fehler
gewinnen.

DE
19
Anzeigetafel
Die Anzeigetafel kann je nach Modell Ihres Geräts Unterschiede vorweisen.
Die visuellen und akustischen Funktionen Ihrer Anzeigetafel helfen Ihnen bei der Nutzung
Ihres Geräts.
45
76
8
9
1 2 3
1. Anzeige Tiefkühlbereich-Schubladen
2. Anzeige Fehlerzustand
3. Temperaturanzeige
4. Ferienfunktion-Taste
5. Temperatureinstellungsknopf
6. Bereichsauswahl-Taste
7. Anzeige Kühlbereich
8. Anzeige Eco-Modus
9. Ferienfunktion-Taste
*optionell
C Abbildungen und Angaben in dieser Anleitung sind schematisch und können etwas
von Ihrem Gerät abweichen. Falls Teile nicht zum Lieferumfang des erworbenen
Gerätes zählen, gelten sie für andere Modelle.

DE
20
1. Anzeige Tiefkühlbereich-Schubladen
Beim Einstellen des Gefrierbereichs brennt
das Licht des Kühlbereichs.
2. Anzeige Fehlerzustand
Falls Ihr Kühlschrank nicht ausreichend
kühlt oder ein Sensordefekt zustande
kommt, schaltet sich diese Anzeige ein.
Wenn diese Anzeige aktiviert ist, wird in der
Temperaturanzeige des Gefrierfachs "E",
in der Temperaturanzeige des Kühlfachs
Zahlen wie "1, 2, 3 ..." angezeigt.
Die Zahlen in diesen Anzeigen geben dem
Personal des Kundendienstes Hinweise
zum Fehler.( )
3. Temperaturanzeige
Zeigt die Temperaturen des Gefrier- und
Kühlfachs an.
4.Ferienfunktion-Taste
Um diese Funktion zu aktivieren, drücken
Sie die Ferientaste 3 Sekunden lang. Wenn
die Ferienfunktion aktiviert ist, zeigt die
Temperaturanzeige des Kühlfachs "- -" an
und es finden im Kühlfach keine aktiven
Kühlungsprozesse statt.
Bei dieser Funktion ist es nicht geeignet,
dass Sie Lebensmittel im Kühlfach lagern.
Die anderen Fächer werden in den
entsprechend eingestellten Temperaturen,
weiterhin kühlen.
Um diese Funktion auszuschalten, drücken
Sie nochmals auf die Ferienfunktions-Taste.
( )
5. Temperatureinstellungsknopf
Ändert die Temperatur zwischen -24°C ...
- 18°C und 8°...1°C.( )
6. Bereichsauswahl-Taste
Um zwischen dem Kühl- und dem
Gefrierbereich zu wechseln, drücken
Sie auf die Bereichsauswahl-Taste des
Kühlschranks. ( )
7. Anzeige Kühlbereich
Beim Einstellen des Kühlungsbereichs
brennt das Licht des Kühlbereichs.
8. Anzeige Eco-Modus
Zeigt an, dass der Kühlschrank im
Energiespar-Modus betrieben wird. Diese
Anzeige wird aktiv, wenn der Gefrierbereich
auf die Temperatur -18°C eingestellt ist. ( )
9.Ferienfunktion-Taste
Zeigt an, dass die Ferienfunktion aktiv ist.
( )

DE
21
1. Tiefkühltemperaturtaste
2. Kühltemperaturtaste
3. Fehlerstatusanzeige
4. Tastensperre-Anzeige
5. Öko-Extra-Anzeige
6. Öko-Extra-/Urlaubstaste
7. Urlaubsfunktionanzeige
8. Energiesparfunktion (Display aus)
9. Eisbereiter-aus-Anzeige (* bei bestimmten
Modellen)
10. Energiesparanzeige
11. Schnellkühlanzeige
12. Schnellkühltaste
13. Kühlbereich-
Temperatureinstellungsanzeige
14. Schnellgefriertaste/Eisbereiter-ein/aus-
Taste
15. Tiefkühlbereich-
Temperatureinstellungsanzeige
16. Schnellgefrieranzeige
C Abbildungen und Angaben in dieser Anleitung sind schematisch und können etwas von
Ihrem Gerät abweichen. Falls Teile nicht zum Lieferumfang des erworbenen Gerätes zählen,
gelten sie für andere Modelle.
* optional
15
14
1
2
3
4
5
13
12
11
10
9
8*
*
7
6

DE
22
1. Tiefkühltemperaturtaste
Mit dieser Funktion geben Sie die
Temperatur des Tiefkühlbereiches vor.
Durch mehrmaliges Drücken dieser Taste
stellen Sie die Tiefkühlbereichtemperatur
auf -18 °, -19 °C, -20 °, -21 °C, -22 °, -23
°C oder -24 ° ein.
2. Kühltemperaturtaste
Mit dieser Funktion geben Sie die
Temperatur des Kühlbereiches vor. Durch
mehrmaliges Drücken dieser Taste stellen
Sie die Kühlbereichtemperatur auf 8 °, 7 °, 6
°, 5 °, 4 °, 3 ° oder 2 °C ein.
3. Fehlerstatusanzeige
Diese Anzeige leuchtet auf, wenn das Gerät
nicht richtig kühlt oder ein Sensor ausgefallen
sein sollte. Wenn diese Anzeige aktiv ist,
zeigt die Tiefkühlbereichtemperaturanzeige
„E“, die Kühlbereichtemperaturanzeige
Zahlen an; z. B. „1, 2, 3, ...“. Anhand dieser
Zahlen kann der Kundendienst wertvolle
Informationen über den jeweiligen Fehler
gewinnen.
Wenn Sie warme Speisen in den
Kühlbereich geben oder die Tür längere Zeit
offen steht, leuchtet das Ausrufezeichen
einige Zeit auf. Dies ist kein Fehler; die
Warnung verschwindet, sobald die Speisen
abkühlen.
4. Tastensperre-Anzeige
Diese Funktion nutzen Sie, wenn
die Temperatureinstellungen Ihres
Gerätes unverändert bleiben sollen.
Zum Einschalten dieser Funktion
halten Sie die Kühltemperatur- und die
Tiefkühltemperaturtaste gemeinsam 3
Sekunden lang gedrückt.
5. Öko-Extra-Anzeige
Zeigt an, dass die Öko-Extra-Funktion
aktiv ist.
Wenn diese Funktion aktiv ist, erkennt
Ihr Kühlgerät die Zeiten, in denen Sie
das Kühlgerät besonders selten nutzen
und passt die Kühlungsleistung in diesen
Zeiträumen entsprechend an. In den
Perioden besonders energiesparender
Kühlung leuchtet das Energiesparsymbol
auf.
Zum Abschalten dieser Funktion drücken
Sie die Taste noch einmal.
6. Öko-Extra-/Urlaubstaste
Zum Einschalten der Öko-Extra-Funktion
berühren Sie diese Taste nur kurz. Durch
Gedrückthalten dieser Taste (3 Sekunden
lang) schalten Sie die Urlaubsfunktion ein.
Zum Abschalten der ausgewählten Funktion
drücken Sie die Taste noch einmal.
7. Urlaubsfunktionanzeige
Zeigt an, dass die Urlaubsfunktion aktiv
ist. Wenn diese Funktion aktiv ist, erscheint
„- -“ in der Anzeige zum Kühlbereich – der
Kühlbereich wird nicht mehr gekühlt. Die
restlichen Bereiche werden weiterhin mit
den vorgegebenen Temperaturen gekühlt.
Zum Abschalten dieser Funktion drücken
Sie die Taste noch einmal.
8. Energiesparfunktion (Display aus)
Wenn die Gerätetüren lange Zeit
geschlossen bleiben, wird die
Energiesparfunktion automatisch aktiviert
und das Energiesparsymbol leuchtet auf.
Bei aktiver Energiesparfunktion
erlöschen sämtliche Display-Symbole mit
Ausnahme des Energiesparsymbols. Die
Energiesparfunktion wird aufgehoben,
sobald Tasten betätigt werden oder die Tür
geöffnet wird. Das Display zeigt wieder die
normalen Symbole.
Die Energiesparfunktion wird während der
Lieferung ab Werk aktiviert und kann nicht
aufgehoben werden.
9. Eisbereiter-aus-Anzeige
Wenn diese Funktionsanzeige leuchtet,
arbeitet der Eisbereiter nicht.
Zum Aktivieren der Eisbereiter-aus-
Funktion müssen Sie die Schnellgefriertaste
3 Sekunden lang gedrückt halten.
10. Energiesparanzeige
Zeigt an, dass das Kühlgerät besonders
energiesparend arbeitet. Diese Anzeige
leuchtet auf, wenn die Temperatur des
Tiefkühlbereiches auf -18 °C eingestellt ist
oder das Gerät mit der Öko-Extra-Funktion
besonders ökonomisch arbeitet.

DE
23
11. Schnellkühlanzeige
Dieses Symbol blinkt, wenn die
Schnellkühlfunktion aktiv ist.
12. Schnellkühltaste
Wenn Sie die Schnellkühltaste drücken,
wird die Innentemperatur über den
vorgegebenen Wert hinaus noch weiter
abgesenkt.
Diese Funktion dient dazu, Lebensmittel,
die im Kühlbereich aufbewahrt werden,
schnell herunterzukühlen.
Wenn Sie große Mengen Lebensmittel
kühlen möchten, sollten Sie diese Funktion
vor dem Einlagern der Lebensmittel
einschalten.
Die Schnellkühlanzeige leuchtet bei
aktiver Schnellkühlfunktion auf. Zum
Aufheben dieser Funktion drücken Sie die
Schnellkühltaste noch einmal.
Sofern Sie diese Funktion nicht vorzeitig
abschalten, wird das Schnellkühlen
beendet, sobald die nötige Temperatur
erreicht ist. Nach 4 Stunden schaltet sich
diese Funktion automatisch ab.
Diese Funktion wird nach einem
Stromausfall nicht automatisch wieder
eingeschaltet.
13. Kühlbereich-
Temperatureinstellungsanzeige
Zeigt die für den Kühlbereich eingestellte
Temperatur an.
14. Schnellgefriertaste Eisbereiter-
ein/aus-Taste
Zeigt die für den Tiefkühlbereich
eingestellte Temperatur an.
Wenn Ihr Kühlschrank kein Eis mehr
bereiten soll, halten Sie die Eisbereiter-
ein/aus-Taste 3 Sekunden lang gedrückt.
Anschließend wird kein Wasser mehr aus
dem Tank zugeführt. Bereits bereitetes Eis
kann aber nach wie vor aus dem Spender
entnommen werden. Wenn Ihr Kühlschrank
wieder Eis bereiten soll, halten Sie die
Eisbereiter-ein/aus-Taste 3 Sekunden lang
gedrückt.
15. Tiefkühlbereich-
Temperatureinstellungsanzeige
Die Schnellgefrieranzeige leuchtet bei
aktiver Schnellgefrierfunktion auf. Zum
Abbrechen dieser Funktion drücken Sie
die Schnellgefriertaste noch einmal. Die
Schnellgefrieranzeige erlischt, die normalen
Einstellungen werden wiederhergestellt.
Sofern Sie diese Funktion nicht vorzeitig
abschalten, wird das Schnellgefrieren
beendet, sobald die nötige Temperatur
erreicht ist. Nach 8 Stunden schaltet sich
diese Funktion automatisch ab.
Wenn Sie große Mengen frischer
Lebensmittel einfrieren möchten, drücken
Sie die Schnellgefriertaste, bevor Sie die
Lebensmittel in den Tiefkühlbereich geben.
Sollten Sie die Schnellgefriertaste
mehrmals innerhalb kurzer Zeit drücken,
spricht eine elektronische Schutzschaltung
an, die dafür sorgt, dass der Kompressor
nicht sofort anläuft.
Diese Funktion wird nach einem
Stromausfall nicht automatisch wieder
eingeschaltet.
16. Schnellgefrieranzeige
Dieses Symbol blinkt, wenn die
Schnellgefrierfunktion aktiv ist.

DE
24
4
2
1
20
19
6
5
22
18
16
21
10
11
9
3
13
15
7
17
*8
14
12
1. Tiefkühlbereich-
Temperatureinstellungsanzeige
2. Tiefkühlbereichtemperatureinstellungsfunktion
3. Schnellgefriertaste/Eisbereiter-ein/aus-Taste
4. Schnellgefrieranzeige
5. Kühlbereich-Temperatureinstellungsanzeige
6. Kühlbereichtemperatureinstellfunktion
7. Schnellkühltaste
8. Eisbereiter-aus-Anzeige (* bei bestimmten
Modellen)
9. Öko-Fuzzy (spezielle Energiesparfunktion)
10. Öko-Fuzzy-Anzeige (besonders
ökonomischer Betrieb)
11. Urlaubsfunktion
12. Urlaubsfunktionanzeige
13. Energiesparfunktion
14. Energiesparanzeige
15. Tastensperre
16. Tastensperre-Anzeige
17. Energiesparanzeige
18. Hochtemperatur-/Fehler-Warnanzeige
19. Eiscremefunktionsauswahl
20. Eiscremefunktionsanzeige
21. Eiscremeanzeige
22. Schnellkühlanzeige
* optional
C Abbildungen und Angaben in dieser Anleitung sind schematisch und können etwas von
Ihrem Gerät abweichen. Falls Teile nicht zum Lieferumfang des erworbenen Gerätes zählen,
gelten sie für andere Modelle.

DE
25
1. Tiefkühlbereichtemperaturanzeige
Zeigt die für den Tiefkühlbereich
eingestellte Temperatur an.
2.
Tiefkühlbereichtemperatureinstellung
Mit dieser Funktion geben Sie die
Temperatur des Tiefkühlbereiches vor. Durch
mehrmaliges Drücken dieser Taste stellen
Sie die Tiefkühlbereichtemperatur auf -18°C,
-19ºC, -20°C, -21°C, -22°, -23°C oder
-24 °C ein.
3. Schnellgefriertaste Eisbereiter-ein/
aus-Taste
Die Schnellgefrieranzeige leuchtet bei
aktiver Schnellgefrierfunktion. Zum
Abbrechen dieser Funktion drücken Sie
die Schnellgefriertaste noch einmal. Die
Schnellgefrieranzeige erlischt, die normalen
Einstellungen werden wiederhergestellt.
Sofern Sie diese Funktion nicht vorzeitig
abschalten, wird das Schnellgefrieren
beendet, sobald die nötige Temperatur
erreicht ist. Nach 4 Stunden schaltet
sich diese Funktion automatisch ab.
Wenn Sie große Mengen frischer
Lebensmittel einfrieren möchten, drücken
Sie die Schnellgefriertaste, bevor Sie
die Lebensmittel in den Tiefkühlbereich
geben. Sollten Sie die Schnellgefriertaste
mehrmals innerhalb kurzer Zeit drücken,
spricht eine elektronische Schutzschaltung
an, die dafür sorgt, dass der Kompressor
nicht sofort anläuft. Diese Funktion wird
nach einem Stromausfall nicht automatisch
wieder eingeschaltet!
4. Schnellgefrieranzeige
Dieses Symbol blinkt, wenn die
Schnellgefrierfunktion aktiv ist.
5. Kühlbereich-
Temperatureinstellungsanzeige
Zeigt die für den Kühlbereich eingestellte
Temperatur an.
6.
Kühlbereichtemperatureinstellfunktion
Mit dieser Funktion geben Sie die
Temperatur des Kühlbereiches vor. Durch
mehrmaliges Drücken dieser Taste stellen
Sie die Kühlbereichtemperatur auf 8°C,
7°C, 6°C, 5°C, 4°C, 3°C oder 2°C ein.
7. Schnellkühltaste
Wenn Sie die Schnellkühltaste drücken,
wird die Innentemperatur über den
vorgegebenen Wert hinaus noch weiter
abgesenkt. Diese Funktion dient dazu,
Lebensmittel im Kühlbereich schnell
herunterzukühlen. Wenn Sie große
Mengen Lebensmittel kühlen möchten,
sollten Sie diese Funktion vor dem
Einlagern der Lebensmittel einschalten.
Die Schnellkühlanzeige leuchtet bei aktiver
Schnellkühlfunktion. Zum Aufheben dieser
Funktion drücken Sie die Schnellkühltaste
noch einmal. Die Schnellkühlanzeige
erlischt, die normalen Einstellungen werden
wiederhergestellt. Sofern Sie diese Funktion
nicht vorzeitig abschalten, wird das
Schnellkühlen beendet, sobald die nötige
Temperatur erreicht ist. Nach 2 Stunden
schaltet sich diese Funktion automatisch
ab.
Diese Funktion wird nach einem
Stromausfall nicht automatisch wieder
eingeschaltet.
8. Eisbereiter-aus-Anzeige
Wenn diese Funktionsanzeige leuchtet,
arbeitet der Eisbereiter nicht.
Zum Aktivieren der Eisbereiter-aus-
Funktion müssen Sie die Schnellgefriertaste
3 Sekunden lang gedrückt halten.

DE
27
17. Energiesparanzeige
Die Energiesparanzeige leuchtet, wenn
die Tiefkühlbereichtemperatur auf -18 °C
eingestellt ist. Die Energiesparanzeige
erlischt, wenn Sie Schnellgefrieren oder
Schnellkühlen auswählen.
18. Hochtemperatur-/Fehler-
Warnanzeige
Diese Leuchte signalisiert zu hohe
Innentemperaturen und sonstige Fehler.
19. Eiscremefunktionsauswahl
Die Eiscremetaste blinkt, wenn sie 3
Sekunden lang gedrückt gehalten wird.
Wenn Sie diese Taste innerhalb 30
Sekunden nicht noch einmal drücken, tritt
wieder der vorherige Zustand ein – die
Eiscremeanzeige schaltet sich aus.
Bei jeder kurzen Betätigung der
Eiscremetaste erhöht sich die Zahl.
Wenn Sie die Eiscremetaste erneut 3
Sekunden lang gedrückt halten, leuchtet
das Eiscremesymbol im Display wieder auf.
Die Eiscremefunktion wird ausgewählt, die
Zahl leuchtet stetig, während die Symbole
auf der linken Seite animiert leuchten.
Zum Abschluss der Eiscremebereitung
blinken die Symbole, ein Signalton erklingt.
5 Minuten nach diesem Signal erlöschen
sämtliche Eiscremesymbole.
Zum Abschalten des Signalton drücken
Sie die Eiscremetaste einmal kurz; dabei
erlöschen auch die Eiscremetasten.
Wenn Sie die Eiscremetaste bei laufender
Eiscremebereitung kurz drücken, ändert
sich nichts in der Anzeige.
Falls bei laufender Eiscremebereitung
ein Stromausfall eintritt, wird die
Eiscremebereitung nach dem Stromausfall
wieder fortgesetzt.
Falls Sie die Eiscremebereitung bei einer
Tiefkühlbereichtemperatur über -10 °C
einschalten, blinken der Buchstabe E und
ein Warnsymbol 30 Sekunden lang in der
Anzeige. Wenn Sie die Eiscremetaste 3
Sekunden lang gedrückt halten, kehrt die
Anzeige zur normalen Eiscremeansicht
zurück, Eiscreme- und Warnsymbol
erlöschen.
20. Eiscremefunktionsauswahl
Zeigt an, welche Eiscremefunktion
eingestellt wurde.
21. Eiscremeanzeige
Leuchtet bei aktiver Eiscremebereitung
auf.
22. Schnellkühlanzeige
Dieses Symbol blinkt, wenn die
Schnellkühlfunktion aktiv ist.

DE
28
Temperatureinstelltaste
Mit der Temperatureinstelltaste regeln Sie
die Innentemperatur Ihres Kühlgerätes.
Temperatur einstellen
Mit dem Temperatureinsteller an
der rechten Innenwand regeln Sie die
Temperatureinstellung Ihres Gerätes. Sie
können den Temperatureinsteller auf fünf
unterschiedliche Positionen einstellen.
Wählen Sie die jeweils passende Position
für Ihren Einsatzzweck.
Stufe 1 wird bei geringster Kühlung, die
maximale Stufe bei intensivster Kühlung des
Kühlbereiches angezeigt.
* optional Doppeltes Kühlsystem
Ihr Kühlgerät ist mit zwei getrennten
Kühlsystemen für Kühl- und Tiefkühlbereich
ausgestattet. Dadurch vermischt sich die
Luft im Kühlbereich nicht mit der Luft im
Tiefkühlbereich. Durch die Trennung der
Kühlsysteme kühlt Ihr Gerät erheblich
schneller als viele andere Kühlgeräte. Auch
die Gerüche der beiden Kühlbereiche
bleiben getrennt. Darüber hinaus sparen
Sie Energie, da auch das automatische
Abtauen getrennt erfolgt.
C Abbildungen und Angaben in dieser Anleitung sind schematisch und können etwas von
Ihrem Gerät abweichen. Falls Teile nicht zum Lieferumfang des erworbenen Gerätes zählen,
gelten sie für andere Modelle.
•Lebensmittel,dieSieeinfrierenmöchten,
sollten frisch und von guter Qualität sein.
•VerteilenSiedieLebensmittel/Gerichte
auf familienfreundliche oder anderweitig
sinnvolle Portionen.
•Lebensmittelsolltenluftdichtverpackt
sein, damit sie nicht austrocknen. Dies gilt
auch dann, wenn Sie Lebensmittel nur
kurze Zeit lagern möchten.
•Verpackungsmaterialienmüssen
luftdicht und gegen Kälte und Feuchtigkeit
beständig sein. Lebensmittelverpackungen
sollten ausreichend dick und stabil
sein. Andernfalls kann es vorkommen,
dass Lebensmittel beim Gefrieren die
Verpackung durchstoßen. Achten Sie
grundsätzlich darauf, dass die Verpackung
richtig versiegelt wird, damit Lebensmittel
maximal lange haltbar bleiben.
•VerbrauchenSieeingefrorene
Lebensmittel direkt nach dem Auftauen,
frieren Sie sie nicht wieder ein.
•BittebeachtenSiediefolgenden
Hinweise, um beste Resultate zu erzielen.

DE
30
Kühlbereich-
Ablagen
Lebensmittel in
Pfannen, Töpfen, auf
abgedeckten Tellern, in
geschlossenen Behältern
Kühlbereich-
Türablagen
Kleine, verpackte
Lebensmittelprodukte
uder Getränke (zum
Beispiel Milch, Saft oder
Bier)
Gemüsefach Gemüse und Früchte
Frischefach
Milch- und
Wurstprodukte (Käse,
Butter, Salami und
dergleichen)
Hinweise zum Tiefkühlen
Lebensmittel sollten schnellstmöglich
eingefroren werden, damit sie nicht an
Qualität verlieren.
Sie können die Frische Ihrer Lebensmittel
viele Monate bewahren (bei einer
Tiefkühlbereichtemperatur von maximal -18
°C).
WARNUNG! A
•VerteilenSiedieLebensmittel/Gerichte
auf familienfreundliche oder anderweitig
sinnvolle Portionen.
• Lebensmittel sollten luftdicht verpackt
sein, damit sie nicht austrocknen. Dies
gilt auch dann, wenn Sie Lebensmittel nur
kurze Zeit lagern möchten.
Benötigtes Verpackungsmaterial:
•KältebeständigesKlebeband
•SelbstklebendeEtiketten
•Gummiringe
•Stift
Geeignete Verpackungsmaterialien
müssen reißfest und unempfindlich
gegenüber Kälte, Feuchtigkeit, Gerüchen,
Ölen und Säuren sein.
Einzufrierende Lebensmittel sollten keinen
direkten Kontakt zu bereits gefrorenen
Eierbehälter
Sie können den Eierbehälter in beliebige
Türablagen einlegen. Dabei bieten sich die
unteren Ablagen an, da hier etwas geringere
Temperaturen herrschen.
Legen Sie den Eierbehälter niemals in den
Tiefkühlbereich.
Achten Sie darauf, dass sich Eier und
andere Lebensmittel nicht berühren.
Lebensmitteln haben, damit diese nicht
antauen. Angetaute Lebensmittel müssen
so schnell wie möglich verbraucht, dürfen
nicht wieder eingefroren werden.

DE
31
Beschreibung und
Hinweise zur Reinigung des
Geruchsfilters:
* optional
Der Geruchsfilter verhindert die Bildung
unangenehmer Gerüche in Ihrem
Kühlschrank.
Ziehen Sie die Abdeckung, in der sich
der Geruchsfilter befindet, nach unten,
entnehmen Sie ihn wie in der Abbildung
gezeigt. Legen Sie den Filter einen Tag lang
ins Sonnenlicht. Der Filter reinigt sich in
dieser Zeit. Bringen Sie den Filter wieder an
Ort und Stelle an.
Der Geruchsfilter muss einmal jährlich
gereinigt werden.
Frühstücksfach
Der Lebensmittel wie Fisch, rotes
Fleisch, Geflügel und Milchprodukte wie
Käse, Joghurt und Milch ein paar Grad
unter der Temperatur des Kühlbereiches
gelagert werden sollten, bringen Sie solche
Lebensmittel am besten im Frühstücksfach
unter. Gemüse und Früchte sollten nicht
im Frühstücksfach gelagert werden.
Insbesondere Tomaten, Auberginen,
Zucchini, Gurken und Zitronen vertragen
keine starke Kälte. Daher gehören solche
Lebensmittel nicht in das Frühstücksfach.
Durch Herausnehmen des
Frühstücksfaches können Sie das Volumen
Ihres Kühlschranks vergrößern.
1. Ziehen Sie das Fach bis zum Anschlag zu
sich hin.
2. Heben Sie den vorderen Bereich an,
ziehen Sie das Fach anschließend zu sich
hin heraus.

DE
32
Wasserspender
* optional
Der Wasserspender ist eine praktische
Einrichtung, mit der Sie kühles Wasser
zapfen können, ohne dabei die Tür Ihres
Kühlschranks öffnen zu müssen. Da Sie die
Tür des Gerätes nicht häufig öffnen müssen,
sparen Sie eine Menge Energie.
Wasserspendertank füllen
Der Wassertank befindet sich an der
Innenseite der Türablage. Öffnen Sie den
Deckel, füllen Sie Trinkwasser ein. Schließen
Sie anschließend den Deckel.
So benutzen Sie den Wasserspender
Drücken Sie mit dem Glas gegen den Hebel
des Wasserspenders. Die Wasserausgabe
stoppt, sobald der Hebel losgelassen wird.
Den schnellsten Durchfluss erreichen Sie,
wenn Sie den Hebel komplett eindrücken.
Denken Sie daran, dass die Stärke des
Wasserdurchflusses davon abhängt, wie
weit der Hebel eingedrückt wird.
Geben Sie den Hebel langsam wieder frei,
sobald das Glas fast vollständig gefüllt ist,
damit nichts überläuft. Das Wasser tritt nur
tropfenweise aus, wenn Sie den Hebel nur
leicht betätigen; dies ist völlig normal.
Warnung!
• FüllenSiedenWassertankNURmit
sauberem Trinkwasser, nicht mit
anderen Flüssigkeiten gleich welcher
Art. Falls andere Flüssigkeiten eingefüllt
werden, kann der Wasserspender
irreparabel beschädigt werden. Solche
Beschädigungen werden nicht durch die
Garantie abgedeckt. Viele Flüssigkeiten
und Getränke enthalten Zusätze, die
das Material des Wassertanks angreifen
können.

DE
33
• NutzenSieausschließlichTrinkwasser.
• DieKapazitätdesWassertanksbeträgt3
Liter; füllen Sie nicht mehr hinein.
• DrückenSiemiteinemhaltbarenGlas
gegen den Hebel des Wasserspenders.
Falls Sie Einwegbecher verwenden,
betätigen Sie den Hebel mit dem Finger.
Wassertank reinigen
• EntfernenSiedenFüllbehälteraufder
Innenseite der Türablage.
• EntfernenSiedieTürablage,indemSie
diese an beiden Seiten greifen.
• FassenSiedenWassertankanbeiden
Seiten, ziehen Sie ihn in einem Winkel von
45 ° heraus.
• ÖffnenSiedieAbdeckung,reinigenden
Wassertank.
Wichtig:
Die Komponenten des Wasserspenders
und des Wassertanks sollten nicht in der
Spülmaschine gereinigt werden.

DE
34
Tropfschale
Wasser, das bei der Nutzung des
Wasserspenders heruntertropft, sammelt
sich in der Tropfschale.
Nehmen Sie das Kunststoffsieb wie in der
Abbildung gezeigt heraus.
Entfernen Sie angesammeltes Wasser mit
einem sauberen, trockenen Tuch.
Verschiebbarer
Vorratsbehälter
* optional
Dieses Zubehör ist so konstruiert, dass das
Volumen der Türablagen vergrößert wird. So
können Sie einfach gößere Flaschen, Gläser
und Dosen in die untere Flaschenablage
platzieren, da diese nach links oder rechts
geschoben werden kann.
(Die Abbildung dient lediglich zur
Orientierung und muss nicht exakt mit
Ihrem Gerät übereinstimmen.)
Blaue Beleuchtung
* optional
Im Gemüsefach gelagertes Gemüse
wird mit blauem Licht beleuchtet. Dadurch
wird die Photosynthese mit Hilfe des
Wellenlängeneffekts des blauen Lichts
fortgesetzt, Vitamine und Frische bleiben
erhalten.

DE
35
Drehbarer Behälter
(bei bestimmten Modellen)
Der Behälter lässt sich nach links oder
rechts verschieben, um Platz für hohe
Flaschen, Gläser und andere hohe
Gegenstände auf der Ablage darunter zu
schaffen (Abbildung 1).
Darin gelagerte Lebensmittel erreichen
Sie, indem Sie den Behälter an der rechten
Seite fassen und nach vorne drehen
(Abbildung 2).
Wenn Sie den Behälter zum einfacheren
Beladen oder zum Reinigen herausnehmen
möchten, drehen Sie ihn um 90 ° nach
vorne, heben ihn etwas an und ziehen ihn
dann zu sich hin heraus (Abbildungen 3 – 4).
3
1
2
4

DE
36
Auto-Eisbereiter
* optional
Mit dem automatischen Eisbereiter haben
Sie kühles Eis stets schnell und bequem
zur Hand. Nehmen Sie den Wassertank
aus dem Kühlbereich heraus, füllen Sie
den Tank mit Wasser, setzen Sie den Tank
anschließend wieder ein.
Nach etwa zwei Stunden liegen die ersten
Eiswürfel in der Eisbereiter-Schublade im
Tiefkühlbereich für Sie bereit.
Wenn Sie den Wassertank komplett füllen,
erhalten Sie etwa 60 – 70 Eiswürfel.
Tauschen Sie das Wasser im Wassertank
etwa alle 2 – 3 Wochen aus.
Hinweis: Bei Geräten mit automatischem
Eisbereiter können Geräusche durch das
herabfallende Eis entstehen. Dies ist völlig
normal und keine Fehlfunktion.

DE
37
Eisbereiter und Eisbehälter
* optional
Eisbereiter verwenden
Füllen Sie den Eisbereiter mit Wasser,
setzen Sie ihn in seine Halterung. Ihr Eis ist
nach etwa zwei Stunden fertig. Nehmen Sie
den Eisbereiter zum Entnehmen des Eises
nicht heraus.
Drehen Sie die Knöpfe am Eisbehälter um
90 ° im Uhrzeigersinn.
Die Eiswürfel fallen in den Eiswürfelbehälter
darunter.
Sie können den Eisbehälter zum Servieren
der Eiswürfel herausnehmen.
Wenn Sie möchten, können Sie das Eis
auch im Eisbehälter aufbewahren.
Eisbehälter
Der Eisbehälter dient ausschließlich zum
Sammeln der Eiswürfel. Füllen Sie kein
Wasser ein. Der Behälter wird sonst platzen.

DE
40
Eiscremebereiter
* optional
• ÖffnenSiedenTiefkühlbereich.
• DrückenSieaufdieAbdeckungdes
Eiscremebereiters im Tiefkühlbereich,
lassen Sie die Abdeckung danach wieder
los.
• SetzenSiedieFrischgefrierschaleindie
Basisabdeckung, schieben Sie diese in
den höchsten Einschub im Fach.
• GebenSiedieaufZimmertemperatur
abgekühlte Eiscrememischung in den
Eiscremebereiterbehälter.
• HaltenSiesichbeiderZubereitung
der Eiscrememischung an die in den
Rezepten angegebenen Mengen. Falls Sie
mehr Eiscrememischung als im Rezept
angegeben einfüllen, läuft die Mischung
über.
• SetzenSiedenBehälterindasGehäuse
am Boden des Faches an die linke Seite.
• DrehenSiedenBehälterzumFixieren
nach rechts.
Produkt Specifikationer
| Mærke: | BEKO |
| Kategori: | Køleskab |
| Model: | DN161230DX |
Har du brug for hjælp?
Hvis du har brug for hjælp til BEKO DN161230DX stil et spørgsmål nedenfor, og andre brugere vil svare dig
Køleskab BEKO Manualer

26 Februar 2025
4 Februar 2025
14 Januar 2025
14 Januar 2025
14 Januar 2025
14 Januar 2025
12 Januar 2025
11 Januar 2025
11 Januar 2025
10 Januar 2025
Køleskab Manualer
- Køleskab DeLonghi
- Køleskab Ikea
- Køleskab Bosch
- Køleskab SilverCrest
- Køleskab PKM
- Køleskab Gram
- Køleskab TCL
- Køleskab Wolkenstein
- Køleskab Siemens
- Køleskab Samsung
- Køleskab Scandomestic
- Køleskab GE
- Køleskab Daikin
- Køleskab Zanussi
- Køleskab Cylinda
- Køleskab Panasonic
- Køleskab Candy
- Køleskab Fisher & Paykel
- Køleskab Gorenje
- Køleskab Husqvarna
- Køleskab VOX
- Køleskab Miele
- Køleskab Silverline
- Køleskab Blomberg
- Køleskab Philips
- Køleskab Caso
- Køleskab Concept
- Køleskab Teka
- Køleskab OK
- Køleskab LG
- Køleskab AEG
- Køleskab Electrolux
- Køleskab Thetford
- Køleskab Bauknecht
- Køleskab Elica
- Køleskab Whirlpool
- Køleskab Vestfrost
- Køleskab Mitsubishi
- Køleskab Sharp
- Køleskab Hotpoint
- Køleskab Dacor
- Køleskab Melissa
- Køleskab Atag
- Køleskab Kenwood
- Køleskab Mobicool
- Køleskab Omega
- Køleskab Hoover
- Køleskab Daewoo
- Køleskab Arçelik
- Køleskab Junker
- Køleskab JennAir
- Køleskab Waeco
- Køleskab Garmin
- Køleskab Sanyo
- Køleskab Grundig
- Køleskab Worx
- Køleskab Progress
- Køleskab De Dietrich
- Køleskab Indesit
- Køleskab GYS
- Køleskab Hotpoint Ariston
- Køleskab Livoo
- Køleskab Toshiba
- Køleskab Pyle
- Køleskab Klarstein
- Køleskab Ardo
- Køleskab Furrion
- Køleskab Etna
- Køleskab Yamaha
- Køleskab Infiniton
- Køleskab Trisa
- Køleskab Princess
- Køleskab Matsui
- Køleskab Nedis
- Køleskab Emerio
- Køleskab Severin
- Køleskab Scholtès
- Køleskab Hansa
- Køleskab Logik
- Køleskab Bartscher
- Køleskab Polar
- Køleskab Moulinex
- Køleskab Sauber
- Køleskab Westinghouse
- Køleskab Ilve
- Køleskab Element
- Køleskab Thomson
- Køleskab Constructa
- Køleskab Hyundai
- Køleskab AKAI
- Køleskab Hisense
- Køleskab TriStar
- Køleskab Porkka
- Køleskab Brandt
- Køleskab Adler
- Køleskab Camry
- Køleskab Crivit
- Køleskab Dometic
- Køleskab Mestic
- Køleskab Blaupunkt
- Køleskab Tomado
- Køleskab AEG-Electrolux
- Køleskab Asko
- Køleskab Atlas
- Køleskab Becken
- Køleskab Elvita
- Køleskab Gaggenau
- Køleskab Helkama
- Køleskab Iberna
- Køleskab Ignis
- Køleskab Küppersbusch
- Køleskab Leonard
- Køleskab Neff
- Køleskab Privileg
- Køleskab Smeg
- Køleskab Viva
- Køleskab Costway
- Køleskab Honeywell
- Køleskab Quigg
- Køleskab Hitachi
- Køleskab Proficook
- Køleskab Medion
- Køleskab Liebherr
- Køleskab Ariston Thermo
- Køleskab Fagor
- Køleskab Haier
- Køleskab Bifinett
- Køleskab Bomann
- Køleskab Russell Hobbs
- Køleskab KitchenAid
- Køleskab United
- Køleskab Luxor
- Køleskab Rosieres
- Køleskab Boretti
- Køleskab Vivax
- Køleskab Mora
- Køleskab Crosley
- Køleskab UPO
- Køleskab Zanker
- Køleskab Galanz
- Køleskab Amana
- Køleskab Amica
- Køleskab Arthur Martin-Electrolux
- Køleskab Euromaid
- Køleskab Comfee
- Køleskab Sunny
- Køleskab Dimplex
- Køleskab Finlux
- Køleskab Telefunken
- Køleskab CaterCool
- Køleskab Kernau
- Køleskab Bertazzoni
- Køleskab Caple
- Køleskab SIBIR
- Køleskab Zerowatt
- Køleskab Cuisinart
- Køleskab Mercury
- Køleskab Primo
- Køleskab Orbegozo
- Køleskab Viking
- Køleskab Franke
- Køleskab Optimum
- Køleskab Veripart
- Køleskab Zenith
- Køleskab Balay
- Køleskab Cata
- Køleskab Exquisit
- Køleskab Hoover-Grepa
- Køleskab Pelgrim
- Køleskab Elba
- Køleskab Elektra Bregenz
- Køleskab Faure
- Køleskab Juno
- Køleskab Nodor
- Køleskab Respekta
- Køleskab Rommer
- Køleskab Stoves
- Køleskab Juno-Electrolux
- Køleskab Schneider
- Køleskab MPM
- Køleskab Profilo
- Køleskab Hanseatic
- Køleskab G3 Ferrari
- Køleskab Frigor
- Køleskab Thor
- Køleskab V-Zug
- Køleskab Maytag
- Køleskab Gourmetmaxx
- Køleskab Domo
- Køleskab Perel
- Køleskab Saro
- Køleskab Bush
- Køleskab Unold
- Køleskab Aspes
- Køleskab Bellini
- Køleskab Salora
- Køleskab Scancool
- Køleskab Nevir
- Køleskab Techwood
- Køleskab Inventum
- Køleskab Thorens
- Køleskab Swan
- Køleskab White Knight
- Køleskab Khind
- Køleskab Dunavox
- Køleskab Midea
- Køleskab Napoleon
- Køleskab CDA
- Køleskab Frigidaire
- Køleskab Frilec
- Køleskab Fridgemaster
- Køleskab Ardes
- Køleskab Husky
- Køleskab Esatto
- Køleskab SVAN
- Køleskab Everglades
- Køleskab Danby
- Køleskab Sogo
- Køleskab RCA
- Køleskab Koenic
- Køleskab Currys Essentials
- Køleskab ECG
- Køleskab General Electric
- Køleskab Eldom
- Køleskab H.Koenig
- Køleskab Proline
- Køleskab Stirling
- Køleskab Gladiator
- Køleskab Eta
- Køleskab Lynx
- Køleskab Lavorwash
- Køleskab Kalorik
- Køleskab Cecotec
- Køleskab Berg
- Køleskab Osprey
- Køleskab Onyx
- Køleskab Royal Catering
- Køleskab Friac
- Køleskab Seiki
- Køleskab Baumatic
- Køleskab Ideal
- Køleskab Cool Head
- Køleskab Chefman
- Køleskab Meireles
- Køleskab Marvel
- Køleskab Kenmore
- Køleskab Avanti
- Køleskab Vestel
- Køleskab U-Line
- Køleskab Continental Edison
- Køleskab Cookology
- Køleskab Corbero
- Køleskab Zephyr
- Køleskab CHiQ
- Køleskab MBM
- Køleskab Artusi
- Køleskab La Germania
- Køleskab Orima
- Køleskab Whynter
- Køleskab Magic Chef
- Køleskab True
- Køleskab Lamona
- Køleskab Philco
- Køleskab Zanussi-Electrolux
- Køleskab Benavent
- Køleskab Sôlt
- Køleskab Novy
- Køleskab Rex
- Køleskab Kunft
- Køleskab Climadiff
- Køleskab Euro Appliances
- Køleskab Summit
- Køleskab LeCavist
- Køleskab Kogan
- Køleskab LERAN
- Køleskab DCG
- Køleskab Coyote
- Køleskab New Pol
- Køleskab Ravanson
- Køleskab Matrix
- Køleskab Fulgor Milano
- Køleskab Hoshizaki
- Køleskab Airlux
- Køleskab Foster
- Køleskab NEO Tools
- Køleskab Avintage
- Køleskab Insignia
- Køleskab Sam Cook
- Køleskab Consul
- Køleskab Jocel
- Køleskab Heller
- Køleskab Signature
- Køleskab InAlto
- Køleskab Manta
- Køleskab FrigeluX
- Køleskab SanGiorgio
- Køleskab Electra
- Køleskab La Sommelière
- Køleskab Orava
- Køleskab NewAir
- Køleskab Kaiser
- Køleskab IFB
- Køleskab Haeger
- Køleskab Linarie
- Køleskab Create
- Køleskab Glem Gas
- Køleskab Premium Levella
- Køleskab Schaub Lorenz
- Køleskab Fhiaba
- Køleskab Lemair
- Køleskab Arktic
- Køleskab Beverage-Air
- Køleskab Thermador
- Køleskab Yolco
- Køleskab Kuhla
- Køleskab Atosa
- Køleskab Cooluli
- Køleskab Hestan
- Køleskab Aconatic
- Køleskab Wisberg
- Køleskab Aldi
- Køleskab Kluge
- Køleskab Leisure
- Køleskab Vintec
- Køleskab AYA
- Køleskab Vedette
- Køleskab Salton
- Køleskab Tricity Bendix
- Køleskab Palsonic
- Køleskab Arthur Martin
- Køleskab Nordland
- Køleskab Saba
- Køleskab BlueStar
- Køleskab John Lewis
- Køleskab Mabe
- Køleskab Monogram
- Køleskab Valberg
- Køleskab Accucold
- Køleskab Castor
- Køleskab Heinner
- Køleskab Nabo
- Køleskab Guzzanti
- Køleskab Defy
- Køleskab Igloo
- Køleskab Premium
- Køleskab Nordmende
- Køleskab Rangemaster
- Køleskab GOTIE
- Køleskab Kubo
- Køleskab WLA
- Køleskab Kelvinator
- Køleskab Steel Cucine
- Køleskab Jenn-Air
- Køleskab Limit
- Køleskab Freggia
- Køleskab Carpigiani
- Køleskab Listo
- Køleskab Edesa
- Køleskab Milectric
- Køleskab EAS Electric
- Køleskab New World
- Køleskab WhiteLine
- Køleskab Bompani
- Køleskab Blaze
- Køleskab M-System
- Køleskab Changhong
- Køleskab Goddess
- Køleskab Godrej
- Køleskab Belling
- Køleskab BeefEater
- Køleskab Essentiel B
- Køleskab Edy
- Køleskab Altus
- Køleskab Edgestar
- Køleskab Parmco
- Køleskab Eurotech
- Køleskab Café
- Køleskab Equator
- Køleskab Electrolux-Rex
- Køleskab Brandy Best
- Køleskab Sub-Zero
- Køleskab Flavel
- Køleskab Teco
- Køleskab Bluesky
- Køleskab Tecnolux
- Køleskab Icecool
- Køleskab Cobal
- Køleskab Marynen
- Køleskab Gardenline
- Køleskab Lec
- Køleskab Oranier
- Køleskab Turbo Air
- Køleskab DAYA
- Køleskab CombiSteel
- Køleskab DCS
- Køleskab Perlick
- Køleskab Tisira
- Køleskab Unic Line
- Køleskab Gastro-Cool
- Køleskab Hiberg
- Køleskab Maxx Cold
- Køleskab Wells
- Køleskab Paulmann
- Køleskab Kucht
- Køleskab Avantco
- Køleskab Norlake
- Køleskab Arctic Air
- Køleskab Snaigė
- Køleskab Romo
- Køleskab Merax
- Køleskab Koolatron
- Køleskab Coca-Cola
- Køleskab Blucher
- Køleskab Silhouette
- Køleskab ColdTech
- Køleskab Magic Cool
- Køleskab Rhino
- Køleskab Le Chai
- Køleskab Gamko
- Køleskab IOMABE
- Køleskab APW Wyott
- Køleskab SPT
- Køleskab Kolpak
- Køleskab Hatco
- Køleskab High One
- Køleskab Les Petits Champs
- Køleskab Airflo
- Køleskab Moa
- Køleskab Master-Bilt
- Køleskab Hydra Kool
- Køleskab XO
- Køleskab Curtiss
- Køleskab Nemco
- Køleskab Winia
- Køleskab Delfield
- Køleskab Traulsen
- Køleskab Alto-Shaam
- Køleskab Simfer
- Køleskab Robinhood
- Køleskab Federal
- Køleskab Structural Concepts
- Køleskab Vinata
- Køleskab Acros
- Køleskab Adventure Kings
- Køleskab Avallon
- Køleskab Emperor's Select
- Køleskab Fisher Paykel
- Køleskab Cosmo
- Køleskab Wine Klima
- Køleskab Marbor
- Køleskab Engel
- Køleskab Americana
- Køleskab EvaKool
- Køleskab Coldtainer
- Køleskab Orien
- Køleskab Enofrigo
- Køleskab BSK
- Køleskab Techfrost
- Køleskab Irinox
- Køleskab Azure
- Køleskab Gecko
- Køleskab Bromic
- Køleskab MSW
- Køleskab Adora
- Køleskab Newpol
- Køleskab Brastemp
- Køleskab Haden
- Køleskab Sedona
- Køleskab Vinotemp
- Køleskab Norpole
- Køleskab Gasmate
- Køleskab Triomph
- Køleskab Schmick
- Køleskab Dellware
- Køleskab HABAU
- Køleskab Electroline
- Køleskab Tuscany
- Køleskab TESLA Electronics
- Køleskab Pando
- Køleskab Smart Brand
- Køleskab Brass Monkey
- Køleskab Waltham
- Køleskab Lec Medical
- Køleskab Kalamazoo
- Køleskab Koldfront
- Køleskab HomeCraft
- Køleskab Coors
- Køleskab Eqtemp
- Køleskab Uniprodo
- Køleskab Landmark
- Køleskab PITSOS
- Køleskab Corona
- Køleskab Coors Light
- Køleskab Miller Lite
- Køleskab Lanbo
- Køleskab Momcube
- Køleskab Sheffield
- Køleskab Imprasio
Nyeste Køleskab Manualer

9 April 2025
9 April 2025
9 April 2025

9 April 2025

6 April 2025

6 April 2025

6 April 2025
6 April 2025
5 April 2025

5 April 2025