Canon Elura 60 Manual
Canon
Videokamera
Elura 60
Læs nedenfor 📖 manual på dansk for Canon Elura 60 (162 sider) i kategorien Videokamera. Denne guide var nyttig for 9 personer og blev bedømt med 4.5 stjerner i gennemsnit af 2 brugere
Side 1/162

Digital Video Camcorder
Instruction Manual
Camescope vidéo numérique
Manuel d’instruction
Videocámara digital
Manual de Instrucciones
English
Françai
s
Español
NTSC
PUB.DIM-625
Mini Digital
Video
Cassette
Please read also the following instruction
manuals.
Veuillez lire aussi les modes d’emploi
suivants.
Lea también los manuales de instrucciones
siguientes.
• Digital Video Software
• DV Network Software
Digit al Vide o So f t war e Ve rs ion 11
Inst ruct ion Ma nual
If you are using Windows operating system, use the supplied
DIGITAL VIDEO SOLUTION DISK For Windows.
If you are using Macintosh operating system, use the supplied
DIGITAL VIDEO SOLUTION DISK For Macintos h.
Si vous travaillez avec le système d’e xploitation Windows, utilisez le d isque
DIGITAL VIDEO SOLUTION DISK For Windows fourni avec l’appare il.
Si vous travaillez avec le système d’e xploitation Macintosh, utilisez le d isque
DIGITAL VIDEO SOLUTION DISK For Macintos h fourni avec l’app areil.
Si está utilizando e l sistema op erativo Windows, use el disco
DIGITAL VIDEO SOLUTION DISK For Windows suministrado.
Si está utilizando e l sistema op erativo Macintosh, use el disco
DIGITAL VIDEO SOLUTION DISK For Macintos h suministrado.
Mode d’e mploi
Manua l de In st rucc ione s
PUB. DIM-627
E
F
Es
This instruction manual explains how to install the software, connect the camcorder to a
computer, and download images from a memory card to a computer. For more de tailed
operational instructions, refer to the PDF format manual provided on the DIGITAL VIDEO
SOLUTION DISK For Windows For Macintosh or DIGITAL VIDEO SOLUTION DISK .
Ce manuel d'instruction exp lique comment installer le logiciel, connecter le
camescope a l'ordinateur et te lecharger des images a partir d'une carte memoire sur
un ordinateur. Pour de s instructions de fonctionnement plus de taillee s, repo rtez -vous
au manuel au format PDF fournie sur le disque DIGITAL VIDEO SOLUTION DISK
For Windows For Macintosh ou DIGITAL VIDEO SOLUTION DISK .
En este manual de instrucciones se exp lica como instalar el software, cone ctar la
videoc amara a un ordenador, y de scargar imagenes de una tarjeta de memoria a un
orde nador. Si desea instrucciones mas detalladas sobre e l funcionamiento, consulte el
manual de fo rmato PDF suministrado con e l disco DIGITAL VIDEO SOLUTION DISK
For Windows o DIGITAL VIDEO SOLUTION .DISK For Macintosh
DV Net work Soft ware Vers ion 2
Ins truc tion Ma nua l (I nstallatio n and Prepar ation)
T his software is for use with Wi ndows
® XP only.
Ce lo gic iel ne p eut être emplo yé que s ou s Windo ws® XP.
Este s oftware so lamente es co mpatible con Windo ws® XP .
Mode d’emp loi (I nstallatio n et p répara tion )
Man ual de I ns tr uc cio nes (Ins talació n y pr eparativo s)
PUB. DIM-594
E
F
Es
This manual covers the installation and the connection procedures only.
For more operating instructions, refer to the PDF format manual provided
on the DIGITAL VIDEO SOLUTION DISK For Windows.
Ce manuel traite uniquement des procédures d’installation et de connexion.
Pour les instructions d’utilisation, reportez -vous au manuel au format PDF
fourni sur le disque DIGITAL VIDEO SOLUTION DISK For Windows.
Este manual solamente cubre los procedimientos de instalación y conexión.
Para más instrucciones de operación, consulte el manual en formato PDF
contenido en el disco DIGITAL VIDEO SOLUTION DISK For Windows.
2
E
Important Usage Instructions
WARNING:
TO REDUCE THE RISK OF FIRE OR ELECTRIC SHOCK, DO NOT EXPOSE THIS
PRODUCT TO RAIN OR MOISTURE.
Digital Video Camcorder, ELURA70/ELURA65/ELURA60 systems
This device complies with Part 15 of the FCC Rules. Operation is subject to the following two conditions: (1)
This device may not cause harmful interference, and (2) this device must accept any interference received,
including interference that may cause undesired operation.
Note: This equipment has been tested and found to comply with the limits for class B digital device, pursuant to
Part 15 of the FCC Rules. These limits are designed to provide reasonable protection against harmful
interference in a residential installation. This equipment generates, uses and can radiate radio frequency energy
and, if not installed and use in accordance with the instructions, may cause harmful interference to radio
communications. However, there is no guarantee that interference will not occur in a particular installation. If
this equipment does cause harmful interference to radio or television reception, which can be determined by
turning the equipment off and on, the user is encouraged to try to correct the interference by one or more of
the following measures:
• Reorient or relocate the receiving antenna.
• Increase the separation between the equipment and receiver.
• Connect the equipment into an outlet on a circuit different from that to which the receiver is connected.
• Consult the dealer or an experienced radio/TV technician for help.
Use of shielded cable is required to comply with class B limits in Subpart B of Part 15 of FCC Rules.
Do not make any changes or modifications to the equipment unless otherwise specified in the manual.
If such changes or modifications should be made, you could be required to stop operation of the equipment.
Canon U.S.A. Inc.
One Canon Plaza, Lake Success, NY 11042, U.S.A.
Tel No. (516)328-5600
WARNING:
TO REDUCE THE RISK OF ELECTRIC SHOCK AND TO REDUCE ANNOYING
INTERFERENCE, USE THE RECOMMENDED ACCESSORIES ONLY.
COPYRIGHT WARNING:
Unauthorized recording of copyrighted materials may infringe on the rights of
copyright owners and be contrary to copyright laws.
Important Warning
CAUTION:
TO REDUCE THE RISK OF ELECTRIC
SHOCK, DO NOT REMOVE COVER (OR
BACK). NO USER-SERVICEABLE PARTS
INSIDE. REFER SERVICING TO QUALIFIED
SERVICE PERSONNEL.
The lightning flash with arrowhead
symbol, within an equilateral triangle, is
intended to alert the user to the presence
of uninsulated “dangerous voltage” within
the product’s enclosure, that may be of
sufficient magnitude to constitute a risk of
electric shock to persons.
The exclamation point, within an
equilateral triangle, is intended to alert the
user to the presence of important
operating and maintenance (servicing)
instructions in the literature accompanying
the product.
CAUTION
RISK OF ELECTRIC SHOCK
DO NOT OPEN
CAUTION:
TO PREVENT ELECTRIC SHOCK, MATCH WIDE BLADE OF PLUG TO WIDE SLOT, FULLY
INSERT.
4
14. Lightning — For added protection of this
product during a lightning storm, or when
it is left unattended and unused for long
periods of time, disconnect it from the wall
outlet and disconnect the antenna. This will
prevent damage to the product due to
lightning and power-line surges.
15. Overloading — Do not overload wall outlets
and extension cords as this can result in a
risk of fire or electric shock.
16. Objects and Liquid Entry — Never push
objects of any kind into this product
through openings as they may touch
dangerous voltage points or short out parts
that could result in a fire or electric shock.
Be careful not to spill liquid of any kind
onto the product.
17. Servicing — Do not attempt to service this
product yourself as opening or removing
covers may expose you to dangerous
voltage or other hazards. Refer all servicing
to qualified service personnel.
power sources including battery, and refer
servicing to qualified service personnel
under the following conditions:
a. When the power-supply cord or plug is
damaged.
b. If any liquid has been spilled onto, or
objects have fallen into, the product.
c. If the product has been exposed to rain
or water.
d. If the product does not operate normally
even if you follow the operating
instructions. Adjust only those controls
that are covered by the operation
instructions. Improper adjustment of
other controls may result in damage and
will often require extensive work by a
qualified technician to restore the
product to its normal operation.
e. If the product has been dropped or the
cabinet has been damaged.
f. When the product exhibits a distinct
change in performance. This indicates a
need for service.
19. Replacement Parts — When replacement
parts are required, be sure the service
technician has used replacement parts that
are specified by Canon or that have the
same characteristics as the original part.
Unauthorized substitutions may result in
fire, electric shock or other hazards.
20. Safety Check — Upon completion of any
service or repairs to this product, ask the
service technician to perform safety checks
to determine that the product is in safe
operating order.
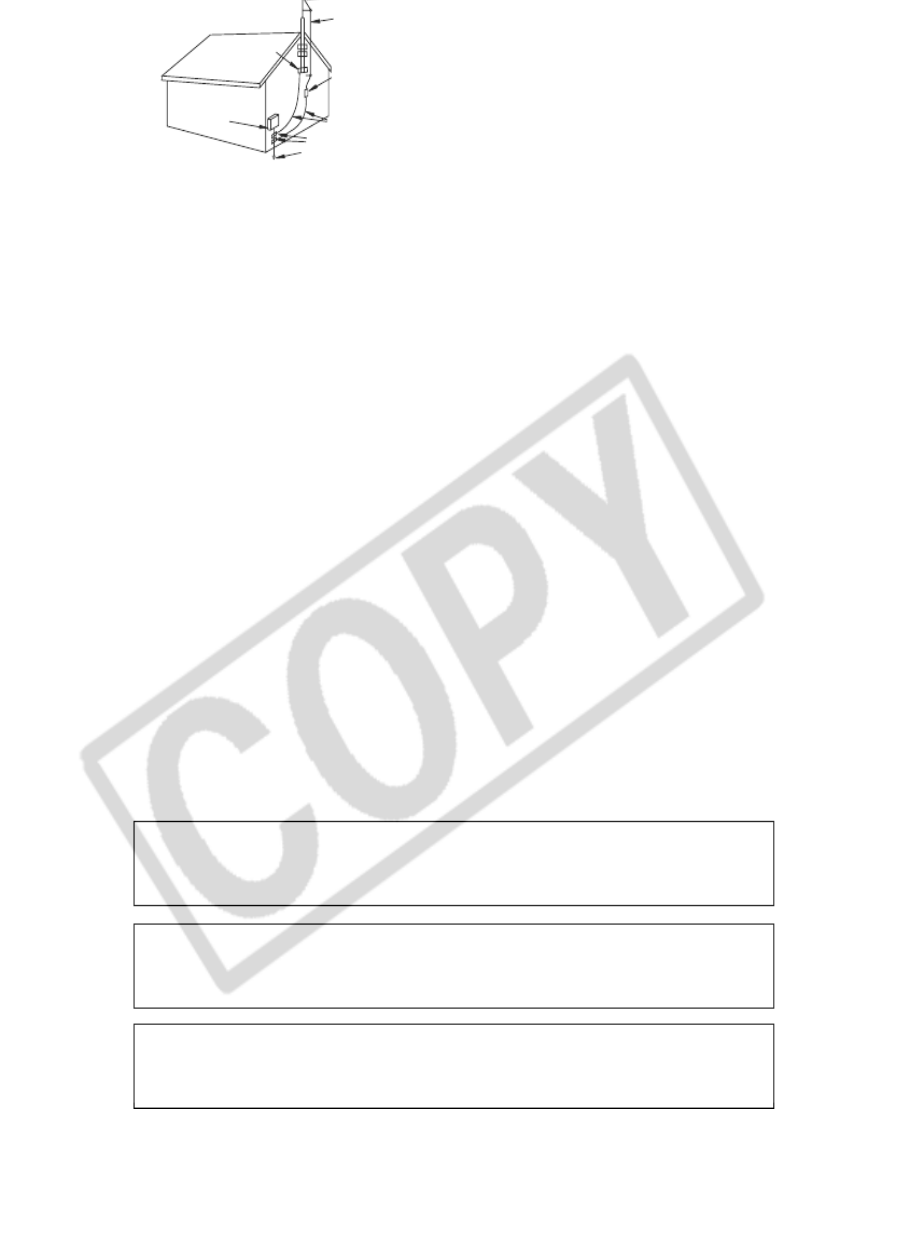
ANTENNA
LEAD IN
WIRE
ANTENNA
DISCHARGE
UNIT
(NEC SECTION
810-20)
GROUNDING CONDUCTORS
(NEC SECTION 810-21)
GROUND CLAMPS
POWER SERVICE
GROUNDING ELECTRODE
SYST EM
(NEC ART 250. PART H)
NEC - NATIONAL ELECTRICAL CODE
ELECTRIC
SERVICE
EQUIPMENT
GROUND
CLAMP
When replacement of power supply is required, please return it to the
responsible nearest Canon Service Center and please replace it with the same
type number CA-570.
The Adapter can be used with a power supply between 100 and 240 V AC.
For areas where 120 V AC power is not used, you will need a special plug
adapter. Contact your nearest Canon Service Center for further information.
Use only CSA/UL Certified power supply cord set, Polarized, Type SPT-2 or
heavier, minimum No. 18 AWG copper, rated 125 or 250 V, minimum ‚P A,
minimum 6 ft (1.8 m), maximum 10 ft (3 m) long.
E
Thank you for purchasing the Canon ELURA70/ELURA65/ELURA60. Please read this
manual carefully before you use the camcorder and retain it for future reference.
Change the display language before you begin ( 76).
Symbols and References Used in This Manual
❍: Precautions related to the camcorder operation.
❍: Additional topics that complement the basic operating procedures.
❍: Reference page number.
❍Capital letters are used to refer to buttons on the camcorder or the wireless controller.
❍[ ] are used to refer to menu items displayed on the screen.
❍“Screen” refers to the LCD and the viewfinder screen.
❍Please note that the illustrations mainly refer to the ELURA70 (illustrations of the battery
pack show the NB-2LH supplied with the ELURA65 and ELURA60).
: Function can be used in this mode.
: Function cannot be used in this mode.
Trademark Acknowledgements
• Canon and Bubble Jet are registered trademarks of Canon Inc.
•Dis a trademark.
• is a trademark.
• Windows®is either a registered trademark or trademark of Microsoft Corporation in the United States
and/or other countries.
• Macintosh and Mac OS are trademarks of Apple Computer, Inc., registered in the United States and
other countries.
• Other names and products not mentioned above may be registered trademarks or trademarks of their
respective companies.
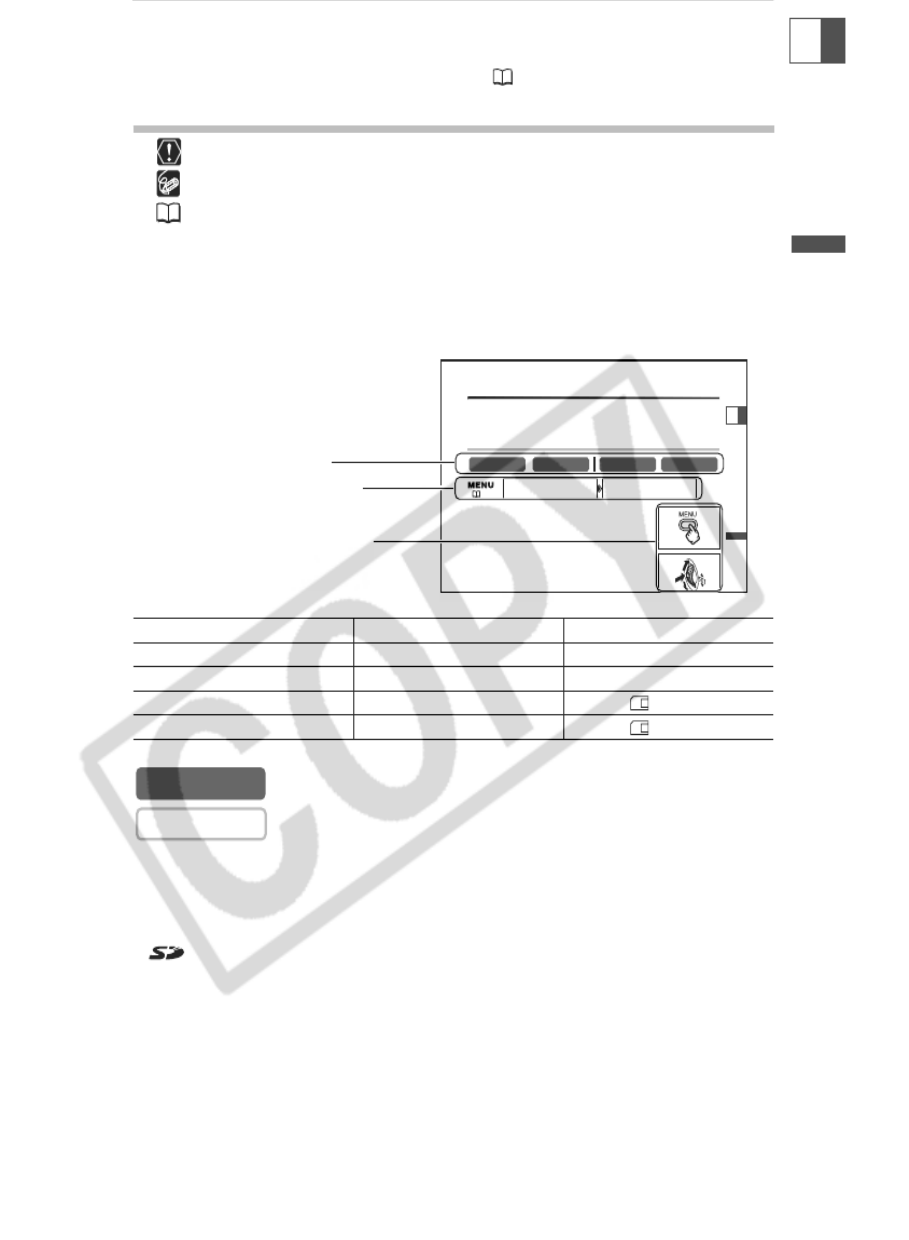
CAMERA
CAMERA
Operating Mode POWER Switch TAPE/CARD Switch
CAMERA CAMERA (TAPE)b
PLAY (VCR) PLAY (VCR) (TAPE)b
CARD CAMERA CAMERA (CARD)
CARD PLAY PLAY (VCR) (CARD)
Basic Functions -
Preparations
E
Setting the Time Zone, Date and Time
Set the time zone, date and time when you first start using your camcorder, or when
you have replaced the backup battery.
Setting the Time Zone/Daylight Saving Time
1. Press the MENU button to open the menu.
2. Turn the SET dial to select [SYSTEM] and press the
SET dial.
3. Turn the SET dial to select [T.ZONE/DST] and press
the SET dial.
CARD PLAYCARD CAMERAPLAY (VCR)CAMERA
T.ZONE/DST•••N.Y. SYSTEM
( 38)
Button and switches to be operated
Operating modes (see below)
Menu item and its default setting.

10
Dioptric adjustment
lever ( 18)
Power switch ( 5, 135)
Grip belt ( 18)
PHOTO button ( 96)
Advanced Accessory shoe ( 80, 154)
Zoom lever ( 29)
Viewfinder ( 18)
Viewfinder protect
cover ( 143)
Cassette compartment
( 16)
Cassette compartment
cover ( 16)
Strap mount ( 19)
Strap mount ( 19)
Start/stop button
( 24, 101)
Built-in speaker ( 34)
OPEN/EJECT switch
( 16)
(print/share) button ( 120, 131)
Program AE
Easy recording
Program selector ( 46)
Accessory shoe ( 153)
CAMERA
OFF
PLAY(VCR)
NETWORK
CAMERA
CAMERA
CAMERA
CAMERA
CAMERA
(VCR)
(VCR)
(VCR)
(VCR)
(VCR)
PLAY
PLAY
PLAY
PLAY
PLAY
NETWORK
NETWORK
NETWORK
NETWORK
NETWORK
PO
WER
POWER
POWER
POWER
POWER
12
W T
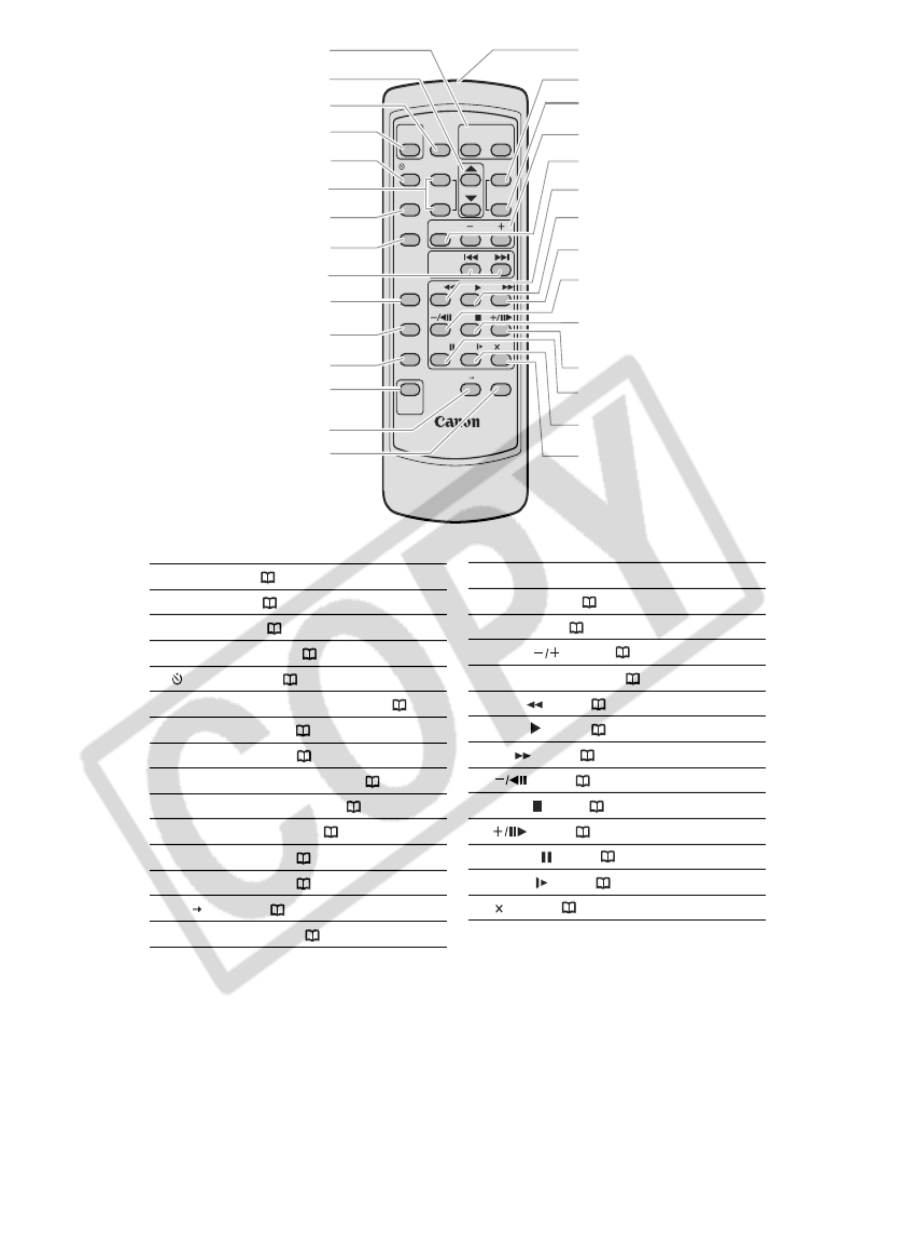
WIRELESS CONTROLLER WL
-
D83
START
/STOP PHOTO ZOOM
SELF T. D.EFFECTS
ON/OFF
SET
MENU
TV SCREEN
REW
PAUSE
AV DV
REMOTE SET
SLOW
2
PLAY
STOP
FF
ZERO SET
MEMORY
REC
PAUSE
12bit
AUDIO OUT
DATE SEARCH
DATA CODE
AUDIO DUB.
SLIDE SHOW
CARD
!8
q
!9
e
y
u
i
!4
!3
!2
!6
!7
r
t
w
@0
o
@5
@6
@7
@2
@3
@4
@8
@9
@1
!0
!1
!5
Zoom buttons ( 29)
Select buttons ( 38)
PHOTO button ( 96)
START/STOP button ( 24, 101)
SELF T. button ( 58)
D. EFFECTS button, ON/OFF button ( 62)
TV SCREEN button ( 136)
DATA CODE button ( 70)
DATE SEARCH / buttons ( 74)- +
ZERO SET MEMORY button ( 73)
12bit AUDIO OUT button ( 90)
AUDIO DUB. button ( 89)
REC PAUSE button ( 84)
AV DV button ( 87)
REMOTE SET button ( 77)
Transmitter
MENU button ( 38)
SET button ( 38)
CARD buttons ( 108)
SLIDE SHOW button ( 109)
REW button ( 32)
PLAY button ( 32)
FF button ( 32)
button ( 33)
STOP button ( 32)
button ( 33)
PAUSE button ( 33)
SLOW button ( 33)
2 button ( 33)
q
w
e
r
t
y
u
i
o
!
0
!
1
!
2
!
3
!
4
!
5
!8
!9
@0
@1
@2
@3
@4
@5
@6
@7
@8
@9
!
6
!7

14
g g p
household power source.
1. Turn the POWER switch to OFF.
2. Connect the power cord to the
power adapter.
3. Plug the power cord into a power
outlet.
4. Connect the power adapter to the
camcorder’s DC IN terminal.
❍Turn off the camcorder before connecting or disconnecting the power adapter.
❍If the adapter is used close to a TV, it may cause picture interference. Move the
adapter away from the TV or the antenna cable.
❍Do not connect any products that are not expressly recommended to the
camcorder’s DC IN terminal or to the power adapter.
❍You may hear some noise from the power adapter during use. This is not a
malfunction.
❍Do not disconnect and reconnect the power cord while charging a battery
pack. Charging may stop. The battery pack may not be charged correctly even
if the CHARGE indicator glows steady. The battery pack may also not be
charged correctly when a power outage occurs during charging. Remove the
battery pack and attach it back to the camcorder.
❍When the power adapter or battery pack is defective, the CHARGE indicator
flashes rapidly (at about 2 flashes/second) and charging stops.
❍The CHARGE indicator informs you about the charge status.
0-50%: Flashes once every second
More than 50%: Flashes twice every second
100%: Glows steadily
q
w
e
r
CAMERA
CAMERA
CAMERA
CAMERA
CAMERA
(VCR)
(VCR)
(VCR)
(VCR)
(VCR)
PLAY
PLAY
PLAY
PLAY
PLAY
NETW ORK
NETWORK
NETWORK
NETWORK
NETWORK
POWER
POWER
POWER
POWER
POWER
OFF
OFF
OFF
OFF
OFF

p
E
The backup battery allows the camcorder to retain date, time ( 21) and other
camcorder settings while the power source is disconnected. Connect a power source to
the camcorder when replacing the backup battery to retain the settings.
1. Press the OPEN button to open the
LCD panel.
2. Pull out the battery holder.
3. Place the lithium battery with the
+ side facing downward into the
battery holder.
4. Insert the battery holder.
5. Close the LCD panel.
WARNING!
• The battery used in this device may present a fire or chemical burn hazard if
mistreated. Do not recharge, disassemble, heat above 212 °F (100 °C) or
incinerate the battery.
• Replace the battery with a CR1616 made by Panasonic, Hitachi Maxell, Sony,
Toshiba, Varta or Renata. Use of other batteries may present a risk of fire or
explosion.
❍Do not pick up the battery using tweezers or other metal tools as this will
cause a short circuit.
❍Wipe the battery with a clean dry cloth to ensure proper contact.
❍Keep the battery out of reach of children. If it is swallowed, seek medical
assistance immediately. The battery case may break and the battery fluids may
damage stomach and intestines.
❍Do not disassemble, heat or immerse the battery in water to avoid the risk of
explosion.
The backup battery has a life span of about a year. j flashes in red to inform
you that it needs to be replaced.
w e r
q
t

20
Point it at the camcorder’s remote
sensor when you press the buttons.
Inserting Batteries
The wireless controller operates with two AA (R6) batteries.
1. Open the battery cover.
2. Insert the batteries following the +
and – markings.
Replace both batteries.
3. Close the battery cover.
❍Camcorder and wireless controller are equipped with 2 remote sensor modes
( 77). If the wireless controller does not work, check if camcorder and
wireless controller are set to the same mode.
❍The wireless controller may not work properly when the remote sensor is
subjected to strong light sources or direct sunlight.

p
E
( 38)
Set the time zone, date and time when you first start using your camcorder, or when
you have replaced the backup battery.
Setting the Time Zone/Daylight Saving Time
1. Press the MENU button to open the menu.
2. Turn the SET dial to select [SYSTEM] and press the
SET dial.
3. Turn the SET dial to select [T.ZONE/DST] and press
the SET dial.
The time zone setting appears (see table on the next page). The default setting is New
York.
4. Turn the SET dial to select the setting option that represents your time
zone and press the SET dial.
To adjust for daylight saving time, select the time zone with the Unext to the area.
Setting the Date and Time
5. Turn the SET dial to select [D/TIME SET] and press
the SET dial.
The year display starts to flash.
6. Turn the SET dial to select the year, and press the
SET dial.
• The next part of the display starts flashing.
• Set the month, day, hours and minutes in the same way.
CARD PLAY
CARD CAMERA
PLAY (VCR)CAMERA
CARD PLAYCARD CAMERAPLAY (VCR)CAMERA
T.ZONE/DST•••N.Y. SYSTEM
( 38)
D/TIME SET•••JAN. 1,2004
12:00 PM
SYSTEM

22
Once you have set time zone, date and time, you do not need to reset the clock
each time you travel to another time zone. Just set the time zone to the one of
your destination, and the camcorder automatically adjusts the clock.
1
24 1 2 3 4 5 6 7 8 9 10 11 12 1314 15 16 17 18 19 20 21 22 23
2
3
5
67 9
8
10
4
12
11
13
24
19 20
18
17
21
23
22
15
14
16
Time zone
LONDON
PARIS
CAIRO
MOSCOW
DUBAI
KARACHI
DACCA
BANGKOK
H. KONG (Hong Kong)
TOKYO
SYDNEY
SOLOMON
WELLGTN (Wellington)
SAMOA
HONOLU. (Honolulu)
ANCHOR. (Anchorage)
L.A. (Los Angeles)
DENVER
CHICAGO
N.Y. (New York)
CARACAS
RIO (Rio de Janeiro)
FERNAN. (Fernando de Noronha)
AZORES
No. Time zoneNo.
Produkt Specifikationer
| Mærke: | Canon |
| Kategori: | Videokamera |
| Model: | Elura 60 |
Har du brug for hjælp?
Hvis du har brug for hjælp til Canon Elura 60 stil et spørgsmål nedenfor, og andre brugere vil svare dig
Videokamera Canon Manualer

13 Januar 2025
4 November 2024
12 Oktober 2024
23 September 2024
22 September 2024
12 September 2024
27 August 2024
27 August 2024
24 August 2024
19 August 2024
Videokamera Manualer
- Videokamera Nilox
- Videokamera SilverCrest
- Videokamera Denver
- Videokamera Sencor
- Videokamera Sony
- Videokamera Samsung
- Videokamera Panasonic
- Videokamera Extech
- Videokamera Philips
- Videokamera Lenco
- Videokamera OK
- Videokamera Braun
- Videokamera Sharp
- Videokamera Logitech
- Videokamera Kenwood
- Videokamera HP
- Videokamera Garmin
- Videokamera Sanyo
- Videokamera Thinkware
- Videokamera Easypix
- Videokamera Nikkei
- Videokamera Bushnell
- Videokamera Toshiba
- Videokamera Pyle
- Videokamera Fujifilm
- Videokamera Nikon
- Videokamera Kodak
- Videokamera Tracer
- Videokamera Olympus
- Videokamera Nedis
- Videokamera Zorki
- Videokamera Hama
- Videokamera Creative
- Videokamera Hyundai
- Videokamera Milwaukee
- Videokamera DataVideo
- Videokamera Trevi
- Videokamera Trust
- Videokamera Laserliner
- Videokamera Mio
- Videokamera Trotec
- Videokamera JVC
- Videokamera Leica
- Videokamera Uniden
- Videokamera Hitachi
- Videokamera T'nB
- Videokamera Medion
- Videokamera Linksys
- Videokamera Cisco
- Videokamera EZVIZ
- Videokamera König
- Videokamera Gembird
- Videokamera EnVivo
- Videokamera Maginon
- Videokamera Vtech
- Videokamera BenQ
- Videokamera Contour
- Videokamera Bresser
- Videokamera National Geographic
- Videokamera Voigtländer
- Videokamera Rollei
- Videokamera Xiaomi
- Videokamera Moultrie
- Videokamera Aiptek
- Videokamera Viewsonic
- Videokamera DJI
- Videokamera Voltcraft
- Videokamera Polaroid
- Videokamera Ricoh
- Videokamera TomTom
- Videokamera Soundmaster
- Videokamera Aida
- Videokamera Konica-Minolta
- Videokamera Kyocera
- Videokamera GoPro
- Videokamera Ikan
- Videokamera Cobra
- Videokamera Xblitz
- Videokamera Velleman
- Videokamera Marshall
- Videokamera FLIR
- Videokamera Energy Sistem
- Videokamera Swann
- Videokamera Zoom
- Videokamera Salora
- Videokamera Lamax
- Videokamera Overmax
- Videokamera SBS
- Videokamera Veho
- Videokamera Midland
- Videokamera Samson
- Videokamera ION
- Videokamera RCA
- Videokamera Prixton
- Videokamera Renkforce
- Videokamera Navitel
- Videokamera Hazet
- Videokamera Transcend
- Videokamera GoClever
- Videokamera Intenso
- Videokamera ARRI
- Videokamera Evolveo
- Videokamera Genius
- Videokamera Zagg
- Videokamera Airis
- Videokamera Steinberg
- Videokamera Spypoint
- Videokamera Vivitar
- Videokamera Contour Design
- Videokamera Dragon Touch
- Videokamera Vimar
- Videokamera Klein Tools
- Videokamera Oregon Scientific
- Videokamera Magellan
- Videokamera Lexibook
- Videokamera SJCAM
- Videokamera Speco Technologies
- Videokamera Prestigio
- Videokamera Blackmagic Design
- Videokamera Kogan
- Videokamera Drift
- Videokamera Insignia
- Videokamera Minox
- Videokamera Elmo
- Videokamera Agfa
- Videokamera AgfaPhoto
- Videokamera Quintezz
- Videokamera AEE
- Videokamera ATN
- Videokamera Activeon
- Videokamera Coby
- Videokamera TacTic
- Videokamera Macally
- Videokamera Naxa
- Videokamera Mamiya
- Videokamera Tronje
- Videokamera Mpman
- Videokamera Ematic
- Videokamera Minolta
- Videokamera Iget
- Videokamera RunCam
- Videokamera SeaLife
- Videokamera Sakar
- Videokamera Jobo
- Videokamera Mediacom
- Videokamera Kreator
- Videokamera Contax
- Videokamera EE
- Videokamera Traveler
- Videokamera Kaiser Baas
- Videokamera Bluetech
- Videokamera Braun Phototechnik
- Videokamera IOPLEE
- Videokamera Vupoint Solutions
- Videokamera Kitvision
- Videokamera Praktica
- Videokamera MMTC
- Videokamera Flip
- Videokamera Jay-tech
- Videokamera Brinno
- Videokamera BlackVue
- Videokamera Storex
- Videokamera Insta360
- Videokamera DXG
- Videokamera MD 80
- Videokamera Berger & Schröter
- Videokamera Whistler
- Videokamera Curve
- Videokamera PCE Instruments
- Videokamera DOD
- Videokamera CamOne
- Videokamera Mobius
- Videokamera ISAW
- Videokamera Beaulieu
- Videokamera Revier Manager
- Videokamera Kobian
- Videokamera FHD 1080P
- Videokamera RSC
- Videokamera Stealth Cam
- Videokamera Aqua-Vu
- Videokamera Hamlet
- Videokamera Qoltec
- Videokamera Leotec
- Videokamera Replay
- Videokamera Akaso
- Videokamera Hamilton Buhl
- Videokamera FeiyuTech
- Videokamera Best Buy
- Videokamera Rexing
- Videokamera Bolex
- Videokamera Microtek
- Videokamera Teslong
- Videokamera Izzo
- Videokamera Aquapix
- Videokamera Tactacam
Nyeste Videokamera Manualer

3 April 2025

14 Marts 2025
14 Marts 2025
14 Marts 2025
13 Marts 2025
12 Marts 2025
12 Marts 2025
12 Marts 2025
27 Februar 2025
25 Februar 2025