Canon Pixma IP100 Manual
Læs nedenfor 📖 manual på dansk for Canon Pixma IP100 (92 sider) i kategorien Printer. Denne guide var nyttig for 105 personer og blev bedømt med 4.5 stjerner i gennemsnit af 2 brugere
Side 1/92

ΔμμΨϤϟ
.ff0{font-family:sans-serif;visi
Photo Printer
Quick Start Guide
series
ϲϏήΒϟϚϔϣΓΪϋΎδϤΑ)1.4.5.( ΔϘτϨϤϟϲϓΔδϛΎόϤϟΔϬΠϟϲϓϚϠδϠϟΎϘηϞ˷Ϝη ϞϜ ϴϬϟϲϓΔΤοϮϤϟ)1.4.6.( ϞϣΎΣΐϴϛήΘΑϢϗ ϞϜθϤϟϖθϟϲϓϚϠδϟήϳήϤΘΑΪϳΪΟϦϣέέίϷ)1.4.7.( ϭϱΰϛήϤϟϞμϔϤϟϲϏήΒΑιΎΨϟ˯Ύτϐϟ ΔϟίΈΑϢϗ
Ϥϟ ΝήΧ ϭϲϏήΒϟ ΖϠϓ Ϟμϔ)1.4.8.( ϲϓ
ϞμϔϤϟήϴϴϐΘΑϢϗϡΎδϗΔΛϼΛϰϠϋΔϳϭΎΤϟΕϼϳΩϮϤϟ
ϲϠϔδϟ ϞμϔϤϟ ΎΑ ϱϮ Ϡόϟ. ΪϴϤΠΘϟϢδϗϦϋΏΎΒϟΔϟί·
)1.4.9.(
ϞμϔϤϟϞμϔϤ ϟ ΝήΧ ϭϲϠΧΪϟ ϲ Ϗ ήΑ ΖϠϓ. Ϣϗ
ΔϬΠϟϲϓϪΘΒΛϭϞμϔϤϟέϮΤϣΔϴόοϭϝΪΒΘγΎΑ ΔδϛΎόϤϟ)1.4.10.(
ϲϠΧΪϟ ΐΤδϟ ξΒϘϣ ΖΒΛ ΏΎΑϲϓΪϴϤΠΘϟ˯ΰΟϲϓ
˯ΰΟϲϓΔΟϼΜϟϲϓϲϠΧΪϟΐΤδϟξΒϘϣϭΔΟϼΜϟ ϢϬΗέΩΈΑϢϗϭΪϴϤΠΘϟ180ΔΟέΩ. ξΑΎϘϣΖϴΒΜΘΑϢϗ ΎϬΗέΩΈΑΔδϛΎόϤϟΔϬΠϟϲϓΔϳΩϮϤόϟΐΤδϟ180 ΔΟέΩ)1.4.11.( ϢδϗϰϠϋΔΟϼΜϟϮΘΣϝΎΣϲϓ ϭϞϔγϷϲϓϱϮϠόϟΐΤδϟξΒϘϣΖϴΒΜΘΑϢϗ ϱΰϛήϣ ΎϬΗΩΈΑϢϗϭϰϠϋϷϲ ϓϲ Ϡϔδϟ180ΔΟέΩ. ΔΟϼΜϠϟΔόΑΎΘϟϝΎϔϗϷΖϴΒΜΗϭΔϴΗάϟϝΎϔϗϷΓέΩΈΑϢϗ βϜόϟΎΑϭΪϴϤΠΘϟ˯ΰΟϲϓ)1.4.12.( ΔΟϼΜϟΏΎΑΖΒΛ)1.4.13 ( ϞμϔϤϟϲϏήΑΪθΑϢϗϭ ϱΰϛήϤϟ)1.4.14.( ΔΟϼΜϟΏΎΑΖϴΒΜΗ)1.4.15.(
ΔΤΘϓ ϲϓ ϕϼϏϹ Δϟ Ϯ δΒϛ ΖϴΒΜΗ ϲϓϱ Ϯ Ϡόϟ ϞμϔϤϟ
ΔδϛΎόϤϟΔϬΠϟ)1.4.16.( ϢϗϭϥέϭΪϟΔϟϮδΒϛϭ ϱ Ϯ ϠόϟϞμϔϤϟ ϲ ϓϚϠδϟέήϣ ΏΎΒϟϞλϭ˯ΰΠΑϪϠλϮΑ)1.4.17.( ϱϮϠόϟϞμϔϤϟϒϠΑϢϗ)1.4.18 ( ˯Ύτϐϟΐϛέϭ)1.4.19.(
(a, b, c)
ϚΘΟϼΛ ϞϳΩϮϣ ϰϠϋ ϑήόΘϟΎΑ Ϣϗ ϮϤϟ ϡϮ γήϟΎΑ ϢϜΤΘϟ έέίΔΤο.

Getting Help from Canon
Help Us Help You Better
Before you contact Canon, please record the following information.
Serial Number (located on the back of the product): _____________________________________
Model Number (located on the top of the product): ______________________________________
Setup CD-ROM number (located on the CD-ROM): ______________________________________
Purchase Date: __________________________________________________________________
Customer Technical Support Sequence*
1.Internet — www.canontechsupport.com
For quick and comprehensive self-help in an intuitively guided interactive troubleshooting
environment, the place to start is our helpful tech support web site. In addition, the latest
driver downloads, answers to frequently asked questions, product information, and “where to
buy” instructions are found here.
2.Email Tech Support — www.canontechsupport.com
For individual attention to a special issue, try emailing our friendly technical support
representatives, specially trained to communicate quick, easy, and logical solutions to your
inquiries within 24 hours.
3.Toll-Free Live Tech Support — (1-800-828-4040)
This option provides live telephone technical support, free of service charges, Monday-
Saturday (excluding holidays), during your product’s 1 year limited warranty period.
Telephone Device for the Deaf (TDD) support is available at (1-866-251-3752).
4.Extended Service and Support — www.canonesp.com
Canon CarePAK Extended Service Plan is a cost-attractive and easy-to-use extended
service program that provides up to three full years of service and support coverage at a very
attractive price. CarePAK offers toll-free Canon technical support and includes Canon’s
superb InstantExchange product replacement program. For further information about
extending your Canon service and support, call (1-800-385-2155), or visit our Web site at
www.canonesp.com. CarePAK must be purchased during your product’s warranty period.
For more information and updated program specifics, please visit our web site at
www.canontechsupport.com.
* Support program specifics are subject to change without notice.
μϧ:
ΔΟϼΜϟϢδϘϟ ΎϬΑμϨϳ ϲΘϟ ΓέήΤϟ ϲϫ 4 ΔΟέΩ
ΪϴϤΠΘϟ ϢδϘϟ ϭΔϳϮΌϣ -19 ϰϠϋ υΎϔΤϠϟ ΔϳϮΌϣΔΟέΩ
Δϴάϐϟ ΩϮϤϟ. ΖΒϏέϝΎΣ ϲϓ μϨϳΪϴϤΠΘΑ ΩϮϤϟ
ΓέήΣ ϝΎϤόΘγΎΑ -24.
ϮΠϟΓέήΣ ϰϠϋ ΔϴϠΧΪϟΓέήΤϟΩΎϤΘϋϰδϨΗϻ
ΏΎΒϟ Θϓ έήϜΗϰϠϋ ϭΔϴόοϮϟ ϰϠϋ
ϭ ϲΟέΎΨϟ.
2.5ΔΟϼΜϟ ΕΎϴϠϤϋ .
ϊϳήδϟΪϳήΒΘϟΔϴϠϤϋ:
ϝϼΧ ΎϴϧΪϟ ΓέήΤϟΎΑ ΔΟϼΜϟ ϞϴϐθΘΑ ΔϴϠϤόϟ ϩάϫ ϡϮϘΗ
6ΕΎϋΎγ . μϨϳ Ϧϣ ήϴΜϜϟϝΎΧΩ· ΪϨϋ ΎϬϓΎϘϳΈΑ
ΔΟϼΜϟ ϲϓ ΔϤόσϷ.
42
2
2.2 .ςΒπϟ ΔϴϠϤϋ.
ϰϠϋ ςϐο ϝϼΧ5 ΕέΎϴΧ ΪϫΎθΘγ ϭ ϲϧϮΛ
ςΒπϠϟ ΔϔϠΘΨϣ )Δϐϟ ,ΦϳέΎΗ ,ΔϋΎγ ,ΕήϳάΤΗ (...
)2.2.1.( ςϐπϟΎΑ ΏϮϏήϤϟςΒπϟέΎϴΧ έΎϴΘΧΎΑ Ϣϗ
ϰϠϋ
)2.2.2.( ϟ ϖϳήσ ήϴϴϐΘΑ Ϧϋ έΎϴΨϟ Ϣϗ ςϐπ ϰϠϋ
+ ϰϠϋϭ-) 2.2.3.( ϰϠϋ ςϐπϟΎΑ έΎϴΨϟϞϐη
)2.2.4.( έί ϰϠϋ ςϐπϟΎΑ Ϣϗ ΔϤΎϘϟϦϣ ΝϭήΨϠϟ ϝϼΧ5 )2.2.5.( ϲϧϮΛ Ϟλϭ /ϱΰϛήϤϟ ϢδϘϟ ϭ ΔΟϼΜϟ Ϟμϓ: ϢδϘϟ ϭ ΔΟϼΜϟ ϞμϔΑ ΕϼϳΩϮϤϟ ξόΑ ϤδΗϱΰϛήϤϟ. ϢδϘϟ έΎϴΘΧΎΑ Ϣϗ)2.3.1 ,2.3.2.( ϞϳΪόΘΑ Ϣϗ έέίϷϝΎϤόΘγΎΑ ΓέήΤϟ
+ , - ϰϠϋΎϤ ϗ έϯήΗ ϰΘΣ
ΔηΎθϟ)2.5.5.( ϰϠϋ ςϐο ϢδϘϟΊϔτϴγ ϭ
)2.5.6.(
2.6ΪϴϤΠΘϟ Ϣδϗ ΕΎϴϠϤϋ .
ϊϳήδϟΪϴϤΠΘϟΔϴϠϤϋ: ήΜϛ ΓέήΤΑ ΪϴϤΠΘϟ Ϣδϗ ϞϴϐθΘΑ ΔϴϠϤόϟ ϩάϫ ϡϮϘΗ ϝϼΧΎ ο Ύ ϔΨϧ52ΔϋΎγ . ϼΧ ΎϬϠϴϐθΘΑ μϨϳ ϝ24 Ϣδϗ ϲϓ ϡΎότϟϦϣ ΓήϴΒϛΔϴϤϛ ϝΎΧΩ· ϞΒϗΔϋΎγΪϴϤΠΘϟ. ΕίΎΟϹΕΎϗϭΔϴϠϤϋ: Ϩϋ Ϊ Ο ΓΪϴϔϣ ΔϴϠϤϋϲϫ ΕίΎΟϹ ΕΎϗϭ ΔϴϠϤϋϥ· Ϊ ϭΖϗϮϟϦϣ ΔϠϳϮσ ΓήΘϓ ϝϼΧ ΔΟϼΜϟϝΎϤόΘγΪϋ βϔϧ ϲϓ ΔΟϼΜϟϲϓ ΔϴάϏΩϮϣ φϔΣϲϓ ΔΒϏήϟ
ϑΎϘϳϹ ϭ ϞϴϐθΘϠϟ: ϱΰϛήϤϟϢδϘϟέΎϴΘΧΎΑ Ϣϗ)2.3.1 ,2.3.2.( ϰϠϋ ςϐοϯήΗ ϰΘΣ ΔηΎθϟϰϠϋ)2.7.1( . ϰϠϋ ςϐπϟΎΑ έΎϴΨϟϞϐη
ΔΟίΎτϟΔϳάϏϷΔϴϠϤϋ: ϦϴΑ ΓέήΣ ΔΟέΩ ϰϠϋ φϓΎΤΗ2 3ϰϟ· ΔϳϮΌϣ ΔΟέΩ . ΔϳήΤΒϟ ΕϻϮϛ΄ϤϟφϔΤϟ ϭ ϙΎϤγϷ ϭ ϡϮΤϠϟ ϲϟΎΜϣ...
ϑΎϘϳϹ ϭ ϞϴϐθΘϠϟ: ϱΰϛήϤϟϢδϘϟέΎϴΘΧΎΑ Ϣϗ)2.3.1 ,2.3.2.( ϰϠϋ ςϐοϯήΗ ϰΘΣ ΔηΎθϟϰϠϋ)2.7.2( . ϰϠϋ ςϐπϟΎΑ έΎϴΨϟϞϐη
ΖϗϮϟ. ϰϠϋ ΔϴϠϤόϟϩάϫΓΪϋΎδϤΑϚΘΟϼΛ φϓΎΤΘγ ϲϓ ϭήϟϞϜθΘΗ Ϧϟ ϭ ΔϗΎτϠϟ Ϊ Ο ξϔΨϨϣ ϙϼϬΘγΎϬϠΧΩ.
ήϳάΤΗ: ΞΎΘϨϟϩάϫ ϰϟ·ϞλϮΘϠϟ ΔΟϼΜϟΏΎΑ ϖϠϐΗ ϥ ΐΠϳ.
ϑΎϘϳϹ ϭ ϞϴϐθΘϠϟ: ΔΟϼΜϟϢδϗέΎϴΘΧΎΑ Ϣϗ)2.3.1 ,
2.3.2.(
(2.5.9).(2.5.10)
ϦϴδϴΗΎϜϴϠϳΩ ΔϴϠϤϋ: ΓέήΣ ΔΟέΩ ϰϠϋ φϓΎΤΗ13ΔϳϮΌϣ ΔΟέΩ . ΔϴϟΎΜϣϻϮϛϮθϟ ϭ ϖΠδϟάϴΒϨϟφϔΤϟ ϡϮΤϟ ϭ ϭ ϥΎΒΟϷ ...
Ϟλϭ /ΪϴϤΠΘϟ Ϣδϗ Ϟμϓ:
2.7ϱΰϛήϤϟ ϢδϘϟ ΕΎϴϠϤϋ .
(2.7.2) (2.7.4) (2.7.3)

Photo Printer
Quick Start Guide
series
ΕΎΠϠΜϤϟ
ϴϠϤ ΪϴϤ ϟ Ϣ
ΓέήΣ ΔΟ
ϢΘϴγϲΘϟϭΎϘΒ δ ϣΓΪϤΠϤϟΩϮϤϟϭΕΎΠϠΜϤϟ
ΎΒϳήϗ ΎϬϛϼϬΘγ.
ϑΎϘϳϹ ϭ ϞϴϐθΘϠϟ: ϱΰϛήϤϟϢδϘϟέΎϴΘΧΎΑ Ϣϗ)2.3.1 ,
2.3.2.( ϰϠϋ ςϐοϯήΗ ϰΘΣ ΔηΎθϟϰϠϋ
)2.7.3.( ϰϠϋ ςϐπϟΎΑ έΎϴΨϟϞϐη
ήϳάΤΗ:
ΓΪϤϟ φϔ
Ϧϣΰϟ Ϧϣ ΔϠϳϮσ.
2.8ϕϼϏϹ
ϝΎϔσϷ
43
3
2.9ϝΎϤόΘ
-Η ϻ ϭ Δ
ΔΟϼΜϟ ϲϓ ΓέΎΣ ΔϤόσ. ϝΎϤόΘγϦϣ ϚϟάΑ ϦϜϤΘΘγ
ΔϗΎτϟϞϜθΑ ϙϼϬΘγ ωΎϔΗέ ϱΩΎϔΗ ϭ ϢϴϠγ ΔΟϼΜϟ.
ΞϠΜϠϟ ϥϮϜϣ ήϴϐϟ ωϮϨϟ Ϧϣ ϙΩήΑ ϥϮϛ ϝΎΣ ϲϓ , ϯΩΎϔΗ ϲϛ ΔϤόσϷϦϴΑ ΔϓΎδϣ ϙήΗϭΔϳϮϬΘϟΕΎϜΒη ΪγΎϬϨϴΑ ϮϬϟ ϙήΤΘϳ.
-Ϣδϗ ϲϓ ΔϳίΎϏ ΕΎΑϭήθϤΑ ήϳέϮϗ ϞΧΪΗ ϻ ϭ ΪϴϤΠΘϟ ΐΒδΑ ϚϟΫϭ ϞϮγϰϠϋ ΔϳϭΎΣ ΔϴΟΎΟί ήϳέϮϗ ϻΎϫέΎΠϔϧ ήτΧ.
-ΎϬϓΎϔΟ ϱΩΎϔΘϟ ΔϟίΎϋ Δϴϋϭ ϲϓ ΩϮϤϟ φϔΣ .
- ϲϛ ΓΩϭήΒϟΓΪϳΪη ΔϴάϏΩϮϣ ϭΕΎΠϠΜϣ ϚϠϬΘδΗ ϻ ϢϔϟΐΒδΗ ϲϓ Ύϗ ϭ ή Σ ϻ
.
3.1ϲϠΧΪϟ ϒϴψϨΘϟ . Δότϗ ϞϤόΘγ ϭ˯ΎϤϟΎΑ ΔϠϠΒϣεΎϤϘϟϭΞϨϔγϹϦϣ ϱΩΎϔΘϟ ϚϟΫϭ ϲϠΧΪϟϢδϘϟϒϴψϨΗ ΪϨϋ ΕΎϧϮΑήϜϴΒϟΔϬϳήϜϟ ϭήϟ ϞϜθΗ.
ϒϴψϨΗ ΓΰϬΟϝϮΣϷϦϣ ϝΎΣ ϱϲϓ ϞϤόΘδΗ ϻΔτηΎϛ ϭϭ ΔΒϳάϣ ϒϴψϨΗ ΩϮϣ ΔϳέΎΨΑ.
3.2ϲΟέΎΨϟ ˯ΰΠϟ ϒϴψϨΗ . ϒϴψϨΘϟΔϳέΎΨΑ ϒϴψϨΗ ΓΰϬΟ ϞϤόΘδΗ ϻΕΎηΎθϟ .
ϡΎόϟϲϓ ΓΪΣϭΓήϣΔϴϔϠΨϟΔϜΒθϟϒϴψϨΘΑ μϨϳΔϴΎΑήϬϛ ΔδϨϜϣ ϝΎϤόΘγΎΑ. 3.3ΔϘΤϠϤϟ ΰΟϷϒϴψϨΗ . ϕΎΒσϷϞδϏίΎϬΟϲϓ ϞδϐϠϟ ΔϤϼϣ Ζδϴϟ. ΎϬϠδϏεΎϤϘϟ ϭ ΞϨϔγϹ Ϧϣ Δότϗ ϝΎϤόΘγΎΑ ΪϴϟΎΑ.
3.4ΡΎΒμϤϟ ήϴϴϐΗ . ΡΎΒμϤϟϕήΘΣϝΎΣ ϲϓ: ϢϗΔΟϼΜϟ ϞμϔΑ . ΔϟίΈΑ Ϣϗ ˯ϮΘϨϟϰϠϋ ςϐπϟΎΑ ˯Ύτϐϟ)3.4.1 ,3.4.3 ( Ϧϋϭ ςΑήϟϲϏήΑ Εϼϓ·ϖϳήσ)3.4.5 ,3.4.6 ( Ϣϗ ϭ ϞτόϤϟΡΎΒμϤϟΝήΧΈΑ)3.4.2 ,3.4.4 ,3,4,7.( Ϣϗ βϔϧ Ϧϣ ήΧϒϟ ΡΎΒμϤΑ ΡΎΒμϤϟϝΪΒΘγΎΑωϮϨϟE14, 220-240V, 15/25W Ϯϫ ΎϣΐδΣ ϭϧϹ ˯ΰΟ ϲϓ οϮϣΓέΎ.
3.5ϥϮΑήϜϟ ήΘϠϓ ϝΪΒΘγ . ϡϮϘϳ ϥϮΑήϛ ήΘϠϓ ϰϠϋϱϮΘΤΗ ϥΔΟϼΜϠϟ ϦϜϤϳ ΩϮϤϟξόΑ Ϧϣ ΓέΩΎμϟΔΒϳήϐϟ ϭήϟιΎμΘϣΎΑ ΕΎΑϭήϜϤϟήμΤϳ ϭ Δϴάϐϟ )ΎϳήΘϜΒϟϭ ΕΎϳήτϔϟ (ΔϳϮϬΘϟ Ϯϫ ϲϓ.
ΎϬΗΪϣΓΩϭΪΤϣΓήΘϓ ϝϼΧϪμΎμΧ ϰϠϋ ήΘϠϔϟφϓΎΤϳ6ήϬη . μϨϳ ϭ ϩάϫέϭήϣΪόΑ ΪϳΪΟ ΪΣϮΑϪϟΪΒΘγΎΑΓήΘϔϟ. ΔΟϼΜϟ ϞϳΩϮϣ ΐδΣ ϪόοϮϣ ήϴϐΘϳ.
˯ϮΘϨϟϰϠϋ ςϐπϟΎΑ ˯ΎτϐϟΔϟίΈΑ Ϣϗ)3.5.1 ,3.5.3 ,3.5.5.( ϪόοϮϣ Ϧϣ ήΘϠϔϟΔϟίΈΑ Ϣϗ)3.5.2 ,3.5.4 ,3.5.6 ( ΔϘλϼϟϊτϘϟΖϠϓϭ)3.5.7.( ήΘϠϔϟΖΒΛϲϠλϷ ϪόοϮϣ ϲϓ.
ήΘϠϔϟ ϞϴϐθΘϟ: ο ϰϠϋ ςϐ ϝϼΧ5 ϝϮΧΪϠϟ ϲϧϮΛ ςΒπϟΔϤΎϗ ϲϓ)3.5.8.( ϰϠϋ ςϐο ϞϜθΑ ϯήΗ ϰΘΣ έήϜΘϣ ΔηΎθϟϰϠϋ)3.5.9.( ςϐο ϰϠϋ ϞϴϐθΘϠϟ)3.5.10.( ςϐπϟΎΑ ΔϤΎϘϟϦϣ ΝήΧ ϰϠϋ ϝϼΧ5 )3.5.11ϲϧϮΛ .(
Ϧϋ Ϊϴό Α έΎϴϐϟϊτϗ ϭ ϚϠϬΘδϤϟήΘϠϔϟϰϠϋ φϓΎΣϝΎϔσϷ Ϊϳ ϝϭΎϨΘϣ, ήτΨϠϟ νήόΘϟϰϟ· ΓήϴΒϛΕΎϴϤϜΑϪόϠΑϱΩΆϳΪϗ. ήΘϠϔϟϞϠΒΗ ϻ, ΎϫΪϨϋϪΗΰϴϣ ϊϴϤΟ ΪϘϔϴγ Ϋ·.
3.6 )ϡϮϛήϴΑ αϮϟΎγ ϱέΎϴΘΧ( αϮϟΎγ ϖΤϠϤϟ ˯ΰΠϟ ϰϠϋ ϱϮΘΤΗ ϚΘΟϼΜϟ ϥ ϦϜϤϳ ϯϮΘδϣ ϰϠϋ υΎϔΤϟϰϠϋ ΪϋΎδϳ ϱάϟϭ ϡϮϛήϴΑ ϭΕϭήπΨϟφϔΣϢδϗ ϲϓ ΖΑΎΛ ΔΑϮσέ ϊϨϤϳ ϚϟάΑΔϳάϏϷ ϑΎϔΟ.
ΕϭήπΨϟφϔΣ ΝέΩ ϞμϓςΧ ϲϓ ΩϮΟϮϣ Ϯϫ ϭ)3.6.1.( ϭώϳήϔΗ α΄ϜΑ ίΎϬΟϦϣ ϥϮϜϣ Ϯϫ ϭ˯ϼΘϣϼϟ ήηΆϣ ϯϮΘδϣ. ϯϮΘδϤϟήηΆϣ ϡϮϘϴγ ήϴΑ αϮϟΎγ ίΎϬΟ ΔΟΎΣ ΪϨϋ˯ΎϔΘΧϻϰΘΣνΎϔΨϧϻΎΑ˯ΎϤϠϟ ϡϮϛ. α΄ϜϟΝήΧΈΑ Ϣϗ)3.6.2 ( ϪϟΎϤόΘγϭ ϥΰΨϟΊϠϤϟ)3.6.3.(
ϦϴϣΎϋ Ϟϛ ήΘϠϔϟήϴϴϐΘΑ μϨϳ)3.6.4.(
(2.7.6)(2.7.5)

© CANON INC.2008
All rights reserved. No part of this publication may be transmitted or copied in any form whatsoever
without the express written permission.
Disclaimer
Canon U.S.A., Inc. has reviewed this manual thoroughly in order that it will be an easy-to-use
guide to your Canon PIXMA iP100 series Photo Printer. All statements, technical information and
recommendations in this manual and in any guides or related documents are believed reliable, but
the accuracy and completeness thereof are not guaranteed or warranted, and they are not intended
to be, nor should they be understood to be, representation or warranties concerning the products
described.
Specifications are subject to change without notice.
Depending on your application program, operations may differ. For details, refer to the instruction
manual of your application. The steps described in this manual are in Windows Vista™ operating
system Ultimate Edition (hereafter referred to as “Windows Vista”) and Mac® OS X v.10.4.x.
All information regarding non-Canon products was compiled from publicly available information. No
representation is made regarding the accuracy thereof.
As an E SNERGY TAR® Partner, Canon Inc. has determined that this product meets
the E SNERGY TAR® guidelines for energy efficiency.
About Consumables
Consumables (ink tanks / FINE Cartridges) are available for 5 years after production has stopped.
Trademarks
z “Microsoft” is a registered trademark of Microsoft Corporation.
z “Windows” is a trademark of Microsoft Corporation, registered in the U.S. and other countries.
z “Windows Vista” is a trademark of Microsoft Corporation.
z “Macintosh” and “Mac” are trademarks of Apple Inc., registered in the U.S. and other countries.
z “IrDA Feature Trademark” is owned by the Infrared Data Association and used under license
therefrom.
z “Bluetooth” is a trademark of Bluetooth SIG, Inc., U.S.A. and licensed to Canon Inc.
4.2ΪϴϤΠΘϟ Ϣδϗ ϲϓ ΔϴϓΎϛήϴϏ ΓΩϭήΑ
- Ύϛ ϝΎΣ ϲϓ ΪίϞϜθΑ ΔϴϟΎϋ ΪϴϤΠΘϟϢδϗΓέήΣ Ζϧ
ΰϣήϟ ϡϮϘϴγ
ϲϓ ϞϐθΘγ ϰϠϋ ϭΔηΎθϟ ξϴϣϮϟΎΑ
ΔότϘΘϣ ΔϴΗϮλ ΓέΎη· ΖϗϮϟ βϔϧ . ΔϴϠϤϋϞϴϐθΘΑ
ϱϭΪϳ ϞϜθΑ ΔϴΗϮμϟΓέΎηϹϞμϔϟ ϊϳήδϟΪϴϤΠΘϟ
)2.3.1 ,2.3.2 ,2.6.1.(
- ήϬψϴγϰϟϭϷΓήϤϠϟ ίΎϬΠϟϞλϭΪϨϋ
ΰϣήϟ
έάϧϹ ϞϴϐθΗ ϥϭΩ.
4.3ϲΎΑήϬϜϟ έΎϴΘϟϊτϗ
44
64
-ΔϳϮϬΘϟ ΔϜΒη Ϊγ ϯΩΎϔΗ .
ΪϳήΒΘϟ ΕέϭΩ ϑϼΗ· ϡΪϋ ϝϭΎΣ.
-ϞΧΪΑ ΔϴΎΑήϬϛ ΓΰϬΟ ϝΎϤόΘγ ϡΪϋ ϥ·ϻ· ΔΟϼΜϟΞΘϨϤϟ ϞΒϗ Ϧϣ ϪΑμϨϳ ϱάϟ ωϮϨϟ Ϧϣ ΖϧΎϛ.
- ήϴϏ ϯήΧϞΎγϭ ϭΔϴϜϴϧΎϜϴϣ ΓΰϬΟϞϤόΘδΗ ϻΪϴϤΠΘϟ Δϟί· ΔϴϠϤϋ ωήγϹ ΞΘϨϤϟ ϞΒϗ Ϧϣ ΔΤοϮϣ.
- ιΎΨη ϞΒϗ Ϧϣ ϝΎϤόΘγϼϟ ίΎϬΠϟ άϫκμΨϳ ϻ )ϝΎϔσϷ ϢϬϴϓ ΎϤΑ ( ϭΔϴδΣ ϭΔϳΪδΟ ΕέΪϗ ϱϭΫϣ ΔϴϠϘϋ ϭΓήΒΨϟϰϠϋϦϴϠλΎΣ ήϴϐϟϭΓΩϭΪΤΔϓήόϤϟ , ΪόΑ ϭΔΒϗήϤϟΖΤΗ ϝΎϤόΘγϻϢΗϥ·ϻ· Ϧϣ ίΎϬΠϟϝΎϤόΘγϝϮΣ ΕΎϤϴϠόΗ ϰϠϋϝϮμΤϟϢϬϨϣ Ϧϋ ϝϮΌδϣ κΨη. Ϧϣ ϩ ϝΎϤόΘγΔΒϗήϣΐΠϳίΎϬΠϟΎΑ ϢϬΒόϟ ϱΩΎϔΘϟ ϝΎϔσϷ ϞΒϗ.
- ΐΠϳ ϲΎΑήϬϜϟέΎϴΘϟΎΑ ϞλϮϟϚϠγϒϠΗϝΎΣ ϲϓΘγ ϊϴΒϟΓΩΎϋ· ΕΎϣΪΧ ϞΒϗ Ϧϣ ϭΞΘϨϤϟ ϞΒϗ Ϧϣ ϪϟΪΒέΎτΧϸϟ νήόΘϟϱΩΎϔΘϟ ϝΎϤϋ ϦϳήϴΒΧ ϖϳήσ Ϧϋ ϭ. 4.4ΔΟϼΜϟ ϲϓ ΔϴόϴΒσ ΔΠο ΕϮλ Βσ ΔΠο ΕϮλξόΑ ΞΘϨΗ ϥ ϚΘΟϼΜϟ ϦϜϤϳ ΔϴόϴΎϬϧ΄θΑ ϖϠϘϟ ϚϴϠϋ ϻ ϲΘϟ ϭΎϬϴϠϤϋ ϝϼΧ.
- ϲϓ ϪϛήΤΗ ˯ΎϨΛ ήϳήΧ έΪμϳ ϥ ΩήΒϤϟ ίΎϐϠϟ ϦϜϤϳ ΕέϭΪϟ.
- ΔϔϴϔΧ ΕΎΑήο ϭϭΎϨϴϧέ ΙΪΤϳ ϥ βΒϜϤϠϟ ϦϜϤϳ ιΎΧ ϞϜθΑ ϪϠϴϐθΗ ΪϨϋ.
- ΙΪΤΗ ϥΔϠϤόΘδϤϟΩϮϤϟέΎδΤϧϭέΎθΘϧϻ ϦϜϤϳϒϴϔΣ ϭ Δόϗήϓ ΕϮλ.
- ϦϜϤϳ έΪμϳ ϥΪϴϤΠΘϟϢδϗΔΣϭήϤϟ ϙήΤϤϟ ϮϬϠϟΔϔϴϔΧ ΔϴϔϠΧ ΔΠο ΕϮλ.
ϚδϔϨΑ ΔΟϼΜϟ Ρϼλ· ϝϭΎΤΗ ϻ. ϢϗήϟϰϠϋ ΔϴϨϔϟΓΪϋΎδϤϟΕΎϣΪΨΑ ϝΎμΗϻΎΑ Ϣϗ.
5
υΎϔΤϟΔΟϼΜϟ ϰϠϋ ΪϋΎδϳ ϞϜθΑ ϩάϫ ϢϴϤμΗ ϢΗ ΪϘϟΔΌϴΒϟ ϰϠϋ. ωϮϧ ΩήΒϤΑ ίΎϬΠϟ άϫ ϞϤόϳR600A ϱΫΆϣήϴϐϟϭΔΌϴΒϠϟ. . ΔΌϴΒϟϡήΘΤϳ. ϡΪΨΘδϳ ΐδΣ Ϣδϗ ϞϜϟ ΔΒγΎϨϤϟΓέήΤϟΕΎΟέΩ ϢϴϠγϝΎϤόΘγϰϠϋϝϮμΤϠϟ ΎϬΟΎΘΤϳ ϲΘϟΔϴϠϤόϟϚΘΟϼΜϟ.
ϥ· ΕίΎΟϹΕΎϗϭΔϴϠϤϋϞϐηϭΔΟϼΜϟϞμϔΑϢϗΔϠϳϮσ ΕήΘϔϟ ΖϔϗϮΗ ίΎϬΠϟ ϝΎϤόΘγ Ϧϋ . Ϧϣ ϞϠϘΘγΎϫήϴϓϮΗ ϰϠϋ ΪϋΎδΗ ϭΔϗΎτϟ ϙϼϬΘγ. ΓήΘϓ ϝϼΧ ΔΣϮΘϔϣ ΏϮΑϷ ϙήΗ ϯΩΎϔΗ Ϧϋ ΓΪίΔϗΎτϟ ϙϼϬΘγ ωΎϔΗέ ϰϟ· ϱΩΆϳ άϫ ϥ Ϋ· ϡϭΰϠϟ. ΔϴϧϭήΘϜϟϹϭΔϴΎΑήϬϜϟΓΰϬΟϷΕϼπϓΓέΩ·. ΔϴϟΰϨϤϟ Εϼπϔϟ ΔϘϓήΑ ΓΰϬΟϷ Ϧϣ κϠΨΘΗ ϻΔϣΎόϟ. ΎϬϣϼΘγΎΑ ιΎΧ ΰϛήϣ ϲϓ Ϣϗ ϚΘΟϼΛ ϢϴϠδΘΑ . ϱΩΎϔΗϰϠϋ ΔϴϟΰϨϤϟΓΰϬΟϷϊϴϨμΗ ΓΩΎϋ· ΪϋΎδΗ ΞΎΘϨϟ ήϴϓϮΘΑ ϤδΗ ϭΔΌϴΒϟϭΔΤμϟϰϠϋ ΔϴΒϠδϟΩέϮϤϟ ϭΔϗΎτϟ. ΕΎτϠδϟϊϣ ϝΎμΗϻΎΑ Ϣϗ ΕΎϣϮϠόϤϟϦϣ ΪϳΰϤϠϟϪϴϓ ϚΘΟϼΛ ήθΑ ΖϤϗ ϱάϟ ϞΤϤϟΎΑ ϭ ΔϴϠΤϤϟ.
ϞϴϣήΑ ϲϓ ίΎϬΠϟ ϲϣέ ΏϮΟϭ ϡΪϋ ϰϟ· ΰϣήϟ άϫ ήϴθϳ
ΔϴϟΰϨϤϟ ΕϼπϔϠϟ Εϼπϔϟ ΔμμΨϤϟΔϳΪϴϠϘΘϟ .
4.1ΡϮΘϔϣ ΏΎΒϟ .
. 4.5

Table of Contents
1
Introduction.....................................................2
Safety Precautions .........................................3
Before Using the Printer ................................6
Included Items ................................................ 6
Accessories .................................................... 7
Turning the Printer On and Off ....................... 8
Loading Printing Paper.................................10
Printing from Your Computer......................18
Printing with Windows...................................18
Printing with Macintosh.................................19
Printing Photographs Directly
from a Compliant Device.......................20
Printing Photographs Directly
from a Compliant Device ..............................20
About PictBridge Print Settings.....................22
Routine Maintenance ...................................24
When Printing Becomes Faint or Colors
Are Incorrect .................................................24
Printing the Nozzle Check Pattern................25
Examining the Nozzle Check Pattern ........... 27
Print Head Cleaning......................................28
Print Head Deep Cleaning............................31
Aligning the Print Head................................. 33
Replacing an Ink Tank ..................................43
Keeping the Best Printing Results ................49
Cleaning Your Printer ...................................50
Troubleshooting ...........................................57
Cannot Install the Printer Driver....................58
Cannot Connect to Computer Properly......... 60
Print Results Not Satisfactory.......................61
Printer Does Not Start...................................64
Printer Moves But Ink Is Not Ejected............65
Paper Does Not Feed Properly.....................65
Paper Jams...................................................66
Alarm Lamp Flashes Orange........................67
Power Lamp Flashes Green and Alarm
Lamp Flashes Orange Alternately ................69
Message Appears on the Computer
Screen ..........................................................70
Error Message Appears on a PictBridge
Compliant Device..........................................74
Cannot Print Properly through Infrared
Communication.............................................75
Cannot Print Properly via Bluetooth
Communication.............................................75
Appendix .......................................................76
Carrying the Printer.......................................76
Traveling Abroad with the Printer .................76
How to Use the Documentation Provided.....77
Reading the On-screen Manuals ..................78
Solution Menu (Windows Only) ....................79
My Printer (Windows Only)...........................79
Specifications ............................................... 80
Users in the U.S.A. ....................................... 82
For California, USA only ............................... 85
Index.............................................................. 86
català
45
1
Manual d’instruccions
Molt important: llegeix íntegrament aquest manual abans d’utilitzar el teu frigorí c.
Aquest manual està dissenyat de manera que els textos estiguin relacionats amb els dibuix
corresponents. Instal·lació
Identidel teu frigorí”, “ ”) comparantc
les il·lustracion
1.1 Desembala
protecció.
1.2 Ubicació. el frigoríts
de calor i prote
per disminuir-n
No instal·lis e
a la pluja.
L’aire ha de c
del frigorí c.
frigorí c i la p
entre el frigoríerra o el sostre am
objecte.
Anivella el frig
sorolls. Tingues
està situat toca
pot produir peti
Així mateix, c
estiguin col·loca
els recipients s
vibracions.
1.3 Connexió
reposar el frigourant almenys 2 h
en posició verti
lo. Comprova le
característiques
terra) (1.3.1, 1.3 No utilitzis ada Evita que el camotor o atrapat
1.4 Canvi de s
Desconnecta ei buida el contin Retira la cobeun tornavís de cargols i treu laamb l’ajuda de Deixa anar el la pestanya (1.4refrigerador (1.4placa de comanmosses dissendel tornavís (1.4
0Identi cació
Fes una mossacontrari, a la zo(1.4.6). Torna ade comandamemossa que aca Retira la cobercentral, a uix(1.4.8). En els mla frontissa supporta del conge A uixa els cai retira-la. Canvfrontissa i col·lo(1.4.10). Col·loca l’agafla porta del refrdel refrigerador180º. Col·loca eseu costat oposSi disposes de l’agafador supegirats 180º. Gira els autotarefrigerador al c(1.4.12). Col·loca la porcargola la frontila porta del refr Col·loca la càpde la frontissa s(1.4.16). Introdueix el cala càpsula de giporta (1.4.17). Cargola la froncol·loca la cobe
2.1 Engegada d c. Pitja (2
(2.1.2) ns qua la pantalla.
2.2 Cona
durant 5 segons i visualitzaràs lecon guració (etc.) (2.2.1). Secon gurar pitj 2.2.2). Modi capitjant les tecles o (2.2.3). Valida pi (2.2.4). Per sortirdurant 5 segons
2.3 Selecció de
2
Ús

2 Introduction
Introduction
This Quick Start Guide uses the following symbols to indicate important information. Always observe
the instructions indicated by these symbols.
Warning
Instructions that, if ignored, could result in death or serious personal injury caused by incorrect operation of
the equipment. These must be observed for safe operation.
Caution
Instructions that, if ignored, could result in personal injury or material damage caused by incorrect
operation of the equipment. These must be observed for safe operation.
Important
Instructions that must be observed for safe operation.
català
46
els recintes r ef
recinte funcionen de mane
Pitja
per seleccionar el recinte
parpellegi (2.3.1) i valida p
(2.3.2). O
pitja la tecla del recinte pe
,
, o bé
(2.3.3). 2.4
temperatura mentre parpe
o
(2.4.1, 2.4.2) i valida-la pitjant
(2.4.3) o
(2.4.4). La temperatura del ter
recinte es modi Pe
recinte, pitja simultàniame
, (2.4.5) o mantingues p
segons la tecla del recinte
La temperatura real parpe
segons i després es tornar
temperatura seleccionada
Redel recinte r efr i la del recinte congelador és per conservar aliments. En cas que vulguis congelarecomanada és . Nodepèn de la temperatura ala freqüència d’obertura.2.5 Fuactiva el refrigerador amb freda durant 6 horquan s’introdueixi al rquantitat d’aliments. Perefrigerador (2.3.1, 2.3.2). P ns que evisualitzi a la pantalla (2.5.1). V (2.5.2). Pitja també la tecla derefrigerador (2.3.3) i tot seguit, la tecla ns que es va la pantalla (2.5.3). Per validar l’acció, pitja (2.5.4). Fués molt útil quan no s’ha d’refrigerador en un llarg peperò es vol conservar alimAmb aquesta funció, el teuun consum molt baix i no gl’interior. Per utilitzar aqueAdvertència:que la porta del frigorí Perefrigerador (2.3.1, 2.3.2). Pitj ns que es(2.5.5). Valida (2.5.6). Pitja també la tecla del recinte r(2.3.3) i tot seguit, la tecla ns que es visula pantalla (2.5.7). Per vali (2.5.8). Codel recinte mitjà: Alguns mla desconnexió del refrigermitjà. Selecciona el recinteModi ca la t
o ns que no
pantalla (2.5.9). Pitja
i el recinte estarà apagat (2.5.10).2.6 Funcions del congelador Funció de congelació ràpidafunció activa el congelador, amtemperatura més freda, durantEs recomana activar-la 24 hored’introduir al congelador una gd’aliments. Per activar i desactivar: seleccongelador. Pitja ns que es visua la pantalla (2.6.1). V(2.6.2). Pitja també la tecla del recinte i tot seguit, la tecla a la pantalla (2.6.3). Per validapitja (2.6.4). Connexió/desconnexió del cQuan apaguis el congelador, stambé els altres r ecapagat. Selecciona el recinte congelatemperatura amb les tecles , ins que no es visualitzi cap dígit a la paPitja per con rmar i també la tecla durant 3 segons (2.5.7).2.7 Funcions del recinte mitj El recinte mitjà del teu frigoríles funcions especials següent Funció delicatessen: Manté utemperatura de 13º. Ideal per aconservació de formatges, vinsxocolata, etc. Per activar i desactivar: Selecmitjà (2.3.1, 2.3.2). Pitja ns que es visualitzi a la pantalla (2.7.1). V (2.7.2). Funció d’aliments frescos: Mtemperatura de -2 a 3º. Ideal pconservació de carns, peixos, Per activar i desactivar: Selecmitjà (2.3.1, 2.3.2). Pitja ns que es visualitzi a la pantalla (2.7.3). V (2.7.4). Funció de gelats/congeladoruna temperatura de -14º. Idealla conservació de gelats i prodcongelats que es consumiran e Per activar i desactivar: Selecmitjà (2.3.1, 2.3.2). Pitja ns que es visualitzi a la pantalla (2.7.5). V (2.7.6). Aquest recinte nAdvertència:per a la conservació d’alimentsllarg període de temps.2.8 Funció de bloqueig. Per emanipulin el frigorí Pitja durant 3 segons la tecla(2.8.1). Per desbloquejar -lo, r
3Safety Precautions
Safety Precautions
Please read the safety warnings and cautions provided in this manual to ensure that you use the
printer safely. Do not attempt to use the printer in any way not described in this manual.
Warning
z This product emits low level magnetic flux. If you use a cardiac pacemaker and feel abnormalities,
please move away from this product and consult your doctor.
z You may cause an electric shock, fire, or damage the printer if you ignore any of these safety
precautions.
Choosing a location Do not place the printer close to flammable solvents such as alcohol or thinners.
Power supply Never attempt to plug in or unplug the printer from the power supply when your hands are wet.
Always push the plug all the way into the power outlet.
Never damage, modify, stretch or excessively bend or twist
the universal AC adapter and power cord. Do not place
heavy objects on the power cord.
Never plug the printer into a power socket that is shared with
other equipment (extension lead/cord, 2- or 3-way adapter,
etc.).
Never use the printer if the power cord is bundled or knotted.
If you detect smoke, unusual smells or strange noises around the printer, immediately unplug the
printer at the power supply and call for service.
Periodically, unplug the printer and use a dry cloth to wipe off
any dust or dirt collected on the plug and the power outlet. If
the printer is placed at a location exposed to a lot of dust,
smoke, or high humidity, the dust collected on the plug
absorbs moisture and may cause insulation failure and fire.
If you hear thunder, disconnect the power supply of the printer and refrain from using it. Leaving
the printer plugged in may cause fire, electric shock, or damage to the printer, depending on the
thunder storm.
Use the power cable included with the printer.
Use only power supplies listed in the user instructions (Canon AC Adapter: K30287, Li-ion Battery
Pack: K30274, Car Adapter: K30275).
Do not use them for other products.
català
47
3
Manteniment i
neteja
3.1 Neteja
una esponja o una baieta
amb bicarbonat per evita
olors.
No utilitzis en cap cas mà
vapor, dissolvents o dete
3.2 Neteja exterior. No util
neteja de vapor per netej
És recomanable netejar la
part del darrere un cop a
aspiradora.
3.3 Neteja dels accessoris
al rentavaixella. Neteja’ls
d’una esponja o una baie
3.4 Canvi del llum. En cas
desconnecta el frigorí
pressionant la pestanya (
a uixant el cargol d’an
i treu el llum avariat (3.4.
Substitueix-lo per un altre
rosca, E14, 220-240 V, 1
indicació de llum.
3.5 Canvi de ltre de c
incorporar un ltre de c
les olors estranyes de ce
microorganismes (fongs
en circulació.
El ltre manté les seves
4
Diagnòstics4.1 Porta
a la pantalla
oberta
(4.1), que desapareix en
porta.
4.2 Fredt al congelador.• Si la tempe
anormalmen
a la pantalla
acústic inter
congelació r
acústic de m
2.6.3, 2.6.4)
• Quan conn
vegada, apa, però no sonarà l’alar4.3 Tall En casobre les port Funcióelèctric: avisun temps limtranscorregucanviar-lo pefunció del mo Retira (3.5.1, 3.5.3,ubicació (3.5els precintesposició origin Per ac durant 5 segons per accedir aPitja diverses vegades ns que aparegui a la per validar (3.5.1 durant 5 seg Mantén els vis fora de l’abagrans quantit No mu, ja que perdrà totes les propietats.3.6 S.P.A El teu fS.P.A., que sconstant d’huaixí, evitar qu Està sitportaverduredipòsit amb univell indicatinecessiti aigquedi ocult. Tper omplir el Es reco(3.6.4).Si durant un minut no pitgés possible que el frigoríautomàticament, i llavors a la pantalla. Per desbloquejaqualsevol tecla durant 5 s2.9 Recomanacions d’ús.• No obris les portes méque és necessari ni quis al aliments calents. D’aquesta maaconseguiràs un ús més e cfrigorí c i evitaràs que augmd’energia.• Si el teu frigorí c és obstrueixis les reixetes de vendeixa espai entre els aliments hi circuli.• No introdueixis al congamb begudes gasoses o ampovidre que continguin líquid, ja qrebentar.• Emmagatzema els alimhermètics per evitar que els aliressequin.• No consumeixis gelatsfreds, ja que poden produir creboca.
4 Safety Precautions
Cleaning the printer Use a damp cloth to clean the printer. Never use flammable
solvents such as alcohol, benzene or thinners.
If flammable solvents come in contact with electrical
components inside the printer, it could cause a fire or electric
shock.
Always unplug the printer from the power outlet before cleaning the printer.
If you accidentally switch the printer on while cleaning it, you could injure yourself or damage the
printer.
Maintaining the
printer
Do not attempt to disassemble or modify the printer. There are no user serviceable parts inside the
printer.
The printer contains high-voltage components. Never attempt any maintenance procedure not
described in this guide.
Working around the
printer
Do not use highly flammable sprays near the printer.
This could cause a fire or electric shock if the spray comes into contact with electrical components
inside the printer.
Caution
You may cause injury or damage the printer if you ignore any of these safety precautions.
Choosing a location Do not install the printer in a location that is unstable or subject to excessive vibration.
Do not install the printer in locations that are very humid or dusty, in direct sunlight, outdoors, or
close to a heating source.
To avoid the risk of fire or electric shocks, install the printer in a location with an ambient
temperature range of 5°C to 35°C (41°F to 95°F) and humidity of 10% to 90% (condensation free).
Do not place the printer on a thick rug or carpet.
Power supply Ensure that the area around the power outlet is kept clear at
all times so you can easily unplug the power cord if
necessary.
Never remove the plug by pulling on the cord.
Do not use an extension lead/cord.
català
48
5
Seguretat
6Medi ambie
Aque
la co
Aque
que
Resp
temp
sego
un ú
Des
de v
què
cons
Evita
temp
augm
Gest
elect
El sí ind’eliper aLliurrecoEl reconsambPer locafrigotall del subministr Per activar/d durant 5 segons per accedA continuació, pitj ns que parpellegi (4.3(4.3.3) i surt del m durant 5 segons (4.3.4). Després d’unelèctric, a la línia missatge “ANUL· per desactivar-lo
4.4 Sondes tre
Quan es detes’activa un mode Sonda del re que parpelleja (4 Sonda del co (que parpelleja (4 Sonda del re que parpelleja (4 Sonda de l’e que parpelleja Durant la vistrencades no es popcions del frigor
4.5 Sorolls no
Durant el seuemetre una sèrie no t’han d’amoïn• El gas refrigeranmentre circula pe• El compressor plleuger petament,en marxa.• Les dilatacions materials utilitzatscruixits.• L’aire que mou pot generar un pe
No manipulis el reparar-lo. Truca
tècnica, 902 105 0• No col·loquisde ventilació.• Vigila que refrigeració.• No utilitzisfrigorí c, tret qufabricant.• No usis disdiferents dels recaccelerar el procé• Apersones (incloenfísiques, sensoriaexperiència o consupervisió o desprelatives a l’ús deresponsable de lase supervisi l’ús dper evitar que hi j• Ssubstituït pel fabro per personal simd’evitar situacion

5Safety Precautions
Working around the
printer
Never put your hands or fingers in the printer while it is printing.
Do not carry or store the printer with the front of printer (the
Paper Output Slot Cover side) down.
A failure can result.
Do not place any object on the printer.
Do not place metal objects (paper clips, staples, etc.) or containers of flammable solvents (alcohol,
thinners, etc.) on top of the printer.
If any foreign object (metal or liquid) fall into the printer, unplug the power cord and call for service.
Print Heads and ink
tanks
Keep ink tanks out of the reach of children.
In case ink is accidentally licked or swallowed, rinse out mouth or give one or two glasses of water
to drink.
If irritation or discomfort occurs, obtain medical advice immediately.
In case ink gets in contact with eyes, rinse with water immediately.
In case ink gets in contact with skin, wash with soap and water immediately.
If irritation to eyes or skin persists, obtain medical advice immediately.
Do not shake Print Heads or ink tanks.
Ink may leak out and stain clothing or the surrounding area.
Never touch the electrical contacts on a Print Head after
printing. The metal parts may be very hot and could cause
burns.
Do not throw ink tanks into fire.
Universal AC Adapter When you pack the universal AC adapter for travel or storage, never wrap the cord around the
body of the AC adapter to prevent the cord from splitting or separating from the body of the AC
adapter and causing a short circuit.
galego
49
1
Manual de instrucións
Moi importante: Le integramente este manual antes de utiliza-lo teu frigorí co.
Este manual está deseñado de forma que os textos estean relacionados cos debuxos
correspondentes.
Instalación
Identio teu frigorí
“ ”, “ ”) compab c
ilustracións.
1.1 Desembalax
protección.
1.2 Ubicación.
fontes de calo
do sol para dim Non instale-loexposto á cho O aire debe cfrigorí co. Dfrigorí co e existente entre co e o chteito con ningú Nivela o frigoruídos. T en situado xunto pode producir Así mesmo, cestean colocaos recipientesvibracións.
1.3 Conexión á
repousa-lo frigo durante, polo me2 horas en posconectalo. Cocaracterísticas(1.3.1, 1.3.2). Non uses ada Evita que o camotor ou atrap
1.4 Cambio de
Desconecta o baleira o conti Retira a cubedestornillador os parafusos ede xiro axudán(1.4.2). Solta o conec(1.4.3). Retira Extrae o porta
0Identi cación
amosegas desdesaparafusad Fai unha amocontrario, na zo(1.4.6). Monta dpasando o cab(1.4.7). Retira a cubecentral, solta o(1.4.8). Nos mocambia a bisaga porta do conx Solta os pararetíraa. Cambiae colócaa no la Coloca o tiraporta do refrixerefrixerador naColoca os tiradoposto xirándode recinto centabaixo e o infe Xira os autopno conxelador Coloca a poraparafusa a bisa porta do refri Coloca a cápbisagra superio Introduce o ccápsula de xiroporta (1.4.17). Aparafusa a coloca a cuber
2.1 Encendido co. Pulsa
(2.1.1) ou (2.1.2) atemperatura na
2.2 Conulsa
durante 5 segundos e visde con guraavisos…) (2.2.desexes con (2.2.2). Modi ca a o ou (2.2.3). Valida pusaír do menú, p durante 5 segundos (2.2.
2.3 Selección d
combinados, o
2
Uso
7Before Using the Printer
Accessories
The following accessories are available for this printer. Confirm the product names when you
purchase the accessories.
* Certain accessories may not be available in some countries or regions.
Portable Kit LK-62 series
This kit allows you to use the Canon printer in location where a power outlet is unavailable. The
kit contains a battery pack (A) and a battery attachment (B). To charge the battery, load the
battery pack in the battery attachment, and attach it to the printer, and then connect the AC
adapter to the printer. For details, refer to the kit’s instruction manual.
Power Cord for Universal AC Adapter
Canon Automobile Power Unit PU-200U
This accessory allows you to supply power from a cigarette lighter outlet of a car to your printer
for operation or battery charging.
Bluetooth Unit BU-30
This accessory allows you to print wireless from a Bluetooth device.
For further information on the installation or the Bluetooth settings, refer to the Bluetooth Guide
on-screen manual.
(A)
(B)
galego
51
3
Mantemento e
limpeza
3.1 Limpeza a
unha esponxa o
con bicarbonato
olores.
Non utilices, e
limpeza a vapor
abrasivos.
3.2 Limpeza e
de limpeza a va
pantallas.
É recomendab
vez ó ano cunha
3.3 Limpeza d
para lavalouzas
dunha esponxa
3.4 Cambio de
funda a lámpada
Retira a cuberta
(3.4.1, 3.4.3) ou
amarre (3.4.5. 3
estropeada (3.4
por outra do me
220-240V, 15/2
de luminaria.
3.5 Cambio de
pode incorporarabsorbe os olor
4
Diagnósticos
4.1 1 Porta aber
podes visualiza-la (4.1), esta icona dporta.
4.2 Frío insu c
• Se a temperatuanormalmente alt no display e activacústico intermiteconxelación rápidacústico de forma2.6.2, 2.6.3, 2.6.4• Cando conecteaparato, aparece, pero non soará a alarma.alimentos e retén(fungos e bacteria O ltro manténun tempo limitadotempo, recoméndA súa ubicación v Retira a cuberta(3.5.1, 3.5.3, 3.5.5ubicación (3.5.2, precintos (3.5.7). ubicación orixinal Para activar l durante 5 segundos para con guración (3 repetidas veces, ata que apareza no displPulsa para validar (3.5.pulsando durante 5 segund
Mantén os gotados e os recambios fóra d
inxerilo en grandeperigoso.
Non mólle-lo 53-xa que perderá
súas propiedades
3.6 S.P .A. salus
O teu frigorí caccesorio S.P .A.un nivel constantportaverduras e, resequen os alim Ubícase na xuntportaverduras (3.un depósito cun vindicativo de enchnecesite auga, o Extrae o vaso (3.depósito (3.6.3). Recoméndase c(3.6.4). Pulsa, durante (2.8.1). Para desoperación. Pasaningún botón, pobloquee automano display. Para decalquera tecla d
2.9 Recomend
• Non ábra-las pnecesario nin mealimentos quenteun uso máis e ce evitara-lo aumeenerxía.• Se o teu frigoobstrúas as reixaespazo entre os acircule entre eles• Non introduzacon bebidas gasede cristal que conconxelador, p53-x• Almacena osherméticos para e• Non consumafríos, p53-xa que na boca.

8 Before Using the Printer
Turning the Printer On and Off
Turn on the printer before printing.
Turning on the Printer
1 Open the Rear Tray Cover.
The Paper Output Slot Cover will open automatically.
2 Press the Power button.
The Power lamp flashes green, and changes to
steady, non-flashing light.
3 Turn on your computer.
Note
If preparatory operations below are not complete, follow your setup sheet to complete them.
z The Print Head and ink tanks are set into place.
z The printer is connected to your computer (or a compatible device).
z The printer driver is installed.
Important
z If you use the battery, make sure that it is charged.
For details, refer to the battery’s instruction
manual.
z If the Alarm lamp begins to flash orange, see
“Alarm Lamp Flashes Orange” on page 67.
galego
52
6
Medio ambiente
5
Seguridade
Este frigorí
conservación d
Este aparato fu
non deteriora o
Respecta o me
temperaturas r
segundo a fun
uso e ciente d
Desconecta o
vacacións para
que non vaias
consumo e afo
Evita mantene
tempo do nece
custo enerxétic
Xestión de res
electrónicos.
O símbolo
indica que o a
eliminar utiliza
residuos domé
Entrega o teu f
recollida.
O reciclado de
consecuencias
ambiente e pe
Para máis info
locais ou co es
frigorí co.
• Mantén des
4.3 Corte de
Ante un corte
abre as portas
Función avis
subministració
que se produc
eléctrica.
Para activar
durante 5 segundos pa(4.3.1). A cont ata que escintilactivar (4.3.3) durante 5 seg Despois dun eléctrica, na liñ“ANULAR AV para desactivalo (4
4.4 Sondas ro
Cando se denun modo de Sonda do refescintilando (4.4.1) . Sonda do coescintilando (4.4.2) . Sonda do recescintilando Sonda do evescintilando (4.4.4) . Durante a visRotas non se opcións do frig
4.5 Ruídos no
O teu frigoríde ruídos quefuncionamentopreocupar.• O gas refrixeranburbulleo ó circul• O compresor poun lixeiro golpetepon en marcha.• As dilatacións omateriais utilizadoou ruxidos.• O aire que movconxelador pode de fondo.
Non manipúle-lreparalo. Chama
técnica, 902 105 0• Ten coidadorefrixeración.• Non utilíce-lodo frigorí co, a nrecomendado po• Non úse-los outros medios dispolo fabricante padesconxelación.• Este aparatode persoas (inclufísicas, sensoriaisque carezan de esalvo baixo superinstruccións relatipersoa responsabsupervisar o uso que xoguen co ap• Se o cable dser sustituido polpostventa ou persevitar situacións p

10 Before Using the Printer
Loading Printing Paper
This section describes how to load printing paper in the Rear Tray.
Using Specialty Media
Canon recommends that you use Canon genuine media to ensure optimal print quality.
z
z
z
zz Photo Quality Media
z Glossy Photo Paper “Everyday Use”
z Photo Paper Plus Semi-gloss
z Photo Paper Plus Glossy
z Photo Paper Plus Glossy II
z Photo Paper Plus Double Sided
z Photo Paper Pro
z Matte Photo Paper
z Photo Stickers
z
z
z
zz Media Suited for Business
Documents
z High Resolution Paper
z Super White Paper
euskara
54edo
(2.4.4) sakatuta.
tenpera
Gune bakoitzeko
jakin de
,
teklak sakatut
teklak 3
(2.4.6).
agertuk
hori iga
agertuk
HoGomendioak:
gradutan egotea
gomend
graduta
gordetz
izozkail gradutara jaistea g Kontuan hartu bahainbattenperairekitze
2.5 Hozkailuaren Azkar hozteko fu
hozkailumantensartzen Aktibatzeko eta dhozteko displaya agertu arte (2.5.1 sakatuta (2.5.2). tekla (2.3.3) eta jarraiadisplaya ikusi arte (2.5.3), baliozta
“Oporrak” funtzi
egokia baina izbadituzoso gutegongo
GailuareOharra:
Aktibatu eta desahozkailu Sakatu displayan ikusi Baliozk sakatua (2.5.6). Shozteko (2.3.3) eta jarraiak tekla sakatu displikusi arte (2.5 (2.5.8).
Hozkailua edo ekonekta
batzuetsoilik itz(2.3.1, 2 , botoiak display-eez den ; edukiontzia itzalita d
2.6 Hozkailuaren Azkar izozteko f
izozkailmantenelikagaaktibatz Aktibatu eta desaizozkailuko gunea displayan agertu arte (2.6.1sakatuta (2.6.2). Sakatu izo eta jarraian sakatu tarte (2.6.3), sakat balioztatzeko (2.
Izozkailua konek
Izozkailua itzalitaitzali egingo dira, da. Aukeratu izozkai , teklekin displayaez den arte (2.6.5 baieztatzeko eta itzali (2.6.6). B tekla sakatuta ere (2.5.
2.7 Erdiko edukio Zure hozkailuko
hauek izan ditzak
“Delicatessen” fu
tenperatura mantoso egokia da gatxokolatea eta abkontserbatzeko. Aktibatu eta desaedukiontzia auke display-ean ikuontzat eman sakatuz (2.7.2).
Elikagai Freskoa
graduko tenperatTenperatura hori arraina, itsaskiak kontserbatzeko. Aktibatu eta desaedukiontzia auke display-ean ikuontzat eman sakatuz (2.7.4).
Izozkiak/Izozkail
tenperatura mantegokia da izozkiadiren izoztutako pkontserbatzeko. Aktibatu eta desaedukiontzia auke ; display-ean ikontzat eman sakatuz (2.7.6).
Ez da eOharra:
erabiltzea elikagagordetzeko.
2.8 Blokeatze fu
umeek gailua era Sakatu 3 segund tekla (2.8.1). Desblokeatzeko gbat igaro eta inolabada, litekeena dblokeatzea eta di agertuko zaizu. Desblokeatzeko, segundoz (2.8.2)
2.9 Erabilera-gom
• Ez ireki atea beeta ez sartu elika

12 Before Using the Printer
*6 This paper cannot be used in Macintosh.
*7 When printing photos to sticker paper from a mobile phone or PDA via infrared
communication or Bluetooth communication, be sure to select Sticker Paper in Paper Size
on the Canon Setup Utility. Refer to “Setting the Page Size, Media Type, and Layout When
Printing from a Mobile Phone or a PDA” in “Printing through Wireless Communication” of the
User’s Guide on-screen manual.
z
z
z
zz Media Types You Cannot Use
Do not use the following types of paper. Using such paper will not only produce unsatisfactory
results, but can also cause the printer to jam or malfunction. Additionally, when printing on A5 or
smaller sized paper, do not use paper thinner than a post card, including plain paper or notepad
paper cut to a small size.
z Folded, curled, or wrinkled paper
z Damp paper
z Paper that is too thin (weighing less than 17 lb / 64 gsm)
z Paper that is too thick (plain paper, except for Canon genuine paper, weighing more than
28 lb / 105 gsm)
z Picture postcards
z Postcards affixed with photos or stickers
z Paper that is not rectangular
z Paper bound with staples or glue
z Paper with adhesives
z Paper decorated with glitter, etc.
Important
Put unused paper back into the package, and store them avoiding heat, humidity, and direct
sunlight.
Note
z To specify the page size and media type when printing photos via infrared communication or
Bluetooth communication, refer to “Setting the Page Size, Media Type, and Layout When
Printing from a Mobile Phone or a PDA” in “Printing through Wireless Communication” of the
User’s Guide on-screen manual.
z For a detailed description of printing media types, refer to “Printing Media” in the User’s Guide
on-screen manual.
euskara
56
6
Ingurumena 5Seg
Gailu hau diseina
zaintza kontuan
Gailu honek ingur
hoztailea erabiltz
Zaindu ingurume
aktibatzerakoan e
gomendatutako te
eraginkortasunez
Itzali hozkailua ed
gailua epe luze b
Horrela, kontsum
aurreztuko duzu.
Ez eduki ateak ire
gehiago, horrek e
Gailu elektriko e
eratorritako hond
ikurrak esan nah
hondakinak jasotz
behar.
Hozkailua horrela
batera eraman.
Etxe-tresnak birzi
ingurumenarentza
saihesten ditu. Gaaurrezten dira.Informazio gehiagzenuen saltokira agintaritzarekin.• Aire• Ez ka• Ez saizango dira fabrikgailuak. • Ez ergailu mekanikorikFabrikatzaileak g• Gailuzentzumenekoa epertsonek erabili eskarmenturik edhaien segurtasungailua erabiltzekoedota horrek erabUmeak gainbegirjolastea saihestek• Kaltesalmenta ondokoMOZKETA OHARdesaktibatzeko (4
4.3 Zu
Zundagero, bisualizatzesartzen da: Hozteeginez agertuko d (4.4.1) . Izozkaagertuko da hau (4.4.2) . Erdikoagertuko da hau (4.4.3) . Lurrunagertuko da hau (4.4.4) . Zundaezin da hozkailukerabili. 4.5 Ga
Gailuaditzake, ez kezka• Gas-hoztaileak zirkuituetan zeha• Konpresorhotsa egin dezakhasten denean.• Erabilitako matekontrakzioa dela entzun daitezke.• Izozkailuko haizaireak hondo-zara
Ez saiatu gailua
Deitu laguntza te902 105 010.kuali katutako tearriskuak saihest

14 Before Using the Printer
2 Prepare to load paper.
(1) Open the Rear Tray Cover.
The Paper Output Slot Cover will open
automatically.
(2) Pull out the Paper Support completely until the
mark and the mark are aligned.
(3) Adjust the position of the Paper Thickness
Lever.
The Paper Thickness Lever switches the
clearance between the Print Head and the
loaded paper to match the media type.
Set it to the left when printing on envelopes or
T-shirt transfers, and right when printing on any
other type of the paper.
3 Load the paper.
(1) Slide the Paper Guide to the left side of the
Rear Tray.
(2) Load the paper in the Rear Tray with the print
side facing UP.
(3) Align the paper stack against the guide on the
right side of the Rear Tray.
(4) Slide the Paper Guide against the left side of
the paper stack.
Do not slide the Paper Guide too strong. Paper
may not be fed properly.
4 Specify the page size and media type settings
according to the loaded paper.
Note
If the corners or edges of the paper are smudged, try to print with the Paper Thickness Lever
set to the left. It may improve print quality.
Reset the Paper Thickness Lever to the right when you finish printing.
Note
Select the size and type of the loaded paper in Page Size (or
Paper Size) and Media Type in the
printer driver.
For details on printer driver settings, see “Printing with Windows” on page 18 or “Printing with
Macintosh” on page 19.
(1)
(2)
(3)
(A) (2)
(3)
(4)
* Do not load higher than the
projection (A).
15Before Using the Printer
Loading Envelopes
Use either European DL or US Comm. Env. #10-sized envelope.
With proper printer driver settings, the address will be printed according to the direction of
envelope.
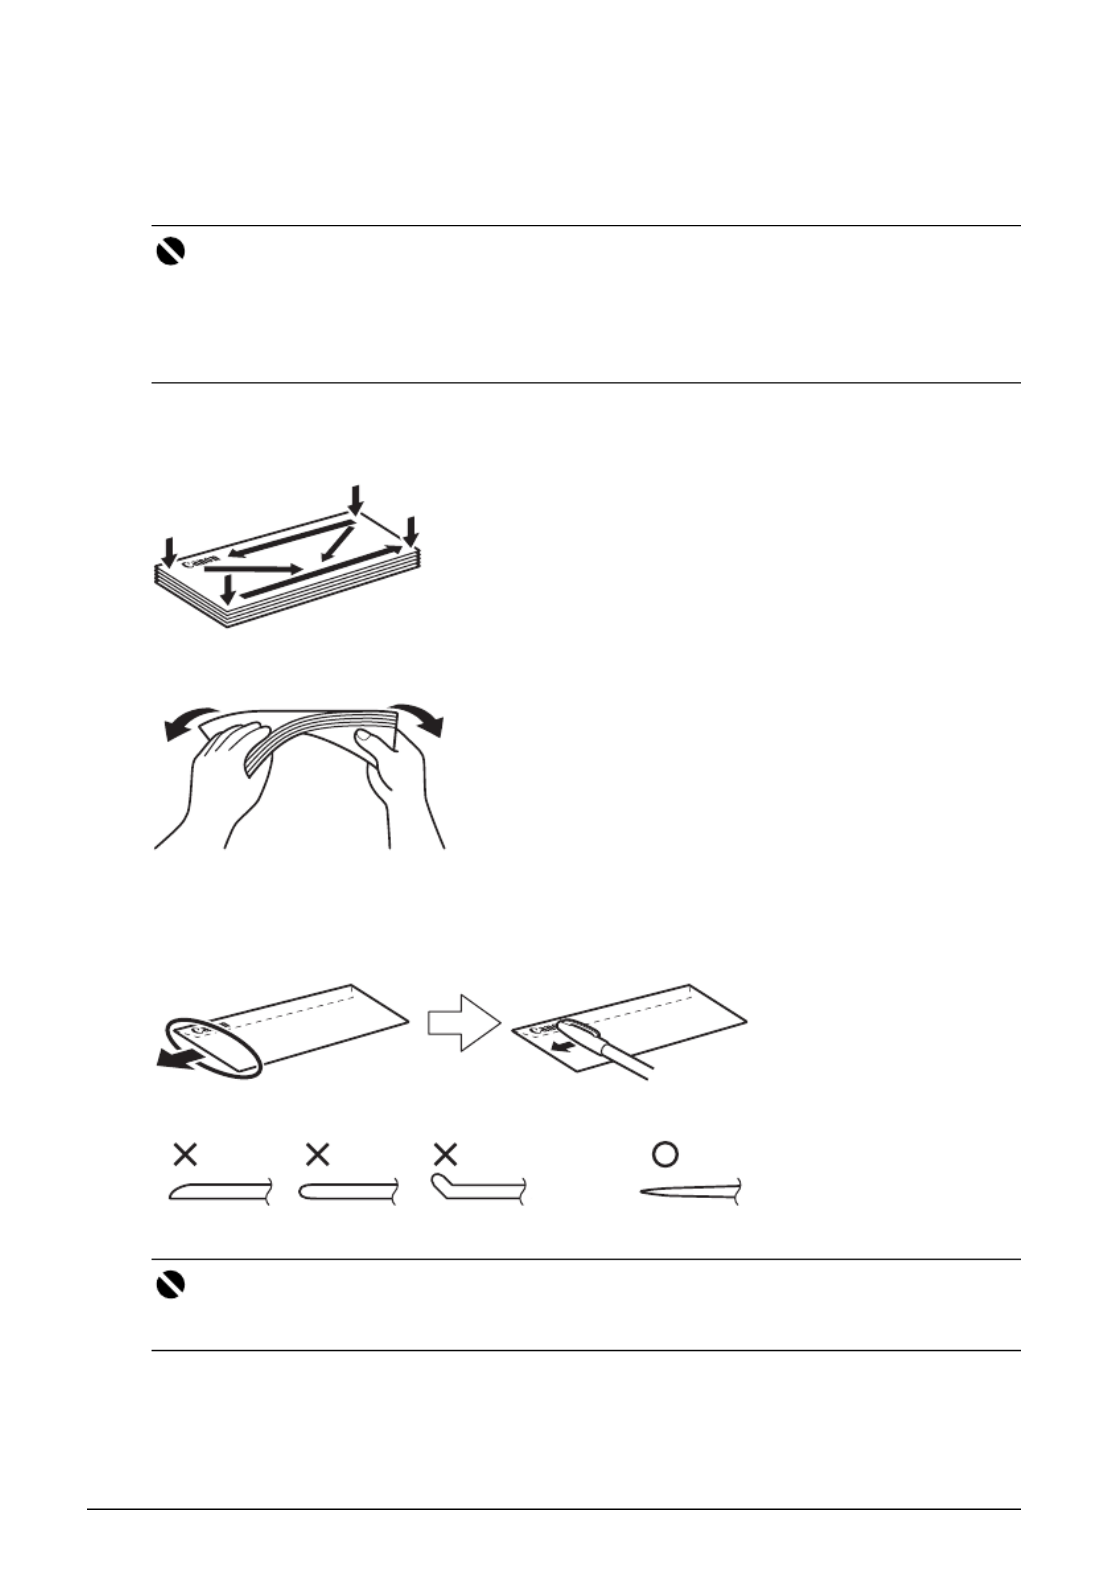
1 Prepare the envelopes.
z Press down on all four corners and edges of the envelopes to flatten them.
z If the envelopes are curled, hold the opposite corners and gently twist them in the opposite
direction.
z If the corner of the envelope flap is folded, flatten it.
z If the leading edge of an envelope is puffed up or curled, use a pen to press the envelope
flat and sharpen the crease.
Press the envelope flat, working from the middle to the edge.
* The above illustrations show a side view of the leading edge of the envelope.
Important
Do not use the following envelopes:
z Envelopes with a double flap (or sticker flaps)
z Envelopes with an embossed or treated surface
z Envelopes with pressure seals
z Envelopes whose gummed flaps are already moistened and adhesive
Important
z The envelopes may jam in the printer if they are not flat or the edges are not aligned.
z Make sure that no curl or puff exceeds 0.1 inches / 3 mm.

16 Before Using the Printer
2 Load the envelopes.
(1) Slide the Paper Guide to the left side of the
Rear Tray.
(2) Load the envelope against the guide on the
right side of the Rear Tray. Load with the
address side facing UP and the rear flaps
DOWN on the left. Up to 10 envelopes can be
loaded at once.
(3) Slide the Paper Guide against the left side of
the envelope.
Do not slide the Paper Guide too strong. Paper
may not be fed properly.
(4) Set the Paper Thickness Lever to the left.
Reset the Paper Thickness Lever to the right
when you finish printing.
3 Specify the settings in the printer driver.
(1) Select Envelope in Media Type.
(2) Select the size for envelopes.
In Windows, select DL Env. or Comm. Env. #10 in Page Size.
In Macintosh, select DL Envelope or #10 Envelope in Paper Size.
(3) Select Landscape in Orientation.
.
Important
Be sure to set the printer driver setting properly. If you do not, the address will be printed in the
wrong direction.
Note
For details on printer driver settings, see “Printing with Windows” on page 18 or “Printing with
Macintosh” on page 19.
(A)
(B)
(3)
(4)
(2)
(A) Printing orientation
(B) Make sure the flaps are folded.
Produkt Specifikationer
| Mærke: | Canon |
| Kategori: | Printer |
| Model: | Pixma IP100 |
| Vægt: | 1996 g |
| Bluetooth: | Ja |
| Antal USB 2.0-porte: | 1 |
| Strømforbrug (standby): | 1.5 W |
| Udskrivningsteknologi: | Inkjet |
| Maksimal opløsning: | 9600 x 2400 dpi |
| Udskrivningshastighed (sort, normal kvalitet, A4/amerikansk papirformat): | 20 sider pr. minut |
| Medietyper til papirbakke: | Fotopapir |
| Maksimal ISO A-serie papirstørrelse: | A4 |
| Ikke-ISO udskriftsmedier størrelse: | Legal |
| Markedspositionering: | Hjemmekontor |
| Dimensioner (BxDxH): | 322.6 x 182.9 x 61 mm |
| Mac kompabilitet: | Ja |
| Bæredygtighedscertifikater: | ENERGY STAR |
| Tid til første side (farve, normal): | 4.3 sek./side |
| PictBridge: | Ja |
| Strømforbrug (udskrivning): | 9 W |
| Kompatible operativsystemer: | Windows XP/2000/Vista\nMac v.10.3.9 to 10.5.x |
| Farve: | Ja |
| Udskrivningshastighed (farve, normal kvalitet, A4/amerikansk papirformat): | 14 sider pr. minut |
| Tid til første side (sort, normal): | 3 sek./side |
| Infrarød dataport: | Ja |
| Maksimal printstørrelse: | 216 x 297 mm |
| Støjniveau, print: | 38.5 dB |
| Vægt (efter britisk standard): | 4.4 Pund |
| Print hoved dyser: | 1.856 |
| Standby-LED: | Ja |
| Dimensioner (BxDxH) (efter britisk standard): | 12.7 x 7.2 x 2.4 " |
Har du brug for hjælp?
Hvis du har brug for hjælp til Canon Pixma IP100 stil et spørgsmål nedenfor, og andre brugere vil svare dig
Printer Canon Manualer

9 April 2025
17 Februar 2025
17 Februar 2025
15 Januar 2025
15 Januar 2025
13 Januar 2025
13 Januar 2025
9 Januar 2025
9 Januar 2025
9 Januar 2025
Printer Manualer
- Printer Nilox
- Printer Sony
- Printer Samsung
- Printer Panasonic
- Printer LG
- Printer Mitsubishi
- Printer Sharp
- Printer Lexmark
- Printer Epson
- Printer HP
- Printer D-Link
- Printer Roland
- Printer Toshiba
- Printer Fujifilm
- Printer Nikon
- Printer Kodak
- Printer Brother
- Printer Lenovo
- Printer Olympus
- Printer Triumph-Adler
- Printer AVM
- Printer Dymo
- Printer Thomson
- Printer JVC
- Printer Honeywell
- Printer Citizen
- Printer Olivetti
- Printer Huawei
- Printer Seiko
- Printer Digitus
- Printer Zebra
- Printer Olympia
- Printer Xiaomi
- Printer Dell
- Printer Intermec
- Printer Fujitsu
- Printer MSI
- Printer Polaroid
- Printer Ricoh
- Printer NEC
- Printer Konica-Minolta
- Printer OKI
- Printer Kyocera
- Printer Avision
- Printer Velleman
- Printer Bixolon
- Printer Sagem
- Printer Pantum
- Printer Xerox
- Printer Renkforce
- Printer Testo
- Printer Ultimaker
- Printer Primera
- Printer Star Micronics
- Printer Star
- Printer Panduit
- Printer ZKTeco
- Printer StarTech.com
- Printer Kogan
- Printer CUSTOM
- Printer Godex
- Printer Equip
- Printer Royal Sovereign
- Printer Argox
- Printer Minolta
- Printer DNP
- Printer Oce
- Printer Metapace
- Printer Ibm
- Printer Tomy
- Printer Approx
- Printer Toshiba TEC
- Printer Frama
- Printer Vupoint Solutions
- Printer Evolis
- Printer Builder
- Printer Fargo
- Printer Brady
- Printer Posiflex
- Printer Datamax-O'neil
- Printer Dascom
- Printer HiTi
- Printer GG Image
- Printer Elite Screens
- Printer DTRONIC
- Printer Phoenix Contact
- Printer Videology
- Printer TSC
- Printer EC Line
- Printer Colop
- Printer Fichero
- Printer Raspberry Pi
- Printer Unitech
- Printer IDP
- Printer Microboards
- Printer Tally Dascom
- Printer CSL
- Printer Nisca
- Printer Epson 7620
- Printer Sawgrass
- Printer Mimaki
Nyeste Printer Manualer

8 April 2025

2 April 2025

29 Marts 2025
29 Marts 2025
29 Marts 2025

9 Marts 2025
9 Marts 2025
5 Marts 2025
5 Marts 2025
5 Marts 2025