Canon Pixma MX700 Manual
Læs nedenfor 📖 manual på dansk for Canon Pixma MX700 (204 sider) i kategorien Printer. Denne guide var nyttig for 23 personer og blev bedømt med 4.5 stjerner i gennemsnit af 2 brugere
Side 1/204

Quick Start Guide
Guide de démarrage rapide
Guía de iniciación rápida
Guia de consulta rápida
Q T 5 1 3 9 6 V 0 1
ESPAÑOL
PORT DO BRASIL
ENGLISHFRANÇAIS
Instrucciones de seguridad
Lea las advertencias y las precauciones de seguridad que se proporcionan en este manual para garantizar
un uso seguro de la impresora. No intente usar la impresora de un modo no descrito en este manual.
Para obtener instrucciones de seguridad más detalladas, consulte el manual en pantalla Guía del Usuario.
Advertencia
Hacer caso omiso de las instrucciones de seguridad podría provocar una descarga eléctrica o un
incendio y dañar la impresora.
Precaución
Hacer caso omiso de las instrucciones de seguridad podría provocar daños al usuario o al equipo.
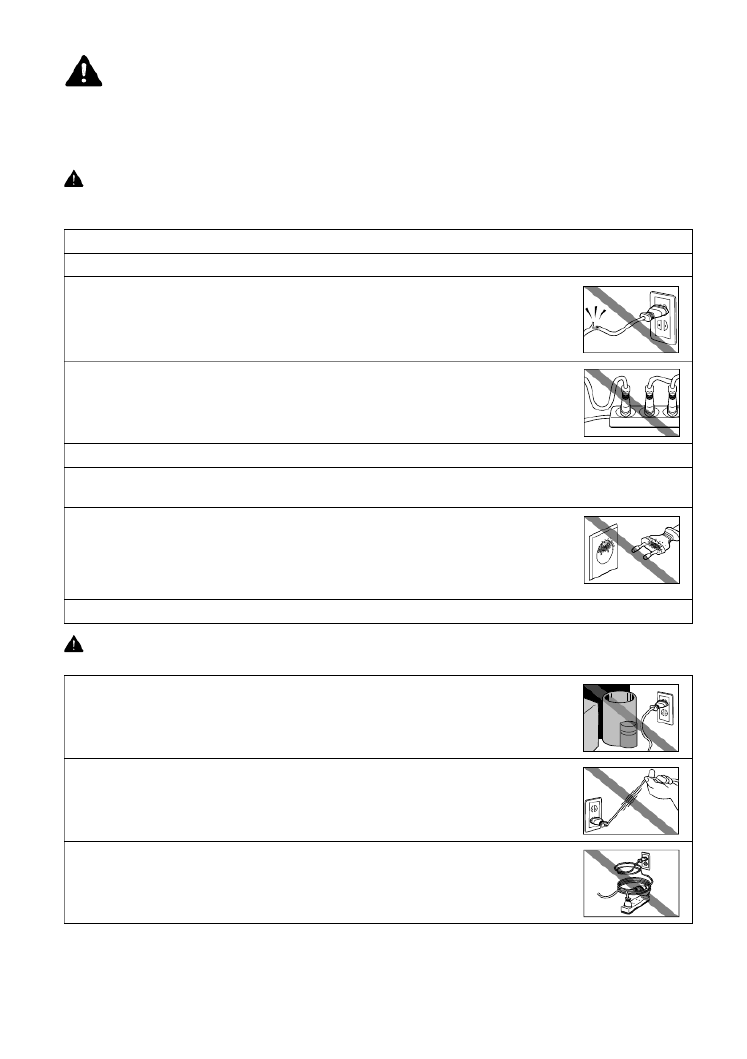
No enchufe la impresora a la toma de corriente ni la desenchufe con las manos húmedas o mojadas.
Empuje siempre el enchufe del equipo en la toma de corriente hasta el final.
No dañe, modifique, estire, curve o retuerza excesivamente el cable de
alimentación eléctrica. No coloque objetos pesados sobre el cable.
No enchufe la impresora en una toma de corriente compartida con otros
equipos (mediante un alargador, un adaptador doble o triple, etc.).
No utilice la impresora cuando el cable de alimentación esté recogido o tenga nudos.
Si detecta humo, olores extraños o ruidos poco frecuentes en una zona próxima a la impresora,
desenchufe la impresora de la toma de corriente al servicio técnico.inmediatamente y avise
Periódicamente, desconecte la impresora y use un trapo seco para eliminar
cualquier acumulación de polvo o suciedad en el enchufe y la toma eléctrica. Si
la impresora se coloca en una ubicación expuesta a grandes cantidades de polvo
o humo, o con mucha humedad, el polvo que se acumula en el enchufe absorbe
la humedad y puede hacer que falle el aislamiento y producir un incendio.
Use el cable de alimentación incluido con la máquina.
Asegúrese de que el área que rodea la toma de corriente esté despejada en
todo momento para que el cable de alimentación se pueda desenchufar
fácilmente en caso de necesidad.
No desenchufe la impresora tirando del cable.
No use alargadores.

ENGLISH
European Union (and EEA) only.
This symbol indicates that this product is not to be disposed of with your household
waste, according to the WEEE Directive (2002/96/EC) and your national law. This prod-
uct should be handed over to a designated collection point, e.g., on an authorized one-
for-one basis when you buy a new similar product or to an authorized collection site for
recycling waste electrical and electronic equipment (EEE). Improper handling of this
type of waste could have a possible negative impact on the environment and human
health due to potentially hazardous substances that are generally associated with EEE.
At the same time, your cooperation in the correct disposal of this product will contribute
to the effective usage of natural resources. For more information about where you can
drop off your waste equipment for recycling, please contact your local city office, waste
authority, approved WEEE scheme or your household waste disposal service.
For more information regarding return and recycling of WEEE products, please visit
www.canon-europe.com/environment.
(EEA: Norway, Iceland and Liechtenstein)
For Customers in Europe, Middle-East, Africa and
Russia only
For Canon Customer Support contacts, please see the back cover of the European Warranty Systems
(EWS) Booklet or visit www.canon-europe.com.
This equipment conforms with the essential requirements of EC Directive 1999/5/EC.
Model Number: K10304 (MX700)

1Introduction
ENGLISH
Introduction
This Quick Start Guide uses the following symbols to indicate important information. Always observe
the instructions indicated by these symbols.
Depending on your application program, operations may differ. For details, refer to the instruction manual of
your application. The steps described in this manual are for printing in Windows Vista™ operating system
Ultimate Edition (hereafter referred to as "Windows Vista") and Mac® OS X v.10.4.x.
Warning
Instructions that, if ignored, could result in death or serious personal injury caused by incorrect
operation of the equipment. These must be observed for safe operation.
Caution
Instructions that, if ignored, could result in personal injury or material damage caused by incorrect
operation of the equipment. These must be observed for safe operation.
Important
Instructions that must be observed for safe operation.
Trademark Notices
z“Microsoft” is a registered trademark of Microsoft Corporation.
z“Windows” is a trademark of Microsoft Corporation, registered in the U.S. and other countries.
z“Windows Vista” is a trademark of Microsoft Corporation.
z“Macintosh” and “Mac” are trademarks of Apple Inc., registered in the U.S. and other countries.
z“Memory Stick”, “Memory Stick PRO”, “Memory Stick Duo” and “Memory Stick PRO Duo” are
trademarks of Sony Corporation.
z“xD-Picture Card” is a trademark of Fuji Film Co. Ltd.
z“MultiMediaCard” is a trademark of the MultiMediaCard Association.
z“SD Card”, “miniSD Card”, and “microSD Card” are trademarks of SD Association.
© CANON INC. 2007
All rights reserved. No part of this publication may be transmitted or copied in any form
whatsoever without the express written permission.

2Introduction
ENGLISH
Exif Print
This machine supports Exif Print.
Exif Print is a standard for enhancing the communication between digital cameras and
printers. By connecting to an Exif Print-compliant digital camera, the camera’s image
data at the time of shooting is used and optimized, yielding extremely high quality
prints.
International ENERGY STAR® Program
As an E SNERGY TAR® Partner, Canon Inc. has determined that this
product meets the E SNERGY TAR® guidelines for energy efficiency.
Power Requirements
Be sure to use the power cable included with the machine. Never use a power supply
voltage other than that supplied in the country of purchase. Using the incorrect voltage
could cause a fire or electric shock. The correct power supply voltages and frequencies
are as follows:
AC 100-240V, 50/60Hz
About Consumables
Consumables (ink tanks / FINE Cartridges) are available for 5 years after production
has stopped.
Super G3 is a phrase used to describe the new generation of fax
machines that use ITU-T V.34 standard 33.6 Kbps * modems.
Super G3 High Speed Fax machines allow transmission time of
approximately 3 seconds * per page which results in reduced
telephone line charges.
* Approximately 3 seconds per page fax transmission time based on Canon FAX
Standard Chart (Standard Mode) at 33.6 Kbps modem speed.
The Public Switched Telephone Network (PSTN) currently supports 28.8 Kbps modem
speeds or lower, depending on telephone line conditions.
Safety Precautions
.
Warning
zThis product emits low level magnetic flux. If you use a cardiac pacemaker and feel abnormalities,
please move away from this product and consult your doctor.
zNever attempt to plug the power cord into the power outlet or unplug the power cord when your hands
are wet.
zNever damage, modify, stretch, or excessively bend or twist the power cord. Do not place heavy
objects on the power cord.
zNever use any power supply other than the standard power supply available in the country of purchase.
Using the incorrect voltage and frequency could cause a fire or electric shock.
zAlways push the plug all the way into the power outlet.
Caution
zFor safety reasons, store ink tanks out of the reach of small children.
zDo not drop or shake ink tanks as this may cause the ink to leak out and stain your clothes and hands.
Also read the Safety Precautions in the User’s Guide on-screen manual. Observe the warnings
and cautions to avoid personal injury or damage to the machine.

3How to Use the Documentation Provided
ENGLISH
How to Use the Documentation Provided
Printed Documentation
Setup Sheet
Be sure to read this sheet first.
This sheet includes instructions for setting up your machine and getting it ready
for use.
Network Setup Guide
Read this guide when starting to use the machine in a network
environment.
This guide includes software installation instructions and troubleshooting tips for
wired LAN connection.
Quick Start Guide (This guide)
Read this guide when starting to use the machine.
After following instructions in your setup sheet or the Network Setup Guide, we
recommend you read this guide to familiarize yourself with the basic operation of
some of the main functions that can be performed on your machine.
On-screen Manuals
User’s Guide
Read this guide when starting to use the machine.
If the Quick Start Guide does not provide you enough information please refer to
the User’s Guide which can be installed from the Setup CD-ROM. This guide
provides detailed instructions for:
zcopying
zprinting from a memory card
zprinting from your computer
zscanning
zfaxing
Additional guides are also available for advanced features.
Scanning Guide
Refer to this guide for full instructions on scanning operation and settings.
PC Printing Guide
Refer to this guide for full instructions on printer driver setting.
FAX Driver Guide (Windows® only)
Refer to this guide for full instructions on fax driver setting.
PC Photo Printing Guide (Windows only)
Refer to this guide for instructions on using the various application software
included on the Setup CD-ROM.

5Preparing the Machine
ENGLISH
4Install the ink tanks.
For fax users
Select the receive mode according to your needs. See “Selecting a Receive Mode” on page 35.
zWhen you have a dedicated telephone line for fax use only:
Select FAX only mode.
zWhen you are using a single telephone line for faxes and voice calls:
If you receive mainly voice calls and sometimes faxes, select TEL priority mode.
If you receive mainly faxes and sometimes voice calls, select FAX priority mode.
zWhen you subscribe to a ring pattern detection service provided by your telephone company. (Not
available depending on the country or region of purchase.):
Select .DRPD or Network switch
Important
zMake sure that all the ink tanks are installed in the correct position, matching the label. The
machine cannot be used unless all the ink tanks are installed.
zWait for about 2 minutes, until the machine has stopped making operating noises, before
proceeding.
Note
zBe sure to remove the clear film from the ink tank in the exact order as shown in step 3 of your
setup sheet.
zDo not squeeze the side of ink tanks as this may cause the ink to leak out and stain your clothes
and hands.
zAn error message will be displayed on the LCD if an ink tank is not installed properly. Open the
Scanning Unit (Printer Cover) and make sure that position of all the ink tanks match the label.
zAfter the ink tanks are installed, align the print head if lines or colors are off. Refer to “Aligning
the Print Head” in the User’s Guide on-screen manual.
Note
To receive a fax, you need to set the telephone line type setting properly on the machine. For details on
how to confirm and change this setting, refer to the User’s Guide on-screen manual.
If you are unsure of your telephone line type, contact your telephone company.

6Preparing the Machine
ENGLISH
Selecting the Language for the LCD
1Press the COPY button, wait for about 5 seconds, and then press the MENU
button.
2Press the ] button twice ( ), then press the OK button.
3Press the ] button once ( ), then press the OK button.
4Press the } button five times, then press the OK button.
5Press the { } or button to select the language you want to be displayed, then
press the OK button.
10 Loading Printing Paper
ENGLISH
Loading Printing Paper
You can load A4, Letter, or B5-sized plain paper in the Front Tray. You cannot load any other paper in
the Front Tray. For information on loading paper in the Rear Tray, refer to the User’s Guide on-
screen manual.
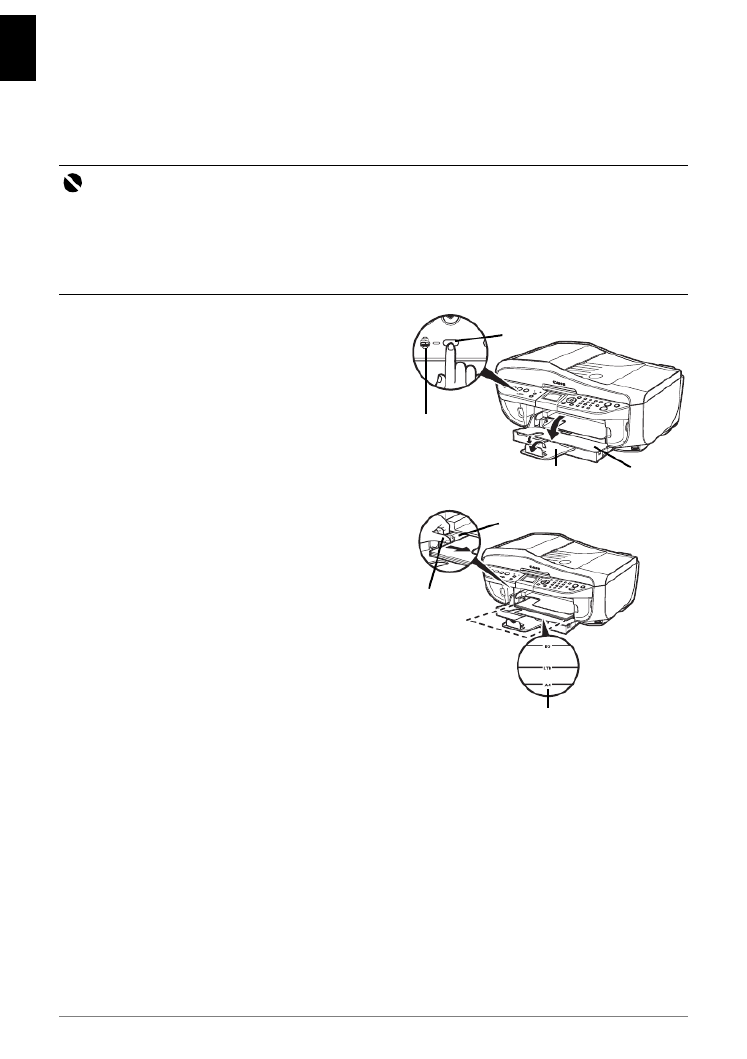
1Open the Paper Output Tray (A).
2Extend the Output Tray Extension (B).
3Press the Feed Switch (C) so that the
Front Tray lamp (D) lights.
4Load the paper in the Front Tray with the
print side facing DOWN, aligning the paper
stack against the right edge of the Front
Tray.
Do not load higher than the Load Limit Mark (A).
5Align the near and the left edges of the
paper with the Paper Size Mark (B).
6Slide the Paper Guide (C) against the left
side of the loaded paper stack.
Important
zTo print out received faxes, the machine uses the Front Tray by default, regardless of the source
selected by the Feed Switch. The paper source used to print out faxes can be specified in the FAX
paper source setting in the Operation Panel.
zIf you cut plain paper to 4" x 6" / 101.6 x 152.4 mm, 5" x 7" / 127.0 x 177.8 mm, or 2.13" x 3.39" / 54.0 x
86.0 mm (credit card-size) for a trial print, it can cause paper jams.
zAlways load paper in portrait orientation. Loading paper in landscape orientation can cause the paper
to be jammed.
(B) (A)
(C)
(D)
(A)
(C)
(B)

11Operation Panel
ENGLISH
Operation Panel
(1) ON/OFF button / Power lamp
Turns the machine on and off. Lights or flashes green to indicate the power status. Before
turning on the machine, make sure the Document Cover is closed.
(2) COPY button
Switches the machine to copy mode.
(3) FAX button
Switches the machine to fax mode.
(4) SCAN button
Switches the machine to scan mode. In scan mode, the machine scans a document to
your computer according to the settings selected. To use this button, the machine must
be connected to a computer. For details, refer to the Scanning Guide on-screen manual.
(5) MEMORY CARD button
Switches the machine to memory card mode.
(6) In Use/Memory lamp
Flashes when the telephone line is in use. Lights when there are documents stored in the
machine’s memory.
(7) Enlarge/Reduce button
Sets the enlargement or reduction ratio for copying.
(8) Alarm lamp
Lights or flashes orange when an error, such as paper-out or ink-out, occurs.
(9) LCD (Liquid Crystal Display)
Displays messages, menu selections, and the operational status.
(10) { } [ ] buttons
Scrolls through menu selections and increases/decreases setting values, such as the
number of copies. You can use these buttons when { } [, , , and ] are displayed on
the LCD. Also, the [ button cancels the entered character, and the ] button enters a
space between characters when entering characters.
(11) OK button
Finalizes your selection for the menu or setting item.
Dismisses the error message and resumes the machine’s normal operation after
resolving a printing error or removing jammed paper.
Ejects documents remaining in the ADF.
(12) Menu button
Accesses the menus and settings to customize operation of your machine.
(13) Numeric buttons
Enter numerical values such as the number of copies, as well as fax/telephone numbers
and characters.
(1) (2) (3) (4) (5) (7)(8) (9) (13) (14) (15) (16)
(17)(18)(19)(20)
(21)
(22)
(23)(24)(25)
(12)(11)(10)(6)

13Copying
ENGLISH
Copying
Making Copies
This section describes the basic procedure to make copies. For details, refer to “Copying” in the
User’s Guide on-screen manual.
1Turn on the machine.
2Press the COPY button.
3Load paper.
4Load the original on the Platen Glass (A) or
the ADF.
5Specify the copy settings.
(1) Press the { or } button or the Numeric buttons to
specify the number of copies (max. 99 copies).
(2) Press the [ or ] button to adjust the intensity.
(3) Press the Settings button to adjust other settings as
necessary.
6Press the Color button for color copying, or the Black button for black & white
copying.
(A)
(1)
(2)
(3)
15Printing from a Memory Card
ENGLISH
Printing from a Memory Card
Inserting the Memory Card
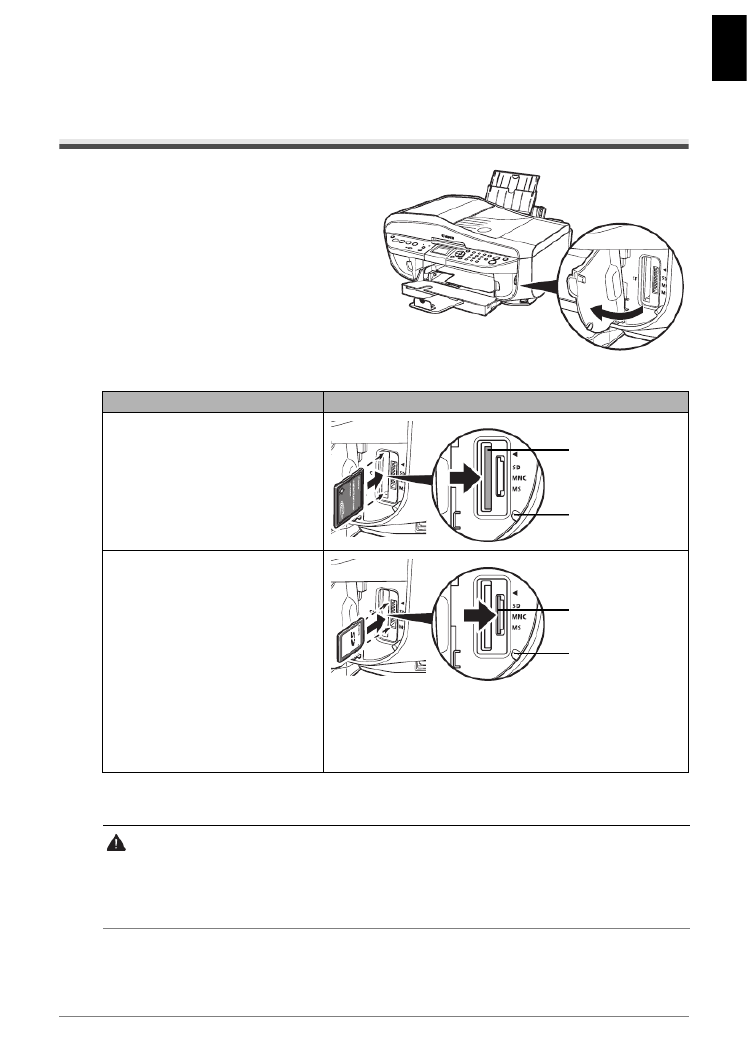
1Turn on the machine.
2Attach a card adapter if your memory
card requires one.
3Open the Card Slot Cover.
4Insert one and only one memory card into the Card Slot.
* Be sure to attach the memory card to the special adapter before inserting it into the Card
Slot.
5Confirm that the Access lamp has lit up.
6Close the Card Slot Cover.
Card Type Inserting Card
z
Compact Flash (CF) card
z
Microdrive
z
xD-Picture card*
z
SD Secure Digital memory card
z
SDHC memory card
z
miniSD Card*
z
microSD Card*
z
Memory Stick
z
Memory Stick PRO
z
Memory Stick Duo*
z
Memory Stick PRO Duo*
z
MultiMediaCard
z
RS-MMC*
CAUTION
zThe memory card will stick out of the Card Slot, but do not force it into the slot any further. Doing
so damages the machine and the memory card.
zMake sure that the memory card is correctly oriented before inserting it into the Card Slot. If you
force the memory card into the Card Slot in the wrong orientation, you may damage the memory
card and/or the machine.
The Access
lamp lights up.
Insert into the
left Card Slot.
The Access
lamp lights up.
Insert into the
right Card Slot.

16 Printing from a Memory Card
ENGLISH
Removing the Memory Card
1Open the Card Slot Cover.
2Make sure that the Access lamp is lit, then remove the memory card.
Do not remove the memory card while the Access lamp is flashing.
Hold the part of the memory card that is sticking out to remove it from the machine.
3Close the Card Slot Cover.
Printing the Photo Displayed on the LCD (Display
Photo)
1Prepare for printing.
(1) Turn on the machine.
(2) Load paper.
2Insert the memory card.
(1) Press the MEMORY CARD button.
(2) Insert the memory card into the Card Slot.
See “Inserting the Memory Card” on page 15.
3Press the [ ] or button to select Display photo, then press the OK button.
4Select the photo to print.
(1) Press the [ or ] button to display the photo to print.
(2) Press the Color button.
(3) Press the { or } button or the Numeric buttons to specify the number of copies to print.
5Adjust the print settings as necessary.
For details, refer to “Setting Items” in “Printing from a Memory Card” in the User’s Guide on-
screen manual.
6Press the Color button to start printing.
Important
The Access lamp flashes while the machine is reading or writing data from/to the memory card.
Removing the memory card or turning off the machine while the Access lamp is flashing may
damage the data saved on the memory card. Do not remove the memory card while the Access
lamp is flashing.

17Printing from a Memory Card
ENGLISH
Using Useful Display Functions
You can change the way photos are displayed.
To change the display when Display photo is selected, press the OK button, press the { or }
button to select a display photo option, and press the OK button.
Full-screen view: Shows one photo at full-screen
Enlarged view: Shows enlarged photo twice as much as the original. Move the area to show using
the {, }, [ or ] button.
Slide show: Shows next photos automatically.
To return to the regular display mode, press the OK button.
Using Useful Printing Functions
Printing Several Photos on a Single Sheet of Paper (Layout print)
Prints photos of your choice in the specified layout.
Printing on Stickers (Sticker print)
Prints your favorite photo with a frame on Canon Photo Stickers.
Printing All Photos (Print all photos)
Prints all photos saved on the memory card.
Printing an Index of All Photos (Photo Index print)
Prints an index of all photos saved on a memory card.
Printing According to DPOF Settings (DPOF print)
Prints according to the Digital Print Order Format (DPOF) settings on your digital camera, if you
have specified them.
Printing with Exif Info (Captured info)
Prints information on photographs at the time of its shooting (Exif info) in the margin of Photo
index print or selected individual photos.
18 Printing from Your Computer
ENGLISH
Printing from Your Computer
This section describes procedure for basic printing.
Printing with Windows
1Turn on the machine and load the paper in the machine.
2Make sure that the proper paper source is selected.
3Create a document or open a file to print using an appropriate application software.
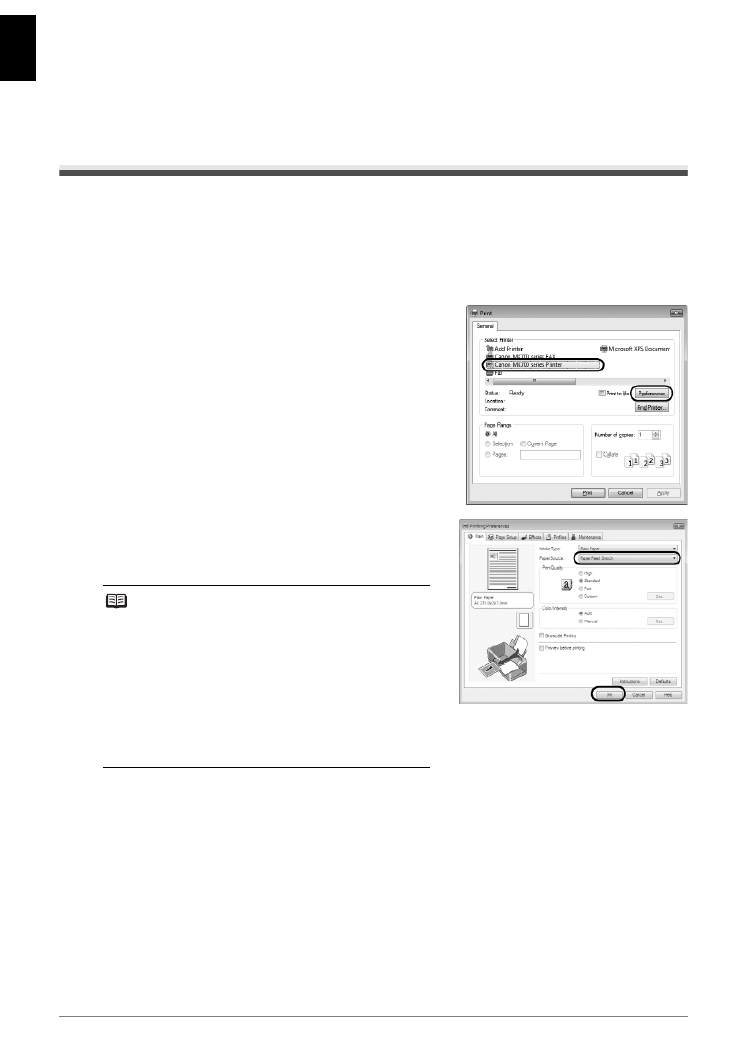
4Select Print on the application software’s File
menu.
5Make sure that Canon XXX Printer (where
“XXX” is your machine’s name) is selected in
Select Printer, and click Preferences (or
Properties).
6Specify the required settings and click OK.
Make sure that Paper Feed Switch is selected in
Paper Source.
7Click Print (or OK).
Note
zIf you select Front for Plain Paper, the machine
will automatically switch to the Front Tray only
when paper size is A4, Letter, or B5 and Plain
Paper is specified for Media Type. You cannot load
paper other than A4, Letter, or B5-sized plain paper
in the Front Tray.
zFor details on the printer driver functions, click Help
or Instructions to view the online help or the PC
Printing Guide on-screen manual. Instructions is
only displayed when the on-screen manuals are
installed.
19Printing from Your Computer
ENGLISH
Printing with Macintosh
1Turn on the machine and load the paper in the machine.
2Make sure that the proper paper source is selected.
3Create a document or open a file to print using an appropriate application software.
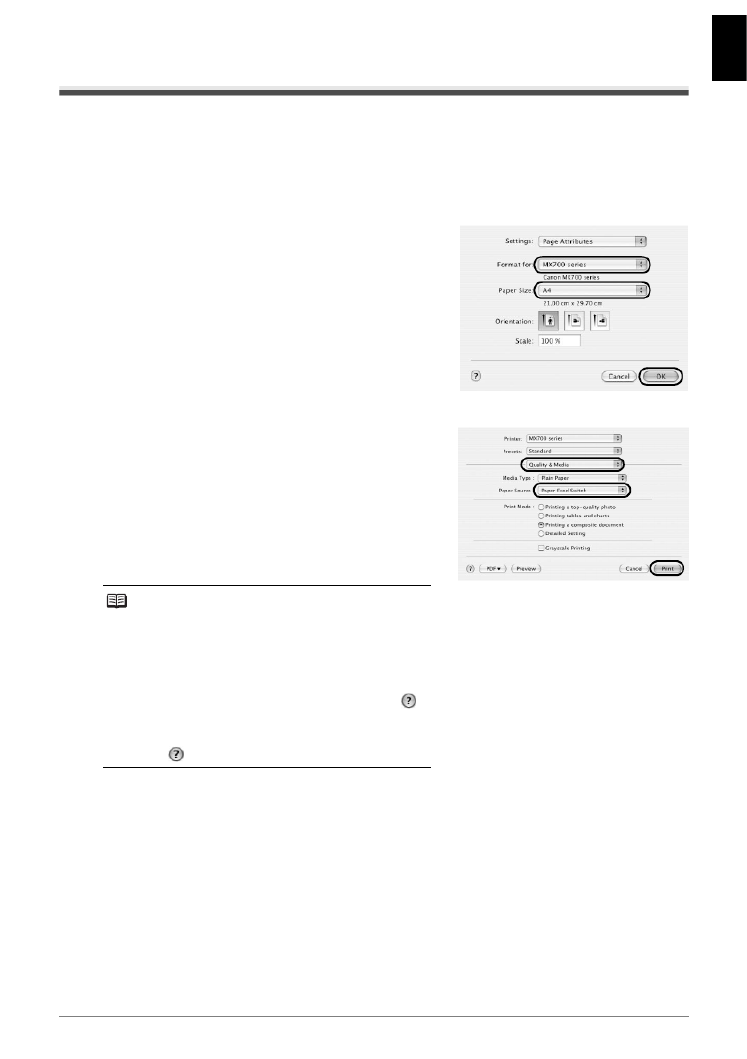
4Select Page Setup on the application
software’s File menu.
5Make sure that your machine’s name is
selected in Format for.
6Select the page size of the loaded paper in
Paper Size.
7Click OK.
8Select Print on the application software’s File
menu.
9Select Quality & Media in the pop-up menu.
10 Specify the required settings.
Make sure that Paper Feed Switch is selected in
Paper Source.
11 Click Print.
Note
zIf you select Front for Plain Paper, the machine
will automatically switch to the Front Tray only
when paper size is A4, Letter, or B5 and Plain
Paper is specified for Media Type. You cannot load
paper other than A4, Letter, or B5-sized plain paper
in the Front Tray.
zFor details on the printer driver functions, click
to view the PC Printing Guide on-screen manual. If
the on-screen manuals are not installed, the PC
Printing Guide on-screen manual is not displayed
even if is clicked.

21Scanning Images
ENGLISH
(4) Press the { or } button to select the scan operation, then press the OK button.
5Press the Color or the Black button.
Note
The operation to be performed after scanning the original depends on the scan operation setting
you have selected in step 4. For details on how to modify the operation settings, refer to the
Scanning Guide on-screen manual.

23Printing Photographs Directly from a Compliant Device
ENGLISH
2Connect the PictBridge compliant device to the machine.
(1) Make sure that the PictBridge compliant device is
turned off.
(2) Connect the PictBridge compliant device to the
machine using a USB cable recommended by the
manufacturer of the device.
The device turns on automatically.
If your device does not turn on automatically, turn
it on manually.
(3) Set up the PictBridge compliant device for direct
printing.
will appear on the LCD of the device when the
machine is correctly connected.
3Specify the print settings such as paper type and layout.
See “About PictBridge Print Settings” on page 24.
You can make settings using the menu on the LCD of your PictBridge compliant device.
Select the size and type of paper that you loaded in the machine.
If your PictBridge compliant device does not have setting menu, change the setting from the
machine. For details, see “Setting on the Machine” on page 26.
4Start printing from your PictBridge compliant device.
Note
Depending on the model or brand of your device, you may have to select a print mode compliant
with PictBridge before connecting the device. You may also have to turn on the device or select
Play mode manually after connecting the device to the machine.
Perform necessary operations on the PictBridge compliant device before connecting it to this
machine according to instructions given in the device’s instruction manual.
(2)

24 Printing Photographs Directly from a Compliant Device
ENGLISH
About PictBridge Print Settings
Settings on a PictBridge Compliant Device
This section describes the print settings on a PictBridge compliant device. When operating the
device, be sure to follow the instructions given in the instruction manual of your PictBridge
compliant device.
z
z
z
zz Paper Size and Paper Type Settings
The following sizes and types of printing paper can be used when printing from a PictBridge
compliant device.
zPaper size
4" x 6" / 101.6 x 152.4 mm, 5" x 7" / 127.0 x 177.8 mm*1, Credit card, 8" x 10" / 203.2 x 254.0
mm, A4, Letter, Wide*1
zPaper type
The available page sizes vary depending on the media type. For details, visit our website.
*1 Can be selected only on certain Canon-brand PictBridge compliant devices.
*2 Plain Paper can be selected for Paper type only when Paper size is set to A4 or 8.5" x
11" (Letter). When Paper type is set to Plain Paper, borderless printing will be disabled
even when Layout is set to Borderless.
*3 You may not be able to purchase some Canon genuine papers depending on the country
or region of purchase.
*4 When printing on Photo Paper Plus Semi-gloss 8" x 10" / 203.2 x 254.0 mm (SG-201),
select 20 x 25 cm/8" x 10" for Paper size and Default for Paper type.
* Select Photo Plus Glossy for Media type in PictBridge settings on the machine.
See “Setting on the Machine” on page 26.
*5 Exclusively used to print photo stickers. When printing on sticker paper, select 10 x 15 cm/
4" x 6" in Paper size and Photo for Paper type. Do not set Layout to Borderless.
Note
zIn the following description, names of setting items are given according to those used in Canon-
brand PictBridge compliant devices. Setting item names may be different depending on the
brand or model of your device.
zSome setting items explained below may not be available on some devices. In this case, the
settings made on the machine are applied. Also, when some items are set to Default on a
PictBridge compliant device, the machine settings for these items are applied. For details, see
“Setting on the Machine” on page 26.
Paper Type Setting Loadable Paper*3
Plain Paper*2 Super White Paper or other plain paper
Photo Photo Paper Plus Glossy
Glossy Photo Paper
Glossy Photo Paper “Everyday Use”
Photo Paper Glossy
Photo Paper Plus Semi-gloss *4
Photo Stickers*5
Fast Photo Photo Paper Pro

25Printing Photographs Directly from a Compliant Device
ENGLISH
z
z
z
zz Layout Setting
Various layout options are available.
z Bordered/Borderless: You can select whether or not to print an image with a border.
z N-up: You can use this option when printing on sticker paper, or A4- or Letter-sized paper.
Sticker paper: When you select 10 x 15 cm/4" x 6" for Paper size, you can print 16 images
on a single sheet of paper.
A4- or Letter-sized paper:When you select A4 or 8.5" x 11" (Letter) for Paper size, you can
print 4 images on a single sheet of paper.
z Shooting Info (Exif Data) *1
:You can print shooting info (Exif Data) along with the image. The
following two options are available.
1-up: Prints the shooting info (Exif Data) in the margin of selected individual images.
20-up *2: Prints 20 images specified with DPOF *3 and their shooting info (Exif Data) in list
format on a single sheet of paper.
z 35 mm Film Style Layout (Contact Printing Layout) *2:You can print the multiple images
specified with DPOF *3 in a list format
that looks like a negative film.
Besides the above options, you can also specify to print an index of images in the DPOF *3 print
settings menu.
*1 Can be selected only on certain Canon-brand PictBridge compliant devices.
*2 You can use this option only when A4 or 8.5" x 11" (Letter) is selected for Paper size.
*3 DPOF (Digital Print Order Format) is a standard format to record the specified information
regarding images, such as which image or number of copies to print.
z
z
z
zz Date/File No. Print Setting
You can specify whether the date and/or file number will be printed.
z
z
z
zz Image Optimize Setting
You can select the optimization method to obtain high print quality.
When you select Default, the most suitable correction for each photo is made using the Auto
image fix function of the machine. See “Setting on the Machine” on page 26.
When you select On, photos are optimized for printing using the Photo optimizer pro function.
If you are using a Canon-brand PictBridge compliant device, the following additional options may
be available, depending on the model.
– VIVID makes green and blue more lively.
– NR (Noise Reduction) reduces the noise on blue areas like the sky as well as on black areas.
– Face brightens a darkened face on the photo taken against the light.
– Red-Eye corrects red eyes in portraits caused by flash photography.
z
z
z
zz Trimming Setting
You can select an area to print.
Note
z If the images already have dates superimposed when shot, set this PictBridge setting item to
Off. If you select Date, File No., or Both, the date and/or file number will be printed over the
date printed by the device’s function.
z Depending on the paper size and layout, the date will only be printed even when Both is
selected.

26 Printing Photographs Directly from a Compliant Device
ENGLISH
Setting on the Machine
This section describes the PictBridge print settings on the machine.
Set the print settings to Default on the PictBridge compliant device when you want to print
according to the settings on the machine.
z
z
z
zz Displaying the PictBridge Settings Screen and Specifying the Settings
1Turn on the machine.
2Press the Menu button.
3Press the [ ] or button to select Maintenance/settings, then press the OK
button.
4Press the [ ] or button to select Device settings, then press the OK button.
5Press the { } or button to select PictBridge settings, then press the OK button.
6Press the [ ] or button to select tab 1 or tab 2.
7Press the { } or button to select the setting item.
8Press the [ ] or button to select the setting, then press the OK button.
28 Faxing
ENGLISH
Faxing
Preparing the Machine for Fax
Methods of Connecting External Devices
z
z
z
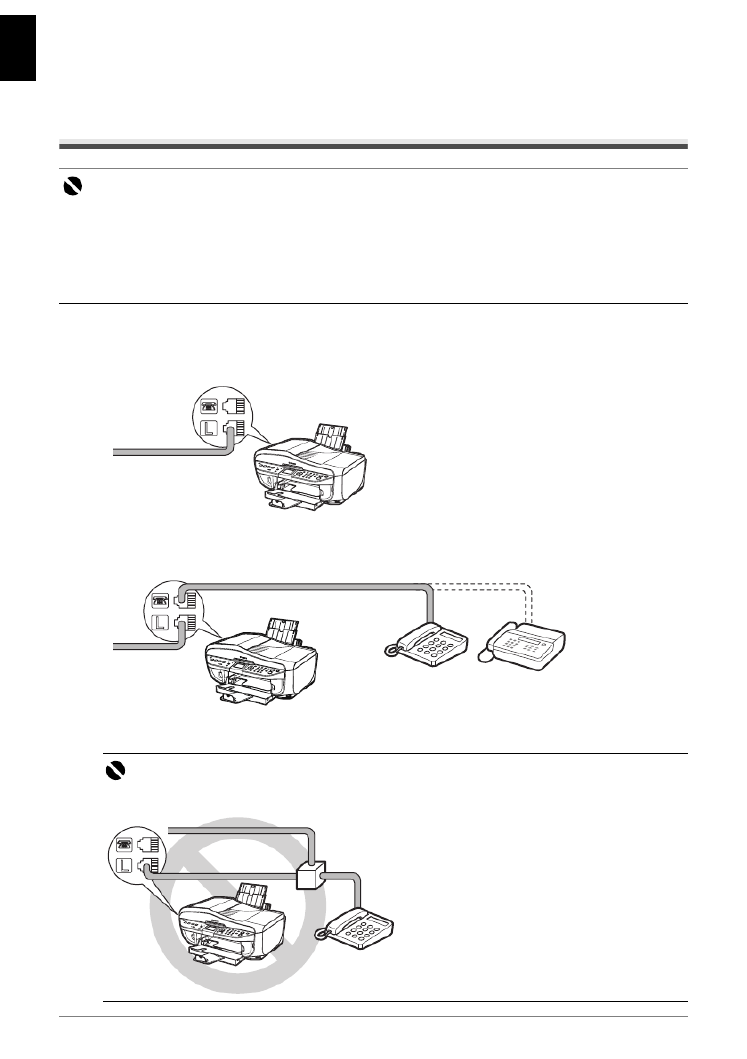
zz Connecting to a Dedicated Analog Line
(A) Telephone line (analog)
z
z
z
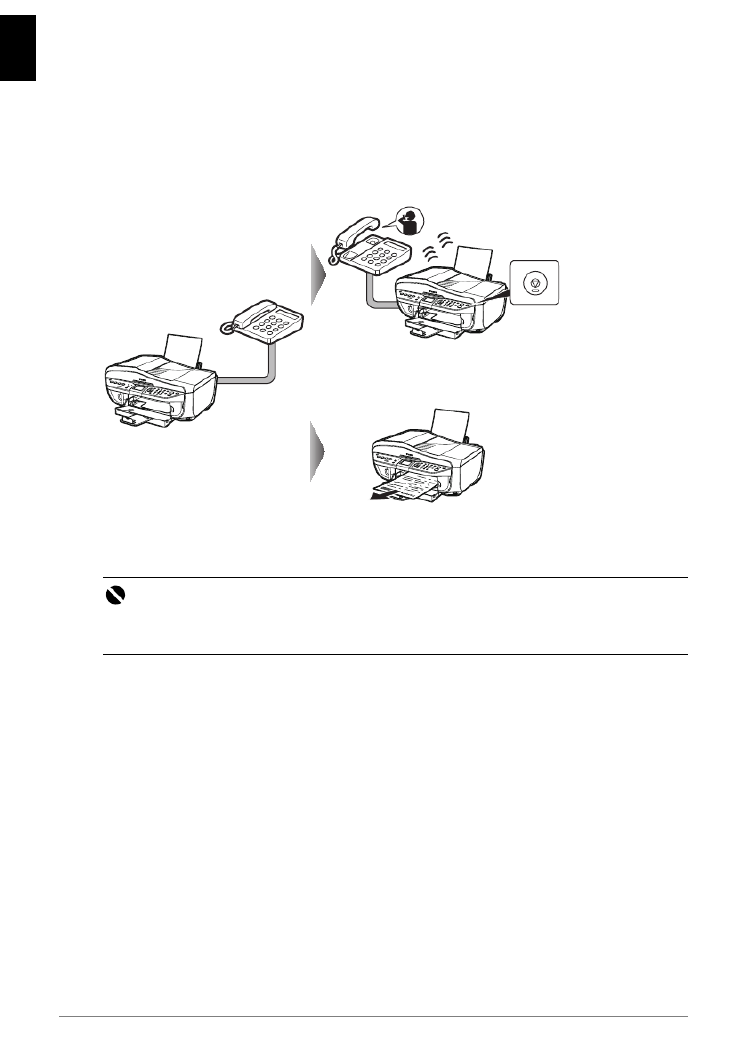
zz Connecting a Telephone or Answering Machine Directly
(A) Telephone or Answering machine
Important
If the Power Disconnects Unexpectedly
If there is a power failure or if you accidentally disconnect the power cord, the date/time settings as well as
all documents stored in memory will be lost. User data and speed dialing settings are retained. If the
power disconnects, the following will apply:
z You will not be able to send or receive faxes or make copies.
z If a telephone is connected to the machine, you can receive voice calls.
z Whether you are able to make voice calls depends on the type of your telephone.
Important
Do not connect the machine and external devices in parallel to the same telephone line using a
splitter (A). The machine may not operate properly.
(A)
(A)
(A)

29Faxing
ENGLISH
z
z
z
zz Connecting a Telephone or Answering Machine via a Computer
(A) Computer
(B) Telephone or Answering machine
Methods of Connecting the Various Lines
z
z
z
zz Connecting to an xDSL
(A) Digital Subscriber Line
(B) Splitter
(C) xDSL modem (splitter may be built-in to the modem)
(D) Computer
For details on xDSL connection and settings, see the manual supplied with your xDSL modem.
The illustrated connection is an example and is not guaranteed to suit every connecting condition.
z
z
z
zz Connecting to an ISDN Line
For details on ISDN connection and settings, see the manuals supplied with your terminal
adapter or dial-up router.
Setting the Telephone Line Type
1Press the FAX button, then press the Menu button.
2Press the [ ] or button to select Maintenance/settings, then press the OK
button.
3Press the [ ] or button to select Device settings, then press the OK button.
4Press the { } or button to select FAX settings, then press the OK button.
5Press the { } or button to select User settings, then press the OK button.
(A)
(B)
(A) (B)
(C) (D)
30 Faxing
ENGLISH
6Press the { } or button to select Telephone line type, then press the OK button.
7Press the { } or button to select the telephone line type, then press the OK
button.
Rotary pulse: Suitable for pulse dialing.
Touch tone: Suitable for tone dialing.
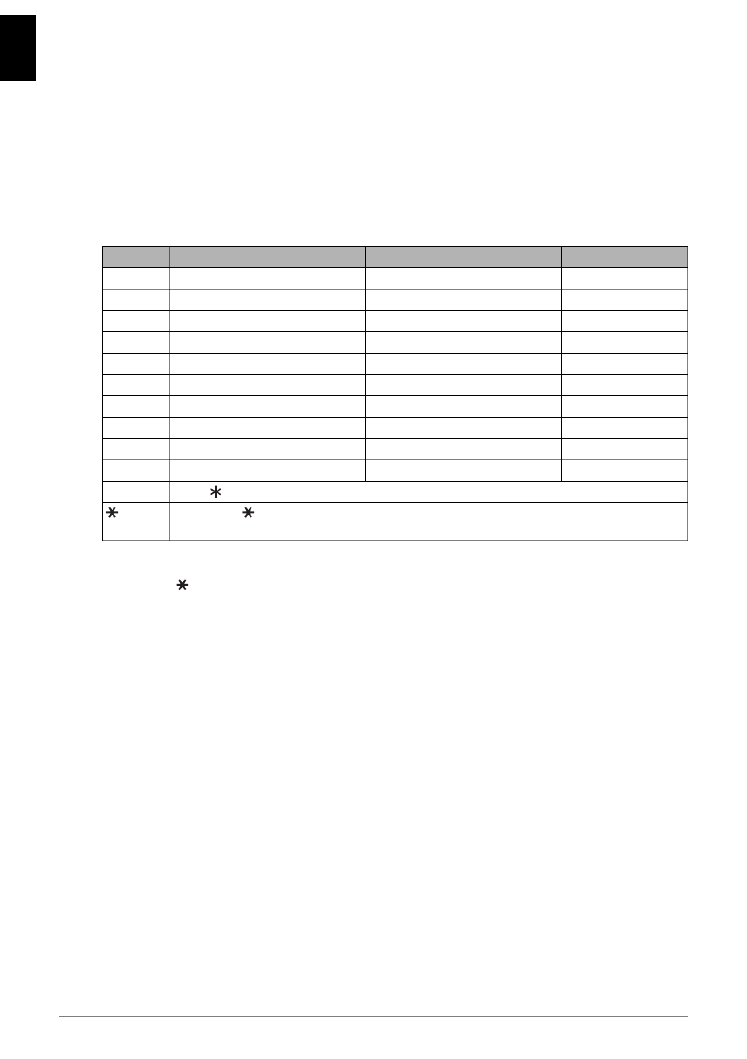
Guidelines for Entering Numbers, Letters, and Symbols
The following characters are assigned to the Numeric buttons.
* SP indicates a space.
1Press the button to switch to uppercase letter mode (:A), lowercase letter mode
(:a), or number mode (:1).
2Press the Numeric buttons to enter a character.
Press the button repeatedly until the character you want appears.
To enter a character that is assigned to the same button as the previous entry:
(1) Press the ] button, then press the same Numeric button again.
To enter a space:
(1) Press the ] button twice.
In number mode, press the ] button once.
To delete a character:
(1) Press the [ button.
To delete an entire entry:
(1) Press and hold the [ button.
Button Uppercase letter mode Lowercase letter mode Number mode
1 1
2 ABCÅÄÁÀÃÂÆÇ abcåäáàãâæç 2
3 DEFËÉÈÊ defëéèê 3
4 GH I Ï Í Ì Î gh i ï í ì î 4
5 JKL jkl 5
6 MNOÑØÖÓÒÕÔ mnoñøöóòõô 6
7 PQRSÞ pqrsþ 7
8 TUVÜÚÙÛ tuvüúùû 8
9 WXYZÝ wxyzý 9
0 0
# -.SP* #!",;:^`_=/|’?$@%&+()[]{}<>
Press the button to switch to uppercase letter mode (:A), lowercase letter
mode (:a), or number mode (:1).

31Faxing
ENGLISH
Registering Sender Information
z
z
z
zz Entering the Date and Time
1Press the FAX button, then press the Menu button.
2Press the [ ] or button to select Maintenance/settings, then press the OK
button.
3Press the [ ] or button to select Device settings, then press the OK button.
4Press the { } or button to select FAX settings, then press the OK button.
5Press the { } or button to select User settings, then press the OK button.
6Press the { } or button to select Date/time setting, then press the OK button.
7Press the Numeric buttons to enter the date and time (in 24-hour format), then
press the OK button twice.
Setting Daylight Saving Time (Summer Time)
1Press the FAX button, then press the Menu button.
2Press the [ ] or button to select Maintenance/settings, then press the OK
button.
3Press the [ ] or button to select Device settings, then press the OK button.
4Press the { } or button to select FAX settings, then press the OK button.
5Press the { } or button to select User settings, then press the OK button.
6Press the { } or button to select Summer time setting, then press the OK
button.
7Press the { } or button to select ON, then press the OK button.
To disable summer time, select OFF.
8Set the date and time that summer time starts.
(1) Press the { or } button to select Start date/time, then press the OK button.
(2) Press the { or } button to select the month when summer time starts, then press the
OK button.
(3) Press the { or } button to select the week when summer time starts, then press the OK
button.
(4) Press the { or } button to select the day of the week when summer time starts, then
press the OK button.
Note
This setting is not available in some country or region of purchase.

32 Faxing
ENGLISH
(5) Press the Numeric buttons to enter the time (in 24-hour format) when summer time starts,
then press the OK button.
9Set the date and time that summer time ends.
(1) Press the { or } button to select End date/time, then press the OK button.
(2) Press the { or } button to select the month when summer time ends, then press the OK
button.
(3) Press the { or } button to select the week when summer time ends, then press the OK
button.
(4) Press the { or } button to select the day of the week when summer time ends, then
press the OK button.
(5) Press the Numeric buttons to enter the time (in 24-hour format) when summer time ends.
10 Press the FAX button.
z
z
z
zz Registering Your Fax/Telephone Number and Name (Sender
Information)
1Press the FAX button, then press the Menu button.
2Press the [ ] or button to select Maintenance/settings, then press the OK
button.
3Press the [ ] or button to select Device settings, then press the OK button.
4Press the { } or button to select FAX settings, then press the OK button.
5Press the { } or button to select User settings, then press the OK button.
6Press the { } or button to select Unit name/TEL registr., then press the OK
button.
7Press the Numeric buttons to enter your name (max. 24 characters, including
spaces), then press the } button.
8Press the Numeric buttons to enter your fax/telephone number (max. 20 digits,
including spaces), then press the OK button.

33Faxing
ENGLISH
Sending Faxes
Sending Methods
1Load the original on the Platen Glass or the ADF.
2Press the FAX button.
3Adjust fax settings as necessary.
4Dial the recipient’s number using the Numeric buttons or coded speed dialing.
5Press the Color button for color sending, or the Black button for black & white
sending.
Dialing the Registering Numbers
z
z
z
zz Coded Speed Dialing
1Press the Coded Dial button.
2Press the Numeric buttons or the { }, , [ ], or button to enter the two-digit code
(00 to 39) assigned to the number you want to dial, then press the OK button.
Registering Coded Speed Dialing
1Press the FAX button, then press the Menu button.
2Press the [ ] or button to select Speed dial registration, then press the OK
button.
3Press the Numeric buttons or the { } [, , , or ] button to select an unoccupied
speed dialing code (00 to 39), then press the OK button.
4Press the Numeric buttons to enter a name for the speed dialing code (max. 16
characters, including spaces), then press the OK button.
5Press the Numeric buttons to enter the fax/telephone number you want to register
(max. 60 digits (40 digits for Korea), including spaces), then press the OK button.

34 Faxing
ENGLISH
Changing or Deleting Registered Information
z
z
z
zz Changing a Registered Name or Number
1Follow the procedures from step 1 to 3 in “Registering Coded Speed Dialing” on
page 33.
2Press the { } or button to select Edit, then press the OK button.
3Press the Numeric buttons to enter the new name (max. 16 characters, including
spaces), then press the OK button.
4Press the Numeric buttons to enter the new fax/telephone number (max. 60 digits
(40 digits for Korea), including spaces), then press the OK button.
z
z
z
zz Deleting an Entire Entry
1Follow the procedures from step 1 to 3 in “Registering Coded Speed Dialing” on
page 33.
2Press the { } or button to select Delete, then press the OK button.
3Press the { } or button to select Yes, then press the OK button.
35Faxing
ENGLISH
Receiving Faxes
Selecting a Receive Mode
z
z
z
zz If You Want to Receive Only Faxes Automatically with the Machine, or
Have a Dedicated Telephone Line for Fax Use Only:
Select FAX only mode.
(A) Incoming call
(B) Receives faxes automatically.
z
z
z
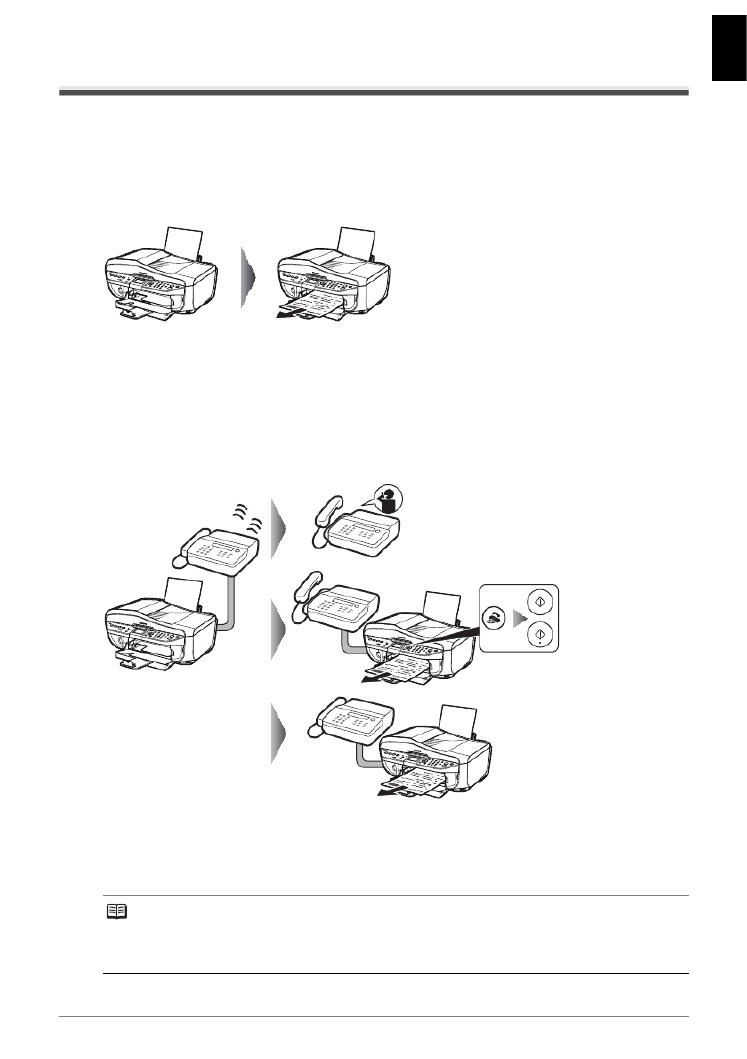
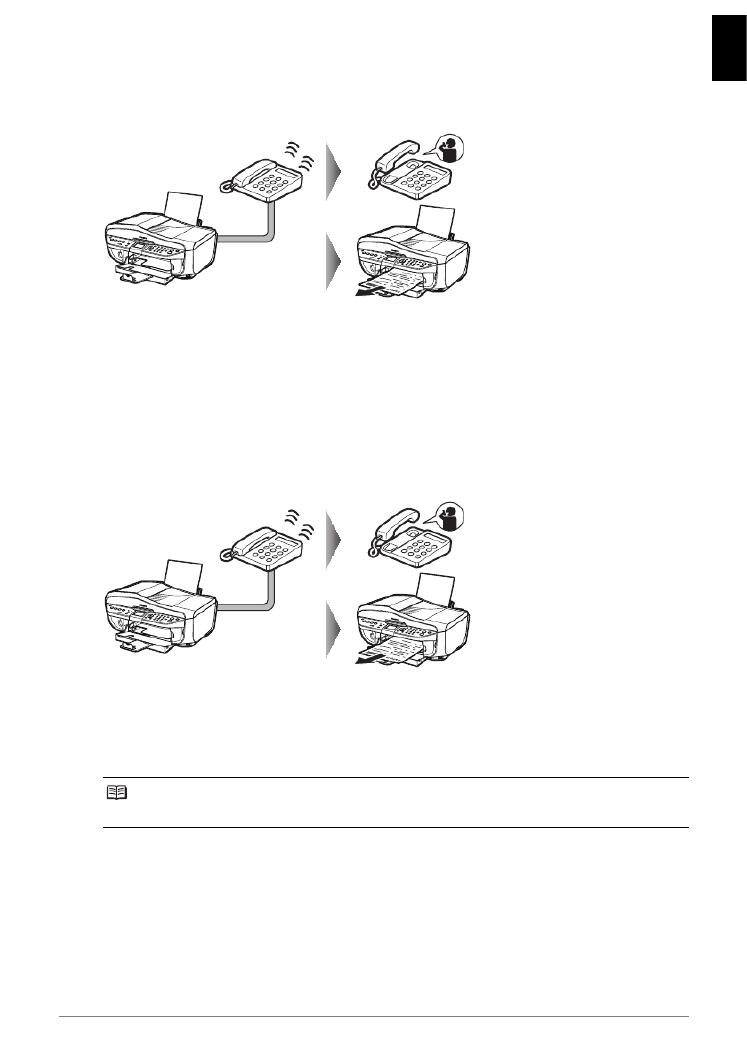
zz If You Are Using a Single Telephone Line for Faxes and Voice Calls and
Use Voice Calls More Frequently:
Select TEL priority mode.
(A) Incoming call
(B) Voice call: The telephone will ring. Pick up the handset to answer the call.
(C) Fax: The telephone will ring. If you pick up the handset when receiving a fax, press the FAX
button, then press the Color or the Black button.
Note
If the machine is located away from the telephone, pick up the handset and dial 25 (the remote
receiving ID) to receive faxes (remote reception). Refer to "Remote Receiving" in the User's Guide
on-screen manual.
(A) (B)
(A)
(B)
(C)
(D)
36 Faxing
ENGLISH
(D) When the answering machine responds:
If it is a voice call, the answering machine responds to the call.
If it is a fax call, the machine receives the fax automatically.
z
z
z
zz If You Are Using a Single Telephone Line for Faxes and Voice Calls and
Want to Receive Faxes Automatically:
Select FAX priority mode.
(A) Incoming call
(B) Voice call: The machine will ring. Pick up the handset, then press the Stop/Reset button to
answer the call.
(C) Fax: The machine receives faxes automatically.
Important
When answering a voice call, be sure to pick up the handset before pressing the Stop/Reset
button. If you press the Stop/Reset button before picking up the handset, the telephone call will be
disconnected.
(A)
(B)
(C)
37Faxing
ENGLISH
z
z
z
zz If You Have Subscribed to a Distinctive Ring Pattern Detection (DRPD)
Service with Your Telephone Company (US and Canada only):
Select .DRPD
(A) Incoming call
(B) Voice call: The telephone will ring. Pick up the handset to answer the call.
(C) Fax: The fax is received automatically when the machine detects the registered fax ring
pattern.
z
z
z
zz If you Want the Machine to Automatically Switch between Fax and Voice
Calls by the Call Ring Patterns:
Select Network switch*.
*This setting may not be available depending on the country or region of purchase.
(A) Incoming call
(B) Voice call: The telephone will ring. Pick up the handset to answer the call.
(C) Fax: The fax is received automatically when the machine detects the registered fax ring
pattern.
Setting the Receive Mode
1Press the FAX button, then press the Menu button.
2Press the [ ] or button to select Receive mode settings, then press the OK
button.
3Press the { } or button to select the receive mode, then press the OK button.
Note
The name of this service varies depending upon a country.
(A)
(B)
(C)
(A)
(B)
(C)

38 Replacing an Ink Tank
ENGLISH
Replacing an Ink Tank
When ink tanks run out of ink, replace them using the following steps.
1Open the Paper Output Tray.
2Make sure that the machine is turned on, lift
the Scanning Unit (Printer Cover) with both
hands, and set the Scanning Unit Support to
hold the cover.
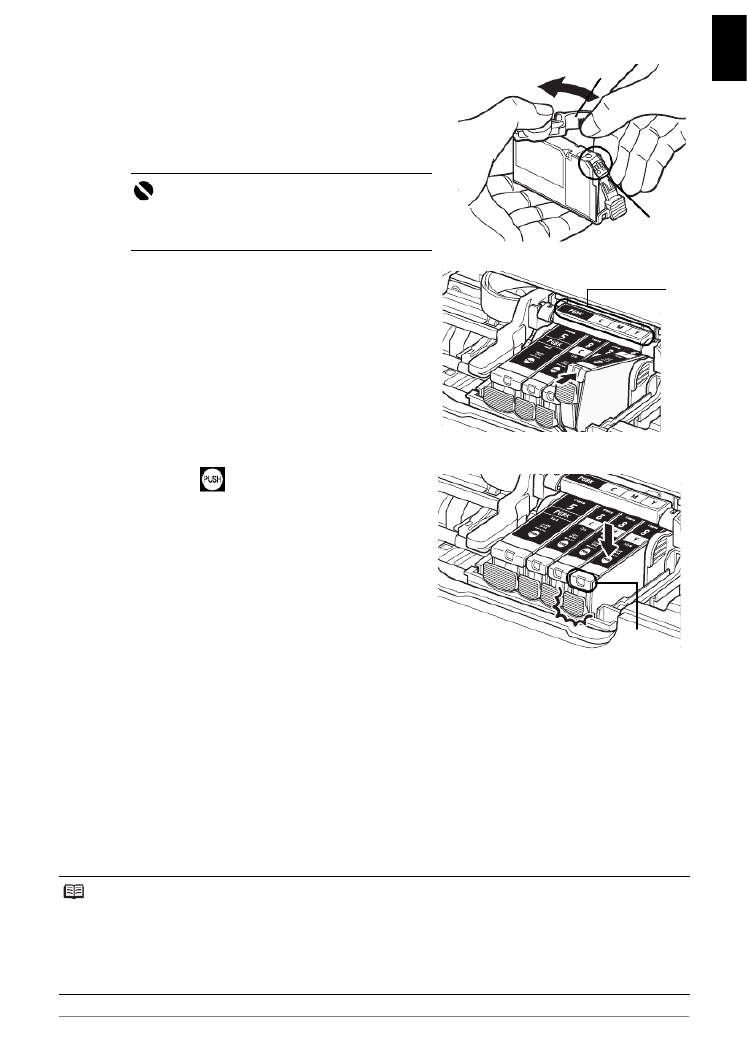
3Push the tab of the ink tank whose lamp is
flashing fast (A) and remove it.
Do not touch the Print Head Lock Lever (B).
4Prepare the replacement tank.
(1) Remove the new ink tank from its packaging.
(2) Pull the orange tape (C) in the direction of the
arrow to peel off the protective film.
(3) Remove the film (D) completely.
Important
Make sure that the protective film does not remain
on the air hole (E). If the air hole is blocked with
the remaining film, ink may leak out or may not
eject properly.
(B) (A)
(D)
(C)
(E)
39Replacing an Ink Tank
ENGLISH
(4) Remove the orange protective cap (F) from the
bottom of the ink tank.
Carefully hold the protective cap when
removing it to prevent the ink from staining
your fingers.
Discard the cap once it is removed.
5Insert the front end of the ink tank into the
Print Head.
Make sure the position of the tank matches the
label (H).
6Press on the mark on the ink tank until
the ink tank snaps firmly into place.
Confirm that the ink lamp (I) lights up red.
7Lift the Scanning Unit (Printer Cover) slightly to set the Scanning Unit Support back
to its original position, and then gently close the Scanning Unit (Printer Cover).
Important
Do not touch the electrical contacts (G) on the ink
tank. Doing so can cause the machine to
malfunction or become unable to print.
Note
If you have pressed the Stop/Reset button for at least 5 seconds when "The remaining level of the ink
cannot be correctly detected." or "The ink has run out. Replace the ink tank." appears on the LCD,
note the following.
zWhen ink runs out, printouts will become faint or blank printouts will be printed.
zWhen receiving faxes, the machine will not store it in its memory even if the ink level becomes low or
run out.
(F)
(G)
(H)
(I)

40 Specifications
ENGLISH
Specifications
General Specifications
Printing resolution (dpi) 4800 (horizontal)* x 1200 (vertical)
* Ink droplets can be placed with a pitch of 1/4800 inch at minimum.
Interface USB 2.0 High Speed*
* A computer that complies with USB 2.0 Hi-Speed standard is required. Since the
USB 2.0 Hi-Speed interface is fully upwardly compatible with USB Full-Speed (USB
1.1), it can be used at USB Full-Speed (USB 1.1).
Wired LAN Interface (100B SE-TX/10BASE-T)A
Print width 8 inches / 203.2 mm max.
(for Borderless Printing: 8.5 inches / 216 mm)
Acoustic noise level Approx. 36.5 dB (A)
* When printing in the highest print quality mode on Photo Paper Pro.
Operating environment Temperature: 5 to 35°C (41 to 95°F)
Humidity: 10 to 90% RH (no condensation)
Storage environment Temperature: 0 to 40°C (32 to 104°F)
Humidity: 5 to 95% RH (no condensation)
Power supply AC 100-240 V, 50/60 Hz
Power consumption Printing (Copy): Approx. 21 W
Standby (minimum): Approx. 4.5 W
OFF: Approx. 1.2 W
External dimensions Approx. 18.9 (W) x 18.2 (D) x 9.4 (H) inches /
Approx. 480 (W) x 463 (D) x 239 (H) mm
* With the Paper Support, Paper Output Tray, and Document Tray retracted.
Weight Approx. 10.4 kg (Approx. 22.3 lb.)
* With the Print Head and ink tanks installed.
Print Head Total 1,600 nozzles
(Bk 320 nozzles, C/M/Y 256 x 5 nozzles)
ADF capacity zMax. 30 pages of A4- or Letter-sized sheets (20 lb / 75 gsm paper), up to 0.16
inches / 4 mm in height
zMax. 10 pages of Legal-sized sheets (20 lb / 75 gsm paper), up to 0.08 inches /
2 mm in height
z1 sheet for sizes other than these
Copy Specifications
Multiple copy 1 - 99 pages
Intensity adjustment 9 positions, Auto intensity (AE copy)
Zoom 25% - 400% (1% unit)
Scan Specifications (Platen Glass)
Scanner driver TWAIN / WIA (Windows Vista and Windows XP only)
Maximum scanning size A4/Letter, 8.5" x 11.7" / 216 x 297 mm
Scanning resolution Optical resolution (horizontal x vertical) max: 2400 dpi x 4800 dpi
Interpolated resolution max: 19200 dpi x 19200 dpi
Gradation (Input/Output) 16bit/8bit
48bit/24bit (RGB each 16bit/8bit)

42 Specifications
ENGLISH
Camera Direct Print (PictBridge)
Paper size 4" x 6" / 101.6 x 152.4 mm, 5" x 7" / 127.0 x 177.8 mm
*, Credit card, 8" x 10" / 203.2 x
254.0 mm, A4, Letter, Wide*
*Can be selected only on certain Canon-brand PictBridge compliant devices.
Paper type Default (Selections based on the machine setting), Photo (Photo Paper Plus Glossy,
Glossy Photo Paper, Glossy Photo Paper “Everyday Use”, Photo Paper Glossy, Photo
Paper Plus Semi-gloss, Photo Stickers), Fast Photo (Photo Paper Pro), Plain Paper (A4/
Letter only)
Layout Default (Selections based on the machine setting), Borderless, Bordered, N-up (2, 4, 9,
16)*1, 35-up*2
*1Layout compatible with Canon-brand sticker above. Refer to “Printing Media” in the
User’s Guide on-screen manual.
*2Selected photos are printed in 35 mm film style layout (contact printing layout). This
print setting is only available with certain Canon PictBridge compliant devices.
You can print shooting Info (Exif Data) on photos in list format, or in the margins of
specified photos.
Select Layout, then select the item displayed with the [i] icon.
(Note that this print setting cannot be used for some models.)
Image optimize Default (Selections based on the machine setting), On, Off, “VIVID”*, “NR” (Noise
Reduction)*, “Face”*, “Red eye”*
* If using a Canon PictBridge compliant camera, you can select it.
Print data & file no. Default (Off: No printing), Date, File No., Both, Off
Trimming Default (Off: No trimming), On (follow camera’s setting), Off
43Specifications
ENGLISH
zOmniPage SE: Windows 2000 Professional SP2 and SP3 not supported
zMP Navigator EX: QuickTime v6.4 or later is needed (Macintosh only)
zSome functions may not be available with Windows Media Center
zTo upgrade from Windows XP to Windows Vista, first uninstall software bundled with the Canon
inkjet printer.
Users in Asia
zScanSoft OmniPage SE (OCR software) can work only with English operating system.
Specifications are subject to change without notice.
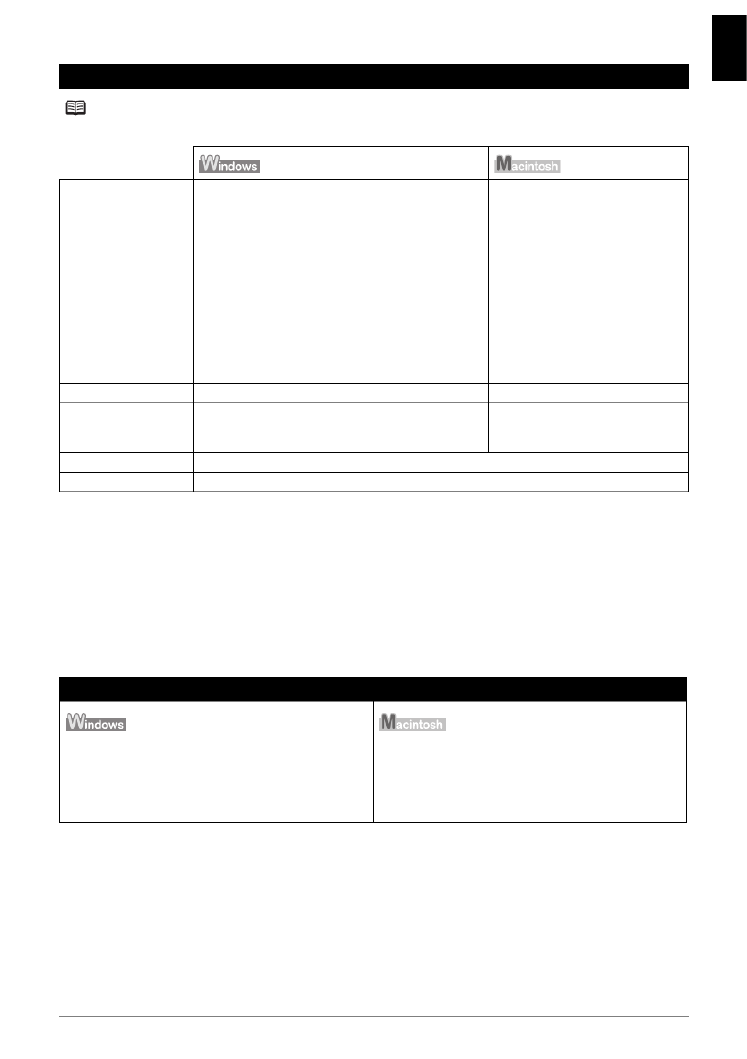
Minimum System Requirements
Note
Conform to the operating system’s requirements when higher than those given here.
Operating System
Processor
RAM
Windows Vista
Pentium II (including compatible processors)
300 MHz
128 MB
Windows XP SP1, SP2
Pentium II (including compatible processors)
300 MHz
128 MB
Windows 2000 Professional SP2, SP3, SP4
Pentium II (including compatible processors)
300 MHz
128 MB
Note: Operation can only be guaranteed on a PC pre-
installed Windows Vista, XP or 2000.
Mac OS X v.10.4
Intel processor
PowerPC G3
256 MB
Mac OS X v.10.2.8 - v.10.3
PowerPC G3
128 MB
Note: Hard disk must be formatted
as Mac OS Extended (Journaled) or
Mac OS Extended.
Browser Internet Explorer 6.0- Safari
Hard Disk Space 800 MB
Note: For bundled software installation.
450 MB
Note: For bundled software
installation.
CD-ROM Drive Required
Other restrictions XGA 1024 x 768
Additional System Requirements for On-Screen Manuals
Browser: Windows HTML Help Viewer
Note: Microsoft Internet Explorer 5.0 or later must be
installed. The on-screen manual may not be displayed
properly depending on your operating system or Internet
Explorer version. We recommend that you keep your
system up to date with Windows Update.
Browser: Help Viewer
Note: The on-screen manual may not be displayed properly
depending on your operating system or Help Viewer
version. We recommend that you keep your system up to
date with Software Update.

45Users in the U.S.A.
ENGLISH
Rights of the Telephone Company
If this equipment causes harm to the telephone network, the telephone company may temporarily
disconnect service. The telephone company also retains the right to make changes in facilities and
services that may affect the operation of this equipment. When such changes are necessary, the
telephone company is required to give adequate prior notice to the user. However, if advance notice
is not possible, the telephone company will notify the customer as soon as possible. Also, the
customer will be advised of his/her right to file a compliant with the FCC if he/she believes it is
necessary.
Warning
The Telephone Consumer Protection Act of 1991 makes it unlawful for any person to use a computer or
other electronic device to send any message via a telephone FAX machine unless such message clearly
contains in a margin at the top or bottom of each transmitted page, or on the first page of the transmission,
the date and time it is sent and an identification of the business or other entity, or other individual sending
the message and the telephone number of the sending machine or such business, other entity, or
individual.
In order to program this information into your FAX machine, you should complete the procedure to register
your name, unit’s telephone number, time, and date. See “Registering Sender Information” of this guide.

46 Users in Canada
ENGLISH
Users in Canada
Pre-Installation Requirements for Canon Facsimile
Equipment
Notice
This equipment meets the applicable Industry Canada technical specifications.
The Ringer Equivalence Number is an indication of the maximum number of devices allowed to be
connected to a telephone interface. The termination on an interface may consist of any combination
of devices subject only to the requirement that the sum of the RENs of all the devices does not
exceed five.
Avis
Le présent matériel est conforme aux spécifications techniques applicables d’Industrie Canada.
L’indice d’équivalence de la sonnerie (IES) sert à indiquer le nombre maximal de terminaux qui
peuvent être raccordés à une interface téléphonique. La terminaison d’une interface peut consister
en une combinaison quelconque de dispositifs, à la seule condition que la somme d’indices
d’équivalence de la sonnerie de tous les dispositifs n’excède pas 5.

47Users in New Zealand
ENGLISH
Users in New Zealand
The grant of a Telepermit for any item of terminal equipment indicates only that Telecom has
accepted that the item complies with minimum conditions for connection to its network. It indicates
no endorsement of the product by Telecom, nor does it provide any sort of warranty. Above all, it
provides no assurance that any item will work correctly in all respects with another item of
Telepermitted equipment of a different make or model, nor does it imply that any product is
compatible with all of Telecom’s network services.
Telepermitted equipment only may be connected to the auxiliary telephone port. The auxiliary
telephone port is not specifically designed for 3-wire connected equipment that may not respond to
incoming ringing when attached to this port.
The automatic calling functions of this equipment must not be used to cause a nuisance to other
Telecom customers.
This equipment must not be programmed for decadic (pulse) dialling.

48 Users in New Zealand
ENGLISH

FRANÇAIS
Guide de démarrage rapide
Table des matières
Introduction 1
Comment utiliser la documentation fournie 3
Préparation de la machine 4
Installation des pilotes MP 7
Lecture des manuels en ligne 9
Chargement du papier d'impression 10
Panneau de contrôle 11
Copie 13
Impression depuis une carte mémoire 15
Impression depuis votre ordinateur 18
Numérisation d'images 20
Impression directe de photos depuis un périphérique compatible 22
Télécopie 28
Remplacement d'un réservoir d'encre 38
Spécifications 40

1Introduction
FRANÇAIS
Introduction
Ce Guide de démarrage rapide utilise les symboles suivants pour indiquer les informations
importantes. Veillez à toujours respecter les instructions indiquées par ces symboles.
Les commandes peuvent être différentes en fonction de votre application. Pour plus d'informations,
reportez-vous au manuel d'instructions de votre application. Les étapes décrites dans ce manuel
concernent l'impression sous le système d'exploitation Windows Vista™ Édition Intégrale (ci-après
appelé « Windows Vista ») et sous Mac ® OS X v.10.4.x.
Avertissement
Instructions dont le non-respect peut entraîner la mort ou des blessures graves provoquées par un
fonctionnement incorrect du matériel. Elles doivent être respectées afin de garantir un
fonctionnement en toute sécurité.
Avertissement
Instructions dont le non-respect peut entraîner des blessures graves ou des dommages matériels
dus à un fonctionnement incorrect du matériel. Elles doivent être respectées afin de garantir un
fonctionnement en toute sécurité.
Important
Instructions à respecter afin de garantir un fonctionnement en toute sécurité.
Marques
z« Microsoft » est une marque commerciale de Microsoft Corporation.
z« Windows » est une marque commerciale de Microsoft Corporation, déposée aux États-Unis
et dans d'autres pays.
z« Windows Vista » est une marque commerciale de Microsoft Corporation.
z« Macintosh » et « Mac » sont des marques d'Apple Computer, Inc., déposées aux États-Unis
et dans d'autres pays.
z« Memory Stick », « Memory Stick PRO », « Memory Stick Duo » et « Memory Stick PRO
Duo » sont des marques commerciales de Sony Corporation.
z« xD-Picture Card » est une marque commerciale de Fuji Film Co., Ltd.
z« MultiMediaCard » est une marque commerciale de MultiMediaCard Association.
z« SD Card », « miniSD Card » et « microSD Card » sont des marques commerciales de
SD Association.
© CANON INC. 2007
Tous droits réservés. Toute reproduction ou transmission, même partielle, sous quelque forme
que ce soit, est interdite sans autorisation expresse écrite.

3Comment utiliser la documentation fournie
FRANÇAIS
Comment utiliser la documentation fournie
Documentation imprimée
Fiche d'installation
Veillez à lire ce document en premier lieu.
Il comprend des instructions relatives à la configuration de votre machine et à sa
préparation avant l'emploi.
Guide d'installation réseau
Lisez ce guide quand vous commencez à utiliser la machine dans un
environnement réseau.
Ce guide comprend les instructions sur l'installation du logiciel et des conseils de
dépannage pour les connexions au réseau local câblé.
Guide de démarrage rapide (le présent guide)
Lisez ce guide quand vous commencez à utiliser la machine.
Après avoir suivi les instructions de la fiche d'installation ou du Guide d'installation
réseau, nous vous recommandons de lire ce guide pour vous familiariser avec le
fonctionnement de base de toutes les fonctions disponibles sur la machine.
Manuels en ligne
Guide d'Utilisation
Lisez ce guide quand vous commencez à utiliser la machine.
Si vous ne trouvez pas suffisamment d'informations dans le Guide de
démarrage rapide, reportez-vous au Guide d'Utilisation que vous pouvez
installer à partir du [CD-ROM d'installation]. Ce guide comprend des instructions
détaillées sur :
zla copie ;
zl'impression depuis une carte mémoire ;
zl'impression depuis votre ordinateur ;
zla numérisation ;
zla télécopie.
Vous trouverez également d'autres guides sur les fonctions avancées.
Guide de numérisation
Reportez-vous à ce guide pour obtenir des informations détaillées sur la
numérisation et la configuration des paramètres.
Guide d'impression PC
Reportez-vous à ce guide pour obtenir des informations détaillées sur le pilote
d'imprimante.
Guide du pilote de télécopieur (Windows
® uniquement)
Reportez-vous à ce guide pour obtenir des informations détaillées sur le pilote
du télécopieur.
Guide d'impression photo PC (Windows uniquement)
Reportez-vous à ce guide pour obtenir des informations sur l'utilisation des
différents logiciels d'application inclus sur le [CD-ROM d'installation].
4Préparation de la machine
FRANÇAIS
Préparation de la machine
Veillez à commencer par lire la fiche d'installation avant de configurer votre machine et de l'utiliser.
Sortez la machine de son emballage
Comparez les éléments contenus dans le carton d'emballage avec l'illustration imprimée sur le
dessus du carton.
1Connectez la ligne téléphonique et le cordon d'alimentation.
Assurez-vous d'utiliser le câble téléphonique fourni.
Si vous connectez la ligne ion « Méthodes de connexion des téléphonique, consultez la sect
périphériques externes », page 28 .
Ôtez la capsule de protection du connecteur téléphonique pour connecter le périphérique
externe.
Utilisateurs résidant au Royaume-Uni
Si le connecteur du périphérique externe ne peut pas être raccordé à la prise de la
machine, vous devez acheter un adaptateur B.T. pour établir la connexion de la manière
suivante :
Raccordez la ligne du périphérique externe à l'adaptateur B.T., puis branchez
l'adaptateur B.T. sur la prise.
2Mettez la machine sous tension.
3Installez la tête d'impression.
Important
Un câble USB est nécessaire pour connecter l'imprimante à votre ordinateur.
Avertissement
Veillez à enlever les rubans adhésifs avant de mettre la machine sous tension.
Remarque
La position du ruban peut varier.
Remarque
zSi la langue affichée sur l'écran LCD n'est pas celle que vous voulez, appuyez sur le bouton
[Back] (Précédent) pour revenir à l'écran <Language selection> (Sélection de langue).
zLa sélection de la langue n'est valable que pour certains pays.
Avertissement
Ne touchez à aucune partie interne à l'exception du levier de verrouillage de la tête d'impression.
Important
zSi l'unité de numérisation (capot d'imprimante) reste ouverte pendant plus de 10 minutes, le
support de la tête d'impression se déplace vers la droite. Fermez et rouvrez l'unité de
numérisation (capot d'imprimante) pour ramener le support de tête d'imprimante vers le centre.
zSi vous n'avez pas pu installer la tête d'impression correctement, soulevez le levier de
verrouillage de la tête d'impression, retirez celle-ci, puis réinstallez-la correctement.
zNe remettez pas la capsule de protection en place après l'avoir retirée.
Remarque
De l'encre transparente ou bleue peut se trouver à l'intérieur de l'étui qui contient la tête
d'impression ou de la capsule de protection : cela n'affecte pas la qualité d'impression. Veillez à ne
pas vous salir en manipulant ces éléments.
5Préparation de la machine
FRANÇAIS
4Installez les réservoirs d'encre.
Pour les utilisateurs du télécopieur
Sélectionnez le mode de réception qui correspond à vos besoins. Reportez-vous à la section
« Sélection d'un mode de réception », page 35.
zSi vous disposez d'une ligne téléphonique dédiée exclusivement aux télécopies :
Sélectionnez <Fax only mode> (Mode Fax seulement).
zLorsque vous utilisez une seule ligne téléphonique pour les télécopies et les appels vocaux :
Si vous recevez principalement des appels vocaux et parfois des télécopies, sélectionnez
<TEL priority mode> (Mode priorité téléph.).
Si vous recevez principalement des télécopies et parfois des appels vocaux, sélectionnez
<Fax priority mode> (Mode priorité fax).
zLorsque vous êtes abonné à un service de détecteur de codes de sonnerie auprès de votre
opérateur téléphonique (non disponible dans tous les pays) :
Sélectionnez <DRPD> (DRPD) ou <Network switch> (Network switch).
Important
zVeillez à ce que tous les réservoirs d'encre soient installés dans la bonne position, en faisant
correspondre les étiquettes. La machine ne peut pas être utilisée tant que les réservoirs ne sont
pas tous installés.
zAvant d'utiliser la machine, patientez environ 2 minutes, jusqu'à ce que la machine ne fasse
plus de bruit.
Remarque
zVeillez à retirer le film transparent du réservoir d'encre exactement comme indiqué à l'étape 3
de votre fiche d'installation.
zN'appuyez pas sur le côté des réservoirs d'encre car l'encre risque de couler et de tacher vos
vêtements et vos mains.
zUn message d'erreur s'affiche sur l'écran LCD si un réservoir d'encre n'est pas installé
correctement. Ouvrez l'unité de numérisation (capot d'imprimante) et assurez-vous que la
position de tous les réservoirs d'encre correspond à l'étiquette.
zDès que les réservoirs d'encre sont installés, alignez la tête d'impression si les lignes ou les
couleurs ne s'impriment pas correctement. Reportez-vous à la section « Alignement de la tête
d'impression » du manuel en ligne Guide d'Utilisation.
Remarque
Pour recevoir une télécopie, vous devez spécifier correctement le type de ligne téléphonique sur la
machine. Pour plus d'informations sur la vérification et la modification de ce paramètre, consultez le
manuel en ligne Guide d'Utilisation.
Si vous ne connaissez pas le type de ligne dont vous disposez, contactez votre opérateur téléphonique.

8Installation des pilotes MP
FRANÇAIS
zSi l'écran [Exécution automatique] apparaît, cliquez sur [Exécuter Msetup4.exe].
Sous Windows XP et Windows 2000, cet écran n'apparaît pas.
zSi l'écran [Contrôle du compte d'utilisateur] apparaît, cliquez sur [Continuer].
Sous Windows XP et Windows 2000, cet écran n'apparaît pas.
zUn message vous demandant de confirmer le redémarrage de l'ordinateur peut apparaître
pendant le processus d'installation. Si ce message s'affiche, suivez les instructions affichées
à l'écran puis cliquez sur [OK].
L'installation reprend à l'étape en vigueur lors du redémarrage de l'ordinateur.
zNous vous remercions de bien vouloir participer au [PIXMA Extended Survey Program]
(Enquête étendue PIXMA) sur l'utilisation des imprimantes Canon. Pour plus de détails,
reportez-vous aux instructions affichées à l'écran.
zSi la connexion n'est pas reconnue, reportez-vous à la section « Impossible d'installer les
pilotes MP » du manuel en ligne Guide d'Utilisation.
Utilisateurs asiatiques
zVous pouvez installer ScanSoft OmniPage SE uniquement sur un système d'exploitation
anglais.
Informations pour Macintosh
zLa machine n'est pas compatible avec les environnements Mac OS 9, Mac OS X Classic,
ou Mac OS X v.10.2.7 ou antérieurs.
zNe retirez pas et n'insérez pas le câble USB au cours de l'installation, car vous pourriez
altérer le fonctionnement de l'ordinateur ou de la machine.
zAvant d'installer les pilotes MP, désactivez tout antivirus ou programme chargé
automatiquement, ou supprimez-les de votre dossier système.
z[XXX FAX] (où "XXX" représente le nom de votre machine) apparaît dans la [Liste des
imprimantes] (ou la liste [Produit] pour Mac OS X v.10.2.8 à v.10.3.x), mais vous ne pouvez
pas ajouter [XXX FAX]. Si votre ordinateur est équipé d'un modem interne, vous pouvez
envoyer une télécopie du document avec les paramètres d'impression actuels. Il n'est pas
possible d'envoyer des télécopies via la machine depuis votre ordinateur.
Sous Mac OS X v.10.2.8 à Mac v.10.3.x :
zAvant d'utiliser le panneau de contrôle de la machine pour enregistrer les originaux
numérisés à partir de la vitre d'exposition ou d'utiliser le CAD sur l'ordinateur, vous devez
sélectionner [MP Navigator EX] comme application de démarrage dans le menu [Transfert
d'images] sous [Applications]. Pour plus d'informations, reportez-vous à la section
« Numérisation d'images » du manuel en ligne Guide d'Utilisation.
Sous Mac OS X v.10.2.8 à Mac v.10.3.3 :
zLe redémarrage de l'ordinateur connecté à la machine peut empêcher celle-ci d'être détectée.
Débranchez le câble USB et rebranchez-le ou mettez la machine hors tension, puis à
nouveau sous tension pour résoudre le problème.
Utilisateurs asiatiques
zPour installer le manuel en ligne Guide d'Utilisation dans une autre langue que celle de
l'installation actuelle, cliquez deux fois sur le dossier [Manuel] du [CD-ROM d'installation],
dans le dossier [Canon], puis copiez un dossier de langue sur votre disque dur.

9Lecture des manuels en ligne
FRANÇAIS
Lecture des manuels en ligne
Pour obtenir des instructions dét anuels en ligne, reportez-vous à la aillées sur l'installation des m
fiche d'installation ou au Guide d'installation réseau.
Vous pouvez consulter les manuels en ligne de la manière suivante :
Pour consulter le manuel en ligne, cliquez deux fois sur l'icône [Manuel en ligne XXX] de votre
bureau ou cliquez sur [Démarrer] > [Tous les programmes] (ou [Programmes]) > [Canon XXX
Manual] > [Manuel en ligne XXX] (où « XXX » est le nom de la machine).
Configuration requise
Navigateur : Windows HTML Help Viewer
Pour consulter le manuel en ligne, cliquez deux fois sur l'alias [Manuel en ligne XXX] situé sur le
bureau (où « XXX » est le nom de la machine).
Configuration requise
Navigateur : Help Viewer
Remarque
zMicrosoft Internet Explorer®5.0 ou ultérieur doit être installé.
zLe manuel en ligne peut ne pas s'afficher correctement selon votre système d'exploitation ou la
version d'Internet Explorer. Nous vous recommandons de mettre à jour votre système avec
Windows Update.
Remarque
Utilisateurs asiatiques
Si vous avez installé le Guide d'Utilisation à partir du répertoire [Manuel] du [CD-ROM d'installation],
ouvrez le répertoire dans lequel vous avez copié le Guide d'Utilisation et cliquez deux fois sur le fichier
[top.htm].
Remarque
zLe manuel en ligne peut ne pas s'afficher correctement selon votre système d'exploitation.
Nous vous recommandons de mettre à jour votre système.
zNous vous recommandons d'utiliser Safari comme navigateur Web pour afficher les manuels en
ligne au format HTML. Si Safari n'est pas installé sur votre ordinateur, téléchargez-le à partir du
site Web d'Apple Inc. pour l'installer.

11Panneau de contrôle
FRANÇAIS
Panneau de contrôle
(1) Bouton [ON/OFF] (MARCHE/ARRÊT) / Témoin [Power] (Alimentation)
Met la machine sous et hors tension. S'allume ou clignote en vert pour indiquer l'état de
l'alimentation. Avant de mettre la machine sous tension, assurez-vous que le capot de
document est fermé.
(2) Bouton [COPY] (COPIE)
Fait basculer la machine en mode copie.
(3) Bouton [FAX]
Fait basculer la machine en mode télécopie.
(4) Bouton [SCAN] (NUMÉRISER)
Fait basculer la machine en mode numérisation. Dans ce mode, la machine numérise un
document sur votre ordinateur selon les paramètres sélectionnés. Pour que ce bouton
puisse être utilisé, la machine doit être connectée à l'ordinateur. Pour plus de détails,
reportez-vous au manuel en ligne Guide de numérisation.
(5) Bouton [MEMORY CARD] (CARTE MÉMOIRE)
Fait basculer la machine en mode carte mémoire.
(6) [Use/Memory] (Voyant en service/mémoire)
Clignote lorsque la ligne téléphonique est en cours d'utilisation. S'allume lorsque des
documents sont en mémoire.
(7) Bouton [Enlarge/Reduce] (Agrandissem./Réduction)
Règle les taux d'agrandissement ou de réduction pour la copie des documents.
(8) Témoin [Alarm] (Alarme)
S'allume ou clignote en orange en cas d'erreur ou lorsqu'il n'y a plus de papier ou d'encre.
(9) Écran d'affichage à cristaux liquides
Affiche des messages, des options de menu et le mode de fonctionnement de la
machine.
(10) Boutons { } [ ]
Font défiler les options de menu et augmentent ou diminuent la valeur d'un réglage telle
que le nombre de copies. , , ,et Lorsque l'écran LCD affiche { } [ ], vous pouvez
utiliser ces boutons LCD. De plus, le bouton [ permet d'annuler le caractère saisi,
et le bouton ] permet d'insérer un espace entre les caractères lors de la saisie.
(11) Bouton [OK]
Confirme votre sélection (menu ou paramètre).
Ignore le message d'erreur et remet la machine en mode de fonctionnement normal
après la résolution d'une erreur ou l'élimination d'un bourrage papier.
Éjecte les documents qui sont toujours dans le CAD.
(12) Bouton [Menu]
Permet d'accéder aux menus et aux paramètres afin de personnaliser le fonctionnement
de la machine.
(1) (2) (3) (4) (5) (7)(8) (9) (13) (14) (15) (16)
(17)(18)(19)(20)(21)(22)(23)(24)(25)
(12)(11)(10)(6)
Produkt Specifikationer
| Mærke: | Canon |
| Kategori: | Printer |
| Model: | Pixma MX700 |
Har du brug for hjælp?
Hvis du har brug for hjælp til Canon Pixma MX700 stil et spørgsmål nedenfor, og andre brugere vil svare dig
Printer Canon Manualer

9 April 2025
17 Februar 2025
17 Februar 2025
15 Januar 2025
15 Januar 2025
13 Januar 2025
13 Januar 2025
9 Januar 2025
9 Januar 2025
9 Januar 2025
Printer Manualer
- Printer Nilox
- Printer Sony
- Printer Samsung
- Printer Panasonic
- Printer LG
- Printer Mitsubishi
- Printer Sharp
- Printer Lexmark
- Printer Epson
- Printer HP
- Printer D-Link
- Printer Roland
- Printer Toshiba
- Printer Fujifilm
- Printer Nikon
- Printer Kodak
- Printer Brother
- Printer Lenovo
- Printer Olympus
- Printer Triumph-Adler
- Printer AVM
- Printer Dymo
- Printer Thomson
- Printer JVC
- Printer Honeywell
- Printer Citizen
- Printer Olivetti
- Printer Huawei
- Printer Seiko
- Printer Digitus
- Printer Zebra
- Printer Olympia
- Printer Xiaomi
- Printer Dell
- Printer Intermec
- Printer Fujitsu
- Printer MSI
- Printer Polaroid
- Printer Ricoh
- Printer NEC
- Printer Konica-Minolta
- Printer OKI
- Printer Kyocera
- Printer Avision
- Printer Velleman
- Printer Bixolon
- Printer Sagem
- Printer Pantum
- Printer Xerox
- Printer Renkforce
- Printer Testo
- Printer Ultimaker
- Printer Primera
- Printer Star Micronics
- Printer Star
- Printer Panduit
- Printer ZKTeco
- Printer StarTech.com
- Printer Kogan
- Printer CUSTOM
- Printer Godex
- Printer Equip
- Printer Royal Sovereign
- Printer Argox
- Printer Minolta
- Printer DNP
- Printer Oce
- Printer Metapace
- Printer Ibm
- Printer Tomy
- Printer Approx
- Printer Toshiba TEC
- Printer Frama
- Printer Vupoint Solutions
- Printer Evolis
- Printer Builder
- Printer Fargo
- Printer Brady
- Printer Posiflex
- Printer Datamax-O'neil
- Printer Dascom
- Printer HiTi
- Printer GG Image
- Printer Elite Screens
- Printer DTRONIC
- Printer Phoenix Contact
- Printer Videology
- Printer TSC
- Printer EC Line
- Printer Colop
- Printer Fichero
- Printer Raspberry Pi
- Printer Unitech
- Printer IDP
- Printer Microboards
- Printer Tally Dascom
- Printer CSL
- Printer Nisca
- Printer Epson 7620
- Printer Sawgrass
- Printer Mimaki
Nyeste Printer Manualer

8 April 2025

2 April 2025

29 Marts 2025
29 Marts 2025
29 Marts 2025

9 Marts 2025
9 Marts 2025
5 Marts 2025
5 Marts 2025
5 Marts 2025