Canon PowerShot A4000 IS Manual
Læs nedenfor 📖 manual på dansk for Canon PowerShot A4000 IS (146 sider) i kategorien Kamera. Denne guide var nyttig for 16 personer og blev bedømt med 4.5 stjerner i gennemsnit af 2 brugere
Side 1/146

Getting Started
Handbuch Erste Schritte
Guide de mise en route
Guía de inicio
Guida introduttiva
Introductiehandleiding
Guia de Iniciação
Startvejledning
Starthandbok
Aloitusopas
Příručka Začínáme
Kezdeti lépések
Pierwsze kroki
Úvodná príručka
Alustamine
Darba uzsākšana
Parengimo darbui instrukcija
Βασικές Οδηγίες Χρήσης
PL
EN
DE
FR
ES
IT
NL
PT
FI
CS
HU
SK
ET
LV
SV
DA
LT
EL
2
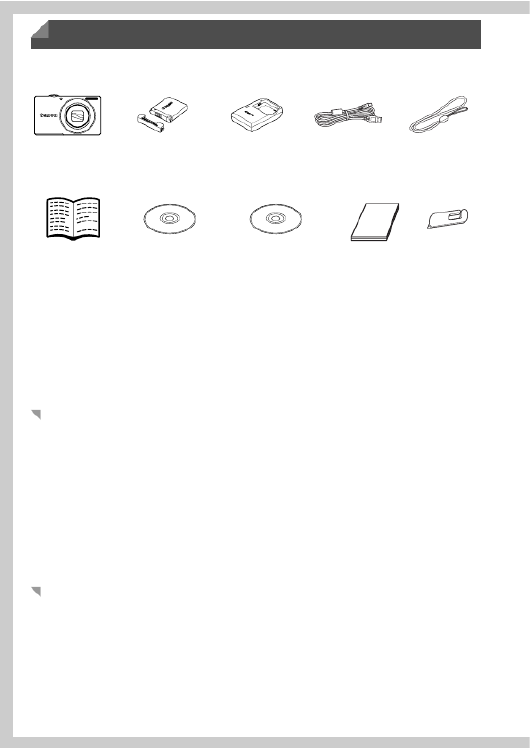
Before use, make sure the following items are included in the package.
If anything is missing, contact your camera dealer.
A memory card is not included.
The following memory cards (sold separately) can be used, regardless of
capacity. For details on the number of shots and recording time per memory
card, refer to “Specifications” in the Camera User Guide.
•SD memory cards*
•SDHC memory cards*
•SDXC memory cards *
* Conforms to SD specifications. However, not all memory cards have been verified to
work with the camera.
This guide uses PowerShot A4000 IS illustrations and screenshots for all
explanations.
Package Contents
Package Contents
Package Contents
Package ContentsPackage Contents
Compatible Memory Cards
Convention in This Guide
Camera Battery Pack
NB-11L (with
terminal cover)
Battery
Charger
CB-2LDE
Interface Cable
IFC-400PCU
Wrist Strap
WS-800*1
Warranty
System Booklet
Getting Started
(This Guide)
DIGITAL CAMERA
Manuals Disk*2
DIGITAL CAMERA
Solution Disk*3
*1 For attachment instructions, refer to the Camera User Guide on the DIGITAL
CAMERA Manuals Disk.
*2 Contains the Camera User Guide and ImageBrowser EX User Guide (p. 8).
*3 Contains software used with the camera. For installation instructions, refer to the
Camera User Guide ImageBrowser EX User , and for instructions on use, refer to the
Guide.
*4 PowerShot A3400 IS only
Stylus*1*4

3
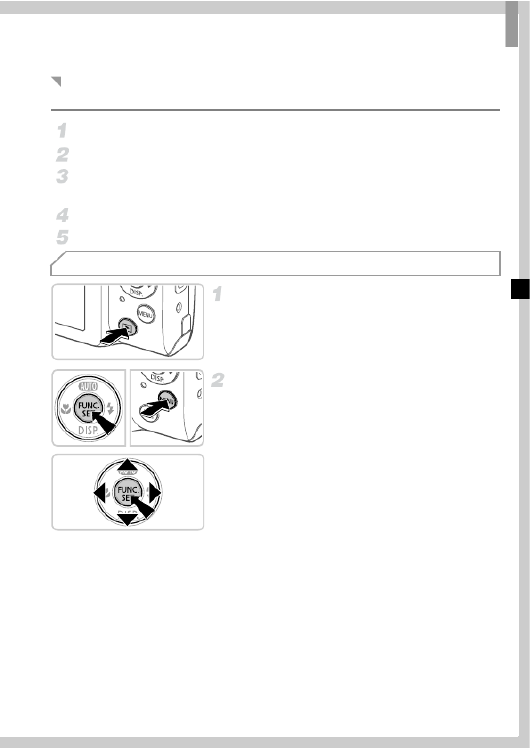
Remove the cover and insert the
battery.
zAfter aligning the o marks on the battery and
charger, insert the battery by pushing it in
( ) and down ( ).
Charge the battery.
zOnce you connect the power cord to the
charger and plug the cord into a power
outlet, the lamp will light up orange.
zWhen charging is finished, the lamp turns
green. Remove the battery.
zFor details on charging time and the number
of shots or recording time available with a
fully charged battery, refer to “Specifications”
in the Camera User Guide.
Open the cover.
zSlide the cover ( ) and open it ( ).
Insert the battery.
zWhile pressing the battery lock in the direction
of the arrow, insert the battery as shown and
push it in until it clicks into the locked position.
zTo remove the battery, press the battery lock
in the direction of the arrow.
Initial Preparations
Charging the Battery
Inserting the Battery and Memory Card
Battery LockTerminals

Initial Preparations
5
Adjust the date and time as follows.
Press the n button.
Move the zoom lever to choose the 3 tab.
Press the op buttons to choose [Date/Time], and then press the m
button.
Follow step 2 on p. 4 again to complete the setting.
Press the n button.
Enter Playback mode.
zPress the 1 button.
Access the setting screen and
choose a language.
zPress and hold the m button, and then press
the n button.
zPress the opqr buttons to choose a
language, and then press the m button.
Changing the Date and Time
Display Language

6
Turn the camera on and enter A
mode.
zPress the ON/OFF button.
zPress the o button repeatedly until is
displayed.
Compose the shot.
zTo zoom in and enlarge the subject, move the
zoom lever toward i (telephoto) as you
watch the screen, and to zoom away from the
subject, move it toward j (wide angle).
Shoot still images.
zPress the shutter button lightly ( ).
zThe camera beeps twice after focusing, and
AF frames are displayed to indicate image
areas in focus. Press the shutter button all
the way down ( ).
Shoot movies.
zPress the movie button to start shooting, and
press it again to stop.
Trying the Camera Out
Shooting

Trying the Camera Out
7
Enter Playback mode.
zPress the 1 button.
Browse through your images.
zTo view the previous or next image, press the
qr buttons.
zMovies are identified by a icon.
To play movies, go to step 3.
Play movies.
zPress the m button to access the movie
control panel, press the qr buttons to choose
, and then press the m button again.
zTo adjust the volume, press the op buttons.
zPlayback now begins, and after the movie is
finished, is displayed.
With PowerShot A3400 IS, the camera’s touch-screen panel enables intuitive
operation by touching or dragging across the screen.
Touch..........Touch the screen briefly with your finger.
For instance, you can start movie playback by touching . To
adjust the volume, quickly drag up or down across the screen
during playback.
Drag ............Touch the screen and move your finger across it.
For instance, when viewing images, you can choose images by
dragging right to left or left to right across the screen.
Viewing
Using the Touch-Screen Panel

Viewing the Manuals
8
If you have difficulty operating the camera by touch, use the included stylus.
Do not use pencils, pens, or sharp objects other than the included stylus to
operate the touch-screen.
To erase the image you chose in step 2, do the following. Note that erased
images cannot be recovered.
Press the qr buttons to choose an image, and then press the o button.
After [Erase?] is displayed, press the qr buttons to choose [Erase], and
then press the m button.
Refer to the manuals on the included DIGITAL CAMERA Manuals Disk for a
more in-depth understanding of the camera, or when using software on the
DIGITAL CAMERA Solution Disk. Adobe Reader is required to view the PDF
manuals. Microsoft Word/Word Viewer can be installed to view the Word
manuals (required only for manuals for the Middle East).
z
Insert the DIGITAL CAMERA Manuals Disk in
the computer’s CD-ROM drive.
zFollow the instructions displayed to view the
manual.
Erasing the Images
Viewing the Manuals
Camera User Guide
Explains how to use all functions of this camera, lists product
specifications, and explains procedures for installing the
included software.
ImageBrowser EX
User Guide Instructions for the included software
Erste Vorbereitungen
5
Gehen Sie wie folgt vor, wenn Sie das Datum und die Uhrzeit anpassen möchten.
Drücken Sie die Taste n.
Bewegen Sie den Zoom-Regler, um die Registerkarte 3 auszuwählen.
Drücken Sie die Tasten op, um [Datum/Uhrzeit] auszuwählen, und
drücken Sie anschließend die Taste m.
Wiederholen Sie Schritt 2 auf S. 4, um die Einstellung zu bestätigen.
Drücken Sie die Taste n.
Wechseln Sie in den
Wiedergabemodus.
zDrücken Sie die Taste 1.
Öffnen Sie den
Einstellungsbildschirm, und
wählen Sie eine Sprache aus.
zHalten Sie die Taste m gedrückt, und
drücken Sie dann die Taste n.
zDrücken Sie die Tasten opqr, um eine
Sprache auszuwählen, und drücken Sie dann
die Taste m.
Ändern von Datum und Uhrzeit
Spracheinstellung
Produkt Specifikationer
| Mærke: | Canon |
| Kategori: | Kamera |
| Model: | PowerShot A4000 IS |
Har du brug for hjælp?
Hvis du har brug for hjælp til Canon PowerShot A4000 IS stil et spørgsmål nedenfor, og andre brugere vil svare dig
Kamera Canon Manualer

13 Januar 2025
14 December 2024
3 Oktober 2024
3 September 2024
3 September 2024
2 September 2024
28 August 2024
27 August 2024
27 August 2024
27 August 2024
Kamera Manualer
- Kamera Bosch
- Kamera SilverCrest
- Kamera Acer
- Kamera Ozito
- Kamera Denver
- Kamera Sony
- Kamera Samsung
- Kamera GE
- Kamera Panasonic
- Kamera TP-Link
- Kamera Philips
- Kamera Lenco
- Kamera Gigaset
- Kamera Braun
- Kamera Logitech
- Kamera Epson
- Kamera Daewoo
- Kamera Technaxx
- Kamera HP
- Kamera Sanyo
- Kamera Easypix
- Kamera Grundig
- Kamera D-Link
- Kamera Arlo
- Kamera Bushnell
- Kamera Pyle
- Kamera Fujifilm
- Kamera Nikon
- Kamera Kodak
- Kamera Lenovo
- Kamera Olympus
- Kamera Nedis
- Kamera Zorki
- Kamera Optoma
- Kamera Creative
- Kamera Azden
- Kamera Casio
- Kamera Trevi
- Kamera Trust
- Kamera Laserliner
- Kamera Blaupunkt
- Kamera JVC
- Kamera Leica
- Kamera Hitachi
- Kamera Medion
- Kamera Exakta
- Kamera EZVIZ
- Kamera König
- Kamera Gembird
- Kamera Powerfix
- Kamera Alpine
- Kamera Netgear
- Kamera Maginon
- Kamera Avaya
- Kamera Nest
- Kamera Vtech
- Kamera BenQ
- Kamera Bresser
- Kamera Anker
- Kamera Sigma
- Kamera Pentax
- Kamera Rollei
- Kamera Xiaomi
- Kamera Moultrie
- Kamera Viewsonic
- Kamera Imou
- Kamera Polaroid
- Kamera Ricoh
- Kamera Aida
- Kamera Konica-Minolta
- Kamera Foscam
- Kamera Kyocera
- Kamera GoPro
- Kamera Lorex
- Kamera Cobra
- Kamera Velleman
- Kamera FLIR
- Kamera Swann
- Kamera Eufy
- Kamera Celestron
- Kamera Ring
- Kamera Fluke
- Kamera Hikvision
- Kamera AVerMedia
- Kamera Reolink
- Kamera EVE
- Kamera Prixton
- Kamera Marshall Electronics
- Kamera General Electric
- Kamera SPC
- Kamera Hanwha
- Kamera ARRI
- Kamera BirdDog
- Kamera Bauhn
- Kamera MuxLab
- Kamera Spypoint
- Kamera Vivitar
- Kamera Ansco
- Kamera Vimar
- Kamera Oregon Scientific
- Kamera Dahua Technology
- Kamera SereneLife
- Kamera Lexibook
- Kamera Intel
- Kamera SJCAM
- Kamera Scosche
- Kamera Speco Technologies
- Kamera Joy-It
- Kamera Kogan
- Kamera Levenhuk
- Kamera Emerson
- Kamera Minox
- Kamera Burris
- Kamera Silvergear
- Kamera Elmo
- Kamera AViPAS
- Kamera UniView
- Kamera AquaTech
- Kamera Alfatron
- Kamera BZBGear
- Kamera PTZ Optics
- Kamera Daitsu
- Kamera Agfa
- Kamera AgfaPhoto
- Kamera Argus
- Kamera Lumens
- Kamera Yashica
- Kamera Sygonix
- Kamera Mamiya
- Kamera Zenit
- Kamera Fuji
- Kamera Minolta
- Kamera EverFocus
- Kamera RunCam
- Kamera SeaLife
- Kamera Aplic
- Kamera FIMI
- Kamera Meade
- Kamera Contax
- Kamera Sinji
- Kamera Traveler
- Kamera Digital Watchdog
- Kamera Getac
- Kamera Ikegami
- Kamera Pelco
- Kamera ZeissIkon
- Kamera Dorr
- Kamera HOLGA
- Kamera Praktica
- Kamera Hasselblad
- Kamera Moto Mods (Motorola)
- Kamera Fantasea Line
- Kamera Brinno
- Kamera Z CAM
- Kamera General
- Kamera Ergoguys
- Kamera Strex
- Kamera Berger & Schröter
- Kamera Leitz Focomat IIc
- Kamera Cosina
- Kamera Videology
- Kamera InfiRay
- Kamera Videotec
- Kamera GoXtreme
- Kamera IOptron
- Kamera Cambo
- Kamera Kobian
- Kamera Kyocera Yashica
- Kamera Red Digital Cinema
- Kamera Konica
- Kamera Akaso
- Kamera Seek Thermal
- Kamera Ikelite
- Kamera Adeunis
- Kamera Hoppstar
- Kamera PatrolEyes
- Kamera Camouflage
- Kamera HuddleCamHD
- Kamera Linhof
- Kamera Aquapix
- Kamera KanDao
Nyeste Kamera Manualer

29 Marts 2025
29 Marts 2025
27 Marts 2025
12 Marts 2025
12 Marts 2025

14 Januar 2025
12 Januar 2025
11 Januar 2025
11 Januar 2025
11 Januar 2025