Canon VIXIA HF G50 Manual
Canon
Videokamera
VIXIA HF G50
Læs nedenfor 📖 manual på dansk for Canon VIXIA HF G50 (140 sider) i kategorien Videokamera. Denne guide var nyttig for 29 personer og blev bedømt med 4.5 stjerner i gennemsnit af 2 brugere
Side 1/140

PUB. DIE-0528-000C
4K Camcorder
Instruction Manual
Firmware ver. 1.0.1.0

2
COPYRIGHT WARNING
Unauthorized recording of copyrighted materials may infringe on the rights of copyright owners and be contrary to copyright
laws.
Trademark Acknowledgements
• SD, SDHC and SDXC Logos are trademarks of SD-3C, LLC.
• Microsoft and Windows are trademarks or registered trademarks of Microsoft Corporation in the United States and/or other countries.
• macOS is a trademark of Apple Inc., registered in the U.S. and other countries.
• HDMI, the HDMI logo and High-Definition Multimedia Interface are trademarks or registered trademarks of HDMI Licensing
Administrator, Inc. in the United States and other countries.
• Other names and products not mentioned above may be trademarks or registered trademarks of their respective companies.
• This device incorporates exFAT technology licensed from Microsoft.
• “Full HD 1080” refers to Canon camcorders compliant with high-definition video composed of 1,080 vertical pixels
(scanning lines).
• This product is licensed under AT&T patents for the MPEG-4 standard and may be used for encoding MPEG-4
compliant video and/or decoding MPEG-4 compliant video that was encoded only (1) for a personal and non-
commercial purpose or (2) by a video provider licensed under the AT&T patents to provide MPEG-4 compliant video. No license is
granted or implied for any other use for MPEG-4 standard.
• THIS PRODUCT IS LICENSED UNDER THE AVC PATENT PORTFOLIO LICENSE FOR THE PERSONAL USE OF A CONSUMER OR OTHER
USES IN WHICH IT DOES NOT RECEIVE REMUNERATION TO (i) ENCODE VIDEO IN COMPLIANCE WITH THE AVC STANDARD (“AVC
VIDEO”) AND/OR (ii) DECODE AVC VIDEO THAT WAS ENCODED BY A CONSUMER ENGAGED IN A PERSONAL ACTIVITY AND/OR WAS
OBTAINED FROM A VIDEO PROVIDER LICENSED TO PROVIDE AVC VIDEO. NO LICENSE IS GRANTED OR SHALL BE IMPLIED FOR ANY
OTHER USE. ADDITIONAL INFORMATION MAY BE OBTAINED FROM MPEG LA, L.L.C. SEE HTTP://WWW.MPEGLA.COM

3
Highlights of the Camcorder
The Canon VIXIA HF G50 4K Camcorder is a high-performance camcorder whose compact size
makes it ideal in a variety of situations. The following are just some of the many functions featured in
the camcorder.
4K Recording
CMOS sensor and DIGIC DV 6 image
processor
The camcorder is equipped with a
1/2.3-inch CMOS sensor that captures video
at an effective pixel count of approximately
8.29 megapixels (3840x2160). The video is
then processed by the DIGIC DV 6 image
processor. In addition to recording 4K video,
the camcorder employs oversampling to
record Full HD video.
Wide zoom lens and 8-bladed aperture
The zoom lens is equipped with 20x optical
zoom and has a focal length at full wide angle
of 29.3 mm* (35 mm equivalent), making the
camcorder versatile in a variety of shooting
situations. The 8-bladed aperture delivers a
pleasing out-of-focus blur (“bokeh”) to your
recordings.
* When the resolution is 3840x2160 and the
image stabilization is a setting other than
Dynamic IS. The focal length is 30.6 mm
when using Dynamic IS.
4K recording at 29.97P and HD
recording at 59.94P
The camcorder can record clips in MP4
format at 3840x2160 with a frame rate of
29.97P or 1920x1080 with a frame rate of
59.94P, giving you the freedom to choose the
video configuration that is most suitable for
your project.
Convenience and Functionality
Recording for extended periods
With its two SD card slots, the camcorder
allows you to use dual recording (A 30) to
record the same clip on two SD cards, or relay
recording to automatically switch to the other
SD card when the one being used becomes
full. Dual recording is a convenient way to
create a backup of your recordings while relay
recording effectively extends the available
recording time.
Emphasis on versatility
This camcorder has features to make it usable
as a main camera but is also small enough to
be very portable. The advanced image
stabilization (A60), which stabilizes the
image along 5 axes, will let you shoot in a
variety of situations in the field. The LCD touch
panel and viewfinder can be angled in a variety
of positions, allowing for shooting in tight
places, for example.
Manual controls at your fingertips
The focus/zoom ring helps you achieve the
focus you are looking for. You can easily
change the ring's functionality so that you can
operate the zoom. You can also assign certain
frequently used functions to a customizable
button and adjust those functions with the
accompanying dial (A80). Additionally, the
camcorder also features 5 assignable buttons
on the camcorder and one onscreen
assignable touch button to which you can
assign a variety of functions to access them
with ease (A81).
Face detection & tracking (A 58)
After detecting a subject's face, the camcorder
can focus on it and even track it. Furthermore,
the camcorder can be in manual focus but
switch to autofocus when a face is detected,
ensuring that important subjects are in focus.

4Creativity and Artistic Expression
Special recording modes (A36, 75)
When you make recordings, you can change
the recording frame rate to achieve a fast or
slow motion effect. Alternatively, you can use
pre-recording to record 3 seconds before you
decide to start recording, helping you capture
those hard-to-catch opportunities.
Looks (A49)
You can adjust various aspects of the picture,
such as the color depth, sharpness and
brightness, to create a desired “look”.
Custom picture settings (A83)
Select one of the preset color settings or set
the combination of gamma curve, color space
and color matrix that you wish to use. Then,
you can adjust a number of other image-
related parameters in detail.
Other Features
• Menu settings file that can be saved in the
camcorder or on an SD card to restore all the
menu settings or replicate them on another
HF G50 camcorder (A91).
• Battery packs compatible with Intelligent
System give you an estimate (in minutes) of
the remaining recording time.
• Compatibility with the optional GP-E2 GPS
Receiver to geotag your recordings (A78).
• Compatibility with the optional RC-V100
Remote Controller (A77) when you need a
professional level of remote control.

5
1 Introduction 7
About this Manual 7
Conventions Used in this Manual 7
Supplied Accessories 9
Names of Parts 10
2 Preparations 14
Attaching the Ferrite Core 14
Charging the Battery Pack 14
Preparing the Camcorder 17
Using the Lens Hood 17
Adjusting the LCD Screen 18
Using the Viewfinder 19
Grip Belt and Straps 19
Basic Operation of the Camcorder 21
Turning the Camcorder On and Off 21
Setting the Camera Mode 22
Using the MENU Button and
Joystick 22
First Time Settings 23
Setting the Date and Time 23
Changing the Language 24
Changing the Time Zone 24
Using the Menus 25
Setup Menus 25
FUNC Menu 26
Using SD Cards 28
Compatible SD Cards 28
Inserting and Removing an SD Card 29
Initializing an SD Card 30
Selecting the SD Card for
Recordings 30
Dual Recording and Relay Recording 30
Recovering Clips 31
3 Recording 32
Recording Clips and Photos 32
Basic Recording 32
Reviewing the Latest Clip Recorded 34
Video Configuration: Resolution, Bit Rate
and Frame Rate 35
Selecting the Resolution and Bit
Rate 35
Selecting the Frame Rate 35
Slow & Fast Motion Recording 36
Shooting Modes 37
Special Scene Modes 38
Exposure Adjustment 40
Manual Exposure (n) 40
Momentary Automatic Aperture - Push
Auto Iris 41
Automatic Exposure 41
Touch Exposure 42
Exposure Lock (AE Lock) 43
Exposure Compensation 43
ND Filter 44
Using the Zebra Pattern 44
Backlight Correction 45
Automatic Gain Control (AGC) Limit 46
White Balance 47
Using Looks 49
Zooming 50
Using the Focus/Zoom Ring 50
Using the Zoom Rocker 51
Using the Touch Screen’s Zoom
Controls 52
Using an Optional Remote Controller 52
Soft Zoom Control 53
Digital Tele-Converter 53
Focus Adjustment 54
Manual Focus 54
Autofocus 57
Face Detection & Tracking 58
Image Stabilization 60
Dynamic IS or Standard IS 60
Setting the Time Code 61
Selecting the Time Code Mode 61
Selecting Drop Frame or Non-Drop
Frame 63
Setting the User Bit 64
Using the Mini Advanced Shoe 65
Recording Audio 66
Using an External Microphone 66
Audio Scenes 67
Audio Recording Level (Built-in
Microphone/MIC Terminal) 68
Microphone Attenuator (Built-in
Microphone or External
Microphone) 69
Table of contents

7
Introduction
About this Manual
Thank you for purchasing the Canon VIXIA HF G50. Please read this manual carefully before you use
the camcorder and retain it for future reference. Should your camcorder fail to operate correctly, refer
to
Troubleshooting
( 117).A
Conventions Used in this Manual
• IMPORTANT: Precautions related to the camcorder’s operation.
• NOTES: Additional topics that complement the basic operating procedures.
•A: Reference page number within this manual.
• The following terms are used in this manual:
“SD card” refers to an SD, SDHC or SDXC memory card.
“Screen” refers to the LCD screen and the viewfinder screen.
“Clip” refers to one movie unit from the point you press the START/STOP button to start recording
until you press again to pause the recording.
• The photos included in this manual are simulated pictures taken with a still camera.
• Some screenshots in this manual have been simplified to show only relevant icons.
IMPORTANT
• Observe the following precautions while the ACCESS indicator is on or flashing. Failing to do so
may result in permanent data loss or damage to the memory.
- Do not disconnect the power source or turn off the camcorder.
- Do not open the SD card compartment cover.
- Do not change the camcorder’s camera mode.
- Do not set the camcorder to MEDIA mode.
- When a USB cable is connected to the camcorder, do not disconnect the USB cable.
1Introduction

About this Manual
8
Brackets [ ] are used to
refer to onscreen buttons
and menu options you will
select and to other
onscreen messages and
displays.
These icons indicate the camcorder’s operating mode and whether a function is available in that
mode.
: Indicates whether the
camcorder is in shooting (CAMERA) or
playback (MEDIA) mode. In this example, the
function is available only in mode. For
details, refer to
Turning the Camcorder On
and Off
(A21).
: Indicates the camera mode. For
details, refer to
Setting the Camera Mode
(A22).
The > arrow is used to abbreviate menu
selections. For details on how to use the
menus, refer to
Using the Menus
(A25).
For a summary of available menu options
and settings, refer to the appendix
Menu
Options
(A104).

Supplied Accessories
9
Supplied Accessories
The following accessories are supplied with the camcorder:
CA-570 Compact Power Adapter
(incl. power cord)
Ferrite core BP-820 Battery Pack
Lens hood with lens barrier Lens cap Quick Guide

Names of Parts
10
Names of Parts
1 Lens barrier switch (A32)
2 SD card slot 2 (A28)
3 SD card slot 3 (A28)
4u (review recording) button (A34)/
Assignable button 5 (A81)
5 Lens hood (A17)
6 Focus/Zoom ring (A50, 54)
7 CUSTOM (customizable) dial (A80)
8 CUSTOM (customizable) button
(A80)
9 SD card compartment cover
10 DISP (onscreen display) button
(A76)/BATT. INFO (battery
information) button (A16)
4
108765
1
32
9
Left side view

Names of Parts
11
1 Built-in speaker (A95)
2 MIC terminal (A66)
3 HDMI OUT terminal (A100, 100)
4 REMOTE terminal (A77)
For connecting commercially
available remote controllers.
5×(headphones) terminal (A73)
6 USB terminal (A78)
7 DC IN terminal (A14)
8 Grip belt (A19)
25
63
4
87
1
Right side view

Names of Parts
12
1 Instant AF sensor (A57, 127)
2 AF/MF button (A54)/
Assignable button 1 (A81)
3 PRE REC (pre-recording) button
(A75)/
Assignable button 2 (A81)
4 LCD touch screen (A18)
5 Focus/Zoom ring switch (A50, 54)
6 Viewfinder (A19)
7 Dioptric adjustment lever (A19)
8 Joystick/SET button (A22)
9 Strap mount (A19)
10 Assignable button 3 (A81)
11 Assignable button 4 (A81)
12 Battery attachment unit (A14)
13 START/STOP button (A32)
14 MENU button (A25)
15 Serial number
1
4 5
6
7
8
9
14
15
13121110
3
2
Front view
Back view

Names of Parts
13
1 Power switch (A21)
2 POWER / CHG (battery charging)
indicator (A14)
3 Built-in stereo microphone
(A66)
4 Accessory shoe
5 Camera mode switch (A22)
6 Grip zoom rocker (A51)
7 ACCESS indicator (A32)
8 Mini advanced shoe (A65)
9 Lens hood mount index mark
10 Tripod socket
For mounting the camcorder on a
tripod with a mounting screw 6.5 mm
(0.26 in.) or shorter.
11 BATTERY RELEASE switch (A15)
12 Eye cup (A19)
3
4
5
6
7
8
1
2
9
10
11
12
Top view Bottom view

14
Preparations
Attaching the Ferrite Core
Attach the enclosed ferrite core before you connect the compact power adapter to the camcorder.
Attaching the ferrite core to the compact power adapter cable is necessary to suppress RF
interference.
Attach the ferrite core to the cable about 6 cm (2.4 in.) from the
DC plug (the plug to be connected to the DC IN terminal).
Pass the cable through the center of the core and wrap it around the
core (as shown in the illustration), then close the unit until it clicks shut.
Charging the Battery Pack
The camcorder can be powered with a battery pack or directly using the supplied CA-570 Compact
Power Adapter.
1 Connect the compact power adapter to the
camcorder and plug the power cord into a power
outlet.
2 Attach the battery pack to the camcorder.
• Press the battery pack softly into the battery attachment
unit and slide it forward until it clicks in place.
DC IN terminal
2Preparations

Charging the Battery Pack
15
3 Charging will start when the camcorder is turned off.
• If the camcorder was on, the green POWER/CHG indicator
will go out when you turn off the camcorder. After a
moment, the POWER/CHG indicator will turn on in red
(battery pack charging). The red POWER/CHG indicator will
go out when the battery pack is fully charged.
• If the indicator flashes, refer to
Troubleshooting
(A119).
To remove the battery pack
1 Slide the BATTERY RELEASE switch in the direction of the
arrow and hold it pressed down (
햲).
2 Slide the battery pack and then pull it out (
햳).
IMPORTANT
• Turn off the camcorder before connecting or disconnecting the compact power adapter. After you
turn off the camcorder, important data is updated on the SD card. Be sure to wait until the green
POWER/CHG indicator goes out.
• When using the compact power adapter, do not fix it permanently to one place as this may cause a
malfunction.
• Do not connect to the camcorder’s DC IN terminal or to the compact power adapter any electrical
equipment that is not expressly recommended for use with this camcorder.
• To prevent equipment breakdowns and excessive heating, do not connect the supplied compact
power adapter to voltage converters for overseas travels or special power sources such as those on
aircraft and ships, DC-AC inverters, etc.
NOTES
• We recommend charging the battery pack in temperatures between 10 °C and 30 °C (50 °F and
86 °F). If either the ambient temperature or the battery pack’s temperature is outside the range of
approx. 0 °C to 40 °C (32 °F to 104 °F), charging will not start.
• The battery pack will be charged only when the camcorder is off.
• If the power supply was disconnected while charging a battery pack, make sure the POWER/CHG
indicator has gone out before restoring the power supply.
POWER/CHG (battery charging) indicator
BATTERY
RELEASE
switch

Charging the Battery Pack
16
• If remaining battery time is an issue, you can power the camcorder using the compact power
adapter so the battery pack will not be consumed.
• Charged battery packs continue to discharge naturally. Therefore, charge them on the day of use, or
the day before, to ensure a full charge.
• The first time you use a battery pack, fully charge it and then use the camcorder until the battery
pack is completely depleted. Doing so will ensure that the remaining recording time will be displayed
accurately.
• We recommend that you prepare battery packs to last 2 to 3 times longer than you think you might
need.
• For handling precautions regarding the battery pack, refer to
Safety Instructions and Handling
Precautions
(A123).
• For charging times and approximate usage times, refer to
Reference Tables
( 135).A
Checking the Remaining Battery Charge
With the camcorder turned off, press the BATT. INFO button to display for about 5 seconds a screen
showing the approximate battery charge level. Note that if the battery charge is too low, the battery
information screen may not appear.

Preparing the Camcorder
17
Preparing the Camcorder
This section covers the basic preparations for the camcorder such as attaching the lens hood,
adjusting the grip belt and adjusting the viewfinder and LCD screen.
IMPORTANT
• Be careful not to drop the camcorder when attaching, removing or adjusting the various
accessories. Using a table or other stable surface is recommended.
Using the Lens Hood
While recording, the supplied lens hood with lens barrier is
effective for reducing stray light that can be the cause of lens
flare and ghost images. Additionally, closing the lens barrier
can help prevent fingerprints and dirt accumulation on the
lens.
1 Remove the lens cap.
2 Align the mark on the lens hood with the lens hood
mount index mark on the bottom of the camcorder
(햲), and then turn the lens hood clockwise until it
stops with a click (햳).
• Be careful not to deform the lens hood.
• Make sure that the lens hood is aligned with the thread.
• To remove the lens hood, turn it counterclockwise.
NOTES
About the lens cap:
• Use the supplied lens cap when carrying the camcorder or storing it after use.
• Note that the lens cap and the lens hood with lens barrier cannot be used simultaneously.

Preparing the Camcorder
18
Adjusting the LCD Screen
Open the LCD panel 90 degrees.
• You can rotate the panel downward or toward the lens.
• Rotating the LCD toward the lens can be useful to allow the subject to monitor the LCD screen while
you use the viewfinder.
NOTES
• You can adjust the brightness of the LCD screen with the [>£ Display Setup] > [LCD
Brightness] or [LCD Backlight] setting. Also, you can hold the DISP button pressed down for more
than 2 seconds to change the [LCD Backlight] setting between bright and normal or from dim to
normal.
• Adjusting the brightness does not affect the brightness of recordings.
• Using a brighter setting will shorten the effective usage time of the battery pack.
• When the LCD panel is turned 180 degrees toward the subject, you can use the >
[£Display Setup] > [LCD Mirror Image] setting to reverse the screen’s image horizontally,
showing a mirror image of the subject.
• For details about how to take care of the LCD screen, refer to
Handling Precautions
( 124), A
Cleaning
(A127).
•About the LCD and viewfinder screens: The screens are produced using extremely high-precision
manufacturing techniques, with more than 99.99% of the pixels operating to specification. Very
rarely, pixels may misfire or may light up permanently as white dots. This has no effect on the
recorded image and does not constitute a malfunction.
Subject can monitor the LCD screen

Preparing the Camcorder
19
Using the Viewfinder
If it is difficult to use the LCD screen, you can use the viewfinder, which can be tilted 45 degrees
upward.
1 Use the power switch to turn on the camcorder.
(A21).
2 Close the LCD panel (햲).
3 Pull out the viewfinder and adjust the viewing angle
(햳).
4 Adjust the viewfinder using the dioptric adjustment
lever (햴).
NOTES
• You can adjust the brightness of the viewfinder with the > [£Display Setup] >
[Viewfinder Backlight] setting.
• Adjusting the brightness does not affect the brightness of recordings.
• Using a brighter setting will shorten the effective usage time of the battery pack.
• You cannot use the LCD screen and viewfinder simultaneously.
• Make sure you keep the eye cup attached when using the
camcorder.
If you wear glasses, you may find the viewfinder easier to
use if you flip back the outer edge of the eye cup toward the
camcorder body.
• For details about how to take care of the viewfinder, refer to
Handling Precautions
( 124), A
Cleaning
(A127).
Grip Belt and Straps
Fasten the grip belt.
• Adjust the grip belt so that you can reach the grip zoom
rocker with your index finger, and the START/STOP button
with your thumb.
햲
햴
햳
햳
Dioptric
adjustment
lever
Preparing the Camcorder
20
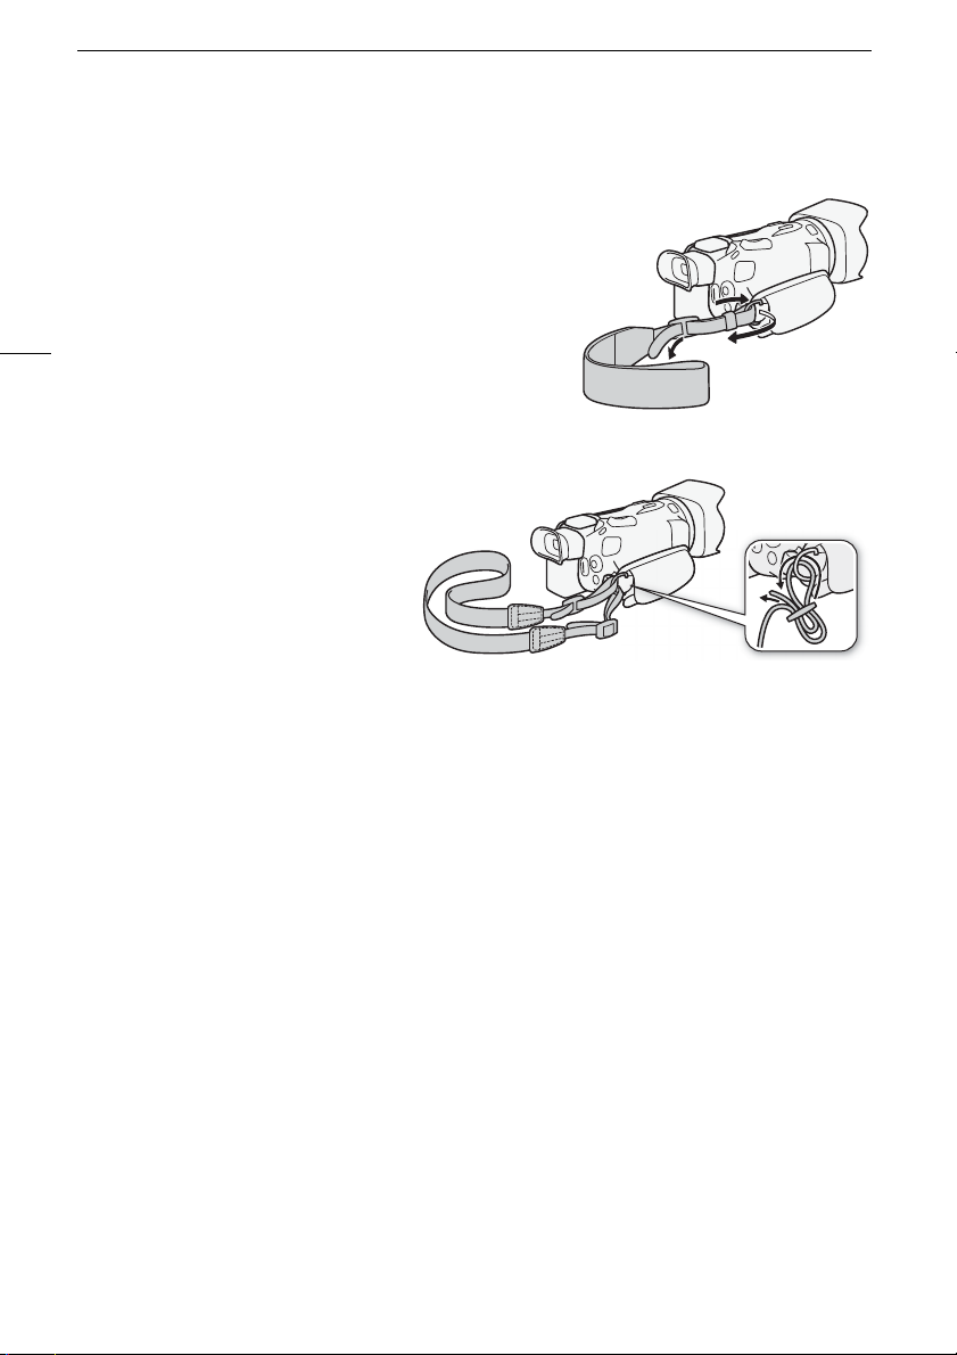
Attaching an optional wrist strap
Attach the wrist strap to the strap mount on the grip belt,
adjust the length and fasten.
• You can use both for extra convenience and protection.
Attaching an optional shoulder strap
Pass the ends of the shoulder strap
through the strap mount on the grip belt
and adjust the length of the strap.
Basic Operation of the Camcorder
21
Basic Operation of the Camcorder
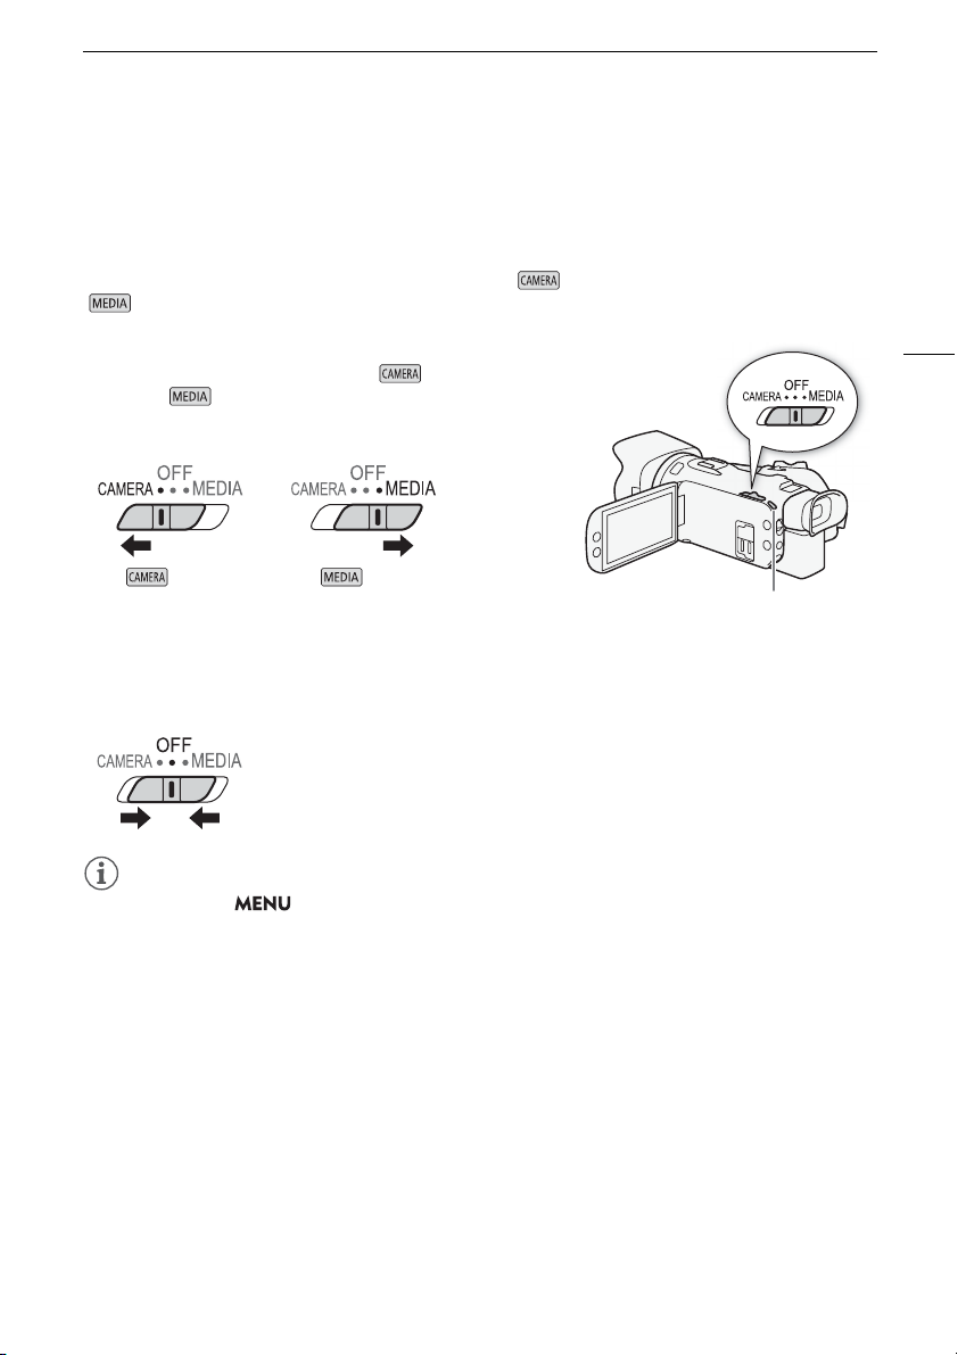
Turning the Camcorder On and Off
You can choose to turn the camcorder on in CAMERA ( ) mode for making recordings or MEDIA
( ) mode for playing back recordings. Select the mode using the power switch.
To turn on the camcorder
Set the power switch to CAMERA for mode (A32) or
MEDIA for mode (A92).
• The POWER/CHG indicator will illuminate in green.
To turn off the camcorder
Set the power switch to OFF.
• The POWER/CHG indicator will go out.
NOTES
• You can use the > [BSystem Setup] > [POWER LED] setting to prevent the POWER
indicator from illuminating.
POWER/CHG indicator
mode mode

Basic Operation of the Camcorder
22
Setting the Camera Mode
When making recordings, you can change the camera mode
to match your shooting style.
(Auto) mode
Set the camera mode switch to N. With this mode, the camcorder takes
care of all the settings while you concentrate on recording (A33). This
operating mode is suitable if you just prefer not to bother with detailed
camcorder settings.
(Manual) mode
Set the camera mode switch to n. With this mode, you can enjoy full access to
menus, settings and advanced functions.
Using the MENU Button and Joystick
You can navigate some of the camcorder’s menus and screens using the MENU button and joystick
instead of using the touch screen.
Joystick/SET button
When making a menu selection, push the joystick to
move the orange selection frame in the menu. Then,
press the joystick itself (in the manual, "press SET")
to select the menu item indicated by the orange
selection frame.
MENU button
Press the button to open the setup menus and then
press again to close the menu after adjusting desired
settings.

First Time Settings
23
First Time Settings
Setting the Date and Time
You will need to set the date and time of the camcorder before
you can start using it. The [Date/Time] screen will appear
automatically when the camcorder’s clock is not set.
1 Use the power switch to turn on the camcorder.
• The [Date/Time] screen will appear.
2 Touch a field you want to change (year, month, day, hours or minutes).
• You can also push the joystick (ÏÐ) to move between the fields.
3 Touch [Í Î] or [ ] to change the field as necessary.
• You can also push the joystick (ÍÎ) to change the field.
4 Set the correct date and time by changing all the fields in the same way.
5 Touch [Y.M.D], [M.D,Y] or [D.M.Y] to select the date format you prefer.
• In some screens, the date will be displayed in short form (numbers instead of month names or
only the day and month), but it will still follow the order you selected.
6 Touch [24H] to use 24-hour clock or leave it unselected to use 12-hour clock (AM/PM).
7 Touch [OK] to start the clock and close the setup screen.
NOTES
• With the following settings, you can change the time zone, date and time also after the initial setup.
You can also change the date format and clock format (12 or 24 hours).
- > > [BSystem Setup] [Time Zone/DST]
- > > [BSystem Setup] [Date/Time]
• When you do not use the camcorder for about 3 months, the built-in rechargeable lithium battery
may discharge completely and the date and time setting may be lost. In such case, recharge the
built-in lithium battery (A126) and set the time zone, date and time again.
• Using the optional GP-E2 GPS Receiver, you can have the camcorder adjust settings automatically
according to the UTC date/time information received from the GPS signal (A78).
Operating modes:

First Time Settings
24
Changing the Language
The default language of the camcorder is English. You can set
it to one of 27 languages.
Refer to
Setup Menus
(A25) for details on how to navigate
the menu for this procedure.
1 Open the [Language ] screen.
[ >B! System Setup] > [Language ]
2 Select the desired language and then select [OK].
3 Select [X] to close the menu.
NOTES
• Some onscreen buttons, such as [ZOOM], [FUNC] and [MENU], will appear in English regardless of
the language selected.
Changing the Time Zone
Change the time zone to match your location. The default setting is New York. In addition, the
camcorder is able to retain the date and time of an additional location. This is convenient when you
travel so that you can set the camcorder to match the time of your home location or that of your travel
destination.
Refer to
Setup Menus
(A25) for details on how to navigate the menu for this procedure.
1 Open the [Time Zone/DST] screen.
[ >B! System Setup] > [Time Zone/DST]
2 Select ["] to set the home time zone, or [#] to set the time zone of your destination
when you are traveling.
3 Select [Ï] or [Ð] to set the desired time zone. If necessary, select [$] to adjust for
daylight saving time.
4 Select [X] to close the menu.
Operating modes:
Operating modes:

Using the Menus
25
Using the Menus
The camcorder’s functions can be adjusted from the setup menus, accessed by pressing the MENU
button, or from the FUNC menu, accessed by touching or selecting the onscreen [FUNC] button. For
details about the available menu options and settings, refer to
Menu Options
( 104).A
Setup Menus
Following is a step-by-step explanation of how to select a typical option from the setup menus. Some
menu items may require additional steps. Such operations will be explained in the respective section of
the manual.
For brevity's sake, references to menu settings throughout the manual may be abbreviated as follows:
> [B! System Setup] > [Language ] > Desired option
To use the touch panel
1 Press the MENU button.
2 Touch the icon of the desired setup menu from the top row.
• In the example, the B icon, corresponding to the [System Setup] menu.
3 Touch the desired menu item ([Language ], in the example).
• If the desired menu item does not appear in the menu page displayed, drag your finger left/right
to scroll through other menu pages.
• For main procedures, the page number may be given in the manual (!, in the example). If you
know the page number, you can touch the number icon on the top left of the screen to open
directly the desired menu page.
• The page number may differ depending on whether the camcorder is in mode or
mode. Throughout the manual, procedures for functions that can be used in both modes give the
page number in mode.
4 Touch the desired setting option and then touch [X] to close the menu.
• You can touch [L] to return to the previous menu page.

Using the Menus
26
To use the joystick
1 Press the MENU button.
2 Push the joystick (Þ) to select the icon of the desired setup menu.
• In the example, the B icon, corresponding to the [System Setup] menu.
• If one of the icons in the top row is not selected when you open the menu, first push the joystick
(Ý) to move the orange selection frame to one of the icons.
3 Push the joystick (Ý) to select the desired menu item ([Language ], in the example)
and then press SET.
• If the desired menu item does not appear in the menu page displayed, push the joystick (Þ)
to scroll through other menu pages.
• For main procedures, the page number may be given in the manual (!, in the example), making
it easier to find the desired menu page.
4 Push the joystick (Ý) to select the desired setting option and then press SET.
5 Press the MENU button to close the menu.
• You can push the joystick to highlight the [L] button and press SET to return to the previous
menu page. You can also highlight the [X] button and press SET to close the menu.
NOTES
• Touching [X] or pressing the MENU button at any time closes the menu.
• Unavailable items may appear grayed out.
FUNC Menu
In mode, the FUNC menu offers a quick way to control various shooting related functions such
as white balance, exposure, focus, etc. Available functions are more limited in mode.
To use the touch panel
1 Touch [FUNC] on the shooting screen.
2 Touch the icon of the desired function on the
left column.
• If necessary, touch [ ]/[ ] to scroll up/down.
3 Touch the icon of the desired setting on the
bottom row.
4 Touch [X L] to close the FUNC menu or [ ] to
return to the left column.
FUNC menu in mode

Using the Menus
27
To use the joystick
1 On the shooting screen, push the joystick to select [FUNC] and then press SET.
2 Push the joystick (Ý) to select the desired icon from the left column and then press SET.
3 Push the joystick (Þ) to select the desired icon from the bottom row and then press
SET.
• To select a value from an adjustment dial, first push the joystick (Î) to highlight the dial in orange
and then (Þ) to select the desired value.
4 Select [X] to close the FUNC menu or [L] to return to the left column.
• From the left column, push the joystick (Ð) to select the [X] icon and then press SET. From the
bottom row, push the joystick (Í) once and then (Þ) to select the desired icon.
NOTES
• Depending on the selected function, other buttons, adjustment dials, and other controls may
appear on the screen. These are explained in the respective section of the manual.

Using SD Cards
28
Using SD Cards
The camcorder records clips and photos on commercially available Secure Digital (SD) cards1. The
camcorder has two SD card slots and you can use two SD cards (in the manual, "SD card A" and "SD
card B") to record on both simultaneously or to automatically switch to the other SD card when the SD
card in use is full (A30).
Initialize SD cards (A30) when you use them with this camcorder for the first time.
1The SD card is used also to save custom picture files and menu settings files.
Compatible SD Cards
The following types of SD cards2 can be used with this camcorder. For the latest information about SD
cards tested for use with this camcorder, visit your local Canon website.
2As of February 2019, the clip recording function has been tested using SD cards made by Panasonic,
Toshiba and SanDisk.
3UHS and SD Speed Class are standards that indicate the minimum guaranteed data transfer rate of SD
cards.
To record 4K clips with a resolution of 3840x2160 (A35) or using slow & fast motion recording
(A36), we recommend using SD cards rated UHS Speed Class U3.
IMPORTANT
• After repeatedly recording, deleting and editing clips (if the SD card is fragmented), you may notice
slower writing speeds to the card and recording may even stop. In such case, save your recordings
and initialize the card with the camcorder. Be sure to initialize SD cards especially before shooting
important scenes.
•About SDXC cards: You can use SDXC cards with this camcorder but SDXC cards are initialized by
the camcorder using the exFAT file system.
- When using exFAT-formatted cards with other devices (digital recorders, card readers, etc.), make
sure that the external device is compatible with exFAT. For more information on compatibility,
contact the computer, operating system or card manufacturer.
- If you use exFAT-formatted cards with a computer OS that is not exFAT-compatible, you may be
prompted to format the card. In such case, cancel the operation to prevent data loss.
NOTES
• Proper operation cannot be guaranteed for all SD cards.
SD card type: . / 0
SD cards SDHC cards SDXC cards
SD Speed Class3:
UHS Speed Class
3:
Speed Class U1 Speed Class U3

Using SD Cards
29
Inserting and Removing an SD Card
1 Turn off the camcorder (햲).
• Make sure the POWER/CHG indicator is off.
2 Open the SD card compartment cover (햳).
3 Insert the SD card straight, with the label facing the
front of the camcorder, all the way into one of the SD
card slots (햴).
• You can also use two cards, one in each SD card slot.
4 Close the SD card compartment cover.
• Do not force the cover closed if the SD card is not correctly
inserted.
To remove the SD card
1 Make sure the ACCESS indicator is off.
2 Push the SD card once to release it. When the SD card springs out, pull it all the way out.
ACCESS (SD card access) indicator
If you set > [BSystem Setup] > [ACCESS LED] to [j Off], the ACCESS indicator will not
illuminate.
IMPORTANT
• Turn off the camcorder before inserting or removing an SD card. Inserting or removing a card with
the camcorder on may result in permanent data loss.
• SD cards have front and back sides that are not interchangeable. Inserting an SD card facing the
wrong direction can cause a malfunction of the camcorder. Be sure to insert the SD card as
described in step 3.
SD card access indicator SD card status
Red (on or flashing) Accessing the SD card(s).
Off Neither SD card is being accessed or no SD cards are
inserted in the camcorder.

Using SD Cards
30
Initializing an SD Card
Initialize SD cards when you use them with this camcorder for the first time. You can also initialize a
card to permanently delete all the recordings it contains.
1 Select [Initialize] for the desired SD card.
[ >3" Recording Setup] > [Initialize 8 6] > [ Mem. Card A] or
[7 Mem. Card B] > [Initialize]
2 Select [Yes].
3 When the confirmation message appears, select [OK] and then select [X].
IMPORTANT
• Initializing an SD card will permanently erase all recordings. Lost data cannot be recovered. Make
sure you save important recordings in advance (A102).
• Depending on the SD card, the initialization may take up to a few minutes.
Selecting the SD Card for Recordings
You can select the SD card on which clips and photos will be recorded.
1 Select [Recording Media].
[ >3! Recording Setup] > [Recording Media]
2 Select the desired SD card ([6 Mem. Card A] or [7 Mem. Card B]) for recording clips
([v Rec Media for Movies]) and/or photos ([{ Rec Media for Photos]).
3 Select [X].
• After closing the menu, the icon of the SD card selected for recording clips will appear on the
screen.
Dual Recording and Relay Recording
The camcorder features two convenient recording methods that can be used when both card slots
contain an SD card: dual recording and relay recording.
Dual recording: This function records the same clip simultaneously to both SD cards, which is a
convenient way to make a backup copy of your recordings while you record.
Relay recording: This function allows you to continue recording on the other SD card without
interruption when the SD card you are using becomes full.
1 Select [Dual/Relay Recording].
[ >3! Recording Setup] > [Dual/Relay Recording]
Operating modes:
Operating modes:
Operating modes:

Using SD Cards
31
2 Select [ Dual Recording] or [ Relay Recording] (or [ Relay Recording]) and then 4
select [X].
• When dual recording is activated, the status of both SD cards will appear at the top right of the
screen.
• Select [Standard Recording] to not use either function.
NOTES
• Relay recording is available from SD card slot A to SD card slot B, and vice versa, but the switch will
be performed only once.
• After saving to a computer relay clips that were originally recorded on different SD cards, you can
use the MP4 Join Tool to join the files and save them as a single clip (A 102).
• If an SD card becomes full during dual recording, recording on both cards will stop. On the other
hand, if an error occurs with one of the SD cards, recording will continue on the other card.
• Dual recording cannot be used together with slow & fast motion recording.
Recovering Clips
Some actions, such as suddenly turning off the camcorder or removing the SD card while data is
being recorded, can cause data errors in the recorded clip. You may be able to recover clips with
corrupted data with the following procedure.
1 Open the index screen with the clip you wish to recover (A92).
2 Select the corrupted clip (a clip with the icon instead of a thumbnail image).
3 When prompted to recover the data, select [Yes].
• The camcorder will attempt to recover the corrupted data.
4 When the confirmation message appears, select [OK].
NOTES
• In the index screen, recovered clips appear with a special playback icon instead of the usual
thumbnail.
• This procedure may delete clips shorter than 0.5 seconds in length.
• In some cases, it may not be possible to recover the data. This is more likely when the file system is
corrupted or the SD card is physically damaged.
• Only clips recorded with this camcorder can be recovered. Photos cannot be recovered.
Operating modes:
32
Recording
Recording Clips and Photos
This section explains the basics of recording clips* and photos. For details on recording audio, refer to
Recording Audio
( 66). A
Before making important recordings for the first time, make test recordings using the video
configuration(s) you plan to use to check that the camcorder operates correctly. Should the camcorder
fail to operate correctly, refer to
Troubleshooting
( 117).A
* “Clip” refers to a single movie unit recorded with a single recording operation.
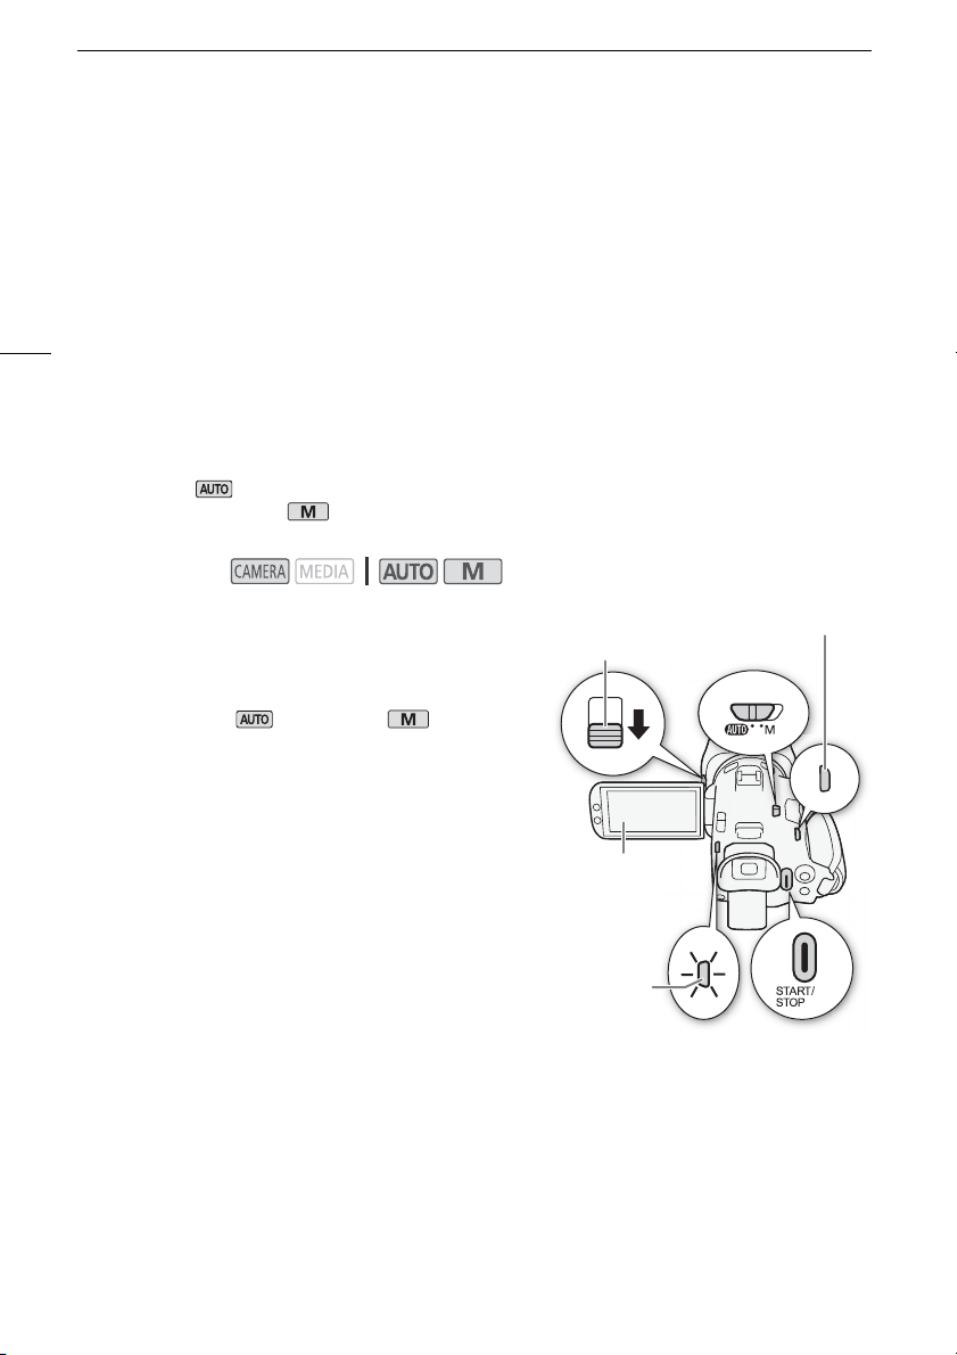
Basic Recording
When you use mode to shoot video and take photos, the camcorder will automatically adjust
various settings for you. In mode, you can manually adjust the focus, exposure and many other
settings according to your needs and preferences.
1 Open the lens barrier.
• Set the lens barrier switch to OPEN.
2 Set the camera mode switch to the desired
position.
• Set it to N ( mode) or ( mode), n
according to how you want to use the camcorder.
3 Set the power switch to CAMERA.
• The POWER/CHG indicator will illuminate in green.
To record video
Press the START/STOP button to begin recording.
• During recording, Ü will appear on the screen.
• The ACCESS indicator will flash from time to time while
the clip is being recorded.
• Press the START/STOP button again to pause the
recording. Ü will change to Ñ and the clip will be
recorded on the SD card selected for recording clips. The
camcorder will enter record standby mode.
To take photos
During record standby mode, touch [PHOTO].
• In the lower center of the screen, a green icon (g) will appear. Also, in the upper right of the screen,
{Ð will appear with the icon of the SD card selected for recording photos. The ACCESS indicator
will illuminate momentarily as the photo is being recorded.
Operating modes:
[PHOTO]
Lens barrier
switch
POWER/CHG
indicator
ACCESS indicator
3Recording
Recording Clips and Photos
33
When you have finished recording
1 Set the lens barrier switch to CLOSED to close the lens barrier.
2 Make sure that the ACCESS indicator is off.
3 Set the power switch to OFF.
4 Close the LCD panel and return the viewfinder to its retracted position.
IMPORTANT
• Be sure to save your recordings regularly ( 102), especially after makiAng important recordings.
Canon shall not be liable for any loss or corruption of data.
NOTES
• You can set > [3Recording Setup] > [Rec Command] and [HDMI Time Code] to
[iOn] to use the camcorder’s START/STOP button to control also the recording operation of a
compatible external recorder connected to the HDMI OUT terminal. (When [Rec Command] is set to
[i On], power saving mode ( > [BSystem Setup] > [Auto Power Off]) will not be
available.)
• The maximum continuous recording time of a single clip is 6 hours. After that, a new clip will be
created automatically and recording will continue as a separate clip.
•About mode: When the camcorder is in mode, it will automatically adjust settings such
as focus, exposure (aperture, shutter speed and gain) and white balance, depending on the scene
being shot. Additionally, when a subject's face is detected, the camcorder will automatically keep
the subject in focus and optimize the exposure.
• A video recording will be saved as separate clips in the following cases:
- When the camcorder switches to the other SD card while recording video due to the relay
recording function (A30).
- The video (stream) file in the clips will be split approximately every 4 GB. Playback with the
camcorder will be continuous.
After saving the separate split clips to a computer, you can use the MP4 Join Tool to join the files
and save them as a single clip (A102).
•About the power saving mode: If > [BSystem Setup] > [Auto Power Off] is set to
[iOn], the camcorder will shut off automatically to save power when it is powered by a battery
pack and is left without any operation for 5 minutes. Use the power switch to turn on the
camcorder.
• Photos are recorded as JPG files. The camcorder can take photos during record standby mode.
• Photos cannot be recorded when pre-recording is activated.
• When recording in bright places, it may be difficult to use the LCD screen. In such case, use the
viewfinder or adjust the brightness of the screen (A110).
• When you need to record for a long time with the camcorder set on a tripod, you can close the LCD
panel and use only the viewfinder in order to save power when using a battery pack (A19).

Recording Clips and Photos
34
Reviewing the Latest Clip Recorded
You can review the last 4 seconds of the last clip recorded with the camcorder without switching to
mode. While reviewing the clip, there will be no sound from the built-in speaker.
1 Record a clip.
2 After you finish recording a clip, press the u
button.

Video Configuration: Resolution, Bit Rate and Frame Rate
35
Video Configuration: Resolution, Bit Rate and Frame Rate
With the following procedures you for recording clips. Select the can set the video configuration used
combination of resolution/bit rate and frame rate settings that best matches your creative needs. The
color sampling will be YCbCr 4:2:0, 8 bit. Available options for some settings may change depending
on previous selections for other settings. See the table following the procedures for a summary.
For details on recording audio, refer to
Recording Audio
(A 66).
Selecting the Resolution and Bit Rate
1 Select [¸ Resolution].
[ >3 ! Recording Setup] > [¸ Resolution]
2 Select the desired option and then select [X].
• The selected resolution and bit rate will appear at the right of the screen.
Selecting the Frame Rate
1 Select [¸ Frame Rate].
[ >3 ! Recording Setup] > [¸ Frame Rate]
2 Select the desired option and then select [X].
• The icon of the selected frame rate will appear at the right of the screen.
Available video configuration settings
NOTES
• The camcorder uses a variable bit rate (VBR).
• For details on approximate recording times, refer to
Approximate recording times
( 135).A
Operating modes:
Resolution (Bit rate*) Frame rate
5 . 2 .9 94P 9 97P 23.98P
3840x2160 (150 Mbps) — ● ●
1920x1080 (35 Mbps) ● ● ●
1920x1080 (17 Mbps) ● ● ●
1280x720 (8 Mbps) ● — —
Slow & Fast Motion Recording
36
Slow & Fast Motion Recording
You can record clips that have a slow motion or fast motion effect during playback, simply by selecting
the desired slow/fast motion rate. Available slow/fast motion rates will vary depending on the
resolution and frame rate currently selected. Sound is not recorded when slow & fast motion recording
is activated.
1 Select [Slow & Fast Motion].
[ >3 ! Recording Setup] > [Slow & Fast Motion]
2 Select the desired slow & fast motion rate and then select [X].
• Select [j] to turn off slow & fast motion recording.
• or and the selected rate will appear on the right of the screen.
Available slow/fast motion rates
NOTES
• Slow & fast motion recording cannot be used together with the following functions.
• The maximum continuous recording time of a single clip using slow motion recording is the
equivalent of 6 hours of playback time, at which point, recording will stop. Consequently, it differs
depending on the slow motion rate used. For example, when the [x0.5] rate is selected, the
maximum continuous recording time will be 3 hours (which, played back at x0.5 slow motion, equal
6 hours of playback time). Conversely, fast motion recording will not stop in such a way.
• Changing the video configuration will deactivate slow & fast motion recording.
• While slow & fast motion recording is activated, the recording command signal will not be output
from the HDMI OUT terminal.
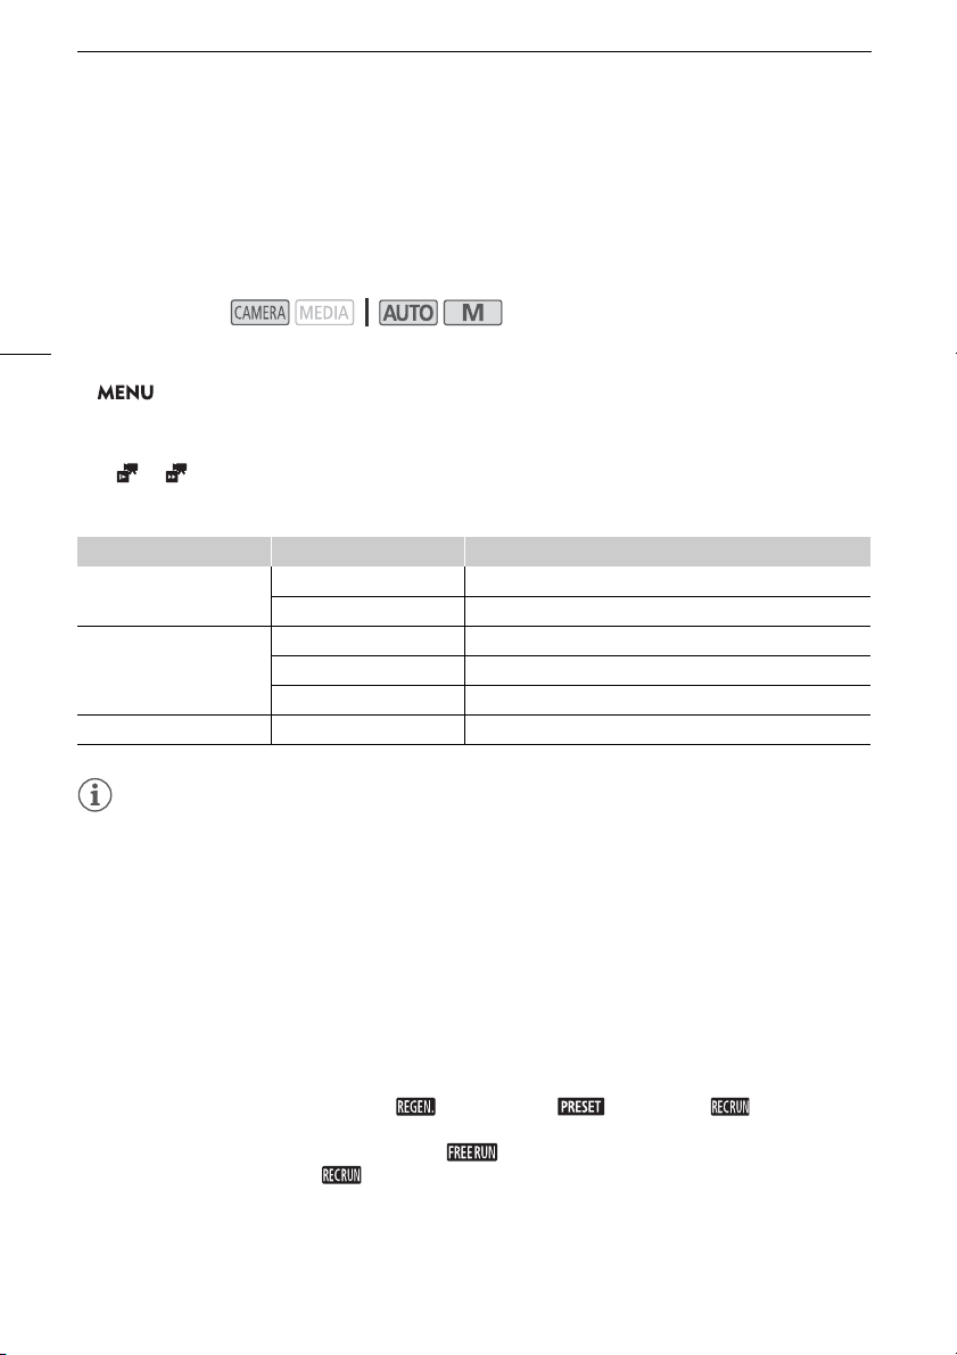
• About the time code when slow & fast motion recording is activated:
- The time code mode can be set to [ Regen.], or to [ Preset] with [ Rec Run]
running mode.
- If the time code running mode was set to [ Free Run], the time code running mode will be
changed automatically to [ Rec Run] when slow & fast motion recording is activated.
- When slow & fast motion recording is turned off, the time code running mode will return to its
previous setting.
- The time code signal cannot be output from the HDMI OUT terminal.
Operating modes:
Resolution Frame rate Available slow/fast motion rates
3840x2160 29 9 6 6. 7P x2, x4, x10, x20, x 0, x120, x 00, x1200
23. 8P9 x0.8
1 5 .920x1080 9 94P x2, x4, x10, x20, x60, x120, x600, x1200
2 .9 97P x0.5
23. 8P9 x0.4, x0.8
1280x720 5 .9 94P x2, x4, x10, x20, x60, x120, x600, x1200
- Dual recording
- Relay recording
- Pre-recording
- Color bars
Shooting Modes
37
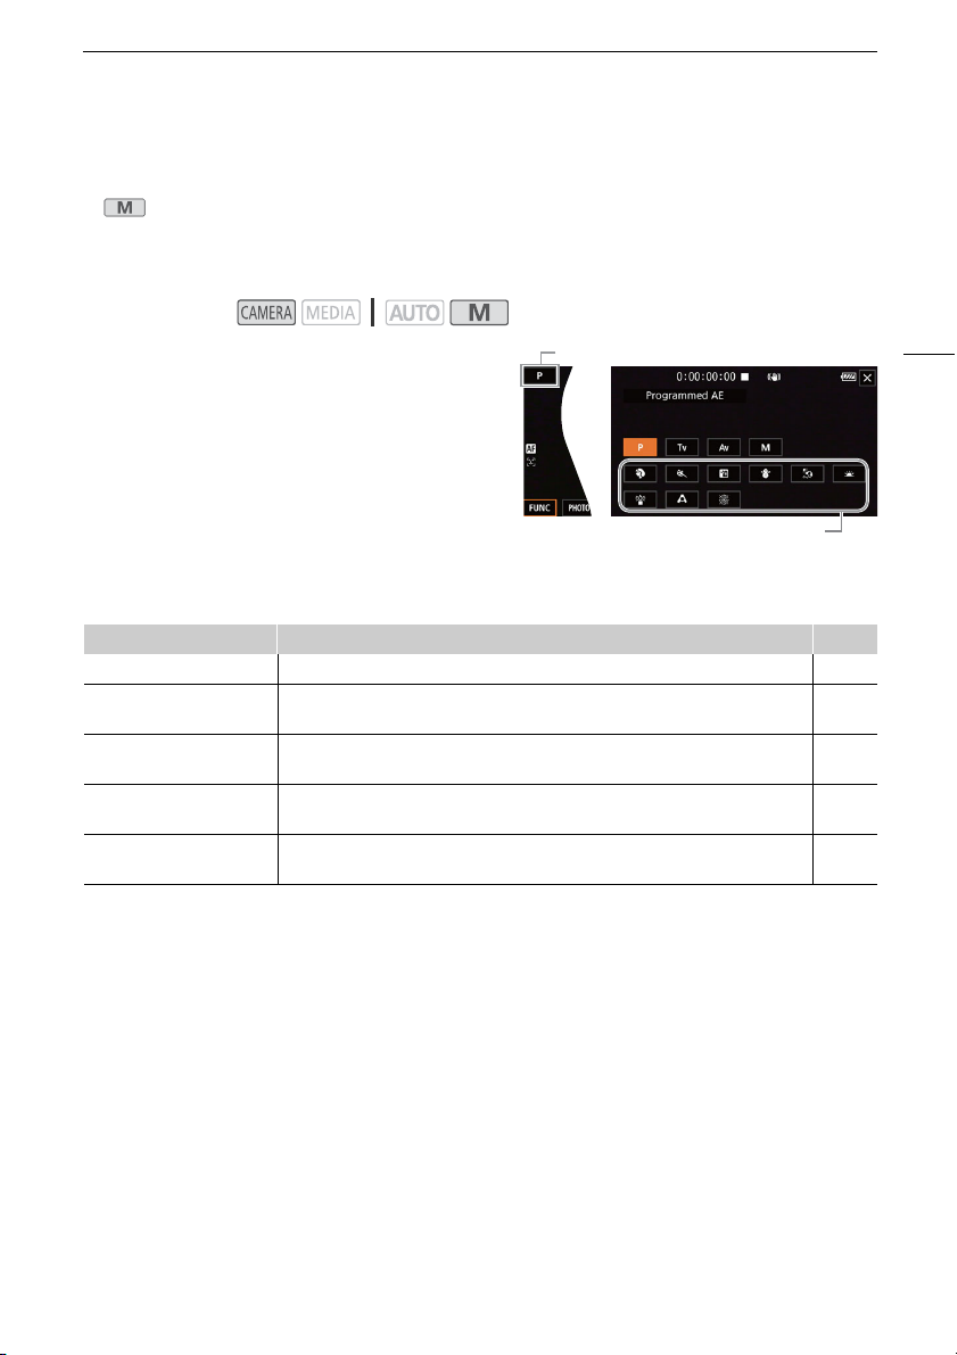
Shooting Modes
In mode, the camcorder offers a number of shooting modes that give you varying degrees of
control over the camcorder’s settings. Select the shooting mode most appropriate to your needs or
creative vision and adjust manually those settings you wish to control, letting the camcorder take care
of the rest.
1 Select the shooting mode button.
2 Select the desired shooting mode and then
select [X].
• The shooting mode button will show the selected
mode's icon.
Available shooting modes
For details on shooting modes other than Special Scene modes, refer to Exposure Adjustment
(A 40).
Operating modes:
Shooting mode Description A
’ (Programmed AE) The camcorder automatically sets the shutter speed, aperture and gain. 41
‚ (Shutter Priority AE) You manually set the shutter speed while the camcorder automatically adjusts
the aperture and gain.
41
“ (Aperture Priority AE) You manually set the aperture and ND filter while the camcorder automatically
adjusts the shutter speed and gain.
42
n (Manual Exposure) You manually set the shutter speed, aperture and gain, giving you full control
over the exposure.
40
Special Scene modes These modes offer preset combinations of settings optimized for specific
situations.
38
Shooting mode button
Special Scene modes

Shooting Modes
38
Special Scene Modes
Using a Special Scene mode can be an easy and convenient alternative to adjusting detailed exposure
settings.
[HPortrait] The camcorder uses a large aperture, to achieve a sharp focus
on the subject while blurring the background.
[ûSports] To record sports scenes, such as sporting events or dance
scenes.
[Q Night Scene] To record nightscapes with lower noise.
[K Snow] To record in bright ski resorts without the subject being
underexposed.
[L Beach] To record on a sunny beach without the subject being
underexposed.
[M Sunset] To record sunsets in vibrant colors.
[R Low Light] To record in low-light situations.
[S Spotlight] To record spotlit scenes.

Shooting Modes
39
NOTES
• [H K LPortrait]/[û Sports]/[ Snow]/[ Beach]: The picture may not appear smooth during
playback.
• [H Portrait]: The blur effect of the background increases the more you zoom in (S).
• [K LSnow]/[ Beach]: The subject may become overexposed on cloudy days or in shaded places.
Check the image on the screen.
• [R Low Light]:
- Moving subjects may leave a trailing afterimage.
- Picture quality may not be as good as in other modes.
- White points may appear on the screen.
- Autofocus may not work as well as in other modes. In such case, adjust the focus manually.
• [R TLow Light]/[ Fireworks]: To avoid camcorder blur (blur due to the camcorder moving) we
recommend using a tripod.
[T Fireworks] To record fireworks.

Exposure Adjustment
40
Exposure Adjustment
At times, the overall exposure obtained automatically by the camcorder may not be best for your shot.
You can select a shooting mode that will give you a varying amount of control over the aperture,
shutter speed and gain, from partial to full control, while the camcorder automatically adjusts the
settings that you do not.
Manual Exposure (n)
This shooting mode gives you the most control over shooting settings as you can set the aperture,
shutter speed and gain to get the exposure that you want.
1 Set the shooting mode to [n Manual Exposure] (A 37).
• The aperture value, shutter speed and gain value will appear at the left of the screen.
2 Set the aperture, shutter speed and gain.
Aperture: [FUNC] > [ Aperture]
Shutter speed: [FUNC] > [ Shutter Speed]
Gain: [FUNC] > [ Gain]
• An adjustment dial will appear on the screen.
3 Drag your finger along the dial to set the desired value.
• You can select [ ] to display the zebra pattern (A 44, step 2) and check for overexposed
areas.
4 Repeat steps 2 and 3 as necessary to adjust the exposure to the desired level.
5 Select [X].
Available settings
1Available values depend on the zoom position. Aperture values displayed on the screen are for
reference only.
2During slow & fast motion recording, available values will vary depending on the selected slow/fast
motion rate.
3Only when the frame rate is 23.98P.
Operating modes:
Aperture
1F1.8, F2.0, F2.2, F2.4, F2. , F2.8, F3.2, F3.4, F3.7, F4.0, F4.4, F4.8, F5.2, F5. , F6 6 6.2, F6.7, F7.3,
F8.0
ND filter When the aperture value is F4.0 or higher: ND1/2, ND1/4, ND1/8
Shutter speed
21/63, 1/8, 1/ , 1/10, 1/12, 1/15, 1/17, 1/20, 1/24, 1/25, 1/30, 1/34, 1/40, 1/48, 1/50, 1/9 60, 1/75,
1/90, 1/100, 1/120, 1/150, 1/180, 1/210, 1/250, 1/300, 1/360, 1/420, 1/500, 1/600, 1/720, 1/840,
1/1000, 1/1200, 1/1400, 1/1700, 1/2000
Gain 0.0 dB to 24.0 dB (1-dB increments)

Exposure Adjustment
41
NOTES
• You can adjust the aperture, shutter speed and gain using the CUSTOM dial (A 80).
Momentary Automatic Aperture - Push Auto Iris
If you set an assignable button to [Push Auto Iris] (A 81), you can press the button to have the
camera temporarily take control and adjust the aperture automatically for an optimal exposure.
When the [ND Filter] setting (A 44) is set to [k Automatic], the combination of aperture value and
ND filter is automatically adjusted for an appropriate exposure level.
1 Set an assignable button to [Push Auto Iris] (A 81).
2 Press and hold the button.
• The camera will automatically adjust the aperture to obtain optimal exposure as long as you hold
the button pressed down, and
E
will appear on the screen next to the aperture value.
• When you release the button the aperture value will be set, automatic aperture mode will end and
the
E
icon will disappear.
Automatic Exposure
Programmed AE (’)
The camcorder automatically sets the shutter speed, aperture and gain (for clips) but you will have the
option to use other functions that are not available in mode.
Set the shooting mode to [’ Programmed AE].
Shutter Priority AE (‚)
With this shooting mode you set the shutter speed manually, for example, to capture fast-moving
subjects in sharp focus or to obtain a brighter image in low-light situations. The camcorder will
automatically adjust other settings to obtain the best exposure.
1 Set the shooting mode to [‚ Shutter-Pri. AE] (A 37).
• The shutter speed will appear at the left of the screen.
2 Open the shutter speed screen.
[FUNC] > [ Shutter Speed]
• An adjustment dial will appear on the screen.
• You can select [ ] to display the zebra pattern (A 44, step 2) and check for overexposed
areas.
The exposure bar
When the shooting mode is set to n, the exposure bar will appear
on the screen, showing the optimal automatic exposure and
current exposure. When the difference between current and
optimal exposure is larger than ±2 EV, the indicator will flash at the
edge of the exposure bar.
Optimal exposure AE±0
Current exposure

Exposure Adjustment
42
3 Drag your finger along the dial to set the desired shutter speed.
• You can also adjust the shutter speed using the CUSTOM dial (A 80).
• For available shutter speeds, see the manual exposure table (A 40).
4 Select [X].
Aperture Priority AE (“)
With this shooting mode you set the aperture value manually to control the depth of field, for example,
in order to defocus the background and make the subject stand out more. The camcorder will
automatically adjust other settings to obtain the best exposure.
1 Set the shooting mode to [“ Aperture-Pri. AE] (A 37).
• The aperture value will appear at the left of the screen.
2 Open the aperture screen.
[FUNC] > [ Aperture]
• An adjustment dial will appear on the screen.
• You can select [ ] to display the zebra pattern (A 44, step 2) and check for overexposed
areas.
3 Drag your finger along the dial to set the desired aperture value.
• You can also adjust the aperture value using the CUSTOM dial (A 80).
• For available aperture values, see the manual exposure table (A 40)
4 Select [X].
NOTES
• When the shooting mode is set to ‚ or “, depending on the brightness of the subject, the
camcorder may not be able to set the appropriate exposure. In such case the shutter speed (‚) or
aperture value (“) will flash on the screen. Change the aperture/shutter speed as necessary.
Touch Exposure
You can touch the screen to optimize the exposure for a specific subject or area. The camcorder will
automatically adjust the exposure for the selected point and lock the exposure settings. You can even
touch a bright area of the image to try to avoid overexposure (Highlight AE). This function can only be
used when the shooting mode is set to ’ ‚ “, , or one of the Special Scene modes, except for
[T Fireworks].
1 Open the exposure screen.
[FUNC] > [y Exposure Comp.]
• An adjustment dial will appear on the screen.
• You can select [ ] to display the zebra pattern (A 44, step 2) and check for overexposed
areas.
2 To use the Highlight AE function, change the touch exposure settings.
[i] > [ Highlights] > [L]

Exposure Adjustment
43
3 Touch the desired area on the LCD screen to optimize and lock the exposure.
• The I mark will flash and the exposure will be adjusted automatically so the area you touched
will be correctly exposed.
• The exposure compensation valu screen. In addie ±0 and will appear on the tion, [ ] will
indicate that the exposure is locked.
• Select [ ] to return the camcorder to automatic exposure.
4 If necessary, drag your finger along the dial to compensate the exposure.
• You can select a compensation level from –3 to +3 in 1/4 increments.
5 Select [X].
• The exposure compensation value and will appear at the left of the screen.
Exposure Lock (AE Lock)
You can lock the current exposure settings and use them even when you reframe the picture. This
function can only be used when the shooting mode is set to ’ ‚ “, , or one of the Special Scene
modes, except for [T Fireworks].
1 Open the exposure screen.
[FUNC] > [y Exposure Comp.]
• An adjustment dial will appear on the screen.
• You can select [ ] to display the zebra pattern (A 44, step 2) and check for overexposed
areas.
2 Select [ ] to lock the current exposure.
• The exposure compensation valu screen. In addie ±0 and will appear on the tion, [ ] will
indicate that the exposure is locked.
• Select [ ] again to return the camcorder to automatic exposure.
3 Drag your finger along the dial to further compensate the exposure.
• You can select a compensation level from –3 to +3 in 1/4 increments.
• Depending on the brightness of the image and the exposure locked, some values may not be
available and the available exposure compensation range may differ.
4 Select [X].
• The exposure compensation value and will appear at the left of the screen.
Exposure Compensation
You can compensate the exposure that was set using automatic aperture, in order to darken or lighten
the image.
This function can only be used when the shooting mode is set to ’ ‚, or “.
1 Open the exposure screen.
[FUNC] > [y Exposure Comp.]
• If the exposure was locked, select [ ] to unlock the automatic exposure.
• An adjustment dial will appear on the screen.
• You can select [ ] to display the zebra pattern (A 44, step 2) and check for overexposed
areas.

Exposure Adjustment
44
2 Drag your finger along the dial to compensate the exposure.
• You can select a compensation level from –2 to +2 in 1/4 increments.
3 Select [X].
• [AE] and the exposure compensation value will appear at the left of the screen.
NOTES
• You can adjust the exposure compensation value using the CUSTOM dial (A 80).
• The locked exposure will return to automatic exposure in the following cases:
- When the power switch or camera mode switch is operated.
- When the shooting mode is changed.
- When the video configuration is changed.
- When the custom picture function is turned on/off or the [Gamma/Color Space] setting is
changed.
ND Filter
Using the ND filter allows you to open up the aperture to obtain a shallower depth of field even when
recording in bright surroundings. You can also use the ND filter to avoid the soft focus caused by
diffraction when using small apertures. The ND filter can be set when the aperture value is F4.0.
This function can only be used when the shooting mode is set to ’ ‚ “, , or n.
1 Select [ND Filter].
[ >v # Camera Setup] > [ND Filter]
2 Select the desired option and then select [X].
ND filter operation
NOTES
• The ND filter is not available with the [T Fireworks] Special Scene mode.
• The ND filter will be set to [k Automatic] when the camera mode is or the shooting mode is
set to a Special Scene mode (except for [T Fireworks]).
Using the Zebra Pattern
You can use the zebra pattern to identify areas that might be overexposed, so you can correct the
exposure appropriately. The camcorder offers two levels of zebra pattern: With 100% only areas that
will lose detail in the highlight areas will be identified, while 70% will identify also areas that are
dangerously close to losing detail.
ND filter option Shooting mode Description
[k Automatic] “ n, When the aperture value is F4.0, you can select the ND filter setting manually.
’, ‚ The camcorder will use the ND filter automatically for automatic exposure.
[j Off] “, n The ND filter will not be used.
’, ‚ The camcorder will not use the ND filter for automatic exposure.

Exposure Adjustment
45
1 Select the aperture, shutter speed, gain or exposure compensation.
Aperture: [FUNC] > [ Aperture]
Shutter speed: [FUNC] > [ Shutter Speed]
Gain: [FUNC] > [ Gain]
Exposure compensation: [FUNC] Exposure Comp.]> [y
2 Select the desired zebra level.
[ ] > > [ 70%] or [z { 100%] [X]
• To turn off the zebra pattern, select [ Off] instead.
• To return to the previous screen and adjust other settings, select [L] instead of [X].
• The zebra pattern will appear on the overexposed areas of the picture.
NOTES
• Using the zebra pattern will not affect your recordings.
• If you set an assignable button to [z Zebra 70%] or [{ Zebra 100%], you can press the button
to turn the assigned zebra level on/off (A 81).
Backlight Correction
When you need to record a scene with constant b use backlight correction acklight conditions, you can
to make the picture, especially the darker areas, brighter.
This function cannot be used when the shooting mode is set to [T Fireworks].
1 Select [ BLC Always On].
[FUNC] > [ BLC Always On]
2 Select [ On] and then select [X].
• will appear at the left of the screen and the exposure will be adjusted to account for backlight
conditions.
• Alternatively, you can set an assignable button to [ BLC Always On] (A 81). In that case,
press the assignable button to turn the backlight correction on and off.
NOTES
• This camcorder also has an automatic backlight correction feature with the > [v Camera
Setup] > [Auto Backlight Correction] setting.
• Backlight correction will be deact following cases:ivated in the
- When the power switch or camera mode switch is operated.
- When the shooting mode is changed.
- When the frame rate is changed.
- When the custom picture function is turned on/off or the [Gamma/Color Space] setting is
changed.

Automatic Gain Control (AGC) Limit
46
Automatic Gain Control (AGC) Limit
When recording in dark surroundings, the camcorder will automatically increase the gain to try to get a
brighter picture. By setting a maximum gain value, you can limit the amount of noise in the picture and
keep a darker look. This function can only be used when the shooting mode is set to ’ ‚, or “.
1 Open the AGC limit adjustment screen.
[FUNC] > [ AGC Limit] > [n]
• An adjustment dial will appear on the screen.
• Select [n] again to return the camcorder to automatic gain control.
2 Drag your finger along the dial to set the desired maximum gain value.
• You can select an AGC limit from 0.0 dB to 23.0 dB. The lower the setting, the lower the AGC
limit.
3 Select [X].
• When an AGC limit is set, and the maximum gain value will appear at the left of the screen.
NOTES
• The AGC limit cannot be set when the exposure is locked (A 43).
• You can adjust the AGC limit using the CUSTOM dial (A 80).
Operating modes:

White Balance
47
White Balance
The camcorder uses an electronic white balance process to calibrate the picture and produce
accurate colors under different lighting conditions. This function can only be used when the shooting
mode is set to ’ ‚ “, , or n.
1 Select [ White Balance].
[FUNC] > [ White Balance]
2 Select the desired option and then select [X].
• If you selected [ Color Temperature], [ Set 1] or [ Set 2] and wish to change the color
temperature value or register a new custom white balance, continue with the appropriate
procedure below instead of selecting [X].
• The icon of the selected option will appear at the left of the screen.
To set the color temperature ([ Color Temperature])
3 Select [i].
• An adjustment dial will appear on the screen.
4 Drag your finger along the dial to set the color temperature value.
5 Select [X].
To set a custom white balance ([ Set 1] or [ Set 2])
3 Point the camcorder at a gray card or white object so that it fills the frame at the center of
the screen and then select [Å].
• When the Å icon stops flashing, the procedure is completed. The setting is retained even if you
turn off the camcorder.
4 Select [X].
Options
Operating modes:
[ Automatic]: The camcorder automatically sets the white balance for natural looking colors.
[¼ Daylight]: To record outdoors on a bright day.
[É Tungsten]: To record under tungsten and tungsten-type (3-wavelength) fluorescent lighting.
[ Color Temperature]:
Allows you to set the color temperature between 2,000 K and 15,000 K.
[ Set 1], [ Set 2]:
Use the custom white balance settings ects appear white to make white subj
under colored lighting.

White Balance
48
NOTES
• When you select a custom white balance:
- Do not adjust the zoom to the digital zoom range (light blue area of the zoom bar).
- Reset the white balance when you change locations or the lighting or other conditions change.
- Depending on the light source, Å may keep flashing. The result will still be better than with
[ Automatic].
• If you set an assignable button to [Å Set WB] (A 81), you can press the button to register a
custom white balance after you point the camcorder at a gray card or white object.
• Using a custom white balance may provide better results in the following cases:
- Changing lighting conditions
- Close-ups
- Subjects in a single color (sky, sea or forest)
- Under mercury lamps, certain types of fluorescent lights and LED lights
• If you set an assignable button to [Ä WB Priority] (A 81), you can press the button to switch to a
frequently used white balance setting pre-selected with > [v Camera Setup] > [Set WB
Priority].

Using Looks
49
Using Looks
You have the option of adding a “look” to your recordings. A look is a combination of various picture
settings, such as color depth and sharpness, that can enhance the recording's visual quality.
This function can only be used when the shooting mode is set to ’ ‚ “, , or n.
You can fully adjust the image quality using a custom picture file (A 83).
1 Disable the custom picture file.
[v% Camera Setup] > [/ Function] > [j Off]
2 Open the looks screen.
[FUNC] > [ Looks]
3 Adjust the detailed settings.
[i] > Select [–] or [+] to adjust the value
• You can also drag your finger along the adjustment bar.
• The sharpness, contrast and color depth can be adjusted as follows:
[Sharpness]: 0 (softer image) to 7 (sharper image)
[Contrast]: –4 (low contrast) to +4 (high contrast)
[Color Depth]: –4 (shallower colors) to +4 (richer colors)
4 Select [X].
NOTES
• Looks are not available when the custom picture function is activated.
Operating modes:

Zooming
50
Zooming
To zoom in and out, you can use the focus/zoom ring, the zoom rocker on the camcorder or the zoom
controls on the touch screen. You can also zoom using the optional RC-V100 Remote Controller
(A 77).
In addition to the 20x optical zoom, you can turn on the digital zoom* (400x) with the >
[v Camera Setup] > [Digital Zoom] setting. This camcorder also features a digital tele-converter,
which allows you to enlarge the image on the screen digitally.
* Digital zoom is not available in mode or when > [v Camera Setup] > [Conversion
Lens] is set to [¿ WA-H58].
Using the Focus/Zoom Ring
1 Set the focus/zoom ring switch to ZOOM.
2 Turn the focus/zoom ring to adjust the zoom.
• Turn the focus/zoom ring slowly for a slow zoom; turn it
faster for faster zooms.
• The zoom bar that appears on the screen indicates the
approximate zoom position.
NOTES
• You can use the > [v Camera Setup] > [Focus/
Zoom Ring Operation] setting to disable the focus/zoom ring’s
operation. You can use the > [v Camera Setup] >
[Zoom Ring Direction] setting to select the direction of the
focus/zoom ring’s operation when it is used to adjust the
zoom.
• If you turn the focus/zoom ring too quickly, the camcorder may not be able to zoom immediately. In
such case, the camcorder will zoom after you finish turning the ring.
Operating modes:
Focus/zoom ring

Zooming
51
Using the Zoom Rocker
Move the zoom rocker toward T (wide angle) to zoom
out. Move it toward S (telephoto) to zoom in.
• By default, the grip zoom rocker operates at a variable speed
– press gently for a slow zoom; press harder for faster zooms.
You can perform the following procedure to adjust the zoom
speed and to select a constant speed.
Setting the Zoom Speed
You can set the zoom speed for the zoom rocker.
To set the zoom speed of the grip zoom rocker
First, set the overall zoom speed to one of three levels. Next,
select whether the zoom rocker operates at a constant or
variable speed. Refer to the following table for a summary of the
zoom speed.
1 Select the overall zoom speed level.
[ ]>v ! Camera Setup] > [Zoom Speed Level] > Desired zoom speed level > [L
• You can select one of three levels, [Z Fast], [[ Normal] or [] Slow].
2 Select whether to use a variable or constant zoom speed.
[Grip Zoom Speed] > [Y] (variable) or [X] (constant)
• If you selected [Y], skip to step 4.
3 Select [Ï] or [Ð], or drag your finger along the adjustment bar, to set the desired constant
speed.
4 Select [X].
NOTES
• When [Zoom Speed Level] is set to [ Fast], the camcorder may pick up and record lens Z
operation sounds.
• When you are using an external microphone while recording, the sound made by the camcorder’s
internal machinery while zooming may be recorded in the clip.
• You can use the > [v Camera Setup] > [Grip Zoom Operation] setting to disable the grip
zoom rocker’s operation.
Approximate zoom speeds*
* Measured from full wide-angle to full telephoto.
** The camcorder will have more trouble focusing automatically while zooming.
[Grip Zoom
Speed] setting
Selected
constant speed
[Zoom Speed Level] setting
[ [ [] Slow] [ Normal] Z Fast]
[Y] (variable) – 3 sec. to 3 min. 25 sec. 2.5 sec. to 2 min 10 sec. 1.8 sec.** to 45 sec.
[X] (constant) 1 (slowest) 3 min. 25 sec. 2 min 10 sec. 45 sec.
16 (fastest) 3 sec. 2.5 sec. 1.8 sec.**
W Zoom out T Zoom in

Zooming
52
To use high-speed zoom in standby mode
When high-speed zoom is activated and > [v Camera Setup] > [Grip Zoom Speed] is set
to [Y] (variable zoom speed), in record standby mode you will be able to zoom at the highest speed
available ([Z Fast]). Nevertheless, the zoom speed while recording will be determined by the [Zoom
Speed Level] setting.
1 Select [High-Speed Zoom].
[ >v ! Camera Setup] > [High-Speed Zoom]
2 Select [i X On] and then select [ ].
NOTES
• When pre-recording is activated, the zoom speed will be determined by the [Zoom Speed Level]
setting even in record standby mode.
• When [Zoom Speed Level] is set to [Z Fast], the zoom speed will not change even in record
standby mode.
Using the Touch Screen’s Zoom Controls
1 Open the onscreen zoom controls.
[FUNC] > [R Zoom]
• The zoom controls appear at the bottom the screen.
2 Touch the zoom controls to operate the zoom.
• Touch anywhere within the V area to zoom out or
anywhere within the area to zoom in. Touch closer to U
the center for a slow zoom; touch closer to the V U/
icons for faster zooms.
3 Select [X].
Using an Optional Remote Controller
The zoom speeds when using the optional RC-V100 Remote Controller or a commercially available
remote control connected to the REMOTE terminal are different.
Zoom speeds for remote operation
Accessory Zoom speed
RC-V100 Remote Controller
(optional)
Variable speed: The greater the angle at which the RC-V100's ZOOM dial is rotated
from the center, the faster the zoom.
Commercially available
remote controls
If the remote control does not support variable zoom: Constant zoom speed.
If the remote control supports variable zoom: Variable zoom according to the remote
control's settings.

Zooming
53
NOTES
• When an optional RC-V100 Remote Controller is connected to the camcorder, you can zoom with
the remote controller's ZOOM dial. At default settings, turn the dial right to zoom in (S) and left to
zoom out (T).
Soft Zoom Control
Soft zoom control allows you to start and/or stop the zoom gradually.
1 Select [Soft Zoom Control].
[ >v ! Camera Setup] > [Soft Zoom Control]
2 Select the desired option and then select [X].
Options
Digital Tele-Converter
Using the digital tele-converter, you can digitally increase the focal length of the camcorder by a factor
of approx. 2 and record the enlarged image.
1 Select [Digital Zoom].
[ >v ! Camera Setup] > [Digital Zoom]
2 Select [ Digital Tele-conv.] and then select [X].
3 Open the zoom controls.
[FUNC] > [R Zoom]
4 Select [ ] (digital tele-converter) and then select [X].
• The center of the screen will be enlarged approximately 2 times and the icon will appear.
• Select [ ] again before closing the screen to deactivate the digital tele-converter.
NOTES
• You can attach the optional tele-converter and use it in conjunction with this function to increase the
effect.
• The digital tele-converter cannot be set while recording or when > [v Camera Setup] >
[Conversion Lens] is set to [¿ WA-H58].
• The image is digitally processed so the image will deteriorate throughout the zoom range.
• The digital tele-converter will be deactivated if the resolution is switched between 3840x2160 and
another one.
[j Off]: Use this setting if you do not intend to use soft zoom control.
[¬ Start]: Zoom starts gradually.
[® Stop]: Zoom stops gradually.
[¯ Start & Stop]: Zoom start and stops gradually.
Operating modes:
Produkt Specifikationer
| Mærke: | Canon |
| Kategori: | Videokamera |
| Model: | VIXIA HF G50 |
Har du brug for hjælp?
Hvis du har brug for hjælp til Canon VIXIA HF G50 stil et spørgsmål nedenfor, og andre brugere vil svare dig
Videokamera Canon Manualer

13 Januar 2025
4 November 2024
12 Oktober 2024
23 September 2024
22 September 2024
12 September 2024
27 August 2024
27 August 2024
24 August 2024
19 August 2024
Videokamera Manualer
- Videokamera Nilox
- Videokamera SilverCrest
- Videokamera Denver
- Videokamera Sencor
- Videokamera Sony
- Videokamera Samsung
- Videokamera Panasonic
- Videokamera Extech
- Videokamera Philips
- Videokamera Lenco
- Videokamera OK
- Videokamera Braun
- Videokamera Sharp
- Videokamera Logitech
- Videokamera Kenwood
- Videokamera HP
- Videokamera Garmin
- Videokamera Sanyo
- Videokamera Thinkware
- Videokamera Easypix
- Videokamera Nikkei
- Videokamera Bushnell
- Videokamera Toshiba
- Videokamera Pyle
- Videokamera Fujifilm
- Videokamera Nikon
- Videokamera Kodak
- Videokamera Tracer
- Videokamera Olympus
- Videokamera Nedis
- Videokamera Zorki
- Videokamera Hama
- Videokamera Creative
- Videokamera Hyundai
- Videokamera Milwaukee
- Videokamera DataVideo
- Videokamera Trevi
- Videokamera Trust
- Videokamera Laserliner
- Videokamera Mio
- Videokamera Trotec
- Videokamera JVC
- Videokamera Leica
- Videokamera Uniden
- Videokamera Hitachi
- Videokamera T'nB
- Videokamera Medion
- Videokamera Linksys
- Videokamera Cisco
- Videokamera EZVIZ
- Videokamera König
- Videokamera Gembird
- Videokamera EnVivo
- Videokamera Maginon
- Videokamera Vtech
- Videokamera BenQ
- Videokamera Contour
- Videokamera Bresser
- Videokamera National Geographic
- Videokamera Voigtländer
- Videokamera Rollei
- Videokamera Xiaomi
- Videokamera Moultrie
- Videokamera Aiptek
- Videokamera Viewsonic
- Videokamera DJI
- Videokamera Voltcraft
- Videokamera Polaroid
- Videokamera Ricoh
- Videokamera TomTom
- Videokamera Soundmaster
- Videokamera Aida
- Videokamera Konica-Minolta
- Videokamera Kyocera
- Videokamera GoPro
- Videokamera Ikan
- Videokamera Cobra
- Videokamera Xblitz
- Videokamera Velleman
- Videokamera Marshall
- Videokamera FLIR
- Videokamera Energy Sistem
- Videokamera Swann
- Videokamera Zoom
- Videokamera Salora
- Videokamera Lamax
- Videokamera Overmax
- Videokamera SBS
- Videokamera Veho
- Videokamera Midland
- Videokamera Samson
- Videokamera ION
- Videokamera RCA
- Videokamera Prixton
- Videokamera Renkforce
- Videokamera Navitel
- Videokamera Hazet
- Videokamera Transcend
- Videokamera GoClever
- Videokamera Intenso
- Videokamera ARRI
- Videokamera Evolveo
- Videokamera Genius
- Videokamera Zagg
- Videokamera Airis
- Videokamera Steinberg
- Videokamera Spypoint
- Videokamera Vivitar
- Videokamera Contour Design
- Videokamera Dragon Touch
- Videokamera Vimar
- Videokamera Klein Tools
- Videokamera Oregon Scientific
- Videokamera Magellan
- Videokamera Lexibook
- Videokamera SJCAM
- Videokamera Speco Technologies
- Videokamera Prestigio
- Videokamera Blackmagic Design
- Videokamera Kogan
- Videokamera Drift
- Videokamera Insignia
- Videokamera Minox
- Videokamera Elmo
- Videokamera Agfa
- Videokamera AgfaPhoto
- Videokamera Quintezz
- Videokamera AEE
- Videokamera ATN
- Videokamera Activeon
- Videokamera Coby
- Videokamera TacTic
- Videokamera Macally
- Videokamera Naxa
- Videokamera Mamiya
- Videokamera Tronje
- Videokamera Mpman
- Videokamera Ematic
- Videokamera Minolta
- Videokamera Iget
- Videokamera RunCam
- Videokamera SeaLife
- Videokamera Sakar
- Videokamera Jobo
- Videokamera Mediacom
- Videokamera Kreator
- Videokamera Contax
- Videokamera EE
- Videokamera Traveler
- Videokamera Kaiser Baas
- Videokamera Bluetech
- Videokamera Braun Phototechnik
- Videokamera IOPLEE
- Videokamera Vupoint Solutions
- Videokamera Kitvision
- Videokamera Praktica
- Videokamera MMTC
- Videokamera Flip
- Videokamera Jay-tech
- Videokamera Brinno
- Videokamera BlackVue
- Videokamera Storex
- Videokamera Insta360
- Videokamera DXG
- Videokamera MD 80
- Videokamera Berger & Schröter
- Videokamera Whistler
- Videokamera Curve
- Videokamera PCE Instruments
- Videokamera DOD
- Videokamera CamOne
- Videokamera Mobius
- Videokamera ISAW
- Videokamera Beaulieu
- Videokamera Revier Manager
- Videokamera Kobian
- Videokamera FHD 1080P
- Videokamera RSC
- Videokamera Stealth Cam
- Videokamera Aqua-Vu
- Videokamera Hamlet
- Videokamera Qoltec
- Videokamera Leotec
- Videokamera Replay
- Videokamera Akaso
- Videokamera Hamilton Buhl
- Videokamera FeiyuTech
- Videokamera Best Buy
- Videokamera Rexing
- Videokamera Bolex
- Videokamera Microtek
- Videokamera Teslong
- Videokamera Izzo
- Videokamera Aquapix
- Videokamera Tactacam
Nyeste Videokamera Manualer

3 April 2025

14 Marts 2025
14 Marts 2025
14 Marts 2025
13 Marts 2025
12 Marts 2025
12 Marts 2025
12 Marts 2025
27 Februar 2025
25 Februar 2025