Casio QV-2300UX Manual
Læs nedenfor 📖 manual på dansk for Casio QV-2300UX (151 sider) i kategorien Kamera. Denne guide var nyttig for 14 personer og blev bedømt med 4.5 stjerner i gennemsnit af 2 brugere
Side 1/151

LCD Digital Camera
User’s Guide
QV-2300UX
/
QV-2800UX
English
All example procedures in this
User’s Guide are based on the
QV-2300UX. The same
procedures also apply to the
QV-2800UX, unless specifically
noted otherwise.
QV-2300UX

INTRODUCTION
E-3
Contents
E-2
INTRODUCTION
Unpacking ................................................................. E-2
Contents .................................................................... E-3
Quick Reference ........................................................ E-7
Getting Ready E-7
Recording an Image E-8
Playback E-9
Deleting Images E-10
Features .................................................................. E-12
Recording Features E-13
Precautions ............................................................. E-15
General Precautions E-15
Operating conditions E-16
Condensation E-16
About the camera’s backlight… E-17
E-18
GETTING ACQUAINTED
General Guide ......................................................... E-18
Front E-18
Back E-19
Terminals and Ports E-20
Bottom E-20
Lens E-21.........................................................................
Changing the Lens Angle E-21
Installing a Conversion Lens E-22
Lens Precautions E-23
Monitor Screen Indicators ....................................... E-24
REC mode E-24
PLAY mode E-25
Operation Indicator Lamp ....................................... E-26
REC mode E-27
PLAY mode E-27
Using the Bundled Accessories .............................. E-28
Using the Lens Cap E-28
Attaching the Strap E-28
Using the Soft Case E-29
Power Requirements ............................................... E-31
Loading Batteries E-31
Battery Handling Precautions E-34
Low Battery Indicator E-34
Using AC Power E-35
Turning the Camera On and Off E-36
Power Save Settings E-36
Memory Cards ......................................................... E-38
Inserting a Memory Card into the Camera E-38
Removing a Memory Card from the Camera E-39
Formatting a Memory Card E-40
Memory Card Precautions E-41
IBM Microdrive Precautions E-41
Menu Screens ......................................................... E-43

INTRODUCTION
E-4
Setting the Current Date and Time ......................... E-44
Setting the Date and Time E-44
Selecting the Date Format E-45
Time Stamp E-46
E-47
BASIC IMAGE RECORDING
Recording a Simple Snapshot ................................ E-47
About the REC Mode Monitor Screen E-49
About Auto Focus E-49
Recording Precautions E-49
Image Recording when the Battery is Low E-50
Using Zoom .............................................................E-50
Using Optical Zoom E-50
Using Digital Zoom E-51
Using the Flash ....................................................... E-52
Flash Status Indicators E-53
Adjusting the Flash Intensity E-53
Precautions when Using Flash E-54
Selecting the Focus Mode ...................................... E-55
Using the Auto Focus Mode E-55
Using the Macro Mode E-56
Using the Infinity Mode E-57
Using the Manual Focus Mode E-57
Using Focus Lock E-58
Specifying Image Size and Quality ......................... E-59
Using the Self-timer ................................................E-60
Exposure Compensation .........................................E-61
E-63
OTHER RECORDING FUNCTIONS
Shooting Portraits .................................................... E-63
Shooting Landscapes ............................................. E-64
Shooting Night Scenes ........................................... E-65
Instant Setup Using the Scene Mode ..................... E-66
Registering Your Own Scene Setups ...................... E-68
Recording a Movie .................................................. E-69
To record a movie using the normal mode E-70
To record a movie using the past mode E-70
Shooting Panoramas ............................................... E-71
Shooting at Fixed Intervals ..................................... E-72
Canceling an Interval Mode Timer Operation E-74
Specifying the Exposure Mode ............................... E-74
Program AE E-74
Aperture Priority AE E-75
Shutter Speed Priority AE E-76
Manual Exposure E-78
Quick Exposure Mode Selection E-79
Selecting the Metering Mode .................................. E-80
Quick Metering Mode Selection E-81
Setting the Sensitivity Level .................................... E-81
Using the Filter Function ......................................... E-82
Selecting White Balance ......................................... E-83
Adjusting White Balance Manually E-83
Quick White Balance Selection E-84

INTRODUCTION
E-5
Enhancing Certain Colors ....................................... E-85
Turning the On-screen Grid On and Off ................. E-86
Specifying Outline Sharpness ................................ E-87
Specifying Color Saturation .................................... E-87
Specifying Contrast ................................................. E-88
Specifying Power On Default Settings .................... E-88
Resetting the Camera E-89
Using the Camera’s Shortcut Features .................. E-90
Changing REC mode FUNCTION Menu Settings
Using the Shortcut Buttons E-90
To assign REC mode FUNCTION menu items
to shortcut buttons E-91
Directly Accessing the REC mode FUNCTION Menu E-93
E-94
PLAYBACK
Basic Playback Operation ....................................... E-94
Playing a Movie ....................................................... E-95
Playing a Panorama ................................................ E-96
Enlarging the Playback Image ................................ E-97
Displaying the 9-image View ................................... E-98
Selecting a Specific Image in the 9-image View E-99
Using the Slide Show Feature .............................. E-100
E-101
DELETING IMAGES
Deleting the Displayed Image ............................... E-101
Deleting Selected Images ..................................... E-102
Deleting All Images in Selected Folders ............... E-103
Deleting All Unprotected Images .......................... E-104
E-105
MANAGING IMAGES
Folders and Files ................................................... E-105
Folders E-105
Files E-106
Selecting a Folder for Playback ............................ E-107
Protecting Images Against Deletion ..................... E-107
Protecting Selected Images E-107
Protecting and Unprotecting All Images in Selected
Folders E-108
Protecting and Unprotecting All Images E-109
DPOF ..................................................................... E-110
Making DPOF Settings for Particular Images E-110
Making DPOF Settings for Particular Folders E-111
Making DPOF Settings of All Images
on the Memory Card E-112

INTRODUCTION
E-6
E-113
OTHER SETTINGS
Turning the Monitor Screen Indicators On and Off ...
E-113
Changing the Display Language ........................... E-114
Turning the Confirmation Beep On and Off .......... E-115
E-116
CONNECTING TO EXTERNAL EQUIPMENT
Connecting to a Television .................................... E-117
Selecting the Video Output Signal Mode E-118
Connecting the Wired Remote Controller
to the Camera .......................................................E-119
Connecting an External Flash Unit
(QV-2800UX Only) ................................................ E-119
External Flash Unit Requirements E-119
Attaching an External Flash Unit E-120
Connecting to a Computer .................................... E-122
USB Port Connection (Windows, Macintosh) E-123
Using a Serial Port Connection E-124
Using a Memory Card to Transfer Image Data ..... E-125
Memory Card Data E-126
DCF Protocol E-126
Memory Card File Structure E-127
Image Files Supported by the Camera E-128
Precautions when Using a Memory Card
on a Computer E-128
Using the HTML Card Browser ............................. E-130
Specifying the Card Browser Type E-130
Viewing Card Browser File Contents E-132
Saving Card Browser Files E-135
E-136
REFERENCE
Camera Menus ......................................................E-136
REC mode E-136
PLAY mode E-137
Scene List..............................................................E-138
Scene Mode Camera Setups ................................ E-140
Mode Settings ....................................................... E-142
Settings in Each Mode E-142
Recording Mode + Exposure Mode Combinations E-143
Troubleshooting .....................................................E-144
Messages E-147
Specifications ........................................................E-149

INTRODUCTION
E-8
Recording an Image (page E-47)
CARD
POWER
ON
/OF
F
WT
MENU
PLAY
R
EC
SHIF T
IN FO
M
F
2
4
3
Slide the REC/PLAY
selector to “REC”.
Point the camera at the
subject, compose the
image on the monitor
screen, and press the
shutter release button
half way to focus the
image.
Slide the POWER
ON/OFF switch to the
right to turn on the
camera.
Press the shutter release
button all the way down
to record the image.
1

INTRODUCTION
E-9
Playback (page E-94)
CARD
POWER
ON
/O F
F
WT
MENU
PLAY
R
EC
SHIFT
IN FO
M
F
2
3
Slide the REC/PLAY
selector to PLAY .“ ”
Use [+] (forward) and [ ] (back) –
to scroll through stored images
on the monitor screen.
Slide the POWER
ON/OFF switch to
the right to turn on
the camera.
1

INTRODUCTION
E-10
Deleting Images (page E-101)
CA
RD
POWER
ON/O F
F
WT
MENU
PLA
Y
REC
SHIFT
IN FO
MF
2
4
Press .
3
Use [+] (forward) and [ ] –
(back) to scroll through
stored images and display
the one you want to delete.
5
Slide the REC/PLAY
selector to PLAY .“ ”
Double check to make
sure you really want to
delete the image you
selected.
• You can exit the image delete
operation by pressing MENU.
6
Use [+] and [ ] to move the –
cursor to Yes and then “ ”
press the shutter release
button to delete the image
you selected.
Slide the POWER
ON/OFF switch to
the right to turn
on the camera.
1

INTRODUCTION
E-11
•CASIO COMPUTER CO., LTD. assumes no responsibility
for any damage or loss resulting from the use of this
manual.
•CASIO COMPUTER CO., LTD. assumes no responsibility
for any loss or claims by third parties which may arise
through the use of the QV-2300UX or the QV-2800UX.
•CASIO COMPUTER CO., LTD. assumes no responsibility
for any damage or loss caused by deletion of data as a
result of malfunction, repairs, or battery replacement. Be
sure to back up all important data on other media to protect
against its loss.
• Windows and Internet Explorer are registered trademarks
of Microsoft Corporation.
• Macintosh is a registered trademark of Apple Computer,
Inc.
• CompactFlash
TM
and logo are registered trademarks of
SanDisk Corporation.
• The USB driver uses software by Phoenix Technologies
Ltd.,
Compatibility Software Copyright
C
1997
Phoenix Technologies Ltd., All Rights Reserved.
• IBM is a registered trademarks of International Business
Machines Corporation.
• Other company, product and service names used herein
may also be trademarks or service marks of others.

INTRODUCTION
E-12
Features
• High-resolution 2.11-megapixel CCD
• 1.8-inch low-glare color LCD (HAST)
• 12X zoom: 3X optical zoom, 4X digital zoom (QV-2300UX)
32X zoom: 8X optical zoom, 4X digital zoom (QV-2800UX)
• Swivel lens mechanism
Shoot from the angle you want without moving the camera
body.
• External flash connectability (QV-2800UX only)
• Memory card image storage
Supports CompactFlash cards (CF TYPE I/II) and the IBM
microdrive.
• Digital Print Order Format (DPOF)
Images can be printed easily in the sequence you want
using a DPOF compatible printer. DPOF can also be used
when specifying images and quantities for printing by pro-
fessional print services.
• DCF Data Storage
DCF (Design rule for Camera File system) data storage
protocol provides image inter-compatibility between the
digital camera and printers.
• VIDEO OUT terminal
Connect to your TV for big-screen viewing of images.
• USB compatibility
Connect to your computer for quick and easy image ex-
changed.
• HTML File Card Browser
Images are displayed on your computer screen in a conve-
nient format.
You can view a gallery of image thumbnails on your com-
puter screen.
• Image management and manipulation software
The QV-2300UX comes bundled with a CD-ROM disc
that’s packed with useful software. Photo Loader auto-
mates uploading of images to your computer, and Pan-
orama Editor lets you stitch images together into panorama
scenes. Other bundled applications include Internet Ex-
plorer (Web browser), Outlook Express (e-mail software),
and QuickTime (movie viewer). You also get a copy of the
Adobe Acrobat Reader PDF file reader for reading the user
documentation on the CD-ROM disc.
INTRODUCTION
E-13
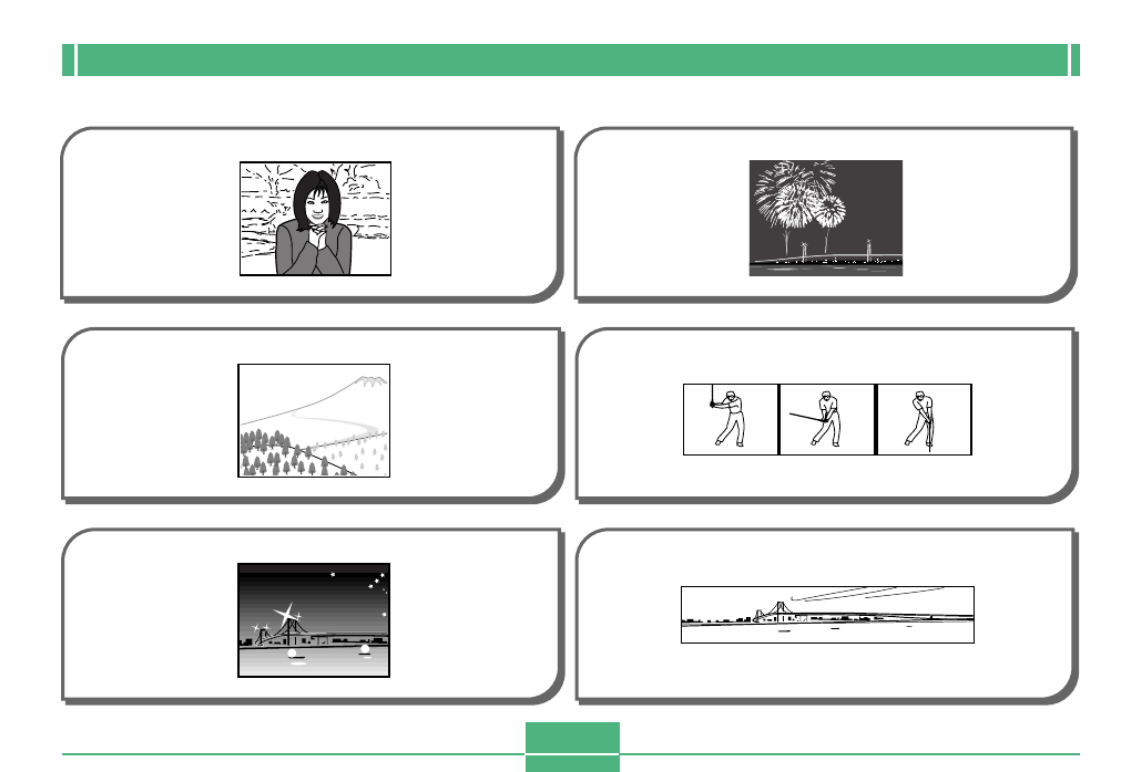
Recording Features
page E-63
Portrait Mode Scene Mode
page E-66
page E-64
Landscape Mode Movie Mode
page E-69
page E-65
Night Scene Mode Panorama Mode
page E-71

INTRODUCTION
E-15
Precautions
General Precautions
Be sure to observe the following important precautions
whenever using the QV-2300UX or the QV-2800UX.
All references in this manual to “this camera” and “the cam-
era” refer to the CASIO QV-2300UX or QV-2800UX Digital
Camera.
• Never try to take pictures or use the built-in display while
operating a motor vehicle or while walking. Doing so cre-
ates the danger of serious accident.
• Never try to open the case of the camera or attempt your
own repairs. High-voltage internal components create the
risk of electrical shock when exposed. Always leave main-
tenance and repair work up to authorized CASIO service
providers.
• Never fire the flash in the direction of a person operating a
motor vehicle. Doing so can interfere with the driver’s vi-
sion and create the danger of accident.
• Never fire the flash while it is too close to the subject’s
eyes. Intense light from the flash can cause eye damage if
it is fired too close to the eyes, especially with young chil-
dren. When using the flash, the camera should be at least
one meter from the eyes of the subject.
• Keep the camera away from water and other liquids, and
never let it get wet. Moisture creates the danger of fire and
electrical shock. Never use the camera outdoors in the rain
or snow, at the seashore or beach, in the bathroom, etc.
• Should foreign matter or water ever get into the camera,
immediately turn power off, unplug the AC adaptor from the
power outlet, and contact your dealer or nearest CASIO
service provider. Using the camera under these conditions
creates the danger of fire and electrical shock.
• Should you ever notice smoke or a strange odor coming out
of the camera, immediately turn power off and unplug the
AC adaptor from the power outlet. Using the camera under
these conditions creates the danger of fire and electrical
shock. After making sure there is no more smoke coming
from the camera, take it to your nearest CASIO service pro-
vider for repair. Never attempt your own maintenance.
• At least once a year, unplug the AC adaptor from the power
outlet and clean the area around the prongs of the plug.
Dust build up around the prongs can create the danger of
fire.
• If the camera’s case should ever become cracked due to
dropping it or otherwise subjecting it to rough treatment,
immediately turn power off, unplug the AC adaptor from the
power outlet, and contact your nearest CASIO service pro-
vider.
• Never use the camera inside of an air craft or in any other
areas where its use is prohibited. Doing so can result in an
accident.
• Physical damage and malfunction of this camera can
cause the image data stored in its memory to be deleted.
Be sure to always keep backup copies of data by transfer-
ring them to personal computer memory.

INTRODUCTION
E-16
Operating conditions
• This camera is designed for use in temperatures ranging
from 0 C to 40° °C.
• Do not use or keep the camera in the following areas.
— In areas subject to direct sunlight
— In areas subject to high humidity or dust
— Near air conditioners, heaters, or other areas subject to
temperature extremes
— Inside of a closed vehicle, especially one parked in the
sun
— In areas subject to strong vibration
Condensation
• When you bring the camera indoors on a cold day or other-
wise expose it to a sudden change of temperature, there is
the possibility that condensation can form on the exterior or
on interior components. Condensation can cause malfunc-
tion of the camera, so you should avoid exposing it to con-
ditions that might cause condensation.
• To keep condensation from forming, place the camera into
a plastic bag before moving it into a location that is much
warmer or colder than your current location. Leave it in the
plastic bag until the air inside the bag has a chance to
reach the same temperature as the new location. If con-
densation does form, remove the batteries from the cam-
era and leave the battery compartment cover open for a
few hours.
• Never open the battery compartment cover, disconnect the
AC adaptor from the camera or unplug it from the wall
socket while recording images. Doing so will not only make
storage of the current image impossible, it can also corrupt
other image data already stored in camera memory.

GETTING ACQUAINTED
E-18
This section contains important information you should know when trying to operate the camera.
General Guide
The following illustrations show the names of each component, button, and switch on the camera.
Front
GETTING ACQUAINTED
Shutter release
button
(page E-47)
Terminal panel cover
(page E-20)
Flash
(page E-52)
Lens
(page E-21)
Exposure
sensor
[+] / [–] buttons
(page E-43)
MENU button
(page E-43)
QV-2800UX

GETTING ACQUAINTED
E-19
CAR D
POWER
ON/OFF
WT
MENU
PLAY
REC
SHIFT
INFO
MF
(Flash/Folder) button
(pages E-52, 107)
(Focus/
Nine Images) button
(pages E-55, 98)
(Self-Timer/Delete)
button
(pages E-60, 101)
SHIFT INFO (Shift/
Information) button
(pages E-25, 90)
Memory card slot cover
(page E-38)
REC/PLAY selector
(page E-47)
Zoom slider
(page E-50)
Monitor screen
(page E-24)
Operation lamp
(page E-26)
POWER ON/OFF switch
(page E-36)
Back
External flash
sync terminal
(pages E-116, 119)
Terminal cap
(page E-119)
QV-2800UX

E-20
GETTING ACQUAINTED
PUSH OPEN
POWER
ME
NU
USB VIDEO OUT
DC IN 6V
DIGITAL
ON/OFF
W T
DIGITAL terminal
(page E-116)
USB port
(page E-116)
DC IN 6V terminal
(page E-35)
VIDEO OUT terminal
(page E-116)
Open Terminal Panel Cover
Tripod screw hole Release button
(page E-31)
Battery compart-
ment cover
(page E-31)
Terminals and Ports Bottom

E-21
GETTING ACQUAINTED
Lens
The swivel lens mechanism lets you easily aim at the angle
you want, without changing the position of the camera body.
Changing the Lens Angle
• Whenever you swivel the lens so it is pointing in the direc-
tion of the back of the camera, the image on the monitor
screen is automatically adjusted so it shows a mirror image
of what it picked up by the lens. This makes self-portrait
images appear with the correct orientation when viewed on
a display.
AAAAA
BBBBB
A.... Image displayed
when recording
B.... Display of
recorded image
IMPORTANT!
• Do not use undue force when rotating the lens mecha-
nism and never try to force it past the point where rota-
tion stops naturally. Rough handling can cause the
lens mechanism to break and other damage to the
camera.
• The proper orientation of the lens when you store the
camera in its case depends on your camera model.
* QV-2300UX: Lens should be pointed forward.
* QV-2800UX: Lens should be pointed up.
• Never set the camera down while the lens is pointed
downwards. Doing so can cause bending or other
damage to the area around the lens.
• Always leave the lens cap on the lens except when
you are actually recording images.

GETTING ACQUAINTED
E-24
Auto Focus frame
• Focusing complete: Green
• Focusing failed: Red
No memory card loaded
warning
Zoom factor
Focus Mode indicator
None Auto Focus
Macro
Infinity
Manual Focus
Monitor Screen Indicators
The following describes the different indicators and markings that appear on the camera’s monitor screen.
REC mode
Battery capacity Date and time
This information appears for one or
two seconds, and then disappears.
Camera shake
indicator
EV value
Spot metering
indicator
Shutter speed value
• An out of range
aperture or shutter
speed causes the
corresponding monitor
screen value to turn
yellow.
Aperture value
Recording Mode indicator
Self-timer
10 SEC, 2 SEC
Quality
FINE, NORMAL, ECONOMY
Memory capacity
(Remaining number of storable images)
Image size
1600 x 1200 pixels
800 x 600 pixels
Image information
Movie Recording: recording time
........... seconds
Panorama: number of images
........... P1 to P10
The recording mode, memory capacity, image size, quality, and battery
capacity indicators do not appear on the REC mode monitor screen when
the “Indicators” option is turned off (page E-113).
Flash Mode indicator
None Auto
Flash Off
Flash On
Red-eye reduction
• Flash indicator indicates
that the flash will fire
(when auto flash is
selected).

GETTING ACQUAINTED
E-28
Using the Bundled Accessories
Using the Lens Cap
Always keep the lens cap on the lens whenever you are not
using the camera.
Small loop
Ring
Cap holder
Large loop
Attach the lens cap holder to the ring. This protects against
accidental loss of the lens cap.
■ QV-2300UX Users
• Be sure to turn off camera power and let the lens retract
into the camera before attaching the lens cap.
• Never turn on camera power with the lens cap affixed to the
lens.
Attaching the Strap
Attach the strap as shown in the illustration below.
IMPORTANT!
• Be sure to keep the strap around your wrist when us-
ing the camera to protect against accidentally drop-
ping it.
• The supplied strap is intended for use with this camera
only. Do not use it for any other application.
• Never swing the camera around by the strap.

GETTING ACQUAINTED
E-31
1.
While holding down the re-
lease button on the battery
compartment cover (on the
bottom of the camera),
slide the cover in the direc-
tion indicated by the arrow
in the nearby illustration
and open the cover.
2.
Load batteries with their
++++
+/----
- ends facing as
shown in the nearby
illustration.
3.
While holding down the
release button, slide the
battery compartment
cover back to its original
position to close it.
IMPORTANT!
• Never use manganese batteries. Use only the battery
types specifically mentioned in this User’s Guide.
PUSH
Power Requirements
Your camera features a two-way power supply that lets you
use either AA-size batteries or household AC current.
A set of AA-size alkaline batteries is supplied with the cam-
era. The other items listed below are available separately.
■ Batteries
• Four AA-size alkaline batteries: LR6
• Four AA-size lithium batteries: FR6
• Four AA-size nickel metal hydride rechargeable batteries:
NP-H3
■ Household Current
• AC Adaptor: AD-C620
• AC Adaptor/Charger: BC-3HA
Loading Batteries
Make sure that camera power is turned off whenever loading
or replacing batteries.

GETTING ACQUAINTED
E-32
● Tips for Prolonging Battery Life
• Use the button to turn off the flash when you are not
using it.
• You can also use the power save settings (page E-36) to
protect against wasting battery power when you forget to
turn off the camera.
● Alkaline Battery Life
The actual life of alkaline batteries is affected by a variety of
factors, including the battery manufacturer, the amount of
time the batteries spend in storage before you use them,
temperature while you are recording, and photographic con-
ditions. As a rule, we recommend the use of lithium batteries
or Ni-MH batteries, which have longer lives than alkaline bat-
teries.
Recording one image per minute under the above conditions
reduces battery life to about one sixth of that noted above.
Battery life is greatly affected by how much you use flash,
zoom and other functions, and how long you leave power
turned on.
● Battery Life Guidelines
The battery life guideline values given below indicate the
amount of time at standard temperature (25 C) until power°
automatically turns off due to battery failure. They do not
guarantee that batteries will provide the amount of service
indicated. Low temperatures and continued use reduce bat-
tery life.
AA-size Ni-MH
Batteries NP-H3
180 minutes
120 minutes
(720 shots)
AA-size Lithium
Batteries FR6
300 minutes
200 minutes
(1200 shots)
AA-size Alkaline
Batteries LR6
170 minutes
80 minutes
(480 shots)
Type of
Operation
Continuous
Playback
Continuous
Recording
• The above figures are approximations only.
• The above guidelines are based on the following battery
types:
Alkaline: MX1500 (AA) DURACELL ULTRA
Lithium: Energizer
* Battery life varies with brand.
• Figures are based on continuous recording under the fol-
lowing conditions.
Flash turned off
One zoom slider switching between T (Telephoto) and W
(Wide-angle)

GETTING ACQUAINTED
E-33
● About rechargeable batteries
Use only the nickel-metal hydride batteries (NP-H3) that are
available from your dealer as options for this camera. Proper
camera operation is not guaranteed when other recharge-
able batteries are used.
AC Adaptor/Charger : BC-3HA
Nickel-metal hydride batteries (4-battery set)/Quick
Charger Set : BC-1HB4
Nickel-metal hydride batteries (4-battery set) : NP-H3P4
IMPORTANT!
• Be sure to keep all four batteries together as a set at
all times, for both charging and powering the camera.
Mixing batteries from different sets can shorten overall
battery life and cause malfunction of the camera.
• Rechargeable batteries cannot be charged while they
are loaded in the camera.
The following examples show how alkaline battery life
changes under different conditions.
photographic conditions shooting conditions
Example 1: Intermittent use of the camera shortens battery
life.
Conditions
• Temperature: 25°C
• Repeat of a cycle of recording of one shot per minute
for 10 minutes, followed by one minute of playback,
and a nine minutes of power off (power on, full lens
extention, half lens contraction, full lens extension,
image recording, power off)
• Flash on
Approximate Battery Life: 50 minutes (46 shots)
Example 2: Low temperatures shorten battery life.
Conditions
• Temperature: 0°C
• Repeat of a cycle of recording of one shot per minute
for 10 minutes, followed by one minute of playback,
and a nine minutes of power off (power on, full lens
extention, half lens contraction, full lens extension,
image recording, power off)
• Flash on
Approximate Battery Life: 12 minutes (11 shots)

GETTING ACQUAINTED
E-34
Low Battery Indicator
The following shows how the battery capacity indicator on
the monitor screen and the indicator display changes as bat-
tery power is used. Replace all four batteries as soon as pos-
sible after they go dead. If you continue to use the camera
while the battery level is or , camera power will auto-
matically turn off.
Battery
Capacity High Low
Monitor
Screen
• Dead batteries are susceptible to leakage, which can
cause serious damage to your camera. Remove batteries
from the camera as soon as you notice they are dead.
• The batteries that power the camera normally become
warm as they discharge.
• Remove batteries from the camera if you do not plan to use
it for more than two weeks.
• Never recharge batteries, never allow direct connection
between two ends of a battery, and never try to take batter-
ies apart.
• Do not expose batteries to direct heat or dispose of them
by burning. Doing so can create the danger of explosion.
• Never mix batteries of different types.
• Use only LR6 (AM-3) type alkaline or FR6 type
lithium or Ni-MH (nickel-metal hydride) dry cell
batteries with this camera. Never mix old bat-
teries with new ones. Doing so can result in
bursting or leaking of batteries, creating the
danger of fire or personal injury.
• Always make sure that the plus (+) and minus
(–) ends of the batteries are facing correctly, as
noted by the markings on the camera itself.
Improper loading of batteries can result in
bursting or leaking of batteries, creating the
danger of personal injury or soiling of objects
nearby.
CAUTION
Battery Handling Precautions
Incorrect use or handling of batteries can cause them to leak
or burst and create the danger of serious damage to your
camera. Be sure to note the following important precautions
to avoid problems with batteries.

GETTING ACQUAINTED
E-35
AC Adaptor precautions
• Never use an electrical outlet whose voltage is
outside the rating marked on the AC adaptor.
Doing so can create the danger of fire or elec-
trical shock. Use only the optional AC adaptor
specified for this camera.
• Do not allow the AC adaptor power cord to be-
come cut or damaged, do not place heavy ob-
jects on it, and keep it away from heat. A dam-
aged power cord creates the risk of fire and
electrical shock.
• Never try to modify the AC adaptor power cord,
or subject it to severe bending, twisting, or pull-
ing. Doing so creates the risk of fire and elec-
trical shock.
• Never touch the AC adaptor while your hands
are wet. Doing so creates the risk of electrical
shock.
• Do not overload extension cords or wall out-
lets. Doing so creates the danger of fire and
electrical shock.
• Should the cord of the AC adaptor become
damaged (exposed internal wiring), request a
replacement from an authorized CASIO ser-
vice provider. A damaged AC adaptor cord
creates the danger of fire or electrical shock.
CAUTION
Using AC Power
Use the adaptor as shown below to power the camera from a
household power outlet.
DC IN 6V
(AC power terminal)
• AC Adaptor: AD-C620 (Option)
• AC Adaptor/Charger: BC-3HA (Option)
The BC-3HA functions both as an AC adaptor and as a
charger unit for AA-size nickel metal hydride batteries. It
comes complete with four rechargeable nickel metal hy-
dride batteries. This AC adaptor/charger unit can be used
with any household power outlet rated for 100V to 240V
AC.
AC Adaptor
BASIC IMAGE RECORDING
E-48
SHIFT
INFO
MF
Operation lamp
• Recorded images are temporarily stored in a buffer,
from which they are stored to the memory card in-
stalled in the camera. You can continue to store im-
ages as long as there is space available in the buffer.
• The number of images you can store in the camera
depends on the storage medium and the image quality
setting (page E-59) you are using.
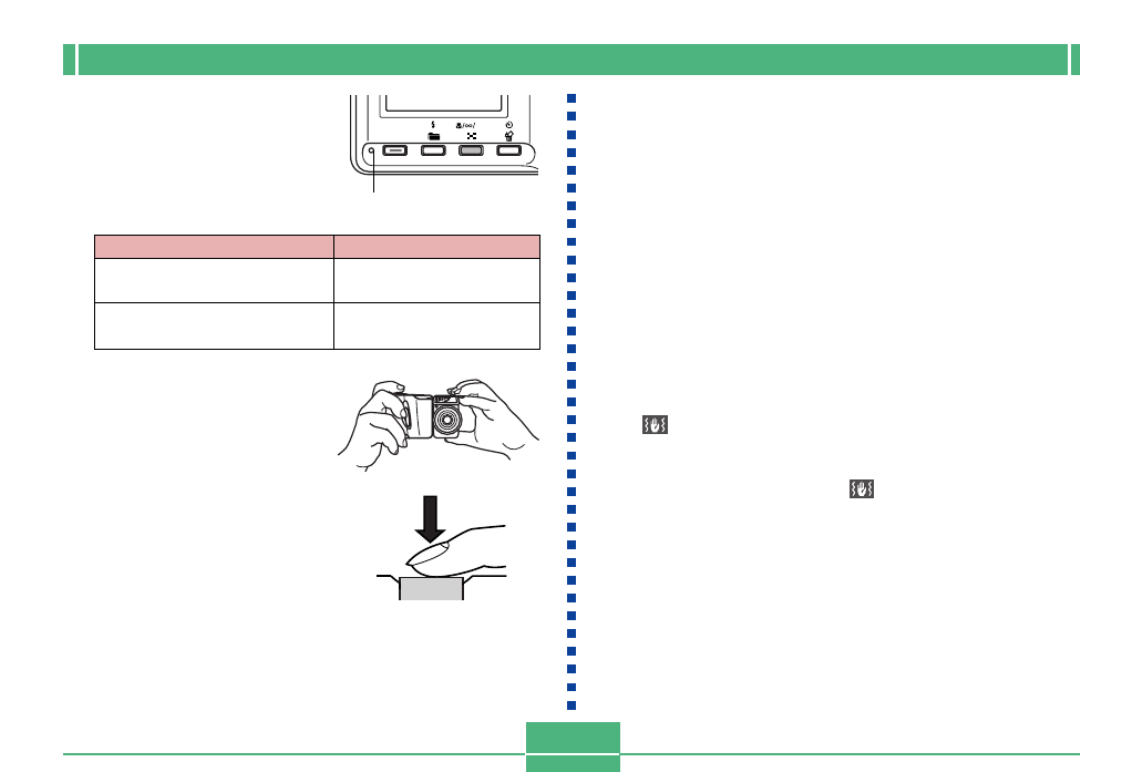
• To avoid hand movement, press the shutter release
button gently.
• Use of a tripod is recommended for slow shutter
speeds and telephoto shots to avoid blurring of the
image due to camera movement.
■ Camera Shake Indicator
The (camera shake indicator) appears on the monitor
screen when the zoom slider is set to T (telephoto) or when a
slow shutter speed is being used.
• If the camera shake indicator appears, use a tripod and
the wired remote controller to avoid camera movement.
• You can find out the
status of the Auto Focus
operation by checking the
color of the focus frame
and the status of the
operation lamp.
• Take care that you do not
block the lens or the
sensors with your fingers
as you hold the camera.
6.
After confirming that
the image is in focus,
press the shutter
release button all the
way down to record the
image.
If you see this
Green focus frame and green
operation lamp
Red focus frame and red
operation lamp
It means this
The image is in focus.
The image is not in focus.
Produkt Specifikationer
| Mærke: | Casio |
| Kategori: | Kamera |
| Model: | QV-2300UX |
Har du brug for hjælp?
Hvis du har brug for hjælp til Casio QV-2300UX stil et spørgsmål nedenfor, og andre brugere vil svare dig
Kamera Casio Manualer

2 September 2024
20 August 2024
16 August 2024
15 August 2024
13 August 2024
9 August 2024
9 August 2024
8 August 2024
8 August 2024
6 August 2024
Kamera Manualer
- Kamera Bosch
- Kamera SilverCrest
- Kamera Acer
- Kamera Ozito
- Kamera Denver
- Kamera Sony
- Kamera Canon
- Kamera Samsung
- Kamera GE
- Kamera Panasonic
- Kamera TP-Link
- Kamera Philips
- Kamera Lenco
- Kamera Gigaset
- Kamera Braun
- Kamera Logitech
- Kamera Epson
- Kamera Daewoo
- Kamera Technaxx
- Kamera HP
- Kamera Sanyo
- Kamera Easypix
- Kamera Grundig
- Kamera D-Link
- Kamera Arlo
- Kamera Bushnell
- Kamera Pyle
- Kamera Fujifilm
- Kamera Nikon
- Kamera Kodak
- Kamera Lenovo
- Kamera Olympus
- Kamera Nedis
- Kamera Zorki
- Kamera Optoma
- Kamera Creative
- Kamera Azden
- Kamera Trevi
- Kamera Trust
- Kamera Laserliner
- Kamera Blaupunkt
- Kamera JVC
- Kamera Leica
- Kamera Hitachi
- Kamera Medion
- Kamera Exakta
- Kamera EZVIZ
- Kamera König
- Kamera Gembird
- Kamera Powerfix
- Kamera Alpine
- Kamera Netgear
- Kamera Maginon
- Kamera Avaya
- Kamera Nest
- Kamera Vtech
- Kamera BenQ
- Kamera Bresser
- Kamera Anker
- Kamera Sigma
- Kamera Pentax
- Kamera Rollei
- Kamera Xiaomi
- Kamera Moultrie
- Kamera Viewsonic
- Kamera Imou
- Kamera Polaroid
- Kamera Ricoh
- Kamera Aida
- Kamera Konica-Minolta
- Kamera Foscam
- Kamera Kyocera
- Kamera GoPro
- Kamera Lorex
- Kamera Cobra
- Kamera Velleman
- Kamera FLIR
- Kamera Swann
- Kamera Eufy
- Kamera Celestron
- Kamera Ring
- Kamera Fluke
- Kamera Hikvision
- Kamera AVerMedia
- Kamera Reolink
- Kamera EVE
- Kamera Prixton
- Kamera Marshall Electronics
- Kamera General Electric
- Kamera SPC
- Kamera Hanwha
- Kamera ARRI
- Kamera BirdDog
- Kamera Bauhn
- Kamera MuxLab
- Kamera Spypoint
- Kamera Vivitar
- Kamera Ansco
- Kamera Vimar
- Kamera Oregon Scientific
- Kamera Dahua Technology
- Kamera SereneLife
- Kamera Lexibook
- Kamera Intel
- Kamera SJCAM
- Kamera Scosche
- Kamera Speco Technologies
- Kamera Joy-It
- Kamera Kogan
- Kamera Levenhuk
- Kamera Emerson
- Kamera Minox
- Kamera Burris
- Kamera Silvergear
- Kamera Elmo
- Kamera AViPAS
- Kamera UniView
- Kamera AquaTech
- Kamera Alfatron
- Kamera BZBGear
- Kamera PTZ Optics
- Kamera Daitsu
- Kamera Agfa
- Kamera AgfaPhoto
- Kamera Argus
- Kamera Lumens
- Kamera Yashica
- Kamera Sygonix
- Kamera Mamiya
- Kamera Zenit
- Kamera Fuji
- Kamera Minolta
- Kamera EverFocus
- Kamera RunCam
- Kamera SeaLife
- Kamera Aplic
- Kamera FIMI
- Kamera Meade
- Kamera Contax
- Kamera Sinji
- Kamera Traveler
- Kamera Digital Watchdog
- Kamera Getac
- Kamera Ikegami
- Kamera Pelco
- Kamera ZeissIkon
- Kamera Dorr
- Kamera HOLGA
- Kamera Praktica
- Kamera Hasselblad
- Kamera Moto Mods (Motorola)
- Kamera Fantasea Line
- Kamera Brinno
- Kamera Z CAM
- Kamera General
- Kamera Ergoguys
- Kamera Strex
- Kamera Berger & Schröter
- Kamera Leitz Focomat IIc
- Kamera Cosina
- Kamera Videology
- Kamera InfiRay
- Kamera Videotec
- Kamera GoXtreme
- Kamera IOptron
- Kamera Cambo
- Kamera Kobian
- Kamera Kyocera Yashica
- Kamera Red Digital Cinema
- Kamera Konica
- Kamera Akaso
- Kamera Seek Thermal
- Kamera Ikelite
- Kamera Adeunis
- Kamera Hoppstar
- Kamera PatrolEyes
- Kamera Camouflage
- Kamera HuddleCamHD
- Kamera Linhof
- Kamera Aquapix
- Kamera KanDao
Nyeste Kamera Manualer

29 Marts 2025
29 Marts 2025
27 Marts 2025
12 Marts 2025
12 Marts 2025

14 Januar 2025

13 Januar 2025
12 Januar 2025
11 Januar 2025
11 Januar 2025