Clarion VRX585USB Manual
Læs nedenfor 📖 manual på dansk for Clarion VRX585USB (66 sider) i kategorien Navigator. Denne guide var nyttig for 12 personer og blev bedømt med 4.5 stjerner i gennemsnit af 2 brugere
Side 1/66

Owner's manual & Installation manual
Mode d'emploi et manuel d'installation
Manul de instrucciones y de instalación
RADIO/DVD MULTIMEDIA CENTER
CENTRE MULTIMÉDIA DVD/RADIO
CENTRO DE MULTIMEDIA DE DVD/RADIO

3
English
Owner’s manual
1.DESCRIPTION 05
1-1 Features 05
1-2 Expanding System 06
1-3 Information Guide 07
2.PRECAUTIONS 08
3.CONTROL 12
3-1 Button Functions 12
3-2 Remote Control 13
4.BUTTON AND TOUCH KEY OPERATION 16
4-1 User Guide 16
4-1-1 POWER on Mode 16
4-1-2 TUNER Mode 17
4-1-3 DVD Mode 18
4-1-4 SOUND Mode 19
4-1-5 ADJUST Mode : At TUNER, iPod, USB Mode 21
4-1-6 ADJUST Mode : At AUX, DVD Mode 23
5.CAUTIONS 24
5-1 Liquid Crystal Panel/Generalities 24
5-2 Cleaning 24
6.DVD Video System 25
6-1 DVD Video Features 25
6-2 Discs 26
6-2-1 Playable Disc 26
6-2-2 CD Extra Disc 26
6-2-3 CD-R/CD-RW Disc (MP3, WMA) 26
6-2-4 DVD R/RW Disc 26
6-2-5 Unsupported Disc Format 26
6-2-6 MP3 / WMA Playback 26
6-2-7 DivX Playback 27
TABLE OF CONTENTS
UserManual

4
English
Owner’s manual
6-2-8 Region Number 27
6-3 Registered Trademark 27
7. OPERATIONS 28
7-1 DCP 28
7-2 Basic Operations 28
7-2-1 POWER On/Off 28
7-2-2 MODE Selections 29
7-2-3 LCP Operations 29
7-2-4 AUDIO Operations 30
7-2-5 ADJUST Operations 34
7-2-6 2ZONE Function 38
7-3 RADIO 40
7-4 DVD Video Player 42
7-4-1 Size of the Screen 42
7-4-2 Parental Level 43
7-4-3 Disc Loading 43
7-4-4 Setting the DVD Video 44
7-5 Other Function 47
7-5-1 CDDA 47
7-5-2 MP3 and WMA 47
8. USAGE OF PERIPHERAL DEVICES 50
8-1 Setting iPod 50
8-2 Setting USB 52
9. TROUBLESHOOTING 54
10. SPECIFICATIONS 55
11. INSTALLATION AND WIRE CONNECTION 57
11-1 Cautions on Installation 57
11-2 Main Unit Installation(Universal Mount) 59
11-3 Removing the Main Unit 60
11-4 Main Unit Installation(Fixed Mount) 61
11-5 Cautions on Wiring 62
11-6 Electrical Connection 63

5
English
Owner’s manual
1. DESCRIPTION
* This image is main body with open LCP(Liquid Crystal Panel).
1-1 Features
Automatic 7 Wide Screen LCD
Touch Panel Control
DVD Video / CD / MP3 / WMA / DivX Play Capability
RCA 6 (+2)-Channel (2-Zone) Output
Built-in 50 W x 4 Amplifier
CD-R/CD-RW/DVD RW CompatibleR/DVD
2-ZONE Control
USB Memory Playback(MP3/WMA/AAC)
iPod Control
“iPod” is for legal or rightholder-authorized copying only. Don’t steal music. “ ” is a trademark iPod
of Apple Inc.
6
English
Owner’s manual
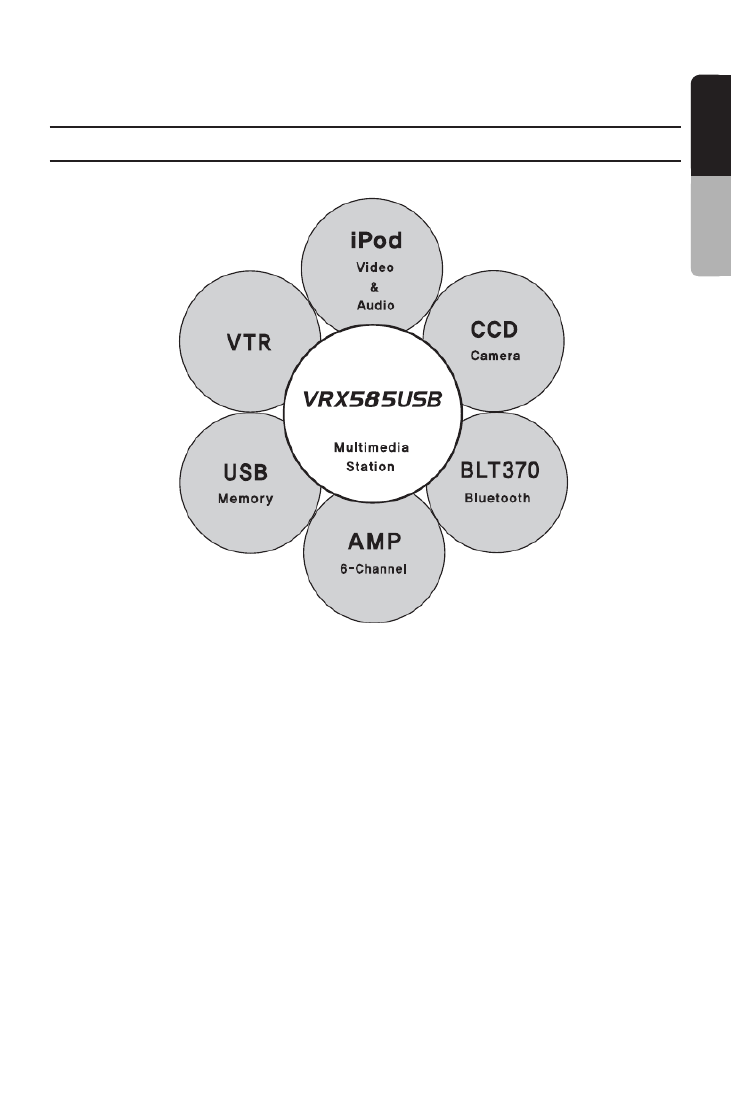
1-2 Expanding System
2. PRECAUTIONS
7
English
Owner’s manual
CLARION PRODUCT REGISTRATION INFORMATION
FOR USA and Canada only
www.clarion.com
Dear Customer:
Congratulations on your purchase of a Clarion mobile electronic products. We are confident that
you'll enjoy your Clarion experience.
There are many benefits to registering your product. We invite you to visit our website at
www.clarion.com to register your Clarion product.
We have made product registration simple with our easy to use website. The registration form is
short and easy to complete. Once you're registered, we can keep you informed of important product
information.
Register at www.clarion.com – it's easy to keep your Clarion product up to date.
1-3 Information Guide
English

8
English
Owner’s manual
2. PRECAUTIONS
WARNING
For your safety, the driver should not watch the DVD video/TV/VTR or operate the
controls while driving. Please note that watching and operating the DVD video/TV/VTR
while driving are prohibited by law in some countries. Also, while driving, keep the
volume to a level at which external sounds can be heard.
When the inside of the car is very cold and the player is used soon after switching on the heater,
moisture may form on the disc (DVD/CD) or the optical parts of the player and proper playback
may not be possible. If moisture forms on the disc (DVD/CD), wipe it off with a soft cloth. If
moisture forms on the optical parts of the player, do not use the player for about one hour. The
condensation will disappear naturally allowing normal operation.
Driving on extremely bumpy roads which cause severe vibration may cause the sound to skip.
This unit uses a precision mechanism. Even in the event that trouble arises, never open the
case, disassemble the unit, or lubricate the rotating parts.
This equipment has been tested and found to comply with the limits for a Class B digital device,
pursuant to Part 15 of the FCC Rules. These limits are designed to provide reasonable protection
against harmful interference in a residential installation. This equipment generates, uses, and can
radiate radio frequency energy and, if not installed and used in accordance with the instructions,
may cause harmful interference to radio communications. However, there is no guarantee that
interference will not occur in a particular installation. If this equipment does cause harmful
interference to radio or television reception, which can be determined by turning the equipment off
and on, the user is encouraged to consult the dealer or an experienced radio/TV technician for help.

10
English
Owner’s manual
Handling Discs
Handling
- New discs may have some roughness around the edges. If such discs are used, the player
may not work or the sound may skip. Use a ball-point pen or the like to remove any
roughness from the edge of the disc.
- Never stick labels on the surface of the disc or mark the surface with a pencil or pen.
- Never play a disc with any cellophane tape or other glue on it or with peeling off marks. If
you try to play such a disc, you may not be able to get it back out of the DVD player or it
may damage the DVD player.
- Do not use discs that have large scratches, are misshapen, cracked, etc. Use of such discs
may cause misoperation or damage.
- To remove a disc from its storage case, press down on the centre of the case and lift the
disc out, holding it carefully by the edges.
- Do not use commercially available disc protection sheets or discs equipped with stabilizers,
etc. These may damage the disc or cause breakdown of the internal mechanism.
Storage
- Do not expose discs to direct sunlight or any heat source.
- Do not expose discs to excess humidity or dust.
- Do not expose discs to direct heat from heaters.
Cleaning
- To remove finger-marks and dust, use a soft cloth and wipe in a straight line from the centre
of the disc to the circumference.
- Do not use any solvents, such as commercially available cleaners, anti-static spray, or
thinner to clean discs.
- After using special disc cleaner, let the disc dry off well before playing it.
On Discs
- Exercise a good precaution when loading a disc with the panel open.
- Never turn off the power and remove the unit from the car with a disc loaded.
Ball-point pen
Roughness
12
English
Owner’s manual
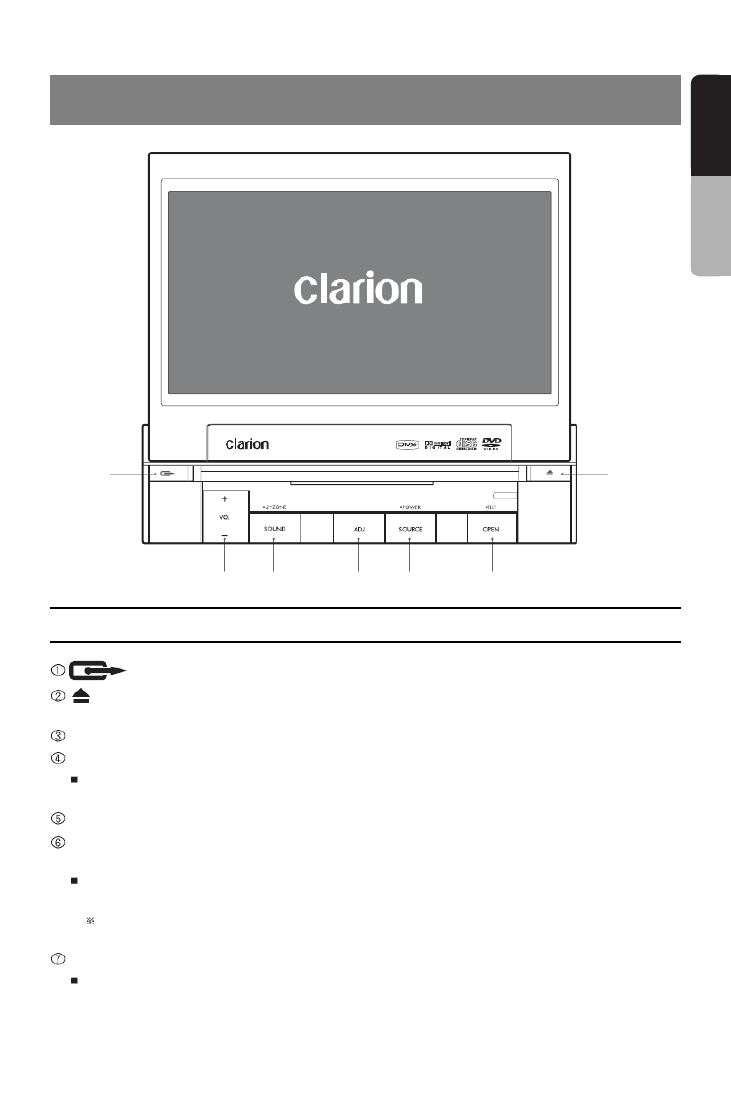
3. CONTROL
①
②
③ ④ ⑤ ⑥ ⑦
3-1 Button Functions
: To remove the DCP (Detachable Control Panel)
: To eject the disc (press this button more than a second if the unit is in middle of turning the
power off)
[+ VOL -] : To increase/decrease the volume (in a range from 0min to 33max)
[SOUND] : To enter/exit the SOUND mode
2-ZONE : To enter the 2-ZONE mode (press the [SOUND] button more than a second)
To exit the 2-ZONE mode (keep pressing this button again)
ADJ : To enter/exit the ADJUST mode changing the settings
[SOURCE] : To enter/exit the SOURCE mode
To change the operation mode when closing the LCP (such as TUNER mode)
POWER : To turn on the power (press the [SOURCE] button more than 2 seconds)
To turn off the power (press this button more than 2 seconds)
If you press this button more than 2 seconds during turning the power off, the power of the
unit will be turned on.
[OPEN] : To open/close the LCP
TILT : To adjust the angle for the LCP, press and hold the [OPEN] button more than a second.
The LCP is moved to forward or backward. (there are 5 adjustable angles available)

13
English
Owner’s manual
3-2 Remote Control
Remote Control Unit (38 buttons)
1 2
3
45
6
7 8
9
0
PWR/SRC BAND
RPT
SCAN
RDM
PBC
SETUP
ENTER
RTN TOP MENU
SLOW
P.CH VOLUME
AUDIO SUB TITLE
WIRELESS REMOTE CONTROLLER
ANGLE 2-ZONE
PLAY/PAUSE MUTE
MENU
P.TIME
SEARCH MODE
PWR/SRC
RPT
SCAN
RDM
PBC
SETUP
RTN
SLOW
P.CH
AUDIO
SUB TITLE
BAND
0 ~ 9
P.TIME
SEARCH MODE
MENU
ENTER
TOP MENU
MUTE
PLAY/PAUSE
VOLUME
2-ZONE
ANGLE
14
English
Owner’s manual
Inserting the Batteries
Open the rear cover, and remove it and insert the AAA (SUM-4, IEC LR03/1.5V) batteries bundled
with the remote control unit in the directions shown in the figure and then, close the rear cover.
Using batteries improperly can cause them to explode. Take note of the following points:
• When replacing batteries, replace both batteries with new ones
• Do not short-circuit, disassemble or heat batteries.
• Do not dispose batteries into fire or flames.
• Dispose of spent batteries properly.
Button Functions
You can use the remote control unit to control this unit. The steering wheel remote control operation
work on the MAIN zone even when the SUB zone is selected.
[PWR/SRC] : To turn on/off the power (press this button more than 2 seconds)
To switch the modes
[BAND] : To switch reception band in TUNER mode
[RPT] : To repeat chapter in DVD mode or repeat track in CD/MP3 modes
To perform folder repeat in MP3 mode
[SCAN] : To scan tracks in USB mode
To scan chapters in DVD mode and tracks in CD/MP3 modes
To scan folders in MP3 mode (keep pressing more than a second)
[RDM] : To play tracks at random in CD/MP3 modes
To play folders at random in MP3 mode (keep pressing more than a second)
[PBC] : To turn on/off PBC function in the Video CD mode
[0-9] : To select the preset number in the Preset List screen of the TUNER mode
To input number of key pad screen in DVD mode
Rear side
Battery cover
AAA (SUM-4, IEC LR03/1.5V)
Batteries

15
English
Owner’s manual
4. BUTTON AND T
[P.TIME] : To turn on/off the playtime display in DVD mode
[SEARCH MODE] : To switch the search mode (keep pressing more than a second in DVD mode)
[SETUP] : To show the DVD SETUP screen while playing DVD
[MENU] : To display stored menu in DVD video disc
[ ] ][ ][ ][ : To select a menu
To scroll the track/folder list screen in MP3 modes (only )
[ENTER] : To select track, file, folder or item in all modes
[RTN] : To return to the previous screen from the list or menu screens
To switch to the previous screen display while the menu screen is being displayed.
[TOP MENU] : To display top menu screen on DVD video disc
[SLOW] : To perform slow playback in DVD mode
[PLAY/PAUSE] : To play or pause the video / audio media
To stop video playback in DVD Video mode (keep pressing more than a
second)
[MUTE] : To turn mute on/off
When the mute is turned on, appears at the top right of the screen.
[P.CH] ( ) : To seek up/down in TUNER mode
To select the next higher or lower chapter number in DVD mode
To perform fast-forward and fast backward (Keep pressing) in DVD/ iPod modes.
To select the next higher or lower track in CD, MP3 modes
To select the next higher or lower track numbers in iPod mode.
[VOLUME] : To increase/decrease the volume
[AUDIO] : To switch the AUDIO function in DVD/CD modes
[SUB TITLE] : To display subtitle in DVD mode
[ANGLE] : To switch the ANGLE function in DVD mode
when the ANGLE MARK is displayed (available only on multiple angles DVDs)
[2-ZONE] : To turn on/off 2-ZONE function
To switch between main-zone and sub-zone when 2-Zone function is turned on
When SUB zone is selected
SUB zone operations are supported, but button functions are limited as follows:
[VOLUME] button controls sound volume for MAIN zone source.
[MUTE] button controls audio mute function for MAIN zone source.

16
English
Owner’s manual
Last mode screen
4-1 User Guide
4-1-1 POWER ON Mode
ENGINE ON
4. BUTTON AND TOUCH KEY
OPERATION
SOURCE “Long press”

17
English
Owner’s manual
4-1-2 TUNER Mode
SOURCE
TUNER
BAND
AS

18
English
Owner’s manual
4-1-3 DVD Mode
SOURCE
DVD
CONTROL
10KEY

19
English
Owner’s manual
4-1-4 SOUND Mode
SOUND
CUSTOM DETAIL
BACK
CUSTOM

20
English
Owner’s manual
OTHERS
BAL/FAD

21
English
Owner’s manual
GENERAL
ADJUST
4-1-5 ADJUST Mode : At TUNER, iPod, USB Mode
ADJ
BACK

22
English
Owner’s manual
BACK
ADJUST

23
English
Owner’s manual
5. CAUTIONS
4-1-6 ADJUST Mode : At AUX, DVD Mode
ADJ
ADJUST
COLOR
+

24
English
Owner’s manual
5. CAUTIONS
5-1 Liquid Crystal Panel/Generalities
5-2 Cleaning
For a longer service life, be sure to read the following cautions.
Be sure to house the liquid crystal panel inside the main unit when parking the car outdoors for
long period of time. The liquid crystal panel will operate properly in a temperature range of 0 to
60°C.
Do not allow any liquids on the set from drinks, umbrellas etc. Doing so may damage the internal
circuitry.
Do not disassemble or modify the set in any way. Doing so may result in damage.
Do not draw the liquid crystal panel out and use it as a tray. Also, subjecting the liquid crystal panel to
shocks may result in breakage, deformation or other damage.
Do not let cigarettes burn the display. Doing so may damage or deform the cabinet.
If a problem should occur, have the set inspected at your store of purchase.
Do not insert objects or poke in the space between the liquid crystal panel and the main unit when
the panel is tilted.
Do not place anything on the display when the panel is tilted.
The remote control unit may not work if the remote control sensor is exposed to direct sunlight.
In extremely cold weather, the display movement may slow down and the display may darken, but
this is not a malfunction. The display will work normally when the temperature increases.
Small black and shiny spots inside the liquid crystal panel are normal for LCD products.
The liquid crystal panel may stop temporarily when it opens or closes, when the engine stops or
when it is cold.
The touch keys on the display operate when slightly touched. Do not press the touch key screen
with much force.
Do not push the case surrounding the touch key panel with much force. This may cause
malfunctioning of the touch keys.
Cleaning the cabinet
For tough dirt, apply some neutral detergent diluted in water to a soft cloth, wipe off the dirt
gently, wipe again with a dry cloth. Do not use benzene, thinner, car cleaner, etc., as these
substances may damage the cabinet or cause the paint to peel. Also, leaving rubber or plastic
products in contact with the cabinet for long periods of time may cause stains.
Cleaning the liquid crystal panel
The liquid crystal panel tends to collect dust, so wipe it off occasionally with a soft cloth.
The surface is easily scratched, so do not rub it with hard objects.

25
English
Owner’s manual
DVD video is a high-quality digital video source that provides crisp and clear images. One 12cm
disc contains either one film or four hours of music.
This unit provides the following functions in addition to the high image quality and sound quality of
DVD video. The functions described in the section, “Features”, for example, the recorded language,
subtitles, angles, etc. differ with the DVD video disc. Refer to the instructions provided with the DVD
video. Some disc functions may operate differently from described in this manual.
Multi-Sound
DVD video can store up to 8 languages for one film; select the language of your preference.
The languages stored on the disc are indicated by the icon shown below.
Multi-Angle
A DVD video that is filmed from multiple angles allows you to select the angle of choice.
The number of recorded angles is indicated by the icon shown below.
Sub-Picture (subtitle)
A DVD video can record subtitles for up to 32 languages and you can select the language of the
subtitles you wish to see.
The number of recorded subtitle languages is indicated by the icon shown below.
Multi-Story
When a DVD video contains more than one story for a film, you can select the story you wish to
enjoy. The operation procedures vary with the disc; observe the instructions for selecting a story
provided during playback.
Dolby Digital
Dolby Digital enables up to 5.1 independent multi-channel audio reproductions, the same type of
surround system that is used in cinemas.
Menu Screen
Menus can be called up during DVD video playback to perform menu setting.
To display the menu, touch the key in the following order:
SOURCE mode [CONTROL] key [MENU] key[DVD] key
6. DVD VIDEO SYSTEM
6-1 DVD Video Features
2
2
2

27
English
Owner’s manual
7. OPERATIONS
6-2-7 DivX Playback
This player can play back DivX format file recorded on DVD R/RW and CD-R/RW discs.
6-2-8 Region Number
The DVD video system assigns a region number to DVD video players and DVD discs by sales
area. The DVD video region number is marked on the disc jacket as shown below.
This product incorporates copyright protection technology that is protected by U.S. patents and
other intellectual property rights. Use of this copyright protection technology must be authorized
by Macrovision, and is intended for home and other limited viewing uses only unless otherwise
authorized by Macrovision. Reverse engineering or disassembly is prohibited.
Manufactured under licence from Dolby Laboratories. “Dolby”, “Pro Logic”, and the double-D
symbol are trademarks of Dolby Laboratories.
“iPod” is for legal or rightholder-authorized copying only. Don’t steal music. “iPod” is a trademark
of Apple Inc.
Windows MediaTM, the Windows®logo are trademarks, or registered trademarks of Microsoft
Corporation in the United States and/or other countries.
DivX, DivX Certified, and associated logos are trademarks of DivX Inc and are used under license.
6-3 Registered Trademark
ALL
146
1
Produkt Specifikationer
| Mærke: | Clarion |
| Kategori: | Navigator |
| Model: | VRX585USB |
Har du brug for hjælp?
Hvis du har brug for hjælp til Clarion VRX585USB stil et spørgsmål nedenfor, og andre brugere vil svare dig
Navigator Clarion Manualer

16 August 2024
16 August 2024
16 August 2024
16 August 2024
15 August 2024
15 August 2024
15 August 2024
14 August 2024
14 August 2024
14 August 2024
Navigator Manualer
- Navigator SilverCrest
- Navigator Acer
- Navigator Honda
- Navigator BMW
- Navigator Toyota
- Navigator Opel
- Navigator Sony
- Navigator Mazda
- Navigator Audi
- Navigator Volkswagen
- Navigator Philips
- Navigator Pioneer
- Navigator Kenwood
- Navigator Lowrance
- Navigator HP
- Navigator Harman Kardon
- Navigator Becker
- Navigator Garmin
- Navigator Sanyo
- Navigator Grundig
- Navigator Volvo
- Navigator Motorola
- Navigator Asus
- Navigator Bushnell
- Navigator Pyle
- Navigator Humminbird
- Navigator Sygic
- Navigator Thomson
- Navigator Skoda
- Navigator Nokia
- Navigator Mio
- Navigator Blaupunkt
- Navigator JVC
- Navigator Uniden
- Navigator Hitachi
- Navigator Medion
- Navigator Alpine
- Navigator Navman
- Navigator Parrot
- Navigator Packard Bell
- Navigator Kapsys
- Navigator Zebra
- Navigator Jensen
- Navigator VDO
- Navigator Zenec
- Navigator Kalkhoff
- Navigator TomTom
- Navigator Cobra
- Navigator Binatone
- Navigator Dual
- Navigator GlobalSat
- Navigator Celestron
- Navigator Overmax
- Navigator Midland
- Navigator Alfa Romeo
- Navigator Raymarine
- Navigator Simrad
- Navigator MaxCom
- Navigator Chrysler
- Navigator Furuno
- Navigator Navitel
- Navigator Caliber
- Navigator Lark
- Navigator Teasi
- Navigator GoClever
- Navigator V7
- Navigator Airis
- Navigator Audiovox
- Navigator Rand McNally
- Navigator Navigon
- Navigator IGo
- Navigator Magellan
- Navigator Scosche
- Navigator Prestigio
- Navigator Boss
- Navigator Camos
- Navigator Coyote
- Navigator Insignia
- Navigator Eagle
- Navigator Xomax
- Navigator Sylvania
- Navigator Marquant
- Navigator Lanzar
- Navigator GolfBuddy
- Navigator Soundstream
- Navigator VDO Dayton
- Navigator Dashmate
- Navigator Route 66
- Navigator Falk
- Navigator Seecode
- Navigator Nav N Go
- Navigator Pharos
- Navigator Viamichelin
- Navigator ModeCom
- Navigator Xzent
- Navigator CarTrek
- Navigator Whistler
- Navigator ESX
- Navigator Dynavin
- Navigator Cheetah
- Navigator Cydle
- Navigator LXNAV
- Navigator Planet Audio
- Navigator Eclipse
- Navigator Voice Caddie
- Navigator SkyCaddie
- Navigator TELE System
- Navigator IZZO Golf
- Navigator Zoleo
- Navigator Izzo
Nyeste Navigator Manualer
18 Januar 2025

10 Januar 2025
31 December 2025
30 December 2025
29 December 2024
29 December 2024
14 December 2024
14 December 2024
8 December 2024
8 December 2024