Dell E2424HS Manual
Læs nedenfor 📖 manual på dansk for Dell E2424HS (59 sider) i kategorien overvåge. Denne guide var nyttig for 52 personer og blev bedømt med 4.5 stjerner i gennemsnit af 2 brugere
Side 1/59

Dell E2424HS
User’s Guide
Monitor Model: E2424HS
Regulatory Model: E2424HSf

Notes, Cautions and Warnings
NOTE: A NOTE indicates important information that helps you make
better use of your computer.
CAUTION: A CAUTION indicates potential damage to hardware or loss of
data if instructions are not followed.
WARNING: A WARNING indicates a potential for property damage, personal
injury, or death.
Copyright © 023 Dell Inc. or its subsidiaries. All rights reserved. 2 Dell, EMC, and other are trademarks
of Dell Inc. or its subsidiaries. Other trademarks may be trademarks of their respective owners.
2023 - 05
Rev. A01

4 │ Contents
Using the On-Screen Display (OSD) menu 36 ..................
Setting up display resolution on your monitor ..............51
Using tilt 53 .................................................................
Troubleshooting 54 ...............................................
Self-test 54 .................................................................
Built-in diagnostics 55 ..................................................
Common problems 56 ...................................................
Product-specific problems 58 ........................................
Appendix .........................................................59
FCC Notices (U.S. Only) and Other Regulatory
Information ............................................................. 59
Contact Dell ............................................................ 59
EU product database for energy label and product
information sheet .................................................... 59

Safety instructions │ 5
Safety instructions
Use the following safety guidelines to protect your monitor from potential damage and
to ensure your personal safety. Unless otherwise noted, each procedure included in this
document assumes that you have read the safety information that shipped with your
monitor.
Before using the monitor, read the safety information that is
shipped with your monitor and also printed on the product. Keep the
documentation at a secure location for future reference.
CAUTION: Use of controls, adjustments, or procedures other than
those specified in this documentation may result in exposure to shock,
electrical hazards, and/or mechanical hazards.
• Place the monitor on a solid surface and handle it carefully. The screen is fragile and
can be damaged if dropped or hit sharply.
• Always be sure that your monitor is electrically rated to operate with the AC power
available in your location.
• Keep the monitor in room temperature. Excessive cold or hot conditions can have an
adverse effect on the liquid crystal of the display.
• Connect the power cable from the monitor to a wall outlet that is near and accessible.
See Connecting your monitor.
• Do not place and use the monitor on a wet surface or near water.
• Do not subject the monitor to severe vibration or high impact conditions. For example,
do not place the monitor inside a car trunk.
• Unplug the monitor when it is going to be left unused for an extended period of time.
• To avoid electric shock, do not attempt to remove any cover or touch the inside of the
monitor.

6 About your monitor │
About your monitor
Package contents
Your monitor ships with the components indicated in the table. Ensure that you have received
all the components and see Contact Dell if anything is missing.
NOTE: Some items may be optional and may not ship with your monitor.
Some features may not be available in certain countries.
NOTE: To set up Stand from any other source, refer to the documentation
comes with the Stand for instruction.
Component image Component description
Display
Stand riser
Stand base
VESA™ Screw Cover
Power cable (varies by country)
VGA cable (Japan region)

About your monitor 7 │
HDMI cable
• Quick Start Guide
• Safety, Environmental, and
Regulatory Information
Product features
The Dell E2424HS flat panel monitor has an active matrix, Thin-Film Transistor (TFT),
Liquid Crystal Display (LCD) Panel with LED backlight.
The monitor features include :
• 60.47 cm (23.8 in.) diagonal viewable area display (measured diagonally).
1920 x 1080 resolution, with full-screen support for lower resolutions.
• Wide viewing angles of 178 degrees in vertical and horizontal directions.
• Contrast ratio (3000:1).
• Digital connectivity with DisplayPort or HDMI.
• Support FHD@60Hz as per specified in HDMI 1.4
• Height adjustment capability.
• Dual built-in speakers.
• Plug and play capable if supported by your computer.
• On-Screen Display (OSD) adjustments for easy setup and screen optimization.
• ≤ 0.3 W in Standby Mode.
• Optimize eye comfort with a flicker-free screen.
• The monitor adopts flicker-free technology, which clears the eye visible flicker, brings
comfort viewing experience and preventing users suffer from eye strain and fatigue.
• Possible long-term effects if blue light emission from the monitor may cause damage to
the eyes, including eye fatigue or digital eye strain. ComfortView feature to reduce risk
of eye strain from high blue light emission.
• Security-lock slot.
• Arsenic-free glass and Mercury-free for panel only.
• BFR/PVC-Reduced (Its circuit boards are made from BFR/PVC-free laminates).
• Meets NFPA 99 leakage current requirement.
• TCO Certified & TCO Certified Edge.
• EPEAT registered where applicable. EPEAT registration varies by country.
See https://www.epeat.net for registration status by country.
• RoHS Compliant.
• Energy Star® Certified.

8 About your monitor │
Identifying features and controls
Front view
Label Description Use
1Function buttons To access the OSD menu and change
the settings if required. For more
information, see Using the front
panel controls.
2Power On/Off button
(with LED indicator)
To turn the monitor On or Off.
Solid white light indicates that the
monitor is turned on and functioning
normally. Blinking white light indicates
that the monitor is in Standby Mode.

About your monitor 9 │
Back view
Without monitor stand With monitor stand
4
5
1 32
Label Description Use
1Security-lock slot (based on
Kensington Security SlotTM)
Secures monitor with security cable
lock (sold separately)
2Barcode, serial number, and
service tag label
See this label if you need to contact
Dell for technical support. The Service
Tag is a enables Dell service technicians
to identify the hardware components
in your computer and access warranty
information.
3Regulatory information List the regulatory approvals.
4Cable-management clip To organize the cables.
5Stand thumbscrew Release stand from monitor.
Side view

10 │ About your monitor
Bottom view, without monitor stand
1 3 4 5
5 2
Label Description Use
1Power port To connect the monitor power cable.
2DP port For connection to your computer using DP cable.
3HDMI port For connection to your computer using HDMI cable.
4VGA port For connection to your computer using VGA cable.
5Speakers To produce audio output.

About your monitor │ 11
Monitor specifications
Model E2424HS
Screen type Active matrix-TFT LCD
Panel type Vertical Alignment(VA)
Viewable area
Diagonal 604.70 mm (23.8 in.)
Active area
Horizontal
Vertical
Area
527.04 mm (20.75 in.)
296.46 mm (11.67 in.)
1562.46 cm2 (242.18 in.2)
Pixel pitch 0.2745 mm x 0.2745 mm
Pixel per inch (PPI) 93
Viewing angle
Horizontal
Vertical
178° (typical)
178° (typical)
Brightness 250 cd/m² (typical)
Contrast ratio 3,000 to 1 (typical)
Faceplate coating Anti-glare with 3H hardness
Backlight LED edgelight system
Response time
Normal mode
Fast mode
< 8 ms
< 5 ms
Color depth 16.7 million colors
Color gamut 72% NTSC (CIE1931)
83% NTSC (CIE1976)
Dell display manager
compatibility
Yes
Connectivity 1 x DP 1.2, 1 x HDMI 1.4, 1 x VGA
Bezel width (edge of
monitor to active area)
5.8 mm (Top)
5.8 mm (Left/Right)
21.95 mm (Bottom)
Security Security-lock slot for cable lock (optional purchase)
Tilt angle -5° to 21°
Swivel (Lazy Susan) -173° to 173°
Height adjustable stand 130+/-5 mm
Built-in Speakers
(2 x 1 W sound output)
Speaker 2x1W

12 About your monitor │
Resolution specifications
Model E2424HS
Horizontal scan range
30 kHz to 83 kHz (automatic)
Vertical scan range 50 Hz to 75 Hz (automatic)
Maximum preset resolution 1920 x 1080 @ 60 Hz
Preset display modes
Display mode Horizontal
frequency
(kHz)
Vertical
frequency
(Hz)
Pixel clock
(MHz)
Sync polarity
(Horizontal/Vertical)
VESA, 720 x 400 31.5 28.370.1 -/+
VESA, 640 x 480 31.5 25.259.9 -/-
VESA, 640 x 480 37.5 75.0 31.5 -/-
VESA, 800 x 600 37.9 +/+60.3 40.0
VESA, 800 x 600 46.9 75.0 49.5 +/+
VESA, 1024 x 768 48.4 60.0 65.0 -/-
VESA, 1024 x 768 60.0 75.0 78.8 +/+
VESA, 1152 x 864 108.067.5 75.0 +/+
VESA, 1280 x1024 64.0 108.060.0 +/+
VESA, 1280 x1024 80.0 75.0 135.0 +/+
VESA, 1600 x 900 108.060.0 60.0 +/+
VESA, 1920 x1080 67.5 +/+60.0 148.5

About your monitor │ 13
Electrical specifications
Model E2424HS
Video input signals • Analog RGB: 0.7 V ± 5 %, 75 Ω input impedance
• HDMI 1.4, 600 mV for each differential line, 100 Ω input
impedance per differential pair
• DP 1.2, 600 mV for each differential line,
100 Ω input impedance per differential pair
Synchronization
input signals
Separate horizontal and vertical synchronizations,
polarity-free TTL level,
SOG (Composite SYNC on green)
AC input voltage/
frequency/current
100 VAC to 240 VAC/50 Hz or 60 Hz ± 3 Hz/1.5 A
Inrush current 30 A (120 V AC Input)
60 A (240 V AC Input)
Power Consumption 0. W (Off Mode)11
0.2 W (Standby Mode)1
14 W (On Mode)1
28 W (Max)2
14.17 W (P )on 3
45.73 kWh (TEC)3
1 As defined in EU 2019/2021 and EU 2019/2013.
2
Max brightness and contrast setting.
3
Pon : Power consumption of On Mode as defined in Energy Star 8.0 version.
TEC: Total energy consumption in kWh as defined in Energy Star 8.0 version.
This document is informational only and reflects laboratory performance. Your
product may perform differently, depending on the software, components, and
peripherals you ordered, and shall have no obligation to update such information.
Accordingly, the customer should not rely upon this information in making
decisions about electrical tolerances or otherwise. No warranty as to accuracy or
completeness is expressed or implied.
NOTE: This monitor is ENERGY STAR certified.
This product qualifies for ENERGY STAR in the factory default settings which
can be restored by "Factory Reset" function in the OSD menu. Changing
the factory default settings or enabling other features may increase power
consumption that could exceed the ENERGY STAR specified limit.

14 About your monitor │
Physical characteristics
Model E2424HS
Signal cable type:
Analog
Digital
D-Sub (VGA), 15 pins (cable is included for JPN
region only)
DP, 20 pins
HDMI, 19 pins
NOTE: Dell monitors are designed to work optimally with the video cables that
are shipped with your monitor. As Dell does not have control over the different
cable suppliers in the market, the type of material, connector and process used to
manufacture these cables, Dell does not guarantee video performance on cables that
are not shipped with your Dell monitor.
Dimensions (with stand):
Height (Extended) 512.07 mm (20.16 in.)
Height (Compressed) 377.91 mm (14.88 in.)
Width 538.64 mm (21.21 in.)
Depth 209.46 mm (8.25 in.)
Dimensions (without stand):
Height 324.21 mm (12.76 in.)
Width 538.64 mm (21.21 in.)
Depth 48.90 mm (1.93 in.)
Stand dimensions:
Height (Extended) 274.12 mm (10.79 in.)
Height (Compressed) 144.12 mm (5.67 in.)
Width 257.11 mm (10.12 in.)
Depth 209.45 mm (8.25 in.)
Weight:
Weight with packaging 5.96 kg (13.14 lb)
With stand assembly and
cables 4.53 kg (10.00 lb)
Without stand assembly and
cables 2.82 kg (6.22 lb)
Weight of stand assembly 1.24 kg (2.73 lb)

About your monitor │ 15
Environmental characteristics
Model E2424HS
Temperature:
Operating 0 °C to 40 °C (32 °F to 104 °F)
Non-operating:
Storage/Shipping -20 °C to 60 °C (-4 °F to 140 °F)
Humidity:
Operating 10% to 80% (non-condensing)
Non-operating:
Storage/Shipping 5% to 90% (non-condensing)
Altitude:
Operating (maximum) 5,000 m (16,400 ft)
Non-operating (maximum) 12,192 m (40,000 ft)
Thermal dissipation 95.54 BTU/hour (maximum)
47 74. BTU/hour (on mode)

16 About your monitor │
Pin assignments
D-Sub 15-pin connector
Pin Number Signal Assignment
1 Video-Red
2 Video-Green
3 Video-Blue
4 GND
5 Self-test
6 GND-R
7 GND-G
8 GND-B
9 DDC +5 V
10 GND-sync
11 GND
12 DDC data
13 H-sync
14 V-sync
15 DDC clock

About your monitor │ 17
Pin assignments
DP 20-pin connector
Pin Number Signal Assignment
1 ML_LANE3_N
2 GND
3 ML_LANE3_P
4 ML_LANE2_N
5 GND
6 ML_LANE2_P
7 ML_LANE1_N
8 GND
9 ML_LANE1_P
10 ML_LANE0_N
11 GND
12 ML_LANE0_P
13 GND
14 GND
15 AUX _CH_P
16 GND
17 AUX _CH_N
18 HPD
19 RETURN
20 DP_PWR
18 About your monitor │
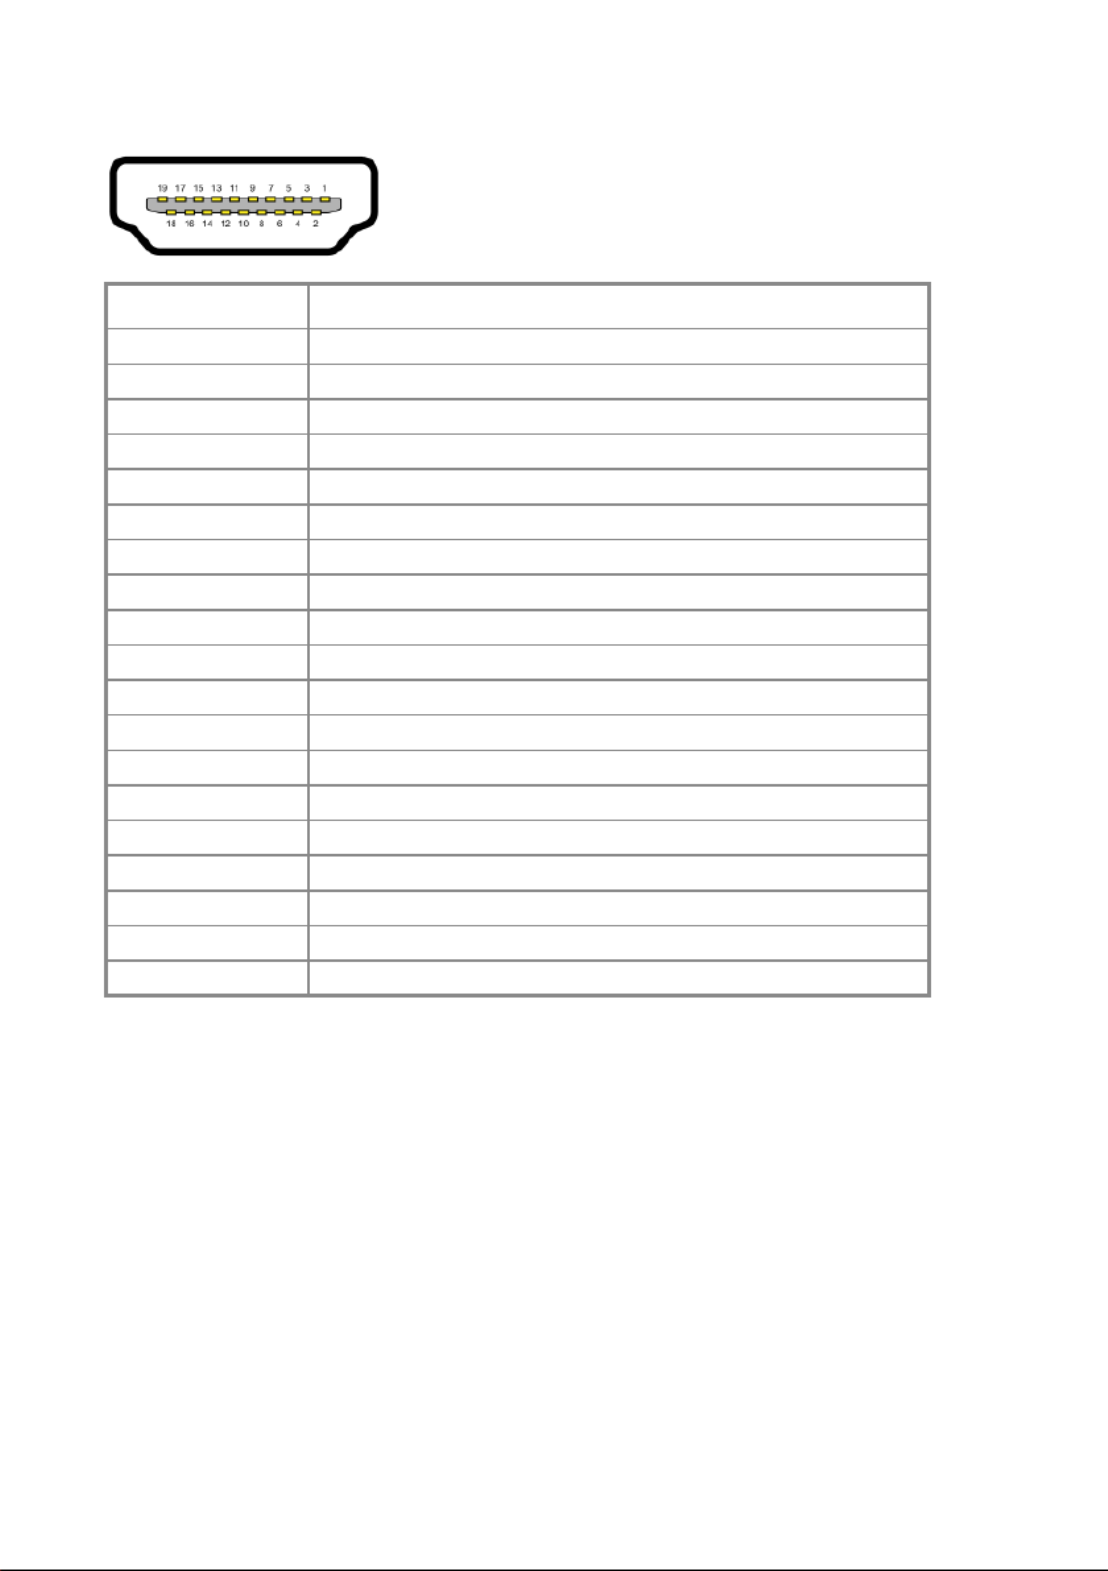
Pin assignments
HDMI 19-pin connector
Pin Number Signal Assignment
1 TMDS DATA 2+
2 TMDS DATA 2 SHIELD
3 TMDS DATA 2-
4 TMDS DATA 1+
5 TMDS DATA 1 SHIELD
6 TMDS DATA 1-
7 TMDS DATA 0+
8 TMDS DATA 0 SHIELD
9 TMDS DATA 0-
10 TMDS CLOCK+
11 TMDS CLOCK SHIELD
12 TMDS CLOCK-
13 CEC
14 Reserved (N.C. on device)
15 DDC CLOCK (SCL)
16 DDC DATA (SDA)
17 DDC/CEC Ground
18 +5 V POWER
19 HOT PLUG DETECT

About your monitor │ 19
Plug and play capability
You can install the monitor in any Plug and Play-compatible system. The monitor
automatically provides the computer with its Extended Display Identification Data (EDID)
using Display Data Channel (DDC) protocols so the
computer
can configure itself and
optimize the monitor settings. Most monitor installations are automatic, you can select
different settings
as required
. For more information about changing the monitor settings,
see Operating your monitor.
LCD monitor quality and pixel policy
During the LCD Monitor manufacturing process, it is normal for one or more pixels to
become fixed in an unchanging state, which are hard to see and do not affect the display
quality or usability. For more information about Dell Monitor Quality and Pixel Policy, see
Dell Support site at www.dell.com/pixelguidelines.

About your monitor 21 │
• When sitting, make sure that the weight of your legs is on your feet and not on the front
portion of your seat. Adjust your chair’s height or use a footrest if necessary to maintain a
proper posture.
• Vary your work activities. Try to organize your work so that you do not have to sit and work
for extended periods of time. Try to stand or get up and walk around at regular intervals.
• Keep the area under your desk clear of obstructions and cables or power cords that may
interfere with comfortable seating or present a potential trip hazard

22 About your monitor │
Handling and moving your display
To ensure the monitor is handled safely when lifting or moving it, follow the guidelines mentioned
below:
• Before moving or lifting the monitor, turn off your computer and the monitor.
• Disconnect all cables from the monitor.
• Place the monitor in the original box with the original packing materials.
• Hold the bottom edge and the side of the monitor firmly without applying excessive pressure
when lifting or moving the monitor.
• When lifting or moving the monitor, ensure the screen is facing away from you and do not
press on the display area to avoid any scratches or damage.
About your monitor │ 23
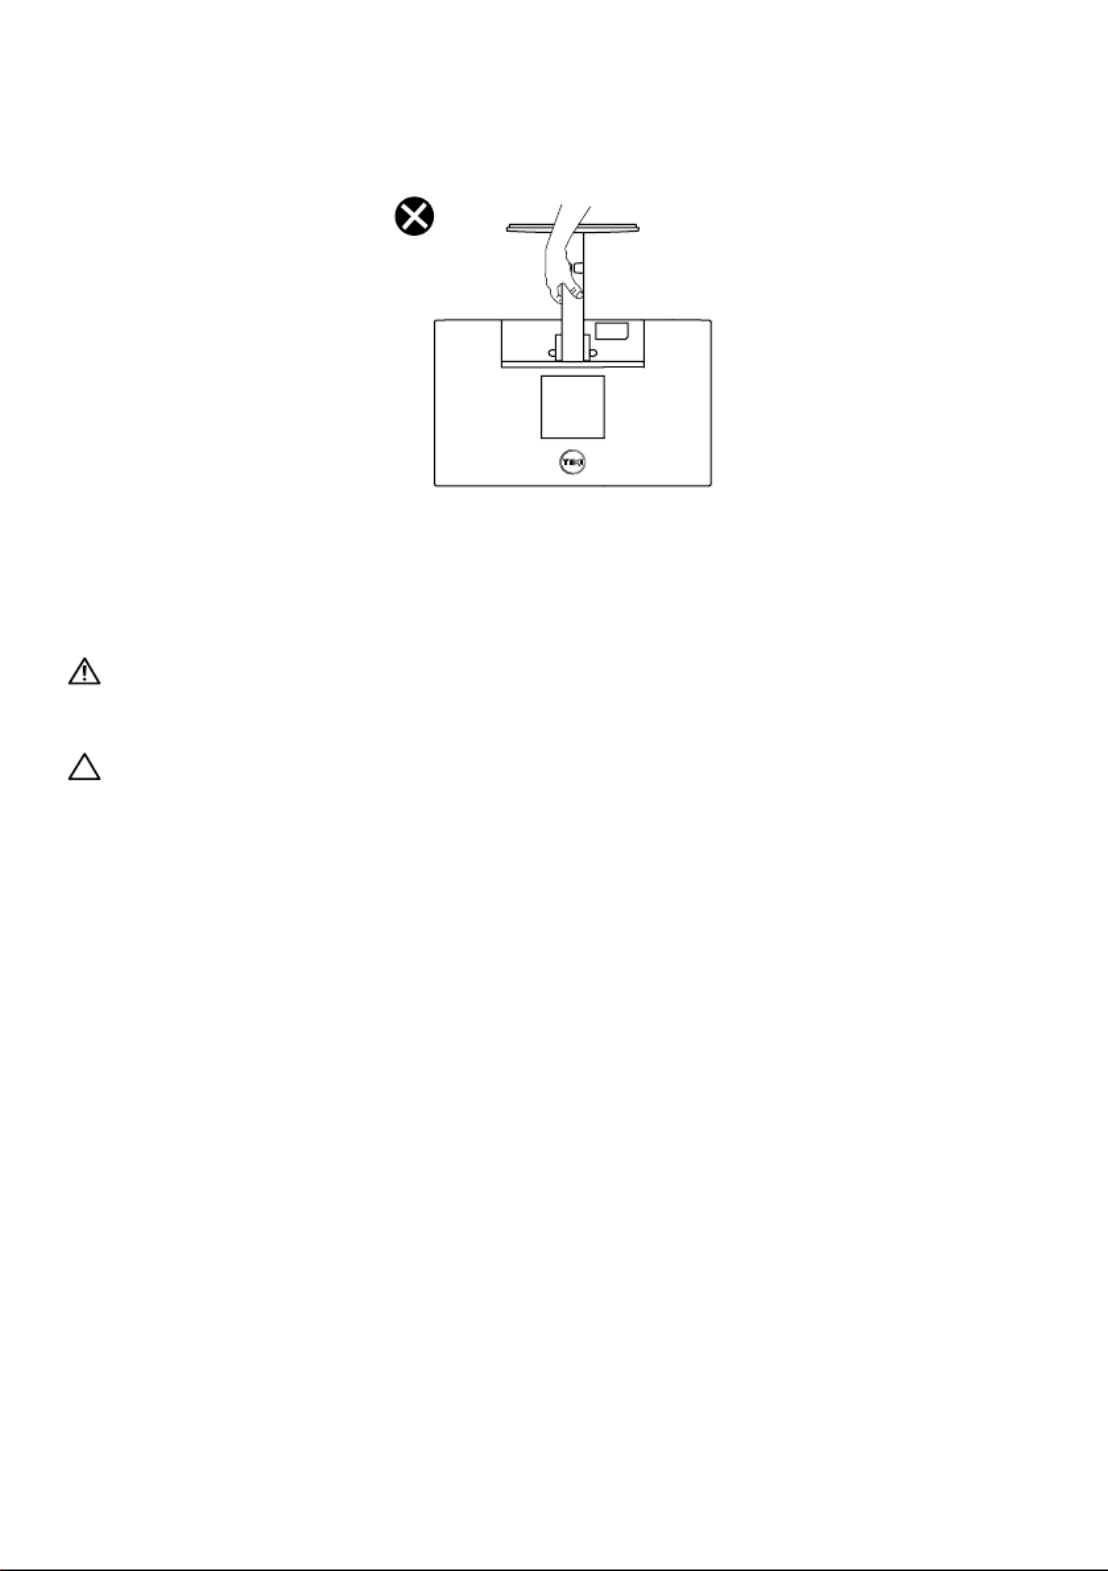
• When transporting the monitor, avoid any sudden shock or vibration to it.
• When lifting or moving the monitor, do not turn the monitor upside down while holding the
stand base or stand riser. This may result in accidental damage to the monitor or cause
personal injury.
Maintenance guidelines
Cleaning your monitor
WARNING: Before cleaning the monitor, unplug the monitor power cable
from the electrical outlet.
CAUTION: Read and follow the Safety instructions before cleaning the
monitor.
For best practices, follow these instructions in the list below while unpacking, cleaning or
handling your monitor:
• To clean your screen, lightly dampen a soft and clean cloth with water. If possible, use a
special screen-cleaning, tissue or solution suitable for the anti- static coating. Do not use
benzene, thinner, ammonia, abrasive cleaners, or compressed air.
• Use a lightly-dampened cloth to clean the monitor. Avoid using detergent of any kind as
some detergents leave a milky film on the monitor.
• If you notice white powder when you unpack your monitor, wipe it off with a cloth.
• Handle your monitor with care as the black-colored monitor may get scratched.
• To help maintain the best image quality on your monitor, use a dynamically changing screen
saver and turn off your monitor when not in use.

24 │Setting up the monitor
Setting up the monitor
Connecting the stand
NOTE: The stand is not attached when the monitor is shipped from the
factory.
NOTE: The following procedure is applicable for the stand that shipped
with your monitor.
To attach the monitor stand:
1. Assemble the stand riser to stand base.
a. Insert the stand base fully into the stand riser slot.
b. Lift the screw handle and turn the screw clockwise.
c. After fully tightening the screw, fold the screw handle flat within the recess.
2. When square indicator on Lazy Susan is aligned with the arrow, this indicates
the Lazy Susan is at the initial zero position (0˚).

Setting up the monitor │ 25
3. Attach the VESA cover.
4. Attach the stand assembly to the monitor.
a. Place the monitor on a soft cloth or cushion near the edge of desk.
b. Align the stand assembly bracket to the monitor groove.
c. Insert the bracket fully towards monitor.
d. Tighten thumbscrew clockwise till it's securely fastened.
26 │Setting up the monitor
Connecting your monitor
WARNING: Before you begin any of the procedures in this section, follow
the Safety instructions.
WARNING: For your safety, be sure that the grounded power outlet you plug
the power cord into easily accessible to operator and located as close to the
equipment as possible.
To disconnect power from the equipment, unplug the power cord from the
power outlet by grasping the plug firmly. Never pull on the cord.
WARNING: A certified power supply cord has to be used with this equipment.
The relevant national installation and/or equipment regulations shall be
considered. A certified power supply cord not lighter than ordinary polyvinyl
chloride flexible cord according to IEC 60227 (designation H05VV-F 3G
0.75mm² or H05VVH2-F2 3G 0.75mm²) shall be used. An alternative flexible
cord is synthetic rubber.
NOTE: Do not connect all cables to the computer at the same time. It is
recommended to route the cables through the cable-management slot
before you connect them to the monitor.
NOTE: Dell monitors are designed to work optimally with Dell supplied inbox
cables. Dell does not guarantee the video quality and performance when
using non-Dell cables.
To connect your monitor to the computer:
1. Turn off your computer and disconnect the power cable.
2. Connect VGA or DP or HDMI cable from your monitor to the computer.
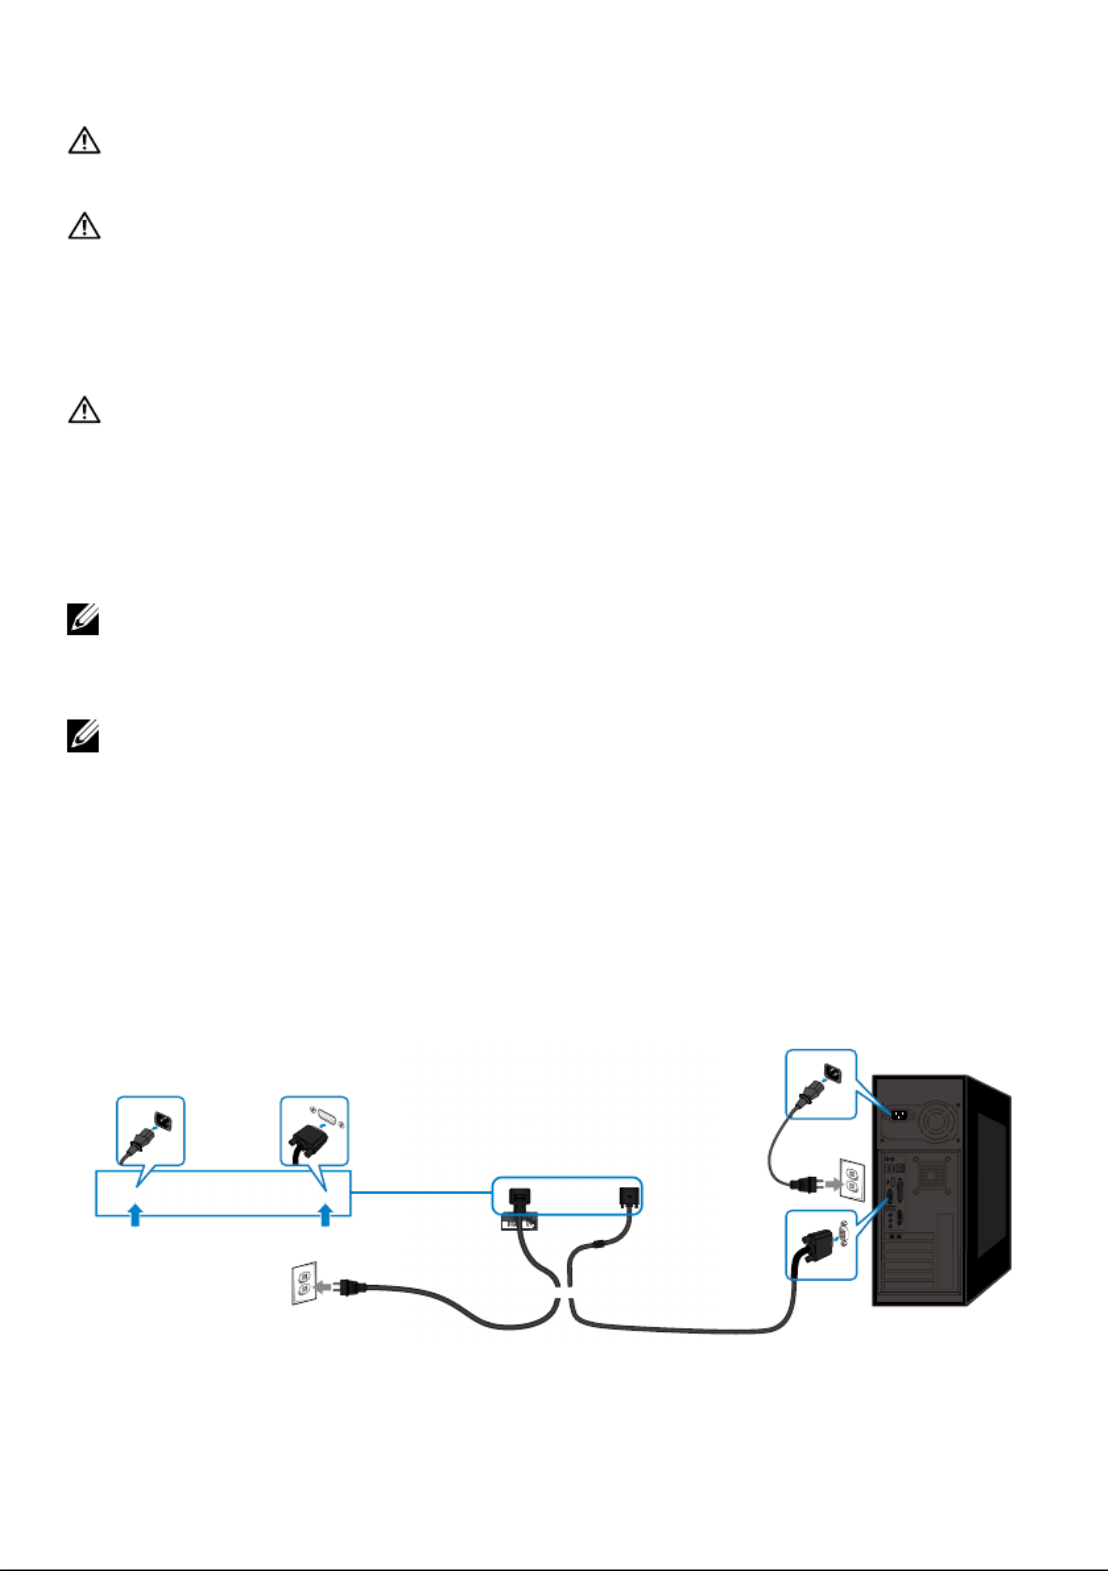
Connecting VGA cable
VGA
VGA

Setting up the monitor │ 27
Connecting DP cable
DP
DP
Connecting HDMI cable
HDMI
HDMI
Organizing cables
Use the cable-management clip to route the cables connected to your monitor.
3C0181Y00-xx x-G(A)xx
DELL E242 4HS
Flat Panel M onitor/液晶显示器
型号:E2424HS
输入电源:
100-240V ~ 50/60Hz,
1.5A
Made in China /
中国制造
Manu factur ed MAY 2022date /製造日 日期:
Service Tag:
BBC1234
Express SVC Co
246 299 383 84
S/N:
CN-012345-
FCC00-951-
001L-A00

28 │Setting up the monitor
Removing the stand
NOTE: To prevent scratches on the screen when removing the stand, ensure
that the monitor is placed on a soft and clean surface.
NOTE: The following procedure is applicable for the stand that shipped with
your monitor.
To remove the stand:
1. a. Place the monitor on a soft cloth along the desk.
b. Unscrew thumbscrew at the tilt bracket fully.
2. Slide the stand out of the monitor completely.

Setting up the monitor │ 29
3. Unscrew the Thumbscrew anti-clockwise till it is loosened. The stand riser can now be
removed from the stand base easily.
To remove the VESA cover:
Press the dimple on the VESA cover to release it from the back of the display.

30 │ Setting up the monitor
Wall Mounting (Optional)
(Screw dimension: M4 x 10 mm).
Refer to the instructions that come with the VESA-compatible base mounting kit.
1. Place the monitor panel on a soft cloth or cushion on a stable flat table.
2. Remove the stand.
3. Use a screwdriver to remove the four screws securing the plastic cover.
4. Attach the mounting bracket from the wall mounting kit to the LCD.
5. Mount the LCD on the wall by following the instructions that came with the base
mounting kit.
NOTE: For use only with UL or CSA or GS-listed wall-mount bracket with
minimum weight/load bearing capacity of 11.28 kg (24.87 lb) for E2424HS.

Operating your monitor │ 31
Operating your monitor
Turning on the monitor
Press the button to turn on the monitor.
Using the front panel controls
Use the control buttons at the bottom edge of the monitor to adjust the image being displayed.
1 2 3 4 5
The following table describes the control buttons:
Control buttons Description
1
Preset mode
Use this button to choose from a list of preset modes.
2
Volume
Use the Volume key to direct access to the "Volume"
control menu.
3
Menu
To launch the On-Screen Display (OSD) menu, or to
access the list of items/options of a menu item. For
more information, see Accessing the OSD menu.
4
Exit
To exit or return to the OSD main menu.
5
Power button
(with power-status light)
To turn the monitor On or Off.
Solid white light indicates that the monitor is turned on
and functioning normally. Blinking white light indicates
that the monitor is in Standby Mode.

32 │ Operating your monitor
Using the OSD lock function
You can lock the front-panel control buttons to prevent access to the OSD menu and/ or
power button.
Use the Lock menu to lock the button(s).
1. Select one of the following options.
Language
Transparency
Timer
Lock
Reset Menu Power Button
Menu + Power Buttons
Disable
Dell 24 Monitor
Brightness / Contrast
Auto Adjust
Input Source
Color
Display
Menu
Audio
Personalize
Others
Menu Buttons
2. The following message appears.
r
E2424HS
Dell 24 Monitor
Are you sure you want to lock the Menu Buttons?
To unlock the Buttons, refer to the User's Guide.
Yes No
3. Select Yes to lock the buttons. Once locked, pressing any control button will display the
lock icon .

Operating your monitor │ 33
Use the front-panel control button to lock the button(s).
1 2 34 5
1. Press and hold Button 4 for four seconds, a menu appears on the screen.
Dell 24 Monitor
Select option:
2. Select one of the following options:
Options Description
1
Menu Buttons lock
Select this option to lock OSD menu function.
2
Power Button lock
Use this option to lock power button.
3
Menu and Power Buttons
lock
Use this option to lock OSD menu and power button.
4
Built-in Diagnostics
Use this option to run the built-in diagnostics, see Built-
in diagnostics.

34 │ Operating your monitor
To unlock the button(s).
Press and hold for four seconds until a menu appears on the screen. The following Button 4
table describes the options to unlock the front-panel control buttons.
Dell 24 Monitor
Select option:
Dell 24 Monitor
Select option:
Dell 24 Monitor
Select option:
Options Description
1
Menu Buttons unlock
Use this option to unlock OSD menu function.
2
Power Button unlock
Use this option to unlock power button.
3
Menu and Power Buttons
unlock
Use this option to unlock OSD menu and power button.
4
Built-in Diagnostics
Use this option to run the built-in diagnostics, see Built-
in diagnostics.

Operating your monitor │ 35
OSD controls
Use the buttons on the bottom edge of the monitor to adjust the image settings.
12 3 4
Control buttons Description
1
Up
Use the Up button to increase values or move up in a
menu.
2
Down
Use the Down button to decrease values or move down
in a menu.
3
OK
Use the OK button to confirm your selection in a menu.
4
Back
Use the Back button to go back to the previous menu.

36 │ Operating your monitor
Using the On-Screen Display (OSD) menu
Accessing the OSD menu
NOTE: Any changes you make are automatically saved when you move
to another menu, exit the OSD menu, or wait for the OSD menu to close
automatically.
1. Press the button to display the OSD main menu.
Dell 24 Monitor
Brightness / Contrast
Auto Adjust
Input Source
75%
75%
Color
Display
Menu
Audio
Personalize
Others
2. Press the and buttons to move between the setting options. As you move from one
icon to another, the option name is highlighted.
3. Press the button once to activate the highlighted option.
4. Press and button to select the desired parameter.
5. Press and then use the and buttons, according to the indicators on the menu, to
make your changes.
6. Select the button going back to previous menu.
Operating your monitor │ 37
Icon Menu and
submenus
Description
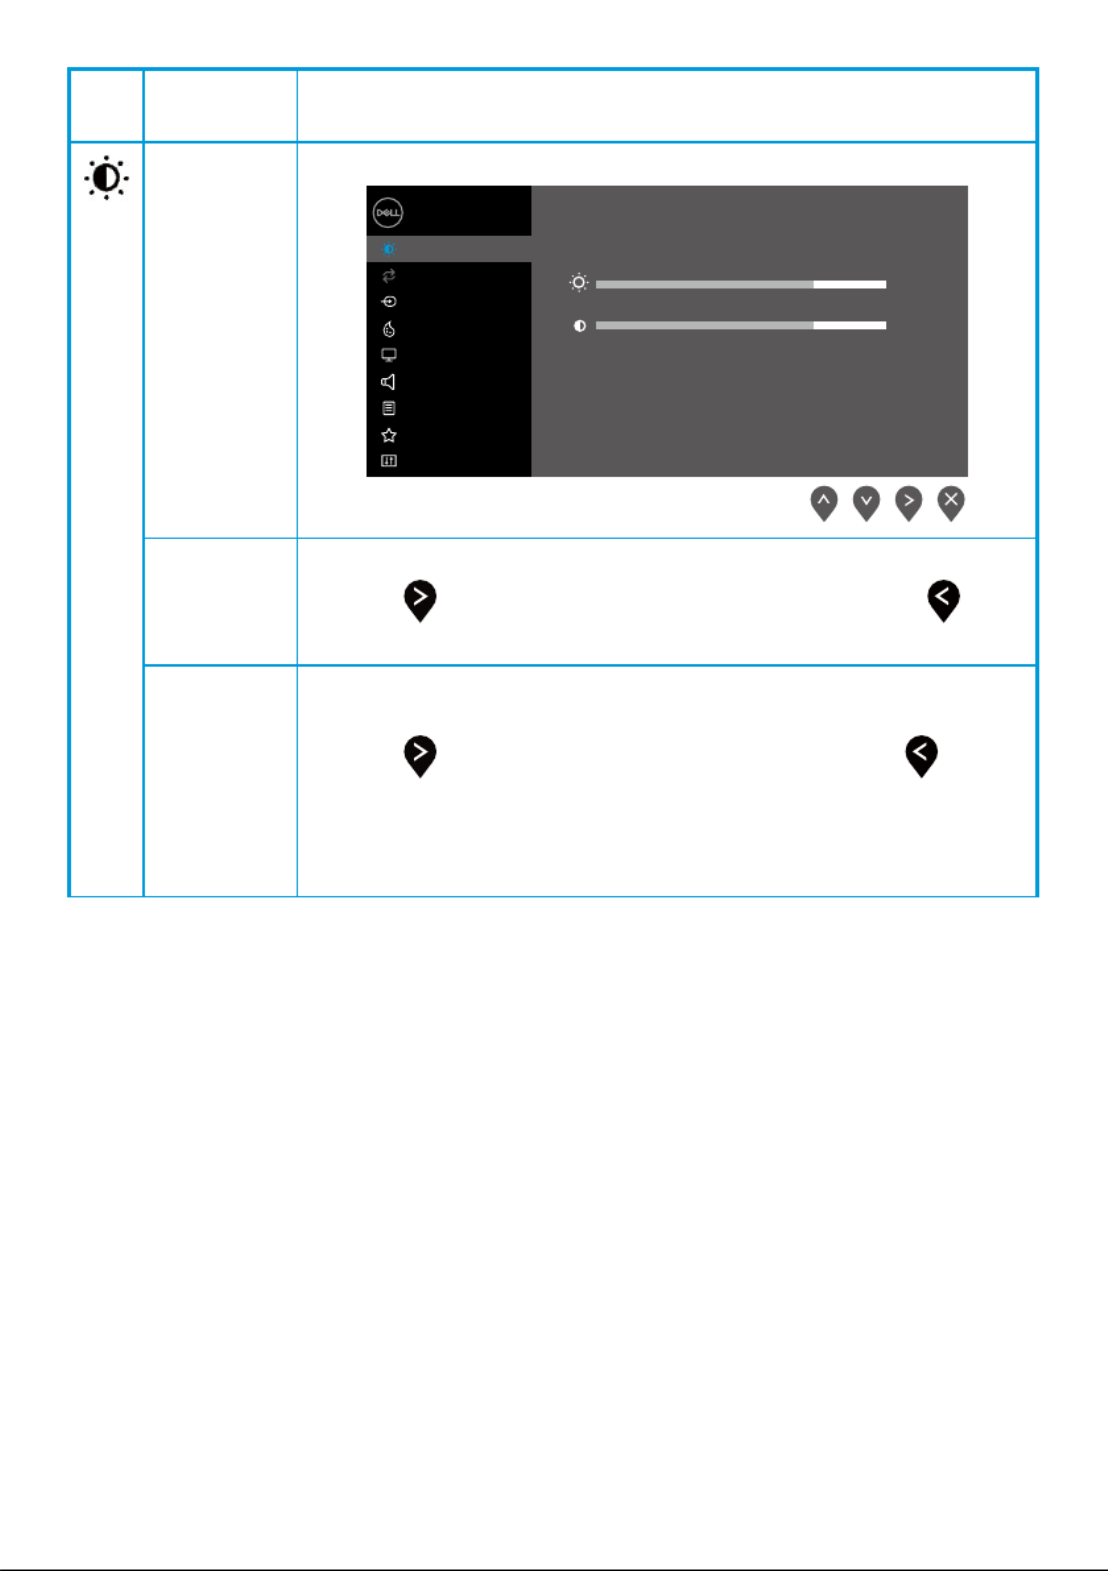
Brightness/
Contrast
Use this option to control the brightness or contrast settings.
Dell 24 Monitor
Brightness / Contrast
Auto Adjust
Input Source
75%
75%
Color
Display
Menu
Audio
Personalize
Others
Brightness Brightness adjusts the luminance of the backlight.
Press the button to increase the brightness and press the button
to decrease the brightness (min. 0; max. 100).
Contrast Adjust the brightness first, and then adjust the contrast only if further
adjustment is necessary.
Press the button to increase the contrast and press the button
to decrease the contrast (min. 0; max. 100).
The contrast function adjusts the degree of difference between
darkness and lightness on the screen.
Produkt Specifikationer
| Mærke: | Dell |
| Kategori: | overvåge |
| Model: | E2424HS |
Har du brug for hjælp?
Hvis du har brug for hjælp til Dell E2424HS stil et spørgsmål nedenfor, og andre brugere vil svare dig
overvåge Dell Manualer

11 Januar 2025
30 December 2025
30 December 2025
8 December 2024
8 December 2024
8 December 2024
8 December 2024
8 December 2024
8 December 2024
8 December 2024
overvåge Manualer
- overvåge Bosch
- overvåge SilverCrest
- overvåge Acer
- overvåge Denver
- overvåge TCL
- overvåge Sony
- overvåge Samsung
- overvåge Panasonic
- overvåge Philips
- overvåge Vitek
- overvåge IFM
- overvåge LG
- overvåge Pioneer
- overvåge Mitsubishi
- overvåge Sharp
- overvåge Behringer
- overvåge Emos
- overvåge Epson
- overvåge Neumann
- overvåge Smart
- overvåge HP
- overvåge AOC
- overvåge Sanyo
- overvåge Akuvox
- overvåge Asus
- overvåge Gigabyte
- overvåge Toshiba
- overvåge Pyle
- overvåge InFocus
- overvåge Lenovo
- overvåge Asrock
- overvåge Yamaha
- overvåge Abus
- overvåge Optoma
- overvåge Da-Lite
- overvåge Westinghouse
- overvåge Element
- overvåge Thomson
- overvåge Hyundai
- overvåge Yorkville
- overvåge JBL
- overvåge Hisense
- overvåge DataVideo
- overvåge RCF
- overvåge Maxell
- overvåge Hannspree
- overvåge Omron
- overvåge Blaupunkt
- overvåge JVC
- overvåge Honeywell
- overvåge Hitachi
- overvåge Medion
- overvåge Citizen
- overvåge Haier
- overvåge Huawei
- overvåge König
- overvåge ProXtend
- overvåge Deltaco
- overvåge NewStar
- overvåge Alpine
- overvåge 3M
- overvåge Festo
- overvåge Danfoss
- overvåge Sunny
- overvåge BlueBuilt
- overvåge Tripp Lite
- overvåge BenQ
- overvåge Packard Bell
- overvåge Mad Catz
- overvåge Jensen
- overvåge Plantronics
- overvåge Xiaomi
- overvåge Peerless-AV
- overvåge Viewsonic
- overvåge Schneider
- overvåge ELO
- overvåge Fujitsu
- overvåge Cooler Master
- overvåge Zalman
- overvåge PreSonus
- overvåge MSI
- overvåge Ricoh
- overvåge NEC
- overvåge Godox
- overvåge APC
- overvåge CTOUCH
- overvåge Ikan
- overvåge AJA
- overvåge GlobalTronics
- overvåge Velleman
- overvåge Marshall
- overvåge JUNG
- overvåge Fostex
- overvåge Salora
- overvåge Focal
- overvåge Genelec
- overvåge KRK
- overvåge NZXT
- overvåge Newline
- overvåge Hikvision
- overvåge Samson
- overvåge Yealink
- overvåge Allen & Heath
- overvåge Midas
- overvåge Simrad
- overvåge Renkforce
- overvåge Marshall Electronics
- overvåge Caliber
- overvåge I3-Technologies
- overvåge Viessmann
- overvåge Brandson
- overvåge Orion
- overvåge QSC
- overvåge BOOX
- overvåge Hanwha
- overvåge LaCie
- overvåge ARRI
- overvåge Onyx
- overvåge ITek
- overvåge Prowise
- overvåge Seiki
- overvåge Ozone
- overvåge M-Audio
- overvåge Bauhn
- overvåge Christie
- overvåge V7
- overvåge Provision-ISR
- overvåge Vorago
- overvåge Atomos
- overvåge EMachines
- overvåge Eurolite
- overvåge Mackie
- overvåge ACTi
- overvåge Faytech
- overvåge Krom
- overvåge Voxicon
- overvåge Chauvet
- overvåge Shure
- overvåge Vimar
- overvåge Continental Edison
- overvåge Dynaudio
- overvåge Iiyama
- overvåge PeakTech
- overvåge Dahua Technology
- overvåge AG Neovo
- overvåge Speco Technologies
- overvåge Prestigio
- overvåge Joy-It
- overvåge Boss
- overvåge IStarUSA
- overvåge Crestron
- overvåge SPL
- overvåge Kogan
- overvåge Barco
- overvåge SMART Technologies
- overvåge Insignia
- overvåge LC-Power
- overvåge AMX
- overvåge Tannoy
- overvåge Qian
- overvåge Xoro
- overvåge HyperX
- overvåge TVLogic
- overvåge Geovision
- overvåge Postium
- overvåge Planar
- overvåge Ernitec
- overvåge Bearware
- overvåge Sonifex
- overvåge TV One
- overvåge AVer
- overvåge Alienware
- overvåge Aputure
- overvåge Maxdata
- overvåge Sunstech
- overvåge Marquant
- overvåge Kubo
- overvåge Swissonic
- overvåge IHealth
- overvåge Peaq
- overvåge Avocor
- overvåge Interlogix
- overvåge Eizo
- overvåge Kindermann
- overvåge EverFocus
- overvåge POSline
- overvåge Peerless
- overvåge Monoprice
- overvåge Promethean
- overvåge Odys
- overvåge HKC
- overvåge Ibm
- overvåge Drawmer
- overvåge Iadea
- overvåge Advantech
- overvåge Kali Audio
- overvåge Ganz
- overvåge Extron
- overvåge Legamaster
- overvåge Ikegami
- overvåge Pelco
- overvåge Approx
- overvåge Belinea
- overvåge Palmer
- overvåge Adam
- overvåge GVision
- overvåge Posiflex
- overvåge Jay-tech
- overvåge MicroTouch
- overvåge X-Rite
- overvåge EKO
- overvåge IBoardTouch
- overvåge Mirai
- overvåge Elite Screens
- overvåge Hollyland
- overvåge Mitsai
- overvåge Skytronic
- overvåge COMMBOX
- overvåge Yiynova
- overvåge Lilliput
- overvåge LightZone
- overvåge AOpen
- overvåge Planet Audio
- overvåge EC Line
- overvåge Datacolor
- overvåge Fluid
- overvåge Atlona
- overvåge HELGI
- overvåge Desview
- overvåge Syscom
- overvåge Allsee
- overvåge Alogic
- overvåge Night Owl
- overvåge ProDVX
- overvåge Varad
- overvåge DoubleSight
- overvåge CTL
- overvåge Game Factor
- overvåge Nixeus
- overvåge Chimei
- overvåge Blue Sea
- overvåge AMCV
- overvåge Hamlet
- overvåge Wyse - Dell
- overvåge SWIT
- overvåge Feelworld
- overvåge GeChic
- overvåge Oecolux
- overvåge ADS-TEC
- overvåge Casalux
- overvåge Positivo
- overvåge Jupiter
- overvåge Transvideo
- overvåge Innocn
- overvåge KeepOut
- overvåge Shimbol
- overvåge Raysgem
- overvåge Motrona
- overvåge AORUS
- overvåge Elvid
- overvåge Wohler
- overvåge Portkeys
- overvåge Mimo Monitors
- overvåge Gamber-Johnson
- overvåge Enttec
- overvåge American Dynamics
- overvåge AIS
- overvåge Eve Audio
- overvåge Wortmann AG
- overvåge Viotek
- overvåge Vidi-Touch
- overvåge KTC
- overvåge CoolerMaster
- overvåge Atlantis Land
- overvåge HEDD
- overvåge Colormetrics
- overvåge Monkey Banana
- overvåge SmallHD
- overvåge UPERFECT
- overvåge Freedom Scientific
- overvåge OSEE
- overvåge CSL
- overvåge Mybeo
- overvåge IOIO
- overvåge DTEN
- overvåge Cocopar
- overvåge Titan Army
- overvåge Delvcam
- overvåge Xenarc
- overvåge Wimaxit
Nyeste overvåge Manualer

4 April 2025
5 Marts 2025

5 Marts 2025

27 Februar 2025

21 Februar 2025

18 Februar 2025
11 Februar 2025
11 Februar 2025
11 Februar 2025
11 Februar 2025