Epson PowerLite Pro Z8000WUNL Manual
Epson
videoprojektorer
PowerLite Pro Z8000WUNL
Læs nedenfor 📖 manual på dansk for Epson PowerLite Pro Z8000WUNL (169 sider) i kategorien videoprojektorer. Denne guide var nyttig for 10 personer og blev bedømt med 4.5 stjerner i gennemsnit af 2 brugere
Side 1/169

PowerLite® Pro Z8000WUNL/Z8050WNL
User’s Guide

Projector Features 11
Enhanced security functions
Easy to handle
Using the projector over a network (PowerLite Pro
Z8050WNL only)
You can use the included software to deliver presentations and meetings
over a network. See your Network Operation Guide for more
information.
Password Protect to restrict and manage users
By setting a Password you can restrict who can use the projector.
Control Panel Lock restricts button operation on the Control
panel.
You can use this to prevent people from changing projector settings
without permission at events, in schools, and so on.
Equipped with various theft deterrent devices
The projector is equipped with the following types of theft deterrent
security devices.
•Security slot
•Security cable installation point
Direct power On/Off
In places where power is managed centrally, such as in a conference room,
the projector can be set to power on and off automatically when the power
source to which the projector is connected is switched on or off. sp.74
No cool down delay
After turning the projector's power off, you can disconnect the projector's
power cable without having to wait for the projector to cool down.
Connect to the projector from computers via a network
You can use your existing network to share the projector from multiple
computers. Documents can be projected from each computer without
having to change any cables during meetings or presentations. Also, you
don't have to worry about the distance between the computer and the
projector.
Connecting wirelessly to a computer
When you install the optional Wireless 802.11a/b/g Module in the projector,
you can connect wirelessly to a computer.

Part Names and Functions 17
Remote Control Name Function
1 [t] button Turns the projector power On or Off.
2 [Computer] button Changes to images from the Computer input port.
3 [BNC] button Changes to images from the BNC input port.
4 [Video] button Changes to images from the Video input port.
5 [S-Video] button Changes to images from the S-Video input port.
6 [Menu] button Displays and closes the configuration menu.
7 [h] button When the configuration menu or Help screen is
displayed, it selects menu items and setting
values.
When using the optional wireless mouse receiver,
use this button to move the pointer in the desired
direction.
8 [Enter] button When the configuration menu or a Help screen is
displayed, it accepts and enters the current
selection and moves to the next level.
Acts as a mouse's left button when using the
optional wireless mouse receiver.
9 [Page] buttons
[ ][][]
When using the optional wireless mouse receiver,
you can change the PowerPoint file page during
projection by pressing the page up/page down
buttons.
10 [Shutter] button Each time you press this button, the electric
shutter closes or opens.
You can close the electric shutter to completely
block a projection.
11 [Auto] button If pressed during projection of computer analog
RGB signals, it automatically adjusts the Tracking,
Sync., and Position to project the optimum image.

Part Names and Functions 18
12 [Aspect] button The Aspect Ratio changes each time the button is
pressed.
13 [Lens Shift] button Press to adjust the lens shift.
14 [ID] button Press to set the remote control ID.
15 [Help] button Displays and closes the Help screen which shows
you how to deal with problems if they occur.
16 Remote port Connects the optional remote control cable set
and outputs signals from the remote control.
When the remote control cable is plugged into
this remote port, the remote receiver is disabled.
17 [Zoom] button Press to adjust the zoom.
18 [Num] button Use this button to enter passwords, IP address
from the Network, and so on.
19 [Focus] button Press to adjust the focus.
20 Numeric buttons Use this button to enter passwords, remote
control IP settings, IP address from the Network,
and so on.
21 [Color Mode] button Each time the button is pressed, the Color Mode
changes.
22 [Freeze] button Images are paused or unpaused.
23 [E-Zoom] buttons
[ ]z][x
The [z] button enlarges the image without
changing the projection size.
The [x] button reduces the parts of images that
have been enlarged using the [z] button.
24 [Pointer] button Press to activate the on screen pointer.
Name Function
25 [Esc] button Stops the current function. If pressed when the
configuration menu is displayed, it moves to the
previous menu level.
Acts as a mouse's right button when using the
optional wireless mouse receiver.
26 [User] button Press to assign a frequently used item from the six
available configuration menu items. By pressing
the button the assigned menu item
selection/adjustment screen is displayed, allowing
you to make one-touch settings/adjustments.
Test Pattern is assigned as the default setting.
27 [LAN] button Changes to images from EasyMP Network
Projection (PowerLite Pro Z8050WNL only). This
button does not function on the PowerLite Pro
Z8000WUNL.
28 ID switch Use this switch to enable (On)/disable (Off) ID
settings for the remote control.
29 [DVI-D/HDMI]
button
Each time you press this button, the image on the
screen changes between the DVI-D and HDMI
input ports.
30 [Search] button Changes to the next input source that is
connected to the projector and is sending an
image.
31 Indicators A light is emitted when outputting remote control
signals.
32 Remote control
light-emitting area
Outputs remote control signals.
Name Function

Unpacking the Projector 20
Unpacking the Projector
After unpacking the projector, make sure you have all the parts shown
below:
Save all packaging in case you need to ship the projector. Always use the
original packaging (or the equivalent) when you need to send the
projector to another location. Before you move the projector, see the
moving and transportation instructions. s p.130
Projector and lens cap Remote control and
2 AA batteries
Power cord VGA cable foot covers
PDF manuals and
registration CD-ROM
Projector software
CD-ROM
Password Protected
sticker

Positioning the Projector 21
Positioning the Projector
If the projector isn’t already installed in the room you’re using, you’ll probably want to place it on a table in front of the screen. This lets you stand in the
front of the room, face the audience, and remain close enough to the equipment to be able to control it. Try to leave as much space as possible between the
projector and the screen to get a good-size image.
Use the illustrations and tables below to help you determine placement. Image size increases with distance, but can vary depending on which lens you’re
using and whether you’ve adjusted the image with zoom or any other settings.
PowerLite Pro Z8000WUNL, 16:10 image, Rear projection wide lens (ELPLR04)
AProjection distance
BThe distance from the center of the lens to the base of the screen. This
changes depending on the setting for vertical lens shift.
CCenter of lens
Screen or image size Projection distance (1) Offset from lens center (2)
60 inches 38 inches (97 cm) 15.9 inches (40 cm)
70 inches 45 inches (114 cm) 18.5 inches (47 cm)
80 inches 52 inches (131 cm) 21.2 inches (54 cm)
90 inches 58 inches (148 cm) 23.8 inches (61 cm)
100 inches 65 inches (165 cm) 26.5 inches (67 cm)
110 inches 72 inches (182 cm) 29.1 inches (74 cm)
120 inches 79 inches (200 cm) 31.8 inches (81 cm)
Connecting the Projector to Your Equipment 29
Connecting the Projector to Your Equipment
The illustrations in this section show the PowerLite Pro Z8000WUNL. If
you are using the PowerLite Pro Z8050WNL, the projector and interfaces
are slightly different.
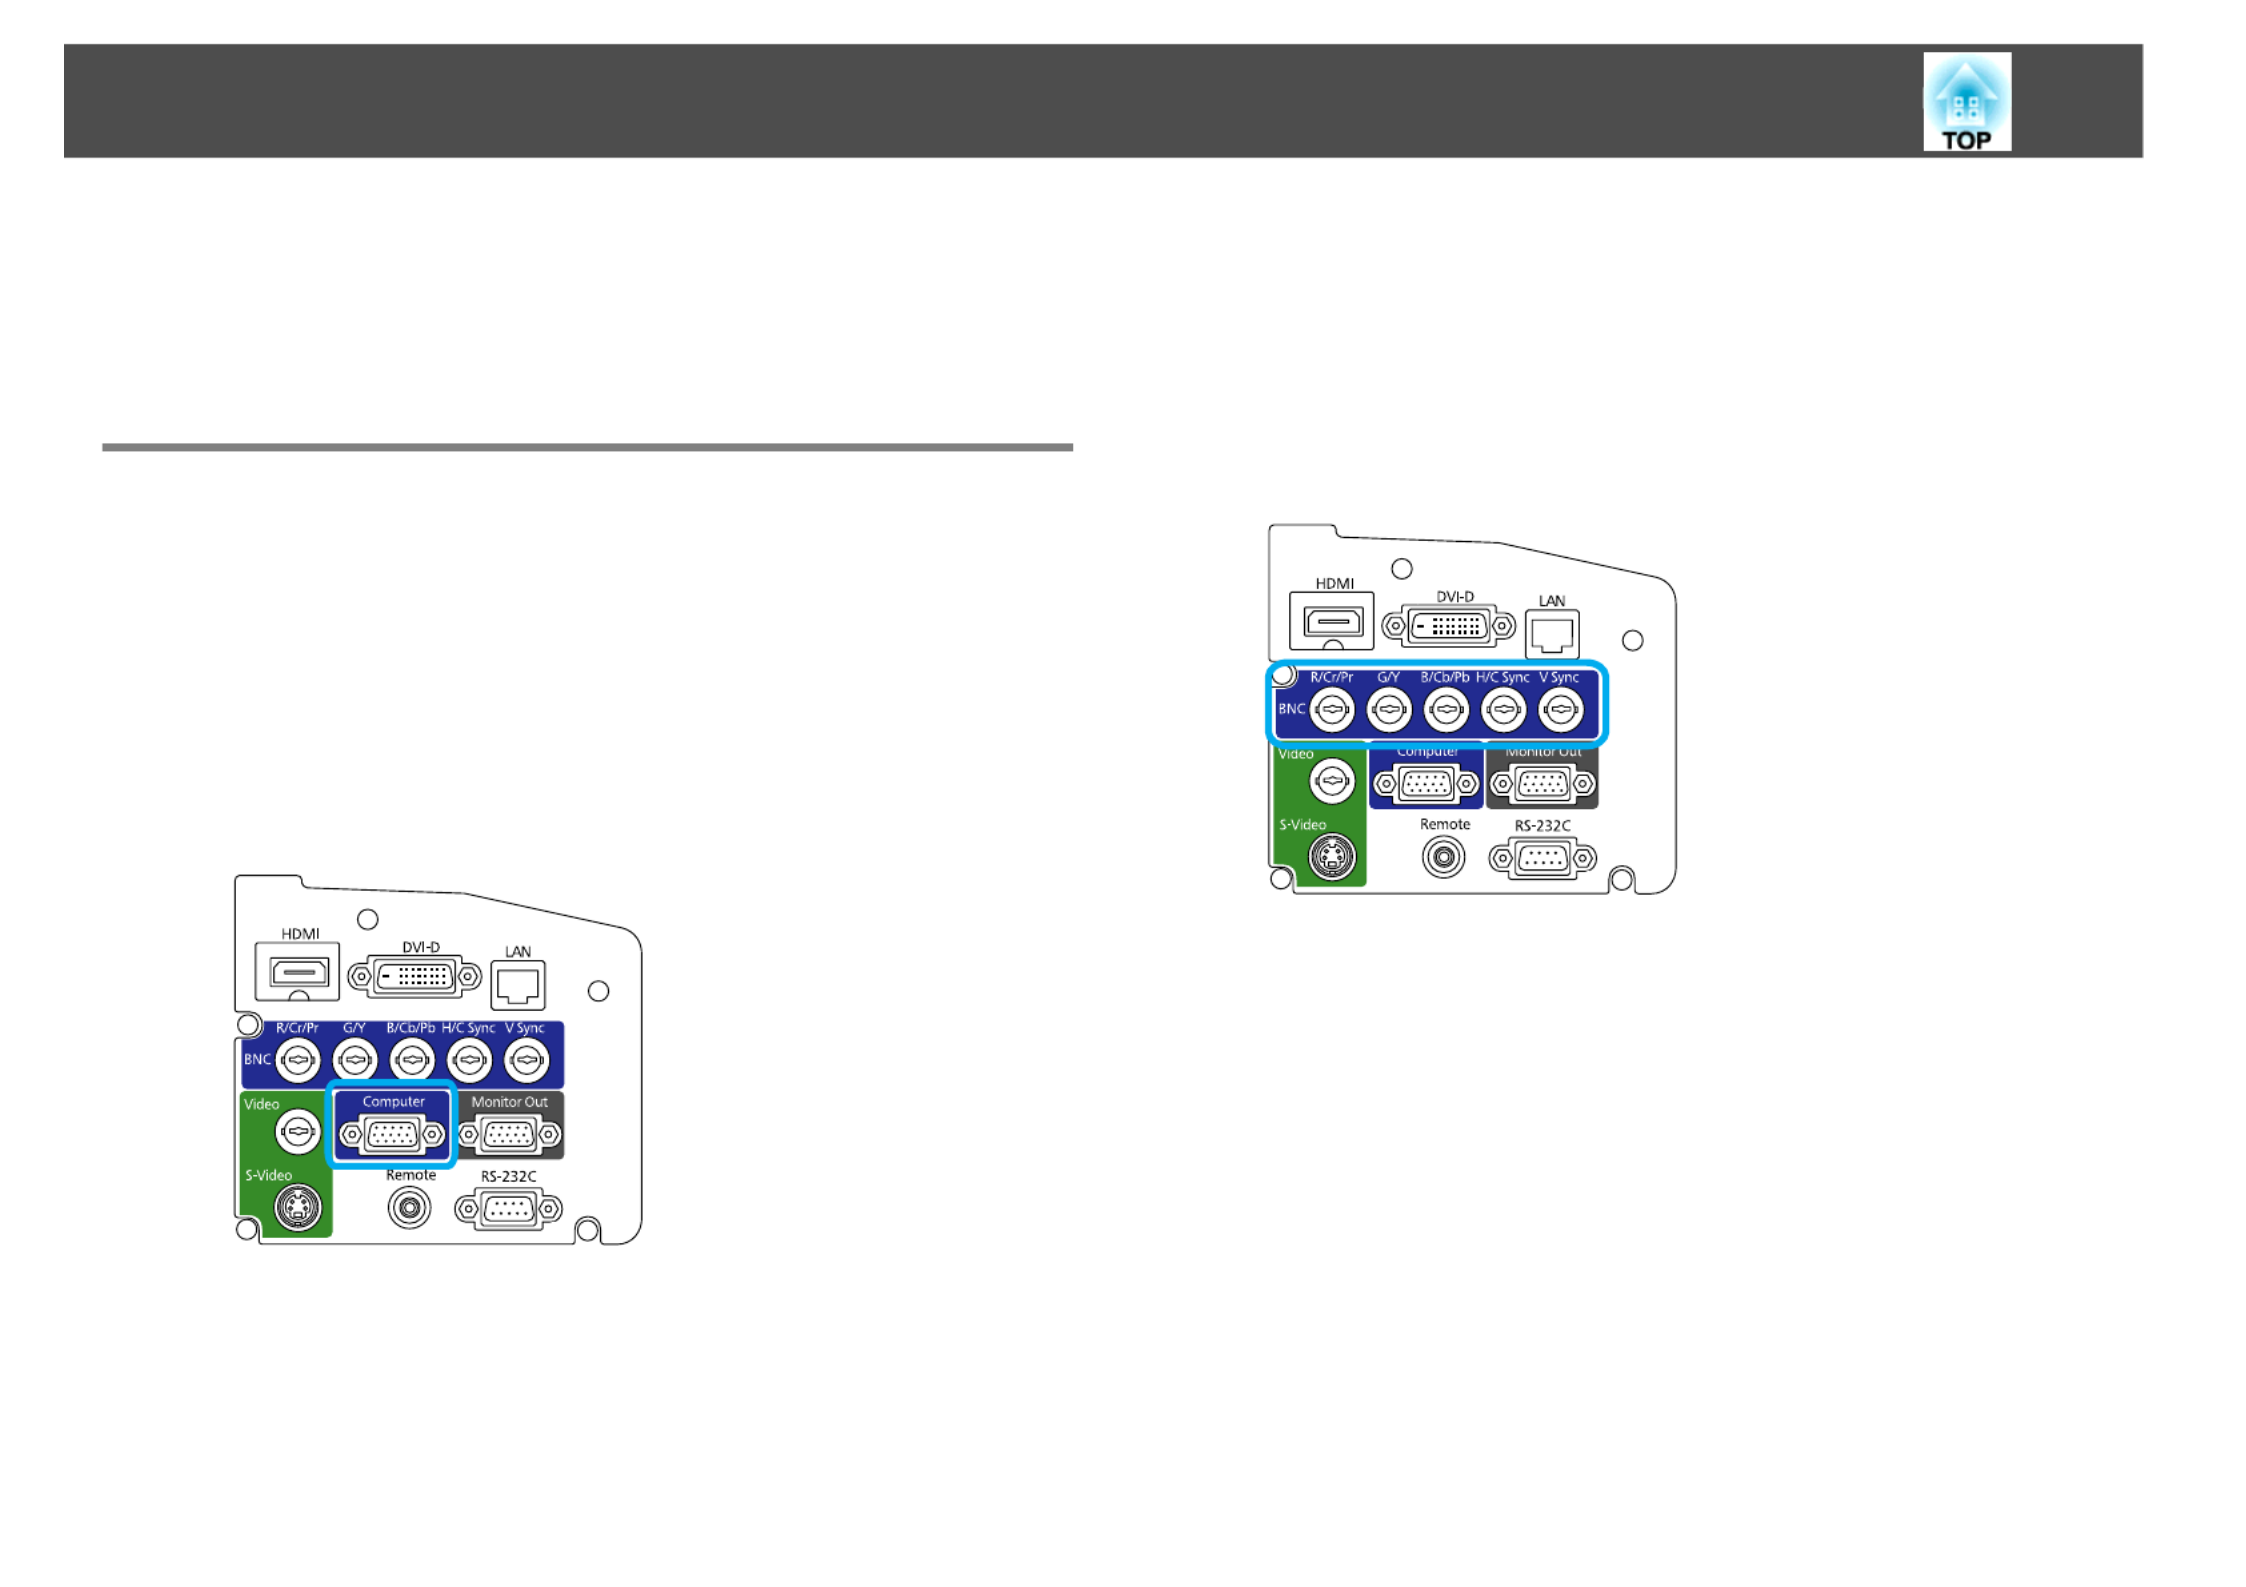
Connecting to a Computer
Connecting to the VGA Port
Procedure
AConnect one end of the VGA computer cable to the
projector’s Computer port, and the other end to your
computer’s monitor port.
BTurn the projector on (s p.34), select the image source
(s p.43), and adjust the image (s p.35).
Make sure the Input Signal setting in the Signal menu is set to Auto or
RGB. s p.69
Connecting to the BNC Ports
Procedure
AAttach the BNC connectors on one end of your cable (not
included) to the projector’s BNC ports. Connect the other
end of the cable to your computer.
BTurn the projector on (s p.34), select the image source
(s p.43), and adjust the image (s p.35).
Make sure the Input Signal setting in the Signal menu is set to Auto or
RGB. s p.69

Connecting the Projector to Your Equipment 31
Connecting to Video Equipment
Connecting to the HDMI Port
Procedure
AConnect one end of your HDMI cable (not included) to the
projector’s HDMI port, and the other end to the HDMI
connector on your equipment.
BTurn the projector on (s p.34), select the image source
(s p.43), and adjust the image (s p.35).
Connecting to the DVI-D Port
Procedure
AConnect one end of your DVI-D cable (not included) to the
projector’s DVI-D port, and the other end to the DVI-D
connector on your equipment.
BTurn the projector on (s p.34), select the image source
(s p.43), and adjust the image (s p.35).

Adjusting the Image 37
Fixing a Tilted Image
If you’ve placed your projector on a table in front of the screen and the
image is tilted as shown below, you can use the four adjustable feet to
correct the tilt.
Produkt Specifikationer
| Mærke: | Epson |
| Kategori: | videoprojektorer |
| Model: | PowerLite Pro Z8000WUNL |
| Vekselstrømsindgangsspænding: | 100 - 240 V |
| Vekselstrømsindgangsfrekvens: | 50 - 60 Hz |
| Vægt: | - g |
| Produktfarve: | Hvid |
| Lampe type: | UHE |
| Wi-Fi: | Ingen |
| Understøttede videotilstande: | 1080i, 1080p, 480i, 480p, 576i, 576p, 720p |
| 3D: | Ja |
| Indbyggede højttaler(e): | Ingen |
| Format til analogt signal: | NTSC, NTSC 4.43, PAL, SECAM |
| Antal HDMI-porte: | 1 |
| DVI-port: | Ja |
| Ethernet LAN-porte (RJ-45): | 1 |
| Komponentvideo (YPbPr/YCbCr) indgang: | 1 |
| Ethernet LAN: | Ja |
| Strømforbrug (standby): | 0.3 W |
| Strømforbrug (typisk): | 776 W |
| Driftstemperatur (T-T): | 0 - 40 °C |
| Dimensioner (BxDxH): | 534 x 734 x 225 mm |
| Batterier inkluderet: | Ja |
| Understøttede grafikopløsninger: | 1280 x 1024 (SXGA), 1400 x 1050 (SXGA+), 1600 x 1200 (UXGA), 640 x 480 (VGA), 800 x 600 (SVGA) |
| Sammensat videoindgang: | 1 |
| Støjniveau: | 38 dB |
| Fjernbetjening inkluderet: | Ja |
| Placering: | Loft |
| Full HD: | Ja |
| Slot til kabellås: | Ja |
| Billedformat: | 16:10 |
| Støjreduktion: | Ja |
| Strøm-LED: | Ja |
| Antal farver: | 16,78 millioner farver |
| Kontrastforhold (typisk): | 5000:1 |
| Horisontal scanningsområde: | 15 - 80 kHz |
| Antal VGA-porte (D-sub): | 1 |
| Kabellåseslids type: | Kensington |
| Brændviddeområde: | 36 - 57.35 mm |
| Projektor lysstyrke: | 6000 ANSI lumens |
| Projektionsteknologi: | LCD |
| Projektor indbygget opløsning: | WUXGA (1920x1200) |
| Skærmstørrelse kompatibilitet: | - " |
| Projiceringsafstand: | 1.5 - 12.7 m |
| Ensartethed: | 90 % |
| Trapezkorrektion, vertikal: | ±30 ° |
| Vertikalt scanningsområde: | 24 - 60 Hz |
| RS-232-porte: | 1 |
| Levetid for lyskilde: | 2500 t |
| Lampeeffekt: | 660 W |
| Levetid for lyskilde (økonomisk tilstand): | 3500 t |
| Lyskilde type: | Lampe |
| Antal af S-video-indgange: | 1 |
| Seriel grænsefladetype: | RS-232 |
| Netværksfunktioner: | Hurtigt ethernet |
| Trapezkorrektion, horisontal: | ±20 ° |
| Støjniveau (økonomisk tilstand): | 32 dB |
| HD-Ready: | Ja |
| Dot clock scanningsfrekvens: | 162 Mhz |
Har du brug for hjælp?
Hvis du har brug for hjælp til Epson PowerLite Pro Z8000WUNL stil et spørgsmål nedenfor, og andre brugere vil svare dig
videoprojektorer Epson Manualer

13 Marts 2025
17 Februar 2025
26 September 2024
29 Juli 2024
24 Maj 2024
22 Maj 2024
16 Maj 2024
8 Maj 2024
8 Maj 2024
7 Maj 2024
videoprojektorer Manualer
- videoprojektorer Acer
- videoprojektorer Sony
- videoprojektorer Canon
- videoprojektorer Samsung
- videoprojektorer Panasonic
- videoprojektorer Philips
- videoprojektorer Lenco
- videoprojektorer OK
- videoprojektorer Derksen
- videoprojektorer LG
- videoprojektorer Mitsubishi
- videoprojektorer Sharp
- videoprojektorer Technaxx
- videoprojektorer Smart
- videoprojektorer HP
- videoprojektorer Sanyo
- videoprojektorer D-Link
- videoprojektorer Asus
- videoprojektorer Livoo
- videoprojektorer Toshiba
- videoprojektorer Pyle
- videoprojektorer Klarstein
- videoprojektorer Kodak
- videoprojektorer InFocus
- videoprojektorer Lenovo
- videoprojektorer Yamaha
- videoprojektorer Adj
- videoprojektorer Optoma
- videoprojektorer Hama
- videoprojektorer Casio
- videoprojektorer Hisense
- videoprojektorer Maxell
- videoprojektorer Smartwares
- videoprojektorer Blaupunkt
- videoprojektorer JVC
- videoprojektorer Hitachi
- videoprojektorer 3M
- videoprojektorer BenQ
- videoprojektorer Xiaomi
- videoprojektorer Aiptek
- videoprojektorer Krüger&Matz
- videoprojektorer Viewsonic
- videoprojektorer Dell
- videoprojektorer Vivitek
- videoprojektorer Polaroid
- videoprojektorer Bauer
- videoprojektorer Ricoh
- videoprojektorer NEC
- videoprojektorer Stairville
- videoprojektorer Reflecta
- videoprojektorer Nebula
- videoprojektorer Salora
- videoprojektorer Marantz
- videoprojektorer Overmax
- videoprojektorer ION
- videoprojektorer Renkforce
- videoprojektorer Christie
- videoprojektorer Sapphire
- videoprojektorer Genee World
- videoprojektorer Eurolite
- videoprojektorer Yaber
- videoprojektorer XGIMI
- videoprojektorer Kogan
- videoprojektorer Barco
- videoprojektorer Steren
- videoprojektorer Elmo
- videoprojektorer Vankyo
- videoprojektorer Celly
- videoprojektorer VAVA
- videoprojektorer Beghelli
- videoprojektorer AOpen
- videoprojektorer AAXA Technologies
- videoprojektorer Miroir
- videoprojektorer AWOL Vision
- videoprojektorer Panamorph
- videoprojektorer Mirabella Genio
Nyeste videoprojektorer Manualer

26 Februar 2025

26 Februar 2025
25 Februar 2025
21 Februar 2025

21 Februar 2025
21 Februar 2025

18 Februar 2025

18 Februar 2025
18 Februar 2025
10 Februar 2025