USER’S MANUAL
SMOKE & CARBON MONOXIDE ALARM
10-YEAR SEALED BATTERY WITH VOICE & LOCATION
Model SMCO210V
IMPORTANT! PLEASE READ CAREFULLY AND SAVE.
The warnings/limitations card and manual contains important information
about your Smoke Alarm’s operation. If you are installing this Alarm for use
by others, you must leave this manual—or a copy of it—with the end user.
Para el manual del usuario en español, por favor visite rstalert.com
01
INTRODUCTION
Thank you for choosing First Alert
®
for your Smoke and Carbon Monoxide Alarm needs. You have purchased a state-of-the-art Smoke
& Carbon Monoxide Alarm designed to help provide you with early warning of a smoke and/or carbon monoxide danger. Please take
the time to read this manual and make the Smoke & Carbon Monoxide Alarm an integral part of your family’s safety plan.
BASIC SAFETY INFORMATION
IMPORTANT!
• Dangers, Warnings, and Cautions alert you to important operating instructions or to potentially hazardous situations. Pay special
attention to these items.
• This Smoke/CO Alarm is approved for use in single-family residences. It is NOT designed for marine or RV use.
! CAUTION!
•
This combination Smoke/Carbon Monoxide Alarm has two separate Alarms. The CO Alarm is not designed to detect re or any other gas.
It will only indicate the presence of carbon monoxide gas at the sensor. Carbon monoxide gas may be present in other areas. The Smoke
Alarm will only indicate the presence of smoke that reaches the sensor. The Smoke Alarm is not designed to sense gas, heat or ames.
! WARNING!
• This Smoke/CO Alarm cannot operate without working batteries. Removing the batteries for any reason, or failing to replace the
batteries at the end of their service life, removes your protection.
• NEVER ignore any Alarm. See “If Your Smoke/CO Alarm Sounds” for more information on how to respond to an Alarm. Failure to
respond can result in injury or death.
• The Silence Features are for your convenience only and will not correct a problem. See “Using the Silence Features” for details.
Always check your home for a potential problem after any Alarm. Failure to do so can result in injury or death.
• Test this Smoke/CO Alarm once a week. If the Alarm ever fails to test correctly, have it replaced immediately! If the Alarm is not
working properly, it cannot alert you to a problem.
• This product is intended for use in ordinary indoor locations of family living units. It is not designed to measure CO levels in
compliance with Occupational Safety and Health Administration (OSHA) commercial or industrial standards. Individuals with
medical conditions that may make them more sensitive to carbon monoxide may consider using warning devices which provide
audible and visual signals for carbon monoxide concentrations under 30 ppm. For additional information on carbon monoxide and
your medical condition contact your physician.
02
ABOUT SMOKE ALARMS
TYPES OF ALARMS
All these Smoke Alarms are designed to provide early warning of res if located, installed and cared for as described in the user’s manual,
and if smoke reaches the Alarm. If you are unsure which type of unit to install, refer to NFPA (National Fire Protection Association) 72
(National Fire Alarm and Signaling Code) and NFPA 101 (Life Safety Code). National Fire Protection Association, One Batterymarch Park,
Quincy, MA 02269-9101. Local building codes may also require specic units in new construction or in different areas of the home.
Battery (DC) operated Smoke Alarms: Provide protection even when electricity fails, provided the batteries are fresh
and correctly installed. Units are easy to install, and do not require professional installation. They do not, however, provide
interconnected functionality.
AC powered Smoke Alarms:
Can be interconnected so if one unit senses smoke, all units Alarm. They do not operate if electricity fails.
AC with battery (DC) back-up: will operate if electricity fails, provided the batteries are fresh and correctly installed. AC and AC/DC
units must be installed by a qualied electrician.
Smoke Alarms for Solar or wind energy users and battery backup power systems: AC powered Smoke Alarms should only be
operated with true or pure sine wave inverters. Operating this Smoke Alarm with most battery powered UPS (uninterruptible power
supply) products or square wave or “quasi sine wave” inverters will damage the Alarm. If you are not sure about your inverter or
UPS type, please consult with the manufacturer to verify.
Smoke Alarms for the hearing impaired: Special purpose Smoke Alarms should be installed for the hearing impaired. They include
a visual Alarm and an audible Alarm horn, and meet the requirements of the Americans with Disabilities Act. These units can be
interconnected so if one unit senses smoke, all units Alarm.
Smoke Alarms are not to be used with detector guards
unless the combination has been evaluated and found
suitable for that purpose.
All First Alert
®
Smoke Alarms conform to regulatory requirements, including UL217 and are designed to detect particles of
combustion. Smoke particles of varying number and size are produced in all res.
Ionization technology is generally more sensitive than photoelectric technology at detecting small particles, which tend to be
produced in greater amounts by aming res, which consume combustible materials rapidly and spread quickly. Sources of
these res may include paper burning in a wastebasket, or a grease re in the kitchen.
Photoelectric technology is generally more sensitive than ionization technology at detecting large particles, which tend to
be produced in greater amounts by smoldering res, which may smolder for hours before bursting into ame. Sources of
these res may include cigarettes burning in couches or bedding.
For maximum protection, use both types of Smoke Alarms on each level and in every bedroom of your home.
03
INSTALLATION
WHERE TO INSTALL THIS ALARM
Minimum coverage for Smoke Alarms, as recommended by the National Fire Protection Association (NFPA), is one Smoke Alarm on every oor,
in every sleeping area, and in every bedroom (See “Regulatory Information For Smoke Alarms” for details on the NFPA recommendations).
For CO Alarms, the National Fire Protection Association (NFPA) recommends that a CO Alarm should be centrally located outside of
each separate sleeping area in the immediate vicinity of the bedrooms. For added protection, install additional CO Alarms in each
separate bedroom, and on every level of your home.
NOTE: For added protection, install an additional Smoke/CO Alarm at least 15 feet (4.6 meters) away from the furnace or fuel burning
heat source where possible. In smaller homes or in manufactured homes where this distance cannot be maintained, install the Alarm
as far away as possible from the furnace or other fuel burning source. Installing the Alarm closer than 15 feet (4.6 meters) will not
harm the Alarm, but may increase the frequency of unwanted Alarms.
IN GENERAL, INSTALL COMBINATION SMOKE AND CARBON MONOXIDE ALARMS:
• On every level of your home, including nished attics and basements.
• Inside every bedroom, especially if people sleep with the door partly or completely closed.
• In the hall near every sleeping area. If your home has multiple sleeping areas, install a unit in each. If a hall is more than 40 feet
(12 meters) long, install a unit at each end.
• At the top of rst-to-second level stairs and at the bottom of the basement stairs.
• For additional coverage, install Alarms in all rooms, halls, and storage areas, where temperatures normally remain between 40˚ F
and 100˚ F (4.4˚ C and 37.8˚ C).
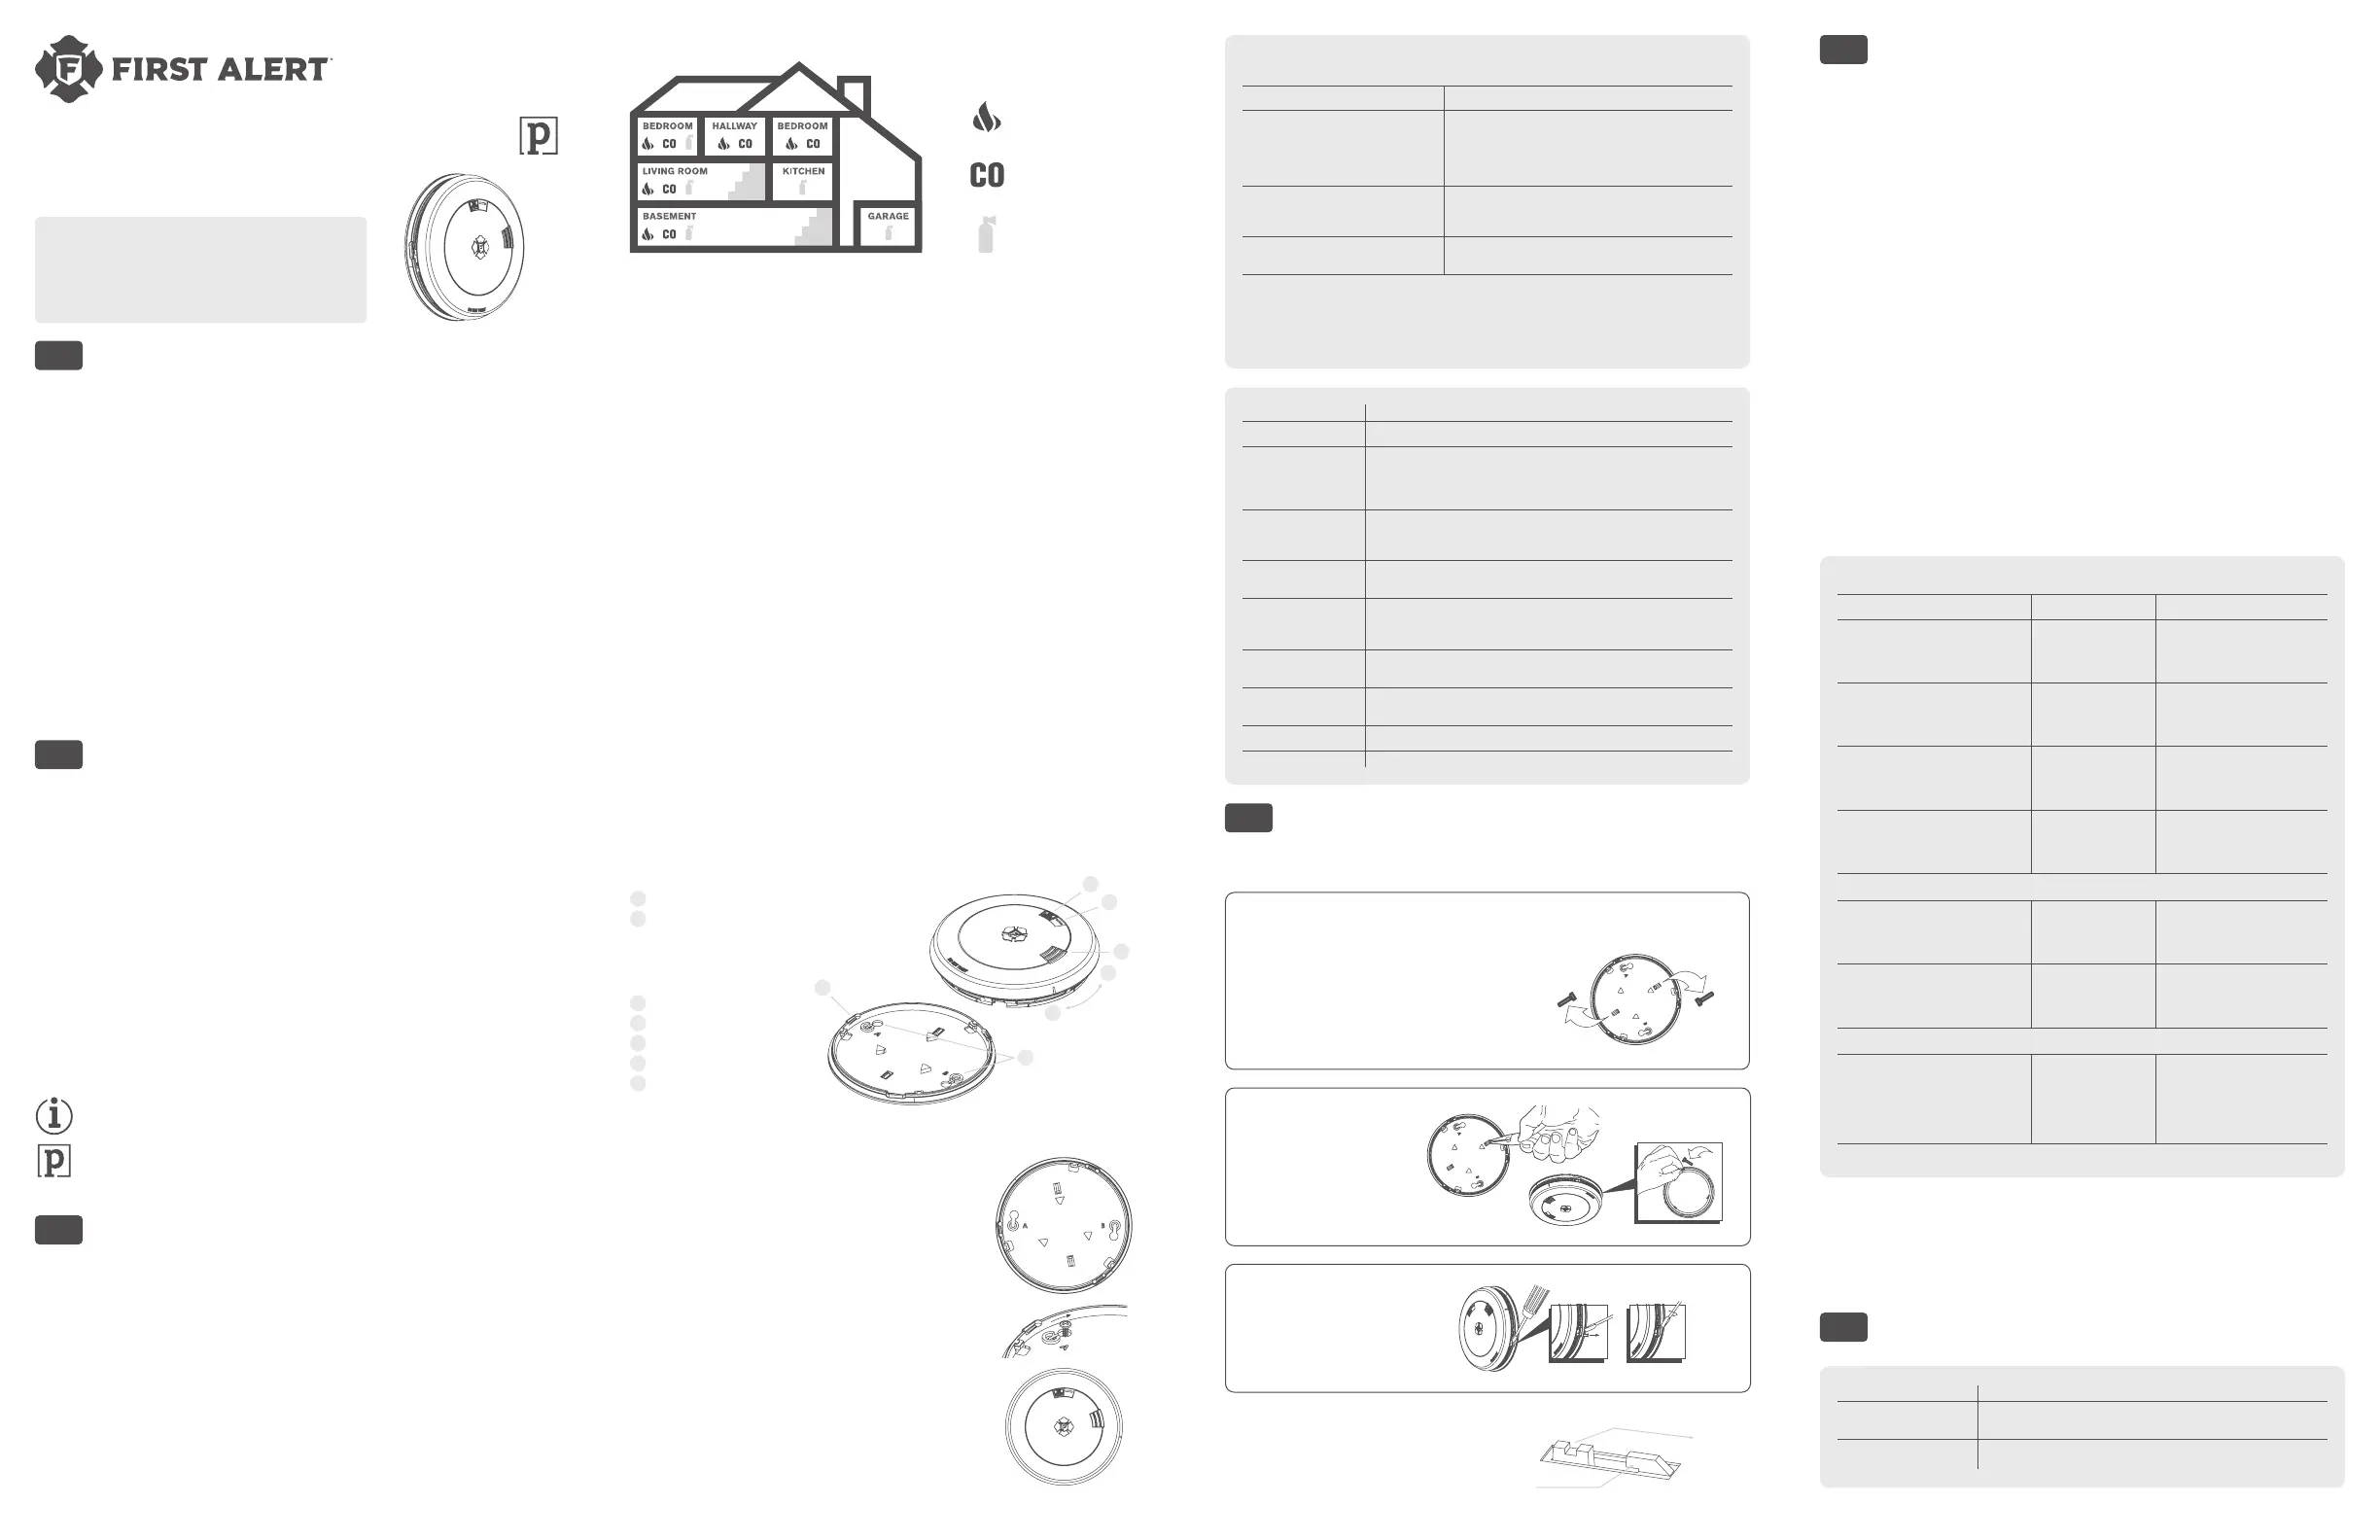
RECOMMENDED PLACEMENT:
Smoke Alarm
One on every level
and in every bedroom
Carbon Monoxide Alarm
One on every level
and in every bedroom
Fire Extinguisher
One on every level,
plus kitchen and garage
• When installing on the wall, the top edge of Smoke Alarms should be placed between 4 inches (102 mm) and 12 inches (305
mm) from the wall/ceiling line.
• When installing on the ceiling, place the Alarm as close to the center as possible.
• In either case, install at least 4 inches (102 mm) from where the wall and ceiling meet. See “Avoiding Dead Air Spaces” for
more information.
NOTE: For any location, make sure no door or other obstruction could keep carbon monoxide or smoke from reaching the Alarm.
WHERE NOT TO INSTALL THIS ALARM
FOR BEST PERFORMANCE, IT IS RECOMMENDED YOU AVOID INSTALLING SMOKE/CO ALARMS IN THESE AREAS:
• In garages, furnace rooms, crawl spaces and unnished attics. Avoid extremely dusty, dirty or greasy areas.
• Where combustion particles are produced. Combustion particles form when something burns. Areas to avoid include poorly
ventilated kitchens, garages, and furnace rooms. Keep units at least 20 feet (6 meters) from the sources of combustion particles
(stove, furnace, water heater, space heater) if possible. In areas where a 20-foot (6 meter) distance is not possible – in modular,
mobile, or smaller homes, for example – it is recommended the Smoke Alarm be placed as far from these fuel-burning sources
as possible. The placement recommendations are intended to keep these Alarms at a reasonable distance from a fuel-burning
source, and thus reduce “unwanted” Alarms. Unwanted Alarms can occur if a Smoke Alarm is placed directly next to a fuel-
burning source. Ventilate these areas as much as possible.
• Within 5 feet (1.5 meters) of any cooking appliance. In air streams near kitchens. Air currents can draw cooking smoke into the
smoke sensor and cause unwanted Alarms.
• In extremely humid areas. This Alarm should be at least 10 feet (3 meters) from a shower, sauna, humidier, vaporizer,
dishwasher, laundry room, utility room, or other source of high humidity.
• In direct sunlight.
• In turbulent air, like near ceiling fans or open windows. Blowing air may prevent CO or smoke from reaching the sensors.
• In areas where temperature is colder than 40˚ F (4.4˚ C) or hotter than 100˚F (37.8˚ C). These areas include non-air conditioned
crawl spaces, unnished attics, uninsulated or poorly insulated ceilings, porches, and garages.
• In insect infested areas. Insects can clog the openings to the sensing chamber.
• Less than 12 inches (305 mm) away from uorescent lights. Electrical “noise” can interfere with the sensor.
• In “dead air” spaces.
AVOIDING DEAD AIR SPACES
“Dead air” spaces may prevent smoke from reaching the Smoke Alarm. To avoid dead air spaces, follow installation
recommendations below.
On ceilings, install Smoke Alarms as close to the center of the ceiling as possible. If this is not possible, install the Smoke Alarm at
least 4 inches (102 mm) from the wall or corner.
For wall mounting (if allowed by building codes), the top edge of Smoke Alarms should be placed between 4 inches (102 mm) and
12 inches (305 mm) from the wall/ceiling line, below typical “dead air” spaces.
On a peaked, gabled, or cathedral ceiling, install the rst Smoke Alarm within 3 feet (0.9 meters) of the peak of the ceiling,
measured horizontally. Additional Smoke Alarms may be required depending on the length, angle, etc. of the ceiling’s slope. Refer to
NFPA 72 for details on requirements for sloped or peaked ceilings.
HOW TO INSTALL THIS ALARM
IMPORTANT!
This combination Smoke/CO Alarm was designed to be mounted on the ceiling or wall. It is not a tabletop device. You must
install this device on the ceiling or wall as outlined below. Read “Where To Install This Alarm” before starting.
This unit is designed to be mounted on the ceiling, or on the wall if necessary.
Tools you will need: pencil, drill with 3/16" (5 mm) drill bit, standard athead screwdriver, hammer
THE PARTS OF THIS SMOKE/CO ALARM
1
Test/Silence button
2
Dual power indicator light and
Alarm indicator: Green LED
provides visual indication of an
Alarm memory condition; Red LED
provides visual indication of an
Alarm and hush modes
3
Speaker
4
Turn this way to remove
5
Turn this way to attach
6
Mounting bracket
7
Mounting slots
1
2
3
4
5
6
7
FOLLOW THESE SIMPLE STEPS
1. Choose a location. See “Where to Install This Alarm” for reference.
WARNING! Do not install this Alarm over an existing electrical box. Only AC
powered units are intended for installation over electrical boxes.
2. Mark hole locations 4-1/4" apart. Use the mounting bracket to verify the hole mark
locations are accurately spaced. If mounting on the wall, holes must be aligned
horizontally to ensure Alarm is mounted upright. Put the Alarm where it won’t get
covered with dust while you drill the holes. Using a 3/16" (5 mm) drill bit, drill a hole
through the marks you made for the mounting holes.
3. Using a 3/16" (5 mm) drill bit, drill a hole through the marks you made for the
mounting holes.
4. Insert the plastic screw anchors (in the plastic bag with screws) into the holes. Tap
the screw anchors gently with a hammer, if necessary, until they are ush with the
ceiling or wall.
5. Insert the screws but do not tighten completely. Leave them about 1/4" (6mm) away
from the wall. Attach the mounting bracket to the wall or ceiling by aligning the round
part of the slots with the screws. To mount on a wall, align the hole marked A with the
left screw. Rotate the bracket until the screws are completely inside the raised portion
of the circular recesses (see image). Once the screws are completely inside the raised
portion of the circular recesses, tighten the screws until they are snug to secure the
bracket. Do not over-tighten the screws.
6. Activating the battery. Mount Alarm to mounting bracket to activate. Alarm will be
oriented as shown. Once unit is activated, it cannot be turned off. Make sure the
Alarm is locked into the mounting bracket.
NOTE: After you activate the battery, there may be Power and LED
activation indicators.
7. Test the Alarm. See “Weekly Testing.”
Mounting Hole Sets
STEP BY STEP GUIDE TO PROGRAMMING THIS ALARM
For First Time
Action Alarm Will Say
Activate Alarm.
“Welcome, First Alert carbon monoxide and Smoke Alarm.”
“No location programmed” if rst time or “[Location, example:
“Hallway”] location programmed” when changing batteries.
“To select location, press and hold test button now.”
Press & hold test button if you would like to
program the location or change the location of
the Alarm. Release button after Alarm responds.
“To save location, press and hold test button after location is heard.”
Alarm will speak list of locations (see below).
After you hear the location of where you are
placing the Alarm, Press & hold the test Button.
“[Location, example: “Hallway”] location saved.” If no location is
chosen: “No location saved.”
Your Alarm has now been programmed for the location of your choice.
Available locations: Basement, Hallway, Ofce, Child’s Bedroom, Kitchen, Utility Room, Dining Room, Living Room, Family
Room, Master Bedroom, Guest Bedroom, No Location
For reprogramming: When it is necessary to reprogram the Alarm after the unit has been activated and is in normal
operation: Tap the test button 5 times to reset the Alarm to again access the programming menu.
Action What You Will See & Hear
Under Normal Operations Voice: Silent; Horn: Silent; Power LED: Flashes Green once a minute
When You Test the Alarm
A “chirp” and then Voice: “Testing.” “Warning, evacuate smoke in [Location, example:
“Hallway”]. Evacuate.”; Horn: 3 beeps, pause, 3 beeps, voice; Power LED: Flashes Red
followed by Voice: “Warning, evacuate carbon monoxide in [Location, example: “Hallway”].
Evacuate.”; Horn: 4 beeps, pause, 4 beeps, voice; Power LED: Flashes Red
If Alarm is Not
Operating Properly
(MALFUNCTION SIGNAL)
Voice: “Detector error in [Location, example “Hallway”], please see manual.” Repeated
every 5 hours; Horn: 3 chirps every minute; Power LED: Three Green ashes
approximately once a minute
If Battery Becomes Low
Voice: “Detector Error in [Location, example “Hallway”], please see manual.” Repeated every 5
hours; Horn: 5 chirps every minute; Power LED: One green ash approximately every minute
Alarm has reached
its End of Life
Voice: “Detector error in [Location, example “Basement”], please see manual.”
Repeated every 5 hours; Horn: 5 chirps every minute; Power LED: Five Green ashes
approximately once a minute
Alarm Levels of
CO are Detected
Voice: “Warning, evacuate carbon monoxide in [Location, example: “Hallway”]. Evacuate.”
“____ ppm.”; Horn: 4 beeps, pause, 4 beeps, voice; Power LED: Flashes Red
Smoke is Detected
Voice: “Warning, evacuate smoke in [Location, example: “Hallway”]. Evacuate.”; Horn: 3
beeps, pause, 3 beeps, voice; Power LED: Flashes Red
Smoke Alarm is Silenced Voice: Silent; Horn: Off; Power LED: Flashes Red
CO Alarm is Silenced Voice: Silent; Horn: Off; Power LED: Flashes Red
04
ALARM FEATURES
• Voice & Location Alerts: Friendly voice tells you what the danger is and it’s location.
• No Battery Replacements: For the life of the Alarm.
• End of Life Warning: Let’s you know when it’s time to replace.
OPTIONAL LOCKING FEATURE
The optional locking feature is designed to prevent unauthorized removal of the Alarm. It is not necessary to activate the lock
in single-family households where unauthorized Alarm removal is not a concern.
Tools you will need: Needle-nose pliers or utility knife, standard
athead screwdriver
The feature uses a locking pin which is molded into the mounting bracket.
Remove locking pin by using needle-nose pliers or a utility knife.
IMPORTANT!
To permanently remove the locking pin, insert a athead screwdriver
between the locking pin and the lock and pry the pin out of the lock.
TO LOCK THE MOUNTING BRACKET
1. Using needle-nose pliers, detach the
pin from the mounting bracket.
2. Insert the locking pin through the hole
on the back of the Smoke Alarm as
shown in the diagram.
3. When you attach the Alarm to the
mounting bracket the locking pin’s head
will t into a notch on the bracket.
TO UNLOCK THE MOUNTING BRACKET
1. Insert a athead screwdriver in between the
mounting bracket and the locking pin.
2. Pry the Alarm away from the bracket
by pushing up the screwdriver and
turning the Alarm counterclockwise (left)
at the same time.
HOW TO PERMANENTLY DEACTIVATE THE SMOKE ALARM
After Malfunction, 10 years of Operation Low Battery or End of Life
Warnings, deactivate the Alarm: Insert a tool below edge where shown and
break tab. Then slide activation switch to deactivate mode.
NOTE: At end of life (chirp): unit must be put into deactivation mode to
deactivate remaining stored energy in battery. Unit will no longer function
once put into this mode. Unit will resist re-mounting.
05
TESTING & MAINTENANCE
WEEKLY TESTING
! WARNING!
• NEVER use an open ame of any kind to test this unit. You might accidentally damage or set re to the unit or to your
home. NEVER use vehicle exhaust! Exhaust may cause permanent damage and voids your warranty.
• DO NOT stand close to the Alarm when the horn is sounding. Exposure at close range may be harmful to your hearing. When
testing, step away when horn starts sounding.
! CAUTION!
It is important to test this unit every week to make sure it is working properly. Using the test button is the recommended
way to test this Smoke/CO Alarm.
You can test this Smoke/CO Alarm by pressing and holding the Test/Silence button on the Alarm cover until Alarm Voice says
“Testing” (typically 3-5 seconds). During testing, you will see and hear the following sequence:
• The Alarm Voice will say “Testing.” The Horn will sound 3 beeps, pause, 3 beeps. The Alarm Voice will say “Warning, evacuate
smoke in [Location, example: “Hallway”]. Evacuate.” The Power LED ashes Red.
• Next the Horn will sound 4 beeps, pause, 4 beeps. The Alarm Voice will say “Warning, evacuate carbon monoxide in [Location,
example: “Hallway”]. Evacuate.” The LED ashes Red.
If the unit does not Alarm, make sure the batteries are correctly installed, and test again. If the unit still does not Alarm,
replace it immediately.
REGULAR MAINTENANCE
This unit has been designed to be as maintenance free as possible, but there are a few simple things you must do to keep
it working properly.
• Test it at least once a week.
•
Clean the Smoke/CO Alarm at least once a month; gently vacuum the outside of the Smoke/CO Alarm using your household vacuum’s
soft brush attachment. A can of clean compressed air (sold at computer or ofce supply stores) may also be used. Follow manufacturer
instructions for use. Test the Smoke/CO Alarm. Never use water, cleaners or solvents since they may damage the unit.
• If the Smoke/CO Alarm becomes contaminated by excessive dirt, dust and/or grime, and cannot be cleaned to avoid unwanted
Alarms, replace the unit immediately.
• If the green power LED ashes 2 times every minute (horn is silent) it means that the Alarm needs to be cleaned as indicated
above. If green light continues to ash, replace Alarm.
• Relocate the unit if it sounds frequent unwanted Alarms. See “Where This Alarm Should Not Be Installed” for details.
• Protect or cover the alarm when doing any maintenance to home i.e. sanding oors, painting, drywall patching, etc. to
prevent contamination.
IMPORTANT!
Actual battery service life depends on the Smoke/CO Alarm and the environment in which it is installed. Alarm is sealed with no serviceable
parts. Battery is not replaceable. You MUST replace the Alarm immediately once it starts “chirping” (the “End of Life Low Battery warning”).
TROUBLESHOOTING GUIDE
IF THE ALARM... PROBLEM... YOU SHOULD...
Horn
sounds 3 “chirps” every minute;
Voice:
“Detector error in [Location, example “Hallway”],
please see manual” repeated every 5 hours;
LED
has 3 Green ashes with “chirps”.
MALFUNCTION SIGNAL.
Device is not working
properly, and
needs to be replaced.
If unit is under warranty, contact
Consumer Support to process a
warranty replacement.
Horn sounds 5 chirps every minute; Voice:
Detector error in [Location, example “Hallway:],
please see manual” repeated every 5 hours;
LED has one Green ash approx every minute.
Low Battery Signal, Alarm
needs to be replaced.
Immediately replace the Alarm.
The light ashes GREEN and the horn sounds
5 “chirps” every minute; Voice: “Detector error
in [Location, example “Basement”], please see
manual.” Repeated every 5 hours.
END OF LIFE SIGNAL.
Alarm needs to be replaced.
Immediately replace the Alarm.
Power LED ashes Green 2 times every minute. Alarm requires cleaning.
Clean Alarm then press and release the
test button. See Regular Maintenance
section. If Green LED Continues to
ash, contact Consumer Support.
CARBON MONOXIDE ALARM ONLY
CO Alarm goes back into Alarm 4 minutes
after you silence it.
CO levels indicate
a potentially
dangerous situation.
IF YOU ARE FEELING SYMPTOMS OF CO
POISONING, EVACUATE your home and
call 911 or the Fire Department. Refer to
“If The CO Alarm Sounds” for details.
CO Alarm sounds frequently even
though no high levels of CO are revealed
in an investigation.
The CO Alarm may be
improperly located.
Refer to “Where to Install
This Alarm” for details.
Relocate your Alarm. If frequent Alarms
continue, have home rechecked for
potential CO problems. You may be
experiencing an intermittent CO problem.
SMOKE ALARM ONLY
Smoke Alarm sounds when no smoke is visible.
Unwanted Alarm may be
caused by nonemergency
source like cooking smoke.
Silence Alarm using Test/Silence button;
clean the Alarm’s cover with a soft,
clean cloth. If frequent unwanted Alarms
continue, relocate your Alarm. Alarm
may be too close to a kitchen, cooking
appliance, or steamy bathroom.
If you have questions that cannot be answered by reading this manual, call the Consumer Support Team at 1-800-323-9005
FIRE SAFETY TIPS
Follow safety rules and prevent hazardous situations: 1) Use smoking materials properly. Never smoke in bed. 2) Keep matches or lighters
away from children; 3) Store ammable materials in proper containers; 4) Keep electrical appliances in good condition and don’t overload
electrical circuits; 5) Keep stoves, barbecue grills, replaces and chimneys grease- and debris-free; 6) Never leave anything cooking on the
stove unattended; 7) Keep portable heaters and open ames, like candles, away from ammable materials; 8) Don’t let rubbish accumulate.
Keep Alarms clean, and test them weekly. Replace Alarms immediately if they are not working properly. Smoke Alarms that do not work
cannot alert you to a re. Keep at least one working re extinguisher on every level, and an additional one in the kitchen. Have re escape
ladders or other reliable means of escape from an upper level in case stairs are blocked; 9) Have an escape plan and practice it regularly.
06
IF YOUR SMOKE/CO ALARM SOUNDS
WHAT TO DO FIRST–IDENTIFY THE TYPE OF ALARM SIGNAL
Type of Alarm What You Will See & Hear
Carbon Monoxide (CO)
Voice: “Warning, evacuate carbon monoxide in [Location, example: “Hallway”].
Evacuate.” “____ ppm.”; Horn: 4 beeps, pause, 4 beeps, voice; LED: Flashes Red
Smoke
Voice: “Warning, evacuate smoke in [Location, example: “Hallway”]. Evacuate.”; Horn:
3 beeps, pause, 3 beeps, voice; LED: Flashes Red


