Fisher & Paykel RGV3-366-N Manual
Fisher & Paykel
Ovn
RGV3-366-N
Læs nedenfor 📖 manual på dansk for Fisher & Paykel RGV3-366-N (42 sider) i kategorien Ovn. Denne guide var nyttig for 25 personer og blev bedømt med 4.5 stjerner i gennemsnit af 2 brugere
Side 1/42

USER GUI D E
US CA
PROFESSIONAL
RGV3-366, RGV3-305, RGV3-304
GAS RANGES

! WARNING!
If the information in this guide is not
followed exactly, a fire or explosion
may result causing property damage,
personal injury or death.
Do not store or use gasoline or other
flammable vapors and liquids in the
vicinity of this or any other appliance.
NEVER use this appliance as a space
heater to heat or warm the room. Doing
so may result in carbon monoxide
poisoning and overheating of the
appliance.
Installation and service must be
performed by a qualified installer,
service agency or the gas supplier.
WHAT TO DO IF YOU SMELL GAS
• Do not try to light any appliance.
• Do not touch any electrical switch.
• Do not use any phone in your
building.
• Immediately call your gas supplier
from a neighbor’s phone.
• Follow the gas supplier’s instructions.
• If you cannot reach your gas supplier,
call the fire department.

! WARNING!
Never operate the top surface cooking
section of this appliance unattended.
• Failure to follow this warning statement
could result in fire, explosion or burn
hazard that could cause property damage,
personal injury or death.
• If a fire should occur, keep away from the
appliance and immediately call your fire
department. Do not attempt to extinguish
an oil/grease fire with water

4
CONTENTS
Safety and warnings 5
Before you begin 10
First use 11
Cooking guide 16
Cooking charts 20
Burner use 25
Care and cleaning 28
Troubleshooting 37
Alert codes 40
Warranty and service 41
Registration
To register your product visit our website: fisherpaykel.com/register

5
SAFETY AND WARNINGS
! WARNING!
Electric Shock Hazard
Failure to follow this advice may result in
electric shock or death.
• Turn the range off at the wall before replacing
the oven lamp.
! WARNING!
Fire Hazard
Failure to follow this advice may result in
overheating, burning, and injury.
• Do not place aluminium foil, dishes, trays, water
or ice on the oven floor during cooking, this will
irreversibly damage the enamel. Lining the oven
with aluminium foil may cause fire.
• Never use the appliance for warming or heating
the room. Persons could be burned or injured or
a fire could start.
• Flammable materials should not be stored in an
oven or near its surface.
! WARNING!
Cut Hazard
Failure to use caution could result in injury.
• Take care - some edges may be sharp.

6
SAFETY AND WARNINGS
! WARNING!
Hot Surface Hazard
Failure to follow this advice could result in
burns and scalds.
• To avoid burns and scalds, keep children away
from the appliance.
• Surfaces of the appliance may become hot
enough to cause burns. Examples include the
oven vent, the surface near the oven vent, and
the oven door.
• Do not touch heating elements or interior
surfaces of the oven. Heating elements may be
hot, even when they are dark in colour.
• Use protection when handling hot surfaces, such
as oven shelves or dishes.
• Be careful when opening the oven door. Let
hot air or steam escape before removing or
replacing food.
• During and after use, do not touch or let
clothing or other flammable materials contact
heating elements or interior surfaces of the oven
until they have had sufficient time to cool.
! WARNING!
Tipping Hazard
Failure to use caution could result in death or
serious burns.
• Range must be secured by a correctly installed
anti-tip bracket. See installation guide for details.
• Ensure the anti-tip bracket is re-engaged when
the range is moved. Do not use the appliance
until it has been secured.

7
! WARNING!
Explosion Hazard
Failure to follow this advice may result in
injury or death.
• If you smell gas, do not use the appliance. Open
a window or door to let the gas escape, then
follow the guidance on the inside front cover of
this manual.
• Do not use water on grease fires. A violent
steam explosion may result.
• Turn all burners off, then smother fire or flame
or use dry chemical or foam-type extinguisher.
• Do not heat unopened food containers, such as
cans. The build-up of pressure may cause the
container to burst.
! WARNING!
Poisoning Hazard
Failure to follow this advice may result in
carbon monoxide poisoning or overheating.
• Never use material, such as aluminium foil, to
cover an entire rack or the oven floor. Doing so
block airflow through the oven.
• Clean the appliance with caution. Some
cleaners can produce noxious fumes if applied
to a hot surface. Follow the directions of the
cleaner manufacturer.
• Never use the appliance as a space heater to
heat or warm the room.
SAFETY AND WARNINGS

8
READ AND SAVE THIS GUIDE
WARNING!
To reduce the risk of fire, electrical shock, injury to persons or damage when using the
oven, follow the important safety instructions listed below. Read all the instructions
before using the oven. Use the oven only for its intended purpose as described in these
instructions.
Installation
zEnsure the appliance is properly installed and earthed by a qualified technician.
zEnsure this range is connected to a circuit that incorporates an isolating switch
providing full disconnection from the power supply.
zDo not install or operate the appliance if it is damaged or not working properly. If you
receive a damaged product, contact your dealer or installer immediately.
zVerify the anti-tip device has been correctly installed and engaged. See installation
guide for details.
Servicing
zDo not repair or replace any part of the appliance unless specifically recommended in
the user guide. All other servicing should be undertaken by a Fisher & Paykel trained
and supported service technician or qualified person.
Fire Hazard
zUse only dry oven mitts or potholders. Moist or damp potholders on hot surfaces could
result in burns from steam. Do not let potholders touch hot areas or heating elements.
Do not use a towel or a bulky cloth for a potholder. It could catch fire.
Food Safety
zLeave food in the oven for as short a time as possible before and after cooking. This is
to avoid contamination by organisms may cause food poisoning. Take particular that
care during warm weather.
General Use
zHousehold appliances are not intended to be played with by children.
zChildren should not be left alone or unattended in the area where the appliance is in
use. They should never be allowed to sit or stand on any part of the appliance.
zChildren of less than 8 years old must be kept away from the appliance unless
continuously supervised.
zThis appliance can be used by children aged from 8 years and above, and persons with
reduced physical, sensory or mental capabilities or lack of experience and knowledge,
if they have been given supervision or instruction concerning the use of the appliance
in a safe way and they understand the hazards involved. Cleaning and user maintenance
shall not be carried out by children without supervision.
zCaution: Do not store items of interest to children in cabinets above the range or on the
backguard of the range. Children climbing to reach items could be seriously injured.
SAFETY AND WARNINGS

9
SAFETY AND WARNINGS
z
Do not place heavy objects on the oven door.
z
Always keep oven vents unobstructed.
z
D o n o t w e a r l o o s e f i t t i n g o r h a n g i n g g a r m e n t s w h e n u s i n g t h e a p p l i a n c e . T h e y c o u l d i g n i t e o r m e l t i f t h e y t o u c h a n e l e m e n t o r h o t s u r f a c e a n d y o u c o u l d b e b u r n e d .
z
C a u t i o n : H o t a i r c a n b l o w f r o m t h e v e n t a t t h e t o p o f t h e r a n g e r a n g e a s p a r t o f t h e ’ s c o o l i n g s y s t e m .
z
A l w a y s p o s i t i o n s h e l v e s i n t h e d e s i r e d l o c a t i o n w h i l e t h e o v e n i s c o o l ( b e f o r e p r e h e a t i n g ) . I f a s h e l f m u s t b e r e m o v e d w h i l e t h e o v e n i s h o t , d o n o t l e t t h e o v e n m i t t s o r p o t h o l d e r c o n t a c t h o t h e a t i n g e l e m e n t s i n t h e o v e n o r t h e b a s e o f t h e o v e n .
z
Use only bakeware approved for oven use. Follow the bakeware manufacturer’s guides.
z
O n l y c e r t a i n t y p e s o f g l a s s , g l a s s / c e r a m i c , e a r t h e n w a r e o r o t h e r g l a z e d u t e n s i l s a r e s u i t a b l e f o r r a n g e - t o p s e r v i c e w i t h o u t b r e a k i n g d u e t o s u d d e n t e m p e r a t u r e c h a n g e s .
z
E n s u r e f l o w o f c o m b u s t i o n a n d v e n t i l a t i o n i s u n o b s t r u c t e d .
z
Do not use the oven for storage.
z
D o n o t c o o k o n a b r o k e n c o o k t o p . S h o u l d t h e c o o k t o p b r e a k , c l e a n i n g s o l u t i o n s a n d s p i l l o v e r s m a y p e n e t r a t e t h e b r o k e n c o o k t o p a n d c r e a t e a r i s k o f e l e c t r i c s h o c k . C o n t a c t a q u a l i f i e d e l e c t r i c i a n i m m e d i a t e l y .
z
D o n o t p l a c e m e t a l l i c o b j e c t s s u c h a s k n i v e s , f o r k s , s p o o n s a n d l i d s o n t h e c o o k t o p s u r f a c e a s t h e y c a n g e t h o t .
z
N e v e r l e a v e s u r f a c e u n i t s u n a t t e n d e d a t a h i g h h e a t s e t t i n g . B o i l o v e r c a u s e s s m o k i n g a n d g r e a s y s p i l l o v e r t h a t m a y i g n i t e .
z
U t e n s i l h a n d l e s s h o u l d b e t u r n e d i n w a r d a n d n o t e x t e n d o v e r a d j a c e n t s u r f a c e .
Cleaning and maintenance
z
D o n o t c l e a n t h e o v e n s e a l o r u s e a n y o v e n - c l e a n i n g p r o d u c t s o n i t . i s e s s e n t i a l f o r T h i s a g o o d s e a l , w h i c h e n s u r e s t h a t t h e o v e n o p e r a t e s e f f i c i e n t l y . C a r e s h o u l d b e t a k e n n o t t o r u b , d a m a g e o r m o v e t h e o v e n s e a l .
z
Do not use oven cleaners, harsh/abrasive cleaning agents, waxes, or polishes. No commercial oven cleaner, oven liner, or protective coating of any kind should be used in or around any part of the range.
z
D o n o t u s e h a r s h / a b r a s i v e c l e a n e r s , s c o u r e r s o r s h a r p m e t a l s c r a p e r s t o c l e a n t h e o v e n d o o r g l a s s s i n c e t h e y s c r a t c h t h e s u r f a c e , w h i c h m a y r e s u l t i n t h e g l a s s s h a t t e r i n g .
z
C l e a n o n l y t h e p a r t s l i s t e d i n t h i s g u i d e .
z
D o n o t u s e a s t e a m c l e a n e r t o c l e a n a n y p a r t o f t h e r a n g e .
z
Keep appliance area clear and free from combustible materials.

10
BEFORE YOU BEGIN
1
2
3
8
4
5
6
7
zEnsure that the anti-tip bracket at the right rear of the range has been installed.correctly
zRead this guide, taking special note of the 'Safety and warnings' section.
zRemove all packaging from the oven and cooktop. Recycle responsibly.
zRemove any adhesive residue using dishwashing liquid on a soft cloth. Do not use any
harsh or abrasive cleaners.
zCondition the oven using the instructions under 'First use'.
IMPORTANT!
Do not block the vents of the oven or the oven door with cookware, utensils or towels.
During cleaning, take care not to let any liquids run down these vents.
Oven features and accessories
1 Back trim
2 Burner grates
3 Control panel
4 Oven vent louvres
5 Oven seal
6 Side rack
7 Serial label
8 Toe kick
9 Broil rack
!0 Broil pan
9
!0
RGV3-366 model illustrated

11
RGV3-366 illustrated
FIRST USE
Replacing the shelves
1 Grip the shelf at the front (ensuring you
are holding the wire shelf and the sliding
frame together).
2 Ensure the shelf is level and facing the
right way with the guard rail at the back.
3 Place the shelf on top of the side racks
at the desired height, hooking the rear
tags over the side racks on both sides.
4 Push the shelf all the way into the oven,
making sure the front tags are also
securely hooked over the side racks.
Shelf positions
Always position the oven shelves before turning
the oven on. Remove any unused shelves and
baking utensils from the oven.
For advice on which shelf position to use, see
sections 'Cooking charts'.
Ensure sliding shelves are positioned on top
of the side rack wires instead of between
them.
The wire shelves and slides are built together
as one unit. When positioned correctly, the
slides will prevent the wire shelves from
tilting when pulled forward.
Guard rail
Front bar

12
FIRST USE
Dial halos
When a function dial is in use, a red halo will
illuminate. When a temperature dial is in use, the
halo will transition from white to red as the cavity
reaches the set temperature (SLOW COOK and BROIL
will turn red immediately).
If all dials are turned OFF, all halos will dim.
Control panel
1 2 3 33333
4 4
RGV3-366 model illustrated
Using the burner dials
To use the burner dials, push in and turn
counterclockwise to LITE. LITE Hold the dial at
before turning to a flame setting.
Control panel features
1 Oven mode dial
2 Oven temperature dial
3 Burner dials
4 Burner indicators

13
FIRST USE
Set the oven function by turning the
dial counterclockwise.
Set the oven temperature by turning
the adjacent TEMPERATURE dial
counterclockwise to the desired
setting.
Setting a function and temperature
For more information on the functions, see the 'Cooking guide' section of this book.
2
3
4To stop cooking and turn the oven off,
turn the dial back to the positionOFF .

14
FIRST USE
Editing or cancelling cooking
Turn the function or temperature dial any point during cooking to adjust.
Changing the temperature
Changing the function
Turn the OVEN MODE dial at any point during
cooking to change the function.
Turn the dial at any point during cooking to
change the temperature.

15
FIRST USE
After conditioning
There will be a distinctive smell and a small amount of smoke during the conditioning
process as manufacturing residue is burnt off, this is normal. Once cooled, wipe out the
oven with a damp cloth and mild detergent, and dry thoroughly.
Set the oven to BAKE at 450oF (230oC) and
heat for 30 minutes.
Conditioning the oven
It is important to condition your oven before use. This will burn off any manufacturing
residues and ensure that you get the best results right from the start.
Before you start
Ensure all packaging is removed and any cables used to secure the shelving during
transit. Make sure all shelves are fitted in the oven. Ensure the kitchen is well ventilated
during conditioning.
1
After 30 minutes change both dials to
BROIL and heat for a further 30 minutes.2
4When you have finished, turn the dial
clockwise back to OFF.

16
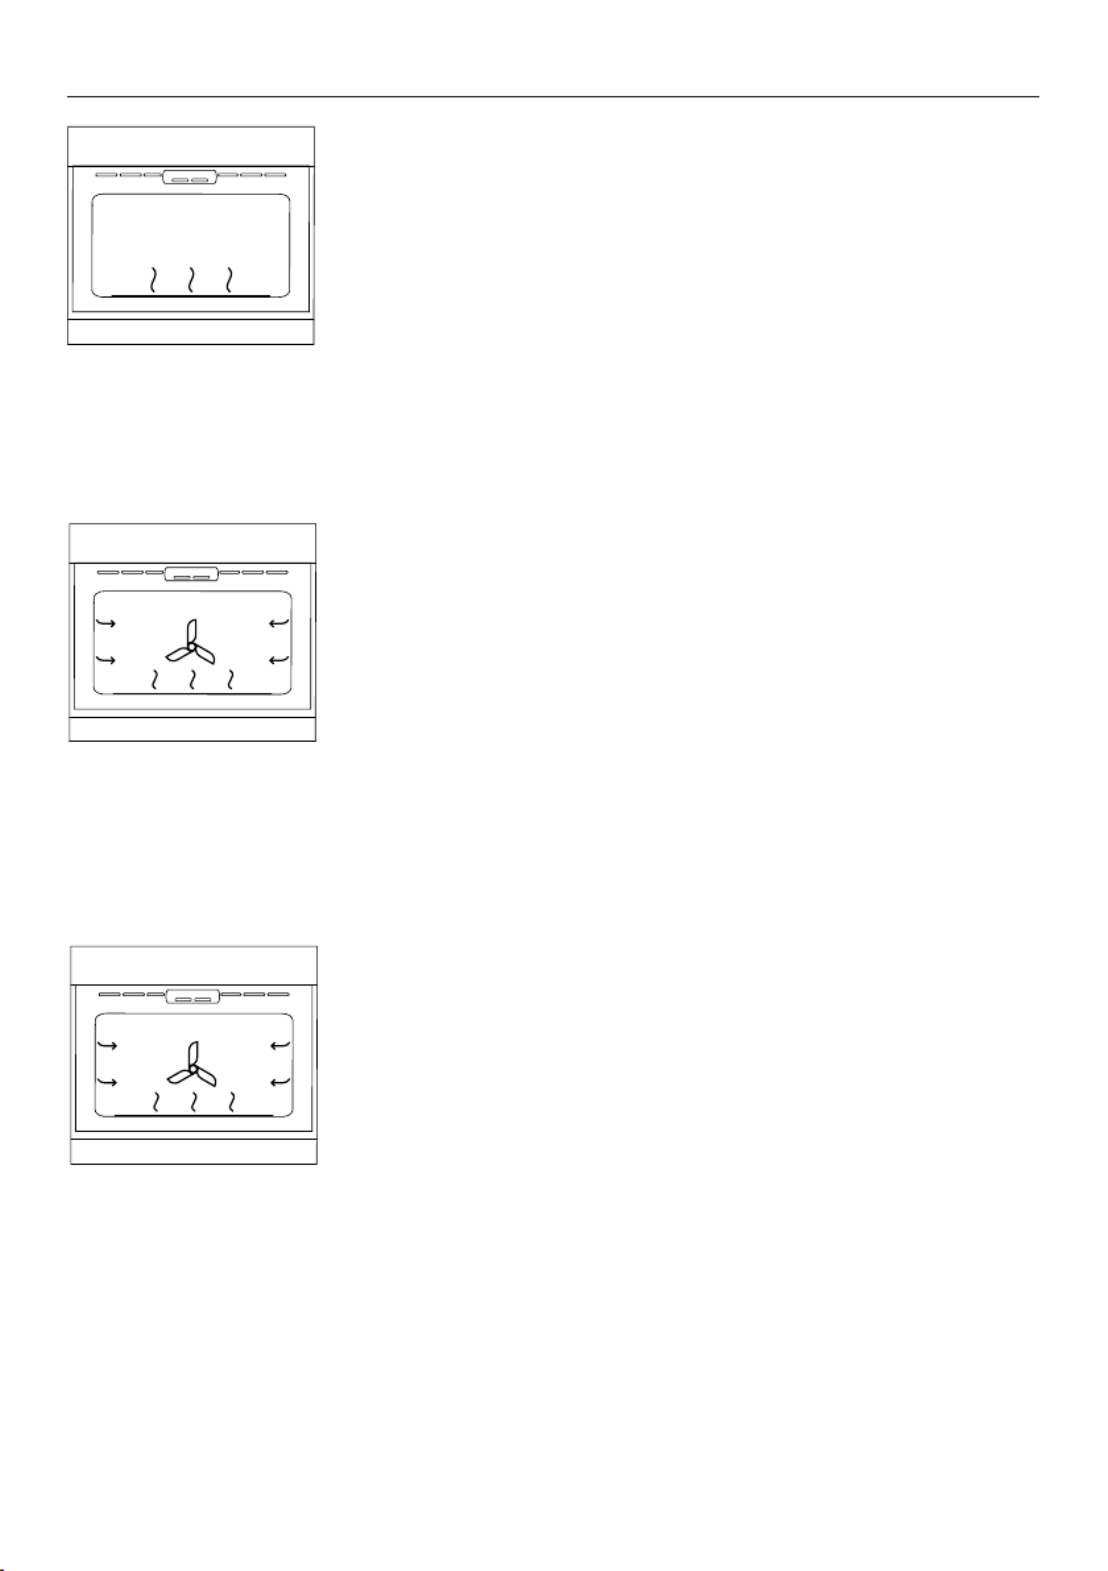
COOKING GUIDE
General guidelines
This range has been designed to utilise the bake burner, broiler and cavity fan in different
combinations to provide you with enhanced performance. The variety of functions, allows
you to cook all food types to perfection.
Oven elements
1 broil burner
2 cavity fan
3 bake burner (concealed)
1
2
3
Ensure all functions are used with the oven door closed.
Baking
zFor best results when baking, always pre-heat your oven.
zSingle shelf cooking: place your baking on a shelf that will position the top of your pan
near the centre of the oven.
zMulti shelf cooking: Always leave a space between shelves to allow the air to circulate.
Broiling
zAlways broil with the oven door completely shut.
zAlways keep a close watch on your food to avoid charring or burning.
zIf you use glass or ceramic pans, be sure they can withstand high temperatures oven .
zFor thinner cuts of meat, or for toasting or browning foods, use a higher shelf position.
zThicker cuts of meats should be broiled on lower shelves or at a lower broil setting to
ensure even cooking.
Setting BROIL
Turn both the OVEN MODE and TEMPERATURE
dials to The temperature is automatically BROIL.
calibrated for optimal broiling.
Roasting
zBoneless, rolled or stuffed roasts require longer than roasts containing bones. Poultry
should be well cooked with the juices running clear and a minimum internal temperature
of 165°F (75°C).
zAlways roast meat fat side up.
zUse a meat thermometer to determine when meat is cooked.
zAlways rest the meat for at least 10 minutes after roasting to allow the juices to settle.
The meat will continue to cook for a few minutes after removing it from the oven.

17
COOKING GUIDE
Reheating
zNever reheat food more than once.
zUse , ° °BAKE to reheat food once hot, use the BAKE function at 200 F (90 C) to keep the
food warm.
zAlways reheat food to piping hot, or to a minimum internal temperature of 185 (°F 85°C).
This reduces the risk of contamination.
zReheat food in a dish with a lid or cover tightly with foil.
Dough proofing
Turn the main OVEN MODE dial to BAKE and the
main TEMPERATURE WARMdial to . Heat for 5
minutes before turning the TEMPERATURE dial to
OFF and placing the dough in the oven.
Once dough has risen to size, remove and turn the
OVEN MODE dial to OFF.
zPlace dough in a lightly oiled bowl and cover with a clean, damp cloth.
zPosition in the centre of the oven and to prevent overproofing check, every 30 minutes.
18
COOKING GUIDE
SLOW COOK
heat is generated by lower burner and distributed via fan
This function has been designed in collaboration with Star-K
for religious faiths that observe a ‘no work’ requirement on
the Sabbath*.
Ideal for:
Slow-cooked dishes such as casseroles, stews and braises.
zThe fan circulates heat inside the cavity to gently cook food.
zThis function has low energy consumption. During use, the
lights will not be active.
zThe oven does not preheatingneed .
zThe recommended temperature for operating SLOW COOK is
250°F – 325°F (120°C – 165°C).
*Oven operation during Slow Cook mode has been developed in collaboration with Star-K (USA - www.star-k.org).
Further information for using the product in compliance with Jewish Law can be found on their websites
BAKE CONVECTION
heat is generated by lower burner and distributed via fan
Ideal for:
Single shelf baking that requires less than an hour to cook.
Foods such as muffins, English scones, cupcakes & enchiladas.
zHot air is blown into cavity, providing a consistent
temperature.
zIf using for multi shelf cooking, always leave a gap between
to allow air to move freely. This ensures food on the lower
tray can still brown.
BAKE
heat is generated by the lower burner
Ideal for:
foods that require a longer cooking time, eg rich fruit cake,
brownies, or bread.
zRetains moisture.
zIdeal for cakes and foods that require baking for a long
time or at low temperatures.
zThis function is not suitable for multi-shelf cooking.

19
BROIL
heat is generated by the broil burner
Ideal for:
toasting bread or for top-browning to finish off dishes.
zRefer to 'Broiling' for details.
zIntense radiant heat is delivered from the broil burner.
zFor best results allow oven to preheat for 5 minutes.
zThe dial halo will remain red while using the broil function.
COOKING GUIDE

22
COOKING CHARTS
SAVOURY SHELVES FUNCTION SHELF
POSITION
TEMP
(°F)
TEMP
(°C)
TIME
(MIN)
CORNBREAD Single Bake Convection 3 400- 425 210-215 20-25
VEGETABLES Single Bake Convection 3 175 - 190 30 - 50350-375
LASAGNE Single Bake Convection 3 175 - 190350- 375 35 - 40
CASSEROLES Single Bake 2 300-350 150-175 1- 2 hrs
PIZZA Single Bake 1 425 220 10-15
QUICHE Single Bake Convection 3 15- 30350 175
POTATOES
Whole baked Single Bake 3 200 50- 60390
FRITTATA
Grill to finish Bake ConvectionSingle 3 340- 360 170-180 15-20
OVEN MEALS Single Bake Convection 3 340- 375 170- 190 30-40
ROASTING SHELVES FUNCTION SHELF
POSITION
TEMP
(°F)
TEMP
(°C)
TIME
(MIN)
BEEF, BONELESS (times per 1lb/450g)
Rare Single Bake 2 320- 340 160- 170 18 -32
Medium Single Bake 2 320-340 160- 170 25- 40
Well done Single Bake 2 320-340 160- 170 30-55
PRIME RIB ROAST (times per 1lb/450g)
Rare Single Bake 2 320-340 160-170 15-30
Medium Single Bake 2 320-340 160-170 20 -35
Well done Single Bake 2 320-340 160-170 25-40
LAMB RACK
Medium Rare Single Bake 2 200 20390
LAMB LEG, BONE IN (times per 1lb/450g)
Medium Single Bake 2 320-340 160-170 18-28
Well done Single Bake 2 320-340 160-170 20-33

23
COOKING CHARTS
ROASTING SHELVES FUNCTION SHELF
POSITION
TEMP
(°F)
TEMP
(°C)
TIME
(MIN)
LAMB LEG, BONELESS (times per 1lb/450g)
Medium Single Bake 2 320-340 160-170 20-35
Well done Single Bake 2 320-340 160-170 25-45
VEAL (times per 1lb/450g)
Medium Single Bake 2 320-340 160-170 20-40
Well done Single Bake 2 320-340 160-170 25-45
CHICKEN (WHOLE) (times per 1lb/450g)
Without stuffing Single Bake 2 15-20350 175
With Stuffing Single Bake 2 350 175 17-22
Butterflied Single Bake 2 40-50350 175
TURKEY, WHOLE (times per 1lb/450g)
Stuffed Single Bake 320-340 160-1701 or 2 17-22
Unstuffed Single Bake 300-330 150-165 15-202 or 2
PORK, BONELESS (times per 1lb/450g)
Medium Single Bake 3 340-350 170-175 25-40
Well done Single Bake 3 340-350 170-175 30-45
PORK CRACKLING
Crisp Single Broil 430 220 5-103 or 4
VENISON (times per 1”/2.5cm thickness)
Rare Single Bake 3 225 7435
Medium Single Bake 3 225 9435
BROILING SHELVES FUNCTION SHELF
POSITION
TEMP
(°F)
TEMP
(°C)
TIME
(MIN)
BEEF
Steak, rare Single Broil 4 8-10Broil Broil
Steak, medium Single Broil 4 10-15Broil Broil
Burgers (ground patties) Single Broil 3 Broil Broil 12- 15
Meatballs (ground) Single Broil 3 12-15Broil Broil

24
COOKING CHARTS
BROILING SHELVES FUNCTION SHELF
POSITION
TEMP
(°F)
TEMP
(°C)
TIME
(MIN)
LAMB CHOPS
Medium Single Broil 4 15 - 20Broil Broil
Well done Single Broil 4 20 - 25Broil Broil
PORK
Chops, well done Single Broil 3 15 - 20Broil Broil
Ham steak Single Broil 3 15 - 20Broil Broil
Bacon Single Broil 3 Broil Broil 4 - 7
CHICKEN
Boneless pieces Single Broil 3 30-40Broil Broil
Bone-in pieces Single Broil 3 40-50Broil Broil
SAUSAGES Single Broil 3 10 -15Broil Broil
FISH
Fillets Single Broil 3 8 -12Broil Broil
Whole Single Broil 3 15 - 20Broil Broil
VEGETABLES
Sliced Single Broil 3 8 -12Broil Broil

25
Identify the desired burner and the
corresponding dial.
When the burner is lit, turn the dial to any
setting between HI SIM (high) and (simmer).
Note: The clicking should stop as soon as
the burner is lit. If the burner doesn’t light,
and/or the clicking doesn’t stop, turn
the dial clockwise back to OFF refer to
'Troubleshooting' for advice.
When you have finished cooking, turn the
dial clockwise back to OFF.
If you are using LP gas, there may be
a slight extinction pop or flash at the flame
spreader a few seconds after the burner has
been turned off. This is normal.
1
2
3
4
BURNER USE
Selecting and using burners
Push the dial in and turn counterclockwise
to LITE. LITE Hold the dial at before turning
to a flame setting.
You should hear a clicking sound when
setting to LITE. If no clicking sound is
present, turn the dial back clockwise to OFF
and refer to 'Troubleshooting' for advice.

26
BURNER USE
Manual lighting
If there has been a power outage, the burners can be manually lit. If the flame is blown
out during a power failure, turn the dial immediately to OFF as the burner will not relight
and gas may escape.
1Carefully hold a battery operated lighter
near the desired burner.
When the burner is lit, turn the dial to any
setting between HI SIM (high) and (simmer).
When you have finished cooking, turn the
dial clockwise back to OFF.
If you are using LP gas, there may be
a slight extinction pop or flash at the flame
spreader a few seconds after the burner has
been turned off. This is normal.
2
3
4
Push the dial in and turn counterclockwise
to LITE. Hold the dial at before turning LITE
to a flame setting.

27
Burner output
All burners have the same low turn-down setting (SIM) for gentle simmering (1,300 BTU/
hr). Use for melting chocolate and butter, cooking rice and delicate sauces, simmering SIM
soups and stews, and keeping cooked food hot.
For cooking that requires intense heat use the burners listed below. These have a higher
maximum output (22,500 BTU/hr for Natural gas) than other burners (17,000 BTU/hr for LP
gas).
RGV3-305GD models: Center burner
RGV3-366 models: Front left or front right burner
All other models: Front left burner
Use and care
zNever leave the cooktop unattended when in use. Boil-over causes smoking and greasy
spills that may ignite.
zNever allow flames to extend beyond cookware or curl up its sides. This could discolor
and damage the utensil and you may get burned touching a hot handle.
zKeep handles out of the way. Turn handles so that they don’t extend over the edge of the
cooktop or another burner that is on.
zTake care when deep-frying. Oil or fat can overheat very quickly, particularly on a high
setting.
zMake sure that all burner parts are correctly fitted. Incorrectly or incompletely assembled
burners may produce dangerous flames. See 'Replacing burner parts'.
zKeep the burners clean. Especially after a spill or boilover, ensure the affected burners
are cleaned before using them again. Food residue may clog the ignitor and the notches
of the flame spreader, stopping the burner from functioning correctly. See 'Care and
cleaning' for instructions.
zCheck that the burner flames are regular. They should be blue with no yellow tipping,
and burn without fluttering around the burner cap. If not, see 'Troubleshooting'
for advice.
zUse woks only with a wok ring. Wok rings can be purchased separately through your
Fisher & Paykel dealer or Customer Care. To use, place the wok ring over the grates,
making sure the small protrusions on its bottom straddle the grate fingers. The wok ring
should be stable and unable to rotate.
BURNER USE
Burner use guidelines

30
WHAT? HOW? IMPORTANT!
Burner caps and brass
flame spreaders
Ensure the burner is turned OFF
and cool. Lift off the burner cap
and brass flame spreader and wash
in hot soapy water. Rinse and dry.
Use a stiff nylon brush or straight-
ended paper clip to clear the
notches of the flame spreader.
Replace the flame spreader
and burner cap correctly. See
'Replacing burner parts'.
Keep the notches of the flame
spreaders clear. Soiling may clog
these and cause ignition problems.
Before replacing the burner parts,
ensure they are dry. Wet burner parts
may result in an irregular flame.
Before lighting a burner, ensure
all parts are positioned correctly.
Incorrect assembly can cause
dangerous irregular flames and
ignition problems.
Ignitors Ensure the burner is turned OFF.
Clean the ignitor with a small
brush or cotton swab that has
been dipped into rubbing alcohol.
The ignitors must be kept clean
and dry to work correctly. Dirty or
wet ignitors could cause constant
clicking and sparking, even if a flame
is present.
Burner grates
Wok ring
(not supplied)
Ensure grates/wok ring has cooled
completely before carefully lifting
them off the cooktop. Place on
a protected surface. To remove
stubborn stains, soak the grates
in a mixture of clothes detergent
and water.Wash in a mixture of hot
water and dishwashing liquid, then
rinse and allow to dry. The grates
are also dishwasher safe.
Take care, the grates are heavy.
Ensure you place a dish towel or
other soft cover on the surface before
putting a grate on it.
CARE AND CLEANING

31
CARE AND CLEANING
Removing the side racks
Remove the side racks to make cleaning the oven easier.
Always turn the oven off at the wall first. Ensure the oven has cooled down completely
before starting.
Slide out all shelves and remove.
1
Gently pull down on the retaining wire
from underneath the lock stud. The
retaining wire will pop out.
Swing the bottom of the side rack up
towards the center of the oven until it
is almost horizontal. Slide the prongs
at the top out of the mounting slots.
2
3

32
Refitting the side racks
1
Ensure the prongs are fully inserted
into the slots, then lower the side rack
carefully, and gently push the retaining
wire underneath the lock stud.
Supporting the side rack from
underneath, hold it almost horizontally
and place the prongs into the
mounting slots.
2
CARE AND CLEANING

33
CARE AND CLEANING
Replacing the oven light bulbs
Use a 40 W, 120 V appliance light bulb for replacement. Do not use a standard light bulb
in any oven, the heat will break it.
Changing the bulb
1 Allow the oven (including the lamp cover and the bulb) to cool completely.
2 Remove any shelves that may get in the way.
3 Remove the door if the lamp will be hard to reach.
4 Turn the power supply to the range off at the main fuse or circuit breaker panel. If you
don’t know how to do this, contact an electrician.
Failure to disconnect the range from the power supply may result in death or
electrical shock.
5 Remove the lamp cover: turn it counterclockwise to unscrew.
6 Remove the faulty bulb and replace with a new 40 W appliance light bulb.
7 Replace the lamp cover: turn it clockwise to tighten.
8 Turn the power supply to the range back on at the main fuse or circuit breaker panel.
Lamp covers

34
CARE AND CLEANING
Removing and refitting the oven door.
zTake care, the oven door is heavy.
zDo not lift the oven door by its handle. Doing so may damage the door.
zEnsure the oven and the door are cool before you begin to remove the door.
zBefore removing the door, ensure there is a large enough clear, protected surface in
the kitchen to rest the door on.
To remove the door
Open the door completely.
Open the hinge locks fully on both sides.
Holding the door on both sides, lift door
back up to 45° and carefully pull the door
out and away from the hinges.
1
2
3

36
CARE AND CLEANING
Replacing burner parts
When replacing the burners, ensure the two locating pins on the bottom of the brass flame
spreader are correctly aligned with the locating pin holes on the top of the simmer ring.
Incorrect alignment will produce a potentially dangerous flame and cause poor burner
performance.
Burner cap
Flame spreader
Ignitor
Correct alignment
Incorrect alignment

37
TROUBLESHOOTING
If there is a problem with your oven, please check the following points before contacting
your local Fisher & Paykel trained and supported service technician or the Customer Care
Centre.
PROBLEM POSSIBLE CAUSES WHAT TO DO
The oven does not work
(no heating).
No power supply (oven light and
dial halos do not come on).
Ensure the circuit breaker hasn’t
tripped and there is no power
outage in your area. If there is a
power outage, you cannot use the
oven until power is restored.
No gas supply. The supply to the house may be
faulty or there may be an outage.
Contact your local gas supplier.
One of the oven lights
does not come on, but the
oven works.
The oven light bulb(s) have
blown.
Replace the light bulb(s). See 'Care
and cleaning' for instructions.
The light bulb is loose. Ensure bulb is secure See 'Care
and cleaning' for instructions.
The oven is not heating. The door is not properly closed or
it is opened too frequently during
cooking.
The heating elements are disabled
while the door is open. Ensure the
door is properly closed and avoid
opening it during cooking.
A glass pane in the
oven door has cracked,
chipped, or shattered.
Incorrect cleaning or the
edge of the glass hitting
against something.
You must use the oven.NOT
Contact a Fisher & Paykel trained
and supported service technician
or Customer Care
I can feel hot air blowing
out of the vents after I
have turned the oven off.
This is normal. For safety reasons the cooling fans
will continue to run even when you
have turned the oven off. The fans
will switch off automatically.
Steam coming from vents
at the back of the range.
Moisture from food evaporating
during cooking.
This is normal, especially if you are
cooking large quantities of food.
The oven fan comes on
when I select a function
that does not use a fan
(eg BAKE).
This is normal. The fan comes on
while the oven is preheating. It
may turn off when the oven has
reached the set temperature.
The oven fan comes on
when I select a function
that does not use a fan
(eg BAKE).
When heating from cold, your
oven is designed to initially heat
to a temperature higher than what
is set.
General

38
PROBLEM POSSIBLE CAUSES WHAT TO DO
The oven has reached the
set temperature but the
temperature dial halo is
still red.
The oven is set to This is normal. The dial halo will BROIL.
stay red whenever this function
is in use as the broil element is
always heating.
The oven sounds a tone
when I try to set the
temperature below a
certain temperature.
This is normal: for food safety
reasons, the oven functions
have factory-set minimum
temperature settings.
Select a different temperature
or try a different function that is
designed for low temperatures.
The temperature dial halo
never turns white when I
use BROIL.
This is normal: the halo stays red
to indicate that the broil element
provides instant radiant heat.
Fan noise and warm air
coming from the range
during and after use.
A cooling fan in the range runs to
prevent the oven door and control
panel from overheating.
This is normal and requires
no action.
Condensation around oven
(eg on control panel or
top of oven door).
Food has high moisture content
or the local climate is contributing
to condensation.
If there is frequent or excessive
condensation, ensure that
cabinetry around the range is
moisture-proof.
The oven door does not
align with the control
panel or cabinetry.
The oven door has been installed
incorrectly and the hinges are
misaligned within the slots.
Re-install the door. See 'Care and
cleaning' for instructions.
Temperature is not
calibrated correctly.
Door is not sealing correctly. Re-install the door. See ‘Care and
cleaning’ for instructions.
The fan does not come on
in a convection mode.
Technical fault. Contact your Authorized Service
Center or Customer Care.
Uneven baking. Oven not correctly preheated. Ensure the dial halo has changed
to red before beginning.
Unsuitable or incorrectly
arranged bakeware.
See 'Cooking guide' for advice.
The halo around the dial
alternates between white
and red during use.
The oven needs to heat
periodically to maintain the set
temperature during use.
This is normal.
TROUBLESHOOTING
General

40
ALERT CODES
What to do if an alert is displayed
1 Make a note of the alert displayed. You may need this information.
2 If you can fix the problem and the alert code does not reappear, you may continue
using your oven.
If you can’t fix the problem yourself or the alert reappears and the problem persists: wait
until the cooling fans have stopped and the oven has completely cooled down, then turn
the power to the oven off at the wall and contact a Fisher & Paykel trained and supported
service technician or Customer Care with the alert code information.
If there is a problem, the oven will automatically suspend all oven functions and either the
TEMPERATURE or OVEN MODE dial will flash.
IMPORTANT!
Do not turn off the mains power supply to the oven (wall switch) if you get an alert
unless the instructions in the chart following instruct you to. There are cooling fans within
the oven which are needed to cool the oven’s components. Turning off the power while
the oven is too hot may damage the oven and its surrounding cabinetry.
ALERT POSSIBLE CAUSES WHAT TO DO
The OVEN MODE dial
is flashing red
Electronics fault •Allow the oven to cool down.
•Once the oven has cooled completely,
disconnect and reconnect the power supply
• If the alert reappears, contact a
Fisher & Paykel trained and supported service
technician or Customer Care.
The TEMPERATURE
dial is flashing red
Electronics fault •Allow the oven to cool down.
•Once the oven has cooled completely,
disconnect and reconnect the power supply
• If the alert reappears, contact a
Fisher & Paykel trained and supported service
technician or Customer Care.
The OVEN MODE dial
is flashing white
Technical fault •Contact a Fisher & Paykel trained and
supported service technician or Customer
Care.
Produkt Specifikationer
| Mærke: | Fisher & Paykel |
| Kategori: | Ovn |
| Model: | RGV3-366-N |
Har du brug for hjælp?
Hvis du har brug for hjælp til Fisher & Paykel RGV3-366-N stil et spørgsmål nedenfor, og andre brugere vil svare dig
Ovn Fisher & Paykel Manualer

1 November 2024
15 Oktober 2024
29 September 2024
23 September 2024
14 September 2024
7 September 2024
6 September 2024
5 September 2024
4 September 2024
3 September 2024
Ovn Manualer
- Ovn DeLonghi
- Ovn Sinbo
- Ovn Ikea
- Ovn Bosch
- Ovn SilverCrest
- Ovn PKM
- Ovn Gram
- Ovn Sencor
- Ovn Krups
- Ovn Maxxmee
- Ovn Wolkenstein
- Ovn Siemens
- Ovn Day
- Ovn Samsung
- Ovn Scandomestic
- Ovn GE
- Ovn Breville
- Ovn Zanussi
- Ovn Cylinda
- Ovn Panasonic
- Ovn Candy
- Ovn Gorenje
- Ovn AENO
- Ovn Husqvarna
- Ovn VOX
- Ovn Miele
- Ovn Ninja
- Ovn Silverline
- Ovn Blomberg
- Ovn Philips
- Ovn Caso
- Ovn Concept
- Ovn Gastroback
- Ovn Steba
- Ovn Teka
- Ovn Rommelsbacher
- Ovn OK
- Ovn LG
- Ovn AEG
- Ovn Electrolux
- Ovn Thetford
- Ovn Bauknecht
- Ovn Elica
- Ovn Whirlpool
- Ovn Vestfrost
- Ovn Mitsubishi
- Ovn Sharp
- Ovn Hotpoint
- Ovn Dacor
- Ovn Melissa
- Ovn Atag
- Ovn Kenwood
- Ovn Sage
- Ovn Omega
- Ovn Qlima
- Ovn Hoover
- Ovn Daewoo
- Ovn Korona
- Ovn Arçelik
- Ovn Junker
- Ovn JennAir
- Ovn Sanyo
- Ovn Grundig
- Ovn Falmec
- Ovn Progress
- Ovn Presto
- Ovn De Dietrich
- Ovn Witt
- Ovn Indesit
- Ovn GYS
- Ovn Hotpoint Ariston
- Ovn Livoo
- Ovn Toshiba
- Ovn Klarstein
- Ovn Tracer
- Ovn Brother
- Ovn Ardo
- Ovn Furrion
- Ovn Etna
- Ovn Tefal
- Ovn Infiniton
- Ovn Trisa
- Ovn Princess
- Ovn Matsui
- Ovn Biltema
- Ovn Emerio
- Ovn Severin
- Ovn Scholtès
- Ovn Hansa
- Ovn Logik
- Ovn Hendi
- Ovn Bartscher
- Ovn Moulinex
- Ovn Sunbeam
- Ovn Sauber
- Ovn Westinghouse
- Ovn Ilve
- Ovn Eico
- Ovn Element
- Ovn Thomson
- Ovn Constructa
- Ovn Hyundai
- Ovn Proctor Silex
- Ovn Hisense
- Ovn TriStar
- Ovn Clas Ohlson
- Ovn Weber
- Ovn Brandt
- Ovn Airforce
- Ovn Adler
- Ovn Black And Decker
- Ovn Campingaz
- Ovn Camry
- Ovn Dometic
- Ovn Mestic
- Ovn Barbecook
- Ovn Eurom
- Ovn Blaupunkt
- Ovn Tomado
- Ovn Ariston
- Ovn Asko
- Ovn Atlas
- Ovn Becken
- Ovn BEKO
- Ovn Gaggenau
- Ovn Helkama
- Ovn Hoover-Helkama
- Ovn Iberna
- Ovn Ignis
- Ovn Küppersbusch
- Ovn Leonard
- Ovn Neff
- Ovn Privileg
- Ovn Smeg
- Ovn Viva
- Ovn Alpina
- Ovn Clatronic
- Ovn Mesko
- Ovn Quigg
- Ovn SEB
- Ovn Hitachi
- Ovn Buffalo
- Ovn Proficook
- Ovn Rowenta
- Ovn Dualit
- Ovn Medion
- Ovn Liebherr
- Ovn Ariston Thermo
- Ovn Fagor
- Ovn Haier
- Ovn König
- Ovn Cramer
- Ovn AFK
- Ovn Bifinett
- Ovn Bomann
- Ovn Morphy Richards
- Ovn Redmond
- Ovn Russell Hobbs
- Ovn WMF
- Ovn Ariete
- Ovn Innoliving
- Ovn KitchenAid
- Ovn Zelmer
- Ovn Luxor
- Ovn Rosieres
- Ovn Boretti
- Ovn FIAP
- Ovn Vivax
- Ovn Mora
- Ovn Thermex
- Ovn Crosley
- Ovn UPO
- Ovn Zanker
- Ovn George Foreman
- Ovn Galanz
- Ovn Maginon
- Ovn Amana
- Ovn Amica
- Ovn Arthur Martin-Electrolux
- Ovn Euromaid
- Ovn Merrychef
- Ovn KKT Kolbe
- Ovn Comfee
- Ovn Wolf
- Ovn Dimplex
- Ovn Finlux
- Ovn Telefunken
- Ovn Micromaxx
- Ovn Kernau
- Ovn Bertazzoni
- Ovn Caple
- Ovn SIBIR
- Ovn Zerowatt
- Ovn Thane
- Ovn Cuisinart
- Ovn Tiger
- Ovn Primo
- Ovn Orbegozo
- Ovn AGA
- Ovn Viking
- Ovn Emax
- Ovn CaterChef
- Ovn Franke
- Ovn Optimum
- Ovn Cadac
- Ovn Char-Broil
- Ovn Jamie Oliver
- Ovn Koenig
- Ovn Landmann
- Ovn OutdoorChef
- Ovn Rösle
- Ovn Taurus
- Ovn Veripart
- Ovn Zenith
- Ovn Faber
- Ovn Westfalia
- Ovn Balay
- Ovn Cata
- Ovn Exquisit
- Ovn Falcon
- Ovn Pelgrim
- Ovn Elba
- Ovn Elektra Bregenz
- Ovn ELIN
- Ovn Faure
- Ovn Juno
- Ovn Nodor
- Ovn Pyramis
- Ovn Respekta
- Ovn Rommer
- Ovn Stoves
- Ovn Schneider
- Ovn MPM
- Ovn Profilo
- Ovn Tesla
- Ovn Hanseatic
- Ovn G3 Ferrari
- Ovn Thor
- Ovn V-Zug
- Ovn Diplomat
- Ovn Maytag
- Ovn Gourmetmaxx
- Ovn Domo
- Ovn Mellerware
- Ovn BEEM
- Ovn Xblitz
- Ovn Atlantic
- Ovn Saro
- Ovn Thomas
- Ovn Bush
- Ovn Hamilton Beach
- Ovn Ambiano
- Ovn Binatone
- Ovn Unold
- Ovn Aspes
- Ovn Bellini
- Ovn Unox
- Ovn Scancool
- Ovn Nevir
- Ovn Imperial
- Ovn Techwood
- Ovn Inventum
- Ovn Edilkamin
- Ovn Swan
- Ovn Khind
- Ovn Midea
- Ovn Napoleon
- Ovn CDA
- Ovn Laica
- Ovn Frigidaire
- Ovn Frilec
- Ovn Bimar
- Ovn Ardes
- Ovn Suntec
- Ovn Esatto
- Ovn SVAN
- Ovn Everglades
- Ovn Danby
- Ovn Sogo
- Ovn RCA
- Ovn Koenic
- Ovn Scarlett
- Ovn Izzy
- Ovn Currys Essentials
- Ovn Cotech
- Ovn Lofra
- Ovn ECG
- Ovn Nova
- Ovn Saturn
- Ovn Eurochef
- Ovn Trebs
- Ovn Wamsler
- Ovn Fritel
- Ovn General Electric
- Ovn Eldom
- Ovn Navitel
- Ovn H.Koenig
- Ovn Proline
- Ovn Termozeta
- Ovn Hobart
- Ovn Stirling
- Ovn RGV
- Ovn Eta
- Ovn Bella
- Ovn Lynx
- Ovn Kalorik
- Ovn ILive
- Ovn Gemini
- Ovn Cecotec
- Ovn Berg
- Ovn Cosori
- Ovn Rinnai
- Ovn Solac
- Ovn Roadstar
- Ovn Royal Catering
- Ovn Friac
- Ovn Technika
- Ovn Efbe-Schott
- Ovn Seiki
- Ovn Baumatic
- Ovn Sirius
- Ovn Frifri
- Ovn Barazza
- Ovn Palson
- Ovn Chefman
- Ovn Traeger
- Ovn Meireles
- Ovn Steinberg
- Ovn Axis
- Ovn PowerXL
- Ovn Emeril Lagasse
- Ovn Tower
- Ovn Team
- Ovn Kenmore
- Ovn Brentwood
- Ovn Avanti
- Ovn Vestel
- Ovn Continental Edison
- Ovn Cookology
- Ovn Corbero
- Ovn Artusi
- Ovn Aurora
- Ovn La Germania
- Ovn Orima
- Ovn Lenoxx
- Ovn Magic Chef
- Ovn Duronic
- Ovn Lamona
- Ovn Bestron
- Ovn Philco
- Ovn Zanussi-Electrolux
- Ovn Waring Commercial
- Ovn Benavent
- Ovn Sôlt
- Ovn Novy
- Ovn Rex
- Ovn Classique
- Ovn TurboTronic
- Ovn Kunft
- Ovn Euro Appliances
- Ovn Summit
- Ovn Kogan
- Ovn LERAN
- Ovn DCG
- Ovn Coyote
- Ovn New Pol
- Ovn Delta
- Ovn Ravanson
- Ovn Matrix
- Ovn Fulgor Milano
- Ovn BLANCO
- Ovn Airlux
- Ovn Foster
- Ovn Sam Cook
- Ovn Oster
- Ovn Mach
- Ovn Consul
- Ovn Jocel
- Ovn Heller
- Ovn Kayoba
- Ovn Bourgini
- Ovn Signature
- Ovn Ufesa
- Ovn InAlto
- Ovn Manta
- Ovn Dash
- Ovn Tepro
- Ovn Vitrokitchen
- Ovn Comelec
- Ovn Orava
- Ovn Kaiser
- Ovn IFB
- Ovn Esperanza
- Ovn Arctic Cooling
- Ovn Haeger
- Ovn Linarie
- Ovn DPM
- Ovn Create
- Ovn Nutrichef
- Ovn Mistral
- Ovn Glem Gas
- Ovn Flama
- Ovn ARC
- Ovn Chef
- Ovn Thermador
- Ovn Kambrook
- Ovn Atosa
- Ovn Hestan
- Ovn Acec
- Ovn Kluge
- Ovn Leisure
- Ovn AYA
- Ovn Vedette
- Ovn Aroma
- Ovn Salton
- Ovn Arthur Martin
- Ovn Jata
- Ovn BlueStar
- Ovn Mabe
- Ovn Monogram
- Ovn Valberg
- Ovn Castor
- Ovn Heinner
- Ovn Nabo
- Ovn Guzzanti
- Ovn Defy
- Ovn Premium
- Ovn Blokker
- Ovn First Austria
- Ovn Nordmende
- Ovn Rangemaster
- Ovn Drew & Cole
- Ovn Kubo
- Ovn WLA
- Ovn Kelvinator
- Ovn Steel Cucine
- Ovn Jenn-Air
- Ovn Limit
- Ovn Freggia
- Ovn Listo
- Ovn Edesa
- Ovn Milectric
- Ovn EAS Electric
- Ovn Zavor
- Ovn New World
- Ovn Bompani
- Ovn Porter & Charles
- Ovn M-System
- Ovn Koblenz
- Ovn German Pool
- Ovn Creda
- Ovn Godrej
- Ovn Ices
- Ovn Belling
- Ovn Conrad
- Ovn Mx Onda
- Ovn Igenix
- Ovn Kleenmaid
- Ovn Essentiel B
- Ovn Montiss
- Ovn Schock
- Ovn Edy
- Ovn Altus
- Ovn Parmco
- Ovn Zephir
- Ovn Eurotech
- Ovn Café
- Ovn Equator
- Ovn Brixton
- Ovn Superior
- Ovn Smev
- Ovn ZLine
- Ovn Grunkel
- Ovn Belion
- Ovn Nesco
- Ovn Coline
- Ovn White And Brown
- Ovn Home Electric
- Ovn Bora
- Ovn Imarflex
- Ovn Sauter
- Ovn Flavel
- Ovn Bluesky
- Ovn Instant
- Ovn Tecnolux
- Ovn Fratelli Onofri
- Ovn Ronco
- Ovn Premier
- Ovn Marynen
- Ovn Therma
- Ovn Luxell
- Ovn Krefft
- Ovn Girmi
- Ovn Mayer
- Ovn Solitaire
- Ovn Oranier
- Ovn Leventi
- Ovn James
- Ovn Roadeyes
- Ovn Globe
- Ovn Esmaltec
- Ovn Riviera And Bar
- Ovn Apelson
- Ovn Dominox
- Ovn Thermomate
- Ovn Melchioni
- Ovn Tisira
- Ovn Fine Dine
- Ovn Venga
- Ovn Everdure
- Ovn OBU
- Ovn Rival
- Ovn Eudora
- Ovn Hiberg
- Ovn Steelmatic
- Ovn Wells
- Ovn Kucht
- Ovn Avantco
- Ovn Mibrasa
- Ovn Bizerba
- Ovn Vulcan
- Ovn Romo
- Ovn Lacanche
- Ovn Verona
- Ovn Riviera Bar
- Ovn LotusGrill
- Ovn APW Wyott
- Ovn SPT
- Ovn Pit Boss
- Ovn Hatco
- Ovn High One
- Ovn Capital
- Ovn WestBend
- Ovn Companion
- Ovn XO
- Ovn NU-VU
- Ovn Curtiss
- Ovn Blodgett
- Ovn Nemco
- Ovn K&H
- Ovn Winia
- Ovn Bakers Pride
- Ovn Alto-Shaam
- Ovn TurboChef
- Ovn Simfer
- Ovn Firefriend
- Ovn Robinhood
- Ovn LAFE
- Ovn Promis
- Ovn Inno-Hit
- Ovn Fisher Paykel
- Ovn Brock
- Ovn Cosmo
- Ovn Arda
- Ovn Casselin
- Ovn Ferrari
- Ovn Americana
- Ovn Petromax
- Ovn YUNA
- Ovn Spring USA
- Ovn BioChef
- Ovn Forge Adour
- Ovn Blow
- Ovn Chef-Master
- Ovn UGo
- Ovn Eltac
- Ovn Kitchenware
- Ovn Novamatic
- Ovn Emilia
- Ovn VENINI
- Ovn Buschbeck
- Ovn Blackstone
- Ovn Beautiful
- Ovn BSK
- Ovn New.Up!
- Ovn Roller Grill
- Ovn Germanica
- Ovn Studio
- Ovn Adora
- Ovn Sunpentown
- Ovn Backyard Pro
- Ovn Brastemp
- Ovn Ribimex
- Ovn BAXTER
- Ovn Longvie
- Ovn Gasmate
- Ovn Triomph
- Ovn PITT
- Ovn KB Elements
- Ovn TZS First Austria
- Ovn Electroline
- Ovn Pando
- Ovn Wiggo
- Ovn Nestor Martin-Electrolux
- Ovn Thermarest
- Ovn HomeCraft
- Ovn La Cornue
- Ovn Master Kitchen
- Ovn Goldbrunn
- Ovn PITSOS
- Ovn Yamazen
- Ovn St George
- Ovn Fratelli
- Ovn Bröhn
- Ovn Platypus
- Ovn Sheffield
Nyeste Ovn Manualer

9 April 2025
6 April 2025
6 April 2025
6 April 2025
6 April 2025
6 April 2025
6 April 2025
6 April 2025
5 April 2025

5 April 2025