Garmin Aera 510 Manual
Garmin
Navigation
Aera 510
Læs nedenfor 📖 manual på dansk for Garmin Aera 510 (230 sider) i kategorien Navigation. Denne guide var nyttig for 25 personer og blev bedømt med 4.5 stjerner i gennemsnit af 2 brugere
Side 1/230
models: 500, 510, 550, 560
™
Pilot's Guide

Garmin aera 500 Series Pilot’s Guide
190-01117-02 Rev. C
iv
Table of Contents
Appendix G: Utilities ........................................................................................................... 179
Flight Log 179 .........................................................................................................................
Track Log 180 .........................................................................................................................
Heading Line 183 ....................................................................................................................
E6B Calculator 184 .................................................................................................................
Aircraft Profile 186 ..................................................................................................................
Weight & Balance 187 ............................................................................................................
EPE Circle 188 ........................................................................................................................
Proximity Waypoints ......................................................................................................... 189
Appendix H: Display Symbols ........................................................................................... 191
VFR Symbols 191 ....................................................................................................................
IFR Symbols 192 .....................................................................................................................
Airspace Symbols 194 .............................................................................................................
Appendix I: Map Datum and Location Formats ............................................................ 197
Map Datums 197 ....................................................................................................................
Location Formats 197 ..............................................................................................................
Appendix J: Glossary ........................................................................................................... 199
Appendix K: License Agreement and Warranty ............................................................ 205
Contact Garmin................................................................................................................ 205
Software License Agreement ............................................................................................. 205
Limited Warranty .............................................................................................................. 205
AOPA Airport Directory Notice 206 ..........................................................................................
AC-U-KWIK LICENSE AGREEMENT .................................................................................... 206
XM Satellite Radio Service Agreement 207 ...............................................................................
Weather Data Warranty .................................................................................................... 207
FCC Compliance............................................................................................................... 208
Industry Canada Compliance 208 ............................................................................................
Index ...................................................................................................................................Index-1

Garmin aera 500 Series Pilot’s Guide
190-01117-02 Rev. C
2
Overview
OverviewGPS NavigationFlight PlanningHazard AvoidanceAdditional FeaturesAppendicesIndex
1.2 GETTING STARTED
BATTERY INSTALLATION
NOTE: Refer to Appendix E for additional battery information.
CAUTION: Always keep the battery installed when the unit is on.
WARNING: The product contains a lithium-ion battery. To prevent damage,
remove the unit from the aircraft or vehicle when exiting or store it out of
direct sunlight.
Installing the battery:
1)
Locate the lithium-ion battery that came in the product box.
2)
Slide the release key until the battery cover on the back of the aera opens
up.
3)
Remove the battery cover.
4)
Locate the metal contacts on the end of the lithium-ion battery.
5)
Insert the battery so that the metal contacts on the battery line-up with the
metal contacts inside the battery compartment.
6)
Slide the top of the battery cover into the groove on the inside of the
battery compartment, and press down.
Installing the Battery

Garmin aera 500 Series Pilot’s Guide
190-01117-02 Rev. C
4
Overview
OverviewGPS NavigationFlight PlanningHazard AvoidanceAdditional FeaturesAppendicesIndex
TURNING THE UNIT ON/OFF
Press and hold the
POWER Button to turn the unit on or off.
The first time the unit is turned on, the receiver must collect satellite data and
establish its present location. To ensure proper initialization, the aera is shipped from
the factory in AutoLocate mode, which allows the receiver to “find itself” anywhere in
the world.
During initialization, current database information is displayed. Database information
includes valid operating dates, cycle number, and database type. When this information
has been reviewed for currency (to ensure that no databases have expired), the pilot
is prompted to continue.
Touching the Press To Accept Button acknowledges this information, and the
' ' Screen is displayed.Home
Database Initialization
CHANGING MODES
The aera offers two modes for transportation: automotive and aviation.
Changing modes:
1)
Touch the automotive or aviation icon at the top of the ' ' Screen.Home
2)
Touch .Yes
AutomotiveAviation
Or:
1)
From the ' ' Screen, touch Home Tools Automotive Aviation > or (from
automotive mode).
2)
Touch .Yes
Garmin aera 500 Series Pilot’s Guide
190-01117-02 Rev. C 9
Overview
Overview GPS Navigation Flight Planning Hazard Avoidance Additional Features Appendices Index
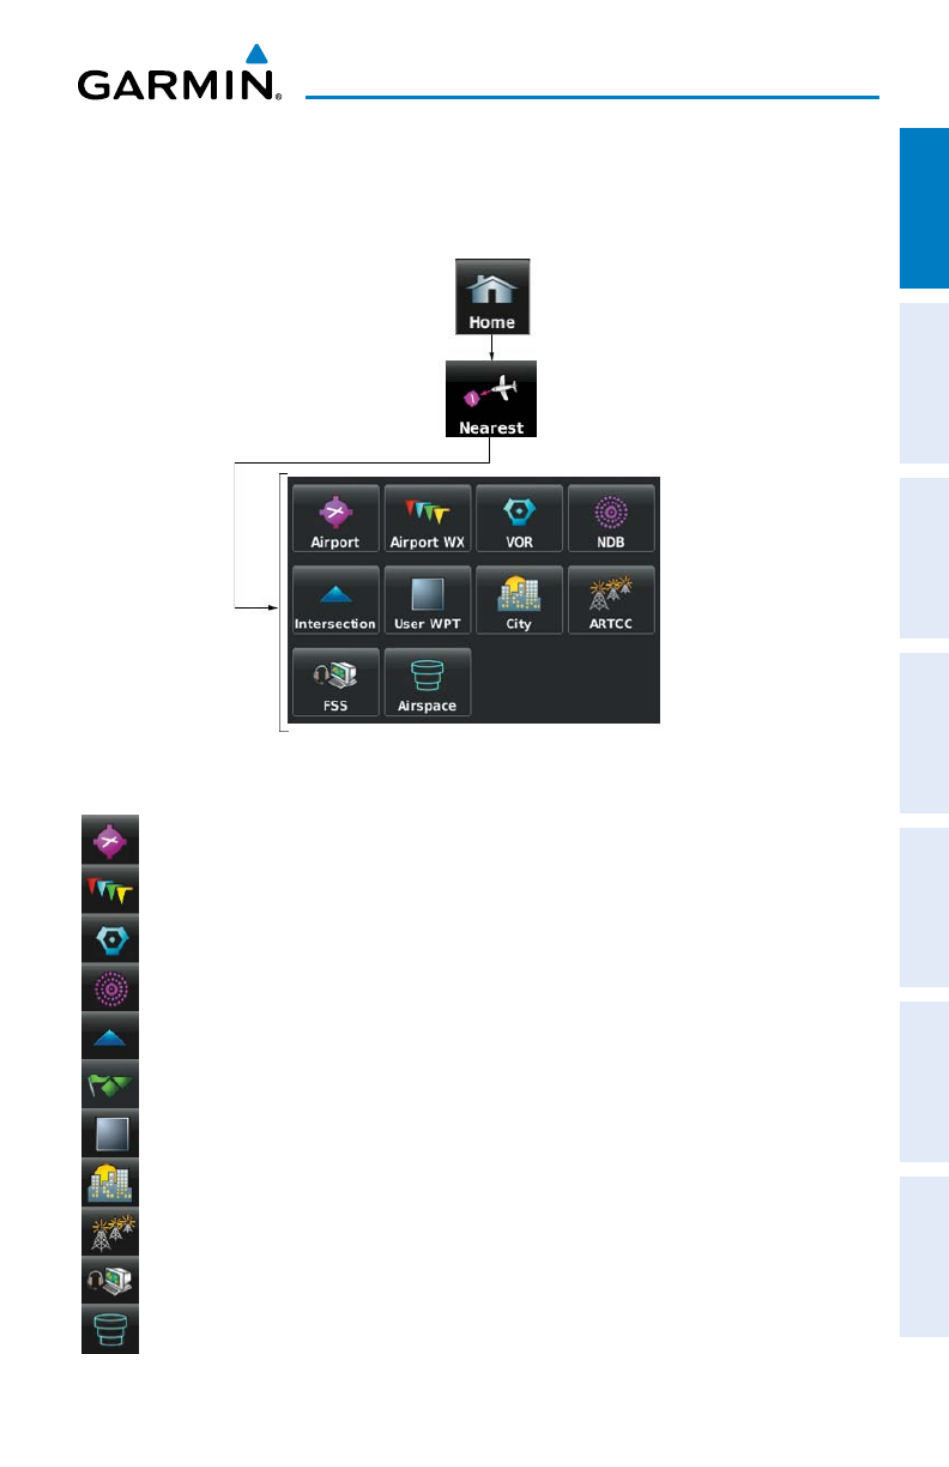
NEAREST ICONS
From the ‘Home‘ Screen, touch the
Nearest Icon to access the second-level
Nearest Icons.
Touch the following icons to perform the associated function:
Airport Displays nearest airports.
Airport WX Displays nearest airport weather.
VOR Displays nearest VORs.
NDB Displays nearest NDBs.
Intersection Displays nearest intersections.
VRP Displays nearest Visual Reporting Point (VRP) (Atlantic).
User WPT Displays nearest user waypoints.
City Displays nearest cities.
ARTCC Displays nearest ARTCCs.
FSS Displays nearest Flight Service Stations (FSS).
Airspace Displays nearest airspace.

Garmin aera 500 Series Pilot’s Guide
190-01117-02 Rev. C
14
Overview
OverviewGPS NavigationFlight PlanningHazard AvoidanceAdditional FeaturesAppendicesIndex
S Ietup conS
From the ‘Home‘ Screen, touch the Tools >
Setup to access the third-level Setup
Icons.
Touch the following third-level icons to perform the associated function:
Display Displays backlight intensity/timeout and color mode settings.
Sound Displays sound settings.
Units Displays unit settings.
Date/Time Displays date & time settings.
Map Displays Navigation Map settings.
Position Displays position settings.
Interface Displays interface settings.
Alarms Displays alarm settings.
SUA Alarms Displays Special Use Airspace alarm settings.
Garmin aera 500 Series Pilot’s Guide
190-01117-02 Rev. C 19
Overview
Overview GPS Navigation Flight Planning Hazard Avoidance Additional Features Appendices Index
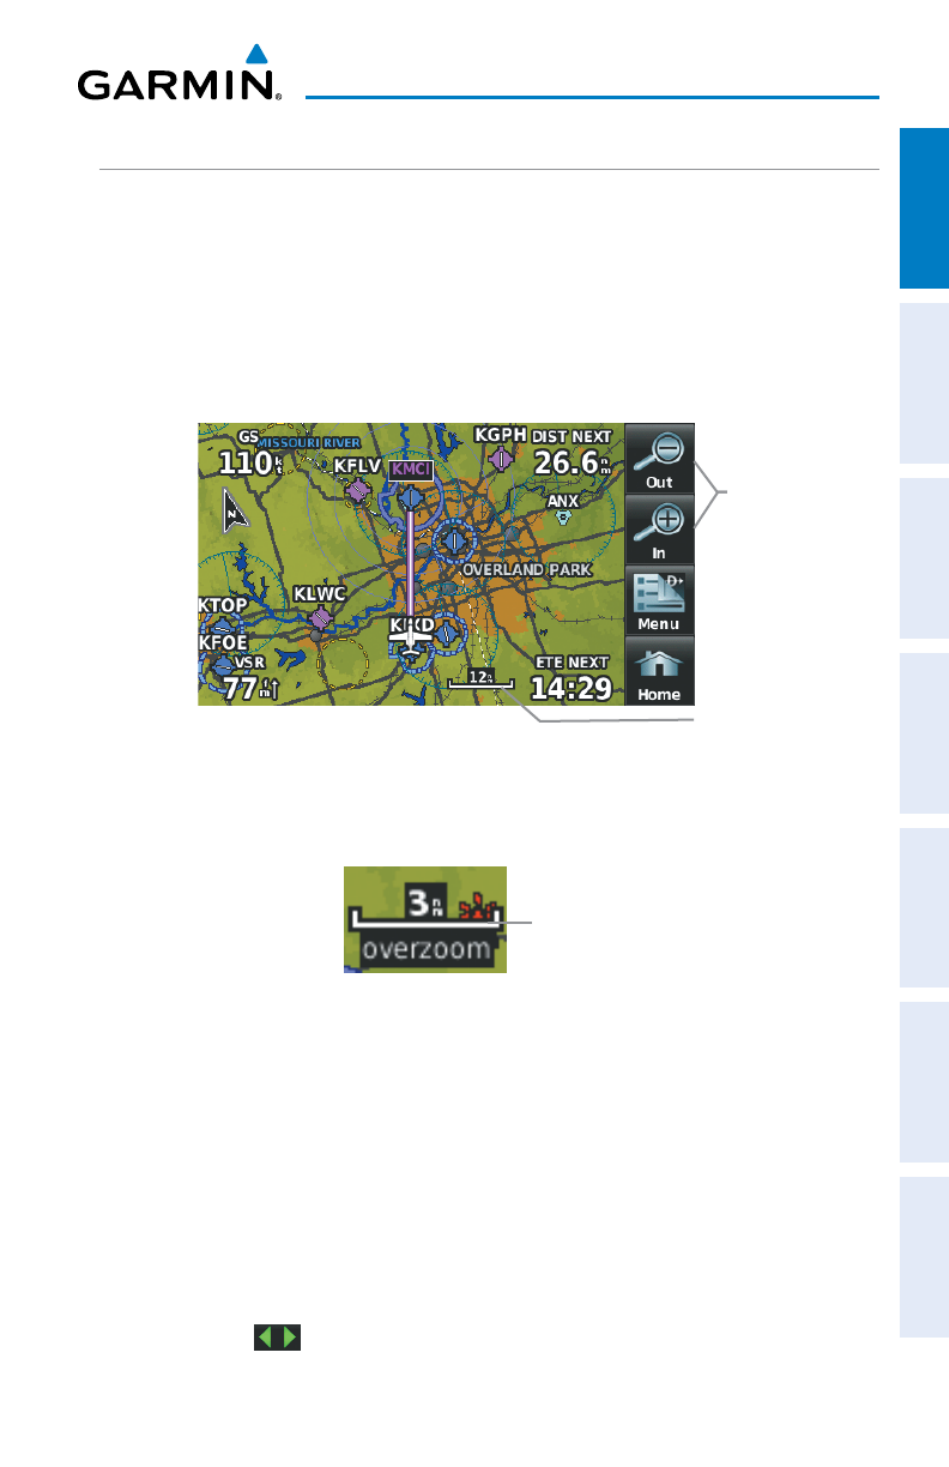
MAP RANGE
There are 23 different map ranges available, from 200 feet to 800 nm. The current
map range is indicated in the lower right. The scale bar represents the map scale. To
change the map range on any map, use the or Icons to zoom ‘out’ (increasing),Out In
or zoom ‘in‘ (decreasing).
Adjusting the map range:
While viewing a Map Display, touch the or Icons.In Out
Navigation Map
Map Range
Range
Icons
When the selected range exceeds the resolution of the map data, ‘overzoom’ appears
below the map range scale.
Map Range/Overzoom
Scale Bar Rep-
resenting a Map
Scale of 3 nm Per
Scale Width.
AUTO ZOOM
Auto Zoom allows the aera to change the map display range to the smallest range
clearly showing the active waypoint. Auto Zoom can be overridden by adjusting th
range and remains that way until the active waypoint changes, a terrain or trafc alert
occurs, or the aircraft takes off.
Enabling/disabling auto zoom:
1)
From the ' ' Screen, touch > > .Home Map Menu Set Up Map
2)
Touch the buttons to select the ' ' Category.General

Garmin aera 500 Series Pilot’s Guide
190-01117-02 Rev. C 23
Overview
Overview GPS Navigation Flight Planning Hazard Avoidance Additional Features Appendices Index
MAP SYMBOLS
Refer to Appendix H for a list of map symbols.
DECLUTTER
The map can be adjusted to declutter (remove unwanted items, such as highways)
on the map.
Adjusting the declutter level of the navigation map:
1)
From the ' ' Screen, touch > > .Home Map Menu Declutter
2)
Touch the desired level ( ) on the right side of the screen. The -1, -2, -3
currently selected level is highlighted blue.
3)
Touch the Icon to remove the detail options.Back
Declutter
MAP DETAIL
The map detail can also be adjusted. Map detail changes the amount of detail with
respect to the zoom scale.
Adjusting the map detail:
1)
From the ' ' Screen, touch > > .Home Map Menu Set Up Map
2)
Touch the buttons to select the ' ' Category.General
3)
Touch .Detail Level
4)
Touch the Data Option Button, and touch the desired option from the list
( , or ).Least, Less, Normal, More Most
Garmin aera 500 Series Pilot’s Guide
190-01117-02 Rev. C
24
Overview
OverviewGPS NavigationFlight PlanningHazard AvoidanceAdditional FeaturesAppendicesIndex
1.6 SYSTEM SETTINGS
The third-level Icons allow management of the following system parameters:Setup
•Display
•Sound
•Units
•Date&Time
•Map
•Position
•Interface
•Alarms
•SUAAlarms
•DataLink
•Weather
•Power
•Keyboard
Restoring system setting defaults:
1)
From the ' ' Screen, touch Home Tools Setup > .
2)
Touch the desired Setup Icon (Display, Sound, Units, Date & Time,
Map, Position Interface Alarms , , , SUA Alarms, or Power).
3)
Touch > .Menu Restore Default
Or
:
From the ' ' Screen, touch Home Tools Setup Menu > > > Restore All
Settings.
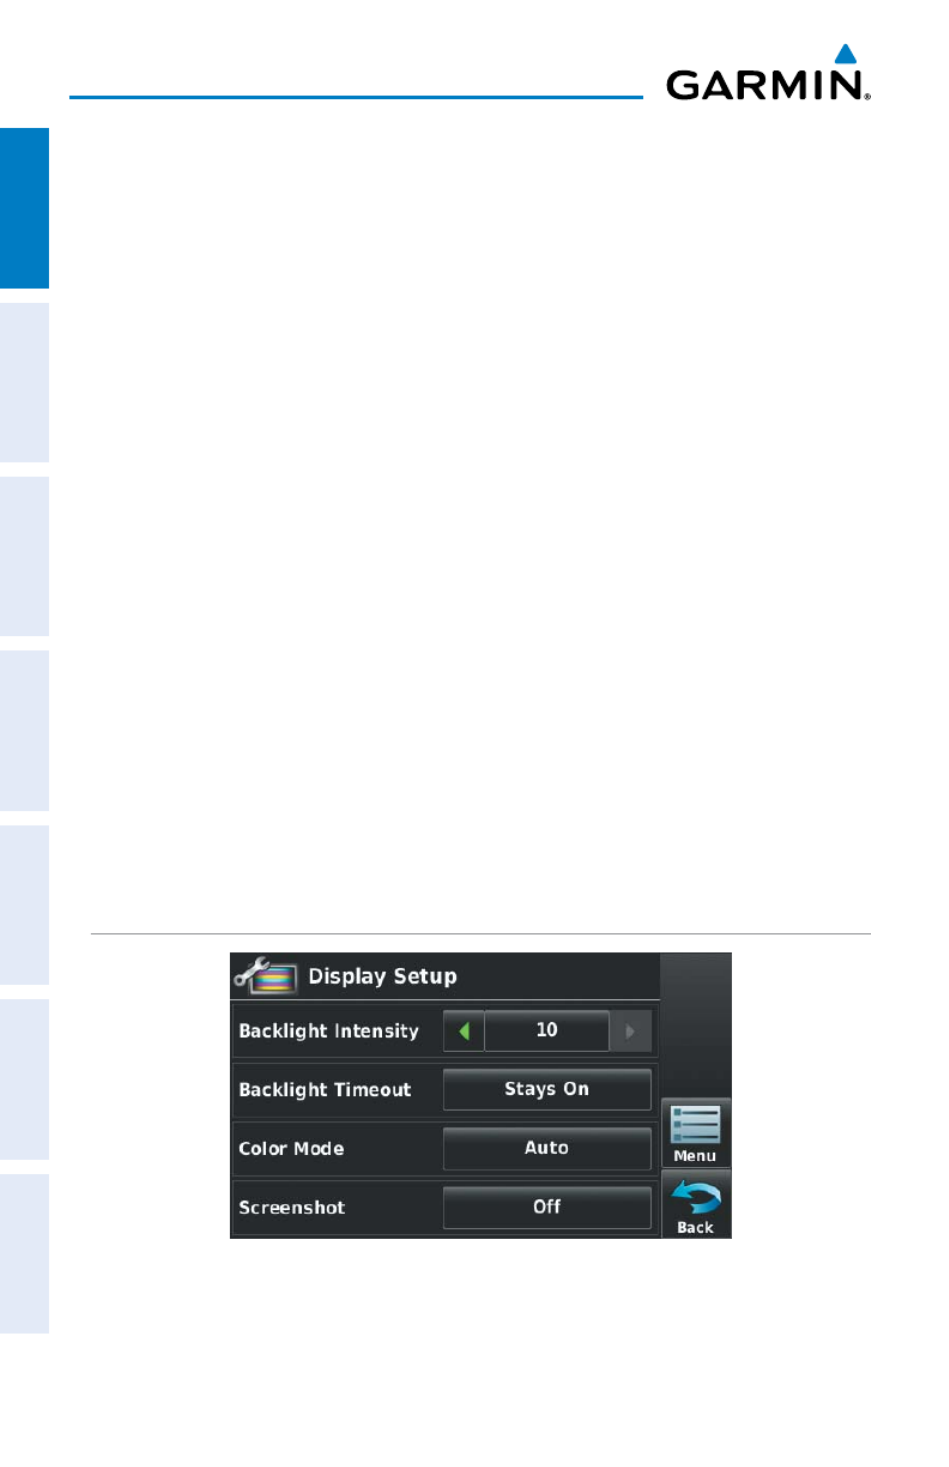
DISPLAY
Display Setup

Garmin aera 500 Series Pilot’s Guide
190-01117-02 Rev. C 25
Overview
Overview GPS Navigation Flight Planning Hazard Avoidance Additional Features Appendices Index
BACKLIGHT INTENSITY
Adjusting backlight intensity:
1)
From the ' ' Screen, touch Home Tools Setup Display > > .
2)
Touch the buttons to adjust the backlight intensity.
Or:
Press the
POWER Button and enter the desired backlight intensity.
BACKLIGHT TIMEOUT
After a specied period of inactivity the backlight will turn off to save batter
power.
Adjusting backlight timeout:
1)
From the ' ' Screen, touch Home Tools Setup Display > > .
2)
Touch the ' ' Data Option Button, and touch the desired Backlight Timeout
option from the list ( , or Stays On, 15 Seconds, 30 Seconds, 1 Minute
2 Minutes).
TOUCHSCREEN
Calibrating the touchscreen:
1)
From the ' ' Screen, touch Home Tools Setup Display Menu > > > >
Calibrate.
2)
Follow the onscreen instructions, and touch . The unit will restart.OK
SOUND
Sound is broken down into ‘Master’, ‘Alerts’, and ‘Media’. 'Master’ controls A
sound. ‘Alerts’ and ‘Media’ are a percentage of the ‘Master’ sound. ‘Alerts’ refers t
navigation phrases (e.g. "Pull Up"), and ‘Media’ refers to the XM radio volume. Th
Terrain Alerts, TIS Alerts, and Key Tones can also be toggled On/Off.

Garmin aera 500 Series Pilot’s Guide
190-01117-02 Rev. C
28
Overview
OverviewGPS NavigationFlight PlanningHazard AvoidanceAdditional FeaturesAppendicesIndex
1.7 NEAREST AIRPORT CRITERIA SETTINGS
The Nearest Airports Option Menu allows the pilot to lter out airports that do not
meet a dened criteria. Specic surface types and runway lengths can be dened, as
well as the option to include private airports and/or heliports.
Runway Surface—allows you to set criteria for the type of surface on the runway:
•
Hard Only—shows only runways with a concrete, asphalt, or similar sealed
surface.
•
Hard or Soft—shows all runways except water landing facilities.
•
Water Only—shows only water landing facilities.
•
Any—shows any runway, regardless of surface type, including water landing
facilities.
Minimum Runway Length—allows the pilot to enter a specic length for the shortest
runway allowed.
Entering airport criteria:
1)
From the ' ' Screen, touch > > > Home Nearest Airport Menu Set
Airport Criteria.
2)
Touch the desired setting to change ('Runway Surface', 'Include
Private Apts', 'Include Heliports + -') or touch the ' ' or ' ' buttons to
increase/decrease the .Minimum Runway Length
Or
:
To restore defaults, touch > Menu Restore Default.
Restoring airport criteria defaults:
See the ‘Entering Airport Criteria’ procedure above.

Garmin aera 500 Series Pilot’s Guide
190-01117-02 Rev. C
30
Overview
OverviewGPS NavigationFlight PlanningHazard AvoidanceAdditional FeaturesAppendicesIndex
Entering a new location:
1)
From the ' ' Screen, touch > > .Home Position Menu New Location
2)
Touch ' ', or ' '.Use Map Use Identier
3)
After selecting your approximate position using the map pointer or entering
an identier, touch .OK
4)
The GPS Receiver will begin a new search based on the location entered.
SIMULATOR MODE
Simulator Mode is helpful for practicing with the unit indoors or when no satellite
or XM signals are available. All waypoints and routes created in Simulator Mode ar
retained in memory for future use.
NOTE: Do not attempt to navigate using Simulator Mode. When the unit is
set to Simulator Mode, the GPS receiver is turned off. Any Satellite Signal
Strength Bars shown are only simulations and do not represent the strength
of actual satellite signals.
Starting/Stopping Simulator Mode:
From the ' ' Screen, touch > > .Home Position Menu Start/Stop Simulator
Adjusting the simulated altitude, track, speed, waypoint, & posi-
tion:
1)
From the ' ' Screen, touch > > .Home Position Menu Start Simulator
2)
Touch the 'GPS simulator is on (for use indoors)' message to remove it.
3)
Touch > .Menu Drive Simulator
4)
Enter the desired data by touching the elds or using the / buttons. + -
Refer to Section 1.4 'Data Entry' for more information.
Simulator Mode

Garmin aera 500 Series Pilot’s Guide
190-01117-02 Rev. C
34
GPS Navigation
OverviewGPS NavigationFlight PlanningHazard AvoidanceAdditional FeaturesAppendicesIndex
DATA FIELD OPTIONS
•Accuracy
•Altitude
•Bearing(BRG)
•CoursetoSteer(CTS)
•CrosstrackError(XTK)
•DesiredTrack(DTK)
•Distance(Destination)(DISTDEST)
•Distance(Next)(DISTNEXT)
•EnRouteSafeAltitude(ESA)
•ExternalVoltage(EXTVOLTS)
•FlightTimer(FLTTIMER)
•FuelTimer
•GlideRatio(G/R)
•GroundSpeed(GS)
•GroundTrack(TRK)
•MinimumSafeAltitude(MSA)
•NextWaypoint(NEXTWPT)
•Sunrise
•Sunset
•Time En Route (Destination) (ETE
DEST)
•TimeEnRoute(Next)(ETENEXT)
•Time ofArrival (Destination) (ETA
DEST)
•TimeofArrival(NEXT)(ETANEXT
•TimetoVNAV(VNAVTIME)
•Time(Local)
•Time(UTC)
•VerticalSpeed(VS)
•VerticalSpeedRequired(VSR)
•Wx(Altimeter)(WXALTIM)
•Wx(DewPoint)(WXDEWPT)
•Wx(Rel.Humidity)(WXHUMIDITY
•Wx(Temperature)(WXTEMP)
•Wx(Wind)(WXWIND)

Garmin aera 500 Series Pilot’s Guide
190-01117-02 Rev. C 35
GPS Navigation
Overview GPS Navigation Flight Planning Hazard Avoidance Additional Features Appendices Index
NUMERIC FLIGHT DATA
The numeric ight data can be independently congured by the user.
NOTE: For units that support XM and have a GDL 39, the 'Numbers' icon is
moved to the Tools Page.
Accessing numeric ight data:
From the ' ' Screen, touch .Home Numbers
Changing numeric ight data elds:
1)
From the ' ' Screen, touch .Home Numbers
2)
Touch the desired data eld to change. The available data elds are
displayed.
3)
Touch the desired data eld.
4)
Touch .OK
Restoring default numeric ight data:
From the ' ' Screen, touch > > .Home Numbers Menu Restore Default
Numeric Flight Data

Garmin aera 500 Series Pilot’s Guide
190-01117-02 Rev. C
38
GPS Navigation
OverviewGPS NavigationFlight PlanningHazard AvoidanceAdditional FeaturesAppendicesIndex
The Course Deviation Indicator, or needle, indicates how far off course, left or right,
based on its placement along the course deviation scale.
The course deviation scale setting is adjustable for Auto, ±0.25, 1.25 or 5.0 (nautical
mile, statute mile, or kilometer) full-scale deflection. The course deviation scale appears
on the lower right corner of the HSI. The default setting is Auto, which uses three
factors to determine the distance from the center of the CDI to full left or right limits:
•CDI scale = 1.25 - within 30 nm of any airport in the active route.
•CDI scale = 0.25 - on an approach leg or within 2 nm of the FAF or MAP.
•CDI scale = 5.0 - if the previous two conditions do not exist.
Displaying the HSI/Panel:
From the ' ' Screen, touch the Home HSI/Panel Icon.
CHANGING THE CDI SCALE
The CDI scale can be set by touching the or Icons from the In Out HSI/Panel Screen
(if the CDI scale is NOT set to 'Automatic') or from the HSI/Panel option menu.
Changing the CDI scale:
1)
From the ' ' Screen, touch Home HSI/Panel Menu Set CDI Scale > > .
2)
Touch the desired CDI Scale (' ', ' ', ' ', or Automatic 0.25 nm 1.25 nm
' ').5.00 nm
SETTING THE BUG INDICATOR
The Bug Indicator can be set from the HSI/Panel option menu.
Setting the Bug Indicator:
1)
From the ' ' Screen, touch Home HSI/Panel Menu Set Bug > >
Indicator.
2)
Touch the desired menu option ('User Selected', 'Bearing', 'Course to
Steer', or ' ').Off

Garmin aera 500 Series Pilot’s Guide
190-01117-02 Rev. C 47
GPS Navigation
Overview GPS Navigation Flight Planning Hazard Avoidance Additional Features Appendices Index
The following descriptions and abbreviations are used:
•Usagetype:Public,Military,orPrivate
•Runwaysurfacetype:Hard,Turf,Sealed,Gravel,Dirt,Soft,Unknown,orWa
•Runwaylightingtype:NoLights,PartTime,FullTime,Unknown,orPCLF
pilot-controlled lighting)
•COMAvailability:TX(transmitonly),RX(receiveonly),PT(parttime),* (ad
information available)
Selecting an airport for review by identier, facility name, or city:
1)
From the ' ' Screen, touch > Tab (if necessary).Home WPT Info Info
2)
Touch the Waypoint Identier Button.
3)
Enter the desired waypoint:
a)
Touch the buttons to 'Search by Identier', 'Search by
Facility Name Search by City', or ' ' using the keypad.
b)
Enter the desired waypoint.
c)
Touch the Icon.OK
Or
:
a)
Touch the buttons to cycle through the waypoint categories
('Flight Plan Waypoints Nearest Airports'', ' , or 'Recent
Waypoints'.)
b)
Touch the desired waypoint from the list.
4)
If duplicate entries exist for the entered facility name or location, duplicate
waypoints are displayed. Touch the desired waypoint from the list.
Selecting a runway:
1)
From the ' ' Screen, touch > Home WPT Info Runway Tab.
2)
Touch the Waypoint Identier Button.
3)
Enter the desired waypoint:
a)
Touch the buttons to 'Search by Identier', 'Search by
Facility Name Search by City', or ' ' using the keypad.
b)
Enter the desired waypoint.
c)
Touch the Icon.OK
Or:
Garmin aera 500 Series Pilot’s Guide
190-01117-02 Rev. C 57
GPS Navigation
Overview GPS Navigation Flight Planning Hazard Avoidance Additional Features Appendices Index
a)
With a map displayed, touch a map feature.
b)
Touch the Icon.Menu
c)
Touch 'Create Waypoint'.
Or:
a)
From the ‘Home’ Screen, touch the Position Icon.
b)
Touch the Mark Waypoint Button.
2)
Enter the desired user waypoint name (up to 10 characters). Refer to the
Overview Section on 'Data Entry' for more information.
3)
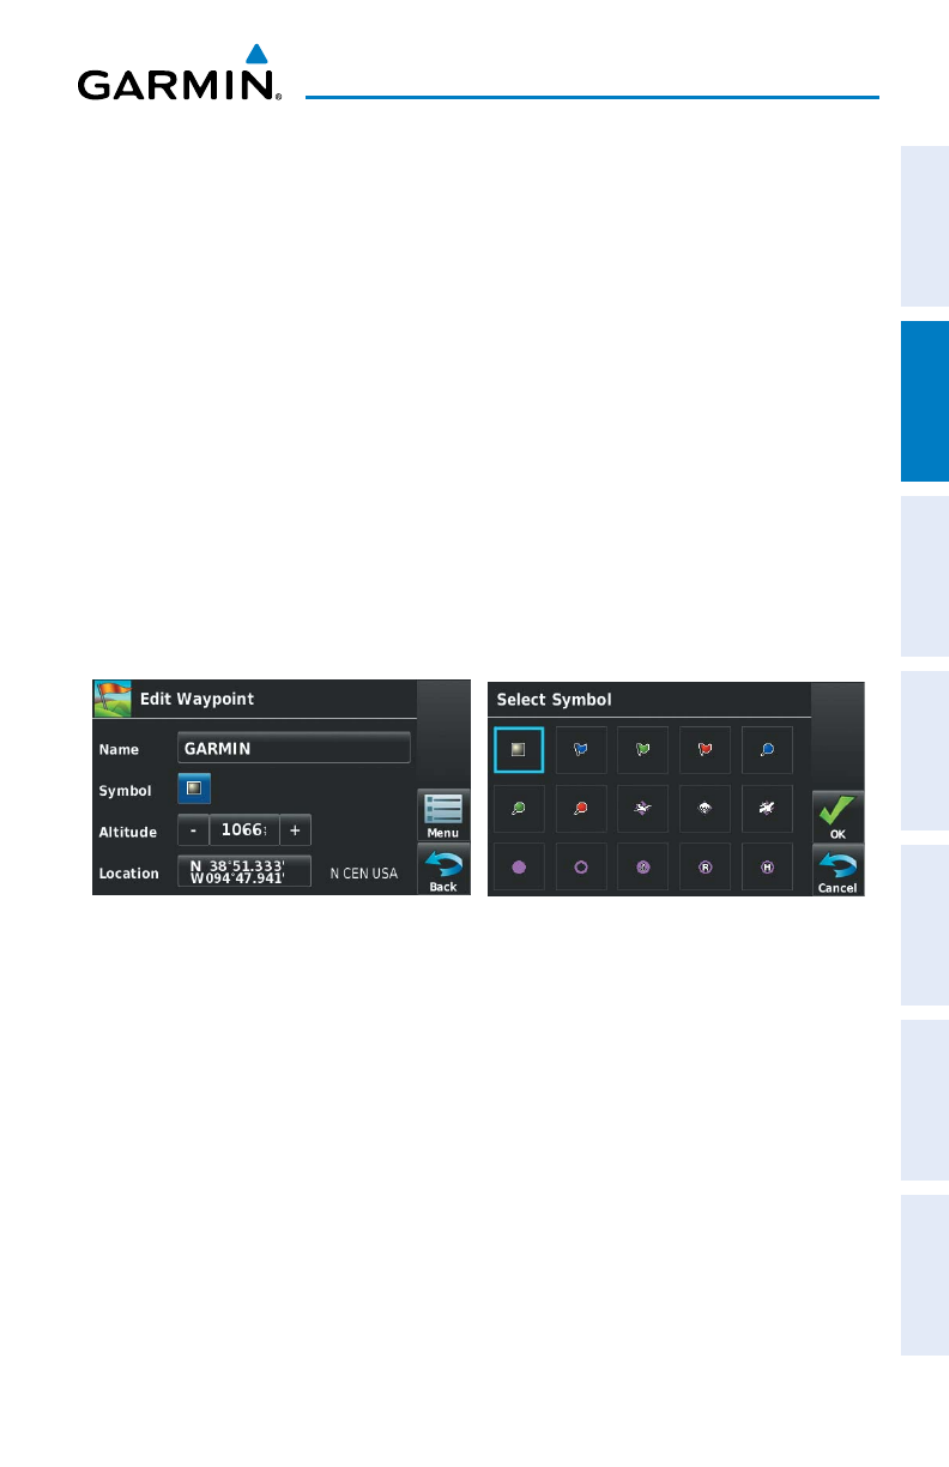
Touch the Icon. If changing the User Waypoint settings (symbol, OK
altitude, location, or reference waypoints) continue with Step 4.
4)
If desired, touch the Field to change the symbol that will appear Symbol
on the map.
a)
Touch the desired symbol.
b)
Touch the Icon.OK
User Waypoint Symbols
5)
If desired, touch the FieldAltitude
a)
Enter the desired altitude using the keypad or the / buttons. Refer to + -
the Overview Section on 'Data Entry' for more information.
b)
Touch the Icon.OK
6)
If desired, touch the Field.Location
a)
Enter the desired latitude and longitude by touching the left/right
arrows to move the cursor, and the up/down arrows to change the
value.
b)
Touch the Icon.OK

Garmin aera 500 Series Pilot’s Guide
190-01117-02 Rev. C 59
GPS Navigation
Overview GPS Navigation Flight Planning Hazard Avoidance Additional Features Appendices Index
3)
Touch the 'Edit Waypoint' menu option.
4)
Touch the desired field to edit:
a)
Touch the Button.Name
b)
Enter the desired user waypoint name (up to 10 characters). Refer to
the Overview Section on 'Data Entry' for more information.
Or:
a)
Touch the Button.Symbol
b)
Touch the desired symbol.
Or:
a)
Touch the Button.Altitude
b)
Enter the desired altitude. Refer to the Overview Section on 'Data
Entry' for more information.
Or:
a)
Touch the Button.Location
b)
Enter the desired latitude and longitude by touching the left/right
arrows to move the cursor, and the up/down arrows to change the
value.
5)
Touch the Icon.OK
Deleting user waypoints:
1)
From the ' ' Screen, touch Home Tools > User WPT.
2)
Delete a single waypoint, delete all waypoints, delete by symbol or delete
by distance:
a)
Touch the desired User Waypoint. The option menu automatically
displays
b)
Touch the 'Delete Waypoint' menu option. The confirmation window
will appear.
Or:
a)
Touch the Icon.Menu
b)
Touch the ' ' menu option. The confirmation window will Delete All
appear.
Or:
Garmin aera 500 Series Pilot’s Guide
190-01117-02 Rev. C
60
GPS Navigation
OverviewGPS NavigationFlight PlanningHazard AvoidanceAdditional FeaturesAppendicesIndex
a)
Touch the Icon.Menu
b)
Touch the ' ' menu option.Delete by Symbol
c)
Touch the desired symbol to delete. The symbol will be highlighted
blue.
d)
Touch the icon. The confirmation window will appear.OK
Or:
a)
Touch the Icon.Menu
b)
Touch the ' ' menu option.Delete by Distance
c)
If desired, touch the Field and touch ' ' From Current Location
(default), ' ', or ' ' from the option menu.Use Identifier Use Map
d)
If desired, touch the ' / ' Button, and touch the Less Than More Than
Distance Field to enter the desired distance.
e)
Touch the icon. The confirmation window will appear.OK
3)
Touch .Yes
CITIES
City information can be viewed using the Waypoint Information function, the Nearest
function, or the Map Panning function.
The Nearest City function can be used to quickly find a city close to the flight path.
The list only includes cities that are within 200nm. If there are no cities in the list, text
indicating that there are no nearest cities is displayed.
Select a city:
1)
From the ' ' Screen, touch > Home WPT Info Info Tab.
2)
Touch the Waypoint Identifier Field.
3)
Touch the buttons until the ' ' option is displayed, and Search by City
touch the button.
4)
Enter the desired city using the keypad and touch . Refer to the OK
Overview Section on 'Data Entry' for more information.
Or
:
1)
From the ' ' Screen, touch > .Home Nearest City
2)
Touch the desired Nearest City from the list.
3)
If desired, touch > .Menu Show Map
Garmin aera 500 Series Pilot’s Guide
190-01117-02 Rev. C
64
GPS Navigation
OverviewGPS NavigationFlight PlanningHazard AvoidanceAdditional FeaturesAppendicesIndex
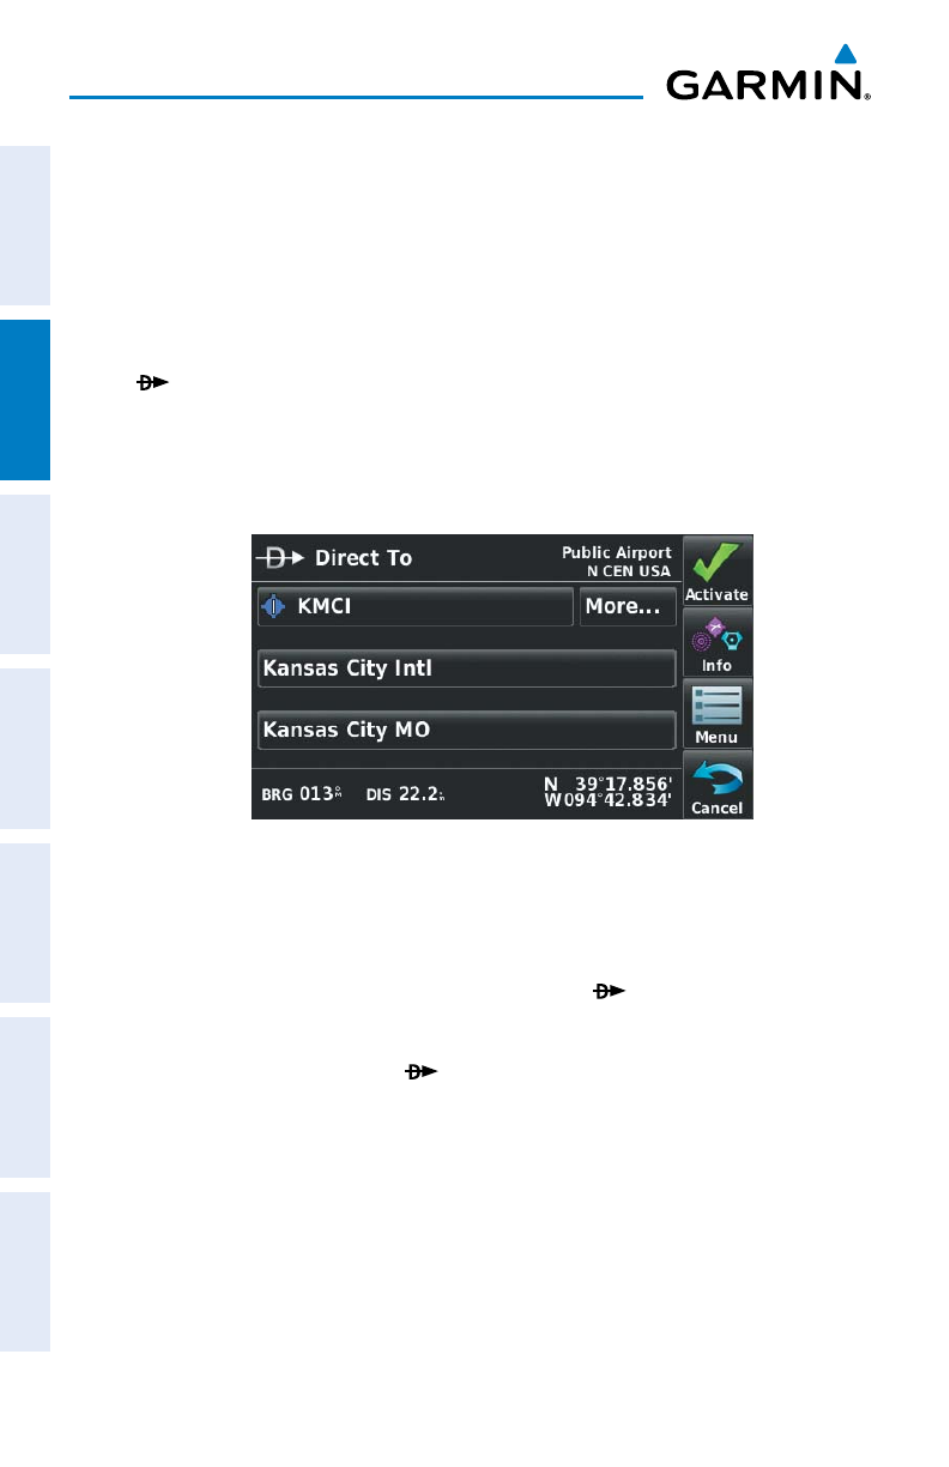
2.6 DIRECT-TO NAVIGATION
The Direct-to method of navigation, initiated by pressing the Direct To Icon is
quicker to use than a ight plan when the desire is to navigate to a single point such
as a nearby airport.
The Direct To Icon is available from the 'Home' Screen, or 'touch and hold' the
Menu/ Icon when available.
Once a direct-to is activated, the aera establishes a point-to-point course line from
the present position to the selected direct-to destination. Course guidance is provided
until the direct-to is replaced with a new direct-to or ight plan, or cancelled.
Direct To
Entering a waypoint identier, facility name, or city as a direct-to
destination:
1)
From the ‘Home’ Screen, touch the Direct To Icon.
Or
:
Touch and hold the / Icon (when available).Menu
2)
Touch Menu Resume Navigation. >
Or
:
a)
Touch the 'Search by Identier', 'Search by Facility Name', or
' ' elds.'.Search by City
b)
Enter the desired Identier, Facility Name, or City using the keypad.
Refer to the Overview Section on 'Data Entry' for more information.
c)
Touch the Icon.OK

Garmin aera 500 Series Pilot’s Guide
190-01117-02 Rev. C
72
Flight Planning
OverviewGPS NavigationFlight PlanningHazard AvoidanceAdditional FeaturesAppendicesIndex
3.4 FLIGHT PLAN ACTIVATION
Activating a stored ight plan erases the active ight plan and replaces it with a copy
of the ight plan being activated. Inverting a stored ight plan reverses the waypoint
order, erases the active ight plan, and replaces it with the ight plan being activated
(the stored ight plan is not changed).
Activating a stored ight plan:
1)
From the ‘Home’ Screen, touch Tools FPL List >
2)
Touch the desired saved ight plan. An option menu is displayed.
3)
Touch the ' ' menu option. A conrmation window Activate Flight Plan
appears.
4)
Touch .Yes
Activating a Flight Plan Leg:
1)
From the ‘Home’ Screen, touch the Icon.Active FPL
2)
While navigating an active ight plan, touch the desired leg to be activated.
An option menu automatically appears.
3)
Touch the ' ' menu option.Activate Leg
4)
Touch .Yes
EDITING SPEED AND FUEL FLOW
Adjusting the Flight Plan cruise speed and fuel ow:
1)
From the ‘Home’ Screen, touch Tools Prole > .
2)
If necessary, touch the Aircraft Button, and touch the desired aircraft from
the vertical list.
3)
Touch the and/or Fields to enter the desired Cruise Speed Fuel Flow
value using the keypad or by touching the ' ' or ' ' Buttons.+ -

Garmin aera 500 Series Pilot’s Guide
190-01117-02 Rev. C 79
Hazard Avoidance
Overview GPS Navigation Flight Planning Hazard Avoidance Additional Features Appendices Index
SECTION 4 HAZARD AVOIDANCE
4.1 WEATHER
WEATHER SOURCE (aera 510 & 560 ONLY)
With a SiriusXM subscription and FIS-B weather information (through GDL 39),
there are three options available for selection through the Main Menu or Weather
Page; AUTO, XM (SiriusXM), and GDL FIS-B. The default selection is ‘AUTO.’ With AUTO
selected, and a SiriusXM subscription, SiriusXM weather information is displayed. If
SiriusXM service is unavailable with AUTO selected, FIS-B weather information is
displayed, if available. If either SiriusXM or FIS-B source is selected, only the selected
source is used to display weather information and no automatic source-switching will
occur. Data from the selected weather source will apply to all weather shown on the
Map Page, Waypoint Page, Weather Page, Nearest Page, and configurable data fields.
The weather source can also be changed manually through the Main Menu or on the
Weather Page (WX)
Switching Weather Sources:
1)
Touch the Weather Menu > > Set Up Weather.
2)
Use the buttons to cycle through the available weather sources
(AUTO, XM, or GDL FIS-B).
XM
®
WEATHER (aera 510 & 560)
NOTE:
You MUST have a GXM 40 smart antenna connected to your aera 510
or aera 560 and a subscription to XM Weather to use XM Weather features.
NOTE:
The weather products displayed on the aera are dependant on the XM
Weather Data Service Package (Aviator LT, Aviator, Aviator Pro) purchased.
Produkt Specifikationer
| Mærke: | Garmin |
| Kategori: | Navigation |
| Model: | Aera 510 |
Har du brug for hjælp?
Hvis du har brug for hjælp til Garmin Aera 510 stil et spørgsmål nedenfor, og andre brugere vil svare dig
Navigation Garmin Manualer

24 August 2024
14 Juli 2024
8 Juli 2024
7 Juli 2024
6 Juli 2024
6 Juli 2024
6 Juli 2024
6 Juli 2024
6 Juli 2024
6 Juli 2024
Navigation Manualer
- Navigation Toyota
- Navigation Mazda
- Navigation Audi
- Navigation Panasonic
- Navigation Pioneer
- Navigation Kenwood
- Navigation Becker
- Navigation Grundig
- Navigation Volvo
- Navigation Sygic
- Navigation Skoda
- Navigation Seat
- Navigation Mio
- Navigation JVC
- Navigation Tacx
- Navigation Medion
- Navigation Fiat
- Navigation Navman
- Navigation Ford
- Navigation Packard Bell
- Navigation Zenec
- Navigation TomTom
- Navigation Kia
- Navigation GlobalTronics
- Navigation Binatone
- Navigation Raymarine
- Navigation Simrad
- Navigation Navitel
- Navigation GoClever
- Navigation Airis
- Navigation Audiovox
- Navigation TakeMS
- Navigation Navigon
- Navigation IGo
- Navigation Magellan
- Navigation Prestigio
- Navigation Fujitsu Siemens
- Navigation Eagle
- Navigation Quintezz
- Navigation A-Rival
- Navigation Apelco
- Navigation LX NAV
- Navigation Marquant
- Navigation Targa
- Navigation Hagenuk
- Navigation Autovision
- Navigation Danew
- Navigation Snooper
- Navigation VDO Dayton
- Navigation Macrom
- Navigation Mappy
- Navigation Bluetech
- Navigation Route 66
- Navigation Falk
- Navigation Seecode
- Navigation Nav N Go
- Navigation Bullit
- Navigation Viamichelin
- Navigation Xzent
- Navigation Navteq
- Navigation Igo 8
- Navigation Keomo
- Navigation RoHS
- Navigation Invion
- Navigation VW
- Navigation Raystar
- Navigation Eclipse
- Navigation Holux
- Navigation PENTAGRAM
- Navigation Roadnavigator
- Navigation WayteQ
- Navigation GoRider
Nyeste Navigation Manualer

15 Januar 2025
11 Januar 2025

5 Oktober 2024

5 Oktober 2024
5 Oktober 2024
5 Oktober 2024
5 Oktober 2024
5 Oktober 2024
5 Oktober 2024
5 Oktober 2024