Getac S400 S3 Manual
Læs nedenfor 📖 manual på dansk for Getac S400 S3 (148 sider) i kategorien Laptop. Denne guide var nyttig for 8 personer og blev bedømt med 4.5 stjerner i gennemsnit af 2 brugere
Side 1/148

Rugged Mobile Computing Solutions
S400
USER’S MANUAL

June 1 201
TRADEMARKS
The Bluetooth® word mark and logos are registered trademarks owned by
Bluetooth SIG, Inc.
All other brand and product names are trademarks or registered trademarks
of their respective owners.
NOTE
The information in this manual is subject to change without notice.
Most screens and operating instructions in this manual are based on
Windows 7. If you’re using a different version of Windows, the screens and
related operations may not be the same.For the latest version of the manual,
please visit the Getac website at www.getac.com.

ENERGY STAR® is a government program that offers businesses and
consumers energy-efficient solutions, making it easy to save money while
protecting the environment for future generations.
Please reference ENERGY STAR ® related information
from www.energystar.gov.
As an ENERGY STAR® Partner, Getac Technology Corporation has
determined that this product meets the ENERGY STAR ® guidelines for
energy efficiency.
An ENERGY STAR® qualified computer uses 70 % less electricity than
computers without enabled power management features.
Earning the E SNERGY TAR®
z When every home office is powered by equipment that has earned the
ENERGY STAR®, the change will keep over 289 billion pounds of
greenhouse gases out of the air.
z If left inactive, ENERGY STAR® qualified computers enter a low-power
mode and may use 15 watts or less. New chip technologies make power
management features more reliable, dependable, and user-friendly than
even just a few years ago.
z Spending a large portion of time in low-power mode not only saves
energy, but helps equipment run cooler and last longer.
z Businesses that use ENERGY STAR® enabled office equipment may
realize additional savings on air conditioning and maintenance.

z Over its lifetime, ENERGY STAR® qualified equipment in a single home
office (e.g., computer, monitor, printer, and fax) can save enough
electricity to light an entire home for more than 4 years.
z Power management (“sleep settings”) on computers and monitors can
result in much savings annually.
Remember, saving energy prevents pollution
Because most computer equipment is left on 24 hours a day, power
management features are important for saving energy and are an easy way
to reduce air pollution. By using less energy, these products help lower
consumers’ utility bills, and prevent greenhouse gas emissions.

i
Table of Contents
Chapter 1 Getting Started .................................................................. 1-1
Getting the Computer Running ............................................. 1-2
Unpacking ........................................................................... 1-2
Using the Tether (Optional) ............................................... 1-3
Connecting to AC Power .................................................... 1-4
Turning On and Off the Computer ................................... 1-5
Taking a Look at the Computer ............................................. 1-7
Front Components .............................................................. 1-7
Rear Components ............................................................... 1-8
Right-Side Components ...................................................... 1-9
Left-Side Components ...................................................... 1-10
Top-open Components ..................................................... 1-12
Bottom Components ........................................................ 1-15
Chapter 2 Operating Your Computer ................................................ 2-1
Using the Keyboard ................................................................ 2-2
Typewriter Keys .................................................................. 2-2
Cursor-Control Keys ............................................................ 2-2
Numeric Keypad ................................................................. 2-3
Function Keys ...................................................................... 2-4
Fn Key .................................................................................. 2-4
Hot Keys .............................................................................. 2-4
Using the Touchpad ................................................................ 2-6
Configuring the Touchpad ................................................. 2-8
Using the Touchscreen (Optional) ......................................... 2-9
Using Multi-touch Gestures (Optional) ........................... 2-10
Using the Input Panel ........................................................... 2-13
Using the Quick Buttons ....................................................... 2-14

ii
Using the DVD Drive ............................................................. 2-16
Inserting and Removing a Disc ........................................ 2-17
Using the Network Features ................................................ 2-18
Using the Modem (Optional) ........................................... 2-18
Using the LAN ................................................................... 2-19
Using the Wireless LAN .................................................... 2-19
Using the Bluetooth Feature (Optional) ............................. 2-23
Turning On/Off the Bluetooth Radio .............................. 2-23
Connecting to another Bluetooth Device ....................... 2-24
Using the Fingerprint Sensor ............................................... 2-27
Using the 3G Feature (Optional) .......................................... 2-29
Installing a SIM Card ......................................................... 2-29
Turning On/Off the 3G Radio .......................................... 2-30
Setting up a 3G Connection ............................................. 2-31
Using the 3G Application ................................................. 2-32
Chapter 3 Managing Power ............................................................... 3-1
AC Adapter .............................................................................. 3-2
Battery Pack ............................................................................. 3-3
Charging the Battery Pack ................................................. 3-3
Initializing the Battery Pack ............................................... 3-4
Checking the Battery Level ................................................ 3-5
Replacing the Battery Pack ................................................ 3-6
Battery Low Signals and Actions ....................................... 3-7
Power Management ............................................................... 3-8
Hibernation ......................................................................... 3-9
Power-Saving Tips ................................................................. 3-10
Chapter 4 Expanding Your Computer ............................................... 4-1
Connecting an External Monitor ........................................... 4-2
Connecting a Serial Device ..................................................... 4-3
Connecting a USB Device ....................................................... 4-4
Connecting an eSATA Device ................................................. 4-5
Connecting an IEEE 1394 Device ............................................ 4-6
Connecting Audio Devices ..................................................... 4-7
Using Smart Cards ................................................................... 4-8
Using PC Cards ......................................................................... 4-9

iii
Using ExpressCards ................................................................ 4-11
Using Storage Cards .............................................................. 4-13
System Memory Upgrade ..................................................... 4-15
Chapter 5 Using BIOS Setup and System Recovery .......................... 5-1
BIOS Setup ............................................................................... 5-2
When and How to Use ....................................................... 5-2
Information Menu .............................................................. 5-3
Main Menu .......................................................................... 5-4
Advanced Menu .................................................................. 5-5
Security Menu ..................................................................... 5-9
Boot Menu ........................................................................ 5-11
Exit Menu .......................................................................... 5-12
System Recovery .................................................................... 5-13
Chapter 6 Using Special Utilities ........................................................ 6-1
Using G-Manager .................................................................... 6-2
Starting G-Manager ............................................................ 6-2
System Tab .......................................................................... 6-3
Battery Tab .......................................................................... 6-4
ECO Tab ............................................................................... 6-6
ECO Information ................................................................. 6-7
Antenna Tab ....................................................................... 6-8
Monitoring Tab ................................................................... 6-9
GPS Status Tab .................................................................. 6-11
Quick Button Definition Utility ............................................ 6-12
Chapter 7 Caring for the Computer ................................................... 7-1
Protecting the Computer ....................................................... 7-2
Using an Anti-Virus Strategy ............................................. 7-2
Using Windows Action Center ........................................... 7-2
Using the Cable Lock .......................................................... 7-3
Taking Care of the Computer ................................................ 7-4
Location Guidelines ............................................................ 7-4
General Guidelines ............................................................. 7-4
Cleaning Guidelines ............................................................ 7-5
Battery Pack Guidelines ...................................................... 7-5
Touchscreen Guidelines ...................................................... 7-6

iv
When Traveling ....................................................................... 7-8
Chapter 8 Troubleshooting ................................................................ 8-1
Preliminary Checklist ............................................................... 8-2
Solving Common Problems .................................................... 8-3
Battery Problems ................................................................ 8-3
Bluetooth Wireless Transmission Problems ...................... 8-3
Display Problems ................................................................. 8-4
DVD Drive Problems ........................................................... 8-5
ExpressCard Problems ......................................................... 8-5
Hardware Device Problems ................................................ 8-6
Hard Disk Drive Problems ................................................... 8-6
Keyboard, Mouse, and Touchpad Problems ..................... 8-7
LAN Problems ...................................................................... 8-7
Modem Problems ................................................................ 8-8
PC Card Problems ................................................................ 8-8
Power Management Problems .......................................... 8-8
Software Problems ............................................................. 8-9
Sound Problems .................................................................. 8-9
Startup Problems .............................................................. 8-10
WLAN Problems ................................................................ 8-11
Other Problems ................................................................. 8-12
Resetting the Computer ....................................................... 8-13
Appendix A Specifications .................................................................... A-1
Appendix B Regulatory Information ................................................... B-1
On the Use of the System ....................................................... B-2
Class B Regulations ............................................................. B-2
Safety Notices ..................................................................... B-3
On the Use of the RF Device .................................................. B-6
USA and Canada Safety Requirements and Notices ........ B-6
European Union CE Marking and Compliance Notices .... B-9

Operating Your Computer 1-1
Chapter 1
Getting Started
Congratulations on purchasing this rugged computer.
This chapter first tells you step by step how to get the computer up and
running. Then, you will find a section briefly introducing the external
components of the computer.

1-2 Operating Your Computer
Getting the Computer Running
This section guides you through the procedures for getting the computer
ready for operation.
Unpacking
After unpacking the shipping carton, you should find these standard items:
z Rugged computer
z Accessories:
− AC adapter
− AC power cord
− Driver disc
− Document(s)
− Stylus and tether (depending on your model)
Inspect all the items. If any item is damaged or missing, notify your dealer
immediately.
Keep the shipping carton and packing materials in case you need to ship or
store the computer in the future.

Operating Your Computer 1-3
Using the Tether (Optional)
A tether is provided for attaching the stylus to your computer.
1. Insert one of the tether’s loop ends through the hole of the stylus (as
indicated by n below). Then, insert the other end through the first loop
(as indicated by o below) and pull it tight.
2. Insert the other loop end to the tether hole on the computer (as
indicated by n below). Then, insert the stylus end through the loop (as
indicated by o below) and pull it tight.

1-4 Operating Your Computer
Connecting to AC Power
The computer operates either on the external AC power or internal battery
power. It is suggested that you use AC power when you start up the
computer for the very first time.
CAUTION: Use only the AC adapter included with your computer. Using
other AC adapters may damage the computer.
1. Plug the DC cord of the AC adapter to the power connector of the
computer (n).
2. Plug the female end of the AC power cord to the AC adapter and the
male end to an electrical outlet (o).
3. When the AC adapter is connected, power is being supplied from the
electrical outlet to the AC adapter and onto your computer. Now, you
are ready to turn on the computer.
CAUTION:
z When you disconnect the AC adapter, disconnect from the electrical
outlet first and then from the computer. A reverse procedure may
damage the AC adapter or the computer.

Operating Your Computer 1-5
z When unplugging the connector, always hold the plug head. Never pull
on the cord.
NOTE: When the AC adapter is connected, it also charges the battery pack.
For information on using battery power, see Chapter 3.
Turning On and Off the Computer
Turning On
1. Open the top cover by pulling the cover latch and lifting up the cover.
You can tilt the cover forward or backward for optimal viewing clarity.

1-6 Operating Your Computer
2. Press the power button ( ).
3. Each time the computer is turned on, it performs a Power-On Self Test
(POST), and the operating system such as Windows should start.
Turning Off
When you finish a working session, you can stop the system by turning off
the power or leaving it in Sleep or Hibernation mode:
To... Do this...
Power off
(Shutdown)
Use the Windows Start menu in the lower left and follow
the shutdown procedure.
Sleep Press the power button* or use the Windows Start menu
to put the computer in Sleep mode.
Hibernate Use the Windows Start menu to put the computer in
Hibernation mode. (See “Hibernation” in Chapter 3 for
more information.)
* “Sleep” is the default setting of the power button. You may change what
the power button does in Windows Control Panel.

Operating Your Computer 1-7
Taking a Look at the Computer
NOTE: Depending on the model you purchased, the appearance of your
computer may not be exactly the same as those shown in this manual.
CAUTION: You need to open the protective covers to access the connectors.
When not using a connector, make sure to close the cover completely for
water- and dust-proof integrity. (Engage the locking mechanism if existing.)
Front Components
Ref Component Description See Also
n Top Cover Latch Locks the top cover. P. 1-5
o Stereo Speaker Sends out sound and voice from the
computer.
p Handle Provides a convenient way to carry the
computer.

1-8 Operating Your Computer
Rear Components
Ref Component Description See Also
n Power
Connector
Connects the AC adapter. P. 1-3
o USB Port Connects a USB device, such as a USB
flash disk, printer, digital camera,
joystick, and more.
P. 4-4
p RS232 Serial
Connector
Connects a serial mouse or serial
communication device.
P. 4-3
q RJ-45 Connector Connects the LAN cable. P. 2-19
r RJ-11 Connector
(optional)
Connects the telephone line. P. 2-18
s VGA Connector Connects an external display monitor. P. 4-2
t Kensington
Lock
Locks the computer to a stationary
object for security.
P. 7-2

Operating Your Computer 1-11
Ref Component Description See Also
t Storage Card
Reader
Accepts a MultiMediaCard (MMC),
Secure Digital (SD), Memory Stick (MS) or
Memory Stick PRO (MS PRO) card for
removable storage media.
P. 4-13
u USB Port Connects a USB device, such as a USB
flash disk, printer, digital camera,
joystick, and more.
P. 4-4
v Mini IEEE 1394
Port
Connects an IEEE 1394 device such as a
scanner, printer, DVCAM, and VCR.
P. 4-5

1-12 Operating Your Computer
Top-open Components
Ref Component Description See Also
n Camera Lens
(optional)
Allows you to use the camera function.
o LCD Screen Displays the output of the computer. May
include the optional touchscreen feature.
P. 2-9
p Power Button Turns the power on or off (Sleep mode by
default).
P. 1-5
q Keyboard Serves as the data input device of the
computer.
P.2-2
Operating Your Computer 1-13
Ref Component Description See Also
r Microphone Receives sound and voice for the
computer.
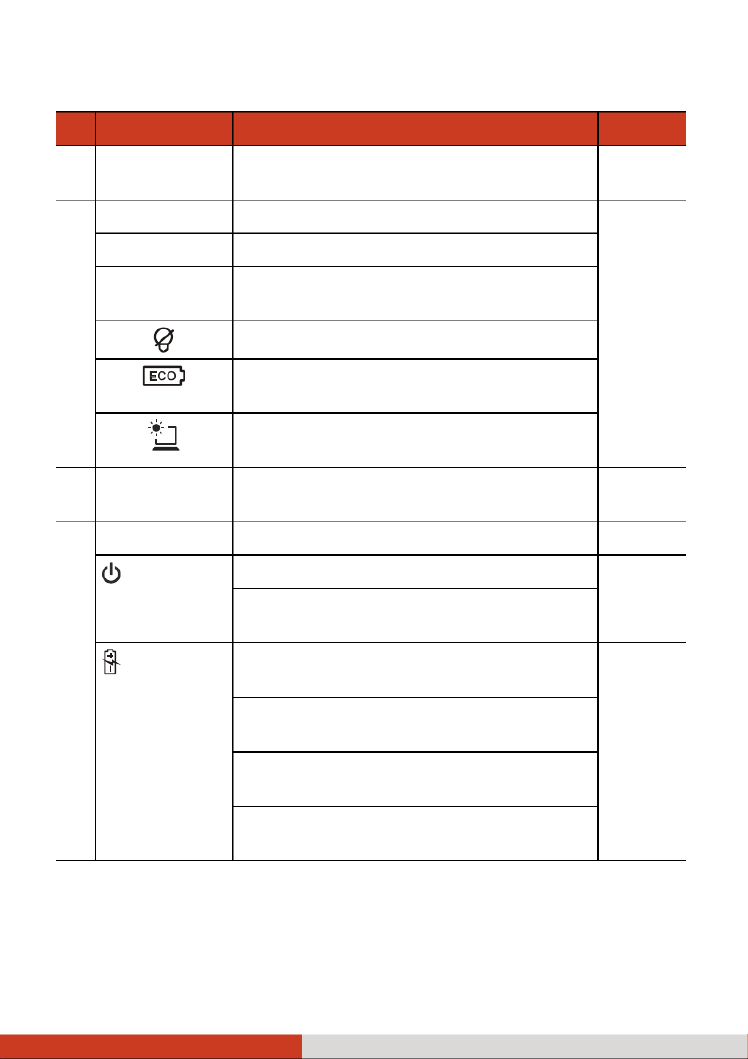
s Quick Buttons P. 2-14
P1 Starts G-Manager by default.
P2 Starts Microsoft Internet Explorer by
default.
Toggles Blackout mode on or off.
Brings up the ECO menu for selecting a
power profile when using battery power.
Toggles the sunlight-readable mode on or
off.
t Touchpad Serves as the pointing device of the
computer.
P. 2-6
u Indicators
Power Lights green when computer is on. P. 1-5
Blinks green when computer is in Sleep
mode.
Battery
Charge
Lights green when the battery is fully
charged.
P. 3-3
Lights amber when the battery is being
charged.
Blinks red when the battery’s capacity is
below 10 %.
Blinks amber when the battery is in an
abnormal condition.
Operating Your Computer 1-15
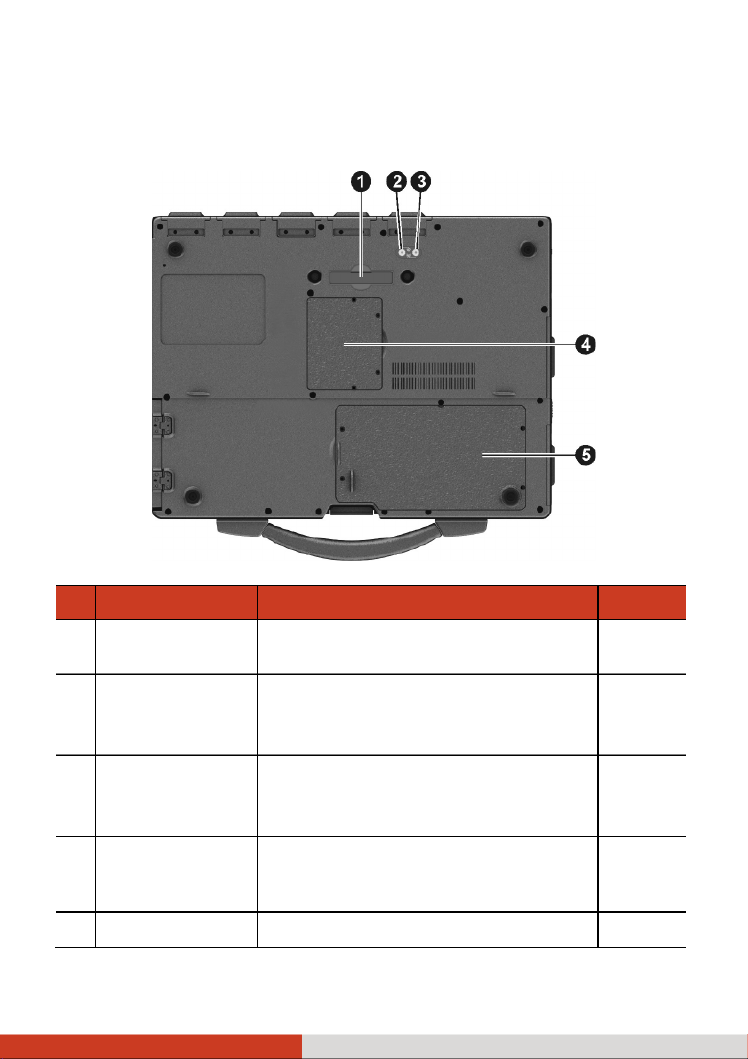
Bottom Components
Ref Component Description See Also
n Docking
Connector
Connects to the Office Dock (purchased
separately).
o GPS Pass-through
Connector
(optional)
Connects to the external antenna for
GPS receiver.
NOTE: Must be connected via docking.
p 3G Pass-through
Connector
(optional)
Connects to the external antenna for
3G transmission.
NOTE: Must be connected via docking.
q Memory Slots Inside are the memory slots for
expanding the memory size of your
computer.
P. 4-15
r Hard Disk Drive Inside is the hard disk drive.


Operating Your Computer 2-1
Chapter 2
Operating Your
Computer
This chapter provides information about the use of the computer.
If you are new to computers, reading this chapter will help you learn the
operating basics. If you are already a computer user, you may choose to read
only the parts containing information unique to your computer.
CAUTION: The computer can get uncomfortably warm when you use it in
high temperatures. As a safety precaution in such a circumstance, do not place
the computer on your lap or touch it with your bare hands for extended
periods of time. Prolonged body contact can cause discomfort and
potentially a burn.

2-2 Operating Your Computer
Using the Keyboard
Your keyboard has all the standard functions of a full-sized computer
keyboard plus an Fn key added for specific functions.
The standard functions of the keyboard can be further divided into four
major categories:
z Typewriter keys
z Cursor-control keys
z Numeric keys
z Function keys
Typewriter Keys
Typewriter keys are similar to the keys on a typewriter. Several keys are
added such as the Ctrl, Alt, Esc, and lock keys for special purposes. When the
lock keys (Caps Lock and Num Lk) are pressed, their corresponding indicators
light up.
The Control (Ctrl) / Alternate (Alt) key is normally used in combination with
other keys for program-specific functions. The Escape (Esc) key is usually
used for stopping a process. Examples are exiting a program and canceling a
command. The function depends on the program you are using.
Cursor-Control Keys
Cursor-control keys are generally used for moving and editing purposes.
NOTE: The word “cursor” refers to the indicator on the screen that lets you
know exactly where on your screen anything you type will appear. It can
take the form of a vertical or horizontal line, a block, or one of many other
shapes.

Operating Your Computer 2-3
Numeric Keypad
A 15-key numeric keypad is embedded in the typewriter keys as shown next:
Numeric keys facilitate entering of numbers and calculations. When Num
Lock is on, the numeric keys are activated; meaning you can use these keys
to enter numerals.
NOTE:
z When the numeric keypad is activated and you need to type the English
letter in the keypad area, you can turn Num Lock off or you can press Fn
and then the letter without turning Num Lock off.
z Some software may not be able to use the numeric keypad on the
computer. If so, use the numeric keypad on an external keyboard
instead.

2-4 Operating Your Computer
Function Keys
On the top row of the keys are the function keys: F1 to F12. Function keys
are multi-purpose keys that perform functions defined by individual
programs.
Fn Key
The Fn key, at the lower left corner of the keyboard, is used with another
key to perform the alternative function of a key. The letter “Fn” and the
alternative functions are identified by the color of blue on the keytop. To
perform a desired function, first press and hold Fn, then press the other key.
Hot Keys
Hot keys refer to a combination of keys that can be pressed any time to
activate special functions of the computer. Most hot keys operate in a cyclic
way. Each time a hot key combination is pressed, it shifts the corresponding
function to the other or next choice.
You can easily identify the hot keys with the icons imprinted on the keytop.
The hot keys are described next.
Key Description
Switches the keyboard backlight off or on (with 4-level
brightness). *
Switches the wireless LAN radio off or on.
Decreases the sound volume.
Increases the sound volume.

Operating Your Computer 2-5
Key Description
Switches the display output when external devices are
connected.
Decreases the LCD brightness.
Increases the LCD brightness.
Switches the touchscreen off or on. *
Switches the touchpad off or on.
Switches the system sound output off (mute) or on.
Switches LCD backlight off or on.
Serves as the sleep button that you can define with
Windows’ Power Options. (See the “Power
Management” in Chapter 3.)
TABLE NOTE: * means “select models only.”
Windows Keys
The keyboard has two keys that perform Windows-specific functions:
Windows Logo key and Application key.
The Windows Logo key opens the Start menu and performs
software-specific functions when used in combination with other keys. The
Application key usually has the same effect as a right mouse click. (See
your Windows manual for more information.)

2-6 Operating Your Computer
Using the Touchpad
CAUTION: Do not use a sharp object such as a pen on the touchpad. Doing
so may damage the touchpad surface.
NOTE:
z Press Fn+F9 to toggle the touchpad on or off.
z For optimal performance of the touchpad, keep your fingers and the
pads clean and dry. When tapping on the pad, tap lightly. Do not use
excessive force.
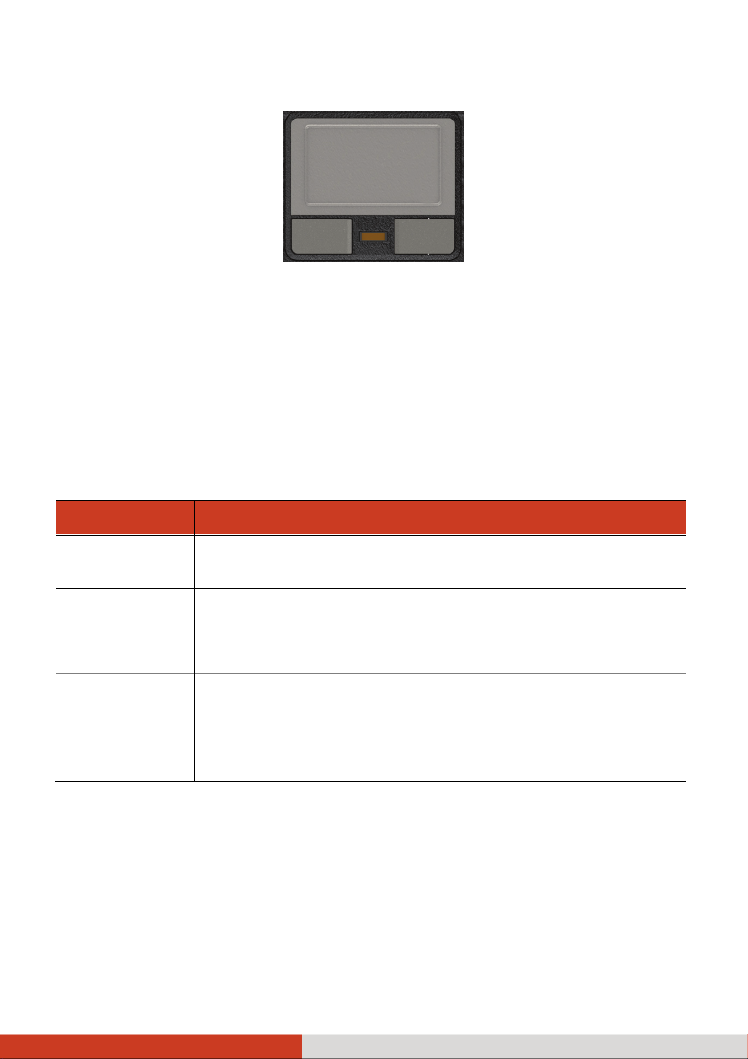
The touchpad is a pointing device that allows you to communicate with the
computer by controlling the location of the pointer on the screen and
making selection with the buttons.
Operating Your Computer 2-7
The touchpad consists of a rectangular pad (work surface) and a left and
right buttons. To use the touchpad, place your forefinger or thumb on the
pad. The rectangular pad acts like a miniature duplicate of your display. As
you slide your fingertip across the pad, the pointer (also called cursor) on the
screen moves accordingly. When your finger reaches the edge of the pad,
simply relocate yourself by lifting the finger and placing it on the other side
of the pad.
Here are some common terms that you should know when using the
touchpad:
Term Action
Point Move your finger on the pad until the cursor points to
the selection on the screen.
Click Press and release the left button.
–or–
Tap gently anywhere on the pad.
Double-click Press and release the left button twice in quick
succession.
–or–
Tap twice on the pad rapidly.
Work surface
within the inner
rectangle

2-8 Operating Your Computer
Term Action
Drag and
drop
Press and hold the left button, then move your finger
until you reach your destination (drag). Finally, release
the button (drop) when you finish dragging your
selection to the destination. The object will drop into
the new location.
–or–
Gently tap twice on the pad and on the second tap,
keep your finger in contact with the pad. Then, move
your finger across the pad to drag the selected object to
your destination. When you lift your finger from the
pad, the selected object will drop into place.
Scroll To scroll is to move up and down or left and right in the
working area on the screen.
To move vertically, place your finger on the right or left
edge of the pad and slide your finger up and down
along the edge. To move horizontally, place your finger
on the top or bottom edge of the pad and slide your
finger left and right.
This function works only after you install the touchpad
driver supplied with the computer and configure the
touchpad to enable the function. It may not work for all
applications.
TABLE NOTE: If you swap the left and right buttons, “tapping” on the
touchpad
as an alternative method of pressing the left button will no longer
be valid.
Configuring the Touchpad
You may want to configure the touchpad to suit your needs. For example, if
you are a left-handed user, you can swap the two buttons so that you can
use the right button as the left button and vice versa. You can also change
the size of the on-screen pointer, the speed of the pointer, and so on.
To configure the touchpad, go to Control Panel Æ Mouse Properties.

Operating Your Computer 2-9
Using the Touchscreen (Optional)
NOTE: Press Fn+F8 to toggle the touchscreen on or off.
CAUTION: Do not use a sharp object such as a ballpoint pen or pencil on
the touchscreen. Doing so may damage the touchscreen surface. Use your
finger or the included stylus.
The touchscreen is a touch-sensitive device that allows you to navigate on
the screen without using a keyboard, touchpad, or mouse.
Use the included stylus to select objects on the screen. The stylus can be
stretched for better grip and handling.
Here are some common terms that you should know when using the
touchscreen:
Term Action
Click/Point Tap gently on the touchscreen.
Double-click Tap twice on the touchscreen rapidly.

2-10 Operating Your Computer
Term Action
Drag and
drop
Press lightly on the touchscreen and move your finger
until you reach your destination (drag). Finally, release
your finger (drop) when you finish dragging your
selection to the destination. The object will drop into
the new location.
Using Multi-touch Gestures (Optional)
If your computer model comes with multi-touch-capable screen and
Windows 7, you can interact with your computer by placing two fingers on
the screen. The movement of the fingers across the screen creates
“gestures,” which send commands to the computer.
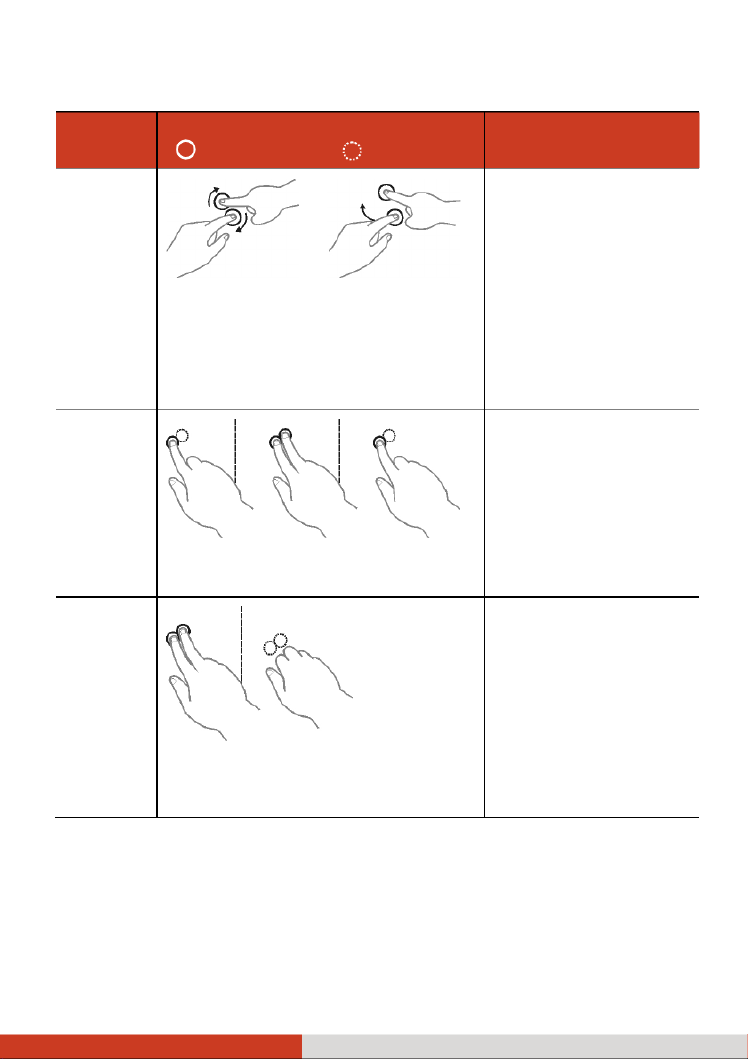
Here are the multi-touch gestures that you can use:
Gestures Actions
( = finger down; = finger up)
Descriptions
Pan
(Scroll)
or
Drag 1 or 2 fingers up or down.
Use panning to see
another part of a page
that has scroll bars.
Zoom
(Pinch)
Move two fingers apart/toward each
other.
Use zooming to make
an item (a photo for
example) on the screen
larger or smaller. The
gesture works in
applications that
support mouse wheel
zooming.
Operating Your Computer 2-11
Gestures Actions
( = finger down; = finger up)
Descriptions
Rotate
or
Move two fingers in opposing
directions.
-or-
Use one finger to pivot around
another.
Use rotating to move a
picture or other item
on the screen in a
circular direction
(clockwise or counter-
clockwise). The gesture
works in applications
that support the
specific gesture.
Press and
Tap
Press on target and tap using a
second finger.
Use press and tap to
access the shortcut
menu.
Two-
finger
Tap
Tap two fingers at the same time
(where the target is in the midpoint
between the fingers).
The function is defined
by applications that
support the specific
gesture.

2-12 Operating Your Computer
Gestures Actions
( = finger down; = finger up)
Descriptions
Flicks
Make quick drag gestures in the
desired direction.
Flick left or right to
navigate back and
forward in a browser
and other
applications. The
gesture works in most
applications that
support back and
forward.

2-14 Operating Your Computer
Using the Quick Buttons
The Quick Buttons allow you to quickly start a program or activate a
function.
The quick buttons are:
Button Description
P1 Starts G-Manager by default.
You can re-define the function of the button. (See “Quick
Button Definition Utility” in Chapter 6 for information.)
Can also serve as “Emergency” button if set according in the
BIOS Setup program. (See “Advanced Menu” in Chapter 5 for
information.)
P2 Starts Microsoft Internet Explorer by default.
You can re-define the function of the button. (See “Quick
Button Definition Utility” in Chapter 6 for information.)
Toggles Blackout mode on or off.
In Blackout mode, the LCD backlight, keyboard/button
backlight, and LED indicators are all turned off; and the sound is
muted.
To bring the computer out of Blackout mode, press the same
button again or the power button.

Operating Your Computer 2-15
Button Description
Brings up the ECO menu as shown below:
Select a mode before the ECO menu disappears. You can select a
mode by pressing the arrow key. Whenever you press the ECO
button, the setting always defaults to Off. The ECO mode will
return to the default Off setting when AC power is connected,
any power related setting is changed, the computer resumes
from Sleep/Hibernation mode, or the computer is restarted.
Each ECO mode (Quick, Power Saving, or Work) is a combination
of power settings that results in different power consumptions.
(For information on configuring the ECO modes, see “ECO Tab”
in Chapter 6.)
NOTE: The button works only when using battery power.
Toggles the sunlight-readable mode on or off.
In sunlight-readable mode, the LCD brightness is increased to
the highest level. The mode automatically ends when the
brightness setting is changed, the computer resumes from
Sleep/Hibernation mode, or the computer is restarted.
ECO Menu
ECO Menu
ECO Menu
ECO Menu ECO Menu
Off
Quick Mode
Power Saving
Work Mode

2-16 Operating Your Computer
Using the DVD Drive
Your computer comes with a Super Multi drive. The drive can read from and
write to CD, DVD+, DVD- and DVD-RAM media.
CAUTION:
z When inserting a disc, do not use force.
z Make sure that the disc is correctly inserted into the tray, and then close
the tray.
z Do not leave the drive tray open. Also, avoid touching the lens in the
tray with your hand. If the lens becomes dirty, the drive may malfunction.
z Do not wipe the lens using materials with rough surface (such as paper
towel). Instead, use a cotton swab to gently wipe the lens.
FDA regulations require the following statement for all laser-based devices:
“Caution, Use of controls or adjustments or performance of procedures
other than those specified herein may result in hazardous radiation
exposure.”
NOTE: The DVD drive is classified as a Class 1 laser product. This label is
located on the DVD drive.
NOTE: This product incorporates copyright protection technology that is
protected by method claims of certain U.S. patents and other intellectual
property rights owned by Macrovision Corporation and other rights owners.
Use of this copyright protection technology must be authorized by
Macrovision Corporation, and is intended for home and other limited
viewing uses only unless otherwise authorized by Macrovision Corporation.
Reverse engineering or disassembly is prohibited.
Operating Your Computer 2-17
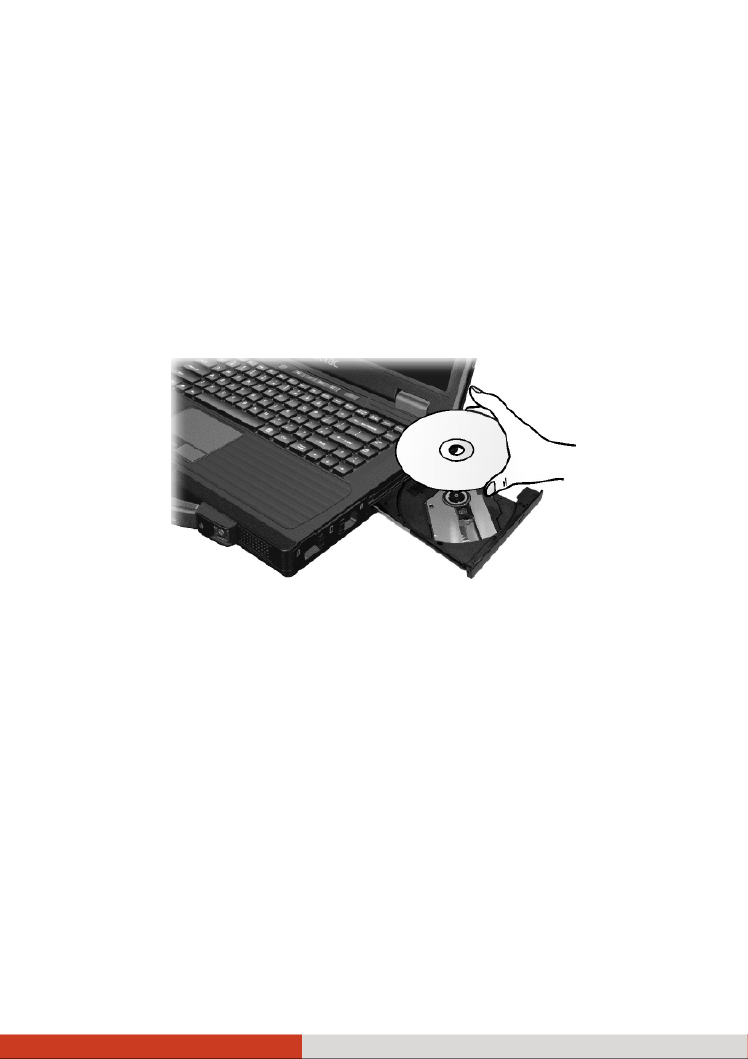
Inserting and Removing a Disc
Follow this procedure to insert or remove a disc:
1. Turn on the computer.
2. Press the eject button and the DVD tray will slide out partially. Gently
pull on it until it is fully extended.
3. To insert a disc, place down the disc in the tray with its label facing up.
Slightly press the center of the disc until it clicks into place.
To remove a disc, hold the disc by its outer edge and lift it up from the
tray.
4. Gently push the tray back into the drive.
NOTE: In the unlikely event that you are unable to release the drive tray by
pressing the eject button, you can manually release the disc. (See “Optical
Drive Problems” in Chapter 8.)

Operating Your Computer 2-19
Using the LAN
The internal 10/100/1000Base-T LAN (Local Area Network) module allows
you to connect your computer to a network. It supports data transfer rate up
to 1000 Mbps.
To connect the network cable to the LAN module, connect one end of the
LAN cable to the RJ-45 connector on the computer and the other end to the
network hub.
Using the Wireless LAN
The WLAN features include:
z Peer-to-Peer (Ad-Hoc) and Access Point (Infrastructure) modes support
z WEP (Wired Equivalent Privacy) 64/128-bit data encryption
z IEEE 802.11a/b/g/n standard compliance

2-20 Operating Your Computer
Technology
Stated
Maximum
Throughput
(Mbps)
Data Rates
(Mbps)
Band
(GHz)
Modulation
Technology
802.11a 54 54, 48, 36,
24, 18, 12,
9, 6
5.15 ~
5.35
OFDM (Orthogonal
Frequency Division
Multiplexing)
802.11b 11 11, 5.5, 2, 1 2.412 ~
2.462
DSSS (Direct
Sequence Spread
Spectrum)
802.11g 54 54, 36, 18, 9 2.4 OFDM (Orthogonal
Frequency Division
Multiplexing)
802.11n 100 Mbps
or more
100 ~ 210 2.4 / 5 Spatial multiplexing,
uses MIMO
(multiple-input
multiple-output)
NOTE: 802.11g mode is backward compatible with 802.11b mode.
Turning On/Off the WLAN Radio
NOTE: The FAA (Federal Aviation Agency) has deemed it unsafe to operate
wireless devices in aircraft as this may interfere with flight safety. Remember
to turn off wireless LAN when using your computer in the airplane.
To turn on the WLAN radio:
1. Make sure that the RF switch is at the ON position.

Operating Your Computer 2-21
2. To turn on the WLAN radio, press Fn+F1 or click the WLAN button in the
Quick Bar as shown below (an X over the button means the radio is
currently off.) When the WLAN radio is on, the WLAN indicator ( )
glows in green.
NOTE: The Quick Bar appears on Windows desktop by default. If it is not
open, you can right-click the Getac Utility icon ( ) located on Windows
taskbar and select Quick Bar to open it.
3. Windows Mobility Center has wireless network turned on by default.
The Wireless Network icon on the taskbar should appear without a
red X
X
X
XX. (In case you have previously turned it off in Windows Mobility
Center, be sure to turn it on when using the function the next time.)
To turn off the WLAN radio:
You can turn off the WLAN radio by pressing Fn+F1 or using the Quick Bar.
If you want to turn off all wireless radio, slide the RF switch to the OFF
position.
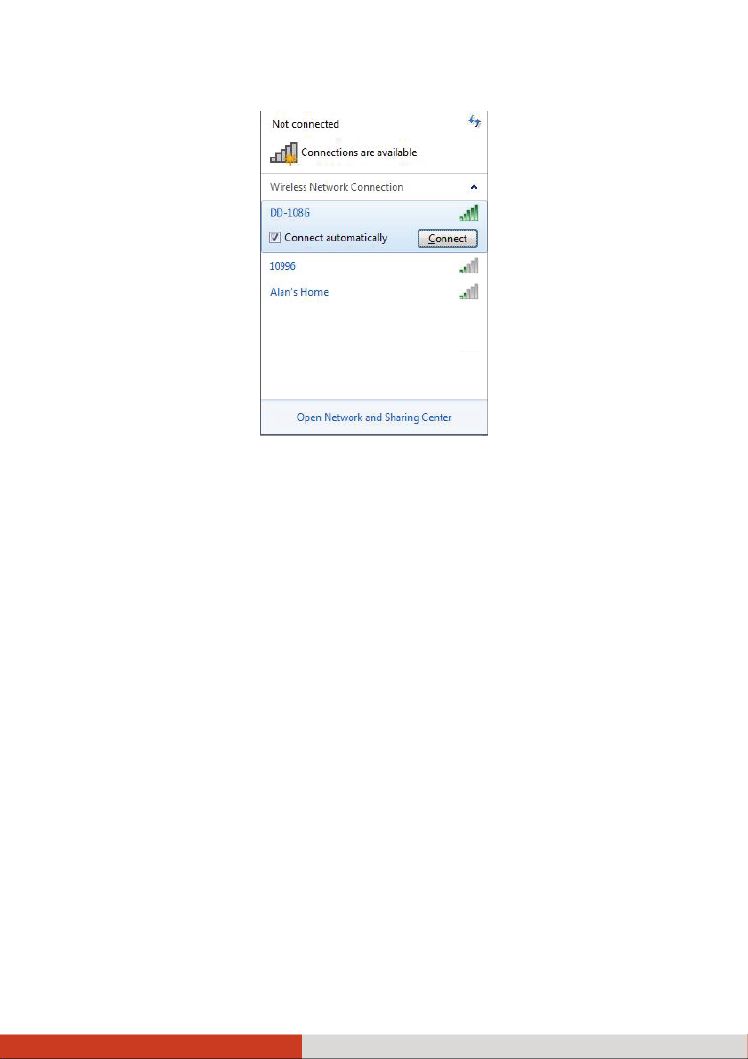
Connecting to a Wireless Network
1. Make sure that the WLAN function is enabled (as described above).
2. Tap the Wireless Network icon on the taskbar. (An orange light in the
icon indicates connections are available.)
3. In the list of available wireless networks, tap a network, and then tap
Connect.
2-22 Operating Your Computer
4. Some networks require a network security key or passphrase. To connect
to one of those networks, ask your network administrator or Internet
service provider (ISP) for the security key or passphrase.
For more information on setting a wireless network connection, refer to
Windows online help.
NOTE: You can use Intel® PROSet Wireless to take full advantage of the
WiFi capabilities of your computer. See the Help of the utility for
instructions.

Operating Your Computer 2-23
Using the Bluetooth Feature
(Optional)
Depending on your model, your computer may incorporate the Bluetooth
capability for short-range (about 10 meters) wireless communications
between devices without requiring a cable connection. With Bluetooth
wireless technology, data can be transmitted through walls, pockets and
briefcases as long as two devices are within range.
The status of the Bluetooth connection is indicated by the Bluetooth icon
located in the taskbar. (You need to tap on the taskbar to show the
hidden icons.)
Status Icon
Off (blue with red logo)
On (blue with white logo).
Connected (blue with green logo)
You can use the Bluetooth Utility to configure Bluetooth wireless connection
settings and transfer files.
Turning On/Off the Bluetooth Radio
To turn on the Bluetooth radio:
1. Make sure that the RF switch is at the ON position.
2. To turn on the Bluetooth radio, click the Bluetooth button in the Quick
Bar as shown below (an X over the button means the radio is currently
Operating Your Computer 2-25
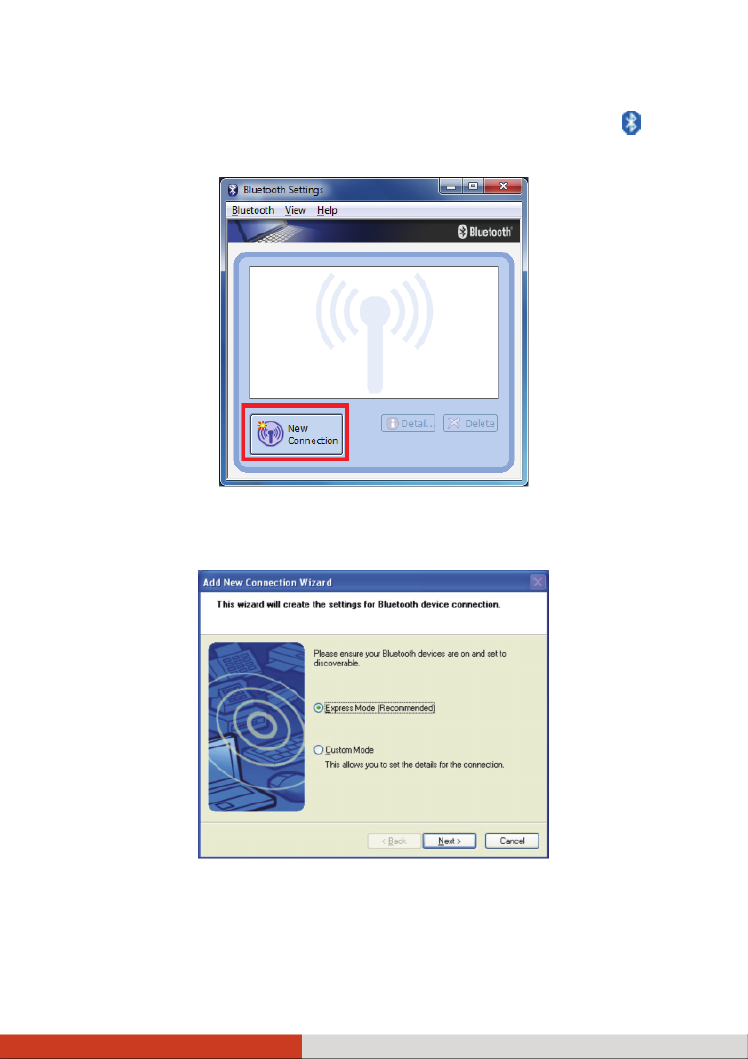
3. Start the Bluetooth utility by double-clicking the Bluetooth icon on
the taskbar and click New Connection.
4. The Add New Connection Wizard window appears. Select Express Mode
(Recommended), and then click Next.

2-26 Operating Your Computer
5. Select the device to connect to and click Next.
6. Depending on the type of Bluetooth device that you want to connect to,
you will need to enter the pertinent information.
For detailed information on using the Bluetooth Utility, see the Bluetooth
Utility Help.

Operating Your Computer 2-27
Using the Fingerprint Sensor
The fingerprint sensor provides a strong authentication mechanism based on
fingerprint recognition. You can log on to your computer or sign in to a web
site with your fingerprint instead of a password.
NOTE: You can register a fingerprint only after creating a password for the
Windows user account.
To register your fingerprint, click Start Æ All Programs Æ Fingerprint
Software Æ
Æ
Æ
ÆÆ Fingerprint Registration. Click the finger you want to register
and follow the onscreen instructions to complete.

2-28 Operating Your Computer
You can then use the Fingerprint Software to set up how the fingerprint
authentication works.
For detailed information, click Start Æ All Programs Æ Fingerprint Software
Æ
Æ
Æ
ÆÆ Help.

Operating Your Computer 2-29
Using the 3G Feature (Optional)
3G is the third generation of mobile phone standards and technology after
2G. Services include wide-area wireless voice telephony and broadband
wireless data, all in a mobile environment.
Unlike IEEE 802.11 networks, 3G networks are “wide area cellular telephone
networks” which evolved to incorporate high-speed internet access and
video telephony. IEEE 802.11 networks are short range, high-bandwidth
networks primarily developed for data.
NOTE: Your model only supports data transmission, voice transmission is not
supported.
Installing a SIM Card
To use the 3G feature to connect to the Internet, you need to subscribe to
3G service and acquire a SIM card from the service provider. To install the
SIM card, follow these steps:
1. Turn off the computer and disconnect the AC adapter.
2. Remove the battery pack. (See “Replacing the Battery Pack” in Chapter 3
for instructions.)
3. Insert the SIM card into the holder. Make sure the golden contact area
on the card is facing upward and the beveled corner on the SIM card
facing outward.
NOTE: To remove the SIM card, push inward to release and slide the SIM
card out of the slot.

Operating Your Computer 2-31
Setting up a 3G Connection
To set up a 3G connection for the first time, follow these steps:
1. Make sure that the SIM card is inserted and the 3G function is enabled
(as described above).
2. On Windows desktop, double click the OneClick Internet shortcut on
Windows desktop. The screen as below appears.
3. If necessary, enter the PIN of your SIM card.
4. If the radio is currently off, click to turn on the radio.
5. Click Settings. You will be in the Profile page. Click to set up a new
profile.

2-32 Operating Your Computer
6. Enter the required information. Contact your network operator for the
correct information.
Using the 3G Application
Once a new profile has been created, it will appear in the dropdown menu
Profiles. You can then select it by clicking Set Profile to use it.
You can manage the mobile Internet communication:
z Internet Connection and Email download
z SMS Manager
z Managing contacts from SIM and Outlook
z GPS Management (for models having the GPS module)
NOTE: For detailed information on using OneClick Internet, click Help.

Managing Power 3-3
Battery Pack
The battery pack is the internal power source for the computer. It is
rechargeable using the AC adapter.
The operating time of a fully charged battery pack depends on how you are
using the computer. When your applications often access peripherals, you
will experience a shorter operating time.
NOTE: Care and maintenance information for the battery is provided in the
“Battery Pack Guidelines” section in Chapter 7.
Charging the Battery Pack
NOTE:
z Charging will not start if the battery’s temperature is below 0 ° °C (32 F)
or above 40 °C (104 °F); the charging process will stop if the battery’s
temperature gets above 60 °C (140 °F). To avoid damaging the battery
under this situation, disconnect the AC adapter and wait for the battery
to return to room temperature before charging again.
z During charging, do not disconnect the AC adapter before the battery
has been fully charged; otherwise you will get a prematurely charged
battery.
To charge the battery pack, connect the AC adapter to the computer and an
electrical outlet. The Battery Charge Indicator ( ) on the computer glows
amber to indicate that charging is in progress. You are advised to keep the
computer power off while the battery is being charged. When the battery is
fully charged, the Battery Charge Indicator lights green.
Produkt Specifikationer
| Mærke: | Getac |
| Kategori: | Laptop |
| Model: | S400 S3 |
Har du brug for hjælp?
Hvis du har brug for hjælp til Getac S400 S3 stil et spørgsmål nedenfor, og andre brugere vil svare dig
Laptop Getac Manualer

28 August 2024
25 August 2024
25 August 2024
25 August 2024
25 August 2024
25 August 2024
25 August 2024
25 August 2024
25 August 2024
15 August 2024
Laptop Manualer
- Laptop Acer
- Laptop Sony
- Laptop Samsung
- Laptop Panasonic
- Laptop LG
- Laptop Apple
- Laptop HP
- Laptop Asus
- Laptop Gigabyte
- Laptop Toshiba
- Laptop Lenovo
- Laptop Thomson
- Laptop Hannspree
- Laptop Razer
- Laptop Medion
- Laptop Haier
- Laptop Huawei
- Laptop Tripp Lite
- Laptop Packard Bell
- Laptop Microsoft
- Laptop Fellowes
- Laptop Xiaomi
- Laptop Viewsonic
- Laptop Dell
- Laptop Fujitsu
- Laptop MSI
- Laptop Honor
- Laptop ECS
- Laptop Prixton
- Laptop SPC
- Laptop GoClever
- Laptop VIZIO
- Laptop Atdec
- Laptop Hercules
- Laptop Airis
- Laptop EMachines
- Laptop Oregon Scientific
- Laptop Lexibook
- Laptop Kogan
- Laptop ADATA
- Laptop Micromax
- Laptop TechBite
- Laptop Alienware
- Laptop Sylvania
- Laptop Coby
- Laptop Evga
- Laptop Mpman
- Laptop Targa
- Laptop Peaq
- Laptop Ematic
- Laptop XPG
- Laptop Inovia
- Laptop Aplic
- Laptop Odys
- Laptop Ibm
- Laptop Compaq
- Laptop SIIG
- Laptop Jay-tech
- Laptop Vulcan
- Laptop System76
- Laptop General Dynamics Itronix
- Laptop CTL
- Laptop Everex
- Laptop Olidata
- Laptop Dynabook
- Laptop Hamilton Buhl
- Laptop AORUS
- Laptop Humanscale
- Laptop Schenker
Nyeste Laptop Manualer
5 Februar 2025

12 Januar 2025
12 Januar 2025

12 Januar 2025

12 Januar 2025
12 Januar 2025
11 Januar 2025
11 Januar 2025
11 Januar 2025
10 Januar 2025