Gigaset R700H Pro Manual
Læs nedenfor 📖 manual på dansk for Gigaset R700H Pro (69 sider) i kategorien Telefon. Denne guide var nyttig for 19 personer og blev bedømt med 4.5 stjerner i gennemsnit af 2 brugere
Side 1/69

pro
R700 H PRO
Up-to-date information on your product: wiki.gigasetpro.com
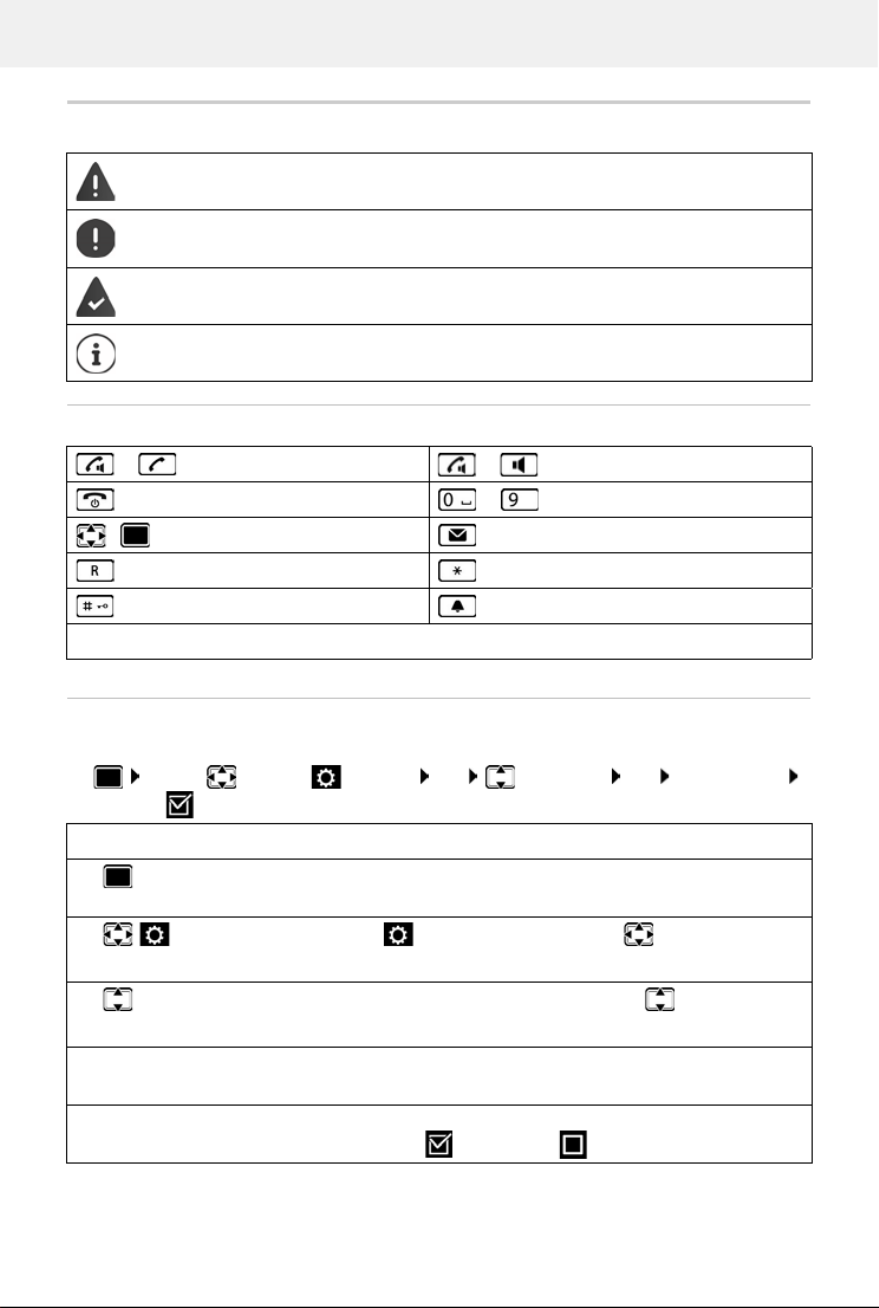
Illustration in the user guide
4Availability and operation of the functions
may differ on your telephone.
Illustration in the user guide
Keys
Procedures
Example: Switching Auto answer on/off
Warnings, which if not heeded, can result in injury to persons or damage to devices.
Important information regarding function and appropriate handling or functions
that could generate costs.
Prerequisite for being able to carry out the following action.
Additional helpful information.
or Talk key or Handsfree key
End call key to Number / letter keys
/ Control key rim / centre Message key
Recall key Star key
Hash key Profile key
OK, Back, Select, , Change Save, . . . Display keys
. . . use to select Settings OK OK Telephony Auto Answer
Change ( = activated)
Symbols Meaning
When in idle status press the centre of the control key.
The main menu opens.
OK
Navigate to the icon using the control key .
Select OK to confirm. The submenu Settings opens.
Telephony
OK
Select the Telephony entry using the control key .
Select OK to confirm. The submenu Telephony opens.
Auto Answer The function to switch Auto answer on/off appears as the first menu
item.
Change Select Change to activate or deactivate.
Function is activated /deactivated .

Safety precautions
Availability and operation of the functions
may differ on your telephone.
5
Safety precautions
Read the safety precautions and the user guide before use.
Comprehensive user guides for all telephones and telephone systems as well as for
accessories can be found online at gigasetpro.com in the Support category. We
thereby help to save paper while providing fast access to the complete up-to-date
documentation at any time.
The device cannot be used in the event of a power failure. In case of a power failure it
is also not possible to make emergency calls.
Emergency numbers be dialled if the cannot keypad/display lock is activated!
Use only rechargeable batteries that correspond to the specification (see list of
permitted batteries www.gigaset.com/service ). Never use a conventional (non-
rechargeable) battery or other battery types as this could result in significant health
risks and personal injury. Rechargeable batteries, which are noticeably damaged,
must be replaced.
The handset must not be operated if the battery cover is open.
Ensure that the batteries can not be short-circuited by objects in the battery compart-
ment
Do not use the devices in environments with a potential explosion hazard
(e.g. paint shops).
The devices are not splashproof. For this reason do not install them in a damp environ-
ment such as bathrooms or shower rooms.
Use only the power adapter indicated on the device.
Whilst charging, the power socket must be easily accessible.
Remove faulty devices from use or have them repaired by our Service team, as these
could interfere with other wireless services.
Do not use the device if the display is cracked or broken. Broken glass or plastic can
cause injury to hands and face. Send the device to our Service department to be
repaired.
Keep small cells and batteries, which can be swallowed, out of the reach of children.
Swallowing a battery can lead to burns, perforation of soft tissue and death. Severe
burns can occur within 2 hours of swallowing.
In the case of a swallowed cell or battery, seek medical care immediately.

Safety precautions
6Availability and operation of the functions
may differ on your telephone.
Using your telephone may affect nearby medical equipment. Be aware of the tech-
nical conditions in your particular environment, e.g. doctor's surgery. If you use a
medical device (e.g. a pacemaker), please contact the device manufacturer. They will
be able to advise you regarding the susceptibility of the device to external sources of
high frequency energy (for the specifications of your Gigaset product see "Technical
data").
If a USB adapter cable is included, only use a USB power supply (5Volt) with USB-A
connection. The use of other voltage sources e.g. PC's with USB connection can cause
damage.
If a plug-in power supply is included, please use this power supply.

Getting started
Availability and operation of the functions
may differ on your telephone.
9
Setting the display language
Press the control key until the language required is selected
on the display, e.g. English press the display key OK
You can also change the display language later on in the Settings
menu.
Select country (if available)
Press the control key until the country in which you are using
the device is highlighted on the display, e.g. Germany Press
the Display key OK
You can also change the country later on from menu Settings
Registering the handset (depending on the base)
On the base / On the router
On the handset
Message Press the pairing button on the base station and wait is displayed.
Once registration is complete, the handset returns t o idle status. The internal number of the
handset appears in the display, e. g. INT 1.
Registration must be initiated on the base station and on the handset.
Both must be carried out within 60 secs.
Gigaset base: Press and hold the Registration/Paging key on the base station
(approx. 3 sec.).
Other base station/router:
Information regarding the registration procedure
Documentation regarding your base/your router
Registration on a router: The handset searches for a router in Registration mode. It is registered
automatically.
Registration on a base: Wait until the message disappears or press the End call key
. . . Please register handset is displayed
Press the Display key . . . A search is performed for a base ready for
registration If required, enter the system PIN (default for Gigaset
bases: ) 0000
Deutsch
English
Francais
United Kingdom
Ireland
Austria

Getting to know your telephone
Availability and operation of the functions
may differ on your telephone.
13
Using the telephone
Getting to know your telephone
Switching the handset on/off
Locking/unlocking the keypad
The keypad lock prevents any accidental use of the telephone.
Lock/unlock the keypad: Press and hol d
Keypad lock activated: the symbol appears in the display.
Control key
In the description below, the side of the control key (up, down, right, left) that you have to press
in the different operating situations is marked in black, e.g. for "press right on the control
key" or for "press the centre of the control key".
When the phone is idle
In submenus, selection and entry fields
Switch on: Press and hold the End call key on the handset when switched off
Switch off: When the telephone is in idle status, press and hold the End call key
If a call is indicated on the handset, the keypad automatically unlocks and you can
accept the call. It then locks again when the call is finished.
Define emergency numbers that can be dialled even when the keypad lock is enabled: p. 52
The control key enables you to navigate the menus and input fields, and also to
call up certain functions depending on the situation.
Open the main menu or
Open the directory Press briefly
Open the list of available online dir ectories (such as the directory of a
provider in the Internet or a central directory on a CAT-iq base)
Press and hold
Open the list of handsets
Set the voice volume for receiver / handsfree function
Set the microphone sensitivity Press and hold
Confirm a function
Navigate a line up/down /
Select an option, move the cursor to the left/right /

Getting to know your telephone
14 Availability and operation of the functions
may differ on your telephone.
During a call
Volume keys
Set volume for receiver/headset, , ringtone handsfree mode and indicating appointments:
Press the volume keys / on the right side of the handset
Functions key
Display keys
The display keys perform a range of functions depending on the operating situation.
Press the Display key . . . The function assigned is performed
Display key icons p. 62
Open the directory
Open the list of available online directories (such as the directory of a
provider in the Internet or a central directory on a CAT-iq base)
Press and hold
Mute the microphone Press briefly
Set the microphone sensitivity Press and hold
Initiating an internal consultation call
Change the voice volume for receiver / handsfree function
Depending on base: The assignment of directories to the key (press briefly or for
longer) can be changed.
The Functions key can be assigned a function of your
choice (QuickDial / Send Key).
Press the key . . . The function assigned is performed
Assign Functions key p. 48
The display keys have a function preset by default in idle status.
Changing the assignment: p. 54
Current display key functions
Display keys
Back Save

Getting to know your telephone
Availability and operation of the functions
may differ on your telephone.
15
LED Torch
Use the phone as a torch. The spot LED is located on the top of the handset.
Activating the torch function
Press the display key LED torch.
or
. . . use to select Additional Features OK LED Torch OK
Deactivating the torch function
Press the display key OFF
or: after 2 minutes the function is automatically deactivated.
Menu guidance
The functions of your telephone are displayed in a menu that consists of several levels.
Select/confirm functions
Main menu
In idle status: Press the centre of the control key . . . use
the control key to select a submenu OK
The main menu functions are shown in the display as icons. The
icon for the selected function is highlighted in colour and the
name of the associated function appears in the display header.
The menu guidance depends on the base. Depending on the number and type of
available functions, these may be provided in different menus, e.g. at top level or in a
submenu.
Examples: Audio Settings may be in the top-level menu or in the Settings submenu,
while Calendar may be in the Organizer menu or the Additional Features menu.
Confirm selection using OK or press the centre of the control key
One menu level back using Back
Change to idle display using Press and hold
Switch function on/off using Change on / off
Activate/deactivate option using Select activated / not activated
Example
Settings
Back OK

Local handset directory
24 Availability and operation of the functions
may differ on your telephone.
Directories
Local handset directory
The local directory is unique to the handset. However, it is possible to send entries to other
handsets.
Opening the directory
Briefly press in idle status
or
Directory entries
Creating an entry
<New Entry> OK . . . use to switch
between the entry fields
Name:
. . . use to enter the first and/or last name
Numbers:
Tel.1 - Type . . . use to select a number type
(Home, Office or Mobile) . . . use to enter a
number
Enter more numbers: use to toggle between the entry
fields Tel.1 - Type Tel.2 - Type Tel.3 - Type/ / . . . use to
enter a number
Information about online directories on IP-capable bases and central directories on
CAT-iq bases user guide of the base.
. . . use to select Contacts OK Directory OK
Changing the assignment of the control key to a directory: p. 28
Number of entries: up to 200
Information: First name and surname, up to three telephone numbers, anniversary
with alert, VIP ringtone with VIP icon
Length of the entries: Numbers: max. 32 digits
First name, surname: max. 16 characters
Example
New Entry
First Name:
Robert
Surname:
I
Tel.1 - Type:
Abc
‚Save

Local answering machine
Availability and operation of the functions
may differ on your telephone.
29
Answer machine
Local answering machine
Some Gigaset bases make available a local answering machine, that you can use from the
handset menu. Below is an introduction to the basic functions. For further information refer
to the user guide for the base.
Activate/deactivate the answer machine
Playing back messages:
Press the Message key . . . use to select an answer machine (if there are mes-
sages for several answer machines) OK
Recording a personal announcement/advisory message
Changing the language for the voice prompt and default announcement
(if available)
. . . use to select Answer Machine OK Activation OK . . .
use to select Answer Machine (if more than one answer machine is available)
Change . . . use to select On or Off Save
. . . use to select Answer Machine OK Announcements OK
. . . use to select Record Announc. or Rec. Advisory Msg. OK . . . use to select
Answer Machine (if there are several) OK OK record your announcement message
(at least 3 seconds) . . . possible options:
Complete the recording and save:
End . . . the announcement is played back for you to check
Repeat the recording:
New
Cancel the recording:
Press the End call key or Back
Resume the recording:
OK
. . . use to select Answer Machine OK Language OK . . .
use to select your language Select ( = selected)

Network mailbox
30 Availability and operation of the functions
may differ on your telephone.
Network mailbox
Each network mailbox accepts incoming calls made via the corresponding line. To record all
calls, a network mailbox must be set up for all handset connections.
Enable network mailbox / Enter number
On the handset, you can manage the network mailboxes that are assigned to one of its receive
connections.
For a fixed line network/connection
. . . use to enter or amend the network mailbox number Save
For a VoIP connection
The network mailbox has been requested from the network provider.
A network mailbox might need to be set up on the phone system or in the base
configuration.
The network mailbox is automatically called via the corresponding connection. An
automatic area code specific to the phone is not prefixed.
The network mailbox messages can be played back using the phone's keypad (digit
codes). In the configuration of the phone system / base, conversion of the digit codes
to the DTMF signals used by the provider must be set.
. . . use to select Answer Machine OK Network Mailbox OK . . .
use to select connection if applicable OK . . . then
To activate/deactivate the network mailbox for the fixed line network connection
use the phone number and a function code of your network provider. Please contact
the network provider if you require any further information.
Activate/deactivate network MB:
Status . . . use to select On or Off
Enter number: Network Mailbox . . . use to enter or amend the network
mailbox number
With some VoIP providers, the phone number has already been
downloaded together with the general VoIP provider data and
saved to the base station.
Save settings: Save

Setting the handset
48 Availability and operation of the functions
may differ on your telephone.
Activating/deactivating automatic keypad lock
Automatically lock the keypad when the handset has been in idle status for around 15 seconds.
. . . use to select Settings OK Display & Keypad OK Auto
Keypadlock Change ( = on)
Assigning the Functions key
Assign one of the following functions to the Functions key in the
top left of the handset.
. . . Use to select Settings OK Display & Keypad OK
Feature Key OK . . . then
Using the Functions key p. 14
Tones and signals
Call volume
You can set the volume of the earpiece, handsfree function and headset on 5 levels inde-
pendently of each other.
During a conversation
Handset Volume . . . use to select volume Save . . . the setting is saved
In idle status
Handset Volume Use to select what the setting is to apply for (Earpiece /
Speaker / Corded headset) Use to select the volume Save . . . The setting is saved
or
QuickDial The phone number assigned to the key is dialled.
Send Key A phone number previously entered from the
keypad (or selected in a call list or the directory)
is dialled.
Enable/disable: Activation: Use to select On or Off
Specify whether the Functions key is also locked when the keypad lock is enabled, or it stays
enabled:
Keypad locked Use to select Key active or Key inactive
To select a function: Function . . . Use to select a function
Save the selection: Save
Changes are only saved permanently in Profile Personal.
. . . Use to select Audio Settings OK Handset Volume OK Use
to select what the setting is to apply for (Earpiece / Speaker / Corded headset) Use to
set the volume Save
Produkt Specifikationer
| Mærke: | Gigaset |
| Kategori: | Telefon |
| Model: | R700H Pro |
| Type: | DECT telefon |
| Brugervejledning: | Ja |
| Produktfarve: | Sort |
| Indbygget skærm: | Ja |
| Pakkevægt: | 381 g |
| Pakkedybde: | 166 mm |
| Pakkebredde: | 224 mm |
| Pakkehøjde: | 60 mm |
| Skærm diagonal: | 2.4 " |
| Skærmopløsning: | 240 x 320 pixel |
| Bluetooth: | Ja |
| Tekstbeskeder (SMS): | Ja |
| Batteriteknologi: | Nikkel-Metalhydrid (NiMH) |
| Skærm: | TFT |
| Volumenkontrol: | Knapper |
| Beskyttelsesfunktioner: | Dust resistant, Impact resistant, Scratch resistant, Shock resistant, Water resistant |
| Kalender: | Ja |
| Indikator for batteriniveau: | Ja |
| Bluetooth-version: | 4.2 |
| Håndsæt, type: | Trådløs håndsæt |
| Taletid: | 13 t |
| Standby tid: | 320 t |
| Højttalertelefon: | Ingen |
| Genopkaldsliste kapacitet: | 60 |
| Antal melodier: | 32 |
| Telefonsvarer: | Ingen |
| Kapacitet for telefonbog: | 500 entries |
| Nummervisning: | Ja |
| Knapper med baggrundsbelysning: | Ja |
| LED-indikatorer: | Ja |
| Monteringstype: | Skrivebord |
| Harmoniseret systemkode (HS): | 85171800 |
| Batteritype: | AAA |
| ECO-tilstand: | Ja |
| Vækkeur: | Ja |
| Genopkald: | Ja |
| Baggrundsbelysning: | Ja |
| Trådløs forbindelse: | Ja |
| Håndsæt dimensioner (BxDxH): | 54 x 25 x 159 mm |
| Antal understøttede batterier: | 2 |
| Antal håndsæt inkluderet: | 1 |
| Basisdimensioner: | 75.5 x 74.2 x 44.2 mm |
| Antal knapper: | 12 |
| GAP kompatibel: | Ja |
| VIP-gruppefunktion: | Ja |
| Vis nummer (CLIP): | Ja |
| Navigeringstast: | Ja |
| Basestation: | Ja |
| Vibrationsalarm: | Ja |
| Headset inkluderet: | Ja |
| Headset-tilslutning: | Bluetooth |
| Indikator for batterikapacitet: | Ja |
| Skærmstørrelse (HxL): | 49 x 37 mm |
| Personalisering: | Icons, Ringtones |
| Indikator for fuldt opladet batteri: | Ja |
| Indikator for batteriopladning: | Ja |
| VIP-gruppe med egen melodi: | Ja |
| Ældre telefon: | Ingen |
| Til/fra nøgle: | Ja |
| Tastaturlås: | Ja |
Har du brug for hjælp?
Hvis du har brug for hjælp til Gigaset R700H Pro stil et spørgsmål nedenfor, og andre brugere vil svare dig
Telefon Gigaset Manualer

9 April 2025
14 Januar 2025
31 December 2025
30 September 2024
29 September 2024
22 September 2024
15 September 2024
14 September 2024
14 September 2024
30 August 2024
Telefon Manualer
- Telefon SilverCrest
- Telefon Acer
- Telefon Amplicomms
- Telefon Denver
- Telefon Sencor
- Telefon Sony
- Telefon Siemens
- Telefon Samsung
- Telefon GE
- Telefon Panasonic
- Telefon Philips
- Telefon LG
- Telefon AEG
- Telefon Audio-Technica
- Telefon Doro
- Telefon AT&T
- Telefon Pioneer
- Telefon Apple
- Telefon Logitech
- Telefon Daewoo
- Telefon Sennheiser
- Telefon Emporia
- Telefon OpenVox
- Telefon Grundig
- Telefon Akuvox
- Telefon D-Link
- Telefon Motorola
- Telefon Roland
- Telefon Asus
- Telefon Toshiba
- Telefon Pyle
- Telefon Brother
- Telefon Lenovo
- Telefon Yamaha
- Telefon Infiniton
- Telefon OnePlus
- Telefon AVM
- Telefon Logik
- Telefon Planet
- Telefon Hama
- Telefon Thomson
- Telefon Nokia
- Telefon JBL
- Telefon TriStar
- Telefon TRENDnet
- Telefon Trevi
- Telefon Trust
- Telefon Fysic
- Telefon Topcom
- Telefon Flex
- Telefon Blaupunkt
- Telefon Sandstrøm
- Telefon Uniden
- Telefon Hitachi
- Telefon Medion
- Telefon Sweex
- Telefon Linksys
- Telefon Cisco
- Telefon Huawei
- Telefon Ranex
- Telefon Bang And Olufsen
- Telefon Geemarc
- Telefon Jabra
- Telefon Loewe
- Telefon Crosley
- Telefon Netgear
- Telefon EnVivo
- Telefon Lifetec
- Telefon Avaya
- Telefon Parrot
- Telefon Telefunken
- Telefon Vtech
- Telefon Microsoft
- Telefon Jacob Jensen
- Telefon Alcatel
- Telefon Anker
- Telefon Zebra
- Telefon Olympia
- Telefon Plantronics
- Telefon Xiaomi
- Telefon Krüger&Matz
- Telefon RugGear
- Telefon CAT
- Telefon Marmitek
- Telefon Oppo
- Telefon Crosscall
- Telefon NEC
- Telefon Alcatel-Lucent
- Telefon MT Logic
- Telefon Kyocera
- Telefon Xblitz
- Telefon Bogen
- Telefon LevelOne
- Telefon Marshall
- Telefon ArtDio
- Telefon Binatone
- Telefon Honor
- Telefon ZyXEL
- Telefon Tiptel
- Telefon Sagem
- Telefon Fortinet
- Telefon Overmax
- Telefon Archos
- Telefon Yealink
- Telefon RCA
- Telefon Ubiquiti Networks
- Telefon AVerMedia
- Telefon Currys Essentials
- Telefon EnGenius
- Telefon Grandstream
- Telefon MaxCom
- Telefon Patton
- Telefon Renkforce
- Telefon SPC
- Telefon ZTE
- Telefon Mikrotik
- Telefon Switel
- Telefon Brondi
- Telefon HTC
- Telefon Escene
- Telefon BlackBerry
- Telefon Evolveo
- Telefon Audioline
- Telefon BT
- Telefon XD Enjoy
- Telefon Mitel
- Telefon GPO
- Telefon Wiko
- Telefon Telstra
- Telefon Aastra
- Telefon Snom
- Telefon Mackie
- Telefon Vimar
- Telefon Oricom
- Telefon Oregon Scientific
- Telefon Lexibook
- Telefon Scosche
- Telefon Prestigio
- Telefon MyPhone
- Telefon Draytek
- Telefon Realme
- Telefon Crestron
- Telefon Lindy
- Telefon MXL
- Telefon Cortelco
- Telefon Legrand
- Telefon CTA Digital
- Telefon Steren
- Telefon Neat
- Telefon Tecdesk
- Telefon Dnake
- Telefon Gamdias
- Telefon Lewitt
- Telefon Allview
- Telefon Alcon
- Telefon Airlive
- Telefon AGFEO
- Telefon Amplicom
- Telefon Ascom
- Telefon Proximus
- Telefon BeeWi
- Telefon Sonim
- Telefon Sunstech
- Telefon Sylvania
- Telefon Swissvoice
- Telefon Marquant
- Telefon Nordmende
- Telefon KPN
- Telefon Belgacom
- Telefon Auerswald
- Telefon Profoon
- Telefon Teledex
- Telefon Valcom
- Telefon Innovaphone
- Telefon Hagenuk
- Telefon Essentiel B
- Telefon Logicom
- Telefon Peaq
- Telefon Vogtec
- Telefon T-Mobile
- Telefon Fanvil
- Telefon Spectralink
- Telefon VXi
- Telefon Unify
- Telefon Sagemcom
- Telefon Edenwood
- Telefon Premier
- Telefon HUMANTECHNIK
- Telefon Polycom
- Telefon Primare
- Telefon Mobotix
- Telefon Edge-Core
- Telefon ClearOne
- Telefon Clarity
- Telefon Syco
- Telefon SMC
- Telefon Pixel
- Telefon Digium
- Telefon FlyingVoice
- Telefon Davolink
- Telefon KONFTEL
- Telefon Mitsai
- Telefon Clear Sounds
- Telefon ALLO
- Telefon Oukitel
- Telefon On-Q
- Telefon Canyon
- Telefon HMD
- Telefon Tecno
- Telefon Olitech
- Telefon Dopod
- Telefon Hamlet
- Telefon Sedna
- Telefon Cubot
- Telefon AudioCodes
- Telefon 3Com
- Telefon British Telecom
- Telefon CyberData Systems
- Telefon Bintec-elmeg
- Telefon Wantec
- Telefon Algo
- Telefon Future Call
- Telefon 4family
- Telefon Tador
- Telefon CSL
- Telefon POCO
- Telefon Liam&Daan
- Telefon Lively
- Telefon EMeet
- Telefon Cyber Acoustics
Nyeste Telefon Manualer

1 Marts 2025
1 Marts 2025
25 Februar 2025
22 Februar 2025
22 Februar 2025
11 Februar 2025
7 Februar 2025
30 Januar 2025
24 Januar 2025
15 Januar 2025