GoClever TAB T76 GPS Manual
Læs nedenfor 📖 manual på dansk for GoClever TAB T76 GPS (85 sider) i kategorien Tablet pc. Denne guide var nyttig for 11 personer og blev bedømt med 4.5 stjerner i gennemsnit af 2 brugere
Side 1/85

GOCLEVER TAB
T76GPS/T76GPS TV
OWNER’S MANUAL
GOCLEVER TAB
T76GPS/T76GPS TV
INSTRUKCJA OBSŁUGI
WWW.GOCLEVER.COM
TO SEE MORE PRODUCTS TAB, NAVIO, DVR, DVB
Read this manual before installation and use.
GOCLEVER TAB
T76GPS/T76GPS TV
OWNER’S MANUAL
GOCLEVER TAB
T76GPS/T76GPS TV
INSTRUKCJA OBSŁUGI
VISIT OUR WEBSITE
WWW.GOCLEVER.COM
TO SEE MORE PRODUCTS TAB, NAVIO, DVR, DVB
Read this manual before installation and use.
T76GPS/T76GPS TV
T76GPS/T76GPS TV
WWW.GOCLEVER.COM
TO SEE MORE PRODUCTS TAB, NAVIO, DVR, DVB
-T

I
NTRODUCTION
P
RODUCT
D
ESCRIPTION
Q
UICK
S
TART
G
UIDE
B
ASIC SETTINGS
M
ULTIMEDIA
C
ONNECTIONS
AND NETWORKS
A
PPLICATIONS
I
NSTALLING NEW APPLIC
ATIONS
A
DVANCED OPERATIONS
System upgrade
Safe Mode
M
OBILE
TV
(
OPTIONAL
)
GPS
T
ROUBLESHOOTING
S
PECIFICATIONS
English
AND NETWORKS
ATIONS
3
4
6
8
17
21
26
30
34
34
34
37
38
40
41
42

Introduction
Acknowledgement
Thanks for
your purchase of our product. The product
touch screen which resolution of 800x480 pixel. It is designed with TTC8925 high speed
processor and 512RAM, and 8GB flash. The operating system is Android 4.0.
The product has a
built in WIFI module, front and rear camera, it is easy
can be viewed high definition video and photos, it can also support camera shooting and
video shooting function. Besides, it is available for many office and entertainm
applications. Brand new operation interface will provide you with different enjoyment.
The manual systemically introduces the functions, use techniques and
announcements, please read this manual carefully before operation.
Announcements
Preventive maintenance
•
Please always keep the tablet
fault and electric short, please prevent the device, battery and charger from
water and moisture, and don’t operate the device or charger by wet hand.
•
To avoid failure of device, battery and charger, please prevent the device,
battery, charger from violent shock or shake.
•
To avoid failure of device, battery and charger, please prevent the device,
battery, charger of all over heating or too cold circums
•
Never shock, throw,
•
Never disassemble the device and accessories arbitrarily, otherwise the
device and accessories are not in our company warranty scope.
your purchase of our product. The product
is tablet
, it is a high end product, with a
touch screen which resolution of 800x480 pixel. It is designed with TTC8925 high speed
processor and 512RAM, and 8GB flash. The operating system is Android 4.0.
built in WIFI module, front and rear camera, it is easy
can be viewed high definition video and photos, it can also support camera shooting and
video shooting function. Besides, it is available for many office and entertainm
applications. Brand new operation interface will provide you with different enjoyment.
The manual systemically introduces the functions, use techniques and
announcements, please read this manual carefully before operation.
Please always keep the tablet
dry. To avoid the device short trouble, corrosion
fault and electric short, please prevent the device, battery and charger from
water and moisture, and don’t operate the device or charger by wet hand.
To avoid failure of device, battery and charger, please prevent the device,
battery, charger from violent shock or shake.
To avoid failure of device, battery and charger, please prevent the device,
battery, charger of all over heating or too cold circums
tance
Never shock, throw,
prod the tablet, or drop, extrude, bend the tablet
Never disassemble the device and accessories arbitrarily, otherwise the
device and accessories are not in our company warranty scope.
4
, it is a high end product, with a
touch screen which resolution of 800x480 pixel. It is designed with TTC8925 high speed
processor and 512RAM, and 8GB flash. The operating system is Android 4.0.
built in WIFI module, front and rear camera, it is easy
Internet function, it
can be viewed high definition video and photos, it can also support camera shooting and
video shooting function. Besides, it is available for many office and entertainm
ent
applications. Brand new operation interface will provide you with different enjoyment.
The manual systemically introduces the functions, use techniques and
dry. To avoid the device short trouble, corrosion
fault and electric short, please prevent the device, battery and charger from
water and moisture, and don’t operate the device or charger by wet hand.
To avoid failure of device, battery and charger, please prevent the device,
To avoid failure of device, battery and charger, please prevent the device,
prod the tablet, or drop, extrude, bend the tablet
.
Never disassemble the device and accessories arbitrarily, otherwise the
device and accessories are not in our company warranty scope.

Safety Instruction
Before the
operation of the tablet
information. For further details, please refer to the safety
• Never use the tablet
when driving car, in order to ensure safe driving.
• In the
medical area, please abide by related rules and regul
the tablet
when it is near to the medical area.
•
To avoid the wireless signal to interrupt the plane
the tablet
or using airplane mode when yo
•
To avoid electronic equipment f
high-
accuracy electronic equipments.
•
Please don’t disassemble the tablet
access to service the tablet
•
Please keep the tablet
may erase the data stored in the magnetic equipments.
• Never use the tablet
station).
• Protect the tablet
and acce
the tablet
without parents’ supervision.
•
Please comply with related rules and regulations, and respect others’ privacy and
legal rights while using the tablet
•
Please strictly adhere to related
ensure the safety of the tablet
• Never use the tablet
in bathroom or other humid environ
tablet
from liquid wash or wet.
operation of the tablet
, please read this chapter and teach your kids about these
information. For further details, please refer to the safety
instructions and announcement.
when driving car, in order to ensure safe driving.
medical area, please abide by related rules and regul
ations. Please shut down
when it is near to the medical area.
To avoid the wireless signal to interrupt the plane
- controlled
signal, please shut down
or using airplane mode when yo
u are boarding a flight,
To avoid electronic equipment f
ailure, please shut down the tablet
accuracy electronic equipments.
Please don’t disassemble the tablet
and accessories. Only authorized age
access to service the tablet
.
Please keep the tablet
far away from magnetic equipments, th
e radiation of tablet
may erase the data stored in the magnetic equipments.
in the vicinage of high temperature, inflammable gas ( gas
and acce
ssories from kids reach scope, a
nd avoid the kids to use
without parents’ supervision.
Please comply with related rules and regulations, and respect others’ privacy and
legal rights while using the tablet
.
Please strictly adhere to related
instructions in the manual when using USB cable
ensure the safety of the tablet
or PC.
in bathroom or other humid environ
ment, and please protect the
from liquid wash or wet.
5
, please read this chapter and teach your kids about these
instructions and announcement.
when driving car, in order to ensure safe driving.
ations. Please shut down
signal, please shut down
ailure, please shut down the tablet
in the vicinage of
and accessories. Only authorized age
nt has
e radiation of tablet
in the vicinage of high temperature, inflammable gas ( gas
nd avoid the kids to use
Please comply with related rules and regulations, and respect others’ privacy and
instructions in the manual when using USB cable
to
ment, and please protect the

Abbreviation/Terminology
Abbreviation/Terminolo
Tablet
WIFI
microSD
HDMI
Pr
oduct Description
Accessories
Belo
w items are included in your tablet
• tablet
complete device
• power adaptor
• USB cable
• Car charger
• Bracket
• Back clip
• User’s manual
• Warranty Card
• OTG connector
Abbreviation/Terminology
Abbreviation/Terminolo
gy
Full Name
Description
Tablet
mobile internet terminal
Wireless Fidelity
Base on IEEE 802.11b
standard wireless LAN
microSD
Alternative name is Micro
SD, super miniature memory
card
High Definition
Multimedia Interface HDMI:
HighDefinition
Multimedia Interface
oduct Description
w items are included in your tablet
package, please confirm:
complete device
6
Description
mobile internet terminal
Base on IEEE 802.11b
standard wireless LAN
Alternative name is Micro
SD, super miniature memory
HighDefinition
Multimedia Interface

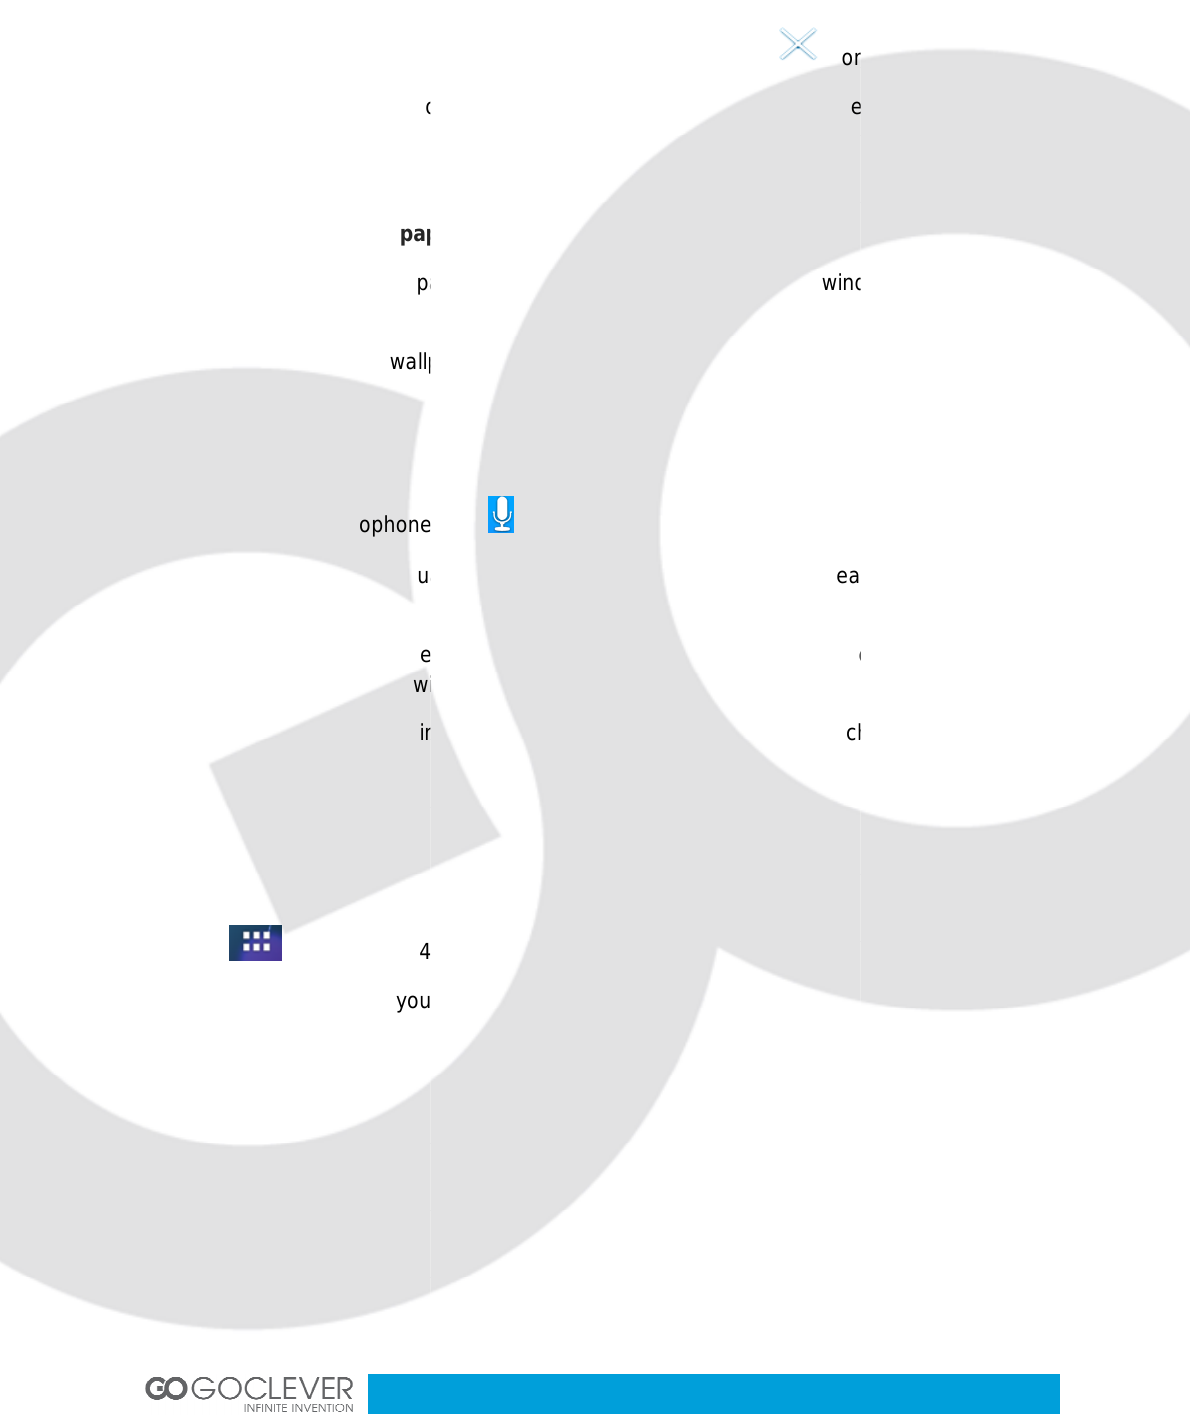
Quick Start Guide
Keys Function
Power key (power)
Volume + (up)
Volume- (down)
HOME key (home)
MENU Key
Display the APPs
Back key (back)
Search (search)
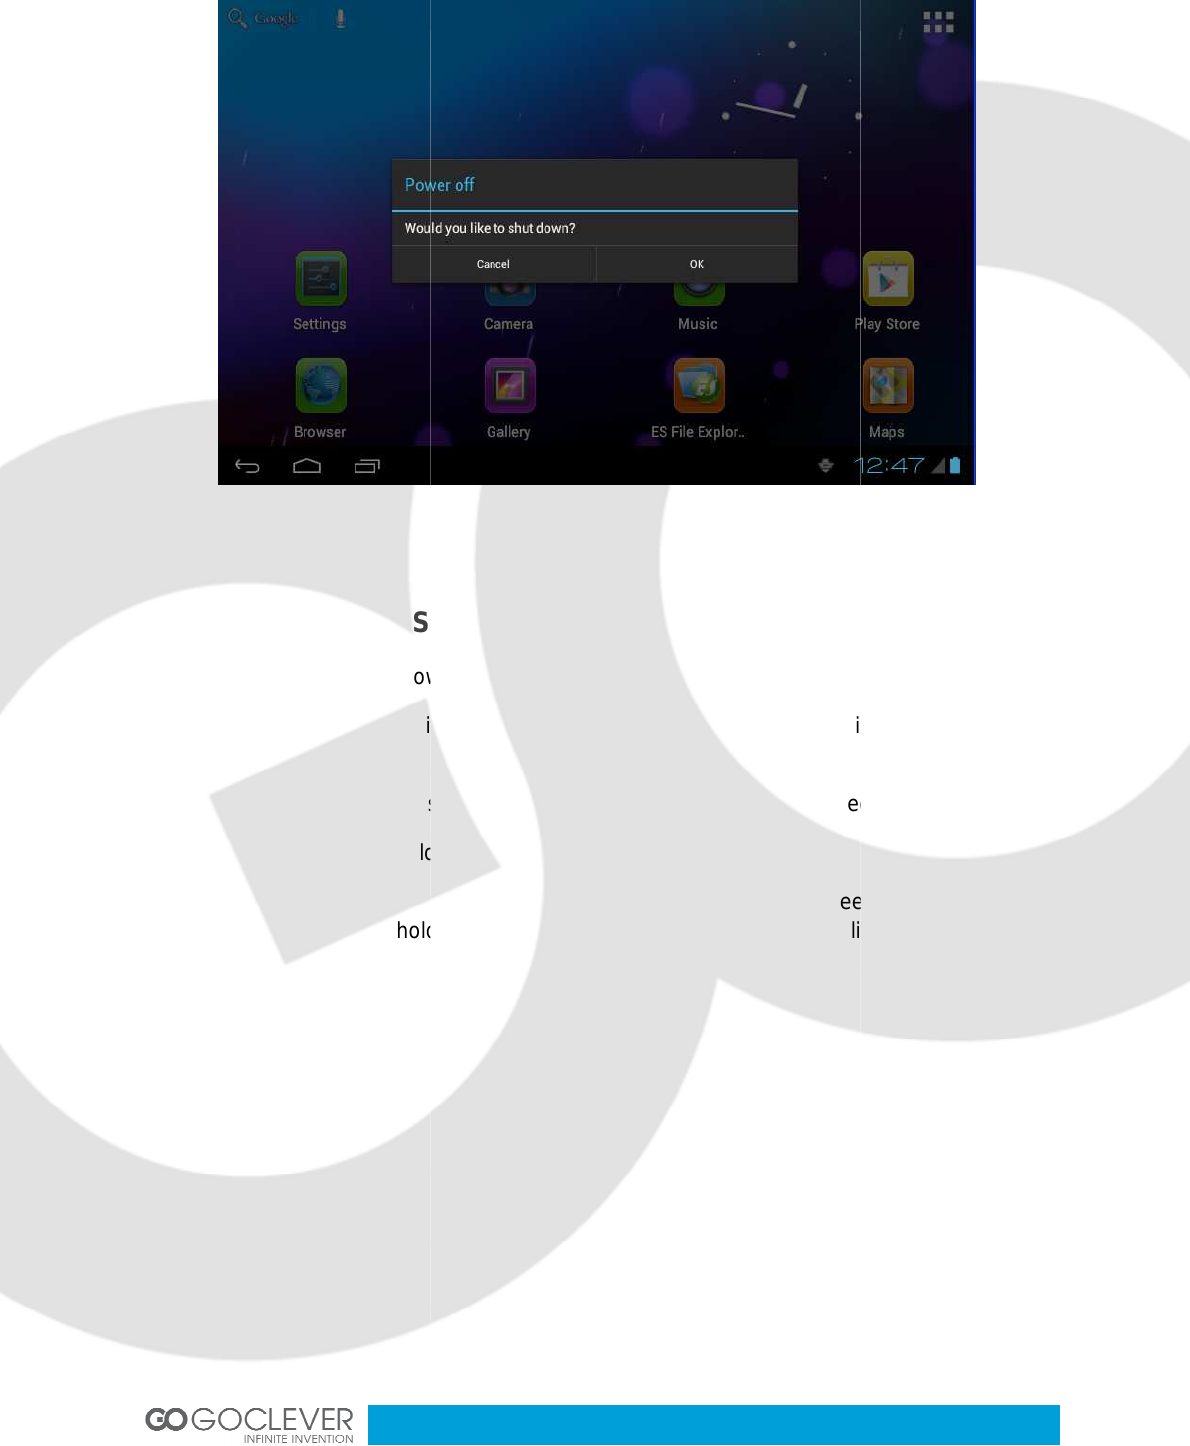
Startup and Shutdown
Startup
Long press Power key for three
enters into screen locked status, please unlock it to enter into main
Shutdown
•
Long press Power, it will popup shutdown window.
•
The setting includes mute mode and shutdown, as picture 1
•
Clicking Shutdown is the last step.
Short press to dormant
/awake function, long press to turn
in/off
Increase volume
Decrease volume
Click
it in any interface to return main menu interface
This icon will be displayed in the applications of
Display the history record that the user browsed
Click it in any interface to return previous
Click it to enter into Google search
Startup and Shutdown
Long press Power key for three
seconds
, you can enter into startup picture. The system
enters into screen locked status, please unlock it to enter into main
interface to operate.
Long press Power, it will popup shutdown window.
The setting includes mute mode and shutdown, as picture 1
Clicking Shutdown is the last step.
8
/awake function, long press to turn
it in any interface to return main menu interface
This icon will be displayed in the applications of
menu key
Display the history record that the user browsed
Click it in any interface to return previous
menu
, you can enter into startup picture. The system
interface to operate.
Open and Close the Screen
Screen will be closed on its
own when no
1.
Screen will be closed on its own if no operation happens for some time to save battery
power.
2.
When screen is open, press Power key, the screen will be closed immediately.
Open the screen when it is closed.
If the screen is closed,
short press Power to open the screen. The scr
picture
2 after opening it, hold “lock” icon via finger or touch pens and sli
as picture 3.
Picture 1
Open and Close the Screen
own when no
operation happens.
Screen will be closed on its own if no operation happens for some time to save battery
When screen is open, press Power key, the screen will be closed immediately.
Open the screen when it is closed.
short press Power to open the screen. The scr
een will be locked as
2 after opening it, hold “lock” icon via finger or touch pens and sli
d up it to
9
Screen will be closed on its own if no operation happens for some time to save battery
When screen is open, press Power key, the screen will be closed immediately.
een will be locked as
d up it to
lock icon,

Picture 2
Picture 3
10

Usage of Touch Screen
Tablet operating methods
There are many methods to view the main screen, menu and applications
Click
When you want to use the screen keyboard input or choose application in the main interface,
you only need to touch it by finger.
Quickly slide or slide
Quickly slide or slide indicates
pen.
Pull
Before you pull, you need to hold it with strength until you pull it into the position you want.
Rotate
For most pictures,
you only need to
from horizont
al to vertical. For instance, when you are inputting words, and listening MP3.
Main Interface
Main menu screen will show all the
applicatio
ns, shortcut and define your main interface wallpapers.
Usage of Touch Screen
There are many methods to view the main screen, menu and applications
When you want to use the screen keyboard input or choose application in the main interface,
you only need to touch it by finger.
Quickly slide or slide indicates
make quick vertical or horizont
al movement via finger or touch
Before you pull, you need to hold it with strength until you pull it into the position you want.
you only need to
rotate the tablet
sidewise to change the
al to vertical. For instance, when you are inputting words, and listening MP3.
Main menu screen will show all the
applications as below Picture
ns, shortcut and define your main interface wallpapers.
11
There are many methods to view the main screen, menu and applications
of your tablet.
When you want to use the screen keyboard input or choose application in the main interface,
al movement via finger or touch
Before you pull, you need to hold it with strength until you pull it into the position you want.
sidewise to change the
screen direction
al to vertical. For instance, when you are inputting words, and listening MP3.
applications as below Picture
4. You can use

1. Search
2. Voice search
3. Dynamic wallpaper
4. Applications
5. Return key
6. Home
Extensible homepage interface
Homepage will extend to exceed the screen to offer more space, you can place newly
increased shortcuts, widgets. Click the blank space in the homepage, then slide right and left
to move to the right and left of the screen. There are two extended pictures a
the homepage.
Picture 4
3. Dynamic wallpaper
7. Last app
8. Notice column
9. Remind information
10. Time
11. Battery status
Extensible homepage interface
Homepage will extend to exceed the screen to offer more space, you can place newly
increased shortcuts, widgets. Click the blank space in the homepage, then slide right and left
to move to the right and left of the screen. There are two extended pictures a
12
Homepage will extend to exceed the screen to offer more space, you can place newly
increased shortcuts, widgets. Click the blank space in the homepage, then slide right and left
to move to the right and left of the screen. There are two extended pictures a
s picture 5 in

Shortcut icons management of desktop applications
System below Android 2.3
has the function of creating folder in the desktop, and put the
icons in the folder. Android 4.0 system
as below:
1. Draw all t
he icons together, as picture
2.
Then click the composited icons to open a
3.
Click unnamed folder below black frame, it will popup hidden keyboard, and you can
rename th
is folder(it is similar with IOS system.)
Picture 5
Shortcut icons management of desktop applications
has the function of creating folder in the desktop, and put the
icons in the folder. Android 4.0 system
make the folder creation more sim
he icons together, as picture
6 shown.
Then click the composited icons to open a
ll the applications as picture
7.
Click unnamed folder below black frame, it will popup hidden keyboard, and you can
is folder(it is similar with IOS system.)
13
has the function of creating folder in the desktop, and put the
make the folder creation more sim
ple. The steps are
7.
Click unnamed folder below black frame, it will popup hidden keyboard, and you can

Picture 6
Picture 7
14
Delete the icons in the desktop
Click and hold the icon needs to delete, the top left will show the
D
raw the icon to the upper of the DELETE icon till the icon turns to red,
ginger to delete.
Change the desktop
wallpaper
C
lick and hold the blank space in main screen, it will popup the window to change the
wallpaper.
C
lick the photo gallary or wallpapers gallary to choose photo.
Voice search
• Touch the
Microphone icon
• You can se
t the language according to your need in the voice search frame, click OK
to confirm.
•
Keep your mouth direct to the microphone, and speak out the content you need to
search, the broswer will open the search result list.
Note: Pl
ease make sure the internet is welll connected before voice search.
Applications
How to open the application.
1. Click
icon (picture 4), enter into application (as picture 8).
2. Choose the application you want to open.
Delete the icons in the desktop
Click and hold the icon needs to delete, the top left will show the
icon.
raw the icon to the upper of the DELETE icon till the icon turns to red,
wallpaper
lick and hold the blank space in main screen, it will popup the window to change the
lick the photo gallary or wallpapers gallary to choose photo.
Microphone icon
t the language according to your need in the voice search frame, click OK
Keep your mouth direct to the microphone, and speak out the content you need to
search, the broswer will open the search result list.
ease make sure the internet is welll connected before voice search.
icon (picture 4), enter into application (as picture 8).
2. Choose the application you want to open.
15
icon.
raw the icon to the upper of the DELETE icon till the icon turns to red,
then move your
lick and hold the blank space in main screen, it will popup the window to change the
t the language according to your need in the voice search frame, click OK
Keep your mouth direct to the microphone, and speak out the content you need to
ease make sure the internet is welll connected before voice search.

USB Connection
MID storage configuration
Before transmitting documents, you have to conduct sto
Connect tablet
and PC via USB connection, the reminder column will show the remind
information.
1. Open the reminder board
2. In the
remind board, click USB is connected, then touch to open USB memory device
3.
Now USB is well connected.
Copy the file into memory card
1. Connect tablet
and PC via USB connector.
2. Operate as the tablet m
emory setting to connect the tablet
3.
Open “My computer” to view Mobile disk(x).
4. Copy the file you need to copy into “Mobile disk(x)”.
5. After copying, click “close USB memory” in your computer to uninstall.
Picture 8
Before transmitting documents, you have to conduct sto
rage configuration
and PC via USB connection, the reminder column will show the remind
remind board, click USB is connected, then touch to open USB memory device
Now USB is well connected.
Copy the file into memory card
and PC via USB connector.
emory setting to connect the tablet
and PC.
Open “My computer” to view Mobile disk(x).
4. Copy the file you need to copy into “Mobile disk(x)”.
5. After copying, click “close USB memory” in your computer to uninstall.
16
rage configuration
for your tablet.
and PC via USB connection, the reminder column will show the remind
remind board, click USB is connected, then touch to open USB memory device
.

Note:
If you want to open memory card resources on your device, you need to disco
USB cable first.
Basic settings
Voice and display
Multi-media volume setting
1. Click setting application in the main interface.
2. Click Voice.
3. Click volume to adjust the volume for music and video.
4. When popup volume setting board, left
5. Click confirm.
Display setting
Adjust the brightness of screen
1. Click Setting application procedure in main interface.
2. Click display.
3. Click brightness when the menu popup.
4. It will popup setting board,
5. Click OK.
Adjust screen standby time
1. Click Setting application procedure in the main interface.
2. Click display.
•
Slide down the screen, and click dormant.
•
It will popup screen stand
If you want to open memory card resources on your device, you need to disco
1. Click setting application in the main interface.
3. Click volume to adjust the volume for music and video.
4. When popup volume setting board, left
or right progress bar to control.
Adjust the brightness of screen
1. Click Setting application procedure in main interface.
3. Click brightness when the menu popup.
4. It will popup setting board,
left and right slide the brightness bar to adjust the brightness.
1. Click Setting application procedure in the main interface.
Slide down the screen, and click dormant.
It will popup screen stand
by time setting, choose the standby time you want.
17
If you want to open memory card resources on your device, you need to disco
nnect the
left and right slide the brightness bar to adjust the brightness.
by time setting, choose the standby time you want.
Basic setting
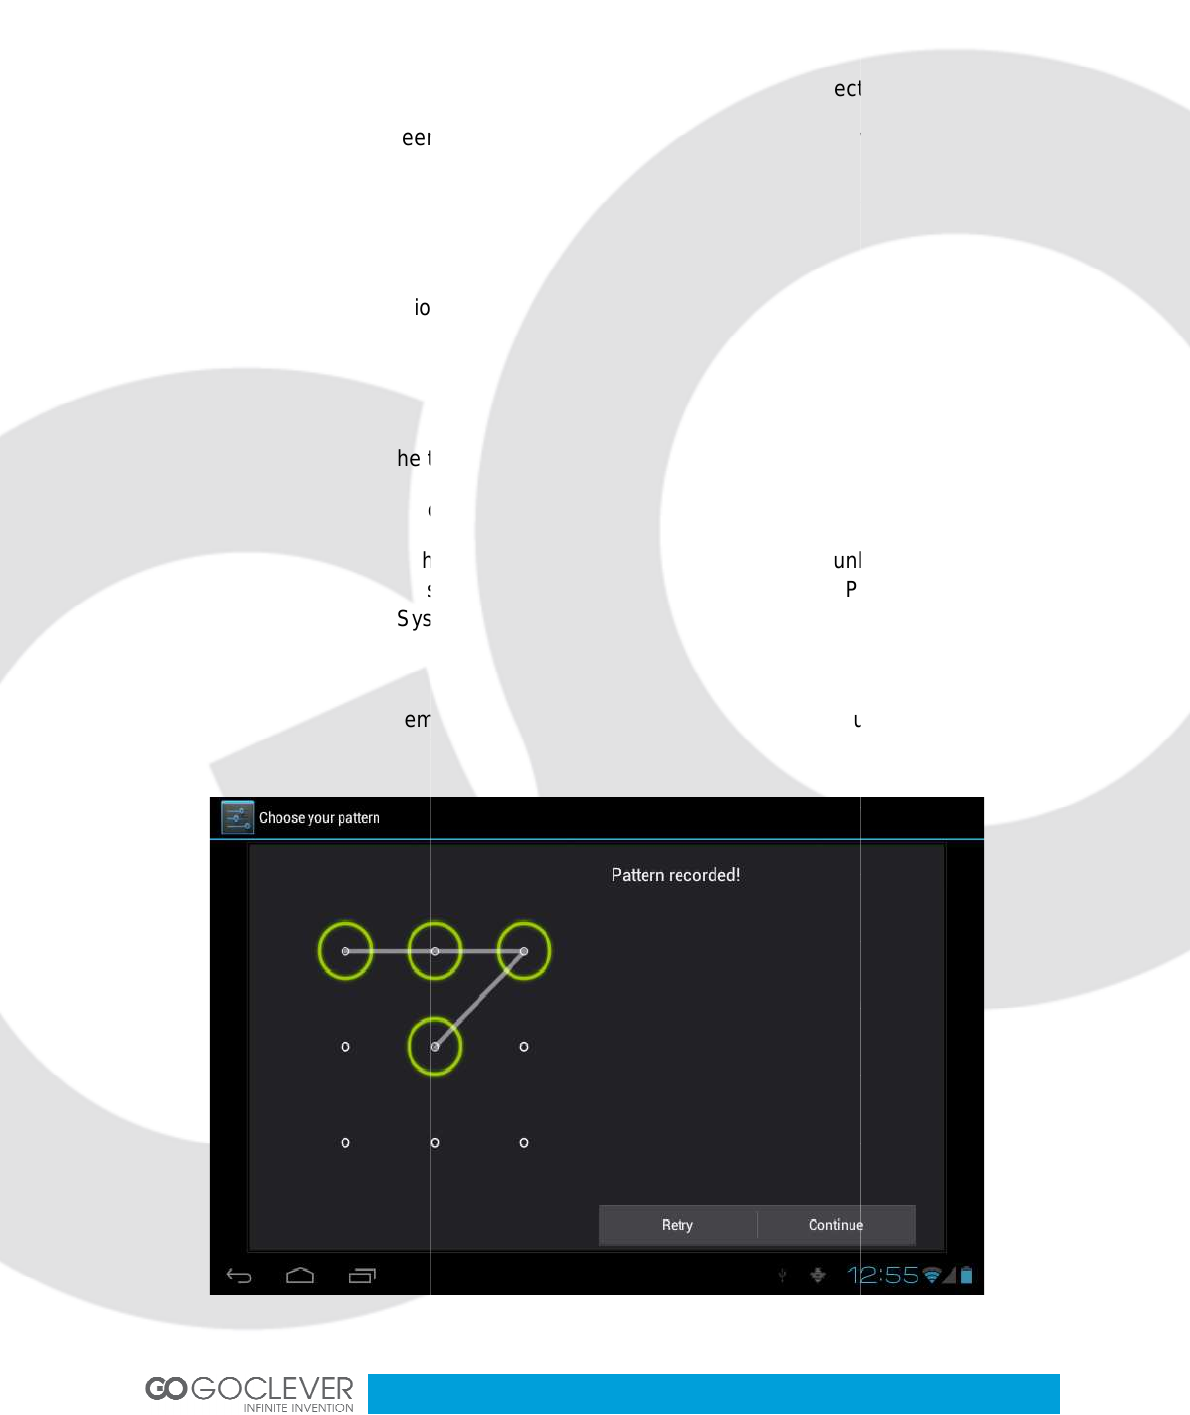
Setting screen lock
You can unlock the picture or password to lock the
Note: After setting the screen locked, you need to enter the
tablet.
Setting unlock picture
•
Click setting application in the main interface.
• Click safety.
• Click screen lock.
•
Choose picture in the text setting area.
•
Move to next step according to remind.
•
There are nine touch points in the picture,
connect the four points from vertical and horizontal direction. As Picture 9, move your
finger when finish. System will record the picture you set.
• Click continue.
•
When you see the remind information, click the screen lo
You can unlock the picture or password to lock the
touch screen to protect you tablet
Note: After setting the screen locked, you need to enter the
password when
Click setting application in the main interface.
Choose picture in the text setting area.
Move to next step according to remind.
There are nine touch points in the picture,
when it popup unlock picture board,
connect the four points from vertical and horizontal direction. As Picture 9, move your
finger when finish. System will record the picture you set.
When you see the remind information, click the screen lo
cked picture, click OK.
Picture 9
18
touch screen to protect you tablet
privacy.
password when
you start the
when it popup unlock picture board,
connect the four points from vertical and horizontal direction. As Picture 9, move your
cked picture, click OK.

Set unlock PIN code
•
Click setting application in the main interface.
• Click confirm.
• Click screen locked.
•
Choose PIN when it popup text setting area.
•
Enter new PIN code and click continue.
•
Enter new PIN code again and
Setting unlock password
•
Click setting application in main interface.
• Click safe.
• Click screen locked.
•
Click password in the text setting area.
•
Set new password(letters and number) and click continue.
•
Enter password again and click confirm.
SD card and tablet
memory
View SD card and tablet
memory available space
•
Click setting application in the main interface.
• Click memory.
•
View the available space in SD card.
• View tablet
internal memory space.
Remove SD card safely
Remove the SD card safely c
an prevent the SD card and extend the SD lifetime.
•
Click setting application in main interface.
• Click memory.
Click setting application in the main interface.
Choose PIN when it popup text setting area.
Enter new PIN code and click continue.
Enter new PIN code again and
choose OK.
Click setting application in main interface.
Click password in the text setting area.
Set new password(letters and number) and click continue.
Enter password again and click confirm.
memory
memory available space
Click setting application in the main interface.
View the available space in SD card.
internal memory space.
an prevent the SD card and extend the SD lifetime.
Click setting application in main interface.
19
an prevent the SD card and extend the SD lifetime.

•
Click remove SD card.
• Pull out SD card.
Date and Time
Manual adjust date, time and zone
•
Click Setting application procedure.
• Slide down screen, a
nd click date and time.
•
Click select time zone, and choose the zone in the list. Slide down to view more zone
information.
•
Click setting date and then click up and down button or slide up and down to set area
to adjust date, month and year, click setting
•
Click setting time and click up and down or slide up and down to setting area to adjust
hour and minute, click AM or PM to change the morning and afternoon(there is no
such selection when you choose 24 hour format), click setting.
• Click to ch
oose 24 hour format, you can switch between 12 hour format and 24 hour
format, the selected time format will be used on the alarm.
Setting Language
•
Click setting application in main interface.
•
Click language and input method.
•
Click language, and select
language.
About Tablet
View the tablet Status
• Click Settings.
•
Click About Tablet, you can view the electric volume, status messages and so on.
Click remove SD card.
Manual adjust date, time and zone
Click Setting application procedure.
nd click date and time.
Click select time zone, and choose the zone in the list. Slide down to view more zone
Click setting date and then click up and down button or slide up and down to set area
to adjust date, month and year, click setting
when finish.
Click setting time and click up and down or slide up and down to setting area to adjust
hour and minute, click AM or PM to change the morning and afternoon(there is no
such selection when you choose 24 hour format), click setting.
oose 24 hour format, you can switch between 12 hour format and 24 hour
format, the selected time format will be used on the alarm.
Click setting application in main interface.
Click language and input method.
Click language, and select
the language you want, slide down to search more
Click About Tablet, you can view the electric volume, status messages and so on.
20
Click select time zone, and choose the zone in the list. Slide down to view more zone
Click setting date and then click up and down button or slide up and down to set area
Click setting time and click up and down or slide up and down to setting area to adjust
hour and minute, click AM or PM to change the morning and afternoon(there is no
oose 24 hour format, you can switch between 12 hour format and 24 hour
the language you want, slide down to search more
Click About Tablet, you can view the electric volume, status messages and so on.

System update
•
Click Setting application procedure in main int
• Click About tablet.
•
Click System update, update as steps.
•
Click Install system update if there is new version. (Please confirm th
version microSD
card in device before installation.
View system version
•
Click Setting application procedure
• Click About Tablet.
•
You can view model NO., Android version, firmware version and internal version.
Multimedia
Supported file formats
Supported music file formats:
AAC, OGG, WAV, APE, FLAC, AMR, WMA
Supported video formats
AVI, MPG, VOB, MKV, FLV,
TS/TP, H264, MPRC
Supported photo formats
JPEG, GIF, PNG, BMP
Click Setting application procedure in main int
erface.
Click System update, update as steps.
Click Install system update if there is new version. (Please confirm th
card in device before installation.
Click Setting application procedure
.
You can view model NO., Android version, firmware version and internal version.
Supported file formats
Supported music file formats:
AAC, OGG, WAV, APE, FLAC, AMR, WMA
TS/TP, H264, MPRC
-
4, RMVB, DIVX, MPEG
21
Click Install system update if there is new version. (Please confirm th
ere is new
You can view model NO., Android version, firmware version and internal version.
4, RMVB, DIVX, MPEG
-2

Music
You music can be divided into four types: artists, album, and music and play list. Choose a
type to view the list.
1. Cover of album
2. View current play
3. Random play
4. Repeat
5. Previous
6. Pause
Play music
•
Click music in the main interface.
•
Enter to select music and click artist, album and play list.
•
Select any music to play.
You music can be divided into four types: artists, album, and music and play list. Choose a
2. View current play
7. Next
8. Elapsed time
9. Progress bar
10. Total time
Click music in the main interface.
Enter to select music and click artist, album and play list.
Select any music to play.
22
You music can be divided into four types: artists, album, and music and play list. Choose a

Add the music into new
playlist
•
Click music in the main interface.
• Enter to select music.
•
Click and hold the music you want play.
•
Click music setting menu, click add into playlist.
• Click new list.
• Input playlist name.
• Click save.
Delete the music in play list
• Click music.
• Click
and hold the music you want delete in the play list.
•
Click delete in popup menu.
Video
Enter into video player: in the desktop choose application and choose the video you want to
play.
•
Click gallery application.
•
Wait for device to refresh all video fi
•
Click a file you want play.
Photo gallery
Photo gallery application shows all video and image files on your SD card.
•
Click photo gallery application in main interface.
playlist
Click music in the main interface.
Click and hold the music you want play.
Click music setting menu, click add into playlist.
and hold the music you want delete in the play list.
Click delete in popup menu.
Enter into video player: in the desktop choose application and choose the video you want to
Click gallery application.
Wait for device to refresh all video fi
les.
Click a file you want play.
Photo gallery application shows all video and image files on your SD card.
Click photo gallery application in main interface.
23
Enter into video player: in the desktop choose application and choose the video you want to
Photo gallery application shows all video and image files on your SD card.

•
Enter into photo gallery, click the file you want to view.
• Click the photo yo
u want to view, system will display the photo in full screen mode.
When you view photos, you can zoom in and out, touch the screen with two fingers, and pull
the fingers or separate the fingers to decrease and increase image size. When you view
photos, yo
u can slide left and right to switch between photos.
Camera
Camera application includes two cameras: front (300.000
camera provides full screen
mode
Open the camera
You can open the camera in
two ways:
1.
Slide the screen (if you already set the setting to “slide”, slide down the icon to camera
icon. )
2. Touch camera icon
in the main screen or application
Enter into photo gallery, click the file you want to view.
u want to view, system will display the photo in full screen mode.
When you view photos, you can zoom in and out, touch the screen with two fingers, and pull
the fingers or separate the fingers to decrease and increase image size. When you view
u can slide left and right to switch between photos.
Camera application includes two cameras: front (300.000
px)
and rear (2 million px). R
mode
and picture capturing.
two ways:
Slide the screen (if you already set the setting to “slide”, slide down the icon to camera
in the main screen or application
menu.
24
u want to view, system will display the photo in full screen mode.
When you view photos, you can zoom in and out, touch the screen with two fingers, and pull
the fingers or separate the fingers to decrease and increase image size. When you view
and rear (2 million px). R
ear
Slide the screen (if you already set the setting to “slide”, slide down the icon to camera
1. View photo or video
2. Switch front and rear camera
3. Take photo
4. Options
Taking photos
•
Open camera, make sure your device is in camera mode (see picture above).
•
Touch blue button to take photos.
•
Note: To avoid the unc
better touch the blue button as soft as possible.
Recording videos
•
Make sure your device is in video mode
•
Touch red button to start recording the video. During the record, the red button will
display a wh
ite diamond.
•
Touch the red button when finish record.
Remember
•
The photos and videos will save automatically.
•
You can view the photos and videos you have recorded.
•
If you want view more photos and videos you can slide left and right.
• When you view the
photos, move together or separately to zoom in or out the photos
or double touch the screen.
•
When you view videos, if you want to play the video, click play button
Panorama mode
Panorama mode can let
you capture scenic shots
•
Open the camera, make sure
•
Aim at the scene you want to shoot from one end to another end.
want to shoot one bridge, please
1. View photo or video
2. Switch front and rear camera
5.
Photo shooting mode
6.
Video recording mode
7. Panorama mode
Open camera, make sure your device is in camera mode (see picture above).
Touch blue button to take photos.
Note: To avoid the unc
lear photo, please catch the tablet
tightly and stably, you‘d
better touch the blue button as soft as possible.
Make sure your device is in video mode
(see picture above).
Touch red button to start recording the video. During the record, the red button will
ite diamond.
Touch the red button when finish record.
The photos and videos will save automatically.
You can view the photos and videos you have recorded.
If you want view more photos and videos you can slide left and right.
photos, move together or separately to zoom in or out the photos
or double touch the screen.
When you view videos, if you want to play the video, click play button
you capture scenic shots
.
Open the camera, make sure
your device is in panorama mode
(see picture above).
Aim at the scene you want to shoot from one end to another end.
For example, if you
want to shoot one bridge, please
take the head of the bridge first.
25
Photo shooting mode
Video recording mode
Open camera, make sure your device is in camera mode (see picture above).
tightly and stably, you‘d
Touch red button to start recording the video. During the record, the red button will
If you want view more photos and videos you can slide left and right.
photos, move together or separately to zoom in or out the photos
When you view videos, if you want to play the video, click play button
.
(see picture above).
For example, if you
• Touch green button
, then
•
Take bridge for example,
•
During the shooting, green button will display a white diamond.
• C
lick the green button
camera w
ill display the progress bar when saving photo.
Connections and networks
3G
(3rd generation mobile telecommunications)
•
Enter the main interface.
•
The device will connect to 3G automatically.
•
Wait for 3G icon to appear on status bar.
WIFI connection
• Your tablet
can connect Wi
• Click settings
in main interface.
• Select WI-Fi.
• Enter into WI-Fi
interface
• Tablet
will auto scan available WI
• Select the WI-Fi
you want to connect, if there is any pa
password and
click Connect to finish.
, then
move the camera from th
e whole scene.
Take bridge for example,
you need to move the camera from one angle to another
During the shooting, green button will display a white diamond.
lick the green button
when finish. T
he system will display full screen photo, and the
ill display the progress bar when saving photo.
Connections and networks
(3rd generation mobile telecommunications)
Enter the main interface.
The device will connect to 3G automatically.
Wait for 3G icon to appear on status bar.
can connect Wi
-Fi internet.
in main interface.
interface
, click WI-Fi button.
will auto scan available WI
-Fi networks. See picture 10.
you want to connect, if there is any pa
ssword window, enter t
click Connect to finish.
26
e whole scene.
you need to move the camera from one angle to another
.
he system will display full screen photo, and the
ssword window, enter t
he

E-mail
E-mail settings
The e-mail application
provides configuration wizard.
service to the external POP3 or IMAP email account of provider (such
Picture 10
provides configuration wizard.
Y
ou can add ordinary web email
service to the external POP3 or IMAP email account of provider (such
as Yahoo
Picture 11
27
ou can add ordinary web email
as Yahoo
or Gmail).

Note:
make sure your internet connection is working before starting e
wizard.
E-mail configuration wizard
•
Enter into main interface
•
Click email icon to start a
• Enter your e-mail
account address and password.
•
Click next button, choose your e
• Click next button to
verify your e
• Enter
account name and the email sender’s name, click finish.
•
If the mailbox is available, it will enter into your in
make sure your internet connection is working before starting e
Enter into main interface
Click email icon to start a
configuration wizard
account address and password.
Click next button, choose your e
-mail type (POP3 or IMAP).
verify your e
-mail settings.
account name and the email sender’s name, click finish.
If the mailbox is available, it will enter into your in
box.
Picture 12
28
make sure your internet connection is working before starting e
-mail configuration

Internet
Web browser
Touch browser icon in main screen or all application screen.
Browser will open the previous webpage you visit. If you haven’t use browser, it will open
your main webpage.
On the top of the screen, it will displ
Viewing pages in offline mode
You can save a
webpage into MID
• Open the
menu to save
• Below the save
webpage bookmark, it will display the thumbnail, to return to the real
webpage, please touch “return” button.
• To vi
ew saved webpage, please touch the
webpage, and the thumbnail of this webpage.
Touch browser icon in main screen or all application screen.
Browser will open the previous webpage you visit. If you haven’t use browser, it will open
On the top of the screen, it will displ
ay the current URL (website address).
Picture 13
Viewing pages in offline mode
webpage into MID
to view it in offline mode (without internet connection)
menu to save
a webpage for viewing it without internet.
webpage bookmark, it will display the thumbnail, to return to the real
webpage, please touch “return” button.
ew saved webpage, please touch the
icon , then
select
webpage, and the thumbnail of this webpage.
29
Browser will open the previous webpage you visit. If you haven’t use browser, it will open
to view it in offline mode (without internet connection)
webpage bookmark, it will display the thumbnail, to return to the real
select
menu, saved

Applications
Clock
• Enter i
nto applications menu.
•
Click the clock application icon.
•
Select settings and add clock (see picture 14)
• Touch menu key to
bring up
Calculator
• Click the calculator
icon
• Enter into the
basic board of calculator.
• Click menu key
, then click advanced board.
•
Touch the number or operator in the calculator.
•
Flip your device to switch between advanced and basic calculator board
nto applications menu.
Click the clock application icon.
Select settings and add clock (see picture 14)
bring up
the clock settings menu.
Picture 14
icon
in the application interface.
basic board of calculator.
, then click advanced board.
Touch the number or operator in the calculator.
Flip your device to switch between advanced and basic calculator board
30
Flip your device to switch between advanced and basic calculator board
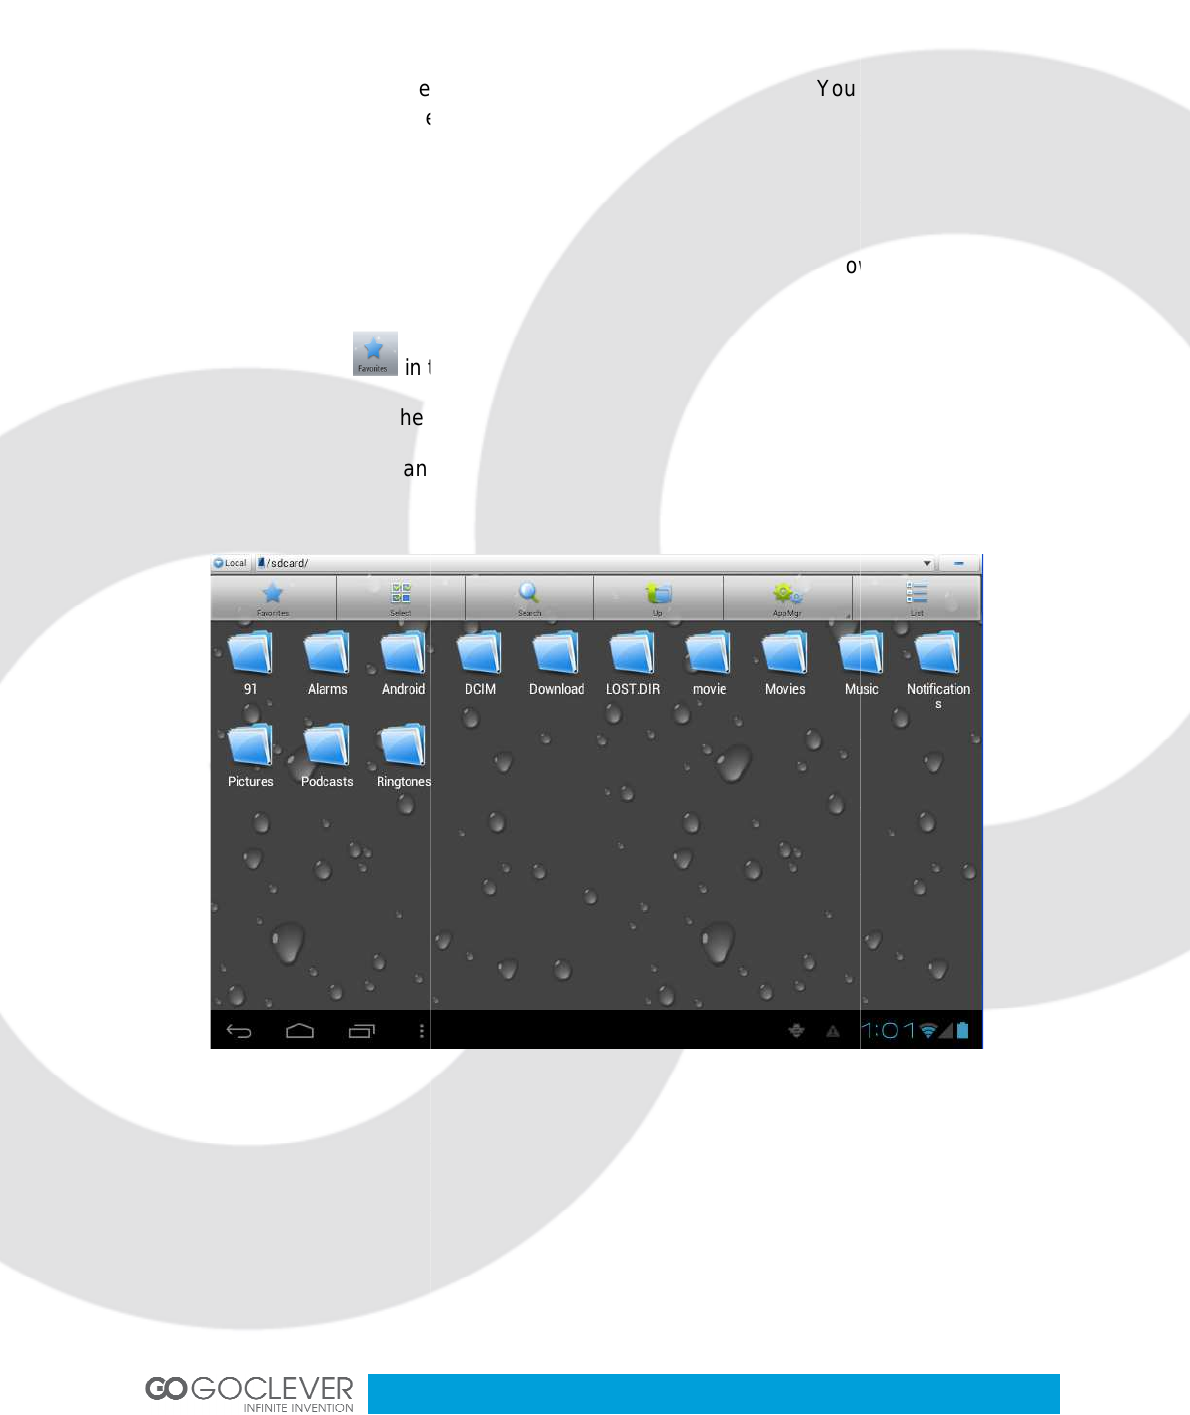
File management
File Browser
You can use the
file browser
service to
share your resources
SD card read path
•
In the main interface click file browser icon to enter into file browser interface (see
picture 15).
• Click the icon
in the top of file browser
• Open
folder, as in the picture 15, click /mnt/ext_sd.
•
Open the file, you can view the file in SD card, (see picture 16)
file browser
to edit and delete files and folders. You
share your resources
.
In the main interface click file browser icon to enter into file browser interface (see
in the top of file browser
folder, as in the picture 15, click /mnt/ext_sd.
Open the file, you can view the file in SD card, (see picture 16)
Picture 15
31
can also use FTP
In the main interface click file browser icon to enter into file browser interface (see
Produkt Specifikationer
| Mærke: | GoClever |
| Kategori: | Tablet pc |
| Model: | TAB T76 GPS |
Har du brug for hjælp?
Hvis du har brug for hjælp til GoClever TAB T76 GPS stil et spørgsmål nedenfor, og andre brugere vil svare dig
Tablet pc GoClever Manualer

4 Oktober 2024
23 September 2024
21 September 2024
23 August 2024
23 August 2024
23 August 2024
19 August 2024
18 August 2024
17 August 2024
17 August 2024
Tablet pc Manualer
- Tablet pc Sencor
- Tablet pc TCL
- Tablet pc Sony
- Tablet pc Samsung
- Tablet pc Panasonic
- Tablet pc Gigaset
- Tablet pc Apple
- Tablet pc HP
- Tablet pc Motorola
- Tablet pc Toshiba
- Tablet pc Lenovo
- Tablet pc Maxell
- Tablet pc Hannspree
- Tablet pc Medion
- Tablet pc Huawei
- Tablet pc Parrot
- Tablet pc PocketBook
- Tablet pc Yarvik
- Tablet pc Vtech
- Tablet pc Fellowes
- Tablet pc Alcatel
- Tablet pc Aiptek
- Tablet pc Viewsonic
- Tablet pc Polaroid
- Tablet pc Vodafone
- Tablet pc Overmax
- Tablet pc Archos
- Tablet pc ZTE
- Tablet pc Amazon
- Tablet pc Orion
- Tablet pc BlackBerry
- Tablet pc VIZIO
- Tablet pc Airis
- Tablet pc Bq
- Tablet pc Lexibook
- Tablet pc Prestigio
- Tablet pc Kogan
- Tablet pc Media-Tech
- Tablet pc Schaub Lorenz
- Tablet pc Xiron
- Tablet pc A-Rival
- Tablet pc A.C.Ryan
- Tablet pc Allview
- Tablet pc Tomtec
- Tablet pc Maxdata
- Tablet pc Sunstech
- Tablet pc Wolder
- Tablet pc Evga
- Tablet pc ATT
- Tablet pc Ricatech
- Tablet pc Mpman
- Tablet pc Logicom
- Tablet pc Peaq
- Tablet pc Iriver
- Tablet pc Ingo
- Tablet pc Difrnce
- Tablet pc Hipstreet
- Tablet pc Cmx
- Tablet pc Klipad
- Tablet pc Iget
- Tablet pc Memup
- Tablet pc Qware
- Tablet pc Odys
- Tablet pc Eken
- Tablet pc Zipy
- Tablet pc HKC
- Tablet pc Woxter
- Tablet pc Storage Options
- Tablet pc Ninetec
- Tablet pc Hiteker
- Tablet pc SIM
- Tablet pc Kurio
- Tablet pc Mustek
- Tablet pc Bluetech
- Tablet pc Viewpia
- Tablet pc Handheld
- Tablet pc I-onik
- Tablet pc Velocity Micro
- Tablet pc KLIVER
- Tablet pc Empire Electronix
- Tablet pc Smartak
- Tablet pc Wintec
- Tablet pc Storex
- Tablet pc Skytex
- Tablet pc Sensation
- Tablet pc Visual Land
- Tablet pc GPCT Mid
- Tablet pc Motion Computing
- Tablet pc Vinci
- Tablet pc IONIK
- Tablet pc Smartbook
- Tablet pc Axxion
- Tablet pc Latte
- Tablet pc Wondermedia
- Tablet pc PENTAGRAM
- Tablet pc Telekom
- Tablet pc Lenovo A8-50
- Tablet pc Tobii
- Tablet pc Time2
- Tablet pc Synchro Digital
- Tablet pc Time 2
- Tablet pc Diversen
- Tablet pc NuVision
- Tablet pc Ice-Phone
Nyeste Tablet pc Manualer
5 Oktober 2024
4 Oktober 2024
26 September 2024
26 September 2024
26 September 2024
23 September 2024
23 September 2024
22 September 2024
22 September 2024
17 September 2024