Grundig 32 VLE 6220 BH Manual
Grundig
televisión
32 VLE 6220 BH
Læs nedenfor 📖 manual på dansk for Grundig 32 VLE 6220 BH (136 sider) i kategorien televisión. Denne guide var nyttig for 23 personer og blev bedømt med 4.5 stjerner i gennemsnit af 2 brugere
Side 1/136
LCD TV
32 VLE 6220 BH
EN

ENGLISH
2
CONTENTS
-------------------------------------------------------------------------------------------------------------------------------------
4 SETUP AND SAFETY
6 GENERAL INFORMATION
6 Special features of your television set
7 Receiving digital channels
7 Important notes on environmental
protection
7 Notes on still images
8 CONNECTION AND PREPARATION
8 Connecting the antenna and power cord
9 Inserting batteries into the remote control
10 OVERVIEW
10 Connections on the television set
11 Controls on the television set
12 The remote control – Main functions
13 The remote control –
All functions
14 SETTINGS
14 Initial set-up and tuning television
channels
14 Selecting language, country and
operating mode
15 Tuning terrestrial television channels
(DVB-T)
15 Tuning television channels from the cable
provider (DVB-C)
16 Changing the program table for the
digital channels
19 Picture settings
20 Sound settings
22 TELEVISION - OPERATION
22 Basic functions
23 Zoom function
23 Eco mode
24 Zapping function
24 Electronic TV guide
25 Changing the picture format
26 SMART INTER@CTIVE TV AND
HOME NETWORK
26 What is Smart Inter@ctive TV
26 Network connection
26 Wired network
32 Smart Inter@ctive TV internet applications
34 Playback the video, music and image files
with home network connection
35 vTuner internet radio
36 USB OPERATION
36 File formats
37 Connecting external
data media
38 The file browser
38 Settings in the USB setup menu
39 Basic playback functions
40 Additional playback
functions
42 TELETEXT OPERATION
42 TOP text or FLOF text mode
42 Additional functions
43 INTER TIVE PORTAL (HBBAC TV)
43 What is HbbTV?
43 Additional functions for video sequences
44 CONVENIENCE FUNCTIONS
44 Opening the SETTINGS menu
44 Language settings
45 Setting the date and time
45 Timer settings
46 Parental control settings
47 Updating software (OAD)
47 Updating software (Online)
47 Restoring the television to the default
settings

3
ENGLISH
CONTENTS
-------------------------------------------------------------------------------------------------------------------------------------
48 OPERATION USING EXTERNAL
DEVICES
48 DIGI LINK
48 The DIGI LINK functions on your television
49 Device operation
50 High definition HD ready
50 Connection options
51 Connecting external devices
52 Using a DVD player, DVD recorder,
video recorder
or set-top box
52 Headphones
53 Hi-fi System
55 OPERATION AS A PC MONITOR
55 Connecting a PC
55 Selecting presets for the PC
55 Settings for PC mode
56 OPERATION WITH A COMMON
INTER EFAC
56 What is a Common Interface?
56 Inserting the moduleCA
56 Access control for CI module and
smart card
57 SPECIAL SETTINGS
58 Searching for terrestrial digital
TV channels automatically
59 Searching for terrestrial digital
TV channels manually
60 Tuning analogue television channels
61 Changing stored analogue channels
63 INFORMATION
63 Displaying signal information
64 Technical data
65 Service information for dealers
65 Environmental note
66 Troubleshooting

ENGLISH
8
CONNECTION AND PREPARATION
-----------------------------------------------
Connecting the antenna and power cord
1a
To receive terrestrial digital broadcasters
(DVB-T) connect the cable for the rooftop
or indoor antenna (passive or active indoor
antenna with its own power supply) to the an-
tenna socket » « on the television set;
ANT IN
or
1b To receive digital cable channels (DVB-C)
connect the cable for the rooftop antenna
to the antenna socket » « on the
ANT IN
television set;
or
1c To receive analogue TV channels, connect
the cable for the rooftop antenna to the an-
tenna socket » « on the television set
ANT IN
Note:
7
When connecting an indoor antenna you
may have to try it out at different positions
until you the best reception.get
2 Plug the power cord into a wall socket.
Note:
7
Do not plug in the power cord of the device
until you have connected the external equip-
ment and the antenna.
7
Only use the power cord supplied to connect
the television set to a suitable earthed safety
socket.
7
Do not use an adapter plug or extension
lead which does not meet the applicable
safety standards. Do not tamper with the
power cord.
1
2

9
ENGLISH
Inserting batteries into the
remote control
CONNECTION AND PREPARATION
-----------------------------------------------
1 Open battery the compartment by removing
the lid.
2
Insert the batteries (2 x 1.5 V micro, for
example R03 or AAA). Observe the po-
larity marked in the bottom of the battery
compartment.
3 Close the battery compartment.
Note:
7
If the television no longer reacts properly
to remote control commands, the batteries
may be flat. Always remove used batteries.
7
The manufacturer accepts no liability for
damage caused leaking batteries.by
Environmental note
7 This symbol on recharge-
able batteries/batteries or
on the packaging indicates
that the rechargeable bat-
tery/battery may not be disposed of with
regular household rubbish. For certain
rechargeable batteries/batteries, this sym-
bol may be supplemented a chemical by
symbol. Symbols for mercury (Hg) or lead
(Pb) are provided if the rechargeable batter-
ies/batteries contain more than 0.0005%
mercury or more than 0.004% lead.
Rechargeable batteries/batteries, including
those which do not contain heavy metal,
may not be disposed of with household
waste. Always dispose of used batteries
in accordance with local environmental
regulations. Make enquiries about the appli-
cable disposal regulations where you live.

ENGLISH
10
OVERVIEW
------------------------------------------------------------------------------------------------------------------------------------
Connections on the television set
AV1 / S-VHS SCART socket (CVBS signal,
RGB signal);
Video and sound socket for
S-Video camcorder.
COMPONENT
Y P Pb r Sockets for video input
(YUV signal).
Sockets for audio input
L R
(YUV signal).
Optic Out Socket for audio output
(optical) for PCM/AC3
signals.
For connecting digital AV
amplifiers or receivers.AV
AUDIO OUT L R Sockets for audio output.
Audio Socket for audio
input for a PC.
PC-IN VGA socket, video input
for PC.
ANT IN Antenna socket for a DVB-T,
DVB-C and analogue
antenna.

11
ENGLISH
OVERVIEW
------------------------------------------------------------------------------------------------------------------------------------
HDMI2 (ARC) HDMI socket,
audio/video input.
HDMI3 HDMI socket,
audio/video input.
HDMI4 HDMI socket,
audio/video input.
USB2 (HDD) USB socket for external
data media
LAN Network cable connection
socket.
U Headphone jack (3.5 mm
jack plug);
Sockets for audio output.
AV2
Video
Video socket for
camcorder
Audio socket for
L R
camcorder.
USB1 USB socket for external
data media without a power
supply of their own and
PVR function.
HDMI1 HDMI socket,
audio/video input.
CI Common Interface Slot.
Controls on the television set
8/I
Switches the television on and
back into standby mode.
V– V+ Adjusts the volume;
selects menu functions.
MENU Opens the menu.
Select a menu option with
» « or » «.
P+ P–
Activate the function with
» «.
V+
Confirm the function with
» « or » «..
V+ V–
Press » « to quit the menu.MENU
SOURCE Opens the pre-selection for
AV channels.
In the menu, press » « or » «
P+ P–
to select and press » « to SOURCE
confirm.
P– P+ Switches the television on from
standby;
selects channels in steps;
selects function in the menu.

ENGLISH
12
OVERVIEW
------------------------------------------------------------------------------------------------------------------------------------
The remote control – Main functions
Switches on and off
(Standby).
Opens menu for channels AV
and USB input.
Then select using »
V
«, »
<
«,
»
>
« or »
Λ
« and press
» «OK
to confirm.
Muting
Opens the »PRnP« menu.
Zapping function;
switches back one menu
level in the menus.
Opens the main menu.
Opens the TOOLS menu.
Switches between
teletext and TV mode;
opens/closes the control
menu when playing a file in
DLNA menu.
Opens the electronic
TV guide.
Switches on from standby;
Selects channel – in steps.
Adjusts the volume.
Navigation in the menus
Moves the cursor up
and down in the menus.
Moves the cursor to the left and
right in the menus.
Activates various functions and
save functions/settings.
Displays information.
Opens the Smart inter@ctive
menu.
Opens the channel list.
Switches on from standby;
Selects channel – directly.
Selects the channel list
(»All«, »FAV 1« to »FAV 4«).

13
ENGLISH
OVERVIEW
------------------------------------------------------------------------------------------------------------------------------------
The remote control –
All functions
@ Opens the Smart inter@ctive menu.
y (red) Selects pages in teletext;
yy (green) Selects/activates various functions
yyy (yellow) in the menus.
yyyy (blue)
5 Selects different audio settings;
Switches to double character size
in teletext;
Selects the next title/next picture in
the file browser.
6 Selects different picture settings;
Refreshes a teletext page;
Selects the previous track/previous
picture in the file browser.
3
Stops scrolling through pages in
teletext;
Starts a fast reverse search in the
file browser.
4
Selects the channel list ( »All«,
»FAV 1« to »FAV 4«);
Reveals answers in teletext;
Starts a fast forward search in the
file browser.
8 Starts playing a programme from
an external data medium;
Starts playing in DLNA and vTuner
menu.
! Freeze frame, if no external data
medium is connected;
Playback pause;
Pauses the file being played in
DLNA and vTuner menu.
7 Ends playback of a programme
from an external data medium;
Splits the screen in teletext;
Ends playing in DLNA and vTuner
menu.
Selects different audio languages
(only for digital television chan-
nels)
Selects different subtitles
(only for digital television chan-
nels)
Note:
7 Your TV supports remote control feature
for Apple iPhones and Android phones.
Depending on the features of your TV,
you may control your your phone TV by
after downloading the free »GRUNDIG
TV Remote« application from Apple App.
Store or Android Market and install it on the
Apple iPhone/Android phone.

ENGLISH
14
SETTINGS
-----------------------------------------------------------------------------------------------------------------------------------------
Initial set-up and tuning
television channels
The television set is equipped with automatic
channel , search which searches for terrestrial
channels channels (DVB-T), cable (DVB-C) and
analogue channels.
You start the search and the television channels
will be stored into the Program Table. Following,
you can sort the television -channels in the Pro
gram Table.
For DVB-T and DVB-C channels presets, 1000
and 99 presets for analogue channels.
The various settings
Depending on the type of antenna connected,
you can decide which channels you would like
the television to search for.
7
Tunes digital terrestrial television channels, on
page .15
7
Tunes digital television channels from the
cable provider, on page .15
7
Tunes analogue television channels, in the
chapter “Special functions”, starting on
page 60.
7
Further settings for digital television -chan
nels after initial set-up can also be the found
in “Special Settings”, on the chapter starting
page .57
Note:
7
M ake the language and country selection for
all types, then continue reading the respective
chapter.
Selecting language, country and
operating mode
1 Switch on the television set from standby with
»8«, » « or » « or » «.1…0 P+ P-
–
During initial set-up, the »Installation Guide«
will be displayed.
Help:
7
If this menu is not displayed, restore the
television set to its default settings (see
page ).47
2 Select the menu language with »
<
«, »
>
«,
»
V
« or »
Λ
« and press
» «OK
to confirm.
3 Select the mode with »
<
« or »
>
« and press
» «OK
to confirm.
– The settings used in »Home Mode« help to
save energy.
–
Alternatively, the menu item »Shop Mode«
can be selected which the retailer can use
for demonstrating the device functions.
Note:
7
End the »Shop Mode« by restoring the televi-
sion set to its default settings (see page ).47
4 Select the country in which the television set
is operated with »
<
«, »
>
«, »
V
« or »
Λ
« and
press
» «OK
to confirm.
– The »Source Setup« menu appears with the
»Connection Type« line marked.
Note:
7
You can find a description of how to tune
the television channel of your choice – de-
pending on the antenna connected – in the
following chapters.

15
ENGLISH
SETTINGS
-----------------------------------------------------------------------------------------------------------------------------------------
Tuning terrestrial television
channels (DVB-T)
1 In the »Source Setup« menu, in the »Connec-
tion Type« line, select the option »Air« with
»
<
« or »
>
«.
2 Select the line »Scan Type« with »
V
« or
»
Λ
«.
Use »<« or »>« to set the required scan
type:
– »DTV«, scan for digital television channels;
– »ATV«, scan for analogue television
channels;
–
»ATV & DTV«, scan for analogue and
digital television channels.
Caution:
7
The antenna power supply (5V ) may only
be switched on if the antenna is an active
indoor antenna with a signal amplifier and it
is not already supplied with a voltage via a
mains plug (or similar supply). Otherwise
you may cause a short circuit and irrepara-
bly damage your antenna.
3
Select the line »Active Antenna Power« with
»
V
«
or »
Λ
«.
Switch on the antenna power supply for the
antenna with »
<
« or »
>
« (»On«).
4 Start the scan with »yy« (green).
– The »Search Results« menu appears, and
the search for TV channels begins.
– Depending on the number of television
channels received, this can easily take a
few minutes.
– The scan is complete as soon as »PRO the -
GRAM appears. TABLE«
Note:
7
You can abort the scan pressing by
» «.
MENU
5 MENU
Press » « to end the setting.
Note:
7
Before recording HD channels, please
check signal quality and Strength, see
chapter "Displaying signal information" on
page 63. If the level is displayed in green,
you can record HD channels without any
problems.
Tuning television channels from
the cable provider (DVB-C)
1 In the »Source Setup« menu, in the »Connec-
tion Type« line, select the option »Cable«
with »
<
« or »
>
«.
2 Select line »Scan the Type« »with
V
« »or
Λ
«.
Use »<« or »
>« to set the required scan type:
– »DTV«, scan for digital television channels;
– »ATV«, scan for analogue television channels;
–
»ATV & DTV«, scan for analogue and
digital television channels.
3 Select the line »Cabel Scan Type« with »
V
«
or »
Λ
«. Select the preferred option (»Quick«
or »Full«) with »
<
« or »
>
«.
– The search function »
Quick
« sets up the
channels according to the information pro-
vided your cable provider in the trans-by
mission signal.
– If the option »Full« is selected, the entire
frequency range will be scanned. The
search can take a long time with this op-
tion. This option is recommended if your
cable provider does not support the scan
type
»
Quick
«
.
Note:
7
You can accelerate the search. do this, To
you need information about the frequency
and
network ID. You are usually able to get
this data from your cable operator or find it
in forums on the Internet.
4 Start the scan with »yy« (green).
–
The »Search Results« menu appears, and
the search for TV channels begins.
– Depending on the number of television
channels received, this can easily take a
few minutes.
– The scan is complete as soon as the -»PRO
GRAM appears. TABLE«
Note:
7
You can abort the scan pressing by
» «.
MENU
5 MENU
Press » « to end the setting.
Note:
7
Before recording HD channels, please check
signal quality and Strength, see chapter
"Displaying signal information" on page 63 .
If level is displayed in green, can the you
record HD channels without any problems.
ENGLISH
16
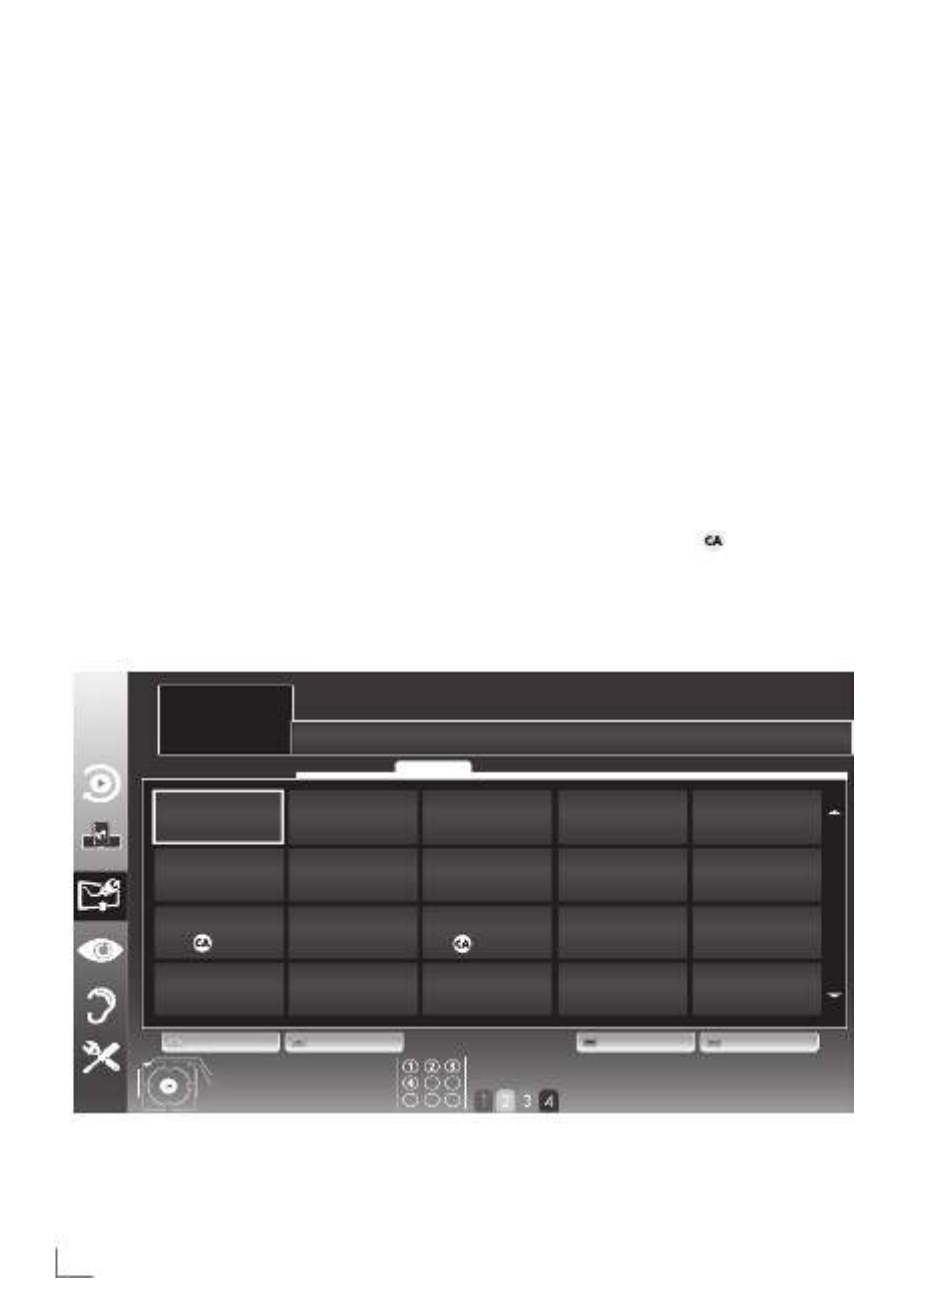
Changing the program table for
the digital channels
Channels which are using scan are found the
saved in the »PROGRAM TABLE«.
You can delete channels which are not required
from programe can the , table you change the
order of channels within the programe table and
lock individual channels (Parental control).
You can also add channels to the favourites list;
in addition, can order of you change the -chan
nels within the favourites list.
With »yy« (green) you can display the channels
which belong to one network.
Switch to the next page in the programe table
with » « and to the previous page with » «.
P+ P-
With »yyy« (yellow) you can open the »LIST
MANAGEMENT« within the programe table.
In List Management can create this you your
own favourites lists.
With »yyyy« (blue) you can sort the channels ac-
cording different criteria.
Selecting channel lists
1 MENU
Open the menu with » «.
2 Select the »SOURCE SETUP« menu with »
V
«
or »
Λ
« and press
» «OK
to confirm.
– The »SOURCE SETUP« menu appears.
3 Select line the »Programe Table« »with
V
«
or »
Λ
« and press
» «OK
to confirm.
– The menu »PROGRAM TABLE« appears.
Important:
7
Programe table and favourites lists are
saved separately according to the different
input sources (cable, air).
7
When opening programme table, the the
respective channel list for the current input
signal appears.
Note:
7
If in the Program Table appears added
to the name of the channel, you need a
CI module and a Smart-Card for watching
these channels.
SETTINGS
-----------------------------------------------------------------------------------------------------------------------------------------
!""#$%"&'%()"*#
#+,
"-""&./%012%
#+,
!!""*#"!
"""#+,
!-""+,"345'(
"""#+,
6""7#8"*#
#+,
9""$'()
#+,
!6"":.;)
"""#+,
!9""3$(<=
"""#+,
>""$'()"*#
#+,
=""0?5)/.@
#+,
!>""8.1A
"""#+,
!=""3BC
"""#+,
D""E6D
#+,
F""+)%(GH
#+,
!D""0'5A5
"""#+,
!F""+,-
"""#+,
I""&./%;)%(.J$1
#+,
!K""LEMN&"*#
"""#+,
!I""345'(!
"""#+,
6K""+,I
"""#+,
ME3+L::L+MOE
0HOPHLQ"+LR:&
&S.( LSS"+5"8$J<E)(T5'U 35'(
&@.(
R$VU
E)(T5'U"L::
3)1)V("8$J5'.()
3)'J.V) L::

17
ENGLISH
SETTINGS
-----------------------------------------------------------------------------------------------------------------------------------------
Deleting channels
1
In the
»PROGRAM TABLE«
menu, select the
Edit mode pressing by
»y« (red)
.
2
Select the television channel to be deleted
with
»
V
«, »
Λ
«
,
»
<
« or »
>
«
and press
»yyy«
(
yellow
) to delete.
Note:
7
You can delete all channels with »yyyy«
(blue).
3 Confirm the deletion process with »yy«
(green);
or
cancel the deletion process with »y« (red);
4 MENU Quit the program table with » «.
Change the order of the channels in
the program table
1
In the
»PROGRAM TABLE«
menu, select the
Edit mode pressing by
»y« (red)
.
2 Select the channel which should be moved
with »
V
«, »
Λ
«, »
<
« or »
>
« and mark it with
»y« (red).
3 Move the channel to its new position with
»
V
«, »
Λ
«, »
<
« or »
>
« and press
» «OK
to
confirm.
Note:
7
Repeat steps and if you would like to 2 3
change other channels.
4 MENU Quit the program table with » «.
Skipping channels
You can mark television channels which should
be when selecting with skipped »
Λ
« »or
V
«.
It is still possible to select them using the number
buttons.
1 In the »PROGRAM TABLE« menu, switch
over to the list view with »yyy« (yellow).
2 Select the preferred channel with »
V
«
or »
Λ
«.
3 Select the column »Skip« with »
<
« or »
>
«
and use
» «OK
to mark the channel.
– The channel is marked » «.by
4 MENU
Quit the program table with » «.
Note:
7
Channels can also be reactivated. Select the
channel with »
V
« or »
Λ
«, then select the
column »Skip« and reactivate the channel
with
» «OK
.
Creating lists of favourites
You can save your favourite channels in up to
four favourites lists (FAV 1 to 4).FAV
Notes:
7
Favourites lists must be created separately
for all input sources (cable, air).
7
You can select the favourites list pressing by
»
FAV
«.
1 In the »PROGRAM TABLE« menu, switch
over to the list view with »yyy« (yellow).
2 Select the channel of your choice with »
V
«
or »
Λ
«.
3 “Push” the channel into the favourites
lists 1 to 4 with »
<
« or »
>
« and press
» «OK
to confirm.
– The position in the favourites list is marked
with » «.
– You can enter the same channel in more
than one favourite list.
–
Each favourite list can store up to 255
channels.

ENGLISH
18
Note:
7
Channels can also be deleted from the
favourites lists. Select
the
channel to be
deleted with »
V
«, »
Λ
«, »
<
« or »
>
«
and
press
» «OK
to delete it.
7
When deleting a channel from the favourites
list, the order within the favourites list will be
updated.
4 MENU Quit the program table with » «.
Sorting channels in the favourite list
You can change the order of channels in the
favourites list.
1 In the »PROGRAM TABLE« menu, select the
favourites list » « to » «.
1 4
2 Select the channel which should be moved
with »
V
«, »
Λ
«, »
<
« or »
>
« and mark it with
»y« (red).
3 Move the channel to its new position with
»
V
«, »
Λ
«, »
<
« or »
>
« and press
» «OK
to
confirm.
Notes:
7
Repeat steps and if you would like to 2 3
change other channels within the same
favourites list.
7
Repeat steps to if you would like to 1 3
change channels in a different favourites list.
4 Exit the current favourites list with »yyyy«
(blue).
– The entire programe table will appear
again.
5 MENU Quit the program table with » «.
SETTINGS
-----------------------------------------------------------------------------------------------------------------------------------------
Enter own names for the favourites
lists (max. 6 characters)
You can enter own names for all favourites lists.
1 In the »PROGRAM TABLE« menu, switch over
to the list view with »OOO« (yellow).
2 1 Select the desired favourites list with » « till
» «.
4
– The Favorite Name screen is displayed.
3 Delete the „old“ name (FAV1), for this
purpose select with »
V
«, »
Λ
«, »
<
« and
»
>
« the push button » « and delete the x
character with »OK«.
4 Select the required character/numeric with
»
V
«, »
Λ
«, »
<
« and »
>
« and confirm with
»OK«.
Repeat the procedure for further characters/
numerics.
– Select » « for uppercase and » «
ABC abc
for lower case and confirm with »OK«.
– Select » « for numbers and
?@123
symbols and confirm with »OK«.
5 Confirm the new name, select the push
button » « with »
Submit
V
«, »
Λ
«, »
<
« or
»
>
« and confirm with »OK«.
6 MENU Press » « to end the seting.

19
ENGLISH
SETTINGS
-----------------------------------------------------------------------------------------------------------------------------------------
Picture settings
1 MENU
Open the menu with » «.
2 Select the menu item »PICTURE SETTINGS«
with »
V
« or »
Λ
« and press
» «OK
to confirm.
– The »PICTURE SETTINGS« menu appears.
Picture(Mode User
Brightness 50
Sharpness 75
Colour(Temperature
DNR
Normal
Off
Contrast 100
Colour 65
MPEG(NR Off
Exit
Back
PICTURE(SETTINGS
Advanced(Tuning
20.09.2010
15:46
3 Select the line »Picture Mode«, »Bright-
ness«, »Contrast«, »Sharpness«, »Colour«, or
»Colour Temperature« with »
V
« or »
Λ
«.
Select the value with »
<
« or »
>
« and press
» «OK
to confirm.
Notes:
7
When changing the values with »
<
« or »
>
«,
the screen will be split. You can see the
current picture value on the left side, the
new setting on the right side.
7
In the »PICTURE SETTINGS« menu you can
also find other additional settings.
4 Select the line »DNR«, »Mpeg NR«, »Vibrant
Colour«, »Perfect Clear«, »Film Mode«,
»Gamma«, »Dynamic Contrast«, »Dynamic
Backlight«, »Backlight« or »MEMC« with
»
V
« or »
Λ
«.
Select the value with »
<
« or »
>
« and press
» «OK
to confirm.
Notes:
7
You can only select the »Mpeg NR« function
on digital and presets.AV
»Mpeg NR« reduces any interference
from artefacts (pixel blocks) from digital
programmes due to MPEG compression
(such as from DVB-T receivers or
DVD players).
7
The »Film Mode« detects and processes
feature films automatically for all channel
sources. This means you will always receive
an optimal picture.
This functions in the modi 480i, 576i and
1080i in TV playback and for other channel
sources.
If the »Film mode« is switched on for
programmes without a feature film signal,
minor problems such as picture freeze,
defective subtitles or fine lines in the picture
could occur.
7
The function »Dynamic Contrast« adapts the
contrast dynamically and optimally for the
respective picture content.
7
With »Dynamic Backlight«, the device
optimally adapts the background lighting to
the picture content.
7
The »Backlight« can only be set manually
when the function »Dynamic Backlight« is
deactivated.
7
»MEMC« will only appear in menus of LCD
products with 200 Hz PPR Feature and LED
products with 400 Hz PPR feature..
5 MENU Press » « to end the setting.

ENGLISH
20
SETTINGS
---------------------------------------------------------------------------------------------------------------
Sound settings
1 MENU
Open the menu with » «.
2 Select the menu item »SOUND SETTINGS«
with »
V
« or »
Λ
« and press
» «OK
to confirm.
– The »SOUND SETTINGS« menu appears.
Volume 10
Balance
Sound/Type/ Stereo
SRS/Sound/Preset
Headphone
Audio/Output/Setup
Sound/Mode SRS/TS/HD
Speech
20
End
Back
SOUND/SETTINGS
External
Accessibility/Settings
20.09.2010
15:46
Note:
7 Additional operations are explained in the
following sections.
Volume
1 Select the line »Volume« with »
V
« or »
Λ
«
and change the setting with »
<
« or »
>
«.
Balance
1 Select the line »Balance« with »
V
« or »
Λ
«
and change the setting with »
<
« or »
>
«.
Automatic volume
Television stations broadcast at different -vol
umes. The automatic limiting (AVL) func volume -
tion means is same when the volume kept the
you switch between channels.
1 Select the line »AVL« with »
V
« or »
Λ
« and
select the option »On« with »
<
« or »
>
«.
Note:
7 If the »SRS TS HD« setting has been selected
in the »Audio Mode« line, the AVL line
cannot be selected.
Stereo/two channel sound, mono
If device two-channel-sound pro the receives -
grammes, e.g. a film with the original soundtrack
on audio channel B (display: »Dual II«) and
the A -dubbed version on sound channel (dis
play: »Dual I«), you can select the audio channel
you prefer.
If device the receives stereo or Nicam pro-
grammes, it switches automatically to stereo
sound (display: »Stereo«).
You can switch the sound to »Mono« if the stereo
sound quality is poor.
1 Select the line »Audio Type« with »
V
« or
»
Λ
« and adjust the setting with »
<
« or »
>
«.
Stereo width
This broadens sound output the for stereo -pro
grammes and improves sound with mono the
reception.
1 Select the line »Audio Mode« with »
V
«
or »
Λ
«.
2 Select the option »Spatial« with »
<
« or »
>
«.

21
ENGLISH
Soundeffects
This menu offers three preset sound effects
(Music, Natural and Speech) and one setting to
be created you (User).by
1 Select the line »Sound Preset« with »
V
« or
»
Λ
«.
2 Select the sound effect »Music«, »Natural«
or »Speech« pressing »by
<
« or »
>
«.
Note:
7 »User« option is active when »Sound mode«
setting is selected as »Normal or »Spatial«.
SRS TruSurround HD
SRS HD is patented audio TruSurround a -tech
nology which is integrated into the television set
and only built-in to requires the speakers -gener
ate a Surround Sound effect.
1 Select the line »Sound Mode« with »
V
«
or »
Λ
«.
2 Select the option »SRS HD« with »TS
<
« or
»
>
«.
3 Select the line »SRS Sound Preset« with »
V
«
or »
Λ
«.
4 Select the sound effect »Music«, »Natural«
or »Speech« with »
<
« or »
>
«.
SETTINGS
---------------------------------------------------------------------------------------------------------------
Equalizer
Equalizer offers sound setting ”User” a that you
can create.
Equaliser appears in menu when »Sound the
mode« is selected as »Spatial« or »Normal«,
and »Sound Medium« as »User«.
1 Select »Equalizer« with »
V
« or »
Λ
« and
press
» «OK
to confirm.
The »EQUALIZER« menu appears.
Note:
7 If the »SRS TS HD« setting has been selected
in the »Sound Mode« line, the »Equalizer«
line will not indicate.
2 Select the frequency bandwidth »120Hz«
with »
V
« or »
Λ
«.
Set the preferred value with »
<
« or »
>
«.
3 Set the next frequency bandwidth with »
V
«
or »
Λ
« and repeat the setting.
4 Press »
<« to save the setting.
Audio description (Audio subtitles)
Audio description is an additional audio channel
for visually-impaired are persons. Descriptions
provided of activities, surroundings, of changes
scene, gestures and actors' facial expressions.
This audio is transmitted simultaneously channel
with the normal sound on digital channels. Avail-
ability depends on the respective channel and
broadcaster.
1 Select the line »Audio Description« with »
V
«
or »
Λ
« and select the option »On« with »
<
«
or »
>
«.
2 Select the line »Volume« with »
V
« or »
Λ
«
and change the volume with »
<
« or »
>
«.
Exiting the setting
1 MENU Press » « to end the setting.
* Under licence from SRS Labs, Inc. TruSurround HD,
SRS and the
symbol are trademarks of
SRS Labs, Inc.

23
ENGLISH
Audio settings
Various audio settings are available.
1 Open the Tools menu with » «.TOOLS
2 Select the menu item »Sound Preset« with
»
V
« or »
Λ
«.
3 Select the audio setting »User«, »Music«,
»Natural« or »Speech« pressing »by
<
« or
»
>
«.
– You can change the »User« audio setting
– see the “Soundeffects” chapter on page
21.
Note:
7 »User« option is active when »Sound mode«
setting is selected as »Normal or »Spatial«.
Audio language
Various -languages are available on digital tele
vision channels. This depends on the programme
being broadcast.
1 Open the selection menu with » «.
2 Select the language by pressing »
V
« or »
Λ
«
and press
» «OK
to confirm.
Subtitles
Various -subtitles are available on digital televi
sion This depends on programme channels. the
being broadcast.
1 Open the selection menu with » «.
2 Select the subtitles with »
V
« or »
Λ
« and
press
» «OK
to confirm.
TELEVISION - OPERATION
----------------------------------------------------------------------
Zoom function
This function allows to enlarge picture you the
as required.
1 Open the Tools menu with » «.TOOLS
2 Select the menu item »Zoom« with »
V
« or
»
Λ
«.
3 OKPress » « repeatedly to enlarge the
display in three steps.
Eco mode
This function allows to power you reduce the
consumption.
1 Open the Tools menu with » «.TOOLS
2 Select the menu item »Eco TV« with »
V
« or
»
Λ
«.
3 Switch on the Eco mode with »
<
« or »
>
«.
4 Switch the Eco mode off again with »
<
« or
»
>
«.

ENGLISH
24
TELEVISION - OPERATION
----------------------------------------------------------------------
Zapping function
This function are remembers the channel you
currently watching while you switch over to other
ones (zapping).
1 1…0 P+ P– Press » « or » «, » « to select the
channel to be stored in the zapping memory
and press »<« to confirm.
2 1…0 Press » « or »
Λ
«, »
V
« to switch to
another television channel.
3 Press »<« to switch between the saved tel-
evision channel and the last television chan-
nel viewed.
4 MENUEnd the function with » «.
Electronic TV guide
The electronic guide provides an overview of TV
all programmes that will be broadcast in the next
week (for digital channels only).
1
Press
» «GUIDE
to display channel informa-
tion.
Notes:
7 Not all channels supply provide a detailed
TV guide.
7 Many broadcasters transmit the current
schedule, but do not offer detailed descrip-
tions.
7 There are broadcasters which do not pro-
vide any information at all.
2 Press »
V
« or »
Λ
« to select a television
channel.
– Today's programmes on the television
channel selected are displayed.
3 Switch to the information about the current
programme with »
>
«.
Notes:
7 You can open and switch off the extensive
programme information with » «.?
7 You can can added the selected broadcast
to the memory timer pressing by
» «OK
.
4 Press »
V
« to select information on the next
programme and, »
Λ
« to return to the infor-
mation for the current programme.
5 Select programmes on over the coming days
with »
yy
« (green), and switch back to the cur-
rent day with »
y« (red).
6 Switch back to the channel selection with
»
<
«.
Note:
7 Filter for certain programmes with »
yyyy
«
(blue), select the channel type with »
<
«,
»
>
«, »
V
« or »
Λ
« and press
» «OK
to con-
firm. Programmes which match the selected
channel type are displayed.
7 Quit the electronic TV guide with » «.MENU
Produkt Specifikationer
| Mærke: | Grundig |
| Kategori: | televisión |
| Model: | 32 VLE 6220 BH |
Har du brug for hjælp?
Hvis du har brug for hjælp til Grundig 32 VLE 6220 BH stil et spørgsmål nedenfor, og andre brugere vil svare dig
televisión Grundig Manualer

15 Januar 2025
15 Januar 2025
15 Januar 2025
15 Januar 2025
30 December 2025
30 December 2025
30 December 2025
8 December 2024
8 December 2024
8 December 2024
televisión Manualer
- televisión SilverCrest
- televisión Acer
- televisión Denver
- televisión Sencor
- televisión TCL
- televisión Sony
- televisión Siemens
- televisión Samsung
- televisión Panasonic
- televisión VOX
- televisión Philips
- televisión Lenco
- televisión OK
- televisión LG
- televisión AEG
- televisión Pioneer
- televisión Mitsubishi
- televisión Sharp
- televisión Daewoo
- televisión Arçelik
- televisión AOC
- televisión Sanyo
- televisión Nikkei
- televisión Toshiba
- televisión Pyle
- televisión Furrion
- televisión Lenovo
- televisión Infiniton
- televisión Nedis
- televisión Logik
- televisión Abus
- televisión Optoma
- televisión Westinghouse
- televisión Element
- televisión Thomson
- televisión Hyundai
- televisión Aiwa
- televisión Nokia
- televisión Casio
- televisión AKAI
- televisión Hisense
- televisión Strong
- televisión Brandt
- televisión Hannspree
- televisión Trevi
- televisión Blaupunkt
- televisión JVC
- televisión BEKO
- televisión Uniden
- televisión Clatronic
- televisión Hitachi
- televisión Medion
- televisión Sweex
- televisión Citizen
- televisión Megasat
- televisión Haier
- televisión TechniSat
- televisión Innoliving
- televisión NewStar
- televisión Bang And Olufsen
- televisión Luxor
- televisión Vivax
- televisión Loewe
- televisión Walker
- televisión Sunny
- televisión Finlux
- televisión Telefunken
- televisión Kernau
- televisión BenQ
- televisión Packard Bell
- televisión Xiaomi
- televisión Peerless-AV
- televisión Krüger&Matz
- televisión Viewsonic
- televisión Schneider
- televisión Fujitsu
- televisión Oppo
- televisión Zalman
- televisión Tesla
- televisión Polaroid
- televisión NEC
- televisión TERRIS
- televisión OKI
- televisión MT Logic
- televisión Yasin
- televisión Bush
- televisión Dual
- televisión Aspes
- televisión Salora
- televisión Sagem
- televisión Nevir
- televisión Teac
- televisión Nextbase
- televisión Techwood
- televisión Vivo
- televisión Albrecht
- televisión SVAN
- televisión Sogo
- televisión Alba
- televisión RCA
- televisión ECG
- televisión AudioSonic
- televisión Manhattan
- televisión Proline
- televisión JGC
- televisión Orion
- televisión ITT
- televisión ILive
- televisión Intenso
- televisión Fantec
- televisión Cecotec
- televisión Roadstar
- televisión VIZIO
- televisión XD Enjoy
- televisión Wharfedale
- televisión Technika
- televisión Seiki
- televisión TechLine
- televisión Monster
- televisión Bauhn
- televisión V7
- televisión Airis
- televisión Majestic
- televisión Star-Light
- televisión Vestel
- televisión Continental Edison
- televisión Iiyama
- televisión RevolutionHD
- televisión GPX
- televisión CHiQ
- televisión MBM
- televisión Orima
- televisión SereneLife
- televisión Lexibook
- televisión AG Neovo
- televisión Philco
- televisión Kunft
- televisión GoGen
- televisión Kogan
- televisión Graetz
- televisión Emerson
- televisión Kemo
- televisión Insignia
- televisión Xoro
- televisión Manta
- televisión SunBriteTV
- televisión JTC
- televisión Reflexion
- televisión Planar
- televisión QBell Technology
- televisión SYLVOX
- televisión Dyon
- televisión Schaub Lorenz
- televisión Daitsu
- televisión Xiron
- televisión Alden
- televisión Alphatronics
- televisión Aldi
- televisión Allview
- televisión AYA
- televisión Aristona
- televisión Apex
- televisión Ziggo
- televisión Icy Box
- televisión Palsonic
- televisión Funai
- televisión Saba
- televisión Antarion
- televisión Tevion
- televisión Proscan
- televisión Tucson
- televisión Sunstech
- televisión Nabo
- televisión Sylvania
- televisión Marquant
- televisión Nordmende
- televisión AudioAffairs
- televisión Magnum
- televisión Kubo
- televisión Coby
- televisión Seg
- televisión Metz
- televisión Qilive
- televisión Changhong
- televisión Naxa
- televisión Mpman
- televisión Cello
- televisión Mx Onda
- televisión Peaq
- televisión Humax
- televisión Superior
- televisión Difrnce
- televisión Grunkel
- televisión Avtex
- televisión Odys
- televisión NPG
- televisión Bluesky
- televisión Videocon
- televisión Durabase
- televisión HKC
- televisión Edenwood
- televisión Woxter
- televisión Premier
- televisión Teleco
- televisión Opera
- televisión LTC
- televisión Horizon
- televisión Elements
- televisión Viewpia
- televisión CGV
- televisión Online
- televisión Doffler
- televisión DirecTV
- televisión Tele 2
- televisión Mystery
- televisión Telesystem
- televisión Jay-tech
- televisión EKO
- televisión E-motion
- televisión Mitsai
- televisión Selfsat
- televisión High One
- televisión Tve
- televisión ISymphony
- televisión Pantel
- televisión Magnavox
- televisión ATYME
- televisión HCI
- televisión Inno-Hit
- televisión Lin
- televisión Engel
- televisión Digihome
- televisión Englaon
- televisión Reflex
- televisión Astar
- televisión Visco
- televisión Tivax
- televisión H&B
- televisión Norcent
- televisión TELE System
- televisión TIM
- televisión Oyster
- televisión Belson
- televisión Vision Plus
- televisión Sbr
- televisión Voxx
- televisión Rm 2000
- televisión Hoher
- televisión Felson
- televisión Elbe
- televisión Axing
- televisión FFalcon
- televisión Smart Tech
- televisión Séura
- televisión Mitzu
- televisión Caratec
- televisión JTC24
- televisión Kivi
- televisión Smart Brand
- televisión FOX Electronics
Nyeste televisión Manualer

20 Februar 2025

19 Februar 2025
19 Februar 2025

10 Februar 2025
5 Februar 2025
30 Januar 2025

30 Januar 2025

15 Januar 2025
15 Januar 2025
15 Januar 2025