Hitachi CP-X870W Manual
Hitachi
videoprojektorer
CP-X870W
Læs nedenfor 📖 manual på dansk for Hitachi CP-X870W (56 sider) i kategorien videoprojektorer. Denne guide var nyttig for 21 personer og blev bedømt med 4.5 stjerner i gennemsnit af 2 brugere
Side 1/56
ENGLISH
Liquid Crystal Projector
CP-X 0W87
USER'S MAN ALU , Vol. 1
Please read this user's manual thoroughly to ensure correct usage through understanding.
USER'S MANUAL, Vol. 2
TECHNICAL
REGULATORY NOTICES

1
LCD Projector CP-X870
USER'S MANUAL
USER'S MANUAL Vol.1 (Basic)
Page
PROJECTOR FEATURES................2
PREPARATIONS ..............................2
PART NAMES...................................4
SETTING UP
THE PROJECTOR ............................6
CONNECTING
YOUR DEVICES................................8
USING THE REMOTE
CONTROL.......................................13
TURNING ON THE POWER ...........15
TURNING OFF THE POWER .........17
ADJUSTING THE VOLUME ...........18
TEMPORARILY MUTING
THE SOUND....................................18
ADJUSTING THE POSITION..........19
USING THE AUTOMATIC
ADJUSTMENT FEATURE ..............20
CORRECTING KEYSTONE
DISTORTIONS ................................21
Page
USING THE MAGNIFY
FEATURE........................................22
FREEZING THE SCREEN ..............22
ADJUSTING SCREEN WITH
ONE-TOUCH...................................23
SELECTING THE ASPECT
RATIO..............................................24
TEMPORARILY BLANKING
THE SCREEN..................................24
DISPLAYING CHILD WINDOW
(P. IN. P: Picture in Picture) ..........24
USING THE MENU
FUNCTIONS....................................25
OPERATING THE PC SCREEN .....26
THE LAMP ......................................27
THE AIR FILTER.............................29
OTHER CARE.................................31
CONTENTS
Thank you for purchasing this projector.
• The information in this manual is subject to change without notice.
• The manufacturer assumes no responsibility for any errors that may appear in this manual
• The reproduction, transmission or use of this document or contents is not permitted without express
written authority.
TRADEMARK ACKNOWLEDGEMENT :
• PS/2, VGA and XGA are registered trademarks of the International Business Machines Corporation.
• Apple, Mac and ADB are registered trademarks of Apple Computer, Inc.
• VESA and SVGA are trademarks of the Video Electronics Standard Association.
• Windows is a registered trademark of Microsoft Corporation.
• All other trademarks are the property of their respective owners.
NOTE
WARNING • Please read the accompanying manual “SAFETY
INSTRUCTIONS” and this “USER'S MANUAL” thoroughly to ensure correct
usage through understanding. After reading, store this instruction manual in a
safe place for future reference.

2
●
Ultra High Brightness
Crisp, ultra-bright presentations is achieved
by using a UHB (ultra high brightness) lamp
and a highly efficient optical system
●
Partial Magnification Function
Interesting parts of images can be magnified
for closer viewing
●
One Touch Function
Just press the ONE TOUCH button to
automatically retrieve input signals, calibrate
images, and correct keystone distortion
PREPARATIONS Your projector should come with the items
shown below. Check to make sure that all the
items are included. Contact your dealer if
anything is missing.
Projector
(with Lens Cap)
ENGLI SH
DEUTSCH
FRANÇAIS
ITAL IANO
ESPAÑOL
NEDERLANDS
NORS K
PORTG ÊS
中
中
中
中
中中
文
文
文
文
文文
REGULAT ORY
NOTI CES
USER' S MANUALVol .1 Basic
Please read this user's manual thoro ughly to ensure co rrect usage through understanding.
BEDIENUN GSANLEITUNG Teil 1 Grun dlag en
Bitte lessen Sie diese Benutzerhandbuch zugunsten der ko rrekten Bedienung aufmerksam.
MANUEL D' UTILISATION Vol. 1 Fon dements
No us vo us reco mmando ns de lire attentivement ce manuel pour bien assimiler le fo nctio nnement de
l'appareil.
MANUALE D' ISTRUZIONI Vol. 1 Info rmazion i di base
Vi preghiamo vo ler leggere attentamente il manuale d'istruzio ni in mo do tale da po ter co mprendere
quanto ripo rtato ai fini di un co rretto utilizzo del proietto re.
MANUAL DE US UARIO Vol. 1 Básico
Lea cuidado samente este manual del usuario para po der utilizar corretamente el producto .
GEBRUIKSAANW IJZING Vol. 1 Basis
Lees voo r het qebruik alstublieft deze handleiding aandachtig doo r, o m vo lledig pro fijt te hebben van
de uitgebreide mogelijkheden.
BRUKERHÅNDBOK Vol. 1 Grun nleg gende
Vennligst les denne bruksanvisningen grundig for å være garantert driftssikker bruk.
NSTRUÇÕES D O PROPRIETÁRIO Vol .1 Básico
Para assegurar o uso co rreto do equipamento, po r favo r leia atentamente este manual do utilizado r.
Liquid Crystal Pr ojector
CP-X870
(CP-X870W)
User's Manuals
(Vol.1/Vol.2)
Safety Instructions
Soft carrying case
Power cord
(US Type)
RS-232C
adapter
Power cord
(UK Type) Power cord
(Europe Type)
RGB cable
Remote control
Two AA batteries
(for the remote
control)
Video/Audio cable
PROJECTOR
FEATURES
This liquid crystal projector is used to project
various computer signals as well as NTSC / PAL /
SECAM video signals onto a screen. Little space
is required for installation and large images can
easily be realized.
• Keep the original packing material for future reshipment.
NOTE
STAN DBY/ON
VIDEO
UP
DOWN
BLAN K
ASPECT
PUSH
LASER
INDICATOR
LASER
RGB
FOCUS
ENTE R
ON
OFF
ESC MEN U RE SET
POSITION
MAGN IFY VOLU ME
MU TE
WIREL ESS KE YSTONE
FREE ZE
ONE TOUCH
AUTO
PinP
ZOOM PAGE
3
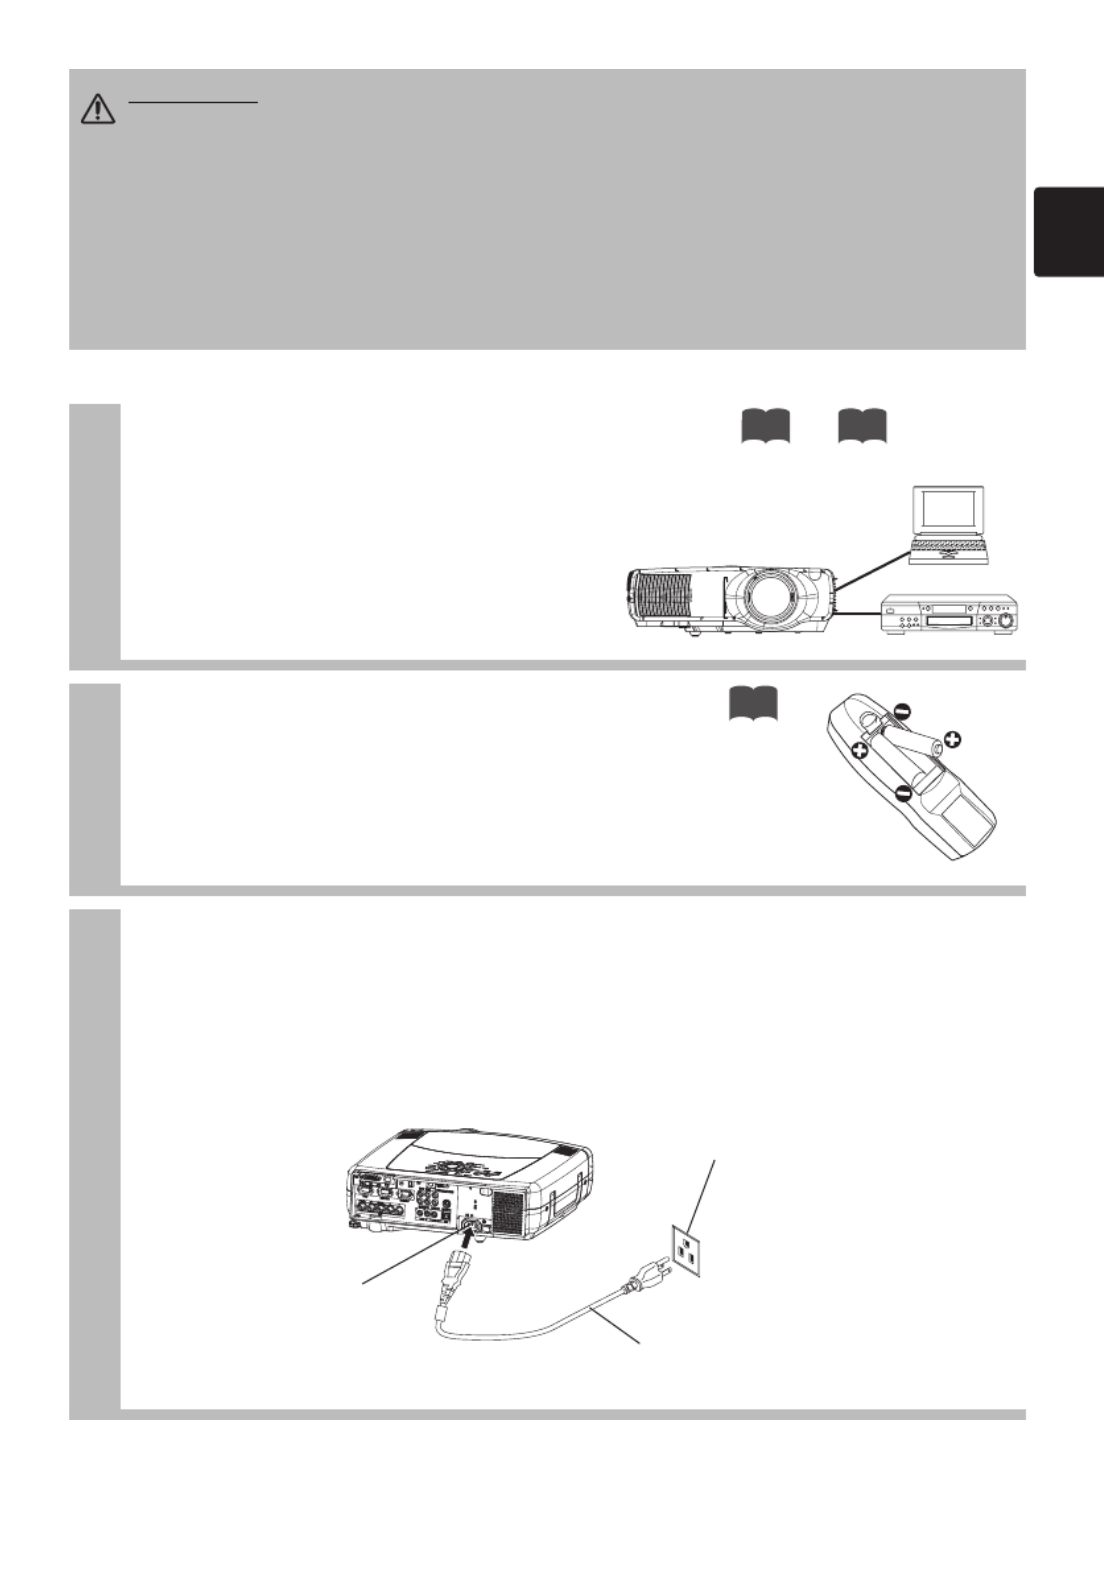
1Connect your devices to the projector
Connect your computer, VCR and/or other
devices you will be using to the projector.
Insert the batteries into the remote
control
2
13
3Connect the power cord
(1)
Connect the connector of the electrical power cord to the AC inlet of the main unit.
(2) Firmly plug the power cord's plug into the outlet
WARNING Precautions to observe in regards to the power cord: Please use extra
caution when connecting the projector's power cord as incorrect or faulty
connections may result in FIRE AND/OR ELECTRICAL SHOCK. Please adhere to the
following safety guidelines to insure safe operation of the projector:
•
Only plug the power cord into outlets rated for use with the power cord's specified voltage range.
• Only use the power cord that came with the projector.
• NEVER ATTEMPT TO DEFEAT THE GROUND CONNECTION OF THE THREE-
PRONGED PLUG!
• Make sure that you firmly connect the power cord to the projector and wall outlet.
∼
8 12
(1)
(2)
Power outlet
Power cord
AC inlet

4
PART NAMES The Projector Indicates the
corresponding
reference page
Air filter
29
Elevator button
6
Elevator screw
6
COMPONENT indicator
16
S-VIDEO indicator 16
VIDEO indicator 16
DVI indicator 16
BNC indicator 16
RGB indicator 16
INPUT dial 16
ZOOM
button
16
FOCUS button
16
RESET button
19
MENU button
25
ONE TOUCH button
22
KEYSTONE button
21
TEMP indicator
9
LAMP indicator
9
Lens
15
Remote sensor
14
Lens cap 15
Elevator feet 6
Remote sensor
14
S-VIDEO IN port
12
VIDEO IN port
12
DVI port 11
RGB port 10
BNC port 11
AUDIO IN R/L port 12
AUDIO IN 1/2 port
10
AUDIO OUT port
9
REMOTE CONTROL port
14
CONTROL port 10
WIRELESS & NETWORK
MODULE port Vol.2
7
RGB OUT port 12
USB port
10
COMPONENT VIDEO port 12
Power switch
15
STANDBY/ON
INPUT KEYSTONE
RESET
MENU
LANPTENP
ONE TOUCH
RGB
BNC
DVI
VIDEO
S-VIDEO
COMPONENT
FOCUS ZOOM
Control Panel
AC power inlet
3
STANDBY/ON button 15
Vol.2
Vol.2

5
The Remote Control
ZOOM
buttons
16
Right mouse button
26
VIDEO button 16
LASER INDICATOR 14 RGB button
16
LASER button
14
FOCUS buttons 16
PAGE buttons
26
BLANK button 24
ASPECT button 24
ESC button 25
MENU button 25
POSITION button 19
MAGNIFY buttons 22
KEYSTONE button 21
REMOTE CONTROL port 14
Left /Right
Key buttons 25
Lever switch (*)
25
RESET button
19
AUTO button
20
PinP button
24
VOLUME button
18
MUTE button
18
FREEZE button
22
ONE TOUCH button
23
Battery cover
(The back)
13
STANDBY/ON
VIDEO
UP
DOWN
BLANK
ASPECT
PUSH
LASER
INDICATOR
LASER
RGB
FOCUS
ENTER
ON
OFF
ESC MENU RESET
POSITION
MAGNIFY VOLUME
MUTE
WIRELESS KEYSTONE
FREEZE
ONE TOUCH
AUTO
PinP
ZOOM PAGE
15
STANDBY/ON button
<For mouse control>
Mouse cursor movement
Left mouse click
<For mouse control>
Right mouse click
* Using the lever switch
Flip toward disk pad : Up ( ) key
Flip toward MENU button
: Down ( ) key
Press in center : ENTER button
Inside of the Battery cover
Laser switch
1: enables the laser function.
2
: disables the laser function.
WIRELESS button Vol.2
7
26
Disk pad

6
Adjusting the Projector's Elevator Feet
1Press and hold in the elevator
buttons
2Raise or lower the projector to the
desired height and then release the
elevator buttons
When you release the elevator buttons, the elevator
feet will lock into position.
3Turn the elevator screw to fine tune.
If the surface on which the projector is placed, or the screen is tilted, use the
elevator feet and elevator screw to adjust the projection angle of the main unit.
The adjustment range of the elevator feet is 0 to 10 degrees.
CAUTION •
Install the projector in a suitable environment according to instructions
of the accompanying manual SAFETY INSTRUCTIONS and this manual.“ ”
• If you press the elevator buttons without holding the projector, the projector might
crash down, overturn, smash your fingers and possibly result in malfunction. To
prevent damaging the projector and injuring yourself, ALWAYS HOLD THE
PROJECTOR whenever using the elevator buttons to adjust the elevator feet.
• An installation angle should be adjusted within the specified adjustment range. The
adjustment beyond the range may become the cause of shortening the lamp life.
SETTING UP THE PROJECTOR
Elevator button
Elevator feet
Elevator screw
7
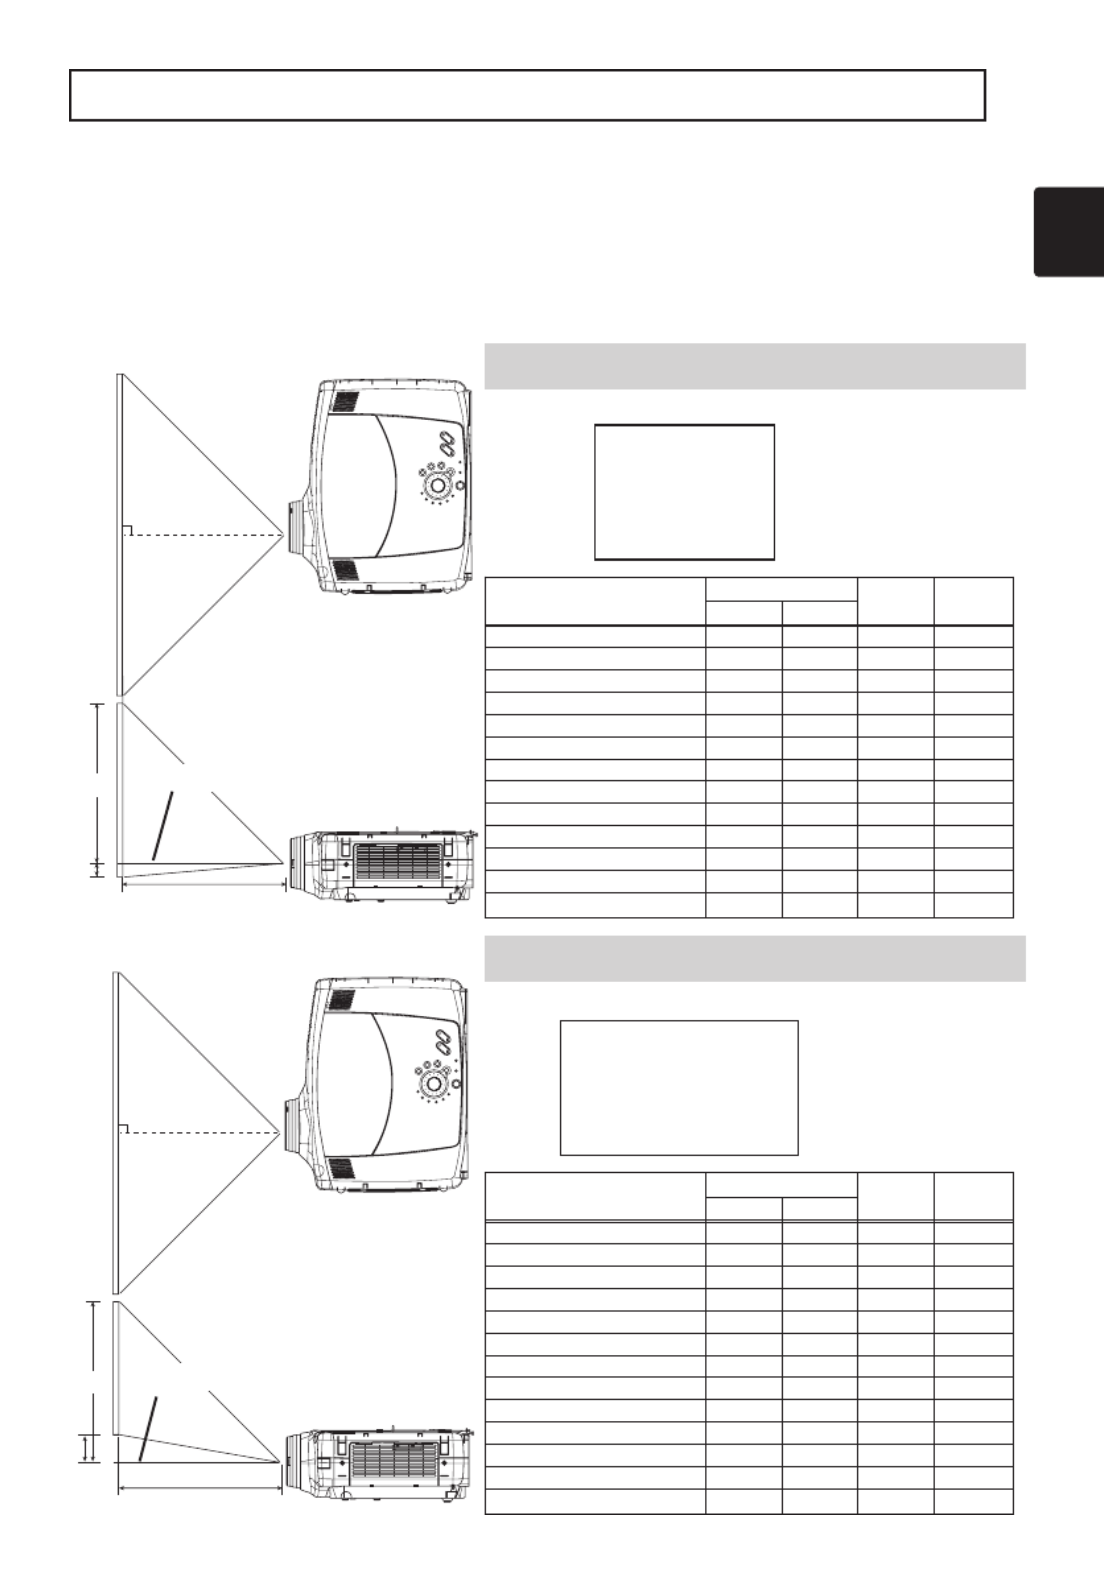
Refer to the illustrations and tables below to determine the screen size and
projection distance.
Adjusting the Screen Size and Projection Distance
Top view
a
c
b
Lens center
The screen
Side view
Top view
a
c
b
Lens center
The screen
Side view
If 4:3 aspect ratio
If 16:9 aspect ratio
4
3
9
16
The values shown in the table are calculated for a full size screen
a:Distance from the projector to the screen (±10%)
b:Distance from the lens center to the bottom of the screen (±10%)
c:Distance from the lens center to the top of the screen (±10%)
Screen Size [inch (m)] a [inch (m)] b
[inch (cm)]
c
[inch (cm)]
Min. Max.
30 (0.8) 42 (1.1) 56 (1.4) 1 (2) 17 (44)
40 (1.0) 57 (1.4) 75 (1.9) 1 (3) 23 (58)
50 (1.3) 72 (1.8) 94 (2.4) 1 (4) 29 (73)
60 (1.5) 87 (2.2)
113 (2.9)
2 (4) 34 (87)
70 (1.8)
102
(2.6)
133 (3.4)
2 (5) 40 (102)
80 (2.0)
117
(3.0)
152 (3.9)
2 (6) 46 (116)
90 (2.3)
131 (3.3) 171 (4.3)
3 (7) 51 (131)
100 (2.5)
146 (3.7) 190 (4.8)
3 (7) 57 (145)
120 (3.0)
176 (4.5) 229 (5.8)
3 (9) 69 (174)
150 (3.8)
221 (5.6) 287 (7.3)
4 (11) 86 (218)
200 (5.0)
296 (7.5) 383 (9.7)
6 (15)
114 (290)
250 (6.3)
371 (9.4)
479 (12.2)
7 (18)
143 (363)
300 (7.5)
446 (11.3)
576 (14.6)
9 (22)
171 (435)
Screen Size [inch (m)] a [inch (m)] b
[inch (cm)]
c
[inch (cm)]
Min. Max.
30 (0.8) 45 (1.2) 61 (1.5) 1 (4) 16 (41)
40 (1.0) 62 (1.6) 81 (2.1) 2 (5) 21 (54)
50 (1.3) 78 (2.0)
102 (2.6)
2 (6) 26 (67)
60 (1.5) 94 (2.4)
123 (3.1)
3 (7) 31 (79)
70 (1.8)
111 (2.8)
144 (3.7)
3 (8) 36 (92)
80 (2.0)
127 (3.2) 165 (4.2)
4 (9) 41 (105)
90 (2.3)
143 (3.6) 186 (4.7)
4 (11) 47 (119)
100 (2.5)
160 (4.1) 207 (5.3)
5 (12) 53 (135)
120 (3.0)
192 (4.9) 249 (6.3)
6 (14) 65 (166)
150 (3.8)
241 (6.1) 312 (7.9)
7 (18) 82 (207)
200 (5.0)
322 (8.2)
147 (10.6)
9 (24)
106 (270)
250 (6.3)
404 (10.3)
522 (13.3)
12 (29)
124 (315)
300 (7.5)
485 (12.3)
627 (15.9)
14 (35)
128 (324)

8
Display monitors
12
DVD players
11
VCRs
11
Laptop computers
10
Desktop computers
10
Indicates the
corresponding
reference page
ATTENTION
Precautions to observe when connecting other devices to the projector
• Whenever attempting to connect other devices to the projector, please thoroughly
read the manual of each device to be connected.
• TURN OFF ALL DEVICES prior to connecting them to the projector. Attempting to
connect a live device to the projector may generate extremely loud noises or other
abnormalities that may result in malfunction and/or damage to the device and/or
projector. Refer to the TECHNICAL of the USER S MANUAL (Vol.2) for the pin“ ” ’
assignment of connectors and RS-232C communication data.
• Make sure that you connect devices to the correct port. Incorrect connection may
result in malfunction and/or damage to the device and/or projector.
• Some cables have to be used with core set. Use the accessory cable or a
designated-type cable for the connection. For cables that have a core only at one
end, connect the core to the projector.
• Secure the screws on the connectors and tighten.
CONNECTING YOUR DEVICES
Devices You Can Connect to the Projector
(Refer to this section for planning your device
configuration to use for your presentation.)
CAUTION • Incorrect connecting could result in fire or electrical shock. Please
read this manual and the separate SAFETY INSTRUCTIONS“ ”.
9
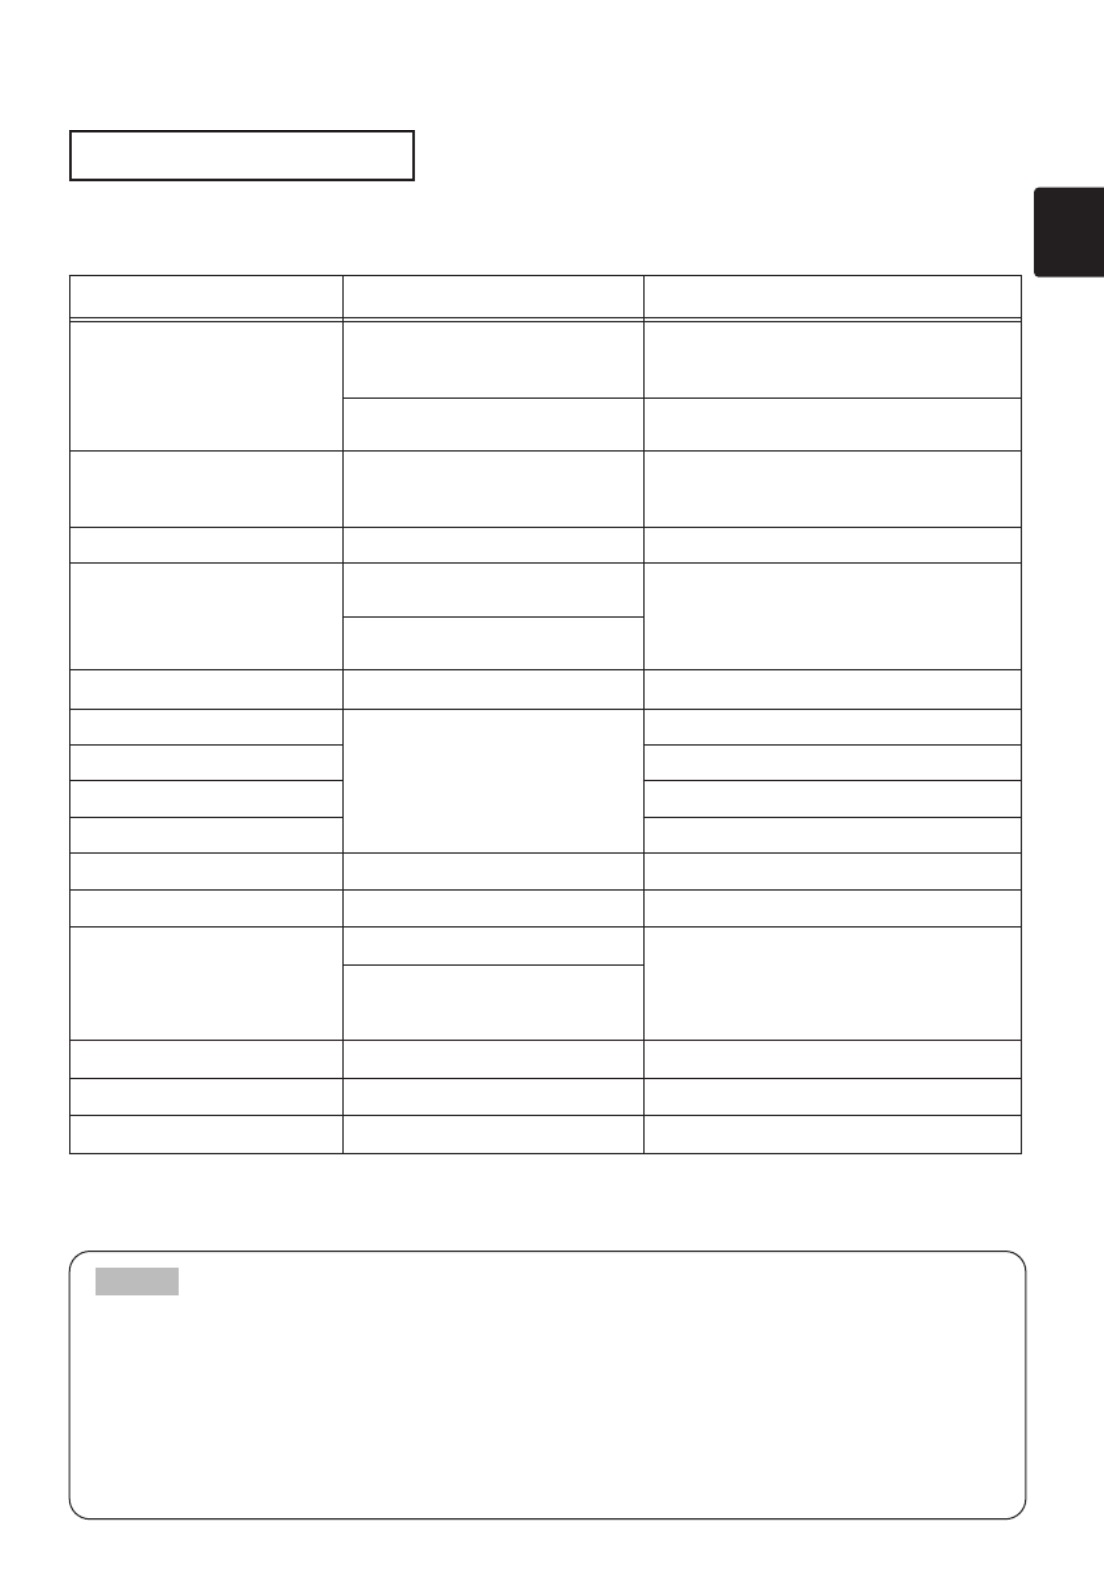
Ports and Cables
Refer to the table below to find out which projector port and cable to use for connecting a
given device. Use this table for determining which cables to prepare.
* Before using the BNC port, change RGB input to component video input on the BNC menu item of
the INPUT menu.
About Plug-and-Play Capability
•
This projector is compatible with VESA DDC 1/2B. Plug-and-Play can be achieved by connecting
this projector to computers that are VESA DDC (display data channel) compatible. Please take
advantage of this function by connecting the accessory RGB cable to the RGB port (DDC 1/2B
compatible). Plug-and-Play may not work properly if any other type of connection is attempted.
• Plug-and-Play is a system composed of the computer, its operating system and
peripheral equipment (i.e. display devices).
• Please use the standard drivers as this projector is a Plug-and-Play monitor.
NOTE
Function Projector Port Connection Cables
Analog RGB input
RGB
RGB cable
(With D-sub 15-pin shrink jack and inch
thread screws)
BNC(R/C R/PR)(G/Y)(B/CB/PB)(H)(V)
• When BNC (RGB) is selected (*) BNC cable
Analog output RGB OUT
RGB cable
(With D-sub 15-pin shrink jack and inch
thread screws)
DVI input DVI
DVI cable
Audio input from computer
AUDIO IN 1
•
Linked to RGB or DVI port input
Audio/video cable (Stereo mini)
AUDIO IN 2
•
Linked to BNC (RGB) port input (*)
USB mouse control USB
USB cable
PS/2 mouse control
CONTROL
PS/2 mouse cable
ADB mouse control ADB mouse cable
Serial mouse control Serial mouse cable
RS-232C communications RS-232C adapter + RS-232C cable
S video input S-VIDEO IN S-video cable (mini DIN 4-pin jack)
Video input VIDEO IN Audio/video cable
Component video input
COMPONENT(C R/PR)(CB/PB)(Y)
Component video cable
BNC(R/C R/PR)(G/Y)(B/CB/PB)
• When BNC (COMPONENT) is
selected (*)
Audio input from video equipment
AUDIO IN R,L
Audio/video cable or audio cable (RCA jack)
Audio output AUDIO OUT Audio cable (Stereo mini)
Wired remote control signal input
REMOTE CONTROL Audio cable (Stereo mini)

10
Laptop computer
CONNECTING YOUR DEVICES (continued)
Connecting to a Computer
ATTENTION Whenever attempting to connect a laptop computer to the projector,
be sure to activate the laptop's RGB external image output (set the laptop to CRT
display or to simultaneous LCD and CRT display). For details on how this is done,
please refer to the instruction manual of the corresponding laptop computer.
• Some computers may have multiple display screen modes. Use of some of these
modes will not be possible with this projector.
• For some RGB input modes, the optional Mac adapter is necessary.
NOTE
AUDIO cable
(Stereo mini)
B
A
VIDEO INR-AUDIO IN-L S-VIDEO IN
RGB
BNC AUDIO IN USBAUDIO OUT
R/C R R/P G/Y B/Ca/Pa H V
Y
1 2
DVI
RGB OUT CONTROL
CR/PRCa/Pa COMPONENT VIIDEO
REMOTE
CONTROL
B
A
RGB cable
Analogue
RGB OUT
AUDIO OUT
CONTROL OUT
MOUSE cable
RGB cable
Analogue
RGB OUT
BA D
C
VIDEO INR-AUDIO IN-L S-VIDEO IN
RGB
BNC AUDIO IN USBAUDIO OUT
R/C R R/P G/Y B/Ca/Pa H V
Y
1 2
DVI
RGB OUT CONTROL
CR/PRCa/Pa COMPONENT VIIDEO
REMOTE
CONTROL
A B
CD
AUDIO cable
(Stereo mini) AUDIO OUT
If connecting to a
USB port equipped
computer
USB cable
USB OUT
Desktop computer

11
Desktop computer Desktop computer
BNC Input DVI Input
Connecting to a Computer (continued)
BNC cable
A B
VIDEO INR-AUDIO IN-L S-VIDEO IN
RGB
BNC AUDIO IN USBAUDIO OUT
R/C R R/P G/Y B/Ca/Pa H V
Y
1 2
DVI
RGB OUT CONTROL
CR/PRCa/Pa COMPONENT VIIDEO
REMOTE
CONTROL
B
A A A A A
AUDIO cable
(Stereo mini) AUDIO OUT
BNC OUT
DVI cable
A B
VIDEO INR-AUDIO IN-L S-VIDEO IN
RGB
BNC AUDIO IN USBAUDIO OUT
R/C R R/P G/Y B/Ca/Pa H V
Y
1 2
DVI
RGB OUT CONTROL
CR/PRCa/Pa COMPONENT VIIDEO
REMOTE
CONTROL
B
A
AUDIO cable
(Stereo mini) AUDIO OUT
DVI OUT
Produkt Specifikationer
| Mærke: | Hitachi |
| Kategori: | videoprojektorer |
| Model: | CP-X870W |
Har du brug for hjælp?
Hvis du har brug for hjælp til Hitachi CP-X870W stil et spørgsmål nedenfor, og andre brugere vil svare dig
videoprojektorer Hitachi Manualer

24 Maj 2024
22 Maj 2024
21 Maj 2024
19 Maj 2024
8 Maj 2024
4 Maj 2024
25 April 2024
21 April 2024
16 April 2024
15 April 2024
videoprojektorer Manualer
- videoprojektorer Acer
- videoprojektorer Sony
- videoprojektorer Canon
- videoprojektorer Samsung
- videoprojektorer Panasonic
- videoprojektorer Philips
- videoprojektorer Lenco
- videoprojektorer OK
- videoprojektorer Derksen
- videoprojektorer LG
- videoprojektorer Mitsubishi
- videoprojektorer Sharp
- videoprojektorer Epson
- videoprojektorer Technaxx
- videoprojektorer Smart
- videoprojektorer HP
- videoprojektorer Sanyo
- videoprojektorer D-Link
- videoprojektorer Asus
- videoprojektorer Livoo
- videoprojektorer Toshiba
- videoprojektorer Pyle
- videoprojektorer Klarstein
- videoprojektorer Kodak
- videoprojektorer InFocus
- videoprojektorer Lenovo
- videoprojektorer Yamaha
- videoprojektorer Adj
- videoprojektorer Optoma
- videoprojektorer Hama
- videoprojektorer Casio
- videoprojektorer Hisense
- videoprojektorer Maxell
- videoprojektorer Smartwares
- videoprojektorer Blaupunkt
- videoprojektorer JVC
- videoprojektorer 3M
- videoprojektorer BenQ
- videoprojektorer Xiaomi
- videoprojektorer Aiptek
- videoprojektorer Krüger&Matz
- videoprojektorer Viewsonic
- videoprojektorer Dell
- videoprojektorer Vivitek
- videoprojektorer Polaroid
- videoprojektorer Bauer
- videoprojektorer Ricoh
- videoprojektorer NEC
- videoprojektorer Stairville
- videoprojektorer Reflecta
- videoprojektorer Nebula
- videoprojektorer Salora
- videoprojektorer Marantz
- videoprojektorer Overmax
- videoprojektorer ION
- videoprojektorer Renkforce
- videoprojektorer Christie
- videoprojektorer Sapphire
- videoprojektorer Genee World
- videoprojektorer Eurolite
- videoprojektorer Yaber
- videoprojektorer XGIMI
- videoprojektorer Kogan
- videoprojektorer Barco
- videoprojektorer Steren
- videoprojektorer Elmo
- videoprojektorer Vankyo
- videoprojektorer Celly
- videoprojektorer VAVA
- videoprojektorer Beghelli
- videoprojektorer AOpen
- videoprojektorer AAXA Technologies
- videoprojektorer Miroir
- videoprojektorer AWOL Vision
- videoprojektorer Panamorph
- videoprojektorer Mirabella Genio
Nyeste videoprojektorer Manualer

13 Marts 2025

26 Februar 2025

26 Februar 2025
25 Februar 2025
21 Februar 2025

21 Februar 2025
21 Februar 2025

18 Februar 2025

18 Februar 2025
18 Februar 2025