Honeywell RTH8580WF1007/W1 Manual
Læs nedenfor 📖 manual på dansk for Honeywell RTH8580WF1007/W1 (2 sider) i kategorien Termostat. Denne guide var nyttig for 4 personer og blev bedømt med 4.5 stjerner i gennemsnit af 2 brugere
Side 1/2
Install your thermostat.
Connect your home Wi-Fi network.
Register online for remote access.
Before you begin
1
2
3
This thermostat works with common 24 volt
systems such as forced air, hydronic, heat pump,
oil, gas, and electric.
It will not work with millivolt systems, such as a
gas fireplace, or with 120/240 volt systems such
as baseboard electric heat.
Apple, iPhone, iPad, iPod touch and iTunes are
trademarks of Apple Inc. All other trademarks
are the property of their respective owners.
C
C
Blank
sticky
tag
Terminal
designation
1.3 Label wires
Do not label by wire color.
Use the supplied sticky tags to label
each wire as you disconnect it. Label
wires according to old thermostat
terminal designations, not by wire
color.
Note: If no tag matches a terminal
designation, write the appropriate
letter on a blank sticky tag.
1.4 Remove wallplate
Remove the old wallplate from
the wall after all wires are
labeled and disconnected.
Finger holds
Wallplate (back view)
Thermostat
1.5 Separate Wi-Fi thermostat
and its wallplate
On your new thermostat, grasp the
finger holds on the top and bottom of
the wallplate with one hand and the
thermostat (front) with the other
hand. Pull pieces apart.
Quick Start Guide
Wi-Fi Touchscreen
Programmable
Thermostat
RTH8500WF Wi-Fi Series
1.1 Switch OFF power to your
heating/cooling system
1.1a Important! To protect your
equipment, switch OFF the
power to your heating/cooling
system at the breaker box or
the system switch.
1.1b Confirm power is OFF.
Try to turn on heating/
cooling equipment by
changing temperature
on your old thermostat.
Your power is OFF if your
system does not turn ON.
Install your thermostat
Turn over
Welcome
Getting set up and ready is simple.
1
or
If you have an older thermostat with a
sealed mercury tube, see warning page
for proper disposal instructions.
1.2 Remove old thermostat
faceplate and leave wires
connected
1.2a Take a picture of the
wire connections for
later reference.
1.2b If no wire is connected
to a terminal labeled C
or no C terminal exists
on the old thermostat,
view the Alternate Wiring videos at
wifithermostat.com/videos
Important! C wire is required and is the
primary power source for your thermostat.
Without a C wire, your thermostat will not
power up.
C
C
Wallplate
1.6 Mount wallplate for Wi-Fi
thermostat
Mount your new wallplate using screws
and anchors included with the
thermostat.
If necessary:
• Drill 3/16-in holes for drywall
• Drill 7/32-in holes for plaster
Note: You may be able to use your
existing wall anchors. Hold the wallplate
up to the existing anchors to check
for alignment.
Y2
W2
K
R C
R
W
Y
G
C
R C
R
O/B
Y
G
C
HEAT PUMP
CONVENTIONAL
L
E/A UX
K
R
Y
C
W
G
Y2
W2
K
R C
R
W
Y
G
C
R C
R
O/B
Y
G
C
R
W
G
C
Y
HEAT PUMP
CONVENTIONAL
L
E/AUX
K
1.7 Connect wires
1.7a Starting with the C Wire, match the
sticky tag on the wire to the terminal
labels.
Important! C wire is required and is the
primary power source. Without a C wire,
your thermostat will not power up.
View the Alternate Wiring videos at
wifithermostat.com/videos
1.7b Loosen screw, insert wire on inside
edge of terminal, then tighten screw.
1.7c Verify wire is firmly secured by gently
pulling on wire.
1.7d Repeat steps 1.7a–1.7c for all other wires.
1.7e Push any excess wire back into the wall
opening after all wires are installed.
Note: The wiring for your
application might be different
than the wiring from above.
Labels don’t match or have heat pump system?
See User Guide.
Remove metal jumper if you only
have both and wiresR RC
Insert wires here
1.8 Install battery
Insert the coin cell battery
(included), observing
the correct polarity.
Note: A correctly inserted battery will
extend about halfway out of the
battery slot on the thermostat,
allowing for easier removal.
This battery maintains time and date
during power outages. It does not
power the thermostat (C wire
required).
1.9 Attach thermostat
to wallplate
Align the thermostat onto
wallplate and snap into place.
Thermostat interior
Circuit
breaker
box
Circuit
breaker
box
Heating/
cooling system
power switch
Heating/
cooling system
power switch
Thermostat
Wallplate
HEAT PUMP
CONVEN TIONAL
L
AUX
/E
K
1.10 Switch heating/cooling
system ON
Important!
1.10a Verify that the C
wire is connected at the
thermostat and at the
heating/cooling system.
1.10b Make sure the heating/
cooling system door is firmly
secured.
1.10c Switch power back ON for
your heating/cooling system
at the breaker box or its
power switch.
or
69-2717-07
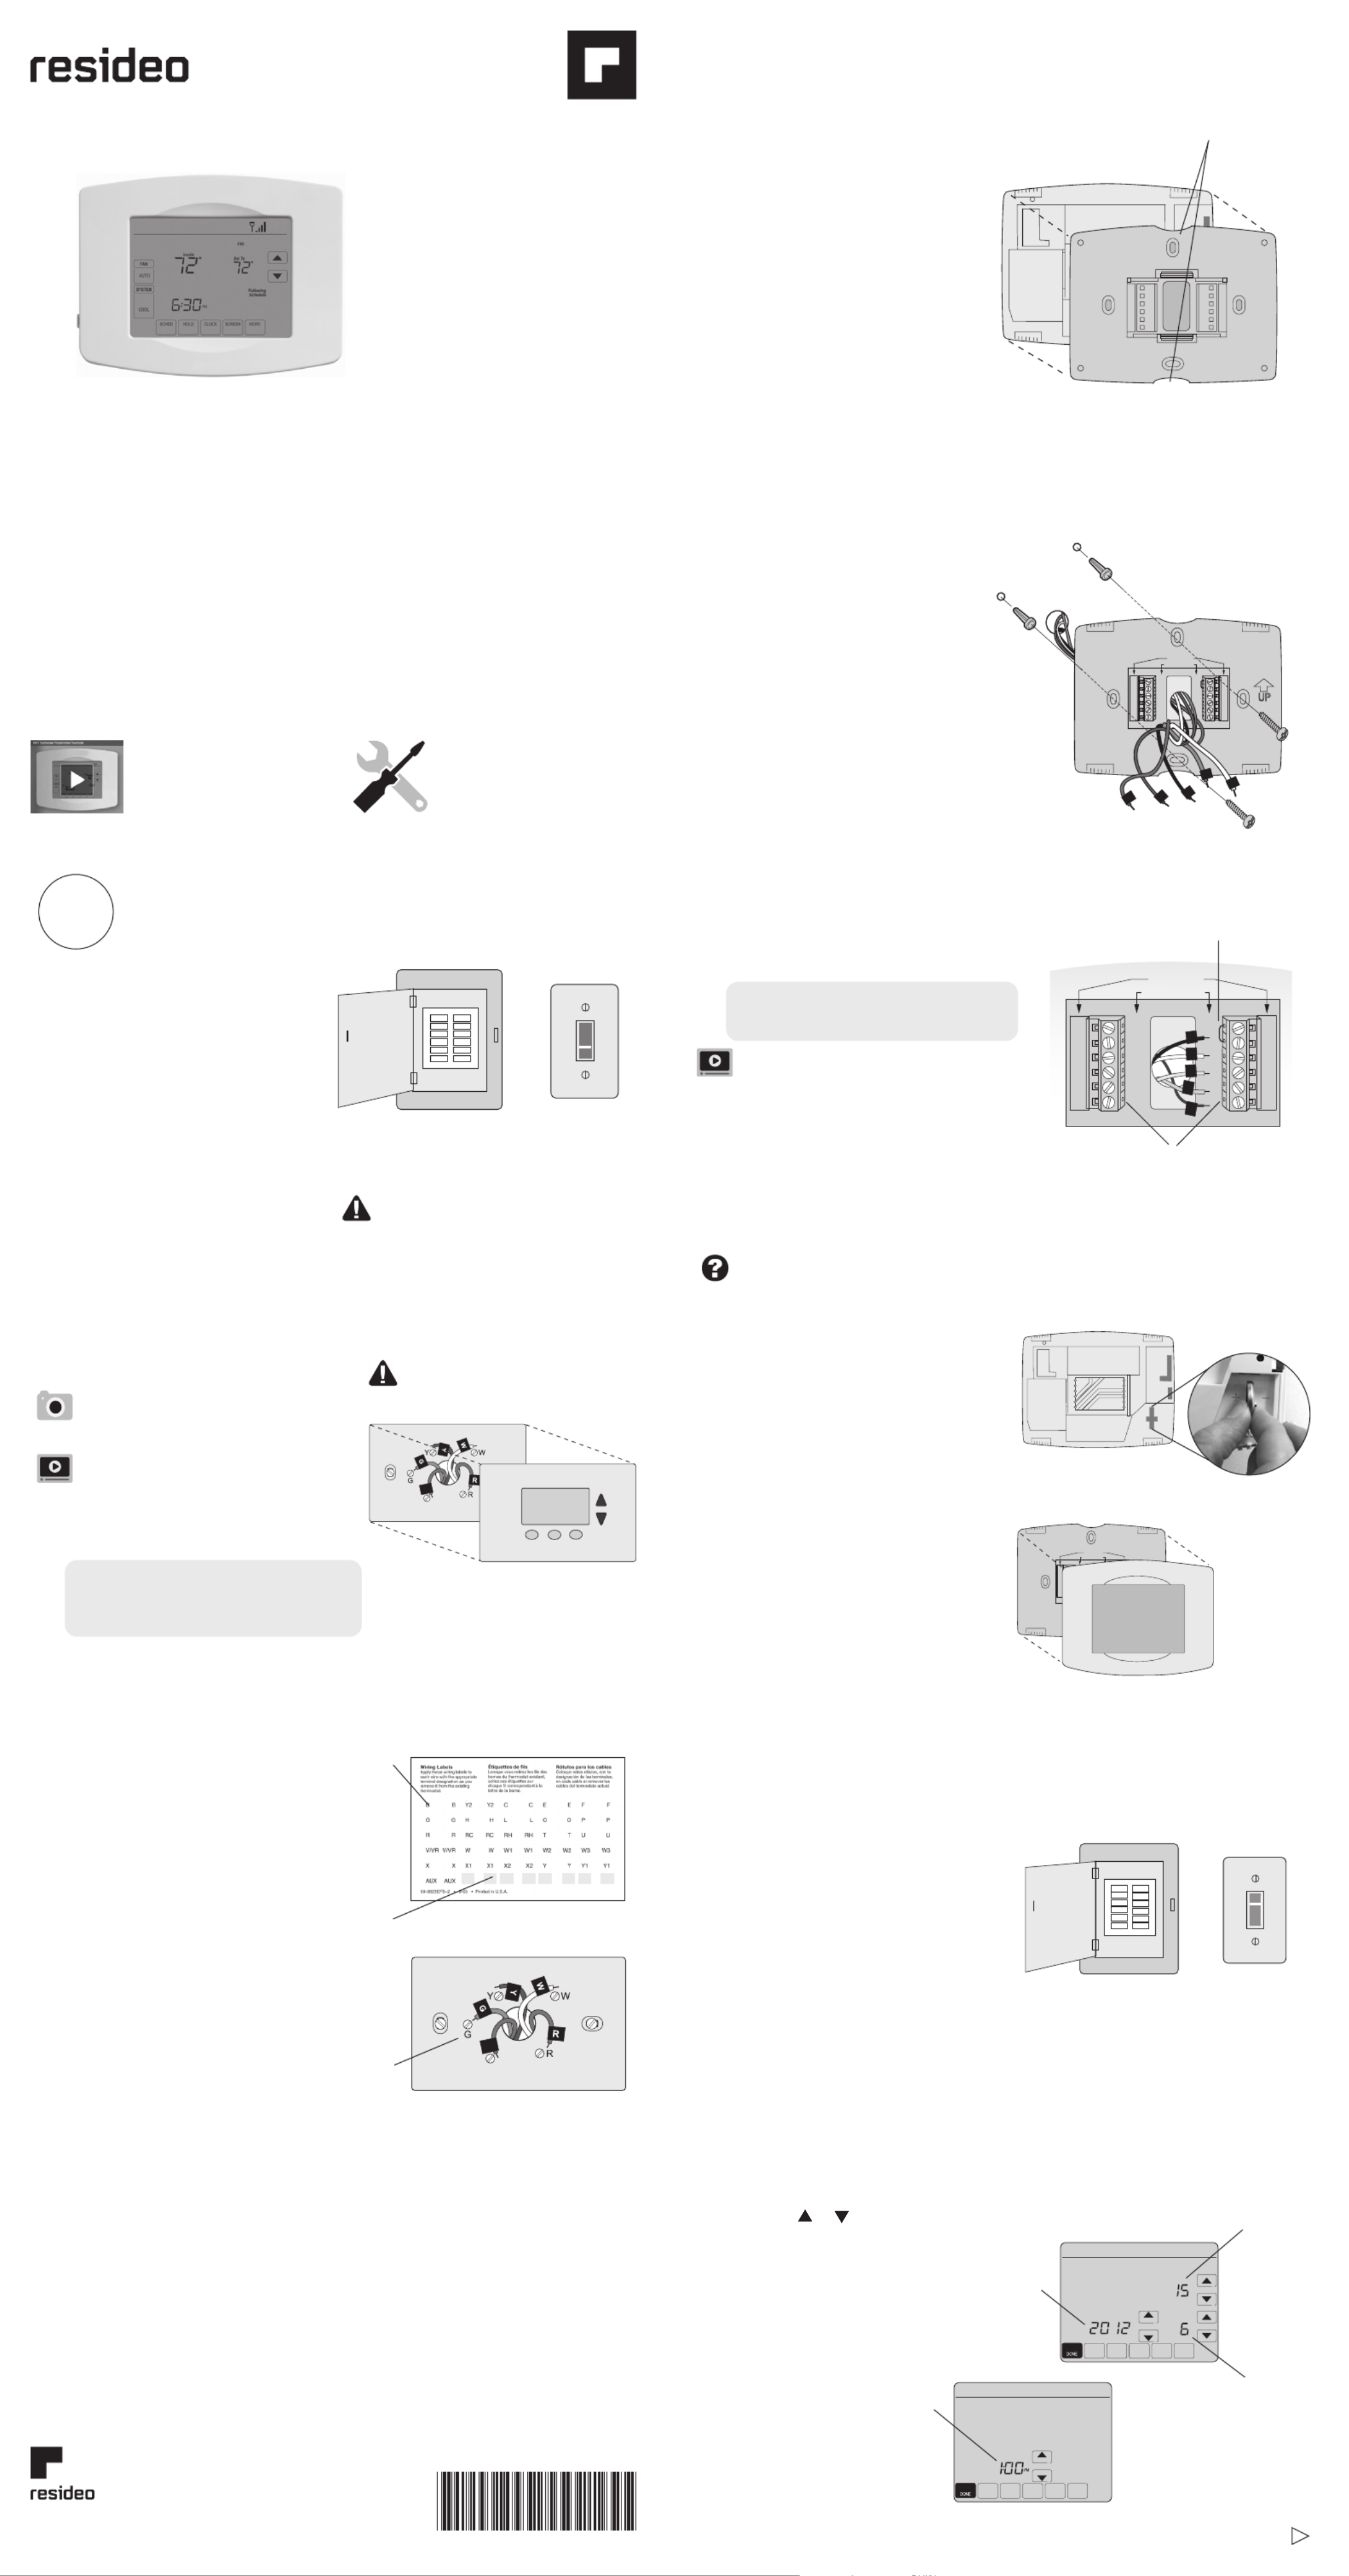
1.11 Set date and time
Touch or buttons to change
displayed time and date.
Press and hold a button to
quickly change a setting.
Day
Time
Month
Year, Month, Day(Top)
Set Time
Year
Sticky
tag
View the installation video
at wifithermostat.com/
support
Gather
• Small screw driver
• Thermostat ID card
• Your home Wi-Fi
network password
Resideo Technologies, Inc.
1985 Douglas Drive North, Golden Valley, MN 55422
1-800-468-1502
69-2717—07 M.S. Rev. 06-21 | Printed in United States
© 2020 Resideo Technologies, Inc. All rights reserved.
This product is manufactured by Resideo Technologies, Inc. and its affiliates.
www.resideo.com
Produkt Specifikationer
| Mærke: | Honeywell |
| Kategori: | Termostat |
| Model: | RTH8580WF1007/W1 |
Har du brug for hjælp?
Hvis du har brug for hjælp til Honeywell RTH8580WF1007/W1 stil et spørgsmål nedenfor, og andre brugere vil svare dig
Termostat Honeywell Manualer

15 Januar 2025
15 Januar 2025
4 Oktober 2024
4 Oktober 2024
1 Oktober 2024
29 September 2024
27 September 2024
23 September 2024
22 September 2024
15 September 2024
Termostat Manualer
- Termostat Bosch
- Termostat SilverCrest
- Termostat Siemens
- Termostat GE
- Termostat Daikin
- Termostat Panasonic
- Termostat Hager
- Termostat TP-Link
- Termostat AEG
- Termostat Gigaset
- Termostat Finder
- Termostat Atag
- Termostat Emos
- Termostat Google
- Termostat Worcester
- Termostat TFA
- Termostat Baxi
- Termostat Carel
- Termostat De Dietrich
- Termostat Buderus
- Termostat AVM
- Termostat Hama
- Termostat Theben
- Termostat Busch-Jaeger
- Termostat Trotec
- Termostat Ariston Thermo
- Termostat Truma
- Termostat Elro
- Termostat Max
- Termostat Vaillant
- Termostat RADEMACHER
- Termostat Carrier
- Termostat Danfoss
- Termostat Wolf
- Termostat Nest
- Termostat Dimplex
- Termostat Eberle
- Termostat Grässlin
- Termostat Heimeier
- Termostat Junkers
- Termostat Salus
- Termostat TrickleStar
- Termostat Weishaupt
- Termostat Alecto
- Termostat Westfalia
- Termostat Boneco
- Termostat HQ
- Termostat EnerGenie
- Termostat Schneider
- Termostat Basetech
- Termostat Tesla
- Termostat Grohe
- Termostat Ferroli
- Termostat Velleman
- Termostat Perel
- Termostat Joblotron
- Termostat Saunier Duval
- Termostat JUNG
- Termostat Vemer
- Termostat ORNO
- Termostat Watts
- Termostat Ambiano
- Termostat Netatmo
- Termostat Technoline
- Termostat Somfy
- Termostat EQ3
- Termostat Techno Line
- Termostat Brennenstuhl
- Termostat Cotech
- Termostat Intergas
- Termostat Devolo
- Termostat Aube
- Termostat Elgato
- Termostat Renkforce
- Termostat SPC
- Termostat Hunter
- Termostat Viessmann
- Termostat Nobo
- Termostat Orbis
- Termostat Remeha
- Termostat Seitron
- Termostat Stiebel Eltron
- Termostat ACV
- Termostat Mikoterm
- Termostat Hive
- Termostat Tado
- Termostat Fibaro
- Termostat Noma
- Termostat POER
- Termostat EQ-3
- Termostat Vimar
- Termostat Oregon Scientific
- Termostat Corbero
- Termostat Remko
- Termostat Nexa
- Termostat Avidsen
- Termostat Crestron
- Termostat Emerson
- Termostat Elektrobock
- Termostat Delta Dore
- Termostat Homematic IP
- Termostat H-Tronic
- Termostat Schwaiger
- Termostat Emko
- Termostat Bearware
- Termostat Ferguson
- Termostat Nefit
- Termostat Amfra
- Termostat Itho
- Termostat Fenix
- Termostat Magnum
- Termostat Horstmann
- Termostat Oventrop
- Termostat King
- Termostat Arnold Rak
- Termostat Heatmiser
- Termostat Itho-Daalderop
- Termostat Bticino
- Termostat Sygonix
- Termostat Plieger
- Termostat Conrad
- Termostat Zehnder
- Termostat Bulex
- Termostat UPM
- Termostat Optima
- Termostat AWB
- Termostat Xavax
- Termostat Fantini Cosmi
- Termostat Niko
- Termostat Gira
- Termostat Eneco
- Termostat Frico
- Termostat Vasco
- Termostat Radson
- Termostat Go Green
- Termostat Extraflame
- Termostat ICY
- Termostat HomeMatic
- Termostat Computherm
- Termostat Brink
- Termostat Drayton
- Termostat Heatit
- Termostat 2Heat
- Termostat Bryant
- Termostat Eqiva
- Termostat Etherma
- Termostat Veria
- Termostat Emmeti
- Termostat Thermy
- Termostat Coati
- Termostat Essent
- Termostat ThermoSmart
- Termostat Plugwise
- Termostat Eurotronic
- Termostat Hornbach
- Termostat Tru Components
- Termostat HomePilot
- Termostat Muller
- Termostat Worcester-Bosch
- Termostat Econo-Heat
- Termostat VDH
- Termostat PECO
- Termostat IR-V
- Termostat EasyTemp
- Termostat Intertechno
- Termostat Helios (Amfra)
- Termostat Easy Timer
- Termostat Z-Wave
- Termostat Hugo Muller
- Termostat IMIT
- Termostat Innogy
- Termostat Wallair
- Termostat Maico
- Termostat Levica
- Termostat Ouellet
- Termostat THERMAFLEX
- Termostat Wachendorff
- Termostat STI
- Termostat Yokis
- Termostat ChiliTec
- Termostat Eliwell
- Termostat Johnson Control
- Termostat Webasto
- Termostat Drayton Erie
- Termostat OJ ELECTRONICS
- Termostat Tellur
- Termostat RWE
- Termostat ATTACK
- Termostat Lowes
- Termostat Jumo
- Termostat Warmup
- Termostat Qubino
- Termostat ELKO
- Termostat Gewiss
- Termostat Sinustec
- Termostat Rose LM
- Termostat Otio
- Termostat MundoControl
- Termostat Enda
- Termostat GENERAL Life
- Termostat Oreg
- Termostat Braeburn
Nyeste Termostat Manualer

26 Marts 2025
26 Februar 2025
26 Februar 2025
5 Februar 2025
1 Februar 2025

1 Februar 2025
1 Februar 2025
29 Januar 2025

15 Januar 2025
15 Januar 2025