HP Color LaserJet Enterprise M555x Manual
Læs nedenfor 📖 manual på dansk for HP Color LaserJet Enterprise M555x (144 sider) i kategorien Printer. Denne guide var nyttig for 9 personer og blev bedømt med 4.5 stjerner i gennemsnit af 2 brugere
Side 1/144
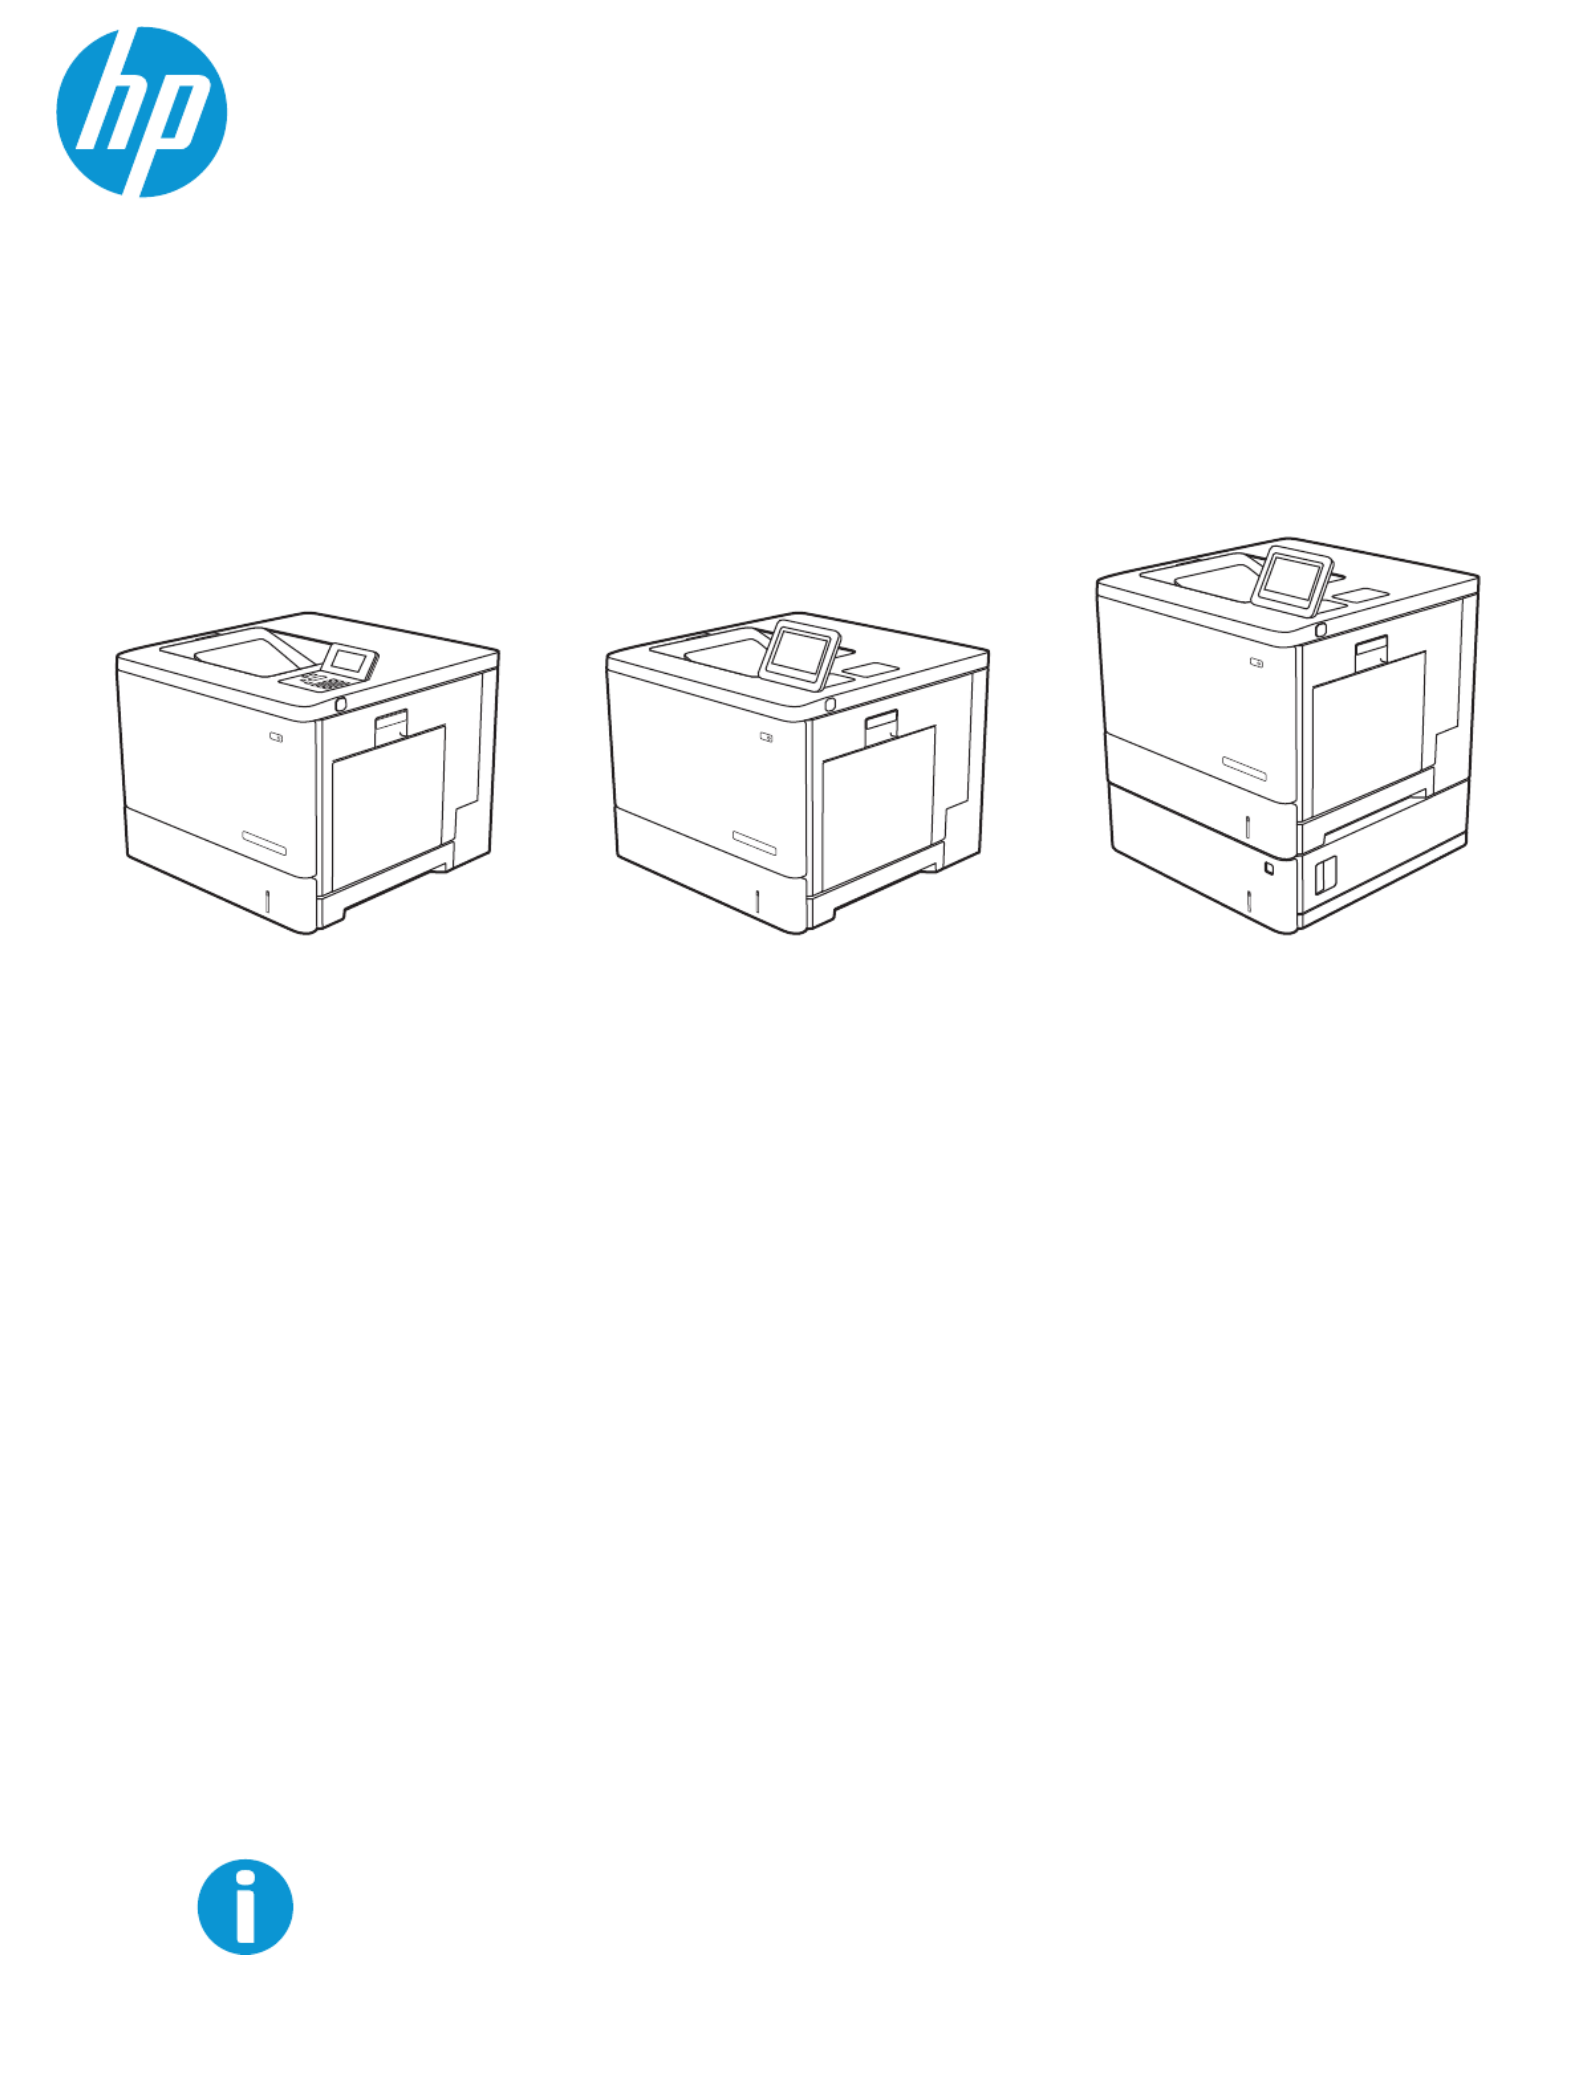
HP Color LaserJet Enterprise M554
HP Color LaserJet Enterprise M555
www.hp.com/videos/LaserJet
www.hp.com/support/colorljM554
User Guide


HP Color LaserJet Enterprise M554, M555
User Guide

Copyright and License
Copyright and License
Copyright and License
Copyright and LicenseCopyright and License
© Copyright 2020 HP Development Company,
L.P.
Reproduction, adaptation, or translation without
prior written permission is prohibited, except as
allowed under the copyright laws.
The information contained herein is subject to
change without notice.
The only warranties for HP products and
services are set forth in the express warranty
statements accompanying such products and
services. Nothing herein should be construed as
constituting an additional warranty. HP shall not
be liable for technical or editorial errors or
omissions contained herein.
Edition 1, 10/2020
Trademark Credits
Trademark Credits
Trademark Credits
Trademark CreditsTrademark Credits
Adobe®, Adobe Photoshop®, Acrobat®, and
PostScript® are trademarks of Adobe Systems
Incorporated.
Apple and the Apple logo are trademarks of
Apple Inc., registered in the U.S. and other
countries.
macOS is a trademark of Apple Inc., registered in
the U.S. and other countries.
AirPrint is a trademark of Apple Inc., registered
in the U.S. and other countries.
Google™ is a trademark of Google Inc.
Microsoft®, Windows®, Windows® XP, and
Windows Vista® are U.S. registered trademarks
of Microsoft Corporation.
UNIX® is a registered trademark of The Open
Group.

T
T
T
TTable o
able o
able o
able oable of c
f c
f c
f cf conten
onten
onten
ontenontents
ts
ts
tsts
1 Printer overview ........................................................................................................................................................................................
1 Printer overview ........................................................................................................................................................................................
1 Printer overview ........................................................................................................................................................................................
1 Printer overview ........................................................................................................................................................................................1 Printer overview ........................................................................................................................................................................................ 1
1
1
1 1
Warning icons ............................................................................................................................................................................ 2
Potential shock hazard ............................................................................................................................................................ 2
Printer views .............................................................................................................................................................................. 4
Printer front view ................................................................................................................................................. 4
Printer back view .................................................................................................................................................. 5
Interface ports ...................................................................................................................................................... 6
Control-panel view (color graphical display with keypad control panel, M554 models only) ................. 6
Control-panel view (touchscreen control panel, M555 models only) ......................................................... 8
Printer ............................................................................................................................................................. 11specications
Technical .................................................................................................................................... 11specications
Supported operating systems ......................................................................................................................... 13
Mobile printing solutions .................................................................................................................................. 14
Printer dimensions ............................................................................................................................................ 15
Power consumption, electrical and acoustic emissions ................................................... 17specications,
Operating-environment range ........................................................................................................................ 17
Printer hardware setup and software installation ............................................................................................................ 18
2 Paper tr
2 Paper tr
2 Paper tr
2 Paper tr2 Paper trays ..............................................................................................................................................................................................
ays ..............................................................................................................................................................................................
ays ..............................................................................................................................................................................................
ays ..............................................................................................................................................................................................ays .............................................................................................................................................................................................. 19
19
19
19 19
Load paper to Tray 1 ............................................................................................................................................................. 20
Introduction ........................................................................................................................................................ 20
Tray 1 paper orientation ................................................................................................................................... 23
Use alternative letterhead mode .................................................................................................................... 24
Load paper to Trays 2, 3, 4, and 5 ....................................................................................................................................... 25
Introduction ........................................................................................................................................................ 25
Trays 2, 3, 4, and 5 paper orientation ............................................................................................................ 27
Use alternative letterhead mode .................................................................................................................... 28
Load envelopes ...................................................................................................................................................................... 29
Introduction ........................................................................................................................................................ 29
Envelope orientation ......................................................................................................................................... 29
Load and print labels ............................................................................................................................................................. 30
Introduction ........................................................................................................................................................ 30
ENWW iii

Manually feed labels ......................................................................................................................................... 30
3 Supplies, accessories, and parts ..........................................................................................................................................................
3 Supplies, accessories, and parts ..........................................................................................................................................................
3 Supplies, accessories, and parts ..........................................................................................................................................................
3 Supplies, accessories, and parts ..........................................................................................................................................................3 Supplies, accessories, and parts .......................................................................................................................................................... 33
33
33
33 33
Order supplies, accessories, and parts ............................................................................................................................... 34
Ordering .............................................................................................................................................................. 34
Supplies and accessories ................................................................................................................................. 34
Customer self-repair parts ............................................................................................................................... 35
Replace the toner cartridges ................................................................................................................................................ 37
Introduction ........................................................................................................................................................ 37
Toner-cartridge information ............................................................................................................................ 37
Remove and replace the cartridges ............................................................................................................... 38
Replace the toner-collection unit ........................................................................................................................................ 41
Introduction ........................................................................................................................................................ 41
Remove and replace the toner-collection unit ............................................................................................. 41
4 Print ..........................................................................................................................................................................................................
4 Print ..........................................................................................................................................................................................................
4 Print ..........................................................................................................................................................................................................
4 Print ..........................................................................................................................................................................................................4 Print .......................................................................................................................................................................................................... 45
45
45
45 45
Print tasks (Windows) ............................................................................................................................................................ 46
How to print (Windows) .................................................................................................................................... 46
Automatically print on both sides (Windows) ............................................................................................... 46
Manually print on both sides (Windows) ........................................................................................................ 47
Print multiple pages per sheet (Windows) .................................................................................................... 47
Select the paper type (Windows) .................................................................................................................... 48
Additional print tasks ........................................................................................................................................ 49
Print tasks (macOS) ............................................................................................................................................................... 50
How to print (macOS) ........................................................................................................................................ 50
Automatically print on both sides (macOS) ................................................................................................... 50
Manually print on both sides (macOS) ........................................................................................................... 50
Print multiple pages per sheet (macOS) ........................................................................................................ 51
Select the paper type (macOS) ........................................................................................................................ 51
Additional print tasks ........................................................................................................................................ 51
Store print jobs on the printer to print later or print privately ........................................................................................ 53
Introduction ........................................................................................................................................................ 53
Create a stored job (Windows) ........................................................................................................................ 53
Create a stored job (macOS) ............................................................................................................................ 54
Print a stored job ............................................................................................................................................... 54
Delete a stored job ............................................................................................................................................ 55
Information sent to printer for Job Accounting purposes ........................................................................... 56
Mobile printing solutions ...................................................................................................................................................... 57
Introduction ........................................................................................................................................................ 57
Wi-Fi, Wi-Fi Direct Print, NFC, and BLE printing ............................................................................................ 57
HP ePrint via email ............................................................................................................................................ 58
iv ENWW

AirPrint ................................................................................................................................................................. 58
Android embedded printing ............................................................................................................................. 59
Print from a USB ash drive ................................................................................................................................................. 60
Introduction ........................................................................................................................................................ 60
Enable the USB port for printing ..................................................................................................................... 60
Print USB documents ........................................................................................................................................ 61
Print using high-speed USB 2.0 port (wired) ..................................................................................................................... 62
Enable the high-speed USB port for printing ................................................................................................ 62
5 Manage the printer .................................................................................................................................................................................
5 Manage the printer .................................................................................................................................................................................
5 Manage the printer .................................................................................................................................................................................
5 Manage the printer .................................................................................................................................................................................5 Manage the printer ................................................................................................................................................................................. 63
63
63
63 63
Advanced with HP Embedded Web Server (EWS) .................................................................................... 64conguration
Introduction ........................................................................................................................................................ 64
How to access the HP Embedded Web Server (EWS) .................................................................................. 64
HP Embedded Web Server features ............................................................................................................... 65
Congure IP network settings .............................................................................................................................................. 72
Printer sharing disclaimer ................................................................................................................................ 72
View or change network settings ................................................................................................................... 72
Rename the printer on a network .................................................................................................................. 72
Manually IPv4 TCP/IP parameters from the control panel ........................................................ 73congure
Manually IPv6 TCP/IP parameters from the control panel ........................................................ 73congure
Link speed and duplex settings ...................................................................................................................... 74
Printer security features ....................................................................................................................................................... 75
Introduction ........................................................................................................................................................ 75
Security statements .......................................................................................................................................... 75
IP Security ........................................................................................................................................................... 75
Assign or change the system password using the HP Embedded Web Server ...................................... 75
Encryption support: HP High Performance Secure Hard Disks .................................................................. 76
Lock the formatter ............................................................................................................................................ 76
Energy-conservation settings .............................................................................................................................................. 77
Introduction ........................................................................................................................................................ 77
Set the idle settings .......................................................................................................................................... 77
Set the sleep timer and the printer to use 1 watt or less of power ........................................ 77congure
HP Web Jetadmin ................................................................................................................................................................... 78
Software and updates .......................................................................................................................................... 79rmware
6 Solve pr
6 Solve pr
6 Solve pr
6 Solve pr6 Solve problems .......................................................................................................................................................................................
oblems .......................................................................................................................................................................................
oblems .......................................................................................................................................................................................
oblems .......................................................................................................................................................................................oblems ....................................................................................................................................................................................... 81
81
81
81 81
Customer support .................................................................................................................................................................. 82
Control panel help system .................................................................................................................................................... 83
Restore factory settings ........................................................................................................................................................ 84
Introduction ........................................................................................................................................................ 84
Method one: Restore factory settings from the printer control panel ...................................................... 84
ENWW v

Method two: Restore factory settings from the HP Embedded Web Server (network-connected
printers only) ...................................................................................................................................................... 84
A “Cartridge is low” or “Cartridge is very low” message displays on the printer control panel ................................. 86
Change the “Very Low” settings ...................................................................................................................... 86
Order supplies .................................................................................................................................................... 87
Printer does not pick up paper or misfeeds ....................................................................................................................... 88
Introduction ........................................................................................................................................................ 88
The printer does not pick up paper ................................................................................................................ 88
The printer picks up multiple sheets of paper .............................................................................................. 90
Clear paper jams .................................................................................................................................................................... 94
Introduction ........................................................................................................................................................ 94
Jam locations ..................................................................................................................................................... 94
Auto-navigation for clearing paper jams ....................................................................................................... 95
Experiencing frequent or recurring paper jams? .......................................................................................... 95
13.B2.D1 tray 1 paper jam ............................................................................................................................... 96
13.B2.D2 tray 2 paper jam ............................................................................................................................... 98
13.A3, 13.A4, 13.A5 tray 3, tray 4, tray 5 paper jam ................................................................................ 101
13.B right door and fuser area paper jam ................................................................................................... 104
13.E1 output bin paper jam ........................................................................................................................... 109
Resolve print-quality problems ......................................................................................................................................... 110
Introduction ...................................................................................................................................................... 110
Troubleshoot print quality ............................................................................................................................. 110
Troubleshoot color quality ............................................................................................................................ 114
Troubleshoot image defects ......................................................................................................................... 115
Solve wired network problems .......................................................................................................................................... 124
Introduction ...................................................................................................................................................... 124
Poor physical connection ............................................................................................................................... 124
The computer is using the incorrect IP address for the printer ............................................................... 124
The computer is unable to communicate with the printer ....................................................................... 125
The printer is using incorrect link and duplex settings for the network ................................................ 125
New software programs might be causing compatibility problems ...................................................... 125
The computer or workstation might be set up incorrectly ...................................................................... 125
The printer is disabled, or other network settings are incorrect ............................................................. 125
Solve wireless network problems ..................................................................................................................................... 126
Introduction ...................................................................................................................................................... 126
Wireless connectivity checklist ..................................................................................................................... 126
The printer does not print after the wireless completes ................................................. 127conguration
The printer does not print, and the computer has a third-party installed .............................. 127rewall
The wireless connection does not work after moving the wireless router or printer .......................... 127
Cannot connect more computers to the wireless printer ........................................................................ 128
The wireless printer loses communication when connected to a VPN .................................................. 128
vi ENWW

The network does not appear in the wireless networks list .................................................................... 128
The wireless network is not functioning ..................................................................................................... 128
Reduce interference on a wireless network ............................................................................................... 129
Index ...........................................................................................................................................................................................................
Index ...........................................................................................................................................................................................................
Index ...........................................................................................................................................................................................................
Index ...........................................................................................................................................................................................................Index ........................................................................................................................................................................................................... 131
131
131
131 131
ENWW vii

viii ENWW

Printer views
Printer views
Printer views
Printer viewsPrinter views
●Printer front view
●Printer back view
●Interface ports
●Control-panel view (color graphical display with keypad control panel, M554 models only)
●Control-panel view (touchscreen control panel, M555 models only)
Printer fr
Printer fr
Printer fr
Printer frPrinter front view
ont view
ont view
ont viewont view
211
7
8
13
4
5
6
9
10
12
13
1 Standard output bin
2 Control panel with color graphical display and keypad (M554 models only)
3 Hardware integration pocket for connecting accessory and third-party devices
4 Easy-access USB port
Insert a USB drive for printing without a computer or to update the printer ash rmware.
NO
NO
NO
NONOTE:
TE:
TE:
TE:TE: An administrator must enable this port before use.
5 Right door (access to the fuser and for clearing jams)
6 Tray 1
7 Model name
8 Tray 2
9 Front door (access to the toner cartridges)
10 buttonOn/o
11 Control panel with color touchscreen display (M555 models only)
12 Lower-right door (access for clearing jams)
13 1 x 550-sheet paper feeder, Tray 3 (included with the M555x model, optional for the other models)
4 Chapter 1 Printer overview ENWW

Printer back view
Printer back view
Printer back view
Printer back viewPrinter back view
2
3
4
5
1
1 Formatter cover
2 Toner-collection-unit door
3 Formatter (contains the interface ports)
4 Power connection
5 Serial number and product number label
ENWW Printer views 5

Interface ports
Interface ports
Interface ports
Interface portsInterface ports
1
3
2
1 Local area network (LAN) Ethernet (RJ-45) network port
2 Hi-Speed USB 2.0 printing port
3 USB port for connecting external USB devices (this port might be covered)
NO
NO
NO
NONOTE:
TE:
TE:
TE:TE: For easy-access USB printing, use the USB port near the control panel.
Con
Con
Con
ConContr
tr
tr
trtrol
ol
ol
olol-panel view (c
-panel view (c
-panel view (c
-panel view (c-panel view (col
ol
ol
ololor gr
or gr
or gr
or gror graphical displ
aphical displ
aphical displ
aphical displaphical display with keypad con
ay with keypad con
ay with keypad con
ay with keypad conay with keypad contr
tr
tr
trtrol panel, M554 models
ol panel, M554 models
ol panel, M554 models
ol panel, M554 models ol panel, M554 models
only)
only)
only)
only)only)
Use the control panel to obtain printer and job status information and to the printer.congure
NO
NO
NO
NONOTE:
TE:
TE:
TE:TE: For more information about the printer-control-panel features, go to www.hp.com/support/colorljM554.
Select , and then select .
Manuals
Manuals
Manuals
ManualsManuals General reference
General reference
General reference
General referenceGeneral reference
6 Chapter 1 Printer overview ENWW
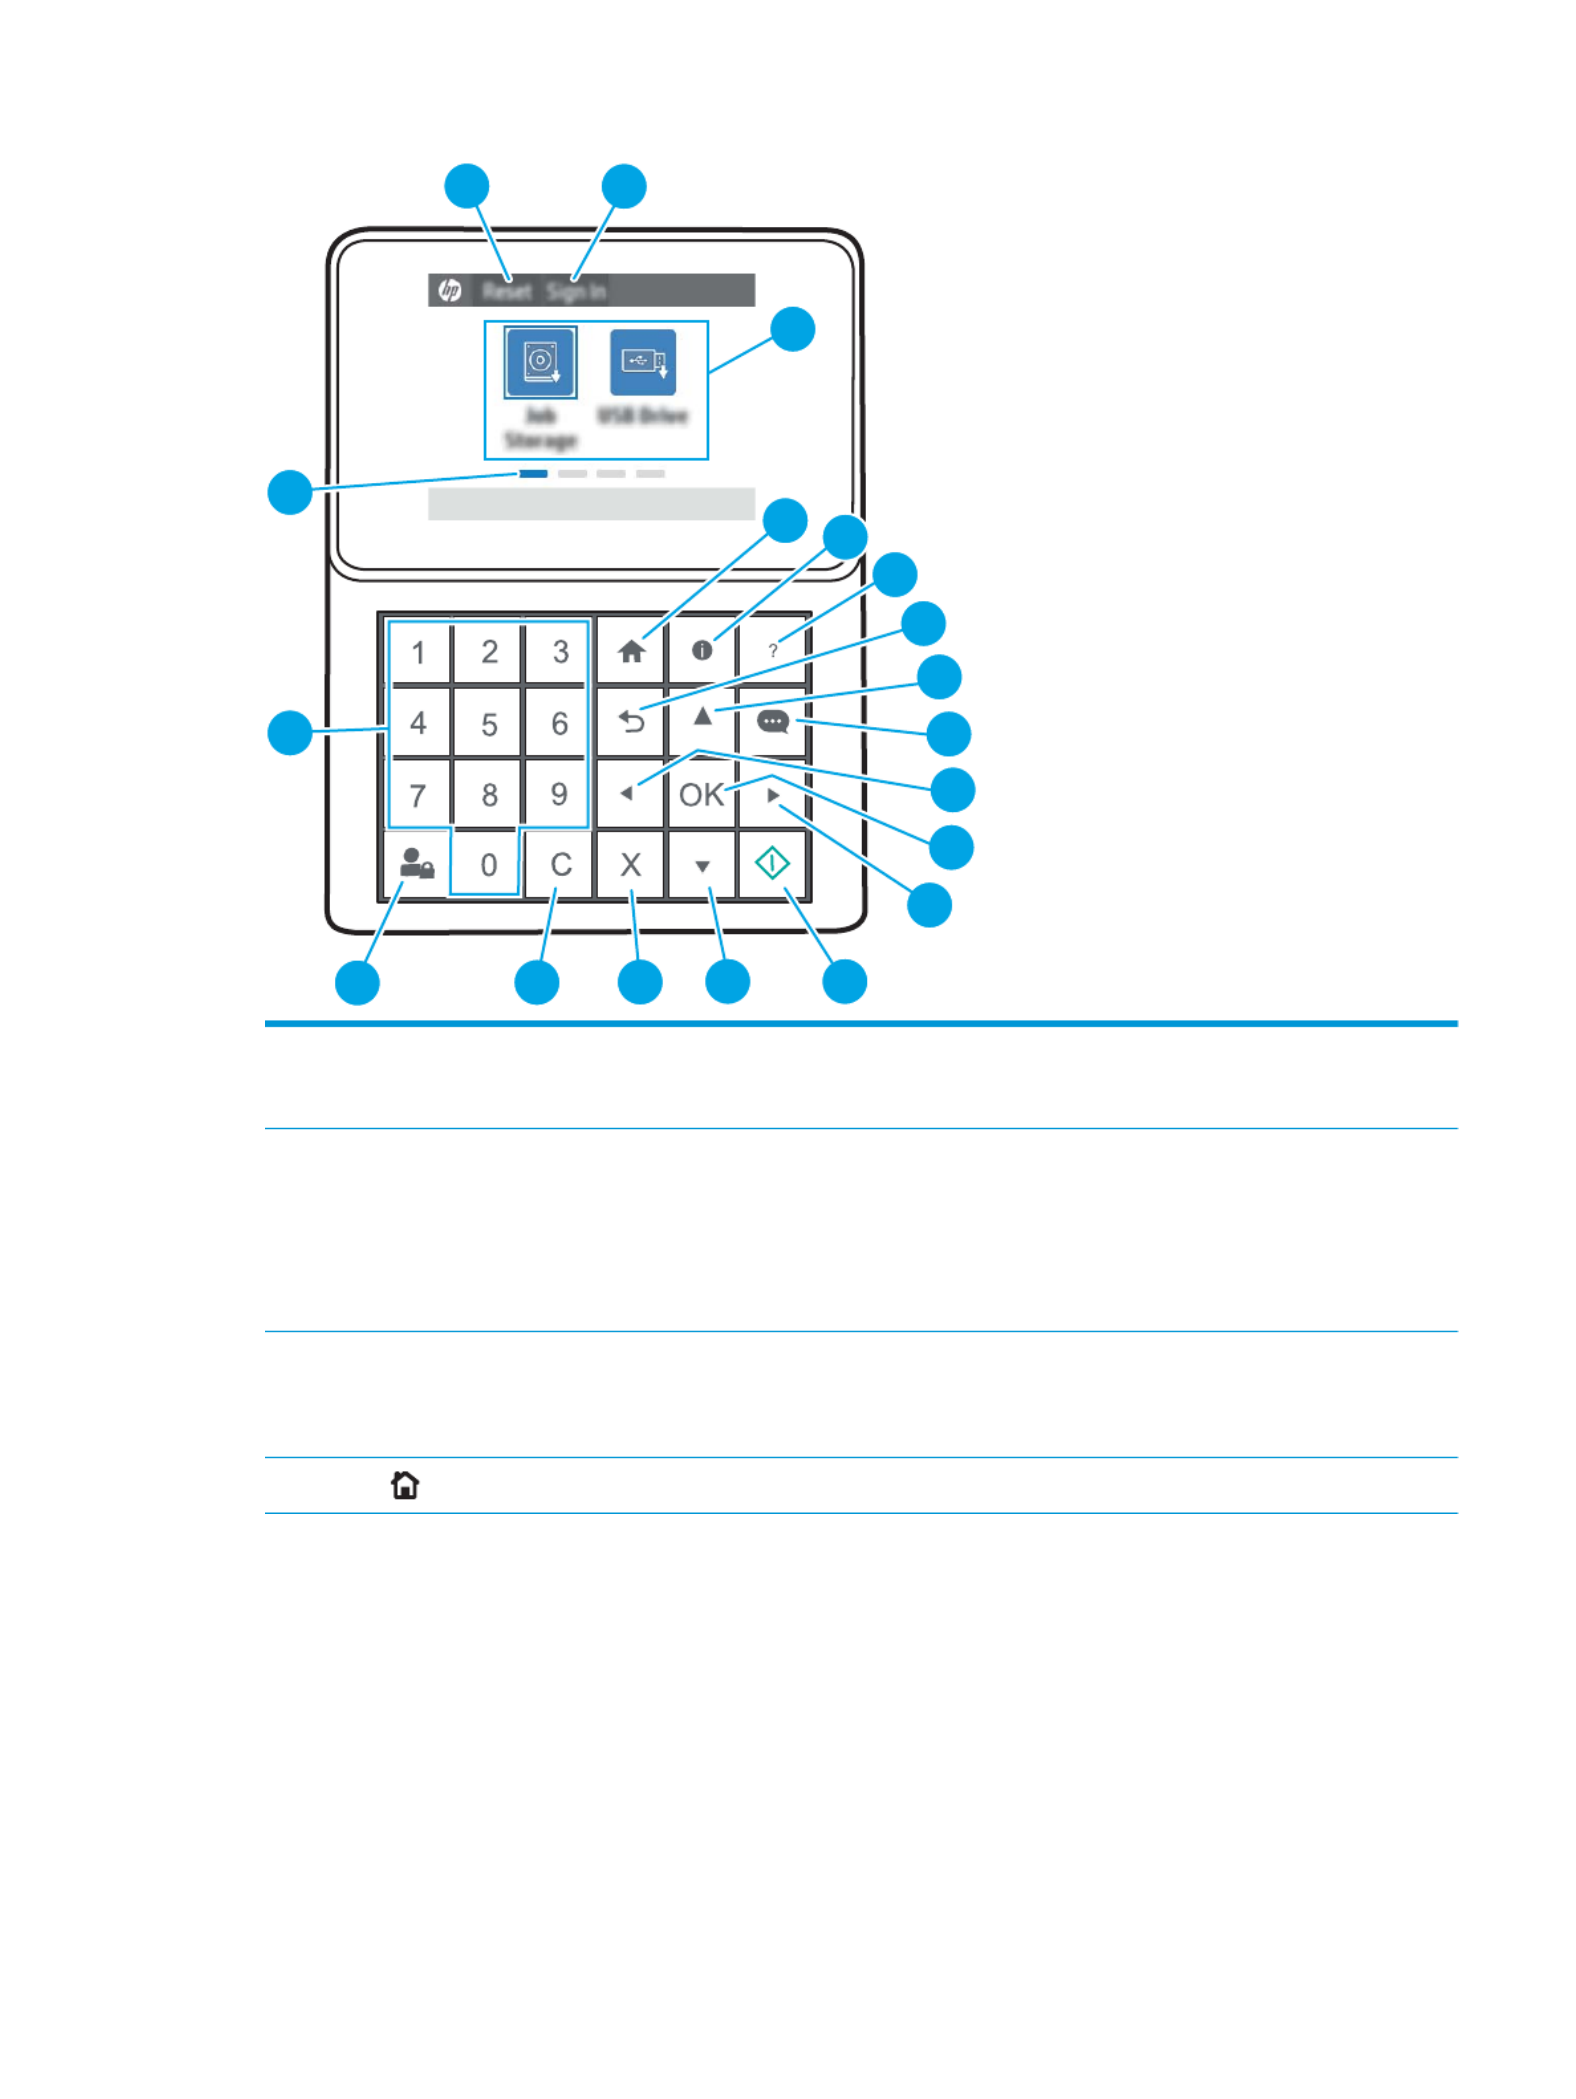
1
2
3
45
6
7
8
9
10
11
12
15
18
19
14
13
1617
1 button Select the button to clear changes, release the printer from a paused state, reset the copy count Reset Reset
eld, display hidden errors, and restore the default settings (including the language and keyboard
layout).
2 or icon Select the button to access secured features.Sign In Sign Out Sign In
Select the button to sign out of the printer. The printer restores all options to the default Sign Out
settings.
NO
NO
NO
NONOTE:
TE:
TE:
TE:TE: This icon displays only if the administrator has the printer to require permission for congured
access to features.
3 Applications area Select any of the icons to open the application.
NO
NO
NO
NONOTE:
TE:
TE:
TE:TE: The available applications vary by printer. The administrator can which applications congure
appear and the order in which they appear.
4Home button Returns to the Home screen
ENWW Printer views 7

23
4
6
8
7
1
5
1 button Touch the Reset button to clear changes, release the printer from a paused state, reset the copy count Reset
eld, display hidden errors, and restore the default settings (including the language and keyboard
layout).
2 or button Touch the button to access secured features.Sign In Sign Out Sign In
Touch the button to sign out of the printer. The printer restores all options to the default Sign Out
settings.
NO
NO
NO
NONOTE:
TE:
TE:
TE:TE: This button displays only if the administrator has the printer to require permission congured
for access to features.
3Information button Touch the information button to access a screen that provides access to several types of printer
information. Touch the buttons at the bottom of the screen for the following information:
●Display Language: Change the language setting for the current user session.
●Sleep Mode: Place the printer into sleep mode.
●Wi-Fi Direct: View information for how to connect directly to the printer using a phone, tablet, or
other device with Wi-Fi.
●Wireless: View or change wireless connection settings (wireless models only).
●Ethernet: View or change Ethernet connection settings.
●HP Web Services: View information to connect and print to the printer using HP Web Services
(ePrint).
4Help button Touch the Help button to open the embedded help system.
5 Current time Displays the current time.
6 Applications area Touch any of the icons to open the application. Swipe the screen sideways to access more applications.
NO
NO
NO
NONOTE:
TE:
TE:
TE:TE: The available applications vary by printer. The administrator can which applications congure
appear and the order in which they appear.
7 Home-screen page
indicator
Indicates the number of pages on the Home Screen or in an application. The current page is
highlighted. Swipe the screen sideways to scroll between pages.
8Home button Touch the Home button to return to the Home screen.
ENWW Printer views 9

How t
How t
How t
How tHow to use the to
o use the to
o use the to
o use the too use the touchscreen con
uchscreen con
uchscreen con
uchscreen conuchscreen control panel
trol panel
trol panel
trol paneltrol panel
Use the following actions to use the printer touchscreen control panel.
Action
Action
Action
ActionAction Description
Description
Description
DescriptionDescription Example
Example
Example
ExampleExample
T
T
T
TTouch
ouch
ouch
ouchouch Touch an item on the screen to select that item
or open that menu. Also, when scrolling through
menus, touch the screen to stop the briey
scrolling.
Touch the icon to open the app.Settings Settings
Swipe
Swipe
Swipe
SwipeSwipe Touch the screen and then move your nger
horizontally to scroll the screen sideways.
Swipe until the app displays.Settings
Scrol
Scrol
Scrol
ScrolScroll
l
l
ll Touch the screen and then move your nger
vertically to scroll the screen up and down. When
scrolling through menus, touch the screen briey
to stop the scrolling.
Scroll through the app.Settings
10 Chapter 1 Printer overview ENWW

Printer
Printer
Printer
Printer Printer specications
specications
specications
specicationsspecications
IMPORT
IMPORT
IMPORT
IMPORTIMPORTANT
ANT
ANT
ANTANT:
:
:
:: The following are correct at the time of publication, but they are subject to change. specications
For current information, see www.hp.com/support/colorljM554.
●Technical specications
●Supported operating systems
●Mobile printing solutions
●Printer dimensions
●Power consumption, electrical and acoustic emissionsspecications,
●Operating-environment range
Technical
Technical
Technical
Technical Technical specications
specications
specications
specicationsspecications
Model name
Model name
Model name
Model nameModel name Product number
Product number
Product number
Product numberProduct number
M554dn 7ZU81A
M555dn 7ZU78A
M555x 7ZU79A
T
T
T
TTable 1-1
able 1-1
able 1-1
able 1-1able 1-1 Paper handling
Paper handling
Paper handling
Paper handling Paper handling specications
specications
specications
specicationsspecications
Paper handling feature
Paper handling feature
Paper handling feature
Paper handling featurePaper handling features
s
s
ss M554dn
M554dn
M554dn
M554dnM554dn M555dn
M555dn
M555dn
M555dnM555dn M555x
M555x
M555x
M555xM555x
Tray 1 (100-sheet capacity)
Tray 2 (550-sheet capacity)
1 x 550-sheet paper feeder
NO
NO
NO
NONOTE:
TE:
TE:
TE:TE: Can accept up to three 1 x 550-
sheet paper feeders.
Optional Optional
Automatic duplex printing
Printer stand Optional Optional Optional
T
T
T
TTable 1-2
able 1-2
able 1-2
able 1-2able 1-2 Connectivity
Connectivity
Connectivity
Connectivity Connectivity specications
specications
specications
specicationsspecications
Connectivity feature
Connectivity feature
Connectivity feature
Connectivity featureConnectivity features
s
s
ss M554dn
M554dn
M554dn
M554dnM554dn M555dn
M555dn
M555dn
M555dnM555dn M555x
M555x
M555x
M555xM555x
10/100/1000 Ethernet LAN connection with
IPv4 and IPv6
Hi-Speed USB 2.0
Easy-access USB port for printing without a
computer and upgrading the rmware
Hardware Integration Pocket for connecting
accessory and third-party devices
HP Internal USB Ports Optional Optional Optional
ENWW Printer 11specications

T
T
T
TTable 1-2
able 1-2
able 1-2
able 1-2able 1-2 Connectivity
Connectivity
Connectivity
Connectivity Connectivity (c
(c
(c
(c (continued)
ontinued)
ontinued)
ontinued)ontinued)
specications
specications
specications
specicationsspecications
Connectivity feature
Connectivity feature
Connectivity feature
Connectivity featureConnectivity features
s
s
ss M554dn
M554dn
M554dn
M554dnM554dn M555dn
M555dn
M555dn
M555dnM555dn M555x
M555x
M555x
M555xM555x
HP Jetdirect LAN Accessory Optional Optional Optional
HP Jetdirect 3100w BLE/NFC/Wireless
Accessory for printing from mobile devices
NO
NO
NO
NONOTE:
TE:
TE:
TE:TE: Connected via the Hardware
Integration Pocket or the rear host USB
port. The HP Jetdirect 3100w BLE/NFC/
Wireless Accessory requires the HP Internal
USB ports accessory.
Optional Optional Optional
T
T
T
TTable 1-3
able 1-3
able 1-3
able 1-3able 1-3 Print
Print
Print
Print Print specications
specications
specications
specicationsspecications
Print features
Print features
Print features
Print featuresPrint features M554dn
M554dn
M554dn
M554dnM554dn M555dn
M555dn
M555dn
M555dnM555dn M555x
M555x
M555x
M555xM555x
Prints 56 pages per minute (ppm) on A4
and 35 ppm on letter-size paper
Not available Not available
Prints 56 ppm on A4 and 40 ppm on
letter-size paper
Not available
Easy-access USB printing (no computer
required)
Store jobs in the printer memory to print
later or print privately
T
T
T
TTable 1-4
able 1-4
able 1-4
able 1-4able 1-4 Mass st
Mass st
Mass st
Mass st Mass storage
orage
orage
orageorage
Mass st
Mass st
Mass st
Mass stMass storage
orage
orage
orageorage M554dn
M554dn
M554dn
M554dnM554dn M555dn
M555dn
M555dn
M555dnM555dn M555x
M555x
M555x
M555xM555x
4 GB embedded Multi-Media Controller
(eMMC)
HP Secure High Performance Hard Disk
Drive FIPS Drive
Optional Optional Optional
T
T
T
TTable 1-5
able 1-5
able 1-5
able 1-5able 1-5 Other
Other
Other
Other Other specications
specications
specications
specicationsspecications
Feature
Feature
Feature
FeatureFeature M554dn
M554dn
M554dn
M554dnM554dn M555dn
M555dn
M555dn
M555dnM555dn M555x
M555x
M555x
M555xM555x
1 GB base memory
NO
NO
NO
NONOTE:
TE:
TE:
TE:TE: The base memory is expandable to
2 GB by adding a DIMM memory module.
Security
Security
Security
SecuritySecurity: HP Trusted Platform Module for
encrypting all data that passes through the
printer
2.7-inch color graphics display with 10-key Not available Not available
Color touchscreen control panel Not available
12 Chapter 1 Printer overview ENWW

Supported operating sys
Supported operating sys
Supported operating sys
Supported operating sysSupported operating systems
tems
tems
temstems
Linux:
Linux:
Linux:
Linux:Linux: For information and print drivers for Linux, go to www.hp.com/go/linuxprinting.
UNIX:
UNIX:
UNIX:
UNIX:UNIX: For information and print drivers for UNIX®, go to www.hp.com/go/unixmodelscripts.
The following information applies to the Windows HP PCL 6 print drivers, HP print drivers for printer-specic
macOS, and to the software installer.
Windows:
Windows:
Windows:
Windows:Windows: Download HP Easy Start from 123.hp.com to install the HP print driver. Or, go to the printer-support
website for this printer: www.hp.com/support/colorljM554 to download the print driver or the software installer
to install the HP print driver.
macOS:
macOS:
macOS:
macOS:macOS: Mac computers are supported with this printer. Download HP Easy Start either from 123.hp.com or from
the Printer Support page, and then use HP Easy Start to install the HP print driver.
1.
1.
1.
1.1. Go to 123.hp.com.
2.
2.
2.
2.2. Follow the steps provided to download the printer software.
T
T
T
TTable 1-6
able 1-6
able 1-6
able 1-6able 1-6 Supported opera
Supported opera
Supported opera
Supported opera Supported operating systems and print drivers
ting systems and print drivers
ting systems and print drivers
ting systems and print driversting systems and print drivers
Operating system
Operating system
Operating system
Operating systemOperating system Print driver (f
Print driver (f
Print driver (f
Print driver (fPrint driver (for Windows, or the installer on the web f
or Windows, or the installer on the web f
or Windows, or the installer on the web f
or Windows, or the installer on the web for Windows, or the installer on the web for macOS)
or macOS)
or macOS)
or macOS)or macOS)
Windows 7, 32-bit and 64-bit The “HP PCL 6” print driver is installed for this printer-specic
operating system as part of the software installation.
Windows 8, 32-bit and 64-bit The “HP PCL 6” print driver is installed for this printer-specic
operating system as part of the software installation.
Windows 8.1, 32-bit and 64-bit The “HP PCL-6” V4 print driver is installed for this printer-specic
operating system as part of the software installation.
Windows 10, 32-bit and 64-bit The “HP PCL-6” V4 print driver is installed for this printer-specic
operating system as part of the software installation.
Windows Server 2008 R2, SP 1, 64-bit The PCL 6 print driver is available for download from printer-specic
the printer-support website. Download the driver, and then use the
Microsoft Add Printer tool to install it.
Windows Server 2012, 64-bit The PCL 6 print driver is available for download from printer-specic
the printer-support website. Download the driver, and then use the
Microsoft Add Printer tool to install it.
Windows Server 2012 R2, 64-bit The PCL 6 print driver is available for download from printer-specic
the printer-support website. Download the driver, and then use the
Microsoft Add Printer tool to install it.
Windows Server 2016, 64-bit The PCL 6 print driver is available for download from printer-specic
the printer-support website. Download the driver, and then use the
Microsoft Add Printer tool to install it.
Windows Server 2019, 64-bit The PCL 6 print driver is available for download from printer-specic
the printer-support website. Download the driver, and then use the
Microsoft Add Printer tool to install it.
macOS 10.13 High Sierra, macOS 10.14 Mojave, macOS 10.15
Catalina
Download HP Easy Start from , and then use it to install 123.hp.com
the print driver.
NO
NO
NO
NONOTE:
TE:
TE:
TE:TE: Supported operating systems can change.
ENWW Printer 13specications

NO
NO
NO
NONOTE:
TE:
TE:
TE:TE: For a current list of supported operating systems, go to www.hp.com/support/colorljM554 for HP's all-
inclusive help for the printer.
NO
NO
NO
NONOTE:
TE:
TE:
TE:TE: For details on client and server operating systems and for HP UPD driver support for this printer, go to
www.hp.com/go/upd. Under Additional inf
Additional inf
Additional inf
Additional infAdditional information
ormation
ormation
ormationormation, click the links.
T
T
T
TTable 1-7
able 1-7
able 1-7
able 1-7able 1-7 Minimum system requirements
Minimum system requirements
Minimum system requirements
Minimum system requirements Minimum system requirements
Windows
Windows
Windows
WindowsWindows macOS
macOS
macOS
macOSmacOS
●Internet connection
●Dedicated USB 1.1 or 2.0 connection or a network connection
●2 GB of available hard-disk space
●1 GB RAM (32-bit) or 2 GB RAM (64-bit)
●Internet connection
●Dedicated USB 1.1 or 2.0 connection or a network connection
●1.5 GB of available hard-disk space
NO
NO
NO
NONOTE:
TE:
TE:
TE:TE: The Windows software installer installs the HP Smart Device Agent Base service. The size is le
approximately 100 kb. Its only function is to check for printers connected via USB hourly. No data is collected. If a
USB printer is found, it then tries to locate a JetAdvantage Management Connector (JAMc) instance on the
network. If a JAMc is found, the HP Smart Device Agent Base is securely upgraded to a full Smart Device Agent
from JAMc, which will then allow printed pages to be accounted for in a Managed Print Services (MPS) account.
The driver-only web packs downloaded from hp.com for the printer and installed through the Add Printer wizard
do not install this service.
To uninstall the service, open the Contr
Contr
Contr
ContrControl Panel
ol Panel
ol Panel
ol Panelol Panel Progr
Progr
Progr
ProgrPrograms
ams
ams
amsams Programs and Fe
Programs and Fe
Programs and Fe
Programs and FePrograms and Features
atures
atures
aturesatures, select or , and then select
Add/Remove Pr
Add/Remove Pr
Add/Remove Pr
Add/Remove PrAdd/Remove Programs
ograms
ograms
ogramsograms Uninstall a Pr
Uninstall a Pr
Uninstall a Pr
Uninstall a PrUninstall a Program
ogram
ogram
ogramogram or to remove the service. The name is le
HPSmartDeviceAgentBase
HPSmartDeviceAgentBase
HPSmartDeviceAgentBase
HPSmartDeviceAgentBaseHPSmartDeviceAgentBase.
Mobile printing sol
Mobile printing sol
Mobile printing sol
Mobile printing solMobile printing solutions
utions
utions
utionsutions
HP multiple mobile printing solutions to enable easy printing to an HP printer from a laptop, tablet, oers
smartphone, or other mobile device. To see the full list and to determine the best choice, go to www.hp.com/go/
MobilePrinting.
NO
NO
NO
NONOTE:
TE:
TE:
TE:TE: Update the printer to ensure all mobile printing capabilities are supported.rmware
●Wi-Fi Direct (wireless models only, with HP Jetdirect 3100w BLE/NFC/Wireless accessory installed)
●HP ePrint via email (Requires HP Web Services to be enabled and the printer to be registered with
HP Connected)
●HP Smart app
●Google Cloud Print
●AirPrint
●Android Printing
14 Chapter 1 Printer overview ENWW

Printer dimensions
Printer dimensions
Printer dimensions
Printer dimensionsPrinter dimensions
Figure 1-1
Figure 1-1
Figure 1-1
Figure 1-1Figure 1-1 Product dimensions
K
C
M
Y
1
1
2
2
3
3
Dimension
Dimension
Dimension
DimensionDimension Product ful
Product ful
Product ful
Product fulProduct fully closed
ly closed
ly closed
ly closedly closed Product ful
Product ful
Product ful
Product fulProduct fully opened
ly opened
ly opened
ly openedly opened
1. Height 399 mm (15.7 in) 399 mm (15.7 in)
2. Depth 479 mm (18.9 in) 771 mm (30.4 in)
3. Width 458 mm (18.0 in) 826 mm (32.5 in)
Weight 27.5 kg (60.6 lb)
Figure 1-2
Figure 1-2
Figure 1-2
Figure 1-2Figure 1-2 Dimensions for the 1 x 550-sheet paper feeder
32
2
1
3
Dimension
Dimension
Dimension
DimensionDimension Measurement
Measurement
Measurement
MeasurementMeasurement
1. Height 130 mm (5.1 in)
2. Depth Tray closed: 458 mm (18.0 in)
Tray opened: 771 mm (30.4 in)
3. Width Lower-right door closed: 458 mm (18.0 in)
Lower-right door opened: 853 mm (33.6 in)
Weight 5.8 kg (12.8 lb)
ENWW Printer 15specications

Figure 1-3
Figure 1-3
Figure 1-3
Figure 1-3Figure 1-3 Dimensions for the stand
1
2
2
3
Dimension
Dimension
Dimension
DimensionDimension Measurement
Measurement
Measurement
MeasurementMeasurement
1. Height 295 mm (11.6 in)
2. Depth Door closed: 465 mm (18.3 in)
Door opened: 900 mm (35.4 in)
3. Width 460 mm (18.1 in)
This value is subject to change. For current information, go to www.hp.com/support/colorljM554.
Weight 17.7 kg (39 lb)
This value is subject to change. For current information, go to www.hp.com/support/colorljM554.
Figure 1-4
Figure 1-4
Figure 1-4
Figure 1-4Figure 1-4 Dimensions for the printer with the 1 x 550-sheet paper tray and stand
1
2
2
3
3
1
Dimension
Dimension
Dimension
DimensionDimension Product and acces
Product and acces
Product and acces
Product and accesProduct and accessories fully cl
sories fully cl
sories fully cl
sories fully clsories fully closed
osed
osed
osedosed Product and acces
Product and acces
Product and acces
Product and accesProduct and accessories fully opened
sories fully opened
sories fully opened
sories fully openedsories fully opened
1. Height 876 mm (34.5 in) 876 mm (34.5 in)
2. Depth 479 mm (18.9 in) 900 mm (35.4 in)
16 Chapter 1 Printer overview ENWW

Dimension
Dimension
Dimension
DimensionDimension Product and acces
Product and acces
Product and acces
Product and accesProduct and accessories fully cl
sories fully cl
sories fully cl
sories fully clsories fully closed
osed
osed
osedosed Product and acces
Product and acces
Product and acces
Product and accesProduct and accessories fully opened
sories fully opened
sories fully opened
sories fully openedsories fully opened
3. Width 458 mm (18.0 in) 853 mm (33.6 in)
Weight 51.1 kg (112.7 lb)
Po
Po
Po
PoPower consumption, electrical
wer consumption, electrical
wer consumption, electrical
wer consumption, electrical wer consumption, electrical and ac
and ac
and ac
and ac and aco
o
o
ooustic emis
ustic emis
ustic emis
ustic emisustic emissions
sions
sions
sionssions
specications,
specications,
specications,
specications,specications,
See www.hp.com/support/colorljM554 for current information.
CAUTION:
CAUTION:
CAUTION:
CAUTION:CAUTION: Power requirements are based on the country/region where the product is sold. Do not convert
operating voltages. This will damage the product and void the product warranty.
Operating-en
Operating-en
Operating-en
Operating-enOperating-envir
vir
vir
virvironment r
onment r
onment r
onment ronment range
ange
ange
angeange
T
T
T
TTable 1-8
able 1-8
able 1-8
able 1-8able 1-8 Operating-envir
Operating-envir
Operating-envir
Operating-envir Operating-environment
onment
onment
onment onment specications
specications
specications
specicationsspecications
Environmen
Environmen
Environmen
EnvironmenEnvironment
t
t
tt Recommended
Recommended
Recommended
RecommendedRecommended All
All
All
AllAllowed
owed
owed
owedowed
Temperature 15° to 27°C (59° to 80.6°F) 10° to 32.5°C (50° to 90.5°F)
Relative humidity 30% to 70% relative humidity (RH) 10% to 80% RH
ENWW Printer 17specications

Printer hardw
Printer hardw
Printer hardw
Printer hardwPrinter hardware setup and softw
are setup and softw
are setup and softw
are setup and software setup and software instal
are instal
are instal
are instalare installa
la
la
lalation
tion
tion
tiontion
For basic setup instructions, see the Hardware Installation Guide that came with the printer. For additional
instructions, go to HP support on the Web.
Go to www.hp.com/support/colorljM554 for HP's all-inclusive help for the printer. Find the following support:
●Install and congure
●Learn and use
●Solve problems
●Download software and updatesrmware
●Join support forums
●Find warranty and regulatory information
18 Chapter 1 Printer overview ENWW

2
2
2
22 P
P
P
PPaper trays
aper trays
aper trays
aper traysaper trays
●Load paper to Tray 1
●Load paper to Trays 2, 3, 4, and 5
●Load envelopes
●Load and print labels
For more inf
For more inf
For more inf
For more infFor more information
ormation
ormation
ormationormation
The following information is correct at the time of publication.
For video assistance, see www.hp.com/videos/LaserJet.
For current information, see www.hp.com/support/colorljM554.
HP's all-inclusive help for the printer includes the following information:
●Install and congure
●Learn and use
●Solve problems
●Download software and updatesrmware
●Join support forums
●Find warranty and regulatory information
ENWW 19

Lo
Lo
Lo
LoLoad paper t
ad paper t
ad paper t
ad paper tad paper to Tray 1
o Tray 1
o Tray 1
o Tray 1o Tray 1
Intr
Intr
Intr
IntrIntroduction
oduction
oduction
oductionoduction
The following information describes how to load paper and envelopes into Tray 1. This tray holds up to 100
sheets of 75 g/m2 (20 lb) paper or 10 envelopes.
CAUTION:
CAUTION:
CAUTION:
CAUTION:CAUTION: To avoid jams, never add or remove paper from Tray 1 during printing.
1.
1.
1.
1.1. Open Tray 1.
2.
2.
2.
2.2. Pull out the tray extension to support the paper.
20 Chapter 2 Paper trays ENWW
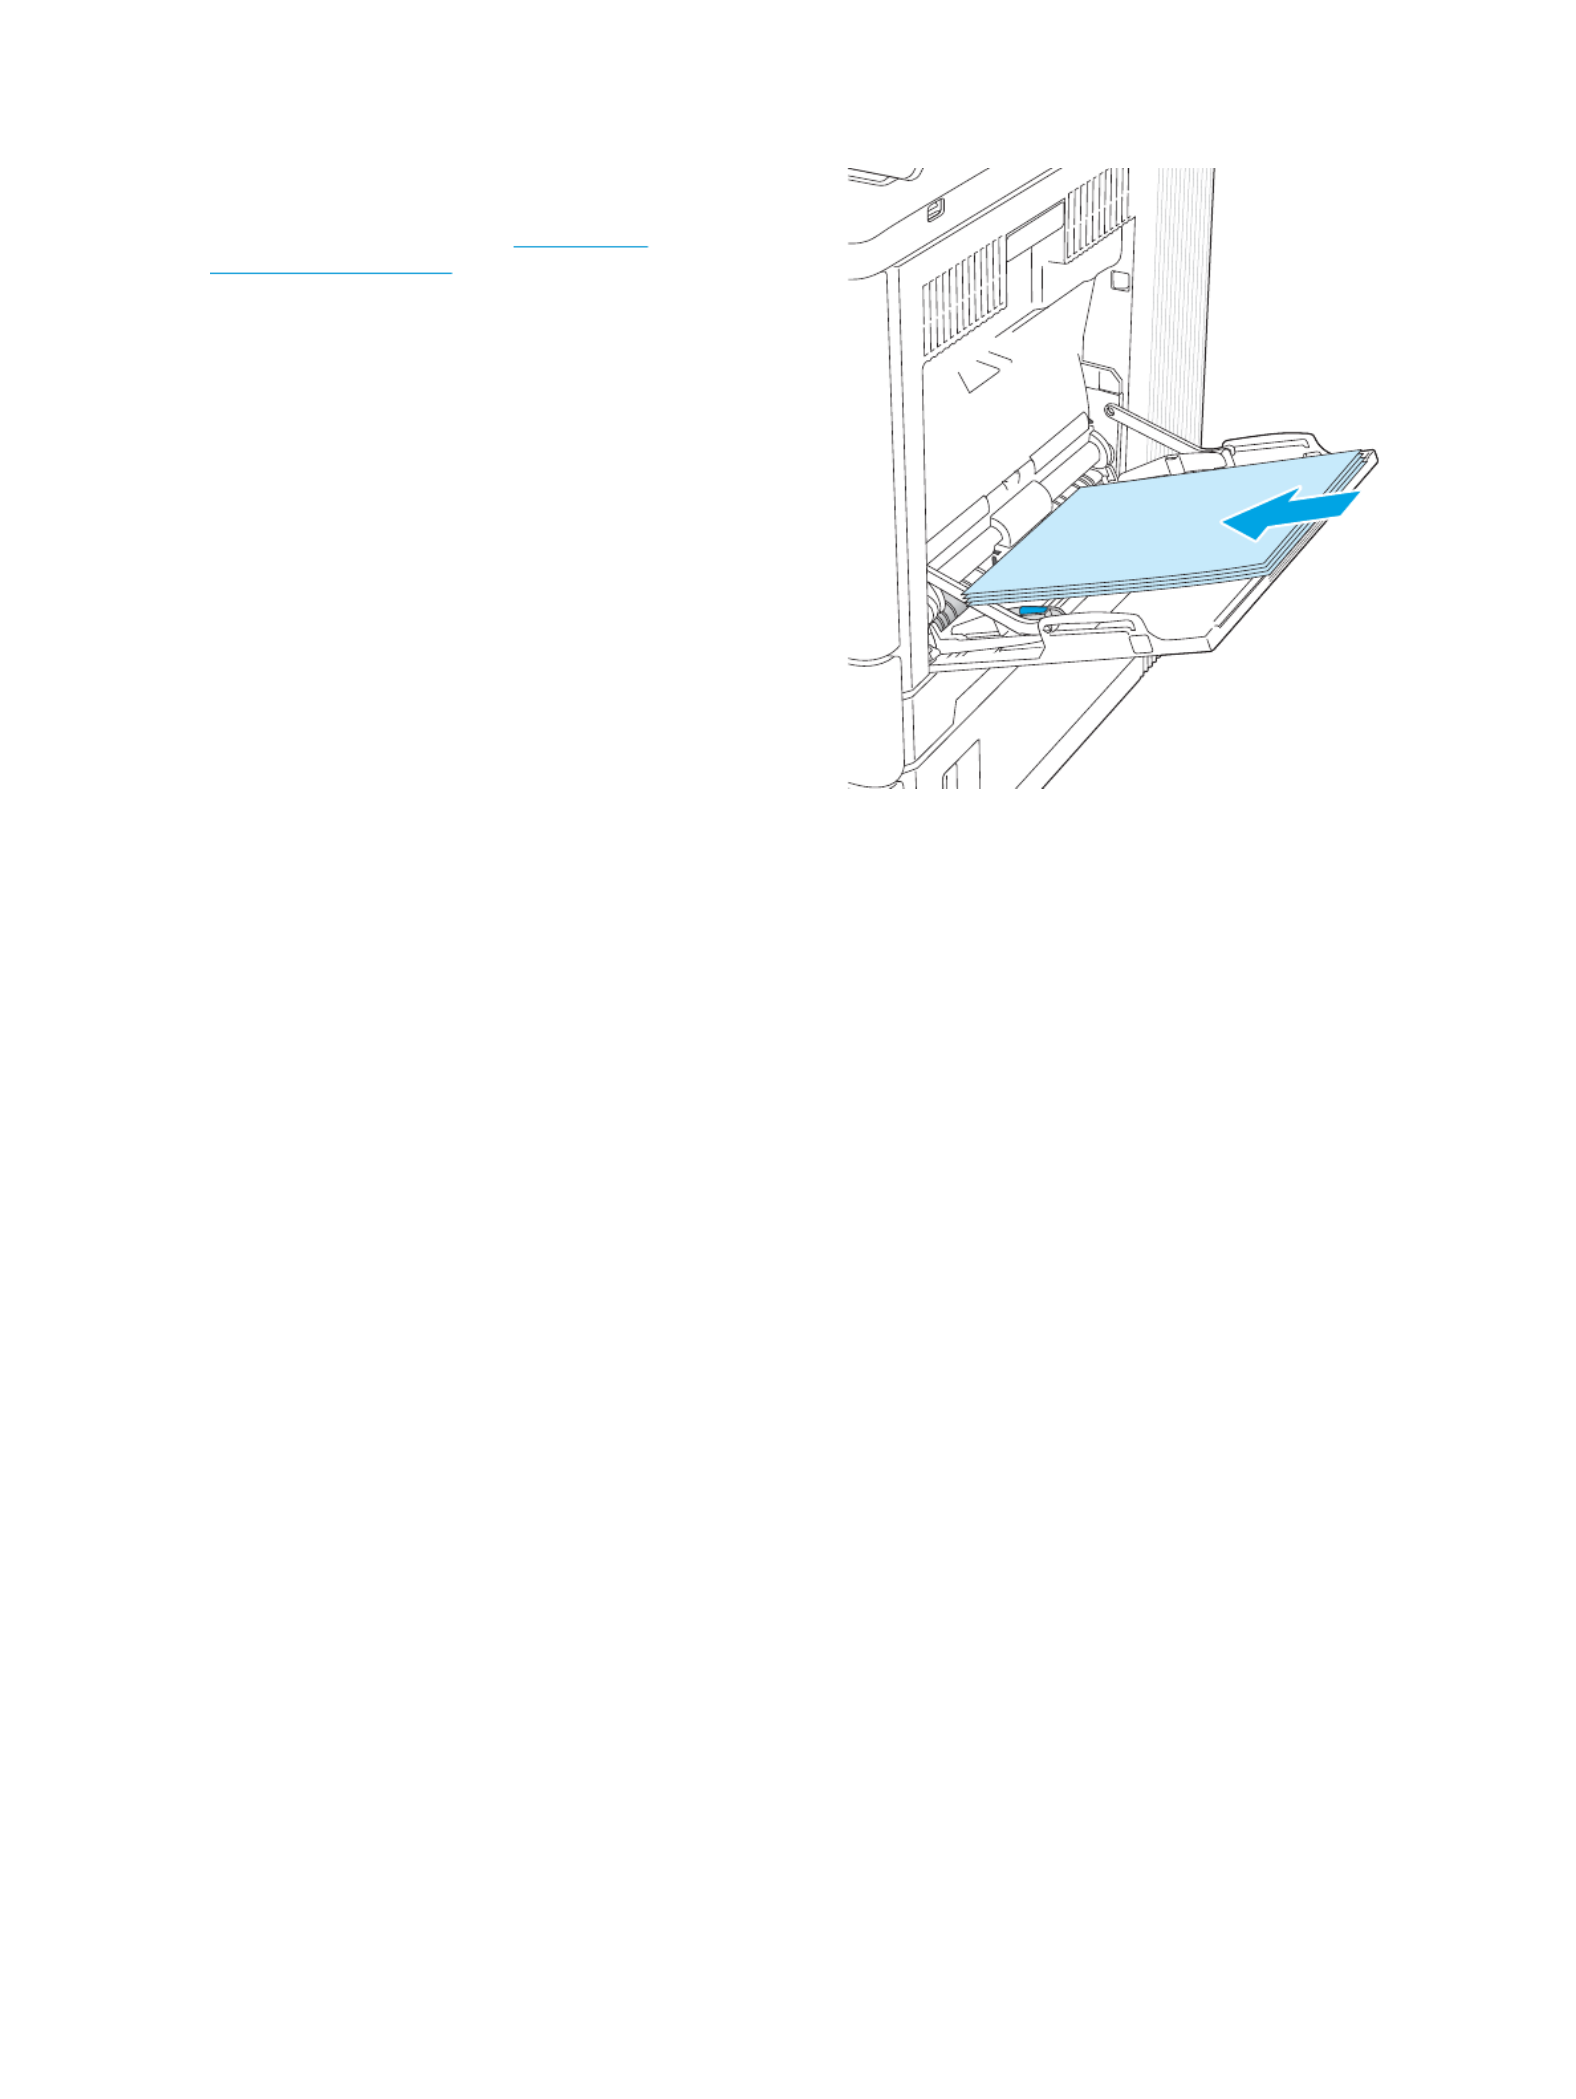
3.
3.
3.
3.3. Spread the paper guides to the correct size, an
then load paper in the tray. For information about
how to orient the paper, see Tray 1 paper
orientation on page 23.
ENWW Load paper to Tray 1 21

4.
4.
4.
4.4. Make sure that the paper under the line on ts ll
the paper guides.
5.
5.
5.
5.5. Adjust the side guides so that they lightly touch the
paper stack, but do not bend it.
22 Chapter 2 Paper trays ENWW

Tray 1 paper orienta
Tray 1 paper orienta
Tray 1 paper orienta
Tray 1 paper orientaTray 1 paper orientation
tion
tion
tiontion
When using paper that requires a orientation, load it according to the information in the following table.specic
NO
NO
NO
NONOTE:
TE:
TE:
TE:TE: The Alternative Letterhead Mode settings the way to load letterhead or preprinted paper. This aects
setting is disabled by default. When using this mode, load paper as for automatic duplex printing. For more
information, see Use alternative letterhead mode on page 24.
T
T
T
TTable 2-1
able 2-1
able 2-1
able 2-1able 2-1 Tray 1 paper orientation
Tray 1 paper orientation
Tray 1 paper orientation
Tray 1 paper orientation Tray 1 paper orientation
Paper type
Paper type
Paper type
Paper typePaper type Image Orientation
Image Orientation
Image Orientation
Image OrientationImage Orientation Single-sided printing
Single-sided printing
Single-sided printing
Single-sided printingSingle-sided printing Duplex printing or with Al
Duplex printing or with Al
Duplex printing or with Al
Duplex printing or with AlDuplex printing or with Alternative
ternative
ternative
ternative ternative
Letterhead Mode enabled
Letterhead Mode enabled
Letterhead Mode enabled
Letterhead Mode enabledLetterhead Mode enabled
Letterhead or preprinted Portrait Face-down
Top edge leading into the product
Face-up
Bottom edge leading into the
product
ENWW Load paper to Tray 1 23

Lo
Lo
Lo
LoLoad paper t
ad paper t
ad paper t
ad paper tad paper to Trays 2, 3, 4, and 5
o Trays 2, 3, 4, and 5
o Trays 2, 3, 4, and 5
o Trays 2, 3, 4, and 5o Trays 2, 3, 4, and 5
Intr
Intr
Intr
IntrIntroduction
oduction
oduction
oductionoduction
The following information describes how to load paper in Tray 2 and the optional 550-sheet trays (Trays 3, 4,
and 5; part number B5L34A). These trays hold up to 550 sheets of 75 g/m2 (20 lb) paper.
NO
NO
NO
NONOTE:
TE:
TE:
TE:TE: The procedure to load paper for the optional 550-sheet trays is the same as for Tray 2. Only Tray 2 is
shown here.
NO
NO
NO
NONOTE:
TE:
TE:
TE:TE: If your printer includes tray locks, see the Hardware Install Guide for instructions about installing them. If
you do not have access to the Hardware Install Guide, note your printer model number and go to the printer
support website: www.hp.com/support/colorljM554.
NO
NO
NO
NONOTE:
TE:
TE:
TE:TE: The paper guides may be locked before use and may not be adjustable.
1.
1.
1.
1.1. Open the tray.
NO
NO
NO
NONOTE:
TE:
TE:
TE:TE: Do not open this tray while it is in use.
2.
2.
2.
2.2. Before loading paper, adjust the paper guides by
squeezing the adjustment latches and sliding the
guides to the size of the paper being used.
ENWW Load paper to Trays 2, 3, 4, and 5 25

3.
3.
3.
3.3. Load paper into the tray. Check the paper to verify
the guides lightly touch the stack, but do not bend
it. For information about how to orient the paper,
see Trays 2, 3, 4, and 5 paper orientation
on page 27.
NO
NO
NO
NONOTE:
TE:
TE:
TE:TE: To prevent jams, adjust the paper guides
to the correct size and do not the tray. Be overll
sure that the top of the stack is below the tray full
indicator.
4.
4.
4.
4.4. Close the tray.
5.
5.
5.
5.5. The tray message displays on the conguration
product control panel.
6.
6.
6.
6.6. If the paper size and type shown is not correct,
select to choose a paper size or Modify dierent
type.
For custom-size paper, specify the X and Y
dimensions for the paper when the prompt
displays on the product control panel.
YX
26 Chapter 2 Paper trays ENWW

Trays 2, 3, 4, and 5 paper orienta
Trays 2, 3, 4, and 5 paper orienta
Trays 2, 3, 4, and 5 paper orienta
Trays 2, 3, 4, and 5 paper orientaTrays 2, 3, 4, and 5 paper orientation
tion
tion
tiontion
When using paper that requires a orientation, load it according to the information in the following table.specic
NO
NO
NO
NONOTE:
TE:
TE:
TE:TE: The Alternative Letterhead Mode settings the way to load letterhead or preprinted paper. This aects
setting is disabled by default. When using this mode, load paper as for automatic duplex printing. For more
information, see Use alternative letterhead mode on page 28.
T
T
T
TTable 2-2
able 2-2
able 2-2
able 2-2able 2-2 Trays 2, 3, 4, and 5 paper orientation
Trays 2, 3, 4, and 5 paper orientation
Trays 2, 3, 4, and 5 paper orientation
Trays 2, 3, 4, and 5 paper orientation Trays 2, 3, 4, and 5 paper orientation
Paper type
Paper type
Paper type
Paper typePaper type Image Orientation
Image Orientation
Image Orientation
Image OrientationImage Orientation Single-sided printing
Single-sided printing
Single-sided printing
Single-sided printingSingle-sided printing Duplex printing or with Al
Duplex printing or with Al
Duplex printing or with Al
Duplex printing or with AlDuplex printing or with Alternative
ternative
ternative
ternative ternative
Letterhead Mode enabled
Letterhead Mode enabled
Letterhead Mode enabled
Letterhead Mode enabledLetterhead Mode enabled
Letterhead or preprinted Portrait Face-up
Top edge toward the right
Face-down
Top edge toward the left
Letterhead or preprinted Landscape Face up
Top edge toward the back of the
product
Face down
Top edge toward the back of the
product
Prepunched Portrait or landscape Holes toward the back of the
product
Holes toward the back of the
product
ENWW Load paper to Trays 2, 3, 4, and 5 27

Lo
Lo
Lo
LoLoad envel
ad envel
ad envel
ad envelad envelopes
opes
opes
opesopes
Intr
Intr
Intr
IntrIntroduction
oduction
oduction
oductionoduction
The following information describes how to load envelopes. Use only Tray 1 to print on envelopes. Tray 1 holds
up to 10 envelopes.
NO
NO
NO
NONOTE:
TE:
TE:
TE:TE: Select the correct paper type in the print driver before printing.
Envel
Envel
Envel
EnvelEnvelope orientation
ope orientation
ope orientation
ope orientationope orientation
Load envelopes in either of these orientations:
Face-down
Top edge toward the back of the product
Face-down
Top edge leading into the product
ENWW Load envelopes 29

Lo
Lo
Lo
LoLoad and print l
ad and print l
ad and print l
ad and print lad and print labels
abels
abels
abelsabels
Intr
Intr
Intr
IntrIntroduction
oduction
oduction
oductionoduction
To print on sheets of labels, use Tray 2 or one of the optional 550-sheet trays. Tray 1 does not support labels.
To print labels using the manual feed option, follow these steps to select the correct settings in the print driver,
and then load the labels into the tray after sending the print job to the printer. When using manual feed, the
printer waits to print the job until it detects the tray has been opened and closed.
Manually feed l
Manually feed l
Manually feed l
Manually feed lManually feed labels
abels
abels
abelsabels
1.
1.
1.
1.1. From the software program, select the option.
Print
Print
Print
PrintPrint
2.
2.
2.
2.2. Select the printer from the list of printers, and then click or tap the Pr
Pr
Pr
PrProperties
operties
operties
opertiesoperties Preference
Preference
Preference
PreferencePreferences
s
s
ss or button to
open the print driver.
NO
NO
NO
NONOTE:
TE:
TE:
TE:TE: The name of the button varies for software programs.dierent
NO
NO
NO
NONOTE:
TE:
TE:
TE:TE: To access these features from a Windows 8 or 8.1 Start screen, select , select , and
Devices
Devices
Devices
DevicesDevices Print
Print
Print
PrintPrint
then select the printer.
3.
3.
3.
3.3. Click or tap the Paper
Paper
Paper
PaperPaper/Quality
/Quality
/Quality
/Quality/Quality tab.
4.
4.
4.
4.4. In the drop-down list, select the correct size for the sheets of labels.
Paper size
Paper size
Paper size
Paper sizePaper size
5.
5.
5.
5.5. In the drop-down list, select .
Paper type
Paper type
Paper type
Paper typePaper type Labels
Labels
Labels
LabelsLabels
6.
6.
6.
6.6. In the drop-down list, select .
Paper source
Paper source
Paper source
Paper sourcePaper source Manual feed
Manual feed
Manual feed
Manual feedManual feed
NO
NO
NO
NONOTE:
TE:
TE:
TE:TE: When using manual feed, the printer prints from the lowest-numbered tray that is for congured
the correct size of paper, so it is not necessary to specify a particular tray. For example, if Tray 2 is
congured for labels, the printer will print from Tray 2. If Tray 3 is installed and for labels, but congured
Tray 2 is not for labels, the printer will print from Tray 3.congured
7.
7.
7.
7.7. Click the button to close the
OK
OK
OK
OKOK Document Pr
Document Pr
Document Pr
Document PrDocument Properties
operties
operties
opertiesoperties dialog box.
8.
8.
8.
8.8. In the dialog box, click the button to print the job.
Print
Print
Print
PrintPrint OK
OK
OK
OKOK
30 Chapter 2 Paper trays ENWW

9.
9.
9.
9.9. Load sheets of labels face-up with the top of the sheet toward the right side of the printer.
ENWW Load and print labels 31

32 Chapter 2 Paper trays ENWW

3
3
3
33 Supplies, acces
Supplies, acces
Supplies, acces
Supplies, accesSupplies, accessories, and parts
sories, and parts
sories, and parts
sories, and partssories, and parts
●Order supplies, accessories, and parts
●Replace the toner cartridges
●Replace the toner-collection unit
For more inf
For more inf
For more inf
For more infFor more information
ormation
ormation
ormationormation
The following information is correct at the time of publication.
For video assistance, see www.hp.com/videos/LaserJet.
For current information, see www.hp.com/support/colorljM554.
HP's all-inclusive help for the printer includes the following information:
●Install and congure
●Learn and use
●Solve problems
●Download software and updatesrmware
●Join support forums
●Find warranty and regulatory information
ENWW 33

Order supplies, acces
Order supplies, acces
Order supplies, acces
Order supplies, accesOrder supplies, accessories, and parts
sories, and parts
sories, and parts
sories, and partssories, and parts
Ordering
Ordering
Ordering
OrderingOrdering
Order supplies and paper www.hp.com
Order genuine HP parts or accessories www.hp.com/buy/parts
Order through service or support providers Contact an HP-authorized service or support provider.
Order using the HP Embedded Web Server (EWS) To access, in a supported Web browser on your computer, enter the
product IP address or host name in the address/URL The EWS eld.
contains a link to the HP SureSupply website, which provides
options for purchasing Original HP supplies.
Supplies and acces
Supplies and acces
Supplies and acces
Supplies and accesSupplies and accessories
sories
sories
soriessories
T
T
T
TTable 3-1
able 3-1
able 3-1
able 3-1able 3-1 Supplies
Supplies
Supplies
Supplies Supplies
Item
Item
Item
ItemItem Description
Description
Description
DescriptionDescription Part number
Part number
Part number
Part numberPart number
HP 212A Black Original LaserJet Toner Cartridge Standard-capacity replacement black toner cartridge W2120A
HP 212A Cyan Original LaserJet Toner Cartridge Standard-capacity replacement cyan cartridge W2121A
HP 212A Yellow Original LaserJet Toner Cartridge Standard-capacity replacement yellow toner cartridge W2122A
HP 212A Magenta Original LaserJet Toner Cartridge Standard-capacity replacement magenta toner
cartridge
W2123A
HP 212X High Yield Black Original LaserJet Toner
Cartridge
High-capacity replacement black toner cartridge W2120X
HP 212X High Yield Cyan Original LaserJet Toner
Cartridge
High-capacity replacement cyan toner cartridge W2121X
HP 212X High Yield Yellow Original LaserJet Toner
Cartridge
High-capacity replacement yellow toner cartridge W2122X
HP 212X High Yield Magenta Original LaserJet Toner
Cartridge
High-capacity replacement magenta toner cartridge W2123X
HP toner-collection unit Replacement toner-collection unit with attached door B5L37A
T
T
T
TTable 3-2
able 3-2
able 3-2
able 3-2able 3-2 Accessories
Accessories
Accessories
Accessories Accessories
Item
Item
Item
ItemItem Description
Description
Description
DescriptionDescription Part number
Part number
Part number
Part numberPart number
550-sheet paper feeder Optional 550-sheet paper feeder (included with
the x model)
Includes installation instructions
B5L34A
HP LaserJet Stand Optional stand to support the printer
Includes installation instructions
B5L51A
HP Secure High-Performance Hard Disk Drive Optional hard drive
Includes installation instructions
B5L29A
34 Chapter 3 Supplies, accessories, and parts ENWW

Item
Item
Item
ItemItem Description
Description
Description
DescriptionDescription Self
Self
Self
SelfSelf-replacement options
-replacement options
-replacement options
-replacement options-replacement options Part number
Part number
Part number
Part numberPart number
Tray 1 Roller kit Replacement rollers for Tray 1
Includes installation instructions
Optional B5L24-67905
Control-panel SVGA kit Replacement touchscreen control panel for
the x model
Includes installation instructions
Mandatory B5L24-67903
HDD 500GB Kit
NO
NO
NO
NONOTE:
TE:
TE:
TE:TE: M555 models only
Replacement HP Secure High-Performance
Hard Disk Drive
Includes installation instructions
Mandatory B5L29-67903
USB Wireless Print Server kit Replacement HP Jetdirect 2900nw Print
Server
Mandatory 5851-6421
NFC Accessory kit HP Jetdirect 3100w BLE/NFC/Wireless
Accessory
Mandatory 3JN69-61001
1GB DDR3 Memory DIMM
NO
NO
NO
NONOTE:
TE:
TE:
TE:TE: M555 models only
Replacement memory DIMM
Includes installation instructions
Mandatory 5851-6422
Two Internal USB Ports kit Replacement internal USB ports Mandatory 5851-6424
36 Chapter 3 Supplies, accessories, and parts ENWW

Replace the t
Replace the t
Replace the t
Replace the tReplace the toner cartridges
oner cartridges
oner cartridges
oner cartridgesoner cartridges
Intr
Intr
Intr
IntrIntroduction
oduction
oduction
oductionoduction
The following information provides details about the toner cartridges for the product, and it includes instructions
to replace them.
●Toner-cartridge information
●Remove and replace the cartridges
T
T
T
TToner
oner
oner
oneroner-cartridge information
-cartridge information
-cartridge information
-cartridge information-cartridge information
This product indicates when the toner-cartridge level is low and very low. The actual toner cartridge life
remaining can vary. Consider having a replacement cartridge available to install when print quality is no longer
acceptable.
The product uses four colors and has a toner cartridge for each color: yellow (Y), magenta (M), cyan (C), dierent
and black (K). The toner cartridges are inside the front door.
Continue printing with the current cartridge until redistributing the toner no longer yields acceptable print
quality. To redistribute the toner, remove the toner cartridge from the printer and gently rock the cartridge back
and forth end to end. Reinsert the toner cartridge into the printer and close the cover.
NO
NO
NO
NONOTE:
TE:
TE:
TE:TE: High-yield toner cartridges contain more toner than standard cartridges for increased page yield. For
more information, go to www.hp.com/go/learnaboutsupplies.
Do not remove the toner cartridge from its package until it is time to replace it.
CAUTION:
CAUTION:
CAUTION:
CAUTION:CAUTION: To prevent damage to the toner cartridge, do not expose it to light for more than a few minutes.
Cover the green imaging drum if the toner cartridge must be removed from the product for an extended period
of time.
The following illustration shows the toner-cartridge components.
1
2
3
4
1 Handle
2 Imaging drum
ENWW Replace the toner cartridges 37

3 Protective shield
4 Memory chip
CAUTION:
CAUTION:
CAUTION:
CAUTION:CAUTION: If toner gets on clothing, wipe it by using a dry cloth and wash the clothes in cold water. Hot water o
sets toner into fabric.
NO
NO
NO
NONOTE:
TE:
TE:
TE:TE: Information about recycling used toner cartridges is in the toner-cartridge box.
Remove and repl
Remove and repl
Remove and repl
Remove and replRemove and replace the cartridges
ace the cartridges
ace the cartridges
ace the cartridgesace the cartridges
1.
1.
1.
1.1. Open the front door.
K
C
M
Y
2.
2.
2.
2.2. Grasp the handle of the used toner cartridge and
pull out to remove it.
38 Chapter 3 Supplies, accessories, and parts ENWW

3.
3.
3.
3.3. Remove the new toner cartridge from its
protective shell by tearing the plastic strip and o
opening the package. Save all packaging for
recycling the used toner cartridge.
1
2
3
4.
4.
4.
4.4. Hold both ends of the toner cartridge and rock it
5-6 times.
5.
5.
5.
5.5. Remove the protective shield from the toner
cartridge.
ENWW Replace the toner cartridges 39

6.
6.
6.
6.6. Support the toner cartridge underneath with one
hand while holding the cartridge handle with the
other. Align the toner cartridge with its slot on the
shelf, and then insert the toner cartridge into the
product.
NO
NO
NO
NONOTE:
TE:
TE:
TE:TE: Avoid touching the green imaging drum.
Fingerprints on the imaging drum can cause print
defects.
7.
7.
7.
7.7. Close the front door.
K
C
M
Y
8.
8.
8.
8.8. Pack the used toner cartridge into the box that the
new cartridge came in, or use a large cardboard
box and it with several cartridges that you need ll
to recycle. See the enclosed recycling guide for
information about recycling.
In the U.S., a pre-paid shipping label is included in
the box. In other countries/regions, go to
www.hp.com/recycle to print a pre-paid shipping
label.
Adhere the pre-paid shipping label to the box, and
return the used cartridge to HP for recycling.
2
1
3
40 Chapter 3 Supplies, accessories, and parts ENWW

Replace the t
Replace the t
Replace the t
Replace the tReplace the toner
oner
oner
oneroner-c
-c
-c
-c-collection unit
ollection unit
ollection unit
ollection unitollection unit
Intr
Intr
Intr
IntrIntroduction
oduction
oduction
oductionoduction
The following information provides details about the toner-collection unit for the product, and it includes
instructions to replace it.
The product indicates when the toner-collection unit is nearly full and when it is completely full. When it is
completely full, printing stops until the toner-collection unit is replaced.
To purchase a toner-collection unit (part number B5L37A), go to the HP Parts Store at www.hp.com/buy/parts.
NO
NO
NO
NONOTE:
TE:
TE:
TE:TE: The toner-collection unit is designed for a single use. Do not attempt to empty the toner-collection unit
and reuse it. Doing so could lead to toner being spilled inside the product, which could result in reduced print
quality. After use, return the toner-collection unit to HP’s Planet Partners program for recycling.
CAUTION:
CAUTION:
CAUTION:
CAUTION:CAUTION: If toner gets on clothing, wipe it by using a dry cloth and wash the clothes in cold water. Hot water o
sets toner into fabric.
Remove and repl
Remove and repl
Remove and repl
Remove and replRemove and replace the toner
ace the toner
ace the toner
ace the tonerace the toner-col
-col
-col
-col-collection unit
lection unit
lection unit
lection unitlection unit
1.
1.
1.
1.1. Open the front door.
Y
2.
2.
2.
2.2. Open the toner-collection unit door on the upper-
left side of the product.
K
C
M
Y
ENWW Replace the toner-collection unit 41

3.
3.
3.
3.3. Pull out the toner-collection unit and the attached
door.
K
C
M
Y
4.
4.
4.
4.4. Remove the new toner-collection unit from its
packaging.
5.
5.
5.
5.5. Install the new toner-collection unit and the
attached door into the product. Align the tabs on
the door with the slots in the product.
K
C
M
Y
42 Chapter 3 Supplies, accessories, and parts ENWW

44 Chapter 3 Supplies, accessories, and parts ENWW

4
4
4
44 Print
Print
Print
PrintPrint
●Print tasks (Windows)
●Print tasks (macOS)
●Store print jobs on the printer to print later or print privately
●Mobile printing solutions
●Print from a USB ash drive
●Print using high-speed USB 2.0 port (wired)
For more inf
For more inf
For more inf
For more infFor more information
ormation
ormation
ormationormation
The following information is correct at the time of publication.
For video assistance, see www.hp.com/videos/LaserJet.
For current information, see www.hp.com/support/colorljM554.
HP's all-inclusive help for the printer includes the following information:
●Install and congure
●Learn and use
●Solve problems
●Download software and updatesrmware
●Join support forums
●Find warranty and regulatory information
ENWW 45

Print tasks (Windo
Print tasks (Windo
Print tasks (Windo
Print tasks (WindoPrint tasks (Windows)
ws)
ws)
ws)ws)
How t
How t
How t
How tHow to print (Windows)
o print (Windows)
o print (Windows)
o print (Windows)o print (Windows)
The following procedure describes the basic printing process for Windows.
1.
1.
1.
1.1. From the software program, select the option.
Print
Print
Print
PrintPrint
2.
2.
2.
2.2. Select the printer from the list of printers. To change settings, click the or
Properties
Properties
Properties
PropertiesProperties Preference
Preference
Preference
PreferencePreferences
s
s
ss button to
open the print driver.
NO
NO
NO
NONOTE:
TE:
TE:
TE:TE: The name of the button varies for software programs.dierent
NO
NO
NO
NONOTE:
TE:
TE:
TE:TE: In Windows 10, 8.1, and 8, these applications will have a layout with features dierent dierent
from what is described below for desktop applications. To access the print feature from a Start screen app,
complete the following steps:
●Windows 10:
Windows 10:
Windows 10:
Windows 10:Windows 10: Print
Print
Print
PrintPrint Select , and then select the printer.
●Windows 8.1 or 8:
Windows 8.1 or 8:
Windows 8.1 or 8:
Windows 8.1 or 8:Windows 8.1 or 8: Devices
Devices
Devices
DevicesDevices Print
Print
Print
PrintPrint Select , select , and then select the printer.
NO
NO
NO
NONOTE:
TE:
TE:
TE:TE: For more information, click the Help (?) button in the print driver.
3.
3.
3.
3.3. Click the tabs in the print driver to the available options. For example, set the paper orientation congure
on the tab, and set the paper source, paper type, paper size, and quality settings on the
Finishing
Finishing
Finishing
FinishingFinishing Paper
Paper
Paper
PaperPaper/
/
/
//
Quality
Quality
Quality
QualityQuality tab.
4.
4.
4.
4.4. Click the button to return to the dialog box. Select the number of copies to print from this screen.
OK
OK
OK
OKOK Print
Print
Print
PrintPrint
5.
5.
5.
5.5. Click the button to print the job.
Print
Print
Print
PrintPrint
Aut
Aut
Aut
AutAutomatically print on bo
omatically print on bo
omatically print on bo
omatically print on boomatically print on both sides (Windows
th sides (Windows
th sides (Windows
th sides (Windowsth sides (Windows)
)
)
))
Use this procedure for printers that have an automatic duplexer installed. If the printer does not have an
automatic duplexer installed, or to print on paper types that the duplexer does not support, print on both sides
manually.
1.
1.
1.
1.1. From the software program, select the option.
Print
Print
Print
PrintPrint
2.
2.
2.
2.2. Select the printer from the list of printers, and then click the Pr
Pr
Pr
PrProperties
operties
operties
opertiesoperties Preferences
Preferences
Preferences
PreferencesPreferences or button to open the
print driver.
NO
NO
NO
NONOTE:
TE:
TE:
TE:TE: The name of the button varies for software programs.dierent
NO
NO
NO
NONOTE:
TE:
TE:
TE:TE: In Windows 10, 8.1, and 8, these applications will have a layout with features dierent dierent
from what is described below for desktop applications. To access the print feature from a Start screen app,
complete the following steps:
●Windows 10:
Windows 10:
Windows 10:
Windows 10:Windows 10: Print
Print
Print
PrintPrint Select , and then select the printer.
●Windows 8.1 or 8:
Windows 8.1 or 8:
Windows 8.1 or 8:
Windows 8.1 or 8:Windows 8.1 or 8: Devices
Devices
Devices
DevicesDevices Print
Print
Print
PrintPrint Select , select , and then select the printer.
3.
3.
3.
3.3. Click the tab.
Finishing
Finishing
Finishing
FinishingFinishing
4.
4.
4.
4.4. Select . Click to close the dialog.
Print on both sides
Print on both sides
Print on both sides
Print on both sidesPrint on both sides OK
OK
OK
OKOK Document Properties
Document Properties
Document Properties
Document PropertiesDocument Properties
5.
5.
5.
5.5. In the dialog, click to print the job.
Print
Print
Print
PrintPrint Print
Print
Print
PrintPrint
46 Chapter 4 Print ENWW

Manually prin
Manually prin
Manually prin
Manually prinManually print on both sides (Windo
t on both sides (Windo
t on both sides (Windo
t on both sides (Windot on both sides (Windows)
ws)
ws)
ws) ws)
Use this procedure for printers that do not have an automatic duplexer installed or to print on paper that the
duplexer does not support.
1.
1.
1.
1.1. From the software program, select the option.
Print
Print
Print
PrintPrint
2.
2.
2.
2.2. Select the printer from the list of printers, and then click the Pro
Pro
Pro
ProProperties
perties
perties
pertiesperties Preferences
Preferences
Preferences
PreferencesPreferences or button to open the
print driver.
NO
NO
NO
NONOTE:
TE:
TE:
TE:TE: The name of the button varies for software programs.dierent
NO
NO
NO
NONOTE:
TE:
TE:
TE:TE: In Windows 10, 8.1, and 8, these applications will have a layout with features dierent dierent
from what is described below for desktop applications. To access the print feature from a Start screen app,
complete the following steps:
●Windows 10:
Windows 10:
Windows 10:
Windows 10:Windows 10: Print
Print
Print
PrintPrint Select , and then select the printer.
●Windows 8.1 or 8:
Windows 8.1 or 8:
Windows 8.1 or 8:
Windows 8.1 or 8:Windows 8.1 or 8: Devices
Devices
Devices
DevicesDevices Print
Print
Print
PrintPrint Select , select , and then select the printer.
3.
3.
3.
3.3. Click the tab.
Finishing
Finishing
Finishing
FinishingFinishing
4.
4.
4.
4.4. Select Print on both sides (manual
Print on both sides (manual
Print on both sides (manual
Print on both sides (manualPrint on both sides (manually)
ly)
ly)
ly)ly) OK
OK
OK
OKOK, and then click to close the Documen
Documen
Documen
DocumenDocument Pro
t Pro
t Pro
t Prot Properties
perties
perties
pertiesperties dialog.
5.
5.
5.
5.5. In the dialog, click to print the side of the job.
Print
Print
Print
PrintPrint Print
Print
Print
PrintPrint rst
6.
6.
6.
6.6. Retrieve the printed stack from the output bin, and place it in Tray 1.
7.
7.
7.
7.7. If prompted, select the appropriate control panel button to continue.
Print mul
Print mul
Print mul
Print mulPrint multiple pages per sheet (Windo
tiple pages per sheet (Windo
tiple pages per sheet (Windo
tiple pages per sheet (Windotiple pages per sheet (Windows)
ws)
ws)
ws)ws)
1.
1.
1.
1.1. From the software program, select the option.
Print
Print
Print
PrintPrint
2.
2.
2.
2.2. Select the printer from the list of printers, and then click the Pro
Pro
Pro
ProProperties
perties
perties
pertiesperties Preferences
Preferences
Preferences
PreferencesPreferences or button to open the
print driver.
NO
NO
NO
NONOTE:
TE:
TE:
TE:TE: The name of the button varies for software programs.dierent
NO
NO
NO
NONOTE:
TE:
TE:
TE:TE: In Windows 10, 8.1, and 8, these applications will have a layout with features dierent dierent
from what is described below for desktop applications. To access the print feature from a Start screen app,
complete the following steps:
●Windows 10:
Windows 10:
Windows 10:
Windows 10:Windows 10: Print
Print
Print
PrintPrint Select , and then select the printer.
●Windows 8.1 or 8:
Windows 8.1 or 8:
Windows 8.1 or 8:
Windows 8.1 or 8:Windows 8.1 or 8: Devices
Devices
Devices
DevicesDevices Print
Print
Print
PrintPrint Select , select , and then select the printer.
3.
3.
3.
3.3. Click the tab.
Finishing
Finishing
Finishing
FinishingFinishing
4.
4.
4.
4.4. Select the number of pages per sheet from the P
P
P
PPages per sheet
ages per sheet
ages per sheet
ages per sheetages per sheet drop-down list.
5.
5.
5.
5.5. Select the correct ,
Print page borders
Print page borders
Print page borders
Print page bordersPrint page borders P
P
P
PPage order
age order
age order
age orderage order Orientation
Orientation
Orientation
OrientationOrientation OK
OK
OK
OKOK, and options. Click to close the Document
Document
Document
Document Document
Properties
Properties
Properties
PropertiesProperties dialog.
6.
6.
6.
6.6. In the dialog, click to print the job.
Print
Print
Print
PrintPrint Print
Print
Print
PrintPrint
ENWW Print tasks (Windows) 47

Select the paper type (Windows)
Select the paper type (Windows)
Select the paper type (Windows)
Select the paper type (Windows)Select the paper type (Windows)
1.
1.
1.
1.1. From the software program, select the option.
Print
Print
Print
PrintPrint
2.
2.
2.
2.2. Select the printer from the list of printers, and then click the Pr
Pr
Pr
PrProperties
operties
operties
opertiesoperties Preferences
Preferences
Preferences
PreferencesPreferences or button to open the
print driver.
NO
NO
NO
NONOTE:
TE:
TE:
TE:TE: The name of the button varies for software programs.dierent
NO
NO
NO
NONOTE:
TE:
TE:
TE:TE: In Windows 10, 8.1, and 8, these applications will have a layout with features dierent dierent
from what is described below for desktop applications. To access the print feature from a Start screen app,
complete the following steps:
●Windows 10:
Windows 10:
Windows 10:
Windows 10:Windows 10: Print
Print
Print
PrintPrint Select , and then select the printer.
●Windows 8.1 or 8:
Windows 8.1 or 8:
Windows 8.1 or 8:
Windows 8.1 or 8:Windows 8.1 or 8: Devices
Devices
Devices
DevicesDevices Print
Print
Print
PrintPrint Select , select , and then select the printer.
3.
3.
3.
3.3. Click the Paper
Paper
Paper
PaperPaper/Quality
/Quality
/Quality
/Quality/Quality tab.
4.
4.
4.
4.4. Select the paper type from the P
P
P
PPaper type
aper type
aper type
aper typeaper type drop-down list.
5.
5.
5.
5.5. Click to close the
OK
OK
OK
OKOK Document Pr
Document Pr
Document Pr
Document PrDocument Properties
operties
operties
opertiesoperties dialog. In the dialog, click to print the job.
Print
Print
Print
PrintPrint Print
Print
Print
PrintPrint
If the tray needs to be a tray message displays on the printer control panel.congured, conguration
6.
6.
6.
6.6. Load the tray with the specied type and size of paper, and then close the tray.
7.
7.
7.
7.7. Select the button to accept the detected type and size, or select the button to choose a OK Modify dierent
paper size or type.
8.
8.
8.
8.8. Select the correct type and size, and then select the button.OK
48 Chapter 4 Print ENWW

Print tasks (macO
Print tasks (macO
Print tasks (macO
Print tasks (macOPrint tasks (macOS)
S)
S)
S)S)
How t
How t
How t
How tHow to print (macOS)
o print (macOS)
o print (macOS)
o print (macOS)o print (macOS)
The following procedure describes the basic printing process for macOS.
1.
1.
1.
1.1. Click the menu, and then click the option.
File
File
File
FileFile Print
Print
Print
PrintPrint
2.
2.
2.
2.2. Select the printer.
3.
3.
3.
3.3. Click or
Show Details
Show Details
Show Details
Show DetailsShow Details Co
Co
Co
CoCopies & Pages
pies & Pages
pies & Pages
pies & Pagespies & Pages, and then select other menus to adjust the print settings.
NO
NO
NO
NONOTE:
TE:
TE:
TE:TE: The name of the item varies for software programs.dierent
4.
4.
4.
4.4. Click the button.
Print
Print
Print
PrintPrint
Aut
Aut
Aut
AutAutomatically print on bo
omatically print on bo
omatically print on bo
omatically print on boomatically print on both sides (macOS
th sides (macOS
th sides (macOS
th sides (macOSth sides (macOS)
)
)
))
NO
NO
NO
NONOTE:
TE:
TE:
TE:TE: This information applies to printers that include an automatic duplexer.
NO
NO
NO
NONOTE:
TE:
TE:
TE:TE: This feature is available if you install the HP print driver. It might not be available if you are using AirPrint.
1.
1.
1.
1.1. Click the menu, and then click the option.
File
File
File
FileFile Print
Print
Print
PrintPrint
2.
2.
2.
2.2. Select the printer.
3.
3.
3.
3.3. Click or
Show Details
Show Details
Show Details
Show DetailsShow Details Co
Co
Co
CoCopies & Pages
pies & Pages
pies & Pages
pies & Pagespies & Pages Layout
Layout
Layout
LayoutLayout, and then click the menu.
NO
NO
NO
NONOTE:
TE:
TE:
TE:TE: The name of the item varies for software programs.dierent
4.
4.
4.
4.4. Select a binding option from the T
T
T
TTwo-
wo-
wo-
wo-wo-Sided
Sided
Sided
SidedSided drop-down list.
5.
5.
5.
5.5. Click the button.
Print
Print
Print
PrintPrint
Manually prin
Manually prin
Manually prin
Manually prinManually print on both sides (macOS
t on both sides (macOS
t on both sides (macOS
t on both sides (macOSt on both sides (macOS)
)
)
))
NO
NO
NO
NONOTE:
TE:
TE:
TE:TE: This feature is available if you install the HP print driver. It might not be available if you are using AirPrint.
1.
1.
1.
1.1. Click the menu, and then click the option.
File
File
File
FileFile Print
Print
Print
PrintPrint
2.
2.
2.
2.2. Select the printer.
3.
3.
3.
3.3. Click or
Show Details
Show Details
Show Details
Show DetailsShow Details Co
Co
Co
CoCopies & Pages
pies & Pages
pies & Pages
pies & Pagespies & Pages Manual Duplex
Manual Duplex
Manual Duplex
Manual DuplexManual Duplex, and then click the menu.
NO
NO
NO
NONOTE:
TE:
TE:
TE:TE: The name of the item varies for software programs.dierent
4.
4.
4.
4.4. Click the box, and select a binding option.
Manual Duplex
Manual Duplex
Manual Duplex
Manual DuplexManual Duplex
5.
5.
5.
5.5. Click the button.
Print
Print
Print
PrintPrint
6.
6.
6.
6.6. Go to the printer, and remove any blank paper that is in Tray 1.
7.
7.
7.
7.7. Retrieve the printed stack from the output bin and place it with the printed side facing down in the input
tray.
8.
8.
8.
8.8. If prompted, select the appropriate control panel button to continue.
50 Chapter 4 Print ENWW

●Print the or last pages of the document on paperrst dierent
●Print watermarks on a document
52 Chapter 4 Print ENWW

S
S
S
SSt
t
t
ttore print jobs on the printer t
ore print jobs on the printer t
ore print jobs on the printer t
ore print jobs on the printer tore print jobs on the printer to print l
o print l
o print l
o print lo print later or prin
ater or prin
ater or prin
ater or prinater or print priva
t priva
t priva
t privat privately
tely
tely
telytely
Intr
Intr
Intr
IntrIntroduction
oduction
oduction
oductionoduction
The following information provides procedures for creating and printing documents that are stored on the
printer. These jobs can be printed at a later time or printed privately.
●Create a stored job (Windows)
●Create a stored job (macOS)
●Print a stored job
●Delete a stored job
●Information sent to printer for Job Accounting purposes
Create a s
Create a s
Create a s
Create a sCreate a st
t
t
ttored job (Windows)
ored job (Windows)
ored job (Windows)
ored job (Windows)ored job (Windows)
Store jobs on the printer for private or delayed printing.
1.
1.
1.
1.1. From the software program, select the option.
Print
Print
Print
PrintPrint
2.
2.
2.
2.2. Select the printer from the list of printers, and then select Pr
Pr
Pr
PrProperties
operties
operties
opertiesoperties Preferences
Preferences
Preferences
PreferencesPreferences or (the name varies for
dierent software programs).
NO
NO
NO
NONOTE:
TE:
TE:
TE:TE: The name of the button varies for software programs.dierent
NO
NO
NO
NONOTE:
TE:
TE:
TE:TE: In Windows 10, 8.1, and 8, these applications will have a layout with features dierent dierent
from what is described below for desktop applications. To access the print feature from a Start screen app,
complete the following steps:
●Windows 10:
Windows 10:
Windows 10:
Windows 10:Windows 10: Print
Print
Print
PrintPrint Select , and then select the printer.
●Windows 8.1 or 8:
Windows 8.1 or 8:
Windows 8.1 or 8:
Windows 8.1 or 8:Windows 8.1 or 8: Devices
Devices
Devices
DevicesDevices Print
Print
Print
PrintPrint Select , select , and then select the printer.
3.
3.
3.
3.3. Click the Job St
Job St
Job St
Job StJob Storage
orage
orage
orageorage tab.
4.
4.
4.
4.4. Select a Job St
Job St
Job St
Job StJob Storage Mode
orage Mode
orage Mode
orage Modeorage Mode option.
●Proo
Proo
Proo
ProoProof and Hold
f and Hold
f and Hold
f and Holdf and Hold: Print and proof one copy of a job, and then print more copies.
●Personal Job
Personal Job
Personal Job
Personal JobPersonal Job: The job does not print until you request it at the printer control panel. For this job-
storage mode, you can select one of the Make Job Private/
Make Job Private/
Make Job Private/
Make Job Private/Make Job Private/Secure
Secure
Secure
SecureSecure options. If you assign a personal
identication number (PIN) to the job, you must provide the required PIN at the control panel. If you
encrypt the job, you must provide the required password at the control panel. The print job is deleted
from memory after it prints and is lost if the printer loses power.
●Quick Copy
Quick Copy
Quick Copy
Quick CopyQuick Copy: Print the requested number of copies of a job and store a copy of the job in the printer
memory so you can print it again later.
●St
St
St
StStored Job
ored Job
ored Job
ored Jobored Job: Store a job on the printer and allow other users to print the job at any time. For this job-
storage mode, you can select one of the Make Job Private/
Make Job Private/
Make Job Private/
Make Job Private/Make Job Private/Secure
Secure
Secure
SecureSecure options. If you assign a personal
identication number (PIN) to the job, the person who prints the job must provide the required PIN at
the control panel. If you encrypt the job, the person who prints the job must provide the required
password at the control panel.
ENWW Store print jobs on the printer to print later or print privately 53

1.
1.
1.
1.1. From the Home screen on the printer control panel, select , and then select Print Print from Job Storage.
2.
2.
2.
2.2. Under Stored Jobs to Print Choose, select , and then select the folder where the document is saved.
3.
3.
3.
3.3. Select the document, and then touch .Select
If the document is private, enter the four-digit PIN in the Password OK and then select eld, .
4.
4.
4.
4.4. To adjust the number of copies, select the box to the left of the Print button, and then select the number of
copies from the keypad that opens. Select the Close button to close the keypad.
5.
5.
5.
5.5. Select to print the document.Print
Delete a st
Delete a st
Delete a st
Delete a stDelete a stored job
ored job
ored job
ored jobored job
You can delete documents that have been saved to the printer when they are no longer needed. You can also
adjust the maximum number of jobs for the printer to store.
●Delete a job that is stored on the printer
●Change the job storage limit
Delete a job that is st
Delete a job that is st
Delete a job that is st
Delete a job that is stDelete a job that is stored on the printer
ored on the printer
ored on the printer
ored on the printerored on the printer
You can delete documents that have been saved to the printer when they are no longer needed. You can also
adjust the maximum number of jobs for the printer to store.
1.
1.
1.
1.1. From the Home screen on the printer control panel, select .Print
2.
2.
2.
2.2. Select Print from Job Storage.
3.
3.
3.
3.3. Select , and then select the name of the folder where the job is stored.Choose
4.
4.
4.
4.4. Select the name of the job. If the job is private or encrypted, enter the PIN or password.
5.
5.
5.
5.5. Select the Trash button to delete the job.
Change the job st
Change the job st
Change the job st
Change the job stChange the job storage limit
orage limit
orage limit
orage limitorage limit
When a new job is stored in the printer memory, the printer overwrites any previous jobs with the same user and
job name. If a job is not already stored under the same user and job name, and the printer needs additional
space, the printer might delete other stored jobs starting with the oldest. Follow these steps to change the
number of jobs that the printer can store:
1.
1.
1.
1.1. From the Home screen on the printer control panel, navigate to the application and then select the Settings
Settings icon.
2.
2.
2.
2.2. Open the following menus:
a.
a.
a.
a.a. Copy/Print Print or
b.
b.
b.
b.b. Manage Stored Jobs
c.
c.
c.
c.c. Temporary Job Storage Limit
3.
3.
3.
3.3. Use the keypad to enter the number of jobs that the printer stores.
4.
4.
4.
4.4. Press the button or touch to save the setting.OK Done
ENWW Store print jobs on the printer to print later or print privately 55

Mobile printing sol
Mobile printing sol
Mobile printing sol
Mobile printing solMobile printing solutions
utions
utions
utionsutions
Intr
Intr
Intr
IntrIntroduction
oduction
oduction
oductionoduction
HP multiple mobile printing solutions to enable easy printing to an HP printer from a laptop, tablet, oers
smartphone, or other mobile device. To see the full list and to determine the best choice, go to www.hp.com/go/
MobilePrinting.
NO
NO
NO
NONOTE:
TE:
TE:
TE:TE: Update the printer to ensure all mobile printing and ePrint capabilities are supported.rmware
●Wi-Fi, Wi-Fi Direct Print, NFC, and BLE printing
●HP ePrint via email
●AirPrint
●Android embedded printing
Wi-Fi, Wi-Fi Direct Print, NFC, and BLE printing
Wi-Fi, Wi-Fi Direct Print, NFC, and BLE printing
Wi-Fi, Wi-Fi Direct Print, NFC, and BLE printing
Wi-Fi, Wi-Fi Direct Print, NFC, and BLE printingWi-Fi, Wi-Fi Direct Print, NFC, and BLE printing
HP provides Wi-Fi, Wi-Fi Direct Print, Near Field Communication (NFC), and Bluetooth Low Energy (BLE) printing
for printers with a supported HP Jetdirect 3100w BLE/NFC/Wireless Accessory. This accessory is available as an
option for HP LaserJet printers that include a hardware-integration pocket (HIP).
Wi-Fi, Wi-Fi Direct Print, NFC, and BLE printing enable Wi-Fi capable (mobile) devices to make a wireless network
connection directly to the printer without using a wireless router.
The printer does not need to be connected to the network for this mobile walk-up printing to work.
Use Wi-Fi Direct Print to print wirelessly from the following devices:
●iPhone, iPad, or iPod touch using Apple AirPrint
●Android mobile devices using the Android embedded print solution
For more information on wireless printing, go to www.hp.com/go/wirelessprinting.
NFC and Wi-Fi Direct Print capabilities can be enabled or disabled from the printer control panel.
1.
1.
1.
1.1. From the Home screen on the printer control panel, open the menu.Settings
2.
2.
2.
2.2. Open the following menus:
●Networking
●Wi-Fi Direct
●Status
3.
3.
3.
3.3. Select , and then select to enable wireless printing.On OK
NO
NO
NO
NONOTE:
TE:
TE:
TE:TE: In environments where more than one model of the same printer is installed, it might be helpful to
provide each printer a unique Wi-Fi Direct Name for easier printer for Wi-Fi Direct printing. The identication
wireless network names, e.g., Wi-Fi, Wi-Fi Direct, etc. are available on the Information screen by pressing or
touching the Information button on the printer control panel, and then selecting the Network option or the
Wireless option.
Complete the following procedure to change the printer Wi-Fi Direct name:
ENWW Mobile printing solutions 57

1.
1.
1.
1.1. From the Home screen on the printer control panel, open the menu.Settings
2.
2.
2.
2.2. Open the following menus:
●Networking
●Wi-Fi Direct
●Wi-Fi Direct name
3.
3.
3.
3.3. Use the keypad to change the name in the text Select .Wi-Fi Direct Name eld. OK
HP ePrint via email
HP ePrint via email
HP ePrint via email
HP ePrint via emailHP ePrint via email
Use HP ePrint to print documents by sending them as an email attachment to the printer's email address from
any email enabled device.
To use HP ePrint, the printer must meet these requirements:
●The printer must be connected to a wired or wireless network and have Internet access.
●HP Web Services must be enabled on the printer, and the printer must be registered with HP Connected.
Follow this procedure to enable HP Web Services and register with HP Connected:
1.
1.
1.
1.1. Open the HP Embedded Web Server (EWS):
a.
a.
a.
a.a. Find the printer IP address. On the printer control panel, press the button, and then use the arrow
keys to select the Ethernet menu. Press the button to open the menu and display the IP OK
address or host name.
b.
b.
b.
b.b. From a computer on the same network as the printer, open a web browser. In the address line, type
the IP address or host name exactly as it displays on the printer control panel. Press the key on Enter
the computer keyboard. The EWS opens.
NO
NO
NO
NONOTE:
TE:
TE:
TE:TE: If the web browser displays a message indicating that accessing the website might not be
safe, select the option to continue to the website. Accessing this website will not harm the computer.
2.
2.
2.
2.2. Click the tab.
HP Web Services
HP Web Services
HP Web Services
HP Web ServicesHP Web Services
3.
3.
3.
3.3. Select the option to enable Web Services.
NO
NO
NO
NONOTE:
TE:
TE:
TE:TE: Enabling Web Services might take several minutes.
4.
4.
4.
4.4. Go to www.hpconnected.com to create an HP ePrint account and complete the setup process.
AirPrint
AirPrint
AirPrint
AirPrintAirPrint
Direct printing using Apple’s AirPrint is supported for iOS and from Mac computers running macOS 10.7 Lion and
newer. Use AirPrint to print directly to the printer from an iPad, iPhone (3GS or later), or iPod touch (third
generation or later) in the following mobile applications:
●Mail
●Photos
58 Chapter 4 Print ENWW

●Safari
●iBooks
●Select third-party applications
To use AirPrint, the printer must be connected to the same network (sub-net) as the Apple device. For more
information about using AirPrint and about which HP printers are compatible with AirPrint, go to
www.hp.com/go/MobilePrinting.
NO
NO
NO
NONOTE:
TE:
TE:
TE:TE: Before using AirPrint with a USB connection, verify the version number. AirPrint versions 1.3 and earlier
do not support USB connections.
Andr
Andr
Andr
AndrAndroid embedded printing
oid embedded printing
oid embedded printing
oid embedded printingoid embedded printing
HP's built-in print solution for Android and Kindle enables mobile devices to automatically and print to HP nd
printers that are either on a network or within wireless range for Wi-Fi Direct printing.
The print solution is built into the many versions of the operating system.
NO
NO
NO
NONOTE:
TE:
TE:
TE:TE: If printing is not available on your device, go to the Google Play > Android apps and install the HP Print
Service Plugin.
For more information on how to use Android embedded printing and which Android devices are supported, go to
www.hp.com/go/MobilePrinting.
ENWW Mobile printing solutions 59

Print fr
Print fr
Print fr
Print frPrint from a USB
om a USB
om a USB
om a USB om a USB drive
drive
drive
drive drive
ash
ash
ash
ashash
Intr
Intr
Intr
IntrIntroduction
oduction
oduction
oductionoduction
This printer features easy-access USB printing, for quickly printing without sending them from a computer. les
The printer accepts standard USB drives in the USB port near the control panel. The control panel USB port ash
supports the following types of les:
–.pdf
–.prn
–.pcl
–.ps
–.cht
●Enable the USB port for printing
●Print USB documents
Enable the USB port for prin
Enable the USB port for prin
Enable the USB port for prin
Enable the USB port for prinEnable the USB port for printing
ting
ting
tingting
The USB port is disabled by default. Before using this feature, enable the USB port. Use one of the following
methods to enable the port:
Method one: Enable the USB port from the prin
Method one: Enable the USB port from the prin
Method one: Enable the USB port from the prin
Method one: Enable the USB port from the prinMethod one: Enable the USB port from the printer control panel menus
ter control panel menus
ter control panel menus
ter control panel menuster control panel menus
1.
1.
1.
1.1. From the Home screen on the printer control panel, navigate to the application, and then select Settings
the icon.Settings
2.
2.
2.
2.2. Open the following menus
a.
a.
a.
a.a. Copy/Print Print or
b.
b.
b.
b.b. Enable Print From USB Drive
3.
3.
3.
3.3. Select the option.Enabled
Method two: Enable the USB port fr
Method two: Enable the USB port fr
Method two: Enable the USB port fr
Method two: Enable the USB port frMethod two: Enable the USB port from the HP Embedded Web Server (net
om the HP Embedded Web Server (net
om the HP Embedded Web Server (net
om the HP Embedded Web Server (netom the HP Embedded Web Server (network
work
work
workwork-c
-c
-c
-c-connected printers only)
onnected printers only)
onnected printers only)
onnected printers only)onnected printers only)
1.
1.
1.
1.1. Find the printer IP address: From the Home screen on the printer control panel, select the Information
icon, and then select the Network icon to display the IP address or host name.
2.
2.
2.
2.2. Open a web browser, and in the address line, type the IP address exactly as it displays on the printer
control panel. Press the key on the computer keyboard. The EWS opens.Enter
NO
NO
NO
NONOTE:
TE:
TE:
TE:TE: If the web browser displays a There is a problem with this website
There is a problem with this website
There is a problem with this website
There is a problem with this websiteThere is a problem with this website’
’
’
’’s security
s security
s security
s security s security certicate
certicate
certicate
certicatecerticate message
when attempting to open the EWS, click C
C
C
CContinue to this website (no
ontinue to this website (no
ontinue to this website (no
ontinue to this website (noontinue to this website (not recommended)
t recommended)
t recommended)
t recommended)t recommended).
Choosing Continue t
Continue t
Continue t
Continue tContinue to this website (not recommended)
o this website (not recommended)
o this website (not recommended)
o this website (not recommended)o this website (not recommended) will not harm the computer while navigating within
the EWS for the HP printer.
3.
3.
3.
3.3. Select the Copy/Prin
Copy/Prin
Copy/Prin
Copy/PrinCopy/Print
t
t
tt tab for multi-function printer models, or the tab for single-function printer
Print
Print
Print
PrintPrint
models.
60 Chapter 4 Print ENWW

Print using high-s
Print using high-s
Print using high-s
Print using high-sPrint using high-speed USB 2.0 port (wired)
peed USB 2.0 port (wired)
peed USB 2.0 port (wired)
peed USB 2.0 port (wired)peed USB 2.0 port (wired)
Enable the high-speed USB port f
Enable the high-speed USB port f
Enable the high-speed USB port f
Enable the high-speed USB port fEnable the high-speed USB port for printing
or printing
or printing
or printingor printing
This printer features a high-speed USB 2.0 port for wired USB printing. The port is located in the interface ports
area on the back of the printer and is disabled by default. Use one of the following methods to enable the port.
Once the port is enabled, install the product software in order to print using this port.
Method one: Enable the high-speed USB 2.0 port fr
Method one: Enable the high-speed USB 2.0 port fr
Method one: Enable the high-speed USB 2.0 port fr
Method one: Enable the high-speed USB 2.0 port frMethod one: Enable the high-speed USB 2.0 port from the printer c
om the printer c
om the printer c
om the printer com the printer contr
ontr
ontr
ontrontrol panel menus
ol panel menus
ol panel menus
ol panel menusol panel menus
1.
1.
1.
1.1. From the Home screen on the printer control panel, navigate to the application, and then select Settings
the icon.Settings
2.
2.
2.
2.2. Open the following menus
a.
a.
a.
a.a. General
b.
b.
b.
b.b. Enable Device USB
3.
3.
3.
3.3. Select the option.Enabled
Method two: Enable the high-s
Method two: Enable the high-s
Method two: Enable the high-s
Method two: Enable the high-sMethod two: Enable the high-speed USB 2.0 port from the HP Embedded Web Server (network
peed USB 2.0 port from the HP Embedded Web Server (network
peed USB 2.0 port from the HP Embedded Web Server (network
peed USB 2.0 port from the HP Embedded Web Server (networkpeed USB 2.0 port from the HP Embedded Web Server (network-connected printers only)
-connected printers only)
-connected printers only)
-connected printers only)-connected printers only)
1.
1.
1.
1.1. Find the printer IP address: From the Home screen on the printer control panel, select the Information
icon, and then select the Network icon to display the IP address or host name.
2.
2.
2.
2.2. Open a web browser, and in the address line, type the IP address exactly as it displays on the printer
control panel. Press the key on the computer keyboard. The EWS opens.Enter
NO
NO
NO
NONOTE:
TE:
TE:
TE:TE: If the web browser displays a There is a pr
There is a pr
There is a pr
There is a prThere is a problem with this website’
oblem with this website’
oblem with this website’
oblem with this website’oblem with this website’s security
s security
s security
s security s security certicate
certicate
certicate
certicatecerticate message
when attempting to open the EWS, click C
C
C
CContinue to this website (not recommended)
ontinue to this website (not recommended)
ontinue to this website (not recommended)
ontinue to this website (not recommended)ontinue to this website (not recommended).
Choosing Continue t
Continue t
Continue t
Continue tContinue to this website (not rec
o this website (not rec
o this website (not rec
o this website (not reco this website (not recommended)
ommended)
ommended)
ommended)ommended) will not harm the computer while navigating within
the EWS for the HP printer.
3.
3.
3.
3.3. Select the tab.
Security
Security
Security
SecuritySecurity
4.
4.
4.
4.4. On the left side of the screen, select .
General Security
General Security
General Security
General SecurityGeneral Security
5.
5.
5.
5.5. Scroll down to the Hardware P
Hardware P
Hardware P
Hardware PHardware Ports
orts
orts
ortsorts and select the check box to enable both of the items:
●Enable Device USB
Enable Device USB
Enable Device USB
Enable Device USBEnable Device USB
●Enable Host USB pl
Enable Host USB pl
Enable Host USB pl
Enable Host USB plEnable Host USB plug and play
ug and play
ug and play
ug and playug and play
6.
6.
6.
6.6. Click .
Apply
Apply
Apply
ApplyApply
62 Chapter 4 Print ENWW

5
5
5
55 Manage the printer
Manage the printer
Manage the printer
Manage the printerManage the printer
●Advanced with HP Embedded Web Server (EWS)conguration
●Congure IP network settings
●Printer security features
●Energy-conservation settings
●HP Web Jetadmin
●Software and updatesrmware
For more inf
For more inf
For more inf
For more infFor more information
ormation
ormation
ormationormation
The following information is correct at the time of publication.
For video assistance, see www.hp.com/videos/LaserJet.
For current information, see www.hp.com/support/colorljM554.
HP's all-inclusive help for the printer includes the following information:
●Install and congure
●Learn and use
●Solve problems
●Download software and updatesrmware
●Join support forums
●Find warranty and regulatory information
ENWW 63

Advanced
Advanced
Advanced
Advanced Advanced with HP Embedded Web Server (EWS)
with HP Embedded Web Server (EWS)
with HP Embedded Web Server (EWS)
with HP Embedded Web Server (EWS) with HP Embedded Web Server (EWS)
conguration
conguration
conguration
congurationconguration
●Introduction
●How to access the HP Embedded Web Server (EWS)
●HP Embedded Web Server features
Intr
Intr
Intr
IntrIntroduction
oduction
oduction
oductionoduction
Use the HP Embedded Web Server to manage printing functions from a computer instead of the printer control
panel.
●View printer status information
●Determine the remaining life for all supplies and order new ones
●View and change tray congurations
●View and change the printer control-panel menu conguration
●View and print internal pages
●Receive of printer and supplies eventsnotication
●View and change network conguration
The HP Embedded Web Server works when the printer is connected to an IP-based network. The HP Embedded
Web Server does not support IPX-based printer connections. Internet access is not needed to open and use the
HP Embedded Web Server.
When the printer is connected to the network, the HP Embedded Web Server is automatically available.
NO
NO
NO
NONOTE:
TE:
TE:
TE:TE: The HP Embedded Web Server is not accessible beyond the network rewall.
How t
How t
How t
How tHow to access the HP Embedded Web Server (EWS)
o access the HP Embedded Web Server (EWS)
o access the HP Embedded Web Server (EWS)
o access the HP Embedded Web Server (EWS)o access the HP Embedded Web Server (EWS)
NO
NO
NO
NONOTE:
TE:
TE:
TE:TE: The steps vary according to the type of control panel.
12
1 Keypad control panel
2 Touchscreen control panel
64 Chapter 5 Manage the printer ENWW

●Networking tab
●Other Links list
Informa
Informa
Informa
InformaInformation tab
tion tab
tion tab
tion tabtion tab
T
T
T
TTable 5-1
able 5-1
able 5-1
able 5-1able 5-1 HP Embedded Web Server Information tab
HP Embedded Web Server Information tab
HP Embedded Web Server Information tab
HP Embedded Web Server Information tab HP Embedded Web Server Information tab
Menu
Menu
Menu
MenuMenu Description
Description
Description
DescriptionDescription
Device Status
Device Status
Device Status
Device StatusDevice Status Shows the printer status and shows the estimated life remaining of HP supplies. The page
also shows the type and size of paper set for each tray. To change the default settings, click
the link.
Change Settings
Change Settings
Change Settings
Change SettingsChange Settings
Job Log
Job Log
Job Log
Job LogJob Log Shows a summary of all jobs the printer has processed.
Conguration
Conguration
Conguration
CongurationConguration Page
Page
Page
Page Page Shows the information found on the page.conguration
Supplies Status P
Supplies Status P
Supplies Status P
Supplies Status PSupplies Status Page
age
age
ageage Shows the status of the supplies for the printer.
Event Log Page
Event Log Page
Event Log Page
Event Log PageEvent Log Page Shows a list of all printer events and errors. Use the link (in the
HP Instant Support
HP Instant Support
HP Instant Support
HP Instant SupportHP Instant Support Other
Other
Other
Other Other
Links
Links
Links
LinksLinks area on all HP Embedded Web Server pages) to connect to a set of dynamicweb
pages that help solve problems. These pages also show additional services available for
the printer.
Usage Page
Usage Page
Usage Page
Usage PageUsage Page Shows a summary of the number of pages the printer has printed, grouped by size, type,
and paper print path.
Device Informa
Device Informa
Device Informa
Device InformaDevice Information
tion
tion
tiontion Shows the printer network name, address, and model information. To customize these
entries, click the Device Inf
Device Inf
Device Inf
Device InfDevice Information
ormation
ormation
ormationormation General
General
General
GeneralGeneral menu on the tab.
Contr
Contr
Contr
ContrControl Panel Snapsho
ol Panel Snapsho
ol Panel Snapsho
ol Panel Snapshool Panel Snapshot
t
t
tt Shows an image of the current screen on the control panel display.
Print
Print
Print
PrintPrint Upload a print-ready from the computer to print. The printer uses the default print le
settings to print the le.
Printable Reports and Pages
Printable Reports and Pages
Printable Reports and Pages
Printable Reports and PagesPrintable Reports and Pages Lists the internal reports and pages for the printer. Select one or more items to print or
view.
Open Source Licenses
Open Source Licenses
Open Source Licenses
Open Source LicensesOpen Source Licenses Shows a summary of the licenses for open source software programs that can be used
with the printer.
General tab
General tab
General tab
General tabGeneral tab
T
T
T
TTable
able
able
able able 5-2
5-2
5-2
5-25-2 HP Embedded Web Server General tab
HP Embedded Web Server General tab
HP Embedded Web Server General tab
HP Embedded Web Server General tab HP Embedded Web Server General tab
Menu
Menu
Menu
MenuMenu Description
Description
Description
DescriptionDescription
Alerts
Alerts
Alerts
AlertsAlerts Setup email alerts for various printer and supplies events.
Contr
Contr
Contr
ContrControl Panel Administr
ol Panel Administr
ol Panel Administr
ol Panel Administrol Panel Administration Menu
ation Menu
ation Menu
ation Menuation Menu Shows the menu structure of the Administration menu on the control panel.
NO
NO
NO
NONOTE:
TE:
TE:
TE:TE: Congure settings on this screen, or the HP Embedded Web Server provides more
advanced options than are available through the conguration Administration menu.
General Settings
General Settings
General Settings
General SettingsGeneral Settings Congure how the printer recovers from jams and whether copy jobs initiated at the printer
control panel take priority over print jobs.
AutoSend
AutoSend
AutoSend
AutoSendAutoSend Congure the printer to send automated emails regarding printer and conguration
supplies to email addresses.specic
Edit Other Links
Edit Other Links
Edit Other Links
Edit Other LinksEdit Other Links Add or customize a link to another website. This link displays in the footer area on all
HP Embedded Web Server pages.
66 Chapter 5 Manage the printer ENWW

Security tab
Security tab
Security tab
Security tabSecurity tab
T
T
T
TTable 5-5
able 5-5
able 5-5
able 5-5able 5-5 HP Embedded Web Server Security tab
HP Embedded Web Server Security tab
HP Embedded Web Server Security tab
HP Embedded Web Server Security tab HP Embedded Web Server Security tab
Menu
Menu
Menu
MenuMenu Description
Description
Description
DescriptionDescription
General Security
General Security
General Security
General SecurityGeneral Security Settings for general security, including the following:
●Congure an administrator password to restrict access to certain features on the
printer.
●Set PJL password for processing PJL commands.
●Set system access and upgrade security.le rmware
●Enable or disable the Host USB port on the control panel or the USB connectivity port
on the formatter for printing directly from a computer.
●View the status of all security settings.
Account P
Account P
Account P
Account PAccount Policy
olicy
olicy
olicyolicy Enable administrator account settings.
Access Con
Access Con
Access Con
Access ConAccess Control
trol
trol
troltrol Congure access to printer functions for individuals or groups, and select the specic
method individuals use to sign in to the printer.
Pro
Pro
Pro
ProProtect Stored Data
tect Stored Data
tect Stored Data
tect Stored Datatect Stored Data Congure and manage the internal hard drive for the printer.
Congure settings for jobs that are stored on the printer hard drive.
Certicate
Certicate
Certicate
CerticateCerticate Management
Management
Management
Management Management Install and manage security for access to the printer and the network.certicates
Web Service Security
Web Service Security
Web Service Security
Web Service SecurityWeb Service Security Allow resources on this printer to be accessed by web pages from domains. If no dierent
sites are added to the list, then all sites are trusted.
Self Tes
Self Tes
Self Tes
Self TesSelf Test
t
t
tt Verify that the security functions are running according to expected system parameters.
HP Web Services tab
HP Web Services tab
HP Web Services tab
HP Web Services tabHP Web Services tab
Use the tab to and enable HP Web Services for this printer. It is necessary to Enable
HP Web Services
HP Web Services
HP Web Services
HP Web ServicesHP Web Services congure
HP Web Services to use the HP ePrint feature.
T
T
T
TTable
able
able
able able 5-6
5-6
5-6
5-65-6 HP Embedded Web Server HP Web Services tab
HP Embedded Web Server HP Web Services tab
HP Embedded Web Server HP Web Services tab
HP Embedded Web Server HP Web Services tab HP Embedded Web Server HP Web Services tab
Menu
Menu
Menu
MenuMenu Description
Description
Description
DescriptionDescription
Web Services Setup
Web Services Setup
Web Services Setup
Web Services SetupWeb Services Setup Connect this printer to HP Connected on the web by enabling HP Web Services.
Web Pro
Web Pro
Web Pro
Web ProWeb Proxy
xy
xy
xyxy Congure a proxy server if there are issues enabling HP Web Services or connecting the
printer to the Internet.
HP JetAdvantage
HP JetAdvantage
HP JetAdvantage
HP JetAdvantageHP JetAdvantage Access solutions that extend the capabilities of the printer
Networking tab
Networking tab
Networking tab
Networking tabNetworking tab
Use the tab to and secure network settings for the printer when it is connected to an IP-
Networking
Networking
Networking
NetworkingNetworking congure
based network. This tab does not display if the printer is connected to other types of networks.
T
T
T
TTable
able
able
able able 5-7
5-7
5-7
5-75-7 HP Embedded Web Server Networking tab
HP Embedded Web Server Networking tab
HP Embedded Web Server Networking tab
HP Embedded Web Server Networking tab HP Embedded Web Server Networking tab
Menu
Menu
Menu
MenuMenu Description
Description
Description
DescriptionDescription
Conguration
Conguration
Conguration
CongurationConguration
ENWW Advanced with HP Embedded Web Server (EWS) 69conguration

T
T
T
TTable 5-7
able 5-7
able 5-7
able 5-7able 5-7 HP Embedded Web Server Networking tab (continued)
HP Embedded Web Server Networking tab (continued)
HP Embedded Web Server Networking tab (continued)
HP Embedded Web Server Networking tab (continued) HP Embedded Web Server Networking tab (continued)
Menu
Menu
Menu
MenuMenu Description
Description
Description
DescriptionDescription
Wireless Direct
Wireless Direct
Wireless Direct
Wireless DirectWireless Direct Congure Wireless Direct settings for printers that include embedded Wireless Direct Print
and NFC printing or that have a wireless accessory installed.
NO
NO
NO
NONOTE:
TE:
TE:
TE:TE: The options available depend on the print server model.conguration
TCP
TCP
TCP
TCPTCP/IP Settings
/IP Settings
/IP Settings
/IP Settings/IP Settings Congure TCP/IP settings for IPv4 and IPv6 networks.
NO
NO
NO
NONOTE:
TE:
TE:
TE:TE: The options available depend on the print server model.conguration
Network Settings
Network Settings
Network Settings
Network SettingsNetwork Settings Congure IPX/SPX, AppleTalk, DLC/LLC, and SNMP settings, depending on the print server
model.
Other Settings
Other Settings
Other Settings
Other SettingsOther Settings Congure general printing protocols and services supported by the print server. The
available options depend on the print server model, but can include update, LPD rmware
queues, USB settings, support information, and refresh rate.
AirPrint
AirPrint
AirPrint
AirPrintAirPrint Enable, set up, or disable network printing from Apple supported printers.
Select Language
Select Language
Select Language
Select LanguageSelect Language Change the language displayed by the HP Embedded Web Server. This page displays if the
web pages support multiple languages. Optionally, select supported languages through
language-preference settings in the browser.
Google Clo
Google Clo
Google Clo
Google CloGoogle Cloud Print
ud Print
ud Print
ud Printud Print
Setup
Setup
Setup
SetupSetup Set up Google Cloud Print options.
Web Pro
Web Pro
Web Pro
Web ProWeb Proxy
xy
xy
xyxy Congure proxy settings.
Security
Security
Security
SecuritySecurity
Settings
Settings
Settings
SettingsSettings View and restore current security settings to factory-default values.
Congure Conguration security settings using the Security Wizard.
NO
NO
NO
NONOTE:
TE:
TE:
TE:TE: Do not use the Security Wizard to security settings using Conguration congure
network-management applications, such as HP Web Jetadmin.
Authorization
Authorization
Authorization
AuthorizationAuthorization Control management and use of this printer, including the following:conguration
●Set or change the administrator password to control access to conguration
parameters.
●Request, install, and manage digital on the HP Jetdirect print server.certicates
●Limit host access to this printer through an Access Control List (ACL) (for selected
print servers on IPv4 networks only).
Secure Communication
Secure Communication
Secure Communication
Secure CommunicationSecure Communication Congure security settings.
Mgmt. Pro
Mgmt. Pro
Mgmt. Pro
Mgmt. ProMgmt. Protocols
tocols
tocols
tocolstocols Congure and manage security protocols for this printer, including the following:
●Set the security management level for the HP Embedded Web Server, and control
trac over HTTP and HTTPS.
●Congure the SNMP (Simple Network Management Protocol) operation. Enable or
disable the SNMP v1/v2c or SNMP v3 agents on the print server.
●Control access through protocols that may not be secure, such as printing protocols,
print services, discovery protocols, name resolution services, and conguration-
management protocols.
70 Chapter 5 Manage the printer ENWW

T
T
T
TTable 5-7
able 5-7
able 5-7
able 5-7able 5-7 HP Embedded Web Server Networking tab (continued)
HP Embedded Web Server Networking tab (continued)
HP Embedded Web Server Networking tab (continued)
HP Embedded Web Server Networking tab (continued) HP Embedded Web Server Networking tab (continued)
Menu
Menu
Menu
MenuMenu Description
Description
Description
DescriptionDescription
802.1X Authentication
802.1X Authentication
802.1X Authentication
802.1X Authentication802.1X Authentication Congure 802.1X authentication settings on the Jetdirect print server as required for client
authentication on the network, and reset the 802.1X authentication settings to factory-
default values.
CAUTION:
CAUTION:
CAUTION:
CAUTION:CAUTION: When changing the 802.1X authentication settings; the printer might lose its
connection. To reconnect, it might be necessary to reset the print server to a factory-
default state and reinstall the printer.
IPsec/Firewal
IPsec/Firewal
IPsec/Firewal
IPsec/FirewalIPsec/Firewall
l
l
ll View or a Firewall policy or an IPsec/Firewall policy.congure
Announcement Agent
Announcement Agent
Announcement Agent
Announcement AgentAnnouncement Agent Enable or disable the HP Device Announcement Agent, set the server, and conguration
congure certicates. mutual authentication using
Diagnostics
Diagnostics
Diagnostics
DiagnosticsDiagnostics
Network Statis
Network Statis
Network Statis
Network StatisNetwork Statistics
tics
tics
ticstics Display network statistics that are collected and stored on the HP Jetdirect print server.
Pro
Pro
Pro
ProProtocol Inf
tocol Inf
tocol Inf
tocol Inftocol Info
o
o
oo View a list of settings on the HP Jetdirect print server for each network-conguration
protocol.
Conguration
Conguration
Conguration
CongurationConguration Page
Page
Page
Page Page View the HP Jetdirect page, which contains status and conguration conguration
information.
Other Links list
Other Links list
Other Links list
Other Links listOther Links list
NO
NO
NO
NONOTE:
TE:
TE:
TE:TE: Congure which links display in the footer of the HP Embedded Web Server by using the Edit Other Links
Edit Other Links
Edit Other Links
Edit Other Links Edit Other Links
menu on the tab. The following are the default links.
General
General
General
GeneralGeneral
T
T
T
TTable 5-8
able 5-8
able 5-8
able 5-8able 5-8 HP Embedded Web Server Other Links list
HP Embedded Web Server Other Links list
HP Embedded Web Server Other Links list
HP Embedded Web Server Other Links list HP Embedded Web Server Other Links list
Menu
Menu
Menu
MenuMenu Description
Description
Description
DescriptionDescription
Product Support
Product Support
Product Support
Product SupportProduct Support Connect to the support site for the printer to search for help on various topics.
Shop for Supplies
Shop for Supplies
Shop for Supplies
Shop for SuppliesShop for Supplies Connect to the HP website for information on purchasing original HP supplies, such as
cartridges and paper.
HP Instant Support
HP Instant Support
HP Instant Support
HP Instant SupportHP Instant Support Connect to the HP website to solutions to printer problems.nd
ENWW Advanced with HP Embedded Web Server (EWS) 71conguration

Congure
Congure
Congure
CongureCongure IP network settings
IP network settings
IP network settings
IP network settings IP network settings
●Printer sharing disclaimer
●View or change network settings
●Rename the printer on a network
●Manually IPv4 TCP/IP parameters from the control panelcongure
●Manually IPv6 TCP/IP parameters from the control panelcongure
●Link speed and duplex settings
Printer sharing disclaimer
Printer sharing disclaimer
Printer sharing disclaimer
Printer sharing disclaimerPrinter sharing disclaimer
HP does not support peer-to-peer networking, as the feature is a function of Microsoft operating systems and
not of the HP printer drivers. Go to Microsoft at www.microsoft.com.
View or change network settings
View or change network settings
View or change network settings
View or change network settingsView or change network settings
Use the HP Embedded Web Server to view or change IP settings.conguration
1.
1.
1.
1.1. Find the printer IP address: From the Home screen on the printer control panel, select the Information
icon, and then select the Network icon to display the IP address or host name.
2.
2.
2.
2.2. Open a web browser, and in the address line, type the IP address or host name exactly as it displays on the
printer control panel. Press the key on the computer keyboard. The EWS opens.Enter
NO
NO
NO
NONOTE:
TE:
TE:
TE:TE: If the web browser displays a message indicating that accessing the website might not be safe,
select the option to continue to the website. Accessing this website will not harm the computer.
3.
3.
3.
3.3. Click the tab to obtain network information. Change settings as needed.
Networking
Networking
Networking
NetworkingNetworking
Rename the printer on a network
Rename the printer on a network
Rename the printer on a network
Rename the printer on a networkRename the printer on a network
To rename the printer on a network so that it can be uniquely use the HP Embedded Web Server.identied,
1.
1.
1.
1.1. Find the printer IP address: From the Home screen on the printer control panel, select the Information
icon, and then select the Network icon to display the IP address or host name.
2.
2.
2.
2.2. Open a web browser, and in the address line, type the IP address or host name exactly as it displays on the
printer control panel. Press the key on the computer keyboard. The EWS opens.Enter
NO
NO
NO
NONOTE:
TE:
TE:
TE:TE: If the web browser displays a message indicating that accessing the website might not be safe,
select the option to continue to the website. Accessing this website will not harm the computer.
3.
3.
3.
3.3. Open the tab.
General
General
General
GeneralGeneral
4.
4.
4.
4.4. On the Device Inf
Device Inf
Device Inf
Device InfDevice Information
ormation
ormation
ormationormation page, the default printer name is in the You can change this
Device Name
Device Name
Device Name
Device NameDevice Name eld.
name to uniquely identify this printer.
72 Chapter 5 Manage the printer ENWW

NO
NO
NO
NONOTE:
TE:
TE:
TE:TE: Completing the other on this page is optional.elds
5.
5.
5.
5.5. Click the button to save the changes.
Apply
Apply
Apply
ApplyApply
Manually
Manually
Manually
Manually Manually IPv4 TCP
IPv4 TCP
IPv4 TCP
IPv4 TCP IPv4 TCP/IP parameters fr
/IP parameters fr
/IP parameters fr
/IP parameters fr/IP parameters from the con
om the con
om the con
om the conom the control panel
trol panel
trol panel
trol paneltrol panel
congure
congure
congure
congurecongure
Use the control-panel menus to manually set an IPv4 address, subnet mask, and default gateway.Settings
1.
1.
1.
1.1. From the Home screen on the printer control panel, navigate to the application, and then select Settings
the icon.Settings
2.
2.
2.
2.2. Open the following menus:
a.
a.
a.
a.a. Networking
b.
b.
b.
b.b. Ethernet
c.
c.
c.
c.c. TCP/IP
d.
d.
d.
d.d. IPV 4 Settings
e.
e.
e.
e.e. Cong Method
3.
3.
3.
3.3. Select the option, and then select .Manual OK
4.
4.
4.
4.4. Open the menu.Manual Settings
5.
5.
5.
5.5. Select the , , or IP Address Subnet Mask Default Gateway option.
6.
6.
6.
6.6. Use the numeric keypad to enter the correct digits for the and then select .eld, OK
Repeat the process for each to be eld congured.
Manually
Manually
Manually
Manually Manually IPv6 TCP
IPv6 TCP
IPv6 TCP
IPv6 TCP IPv6 TCP/IP parameters fr
/IP parameters fr
/IP parameters fr
/IP parameters fr/IP parameters from the con
om the con
om the con
om the conom the control panel
trol panel
trol panel
trol paneltrol panel
congure
congure
congure
congurecongure
Use the control-panel menus to manually set an IPv6 address.Settings
1.
1.
1.
1.1. From the Home screen on the printer control panel, navigate to the application, and then select Settings
the icon.Settings
2.
2.
2.
2.2. To enable manual open the following menus:conguration,
a.
a.
a.
a.a. Networking
b.
b.
b.
b.b. Ethernet
c.
c.
c.
c.c. TCP/IP
d.
d.
d.
d.d. IPV6 Settings
3.
3.
3.
3.3. Select , select , and then select .Enable On OK
4.
4.
4.
4.4. Open the menu.Address
5.
5.
5.
5.5. Open the menu, and then select . Use the keypad to enter the address, and then Manual Settings Address
select .OK
ENWW IP network settings 73Congure

Link speed and duplex settings
Link speed and duplex settings
Link speed and duplex settings
Link speed and duplex settingsLink speed and duplex settings
NO
NO
NO
NONOTE:
TE:
TE:
TE:TE: This information applies only to Ethernet networks. It does not apply to wireless networks.
The link speed and communication mode of the print server must match the network hub. For most situations,
leave the printer in automatic mode. Incorrect changes to the link speed and duplex settings might prevent the
printer from communicating with other network devices. To make changes, use the printer control panel.
NO
NO
NO
NONOTE:
TE:
TE:
TE:TE: The printer setting must match the setting for the network device (a network hub, switch, gateway,
router, or computer).
NO
NO
NO
NONOTE:
TE:
TE:
TE:TE: Making changes to these settings causes the printer to turn and then on. Make changes only when o
the printer is idle.
1.
1.
1.
1.1. From the Home screen on the printer control panel, navigate to the application, and then select Settings
the icon.Settings
2.
2.
2.
2.2. Open the following menus:
a.
a.
a.
a.a. Networking
b.
b.
b.
b.b. Ethernet
c.
c.
c.
c.c. Link Speed
3.
3.
3.
3.3. Select one of the following options:
●Auto: The print server automatically itself for the highest link speed and communication congures
mode allowed on the network.
●10T Half: 10 megabytes per second (Mbps), half-duplex operation
●10T Full: 10 Mbps, full-duplex operation
●10T Auto: 10 Mbps, automatic-duplex operation
●100TX Half: 100 Mbps, half-duplex operation
●100TX Full: 100 Mbps, full-duplex operation
●100TX Auto: 100 Mbps, automatic-duplex operation
●1000T Full: 1000 Mbps, full-duplex operation
4.
4.
4.
4.4. Select . The printer turns and then on.OK o
74 Chapter 5 Manage the printer ENWW

Printer security fe
Printer security fe
Printer security fe
Printer security fePrinter security features
atures
atures
aturesatures
Intr
Intr
Intr
IntrIntroduction
oduction
oduction
oductionoduction
The printer includes several security features to restrict who has access to settings, to secure data, conguration
and to prevent access to valuable hardware components.
●Security statements
●IP Security
●Assign or change the system password using the HP Embedded Web Server
●Encryption support: HP High Performance Secure Hard Disks
●Lock the formatter
Security statemen
Security statemen
Security statemen
Security statemenSecurity statements
ts
ts
tsts
The printer supports security standards and recommended protocols that help you keep the printer secure,
protect critical information on your network, and simplify the way you monitor and maintain the printer.
IP Security
IP Security
IP Security
IP SecurityIP Security
IP Security (IPsec) is a set of protocols that control IP-based network to and from the printer. IPsec trac
provides host-to-host authentication, data integrity, and encryption of network communications.
For printers that are connected to the network and have an HP Jetdirect print server, you can IPsec by congure
using the tab in the HP Embedded Web Server.
Networking
Networking
Networking
NetworkingNetworking
Assign or change the sys
Assign or change the sys
Assign or change the sys
Assign or change the sysAssign or change the system password using the HP Embedded Web Server
tem password using the HP Embedded Web Server
tem password using the HP Embedded Web Server
tem password using the HP Embedded Web Servertem password using the HP Embedded Web Server
Assign an administrator password for access to the printer and the HP Embedded Web Server so that
unauthorized users cannot change the printer settings.
1.
1.
1.
1.1. Find the printer IP address: From the Home screen on the printer control panel, select the Information
icon, and then select the Network icon to display the IP address or host name.
2.
2.
2.
2.2. Open a web browser, and in the address line, type the IP address or host name exactly as it displays on the
printer control panel. Press the Enter key on the computer keyboard. The EWS opens.
NO
NO
NO
NONOTE:
TE:
TE:
TE:TE: If the web browser displays a message indicating that accessing the website might not be safe,
select the option to continue to the website. Accessing this website will not harm the computer.
3.
3.
3.
3.3. Click the tab.
Security
Security
Security
SecuritySecurity
4.
4.
4.
4.4. Open the menu.
General Security
General Security
General Security
General SecurityGeneral Security
5.
5.
5.
5.5. In the area labeled Set the L
Set the L
Set the L
Set the LSet the Local Administra
ocal Administra
ocal Administra
ocal Administraocal Administrator P
tor P
tor P
tor Ptor Password
assword
assword
asswordassword, enter the name to associate with the password in
the
Username
Username
Username
UsernameUsername eld.
6.
6.
6.
6.6. Enter the password in the Ne
Ne
Ne
NeNew Passw
w Passw
w Passw
w Passww Password
ord
ord
ordord Verify P
Verify P
Verify P
Verify PVerify Password
assword
assword
asswordassword and then enter it again in the eld, eld.
ENWW Printer security features 75

A “Cartridge is l
A “Cartridge is l
A “Cartridge is l
A “Cartridge is lA “Cartridge is low” or “Cartridge is very l
ow” or “Cartridge is very l
ow” or “Cartridge is very l
ow” or “Cartridge is very low” or “Cartridge is very lo
o
o
oow” message dis
w” message dis
w” message dis
w” message disw” message displays on
plays on
plays on
plays on plays on
the printer c
the printer c
the printer c
the printer cthe printer contr
ontr
ontr
ontrontrol panel
ol panel
ol panel
ol panelol panel
Cartridge is lo
Cartridge is lo
Cartridge is lo
Cartridge is loCartridge is low
w
w
ww: The printer indicates when a toner cartridge level is low. Actual toner cartridge life remaining
may vary. Consider having a replacement available to install when print quality is no longer acceptable. The toner
cartridge does not need to be replaced now.
Continue printing with the current cartridge until redistributing the toner no longer yields acceptable print
quality. To redistribute the toner, remove the toner cartridge from the printer and gently rock the cartridge back
and forth end to end. Reinsert the toner cartridge into the printer and close the cover.
Cartridge is very lo
Cartridge is very lo
Cartridge is very lo
Cartridge is very loCartridge is very low
w
w
ww: The printer indicates when the cartridge level is very low. Actual cartridge life remaining
may vary. To extend the life of the toner, gently rock the cartridges back and forth end to end. Consider having a
replacement available to install when print quality is no longer acceptable. The cartridge does not need to be
replaced now unless the print quality is no longer acceptable.
Once an HP toner cartridge has reached Very L
Very L
Very L
Very LVery Low
ow
ow
owow, HP’s Premium Protection Warranty on that toner cartridge has
ended.
Change the “Very Low” settings
Change the “Very Low” settings
Change the “Very Low” settings
Change the “Very Low” settingsChange the “Very Low” settings
You can change the way the printer reacts when supplies reach the Very Low state. You do not have to re-
establish these settings when you install a new toner cartridge.
1.
1.
1.
1.1. From the Home screen on the printer control panel, open the menu.Settings
2.
2.
2.
2.2. Open the following menus:
●Manage Supplies
●Very Low Behavior
●Black Cartridge Color Cartridges or
3.
3.
3.
3.3. Select one of the following options:
86 Chapter 6 Solve problems ENWW

●Select the Stop option to set the printer to stop printing when the cartridge reaches the Very Low
Very Low
Very Low
Very Low Very Low
threshold.
●Select the Prompt to continue option to set the printer to stop printing when the cartridge reaches the
Very Low
Very Low
Very Low
Very LowVery Low threshold. You can acknowledge the prompt or replace the cartridge to resume printing.
●Select the option to set the printer to alert you that the cartridge is very low, and to continue Continue
printing beyond the setting without interaction. This can result in unsatisfactory print
Very Low
Very Low
Very Low
Very LowVery Low
quality.
Order supplies
Order supplies
Order supplies
Order suppliesOrder supplies
Order supplies and paper www.hp.com
Order through service or support providers Contact an HP-authorized service or support provider.
Order using the HP Embedded Web Server (EWS) To access, in a supported web browser on your computer, enter the
printer IP address or host name in the address/URL The EWS eld.
contains a link to the HP website, which provides options for
purchasing Original HP supplies.
ENWW A “Cartridge is low” or “Cartridge is very low” message displays on the printer control panel 87

Printer does no
Printer does no
Printer does no
Printer does noPrinter does not pick up paper or misfeeds
t pick up paper or misfeeds
t pick up paper or misfeeds
t pick up paper or misfeedst pick up paper or misfeeds
Intr
Intr
Intr
IntrIntroduction
oduction
oduction
oductionoduction
The following solutions can help solve problems if the printer is not picking up paper from the tray or is picking
up multiple sheets of paper at one time. Either of these situations can result in paper jams.
●The printer does not pick up paper
●The printer picks up multiple sheets of paper
The printer does no
The printer does no
The printer does no
The printer does noThe printer does not pick up paper
t pick up paper
t pick up paper
t pick up papert pick up paper
If the printer does not pick up paper from the tray, try these solutions.
1.
1.
1.
1.1. Open the printer and remove any jammed sheets of paper. Verify that no torn remnants of paper remain
inside the printer.
2.
2.
2.
2.2. Load the tray with the correct size of paper for the job.
3.
3.
3.
3.3. Make sure the paper size and type are set correctly on the printer control panel.
88 Chapter 6 Solve problems ENWW

5.
5.
5.
5.5. Verify that the humidity in the room is within for this printer and that paper is being stored in specications
unopened packages. Most reams of paper are sold in moisture-proof wrapping to keep paper dry.
In high-humidity environments, paper at the top of the stack in the tray can absorb moisture, and it might
have a wavy or uneven appearance. If this happens, remove the top 5 to 10 sheets of paper from the stack.
In low-humidity environments, excess static electricity can cause sheets of paper to stick together. If this
happens, remove the paper from the tray, and the stack by holding it at each end and bringing the ex
ends up to form a U shape. Then, rotate the ends down to reverse the U shape. Next, hold each side of the
stack of paper, and repeat this process. This process releases individual sheets without introducing static
electricity. Straighten the paper stack against a table before returning it to the tray.
Figure 6-3
Figure 6-3
Figure 6-3
Figure 6-3Figure 6-3 Technique for the paper stackexing
12
6.
6.
6.
6.6. Check the printer control panel to see if it is displaying a prompt to feed the paper manually. Load paper,
and continue.
7.
7.
7.
7.7. The rollers above the tray might be contaminated. Clean the rollers with a lint-free cloth dampened with
warm water. Use distilled water, if it is available.
CAUTION:
CAUTION:
CAUTION:
CAUTION:CAUTION: Do not spray water directly on to the printer. Instead, spray water on the cloth or dab the cloth
in water and wring it out before cleaning the rollers.
The following image shows examples of the roller location for various printers.
Figure 6-4
Figure 6-4
Figure 6-4
Figure 6-4Figure 6-4 Roller locations for Tray 1 or the multipurpose tray
The printer picks up mul
The printer picks up mul
The printer picks up mul
The printer picks up mulThe printer picks up multiple sheets o
tiple sheets o
tiple sheets o
tiple sheets otiple sheets of paper
f paper
f paper
f paperf paper
If the printer picks up multiple sheets of paper from the tray, try these solutions.
1.
1.
1.
1.1. Remove the stack of paper from the tray and it, rotate it 180 degrees, and it over. ex ip Do not fan the
paper. Return the stack of paper to the tray.
90 Chapter 6 Solve problems ENWW
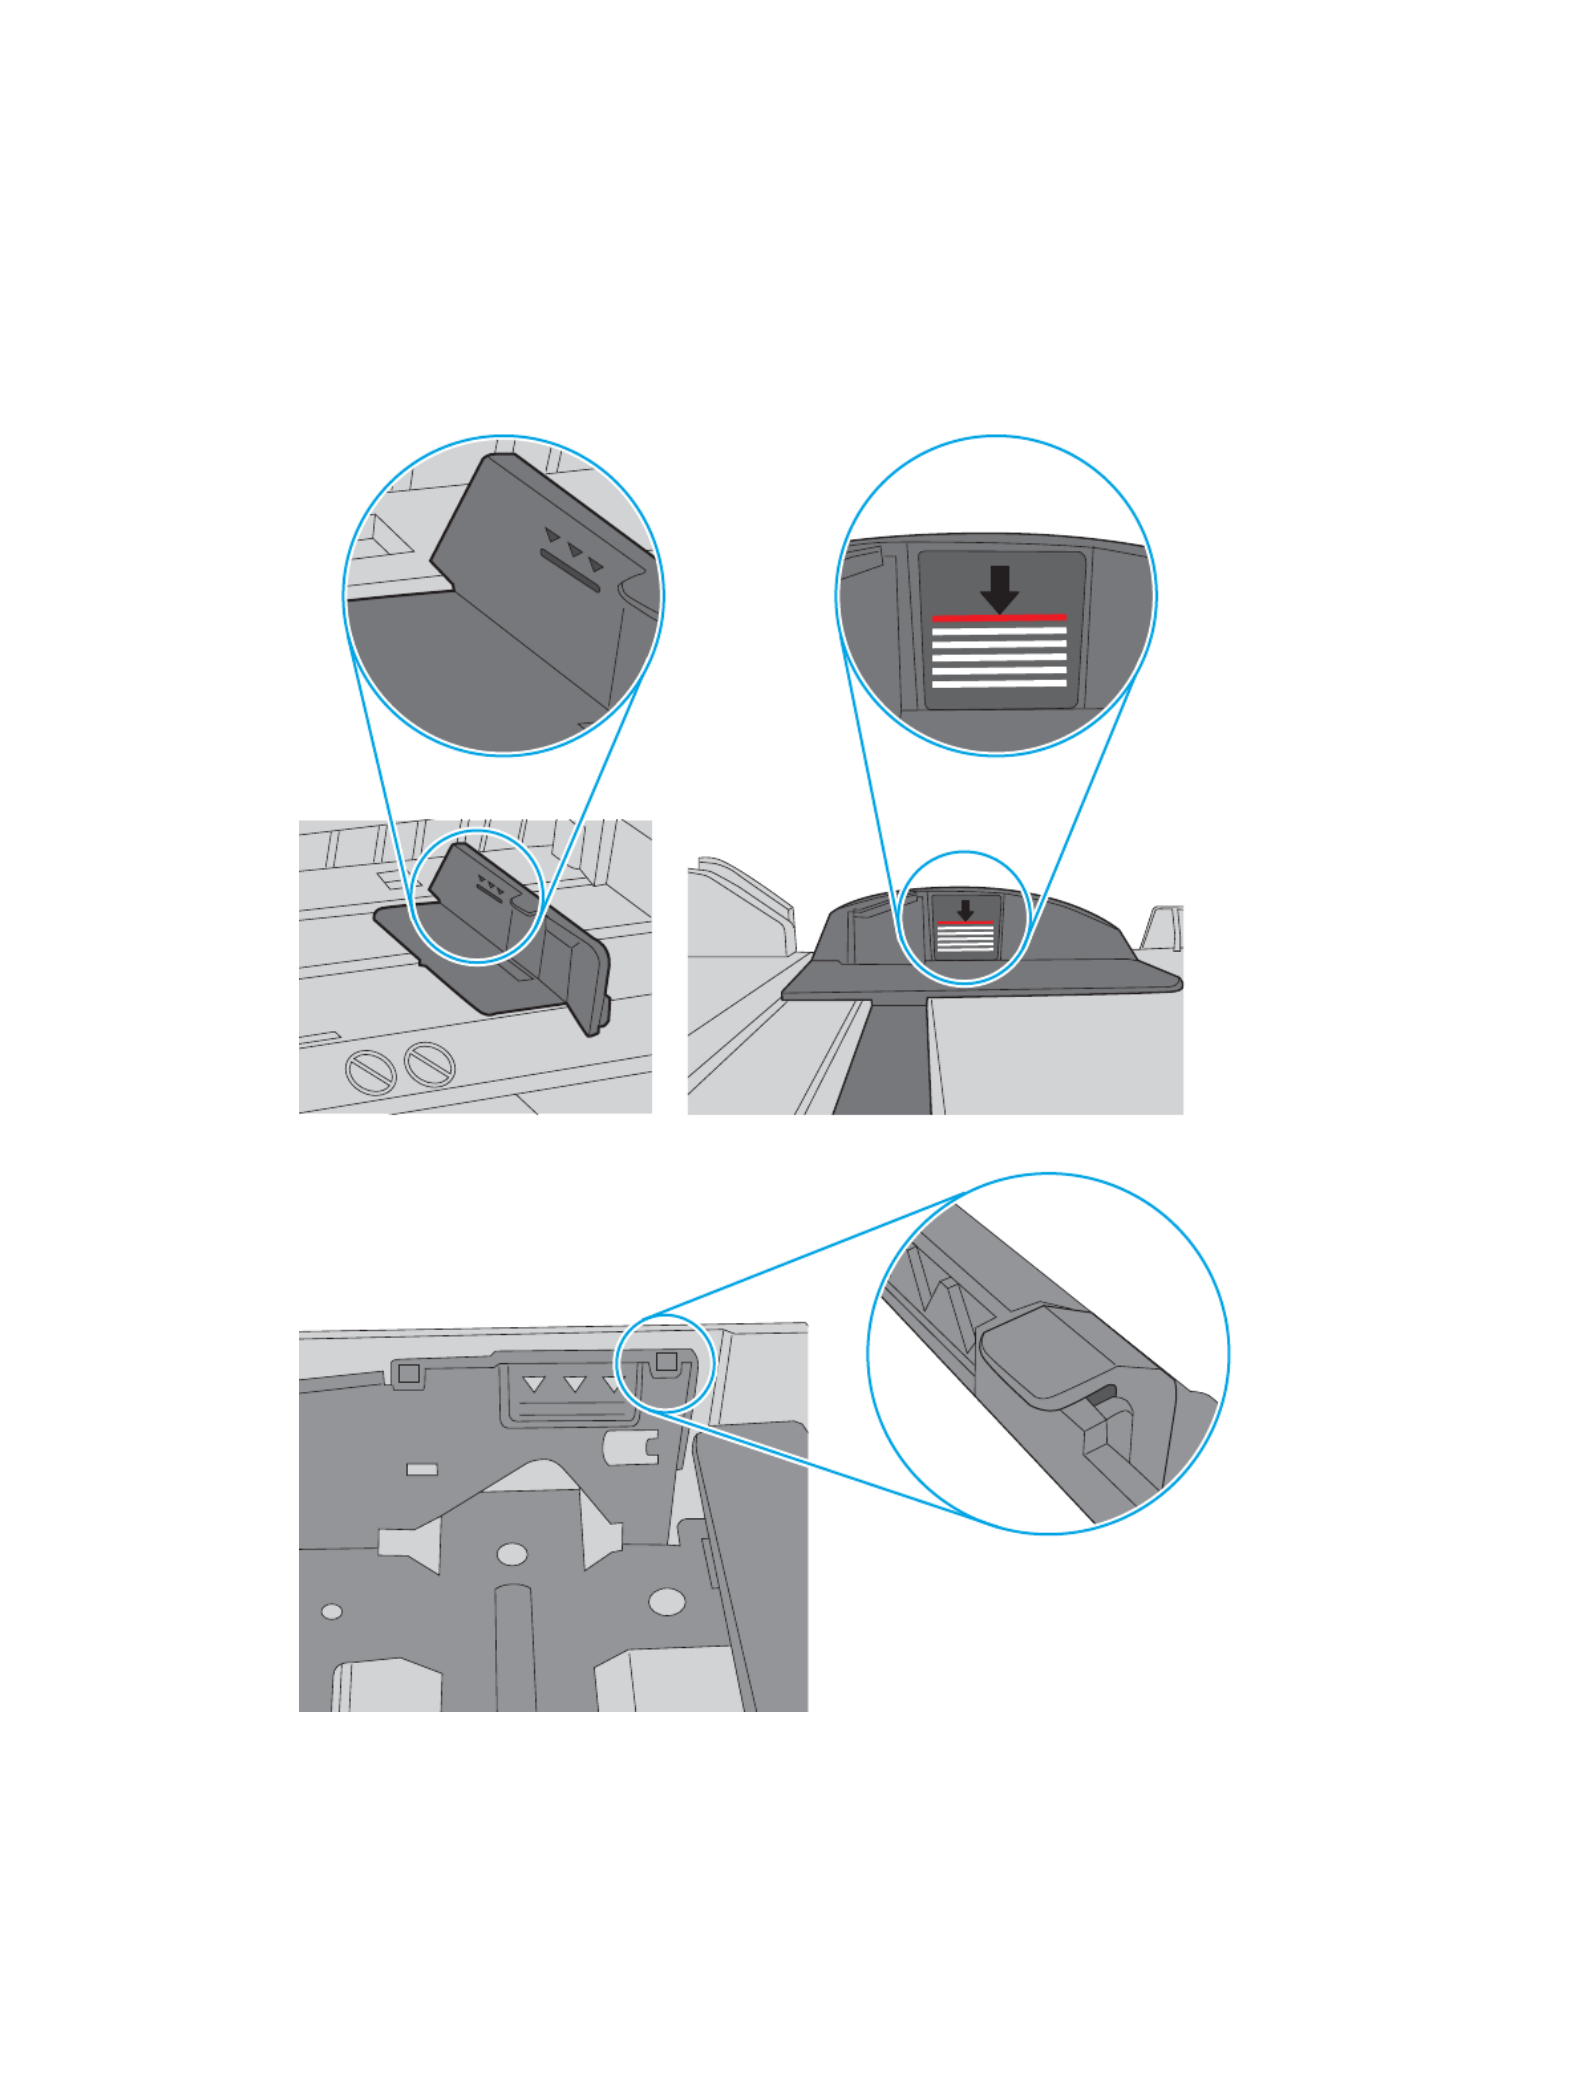
5.
5.
5.
5.5. Make sure the tray is not by checking the stack-height markings inside the tray. If it is overlled overlled,
remove the entire stack of paper from the tray, straighten the stack, and then return some of the paper to
the tray.
The following images show examples of the stack-height markings in the trays for various printers. Most
HP printers have markings similar to these. Also make sure that all sheets of paper are below the tabs near
the stack-height marks. These tabs help hold the paper in the correct position as it enters the printer.
Figure 6-6
Figure 6-6
Figure 6-6
Figure 6-6Figure 6-6 Stack-height markings
Figure 6-7
Figure 6-7
Figure 6-7
Figure 6-7Figure 6-7 Tab for the paper stack
92 Chapter 6 Solve problems ENWW

6.
6.
6.
6.6. Make sure the paper guides in the tray are adjusted correctly for the size of paper. Adjust the guides to the
appropriate indentation in the tray. The arrow on the tray guide should line up exactly with the marking on
the tray.
NO
NO
NO
NONOTE:
TE:
TE:
TE:TE: Do not adjust the paper guides tightly against the paper stack. Adjust them to the indentations or
markings in the tray.
The following images show examples of the paper-size indentations in the trays for various printers. Most
HP printers have markings similar to these.
Figure 6-8
Figure 6-8
Figure 6-8
Figure 6-8Figure 6-8 Size markings for Tray 1 or the multipurpose tray
Figure 6-9
Figure 6-9
Figure 6-9
Figure 6-9Figure 6-9 Size markings for cassette trays
7.
7.
7.
7.7. Make sure the printing environment is within recommended specications.
ENWW Printer does not pick up paper or misfeeds 93
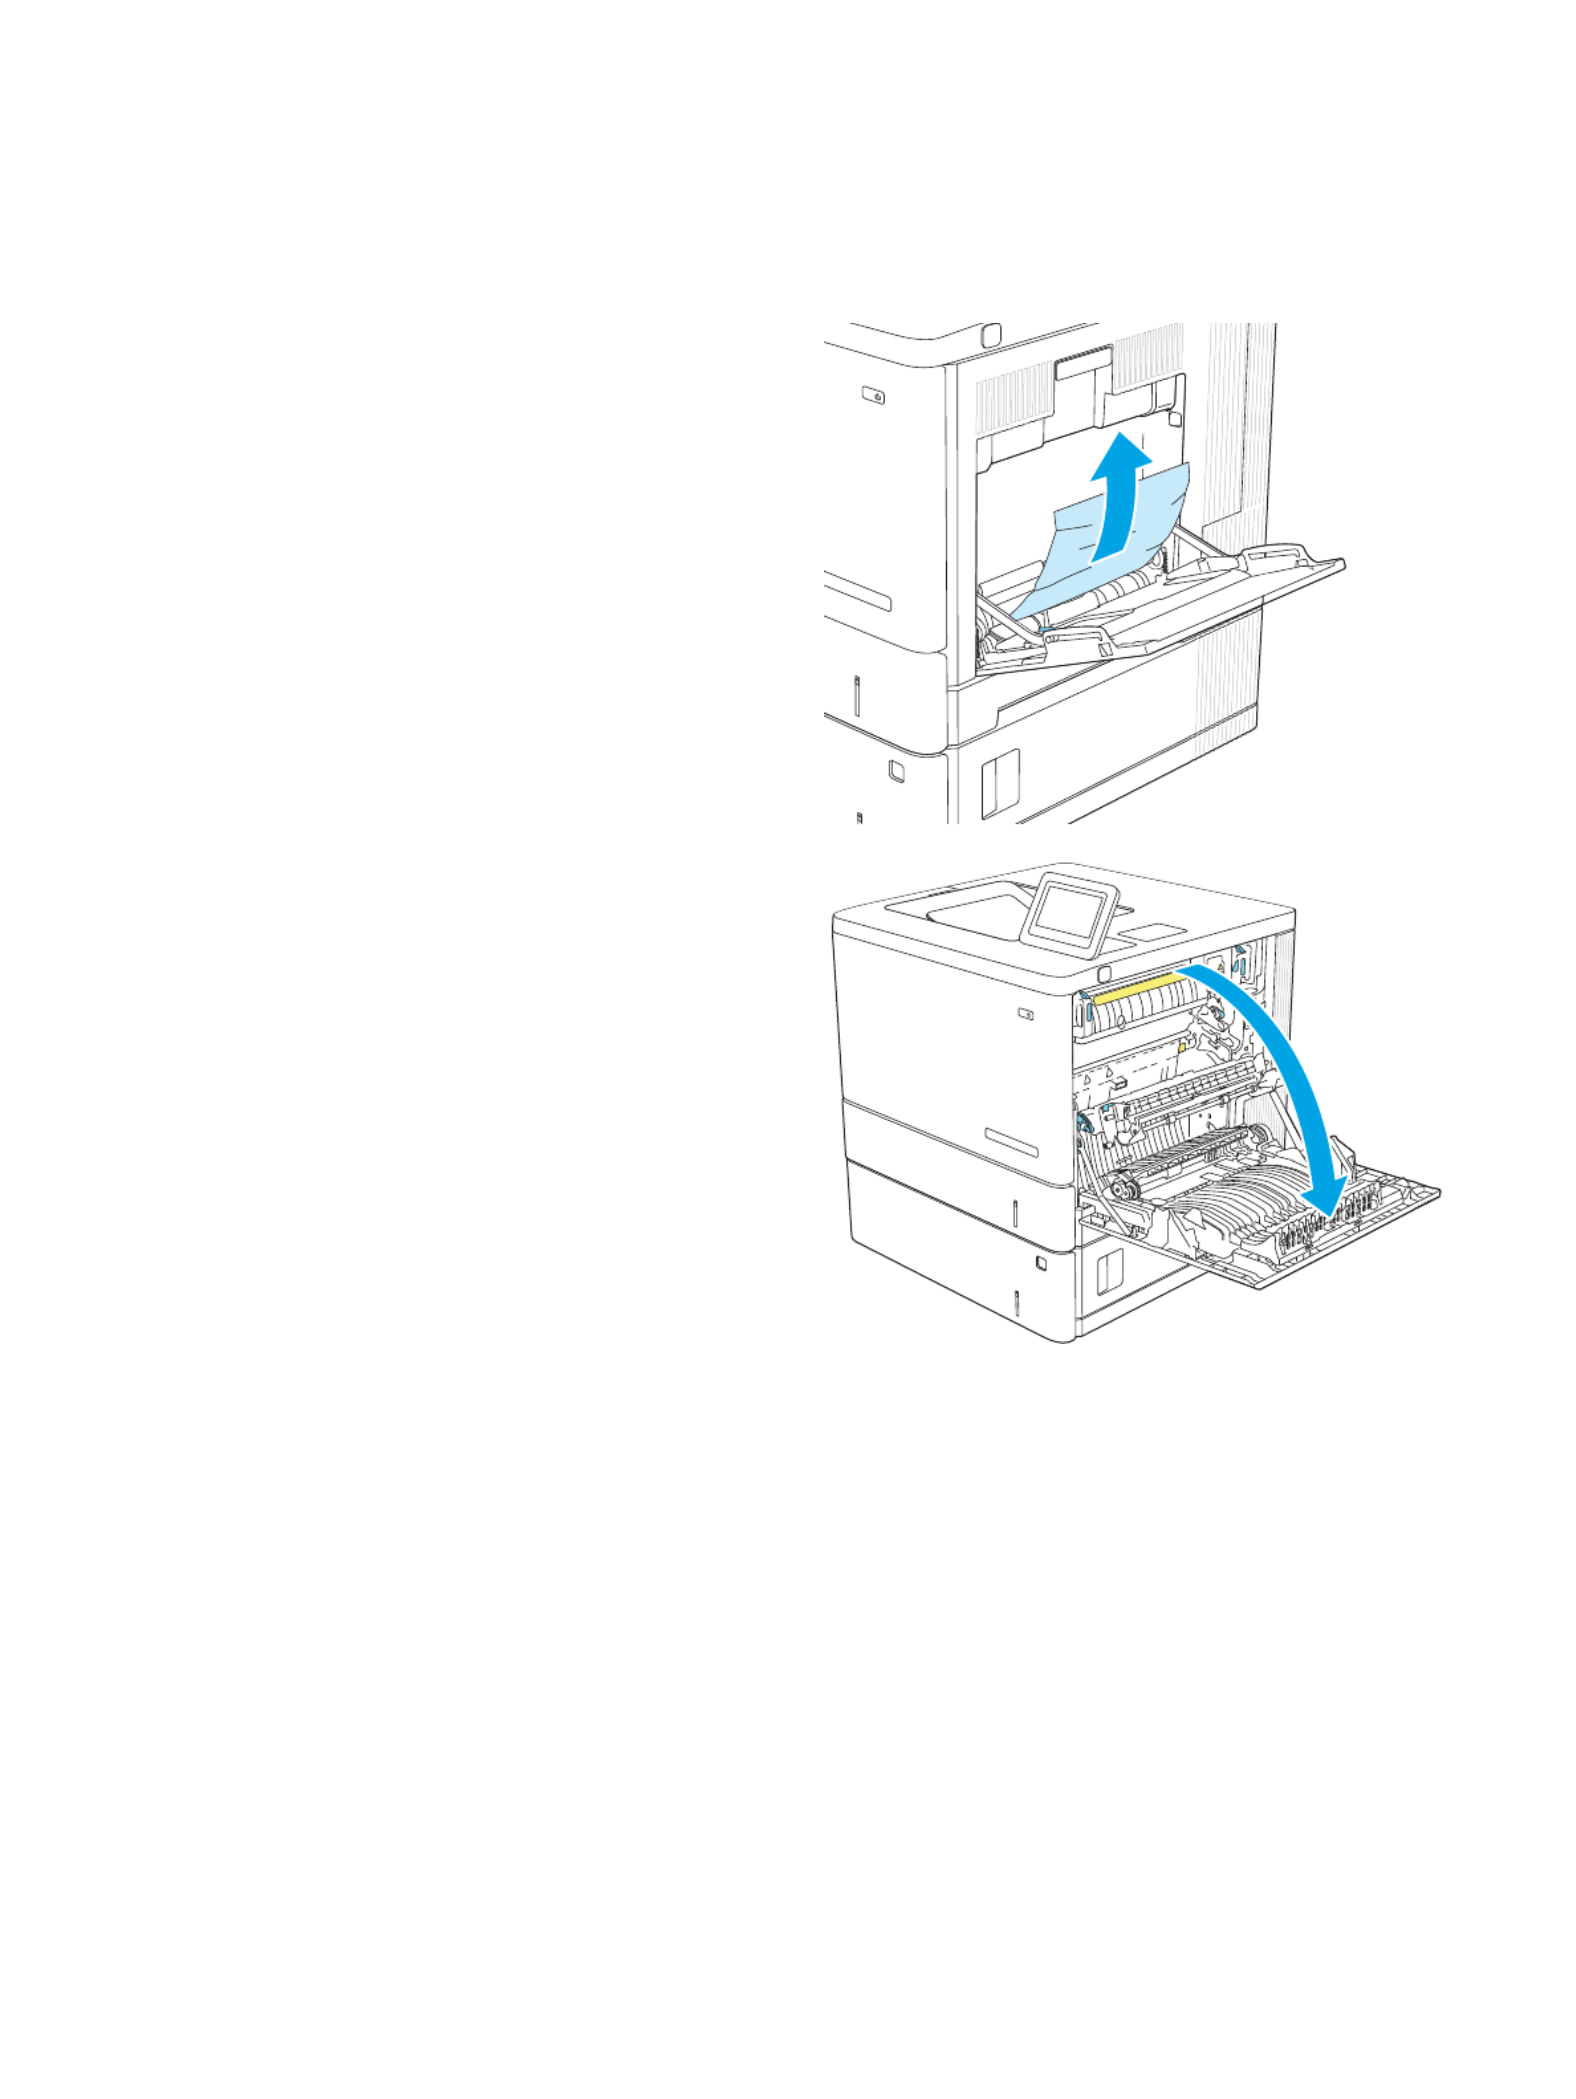
13.B2.D1 tray 1 paper jam
13.B2.D1 tray 1 paper jam
13.B2.D1 tray 1 paper jam
13.B2.D1 tray 1 paper jam13.B2.D1 tray 1 paper jam
Use the following procedure to check for paper in all possible jam locations related to Tray 1. When a jam occurs,
the control panel displays an animation that assists in clearing the jam.
1.
1.
1.
1.1. If jammed paper is visible in Tray 1, clear the jam
by gently pulling the paper straight out. Touch the
OK button to clear the message.
2.
2.
2.
2.2. If the paper remains stuck, or if no jammed paper
is visible in Tray 1, remove any remaining paper in
the tray, and then close Tray 1 and open the right
door.
96 Chapter 6 Solve problems ENWW

3.
3.
3.
3.3. If jammed paper is present, gently pull it out.
4.
4.
4.
4.4. Close the right door.
ENWW Clear paper jams 97
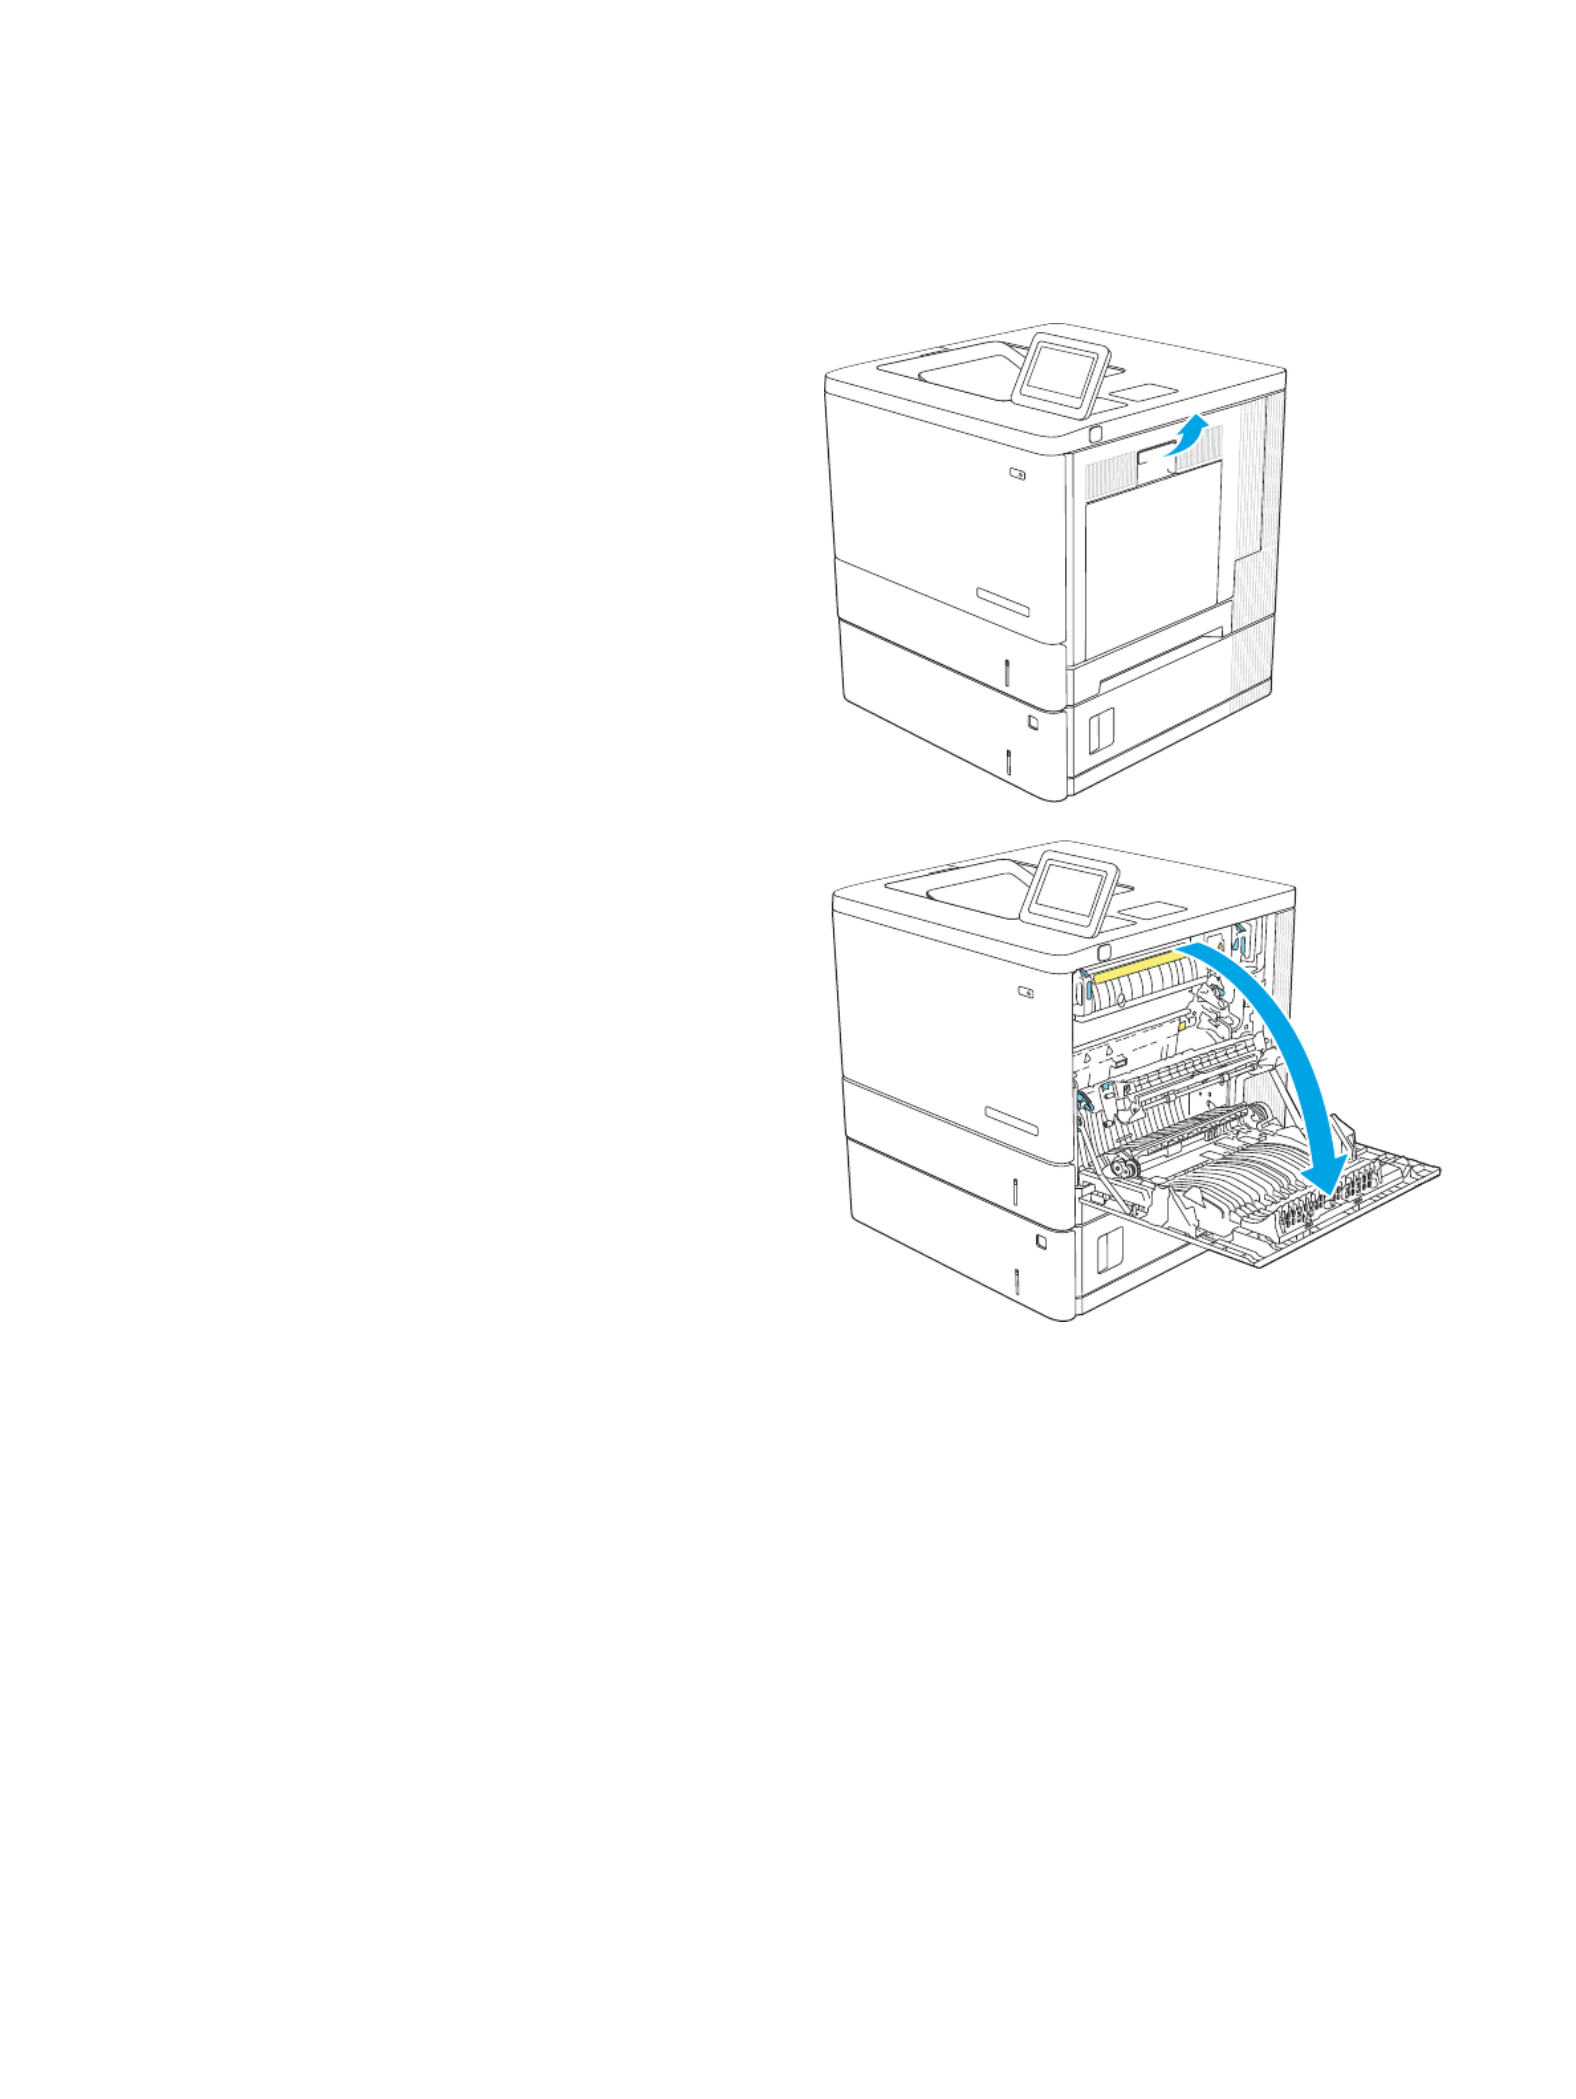
13.B2.D2 tray 2 paper jam
13.B2.D2 tray 2 paper jam
13.B2.D2 tray 2 paper jam
13.B2.D2 tray 2 paper jam13.B2.D2 tray 2 paper jam
Use the following procedure to check for paper in all possible jam locations related to Tray 2. When a jam occurs,
the control panel displays an animation that assists in clearing the jam.
1.
1.
1.
1.1. Lift the latch on the right door to release it.
2.
2.
2.
2.2. Open the right door.
98 Chapter 6 Solve problems ENWW

3.
3.
3.
3.3. Gently pull out any jammed paper from the pick up
area.
4.
4.
4.
4.4. Pull the tray completely out of the printer by
pulling and lifting it up slightly.
5.
5.
5.
5.5. Remove any jammed or damaged sheets of paper.
Verify that the tray is not and that the overlled
paper guides are adjusted correctly.
ENWW Clear paper jams 99

13.A3, 13.A4, 13.
13.A3, 13.A4, 13.
13.A3, 13.A4, 13.
13.A3, 13.A4, 13.13.A3, 13.A4, 13.A5 tray 3, tr
A5 tray 3, tr
A5 tray 3, tr
A5 tray 3, trA5 tray 3, tray 4, tray 5 paper jam
ay 4, tray 5 paper jam
ay 4, tray 5 paper jam
ay 4, tray 5 paper jamay 4, tray 5 paper jam
Use the following procedure to check for paper in all possible jam locations related to the optional 550-sheet
paper feeders. When a jam occurs, the control panel displays an animation that assists in clearing the jam.
1.
1.
1.
1.1. Open the lower-right door.
2.
2.
2.
2.2. Gently pull out any jammed paper.
3.
3.
3.
3.3. Pull the tray completely out of the printer by
pulling and lifting it up slightly.
ENWW Clear paper jams 101
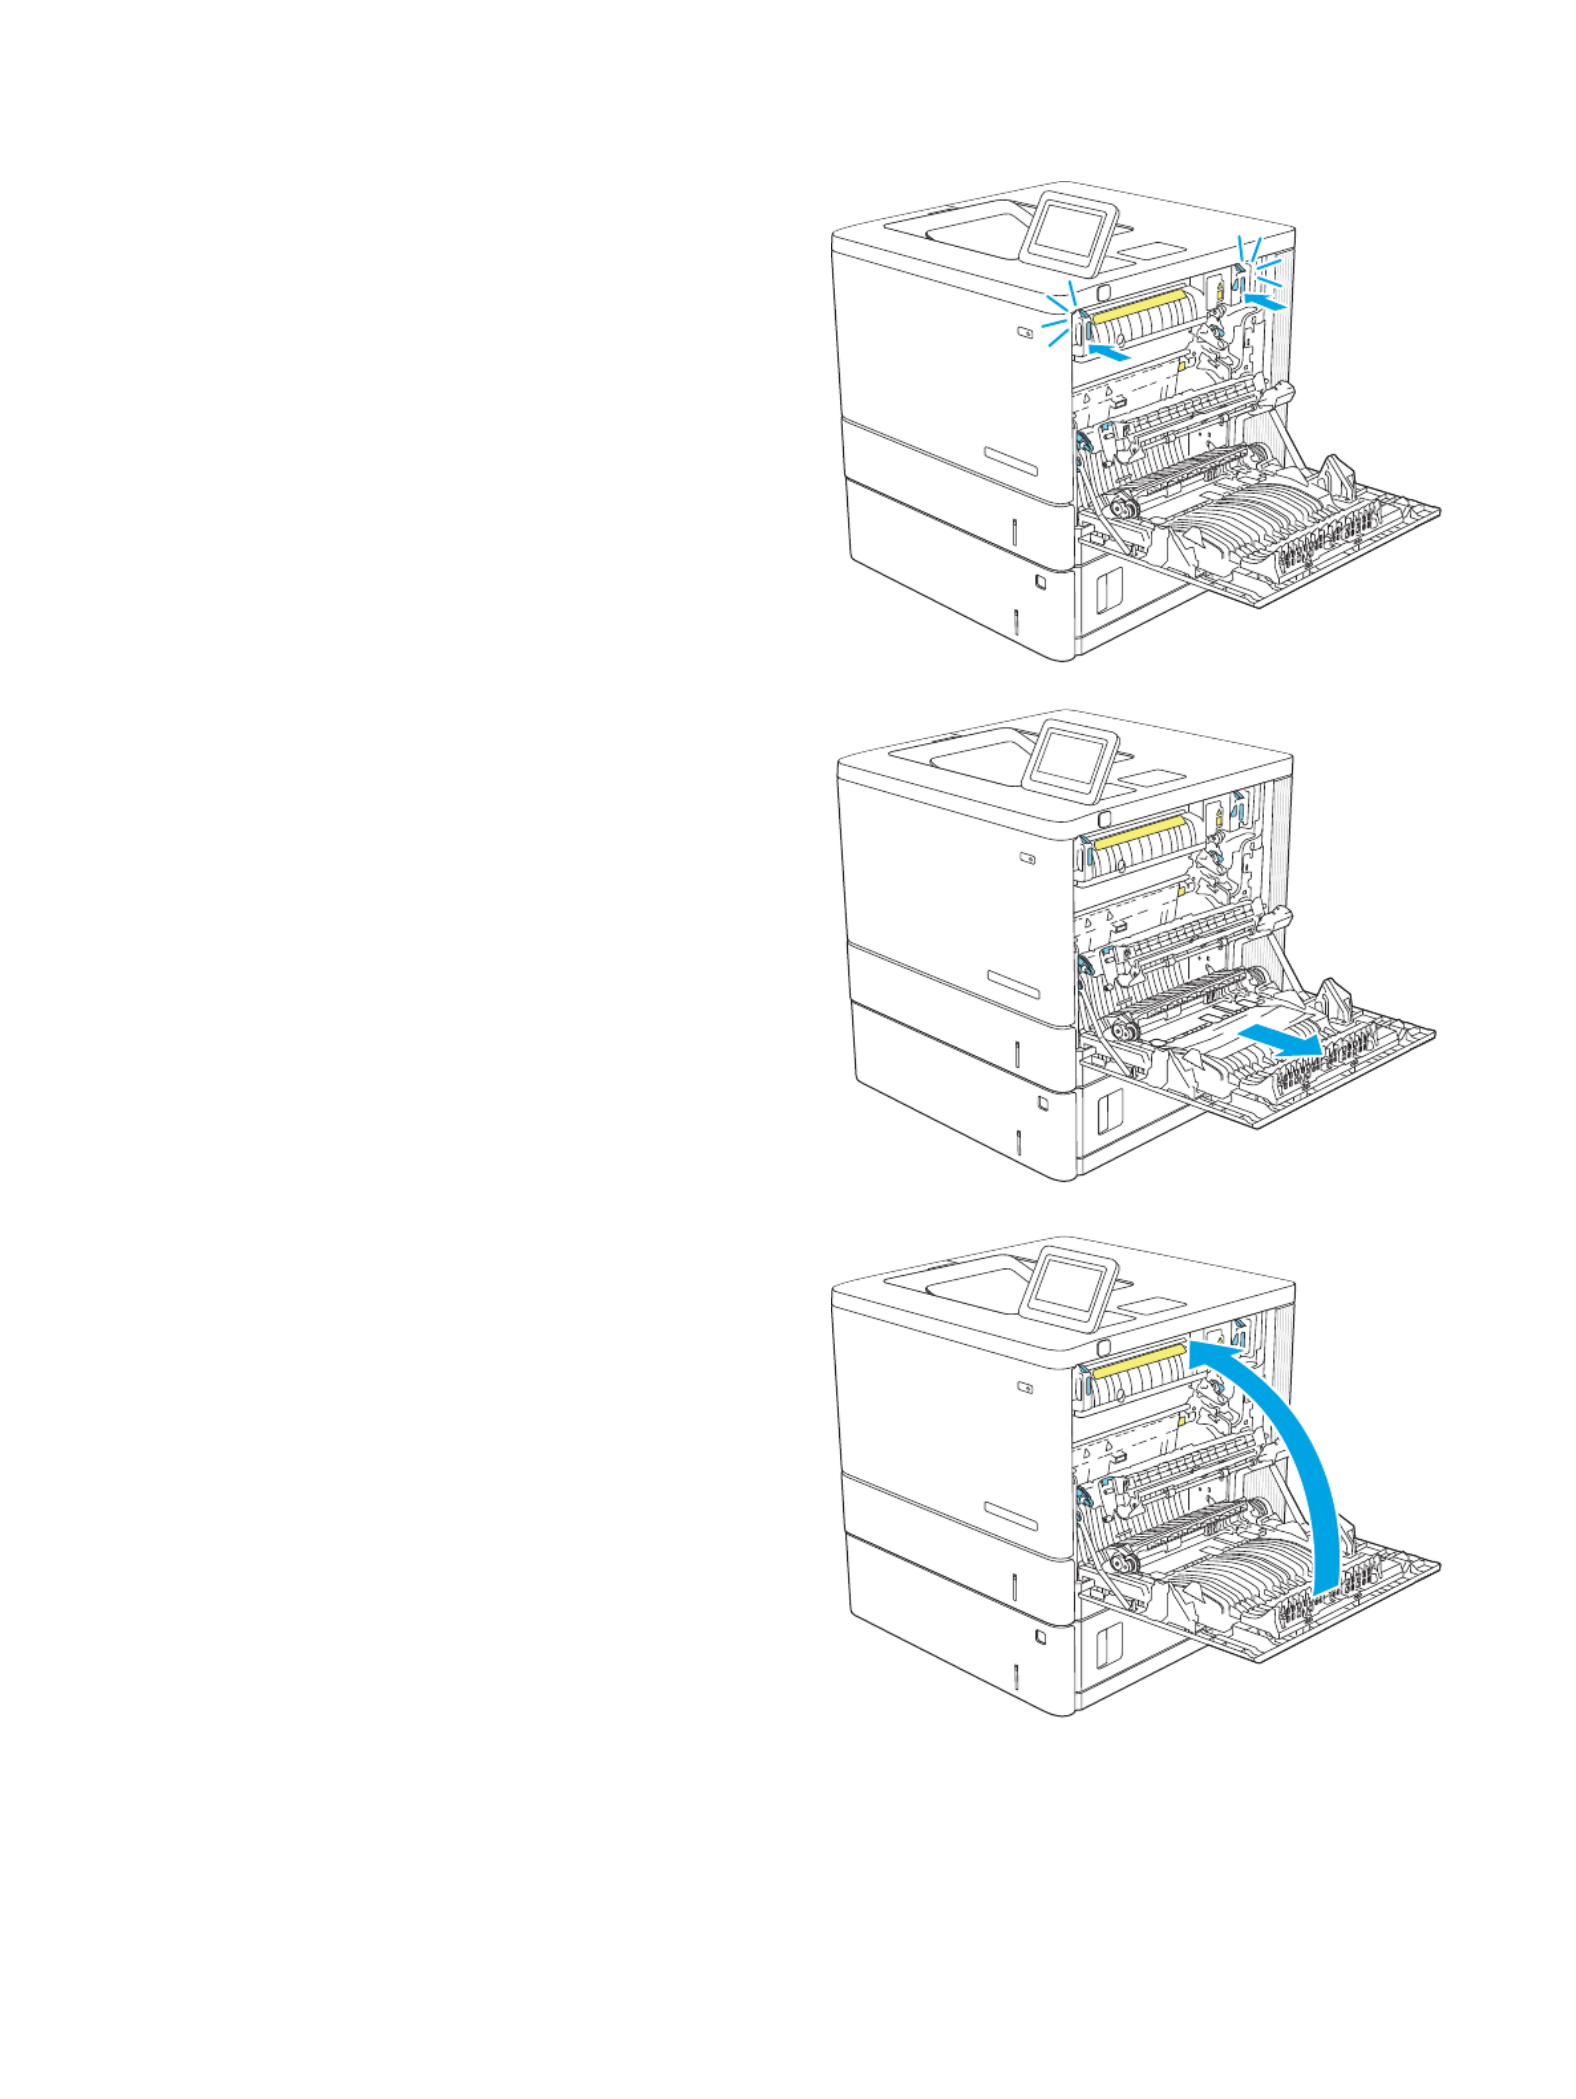
12.
12.
12.
12.12. Close the jam-access door, and push the fuser
completely into the printer until it clicks into place.
13.
13.
13.
13.13. Check for jammed paper in the duplex path inside
the right door, and remove any jammed paper.
14.
14.
14.
14.14. Close the right door.
108 Chapter 6 Solve problems ENWW
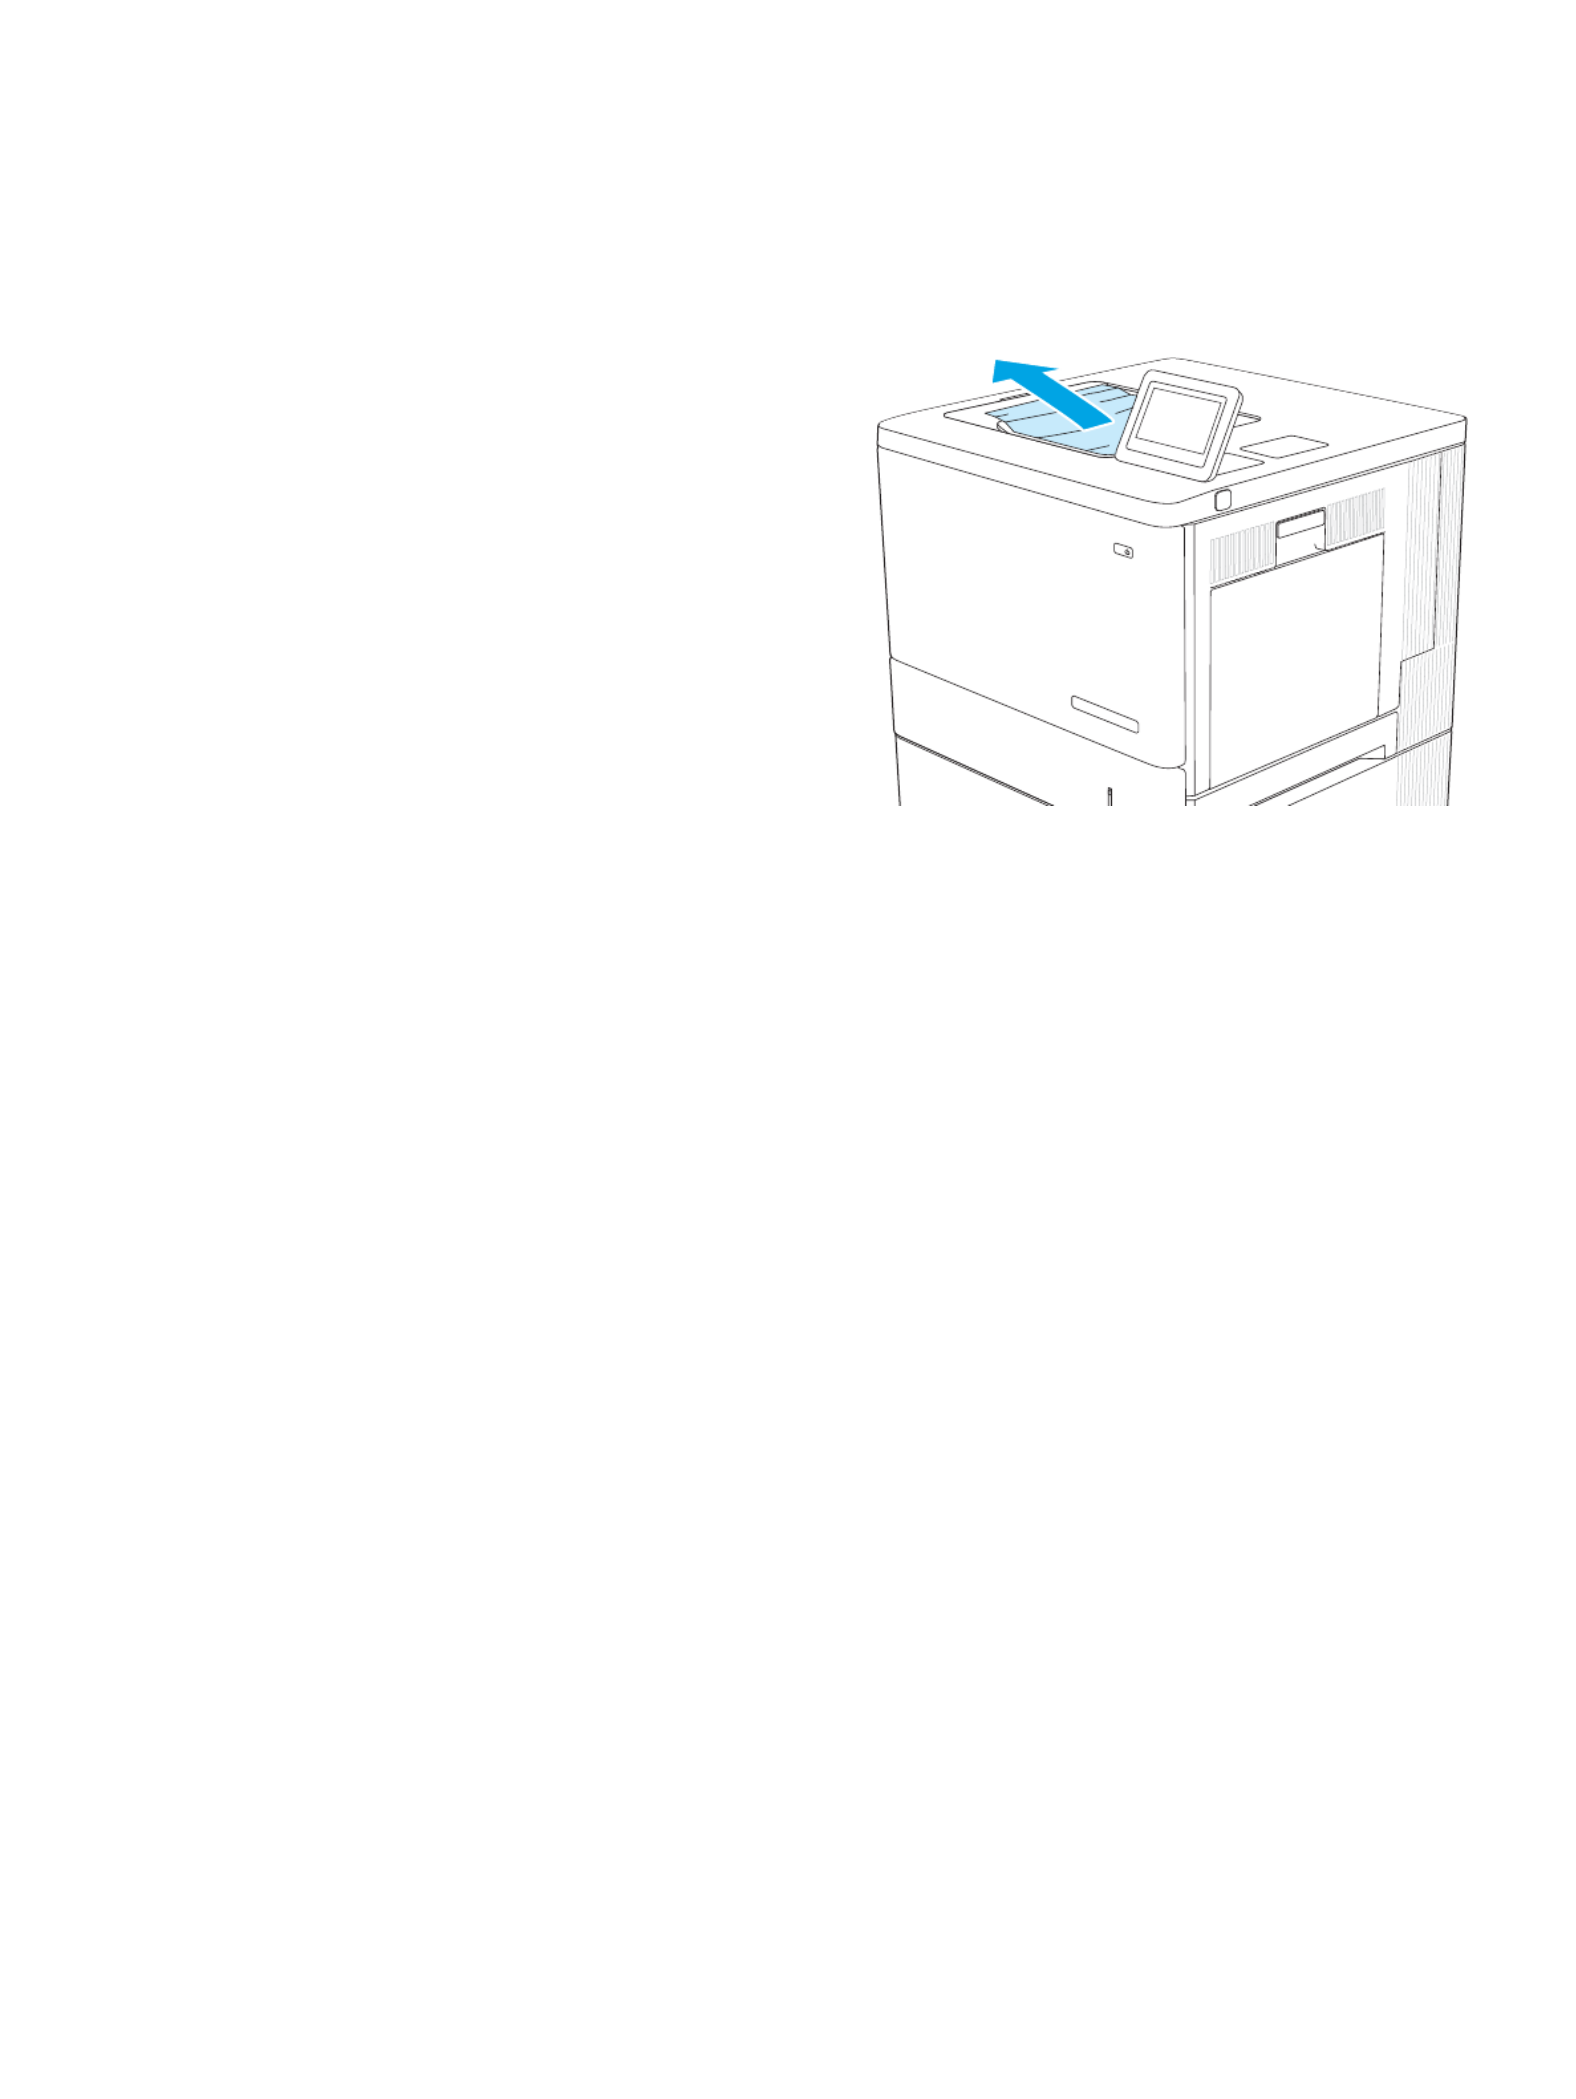
13.E1 output bin paper jam
13.E1 output bin paper jam
13.E1 output bin paper jam
13.E1 output bin paper jam 13.E1 output bin paper jam
Use the following procedure to clear jams in the output bin. When a jam occurs, the control panel displays an
animation that assists in clearing the jam.
1.
1.
1.
1.1. If paper is visible in the output bin, grasp the
leading edge and remove it.
ENWW Clear paper jams 109
Produkt Specifikationer
| Mærke: | HP |
| Kategori: | Printer |
| Model: | Color LaserJet Enterprise M555x |
| Vekselstrømsindgangsspænding: | 110 - 240 V |
| Vekselstrømsindgangsfrekvens: | 50/60 Hz |
| Bredde: | 458 mm |
| Dybde: | 479 mm |
| Højde: | 513 mm |
| Vægt: | 33400 g |
| Kontroltype: | Berøring |
| Indbygget skærm: | Ja |
| Pakkevægt: | 39600 g |
| Pakkedybde: | 600 mm |
| Pakkebredde: | 750 mm |
| Pakkehøjde: | 598 mm |
| Skærm diagonal: | 4.3 " |
| Wi-Fi: | Ja |
| USB-port: | Ja |
| Opbevaringstemperatur (T-T): | -20 - 40 °C |
| Relativ luftfugtighed ved drift (H-H): | 10 - 80 % |
| Antal USB 2.0-porte: | 3 |
| Ethernet LAN: | Ja |
| Wi-Fi-standarder: | 802.11b,802.11g,Wi-Fi 4 (802.11n) |
| Driftstemperatur (T-T): | 10 - 32 °C |
| Udskrivningsteknologi: | Laser |
| Maksimal opløsning: | 1200 x 1200 dpi |
| Udskrivningshastighed (sort, normal kvalitet, A4/amerikansk papirformat): | 40 sider pr. minut |
| Medietyper til papirbakke: | Bond paper,Envelopes,Glossy paper,Heavy paper,Labels,Letterhead,Lightweight paper,Plain paper,Recycled paper,Rough paper |
| Maksimal ISO A-serie papirstørrelse: | A4 |
| ISO A-serie, størrelser (A0...A9): | A4 |
| ISO B-serie, størrelser (B0...B9): | B5 |
| Ikke-ISO udskriftsmedier størrelse: | Legal (media size),Letter (media size) |
| Kuverter størrelser: | B5,C5,C6,DL |
| Medievægt på papirbakke: | 60 - 220 g/m² |
| Samlet antal inputbakker: | 2 |
| Samlet inputkapacitet: | 2300 ark |
| Samlet outputkapacitet: | 250 ark |
| Ethernet LAN-datahastigheder: | 10,100,1000 Mbit/s |
| Sikkerhedsalgoritmer: | EAP-PEAP, EAP-TLS, FIPS 140, HTTPS, IPSec, SNMPv3, SSL/TLS |
| Mobile udskrivningsteknologier: | Apple AirPrint,HP ePrint,Mopria Print Service |
| Skærm: | CGD |
| Markedspositionering: | Enterprise |
| Direkte udskrivning: | Ja |
| Strømforbrug (slukket): | 0.06 W |
| Maksimal driftscyklus: | 8000 sider pr. måned |
| Udskrivning af farver: | Black,Cyan,Magenta,Yellow |
| Intern hukommelse: | 1000 MB |
| Kabler inkluderet: | Vekselstrøm |
| Certificering: | CECP |
| Strømforbrug (strømbesparelse): | 0.06 W |
| Produkter pr. palle: | 6 stk |
| Kabelteknologi: | 10/100/1000Base-T(X) |
| Duplex udskrivning: | Ja |
| Duplex udskrivningstilstand: | Automatisk |
| Maksimal indgangskapacitet: | 2300 ark |
| Brugerdefineret mediebredde: | 76 - 216 mm |
| Brugerdefineret medielængde: | 127 - 356 mm |
| Antal printpatroner: | 4 |
| Wi-Fi Direct: | Ja |
| Bæredygtighedscertifikater: | Blue Angel,ENERGY STAR |
| Processorfrekvens: | 1200 MHz |
| Maksimal intern hukommelse: | 2000 MB |
| Tid til første side (farve, normal): | 7.6 sek./side |
| Strømforbrug (udskrivning): | 622 W |
| Understøttede Windows-operativsystemer: | Windows 8.1, Windows 7 Ultimate, Windows 10 |
| Understøttede Mac-operativsystemer: | Ja |
| Andre understøttede operativsystemer: | iOS, Android |
| Hukommelsesstik: | 1 |
| Intern lagerkapacitet: | 500 GB |
| Farve: | Ja |
| Udskrivningshastighed (farve, normal kvalitet, A4/amerikansk papirformat): | 40 sider pr. minut |
| Lydtryksniveau (udskrivning): | 51 dB |
| Oprindelsesland: | Japan |
| ISO C-seriens størrelser (C0…C9): | C5, C6 |
| Farveskærm: | Ja |
| Tid til første side (sort, normal): | 6.7 sek./side |
| Sidebeskrivelsessprog: | PCL 5c,PCL 6,PDF 1.7 |
| Anbefalet arbejdscyklus: | 2000 - 10000 sider pr. måned |
| Maksimal kapacitetsydelse: | 250 ark |
| Maksimalt antal inputbakker: | 5 |
| Overholdelse af bæredygtighed: | Ja |
| Sikker udskrivning: | Ja |
| Universal-magasin kapacitet: | 100 ark |
| Papirbakke 2 inputkapacitet: | 550 ark |
| Multifunktionsbakke: | Ja |
| Energy Star-typisk elektricitetsforbrug (TEC): | 1.368 kWh/uge |
| Indbygget processer: | Ja |
| Patron(er) inkluderet: | Ja |
| Inkluderet patronkapacitet (sort): | 5500 Sider |
| Inkluderet patronkapacitet (CMY): | 3500 Sider |
| Lag pr. palle: | 3 stk |
| Opvarmningstid: | 176 sek./side |
| Fotopapir størrelser: | 10x15 cm |
| Indeholder ikke: | Kviksølv |
| Maksimal printstørrelse: | 216 x 356 mm |
| Lydeffektniveau (udskrivning): | 6.3 dB |
| Farve på udskriftsopløsning: | 1200 x 1200 dpi |
| Udskriftsopløsning sort: | 1200 x 1200 dpi |
| Pallens bruttovægt: | 255 g |
| Strømforbrug (klar): | 31.1 W |
| JIS B-seriens størrelser (B0…B9): | B5,B6 |
| Udskrivning af vandmærke: | Ja |
| Papirbakke 1 inputkapacitet: | 100 ark |
| Printer skrifttyper: | PostScript, Scalable, TrueType, Windows |
| Hovedkasser pr. pallelag (udvendigt): | 2 stk |
| HP segment: | Enterprise |
| Palle dimensioner (BxDxH): | 1200 x 800 x 1944 mm |
| Anbefalet luftfugtighed ved drift: | 30 - 70 % |
| Anbefalede systemkrav: | 2 GB available hard disk space, Internet connection, or USB port, Internet browser. |
| HP Auto-On/Auto-Off: | Ja |
| Aktustike effekt emissioner (klar): | 47 dB |
| Akustiske tryk emissioner af forbipasserende (klar): | 34 dB |
Har du brug for hjælp?
Hvis du har brug for hjælp til HP Color LaserJet Enterprise M555x stil et spørgsmål nedenfor, og andre brugere vil svare dig
Printer HP Manualer

8 April 2025
26 Februar 2025
26 Februar 2025
27 Januar 2025
26 Januar 2025
15 Januar 2025
15 Januar 2025
15 Januar 2025
15 Januar 2025
14 Januar 2025
Printer Manualer
- Printer Nilox
- Printer Sony
- Printer Canon
- Printer Samsung
- Printer Panasonic
- Printer LG
- Printer Mitsubishi
- Printer Sharp
- Printer Lexmark
- Printer Epson
- Printer D-Link
- Printer Roland
- Printer Toshiba
- Printer Fujifilm
- Printer Nikon
- Printer Kodak
- Printer Brother
- Printer Lenovo
- Printer Olympus
- Printer Triumph-Adler
- Printer AVM
- Printer Dymo
- Printer Thomson
- Printer JVC
- Printer Honeywell
- Printer Citizen
- Printer Olivetti
- Printer Huawei
- Printer Seiko
- Printer Digitus
- Printer Zebra
- Printer Olympia
- Printer Xiaomi
- Printer Dell
- Printer Intermec
- Printer Fujitsu
- Printer MSI
- Printer Polaroid
- Printer Ricoh
- Printer NEC
- Printer Konica-Minolta
- Printer OKI
- Printer Kyocera
- Printer Avision
- Printer Velleman
- Printer Bixolon
- Printer Sagem
- Printer Pantum
- Printer Xerox
- Printer Renkforce
- Printer Testo
- Printer Ultimaker
- Printer Primera
- Printer Star Micronics
- Printer Star
- Printer Panduit
- Printer ZKTeco
- Printer StarTech.com
- Printer Kogan
- Printer CUSTOM
- Printer Godex
- Printer Equip
- Printer Royal Sovereign
- Printer Argox
- Printer Minolta
- Printer DNP
- Printer Oce
- Printer Metapace
- Printer Ibm
- Printer Tomy
- Printer Approx
- Printer Toshiba TEC
- Printer Frama
- Printer Vupoint Solutions
- Printer Evolis
- Printer Builder
- Printer Fargo
- Printer Brady
- Printer Posiflex
- Printer Datamax-O'neil
- Printer Dascom
- Printer HiTi
- Printer GG Image
- Printer Elite Screens
- Printer DTRONIC
- Printer Phoenix Contact
- Printer Videology
- Printer TSC
- Printer EC Line
- Printer Colop
- Printer Fichero
- Printer Raspberry Pi
- Printer Unitech
- Printer IDP
- Printer Microboards
- Printer Tally Dascom
- Printer CSL
- Printer Nisca
- Printer Epson 7620
- Printer Sawgrass
- Printer Mimaki
Nyeste Printer Manualer

9 April 2025

2 April 2025

29 Marts 2025
29 Marts 2025
29 Marts 2025

9 Marts 2025
9 Marts 2025
5 Marts 2025
5 Marts 2025
5 Marts 2025