HP PhotoSmart 612 Manual
HP
Digital kamera
PhotoSmart 612
Læs nedenfor 📖 manual på dansk for HP PhotoSmart 612 (84 sider) i kategorien Digital kamera. Denne guide var nyttig for 17 personer og blev bedømt med 4.5 stjerner i gennemsnit af 2 brugere
Side 1/84

user guide
hp
photosmart
612
digital camera
hp photosmart 612 digital camera
user guide
SwUG.book Page 1 Tuesday, September 25, 2001 1:30 PM

Trademark and copyright information
© Copyright 2001 Hewlett-Packard Company
All rights are reserved. No part of this document may be
photocopied, reproduced, or translated to another language
without the prior written consent of Hewlett-Packard Company.
The information contained in this document is subject to change
without notice. Hewlett-Packard shall not be liable for errors
contained herein or for consequential damages in connection with
the furnishing, performance, or use of this material.
Microsoft®, Windows®, and Windows NT® are U.S. registered
trademarks of Microsoft Corporation.
Pentium® is a U.S. registered trademark of Intel Corporation.
Materials disposal
This HP product contains the following materials that might require
special handling at end-of-life:
Mercury in the fluorescent lamp in the liquid crystal display
Lead in solder
Alkaline manganese dioxide-zinc or lithium-iron disulfide AA
batteries that are included with the camera
Disposal of this material can be regulated because of
environmental considerations. For disposal or recycling
information, please contact your local authorities or the Electronic
Industries Alliance (EIA) (www.eiae.org).
SwUG.book Page 2 Tuesday, September 25, 2001 1:30 PM
iiiTable of Contents
Table of Contents
Chapter 1: Getting started
Camera parts . . . . . . . . . . . . . . . . . . . . . . . . . . . . . . . . . . . . . . . . . 1
Setup . . . . . . . . . . . . . . . . . . . . . . . . . . . . . . . . . . . . . . . . . . . . . . . 3
Step 1: Attach the wrist strap. . . . . . . . . . . . . . . . . . . . . . . . . . 3
Step 2: Install the batteries . . . . . . . . . . . . . . . . . . . . . . . . . . . 3
Step 3: Choose the camera language . . . . . . . . . . . . . . . . . . . 4
Step 4: Set the camera date and time . . . . . . . . . . . . . . . . . . . 4
Using the control dial . . . . . . . . . . . . . . . . . . . . . . . . . . . . . . . . . . . 4
Storing images on a CF memory card . . . . . . . . . . . . . . . . . . . . . . 6
Chapter 2: Taking pictures
Taking a picture . . . . . . . . . . . . . . . . . . . . . . . . . . . . . . . . . . . . . . . 7
Previewing your pictures . . . . . . . . . . . . . . . . . . . . . . . . . . . . . . . . 8
Understanding automatic focus and automatic exposure . . . . . . . 8
Using focus lock . . . . . . . . . . . . . . . . . . . . . . . . . . . . . . . . . . . 9
Using the optical or digital zoom . . . . . . . . . . . . . . . . . . . . . . . . . . 9
Using the self-timer . . . . . . . . . . . . . . . . . . . . . . . . . . . . . . . . . . . 10
Chapter 3: Managing images on the camera
Viewing your images . . . . . . . . . . . . . . . . . . . . . . . . . . . . . . . . . . 13
Creating a print order . . . . . . . . . . . . . . . . . . . . . . . . . . . . . . . . . . 14
Deleting your images . . . . . . . . . . . . . . . . . . . . . . . . . . . . . . . . . . 16
Viewing small versions (thumbnails) of your images . . . . . . . . . . 17
Magnifying your images. . . . . . . . . . . . . . . . . . . . . . . . . . . . . . . . 17
Chapter 4: Adjusting the camera settings
Using the flash . . . . . . . . . . . . . . . . . . . . . . . . . . . . . . . . . . . . . . . 19
Changing the image quality . . . . . . . . . . . . . . . . . . . . . . . . . . . . . 21
Changing the date and time. . . . . . . . . . . . . . . . . . . . . . . . . . . . . 22
Changing the camera language. . . . . . . . . . . . . . . . . . . . . . . . . . 23
Setting the welcome screen. . . . . . . . . . . . . . . . . . . . . . . . . . . . . 24
Chapter 5: Sharing and printing images
Using the camera with a Windows computer. . . . . . . . . . . . . . . . 26
SwUG.book Page iii Tuesday, September 25, 2001 1:30 PM
HP photosmart 612 User Guideiv
System requirements for a Windows computer . . . . . . . . . . . 26
Installing the software on a Windows computer. . . . . . . . . . . 27
Connecting the camera to a Windows computer . . . . . . . . . . 27
Unloading images to a Windows computer . . . . . . . . . . . . . . 28
Using the camera with a Windows NT 4.0 computer . . . . . . . 29
Using the camera with a Macintosh computer . . . . . . . . . . . . . . . 31
System requirements for a Macintosh computer . . . . . . . . . . 31
Changing the PC Connect Mode setting . . . . . . . . . . . . . . . . 31
Installing the software on a Macintosh computer. . . . . . . . . . 32
Connecting the camera to a Macintosh computer . . . . . . . . . 32
Unloading images to a Macintosh computer . . . . . . . . . . . . . 33
Tips for unloading images to a Macintosh computer . . . . . . . 34
Unloading images without using the camera software . . . . . . . . . 35
Using a card reader . . . . . . . . . . . . . . . . . . . . . . . . . . . . . . . . . . . 36
Printing images on a printer equipped with a card reader . . . . . . 36
Chapter 6: Storing images in memory
Determining the number of pictures you can take . . . . . . . . . . . . 38
Using a CF memory card . . . . . . . . . . . . . . . . . . . . . . . . . . . . . . . 39
Installing a CF memory card . . . . . . . . . . . . . . . . . . . . . . . . . 40
Checking the CF memory card status . . . . . . . . . . . . . . . . . . 41
Using both internal memory and a CF memory card . . . . . . . . . . 42
Formatting memory . . . . . . . . . . . . . . . . . . . . . . . . . . . . . . . . . . . 43
Chapter 7: Maintaining your camera
Powering your camera . . . . . . . . . . . . . . . . . . . . . . . . . . . . . . . . . 45
Determining if the batteries need to be changed . . . . . . . . . . 45
Replacing the batteries . . . . . . . . . . . . . . . . . . . . . . . . . . . . . 47
Using an ac power adapter . . . . . . . . . . . . . . . . . . . . . . . . . . 48
Caring for your camera and accessories . . . . . . . . . . . . . . . . . . . 49
Camera . . . . . . . . . . . . . . . . . . . . . . . . . . . . . . . . . . . . . . . . . 49
Memory cards . . . . . . . . . . . . . . . . . . . . . . . . . . . . . . . . . . . . 49
Safety precautions . . . . . . . . . . . . . . . . . . . . . . . . . . . . . . . . . . . . 50
Chapter 8: Troubleshooting
Problems and solutions . . . . . . . . . . . . . . . . . . . . . . . . . . . . . . . . 51
Error messages . . . . . . . . . . . . . . . . . . . . . . . . . . . . . . . . . . . 56
Getting assistance . . . . . . . . . . . . . . . . . . . . . . . . . . . . . . . . . . . . 58
Visiting HP Web sites. . . . . . . . . . . . . . . . . . . . . . . . . . . . . . . 58
Visiting related Web sites. . . . . . . . . . . . . . . . . . . . . . . . . . . . 58
Contacting HP Customer Support . . . . . . . . . . . . . . . . . . . . . 59
SwUG.book Page iv Tuesday, September 25, 2001 1:30 PM
vTable of Contents
Obtaining support within the United States . . . . . . . . . . . . . 59
Obtaining support worldwide . . . . . . . . . . . . . . . . . . . . . . . . 60
Hewlett-Packard limited warranty statement . . . . . . . . . . . . . . . . 63
Appendix A: Reference
Symbols on the status LCD . . . . . . . . . . . . . . . . . . . . . . . . . . . . . 65
Camera indicator lights . . . . . . . . . . . . . . . . . . . . . . . . . . . . . . . . 67
Camera specifications . . . . . . . . . . . . . . . . . . . . . . . . . . . . . . . . . 68
SwUG.book Page v Tuesday, September 25, 2001 1:30 PM
HP photosmart 612 User Guidevi
SwUG.book Page vi Tuesday, September 25, 2001 1:30 PM

Getting started 1
Getting started
Your HP photosmart 612 digital camera takes high-quality pictures
you can share with family and friends on the Internet or by e-mail.
It comes with software for manipulating, storing, and printing your
photos. Your camera includes the following features:
2.3 megapixel (MP) resolution
point-and-shoot simplicity
automatic exposure
automatic focus
integrated flash with red-eye reduction
universal serial bus (USB) computer connection
2x digital zoom
2x optical zoom
color image display for previewing and reviewing images
8 MB internal memory for storing images in the camera
slot for CompactFlash (CF) memory card (card not included)
self-timer
batteries
Camera parts
The following illustrations show the parts of the
HP photosmart 612 digital camera.
1
SwUG.book Page 1 Tuesday, September 25, 2001 1:30 PM
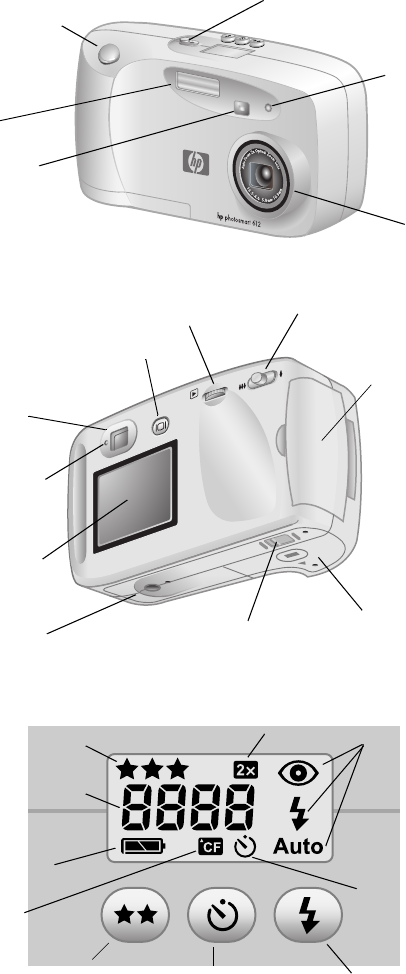
HP photosmart 612 User Guide2
shutter button
flash
self-timer LED
viewfinder
lens
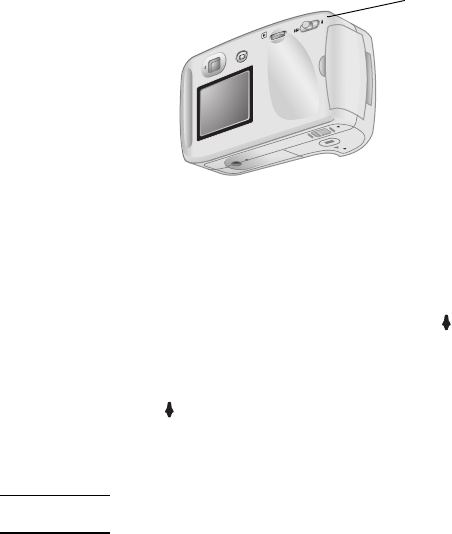
power control
image display
zoom control
control dial
display
control
viewfinder
CF memory card
compartment
door
battery access
CF card release
tripod mount
viewfinder LED
self-timer button flash button
image quality
button
self-timer
indicator
images remaining
flash symbols
digital zoom
indicator
CF card
indicator
battery level
image quality
indicator
SwUG.book Page 2 Tuesday, September 25, 2001 1:30 PM

Getting started 3
Setup
Setting up your digital camera is quick and easy—follow these
steps and you’ll be ready to take pictures.
Step 1: Attach the wrist strap
1Thread the short loop
through the wrist strap
attachment that is
located under the CF
memory card
compartment door. You
might need to use a
pointed object, such as
a paper clip, to pull the
end of the loop through.
2Pull the strap through the loop, and then pull the knot tight.
Step 2: Install the batteries
1Locate the battery compartment door on the bottom of the
camera. Slide the door out, and then lift it open..
2Insert the batteries
according to the
markings inside the
battery compartment
SwUG.book Page 3 Tuesday, September 25, 2001 1:30 PM

HP photosmart 612 User Guide4
Step 3: Choose the camera language
1Slide the POWER CONTROL to turn the camera on.
2Turn the CONTROL ( ) dial until
the language you want to use is
highlighted on the image display.
3Press the dial in to select the
language.
Step 4: Set the camera date
and time
1Turn the dial to point to the date format, and then press
the dial to change it.
2Turn the dial to point to the date, and then press
the dial.
3Turn the dial to change the number, and then press
the dial to confirm it.
4Set the remaining values in the same way.
5Select Exit. The image display turns off.
Using the control dial
Use the dial to:
scroll through images of pictures that you have taken.
make selections from the camera menus, which allow you to
manipulate your images and adjust the camera settings.
The dial operates in two
distinct ways: you can depress
it, or you can turn it left or right.
SwUG.book Page 4 Tuesday, September 25, 2001 1:30 PM

Getting started 5
To review your images
1Press the dial to begin reviewing your pictures on the
image display on the back of the camera.
2Turn the dial to scroll through images of pictures you have
taken.
To navigate the menus
1Press the dial again. The main menu appears as a row of
icons across the top of the image display.
2Turn the dial to the right until the desired icon is selected on
the image display. Each icon represents an action or a menu. A
selected icon has a yellow border and background. A text
description of the icon appears in the status line at the bottom
of the image display.
3Press the dial to open the menu or perform the action
represented by the icon.
4Continue turning and pressing the dial to manipulate your
images or select options.
Specific instructions about using the camera menus appear
throughout this guide.
Note To exit a menu without making a selection, select
Exit.
PRINT
(DPOF)
DELETE VIEW
THUMB-
NAILS
MAGNIFY SETUP EXIT
SwUG.book Page 5 Tuesday, September 25, 2001 1:30 PM
HP photosmart 612 User Guide6
Storing images on a CF memory
card
Your digital camera comes with 8 megabytes (MB) of internal
memory so that you can store images directly in the camera.
However, it also has a slot for an optional CF memory card. The
CF memory card allows you to expand your camera’s memory so
you can take more pictures. Then, after you unload images to your
computer, you can reuse the card.
With a CF memory card you can also view and save images on a
computer that is equipped with a CF memory card reader, and
print images directly from a printer that has a CF memory card
slot.
SwUG.book Page 6 Tuesday, September 25, 2001 1:30 PM

Taking pictures 7
Taking pictures
This chapter describes the basic process of taking pictures with
your digital camera and gives you tips for taking the best pictures.
When you are familiar with this process, you can use the
advanced camera functions described in later chapters.
Note If the camera is on, you can take a picture anytime,
even if the image display is off or shows a menu.
Taking a picture
1Turn on the camera.
2Frame your subject in the viewfinder.
3Adjust the zoom by pressing the ends of the ZOOM ()
control until the subject is positioned as you desire. Press and
hold the SHUTTER button halfway down to allow the camera to
adjust the focus and exposure.
4When you see the green light to the left of the viewfinder, press
the SHUTTER button all the way down.
5The image display on the back of the camera turns on and
displays the image for a short time.
To preserve battery power, the image display turns off after the
image has been saved to memory.
To review all the pictures you have taken, press the dial.
Tip When you are taking a picture, be careful to keep
your fingers away from the lens and the flash.
.
2
SwUG.book Page 7 Tuesday, September 25, 2001 1:30 PM

HP photosmart 612 User Guide8
Previewing your pictures
Instead of looking through the viewfinder to frame a picture, you
can use the image display to preview a picture. The image display
shows exactly what your picture will look like, whereas the
viewfinder is slightly less accurate. Preview your picture on the
image display when precise framing is important, especially when
you are taking a close-up shot.
Note Using the image display consumes a lot of battery
power. To conserve battery power, the camera
automatically turns off the image display after 60
seconds if you do not press a button.
To preview a picture
1Turn on the camera.
2Press the IMAGE DISPLAY ON/OFF ( ) button to turn the
image display on.
3Frame your picture in the image display by pointing the camera
lens at your subject.
4Press and hold the SHUTTER button halfway down to allow the
camera to adjust the focus and exposure.
5When you see the steady green light to the left of the
viewfinder, press the SHUTTER button all the way down to take
the picture.
To turn the image display off, press the button.
Understanding automatic focus and
automatic exposure
The camera adjusts the focus and exposure automatically for the
current lighting condition. You are more likely to catch the perfect
shot, especially when you are photographing an active subject, if
you set the camera’s focus and exposure early. To do this, press
the SHUTTER button halfway down, and then press the SHUTTER
button all the way down at the exact moment you want to capture
the image.
SwUG.book Page 8 Tuesday, September 25, 2001 1:30 PM

Taking pictures 9
Note If the camera cannot find a focus or if the exposure
will be longer than 1/30 second, a yellow light
appears to the left of the viewfinder. You can still
take the picture, but the results might not be optimal.
Using focus lock
The automatic focus feature focuses on the subject in the middle
of the picture and requires good contrast within that subject area.
If you do not want your subject to be in the middle of the image or
if the subject lacks contrast, use focus lock.
1Frame a subject that is the same distance from the lens as
your subject.
2Press the SHUTTER button halfway down to lock the focus. Wait
until you see the green light next to the viewfinder.
3Keeping the SHUTTER button pressed halfway down, move the
camera to frame your subject.
4Press the SHUTTER button all the way down to take the picture.
Using the optical or digital zoom
You can use the camera’s optical or digital zoom to make a subject
appear to be closer.
Note Digital zoom reduces image quality.
To use the optical zoom
1With the camera on, frame the subject in the viewfinder.
2Move the zoom control toward the wide ( ) position to
zoom out. Move the zoom control toward the telephoto ( )
position to zoom in.
SwUG.book Page 9 Tuesday, September 25, 2001 1:30 PM
HP photosmart 612 User Guide10
When the lens reaches either the extreme wide or extreme
telephoto position it stops moving even if you continue to press
the control.
To use the digital zoom
1Turn on the camera and go to Prieview mode.
2Press the zoom control toward the telephoto ( ) position and
hold it.
3Release the control and then press the zoom control toward
the telephoto ( ) position again to activate digital zoom. The
image display comes on automatically and 2X DIGITAL ZOOM
appears in the status line.
Note Digital zoom works in Preview mode only.
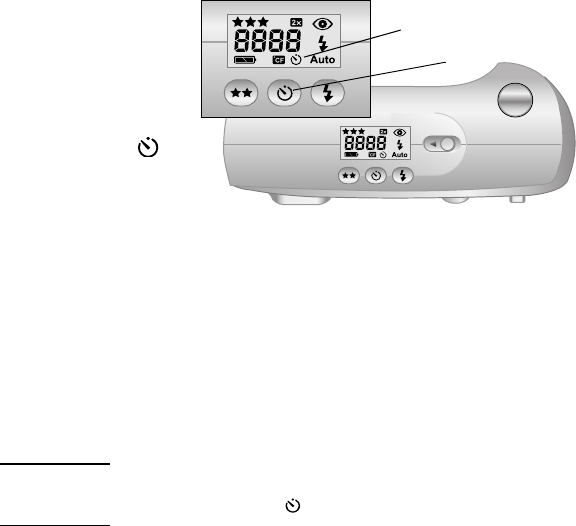
Using the self-timer
Use the self-timer to take a picture of yourself or a posed group.
After you turn on the self-timer and press the SHUTTER button, the
camera waits 10 seconds before taking the picture.
Zoom control
SwUG.book Page 10 Tuesday, September 25, 2001 1:30 PM
Taking pictures 11
To use the self-timer
1Attach the camera to a tripod, or place it on a stable surface at
an appropriate distance and height from the subject.
2With the
camera on,
frame your
subject in the
viewfinder, and
then press the
SELF-TIMER ()
button until the
self-timer
symbol appears
on the status LCD.
3Press the SHUTTER button all the way down, and then release
it.
The red self-timer indicator light on the front of the camera
blinks for 10 seconds with an increasing frequency. After 10
seconds, the camera takes the picture and the self-timer turns
off automatically.
Note To cancel the self-timer before the camera takes the
picture, press the button again.
self-timer indicator
self-timer button
SwUG.book Page 11 Tuesday, September 25, 2001 1:30 PM
HP photosmart 612 User Guide12
SwUG.book Page 12 Tuesday, September 25, 2001 1:30 PM

Managing images on the camera 13
Managing images
on the camera
After you have taken some pictures you can view them with the
camera’s image display. While viewing images, you can magnify
or delete them, or create a print order to print a set of photos.
Tip To preserve battery life, connect an ac power
adapter (optional) while using the image display.
Viewing your images
1Turn on the camera.
2Press the dial. The last picture you took or viewed appears
on the image display.
3Turn the dial to scroll through your images.
Each time a new image appears on the display, the image quality
indicator appears in the upper left corner of the image,
represented by one, two, or three stars. The image quality
indicator disappears after two seconds. The 2X symbol appears in
the upper right corner if the picture was digitally zoomed.
The status line at the bottom of the image display shows the
following information about the current image:
The number of the picture and the number of images stored in
memory or on the CF memory card
If the image is selected for printing, the number of copies you
want to print and the print order icon
The date the picture was taken
3
SwUG.book Page 13 Tuesday, September 25, 2001 1:30 PM

HP photosmart 612 User Guide14
When you have finished reviewing images, be sure to turn off the
image display to conserve battery power. To do this, press the
IMAGE DISPLAY ON/OFF ( ) button or turn the camera off.
Creating a print order
You can use your camera to select the images that you want to
print. For example, when you gather with family and friends to
view your photos, you can keep track of the photos they want
copies of and then print the photos later.
With a print order you can:
select one image, several images, or all of the images that you
have stored in the camera.
select how many copies you want of each image or of all
images.
To add an image to a print order, you select the number of copies
that you want to print.
Note When you are reviewing images on the image
display, a print order icon appears on the status line
for images that you have added to the print order.
A print order creates a Digital Print Order Format (DPOF) file. This
file is stored with your images in memory.
status line
image number and number
of images stored in memory
print order (DPOF)
information and
print order icon
date the picture was
taken
image
quality
indicator
SwUG.book Page 14 Tuesday, September 25, 2001 1:30 PM

Managing images on the camera 15
You can print photos from your print order in one of two ways:
When you transfer your images from the camera to a
computer, the print order is copied along with them. If you have
configured the software that came with your camera to do so,
the computer reads the print order and prints the specified
images. For more information, see the online help in the
software.
If your images are stored on a CF memory card, you can insert
the memory card directly into a DPOF-compatible printer. The
printer reads the print order and prints the specified images.
Note A Macintosh computer does not recognize a DPOF
print order.
To create or edit a print order
1Turn on the camera.
2Press the dial to begin reviewing your images.
3If you want copies of a single image, use the dial to scroll to
the image you want to add to or remove from the print order.
Note If you want copies of all images, it does not matter
which image is displayed on the image display.
4Press the dial to open the main menu, and then
press the dial to open the Print (DPOF) menu.
5Turn the dial to select This
Image if you want copies of the
current image. Select All Images if
you want copies of all the images in
memory.
6Press the dial.
7Select the number of copies of the
image that you want.
SwUG.book Page 15 Tuesday, September 25, 2001 1:30 PM

HP photosmart 612 User Guide16
Tip To remove an image from a print order, set the
number of copies for that image to zero.
Deleting your images
You can delete a single image or all images from the camera. After
an image has been deleted, it cannot be recovered.
Note If you have a CF memory card installed, images are
deleted only from the card.
To delete images
1Turn on the camera.
2Press the dial to begin reviewing your images.
3If you are deleting a single image, turn the dial to scroll to
the image you want to delete.
Note If you are deleting all images, it does not matter
which image is displayed on the image display.
4Press the dial to open the main menu.
5Turn the dial to scroll to the Delete icon, and press
the dial to open the Delete menu.
6Turn the dial to select This
Image if you want to delete the
current image only or All Images if
you want to delete all images.
7Press the dial to delete the
image or images.
8If you chose to delete all images,
the camera asks you to confirm. To confirm, turn the dial to
select Yes, and then press the dial.
SwUG.book Page 16 Tuesday, September 25, 2001 1:30 PM

Managing images on the camera 17
Note From the Delete menu, you can also choose to
Format Memory (or Format CF Card if a CF
memory card is installed).
Viewing small versions
(thumbnails) of your images
You can view up to nine of your images at the same time on the
image display.
To look at thumbnails of your images
1Turn on the camera.
2Press the dial twice to open the main menu.
3Turn the dial to scroll to the View Thumbnails
icon, and then press the dial.
The image display shows you up to nine of your
images at one time, depending on how many images you have
stored in memory. A yellow border frames the currently
selected image.
4Turn the dial to
select a different image.
5Press the dial to see
the selected image in
full view.
Magnifying
your images
While reviewing an image, you can magnify an area of the image
to three times or six times its normal size. This is helpful when you
want to view a detail of an image. For example, you can check to
see if people had their eyes closed when you took their picture.
Note Magnifying an image does not change the image
stored in memory.
selected
image
SwUG.book Page 17 Tuesday, September 25, 2001 1:30 PM

HP photosmart 612 User Guide18
To magnify an image
1Turn on the camera.
2Press the dial to begin reviewing your images.
3Turn the dial to scroll to the image you want to magnify.
4Press the dial to open the main menu.
Turn the dial to scroll to the Magnify icon, and
then press the dial to magnify the image.
The camera magnifies the center of the image to
three times its normal size. Turn the dial to pan left or right
in the image.
5Press the dial to open the Magnify menu.
6To change the panning direction so
you can pan up and down, turn the
dial to scroll to the double arrow
icon, and then press the dial.
7To magnify the image further, turn
the dial to scroll to the magnifying
glass icon, and then press the
dial.
The camera magnifies the center of the image to six times its
normal size.
8Repeat steps 6 and 7 to scroll the image left and right or to
reduce the magnification.
9To return to a full view of the image, select the Exit icon, and
then press the dial.
SwUG.book Page 18 Tuesday, September 25, 2001 1:30 PM

Adjusting the camera settings 19
Adjusting the
camera settings
You can modify the camera settings to fit the current picture-taking
conditions and your preferences. For example, you can adjust the
flash settings to fit current lighting conditions. This chapter
describes how to:
use the flash.
change the image quality.
change the date and time.
change the language.
set the welcome screen.
Using the flash
The camera offers four flash settings. The current flash setting is
indicated by an icon on the status LCD. In addition, if the image
display is on, a message appears about the flash setting in the
status line.
Each time you turn the camera off and then on again, the flash
setting automatically reverts to AUTO FLASH. If you change the
flash setting, it remains until you change it again or until you turn
the camera off and on.
.
Icon Message Description
AUTO FLASH The camera determines the need for a flash
based on lighting conditions. The flash setting
reverts to AUTO FLASH each time you turn the
camera on.
4
SwUG.book Page 19 Tuesday, September 25, 2001 1:30 PM

HP photosmart 612 User Guide20
To change the flash setting
1Turn on the camera.
2Press the FLASH ( ) button
repeatedly until the flash
setting you want appears on
the status LCD.
The button cycles through
the four available flash
settings.
Note The flash
recharges between pictures. This is indicated by a
blinking flash icon on the status LCD. When the
flash icon stops blinking, you can take another flash
picture.
RED-EYE The flash will be used if needed. Red-eye
reduction minimizes the occurrence of red-eye in
pictures of people or animals by emitting several
short flashes to condition the subject’s eyes to
the flash, followed by a final flash to take the
picture. If you are photographing people, tell
them to wait for the final flash before moving.
FLASH ON The flash will be used in all lighting conditions.
The amount of light provided by the flash will be
adjusted according to the current lighting
conditions. Use this setting when the lighting for
the entire picture is sufficient, but the lighting for
the subject is not, as in a backlighting situation.
This is commonly called “fill flash.”
FLASH OFF The flash will not be used, regardless of the
lighting conditions. Use this setting in places
where flash photography is not permitted. If
necessary, use a tripod to hold the camera
steady. The message HOLD STEADY may
appear in the status line when you press the
shutter botton.
Icon Message Description
flash indicator
flash button
SwUG.book Page 20 Tuesday, September 25, 2001 1:30 PM

Adjusting the camera settings 21
Changing the image quality
The camera has three image quality settings: Good, Better, and
Best. The current image quality setting is indicated by one, two, or
three stars on the status LCD. In addition, if the image display is
on, GOOD, BETTER or BEST appears in the status line.
The image quality setting determines the quality of your images
and how many images can be stored in internal memory or on the
CF memory card. Pictures taken with higher image quality take up
more space in memory; pictures taken with lower image quality
take up less space.
Here are some important notes about the image quality setting:
You can use different image quality settings for different
images.
The camera retains the current image quality setting until you
change it, even if you turn the camera off.
Because image quality affects the number of images that can
be stored in memory or on a memory card, the number of
available images (shown on the status LCD) changes as you
change the image quality.
Image quality Description Resolution
(in pixels)
GOOD This is the most memory-efficient
image quality setting. Use this
setting for taking pictures that you
will only send in e-mail or place on
the Internet.
Digital zoom off:
592 by 400
Digital zoom on:
592 by 400
SwUG.book Page 21 Tuesday, September 25, 2001 1:30 PM

HP photosmart 612 User Guide22
To change the image quality
1Turn on the camera.
2Press the IMAGE QUALITY ()
button repeatedly until the
quality level you want appears
on the status LCD.
Changing the date and time
The camera has a real-time clock that records the date and time at
which you take each picture.The camera prompts you to enter the
date and time under the following circumstances:
When you turn the camera on for the first time.
If the camera was without battery power (the batteries lost
power or were removed from the camera) for an extended
period of time.
Note For your convenience, the camera maintains the
date and time for at least 10 minutes after you
remove old batteries.
BETTER This setting produces high-quality
images and requires less memory
than BEST mode. Use this setting
for taking pictures that you plan to
print 13 cm by 18 cm (5 by 7
inches) or smaller. This is the
default setting.
Digital zoom off:
1792 by 1200
Digital zoom on:
896 by 600
BEST Produces the highest-quality
images and uses the most
memory. Use this setting for taking
pictures that you plan to crop and
enlarge using image editing
software, or print 20 cm by 25 cm
(8 by 10 inches) or larger.
Digital zoom off:
1792 by 1200
Digital zoom on:
896 by 600
Image quality Description Resolution
(in pixels)
image
quality
indicator
image
quality
button
SwUG.book Page 22 Tuesday, September 25, 2001 1:30 PM

Adjusting the camera settings 23
To change the date and time
1Turn on the camera.
2Press the dial twice to open the main menu.
3Turn the dial to scroll to the Setup icon, and then
press the dial to open the Setup menu.
4Turn the dial to scroll to Date & Time, and then
press the dial.
5Select the date format you want to use. You can choose MDY
(mm/dd/yyyy), DMY (dd/mm/yyyy), or YMD (yyyy/mm/dd).
6Select the day, month, and year.
7Select the hour format you want to use—12-hour or 24-hour.
8Select the hour and minutes.
9To save your settings, select Exit.
Changing the camera language
You can change the language used for the camera menus to one
of six languages: English, French, German, Spanish, Italian, or
Japanese.
To change the camera language
1Turn on the camera.
2Press the dial twice to open the main menu.
3Turn the dial to scroll to the Setup icon, and then
press the dial to open the Setup menu.
4Turn the dial to scroll to the row of flags, and then
press the dial.
5Turn the dial to scroll to the language you want, and then
press the dial.
SwUG.book Page 23 Tuesday, September 25, 2001 1:30 PM

HP photosmart 612 User Guide24
Setting the welcome screen
When you first turn the camera on, the welcome screen displays
the HP Invent logo.
You can configure the welcome screen to display an image of your
choice.
To change the image on the welcome screen
1Turn on the camera.
2Press the dial to begin reviewing your images.
3Turn the dial to scroll to the image that you want to use as
the welcome screen.
4Press the dial to open the main menu.
5Turn the dial to scroll to the Setup icon, and then
press the dial to open the Setup menu.
6Turn the dial to scroll to Welcome Screen, and
then press the dial.
7Turn the dial to scroll to either
This Image or HP Logo, and then
press the dial.
SwUG.book Page 24 Tuesday, September 25, 2001 1:30 PM

Sharing and printing images 25
Sharing and
printing images
After you have taken some pictures with your digital camera, you
can use them in many fun and creative ways. You can transfer
them to your computer for use in creative projects or for sharing
with family and friends over the Internet. If you have a printer with
a slot for a CompactFlash (CF) memory card, you can print your
images directly from a CF memory card.
Check out HP’s photosmart Web site at www.hp.com/photosmart
for great ideas and tips about how to use your images to create
fun projects.
This chapter describes how to use the camera with the following
equipment:
Microsoft® Windows® or a Microsoft Windows NT® computer
Macintosh computer
Computer on which you have not installed the HP software
Card reader
Printer equipped with a card reader
5
SwUG.book Page 25 Tuesday, September 25, 2001 1:30 PM

HP photosmart 612 User Guide26
Using the camera with a Windows
computer
You can copy the images from your digital camera to a Microsoft
Windows computer.
System requirements for a Windows
computer
To work with your camera, your computer must meet or exceed
the following requirements.
For updated system requirements, go to www.hp.com/
photosmart.
Operating system Windows 98, Windows Millennium Edition
(Me), Windows XP, Windows 2000, or
Windows NT 4.0
Processor 166 megahertz (MHz) Pentium® or
equivalent (233 MHz for Windows XP)
Memory (RAM) Windows 98, Windows Me, Windows 2000:
32 MB
Windows NT 4.0: 64 MB
Windows XP: 64 MB (128 MB recommended)
Free hard disk
space
180 MB
Video display 640 by 480 pixels, 256-bit color
CD-ROM Any speed
Interface Windows 98, Windows Me, Windows XP, and
Windows 2000: USB port
Windows NT 4.0: CF memory card and card
reader (purchased separately)
SwUG.book Page 26 Tuesday, September 25, 2001 1:30 PM

Sharing and printing images 27
Installing the software on a Windows
computer
1Insert the HP photosmart 612 CD into your computer’s CD-
ROM drive. The installation window automatically appears.
Note If the installation window does not appear, click
Start, and then click Run. Type
X
:\Setup.exe,
where
X
is the letter of your CD-ROM drive.
2Click Next, and then follow the instructions on the screen to
install the software.
Certain versions of the camera are shipped with bonus software.
Keep the HP photosmart 612 CD-ROM in the computer’s
CD-ROM drive and continue to the next section to install the
bonus software.
To install the bonus software
1Click Start, click Run, and in the Open box, type
X
:\Bonus\setup.exe (where
X
is the drive letter assigned to
your CD-ROM drive).
2Click OK, and then follow the instructions on the screen to
install the bonus software.
Connecting the camera to a Windows
computer
Before connecting the camera to your computer, make sure you
have installed the software.
Note The camera uses a USB connection, so you do not
need to turn the computer off when connecting or
disconnecting the camera.
SwUG.book Page 27 Tuesday, September 25, 2001 1:30 PM

HP photosmart 612 User Guide28
To connect the camera to a Windows computer
1Make sure the camera is turned off.
2Plug the smaller end of the USB
cable into the camera.
3Plug the flat end of the cable into any
USB port on your computer.
Note When the camera is connected to
your computer, only the power
control operates. The other
camera buttons do not respond.
Unloading images to a Windows computer
Unloading is the process of copying images from the camera’s
memory to your computer. If you have a CF memory card installed
in the camera, images will be copied from the CF memory card to
the computer.
You can unload images from your camera in one of three ways:
automatically, manually, or by connecting the camera as a disk
drive. The automatic unload procedure is the preferred method.
For descriptions of the other methods, see the online
documentation with the HP Photo Imaging software.
Tip To conserve battery power, you can use an HP-
approved ac adapter (optional) when you are
unloading images to your computer.
Follow the procedure in this section if your computer runs
Windows Me, Windows XP, Windows 2000, or Windows 98.
To unload images automatically
1Connect the camera to your computer using the USB cable.
2Turn on the camera.
SwUG.book Page 28 Tuesday, September 25, 2001 1:30 PM

Sharing and printing images 29
The status LCD displays PC to indicate the camera is
connected to a computer. After a few seconds, the software
starts. Follow the instructions in the software to complete the
unload process.
Note To pause the automatic unload, click anywhere in
the HP Automatic Image Unload Software window.
If you have no new images in your camera when
you connect it to the computer, the software appears
to unload images and then informs you that no new
images were found.
You can set up the HP Automatic Image Unload software so that
certain tasks occur automatically after the images are unloaded
from the camera. You can:
automatically view your images.
automatically print your images.
automatically lay out a photo album page.
To set up the automatic tasks, in the HP Automatic Image Unload
Software window, click Task Options. For more information,
double-click the HP Quick Reference—Photo Imaging icon that
is installed on your desktop with the software.
Using the camera with a Windows NT 4.0
computer
Windows NT 4.0 does not support the USB interface, so you
cannot connect your camera directly to your computer. You can
save your images to a CF memory card (purchased separately)
and then transfer them from the card to the computer through
either a memory card slot in an HP printer equipped with one or
through a memory card reader.
To use an HP printer that has a memory card slot
Follow the instructions in your printer documentation to transfer
images from the memory card to your Windows NT 4.0 computer
through the printer’s memory card slot.
SwUG.book Page 29 Tuesday, September 25, 2001 1:30 PM

HP photosmart 612 User Guide32
6Turn the dial to scroll to Disk Drive, and then press the
dial.
Installing the software on a Macintosh
computer
You can unload images to your computer either manually or
automatically. To use the software’s automatic unload feature,
install the ArcSoft PhotoImpression with software from the camera
CD.
1Insert the HP photosmart 612 CD into your computer’s
CD-ROM drive.
2Double-click the CD icon on the desktop.
3Double-click the appropriate language folder, and then double-
click the installer icon.
4Follow the instructions on the screen to install the software.
Certain versions of the camera are shipped with bonus software.
Keep the HP photosmart 612 CD in the computer’s CD-ROM drive
and continue to the next section to install the bonus software.
To install the bonus software
1Double-click the Bonus folder icon.
2Double-click the installer icon for Panorama Maker or
PhotoFantasy.
3Follow the instructions on the screen to install the software.
Connecting the camera to a Macintosh
computer
Note The camera uses a USB connection, so you do not
need to turn the computer off when connecting or
disconnecting the camera.
SwUG.book Page 32 Tuesday, September 25, 2001 1:30 PM

Sharing and printing images 33
To connect the camera to a Macintosh computer
1Make sure the camera is turned off.
2Plug the smaller end of the USB
cable (supplied) into the camera.
3Plug the flat end of the cable into
any USB port on your computer.
Note When the camera is
connected to your
computer, only the power control operates. The
other camera buttons do not respond.
Unloading images to a Macintosh computer
Unloading images is the process of copying images from the
camera to your computer. If you have a CF memory card installed
in the camera, images will be copied from the CF memory card to
the computer.
You can unload images from your camera in one of two ways:
automatically or by mounting the camera as a disk drive. The
automatic unload procedure is the preferred method.
Tip To conserve battery power, you can use an HP-
approved ac power adapter (optional) when you are
unloading images to your computer.
To automatically unload images to a Macintosh computer
1Connect the camera to your computer by using the USB cable.
2Turn on the camera.
The status LCD displays PC to indicate the camera is
connected to a computer.
SwUG.book Page 33 Tuesday, September 25, 2001 1:30 PM

HP photosmart 612 User Guide34
3If the welcome screen appears on your computer screen, click
OK.
4After a few seconds, the software begins unloading new
images from the camera to the computer. To pause the
automatic unload, click Pause.
You can set up your software so that certain tasks occur
automatically after the images are unloaded from the camera. To
gain access to these options, click Options.
When all the new images have been unloaded to your computer,
the ArcSoft PhotoImpression software opens and you can view,
edit, print, and create projects with your images.
For more information, see the ArcSoft software Help.
Tips for unloading images to a Macintosh
computer
When you unload images to your computer, the images are still
stored in the camera until you delete them. If you take new
pictures and then unload images again, the automatic unload
software ignores the old images. That way, you do not end up
with multiple copies of the same image on your computer.
If you have no new images in your camera when you connect it
to the computer, the automatic unload does not take place.
In the Options window, you can disable the automatic unload
feature. To turn the feature on again, open the Options window
in the ArcSoft PI folder.
Make sure you know where your images are stored on your
computer’s hard disk. By default, images are stored in the
PhotoImpression folder, for example Macintosh HD:ArcSoft
PI:Photos:2002.07.04. If you ever decide to delete the ArcSoft
PI folder, you must first move your images to another folder. If
you do not, your images will be deleted from the hard disk
when you delete the PhotoImpression folder.
SwUG.book Page 34 Tuesday, September 25, 2001 1:30 PM

Sharing and printing images 35
Unloading images without using
the camera software
If you are away from home, you can unload images to a computer
that does not have the camera software installed on it.
Note Make sure that the computer has a USB port and
that its operating system is Windows 2000 or
Windows ME or later, or Macintosh OS 8.6 or later.
To unload images to a Windows or Macintosh computer
1Change the camera's PC Connect Mode to Disk Drive. For
more information, see “Changing the PC Connect Mode
setting” on page 31.
2Connect the camera to the computer with the USB cable.
3Turn on the camera. The letters PC appear in the status LCD
to indicate that the camera is connected to the computer. The
computer recognizes the camera as a disk drive.
4Use the following procedure to access your images as files:
•
Windows:
Double-click the icon for the newly assigned disk
drive in My Computer or navigate to the drive letter in
Windows Explorer. Use the Copy and Paste commands to
transfer selected images to your hard drive.
•
Macintosh:
Double-click the icon for the newly assigned
disk drive which appears on the desktop, and then drag and
drop the selected files to your hard drive.
SwUG.book Page 35 Tuesday, September 25, 2001 1:30 PM
HP photosmart 612 User Guide36
Using a card reader
You can use a CF memory card reader, such as the SanDisk
ImageMate or a PCMCIA adapter, to view and save image files on
your computer. If you have saved your images to a CF memory
card and you have a card reader installed on your computer, insert
the CF memory card into the card reader. Then, access your
images on the CF memory card just as you would access files on
a floppy disk. See your card reader’s documentation for details.
Card readers can be purchased from www.hpshopping.com
(selected countries only), or from your local digital camera or
electronics store.
Printing images on a printer
equipped with a card reader
If your printer has a slot for a CF memory card, as the HP
photosmart 1000 and higher series printers do, you can print your
images directly from the card. For more information, see your
printer’s documentation.
SwUG.book Page 36 Tuesday, September 25, 2001 1:30 PM

Storing images in memory 37
Storing images
in memory
When you first unpack your digital camera and begin taking
pictures, the images are stored in the camera’s internal memory.
This makes it easier than ever to save pictures; there’s no need for
film of any kind. You can delete unwanted images from the camera
anytime, making space available for new images.
However, your camera also has a slot for digital “film” in the form
of a CompactFlash (CF) memory card (purchased separately).
The card is more economical than conventional film because you
can reuse the card over and over again. If you install a CF
memory card in your camera, images are stored on the CF
memory card rather than in the camera’s internal memory.
Note If your computer runs Windows NT or if it does not
have a USB port, you must store images on a CF
memory card. Then use a CF memory card reader
to transfer images to your computer.
This chapter describes how to use your camera with or without a
CF memory card and how to copy images from internal memory to
a CF memory card.
Tip As long as you have a CF memory card in the
camera, you can gain access to only the images
stored on the CF memory card. For more
information, see “Using both internal memory and a
CF memory card” on page 42.
6
SwUG.book Page 37 Tuesday, September 25, 2001 1:30 PM

HP photosmart 612 User Guide38
Determining the number of pictures
you can take
You can store as many as 113 images in the camera’s internal
memory. The number of pictures that you can take and store in the
space remaining in memory depends on several factors. Unlike
conventional film, each digital image takes up a different amount
of space in memory. Images that are complex and contain many
details take up more space, whereas simple images take up less
space. Pictures taken full size occupy more space, whereas
pictures taken with digital zoom occupy less space. However, the
most important factor in image size is the image quality you have
selected.
The number of images remaining in memory is indicated in the
status LCD on top of the camera. It is an approximate number that
decreases as you take pictures.
Note You can take each picture with a different setting. As
you change the settings, the number of remaining
images that is indicated on the status LCD changes.
The number of images you can store in the camera depends
primarily on image quality:
Pictures taken with an image quality of BEST (three stars)
require the most memory. You can store approximately 7 such
images on the camera.
Pictures taken with an image quality of BETTER (two stars)
require less memory. You can store approximately 16 such
images on the camera.
Pictures taken with an image quality of GOOD (one star)
require the least amount of memory. You can store a maximum
of approximately 113 such images on the camera.
number of
images remaining
in memory
SwUG.book Page 38 Tuesday, September 25, 2001 1:30 PM

Storing images in memory 39
If internal memory is full, “0” appears for the remaining picture
count and a red light appears to the left of the viewfinder when you
press the SHUTTER button. In addition, if the image display is on,
the message MEMORY FULL appears in the status line.
To resume taking pictures, unload images to your computer and
delete them from the camera, or install a CF memory card.
Note The HP photosmart 612 digital camera is shipped
without a CF memory card. If you do not install a CF
memory card, all images are automatically stored in
internal memory.
Using a CF memory card
If you install a CF memory card, all images taken after installing
the CF memory card are saved to the card.
Note Even if there is space available in internal memory,
images will be stored on the CF memory card.
In addition, as long as the CF memory card is in the camera, all
camera operations involve the images that are on the CF memory
card. The remaining image count applies to the CF memory card,
and images that you review are stored on the CF memory card.
When a CF memory card is installed, the letters CF appear on the
status LCD.
CF card indicator
SwUG.book Page 39 Tuesday, September 25, 2001 1:30 PM

HP photosmart 612 User Guide40
Installing a CF memory card
Use only CompactFlash Association (CFA)
certified type 1 CF memory cards with your
digital camera. These cards are manufactured
by several vendors and are available in a variety
of memory sizes. You can purchase additional
CF memory cards from www.hpshopping.com
(selected countries only), or from your local digital camera or
electronics store.
To install a CF memory card
1Make sure the camera is turned off.
CAUTION
Inserting or removing a CF memory card while the
camera is on could damage the existing card or result
in lost images.
2Open the CF memory card door.
3If there is a card already in the camera,
remove the existing card. To do this, locate
the lever on the bottom of the camera under
the CF memory card door. Slide it toward the
center of the camera. The card pops out.
4Hold the new CF memory card so that the
tiny ledge on the top rear of the card is
between your fingers, the side with pinholes
faces the camera, and the ledge on the back of the card faces
the front of the camera.
5Insert the card firmly all the way into the camera.
CAUTION
The card should fit easily almost all the way into the
slot. If it stops when it is only partially inserted, turn the
card over and try again. Do not force the card into the
camera.
CF removal
lever
SwUG.book Page 40 Tuesday, September 25, 2001 1:30 PM

Storing images in memory 41
6Gently push the CF memory card all the way into the camera.
7Close the CF memory card door.
Tip If you cannot close the CF memory card door, you
might not have inserted the card correctly. Remove
the card and try again.
Checking the CF memory card status
If you have a CF memory card installed in the camera, the letters
CF appear in the status LCD and in the status line of the image
display.
If the CF memory card is full, “0” appears for the remaining picture
count and a red light appears to the left of the viewfinder when you
press the SHUTTER button. In addition, if the image display is on,
the message CF CARD FULL appears on the status line to
indicate that you cannot take any more pictures.
If the CF memory card is damaged or unformatted, the letters CF
appear on the status LCD and blink, and an error message
appears on the image display.
To resume taking pictures, try the following steps:
If you receive any card error indications immediately after
installing a new, blank CF memory card, the card might need to
be formatted.
If the message CF CARD FULL appears on the image display
after you have successfully taken and stored numerous images
on the CF memory card, the CF memory card is full. Unload
SwUG.book Page 41 Tuesday, September 25, 2001 1:30 PM

HP photosmart 612 User Guide42
the images to your computer, then delete all images on the
card or re-format it.
If you receive the card error indications and the card is
formatted and is not full, the card might be damaged. Try
reformatting the card, or try a different card.
Using both internal memory and a
CF memory card
If you have images stored in internal memory and you install a CF
memory card, you can no longer access the images in internal
memory. You have two options:
Turn the camera off, remove the card, and turn the camera
back on. You now have access to images in internal memory.
Copy the images from internal memory to the CF memory card
and access the images from the CF memory card.
To copy images from internal memory to a CF memory card
1If you have not already already done so, install a CF memory
card in the camera.
2Turn on the camera.
3Press the dial twice to open the main menu.
4Turn the dial to scroll to the Setup icon, and then
press the dial to open the Setup menu.
5Turn the dial to scroll to Copy to CF Card, and
then press the dial.
Note Copying images from internal memory to a CF
memory card does not overwrite content that is
already on the CF memory card. If the CF memory
card does not have enough room to store all the
images that are in internal memory, an error
message appears. Either make room on the CF
memory card or turn the camera off and replace the
CF memory card.
6Turn the dial to select Yes, and then press the dial.
SwUG.book Page 42 Tuesday, September 25, 2001 1:30 PM

Storing images in memory 43
The images are copied from internal memory to the CF
memory card. Your images are still stored in internal memory
until you delete them. If you have created a print order for
those images, the print order is copied to the CF memory card
along with the images.
Formatting memory
The internal memory installed in your digital camera is formatted
at the factory. Under ordinary circumstances, you do not need to
format it. However, if the camera does not store images properly,
you might want to try formatting the internal memory.
CAUTION
Formatting deletes everything stored in memory.
Most CF memory cards are already formatted when you buy them.
However, if you buy a CF memory card that has not been
formatted, you need to format it before you can store images on it.
If you insert a new, formatted card in the camera and it doesn’t
work, try reformatting it—it might have been formatted improperly.
Also reformat cards that were previously used in a different
camera to optimize them for use with your camera.
Note You can reuse a CF memory card that is full by
formatting it. This deletes all images and files from
the card. You can also use the Delete menu to
delete one or all images from a CF memory card.
To format internal memory or a CF memory card
1Turn on the camera.
2Press the dial twice to open the main menu.
3Turn the dial to scroll to the Delete icon, and then
press the dial to open the Delete menu.
4Turn the dial to scroll to Format Memory or, if a
CF memory card is installed, scroll to Format CF Card, and
then press the dial.
5Turn the dial to select Yes, and then press the dial.
SwUG.book Page 43 Tuesday, September 25, 2001 1:30 PM

HP photosmart 612 User Guide44
When memory has been formatted, the message NO IMAGES
IN MEMORY (or NO IMAGES ON CF CARD) appears on the
image display.
CAUTION
Formatting deletes everything stored on the CF
memory card, including files from other devices such as
pocket computers. Make sure you are formatting the
correct card! If you’re not sure, check the contents of
the card before you format it.
SwUG.book Page 44 Tuesday, September 25, 2001 1:30 PM

Maintaining your camera 45
Maintaining your
camera
This chapter describes how to use batteries or an ac power
adapter to power your camera, how to care for your camera, and
how to use your camera safely.
Powering your camera
Your digital camera can be powered by batteries or an HP-
approved ac power adapter. For convenience, use batteries when
you are taking pictures. To preserve battery power, use an ac
adapter (purchased separately) when you are reviewing images
on the image display for an extended period of time, or when you
are transferring images from the camera to your computer.
Determining if the batteries need to be
changed
The battery icon on the status LCD indicates the charge level of
the batteries. There are three levels of battery charge: good, low,
and empty.
If the battery icon shows that the batteries are empty, it is time to
replace the batteries.
Good Low Empty
7
SwUG.book Page 45 Tuesday, September 25, 2001 1:30 PM

HP photosmart 612 User Guide46
Note When the empty-battery icon on the status LCD
begins blinking, the power is about to shut off. You
need to replace the batteries before you can take
another picture.
The life of the batteries depends on several factors. These
include:
how often and how long you use the image display.
how often you use the flash.
the number of pictures you take.
temperature conditions (operating the camera at colder
temperatures results in shorter battery life).
the type of battery (photo-lithium batteries have the longest life,
alkaline have the shortest).
To extend battery life:
When using the camera with a computer or when using the
image display for extended periods of time, use an ac power
adapter that HP has approved for use with your digital camera.
Limit your use of the image display, except when using an ac
power adapter.
Use only batteries that are designed for digital cameras, such
as photo-quality alkaline, photo-lithium, or rechargeable nickel-
metal hydride (NiMH) batteries, available from various battery
manufacturers.
If you are using rechargeable batteries, be sure you fully drain
and recharge the batteries according to the manufacturer’s
instructions.
Use only batteries that are in good condition. Batteries that
show signs of leakage, corrosion, or swelling should not be
installed in the camera.
SwUG.book Page 46 Tuesday, September 25, 2001 1:30 PM

Maintaining your camera 47
Replacing the batteries
The camera uses four AA batteries. You can use photo-lithium or
photo-quality alkaline AA batteries, or rechargeable NiMH AA
batteries. You can purchase additional batteries from your local
camera or electronics store.
Note If you choose to use rechargeable batteries, you
must recharge them in a separate device, outside
the camera. The batteries do not recharge in the
camera when you connect an ac adapter.
To insert new batteries
1Make sure the camera is turned off.
2To open the battery
compartment, slide the
battery compartment cover in
the direction of the arrow,
and then lift it.
3Insert four new batteries,
making sure the + / −
electrodes are facing the
proper direction (see the
diagram inside the battery
compartment).
4Close the battery compartment cover by sliding it into place
and then clicking it shut.
CAUTION
Replace all the batteries at the same time. Do not
replace the batteries individually or use batteries of
different types. Always follow the instructions on the
battery package when handling or disposing of
batteries.
SwUG.book Page 47 Tuesday, September 25, 2001 1:30 PM
Produkt Specifikationer
| Mærke: | HP |
| Kategori: | Digital kamera |
| Model: | PhotoSmart 612 |
Har du brug for hjælp?
Hvis du har brug for hjælp til HP PhotoSmart 612 stil et spørgsmål nedenfor, og andre brugere vil svare dig
Digital kamera HP Manualer

7 Juli 2024
6 Juli 2024
4 Juli 2024
4 Juli 2024
4 Juli 2024
4 Juli 2024
4 Juli 2024
28 Juni 2024
28 Juni 2024
28 Juni 2024
Digital kamera Manualer
- Digital kamera Denver
- Digital kamera Sony
- Digital kamera Canon
- Digital kamera Samsung
- Digital kamera GE
- Digital kamera Panasonic
- Digital kamera Epson
- Digital kamera Technaxx
- Digital kamera Easypix
- Digital kamera Motorola
- Digital kamera Bushnell
- Digital kamera Toshiba
- Digital kamera Fujifilm
- Digital kamera Nikon
- Digital kamera Kodak
- Digital kamera Olympus
- Digital kamera Casio
- Digital kamera Trust
- Digital kamera JVC
- Digital kamera Geonaute
- Digital kamera Leica
- Digital kamera Medion
- Digital kamera Gembird
- Digital kamera Powerfix
- Digital kamera EnVivo
- Digital kamera Maginon
- Digital kamera Fisher-Price
- Digital kamera Vtech
- Digital kamera BenQ
- Digital kamera Sigma
- Digital kamera Pentax
- Digital kamera Rollei
- Digital kamera Xiaomi
- Digital kamera Aiptek
- Digital kamera Polaroid
- Digital kamera Ricoh
- Digital kamera TomTom
- Digital kamera Kyocera
- Digital kamera GoPro
- Digital kamera FLIR
- Digital kamera Lamax
- Digital kamera Veho
- Digital kamera Renkforce
- Digital kamera General Electric
- Digital kamera HTC
- Digital kamera GoClever
- Digital kamera Genius
- Digital kamera Spypoint
- Digital kamera Vivitar
- Digital kamera Oregon Scientific
- Digital kamera Lexibook
- Digital kamera Pulsar
- Digital kamera Drift
- Digital kamera Minox
- Digital kamera Beha-Amprobe
- Digital kamera Agfa
- Digital kamera AgfaPhoto
- Digital kamera Quintezz
- Digital kamera A-Rival
- Digital kamera AEE
- Digital kamera Apeman
- Digital kamera Argus
- Digital kamera Tevion
- Digital kamera Targa
- Digital kamera Fuji
- Digital kamera Minolta
- Digital kamera Ingo
- Digital kamera Dnt
- Digital kamera Wanscam
- Digital kamera SeaLife
- Digital kamera Sakar
- Digital kamera Jobo
- Digital kamera Odys
- Digital kamera Guardo
- Digital kamera Red
- Digital kamera Digital Blue
- Digital kamera Traveler
- Digital kamera Mustek
- Digital kamera Plawa
- Digital kamera BML
- Digital kamera RadioShack
- Digital kamera Liquid Image
- Digital kamera Praktica
- Digital kamera Somikon
- Digital kamera Brinno
- Digital kamera BlackVue
- Digital kamera Storex
- Digital kamera Insta360
- Digital kamera Bolyguard
- Digital kamera Voigtlaender
- Digital kamera WASPcam
- Digital kamera Revue
- Digital kamera Kompernass - Lidl
- Digital kamera Guide
- Digital kamera Umax
- Digital kamera Magpix
- Digital kamera Konig Electronic
- Digital kamera Sipix
- Digital kamera Nytech
- Digital kamera Yakumo
- Digital kamera Konica
- Digital kamera Duramaxx
Nyeste Digital kamera Manualer

15 Januar 2025
15 Januar 2025

15 Januar 2025

12 Januar 2025
12 Januar 2025
12 Januar 2025

11 Januar 2025

11 Januar 2025
11 Januar 2025
11 Januar 2025