Lenovo ThinkCentre M800z Manual
Lenovo
Skrivebord
ThinkCentre M800z
Læs nedenfor 📖 manual på dansk for Lenovo ThinkCentre M800z (116 sider) i kategorien Skrivebord. Denne guide var nyttig for 21 personer og blev bedømt med 4.5 stjerner i gennemsnit af 2 brugere
Side 1/116

ThinkCentreM700zandM800z
UserGuide
MachineTypes:10ET,10EU,10EV,10EW,10EY,and10F1

Note:Beforeusingthisinformationandtheproductitsupports,besuretoreadandunderstandthe“Read
thisfirst:Importantsafetyinformation”onpageiii andAppendixF“Notices”onpage103.
FourthEdition(October2016)
©CopyrightLenovo2015,2016.
LIMITEDANDRESTRICTEDRIGHTSNOTICE:IfdataorsoftwareisdeliveredpursuanttoaGeneralServices
Administration“GSA”contract,use,reproduction,ordisclosureissubjecttorestrictionssetforthinContractNo.
GS-35F-05925.

Contents
Readthisfirst:Importantsafety
information..............iii
Beforeusingthismanual............iii
Serviceandupgrades.............iii
Staticelectricityprevention...........iv
Powercordsandpoweradapters........iv
Extensioncordsandrelateddevices.......v
Plugsandoutlets...............v
Externaldevices...............v
Heatandproductventilation..........v
Operatingenvironment............vi
Lasercompliancestatement..........vi
Powersupplystatement...........vii
Cleaningandmaintenance..........vii
Glasspartsnotice.............vii
Tip-overhazardpreventionnotice.......vii
Chapter1.Productoverview......1
Hardwarelocations..............1
Frontview................1
Rearview................4
Computercomponents..........7
Partsonthesystemboard........11
Machinetypeandmodellabel.......12
Features.................13
Specifications...............15
Programs.................16
Accessingaprogramonthecomputer...16
Installingaprogramthatisreadytobe
installed...............17
AnintroductiontoLenovoprograms....17
Chapter2.Usingyourcomputer...19
Adjustingthecomputerstand.........19
Adjustingthefull-functionmonitorstand(for
M700z)................19
Adjustingthetilt-onlymonitorstand....21
AdjustingtheUltraFlexIIStand(forM800z)..21
Registeringthecomputer..........23
Settingthecomputervolume.........23
AddinganicontotheWindowsnotificationarea.23
Usingadisc................24
Guidelinesaboutusingtheopticaldrive...24
Handlingandstoringadisc........24
Playingandremovingadisc.......24
Recordingadisc............25
Connectingtoanetwork...........25
ConnectingtoanEthernetLAN......25
ConnectingtoawirelessLAN.......25
ConnectingtoaBluetooth-enableddevice..26
Usingthesingle-touchormulti-touchfeature...26
Chapter3.Y ouandyourcomputer..27
Arrangingyourworkspace..........27
Glareandlighting............27
Aircirculation.............27
Electricaloutletlocationsandcablelengths.27
Comfort...............27
Accessibilityinformation...........28
Cleaningthecomputer...........31
Maintenance...............31
Basicmaintenancetips.........31
Goodmaintenancepractices.......31
Keepingthecomputercurrent.......32
Movingthecomputer............33
Chapter4.Security..........35
Lockingthecomputer............35
AttachingaKensington-stylecablelock...35
Viewingandchangingsecuritysettingsinthe
SetupUtilityprogram............37
Preventingunauthorizedaccesstothecomputer.37
Usingfingerprintauthentication........38
Usingandunderstandingfirewalls.......38
Protectingdataagainstviruses........38
ComputraceAgentsoftwareembeddedin
firmware.................38
TrustedPlatformModule(TPM)........39
Chapter5.Advancedconfiguration..41
UsingtheSetupUtilityprogram........41
StartingtheSetupUtilityprogram.....41
Enablingordisablingadevice.......41
EnablingordisablingtheAutomaticPowerOn
features...............41
EnablingordisablingtheErPLPScompliance
mode................42
ChangingICEPerformanceMode.....42
EnablingordisablingtheConfiguration
ChangeDetectionfeature........42
Usingthecoverpresenceswitch......43
UsingBIOSpasswords.........43
Selectingastartupdevice........44
ExitingtheSetupUtilityprogram......45
UpdatingtheBIOS.............45
©CopyrightLenovo2015,2016 i

Chapter6.Troubleshooting,
diagnostics,andrecovery......47
Basicprocedureforresolvingcomputer
problems.................47
T roubleshooting..............47
Startupproblems............47
Audioproblems............48
CDproblems.............49
DVDproblems.............49
Intermittentproblems..........50
Storagedriveproblems.........50
Screenproblems............51
Networkingproblems..........51
Performanceproblems..........53
Serialconnectorcannotbeaccessed....55
USBdeviceproblems..........55
Softwareanddriverproblems.......55
Diagnostics................56
LenovoSolutionCenter.........56
Recoveryinformation............56
RecoveryinformationforWindows7....56
RecoveryinformationforWindows10....57
Chapter7.Installingorreplacing
hardware...............59
Handlingstatic-sensitivedevices.......59
Installingorreplacinghardware........59
Installingexternaloptions........59
Replacingthecomputerstand.......60
Replacingthepoweradapter(forM700z)..64
Removingthecomputercover.......65
Replacingthesystem-boardshield.....66
ReplacingtheVESAmountbracket.....68
Replacingthestoragedrive........69
Replacingthecontrol-buttonboard.....71
Replacingamemorymodule.......74
Replacingthecardreader........75
Replacingtheserialconnectormodule...77
Replacingthecoin-cellbattery......79
ReplacingtheWi-Ficard.........80
Completingthepartsreplacement.....82
Chapter8.Gettinginformation,help,
andservice..............85
Informationresources............85
Accessingtheuserguideinvarious
languages...............85
Windowshelpsystem..........85
Safetyandwarranty...........85
LenovoWebsite............85
LenovoSupportWebsite.........86
Frequentlyaskedquestions........86
Helpandservice..............86
Callingforservice............86
Usingotherservices..........87
Purchasingadditionalservices......87
AppendixA.Regulatory
information..............89
Exportclassificationnotice..........89
Electronicemissionsnotices.........89
FederalCommunicationsCommission
DeclarationofConformity........89
Eurasiancompliancemark..........91
Brazilaudionotice.............91
Mexicowireless-radiocomplianceinformation..92
T aiwanvisionprecautionnotice........92
Additionalregulatoryinformation.......92
AppendixB.WEEEandrecycling
information..............93
ImportantWEEEinformation.........93
RecyclinginformationforJapan........93
RecyclinginformationforBrazil........94
BatteryrecyclinginformationforT aiwan.....94
BatteryrecyclinginformationfortheEuropean
Union..................95
AppendixC.RestrictionofHazardous
Substances(RoHS)Directive.....97
EuropeanUnionRoHS...........97
ChinaRoHS................97
T urkishRoHS...............97
UkraineRoHS...............98
IndiaRoHS................98
T aiwanRoHS...............98
AppendixD.ChinaEnergyLabel...99
AppendixE.ENERGYSTARmodel
information.............101
AppendixF.Notices.........103
T rademarks................104
iiThinkCentreM700zandM800zUserGuide

Readthisfirst:Importantsafetyinformation
CAUTION:
Beforeusingthecomputer,besuretoreadandunderstandalltherelatedsafetyinformationforthis
product.RefertothesafetyinformationinthissectionandintheSafetyandWarrantyGuidethatyou
receivedwiththisproduct.Readingandunderstandingallthesafetyinformationreducestheriskof
personalinjuryanddamagetoyourproduct.IfyounolongerhaveacopyoftheSafetyandWarranty
Guide,youcanobtainaPortableDocumentFormat(PDF)versionfromtheLenovo ®SupportWeb
siteathttp://www.lenovo.com/UserManuals.
Beforeusingthismanual
CAUTION:
Beforeusingthismanual,besuretoreadandunderstandalltherelatedsafetyinformationforthis
product.RefertotheinformationinthissectionandthesafetyinformationintheSafetyandWarranty
Guidethatyoureceivedwiththisproduct.Readingandunderstandingthissafetyinformationreduces
theriskofpersonalinjuryanddamagetoyourproduct.
IfyounolongerhaveacopyoftheSafetyandWarrantyGuide,youcanobtainaPortableDocumentFormat
(PDF)versionfromtheLenovo ®SupportWebsiteathttp://www.lenovo.com/UserManuals.
Serviceandupgrades
DonotattempttoserviceaproductyourselfunlessinstructedtodosobytheCustomerSupportCenteror
yourdocumentation.OnlyuseaServiceProviderwhoisapprovedtorepairyourparticularproduct.
Note:Somecomputerpartscanbeupgradedorreplacedbythecustomer.Upgradestypicallyare
referredtoasoptions.ReplacementpartsapprovedforcustomerinstallationarereferredtoasCustomer
ReplaceableUnits,orCRUs.Lenovoprovidesdocumentationwithinstructionswhenitisappropriatefor
customerstoinstalloptionsorreplaceCRUs.Youmustcloselyfollowallinstructionswheninstallingor
replacingparts.TheOffstateofapowerindicatordoesnotnecessarilymeanthatvoltagelevelsinsidea
productarezero.Beforeyouremovethecoversfromaproductequippedwithapowercord,alwaysensure
thatthepoweristurnedoffandthattheproductisunpluggedfromanypowersource.Ifyouhaveany
questionsorconcerns,contacttheCustomerSupportCenter.
Althoughtherearenomovingpartsinthecomputerafterthepowercordhasbeendisconnected,the
followingwarningsarerequiredforyoursafety.
CAUTION:
Hazardousmovingparts.Keepfingersandotherbodypartsaway.
CAUTION:
©CopyrightLenovo2015,2016 iii

Beforeyouopenthecomputercover,turnoffthecomputerandwaitseveralminutesuntilthe
computeriscool.
Staticelectricityprevention
Staticelectricity,althoughharmlesstoyou,canseriouslydamagecomputercomponentsandoptions.
Improperhandlingofstatic-sensitivepartscancausedamagetothepart.Whenyouunpackanoption
orCRU,donotopenthestatic-protectivepackagecontainingthepartuntiltheinstructionsdirectyou
toinstallit.
WhenyouhandleoptionsorCRUs,orperformanyworkinsidethecomputer,takethefollowingprecautions
toavoidstatic-electricitydamage:
•Limityourmovement.Movementcancausestaticelectricitytobuilduparoundyou.
•Alwayshandlecomponentscarefully.Handleadapters,memorymodules,andothercircuitboardsbythe
edges.Nevertouchexposedcircuitry.
•Preventothersfromtouchingcomponents.
•Whenyouinstallastatic-sensitiveoptionorCRU,touchthestatic-protectivepackagecontainingthe
parttoametalexpansion-slotcoverorotherunpaintedmetalsurfaceonthecomputerforatleasttwo
seconds.Thisreducesstaticelectricityinthepackageandyourbody.
•Whenpossible,removethestatic-sensitivepartfromthestatic-protectivepackagingandinstallthepart
withoutsettingitdown.Whenthisisnotpossible,placethestatic-protectivepackagingonasmooth,
levelsurfaceandplacethepartonit.
•Donotplacethepartonthecomputercoverorothermetalsurface.
Powercordsandpoweradapters
Useonlythepowercordsandpoweradapterssuppliedbytheproductmanufacturer.Donotusetheac
powercordforotherdevices.
Thepowercordsshallbesafetyapproved.ForGermany,itshallbeH03VV-F,3G,0.75mm 2(thepowercord
connectedtothepoweradapter),H05VV-F,3G,0.75mm 2(thepowercordconnectedtotheinternalpower
supplyassembly),orbetter.Forothercountries,thesuitabletypesshallbeusedaccordingly.
Neverwrapapowercordaroundapoweradapterorotherobject.Doingsocanstressthecordinwaysthat
cancausethecordtofray,crack,orcrimp.Thiscanpresentasafetyhazard.
Alwaysroutepowercordssothattheywillnotbewalkedon,trippedover,orpinchedbyobjects.
Protectpowercordandpoweradaptersfromliquids.Forinstance,donotleaveyourpowercordorpower
adapternearsinks,tubs,toilets,oronfloorsthatarecleanedwithliquidcleansers.Liquidscancausea
shortcircuit,particularlyifthepowercordorpoweradapterhasbeenstressedbymisuse.Liquidsalsocan
causegradualcorrosionofpowercordterminalsand/ortheconnectorterminalsonapoweradapter,
whichcaneventuallyresultinoverheating.
Ensurethatallpowercordconnectorsaresecurelyandcompletelypluggedintoreceptacles.
Donotuseanypoweradapterthatshowscorrosionattheacinputpinsorshowssignsofoverheating(such
asdeformedplastic)attheacinputoranywhereonthepoweradapter.
Donotuseanypowercordswheretheelectricalcontactsoneitherendshowsignsofcorrosionor
overheatingorwherethepowercordappearstohavebeendamagedinanyway.
ivThinkCentreM700zandM800zUserGuide

Extensioncordsandrelateddevices
Ensurethatextensioncords,surgeprotectors,uninterruptiblepowersupplies,andpowerstripsthatyouuse
areratedtohandletheelectricalrequirementsoftheproduct.Neveroverloadthesedevices.Ifpowerstrips
areused,theloadshouldnotexceedthepowerstripinputrating.Consultanelectricianformoreinformation
ifyouhavequestionsaboutpowerloads,powerrequirements,andinputratings.
Plugsandoutlets
Ifareceptacle(poweroutlet)thatyouintendtousewiththecomputerequipmentappearstobedamagedor
corroded,donotusetheoutletuntilitisreplacedbyaqualifiedelectrician.
Donotbendormodifytheplug.Iftheplugisdamaged,contactthemanufacturertoobtainareplacement.
Donotshareanelectricaloutletwithotherhomeorcommercialappliancesthatdrawlargeamountsof
electricity;otherwise,unstablevoltagemightdamagethecomputer,data,orconnecteddevices.
Someproductsareequippedwithathree-prongedplug.Thisplugfitsonlyintoagroundedelectricaloutlet.
Thisisasafetyfeature.Donotdefeatthissafetyfeaturebytryingtoinsertitintoanon-groundedoutlet.If
youcannotinserttheplugintotheoutlet,contactanelectricianforanapprovedoutletadapterortoreplace
theoutletwithonethatenablesthissafetyfeature.Neveroverloadanelectricaloutlet.Theoverallsystem
loadshouldnotexceed80percentofthebranchcircuitrating.Consultanelectricianformoreinformation
ifyouhavequestionsaboutpowerloadsandbranchcircuitratings.
Besurethatthepoweroutletyouareusingisproperlywired,easilyaccessible,andlocatedclosetothe
equipment.Donotfullyextendpowercordsinawaythatwillstressthecords.
Besurethatthepoweroutletprovidesthecorrectvoltageandcurrentfortheproductyouareinstalling.
Carefullyconnectanddisconnecttheequipmentfromtheelectricaloutlet.
Externaldevices
DonotconnectordisconnectanyexternaldevicecablesotherthanUniversalSerialBus(USB)cableswhile
thecomputerpowerison;otherwise,youmightdamagethecomputer.Toavoidpossibledamageto
connecteddevices,waitatleastfivesecondsafterthecomputerisshutdowntodisconnectexternaldevices.
Heatandproductventilation
Computers,poweradapters,andmanyaccessoriescangenerateheatwhenturnedonandwhenbatteries
arecharging.Alwaysfollowthesebasicprecautions:
•Donotleavethecomputer,poweradapter,oraccessoriesincontactwithyourlaporanypartofyour
bodyforanextendedperiodwhentheproductsarefunctioningorwhenthebatteryischarging.The
computer,poweradapter,andmanyaccessoriesproducesomeheatduringnormaloperation.Extended
contactwiththebodycouldcausediscomfortor,potentially,askinburn.
•Donotchargethebatteryoroperatethecomputer,poweradapter,oraccessoriesnearflammable
materialsorinexplosiveenvironments.
•Ventilationslots,fans,andheatsinksareprovidedwiththeproductforsafety,comfort,andreliable
operation.Thesefeaturesmightinadvertentlybecomeblockedbyplacingtheproductonabed,sofa,
carpet,orotherflexiblesurface.Neverblock,cover,ordisablethesefeatures.
©CopyrightLenovo2015,2016 v

Inspectyourdesktopcomputerfordustaccumulationatleastonceeverythreemonths.Beforeinspecting
thecomputer,turnoffthepowerandunplugthecomputer'spowercordfromtheelectricaloutlet;then
removeanydustfromventsandperforationsinthebezel.Ifyounoticeexternaldustaccumulation,then
examineandremovedustfromtheinsideofthecomputerincludingheatsinkinletfins,powersupplyvents,
andfans.Alwaysturnoffandunplugthecomputerbeforeopeningthecover.Ifpossible,avoidoperatingthe
computerwithintwofeetofhigh-trafficareas.Ifyoumustoperatethecomputerinornearahigh-traffic
area,inspectand,ifnecessary,cleanthecomputermorefrequently.
Foryoursafetyandtomaintainoptimumcomputerperformance,alwaysfollowthesebasicprecautions
withyourdesktopcomputer:
•Keepthecoverclosedwheneverthecomputerispluggedin.
•Regularlyinspecttheoutsideofthecomputerfordustaccumulation.
•Removedustfromventsandanyperforationsinthebezel.Morefrequentcleaningsmightberequiredfor
computersindustyorhigh-trafficareas.
•Donotrestrictorblockanyventilationopenings.
•Donotstoreoroperatethecomputerinsidefurniture,asthismightincreasetheriskofoverheating.
•Airflowtemperaturesintothecomputershouldnotexceed35°C(95°F).
•Donotinstallairfiltrationdevices.Theymayinterferewithpropercooling.
Operatingenvironment
Theoptimalenvironmentinwhichtousethecomputeris10°C–35°C(50°F–95°F)withhumidityranging
between35%and80%.Ifthecomputerisstoredortransportedintemperatureslessthan10°C(50°F),allow
thecoldcomputertoriseslowlytoanoptimaloperatingtemperatureof10°C–35°C(50°F–95°F)beforeuse.
Thisprocesscouldtaketwohoursinextremeconditions.Failuretoallowthecomputertorisetoanoptimal
operatingtemperaturebeforeusecouldresultinirreparabledamagetothecomputer.
Ifpossible,placethecomputerinawell-ventilatedanddryareawithoutdirectexposuretosunshine.
Keepelectricalappliancessuchasanelectricfan,radio,high-poweredspeakers,airconditioner,and
microwaveovenawayfromthecomputerbecausethestrongmagneticfieldsgeneratedbytheseappliances
candamagethemonitoranddataonthestoragedrive.
Donotplaceanybeveragesontopoforbesidethecomputerorotherconnecteddevices.Ifliquidisspilled
onorinthecomputeroraconnecteddevice,ashortcircuitorotherdamagemightoccur.
Donoteatorsmokeoveryourkeyboard.Particlesthatfallintoyourkeyboardcancausedamage.
Lasercompliancestatement
CAUTION:
Whenlaserproducts(suchasCD-ROMs,DVDdrives,fiberopticdevices,ortransmitters)are
installed,notethefollowing:
•Donotremovethecovers.Removingthecoversofthelaserproductcouldresultinexposureto
hazardouslaserradiation.Therearenoserviceablepartsinsidethedevice.
•Useofcontrolsoradjustmentsorperformanceofproceduresotherthanthosespecifiedherein
mightresultinhazardousradiationexposure.
viThinkCentreM700zandM800zUserGuide

DANGER
SomelaserproductscontainanembeddedClass3AorClass3Blaserdiode.Notethefollowing:
Laserradiationwhenopen.Donotstareintothebeam,donotviewdirectlywithoptical
instruments,andavoiddirectexposuretothebeam.
Powersupplystatement
Neverremovethecoveronapowersupplyoranypartthathasthefollowinglabelattached.
Hazardousvoltage,current,andenergylevelsarepresentinsideanycomponentthathasthislabelattached.
Therearenoserviceablepartsinsidethesecomponents.Ifyoususpectaproblemwithoneoftheseparts,
contactaservicetechnician.
Cleaningandmaintenance
Keepthecomputerandworkspaceclean.Shutdownthecomputerandthendisconnectthepower
cordbeforecleaningthecomputer.Donotsprayanyliquiddetergentdirectlyonthecomputeroruse
anydetergentcontainingflammablematerialtocleanthecomputer.Spraythedetergentonasoftcloth
andthenwipethecomputersurfaces.
Glasspartsnotice
CAUTION:
Somepartsofyourproductmaybemadeofglass.Thisglasscouldbreakiftheproductisdropped
onahardsurfaceorreceivesasubstantialimpact.Ifglassbreaks,donottouchorattempttoremove
it.Stopusingyourproductuntiltheglassisreplacedbytrainedservicepersonnel.
Tip-overhazardpreventionnotice
•Placethecomputeronasturdyandlowbase,oranchorthefurnitureandpositionthecomputeras
farbackonthefurnitureaspossible.
•Keepremotecontrols,toys,andotheritemsthatmightattractchildrenoffthecomputer.
•Keepthecomputer,cables,andcordsoutofthereachofchildren.
•Supervisechildreninroomswherethesesafetytipshavenotbeenfollowed.
©CopyrightLenovo2015,2016 vii

viiiThinkCentreM700zandM800zUserGuide

Chapter1.Productoverview
Thischapterprovidesinformationaboutthefollowingtopics:
•“Hardwarelocations”onpage1
•“Features”onpage13
•“Specifications”onpage15
•“Programs”onpage16
Hardwarelocations
Thissectionprovidesinformationaboutthelocationsofthecomputerhardware.
Note:Thecomputerhardwaremightlookslightlydifferentfromtheillustrations.
Frontview
ForM700z
Figure1.Frontview
©CopyrightLenovo2015,2016 1

1Integratedcameraactivityindicator(somemodels)2Integratedcamera(somemodels)
3Integratedmicrophone(somemodels) 4Microphone-muteindicator
5Powerindicator 6Storagedriveactivityindicator
7Internalspeakers(2)B3.0connector
9AlwaysOnUSB3.0connector(forrapidcharge)10Headsetconnector(alsoknownascomboaudiojack)
11Cardreaderslot(somemodels)
ForM800z
1Integratedcameraactivityindicator(somemodels)2Integratedcamera(somemodels)
3Integratedmicrophone(somemodels) 4Microphone-muteindicator
5Powerindicator 6Storagedriveactivityindicator
7Internalspeakers(2)B3.0connector
9AlwaysOnUSB3.0connector(forrapidcharge)10Headsetconnector(alsoknownascomboaudiojack)
11Cardreaderslot(somemodels)
•AlwaysOnUSB3.0connector(forrapidcharge)
UsedtoconnectadevicethatrequiresaUSB2.0orUSB3.0connection,suchasakeyboard,amouse,a
scanner,aprinter,orapersonaldigitalassistant(PDA).Withtheacpoweradapterconnected,youcan
chargetheautomaticallydetecteddeviceevenwhenthecomputerisinhibernationmodeorturnedoff.If
theAlwaysOnUSBconnectorfunctionisnotenabled,openthePowerManagerprogramandenablethe
function.T oopenthePowerManagerprogram,see“Accessingaprogramonthecomputer”onpage16 .
ToenabletheAlwaysOnUSBconnector,refertothehelpsystemofthePowerManagerprogram.
2ThinkCentreM700zandM800zUserGuide

•Cardreaderslot
Usedtoholdacard-shapedstoragemediumsothatthecardreadercanreadthedataonthestorage
medium.
•Headsetconnector(alsoknownascomboaudiojack)
Usedtoconnectaheadsetorheadphonestoyourcomputer.
•Microphone-muteindicator
Whenthemicrophone-muteindicatorison,themicrophonesaremuted.
•Integratedcamera
Usedtotakepicturesorholdavideoconference.
•Integratedcameraactivityindicator
Whentheindicatorison,thecameraisinuse.
•Integratedmicrophone
Usedtorecordsoundsorusespeech-recognitionsoftwarewithoutusingamicrophone.
•Internalspeaker
Usedtolistentothesoundsfromyourcomputerwithoutusingaheadsetorheadphones.
•Powerindicator
Whentheindicatorison,thecomputerison.
•Storagedriveactivityindicator
Whentheindicatorison,thestoragedrivesareinuse.
•USB3.0connector
UsedtoconnectadevicethatrequiresaUSB2.0orUSB3.0connection,suchasakeyboard,amouse,a
scanner,aprinter,oraPDA.
Chapter1.Productoverview3

ForM800z
Figure3.Rearview
1Integratedcamerashieldcontrolslider(somemodels)2Security-lockslot
3USB2.0connectors(4) 4DisplayPort ®-outconnector
5Ethernetconnector 6Serialconnector(somemodels)
7Powercordconnector8Brightness-upcontrol
9Brightness-downcontrol10Microphone-mutebutton
11Powerbutton 12Opticaldriveeject/closebutton(somemodels)
•Brightness-downcontrol
Usedtodecreasethebrightness.
•Brightness-upcontrol
Usedtoincreasethebrightness.
•DisplayPort-outconnector
Usedtoconnectahigh-performancemonitor,adirect-drivemonitor,orotherdevicesthatusea
DisplayPortconnector.
Chapter1.Productoverview5

•Ethernetconnector
UsedtoconnectanEthernetcableforaLAN.
Note:T ooperatethecomputerwithinFederalCommunicationsCommission(FCC)ClassBlimits,usea
Category5eorbetterEthernetcable.
•Integratedcamerashieldcontrolslider
Usedtoblocktheintegratedcamera.
•Microphone-mutebutton
Usedtomuteorunmutethemicrophones.
•Opticaldriveeject/closebutton
Usedtoejectthetrayoftheopticaldrivefromthedrive.Afteryouinsertadiscintothetray,press
theeject/closebuttontoclosethetray.
•Powerbutton
Usedtoturnonyourcomputer.Youalsocanusethepowerbuttontoturnoffyourcomputeronlywhen
youcannotuseanyMicrosoft ®Windows®shutdownproceduretoturnoffyourcomputer.
•Powercordconnector
Usedtoconnectthepowercordtoyourcomputerforpowersupply.
•Serialconnector
Usedtoconnectanexternalmodem,aserialprinter,orotherdevicesthatusea9-pinserialconnector.
•Security-lockslot
Forinformation,see“AttachingaKensington-stylecablelock”onpage35 .
•USB2.0connector
UsedtoconnectadevicethatrequiresaUSB2.0connection,suchasakeyboard,amouse,ascanner,a
printer,orapersonaldigitalassistant(PDA).
6ThinkCentreM700zandM800zUserGuide

Computercomponents
Note:Dependingonyourcomputermodel,someofthefollowingcomponentsmightnotbeavailable.
ForM700z
Figure4.Computercomponents
Chapter1.Productoverview7

1Tilt-onlymonitorstand2Tilt-onlymonitorstandbase
3Full-functionmonitorstand4Full-functionmonitorstandbase
5Computercover
7System-boardshield 8Integratedcamera
9Integratedcamerabracket 10Wi-Fiantennas(2)
11Wi-Ficard 12Chassis
13LCDpanel 14Heatsink
15Microprocessorrymodule
17Cardreader
19Serialconnectormodule20Coin-cellbattery
21Internalspeakers(2)2Storagedrive
23Control-buttonboard24Control-buttonboardholder
25Storagedrivebracket26Opticaldrive
27Opticaldriveholderystemfan
29Coverpresenceswitch(intrusionswitch)30VESA ®mountbracket
31Powercord
8ThinkCentreM700zandM800zUserGuide

ForM800z
Figure5.Computercomponents
1Tilt-onlymonitorstand2Tilt-onlymonitorstandbase
3UltraFlexIIStandutercover
5I/Obracketeld
Chapter1.Productoverview9

7Integratedcameraatedcamerabracket
9Wi-Fiantennas(2) 10Wi-Ficard
11Chassis
13LCDpanel 14Heatsink
15Microprocessorymodule
17Cardreadermodule
19Coin-cellbatteryalspeakers(2)
21Control-buttonboardholder22Control-buttonboard
23Powersupplyassembly 24Opticaldrive
25Storagedriveolder
27Systemfanitch(intrusionswitch)
29VESAmountbracket 30Powercord
10ThinkCentreM700zandM800zUserGuide
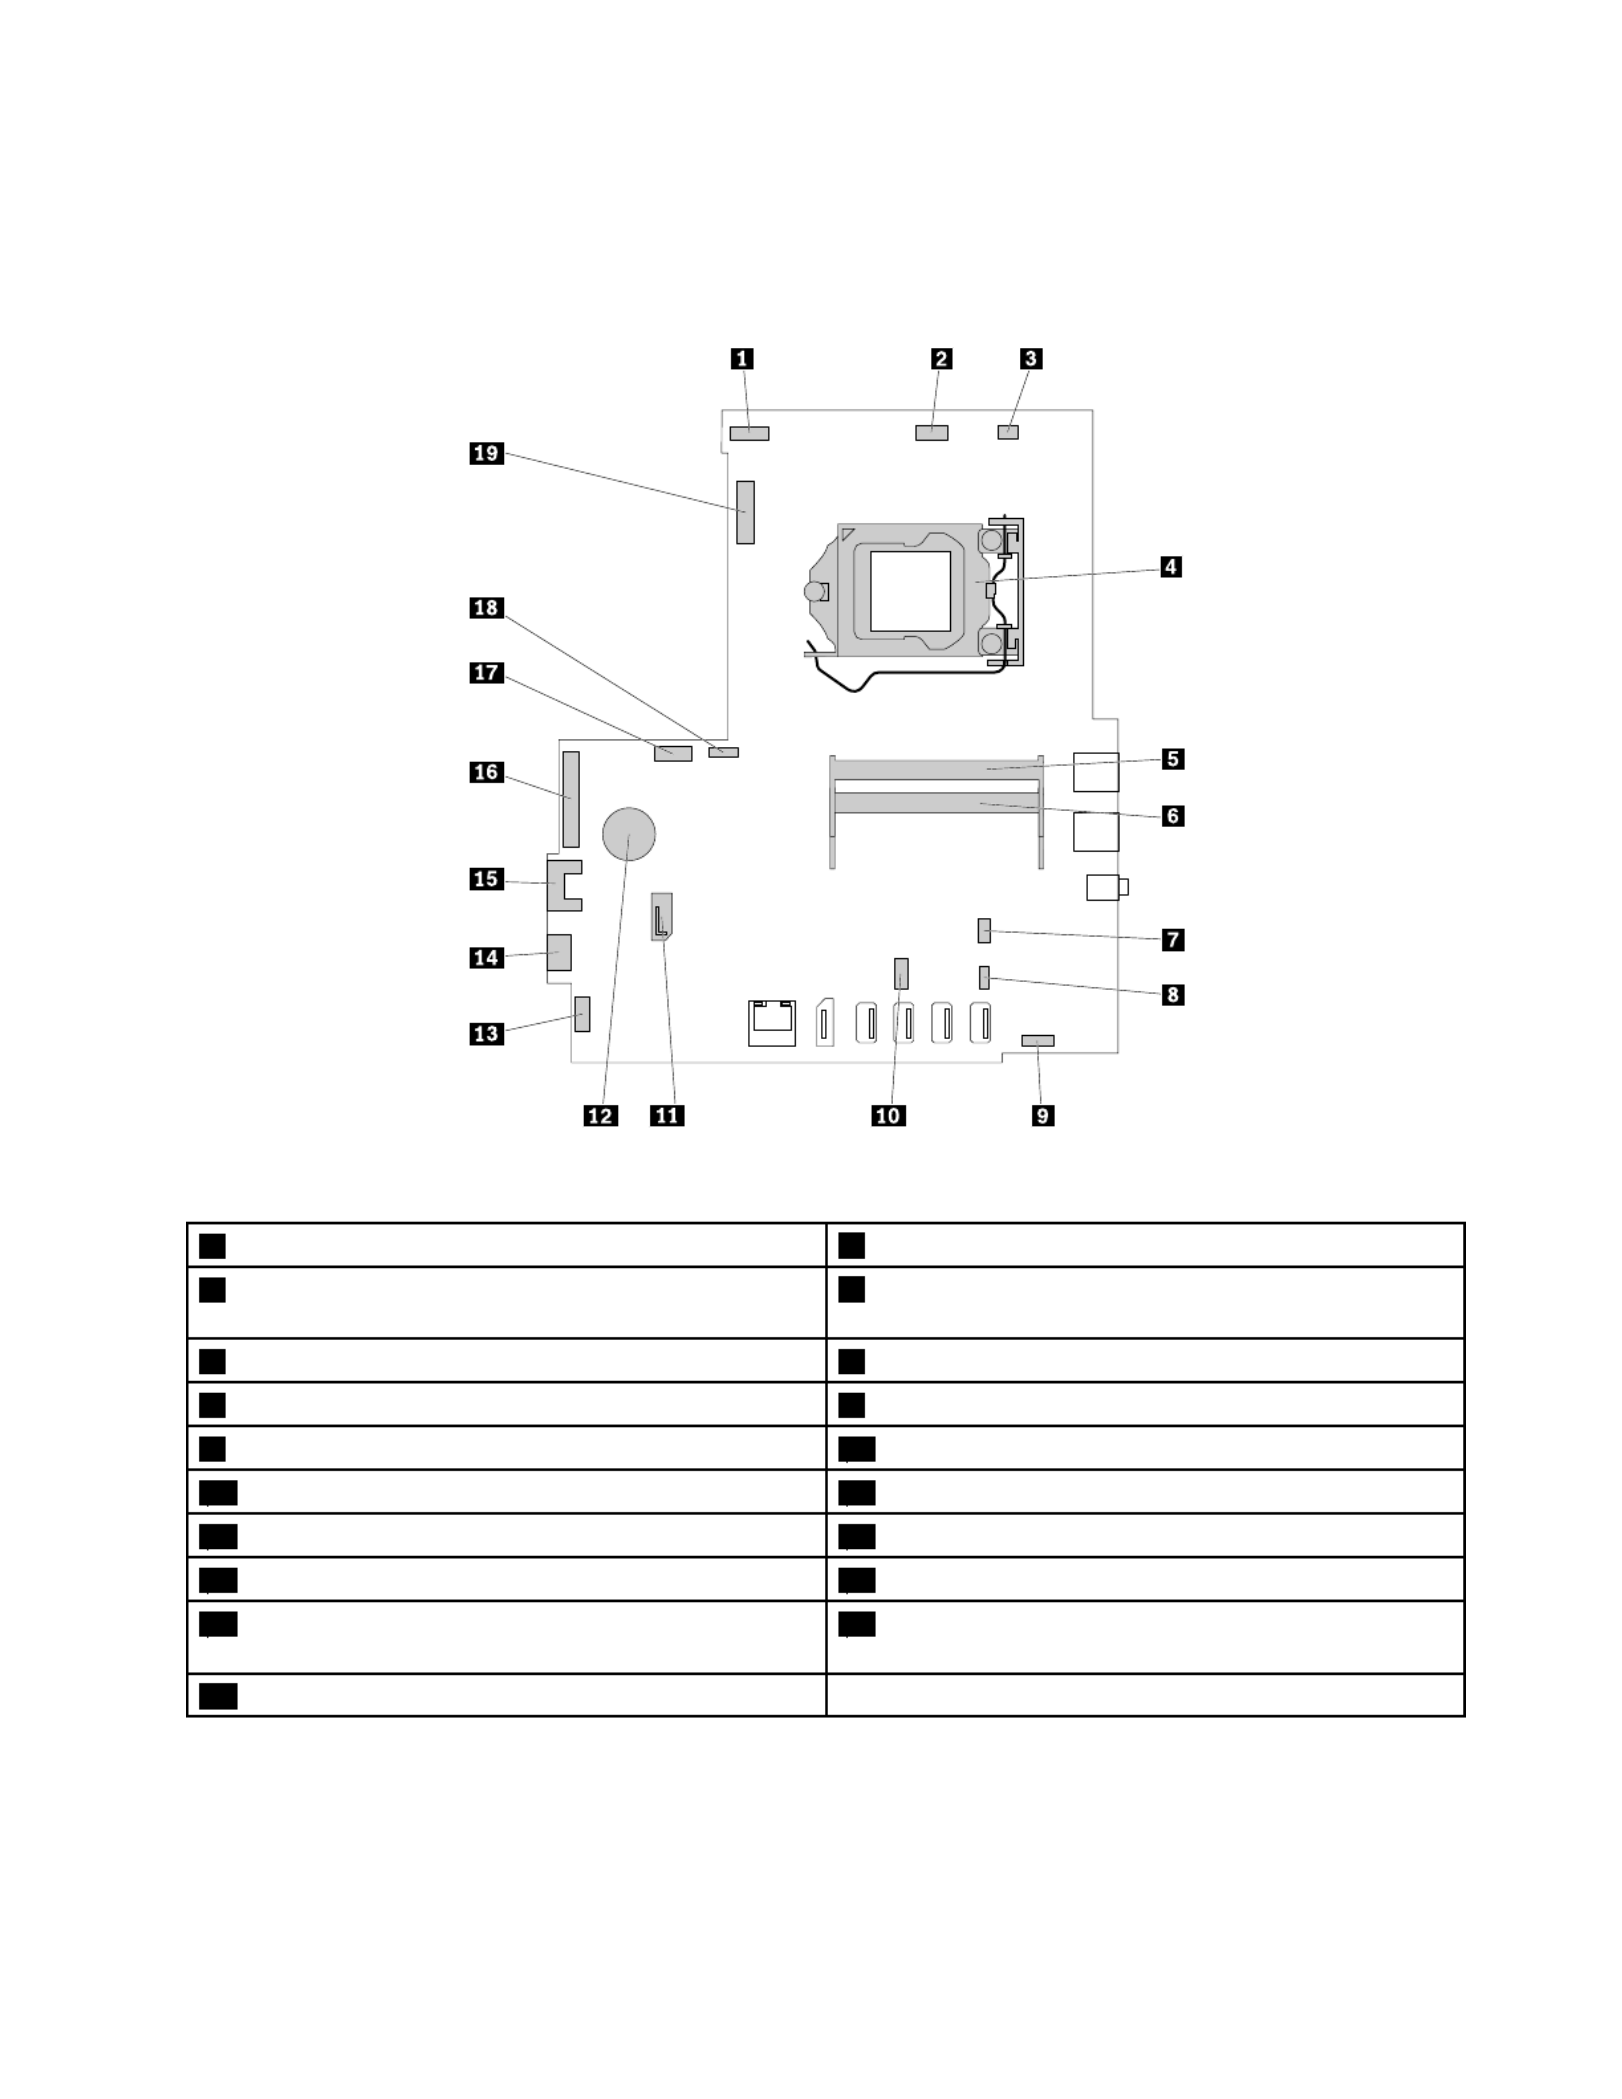
Partsonthesystemboard
Note:Forthepartsthataredisplayedonthefollowingfigurebutnotintroducedinthefollowingtable,see
“Frontview”onpage1and“Rearview”onpage4.
Figure6.Partsonthesystemboard
1LCDpanelpowerconnector 2Integratedcameraconnector
3Coverpresenceswitchconnector(intrusionswitch
connector)
4Microprocessorsocket
5Memoryslot1
7T ouchboardconnector(forM800z)8Cardreaderconnector
9Internalspeakerconnector 10Serialconnector
11SA T A3.0connector(opticaldrivesignalconnector)12Coin-cellbattery
13Control-buttonboardconnector14Powersupplyassemblyconnector(forM800z)
15SA T A2.0connector(storagedrivesignalconnector)16LCDpanelsignalconnector
17SAT Apowerconnector(storagedriveandoptical
drivepowerconnector)
18Systemfanconnector
19M.2Wi-Ficardslot
Chapter1.Productoverview11
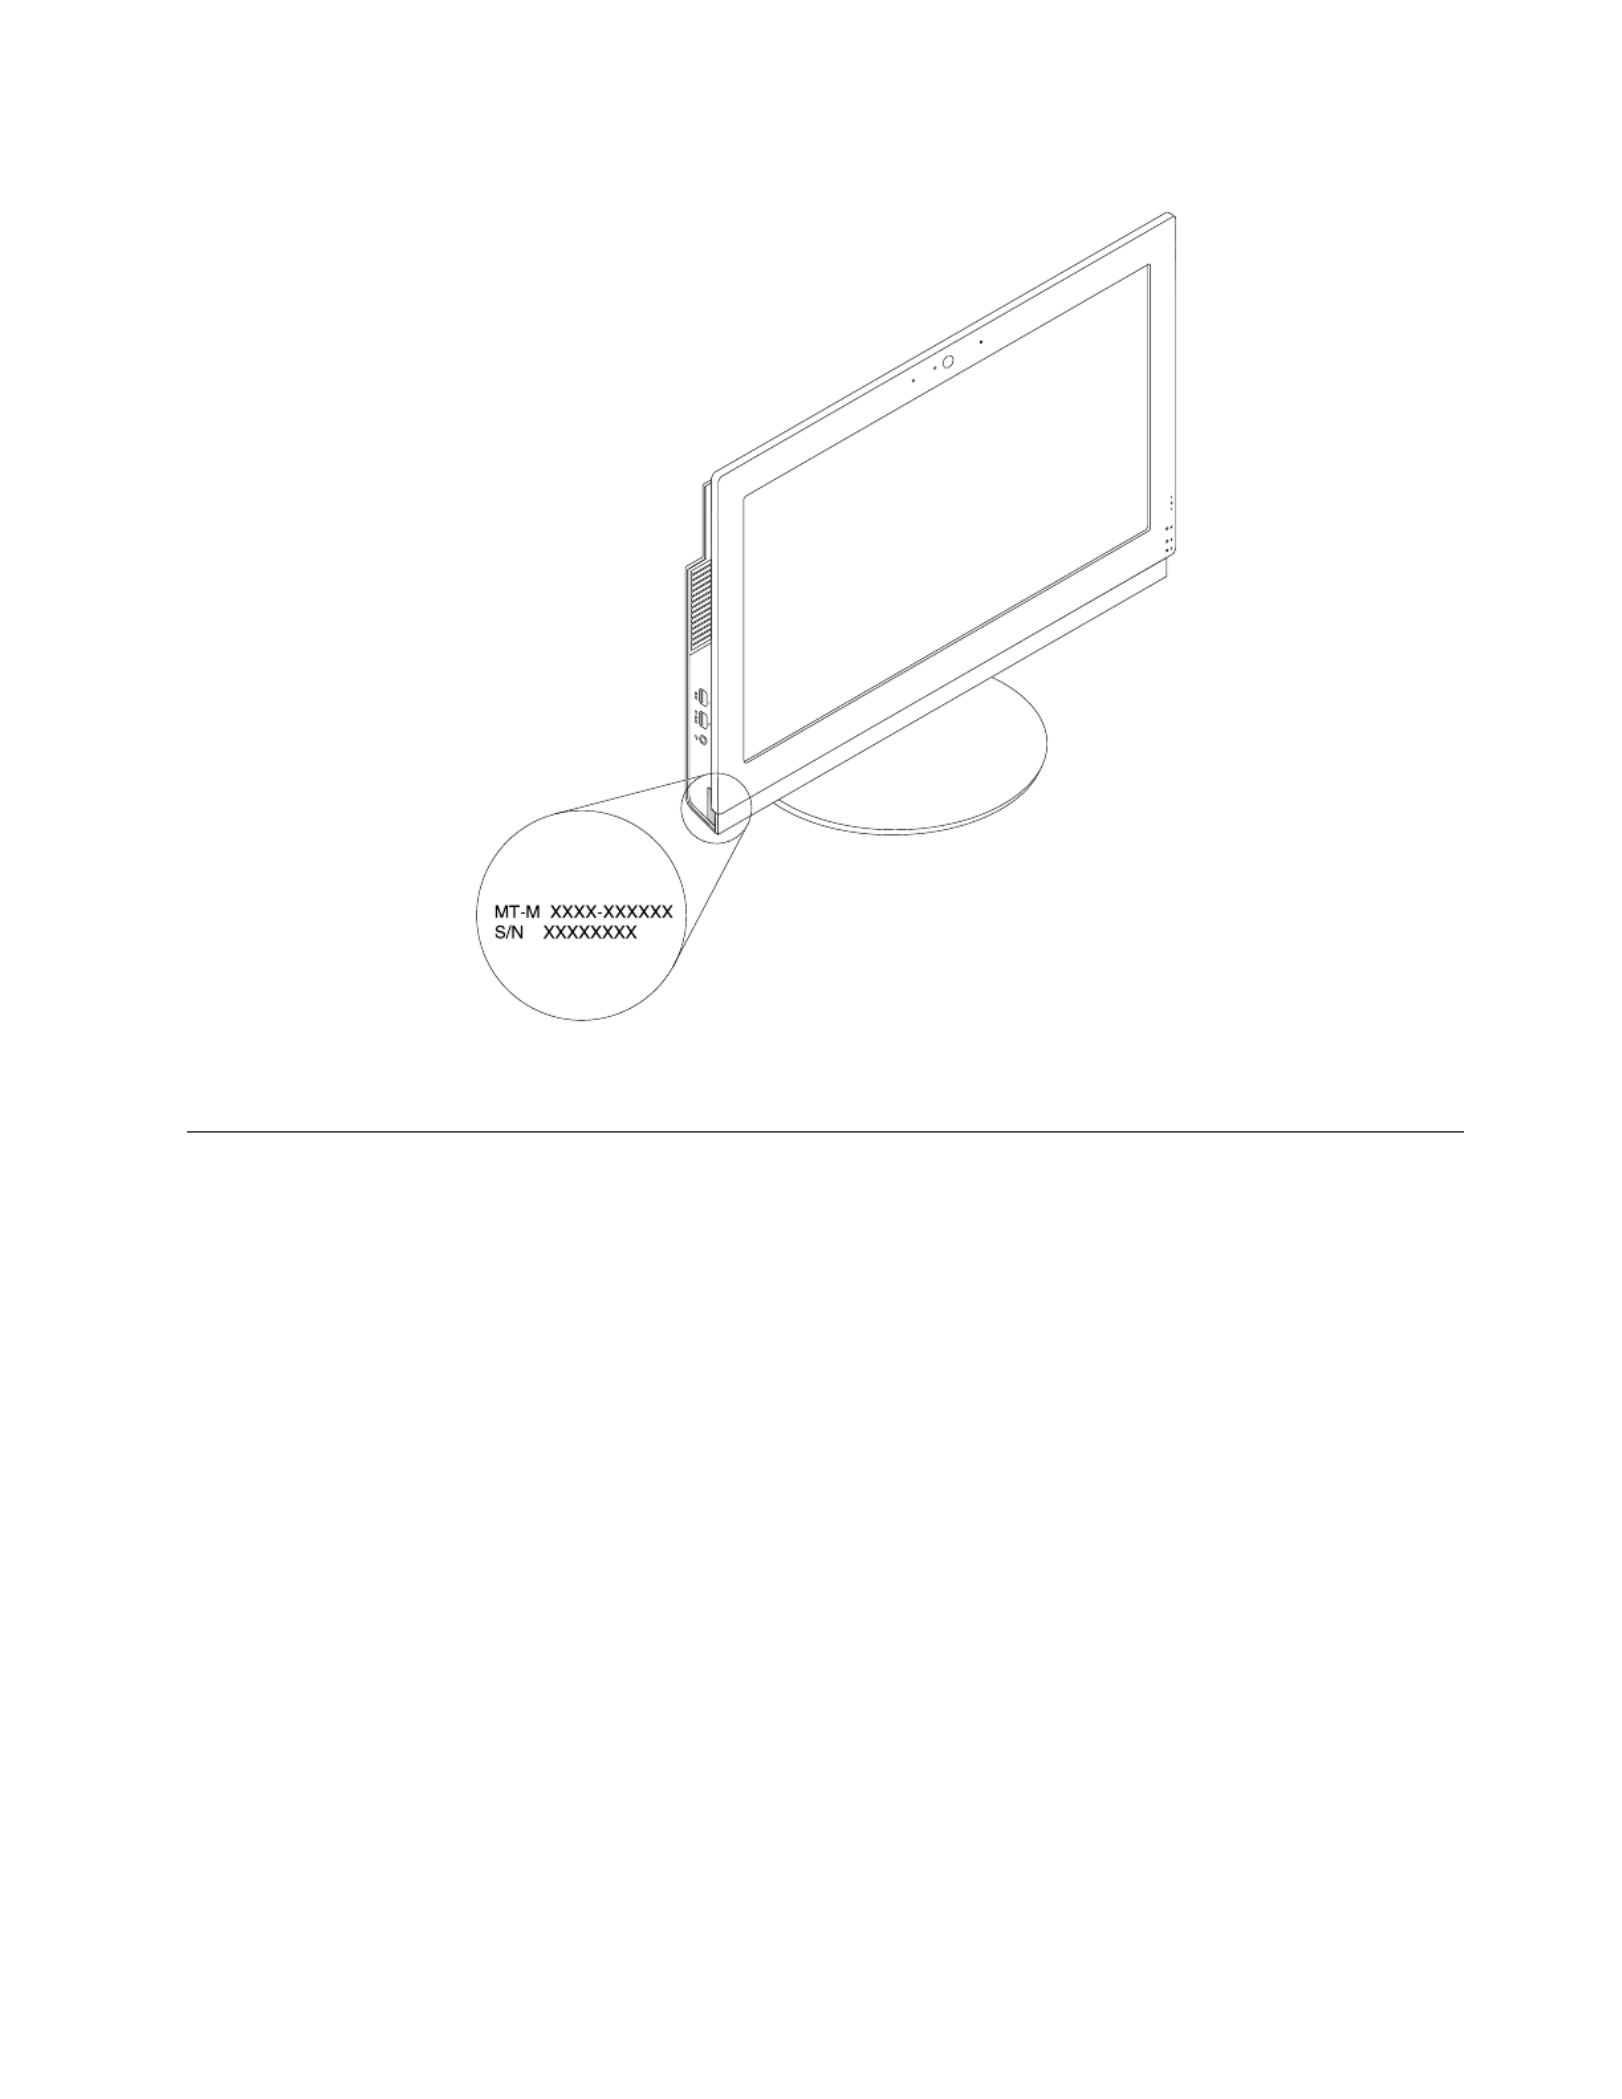
Figure8.Machinetypeandmodellabel(forM800z)
Features
Thecomputerfeaturesintroducedinthissectionapplytovariousmodels.
Informationaboutyourcomputer
•T oviewbasicinformation(suchasmicroprocessorandmemoryinformation)aboutyourcomputer,
dothefollowing:
1.ClicktheStartbuttontoopentheStartmenu.
2.DependingonyourWindowsversion,dooneofthefollowing:
–ForWindows7:Right-clickComputer,andthenclickProperties.
–ForWindows10:ClickSettings➙System➙About.
•T oviewdetailedinformationaboutthedevices(suchastheopticaldriveandnetworkadapters)onyour
computer,dothefollowing:
1.DependingonyourWindowsversion,dooneofthefollowing:
–ForWindows7:ClicktheStartbuttontoopentheStartmenu.Right-clickComputer,andthen
clickProperties.
–ForWindows10:Right-clicktheStartbuttontoopentheStartcontextmenu.
2.ClickDeviceManager.T ypetheadministratorpasswordorprovideconfirmationifprompted.
Chapter1.Productoverview13

Preinstalledoperatingsystem
YourcomputerispreinstalledwithWindows7orWindows10operatingsystem.Additionaloperating
systemsmightbeidentifiedbyLenovoascompatiblewithyourcomputer.T odetermineifanoperating
systemhasbeencertifiedortestedforcompatibility,checktheWebsiteoftheoperatingsystemprovider.
Powersupply
•ForM700z:120-wattacpoweradapter
•ForM800z:150-wattautomaticvoltage-sensingpowersupply
Storagedrives
Yourcomputersupportsuptoonestoragedrives(harddiskdrives,hybriddrives,orsolid-statedrives).
T oviewtheamountofstoragedrivespace,dothefollowing:
1.DependingonyourWindowsversion,dooneofthefollowing:
•ForWindows7:ClicktheStartbuttontoopentheStartmenu.Right-clickComputer,andthenclick
Manage.
•ForWindows10:Right-clicktheStartbuttontoopentheStartcontextmenu.
2.ClickDiskManagement.
Videofeatures
TheintegratedgraphicscardsupportstheDisplayPort-outconnectoronyourcomputer.
Audiofeatures
Theintegratedaudiocardsupportsthefollowingaudioconnectorsanddevicesonyourcomputer:
•Headsetconnector
•Integratedmicrophone(availableonsomemodels)
•Internalspeakers(availableonsomemodels)
Input/Output(I/O)features
•Cardreaderslot(availableonsomemodels)
•DisplayPort-outconnector
•Ethernetconnector
•Headsetconnector
•Serialconnector(availableonsomemodels)
•USBconnector
Expansion
•Cardreader(availableonsomemodels)
•Memoryslot
•Opticaldrive(availableonsomemodels)
•Storagedrivebay
Networkfeatures
•EthernetLAN
TheintegratednetworkinterfacecardsupportstheEthernetconnectoronyourcomputer.
•WirelessLAN(availableonsomemodels)
14ThinkCentreM700zandM800zUserGuide

•Bluetooth(availableonsomemodels)
Securityfeatures
Formoreinformation,seeChapter4“Security”onpage35.
Systemmanagementfeatures
•Abilitytostorepower-onself-test(POST)hardwaretestresults
•DesktopManagementInterface(DMI)
DesktopManagementInterfaceprovidesacommonpathforuserstoaccessinformationaboutall
aspectsofacomputer.Theinformationincludesprocessortype,installationdate,connectedprintersand
otherperipherals,powersources,maintenancehistory,andsoon.
•ErPLPScompliancemode
Theenergy-relatedproductsdirective(ErP)lowestpowerstate(LPS)compliancemodereducesthe
consumptionofelectricitywhenyourcomputerisinsleeporoffmode.Formoreinformation,see
“EnablingordisablingtheErPLPScompliancemode”onpage42 .
•IntelligentCoolingEngine(ICE)
TheIntelligentCoolingEngineisasystemthermalmanagementsolutionthatenablesyourcomputer
torunwithbetterthermalandacousticperformance.TheICEfunctionalsomonitorsthethermal
performanceofyourcomputertoidentifythermalproblems.Formoreinformation,see“ChangingICE
PerformanceMode”onpage42.
•PrebootExecutionEnvironment(PXE)
PrebootExecutionEnvironmentenablescomputerstostartthroughanetworkinterfaceindependentof
datastoragedrives(suchasharddiskdrives)orinstalledoperatingsystems.
•SystemManagement(SM)BasicInput/OutputSystem(BIOS)andSMsoftware
TheSMBIOSspecificationdefinesdatastructuresandaccessmethodsthatcanbeusedtoread
managementdatastoredintheBIOSofacomputer.
•WakeonLAN
WakeonLANisanEthernetcomputernetworkingstandardthatallowsacomputertobeturnedon
orwokenupbyanetworkmessage.Themessageusuallyissentbyaprogramrunningonanother
computeronthesameLAN.
•WakeonRing
WakeonRing,sometimesreferredtoasWakeonModem,isaspecificationthatallowssupported
computersanddevicestoresumefromsleeporhibernationmode.
•WindowsManagementInstrumentation(WMI)
WindowsManagementInstrumentationisasetofextensionstotheWindowsDriverModel.Itprovidesan
operatingsysteminterfacethroughwhichinstrumentedcomponentsprovideinformationandnotification.
Specifications
Thissectionliststhephysicalspecificationsforyourcomputer.
Chapter1.Productoverview15

1.ClicktheStartbuttontoopentheStartmenu.
2.DependingonyourWindowsversion,dooneofthefollowing:
–ForWindows7:ClickAllProgramstodisplaytheprogramlist.Fromthelistorafolderinthelist,
clickthenameofthedesiredprogramtolaunchtheprogram.
–ForWindows10:Fromtheprogramlistorafolderinthelist,clickthenameofthedesiredprogram
tolaunchtheprogram.
3.IftheprogramnameisnotdisplayedontheStartmenu,dooneofthefollowing:
–ForWindows7:ClickControlPanelontheStartmenu.
–ForWindows10:Right-clicktheStartbuttontoopentheStartcontextmenu,andthenclick
ControlPanel.
4.ViewControlPanelusinglargeiconsorsmallicons,andthenclickthenameofthedesiredprogram
tolaunchtheprogram.
Installingaprogramthatisreadytobeinstalled
Note:ForWindows7,dependingonthecomputermodel,someoftheLenovoprogramsmightbereadyto
beinstalled,soyouneedtoinstallthemmanually.Then,youcanaccessandusetheseprograms.
Toinstallaprogramthatisreadytobeinstalled,dothefollowing:
1.OpentheLenovoThinkVantage ®T oolsprogram.See“Accessingaprogramonthecomputer”on
page16.
2.ViewtheprogramiconsusingTiles.
3.Followtheinstructionsundergreyed-outiconstolocatetheiconforthedesiredprogram.Then,
double-clicktheicontoinstalltheprogram.
AnintroductiontoLenovoprograms
ThissectionprovidesinformationaboutthemajorLenovoprogramsavailableonyouroperatingsystem.
Note:Dependingonyourcomputermodel,someofthefollowingprogramsmightnotbeavailable.
•ForWindows7only:
–CreateRecoveryMedia
TheCreateRecoveryMediaprogramenablesyoutorestoreonlytheCdriveortheentirestorage
drivetothefactory-defaultsettings.
–FingerprintManagerProorThinkVantageFingerprintSoftware
TheFingerprintManagerProorThinkVantageFingerprintSoftwareprogramenablesyoutousea
fingerprintreader.Theintegratedfingerprintreaderprovidedonsomekeyboardsenablesyoutoenroll
yourfingerprintandassociateitwithyourpower-onpassword,harddiskpassword,andWindows
password.Asaresult,fingerprintauthenticationcanreplacepasswordsandenablesimpleandsecure
useraccess.
–LenovoBluetoothLock
TheLenovoBluetoothLockprogramenablesyoutouseaBluetoothdevice(suchasyoursmartphone)
asaproximity-basedunitforlockingorunlockingyourcomputerautomatically.Bydetectingthe
distancebetweenyourcomputerandthepredefinedBluetoothdevicethatyouarecarrying,theLenovo
BluetoothLockprogramautomaticallylocksyourcomputerwhenyouwalkawayandunlocksyour
computerwhenyoucomeback.Thisisasimplewaytoprotectyourcomputeragainstunauthorized
accessincasethatyouforgettolockyourcomputer.
–LenovoPowerENGAGE
TheLenovoPowerENGAGEprogramenablesyoutoregisteryourcomputerwithLenovo.
Chapter1.Productoverview17

–PasswordManager
ThePasswordManagerprogramautomaticallycapturesandfillsinauthenticationinformationfor
WindowsprogramsandWebsites.
–PowerManager
ThePowerManagerprogramprovidesconvenient,flexible,andcompletepowermanagementfor
yourcomputer.Itenablesyoutoadjustyourcomputerpowersettingstoachievethebestbalance
betweenperformanceandpowersaving.
–RescueandRecovery ®
TheRescueandRecoveryprogramisaone-buttonrecoveryandrestoresolution.Itincludesaset
ofself-recoverytoolstohelpyoudiagnosecomputerproblems,gethelp,andrecoverfromsystem
crashes,evenifyoucannotstarttheWindowsoperatingsystem.
–SystemUpdate
TheSystemUpdateprogramprovidesregularaccesstothesystemupdatesforyourcomputer,such
asdevicedriverupdates,softwareupdates,andBIOSupdates.Theprogramgathersinformationfrom
theLenovoHelpCenteraboutnewupdatesforyourcomputer,thensortsanddisplaystheupdatesfor
downloadandinstallation.Youhavecompletecontrolofwhichupdatestodownloadandinstall.
•ForWindows10only:
–LenovoCompanion
Yourcomputer’sbestfeaturesandcapabilitiesshouldbeeasytoaccessandunderstand.WithLenovo
Companion,theyare.UseLenovoCompaniontodothefollowing:
–Optimizeyourcomputer’sperformance,monitoryourcomputer’shealth,andmanageupdates.
–Accessyouruserguide,checkwarrantystatus,andviewaccessoriescustomizedforyourcomputer.
–Readhow-toarticles,exploreLenovoforums,andstayup-to-dateontechnologynewswitharticles
andblogsfromtrustedsources.
LenovoCompanionisfilledwithexclusiveLenovocontenttohelpyoulearnmoreaboutwhatyou
candowithyourcomputer.
–LenovoID
TheLenovoIDprogramenablesyoutocreateyourLenovoIDandaccessallsupportedLenovo
programsandwebportalswithsinglesign-on.
–LenovoSettings
TheLenovoSettingsprogramistheonestopshopforyoutocontrolhardwarefeatures,sensors
andprogramsonyourcomputer.LenovoSettingsenablesyoutooptimizedeviceperformanceby
customizingkeyfunctions,suchaspowerplans,audio,camera,andnetworks.
•ForWindows7andWindows10:
–LenovoDeviceExperienceorLenovoPCExperience
TheLenovoDeviceExperienceorLenovoPCExperienceprogramhelpsyouworkmoreeasilyand
securely.TheprogramprovideseasyaccesstoLenovoThinkVantageT oolsorLenovoT ools,important
settingsandinformationaboutyourcomputer,theLenovoSupportWebsite,andsoon.
–LenovoSolutionCenter
TheLenovoSolutionCenterprogramenablesyoutotroubleshootandresolvecomputerproblems.It
combinesdiagnostictests,systeminformationcollection,securitystatus,andsupportinformation,
alongwithhintsandtipsformaximumsystemperformance.
18ThinkCentreM700zandM800zUserGuide

Chapter2.Usingyourcomputer
Thischaptercontainsthefollowingtopics:
•“Adjustingthecomputerstand”onpage19
•“Registeringthecomputer”onpage23
•“Settingthecomputervolume”onpage23
•“AddinganicontotheWindowsnotificationarea”onpage23
•“Usingadisc”onpage24
•“Connectingtoanetwork”onpage25
•“Usingthesingle-touchormulti-touchfeature”onpage26
Adjustingthecomputerstand
Youcanusethecomputerstandtoadjustthecomputertoapositioncomfortableforyou.
Notes:Thecomputerstandisavailableonlyonsomemodels.
•Ifyourcomputercomeswithacomputerstand,ensurethatyouusethecomputerwiththestandinstalled.
Ifyouwanttousethecomputerwiththestandremoved,donotturnonthecomputerbeforecontacting
theLenovoCustomerSupportCenterfortheadditionalthermalsolution.
•Ifyourcomputerdoesnotcomewithacomputerstand,donottearofftheMylarontherearofthe
computer.Afterinitialsetup,youcanusethecomputer.
Adjustingthefull-functionmonitorstand(forM700z)
Youcanusethefull-functionmonitorstandtoadjustthecomputerbydoingtheoneofthefollowing:
©CopyrightLenovo2015,2016 19

•Y oucanadjusttheverticalpositionofthecomputeratanangleofbetween5°tothefrontand45°
totherear.
Figure9.Adjustingthecomputertothefrontortotherear
•Y oucanadjusttheheightofthefull-functionmonitorstandwithinalengthof110.00mm(4.33inches)
Figure10.Adjustingtheheightofthefull-functionmonitorstand
20ThinkCentreM700zandM800zUserGuide

•Y oucanturnthecomputeratanangelof45°totheleftand45°totheright.
Figure11.T urningthecomputertotheleftortotheright
Adjustingthetilt-onlymonitorstand
Youcanadjusttheverticalpositionofthecomputerbetween5°tothefrontand45°totherearasshown.
Figure12.Adjustingthetilt-onlymonitorstand
AdjustingtheUltraFlexIIStand(forM800z)
YoucanusetheUltraFlexIIStandtoadjustthecomputerbydoingthefollowing:
Chapter2.Usingyourcomputer21

1.Y oucanadjusttheverticalpositionofthecomputeratanangleofbetween5°tothefrontand61°
totherearasshown.
Figure13.Adjustingthecomputertothefrontortotherear
2.Afteryouadjustyourcomputertotherear,youcanadjusttheUltraFlexIIStanddownwardwithina
rangeof59°asshown.
Figure14.AdjustingtheUltraFlexIIStand
22ThinkCentreM700zandM800zUserGuide

3.Y oucanadjustthecomputeratanangleofbetween45°totheleftand45°totherightasshown.
Figure15.Adjustingthecomputertotheleftortotheright
Registeringthecomputer
WhenyouregisterthecomputerwithLenovo,youenterrequiredinformationintoaLenovodatabase.The
informationenablesLenovotocontactyouwhenthereisarecallorothersevereproblemandprovide
quickerservicewhenyoucallLenovoforhelp.Inaddition,somelocationsofferextendedprivilegesand
servicestoregisteredusers.
T oregisterthecomputerwithLenovo,ensurethatthecomputerisconnectedtotheInternet.Then,goto
http://www.lenovo.com/registerandfollowtheinstructionsonthescreen.
Settingthecomputervolume
T osetthecomputervolume,dothefollowing:
1.ClickthevolumeiconintheWindowsnotificationareaonthetaskbar.
Note:IfthevolumeiconisnotdisplayedintheWindowsnotificationarea,addtheicontothe
notificationarea.See“AddinganicontotheWindowsnotificationarea”onpage23 .
2.Followtheinstructionsonthescreentoadjustthevolume.Clickthespeakericontomutetheaudio.
AddinganicontotheWindowsnotificationarea
T oaddanicontotheWindowsnotificationarea,dothefollowing:
1.Clickthearrownexttothenotificationareatoviewhiddenicons.Then,clickthedesirediconand
dragittothenotificationarea.
2.Iftheiconisnotdisplayed,turnontheicon.
a.ClicktheStartbuttontoopentheStartmenu.
b.DependingonyourWindowsversion,dooneofthefollowing:
•ForWindows7:ClickControlPanel.ViewControlPanelusinglargeiconsorsmallicons,and
thenclickNotificationAreaIcons➙Turnsystemiconsonoroff.
•ForWindows10:ClickSettings➙Personalization➙Taskbar➙Turnsystemiconsonoroff.
c.T urnonthedesiredicon.
3.IftheiconisstillnotdisplayedintheWindowsnotificationarea,repeatstep1.
Chapter2.Usingyourcomputer23

Note:Ifthetraydoesnotslideoutofthedrivewhenyoupresstheeject/closebutton,turnoffthecomputer.
Then,insertastraightenedpaperclipintotheemergency-ejectholeadjacenttotheeject/closebutton.
Usetheemergencyejectonlyinanemergency.
Recordingadisc
Ifyouropticaldrivesupportsrecording,youcanrecordadisc.
RecordingadiscusingWindowstools
TorecordadiscusingWindowstools,dooneofthefollowing:
•BurnadiscusingtheAutoPlaywindow.
1.Ensurethatthediscisplayedautomatically.
a.ClicktheStartbuttontoopentheStartmenu.
b.DependingonyourWindowsversion,dooneofthefollowing:
–ForWindows7:ClickControlPanel.ViewControlPanelusinglargeiconsorsmallicons,
andthenclickAutoPlay.
–ForWindows10:ClickSettings➙Devices➙AutoPlay.
c.SelectorturnonUseAutoPlayforallmediaanddevices.
2.Insertarecordablediscintotheopticaldrivethatsupportsrecording.TheAutoPlaywindowopens.
3.Followtheinstructionsonthescreen.
•BurnadiscusingWindowsMedia ®Player.
1.Insertarecordablediscintotheopticaldrivethatsupportsrecording.
2.OpenWindowsMediaPlayer.See“Accessingaprogramonthecomputer”onpage16.
3.Followtheinstructionsonthescreen.
•BurnadiscfromanISOfile.
1.Insertarecordablediscintotheopticaldrivethatsupportsrecording.
2.Double-clicktheISOfile.
3.Followtheinstructionsonthescreen.
Connectingtoanetwork
Thissectionprovidesinformationaboutconnectingtoanetwork.Ifyoucannotconnectthecomputertoa
network,see“Networkingproblems”onpage51 .
ConnectingtoanEthernetLAN
YoucanconnectthecomputertoanEthernetLANbyconnectinganEthernetcabletotheEthernetconnector.
DANGER
Toavoidtheriskofelectricalshock,donotconnectthetelephonecabletotheEthernetconnector.
ConnectingtoawirelessLAN
YoucanconnectthecomputertoawirelessLANwithouttheuseofanEthernetcablebutbymeansof
radiowavesonly.
Note:ThewirelessLANfeatureisoptional.
Chapter2.Usingyourcomputer25

Toestablishawireless-LANconnection,dothefollowing:
1.EnsurethatawirelessLANisavailableandthewirelessLANfeatureonthecomputerisworking.
2.Clickthewireless-network-connection-statusiconintheWindowsnotificationareatodisplayavailable
wirelessnetworks.
Note:Ifthewireless-network-connection-statusiconisnotdisplayedintheWindowsnotificationarea,
addtheicontothenotificationarea.See“AddinganicontotheWindowsnotificationarea”onpage23.
3.ClickawirelessLAN,andthenclickConnecttoconnectthecomputertoit.Providerequired
informationifneeded.
ConnectingtoaBluetooth-enableddevice
Bluetoothisashort-rangewirelesscommunicationstechnology.UseBluetoothtoestablishawireless
connectionbetweenthecomputerandanotherBluetooth-enableddevicewithinadistanceofabout10
m(32.8ft).
Note:TheBluetoothfeatureisoptional.
ToconnecttoaBluetooth-enableddevice,dothefollowing:
1.EnsurethattheBluetoothfeatureonthecomputerisworkingandtheBluetooth-enableddeviceis
locatedwithinadistanceofabout10m(32.8ft)fromthecomputer.
2.ClicktheBluetoothiconintheWindowsnotificationareaonthetaskbar.Then,clickAddaDeviceand
followtheinstructionsonthescreen.
Note:IftheBluetoothiconisnotdisplayedintheWindowsnotificationarea,addtheicontothe
notificationarea.See“AddinganicontotheWindowsnotificationarea”onpage23.
Usingthesingle-touchormulti-touchfeature
Dependingonthecomputermodel,thesingle-touchorthemulti-touchfeatureisavailable.Thesingle-touch
featureenablesyoutouseonlyonefingeratatimetointeractwiththecomputer.Themulti-touchfeature
enablesyoutouseoneortwofingerstointeractwiththecomputer.
Note:Thesingle-touchandmulti-touchfeaturesareoptional.
Tousethesingle-touchormulti-touchfeature,dothefollowing:
•T omakeasingleclick,tapthetouchscreenoncewithyourfinger.
•T omakeadouble-click,taptwicewithoutpausing.
•T omakearight-click,tapthetouchscreenonceandthenholdyourfingeronthetouchscreenuntila
roundcircleisdisplayed.Then,liftyourfingeroffthetouchscreensothatacontextmenuisdisplayed.
Youcanmakeyourselectiononthemenu.
•T omakeiteasiertoreadoreditadocument,usetwofingerstozoomin,zoomout,scroll,orrotate
onthetouchscreen.
26ThinkCentreM700zandM800zUserGuide

Chapter3.Youandyourcomputer
Thischaptercontainsthefollowingtopics:
•“Arrangingyourworkspace”onpage27
•“Accessibilityinformation”onpage28
•“Cleaningthecomputer”onpage31
•“Maintenance”onpage31
•“Movingthecomputer”onpage33
Arrangingyourworkspace
Arrangeyourworkspacetosuityourneedsandthekindofworkyoudo.Thissectionprovidesinformation
aboutthefactorsthataffectthewayyouarrangeyourworkspace.
Glareandlighting
Positionthecomputertominimizeglareandreflectionsfromoverheadlights,windows,andotherlight
sources.Reflectedlightfromshinysurfacescancauseannoyingreflectionsonyourscreen.Whenpossible,
placethecomputeratrightanglestowindowsandotherlightsources.Ifnecessary,reduceoverhead
lightingbyturningofflightsorusinglowerwattagebulbs.Ifyouinstallthecomputernearawindow,use
curtainsorblindstoblockthesunlight.Youcanadjustthebrightnessandcontrastcontrolsonthecomputer
astheroomlightingchangesthroughouttheday.
Whereitisimpossibletoavoidreflectionsortoadjustthelighting,anantiglarefilterplacedoverthescreen
mightbehelpful.However,thesefiltersmightaffecttheclarityoftheimageonthescreen;trythemonlyafter
youhaveexhaustedothermethodsofreducingglare.
Aircirculation
Thecomputerproducesheat.Thecomputerhasafanthatpullsinfreshairandforcesouthotairthrough
theairvents.Blockingtheairventscancauseoverheating,whichmightresultinamalfunctionordamage.
Positionthecomputersothatnothingblockstheairvents;usually,51mm(2inches)ofairspaceissufficient.
Ensurethattheventedairisnotblowingonpeople.
Electricaloutletlocationsandcablelengths
Thefollowingfactorsmightdeterminethefinalplacementofthecomputer:
•Locationsofelectricaloutlets
•Lengthofpowercordsorpoweradapters
•Lengthofthecablesthatareconnectedtootherdevices
Formoreinformationaboutpowercordsorpoweradapters,see“Powercordsandpoweradapters”on
pageiv .
Comfort
Althoughnosingleworkingpositionisidealforeveryone,hereareafewguidelinestohelpyoufindaposition
thatsuitsyoubest.Thefollowingfiguresetsanexampleforyourreference.
©CopyrightLenovo2015,2016 27
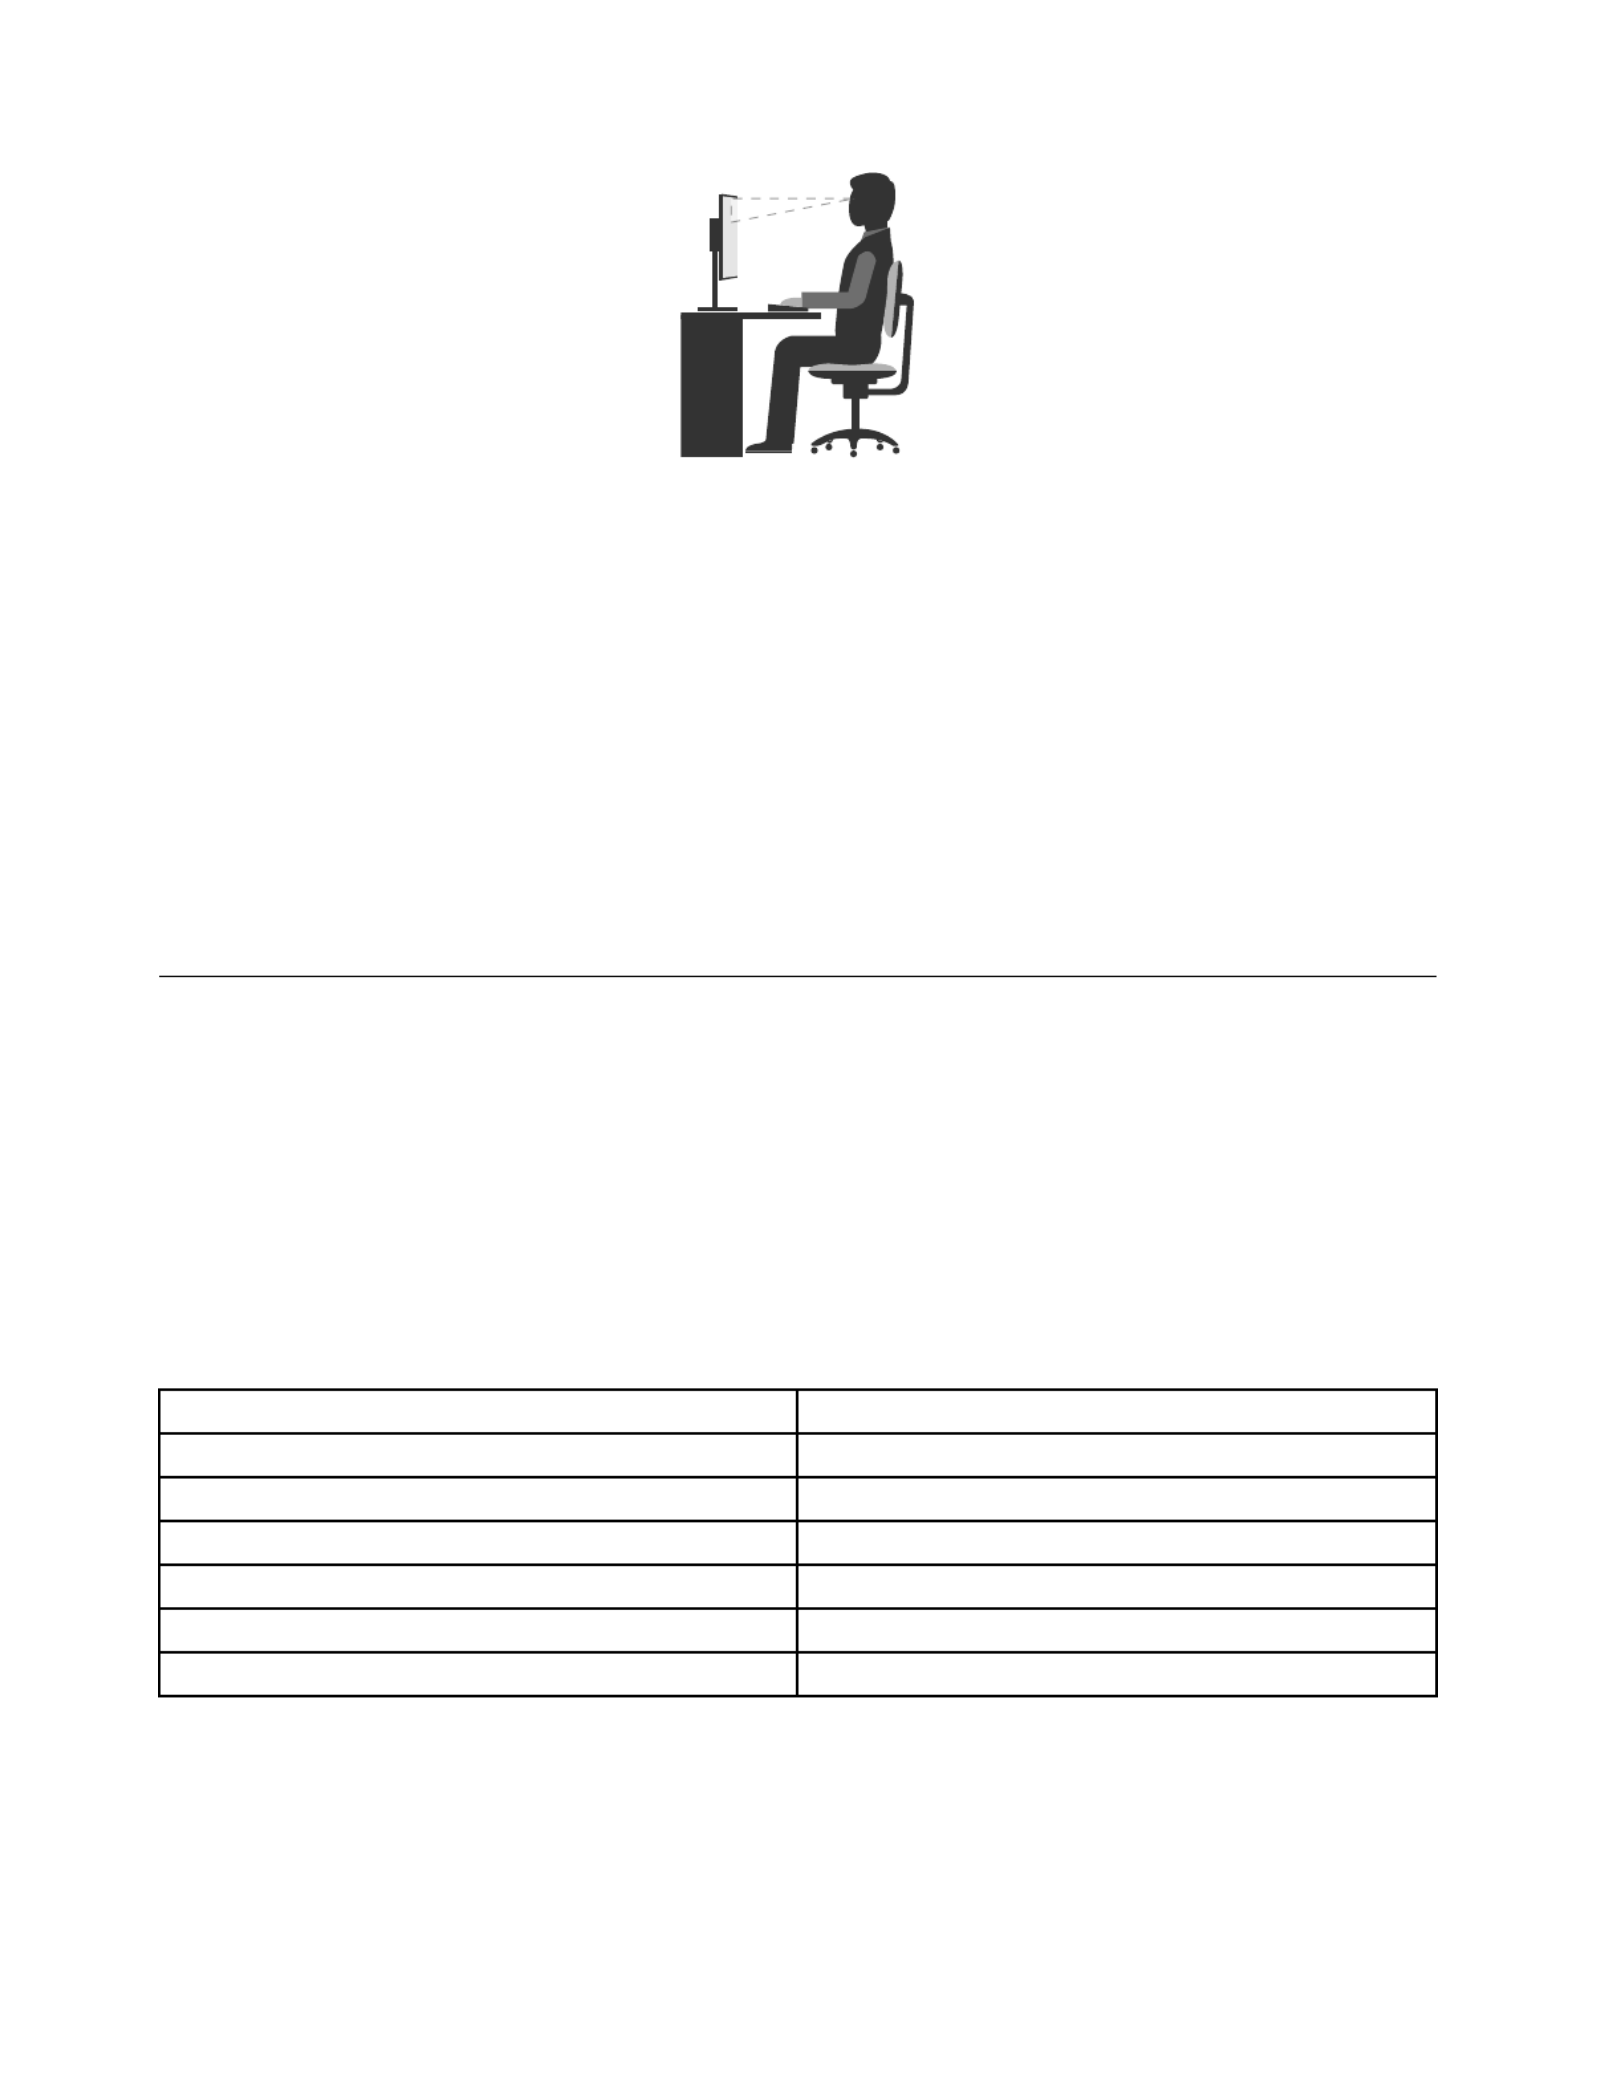
•Screenposition:Keepthescreenatacomfortableviewingdistance,usually51-61cm(20-24inches).
Then,adjustthescreensothatthetopofthescreenisatorslightlybeloweyelevelandyoucanviewit
withouttwistingyourbody.
•Chairposition:Useachairthatgivesyougoodbacksupportandseatheightadjustment.Usechair
adjustmentstobestsuityourdesiredposture.
•Headposition:Keepyourheadandneckinacomfortableandneutral(verticalorupright)position.
•Armandhandpositions:Keepyourforearms,wrists,andhandsinarelaxedandneutral(horizontal)
position.T ypewithasofttouchwithoutpoundingthekeys.
•Legposition:Keepyourthighsparalleltothefloorandyourfeetflatonthefloororonafootrest.
Makeminormodificationsinyourworkingposturetodetertheonsetofdiscomfortcausedbylongperiodsof
workinginthesameposition.Frequent,shortbreaksfromyourworkalsohelptopreventminordiscomfort
associatedwithyourworkingposture.
Accessibilityinformation
Lenovoiscommittedtoprovidinguserswhohavehearing,vision,andmobilitylimitationswithgreater
accesstoinformationandtechnology.Thissectionprovidesinformationaboutthewaystheseuserscanget
themostoutoftheircomputerexperience.Youalsocangetthemostup-to-dateaccessibilityinformation
fromthefollowingWebsite:
http://www.lenovo.com/accessibility
Keyboardshortcuts
Thefollowingtablecontainskeyboardshortcutsthatcanhelpmakethecomputereasiertouse.
Note:Dependingonyourkeyboard,someofthefollowingkeyboardshortcutsmightnotbeavailable.
Keyboardshortcuttion
Windowslogokey+U OpenEaseofAccessCenter
RightShiftforeightseconds T urnonorturnoffFilterKeys
ShiftfivetimeskyKeys
NumLockforfivesecondsT urnonorturnoffT oggleKeys
LeftAlt+LeftShift+NumLock T urnonorturnoffMouseKeys
LeftAlt+LeftShift+PrtScn(orPrtSc)T urnonorturnoffHighContrast
Formoreinformation,gotohttp://windows.microsoft.com/,andthenperformasearchusinganyofthe
followingkeywords:keyboardshortcuts,keycombinations,shortcutkeys.
28ThinkCentreM700zandM800zUserGuide

EaseofAccessCenter
EaseofAccessCenterontheWindowsoperatingsystemenablesuserstoconfiguretheircomputersto
suittheirphysicalandcognitiveneeds.
TouseEaseofAccessCenter,dothefollowing:
1.ClicktheStartbuttontoopentheStartmenu.
2.DependingonyourWindowsversion,dooneofthefollowing:
•ForWindows7:ClickControlPanel.ViewControlPanelusinglargeiconsorsmallicons,and
thenclickEaseofAccessCenter.
•ForWindows10:ClickSettings➙EaseofAccess.
3.Choosetheappropriatetoolbyfollowingtheinstructionsonthescreen.
EaseofAccessCentermainlyincludesthefollowingtools:
•Magnifier
Magnifierisausefulutilitythatenlargestheentirescreenorpartofthescreensothatyoucansee
theitemsbetter.
•Narrator
Narratorisascreenreaderthatreadsaloudwhatisdisplayedonthescreenanddescribeseventssuchas
errormessages.
•On-ScreenKeyboard
Ifyouprefertotypeorenterdataintothecomputerusingamouse,joystick,orotherpointingdevice
insteadofaphysicalkeyboard,youcanuseOn-ScreenKeyboard.On-ScreenKeyboarddisplaysavisual
keyboardwithallthestandardkeys.
•HighContrast
HighContrastisafeaturethatheightensthecolorcontrastofsometextandimagesonyourscreen.Asa
result,thoseitemsaremoredistinctandeasiertoidentify.
•Personalizedkeyboard
Adjustkeyboardsettingstomakeyourkeyboardeasiertouse.Forexample,youcanuseyourkeyboard
tocontrolthepointerandtypecertainkeycombinationseasier.
•Personalizedmouse
Adjustmousesettingstomakeyourmouseeasiertouse.Forexample,youcanchangethepointer
appearanceandmakeiteasiertomanagewindowswiththemouse.
SpeechRecognition
SpeechRecognitionenablesyoutocontrolthecomputerbyvoice.
Usingonlyyourvoice,youcanstartprograms,openmenus,clickobjectsonthescreen,dictatetextinto
documents,andwriteandsende-mails.Everythingyoudowiththekeyboardandmousecanbedonewith
onlyyourvoice.
TouseSpeechRecognition,dothefollowing:
1.DependingonyourWindowsversion,dooneofthefollowing:
•ForWindows7:ClicktheStartbuttontoopentheStartmenu.
•ForWindows10:Right-clicktheStartbuttontoopentheStartcontextmenu.
2.ClickControlPanel.ViewControlPanelusinglargeiconsorsmallicons,andthenclickSpeech
Recognition.
Chapter3.Y ouandyourcomputer29

3.Followtheinstructionsonthescreen.
Screen-readertechnologies
Screen-readertechnologiesareprimarilyfocusedonsoftwareprograminterfaces,helpinformationsystems,
andvariousonlinedocuments.Foradditionalinformationaboutscreenreaders,seethefollowing:
•UsingPDFswithscreenreaders:
http://www.adobe.com/accessibility.html?promoid=DJGVE
•UsingtheJAWSscreenreader:
http://www.freedomscientific.com/jaws-hq.asp
•UsingtheNVDAscreenreader:
http://www.nvaccess.org/
Screenresolution
Youcanmakethetextandimagesonyourscreeneasiertoreadbyadjustingthescreenresolutionofthe
computer.
T oadjustthescreenresolution,dothefollowing:
1.Right-clickablankareaonthedesktop.
2.DependingonyourWindowsversion,dooneofthefollowing:
•ForWindows7:ClickScreenresolution.
•ForWindows10:ClickDisplaysettings.OntheDisplaytab,clickAdvanceddisplaysettings.
3.Followtheinstructionsonthescreen.
Note:Settingtheresolutiontoolowmightpreventsomeitemsfromfittingonthescreen.
Customizableitemsize
Youcanmaketheitemsonyourscreeneasiertoreadbychangingtheitemsize.
•T ochangetheitemsizetemporarily,usetheMagnifiertoolinEaseofAccessCenter.See“Easeof
AccessCenter”onpage29.
•T ochangetheitemsizepermanently,dothefollowing:
–Changethesizeofalltheitemsonyourscreen.
1.Right-clickablankareaonthedesktop.
2.DependingonyourWindowsversion,dooneofthefollowing:
–ForWindows7:ClickScreenresolution➙Maketextandotheritemslargerorsmaller.
–ForWindows10:ClickDisplaysettings.
3.Changetheitemsizebyfollowingtheinstructionsonthescreen.
–ChangethesizeoftheitemsonaWebpage.
PressandholdCtrl,andthenpresstheplus-signkey(+)toenlargeortheminus-signkey(-)to
reducethetextsize.
–Changethesizeoftheitemsonthedesktoporawindow.
Note:Thisfunctionmightnotworkonsomewindows.
Ifyourmousehasawheel,pressandholdCtrl,andthenscrollthewheeltochangetheitemsize.
Industry-standardconnectors
Thecomputerprovidesindustry-standardconnectorsthatenableyoutoconnectassistivedevices.
30ThinkCentreM700zandM800zUserGuide

TTY/TDDconversionmodem
Thecomputersupportstheuseofatexttelephone(TTY)orthetelecommunicationsdeviceforthedeaf(TDD)
conversionmodem.ThemodemmustbeconnectedbetweenthecomputerandaTTY/TDDtelephone.
Then,youcantypeamessageonthecomputerandsendittothetelephone.
Documentationinaccessibleformats
Lenovoprovideselectronicdocumentationinaccessibleformats,suchasproperlytaggedPDFfilesor
HyperT extMarkupLanguage(HTML)files.Lenovoelectronicdocumentationisdevelopedtoensure
thatvisuallyimpaireduserscanreadthedocumentationthroughascreenreader.Eachimageinthe
documentationalsoincludesadequatealternativetextsothatvisuallyimpaireduserscanunderstandthe
imagewhentheyuseascreenreader.
Cleaningthecomputer
CAUTION:
Removeanymediafromthedrivesandturnoffallconnecteddevicesandthecomputer.Then,
disconnectallpowercordsfromelectricaloutletsanddisconnectallcablesthatareconnected
tothecomputer.
Itisagoodpracticetocleanthecomputerperiodicallytoprotectthesurfacesandensuretrouble-free
operation.Useonlymildcleaningsolutionsandadampclothtocleanthepaintedsurfacesofthecomputer.
Dustbuildupcompoundsproblemsassociatedwithglare,soremembertocleanthescreenperiodically.
Wipethescreensurfacegentlywithasoft,drycloth,orblowonthescreentoremovegritandotherloose
particles.Dependingonthetypeofthescreen,moistenasoft,lint-freeclothwithanLCDcleanerorliquid
glasscleanerandthenwipethescreensurface.
Maintenance
Withappropriatecareandmaintenance,thecomputerwillserveyoureliably.Thissectionprovides
informationaboutmaintainingthecomputersothatitcankeepworkingintoporder.
Basicmaintenancetips
Herearesomebasicpointsaboutkeepingthecomputerfunctioningproperly:
•Keepthecomputerinaclean,dryenvironment.Ensurethatthecomputerrestsonaflat,steadysurface.
•Donotcoveranyofairvents.Theseairventsprovideairflowtokeepthecomputerfromoverheating.
•Keepfoodanddrinksawayfromallpartsofthecomputer.Foodparticlesandspillsmightmakethe
keyboardandmousestickandunusable.
•Donotgetthepowerswitchesorothercontrolswet.Moisturecandamagethesepartsandcausean
electricalhazard.
•Alwaysdisconnectapowercordbygraspingthepluginsteadofthecord.
Goodmaintenancepractices
Byperformingafewgoodmaintenancepractices,youcanmaintaingoodcomputerperformance,protect
yourdata,andbepreparedincaseofacomputerfailure.
•Keepthecomputersoftware,devicedrivers,andoperatingsystemup-to-date.See“Keepingthe
computercurrent”onpage32 .
•Emptyyourrecyclebinonaregularbasis.
•CleanoutyourInbox,SentItems,andDeletedItemsfoldersinyoure-mailapplicationonaregularbasis.
Chapter3.Youandyourcomputer31

•Cleanupfilesandfreeupstoragedrivespaceandmemoryspaceoccasionallytopreventperformance
problems.See“Performanceproblems”onpage53 .
•Keepalogbook.Entriesmightincludemajorsoftwareorhardwarechanges,device-driverupdates,
intermittentproblemsandwhatyoudidtoresolvethem,andotherissuesyoumighthaveexperienced.
Thecauseofaproblemmightbechangeinhardware,changeinsoftware,oranyotheractionsthatmight
havetakenplace.AlogbookcanhelpyouoraLenovotechniciandeterminethecauseofaproblem.
•Backupyourdataonthestoragedriveregularly.Youcanrestorethestoragedrivefromabackup.
T obackupyourdata,dooneofthefollowing:
–ForWindows7:OpentheRescueandRecoveryprogram.See“Accessingaprogramonthecomputer”
onpage16 .Formoreinformationaboutbackingupyourdata,refertothehelpsystemoftheprogram.
–ForWindows10:Right-clicktheStartbuttontoopentheStartcontextmenu,andthenclickControl
Panel.ViewControlPanelusinglargeiconsorsmallicons,andthenclickFileHistory.Followthe
instructionsonthescreen.
•Createarecoverymediumasearlyaspossible.Youcanusetherecoverymediumtorecoveryour
operatingsystemevenifWindowsfailstostartup.
T ocreatearecoverymedium,dooneofthefollowing:
–ForWindows7:OpentheCreateRecoveryMediaprogram.See“Accessingaprogramonthe
computer”onpage16 .Formoreinformationaboutcreatingarecoverymedium,refertothehelp
systemoftheprogram.
–ForWindows10:Right-clicktheStartbuttontoopentheStartcontextmenu,andthenclickControl
Panel.ViewControlPanelusinglargeiconsorsmallicons,andthenclickRecovery.Followthe
instructionsonthescreen.
•ForWindows7,createarescuemediumasearlyaspossible.Youcanusetherescuemediumto
recoverfromfailuresthatpreventyoufromgainingaccesstotheRescueandRecoveryworkspace
onyourstoragedrive.
T ocreatearescuemedium,opentheRescueandRecoveryprogram.See“Accessingaprogramonthe
computer”onpage16 .Formoreinformationaboutcreatingarescuemedium,refertothehelpsystem
oftheprogram.
Keepingthecomputercurrent
Inmostcases,itisagoodpracticetohavethemostup-to-dateoperatingsystemupdatepatches,software
programs,anddevicedrivers.Thissectionprovidesinformationabouthowtogetthelatestupdatesforthe
computer.
Gettingthelatestdevicedrivers
Attention:Reinstallingdevicedriverswillchangethecurrentconfigurationofthecomputer.
T ogetthelatestdevicedriversforthecomputer,dooneofthefollowing:
•Downloadthedevicedriversthatarepreinstalledonthecomputer.Gotohttp://www.lenovo.com/drivers.
•UsetheLenovoprogramorWindowsUpdate.See“Gettingthelatestsystemupdates”onpage32.
Note:ThedevicedriversprovidedbyWindowsUpdatemightnotbetestedbyLenovo.Itisrecommended
thatyougetdevicedriversfromLenovo.
Gettingthelatestsystemupdates
T ogetthelatestsystemupdatesforthecomputer,ensurethatthecomputerisconnectedtotheInternet
anddooneofthefollowing:
•UseoneofthefollowingLenovoprogramstogetthesystemupdates:
32ThinkCentreM700zandM800zUserGuide

–ForWindows7:UsetheSystemUpdateprogram.
–ForWindows10:UsetheLenovoCompanionprogram.
ToopentheSystemUpdateorLenovoCompanionprogram,see“ Accessingaprogramonthecomputer”
onpage16.Formoreinformationaboutusingtheprogram,refertothehelpsystemoftheprogram.
•UseWindowsUpdatetogetthesystemupdates.
1.ClicktheStartbuttontoopentheStartmenu.
2.DependingonyourWindowsversion,dooneofthefollowing:
–ForWindows7:ClickControlPanel.ViewControlPanelusinglargeiconsorsmallicons,and
thenclickWindowsUpdate.
–ForWindows10:ClickSettings➙Update&security➙WindowsUpdate.
3.Followtheinstructionsonthescreen.
Movingthecomputer
Beforemovingthecomputer,takethefollowingprecautions:
1.Backupyourdataonthestoragedrive.See“Goodmaintenancepractices”onpage31.
2.Removeanymediafromthedrivesandturnoffallconnecteddevicesandthecomputer.Then,
disconnectallpowercordsfromelectricaloutletsanddisconnectallcablesthatareconnectedtothe
computer.
3.Ifyousavedtheoriginalshippingcartonsandpackingmaterials,usethemtopacktheunits.Ifyouare
usingdifferentcartons,cushiontheunitstoavoiddamage.
Movingthecomputertoanothercountryorregion
Whenyoumovethecomputertoanothercountryorregion,youmusttakelocalelectricalstandardsinto
consideration.Ifthelocalelectricaloutletstyleisdifferentfromthetypeyouarecurrentlyusing,contactthe
LenovoCustomerSupportCentertopurchaseeitheranelectricalplugadapteroranewpowercord.Fora
listofLenovoSupportphonenumbers,gotohttp://www.lenovo.com/support/phone.Ifyoucannotfindthe
supporttelephonenumberforyourcountryorregion,contactyourLenovoreseller.
Chapter3.Y ouandyourcomputer33

34ThinkCentreM700zandM800zUserGuide

Chapter4.Security
Thischaptercontainsthefollowingtopics:
•“Lockingthecomputer”onpage35
•“ViewingandchangingsecuritysettingsintheSetupUtilityprogram”onpage37
•“Preventingunauthorizedaccesstothecomputer”onpage37
•“Usingfingerprintauthentication”onpage38
•“Usingthecoverpresenceswitch”onpage43
•“Usingandunderstandingfirewalls”onpage38
•“Protectingdataagainstviruses”onpage38
•“ComputraceAgentsoftwareembeddedinfirmware”onpage38
•“T rustedPlatformModule(TPM)”onpage39
Lockingthecomputer
Thissectionprovidesinformationaboutlockingthecomputerwiththelockingdevicestokeepthecomputer
safe.
AttachingaKensington-stylecablelock
YoucanuseaKensington-stylecablelocktosecureyourcomputertoadesk,table,orothernon-permanent
fixture.Thecablelockconnectstothesecurity-lockslotattherearofyourcomputer.Dependingonthetype
selected,thecablelockcanbeoperatedwithakeyorcombination.Thecablelockalsolocksthebuttons
usedtoopenthecomputercover.Thisisthesametypeoflockusedwithmanynotebookcomputers.You
canordersuchacablelockdirectlyfromLenovobysearchingforKensingtonat:
http://www.lenovo.com/support
©CopyrightLenovo2015,2016 35

Figure16.Kensington-stylecablelock(forM700z)
36ThinkCentreM700zandM800zUserGuide

Figure17.Kensington-stylecablelock(forM800z)
ViewingandchangingsecuritysettingsintheSetupUtilityprogram
ToviewandchangesecuritysettingsintheSetupUtilityprogram,dothefollowing:
1.StarttheSetupUtilityprogram.See“StartingtheSetupUtilityprogram”onpage41.
2.SelectSecurity.
3.Followtheinstructionsontherightsideofthescreentoviewandchangesecuritysettings.Youcan
referto“UsingtheSetupUtilityprogram”onpage41togetbasicinformationaboutsomemajor
securitysettings.
4.ExittheSetupUtilityprogram.See“ExitingtheSetupUtilityprogram”onpage45.
Preventingunauthorizedaccesstothecomputer
YoucanuseBIOSpasswordsandWindowsaccountstopreventunauthorizedaccesstothecomputerand
data.
•T ouseBIOSpasswords,see“UsingBIOSpasswords”onpage43 .
•T ouseWindowsaccounts,dothefollowing:
1.ClicktheStartbuttontoopentheStartmenu.
2.DependingonyourWindowsversion,dooneofthefollowing:
–ForWindows7:ClickControlPanel➙UserAccounts.
–ForWindows10:ClickSettings➙Accounts.
3.Followtheinstructionsonthescreen.
Chapter4.Security37

Usingfingerprintauthentication
Ifyourkeyboardhasafingerprintreader,youcanusefingerprintauthenticationtoreplacepasswordsfor
simpleandsecureuseraccess.T ousefingerprintauthentication,firstenrollyourfingerprintsandassociate
themwithyourpasswords(suchasthepower-onpassword,harddiskpassword,andWindowspassword).
Usethefingerprintreaderandthefingerprintprogramtocompletethisprocedure.
Tousefingerprintauthentication,dooneofthefollowing:
•ForWindows7:OpentheFingerprintManagerProorThinkVantageFingerprintSoftwareprogram
providedbyLenovo.See“Accessingaprogramonthecomputer”onpage16.Formoreinformation
aboutusingtheprogram,refertothehelpsystemoftheprogram.
•ForWindows10:ClicktheStartbuttontoopentheStartmenu,andthenclickSettings➙Accounts➙
Sign-inoptions.Followtheinstructionsonthescreen.
Tousethefingerprintreader,refertothedocumentationshippedwiththefingerprintkeyboardorlocatedon
theLenovoSupportWebsiteathttp://www.lenovo.com/support/keyboards.
Usingandunderstandingfirewalls
Afirewallcanbehardware,software,oracombinationofbothdependingonthelevelofsecurityrequired.
Firewallsworkonasetofrulestodeterminewhichinboundandoutboundconnectionsareauthorized.Ifthe
computerispreinstalledwithafirewallprogram,ithelpsprotectagainstcomputerInternetsecuritythreats,
unauthorizedaccess,intrusions,andInternetattacks.Italsoprotectsyourprivacy.Formoreinformation
abouthowtousethefirewallprogram,refertothehelpsystemofyourfirewallprogram.
TouseWindowsFirewall,dothefollowing
1.DependingonyourWindowsversion,dooneofthefollowing:
•ForWindows7:ClicktheStartbuttontoopentheStartmenu.
•ForWindows10:Right-clicktheStartbuttontoopentheStartcontextmenu.
2.ClickControlPanel.ViewControlPanelusinglargeiconsorsmallicons,andthenclickWindows
Firewall.
3.Followtheinstructionsonthescreen.
Protectingdataagainstviruses
Thecomputerispreinstalledwithanantivirusprogramtohelpyouguardagainst,detect,andeliminate
viruses.
Lenovoprovidesafullversionofantivirussoftwareonthecomputerwithafree30-daysubscription.After30
days,youmustrenewthelicensetocontinuereceivingtheantivirussoftwareupdates.
Note:Virusdefinitionfilesmustbekeptup-to-datetoguardagainstnewviruses.
Formoreinformationabouthowtouseyourantivirussoftware,refertothehelpsystemofyourantivirus
software.
ComputraceAgentsoftwareembeddedinfirmware
TheComputraceAgentsoftwareisanITassetmanagementandcomputertheftrecoverysolution.The
softwaredetectsifchangeshavebeenmadeonthecomputer,suchashardware,software,orthecomputer
call-inlocation.Y oumighthavetopurchaseasubscriptiontoactivatetheComputraceAgentsoftware.
38ThinkCentreM700zandM800zUserGuide

TrustedPlatformModule(TPM)
TPMisasecurecryptoprocessorthatcanstorecryptographickeysthatprotectinformationstoredinthe
computer.
Chapter4.Security39

40ThinkCentreM700zandM800zUserGuide

Chapter5.Advancedconfiguration
Thischaptercontainsthefollowingtopics:
•“UsingtheSetupUtilityprogram”onpage41
•“UpdatingtheBIOS”onpage45
•“UpdatingtheBIOS”onpage45
UsingtheSetupUtilityprogram
TheSetupUtilityprogramisusedtoviewandchangetheconfigurationsettingsofthecomputer.This
sectionprovidesinformationaboutonlythemajorconfigurationsettingsavailableintheprogram.
Note:TheoperatingsystemsettingsmightoverrideanysimilarsettingsintheSetupUtilityprogram.
StartingtheSetupUtilityprogram
TostarttheSetupUtilityprogram,dothefollowing:
1.Turnonorrestartthecomputer.
2.BeforeWindowsstartsup,repeatedlypressandreleasetheF1keyuntiltheSetupUtilityprogram
opens.IfaBIOSpasswordhasbeenset,theSetupUtilityprogramwillnotopenuntilyouenterthe
correctpassword.Formoreinformation,see“UsingBIOSpasswords”onpage43 .
Note:Forsomekeyboards,youmightneedtopressFn+F1toopentheSetupUtilityprogram.
Toviewandchangetheconfigurationsettings,followtheinstructionsontherightsideofthescreen.The
keysusedtoperformvarioustasksaredisplayedatthebottomofthescreen.
Enablingordisablingadevice
Thissectionprovidesinformationabouthowtoenableordisableuseraccesstohardwaredevices(such
asUSBconnectorsorstoragedrives).
Toenableordisableadevice,dothefollowing:
1.StarttheSetupUtilityprogram.See“StartingtheSetupUtilityprogram”onpage41.
2.SelectDevices.
3.SelectthedeviceyouwanttoenableordisableandpressEnter.
4.SelectthedesiredsettingandpressEnter.
5.ExittheSetupUtilityprogram.See“ExitingtheSetupUtilityprogram”onpage45.
EnablingordisablingtheAutomaticPowerOnfeatures
IfyouenabletheAutomaticPowerOnfeatures,thecomputerwillstartupautomatically.
ToenableordisabletheAutomaticPowerOnfeatures,dothefollowing:
1.StarttheSetupUtilityprogram.See“StartingtheSetupUtilityprogram”onpage41.
2.SelectPower➙AutomaticPowerOnandpressEnter.
3.SelectthefeatureyouwanttoenableordisableandpressEnter.
4.SelectthedesiredsettingandpressEnter.
©CopyrightLenovo2015,2016 41

5.ExittheSetupUtilityprogram.See“ExitingtheSetupUtilityprogram”onpage45.
EnablingordisablingtheErPLPScompliancemode
Lenovocomputersmeettheeco-designrequirementsoftheErPLot3regulation.Formoreinformation,go
to:
http://www.lenovo.com/ecodeclaration
YoucanenabletheErPLPScompliancemodeintheSetupUtilityprogramtoreducetheconsumptionof
electricitywhenthecomputerisofforinsleepmode.
T oenableordisabletheErPLPScompliancemode,dothefollowing:
1.StarttheSetupUtilityprogram.See“StartingtheSetupUtilityprogram”onpage41.
2.SelectPower➙EnhancedPowerSavingModeandpressEnter.
3.DependingonwhetheryouselectEnabledorDisabled,dooneofthefollowing:
•IfyouselectEnabled,pressEnter.Then,disabletheWakeonLANfeature.See“Enablingor
disablingtheAutomaticPowerOnfeatures”onpage41 .
•IfyouselectDisabled,pressEnter.Then,gotothenextstep.
4.ExittheSetupUtilityprogram.See“ExitingtheSetupUtilityprogram”onpage45.
WhentheErPLPScompliancemodeisenabled,youcanwakeupthecomputerbydoingoneofthe
following:
•Pressthepowerbutton.
•EnabletheWakeUponAlarmfeaturetomakethecomputerwakeupatasettime.See“Enablingor
disablingtheAutomaticPowerOnfeatures”onpage41 .
•EnabletheAfterPowerLossfeaturetomakethecomputerwakeupwhenthepowersupplyresumesafter
asuddenlossofelectricity.
1.StarttheSetupUtilityprogram.See“StartingtheSetupUtilityprogram”onpage41.
2.SelectPower➙AfterPowerLossandpressEnter.
3.SelectPowerOnandpressEnter.
4.ExittheSetupUtilityprogram.See“ExitingtheSetupUtilityprogram”onpage45.
ChangingICEPerformanceMode
YoucanadjusttheacousticandthermalperformanceofyourcomputerbychangingtheICEperformance
mode.
T ochangetheICEperformancemode,dothefollowing:
1.StarttheSetupUtilityprogram.See“StartingtheSetupUtilityprogram”onpage41.
2.SelectPower➙IntelligentCoolingEngine(ICE)andpressEnter.
3.SelectICEPerformanceModeandpressEnter.
4.FollowtheinstructionsonthescreentochoosetheappropriateICEperformancemode.
5.ExittheSetupUtilityprogram.See“ExitingtheSetupUtilityprogram”onpage45.
EnablingordisablingtheConfigurationChangeDetectionfeature
IfyouenabletheConfigurationChangeDetectionfeature,whenthePOSTdetectstheconfigurationchanges
ofsomehardwaredevices(suchasstoragedrivesormemorymodules),anerrormessagewillbedisplayed
whenyouturnonthecomputer.
42ThinkCentreM700zandM800zUserGuide

ToenableordisabletheConfigurationChangeDetectionfeature,dothefollowing:
1.StarttheSetupUtilityprogram.See“StartingtheSetupUtilityprogram”onpage41.
2.SelectSecurity➙ConfigurationChangeDetectionandpressEnter.
3.SelectthedesiredsettingandpressEnter.
4.ExittheSetupUtilityprogram.See“ExitingtheSetupUtilityprogram”onpage45.
Tobypasstheerrormessageandlogintotheoperatingsystem,dooneofthefollowing:
•PresstheF2key.
Note:Forsomekeyboards,youmightneedtopressFn+F2tobypasstheerrormessage.
•StartandthenexittheSetupUtilityprogram.See“StartingtheSetupUtilityprogram”onpage41and
“ExitingtheSetupUtilityprogram”onpage45.
Usingthecoverpresenceswitch
Thecoverpresenceswitchpreventsthecomputerfromloggingintotheoperatingsystemwhenthe
computercoverisnotproperlyinstalledorclosed.
Toenablethecover-presence-switchconnectoronthesystemboard,dothefollowing:
1.StarttheSetupUtilityprogram.See“StartingtheSetupUtilityprogram”onpage41.
2.SelectSecurity➙ChassisIntrusionDetectionandpressEnter.
3.SelectEnabledandpressEnter.
4.ExittheSetupUtilityprogram.See“ExitingtheSetupUtilityprogram”onpage45.
Whenthecover-presence-switchconnectoronthesystemboardisenabled,ifthecoverpresenceswitch
detectsthatthecomputercoverisnotcorrectlyinstalledorclosed,anerrormessagewillbedisplayedwhen
youturnonthecomputer.T obypasstheerrormessageandlogintotheoperatingsystem,dothefollowing:
1.Properlyinstallorclosethecomputercover.
2.StartandthenexittheSetupUtilityprogram.See“StartingtheSetupUtilityprogram”onpage41and
“ExitingtheSetupUtilityprogram”onpage45.
UsingBIOSpasswords
ByusingtheSetupUtilityprogram,youcansetpasswordstopreventunauthorizedaccesstothecomputer
anddata.
Youdonothavetosetanypasswordstousethecomputer.However,usingpasswordsimprovescomputer
security.Ifyoudecidetosetanypasswords,readthefollowingtopics.
SetupUtilityprogrampasswordtypes
Thefollowingtypesofpasswordsareavailable:
•Power-onpassword
Whenapower-onpasswordisset,youarepromptedtoenteravalidpasswordeachtimethecomputeris
turnedon.Thecomputercannotbeuseduntilthevalidpasswordisentered.
•Administratorpassword
Settinganadministratorpassworddetersunauthorizedusersfromchangingconfigurationsettings.Ifyou
areresponsibleformaintainingtheconfigurationsettingsofseveralcomputers,youmightwanttoset
anadministratorpassword.
Chapter5.Advancedconfiguration43

Whenanadministratorpasswordisset,youarepromptedtoenteravalidpasswordeachtimeyou
trytoaccesstheSetupUtilityprogram.TheSetupUtilityprogramcannotbeaccesseduntilavalid
passwordisentered.
Ifboththepower-onpasswordandadministratorpasswordareset,youcanentereitherpassword.
However,youmustuseyouradministratorpasswordtochangeanyconfigurationsettings.
•Harddiskpassword
Settingaharddiskpasswordpreventsunauthorizedaccesstothedataonthestoragedrive.Whena
harddiskpasswordisset,youarepromptedtoenteravalidpasswordeachtimeyoutrytoaccess
thestoragedrive.
Notes:
–Afteryousetaharddiskpassword,yourdataonthestoragedriveisprotectedevenifthestoragedrive
isremovedfromonecomputerandinstalledinanother.
–Iftheharddiskpasswordisforgotten,thereisnowaytoresetthepasswordorrecoverdatafrom
thestoragedrive.
Passwordconsiderations
Apasswordcanbeanycombinationofupto64alphabeticandnumericcharacters.Forsecurityreasons,it
isrecommendedtouseastrongpasswordthatcannotbeeasilycompromised.
Note:TheSetupUtilityprogrampasswordsarenotcasesensitive.
Tosetastrongpassword,considerthefollowingguidelines:
•Haveatleasteightcharactersinlength
•Containatleastonealphabeticcharacterandonenumericcharacter
•Notbeyournameoryourusername
•Notbeacommonwordoracommonname
•Besignificantlydifferentfromyourpreviouspasswords
Setting,changing,anddeletingapassword
Toset,change,ordeleteapassword,dothefollowing:
1.StarttheSetupUtilityprogram.See“StartingtheSetupUtilityprogram”onpage41.
2.SelectSecurity.
3.Dependingonthepasswordtype,selectSetPower-OnPassword,SetAdministratorPassword,or
HardDiskPasswordandpressEnter.
4.Followtheinstructionsontherightsideofthescreentoset,change,ordeleteapassword.
Note:Apasswordcanbeanycombinationofupto64alphabeticandnumericcharacters.Formore
information,see“Passwordconsiderations”onpage44 .
5.ExittheSetupUtilityprogram.See“ExitingtheSetupUtilityprogram”onpage45.
Selectingastartupdevice
Ifthecomputerdoesnotstartupfromadeviceasexpected,youcanchoosetochangethestartupdevice
sequencepermanentlyorselectatemporarystartupdevice.
Changingthestartupdevicesequencepermanently
Tochangethestartupdevicesequencepermanently,dothefollowing:
1.Dependingonthetypeofthestoragedevice,dooneofthefollowing:
44ThinkCentreM700zandM800zUserGuide
Produkt Specifikationer
| Mærke: | Lenovo |
| Kategori: | Skrivebord |
| Model: | ThinkCentre M800z |
| Brugervejledning: | Ja |
| Produktfarve: | Sort |
| Produkttype: | All-in-One PC |
| Skærm diagonal: | 21.5 " |
| Skærmopløsning: | 1920 x 1080 pixel |
| Berøringsskærm: | Ingen |
| Wi-Fi: | Ja |
| Bluetooth: | Ja |
| HD-type: | Fuld HD |
| Naturligt aspektforhold: | 16:9 |
| Skærmens lysstyrke: | 250 cd/m² |
| Skærm form: | Flad |
| Indbyggede højttaler(e): | Ja |
| Antal højttalere: | 2 |
| Udgangseffekt (RMS): | 4 W |
| Ethernet LAN-porte (RJ-45): | 1 |
| Antal USB 2.0-porte: | 4 |
| Antal USB 3.2 Gen 1 (3.1 Gen 1) type-A-porte: | 2 |
| Ethernet LAN: | Ja |
| Wi-Fi-standarder: | 802.11a, Wi-Fi 5 (802.11ac), 802.11b, 802.11g, Wi-Fi 4 (802.11n) |
| Processorkerner: | 4 |
| Bredde (uden stativ): | 535 mm |
| Dybde (uden stativ): | 45 mm |
| Højde (uden stativ): | 363 mm |
| Vægt (uden stativ): | 5800 g |
| Bredde (med stativ): | 535 mm |
| Dybde (med stativ): | 253 mm |
| Højde (med stativ): | 431 mm |
| Vægt (med stativ): | 7700 g |
| Ethernet LAN-datahastigheder: | 10,100,1000 Mbit/s |
| Intern hukommelse: | 8 GB |
| Indgangsspænding for vekselstrømsadapter: | 100 - 240 V |
| Frekvens for vekselstrømsadapter: | 50/60 Hz |
| Operativsystem installeret: | Windows 7 Professional |
| Bluetooth-version: | 4.1 |
| Bedste Wi-Fi standard: | Wi-Fi 5 (802.11ac) |
| Indbygget kortlæser: | Ja |
| HDD kapacitet: | 1000 GB |
| LED-baggrundsbelysning: | Ja |
| Indbygget kamera: | Ja |
| Intel® Wireless Display (Intel® WiDi): | Ja |
| Bæredygtighedscertifikater: | RoHS, EPEAT Gold, ENERGY STAR |
| Processorfrekvens: | 2.7 GHz |
| Processorserie: | Intel® Core™ i5 |
| Processor boost frekvens: | 3.3 GHz |
| Processortråde: | 4 |
| Processor-cache: | 6 MB |
| Processor cache type: | Smart cache |
| Intern hukommelsestype: | DDR4-SDRAM |
| Hukommelsesur hastighed: | 2133 Mhz |
| Maksimal intern hukommelse: | 32 GB |
| Hukommelse form faktor: | DIMM/SO-DIMM |
| Samlet lagringskapacitet: | 1000 GB |
| Lagermedie: | HDD |
| Paneltype: | TFT |
| On-board grafikkort, model: | Intel® HD Graphics 530 |
| Diskret grafikadaptermodel: | Ikke tilgængelig |
| On-board grafikkort: | Ja |
| Indbygget grafikadapterfamilie: | Intel® HD Graphics |
| Mikrofonindgang: | Ingen |
| Intel® Hyper Threading Teknologi (Intel® HT Technology): | Ingen |
| Intel® Turbo Boost Teknologi: | 2.0 |
| Vekselstrømsadapter strøm: | 150 W |
| Slot til kabellås: | Ingen |
| Samlet antal megapixels: | 1 MP |
| Hukommelsesstik: | 2 |
| Processorproducent: | Intel |
| Processormodel: | i5-6400 |
| Skærmoverflade: | Mat |
| Antal DisplayPorts: | 1 |
| Mus inkluderet: | Ja |
| Optisk drevtype: | DVD±RW |
| Kombineret hovedtelefon/mikrofon-port: | Ja |
| Trusted Platform Module (TPM): | Ja |
| Enhanced Intel SpeedStep Teknologi: | Ja |
| Udfør deaktivering af bit: | Ja |
| Idle status: | Ja |
| CPU-konfiguration (maks.): | 1 |
| Intel® VT-x with Extended Page Tables (EPT): | Ja |
| Indlejret tilgængelige muligheder: | Ingen |
| Intel® 64: | Ja |
| Intel® Virtualization Technology for Directed I/O (VT-d): | Ja |
| Intel® Software Guard Extensions (Intel® SGX): | Ja |
| Intel® Virtualization Technology (VT-x): | Ja |
| Kameraopløsning: | 1280 x 720 pixel |
| HDD-grænseflade: | SATA III |
| Aftagelig skærm: | Ingen |
| Bus type: | DMI3 |
| Processorgeneration: | 6th gen Intel® Core™ i5 |
| Intel® Flex Memory Access: | Ingen |
| Intel® Trusted Execution Teknologi: | Ingen |
| Intel® Enhanced Halt State: | Ja |
| Intel® TSX-NI: | Ingen |
| Intel® Stabil Billede Platformsprogram (SIPP): | Ingen |
| Intel® klar video teknologi: | Ja |
| Intel® Identity Protection Technology version: | 1.00 |
| Intel® Secure Key Technology version: | 1.00 |
| Intel® Stable Billede Platform Program (SIPP) version: | 0.00 |
| Intel® TSX-NI-version: | 0.00 |
| Konfliktfri processor: | Ja |
| HDD hastighed: | 5400 rpm |
| Processor sokkel: | LGA 1151 (stik H4) |
| Processor litografi: | 14 nm |
| Stepping: | R0 |
| Thermal Design Power (TDP): | 65 W |
| Maksimalt antal PCI Express-kanaler: | 16 |
| PCI Express slots version: | 3.0 |
| PCI Express-konfigurationer: | 1x16, 2x8, 1x8+2x4 |
| Fejlkorrigerende kode understøttet af processor: | Ingen |
| Processor front side bus: | - Mhz |
| Systembus-hastighed: | 8 GT/s |
| Processor driftstilstande: | 64-bit |
| Processor kodenavn: | Skylake |
| FSB Paritet: | Ingen |
| Intel® InTru™ 3D Teknologi: | Ja |
| Intel® Clear Video HD Teknologi (Intel® CVT HD): | Ja |
| Intel® Insider™: | Ja |
| Intel® Sikker Nøgle: | Ja |
| Intel® My WiFi Teknologi (Intel® MWT): | Ingen |
| Intel® Anti-Theft Teknologi (Intel® AT): | Ingen |
| Intel® Identity Protection Teknologi (Intel® IPT): | Ja |
| Intel® Quick Sync Video Teknologi: | Ja |
| Intel® AES Nye Instruktioner (Intel® AES-NI): | Ja |
| Intel® Demand Based Switching: | Ingen |
| Intel® OS Guard: | Ja |
| Termiske overvågningsteknologier: | Ja |
| Intel® Dual Display Capable Teknologi: | Ingen |
| Intel® FDI Teknologi: | Ingen |
| Intel® Rapid Storage Teknologi: | Ingen |
| Intel® Fast Memory Access: | Ingen |
| Intel® Clear Video Teknologi til MID (Intel® CVT for MID): | Ja |
| Processor-pakke størrelse: | 37.5 x 37.5 mm |
| Processor kode: | SR2BY |
| Grafisk og IMC litografi: | 14 nm |
| Processor ARK ID: | 88185 |
| Hukommelseslayout (slots x størrelse): | 1 x 8 GB |
| Antal installerede HDD'er: | 1 |
| Indbygget grafikadapter basefrekvens: | 350 Mhz |
| Indbygget grafikadapter dynamisk frekvens (maks.): | 950 Mhz |
| Intel® segment tagging: | Enterprise, Professional |
| Indbygget grafikadapter-ID: | 1912 |
| Operativsystemets arkitektur: | 64-bit |
| Understøttede instruktionssæt: | SSE4.2, AVX 2.0, SSE4.1 |
| Intel® Smart Cache: | Ja |
| Maksimalt indbygget grafikadapterhukommelse: | 64 GB |
| Indbygget grafikadapter DirectX-version: | 12.0 |
| Bundkort chipsæt: | Intel® H110 |
| Lydchip: | Realtek ALC233 |
| Hukommelses slots type: | SO-DIMM |
| Selvstyret tilstand: | Ingen |
| Antal installerede lagerdiske: | 1 |
| Tastatur inkluderet: | Ja |
| Maksimal intern hukommelse understøttet af processor: | 64 GB |
| Hukommelsestyper understøttet af processor: | DDR3L-SDRAM, DDR4-SDRAM |
| Hukommelsesurhastigheder understøttet af processor: | 2133,1333,1600,1866 Mhz |
| Hukommelsesbåndbredde understøttet af processor (maks.): | 34.1 GB/sek. |
| Hukommelsesspænding understøttet af processor: | 1.35 V |
| Tcase: | 71 °C |
| Indbygget grafikadapter OpenGL-version: | 4.4 |
| Antal understøttede skærme (indbygget grafik): | 3 |
| Skalerbarhed: | 1S |
| Specifikation for termisk opløsning: | PCG 2015C |
| Intel® Small Business Advantage (SBA) version: | 1.00 |
| USB-porte til Sleep-and-Charge: | 1 |
| USB Sleep-and-Charge: | Ja |
| Hukommelseskanaler understøttet af processor: | Dobbelt |
| Gendannelse af operativsystem: | Windows 10 Pro |
| Optisk drevgrænseflade: | SATA |
Har du brug for hjælp?
Hvis du har brug for hjælp til Lenovo ThinkCentre M800z stil et spørgsmål nedenfor, og andre brugere vil svare dig
Skrivebord Lenovo Manualer

23 November 2024
23 November 2024
10 Oktober 2024
10 Oktober 2024
17 September 2024
10 September 2024
9 September 2024
31 August 2024
28 August 2024
13 August 2024
Skrivebord Manualer
- Skrivebord Ikea
- Skrivebord Acer
- Skrivebord Sony
- Skrivebord Samsung
- Skrivebord Panasonic
- Skrivebord Apple
- Skrivebord Sharp
- Skrivebord HP
- Skrivebord Asus
- Skrivebord Gigabyte
- Skrivebord Toshiba
- Skrivebord InFocus
- Skrivebord Asrock
- Skrivebord Butler
- Skrivebord Optoma
- Skrivebord Zaor
- Skrivebord JYSK
- Skrivebord Parisot
- Skrivebord United Office
- Skrivebord Razer
- Skrivebord Medion
- Skrivebord Haier
- Skrivebord Seagate
- Skrivebord Vtech
- Skrivebord Tripp Lite
- Skrivebord Packard Bell
- Skrivebord Microsoft
- Skrivebord Fellowes
- Skrivebord Digitus
- Skrivebord Genesis
- Skrivebord Techly
- Skrivebord Viewsonic
- Skrivebord Dell
- Skrivebord ELO
- Skrivebord Fujitsu
- Skrivebord Cooler Master
- Skrivebord MSI
- Skrivebord NEC
- Skrivebord Bush
- Skrivebord TrekStor
- Skrivebord ECS
- Skrivebord SPC
- Skrivebord ZTE
- Skrivebord Kobo
- Skrivebord Kramer
- Skrivebord Onyx
- Skrivebord Vorago
- Skrivebord EMachines
- Skrivebord Axis
- Skrivebord Faytech
- Skrivebord Intel
- Skrivebord Sharkoon
- Skrivebord Supermicro
- Skrivebord BDI
- Skrivebord Kogan
- Skrivebord LC-Power
- Skrivebord Planar
- Skrivebord Overdrive
- Skrivebord Zotac
- Skrivebord Moxa
- Skrivebord Alienware
- Skrivebord Aeris
- Skrivebord Maxdata
- Skrivebord Targa
- Skrivebord Peaq
- Skrivebord Shuttle
- Skrivebord Promethean
- Skrivebord Foxconn
- Skrivebord Ibm
- Skrivebord Advantech
- Skrivebord Pelco
- Skrivebord Xtech
- Skrivebord MP
- Skrivebord Elitegroup
- Skrivebord X Rocker
- Skrivebord Smart Things
- Skrivebord System76
- Skrivebord Zoostorm
- Skrivebord Bestar
- Skrivebord Cybernet
- Skrivebord Altra
- Skrivebord Dell Wyse
- Skrivebord AOpen
- Skrivebord ProDVX
- Skrivebord NComputing
- Skrivebord MvixUSA
- Skrivebord Seville Classics
- Skrivebord AIS
- Skrivebord Wyse
- Skrivebord Mount-It!
Nyeste Skrivebord Manualer

1 April 2025
4 Marts 2025

18 Februar 2025

15 Februar 2025
14 Februar 2025
14 Februar 2025
14 Februar 2025
14 Februar 2025

10 Januar 2025
6 Januar 2025