Lexmark C734 Manual
Læs nedenfor 📖 manual på dansk for Lexmark C734 (216 sider) i kategorien Printer. Denne guide var nyttig for 7 personer og blev bedømt med 4.5 stjerner i gennemsnit af 2 brugere
Side 1/216

C734 and C736 Series
User's Guide
www.lexmark.com
Machine types/model numbers:
5026: 210, 230, 280, 410, 430, 480
4976: n01, n02, n03, gn1, gn2, dn1, dn2, dn3, gd1, gd2, dw1, dw2, gw1, gw2
4977: n01, n02, n03, gn1, gn2, dn1, dn2, dn3, gd1, gd2

Contents
Safety information.............................................................................9
Learning about the printer.............................................................11
Finding information about the printer 11........................................................................................................................
Selecting a location for the printer 12...............................................................................................................................
Printer configurations 13........................................................................................................................................................
Using the security lock feature 15.......................................................................................................................................
Understanding the printer control panel 15...................................................................................................................
Additional printer setup..................................................................17
Installing internal options 17................................................................................................................................................
Available internal options............................................................................................................................................................ 17
Accessing the system board to install internal options.................................................................................................... 18
Installing a memory card ............................................................................................................................................................. 19
Installing a flash memory or firmware card........................................................................................................................... 21
Installing an Internal Solutions Port......................................................................................................................................... 23
Installing a printer hard disk ....................................................................................................................................................... 29
Reattaching the system board cover....................................................................................................................................... 32
Attaching cables 33..................................................................................................................................................................
Installing optional trays 35.....................................................................................................................................................
Verifying printer setup 37.......................................................................................................................................................
Printing a menu settings page................................................................................................................................................... 37
Printing a network setup page .................................................................................................................................................. 37
Setting up the printer software 37......................................................................................................................................
Installing printer software ........................................................................................................................................................... 37
Updating available options in the printer driver................................................................................................................. 38
Setting up wireless printing.............................................................................................................................................39
Information you will need to set up the printer on a wireless network...................................................................... 39
Installing the printer on a wireless network (Windows) ................................................................................................... 40
Installing the printer on a wireless network (Macintosh)................................................................................................. 41
Installing the printer on a wired network 44...................................................................................................................
Changing port settings after installing a new network Internal Solutions Port 46...........................................
Setting up serial printing 48..................................................................................................................................................
Minimizing your printer's environmental impact.....................50
Saving paper and toner 50.....................................................................................................................................................
Using recycled paper..................................................................................................................................................................... 50
Conserving supplies.......................................................................................................................................................................50
Contents
2

Saving energy 51.......................................................................................................................................................................
Using Eco-Mode .............................................................................................................................................................................. 51
Reducing printer noise ................................................................................................................................................................. 52
Adjusting Power Saver.................................................................................................................................................................. 52
Adjusting the brightness of the display ................................................................................................................................. 53
Recycling.................................................................................................................................................................................54
Recycling Lexmark products....................................................................................................................................................... 54
Recycling Lexmark packaging.................................................................................................................................................... 54
Returning Lexmark cartridges for reuse or recycling......................................................................................................... 54
Loading paper and specialty media.............................................55
Setting the paper size and type 55.....................................................................................................................................
Loading the paper tray 55......................................................................................................................................................
Loading the multipurpose tray.......................................................................................................................................58
Linking and unlinking trays 61.............................................................................................................................................
Linking trays...................................................................................................................................................................................... 61
Unlinking trays................................................................................................................................................................................. 61
Paper and specialty media guide..................................................63
Paper guidelines 63..................................................................................................................................................................
Paper characteristics...................................................................................................................................................................... 63
Unacceptable paper ...................................................................................................................................................................... 64
Selecting paper................................................................................................................................................................................ 64
Selecting preprinted forms and letterhead........................................................................................................................... 64
Using recycled paper and other office papers ..................................................................................................................... 65
Storing paper 65........................................................................................................................................................................
Supported paper sizes, types, and weights 66...............................................................................................................
Supported paper sizes .................................................................................................................................................................. 66
Supported paper types and weights....................................................................................................................................... 67
Printing...............................................................................................69
Printing a document 69..........................................................................................................................................................
Printing a document...................................................................................................................................................................... 69
Printing specialty documents 69.........................................................................................................................................
Printing on letterhead................................................................................................................................................................... 69
Tips on using transparencies...................................................................................................................................................... 70
Tips on using envelopes............................................................................................................................................................... 71
Tips on using labels........................................................................................................................................................................ 71
Tips on using card stock............................................................................................................................................................... 72
Printing confidential and other held jobs...................................................................................................................72
Holding jobs in the printer.......................................................................................................................................................... 72
Printing confidential and other held jobs.............................................................................................................................. 73
Contents
3

Printing from a flash drive 75................................................................................................................................................
Printing photos from a PictBridge-enabled digital camera 76.................................................................................
Printing information pages 76..............................................................................................................................................
Printing a font sample list............................................................................................................................................................ 76
Printing a directory list.................................................................................................................................................................. 77
Printing the print quality test pages........................................................................................................................................ 77
Canceling a print job 77..........................................................................................................................................................
Canceling a print job from the printer control panel ........................................................................................................ 77
Canceling a print job from the computer.............................................................................................................................. 77
Printing in black and white 78..............................................................................................................................................
Using Max Speed and Max Yield 79....................................................................................................................................
Clearing jams.....................................................................................80
Avoiding jams 80.......................................................................................................................................................................
Understanding jam messages 80........................................................................................................................................
200 paper jams 81.....................................................................................................................................................................
200 or 201 paper jam 82.........................................................................................................................................................
201 paper jam 83.......................................................................................................................................................................
202 paper jam 84.......................................................................................................................................................................
203 paper jam 86.......................................................................................................................................................................
230 paper jam 87.......................................................................................................................................................................
240 paper jam 88.......................................................................................................................................................................
250 paper jam 90.......................................................................................................................................................................
Understanding printer menus.......................................................91
Menus list................................................................................................................................................................................91
Supplies menu 92......................................................................................................................................................................
Paper menu 93...........................................................................................................................................................................
Default Source menu.....................................................................................................................................................................93
Paper Size/Type menu.................................................................................................................................................................. 93
Configure MP menu....................................................................................................................................................................... 96
Substitute Size menu..................................................................................................................................................................... 96
Paper Texture menu ...................................................................................................................................................................... 97
Paper Weight menu....................................................................................................................................................................... 98
Paper Loading menu...................................................................................................................................................................100
Custom Types menu....................................................................................................................................................................101
Universal Setup menu.................................................................................................................................................................101
Reports menu 102.....................................................................................................................................................................
Reports menu.................................................................................................................................................................................102
Network/Ports menu 103.......................................................................................................................................................
Contents
4

Active NIC menu............................................................................................................................................................................103
Standard Network or Network <x> menus .........................................................................................................................103
Network Reports menu ..............................................................................................................................................................105
Network Card menu.....................................................................................................................................................................106
TCP/IP menu ...................................................................................................................................................................................106
IPv6 menu........................................................................................................................................................................................107
Wireless menu................................................................................................................................................................................108
AppleTalk menu ............................................................................................................................................................................108
NetWare menu...............................................................................................................................................................................109
LexLink menu.................................................................................................................................................................................110
Standard USB and USB <x> menus........................................................................................................................................110
Parallel <x> menu.........................................................................................................................................................................112
Serial <x> menu ............................................................................................................................................................................114
SMTP Setup menu ........................................................................................................................................................................116
Security menu 117....................................................................................................................................................................
Miscellaneous menu....................................................................................................................................................................117
Confidential Print menu.............................................................................................................................................................118
Disk Wiping menu........................................................................................................................................................................119
Security Audit Log menu ...........................................................................................................................................................120
Set Date/Time menu....................................................................................................................................................................121
Settings menu 121....................................................................................................................................................................
General Settings menu...............................................................................................................................................................121
Setup menu ....................................................................................................................................................................................125
Finishing menu..............................................................................................................................................................................127
Quality menu..................................................................................................................................................................................128
Utilities menu.................................................................................................................................................................................132
XPS menu.........................................................................................................................................................................................133
PDF menu........................................................................................................................................................................................133
PostScript menu............................................................................................................................................................................133
PCL Emul menu .............................................................................................................................................................................134
HTML menu.....................................................................................................................................................................................137
Image menu....................................................................................................................................................................................138
PictBridge menu............................................................................................................................................................................139
Flash Drive menu ..........................................................................................................................................................................139
Help menu 141...........................................................................................................................................................................
Understanding printer messages...............................................143
List of status and error messages 143................................................................................................................................
Maintaining the printer.................................................................157
Cleaning the exterior of the printer............................................................................................................................157
Cleaning the printhead lenses 157.....................................................................................................................................
Storing supplies 159.................................................................................................................................................................
Contents
5

Checking the status of supplies 159...................................................................................................................................
Checking the status of supplies from the printer control panel..................................................................................159
Checking the status of supplies from a network computer..........................................................................................160
Ordering supplies..............................................................................................................................................................160
Ordering toner cartridges..........................................................................................................................................................160
Ordering photoconductors.......................................................................................................................................................160
Ordering a fuser or a transfer module...................................................................................................................................160
Ordering a waste toner box ......................................................................................................................................................161
Replacing Supplies 162...........................................................................................................................................................
Replacing a photoconductor ...................................................................................................................................................162
Replacing a toner cartridge.......................................................................................................................................................165
Replacing the waste toner box................................................................................................................................................169
Moving the printer............................................................................................................................................................170
Before moving the printer.........................................................................................................................................................170
Moving the printer to another location................................................................................................................................171
Setting the printer up in a new location ..............................................................................................................................171
Shipping the printer ....................................................................................................................................................................172
Administrative support.................................................................173
Finding advanced networking and administrator information 173.......................................................................
Using the Embedded Web Server 173...............................................................................................................................
Checking the virtual display 173..........................................................................................................................................
Checking the device status............................................................................................................................................174
Setting up e-mail alerts 174...................................................................................................................................................
Viewing reports..................................................................................................................................................................174
Restoring the factory default settings 175.......................................................................................................................
Troubleshooting.............................................................................176
Checking an unresponsive printer..............................................................................................................................176
Solving printing problems 176.............................................................................................................................................
Multiple-language PDFs do not print....................................................................................................................................176
Printer control panel display is blank or displays only diamonds...............................................................................176
Error message about reading USB drive appears..............................................................................................................176
Jobs do not print...........................................................................................................................................................................176
Confidential and other held jobs do not print...................................................................................................................177
Job takes longer than expected to print..............................................................................................................................178
Job prints from the wrong tray or on the wrong paper .................................................................................................178
Incorrect characters print...........................................................................................................................................................178
Tray linking does not work........................................................................................................................................................178
Large jobs do not collate ...........................................................................................................................................................179
Unexpected page breaks occur...............................................................................................................................................179
Contents
6

Contacting Customer Support 19.....................................................................................................................................
Notices..............................................................................................194
Product information.........................................................................................................................................................
Edition notice..................................................................................................................................................................
Power consumption.........................................................................................................................................................
Index.................................................................................................211
Contents
8

Safety information
Connect the power supply cord to a properly grounded electrical outlet that is near the product and easily accessible.
CAUTION—POTENTIAL INJURY: Do not twist, bind, crush, or place heavy objects on the power cord. Do not
subject the power cord to abrasion or stress. Do not pinch the power cord between objects such as furniture
and walls. If the power cord is misused, a risk of fire or electrical shock results. Inspect the power cord regularly
for signs of misuse. Remove the power cord from the electrical outlet before inspecting it.
Do not place or use this product near water or wet locations.
Use only the power cord provided with this product or the manufacturer's authorized replacement.
Refer service or repairs, other than those described in the user documentation, to a professional service person.
CAUTION—SHOCK HAZARD: Do not use the fax feature during a lightning storm. Do not set up this product
or make any electrical or cabling connections, such as the power supply cord or telephone, during a lightning
storm.
This product is designed, tested, and approved to meet strict global safety standards with the use of specific
manufacturer's components. The safety features of some parts may not always be obvious. The manufacturer is not
responsible for the use of other replacement parts.
CAUTION—SHOCK HAZARD: Make sure that all external connections (such as Ethernet and telephone system
connections) are properly installed in their marked plug-in ports.
CAUTION—POTENTIAL INJURY: This product uses a laser. Use of controls or adjustments or performance of
procedures other than those specified herein may result in hazardous radiation exposure.
This product uses a printing process that heats the print media, and the heat may cause the media to release emissions.
You must understand the section in your operating instructions that discusses the guidelines for selecting print media
to avoid the possibility of harmful emissions.
CAUTION—HOT SURFACE: The fuser and the inside of the printer near the fuser may be hot. Wait for the fuser
to cool before clearing jams from this area.
Safety information
9

This product contains a lithium battery.
CAUTION—POTENTIAL INJURY: There is a risk of explosion if the battery is replaced with an incorrect type.
Discard used batteries according to the battery manufacturer’s instructions and local regulations.
CAUTION—SHOCK HAZARD: If you are installing memory or option cards sometime after setting up the printer,
turn the printer off and unplug the power cord from the wall outlet before continuing. If you have any other
devices attached to the printer, turn them off as well and unplug any cables going to the printer.
CAUTION—SHOCK HAZARD: If you are installing an optional tray after setting up the printer, then turn the
printer off and unplug the power cord, the USB cable, and the Ethernet cable before continuing.
CAUTION—SHOCK HAZARD: If you are installing an Internal Solutions Port (ISP) after setting up the printer,
then turn the printer off and unplug the power cord from the wall outlet before continuing.
CAUTION—SHOCK HAZARD: To avoid the risk of electric shock when cleaning the exterior of the printer, unplug
the power cord from the wall outlet and disconnect all cables from the printer before proceeding.
CAUTION—TIPPING HAZARD: Floor-mounted configurations require additional furniture for stability. You
must use either a printer stand or printer base if you are using a high-capacity input tray, a duplex unit and an
input option, or more than one input option. If you purchased a multifunction printer (MFP) that scans, copies,
and faxes, you may need additional furniture. For more information, see
www.lexmark.com/multifunctionprinters.
CAUTION—POTENTIAL INJURY: The printer weight is greater than 18 kg (40 lb) and requires two or more
trained personnel to lift it safely.
Safety information
10

Learning about the printer
Finding information about the printer
Setup
information
Description Where to find
The Setup information gives you instructions for setting
up the printer. Follow the set of instructions for local,
network, or wireless, depending on what you need.
You can find the information in the printer box or on theSetup
Lexmark Web site at .www.lexmark.com
Wireless Setup Guide
Description Where to find
If your printer has built-in wireless functionality, a
Wireless Setup Guide gives you instructions for
connecting the printer wirelessly.
You can find the in the printer box or onWireless Setup Guide
the Lexmark Web site at .www.lexmark.com
Help
Description Where to find
The Help gives you instructions for using the software. While in any Lexmark software program, click , Help Tips ª
ª
ª
ªª
Help Help Help Topics, or ª
ª
ª
ªª .
Customer support
Description Where to find (North America) Where to find (rest of world)
Telephone support Call us at
•US: 1-800-332-4120
Monday–Friday (8:00 AM–11:00 PM ET)
Saturday (Noon–6:00 PM ET)
•Canada: 1-800-539-6275
Monday–Friday (8:00 AM–11:00 PM ET)
Saturday (Noon–6:00 PM ET)
•Mexico: 001-888-377-0063
Monday–Friday (8:00 AM–8:00 PM ET)
Note: Telephone numbers and support
times may change without notice. For the
most recent telephone numbers available,
see the printed warranty statement that
came with your printer.
Telephone numbers and support hours
vary by country or region.
Visit our Web site at .www.lexmark.com
Select a country or region, and then select
the Customer Support link.
Note: For additional information about
contacting Lexmark, see the printed
warranty that came with your printer.
Learning about the printer
11

Description Where to find (North America) Where to find (rest of world)
E-mail support For e-mail support, visit our Web site:
www.lexmark.com.
1Click .SUPPORT
2Click .Technical Support
3Select your printer type.
4Select your printer model.
5From the Support Tools section, click
e-Mail Support.
6Complete the form, and then click
Submit Request.
E-mail support varies by country or region,
and may not be available in some
instances.
Visit our Web site at www.lexmark.com.
Select a country or region, and then select
the Customer Support link.
Note: For additional information about
contacting Lexmark, see the printed
warranty that came with your printer.
Selecting a location for the printer
When selecting a location for the printer, leave enough room to open trays, covers, and doors. If you plan to install
any options, leave enough room for them also. It is important to:
•Make sure airflow in the room meets the latest revision of the ASHRAE 62 standard.
•Provide a flat, sturdy, and stable surface.
•Keep the printer:
–Away from the direct airflow of air conditioners, heaters, or ventilators
–Free from direct sunlight, humidity extremes, or temperature fluctuations
–Clean, dry, and free of dust
•Allow the following recommended amount of space around the printer for proper ventilation:
1152.4 mm (6.0 in.)
2101.6 mm (4.0 in.)
3609.6 mm (24.0 in.)
Learning about the printer
12

4101.6 mm (4.0 in.)
5304.8 mm (12.0 in.)
When the printer is set up, allow clearance around it as shown.
Printer configurations
Basic model
1Standard exit bin
2Paper support
3Printer control panel
4Standard 550-sheet tray (Tray 1)
5Multipurpose tray
Configured models
CAUTION—TIPPING HAZARD: Floor-mounted configurations require additional furniture for stability. You
must use either a printer stand or printer base if you are using a high-capacity input tray, a duplex unit and an
input option, or more than one input option. If you purchased a multifunction printer (MFP) that scans, copies,
and faxes, you may need additional furniture. For more information, see
www.lexmark.com/multifunctionprinters.
Learning about the printer
13

1Standard exit bin
2Paper support
3Printer control panel
4Optional 550-sheet specialty media drawer
5Optional 550-sheet tray
6Optional 2,000-sheet tray
7Standard 550-sheet tray (Tray 1)
8Multipurpose tray
Learning about the printer
14

Using the security lock feature
The printer is equipped with a security lock feature. When a lock compatible with most laptop computers is attached,
the printer is locked. Once locked, the metal plate and the system board cannot be removed. Attach a security lock
to the printer in the location shown.
Understanding the printer control panel
Control panel item Description
1Display The display shows messages and pictures that communicate the status
of the printer.
2Select Pressing initiates action on a menu item.
Learning about the printer
15

Control panel item Description
3Navigation buttons Press the up or down arrow button to scroll through menu lists.
Press the left or right arrow button to scroll through values or text that
rolls to another screen.
4Numeric keypad Consists of the numbers 0–9, characters A through Z, an , and a
backspace button.
Note: The button functions as Caps Lock, and includes the # character.
5Back Returns the display to the previous screen
6Indicator light Indicates the printer status:
•Off—The power is off, or the printer is in Eco Mode.
•Blinking green—The printer is warming up, processing data, or
printing.
•Solid green—The printer is on, but idle.
•Solid red—Operator intervention is needed.
7Stop Stops all printer activity
A list of options is offered once appears on the display.Stopped
8Menus Opens the menus index
Note: These menus are available only when the printer is in the Ready
state.
9USB Direct port Insert a USB flash drive to send data to the printer.
Insert a USB cable from a digital camera to print photos with a PictBridge–
enabled digital camera.
Learning about the printer
16

Accessing the system board to install internal options
CAUTION—SHOCK HAZARD: If you are installing memory or option cards sometime after setting up the printer,
then turn the printer off and unplug the power cord from the wall outlet before continuing. If you have any other
devices attached to the printer, then turn them off as well, and unplug any cables going to the printer.
Note: This operation requires a flathead screwdriver.
1Remove the cover.
aTurn the screws on the cover counterclockwise to loosen them, but do not remove them.
bSlide the cover up until each screw is in the keyhole.
cPull the cover forward to remove it.
Additional printer setup
18

2Use the following illustration to locate the appropriate connector.
Warning—Potential Damage: System board electrical components are easily damaged by static electricity.
Touch something metal on the printer before touching any system board electronic components or connectors.
1Firmware and flash memory card connectors
2Hard disk connector
3Internal print server connector
4Memory card connector
5Dust cover
Installing a memory card
CAUTION—SHOCK HAZARD: If you are installing memory or option cards sometime after setting up the printer,
then turn the printer off and unplug the power cord from the wall outlet before continuing. If you have any other
devices attached to the printer, then turn them off as well and unplug any cables going to the printer.
Warning—Potential Damage: System board electrical components are easily damaged by static electricity. Touch
something metal on the printer before touching any system board electronic components or connectors.
An optional memory card can be purchased separately and attached to the system board. To install the memory
card:
1Access the system board.
2Unpack the memory card.
Note: Avoid touching the connection point along the edge of the card.
Additional printer setup
19

3Open the memory card connector latches.
4Align the notch on the memory card with the ridge on the connector.
1Notch
2Ridge
Additional printer setup
20

5Push the memory card straight into the connector until it into place.snaps
6Reattach the system board cover.
Installing a flash memory or firmware card
The system board has two connections for an optional flash memory or firmware card. Only one of each may be
installed, but the connectors are interchangeable.
CAUTION—SHOCK HAZARD: If you are installing memory or option cards sometime after setting up the printer,
then turn the printer off and unplug the power cord from the wall outlet before continuing. If you have any other
devices attached to the printer, then turn them off as well, and unplug any cables going to the printer.
Warning—Potential Damage: System board electronic components are easily damaged by static electricity. Touch
something metal on the printer before touching any system board electronic components or connectors.
1Access the system board.
2Unpack the card.
Note: Avoid touching the connection points along the edge of the card.
Additional printer setup
21
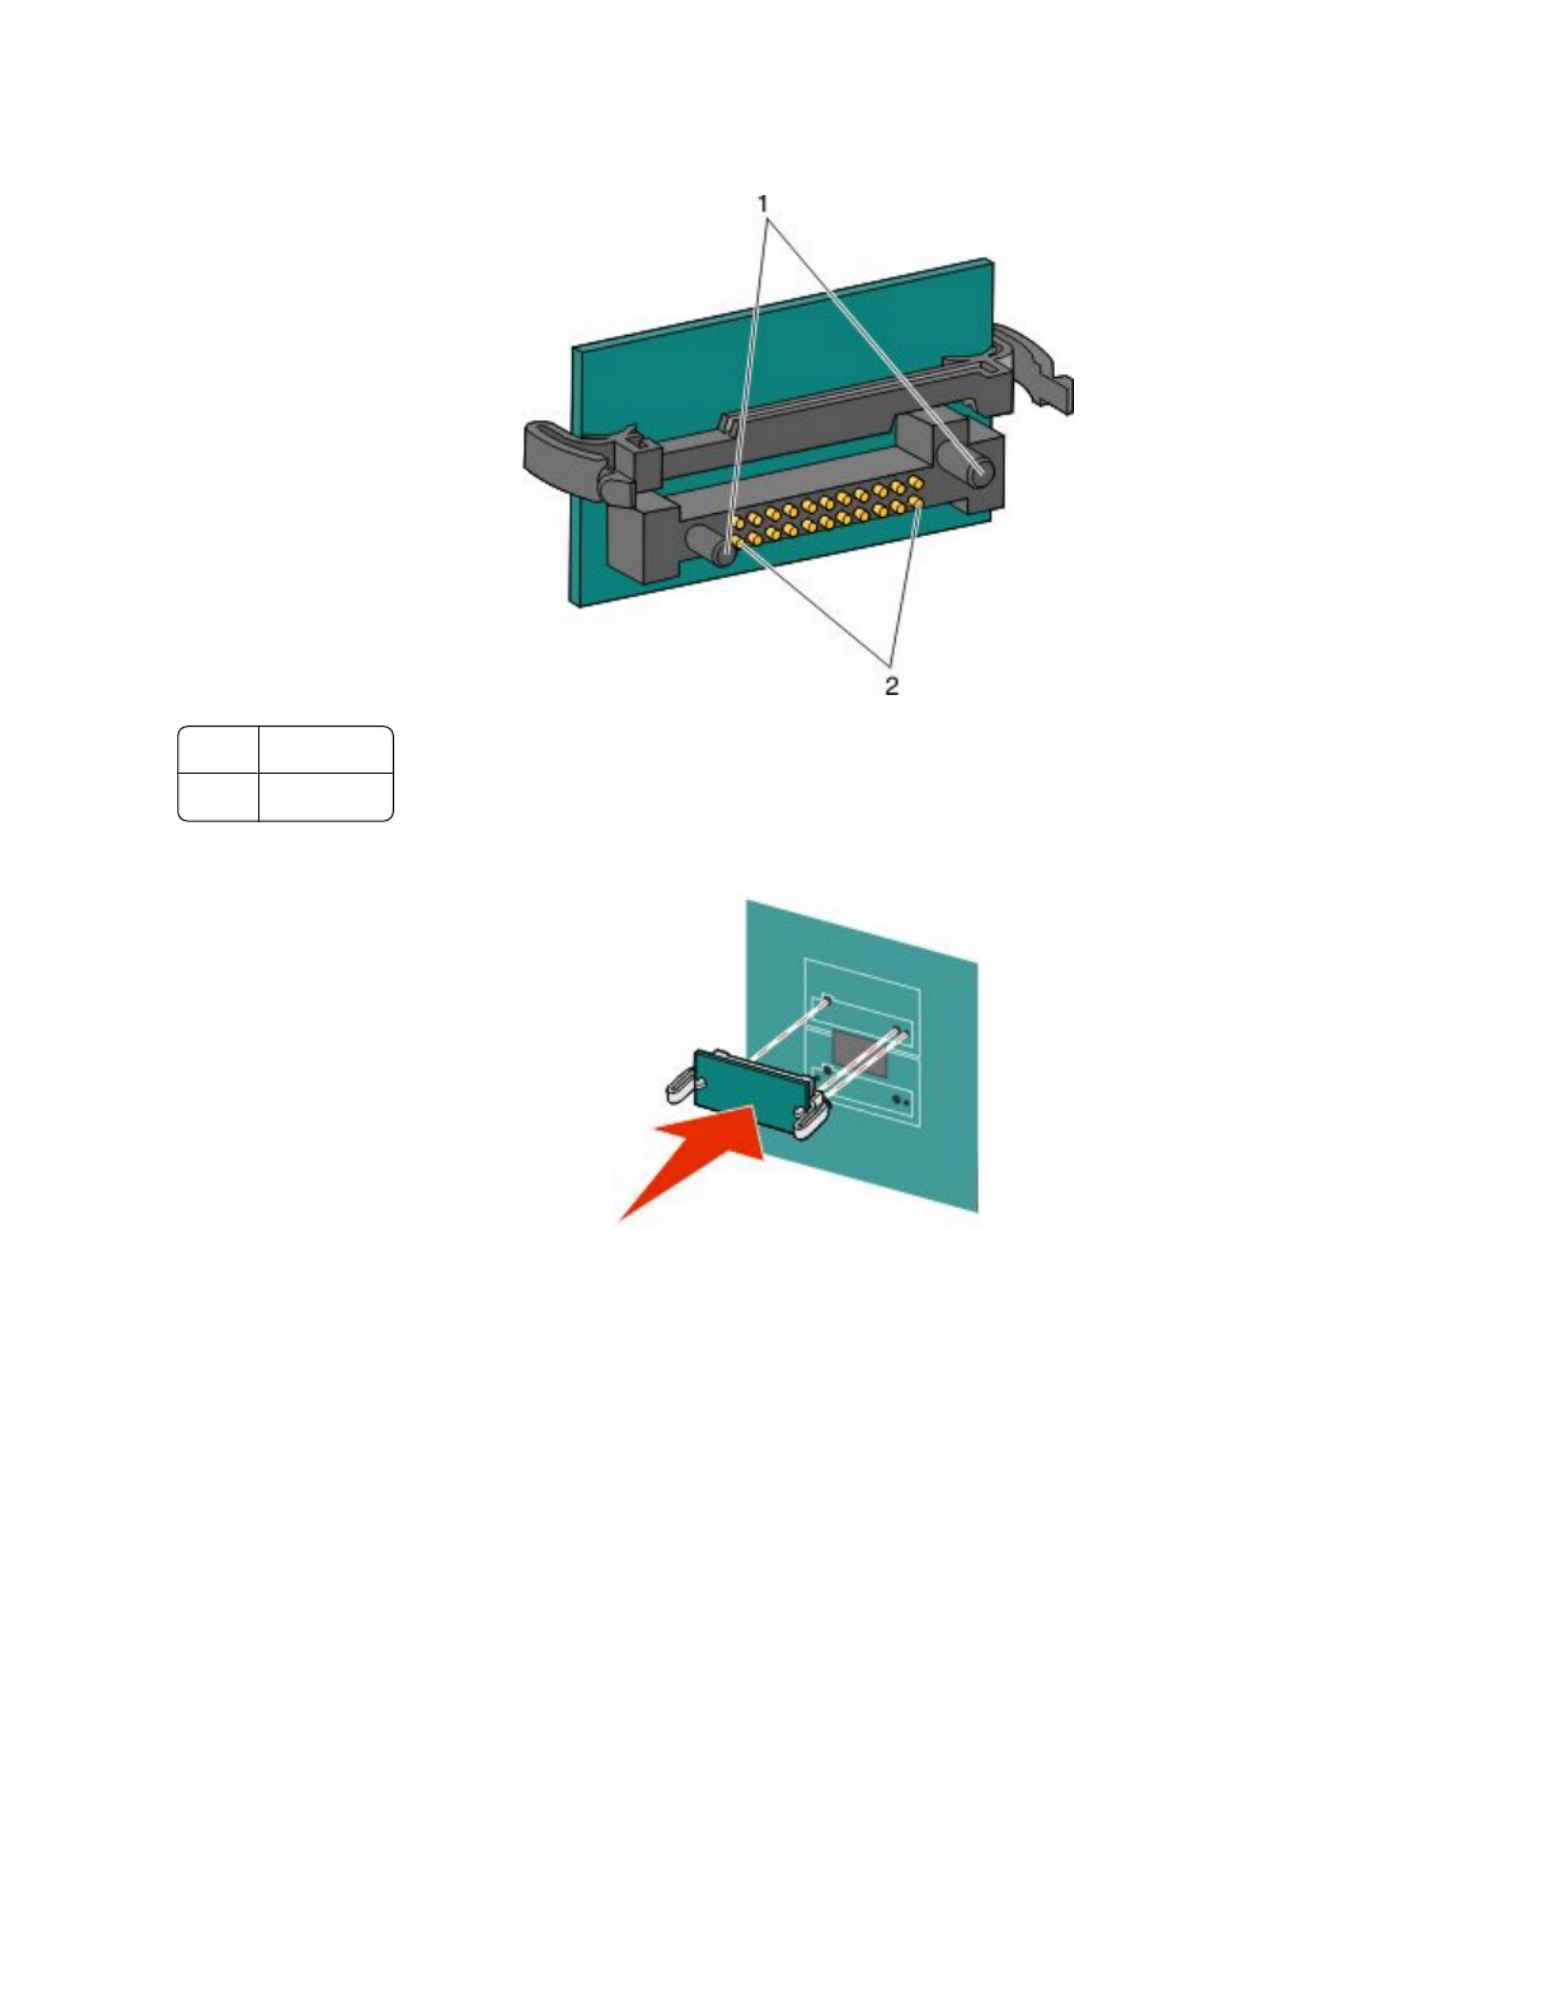
3Holding the card by its sides, align the plastic pins on the card with the holes on the system board.
1Plastic pins
2Metal pins
4Push the card firmly into place.
Notes:
•The entire length of the connector on the card must touch and be flush against the system board.
•Be careful not to damage the connectors.
5Reattach the system board cover.
Additional printer setup
22

Installing an Internal Solutions Port
The system board supports one optional Lexmark Internal Solutions Port (ISP).
Note: This task requires a flathead screwdriver.
CAUTION—SHOCK HAZARD: If you are installing an Internal Solutions Port (ISP) after setting up the printer,
then turn the printer off and unplug the power cord from the wall outlet before continuing.
Warning—Potential Damage: System board electronic components are easily damaged by static electricity. Touch
something metal on the printer before touching any system board electronic components or connectors.
1Access the system board.
2Unpack the ISP and plastic tee.
Note: Avoid touching the components on the card.
3Locate the appropriate connector on the system board.
Note: If an optional printer hard disk is currently installed, then it must first be removed. To remove the printer
hard disk:
Additional printer setup
23

aUnplug the printer hard disk interface cable from the system board, leaving the cable attached to the printer
hard disk. To unplug the cable, squeeze the paddle at the plug of the interface cable to disengage the latch
before pulling the cable out.
bRemove the screws holding the printer hard disk in place.
Additional printer setup
24

cRemove the printer hard disk by pulling it upward to unseat the standoffs.
dRemove the thumbscrews that attach the printer hard disk mounting bracket to the printer hard disk, and
then remove the bracket. Set the printer hard disk aside.
4Remove the metal cover from the ISP opening.
Additional printer setup
25

5Align the posts of the plastic tee to the holes in the system board, and press downward until the tee intosnaps
place. Be sure each post of the tee has latched completely, and the tee is seated firmly on the system board.
6Install the ISP on the plastic tee. Angle the ISP over the plastic tee, and approach the plastic tee so that any
overhanging connectors will pass through the ISP opening in the system board cage.
Additional printer setup
26

7Lower the ISP toward the plastic tee until the ISP is seated between the guides of the plastic tee.
8Insert the long thumbscrew and turn it clockwise enough to hold the ISP in place, but do not tighten the
thumbscrew at this time.
Additional printer setup
27

9Attach the two provided screws to secure the ISP mounting bracket to the system board cage.
10 Tighten the long thumbscrew.
Warning—Potential Damage: Do not overtighten the thumbscrew.
11 Insert the plug of the ISP interface cable into the receptacle of the system board.
Note: The plugs and receptacles are color-coded.
12 Reattach the system board cover.
Additional printer setup
28

Installing a printer hard disk
The optional printer hard disk can be installed with or without a Lexmark Internal Solutions Port (ISP).
Note: This task requires a flathead screwdriver.
CAUTION—SHOCK HAZARD: If you are installing an Internal Solutions Port (ISP) after setting up the printer,
then turn the printer off and unplug the power cord from the wall outlet before continuing.
Warning—Potential Damage: System board electronic components are easily damaged by static electricity. Touch
something metal on the printer before touching any system board electronic components or connectors.
1Access the system board.
2Unpack the printer hard disk.
Note: Avoid touching the components on the card.
3Locate the appropriate connector on the system board.
Note: If an optional ISP is currently installed, then the printer hard disk must be installed onto the ISP.
To install a printer hard disk onto the ISP:
aUsing a flathead screwdriver to loosen the screws, remove the thumbscrews that attach the printer hard disk
mounting bracket to the printer hard disk, and then remove the bracket.
Additional printer setup
29

bAlign the standoffs of the printer hard disk with the holes in the ISP, and then press downward on the printer
hard disk until the standoffs have seated into place.
cInsert the plug of the printer hard disk interface cable into the receptacle of the ISP.
Note: The plugs and receptacles are color-coded.
Additional printer setup
30

4Reattach the system board cover.
Reattaching the system board cover
Warning—Potential Damage: System board electrical components are easily damaged by static electricity. Touch
something metal on the printer before touching any system board electronic components or connectors.
Note: This task requires a flathead screwdriver.
1Align the eight keyholes with the screws to replace the cover.
Additional printer setup
32
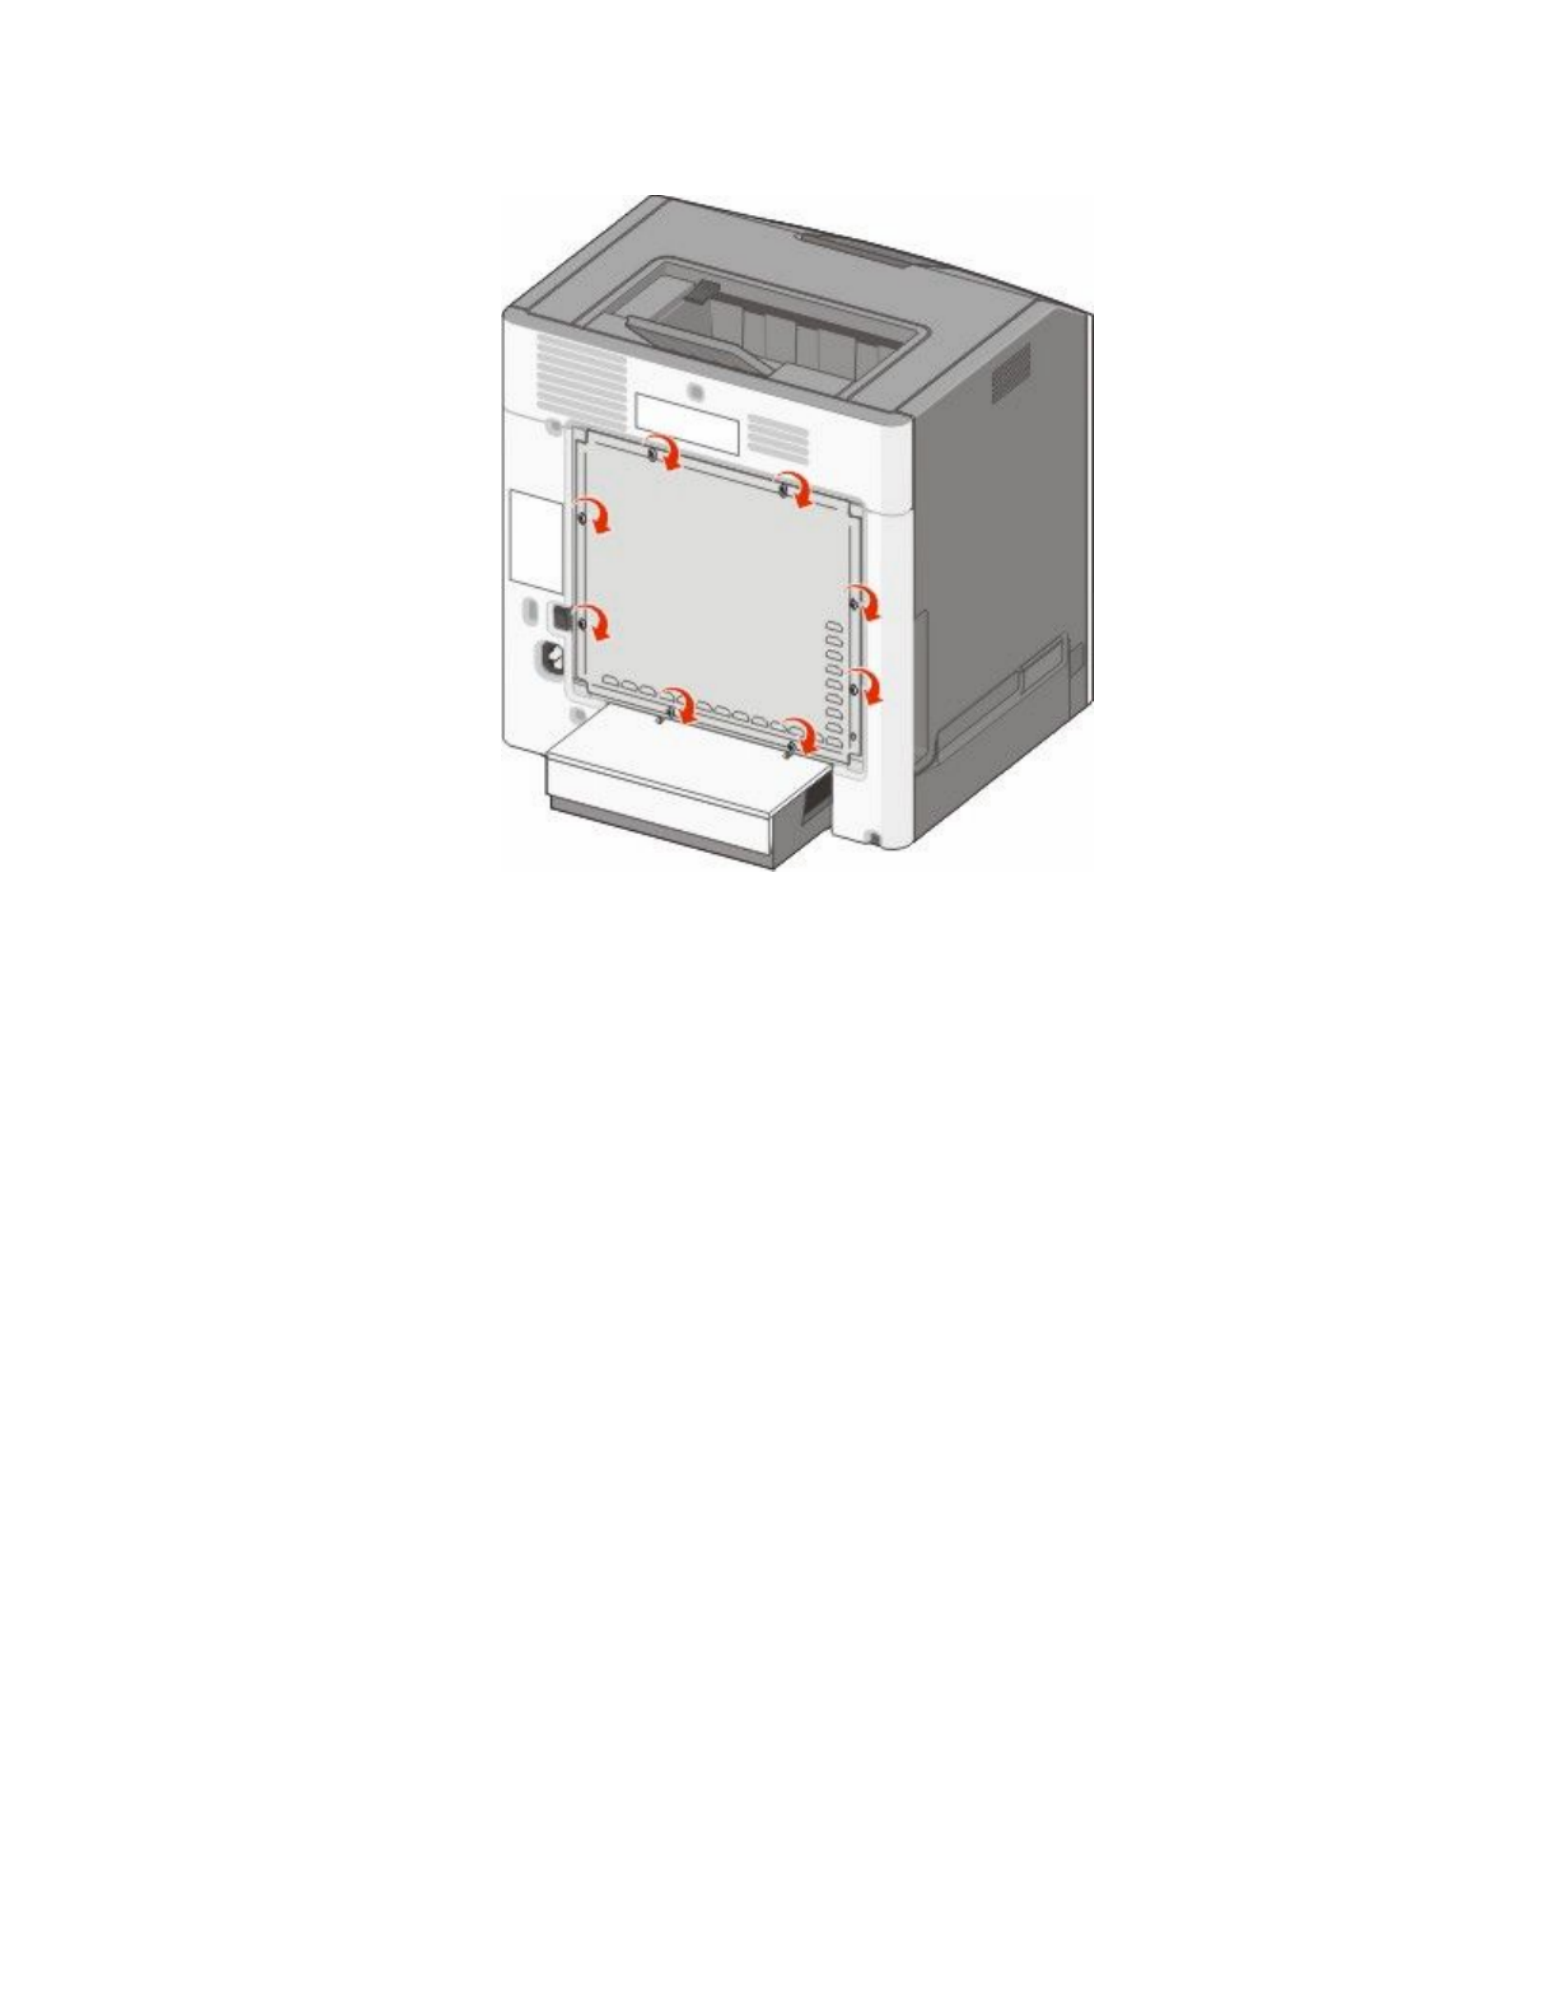
2Slide the cover down, and then turn each screw clockwise to tighten.
Attaching cables
Connect the printer to the computer using a USB cable or Ethernet cable.
Be sure to match the following:
•The USB symbol on the cable with the USB symbol on the printer
•The appropriate Ethernet cable to the Ethernet port
Additional printer setup
33

1USB port
2Ethernet port
Additional printer setup
34

Installing optional trays
The printer supports up to three optional input sources: an optional 550-sheet tray, an optional 2,000-sheet tray, and
an optional 550-sheet specialty media drawer. Instructions for installing an optional input source are the same for
each.
CAUTION—TIPPING HAZARD: Floor-mounted configurations require additional furniture for stability. You
must use either a printer stand or printer base if you are using a high-capacity input tray, a duplex unit and an
input option, or more than one input option. If you purchased a multifunction printer (MFP) that scans, copies,
and faxes, you may need additional furniture. For more information, see
www.lexmark.com/multifunctionprinters.
Note: The C736n, C736dn, and C736dtn model printers support a total of four optional input sources. The C734n,
C734dn, C734dtn, and C734dnw model printers support a total of three optional input sources.
CAUTION—POTENTIAL INJURY: The printer weight is greater than 18 kg (40 lb) and requires two or more
trained personnel to lift it safely.
CAUTION—SHOCK HAZARD: If you are installing an optional tray after setting up the printer, then turn the
printer off and unplug the power cord, the USB cable, and the Ethernet cable before continuing.
1Unpack the optional tray, and remove all packing material.
2Place the tray in the location chosen for the printer.
Note: If you are installing more than one optional tray, the 2,000-sheet tray must always be installed as the first
optional tray (configuring from the bottom up).
Note: The optional 550-sheet tray and the optional 550-sheet specialty media drawer are interchangeable.
Additional printer setup
35

1Optional 550-sheet tray (or optional 550-sheet specialty media drawer)
2Optional 550-sheet specialty media drawer (or optional 550-sheet tray)
3Optional 2,000-sheet tray
Note: Optional trays lock together when stacked. Remove stacked trays one at a time from the top down.
3Align the printer with the tray, and then lower the printer into place.
Additional printer setup
36

Verifying printer setup
Printing a menu settings page
Print a menu settings page to review the status of the supplies.
1Make sure the printer is on and appears.Ready
2From the printer control panel, press .
3Press the down arrow button until Reports appears, and then press .
4Press to select Menu Settings Page.
Printing Menu Settings Page Ready appears. After the menu settings page prints, appears.
Printing a network setup page
If the printer is attached to a network, print a network setup page to verify the network connection. This page also
provides important information that aids network printing configuration.
1Make sure the printer is on and appears.Ready
2From the printer control panel, press .
3Press the down arrow button until appears, and then press .Reports
4Press the down arrow button until appears, and then press .Network Setup Page
After the network setup page prints, appears.Ready
5Check the first section on the network setup page, and confirm that Status is “Connected.”
If Status is “Not Connected,” the LAN drop may not be active, the network cable may be malfunctioning, or, if you
have a wireless printer model, the wireless network may not be configured properly. Consult a system support
person for a solution, and then print another network setup page.
Setting up the printer software
Installing printer software
A printer driver is software that lets the computer communicate with the printer. The printer software is typically
installed during the initial printer setup. If you need to install the software after setup, follow these instructions:
For Windows users
1Close all open software programs.
2Insert the CD.Software and Documentation
3From the main installation dialog, click .Install
4Follow the instructions on the screen.
Additional printer setup
37

In Mac OS X version 10.4 and earlier
1From the Finder desktop, choose > .Go Applications
2Double-click , and then double-click or .Utilities Print Center Printer Setup Utility
3Select the printer, and then from the Printers menu, choose .Show Info
4From the pop-up menu, choose .Installable Options
5Add any installed hardware options, and then click .Apply Changes
Setting up wireless printing
Follow these instructions if your printer model is wireless.
Note: A Service Set Identifier (SSID) is a name assigned to a wireless network. Wireless Encryption Protocol (WEP) and
Wi-Fi Protected Access (WPA) are types of security used on a network.
Information you will need to set up the printer on a wireless
network
Note: Do not connect the installation or network cables until prompted to do so by the setup software.
•SSID—The SSID is also referred to as the network name.
•Wireless Mode (or Network Mode)—The mode will be either infrastructure or ad hoc.
•Channel (for ad hoc networks)—The channel defaults to auto for infrastructure networks.
Some ad hoc networks will also require the auto setting. Check with your system support person if you are not
sure which channel to select.
•Security Method—There are three basic options for Security Method:
–WEP key
If your network uses more than one WEP key, enter up to four in the provided spaces. Select the key currently
in use on the network by selecting the Default WEP Transmit Key.
or
–WPA or WPA2 passphrase
WPA includes encryption as an additional layer of security. The choices are AES or TKIP. Encryption must be
set for the same type on the router and on the printer, or the printer will not be able to communicate on the
network.
–No security
If your wireless network does not use any type of security, then you will not have any security information.
Note: Using an unsecured wireless network is not recommended.
If you are installing the printer on an 802.1X network using the Advanced method, then you may need the following:
•Authentication type
•Inner authentication type
•802.1X username and password
•Certificates
Note: For more information on configuring 802.1X security, see the on the Networking Guide Software and
Documentation CD.
Additional printer setup
39
Installing the printer on a wireless network (Windows)
Before you install the printer on a wireless network, make sure that:
•Your wireless network is set up and working properly.
•The computer you are using is connected to the same wireless network where you want to set up the printer.
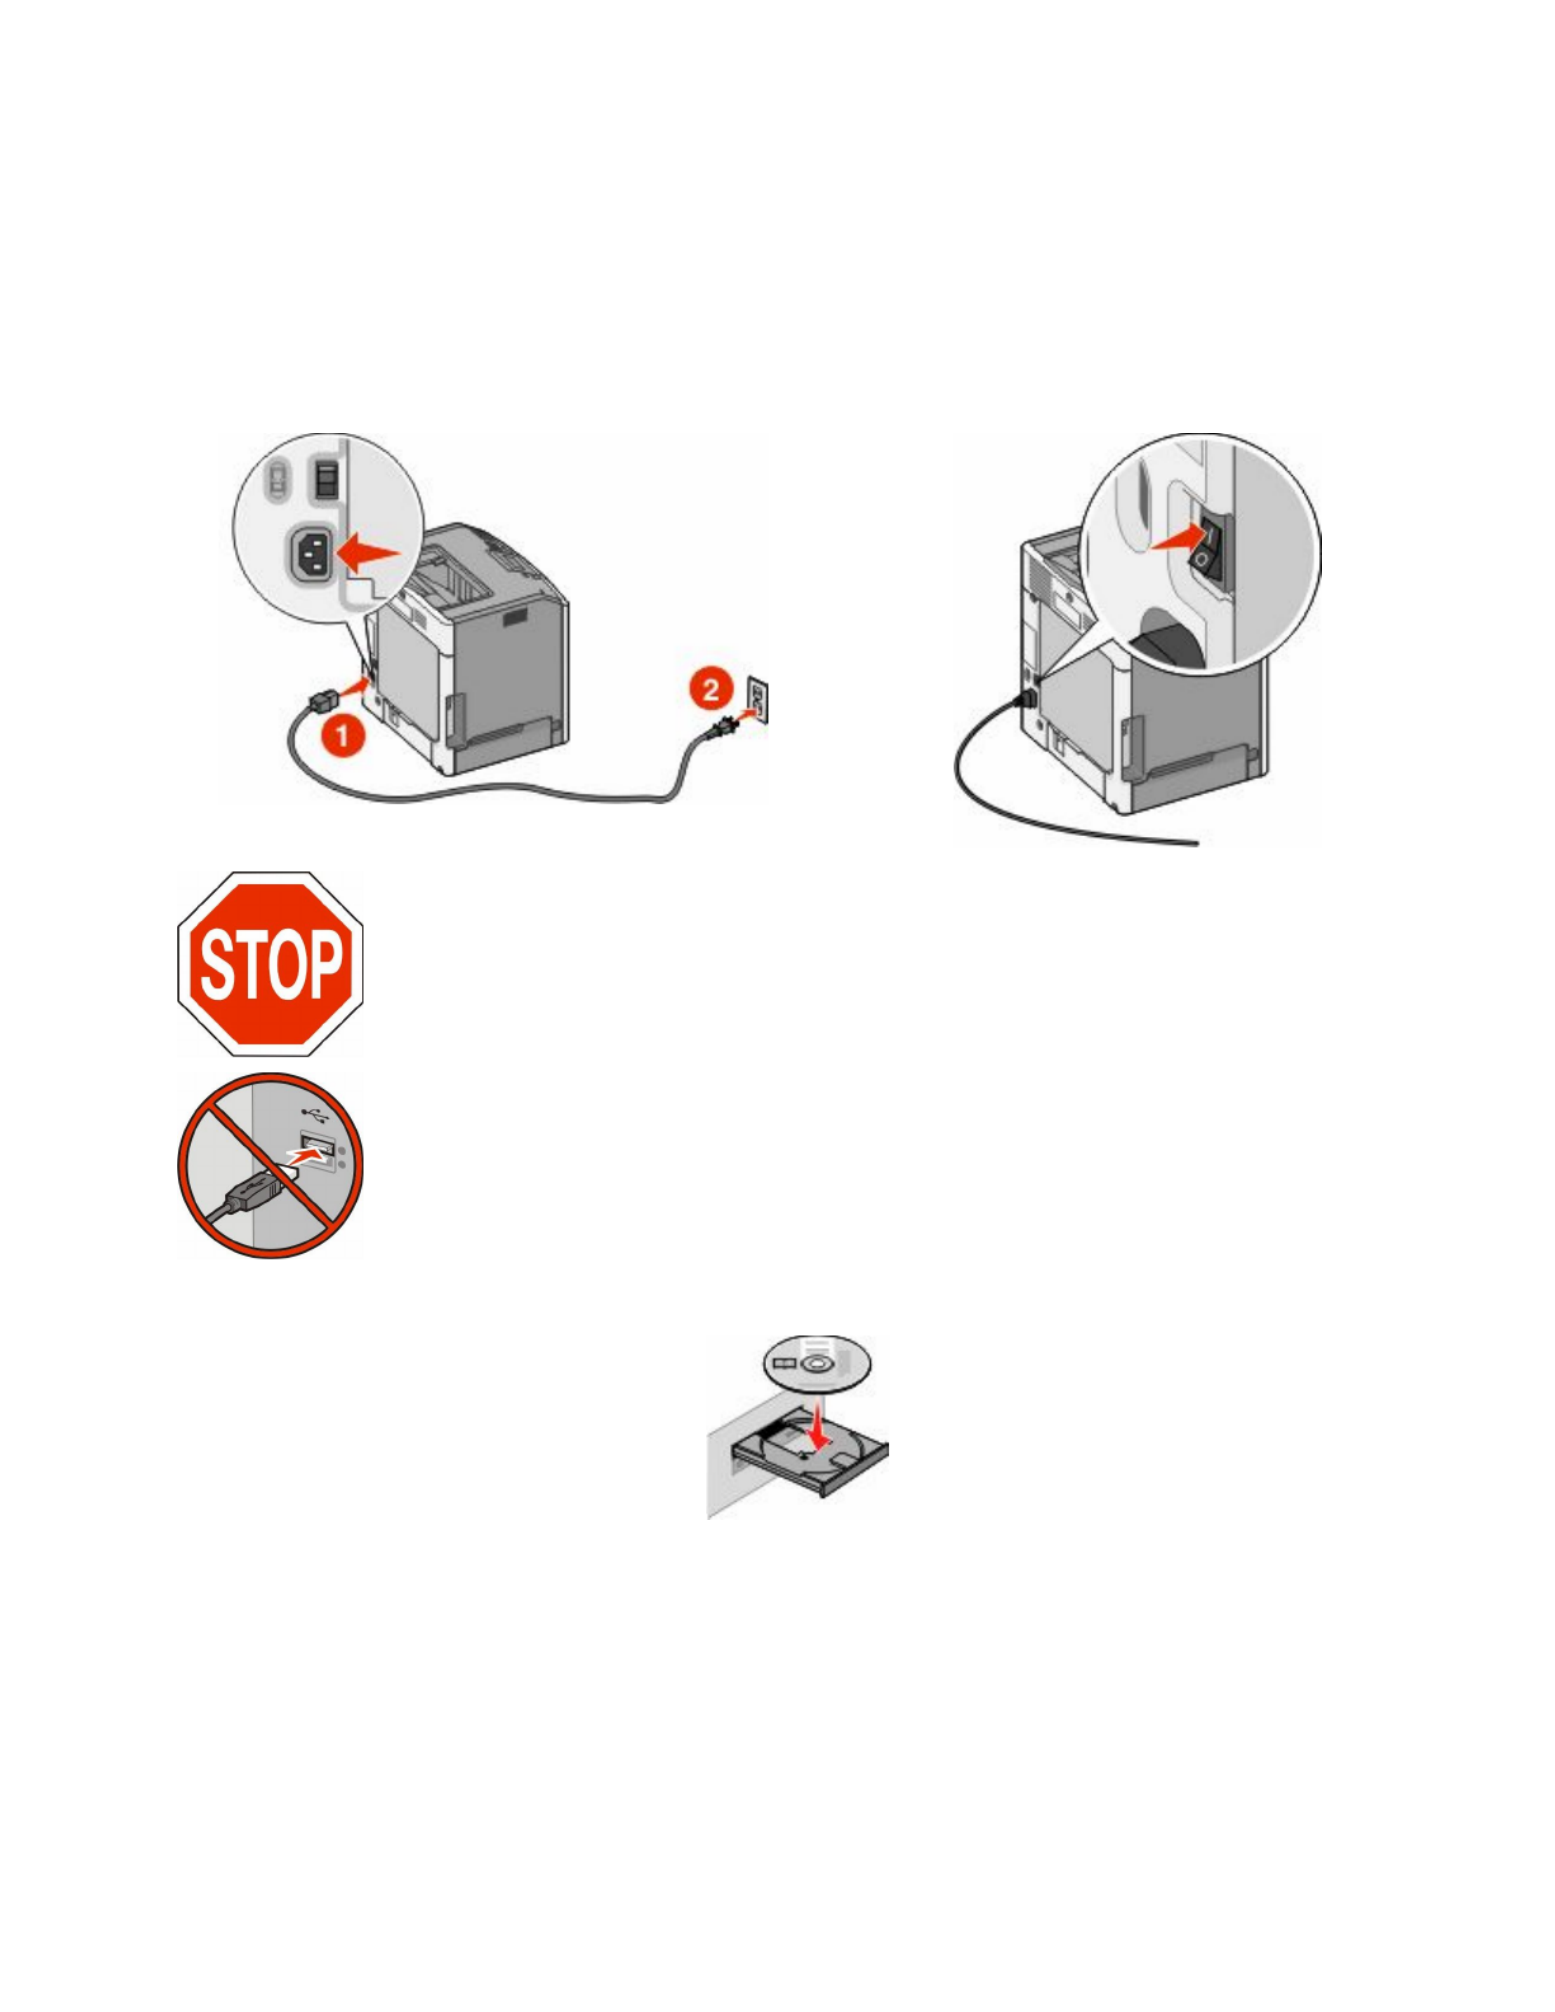
1Connect the power cable to the printer and then to a properly grounded electrical outlet, and then turn the printer
on.
Make sure the printer and computer are fully on and ready.
Do not connect the USB cable until instructed to do so on the screen.
2Insert the CD.Software and Documentation
3Click .Install Printer and Software
4Click to agree to the License Agreement.Agree
5Click , and then click .Suggested Next
6Click .Wireless Network Attach
Additional printer setup
40

3Click .+
4Click .AppleTalk
5Select the printer from the list.
6Click .Add
In Mac OS X version 10.4 and earlier
1From the Finder desktop, choose > .Go Applications
2Double-click .Utilities
3Double-click or .Print Center Printer Setup Utility
4From the Printer List, click .Add
5Choose the tab.Default Browser
6Click .More Printers
7From the first pop-up menu, choose .AppleTalk
8From the second pop-up menu, select .Local AppleTalk zone
9Select the printer from the list.
10 Click .Add
Note: If the printer doesn't show up in the list, you may need to add it using the IP address. Contact your
system support person for assistance.
Changing port settings after installing a new
network Internal Solutions Port
When a new network Lexmark Internal Solutions Port (ISP) is installed in the printer, the printer configurations on
computers that access the printer must be updated because the printer will be assigned a new IP address. All
computers that access the printer must be updated with this new IP address in order to print to it over the network.
Notes:
•If the printer has a static IP address that will stay the same, then you do not need to make any changes to the
computer configurations.
•If the computers are configured to print to the printer by a network name that will stay the same, instead of by
IP address, then you do not need to make any changes to the computer configurations.
•If you are adding a wireless ISP to a printer previously configured for a wired connection, then make sure the
wired network is disconnected when you configure the printer to operate wirelessly. If the wired connection
remains connected, then the wireless configuration will complete, but the wireless ISP will not be active. In the
event that the printer was configured for a wireless ISP while still attached to a wired connection, disconnect
the wired connection, turn the printer off, and then turn the printer back on again. This will enable the wireless
ISP.
•Only one network connection at a time is active. If you want to switch the connection type between wired and
wireless, you must first turn the printer off, connect the cable (to switch to a wired connection) or disconnect
the cable (to switch to a wireless connection), and then turn the printer back on again.
For Windows users
1Print a network setup page and make a note of the new IP address.
2Click , or click and then click .Start Run
Additional printer setup
46

3Click .Timeouts
4In the Power Saver box, increase or decrease the number of minutes you want the printer to wait before it enters
Power Saver mode.
5Click .Submit
Using the printer control panel
1Make sure the printer is on and appears.Ready
2Press .
3Press the arrow buttons until appears, and then press .Settings
4Press the arrow buttons until appears, and then press .General Settings
5Press the arrow buttons until appears, and then press .Timeouts
6Press the arrow buttons until appears, and then press .Power Saver
7Press the arrow buttons to increase or decrease the number of minutes before the printer enters Power Saver
mode, and then press .
Adjusting the brightness of the display
To save energy, or if you are having trouble reading your display, you can adjust the brightness of the display.
Available settings range from 1–10. The factory default setting is 5.
Using the Embedded Web Server
1Type the printer IP address into the address field of your Web browser.
Note: If you do not know the IP address of the printer, then print a network setup page and locate the IP address
in the TCP/IP section.
2Click , and then click .Settings Utilities Menu
3In the LCD Brightness box, type in the brightness you want for your display.
4Click .Submit
Using the printer control panel
1Make sure the printer is on and appears.Ready
2Press .
3Press the arrow buttons until appears, and then press .Settings
4Press the arrow buttons until appears, and then press .Utilities Menu
5Press the arrow buttons until LCD Brightness appears, and then press .
6Press the arrow buttons to select a setting, and then press .
Minimizing your printer's environmental impact
53
Produkt Specifikationer
| Mærke: | Lexmark |
| Kategori: | Printer |
| Model: | C734 |
| Vægt: | 29700 g |
| Produktfarve: | Hvid |
| Pakkevægt: | 30800 g |
| Wi-Fi: | Ingen |
| Relativ luftfugtighed ved drift (H-H): | 8 - 80 % |
| Antal USB 2.0-porte: | 2 |
| Ethernet LAN: | Ja |
| Driftstemperatur (T-T): | 16 - 32 °C |
| Udskrivningsteknologi: | Laser |
| Maksimal opløsning: | 1200 x 1200 dpi |
| Udskrivningshastighed (sort, normal kvalitet, A4/amerikansk papirformat): | - sider pr. minut |
| Medietyper til papirbakke: | Card stock,Envelopes,Glossy paper,Labels,Plain paper,Transparencies |
| Maksimal ISO A-serie papirstørrelse: | A4 |
| ISO A-serie, størrelser (A0...A9): | A4,A5,A6 |
| ISO B-serie, størrelser (B0...B9): | B5 |
| Ikke-ISO udskriftsmedier størrelse: | Executive (184 x 267mm),Folio (media size),Letter (media size),Oficio (media size),Statement (140 x 216mm),Legal (media size) |
| Kuverter størrelser: | 7 3/4,9,10,B5,C5,DL |
| Samlet antal inputbakker: | 3 |
| Samlet inputkapacitet: | 1200 ark |
| Samlet outputkapacitet: | 300 ark |
| Sikkerhedsalgoritmer: | 802.1x RADIUS,EAP-TLS,EAP-TTLS,LEAP,MD5,PEAP |
| Skærm: | LCD |
| Direkte udskrivning: | Ja |
| Maksimal driftscyklus: | 85000 sider pr. måned |
| Udskrivning af farver: | Black,Cyan,Magenta,Yellow |
| Intern hukommelse: | 256 MB |
| Dimensioner (BxDxH): | 435 x 545 x 576 mm |
| Elektronisk kompas: | Ja |
| Sensor for omgivende lys: | Ja |
| Pakkens dimensioner (BxDxH): | 633 x 553 x 570 mm |
| Duplex udskrivning: | Ja |
| Maksimal indgangskapacitet: | 3750 ark |
| Antal printpatroner: | 4 |
| Intel® Wireless Display (Intel® WiDi): | Ja |
| Mac kompabilitet: | Ja |
| GPS (satellit): | Ja |
| Bæredygtighedscertifikater: | ENERGY STAR |
| Processorfrekvens: | 600 Mhz |
| Maksimal intern hukommelse: | 1280 MB |
| Pegeredskab: | Clickpad |
| Numerisk tastatur: | Ja |
| Tastatur i fuld størrelse: | Ja |
| Baggrundsbelyst tastatur: | Ja |
| Tastatur i ø-stil: | Ja |
| Intel® Hyper Threading Teknologi (Intel® HT Technology): | Ja |
| Intel® Turbo Boost Teknologi: | 1.0 |
| Driftshøjde: | 0 - 3048 m |
| Tid til første side (farve, normal): | 9.5 sek./side |
| PictBridge: | Ja |
| Trådløs teknologi: | Ingen |
| Strømforbrug (udskrivning): | - W |
| Understøttede Windows-operativsystemer: | Ja |
| Understøttede Mac-operativsystemer: | Ja |
| Understøttede Linux-operativsystemer: | Ja |
| Andre understøttede operativsystemer: | Novell NetWare 5.x,Novell NetWare 6.x |
| Farve: | Ja |
| Udskrivningshastighed (farve, normal kvalitet, A4/amerikansk papirformat): | 28 sider pr. minut |
| Lydtryksniveau (udskrivning): | 54 dB |
| Strøm-LED: | Ja |
| Standard grænseflader: | Ethernet,USB 2.0 |
| Drivere inkluderet: | Ja |
| Gyroskop: | Ja |
| Accelerometer: | Ja |
| Tid til første side (sort, normal): | 9.5 sek./side |
| Sidebeskrivelsessprog: | Microsoft XPS,PCL 5c,PCL 6,PostScript 3,PPDS,XHTML |
| Anbefalet arbejdscyklus: | 9200 sider pr. måned |
| TV-tuner, integreret: | Ja |
| Nærhedssensor: | Ja |
| Optisk drevtype: | Blu-Ray DVD Combo |
| Enhanced Intel SpeedStep Teknologi: | Ja |
| Udfør deaktivering af bit: | Ja |
| Idle status: | Ja |
| Intel® VT-x with Extended Page Tables (EPT): | Ja |
| Indlejret tilgængelige muligheder: | Ja |
| Intel® 64: | Ja |
| Intel® Virtualization Technology for Directed I/O (VT-d): | Ja |
| Intel® Software Guard Extensions (Intel® SGX): | Ja |
| Intel® Virtualization Technology (VT-x): | Ja |
| Duplex udskrivningshastighed (farve, normal kvalitet, A4/amerikansk papirformat): | 19 sider pr. minut |
| Universal-magasin kapacitet: | 100 ark |
| Multifunktionsbakke: | Ja |
| Understøttede operativsystemer til servere: | Windows 2000 Server,Windows Server 2003,Windows Server 2008,Windows Server 2008 R2 |
| Netværk klar: | Ja |
| Lydeffektniveau (standby): | 33 dB |
| Administrationsprotokoller: | TCP/IP IPv4, IPX/SPX, AppleTalk, LexLink (DLC), TCP/IP IPv6, TCP, UDP |
| Orienteringssensor: | Ja |
| Tastaturopsætning: | AZERTY |
| Maksimal printstørrelse: | 210 x 297 mm |
| Dockingstation inkluderet: | Ja |
| Farvescanning: | Ingen |
| Windows taster: | Ja |
| Intel® Flex Memory Access: | Ja |
| Intel® Trusted Execution Teknologi: | Ja |
| Intel® Enhanced Halt State: | Ja |
| Intel® TSX-NI: | Ja |
| Intel® Stabil Billede Platformsprogram (SIPP): | Ja |
| Intel® klar video teknologi: | Ja |
| Farve fax: | Ingen |
| Intel® InTru™ 3D Teknologi: | Ja |
| Intel® Clear Video HD Teknologi (Intel® CVT HD): | Ja |
| Intel® Insider™: | Ja |
| Intel® Sikker Nøgle: | Ja |
| Intel® Smart Connect Teknologi: | Ja |
| Intel® My WiFi Teknologi (Intel® MWT): | Ja |
| Intel® Anti-Theft Teknologi (Intel® AT): | Ja |
| Intel® Rapid Start Teknologi: | Ja |
| Intel® Smart Response Teknologi: | Ja |
| Intel® Identity Protection Teknologi (Intel® IPT): | Ja |
| Intel® Mindre Forretnings-fordele (Intel® SBA): | Ja |
| Intel® Matrix Storage Teknologi (Intel® MST): | Ja |
| Intel® Active Management Teknologi (Intel® AMT): | Ja |
| Intel® RealSense™ Teknologi: | Ja |
| Intel® Pro trådløs skærm (Intel® Pro WiDi): | Ja |
| Intel® Wireless-AC-teknologi: | Ja |
| Intel® Indbygget visuel teknologi: | Ja |
| Thunderbolt™ 3 teknologi: | Ja |
| Intel® Quick Sync Video Teknologi: | Ja |
| Intel® QuickPath Interconnect: | Ja |
| Intel® AES Nye Instruktioner (Intel® AES-NI): | Ja |
| Intel® Demand Based Switching: | Ja |
| Intel® OS Guard: | Ja |
| Termiske overvågningsteknologier: | Ja |
| Fysisk adresseudvidelse (PAE): | Ja |
| UART: | Ja |
| True Key™: | Ja |
| Intel® Smart Idle teknologi: | Ja |
| Intel® Instruction Replay Teknologi: | Ja |
| Intel® sikkerhedsstart: | Ja |
| Intel® Smart lyd teknologi: | Ja |
| Intel® Avanceret Vector-udvidelser: | Ja |
| Intel® Dual Display Capable Teknologi: | Ja |
| Intel® HD Boost: | Ja |
| Intel® FDI Teknologi: | Ja |
| Intel® I/O Acceleration Teknologi: | Ja |
| Intel® Power Management Teknologi: | Ja |
| Intel® QuickAssist Teknologi: | Ja |
| Intel® Rapid Storage Teknologi: | Ja |
| Intel® Unite understøttes: | Ja |
| Intel® Unite installeret: | Ja |
| Intel® Fast Memory Access: | Ja |
| Intel® Clear Video Teknologi til MID (Intel® CVT for MID): | Ja |
| Processor-pakke størrelse: | 0 mm |
| Grafisk og IMC litografi: | 0 nm |
| Lydtryksniveau (dupleksudskrivning): | 54 dB |
| Duplex udskrivningshastighed (sort, normal kvalitet, A4/amerikansk papirformat): | 20 sider pr. minut |
| JIS B-seriens størrelser (B0…B9): | B5 |
| CD-læsehastighed: | 0 x |
| CD-skrivehastighed: | 0 x |
| CD omskrivningshastighed: | 0 x |
| Operativsystemets arkitektur: | 32-bit |
| Intel® Smart Cache: | Ja |
| LightScribe: | Ja |
| Standby-LED: | Ja |
| CD-R skrivehastighed: | 0 x |
| CD-RW skrivehastighed: | 0 x |
| DVD-R skrivehastighed: | 0 x |
| DVD-R dobbeltlags skrivehastighed: | 0 x |
| DVD-RW skrivehastighed: | 0 x |
| DVD+R skrivehastighed: | 0 x |
| DVD+R dobbeltlags skrivehastighed: | 0 x |
| DVD+RW skrivehastighed: | 0 x |
| DVD-RAM skrivehastighed: | 0 x |
| Intel HD Audio Teknologi: | Ja |
| Opstartstid: | 0 sek./side |
| Skalerbarhed: | 1S |
| Specifikation for termisk opløsning: | PCA 2013D |
| Spildsikret tastatur: | Ja |
| Fysisk adresse udvidelse (PAE): | 0 Bit |
| Klar til Virtual Reality (VR): | Ja |
| DVD+R læsehastighed: | 0 x |
| DVD-R læsehastighed: | 0 x |
| CD-R læsehastighed: | 0 x |
| Intel® HD Graphics: | Ja |
| Intel® ME Firmware Version: | 3 |
| Gendannelse af operativsystem: | Windows 10 |
| CD-RW læsehastighed: | 0 x |
| DVD-R dobbeltlags læsehastighed: | 0 x |
| DVD-RW læsehastighed: | 0 x |
| DVD+R dobbeltlags læsehastighed: | 0 x |
| DVD+RW læsehastighed: | 0 x |
| DVD-RAM læsehastighed: | 0 x |
| BD-R skrivehastighed: | 0 x |
| BD-R dobbeltlags skrivehastighed: | 0 x |
| BD-RE skrivehastighed: | 0 x |
| BD-RE dobbeltlags skrivehastighed: | 0 x |
| BD-R læsehastighed: | 0 x |
| BD-RE læsehastighed: | 0 x |
| BD-ROM læsehastighed: | 0 x |
| BD-R dobbeltlags læsehastighed: | 0 x |
| BD-RE dobbeltlags læsehastighed: | 0 x |
| Alienware-grafikforstærkerport: | Ja |
| Intel® Optane™ Memory Ready: | Ja |
| Leveres med valgfrit operativsystem: | Windows 10 Education |
| Berøringsbånd: | Ja |
| Valgfrit operativsystem installeret: | Android 5.1 |
| LangtrækkendeIntel® RealSense™ kamera: | Ja |
| Kortrækkende Intel RealSense kamera: | Ja |
| Intel® hukommelse beskyttelsesudvidelser (Intel® MPX): | Ja |
| HD DVD-ROM læsehastighed: | 0 x |
| HD DVD-ROM skrivehastighed: | 0 x |
| BD-R XL læsehastighed: | 0 x |
| BD-R XL skrivehastighed: | 0 x |
| BD-RE XL læsehastighed: | 0 x |
| BD-RE XL skrivehastighed: | 0 x |
| Tilslutningsgrænseflade til dockingstation: | Lenovo OneLink |
| Dockingstation grafikadaptermodel: | AMD Radeon HD R9 290 |
| Dockingstation grafikadapterhukommelsestype: | GDDR5 |
| Producent af dockingstationenes grafikadapter: | PNY |
| Dockingstation med indbyggede højttalere: | Ja |
| Dockingstation lydudgangskanaler: | 2.0 |
| Dockingstation Ethernet LAN: | Ja |
| Dockingstation HDMI-port: | Ja |
| Dockingstation DVI-port: | Ja |
| Dockingstation Dual-Link DVI: | Ja |
| Port til dockingstation VA D-sub): | Ja |
| Dockingstation DisplayPort: | Ingen |
| Dockingstation mini-Displayport: | Ja |
| Dockingstation hovedtelefonudgang: | Ja |
| Dockingstation mikrofonindgang: | Ja |
| Strømstik til dockingstation: | 24-pin |
Har du brug for hjælp?
Hvis du har brug for hjælp til Lexmark C734 stil et spørgsmål nedenfor, og andre brugere vil svare dig
Printer Lexmark Manualer

13 Januar 2025
11 Januar 2025
13 Oktober 2024
11 Oktober 2024
11 Oktober 2024
29 September 2024
15 September 2024
13 September 2024
13 September 2024
8 September 2024
Printer Manualer
- Printer Nilox
- Printer Sony
- Printer Canon
- Printer Samsung
- Printer Panasonic
- Printer LG
- Printer Mitsubishi
- Printer Sharp
- Printer Epson
- Printer HP
- Printer D-Link
- Printer Roland
- Printer Toshiba
- Printer Fujifilm
- Printer Nikon
- Printer Kodak
- Printer Brother
- Printer Lenovo
- Printer Olympus
- Printer Triumph-Adler
- Printer AVM
- Printer Dymo
- Printer Thomson
- Printer JVC
- Printer Honeywell
- Printer Citizen
- Printer Olivetti
- Printer Huawei
- Printer Seiko
- Printer Digitus
- Printer Zebra
- Printer Olympia
- Printer Xiaomi
- Printer Dell
- Printer Intermec
- Printer Fujitsu
- Printer MSI
- Printer Polaroid
- Printer Ricoh
- Printer NEC
- Printer Konica-Minolta
- Printer OKI
- Printer Kyocera
- Printer Avision
- Printer Velleman
- Printer Bixolon
- Printer Sagem
- Printer Pantum
- Printer Xerox
- Printer Renkforce
- Printer Testo
- Printer Ultimaker
- Printer Primera
- Printer Star Micronics
- Printer Star
- Printer Panduit
- Printer ZKTeco
- Printer StarTech.com
- Printer Kogan
- Printer CUSTOM
- Printer Godex
- Printer Equip
- Printer Royal Sovereign
- Printer Argox
- Printer Minolta
- Printer DNP
- Printer Oce
- Printer Metapace
- Printer Ibm
- Printer Tomy
- Printer Approx
- Printer Toshiba TEC
- Printer Frama
- Printer Vupoint Solutions
- Printer Evolis
- Printer Builder
- Printer Fargo
- Printer Brady
- Printer Posiflex
- Printer Datamax-O'neil
- Printer Dascom
- Printer HiTi
- Printer GG Image
- Printer Elite Screens
- Printer DTRONIC
- Printer Phoenix Contact
- Printer Videology
- Printer TSC
- Printer EC Line
- Printer Colop
- Printer Fichero
- Printer Raspberry Pi
- Printer Unitech
- Printer IDP
- Printer Microboards
- Printer Tally Dascom
- Printer CSL
- Printer Nisca
- Printer Epson 7620
- Printer Sawgrass
- Printer Mimaki
Nyeste Printer Manualer

9 April 2025

8 April 2025

2 April 2025

29 Marts 2025
29 Marts 2025
29 Marts 2025

9 Marts 2025
9 Marts 2025
5 Marts 2025
5 Marts 2025