Lexmark E323 Manual
Læs nedenfor 📖 manual på dansk for Lexmark E323 (127 sider) i kategorien Printer. Denne guide var nyttig for 20 personer og blev bedømt med 4.5 stjerner i gennemsnit af 2 brugere
Side 1/127

www.lexmark.com
User’s Reference
November 2003
Lexmark and Lexmark with diamond design are trademarks of Lexmark International, Inc.,
registered in the United States and/or other countries.
© 2003 Lexmark International, Inc. All rights reserved.
740 West New Circle Road
Lexington, Kentucky 40550
E230, E232, E330, E332n

Contents
2
Contents
Notices ............................................................................................. 6
Edition notice.................................................................................................. 6
Trademarks .................................................................................................... 6
Licensing notice.............................................................................................. 7
Safety information .......................................................................................... 7
Laser notice.................................................................................................... 7
The United Kingdom Telecommunications Act 1984 ..................................... 7
Conventions ................................................................................................... 7
Electronic emission notices............................................................................ 7
Printer energy consumption ........................................................................... 9
Statement of Limited Warranty....................................................................... 9
Chapter 1: Printer overview ........................................................ 11
Chapter 2: Print media tasks and tips........................................ 13
What types of print media can be loaded? ................................................... 14
Where can print media be loaded in the printer? ......................................... 15
Tips on choosing the right print media ......................................................... 16
Paper ...................................................................................................... 16
Preprinted forms and letterhead ............................................................. 16
Transparencies ....................................................................................... 16
Envelopes ............................................................................................... 17
Labels ..................................................................................................... 17
Card stock .............................................................................................. 18
Tips on storing print media and supplies...................................................... 18
Storing paper .......................................................................................... 18
Storing supplies ...................................................................................... 18
Tips on preventing jams ............................................................................... 19
How to load the 250-sheet and 550-sheet trays........................................... 20
Extending the tray for legal or folio size paper ....................................... 23

Contents
3
How to load the manual feeder .................................................................... 24
How to use the rear exit ............................................................................... 25
How to clear paper jams............................................................................... 26
Chapter 3: Printing tasks............................................................. 29
How to manually feed a print job.................................................................. 30
How to print on both sides of the paper (manual duplex)............................. 32
How to print multiple page images on one page (N-up printing) .................. 34
How to print a booklet................................................................................... 35
How to print a poster .................................................................................... 36
How to print on letterhead ............................................................................ 37
How to print using an overlay or a watermark.............................................. 37
Using an overlay ..................................................................................... 38
Using a watermark ................................................................................. 38
How to cancel a print job.............................................................................. 39
From the printer operator panel .............................................................. 39
From a Windows computer .................................................................... 39
From a Macintosh computer ................................................................... 39
Chapter 4: How to install options ............................................... 40
How to access the system board ................................................................. 41
How to reattach the system board cover ................................................ 44
How to add a memory card .......................................................................... 45
How to add a flash card................................................................................ 46
How to install a 550-sheet drawer ................................................................ 48
How to get the printer driver to recognize installed options.......................... 49
Chapter 5: Using the operator panel.......................................... 50
Overview of the operator panel .................................................................... 51
Understanding the operator panel lights ...................................................... 52
Secondary errors .................................................................................... 54
Operator panel codes................................................................................... 57
Primary codes ........................................................................................ 57
Secondary error codes ........................................................................... 69
Chapter 6: Understanding the printer configuration menus.... 83
Printing the Printer Settings Configuration sheet ......................................... 83

Contents
4
Configuration menus overview..................................................................... 84
Network menu ........................................................................................ 85
Parallel menu ......................................................................................... 86
Setup menu ............................................................................................ 86
USB menu .............................................................................................. 87
Utilities menu .......................................................................................... 87
Chapter 7: Software and network tasks..................................... 88
How to install drivers for local printing.......................................................... 89
Windows ................................................................................................. 89
Macintosh ............................................................................................... 91
UNIX/Linux ............................................................................................. 93
How to print the menu settings and network setup pages............................ 94
How to print a test page ............................................................................... 94
Windows ................................................................................................. 94
Macintosh ............................................................................................... 94
How to configure for TCP/IP......................................................................... 95
Assigning a printer IP address ............................................................... 95
Verifying the IP settings .......................................................................... 95
How to set up the printer for network printing............................................... 96
Windows ................................................................................................. 96
Macintosh ............................................................................................. 100
UNIX/Linux ........................................................................................... 102
NetWare ............................................................................................... 102
Using the printer resident Web page.......................................................... 102
Using the Local Printer Setup Utility........................................................... 103
Chapter 8: Supplies information............................................... 104
What supplies do I need and how do I order them?................................... 105
Storing supplies .................................................................................... 105
How to conserve supplies .......................................................................... 105
How to know when you need new supplies................................................ 106
Checking the toner and photoconductor levels .................................... 106
Recognizing the operator panel light sequences ................................. 107
How to change a toner cartridge ................................................................ 108
Lexmark Return Program ........................................................................... 111
Refilled toner cartridge notice ............................................................... 111
Recycling Lexmark products ...................................................................... 111
How to change a photoconductor kit .......................................................... 112

Notices
7
Licensing notice
The printer resident software contains:
•Software developed and copyrighted by Lexmark
•Lexmark modified software licensed under the provisions of
the GNU General Public License version 2 and the GNU
Lesser General Public License version 2.1
•Software licensed under the BSD license and warranty
statements
Click the title of the document you want to review:
The Lexmark modified GNU licensed software is free software; you
can redistribute it and/or modify it under the terms of the licenses
referenced above. These licenses do not provide you any rights to
the Lexmark copyrighted software in this printer.
Since the GNU licensed software that the Lexmark modifications
are based upon is supplied explicitly without warranty, use of the
Lexmark modified version is similarly provided without warranty.
See the warranty disclaimers in the referenced licenses for
additional details.
To obtain source code files for the Lexmark modified GNU licensed
software, launch the drivers CD that shipped with your printer and
click Contact Lexmark.
Safety information
•If your product is not marked with this symbol , it must be
connected to an electrical outlet that is properly grounded.
CAUTION: Do not set up this product or make any electrical
or cabling connections, such as the power cord or telephone,
during a lightning storm.
•The power cord must be connected to an electrical outlet that
is near the product and easily accessible.
•Refer service or repairs, other than those described in the
operating instructions, to a professional service person.
•This product is designed, tested, and approved to meet strict
global safety standards with the use of specific Lexmark
components. The safety features of some parts may not
always be obvious. Lexmark is not responsible for the use of
other replacement parts.
•Your product uses a laser.
CAUTION: Use of controls or adjustments or performance of
procedures other than those specified herein may result in
hazardous radiation exposure.
•Your product uses a printing process that heats the print
media, and the heat may cause the media to release
emissions. You must understand the section in your
operating instructions that discusses the guidelines for
selecting print media to avoid the possibility of harmful
emissions.
Laser notice
The printer is certified in the U.S. to conform to the requirements of
DHHS 21 CFR Subchapter J for Class I (1) laser products, and
elsewhere is certified as a Class I laser product conforming to the
requirements of IEC 60825-1.
Class I laser products are not considered to be hazardous. The
printer contains internally a Class IIIb (3b) laser that is nominally a
5 milliwatt gallium arsenide laser operating in the wavelength region
of 770-795 nanometers. The laser system and printer are designed
so there is never any human access to laser radiation above a
Class I level during normal operation, user maintenance, or
prescribed service condition.
The United Kingdom
Telecommunications Act 1984
This apparatus is approved under the approval number
NS/G/1234/J/100003 for the indirect connections to the public
telecommunications systems in the United Kingdom.
Conventions
Note: A note identifies something that could help you.
CAUTION: A caution identifies something that could cause you
harm.
Warning: A warning identifies something that could damage your
product hardware or software.
Electronic emission notices
Federal Communications Commission (FCC)
compliance information statement
The Lexmark E230, Machine Type 4505-100, Lexmark E232,
Machine Type 4505-200, Lexmark E330, Machine Type 4505-300,
and Lexmark E332n, Machine Type 4505-310, have been tested
and found to comply with the limits for a Class B digital device,
pursuant to Part 15 of the FCC Rules. Operation is subject to the
following two conditions: (1) this device may not cause harmful
interference, and (2) this device must accept any interference
received, including interference that may cause undesired
operation.
The FCC Class B limits are designed to provide reasonable
protection against harmful interference in a residential installation.
This equipment generates, uses, and can radiate radio frequency
energy and, if not installed and used in accordance with the
instructions, may cause harmful interference to radio
communications. However, there is no guarantee that interference
will not occur in a particular installation. If this equipment does
cause harmful interference to radio or television reception, which
can be determined by turning the equipment off and on, the user is
encouraged to try to correct the interference by one or more of the
following measures:
BSD License and Warranty statements
GNU General Public License

Notices
8
•Reorient or relocate the receiving antenna.
•Increase the separation between the equipment and
receiver.
•Connect the equipment into an outlet on a circuit different
from that to which the receiver is connected.
•Consult your point of purchase or service representative for
additional suggestions.
The manufacturer is not responsible for any radio or television
interference caused by using other than recommended cables or by
unauthorized changes or modifications to this equipment.
Unauthorized changes or modifications could void the user's
authority to operate this equipment.
Note: To assure compliance with FCC regulations on
electromagnetic interference for a Class B computing device, use a
properly shielded and grounded cable such as Lexmark part
number 1329605 for parallel attach or 12A2405 for USB attach.
Use of a substitute cable not properly shielded and grounded may
result in a violation of FCC regulations.
Any questions regarding this compliance information statement
should be directed to:
Director of Lexmark Technology & Services
Lexmark International, Inc.
740 West New Circle Road
Lexington, KY 40550
(859) 232-3000
Industry Canada compliance statement
This Class B digital apparatus meets all requirements of the
Canadian Interference-Causing Equipment Regulations.
Avis de conformité aux normes de l’industrie du
Canada
Cet appareil numérique de la classe B respecte toutes les
exigences du Règlement sur le matériel brouilleur du Canada.
European Community (EC) directives conformity
This product is in conformity with the protection requirements of EC
Council directives 89/336/EEC and 73/23/EEC on the
approximation and harmonization of the laws of the Member States
relating to electromagnetic compatibility and safety of electrical
equipment designed for use within certain voltage limits.
A declaration of conformity with the requirements of the directives
has been signed by the Director of Manufacturing and Technical
Support, Lexmark International, S.A., Boigny, France.
This product satisfies the Class B limits of EN 55022 and safety
requirements of EN 60950.
Japanese VCCI notice
Korean MIC statement
If your product includes the following
symbol on the regulatory label:
the following statement is applicable to
your product.
This equipment has undergone EMC registration as a household
product. It can be used in any area, including a residential area.
Noise emission levels
The following measurements were made in accordance with
ISO 7779 and reported in conformance with ISO 9296.
ENERGY STAR
The EPA ENERGY STAR Office
Equipment program is a partnership effort
with office equipment manufacturers to
promote the introduction of
energy-efficient products and to reduce air
pollution caused by power generation.
Companies participating in this program introduce products that
power down when they are not being used. This feature will cut the
energy used by up to 50 percent. Lexmark is proud to be a
participant in this program.
As an ENERGY STAR Partner, Lexmark International, Inc. has
determined that this product meets the ENERGY STAR guidelines
for energy efficiency.
1-meter average sound pressure, dBA
Printing
51—Machine types 4505-100, 4505-200, 4546-xxx
52—Machine types 4505-300, 4505-310, 4547-xxx
Idling 30

Notices
9
Printer energy consumption
The following table documents the power consumption
characteristics of the printer.
The power consumption levels listed in the previous table represent
time-averaged measurements. Instantaneous power draws may be
substantially higher than the average.
Power Saver
As part of the ENERGY STAR program, this printer is designed with
an energy-saving mode called Power Saver. The Power Saver
Mode is equivalent to the EPA Sleep Mode. The Power Saver Mode
saves energy by lowering power consumption during extended
periods of inactivity. The Power Saver Mode is automatically
engaged after this printer is not used for a specified period of time,
called the Power Saver Timeout. The factory default Power Saver
Timeout is 15 minutes for the Lexmark E230 and 30 minutes for the
Lexmark E232, Lexmark E330, and Lexmark E332n.
By using the printer configuration menus, the Power Saver Timeout
can be modified between 1 minute and 240 minutes. Setting the
Power Saver Timeout to a low value reduces energy consumption,
but may increase the response time of the printer. Setting the Power
Saver Timeout to a high value maintains a fast response, but uses
more energy.
If the Power Saver Mode is affecting the effective use of this printer,
this mode can be disabled from the Local Printer Setup Utility (see
page 103) or, if you have a network model, from the printer’s
resident Web page (see page 102).
Total energy usage
It is sometimes helpful to calculate the total printer energy usage.
Since power consumption claims are provided in power units of
Watts, the power consumption should be multiplied by the time the
printer spends in each mode in order to calculate energy usage.
The total printer energy usage is the sum of each mode's energy
usage.
Statement of Limited Warranty
Lexmark International, Inc., Lexington, KY
This warranty applies to the United States and Canada. For
customers outside the U.S. and Canada, refer to the
country-specific warranty information that came with your printer.
Lexmark E230, E232, E330, E332n
This Statement of Limited Warranty applies to this product if it was
originally purchased for your use, and not for resale, from Lexmark
or a Lexmark remarketer, referred to in this statement as
“Remarketer.”
Warranty
Lexmark warrants that this product:
•Is manufactured from new parts, or new and serviceable
used parts, which perform like new parts
•Is free from defects in material and workmanship
•Conforms to Lexmark’s official published specifications
•Is in good working order
If this product does not function as warranted during the warranty
period, contact a Remarketer or Lexmark for repair without charge.
If this product is a feature or option, this statement applies only
when that feature or option is used with the product for which it was
designed. To obtain warranty service, you may be required to
present the feature or option with the product.
If you transfer this product to another user, warranty service under
the terms of this statement is available to that user for the
remainder of the warranty period. You should transfer proof of
original purchase and this statement to that user.
Warranty service
The warranty period is 12 months and starts on the date of original
purchase as shown on the purchase receipt.
To obtain warranty service you may be required to present proof of
original purchase. Warranty service will be provided at a
Remarketer or a Lexmark designated location. You may be required
to deliver your product to the Remarketer or Lexmark, or ship it
prepaid and suitably packaged to a Lexmark designated location.
You are responsible for loss of, or damage to, a product in transit to
the Remarketer or the designated location.
When warranty service involves the exchange of a product or part,
the item replaced becomes the property of the Remarketer or
Lexmark. The replacement may be a new or repaired item. The
replacement item assumes the remaining warranty period of the
original product.
Replacement is not available to you if the product you present for
exchange is defaced, altered, in need of a repair not included in
warranty service, or damaged beyond repair. Also, such product
must be free of any legal obligation or restrictions that prevent its
exchange.
Before you present this product for warranty service, remove all
programs, data, and removable storage media.
Mode Description
Power consumption
(by Machine Type)
4505-100,
4505-200,
4546-xxx
4505-300,
4505-310,
4547-xxx
Printing
Printer is generating
hard copy output 370 W 420 W
Ready
Printer is waiting for
a print job 65 W 80 W
Power
Saver
Printer is in energy
saving mode 6 W 7 W
Off
Printer is plugged
into a wall outlet, but
switch is turned off 0 W 0 W
Printer overview
11
1
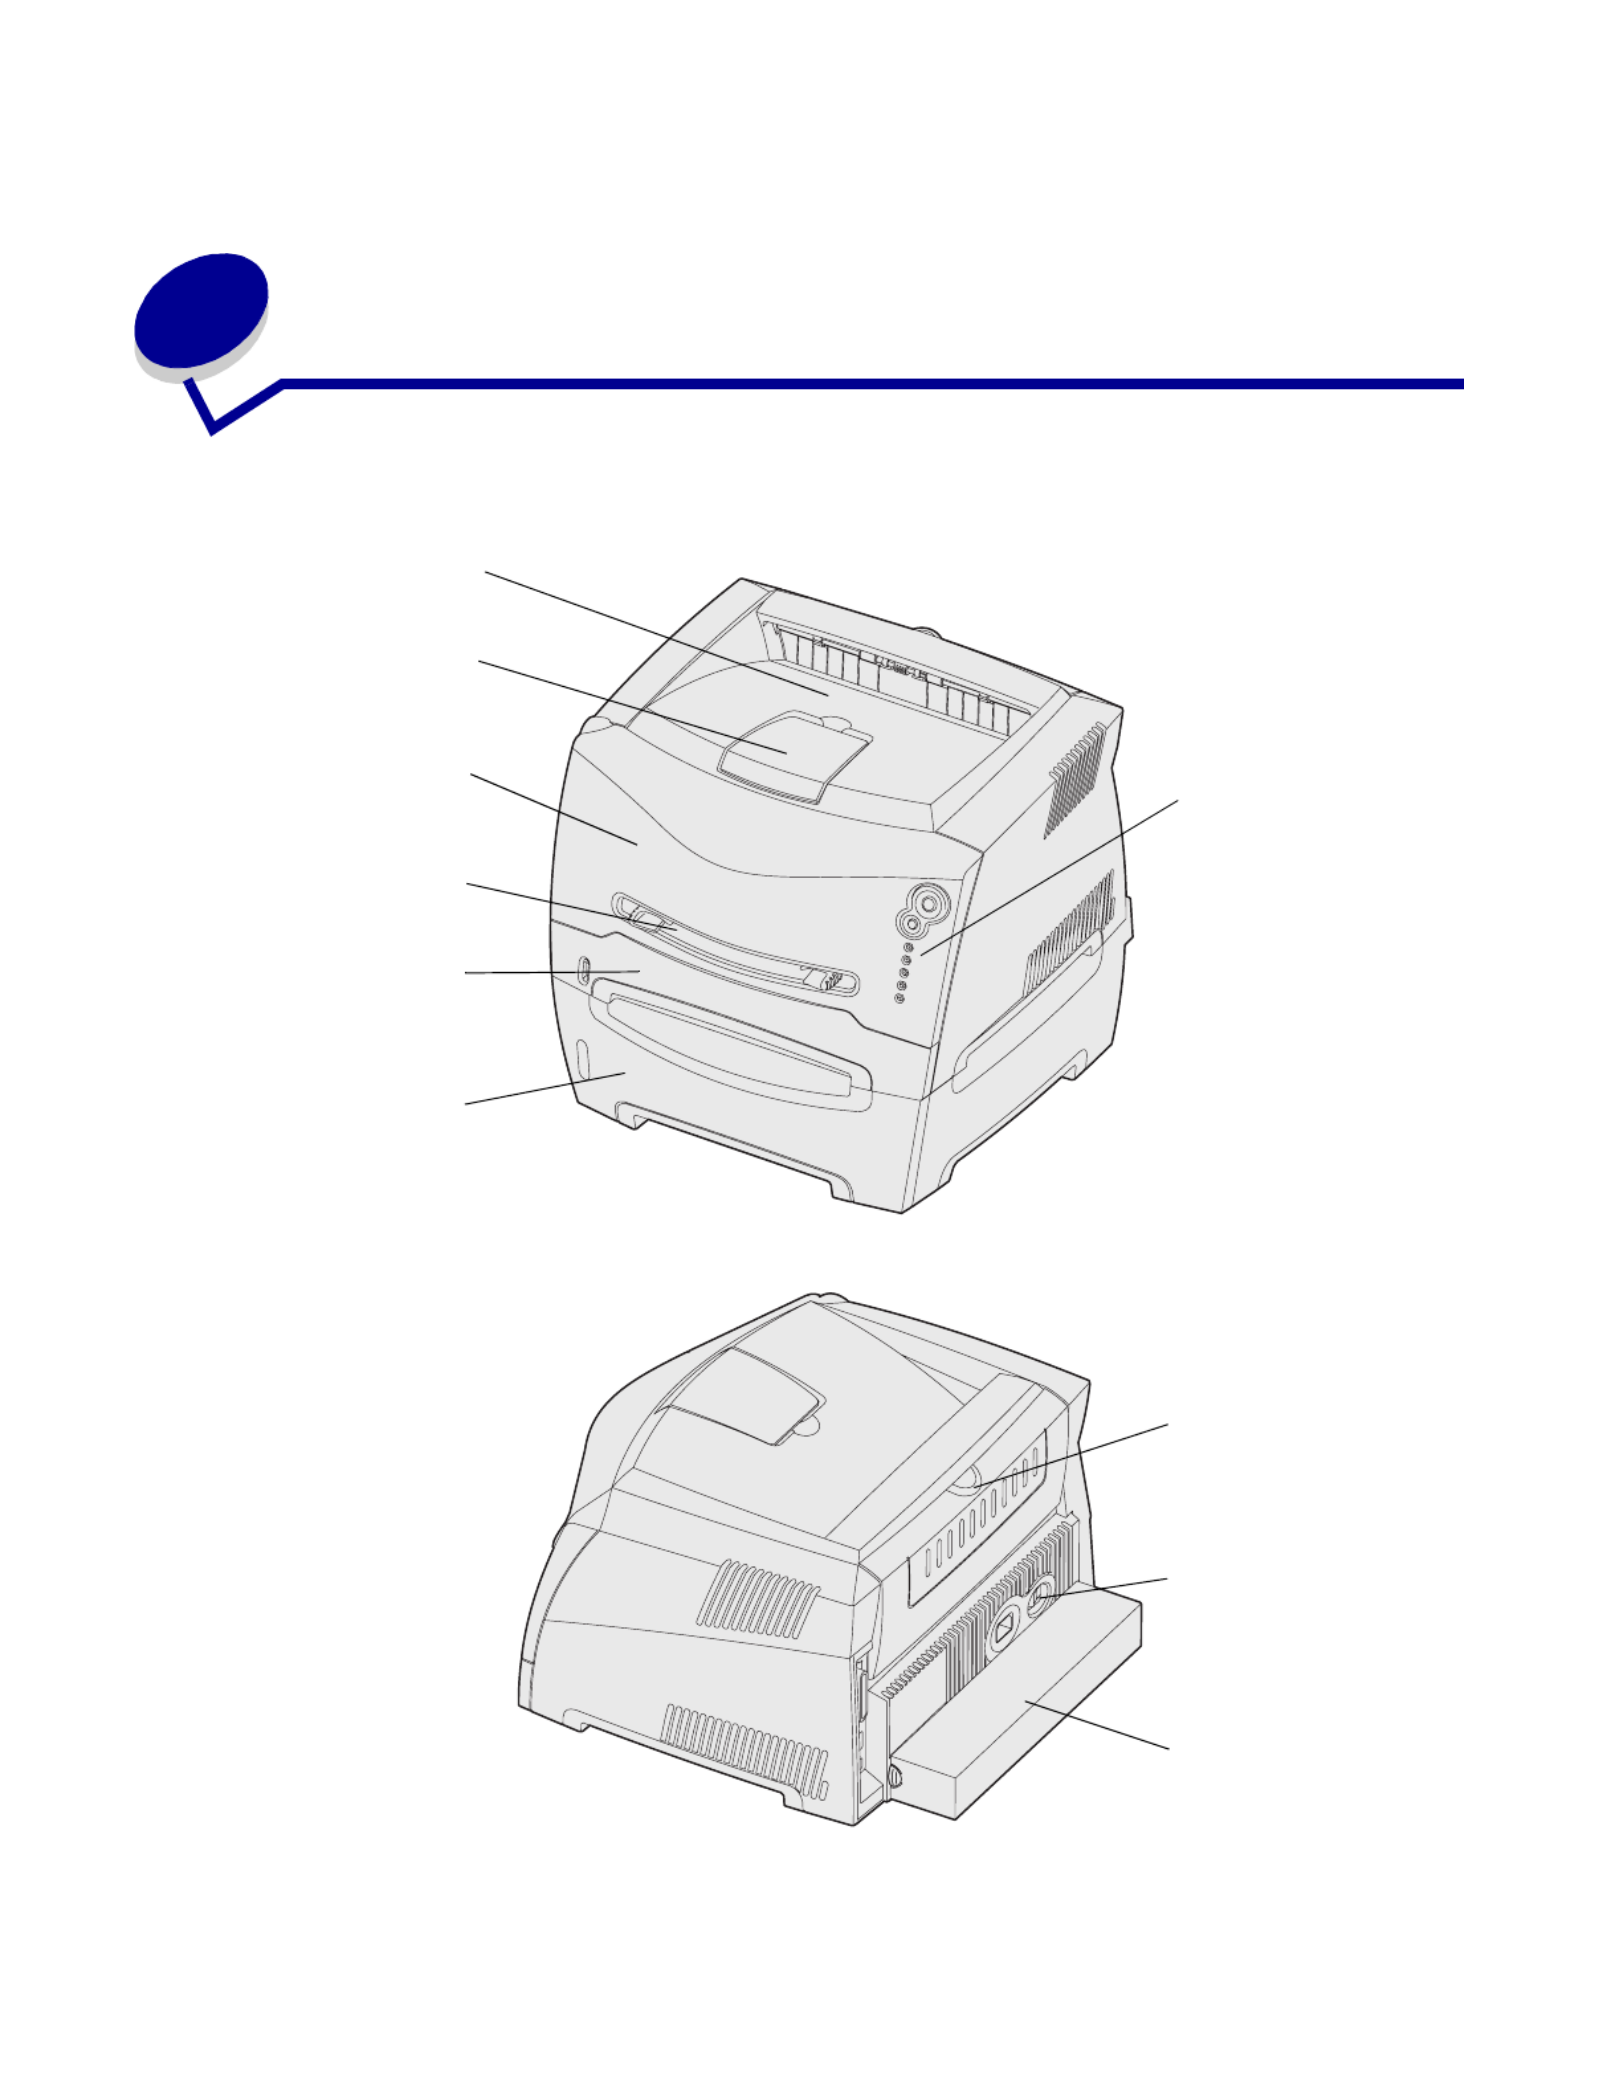
Printer overview
250-sheet tray
Paper support
150-sheet output bin
Operator panel
Manual feeder
Front cover
Optional 550-sheet drawer
Rear paper exit
Power button
Dust cover
(some models)

Printer overview
12
The operator panel has 5 lights and 2 buttons.
Note: The Continue button also functions as a light.
•Press and release Continue to resume printing.
•Press and release Continue twice quickly to display a secondary error code.
•Press and release Cancel to cancel the job currently printing.
•Press and hold Cancel until all of the lights come on to reset the printer.
Ready
Toner Low / Replace PC Kit
Load Paper
Paper Jam
Continue
Cancel
Error

Print media tasks and tips
13
2
Print media tasks and tips
Section Page
What types of print media can be loaded? 14
Where can print media be loaded in the printer? 15
Tips on choosing the right print media 16
Tips on storing print media and supplies 18
Tips on preventing jams 19
How to load the 250-sheet and 550-sheet trays 20
How to load the manual feeder 24
How to use the rear exit 25
How to clear paper jams 26

Print media tasks and tips
14
What types of print media can be loaded?
Get the most out of your printer by properly loading the trays. Never mix media types within a tray.
Source Sizes Types Weight Capacity* (sheets)
Tray 1
(250-sheet tray)
A4, A5, JIS B5, letter,
legal, executive, folio,
statement, Universal‡
Plain paper,
transparencies,
labels
60–90 g/m2
(16–24 lb)
• 250 paper
• 50 labels
• 50 transparencies
Tray 2
(550-sheet tray)
A4, A5, JIS B5, letter,
legal, executive, folio,
statement, Universal‡
Plain paper,
transparencies,
labels
60–163 g/m2
(16–43 lb)
• 550 paper
• 50 labels
• 50 transparencies
Manual feeder A4, A5, JIS B5, letter,
legal, executive, folio,
statement, Universal‡
Plain paper,
transparencies,
labels
60–163 g/m2
(16–43 lb)
1
Card stock†• 120–163 g/m2
(16–90 lb) Index Bristol
• 75–163 g/m2
(50–100 lb) Tag
7¾, 9, 10, DL, C5, B5 Envelopes 90 g/m2 (24 lb)
* Capacity for 20 lb print media, unless otherwise noted.
† Grain short is recommended. Use rear exit for best results.
‡ Universal size ranges:
– Tray 1: 89–216 x 210–356 mm (3.5–8.5 x 8.27–14.0 in.)
– Tray 2: 148–216 x 210–356 mm (5.83–8.5 x 8.27–14.0 in.)
– Manual feeder: 76–216 x 127–356 mm (3.0–8.5 x 5.0–14.0 in.) (includes 3 x 5 in. cards)

Print media tasks and tips
15
Where can print media be loaded in the printer?
Your printer has two standard paper sources: an automatic 250-sheet paper feeder (Tray 1) and a
single-sheet manual feeder. Use Tray 1 for most print jobs. Use the manual feeder for a single piece
of paper, transparency, envelope, paper label, card stock, or index card. You can increase paper
capacity by purchasing an optional 550-sheet drawer.
An output bin on top of the printer holds up to 150 sheets. The single-sheet rear exit provides a
straight-through paper path to help reduce curling and potential jams. This is especially useful for
specialty media, such as transparencies, envelopes, paper labels, card stock, or index cards.
250-sheet tray
Front paper support
150-sheet output bin
Operator panel
Manual feeder
Front cover
Optional 550-sheet drawer
Rear paper exit

Print media tasks and tips
17
Envelopes
•Use envelopes made from 24 lb (90 g/m2) bond paper.
•Do not use envelopes that:
–Have excessive curl
–Are stuck together
–Are damaged in any way
–Contain windows, holes, perforations, cutouts, or embossments
–Use metal clasps, string ties, or metal folding bars
–Have postage stamps attached
–Have any exposed adhesive when the flap is in the sealed position
•Use envelopes that can withstand temperatures of 170°C (338°F) without:
–sealing
–excessive curling
–wrinkling
–releasing hazardous emissions
If you have any doubts about the envelopes you are considering using, check with the
envelope supplier.
•A combination of high humidity (over 60%) and the high printing temperatures may seal the
envelopes.
Labels
•Do not use labels that have exposed adhesive on the sheets.
•Do not print a large number of labels continuously.
•Do not use vinyl labels.
•Use labels that can withstand temperatures of 170°C (338°F) without sealing, excessive
curling, wrinkling, or releasing hazardous emissions. Label adhesives, face sheet (printable
stock), and topcoats must also be able to withstand 25 pounds per square inch (psi)
(172 kilopascals) pressure.

Print media tasks and tips
18
Card stock
•Preprinting, perforation, and creasing can significantly affect the print quality and cause
media handling or jamming problems.
•Avoid using card stock that may release hazardous emissions when heated.
•Do not use preprinted card stock manufactured with chemicals that may contaminate the
printer. Preprinting introduces semi-liquid and volatile components into the printer.
•Use card stock with a maximum weight of 163 g/m2 and a minimum size of 76 x 127 mm
(3 x 5 in.).
Tips on storing print media and supplies
Storing paper
Use the following guidelines to avoid paper feeding problems and uneven print quality.
•Store paper in an environment where the temperature is approximately 21°C (70°F) and the
relative humidity is 40%.
•Store cartons of paper on a pallet or shelf rather than directly on the floor.
•If you store individual packages of paper out of the original carton, make sure they rest on a
flat surface so the edges do not buckle, curl, or become damaged.
•Do not place anything on top of paper packages.
Storing supplies
Choose a cool, clean storage area for your printer supplies. Store supplies right side up in their
original packaging until you are ready to use them.
Do not expose supplies to:
•Direct sunlight
•Temperatures above 35°C (95°F)
•High humidity (above 80%)
•Salty air
•Corrosive gases
•Heavy dust

Print media tasks and tips
19
Tips on preventing jams
You can avoid most paper jams by correctly loading paper and specialty media in the printer.
The following hints can help you avoid paper jams:
•Do not load wrinkled, creased, or damp paper.
•Never mix media types within a tray.
•Flex, fan, and straighten paper before you load it.
•Do not exceed the maximum stack height.
•Push all trays firmly into the printer after loading them.
•Make sure the guides in the trays are positioned snug against the paper or specialty media.
•Do not remove paper trays while a job is printing. Wait for a Load Paper light sequence
(see “Load media” on page 61) before you remove the tray.
•Before loading transparencies, fan the stack to prevent sheets from sticking together.
•Do not use envelopes that:
–Have excessive curl
–Are stuck together
–Are damaged in any way
–Contain windows, holes, perforations, cutouts, or embossments
–Have metal clasps, string ties, or metal folding bars
–Have postage stamps attached
–Have any exposed adhesive when the flap is in the sealed position
•Use only recommended paper. Refer to the Card Stock & Label Guide available on our
Lexmark Web site at www.lexmark.com for more information about which paper provides
optimum results for your printing environment.
•If you need detailed information before purchasing large quantities of customized paper, refer
to the Card Stock & Label Guide.

Print media tasks and tips
20
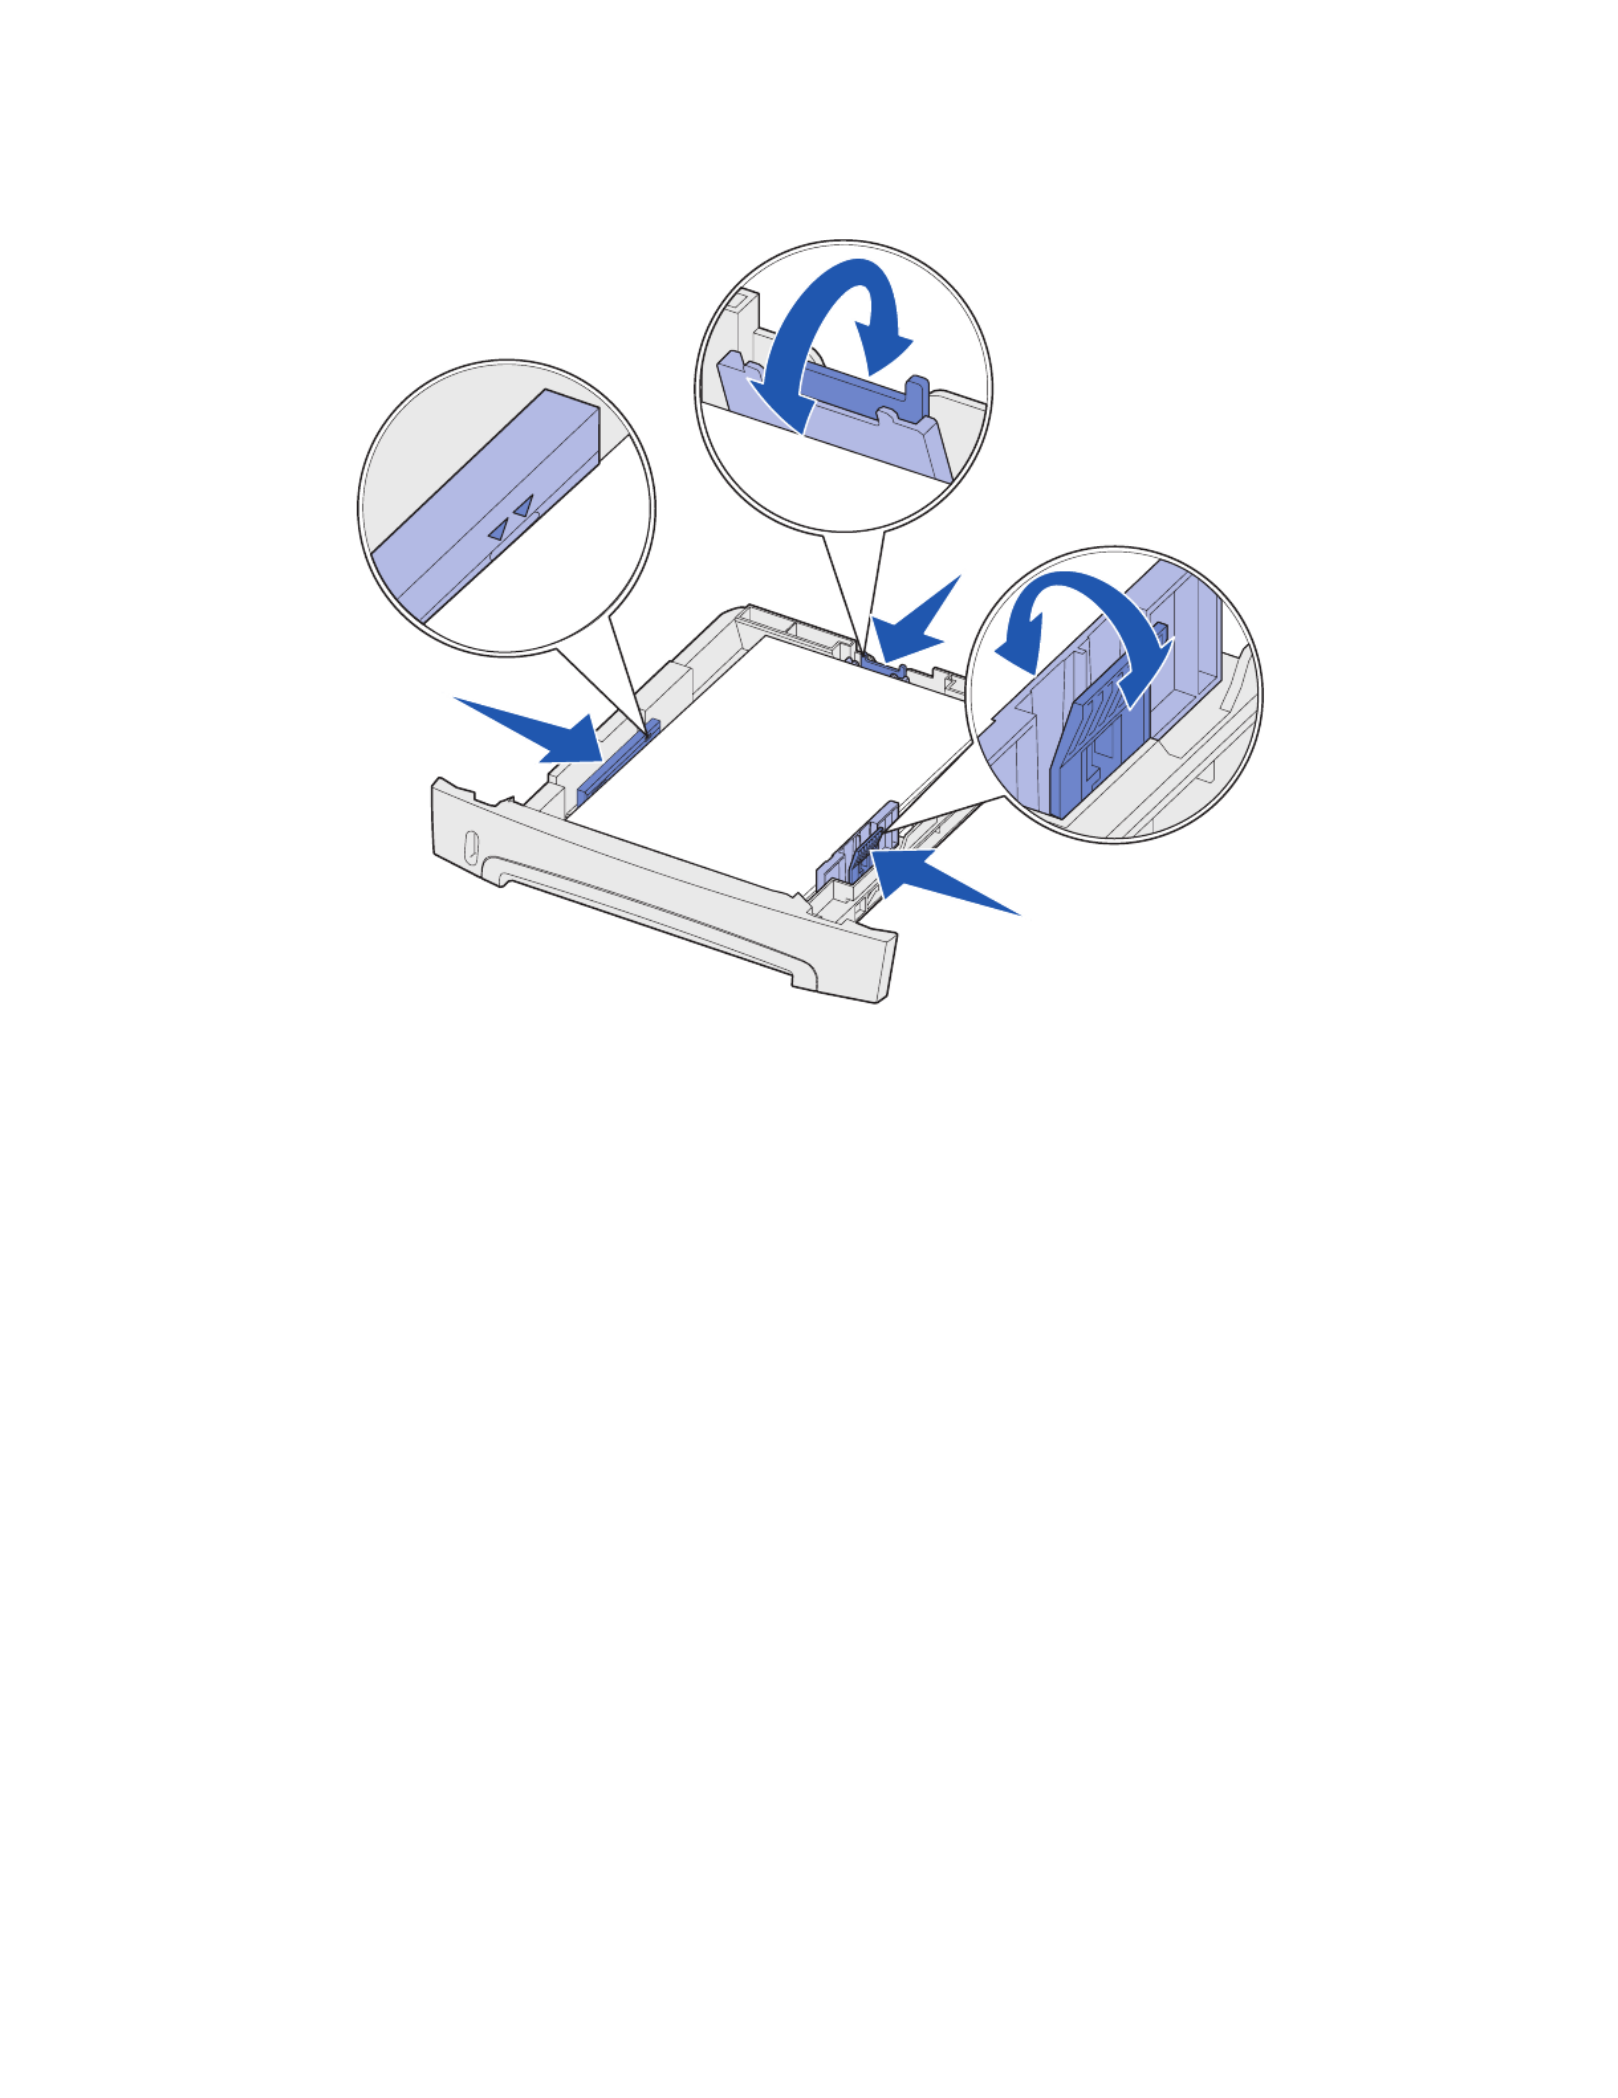
How to load the 250-sheet and 550-sheet trays
Follow these instructions to load paper in the 250-sheet tray and 550-sheet tray.
1Remove the tray.
Note: If you are going to load legal or folio size paper, you have to extend the length of
the paper tray. See “Extending the tray for legal or folio size paper” on page 23
for instructions.
2Prepare a stack of paper for loading by flexing or fanning it back and forth. Straighten the
edges on a level surface.
Print media tasks and tips
21
3Load the paper in the tray with the print side facing down.
Note: Load letterhead paper with the design side facing down. The top edge of the sheet
with the logo should be placed at the front of the tray.
Make sure the paper is below the max fill line on the side guides. Overloading may cause
jams.
4Slide the two side guides and the back guide until they fit snugly against the stack of paper.

Print media tasks and tips
22
5Insert the tray.
6Extend the paper support on the output bin.

Print media tasks and tips
23
Extending the tray for legal or folio size paper
To load legal or folio size paper, you need to extend the paper tray. You should also attach the dust
cover on the back of the printer to protect the tray while it is extended.
1Press down on the latch at the back of the tray.
2Expand the tray until the extender locks into place.
Attaching the dust cover
The dust cover helps protect the paper
tray from the environment as well as
keep the tray from being knocked out of
position while it is extended.
Note: Not all models come
with a dust cover.
Attach the dust cover to the back of the
printer by aligning the tabs on the cover
to the holes on the printer and snap the
cover in place.

Print media tasks and tips
24
How to load the manual feeder
The manual feeder is located at the front of your printer and can only feed one sheet of print media at
a time. You can use the manual feeder to make quick runs of paper types or sizes that are not
currently loaded in the paper tray.
For information on acceptable print media to use in the manual feeder, see “What types of print
media can be loaded?” on page 14. Using only the specified print media helps prevent paper jams
and print quality problems.
Note: We recommend that you send your print job to the printer prior to loading the
manual feeder. See “How to manually feed a print job” on page 30 for more
information.
To load the manual feeder:
1Place a sheet of the selected print
media, print side facing up, at the
center of the manual feeder, but only
to the point where its leading edge
can contact the paper guides.
Otherwise, the printer will engage
the print media too soon and likely
skew the print job.
2Adjust the paper guides to the print
media’s width.
3Hold both sides of the print media
close to the manual feeder and push
it into the printer until it automatically
engages.
There is a brief pause between the
time the printer engages the print
media and when it feeds into the
printer.
Warning: Do not force the print media into the feeder. Forcing the media causes jams.
•Insert envelopes with the flap side down and with the stamp area as shown.
•Hold transparencies by the edges and avoid touching the print side. Oil from your fingers can
affect print quality.
•Load letterhead face-up, with the top of the sheet first.
•If you experience problems with paper feed, turn the paper over.
Print media tasks and tips
25
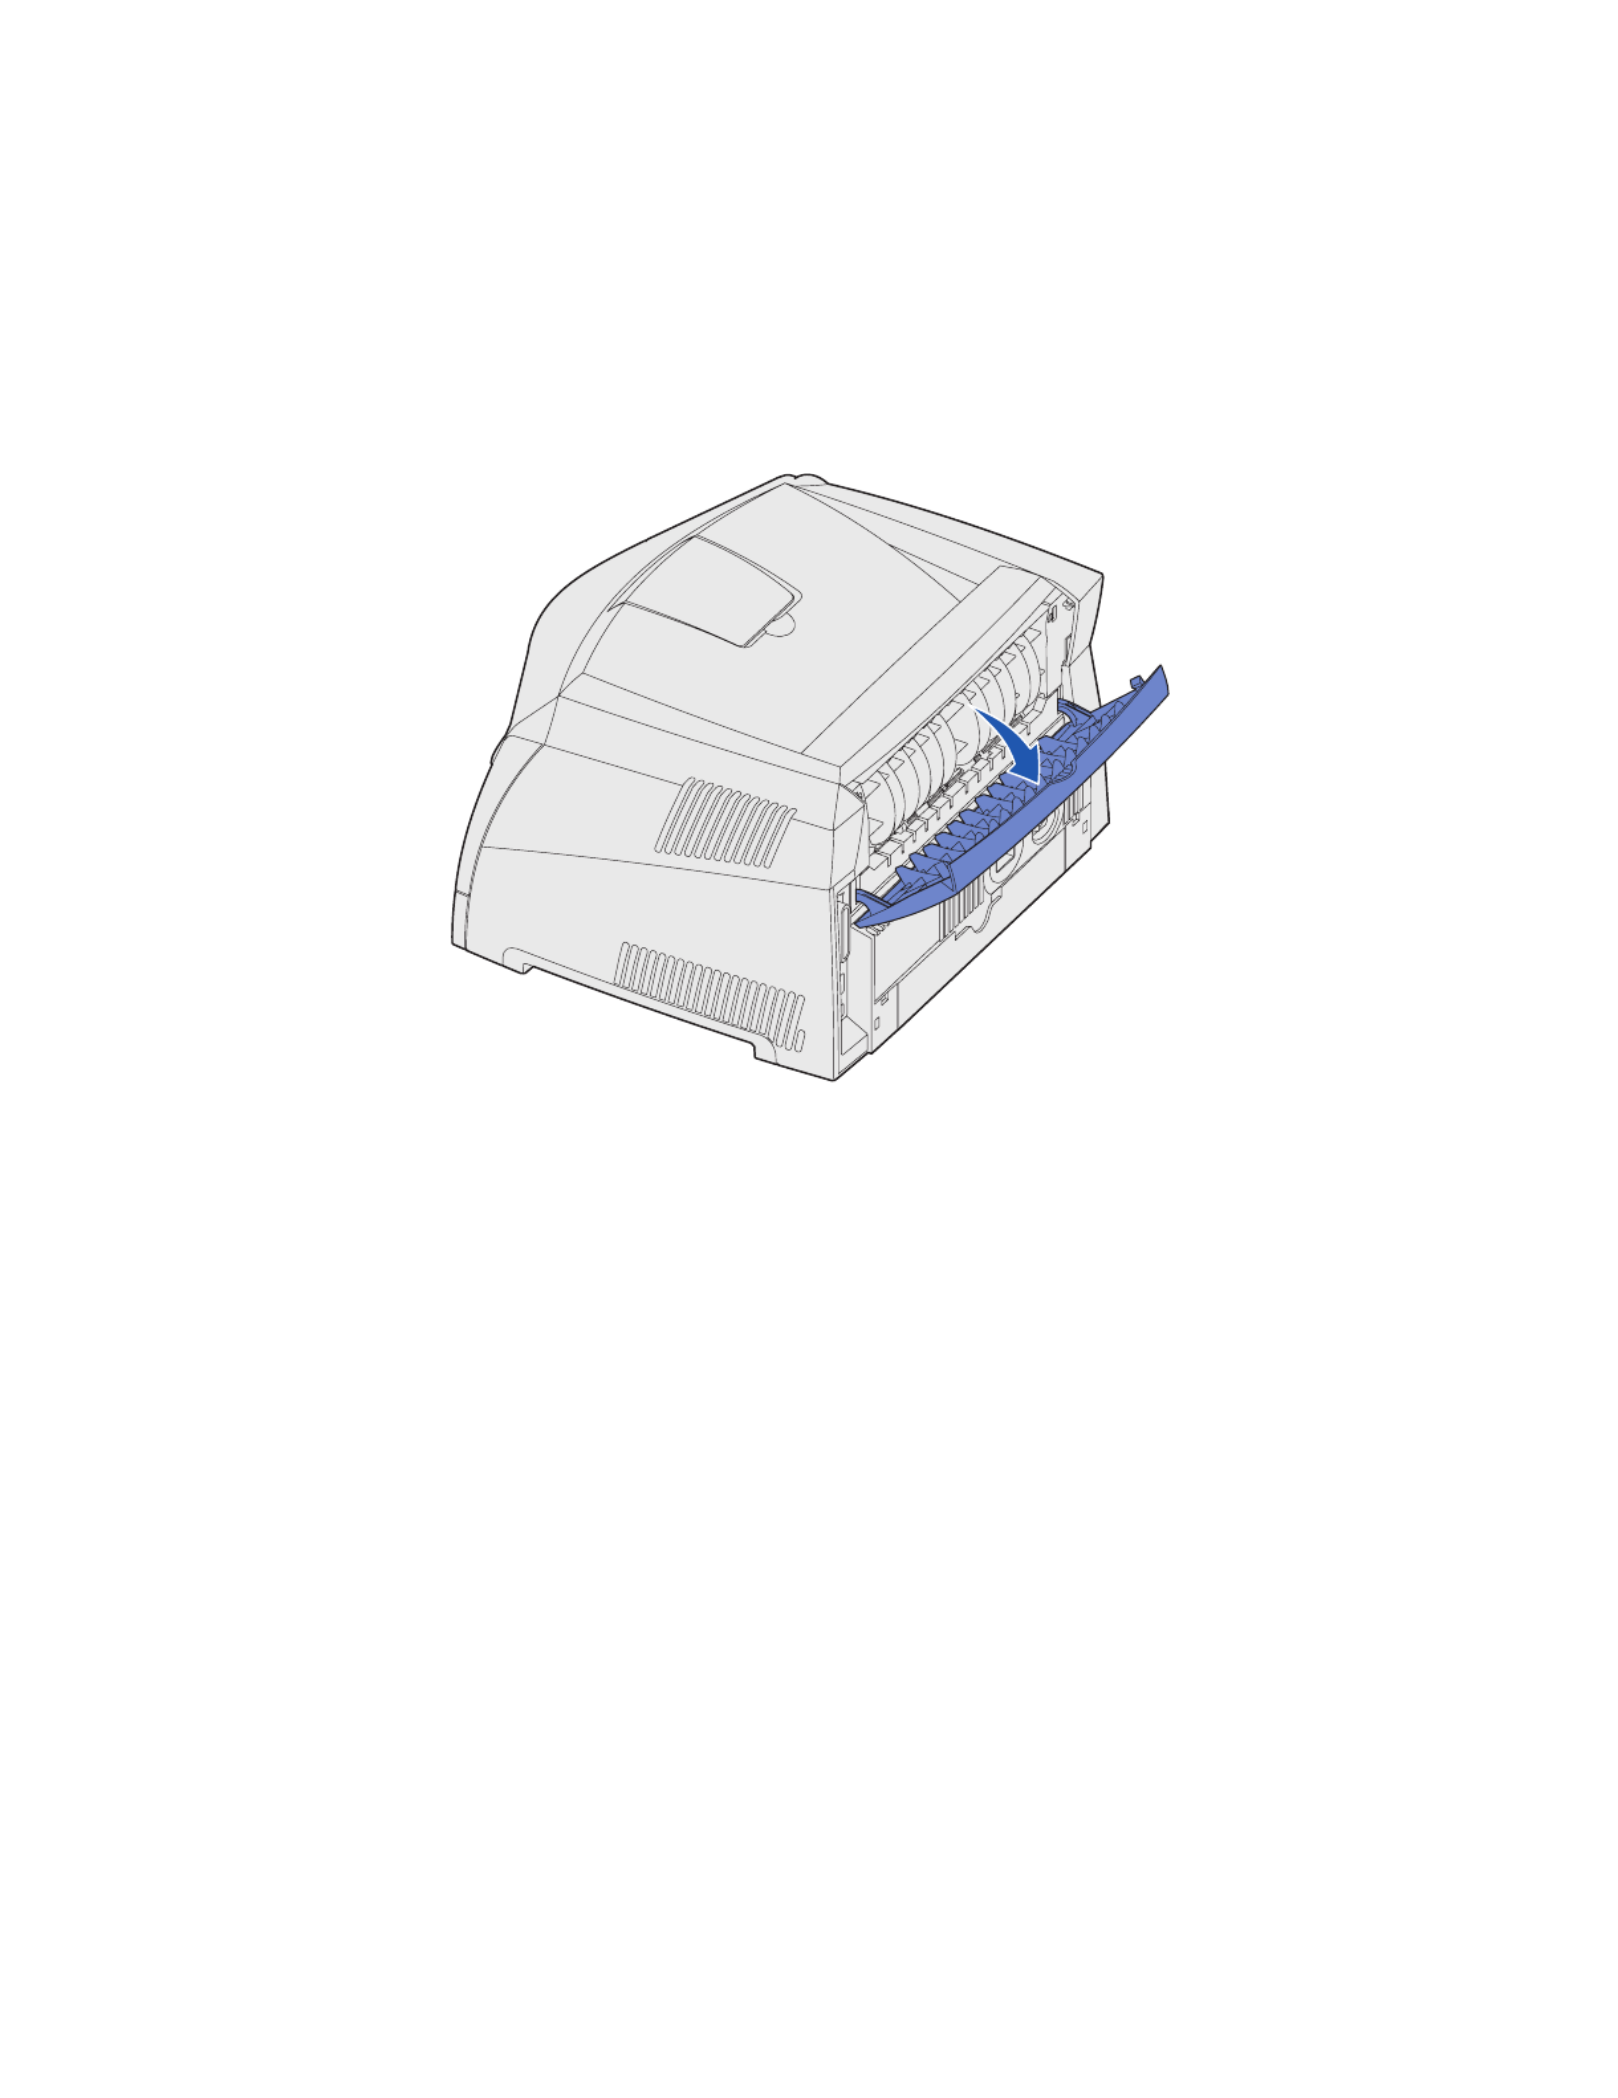
How to use the rear exit
The single-sheet rear exit provides a straight-through paper path to help reduce curling and potential
jams. This is especially useful for specialty media, such as transparencies, envelopes, labels, card
stock, or index cards.
To use the rear exit, simply open the rear exit door. When the rear exit door is open, all print media
comes out the rear exit. When closed, all media is sent to the output bin on top of the printer.

Print media tasks and tips
27
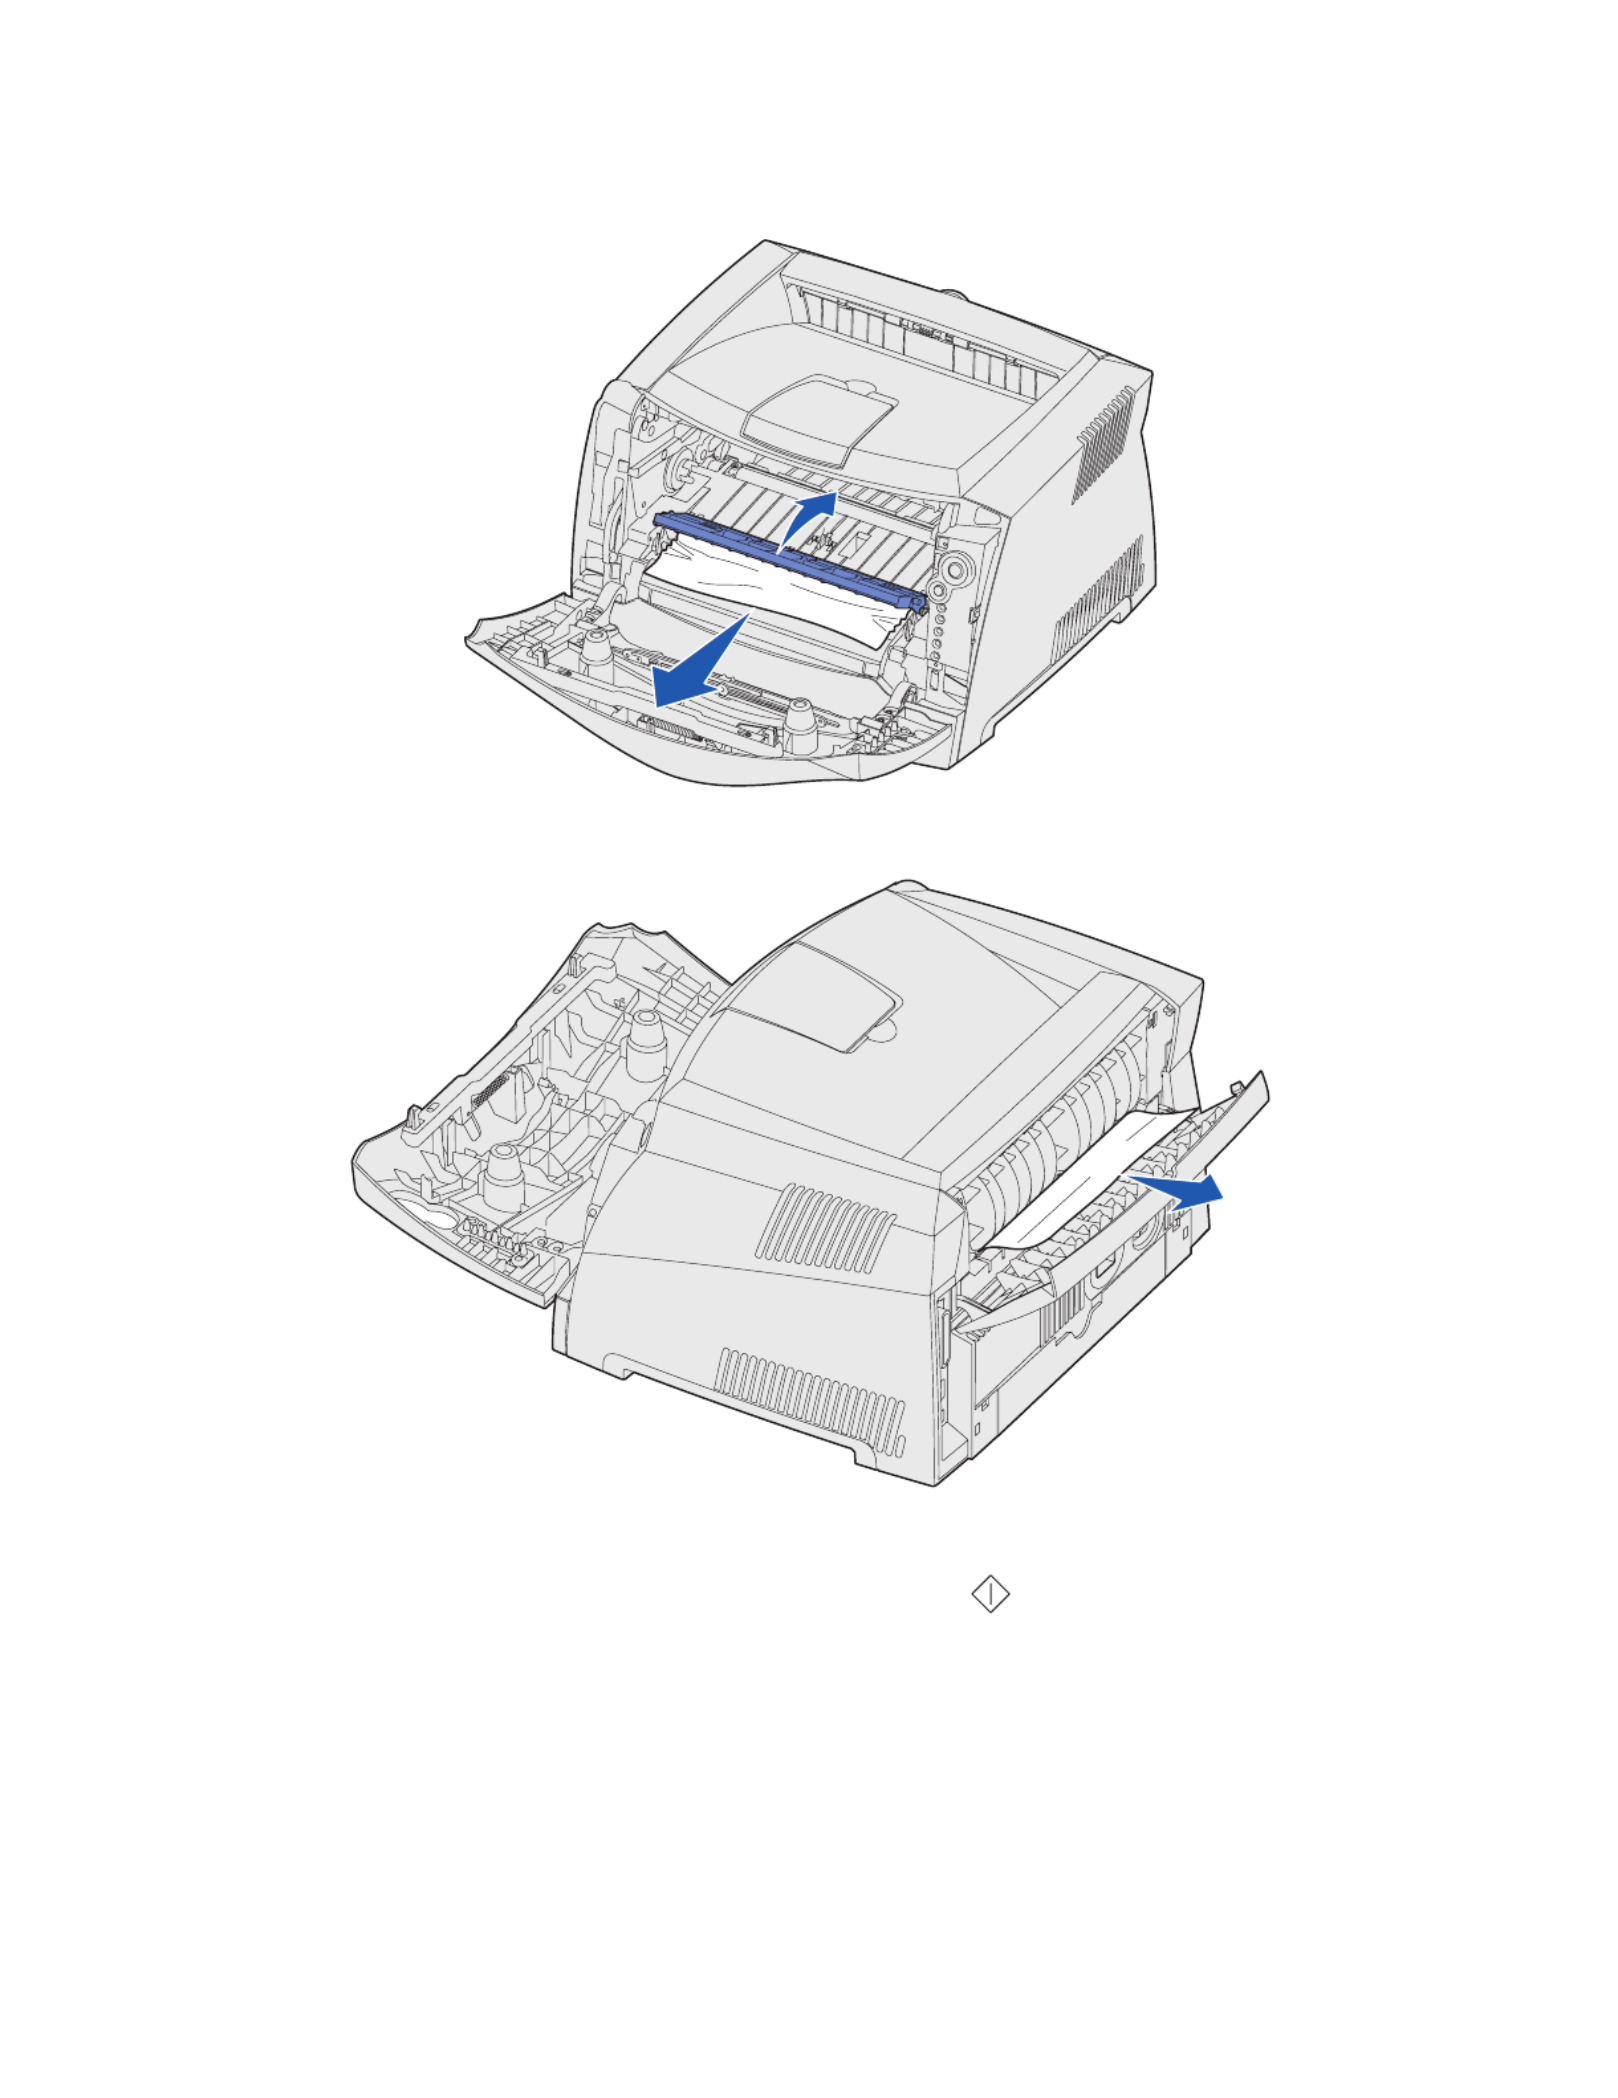
2Open the front cover and remove the print cartridge assembly.
Warning: Do not leave the print cartridge assembly exposed to direct light for an extended
period of time. Extended light exposure can cause print quality problems.
3Remove any jams in the area behind the print cartridge assembly.
Print media tasks and tips
28
4Lift the flap at the front of the printer and remove any jams beneath the flap.
5Open the rear exit and remove any jams.
6After you have cleared the jams, reinstall the print cartridge assembly, make sure all printer
covers and trays are closed, and then press Continue to resume printing.
Note: The printer reprints the pages that caused the paper jam.

Printing tasks
29
3
Printing tasks
Section Page
How to manually feed a print job 30
How to print on both sides of the paper (manual duplex) 32
How to print multiple page images on one page (N-up printing) 34
How to print a booklet 35
How to print a poster 36
How to print on letterhead 37
How to print using an overlay or a watermark 37
How to cancel a print job 39

Printing tasks
30
How to manually feed a print job
The manual feeder is located at the front of your printer and can only feed one sheet of print media at
a time. For information on acceptable print media to use in the manual feeder, see “What types of
print media can be loaded?” on page 14.
When using the manual feeder, send the print job to the printer before loading the print media. When
the printer is ready, it will display the Load Manual Feeder light sequence, at which point you should
load the media.
To manually feed a print job:
1From the computer’s software application, select File Æ Print.
2Click Properties (or Options, Printer, or Setup, depending on the application) to view the
printer driver settings.
3Click the Paper tab.
4Select Manual paper from the Paper tray drop-down list.
5Select the appropriate Paper size and type.
6Click OK.
7Click OK on the Print window to send the job to print.
The printer displays the Load Manual Feeder light sequence.

Printing tasks
31
8Place a sheet of the selected print media, print side facing up, at the center of the manual
feeder, but only to the point where its leading edge can contact the paper guides.
•Hold transparencies by the edges and avoid touching the print side. Oil from your fingers
can affect print quality.
•Insert envelopes with the flap side face down and with the stamp area as shown.
•Load letterhead face up, with the top of the sheet first.
•If you experience problems with paper feed, turn the paper over.
9Adjust the paper guides to the print media’s width.
10 Hold both sides of the print media close to the manual feeder and push it into the printer until
it automatically engages.
There is a brief pause between the time the printer engages the print media and when it
feeds into the printer.
Warning: Do not force the print media into the feeder. Forcing the media causes jams.

Printing tasks
32
How to print on both sides of the paper (manual duplex)
Printing on both sides of the paper reduces printing costs.
Although you can use Tray 1 or the 550-sheet tray to print the first side of the duplex job, only use
Tray 1 to print the second side.
You can choose how you want your job duplexed: Long Edge or Short Edge.
•Long Edge means pages are bound along the long edge of the page (left edge for portrait,
top edge for landscape).
•Short Edge means pages are bound along the short edge of the page.
To manually duplex a print job:
1From the computer’s software application, select File Æ Print.
2Click Properties (or Options, Printer, or Setup, depending on the application) to view the
printer driver settings.
3From the Page Layout tab, select 2-sided printing.
Back of
sheet
Front of
next sheet
Back of sheet
Front of
next sheet
Portrait
Landscape
Back of sheet
Front of sheet
Back of sheet Front of sheet
Landscape
Portrait

Printing tasks
33
4Select either Long Edge or Short Edge.
5Select Manual 2-sided printing.
6Click the Paper tab.
7Select the appropriate Input options for your print job.
8Click OK.
9Click OK on the Print window.
The printer prints every other page of the document first. Once the first side of your job prints,
the Load Paper light comes on and the Continue light blinks.
10 Load the paper back into the printer with the already-printed side up and the top of the page
toward the front of the tray.

Printing tasks
34
How to print multiple page images on one page (N-up printing)
The Multipage Printing (N-up) setting is used to print multiple page images on a single page. For
example, 2-Up means two page images are printed on one page, 4-up means four page images are
printed on one page, and so on.
The printer uses the Multipage Order, Multipage View, and Multipage Border settings to determine
the order and orientation of the page images, and whether a border is printed around each page
image.
1From the computer’s software application, select File Æ Print.
2Click Properties (or Options, Printer, or Setup, depending on the application) to view the
printer driver settings.
3From the Page Layout tab, select the number of images per sheet (from the Multipage
printing section) and the orientation you would like the paper to have.
The positioning depends on the number of images and whether the images are portrait or
landscape in orientation.
For example, if you select 4-Up multipage printing and portrait orientation, the results differ
depending on the Multipage Order value you select:
4To print a visible border around each page image, select Print page borders.
5Click OK.
6Click OK on the Print window to send the job to print.
Across Down
21
43
31
42

Printing tasks
35
How to print a booklet
The Booklet setting lets you print multiple pages in booklet form without having to re-format your
document so the pages print in the proper order. The pages print so that the finished collated
document may be folded along the center of each page to form a booklet.
If the document contains many pages, a booklet may have too many pages to fold easily. If you are
printing a fairly large booklet, you might want to use the Sheets per Bundle option to specify how
many physical pages are put into one bundle. The printer will print the necessary number of bundles,
which you can then bind into one booklet. Printing in bundles helps the outside edge of the pages
line up more evenly.
You must specify whether or not you want to print using any Duplex printing options before you select
to print using the booklet function. Once you choose Print Using Booklet, the controls for the Duplex
options are dimmed and remain at the last setting used.
1From the computer’s software application, select File Æ Print.
2Click Properties (or Options, Printer, or Setup, depending on the application) to view the
printer driver settings.
3From the Page Layout tab, click More Page Layout Options.
4Click Booklet.
If your print job is large, you may want to use the Sheets per Bundle option.
5Select the appropriate binding edge for your print job.
6To print a visible fold mark on the pages, select Print fold mark.
7Click OK twice.
8Click OK on the Print window to send the job to print.
2
4
5
7

Printing tasks
36
How to print a poster
The Poster setting lets you print a single image across several pages. Once printed, you can
combine the pages to create one large image.
1From the computer’s software application, select File Æ Print.
2Click Properties (or Options, Printer, or Setup, depending on the application) to view the
printer driver settings.
3From the Page Layout tab, click More Page Layout Options.
4Click Poster.
5Select the poster size you want by choosing the number of pages to use in the poster.
6To print crop marks on the pages, select Print crop marks.
7Select the amount of overlap you want each page to have.
8Click OK twice.
9Click OK on the Print window to send the job to print.

Printing tasks
37
How to print on letterhead
To print on letterhead, make sure the paper is loaded with the proper orientation.
1Make sure the letterhead is properly loaded according to the paper source you are using:
•Tray 1 or 2—Load the letterhead paper with the design side facing down. The top edge of
the sheet with the logo should be placed at the front of the tray.
•Manual feeder—Load the letterhead paper face-up, with the top of the sheet first.
Note: If you are using the manual feeder, first send the job to print, then load the
letterhead when the printer displays the Load Manual Feeder light sequence (see
“How to manually feed a print job” on page 30).
2From the computer’s software application, select File Æ Print.
3Click Properties (or Options, Printer, or Setup, depending on the application) to view the
printer driver settings.
4Click the Paper tab.
5Select Letterhead from the Paper type drop-down lists.
6Select the appropriate paper size and tray.
7Click OK.
8Click OK on the Print window to send the job to print.
How to print using an overlay or a watermark
Overlays and watermarks are templates that can be defined and then printed as a background on a
form before the data from the current job is printed. Typical examples of overlays include company
logos or letterheads, decorative borders, and simulated “preprinted” forms. Overlays can include text,
graphics, or images. Watermarks are simple text. You can create overlays and watermarks and then
download them directly to the printer, or you can create an overlay or watermark file on your system
and then download it to the printer.
Note: To create and download overlays, you must have flash memory installed.
For information about how to create, save, or download an overlay or watermark, refer to the printer
driver Help.

Printing tasks
39
How to cancel a print job
A print job can be canceled from the operator panel or from your computer. The Cancel job light
sequence is displayed on the operator panel while the job is being cancelled.
From the printer operator panel
Press and release Cancel to cancel the job currently printing.
From a Windows computer
1Click Start Æ Settings ÆPrinters.
2Double-click the printer you are using to print the job.
A list of print jobs appears.
3Right-click the document you want to stop printing, and then click Cancel.
From a Macintosh computer
When you send a job to print, the printer icon appears on the desktop.
1Double-click the printer icon on your desktop.
A list of print jobs appears.
2Press Control and click the print job you want to cancel. Choose Stop Queue from the
pop-up menu.
How to install options
41
How to access the system board
To install a memory or flash card you must access the printer system board.
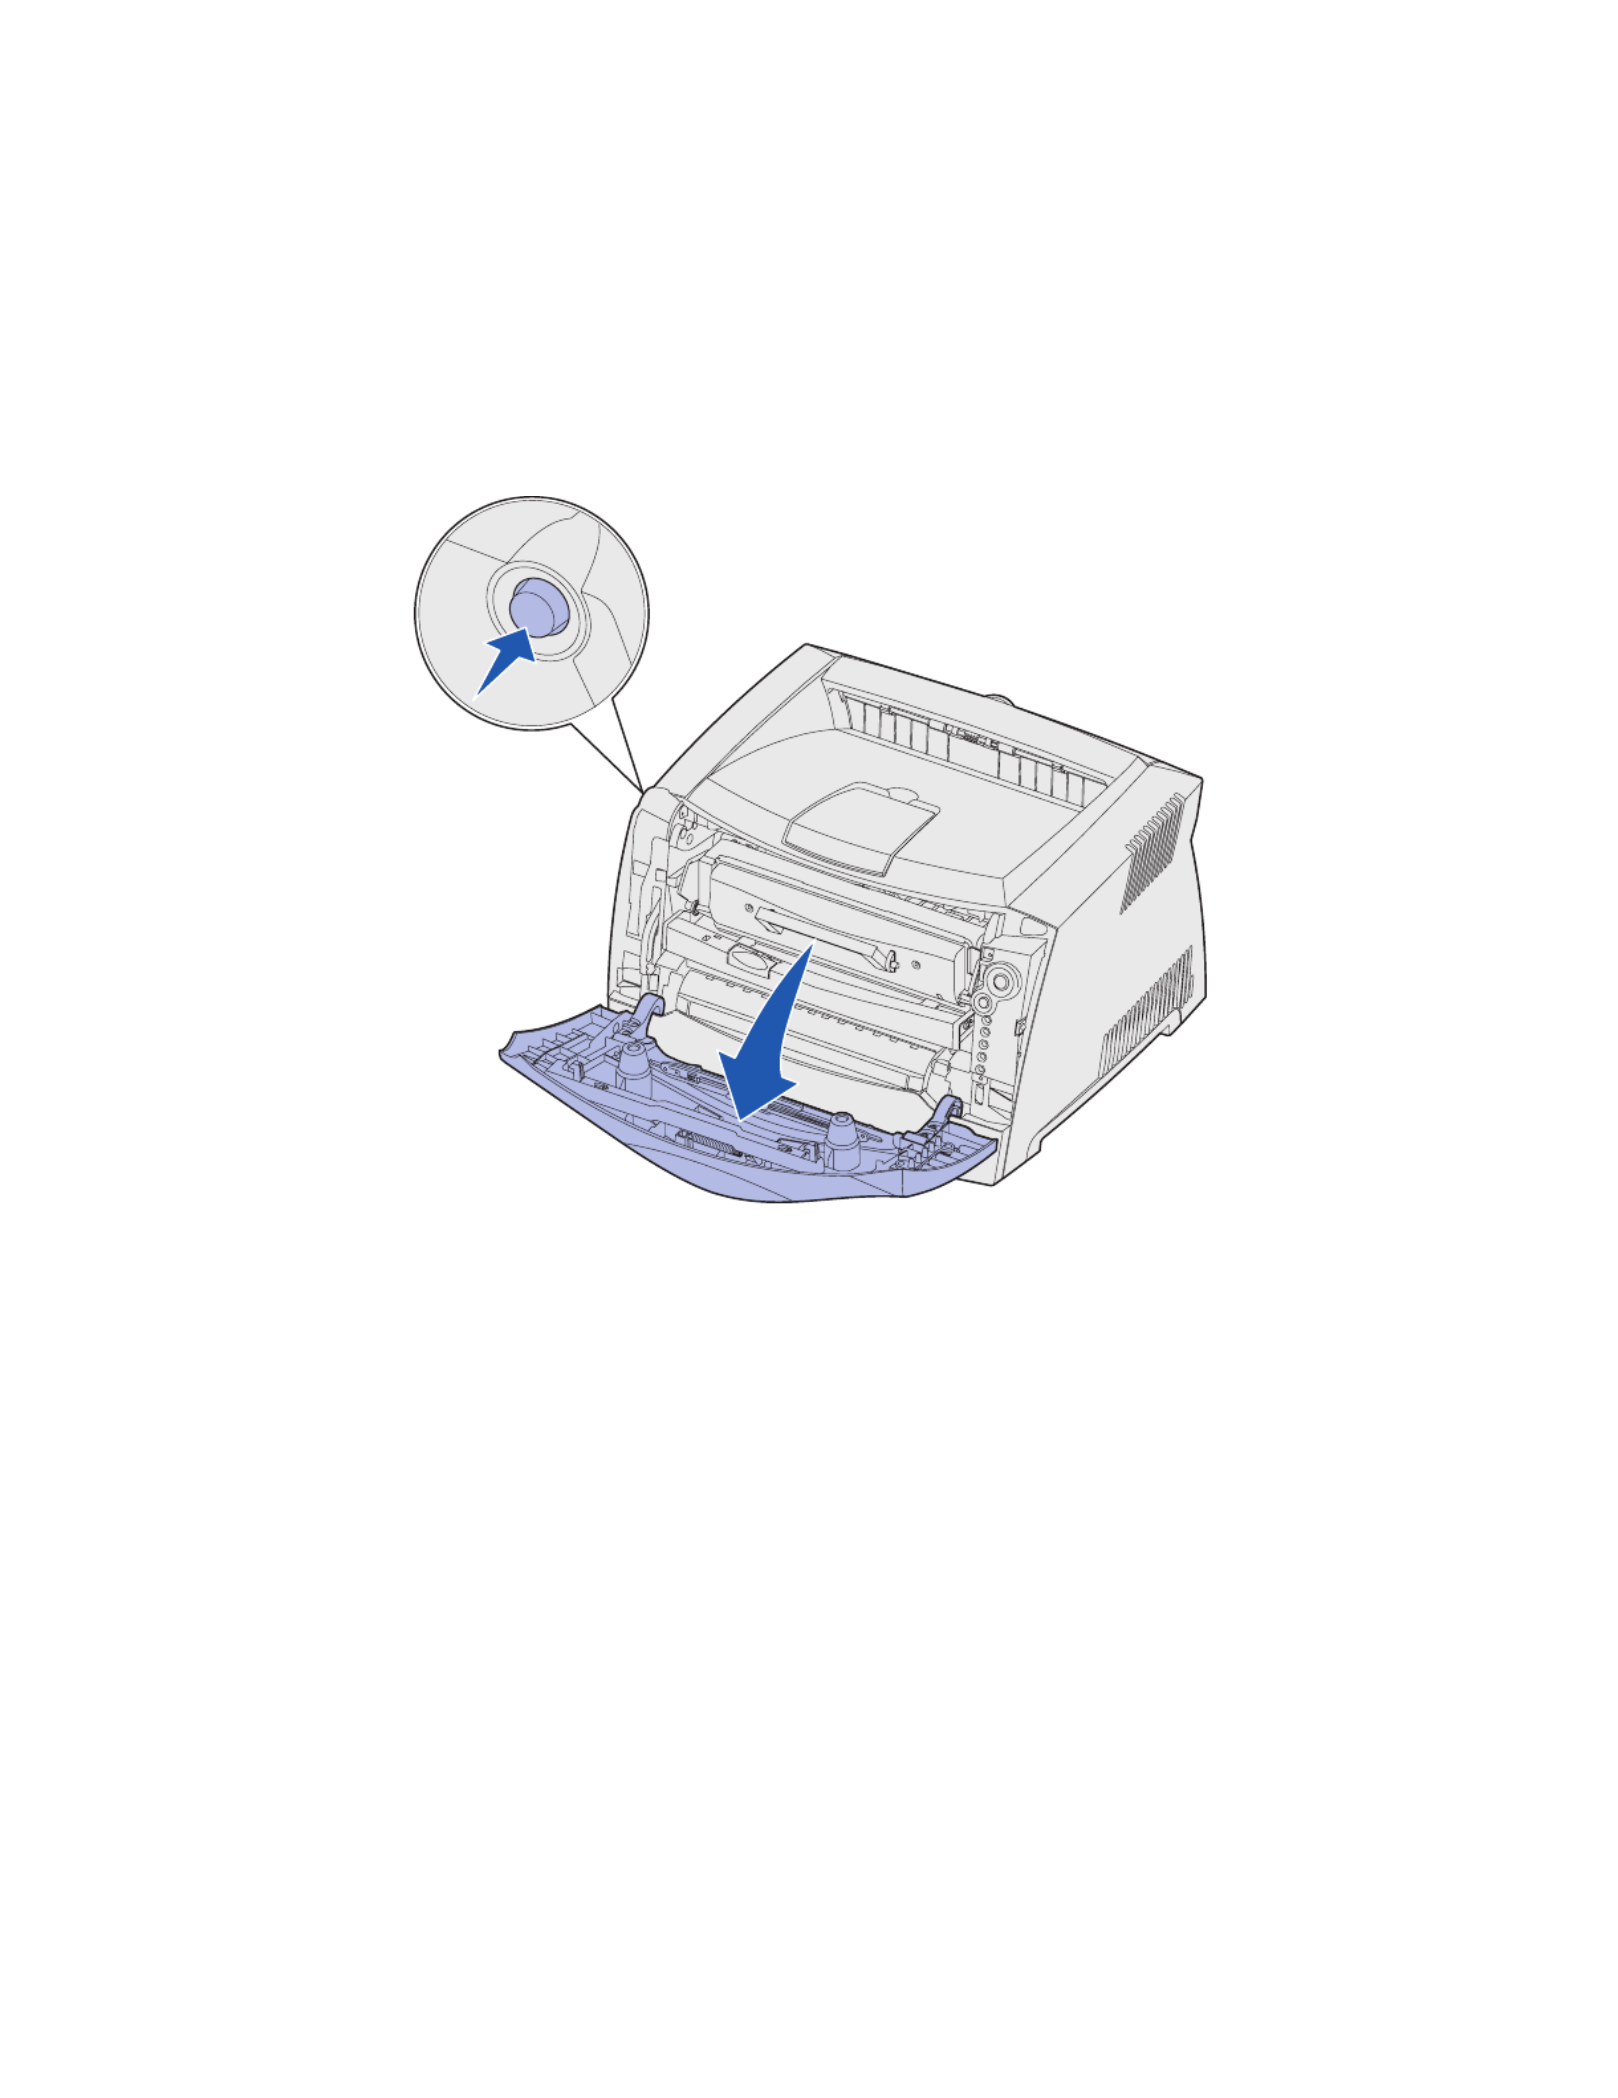
CAUTION: Turn the printer off and unplug the power cord before continuing.
1Open the front cover by pressing the button on the left side of the printer and lowering the
cover.

How to install options
43
4Remove the two screws at the top and side of the metal plate covering the system board.
5Remove the metal plate by rotating it towards the front and to the right.
How to install options
45
How to add a memory card
The system board has one connector for an optional memory card. The printer can support up to
64MB of additional memory (for a total of 80MB) for the Lexmark E232 and up to 128MB (for a total
of 160MB) for the Lexmark E330 and Lexmark E332n. The Lexmark E230 does not support
additional memory.
CAUTION: If you are installing a memory card after setting up the printer, turn the printer off
and unplug the power cord before continuing.
Note: Memory options designed for other Lexmark printers may not work with your
printer.
1Access the system board (see How to access the system board).
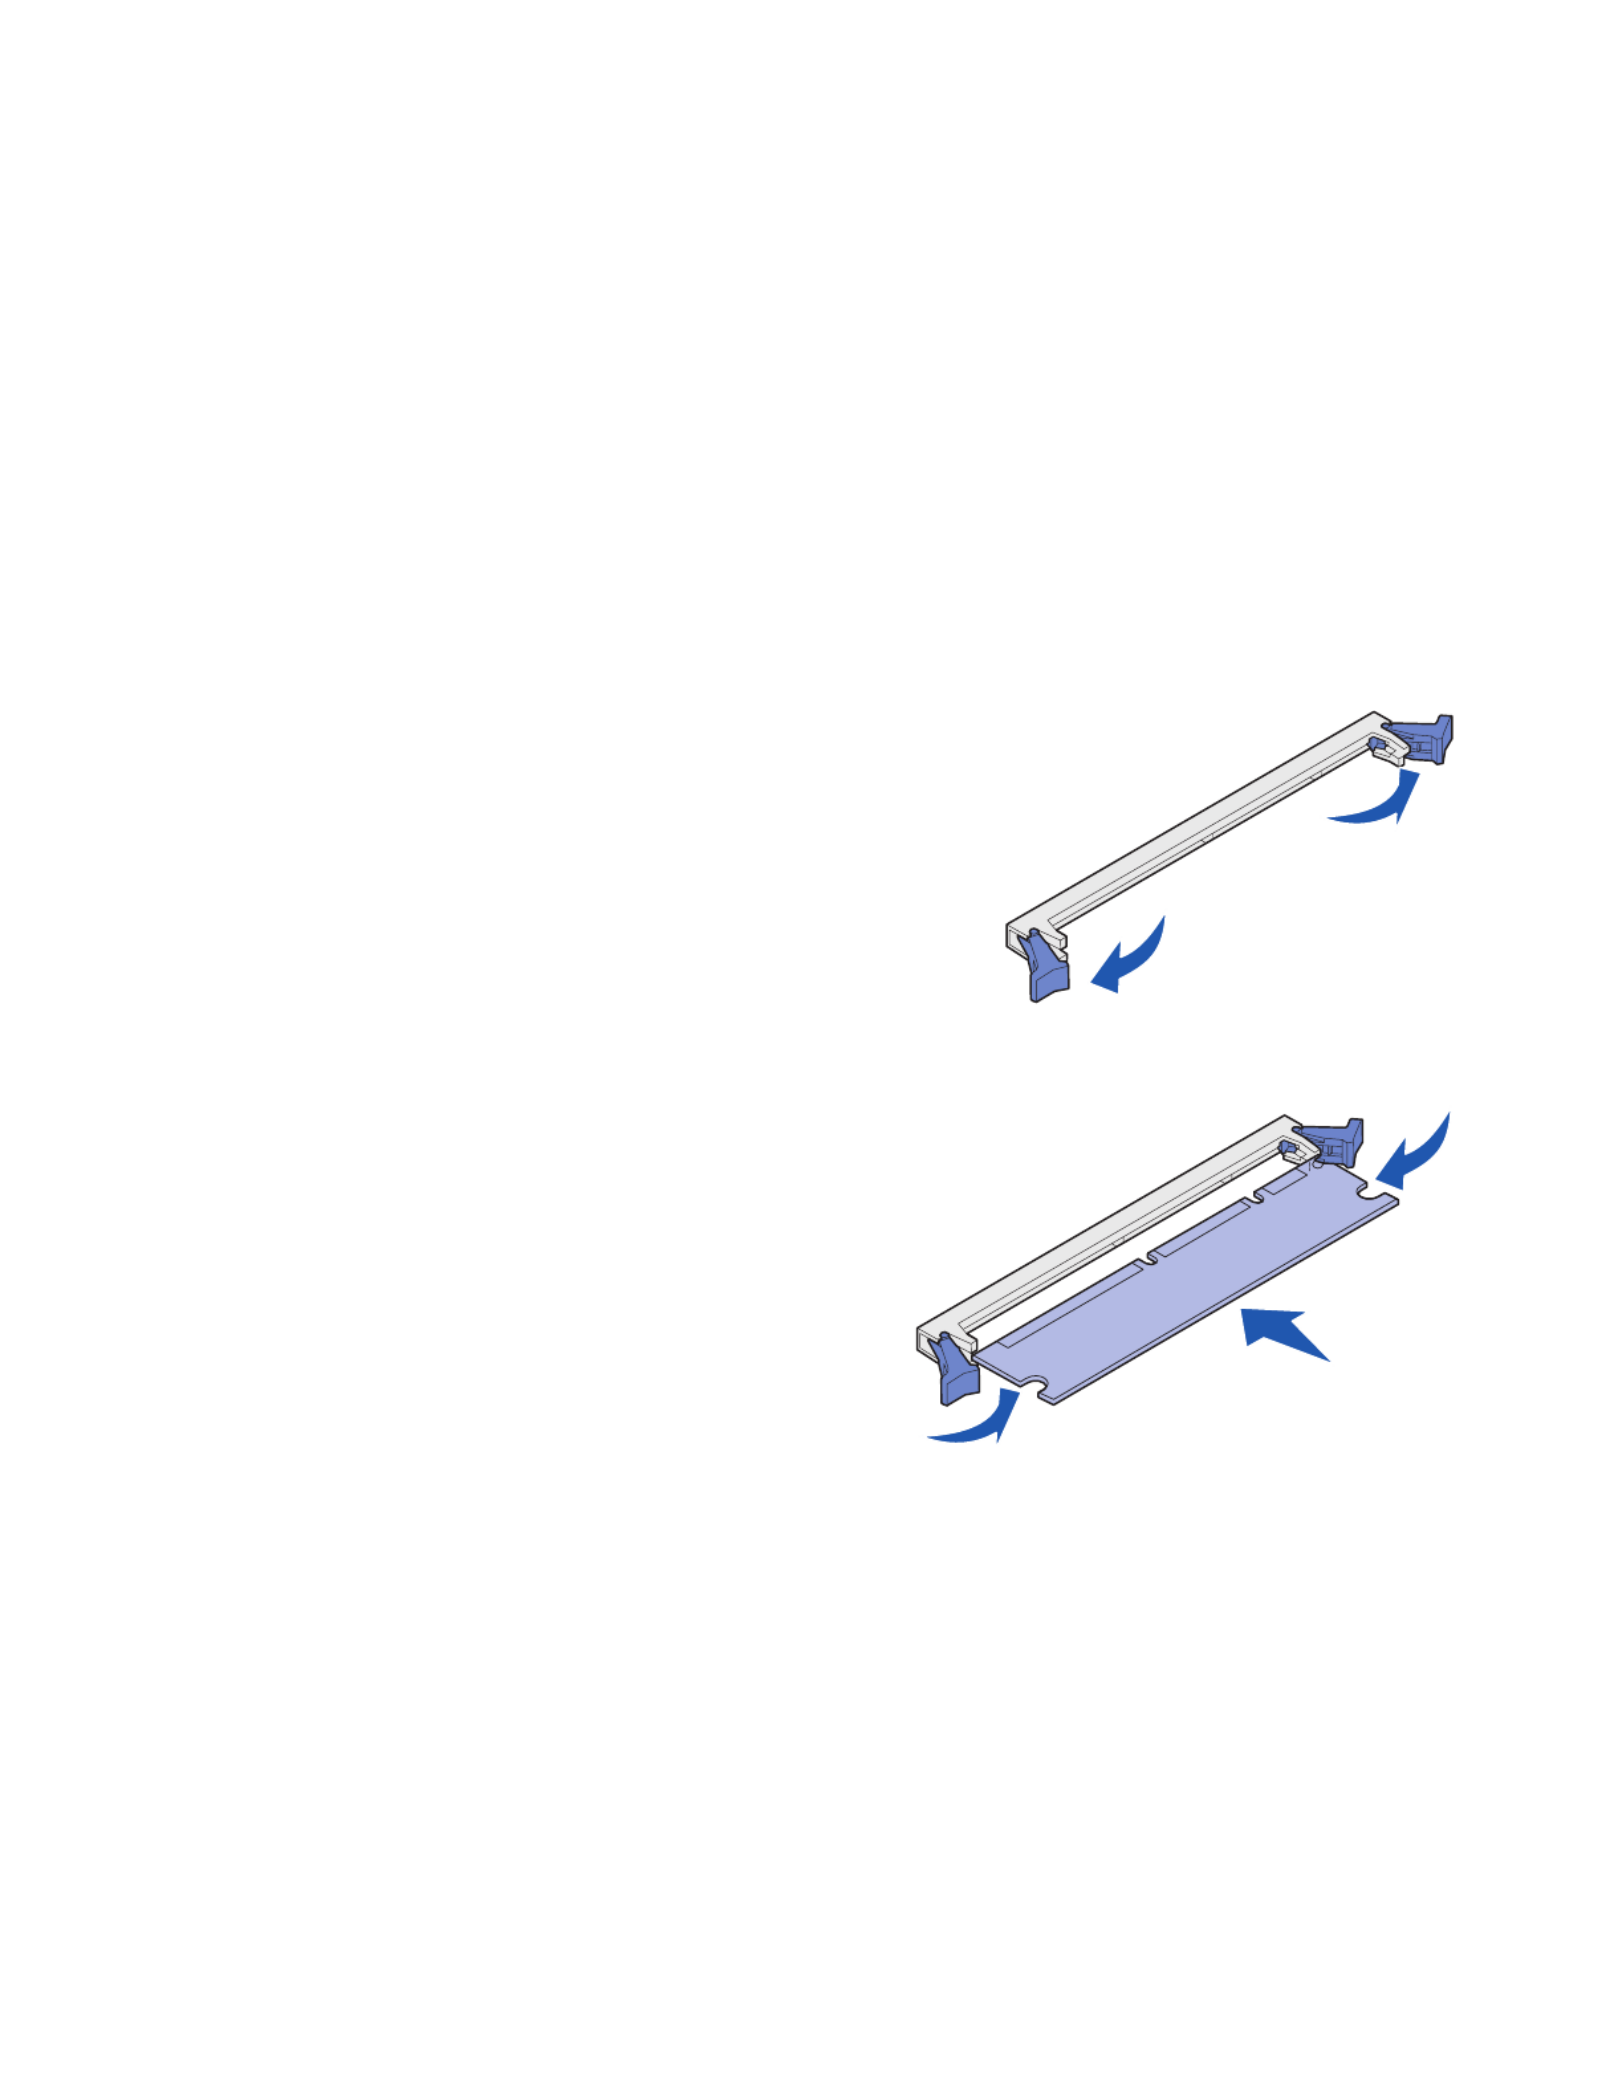
2Push open the latches on both ends of the memory
connector.
3Unpack the memory card.
Warning: Memory and flash memory cards are easily
damaged by static electricity. Touch
something metal, such as the printer frame,
before you touch a memory card.
Avoid touching the connection points along the edge of the card.
4Align the notches on the bottom of the card with
the notches on the connector.
5Push the memory card firmly into the connector
until the latches on either end of the connector
snap into place.
It may require some force to fully seat the card.
6Make sure each latch fits over the notch on each
end of the card.
7Reattach the system board cover (see How to reattach the system board cover).
8See How to get the printer driver to recognize installed options.

How to install options
47
4Push the flash card firmly into place.
The entire length of the connector on the flash card must touch and be flush against the
system board.
Be careful not to damage the connectors.
5Reattach the system board cover (see How to reattach the system board cover).
6See How to get the printer driver to recognize installed options.

How to install options
49
How to get the printer driver to recognize installed options
After the printer is turned on, the printer driver should automatically recognize an option you
installed. If it does not, you can add it manually.
Note: If you have not installed your printer driver yet, follow the appropriate instructions
under Software and network tasks. After you have installed a printer driver, return
here to complete these instructions.
1Click Start Æ Settings ÆPrinters.
2Select the printer’s icon.
3Click File Æ .Properties
4Click the Install Options tab.
5Add the appropriate options to your configuration:
•550-Sheet Tray or Flash Card—Select the option you installed from the Available options
list and click Add.
•Memory Card—Increase the printer memory to the appropriate number.
6Click OK.

Using the operator panel
50
5
Using the operator panel
Section Page
Overview of the operator panel 51
Understanding the operator panel lights 52
Operator panel codes 57

Using the operator panel
51
Overview of the operator panel
The operator panel has 5 lights and 2 buttons.
Note: The Continue button also functions as a light.
•Press and release Continue to resume printing.
•Press and release Continue twice quickly to display a secondary error code.
•Press and release Cancel to cancel the job currently printing.
•Press and hold Cancel until all of the lights come on to reset the printer.
Ready
Toner Low / Replace PC Kit
Load Paper
Paper Jam
Continue
Cancel
Error

Using the operator panel
52
Understanding the operator panel lights
The operator panel lights mean different things, depending on their sequence. Lights that are off, on,
and/or blinking indicate printer conditions such as printer status, intervention, or service.
The following tables show the most common light sequences. Click the indicated page for more
information on what it means.
Common light sequences
Printer condition
Ready /
Power Saver
Busy
Hex Trace Ready
Waiting
Flushing /
Resolution reduced
Not ready
(printer is offline)
Close door
Load media
Load manual feeder
Print side two
of a duplex job
Invalid engine code /
Invalid network code
Page: 57 58 59 59 60 60 61 61 62 62 63
Continue
Ready
Toner Low /
Replace PC Kit
Load Paper
Paper Jam
Error
= On = Blinking = Slow blink Empty = Off

Using the operator panel
53
Common light sequences (continued)
Printer condition
Toner low
Photoconductor kit near full
Replace photoconductor kit
Replace photoconductor kit
(printer hard stop)
Unsupported toner cartridge /
Toner cartridge is not installed
Change invalid toner cartridge
Programming engine code /
Programming system code
Cancel job /
Reset printer
Service error
Printer error *
Paper jam printer error *
Page: 63 64 64 65 65 66 66 67 67 68 68
Continue
Ready
Toner Low /
Replace PC Kit
Load Paper
Paper Jam
Error
* See “Secondary errors” on page 54 for more information.
= On = Blinking = Slow blink Empty = Off

Using the operator panel
54
Secondary errors
•When the Error and Continue lights are both on, a secondary error has occurred.
•When the Paper Jam and Continue lights are both on, a paper jam secondary error
has occurred.
Press and release Continue twice quickly to display the secondary error code light sequence.
The following table shows what these light sequences mean and where to go for help.

Using the operator panel
56
Secondary Error codes (continued)
Printer condition
Insufficient defrag memory
Network interface errors
Error communicating
with the host computer
Host interface disabled
Memory full
Short paper
Flash full
Unformatted flash
Invalid engine code
Invalid network code
Page: 76 76 77 77 78 79 80 81 81 82
Continue
Ready
Toner Low /
Replace PC Kit
Load Paper
Paper Jam
Error
= On = Blinking Empty = Off

Using the operator panel
57
Operator panel codes
Below are explanations of what the primary light sequences, or codes, and secondary error codes
mean and what you can do to clear them.
Primary codes
Ready / Power Saver
Light sequence:
•Ready—On
What this light sequence means:
•The printer is ready to receive and process data.
•The printer is in Power Saver mode.
What you can do:
•Send a print job.
•Press Continue to print the menu settings pages for a
list of current printer settings.
•Press and hold Cancel to reset the printer.
Note: If you want to change the Power Saver setting, it
can only be set from the Local Printer Setup Utility
(see “Using the Local Printer Setup Utility” on
page 103).

Using the operator panel
58
Busy
Light sequence:
•Ready—Blink
What this light sequence means:
•The printer is busy receiving and processing data or printing.
•The printer is defragmenting the flash memory to reclaim
storage space occupied by deleted resources.
•The printer is formatting the flash memory.
•The printer is storing resources, such as fonts or macros, in
flash memory.
•The printer is printing a directory, font list, menu settings
pages, or Print Quality Test Pages.
What you can do:
•Busy:
–Wait for the message to clear.
–Press and release Cancel to cancel the print job.
–Press and hold Cancel to reset the printer.
•Defragmenting flash, formatting flash, or programming flash:
–Wait for the message to clear.
– Warning: Do not turn the printer off while this message is
displayed.
•Printing a directory, a font list, menu settings pages, or Print
Quality Test Pages:
–Wait for the pages to print. The Busy message is
displayed as the pages print. The Ready light is on when
printing stops.
–Press and release Cancel to cancel printing.
–Press and hold Cancel to reset the printer.
•Receiving/processing data from a host interface:
–Wait for the message to clear.
–Press and release Cancel to stop processing.
–Press and hold Cancel to reset the printer.

Using the operator panel
59
Hex Trace Ready
Waiting
Light sequence:
•Ready—Slow blink
What this light sequence means:
The printer is in the Ready mode and Hex Trace is active.
What you can do:
•Advanced users can use Hex Trace to help troubleshoot
printing problems. After resolving the problem, turn off the
printer to exit Hex Trace.
•Press and hold Cancel to reset the printer.
Light sequence:
•Continue—On
•Ready—On
What this light sequence means:
The printer is waiting until a print timeout occurs, or until it receives
additional data.
What you can do:
•Press Continue to print the contents of the print buffer.
•Press and release Cancel to cancel the print job.
•Press and hold Cancel to reset the printer.
Produkt Specifikationer
| Mærke: | Lexmark |
| Kategori: | Printer |
| Model: | E323 |
Har du brug for hjælp?
Hvis du har brug for hjælp til Lexmark E323 stil et spørgsmål nedenfor, og andre brugere vil svare dig
Printer Lexmark Manualer

13 Januar 2025
11 Januar 2025
13 Oktober 2024
11 Oktober 2024
11 Oktober 2024
29 September 2024
15 September 2024
13 September 2024
13 September 2024
8 September 2024
Printer Manualer
- Printer Nilox
- Printer Sony
- Printer Canon
- Printer Samsung
- Printer Panasonic
- Printer LG
- Printer Mitsubishi
- Printer Sharp
- Printer Epson
- Printer HP
- Printer D-Link
- Printer Roland
- Printer Toshiba
- Printer Fujifilm
- Printer Nikon
- Printer Kodak
- Printer Brother
- Printer Lenovo
- Printer Olympus
- Printer Triumph-Adler
- Printer AVM
- Printer Dymo
- Printer Thomson
- Printer JVC
- Printer Honeywell
- Printer Citizen
- Printer Olivetti
- Printer Huawei
- Printer Seiko
- Printer Digitus
- Printer Zebra
- Printer Olympia
- Printer Xiaomi
- Printer Dell
- Printer Intermec
- Printer Fujitsu
- Printer MSI
- Printer Polaroid
- Printer Ricoh
- Printer NEC
- Printer Konica-Minolta
- Printer OKI
- Printer Kyocera
- Printer Avision
- Printer Velleman
- Printer Bixolon
- Printer Sagem
- Printer Pantum
- Printer Xerox
- Printer Renkforce
- Printer Testo
- Printer Ultimaker
- Printer Primera
- Printer Star Micronics
- Printer Star
- Printer Panduit
- Printer ZKTeco
- Printer StarTech.com
- Printer Kogan
- Printer CUSTOM
- Printer Godex
- Printer Equip
- Printer Royal Sovereign
- Printer Argox
- Printer Minolta
- Printer DNP
- Printer Oce
- Printer Metapace
- Printer Ibm
- Printer Tomy
- Printer Approx
- Printer Toshiba TEC
- Printer Frama
- Printer Vupoint Solutions
- Printer Evolis
- Printer Builder
- Printer Fargo
- Printer Brady
- Printer Posiflex
- Printer Datamax-O'neil
- Printer Dascom
- Printer HiTi
- Printer GG Image
- Printer Elite Screens
- Printer DTRONIC
- Printer Phoenix Contact
- Printer Videology
- Printer TSC
- Printer EC Line
- Printer Colop
- Printer Fichero
- Printer Raspberry Pi
- Printer Unitech
- Printer IDP
- Printer Microboards
- Printer Tally Dascom
- Printer CSL
- Printer Nisca
- Printer Epson 7620
- Printer Sawgrass
- Printer Mimaki
Nyeste Printer Manualer

9 April 2025

8 April 2025

2 April 2025

29 Marts 2025
29 Marts 2025
29 Marts 2025

9 Marts 2025
9 Marts 2025
5 Marts 2025
5 Marts 2025