Lightware DA2HDMI-4K-Plus Manual
Lightware
AV forlænger
DA2HDMI-4K-Plus
Læs nedenfor 📖 manual på dansk for Lightware DA2HDMI-4K-Plus (2 sider) i kategorien AV forlænger. Denne guide var nyttig for 13 personer og blev bedømt med 4.5 stjerner i gennemsnit af 2 brugere
Side 1/2
Quick Start Guide
DA2HDMI-4K-Plus-A
DA2HDMI-4K-Plus
Further Information
The document is valid with the following rmware version: 1.0.0
The Product brief and further information of this appliance are available on www.lightware.eu.
See the Downloads section on the website of the product.
Contact Us
sales@lightware.eu
+36 1 255 3800
support@lightware.eu
+36 1 255 3810
Lightware Visual Engineering LLC.
Peterdy 15, Budapest H-1071, Hungary
Doc. ver.: 1.1
19200046
INPUT
LIVE
AUDIO
OUTPUT
HDCP
enable
HDCP
disable
Important Safety Instructions
Please read and keep the information in the attached safety instructions supplied with the
product before you start using the device.
Introduction
DA2HDMI-4K-Plus-A is a multifunctional distribution amplier with built-in EDID Management
and Pixel Accurate Reclocking, supporting DVI and HDMI 1.4 signals with or without HDCP
encryption. The output signal is reclocked and stabilized using Lightware Pixel Accurate
Reclocking technology to remove jitter caused by long cables or poor quality sources. The
product features Advanced EDID Management and can emulate any HDMI display for
continuous video output, even if the attached display is disconnected or powered down.
Box Contents
Distribution Amplier 5V DC Power Adaptor
with Interchangeable Plugs
USB Cable
Phoenix Combicon
5-pole connector
Safety and Warranty info,
Quick Start Guide
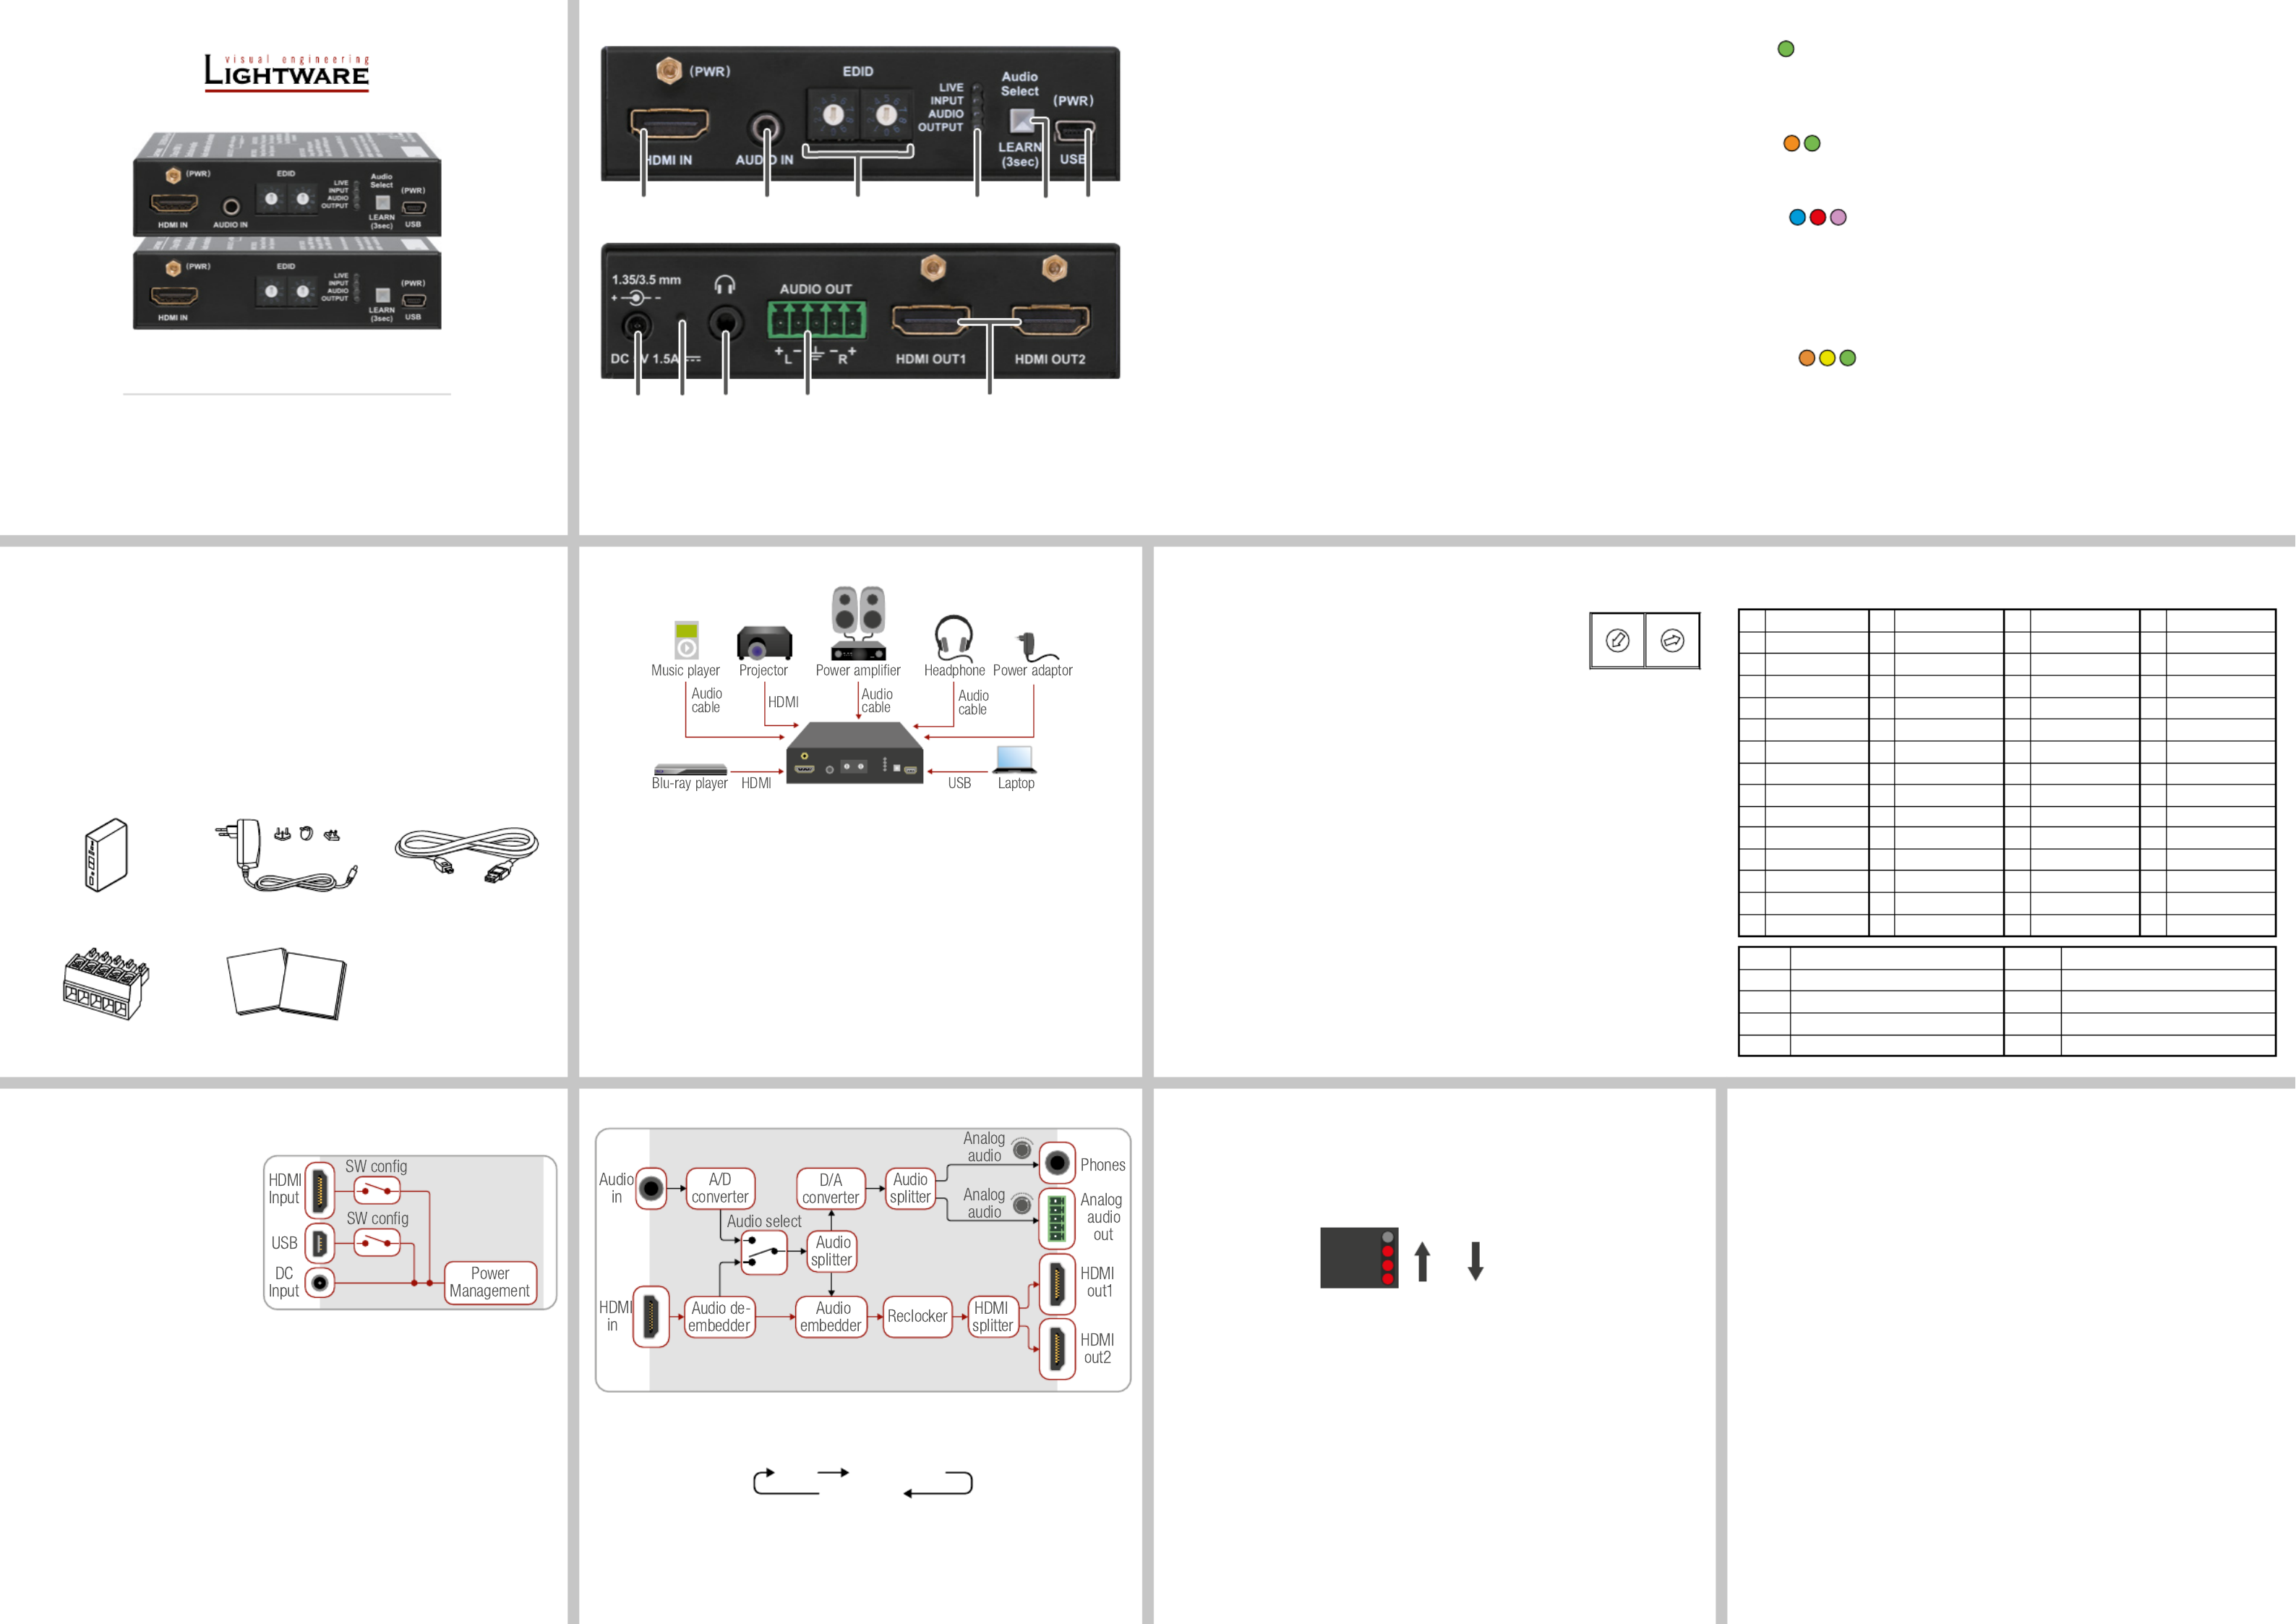
Front and Rear Views
1
HDMI Input HDMI input port for sources and for supplying the device with
power (depends on source capabilities). The applied cable
shall not be more than 20 m (4Kp30) or 30 m (1080p60).
2
Audio Input 3.5 mm jack connector for assymetric analog audio signal.
3
Rotary Switches Selecting one of the EDID memory addresses.
4
Status LEDs The LEDs display information about the signal states.
5
Learn Button
(Audio Select)
Store the EDID of the sink on HDMI OUT1, start the device in
Bootload mode, or toggle between the audio sources.
6
USB Control USB mini-B type connector to access special settings,
perform a rmware upgrade, and supply the unit with power.
7
DC Input Input for the supplied power adaptor.
8
Hidden Button Button for restarting the unit.
9
Phones 3.5mm jack output connector which is the same as the
Analog Audio Output (Phoenix).
q
Audio Output 5-pole Phoenix connector for balanced analog audio; the
signal is de-embedded from the HDMI outputs.
w
HDMI Outputs
(mirrored)
Identical video output ports. Connect an HDMI cable between
the sink and the unit.
Legend Front Panel LEDs
LIVE
BLINKING (slow): the device is powered properly and operational.
BLINKING (fast): the device is in Bootload mode.
ON: shows the malfunction of the CPU; please restart the device.
INPUT
ON (orange): source is connected (5V detected).
ON (green): signal is present.
AUDIO
ON (blue): analog audio input is selected to be embedded in the video stream.
ON (red): HDMI, multichannel / compressed audio signal is detected.
ON (purple): HDMI, PCM 2 channel audio signal is detected.
BLINKING: autoselect is enabled.
OFF: no audio is transmitted.
OUTPUT
ON (orange): hotplug detected on HDMI OUT1.
ON (yellow): hotplug detected on HDMI OUT2.
ON (green): hotplug detected on HDMI OUT 1 and HDMI OUT 2.
DA2HDMI-4K-Plus does not contain Analog audio connectors.
Never use a third-party power supply but the supplied one or use Lightware’s rack-
mountable power supply unit with the appropriate DC-DC cable.
ID Resolution ID Resolution ID Resolution ID Resolution
00 Copy HDMI1 14 640x480p59 28 1920x1080i50_2 42 3440x1440p24
01 640x480p60 15 720x480p59 29 1920x1080i60 43 3440x1440p30
02 800x600p60 16 720x576p50 30 1920x1080i60 44 2560x1600p60
03 1024x768p60 17 1280x720p50 31 1920x1080p24 45 2560x2048p50
04 1280x768p50 18 1280x720p60 32 1920x1080p30 46 3840x2160p24
05 1280x768p60 19 1024x768p60 1920x1080p50 47 3840x2160p3033
06 1280x1024p50 20 1366x768p60 34 1920x1080p60 48 3840x2160p60
07 1280x1024p60 21 1280x800p60 35 1920x1080p60 49 4096x2160p24
08 1600x1200p50 22 1440x900p60 2048x1080p60 50 4096x2160p3036
09 1600x1200p60 23 1600x900p60 37 2560x1080p60 51 4096x2160p60
10 1920x1200p50 24 1280x1024p50 38 1600x1200p50 52 3840x2400p24
11 1920x1200p60 25 1280x1024p60 39 1600x1200p60 53 3840x2400p30
12 1440x480i60 26 1440x1080p60 40 1920x1200p60 54 720p60_3D
13 1440x576i50 27 1920x1080i50_1 41 2560x1440p60 55 1080p60_3D
ID Description ID Description
56 Universal DVI 60 Universal HDMI 4K PCM AUDIO
57 Universal HDMI PCM AUDIO 61 Universal HDMI 4K ALL AUDIO
58 Universal HDMI ALL AUDIO 62-98 User EDIDs
59 Universal HDMI DC ALL AUDIO 99 Copy HDMI2
EDID Memory Structure
01-11: 12-55: DVI EDIDs; HDMI EDIDs
HDCP Management
The HDCP setting of the HDMI input port can be enabled/disabled on the front panel as follows:
1. Turn the EDID rotary switches to ‘01’ position.
2. Press the LEARN button and keep it pressed for three seconds.
3. The lower three LEDs give displays if the HDCP state is changed:
HDCP is : LEDs are dark and light up sequentially.enabled
HDCP is : LEDs light and get dark sequentially.disabled
EDID Emulation
Selecting an EDID
Turn the EDID address rotary switches to the desired position. Use a at
head screwdriver to change the address. The left switch sets the tens
value, the right switch gives the ones value of the EDID.
Avoid the use of keys, coins, knives and other sharp objects.
EDID Learning (OUTPUT LED)
The EDID of the sink connected to HDMI OUT 1 can be stored in the user EDID memory:
1. Turn the EDID rotary switches to the desired position (between #62 - #98).
2. Press the LEARN button and keep it pressed for three seconds.
3. The OUTPUT LED turns to dark for a second then provides feedback:
BLINKING (green): EDID learning is successful, the EDID is stored.
BLINKING (red): EDID learning is failed.
4. The LED turns to dark for a second, then shows the state(s) of the connected sink(s).
Please note that the EDIDs stored in the User EDID memory are deleted when the factory
default settings are restored.
Further EDID Options
The following functions are available when connecting to the device by LDC:
EDID learning or importing an EDID, deleting an EDID (from the user memory).
Exporting an EDID and saving it as a le.
Creating a custom EDID by using the EDID Editor or the Easy EDID Creator.
Port Diagram
Audio Selection (only on Plus-A variant)
Press the Audio select (LEARN) button to toggle the audio options:
The device is able to select an audio source automatically: activate the Autoselect mode by
the Audio select button. In this case the Analog input port has higher priority: if the Autoselect
mode is active and a 3.5mm Jack plug is connected to the Audio input port, it will be embedded
in the HDMI stream.
Powering Options
The device can be powered by any of the following ways:
Using the supplied power adaptor
(recommended).
Connect the device to a proper
USB port by the supplied cable.
Connecting an HDMI source to the
HDMI input port.
Make sure that the port is able to
supply 5V 500 mA current.
If the power adaptor is connected, it will supply the device independently from the HDMI/
USB ports. If the adaptor is disconnected from the DC input connector the device tries to
use a different power source (HDMI or USB) if it is enabled and connected. (If the adaptor is
unplugged from the AC socket but the DC plug is still connected, the device will be switched
off and cannot be changed to another power source. Unplug the DC cable from the device to
be powered by USB or HDMI.)
The USB and HDMI powering modes can be enabled/disabled via LDC software.
If you are not sure that your USB or HDMI port has enough power, disable the
powering over USB and HDMI by Lightware Device Controller software. If the supplied
power over USB or HDMI is not enough the device will switch off. In the case of any
strange behavior of the device, please disconnect the USB and HDMi cables and
connect the 5V DC adaptor.
Installation
1
Connect the desired source to the HDMI input port.
2
Optionally connect an audio source to the port.Audio input
3
Connect one or two sink device(s) to the port(s).HDMI output
4
Optionally connect an audio device (e.g. amplier) to the Phoenix Audio output port.
5
Optionally connect a headphone to the 3.5 mm port.Jack Audio output
6
Optionally connect a laptop or PC to the port and run LDC software.USB
7
Connect rstly the power cord of the supplied adaptor to the , then secondly DC input
to the AC power socket.
Safety and
warranty
info
Quick
Start
Guide
31
7
54 6
w9 q
2
8
0
1
2
3
4
5
6
7
8
9
0
1
2
3
4
5
6
7
8
9
Autoselect
HDMI Analog audio
45
3 7
2
1 6
Produkt Specifikationer
| Mærke: | Lightware |
| Kategori: | AV forlænger |
| Model: | DA2HDMI-4K-Plus |
Har du brug for hjælp?
Hvis du har brug for hjælp til Lightware DA2HDMI-4K-Plus stil et spørgsmål nedenfor, og andre brugere vil svare dig
AV forlænger Lightware Manualer

11 Januar 2025
24 August 2024
24 August 2024
24 August 2024
24 August 2024
24 August 2024
24 August 2024
24 August 2024
24 August 2024
24 August 2024
AV forlænger Manualer
- AV forlænger Philips
- AV forlænger UTEPO
- AV forlænger D-Link
- AV forlænger Roland
- AV forlænger Gigabyte
- AV forlænger Pyle
- AV forlænger InFocus
- AV forlænger One For All
- AV forlænger Nedis
- AV forlænger Abus
- AV forlænger Planet
- AV forlænger Belkin
- AV forlænger Edimax
- AV forlænger Black Box
- AV forlænger DataVideo
- AV forlænger Trevi
- AV forlænger Megasat
- AV forlænger König
- AV forlænger Tripp Lite
- AV forlænger KEF
- AV forlænger Digitus
- AV forlænger Techly
- AV forlænger Peerless-AV
- AV forlænger Marmitek
- AV forlænger Kopul
- AV forlænger AJA
- AV forlænger Bogen
- AV forlænger LevelOne
- AV forlænger Telestar
- AV forlænger Vivotek
- AV forlænger MIPRO
- AV forlænger Monacor
- AV forlænger AV:link
- AV forlænger Renkforce
- AV forlænger Marshall Electronics
- AV forlænger Manhattan
- AV forlænger I3-Technologies
- AV forlænger LogiLink
- AV forlænger Eminent
- AV forlænger Kramer
- AV forlænger Aitech
- AV forlænger Provision-ISR
- AV forlænger Vision
- AV forlænger Analog Way
- AV forlænger MuxLab
- AV forlænger Rose
- AV forlænger Iogear
- AV forlænger ATen
- AV forlænger Dynaudio
- AV forlænger Smart-AVI
- AV forlænger Vivolink
- AV forlænger AG Neovo
- AV forlænger StarTech.com
- AV forlænger Rocstor
- AV forlænger Adder
- AV forlænger Crestron
- AV forlænger Lindy
- AV forlænger AVMATRIX
- AV forlænger CYP
- AV forlænger AMX
- AV forlænger Intellinet
- AV forlænger Schwaiger
- AV forlænger Steren
- AV forlænger Ocean Matrix
- AV forlænger Comprehensive
- AV forlænger Intelix
- AV forlænger Alfatron
- AV forlænger Speaka
- AV forlænger KanexPro
- AV forlænger Gefen
- AV forlænger TV One
- AV forlænger Sescom
- AV forlænger Apantac
- AV forlænger Blustream
- AV forlænger C2G
- AV forlænger WyreStorm
- AV forlænger Allnet
- AV forlænger Matrox
- AV forlænger Genexis
- AV forlænger Kindermann
- AV forlænger Wentronic
- AV forlænger Peerless
- AV forlænger Monoprice
- AV forlænger SIIG
- AV forlænger Polycom
- AV forlænger Advantech
- AV forlænger Micro Connect
- AV forlænger Extron
- AV forlænger ASSMANN Electronic
- AV forlænger Avocent
- AV forlænger PureLink
- AV forlænger Approx
- AV forlænger Ebode
- AV forlænger Accell
- AV forlænger Ecler
- AV forlænger Rose Electronics
- AV forlænger Epcom
- AV forlænger SmartAVI
- AV forlænger IMG Stage Line
- AV forlænger Oehlbach
- AV forlænger Atlona
- AV forlænger HELGI
- AV forlænger Liberty
- AV forlænger Enson
- AV forlænger SWIT
- AV forlænger Hall Research
- AV forlænger Seco-Larm
- AV forlænger ConnectPro
- AV forlænger Kanex
- AV forlænger TechLogix Networx
- AV forlænger SEADA
- AV forlænger Camplex
Nyeste AV forlænger Manualer
8 April 2025
25 Februar 2025
28 Januar 2025
28 Januar 2025
20 Januar 2025
14 Januar 2025
13 Januar 2025
13 Januar 2025
13 Januar 2025
13 Januar 2025