Martin ELP PAR Manual
Læs nedenfor 📖 manual på dansk for Martin ELP PAR (53 sider) i kategorien Lettelse. Denne guide var nyttig for 14 personer og blev bedømt med 4.5 stjerner i gennemsnit af 2 brugere
Side 1/53

ELP PAR
User Guide

©2021-2023 HARMAN PROFESSIONAL DENMARK ApS. All rights reserved.
Features, specications and appearance are subject to change without notice.
HARMAN PROFESSIONAL DENMARK ApS and all aliated companies
disclaim liability for any injury, damage, direct or indirect loss, consequential or
economic loss or any other loss occasioned by the use of, inability to use or
reliance on the information contained in this document. Martin is a registered
trademark of HARMAN PROFESSIONAL DENMARK ApS registered in the
United States and/or other countries.
HARMAN PROFESSIONAL DENMARK ApS, Olof Palmes Allé 44, 8200
Aarhus N, Denmark
HARMAN PROFESSIONAL SOLUTIONS U.S., 8500 Balboa Blvd., Northridge
CA 91329, USA
www.martin.com
ELP PAR User Guide Revision C

Table of contents
Safety information ................................................................................. 4
Introduction ........................................................................................... 9
Before using the product for the rst time ....................................... 9
Fixture overview ................................................................................. 10
Physical installation ............................................................................ 11
Standing the xture on a at, horizontal surface ........................... 12
Fastening the xture to a at surface ............................................ 13
Mounting the xture on a truss ...................................................... 13
Securing with a safety cable ......................................................... 14
Connecting to AC power ..................................................................... 15
Linking xtures to power in a chain ............................................... 16
Connecting to data ............................................................................. 17
Tips for reliable data transmission ................................................ 17
Connecting the DMX data link ....................................................... 17
Fixture setup ....................................................................................... 18
DMX address setting ..................................................................... 19
DMX mode .................................................................................... 19
Raw, extended and calibrated modes ........................................... 20
Tungsten emulation mode ............................................................ 20
Dimming curves ............................................................................ 20
Dimming speed and smoothness .................................................. 21
Blackout or Hold if DMX signal stops ............................................ 21
Scene capture ............................................................................... 21
Cooling mode ................................................................................ 22
Display rotation ............................................................................. 23
Display intensity ............................................................................ 23
Temperature units ......................................................................... 23
Resetting to factory defaults ......................................................... 23
Fixture test .................................................................................... 24
Fixture information ........................................................................ 24
DMX Live ...................................................................................... 26
Resetting the xture ...................................................................... 26
Manual control .............................................................................. 26
Focus shortcut .............................................................................. 27
Control / Settings DMX channel .................................................... 27
Eects ................................................................................................ 28
RDM ................................................................................................... 30
Maintenance ....................................................................................... 32
Cleaning ........................................................................................ 32
Uploading new rmware ............................................................... 33
Service and repairs ....................................................................... 34
DMX protocol Basic Mode (default) –................................................. 35
DMX protocol Compact M –ode.......................................................... 39
Control menus .................................................................................... 40
Troubleshooting .................................................................................. 45
Dimensions ......................................................................................... 46
Specications ..................................................................................... 47

4 Martin® ELP PAR User Guide
Safety information
WARNING!
Read the safety precautions in this manual before
installing, operating or servicing this product.
The following symbols are used to identify important safety information on
the product and in this manual:
Warning!
Safety hazard.
Risk of severe
injury or death.
Warning!
Powerful light
emission. Risk
of eye injury.
Warning!
See user
manual for
important
safety
information.
Warning!
Hazardous
voltage. Risk
of lethal or
severe electric
shock.
Warning!
Hot surfaces
and re
hazard.
Warning! Risk Group 2 product according to EN 62471 and
IEC/TR 62778. Possibly hazardous radiation emitted from this
product. May be harmful to the eyes. Do not stare at operating
lamp and do not view the light output with optical instruments
or any device that may concentrate the beam.
This lighting xture is for professional use only and must be
installed by a qualied technician. It is not for household use. It
presents risks of severe injury or death due to re hazards,
electric sho nd falls. It prod es a powerful, concentrated ck a uc
beam of light that can create a re hazard or a risk of eye
injury if the safety pr autions below are not followed. Respect ec
all locally applicable laws, codes and regulations when
installing, operating or servicing the xture.
The light source contained in this xture must be replaced by
Martin Service or an authorized Martin Service partner only.

Martin® ELP PAR User Guide 5
Install, operate and service Martin products only as directed in
their user manuals, or you may create a safety hazard or
cause damage that is not covered by product warranties.
Follow the safety precautions listed below and observe all
warnings in this manual and printed on the product. Before
you install, operate or service the fixture, check the Martin
website at www.martin.com and make sure that you have the
latest user documentation for the fixture. Document revisions
are indicated at the bottom of page 2.
Technical Support
If you have questions about how to install or operate the
xture safely, please contact Harman Professional Technical
support:
• For technical support in North America, please contact:
HProTechSupportUSA@harman.com
Phone: (844) 776-4899
• For technical support outside North America, please
contact your national distributor.
Protection from electric shock
Do not expose the xture to rain or moisture.
Disconnect the xture from AC power before carrying out any
installation or maintenance work and when the xture is not in
use.
Ensure that the xture is electrically connected to ground
(earth).
Use only a source of AC power that complies with local
building and electrical codes and has both overload and
ground-fault (earth-fault) protection.
Socket outlets or external power switches used to supply the
xture with power must be located near the xture and easily
accessible so that the xture can easily be disconnected from
power.
Isolate the xture from power immediately if the power plug or
any seal, cover, cable, or other component is damaged,
defective, deformed, wet or showing signs of overheating. Do
not reapply power until repairs have been completed.

6 Martin® ELP PAR User Guide
Before using the xture, check that all power distribution
equipment and cables are in perfect condition and rated for
the current requirements of all connected devices.
Use only Neutrik powerCON TRUE1 TOP cable connectors to
connect to the fixture’s power sockets.
Do not connect devices to power in a chain that will exceed
the electrical ratings of any cable or connector used in the
chain.
To connect xtures to mains power in a chain, you must rst
obtain AWG or 2.5 mm12 2 power input and throughput cables
that are 16 A rated and temperature-rated to suit the
application. In the USA and Canada the cables must be UL-
listed, type SJT or equivalent. In the EU the cables must be
type H05VV- or equivalent. Suitable cables with Neutrik F
powerCON TRUE1 TOP connectors are available from Martin
(see Accessories on page ). If you use these cables, you ‘ ’ 49
can connect xtures to power in a linked chain, POWER OUT
throughput socket to POWER IN input socket, but do not link
more than:
• four (4 ELP PAR xtures in total at 100-120 V, or )
• seven (7 ELP PAR xtures in total at 200-240 V. )
If you intend to connect other devices to the POWER OUT
socket in a daisy chain, add together the maximum current
draw of all the devices in the chain. Do not create a chain of
devices whose total maximum current draw will exceed the
maximum current rating of any connector in the chain. The
maximum permitted current at the POWER IN connector is
16 A. The maximum permitted current at the POWER OUT
connector is 12 A.
The voltage and frequency at the POWER OUT socket are the
same as the voltage and frequency applied to the POWER IN
socket. Only connect devices to the POWER OUT socket that
accept this voltage and frequency.
Protection from burns and re
Do not operate the xture if the ambient temperature (Ta)
exceeds 40° C (104° F).
The surface of the product casing can reach up to ° C 71
(160° during operation. Avoid contact by persons F)

Martin® ELP PAR User Guide 7
and materials. Allow the xture to cool for at least minutes 15
before handling.
Keep ammable materials well away from the xture. Keep all
combustible materials (e.g. fabric, wood, paper) at least 0.5 m
(1.7 .) away from the xture housing. ft
Ensure that there is free and unobstructed airow around the
xture. Provide a minimum clearance of 0.5 m (1.7 .) around ft
fans and air vents.
Do not use the xture to illuminate surfaces within 1 m (3.3 .) ft
of the xture.
Do not stick lters, masks or other materials onto any optical
component.
The fixture’s lenses can focus the sun’s rays, creating a risk of
re and damage. Do not expose the front of the fixture to
sunlight or any other bright light source.
Protection from eye injury
Warning! Risk Group 2 product according to EN 62471 and
IEC/TR 62778.
The ELP PAR xture falls into the following risk groups
according to EN 62471 and IEC/TR 62778 at the distances
indicated below.
The luminaire should be positioned so that prolonged staring
into the luminaire at a distance closer than 21.5 m is not
expected.
Do not look directly into the product’s light output.
Do not look at operating lamp. Eye injury may result.
Do not look at the light output with magniers, telescopes,
binoculars or similar optical instruments that may concentrate
the light output.
Ensure that persons are not looking directly into the front of

8 Martin® ELP PAR User Guide
the xture when the product lights up suddenly. This can
happen when power is applied, when the product receives a
DMX signal, or when certain control menu items are selected.
To minimize the risk of eye irritation or injury, disconnect the
xture from power at all times when the xture is not in use
and provide well-lit conditions to reduce the pupil diameter of
anyone working on or near the xture.
Protection from injury
The xture is not portable when installed.
Ensure that any supporting structure and/or hardware used
can hold at least 10 times the weight of all the devices they
support.
If suspending from a rigging structure, fasten the xture to a
rigging clamp. Do not use safety cables as the primary means
of support.
If the xture is installed in a location where it may cause injury
or damage if it falls, install as directed in this manual a
secondary attachment such as a safety cable that will hold the
xture if a primary attachment fails. The secondary attachment
must be approved by an ofcial body such as TÜV as a safety
attachment for the weight that it secures, must comply with EN
60598-2-17 Section 17.6.6 and must be capable of bearing a
static suspended load that is ten times the weight of the xture
and all installed accessories.
Check that all external covers and rigging hardware are
securely fastened.
Block access below the work area and work from a stable
platform whenever installing, servicing or moving the xture.
Do not operate the xture with missing or damaged covers,
shields or any optical component.
In the event of an operating problem, stop using the xture
immediately and disconnect it from power. Do not attempt to
use a xture that is obviously damaged.
Do not modify the xture in any way not described in this
manual or install other than genuine Martin parts.
Refer any service operation not described in this manual to a
qualied technician.

Martin® ELP PAR User Guide 9
Introduction
The ELP PAR is a bright LED PAR Can with calibrated color output from
seven RGBW LEDs and a motorized zoom with an angle that varies from
5.6° 57.6° (eld angle, one-tenth peak) or 4.2 35.4° (beam angle, half-to ° to
peak). It oers electronic dimming and strobe and features a bracket for oor
or truss mounting.
The ELP PAR can be controlled using any DMX-compliant controller and is
RDM-compatible.
The xture is supplied with a folding mounting bracket.
Before using the product for the rst time
1. Read Safety information‘ ’ on page 4 before installing, operating or
servicing the xture.
2. Unpack and ensure that there is no transportation damage before using
the xture. Never attempt to operate a damaged xture.
3. Check that the voltage and frequency of the local power source match
the mains power requirements of the xture.
4. Either hard-wire the xture to an AC mains power source or provide a
power input cable and local power plug as described in this manual and
connect to an AC mains power outlet.
5. Check the support pages on the Martin Professional website at
www.martin.com for the most recent user documentation and technical
information about the xture. Martin user manual revisions are identied
by the revision letter at the bottom of the inside cover.
Be prepared for the xture to suddenly emit bright light when power is
applied.

10 Martin® ELP PAR User Guide
Fixture overview
1 Display –
2 Control buttons –
3 Tilt adjustment handle –
4 Mains power IN (Neutrik powerCON TRUE1 TOP) –
5 Mains power OUT / THRU (Neutrik powerCON TRUE1 TOP) –
6 DMX IN (Neutrik 5-pin XLR) –
7 DMX OUT / THRU (Neutrik 5-pin XLR) –
8 Carabiner clips (not supplied) for safety cable –
2
1
3
4
5
7
6
8
8
Martin® ELP PAR User Guide 11
Physical installation
Read ‘ ’ on page Safety information 4 before installing the
xture.
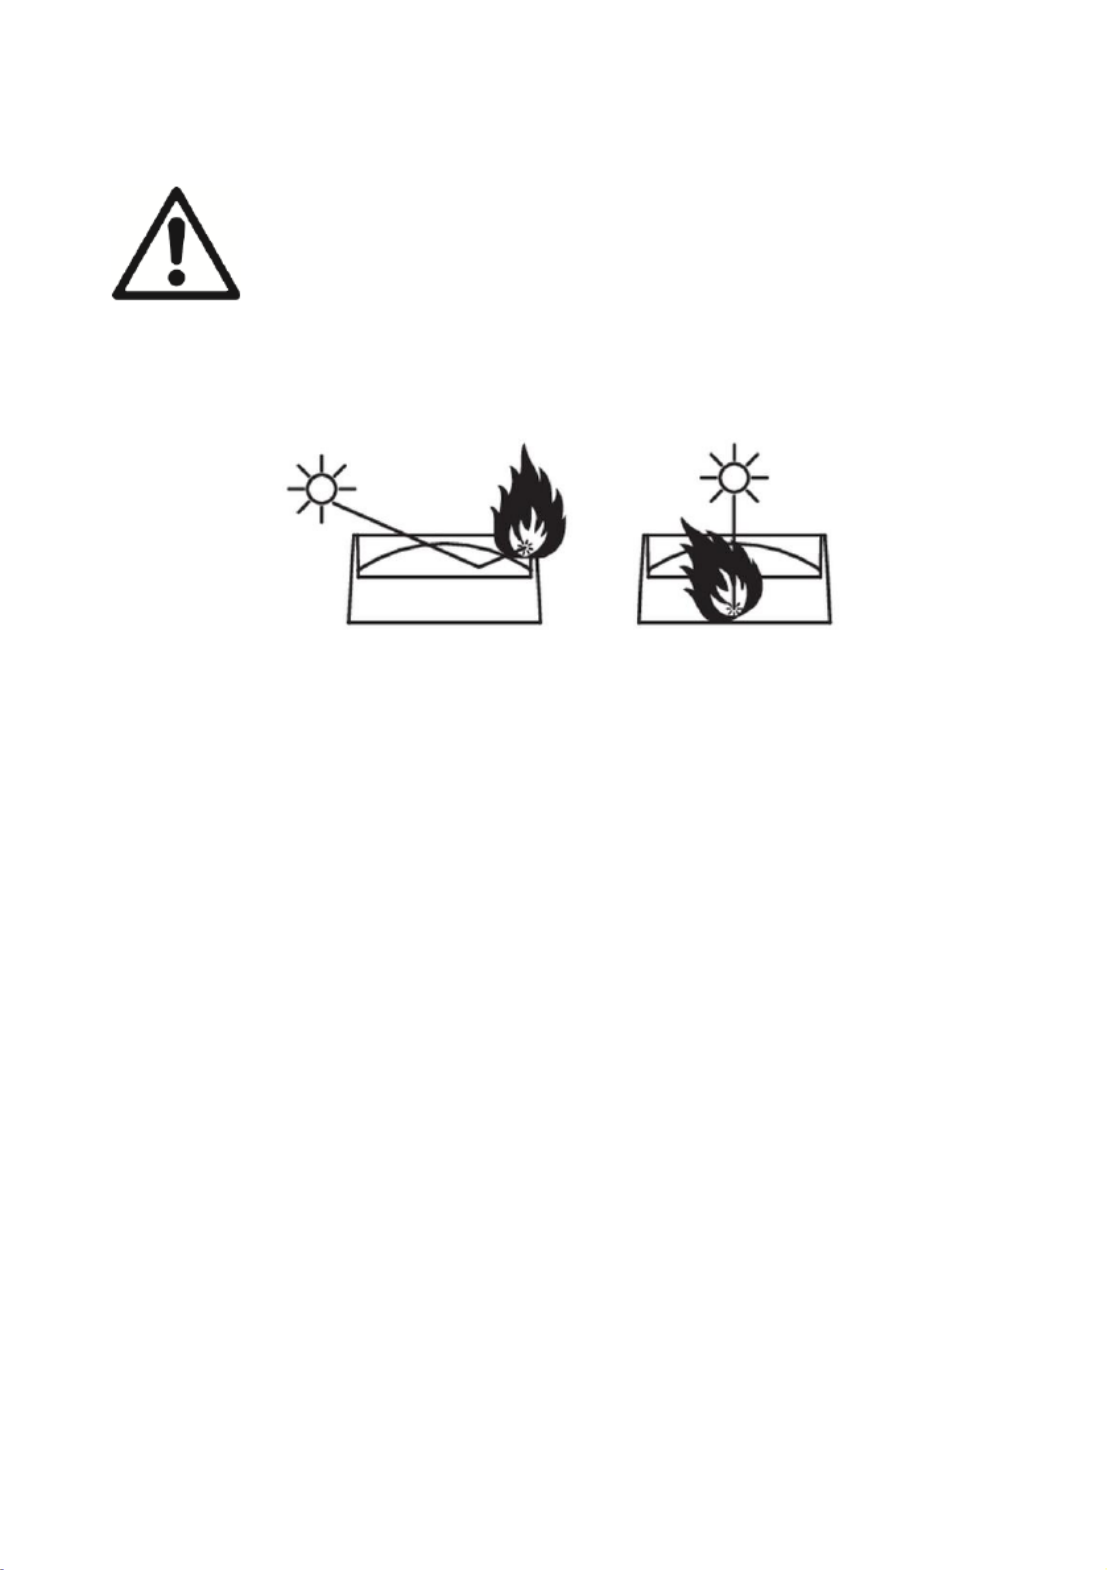
Warning! See illustration below. Position or shade the
head so that the front of the head will not be exposed to
sunlight or any other strong light source from any angle –
even for a few seconds. The fixture can focus the sun’s
rays internally, creating a risk of re and damage.
The xture is i e for indoor use only and must be used in a dry des gn d
location with adequate ventilation. su that none of En re the fixture’s
ventilation slots are bl ked. oc
You can either fasten the xture to a secure structure (such as a rigging
truss) or surface. You can also stand it on a secure surface. Do not place
the xture in a location where it can be moved, fall over, or present a danger
of tripping or injury.
If you install the xture in a location where it may cause injury or damage if it
falls, secure it as directed in this user manual using a securely anchored
safety cable that will hold the xture if the primary fastening method fails.
Martin can supply safety cables and rigging clamps that are suitable for use
w Accessoriesith the fixture (see ‘ ’ on page 49).
Avoiding damage from other light sources
Important! Do not point the light output from other lighting xtures at the ELP
PAR, as powerful light can damage the display.

12 Martin® ELP PAR User Guide
Mounting bracket angle scales
See illustration on right. The fixture’s mounting
bracket has angle scales printed on both sides
next to the adjustment handles The scales show .
the precise angle at which the head is tilted. There
are two scales he inner scale is for use when . T
standing the xture on the oor he outer scale is . T
for use when ying the xture overhead.
Standing the xture on a at, horizontal surface
Use a stable horizontal surface that can support at
least 10 times the weight of all the xtures and
equipment that it will support.
See illustration on right. The fixture can be
placed on the surface by releasing the adjustment
handles (arrowed) on both sides of the xture, fully
opening the legs of the mounting bracket, then and
re-tightening the adjustment handles .

Martin® ELP PAR User Guide 13
Fastening the fixture to a flat surface
Use a stable horizontal surface that can support at least 10 times the weight
of all the xtures and equipment that it will support. Ensure that all fasteners
used can support at least ten times the weight of all the xtures and
equipment that they will support.
To fasten the xture to a surface:
1. See illustration on left. Pass an M12,
grade 8.8 steel minimum, bolt or
screwbolt through the hole (arrowed) in
the center of the main mounting
bracket leg and into the surface.
2. If using a bolt, secure with a washer
and self-locking nut.
3. Check that the xture is held securely.
4. If you install the xture in a location
where it may cause injury or damage if
it falls, secure it as directed below with
a securely anchored safety cable that
will hold the xture if the primary
fastening method fails.
Mounting the xture on a truss
The xture can be clamped to a truss or similar rigging
structure in any orientation. When installing the xture
hanging vertically down, you can use an open-type clamp
such as a G-clamp. When installing in any other
orientation, you must use a half-coupler clamp (see
illustration on right) that completely encircles the truss
chord.
To clamp the xture to a truss:
1. Check that the rigging structure can support at least ten times the weight
of all xtures and equipment to be installed on it.
2. Block access under the work area.
3. Either:
- Bolt a rigging clamp directly to the fixture’s mounting bracket using
an M12 grade 8.8 steel bolt and self-locking washer, or

14 Martin® ELP PAR User Guide
- Bolt a rigging clamp to Martin omega a
bracket (available as an accessory by
ordering P/N 91602001 from your
Martin supplier) using a grade 8.8 steel
bolt. See illustration on right. Fold the
legs of the fixture’s mounting bracket
together and fasten the omega bracket
securely to the mounting bracket Turn the .
quarter-turn fasteners on the omega
bracket a full 90° to lock.
4. Working from a stable platform, hang the xture
with its clamp on the truss and fasten the clamp
securely.
5. Loosen the adjustment handles on both sides of the xture, adjust the
fixture’s tilt angle, and re-tighten the handles.
6. Secure the xture with a safety cable as directed below.
Securing with a safety cable
1. Obtain a safety cable (or other secondary
attachment) that is approved for the weight of the
xture.
2. See illustration on right. There is one attachment
point (arrowed) in the cooling vent on the top of
the xture and a second, identical attachment
point on the bottom of the xture. Fasten the
cable to one of the safety cable attachment
points (arrowed) on the xture by either looping it
around the attachment point or using a carabiner
clip.
Do not simply loop the safety cable around the
legs of the mounting bracket, as this will leave
the xture unsecured if the xture separates from
the mounting bracket.
3. Remove as much slack as possible from the safety cable and fasten it to
a secure anchoring point.
4. Make sure that the safety cable will hold the xture if a primary
attachment fails.
Your Martin dealer can supply suitable safety cables and rigging clamps
(see ‘ ’ on page Accessories 49).

Martin® ELP PAR User Guide 15
Connecting to AC power
Read Safety information‘ ’ on page 4 before connecting the
xture to AC mains power.
Before you connect other xtures to the POWER OUT socket,
see ‘Linking xtures to power in a chain’ on page 16.
For protection from electric shock, the xture must be
grounded (earthed). The power distribution circuit must be
equipped with a fuse or circuit breaker and ground-fault (earth-
fault) protection.
Socket outlets or external power switches used to supply the
xture with power must be located near the xture and easily
accessible so that the xture can easily be disconnected from
power.
Do not use an external dimming system to supply power to the xture, as
this may cause damage to the xture that is not covered by the product
warranty.
The xture requires a power input cable with a Neutrik powerCON TRUE1
NAC3FX-W (TOP) female cable connector for AC mains power input. The
cable must meet the requirements listed under “Protection from electric
shock” on page 5. Martin can supply suitable cables with female TRUE1
TOP input connectors 1.5 m (4.9 ft.) or 5 m (16.4 ft.) long, as well as loose
female TRUE1 TOP Accessories input connectors (see “ ” on page 49).
The xture can be hard-wired to a building electrical installation if you want
to install it permanently, or a power plug that is suitable for the local power
outlets can be installed on the power cable. If you install a power plug on the
power cable, follow the plug manufacturer’s instructions and connect the
wires in the power cable as shown in this table:
Earth Ground, or
Neutral N or
Live L or
US system
Green
White
Black
EU system
Yellow/green
Blue
Brown
The xture has an auto-ranging power supply that accepts AC mains power
at 100-120/200-240 V at 50/60 Hz. Do not apply AC mains power at any
other voltage or frequency to the xture.

16 Martin® ELP PAR User Guide
Linking xtures to power in a chain
If you obtain a AWG / 2.5 mm12 2 power input cable and AWG / 2.5 mm12 2
throughput cables from Martin (see “ ” on page Accessories 49), you can
relay mains power from one fixture to another by connecting xtures to
power in a linked daisy-chain, POWER OUT throughput socket to POWER
IN input socket.
Using 12 AWG / 2.5 mm2 cables from Martin, you can create a daisy chain
of linked xtures that contains:
• maximum four (4) ELP PAR xtures in total at 100-120 V, or
• maximum seven (7) ELP PAR xtures in total at 200-240 V.

Martin® ELP PAR User Guide 17
Connecting to data
A DMX 512 data link is required in order to control the xture via DMX. The
xture has 5-pin XLR connectors for DMX data input and output.
The number of daisy-chained xtures is limited by the number of DMX
channels required by the xtures in relation to the maximum 512 channels
available in one DMX universe. Note that if independent control of a xture is
required, it must have its own DMX channels. Fixtures that are required to
behave identically can share the same DMX address and channels. To add
more xtures or groups of xtures when the above limit is reached, add a
DMX universe and another daisy-chained link.
Tips for reliable data transmission
Use shielded twisted-pair cable designed for RS-485 devices: standard
microphone cable cannot transmit control data reliably over long runs. 24
AWG cable is suitable for runs up to 300 meters (1000 ft.). Heavier gauge
cable and/or an amplier is recommended for longer runs. The pinout on all
connectors is pin 1 = shield, pin 2 = cold (-), and pin 3 = hot (+). Pins 4 and 5
in the 5-pin XLR connectors are not used in the xture but are available for
possible additional data signals as required by the DMX512-A standard.
Standard pinout is pin 4 = data 2 cold (-) and pin 5 = data 2 hot (+).
If you need to split the link into branches, use an opto-isolated splitter. Use
an RDM-compatible splitter if using RDM.
Terminate the link by installing a DMX termination plug in the output socket
of the last xture. The termination plug, which is a male XLR plug with a 120
Ohm, 0.25 W resistor soldered between pins 2 and 3, “soaks up” the control
signal so it does not reect and cause interference. If a splitter is used,
terminate each branch of the link.
Connecting the DMX data link
To connect the xture to data:
1. Connect the DMX data output from the controller to the first fixture’s
male XLR DMX input connector.
2. Connect the first fixture’s DMX output to the DMX input of the next
xture and continue connecting fixtures output to input. Terminate the
last xture on the link with a DMX termination plug.

18 Martin® ELP PAR User Guide
Fixture setup
This section explains the xture characteristics that can be set determine to
how it can be controlled and will behave. These settings are made using the
menus available the control panel. Settings are retained in memory when in
the xture is powered o.
You can nd a complete map of the control menu structure in Control ‘
menus page . ’ on 40
Using the control menus
• To access the control menus or to return to the next highest level in the
menu structure, press the MENU button.
• Navigate the menu structure using the DOWN, UP and ENTER buttons.
• If you have selected a menu option, conrm your selection and set that
option using the ENTER button, or if you want to return to the next
highest level in the menu structure without making a change, press the
MENU button.
• To exit the menus, press the MENU button.
Special keypress functions
• Holding the UP button and pressing the DOWN button rotates the
control panel display through 180°.
• Holding the MENU button and pressing the UP button resets the entire
xture.
• Holding the ENTER button pressed for two seconds puts the xture into
Focus shortcut mode for one minute (see ‘ ’ on page Focus shortcut 27).
MENU
• Activate the control menus, or
• Open the Shortcuts menu by holding for 2
seconds, or
• Return to the previous level of the menu structure,
or
• Press to exit the menus
DOWN
Go down a menu level
UP
Go up a menu level
ENTER
• Conrm the selected function
• Hold for 2 seconds to enter Focus shortcut mode

Martin® ELP PAR User Guide 19
Menu shortcuts
Pressing and holding the MENU button for two seconds opens a small
Shortcuts menu with two items:
• RESET ALL carries out a complete reset of the xture with all its eects.
• ROTATE DISPLAY rotates the control panel display through 180°. This
function makes it easier to read the control panel menus when changing
from standing to hanging installation.
• PERSONALITY OVERVIEW displays a list of the fixture’s personality
settings. Use the DOWN and UP buttons to scroll through the list.
DMX address setting
The DMX address, also known as the start channel, is the rst channel used
to receive instructions from a DMX controller. The xture uses 14 DMX
channels. This means that if you have a group of xtures and you set the
rst xture DMX address 1, then DMX address 15 is available for the ’s to
next xture DMX address 29 for the xture after that, and so on. ,
For independent control, each xture must be assigned its own control
channels. You can give the same DMX address to two xtures of the same
type if you want them to behave identical Giving the same DMX address ly.
to multiple xtures can be useful for grouped control and troubleshooting.
To set the fixture’s DMX address:
1. In the fixture’s control panel, use the UP and DOWN buttons to select
DMX ADDRESS and press ENTER. The fixture’s currently set DMX
address will blink the display. in
2. Use the UP and DOWN buttons to select a new address.
3. Once the new address has been selected, pres ENTER to conrm it (or s
press MENU to exit without making a change).
DMX mode
Two DMX modes are available:
• is the default DMX Basic Mode mode. It gives control of all the feature’s
eects as well as the Control/Settings channel that lets you congure
the xture over the DMX link. Basic Mode uses 14 DMX channels.
• is a reduced mode with a smaller DMX footprintCompact Mode . It
gives control of a reduced number of eects, with 8-bit RGB control and
does not give access to the Control/Settings channel. Compact Mode
uses DMX channels. 9

20 Martin® ELP PAR User Guide
Raw, extended and calibrated modes
In mode, all LEDs operate at full intensity and CTC (color temperature raw
correction) functionality is disabled. The color output of one xture may or
may not closely match that of other xtures, depending on LED binning.
In mode, mixed white is calibrated, giving perfect white matching extended
across multiple xtures, but primary and secondary colors are not calibrated,
which allows maximum color saturation. The closer you move towards white,
the more closely multiple fixtures will match each other’s output. The further
you move away from white and the closer you move towards saturated color,
the less closely multiple fixtures will match each other’s output.
In mode, white and color are fully calibrated. This means that the calibrated
output of multiple xtures will match with no visible differences. On the other
hand, color saturation will be slightly less heavy.
Tungsten emulation mode
In tungsten emulation mode, the fixture’s white light output is made warmer,
the warm shift is increased at lower dimming levels, and an ‘afterglow‘ effect
is added after dimming. This mode gives the ‘look and feel’ of a fixture that
uses a 2800 K incandescent light bulb as its source.
Dimming curves
Four dimming curves are available:
LINEAR The increase in light intensity appears to be linear as DMX –
value is increased .
SQUARE LAW light intensity control is ner at low levels and coarser –
at high levels.
INVERSE SQUARE LAW light intensity control is coarser at low levels –
and ner at high levels.
S-CURVE –light intensity control is ner at low levels and high levels
and coarser at medium levels .

Martin® ELP PAR User Guide 21
To ing curve: set the fixture’s dimm
1. Select DIMMER CURVE and press ENTER. The currently set dimming
curve mode will blink in the display.
2. Use the DOWN and UP buttons to select LINEAR SQUARE LAW, , INV
SQ LAW, or S-CURVE .
3. Press ENTER to conrm your choice (or press MENU to exit without
making a change).
Dimming speed and smoothness
You can optimize dimming to give either the fastest the smoothest or
changes in dimming levels. To optimize dimming:
1. Select DIMMING SPEED and press ENTER.
2. Use the DOWN and UP buttons to select FAST (dimmer optimized for
speed) or SMOOTH (dimmer optimized for smoothness).
3. Press ENTER to conrm your choice (or press MENU to exit without
making a change).
B lackout or Hold if DMX signal stops
You can decide how the xture should behave if you are controlling the
xture via DMX and then you stop sending the DMX data signal:
1. Select NO DATA MODE and press ENTER. The currently set mode will
blink in the display.
2. Using the DOWN and UP buttons, select BLACKOUT or HOLD to
decide how the xture should respond if it stops receiving a DMX signal:
- If you select BLACKOUT, the xture will black out
- If you select HOLD, the xture will continue to show the effect that it
is displaying at the time .
3. Press ENTER to conrm your choice (or press MENU to exit without
making a change ).
Scene capture
The SCENE CATCH menu lets you capture all the DMX values that the
xture is currently receiving and save them as a scene that you can choose ‘ ’
to play back each time the xture power is cycled o and on or each time fi
that you carry out a reset.
Three scene capture controls are available:
• SCENE CATCH RECORD stores the currently displayed scene in the
fixture’s memory. Once you have captured a scene, the fixture keeps
that scene in memory even if you cycle power off and on again.

22 Martin® ELP PAR User Guide
• SCENE CATCH = ON sets the xture to show the scene that is stored in
memory if the xture stops receiving a DMX signal.
If the xture receives a DMX control signal during scene playback, it will
immediately stop showing its saved scene. If xture power is cycled off
and on again or if the xture is reset, it will again show its saved scene.
• SCENE CATCH = OFF disables the scene playback function: the xture
does not show the scene that is stored in memory.
Setting SCENE CATCH to OFF does not delete the saved scene from
memory: the scene will still be available if you set SCENE CATCH to ON
again.
Cooling mode
The cooling mode setting lets you decide whether to give priority to lowest
noise level or maximum light output:
1. Select COOLING MODE and press ENTER. The currently set mode will
blink in the display.
2. Using the DOWN and UP buttons, select one of the three cooling
options:
- If you select REGULATED FANS, the fans operate at normal speed.
Temperature regulation increases fan speed if the xture
approaches its maximum operating temperature. This setting
provides a good compromise between low fan noise and powerful
light output.
- If you select THEATER MODE, the fans operate at lower speed.
Temperature regulation reduces maximum light output if the xture
approaches its maximum operating temperature. This setting gives
priority to the lowest possible noise.
The THEATER MODE setting also increases the LED PWM
frequency to 19 200 Hz to ensure icker-free high speed video
recording.
- If you select FULL, the fans operate at full speed without
temperature regulation. This setting maximizes cooling and gives
priority to the highest possible light output intensity. FULL fan mode
can also be used as a quick way of dislodging dirt from fans.
3. Press ENTER to conrm your choice (or press MENU to exit without
making a change).

Martin® ELP PAR User Guide 23
D rotation isplay
The fastest way t rotate the control panel display through 180° to match the o
fixture’s orientation is to press and hold the UP button then press the and
DOWN button.
You can also rotate the display using the DISPLAY control menu:
1. Select DISPLAY DISPLAY ROTATION and press ENTER →.
2. Use the DOWN and UP buttons to selec NORMAL (display in normal t
orientation) or ROTATE 180° (display inverted to make it easier to read if
you install the xture hanging vertically from its mounting bracket).
3. Press ENTER to conrm your choice (or press MENU to exit without
making a change ).
Display intensity
To set the brightness of the control panel display:
1. Select DISPLAY DISPLAY INTENSITY and press ENTER. →
2. Use the DOWN and UP buttons to adjust the brightness of the display
from 10% to 100%.
3. Press ENTER to conrm your choice (or press MENU to exit without
making a change).
Temperature units
To set the xture to display temperatures in degrees Celsius or Fahrenheit:
1. Select DISPLAY TEMPERATURE UNIT and press ENTER. →
2. Use the DOWN and UP buttons to select °C or °F.
3. Press ENTER to conrm your choice (or press MENU to exit without
making a change).
Reset g to factory defaults tin
To reset the xture to its factory default settings:
1. Select FACTORY DEFAULT and press ENTER to conrm.
2. Use the DOWN and UP buttons to select YES to erase any custom
settings that you have congured and reset the xture to its factory
default settings, or select NO.
3. Press ENTER to conrm your choice (or press MENU to exit without
making a change).

24 Martin® ELP PAR User Guide
Fixture test
You can run an automatic sequence to test all eects or the fixture’s
manual test individual eects using the control menus. ly
Automatic eects test
To perform a complete test of all of the xture eects: ’s
1. Select FIXTURE TEST TEST ALL and press ENTER to conrm→. The
automatic test will run.
2. To stop the test and return to the previous level of the menu structure,
press MENU .
Manual eects tests
You can also manually test individual eects.
To test LED dimming:
1. Select FIXTURE TEST TEST DIMMER and press ENTER →.
2. To stop the test and return to the previous level of the menu structure,
press MENU.
To test individual eect: an
1. Select FIXTURE TEST TEST EFFECTS and press ENTER. →
2. Use the DOWN and UP buttons to select RED GREEN BLUE CTC, , , ,
COLOR (this tests the virtual color wheel effect), or ZOOM ress . P
ENTER to conrm your selection The xture will now run an automatic .
test of the selected effect.
3. Press MENU to exit the test and return to the list of eects.
Fixture information
Power on time
1. Select INFORMATION POWER ON TIME and press ENTER to →
display the total number of hours the xture has been powered on since
it left the factory.
2. To return to the previous level of the menu structure, press MENU.
LED operating time
1. Select INFORMATION LED HOURS and press ENTER to display the →
total number of hours the LEDs have been activated since the xture left
the factory.
2. To return to the previous level of the menu structure, press MENU.

Martin® ELP PAR User Guide 25
Firmware version
To see which software version is installed in the xture:
1. Select INFORMATION SW VERSION and press ENTER. The display →
will indicate the currently installed rmware version.
2. Use the UP and DOWN buttons to scroll through rmware revisions.
3. To return to the previous level of the menu structure, press MENU.
Fixture ID number
You can set a custom 4-digit ID number for the xture to help you identify it.
To manage the ID number:
1. Select INFORMATION FIXTURE ID and press ENTER. The display →
will indicate the current xture ID number.
2. Use the DOWN and UP buttons to increase or decrease the current
xture ID number until you reach the ID number that you want to allocate
to the xture.
3. Press ENTER to conrm the new ID number (or press MENU to exit
without making a change).
RDM unique number ID
You can view the fixture’s unique non-resettable 12-digit RDM ID number.
To view the RDM UID number:
1. Select INFORMATION UID and press ENTER. The display will →RDM
indicate the xture unique RDM ID number. ’s
2. Press MENU to exit.
Fixture temperature readouts
To check the onboard temperature of the xture:
1. Select INFORMATION TEMPERATURES and press ENTER. The →
xture will display on two lines the current temperatures of the LED PCB
and of the PSU PCB.
2. To return to the previous level of the menu structure, press MENU.
Fan speed readouts
To view the current speed of each of the fixture’s cooling fans in RPM:
1. Select INFORMATION FAN SPEED and press ENTER. The fixture →
will display on two lines the current speeds in RPM of the LED PCB
cooling fan and of the PSU PCB cooling fan.
2. To return to the previous level of the menu structure, press MENU.

26 Martin® ELP PAR User Guide
DMX Live
You can view the DMX values currently being received on each of the
fixture’s DMX channels. This can be useful for troubleshooting purposes.
To view the DMX values being received:
1. Select DMX LIVE and use the UP and DOWN buttons to scroll through
the value being received on each channel.
2. To return to the previous level of the menu structure, press MENU.
Resetting the xture
You can reset the entire xture to return it to its state when you powered it
on, or you can reset its eects only.
• To carry out a full reset, select MANUAL CONTROL RESET ALL→ → ,
select YES or NO and press ENTER. The entire xture will reset as if
you had cycled power. The reset process will take several seconds.
• To reset only the fixture’s eects, select MANUAL CONTROL RESET →
→ EFFECTS and press ENTER. The fixture’s effects will reset. The
eects reset process will take several seconds.
M anual control
You can control the fixture’s effects manually without needing a DMX signal.
This lets you set up a stand-alone scene.
To manually control the xture:
1. Select MANUAL CONTROL and then use the UP and DOWN buttons to
scroll to the effect that you want to control. Press ENTER.
2. Use the UP and DOWN buttons to scroll to the DMX value from 000 to
255 that you want to send to that effect. Press ENTER to conrm and
send that value.
3. To return to the list of effects, press MENU.
4. If you want to manually control other eects together with the rst effect,
repeat steps 1. and 2. and 3. above for the other effects. When you have
nished setting eects, return to the previous level of the menu structure,
by pressing MENU.
The xture will continue to show the eects that you have set manually
until you set new manual control values for the effects. The effects are
unaected by a power OFF/ON cycle: if you power the xture off and on
again, it will resume showing the eects.
To stop the effects, open the DMX SETUP menu. This will immediately
stop all manually controlled eects.

Martin® ELP PAR User Guide 27
When in manual control mode, pressing any button on the control panel
lights up the control panel display and shows the message MANUAL
CONTROL MODE.
Focus shortcut
The xture features a ‘focus shortcut’ mode that lets you adjust the zoom
eect. This can be useful if you are setting up multiple xtures in the rig and
want to match the appearance of their projected beams.
To adjust the zoom eect:
1. Hold ENTER for two seconds Focus shortcut mode is now enabled for .
one minute ight output switches to full white zoom moves to . L and
narrow
2. Use the UP and DOWN buttons to adjust the zoom effect for optimum
angle and position.
3. To return to the previous level of the menu structure, press MENU.
4. The xture will keep its zoom adjustment setting until the next power
cycle.
DMX control is disabled while the fixture is in ‘focus shortcut’ mode.
Control / Settings DMX channel
The Control / Settings DMX channel lets you congure certain xture
settings remotely via DMX. It gives access to many of the settings that are
available in the control menus Fixture setup(see the ‘ ’ chapter starting on
page 18) and it also gives access to Hibernation Mode (see below).
The control / settings functions require you to hold the required DMX value
for a certain number of seconds to implement them (see the DMX protocol
section on page 35).
Hibernation mode
Hibernation mode sets light output intensity to zero and disables eect
deployment.
The main purpose of th mode is to protect the xture from the intake of is
airborne material such as dust and confetti and to provide an option for
situations where noise is critical. The small reduction in power consumption
obtained in hibernation mode is not the mode’s main purpose.
When you bring the xture out of hibernation mode, it performs a full reset.
Produkt Specifikationer
| Mærke: | Martin |
| Kategori: | Lettelse |
| Model: | ELP PAR |
Har du brug for hjælp?
Hvis du har brug for hjælp til Martin ELP PAR stil et spørgsmål nedenfor, og andre brugere vil svare dig
Lettelse Martin Manualer

29 August 2024
23 August 2024
22 August 2024
22 August 2024
22 August 2024
21 August 2024
21 August 2024
21 August 2024
21 August 2024
21 August 2024
Lettelse Manualer
- Lettelse Ikea
- Lettelse Bosch
- Lettelse Denver
- Lettelse EasyMaxx
- Lettelse Mazda
- Lettelse Maxxmee
- Lettelse Metabo
- Lettelse DeWalt
- Lettelse TP-Link
- Lettelse RYOBI
- Lettelse Philips
- Lettelse Medisana
- Lettelse IFM
- Lettelse OK
- Lettelse LG
- Lettelse Qtx
- Lettelse Behringer
- Lettelse Emos
- Lettelse Gardena
- Lettelse TFA
- Lettelse Roland
- Lettelse Eheim
- Lettelse Biltema
- Lettelse Nedis
- Lettelse American DJ
- Lettelse Friedland
- Lettelse Adj
- Lettelse Westinghouse
- Lettelse Hama
- Lettelse Milwaukee
- Lettelse Theben
- Lettelse Dyson
- Lettelse JBL
- Lettelse Smartwares
- Lettelse Trust
- Lettelse Fysic
- Lettelse Florabest
- Lettelse Crivit
- Lettelse Dometic
- Lettelse Rocktrail
- Lettelse Livarno
- Lettelse Mio
- Lettelse Busch-Jaeger
- Lettelse Trotec
- Lettelse Blaupunkt
- Lettelse Honeywell
- Lettelse Hikoki
- Lettelse Miomare
- Lettelse Kress
- Lettelse Razer
- Lettelse LivarnoLux
- Lettelse Vivanco
- Lettelse Levita
- Lettelse Eglo
- Lettelse Elro
- Lettelse Innoliving
- Lettelse Konstsmide
- Lettelse Lucide
- Lettelse Massive
- Lettelse Max
- Lettelse Maxim
- Lettelse Näve
- Lettelse Nordlux
- Lettelse Osram
- Lettelse Qazqa
- Lettelse Ranex
- Lettelse Steinel
- Lettelse Melinera
- Lettelse Gembird
- Lettelse Geemarc
- Lettelse FIAP
- Lettelse Pontec
- Lettelse Auriol
- Lettelse Powerfix
- Lettelse Hayward
- Lettelse EnVivo
- Lettelse Maginon
- Lettelse RADEMACHER
- Lettelse Tesy
- Lettelse Zuiver
- Lettelse Telefunken
- Lettelse Tiger
- Lettelse Reer
- Lettelse Craftsman
- Lettelse Powerplus
- Lettelse BeamZ
- Lettelse Goobay
- Lettelse Sigma
- Lettelse Gamma
- Lettelse Cateye
- Lettelse Sencys
- Lettelse Astro
- Lettelse Ansmann
- Lettelse Dymond
- Lettelse GP
- Lettelse Varta
- Lettelse Xiaomi
- Lettelse HQ
- Lettelse AFX
- Lettelse Peerless-AV
- Lettelse Aiptek
- Lettelse Schneider
- Lettelse NGS
- Lettelse Godox
- Lettelse Stairville
- Lettelse GEV
- Lettelse Nexxt
- Lettelse Kathrein
- Lettelse Olymp
- Lettelse Ikan
- Lettelse GlobalTronics
- Lettelse Reflecta
- Lettelse Elation
- Lettelse Omnitronic
- Lettelse Velleman
- Lettelse Corsair
- Lettelse Perel
- Lettelse Porter-Cable
- Lettelse JUNG
- Lettelse ORNO
- Lettelse GLP
- Lettelse HQ Power
- Lettelse Genaray
- Lettelse Harvia
- Lettelse Blumfeldt
- Lettelse Ring
- Lettelse Gre
- Lettelse NZXT
- Lettelse IDance
- Lettelse Ardes
- Lettelse Monacor
- Lettelse Sun Joe
- Lettelse ION
- Lettelse Black Diamond
- Lettelse Brennenstuhl
- Lettelse Litecraft
- Lettelse Cotech
- Lettelse Chamberlain
- Lettelse EnGenius
- Lettelse MaxCom
- Lettelse ColorKey
- Lettelse Hazet
- Lettelse GVM
- Lettelse AudioSonic
- Lettelse Caliber
- Lettelse Steinhauer
- Lettelse OneConcept
- Lettelse Viessmann
- Lettelse Trio Lighting
- Lettelse Be Cool
- Lettelse Brandson
- Lettelse Lexon
- Lettelse ILive
- Lettelse Gemini
- Lettelse Brilliant
- Lettelse Generac
- Lettelse ARRI
- Lettelse Anslut
- Lettelse Monster
- Lettelse Nanlite
- Lettelse Lumie
- Lettelse Beper
- Lettelse Eurolite
- Lettelse Merlin Gerin
- Lettelse Bright Spark
- Lettelse Megaman
- Lettelse Ledlenser
- Lettelse Chauvet
- Lettelse Vimar
- Lettelse Klein Tools
- Lettelse Chacon
- Lettelse Lenoxx
- Lettelse SereneLife
- Lettelse Duronic
- Lettelse EtiamPro
- Lettelse Nexa
- Lettelse Conceptronic
- Lettelse Livarno Lux
- Lettelse Kern
- Lettelse Novy
- Lettelse Toolcraft
- Lettelse Cameo
- Lettelse Crestron
- Lettelse Nitecore
- Lettelse Showtec
- Lettelse Kogan
- Lettelse Esylux
- Lettelse Delta Dore
- Lettelse Adastra
- Lettelse Smith-Victor
- Lettelse Olight
- Lettelse DiO
- Lettelse V-TAC
- Lettelse Silverstone
- Lettelse Impact
- Lettelse Neewer
- Lettelse Heitronic
- Lettelse Yato
- Lettelse XQ-lite
- Lettelse Cocraft
- Lettelse Aqara
- Lettelse Ecomed
- Lettelse Blackburn
- Lettelse Knog
- Lettelse Bearware
- Lettelse Perfect Christmans
- Lettelse Setti+
- Lettelse Fiilex
- Lettelse Digipower
- Lettelse Lume Cube
- Lettelse SmallRig
- Lettelse Light4Me
- Lettelse Artecta
- Lettelse Quintezz
- Lettelse Vintec
- Lettelse All Solar Lights
- Lettelse Tel Sell
- Lettelse Aputure
- Lettelse Kichler
- Lettelse Halo
- Lettelse KlikaanKlikuit
- Lettelse Fenix
- Lettelse Watshome
- Lettelse In Lite
- Lettelse Bigben
- Lettelse Yongnuo
- Lettelse Laser
- Lettelse Belux
- Lettelse Gira
- Lettelse Profoto
- Lettelse Qnect
- Lettelse Wentronic
- Lettelse Peerless
- Lettelse Infinity
- Lettelse Bora
- Lettelse Aplic
- Lettelse Garden Lights
- Lettelse Shada
- Lettelse Swisstone
- Lettelse Handson
- Lettelse KS
- Lettelse Dydell
- Lettelse Trump Electronics
- Lettelse Verbatim
- Lettelse Blizzard
- Lettelse SIIG
- Lettelse Panzeri
- Lettelse SLV
- Lettelse Botex
- Lettelse Claypaky
- Lettelse Integral LED
- Lettelse Unitec
- Lettelse Dorr
- Lettelse Ludeco
- Lettelse Middle Atlantic
- Lettelse DeSisti
- Lettelse Hortensus
- Lettelse Paulmann
- Lettelse Heirt
- Lettelse Kanlux
- Lettelse Woodland Scenics
- Lettelse LYYT
- Lettelse Wetelux
- Lettelse Sagitter
- Lettelse Handy Century
- Lettelse Solaris
- Lettelse Aqua Signal
- Lettelse Century
- Lettelse Esotec
- Lettelse Fuzzix
- Lettelse Berger & Schröter
- Lettelse Lideka
- Lettelse Lutec
- Lettelse Maxxworld
- Lettelse SolarlampKoning
- Lettelse Ibiza Light
- Lettelse IXL
- Lettelse Fun Generation
- Lettelse Karma
- Lettelse Meipos
- Lettelse Mr. Beams
- Lettelse Pegasi
- Lettelse Mellert SLT
- Lettelse 4K5
- Lettelse Lightway
- Lettelse IMG Stage Line
- Lettelse Wireless Solution
- Lettelse Eutrac
- Lettelse NUVO
- Lettelse Futurelight
- Lettelse LightZone
- Lettelse Varytec
- Lettelse Tractel
- Lettelse Enerdan
- Lettelse Luxform Lighting
- Lettelse Canarm
- Lettelse Angler
- Lettelse Luxform
- Lettelse Karwei
- Lettelse DistriCover
- Lettelse Blumill
- Lettelse Aquatica
- Lettelse Ledar
- Lettelse Delock Lighting
- Lettelse LightPro
- Lettelse FlinQ
- Lettelse Adviti
- Lettelse 9.solutions
- Lettelse Pauleen
- Lettelse Obsidian
- Lettelse FeinTech
- Lettelse Gumax
- Lettelse WAC Lighting
- Lettelse Quoizel
- Lettelse Doughty
- Lettelse Sharper Image
- Lettelse CIVILIGHT
- Lettelse ActiveJet
- Lettelse Enlite
- Lettelse Gingko
- Lettelse Outspot
- Lettelse Innr
- Lettelse Fristom
- Lettelse Dracast
- Lettelse Raya
- Lettelse DTS
- Lettelse Expolite
- Lettelse LSC Smart Connect
- Lettelse Mr Safe
- Lettelse Swisson
- Lettelse Tellur
- Lettelse SSV Works
- Lettelse ETC
- Lettelse SWIT
- Lettelse Meteor
- Lettelse COLBOR
- Lettelse Megatron
- Lettelse MeLiTec
- Lettelse Time 2
- Lettelse Wachsmuth - Krogmann
- Lettelse Amaran
- Lettelse Dynamax
- Lettelse DreamLED
- Lettelse Ideen Welt
- Lettelse Casalux
- Lettelse Briloner
- Lettelse Retlux
- Lettelse Adam Hall
- Lettelse Hoftronic
- Lettelse Musicmate
- Lettelse Illuminex
- Lettelse Sonoff
- Lettelse Lirio By Philips
- Lettelse Raytec
- Lettelse Gewiss
- Lettelse Hella Marine
- Lettelse Sengled
- Lettelse Enttec
- Lettelse Ledino
- Lettelse Ikelite
- Lettelse Audibax
- Lettelse Sonlux
- Lettelse Atmospheres
- Lettelse Dainolite
- Lettelse DOTLUX
- Lettelse Ape Labs
- Lettelse Insatech
- Lettelse JMAZ Lighting
- Lettelse Kinotehnik
- Lettelse Litegear
- Lettelse Busch + Müller
- Lettelse Kino Flo
- Lettelse DCW
- Lettelse LumenRadio
- Lettelse HERA
- Lettelse BB&S
- Lettelse Intellytech
- Lettelse Astera
- Lettelse Magmatic
- Lettelse Temde
- Lettelse Excello
- Lettelse Varaluz
- Lettelse Aveo Engineering
- Lettelse AD Trend
- Lettelse Prolycht
- Lettelse Cineo
- Lettelse Zylight
- Lettelse Light & Motion
- Lettelse LUPO
- Lettelse CSL
- Lettelse Altman
- Lettelse EXO
- Lettelse Portman
- Lettelse Fotodiox
- Lettelse Crystorama
- Lettelse Litepanels
- Lettelse ET2
- Lettelse Golden Lighting
- Lettelse Weeylite
- Lettelse Valerie Objects
- Lettelse OttLite
- Lettelse Sonneman
- Lettelse Elan
- Lettelse Stamos
- Lettelse Hinkley Lighting
- Lettelse Sea&Sea
- Lettelse Currey & Company
- Lettelse Wiesenfield
- Lettelse Luxli
- Lettelse Singercon
Nyeste Lettelse Manualer
5 April 2025
5 April 2025
5 April 2025
5 April 2025
4 April 2025
4 April 2025
4 April 2025
4 April 2025
4 April 2025
4 April 2025