Conguration A
Input 2x DisplayPort female
Output 1x DisplayPort female
Conguration B
Input 1x DisplayPort female
Output 2x DisplayPort female
c Kurzanleitung
Bidirektionaler
2-Port
DisplayPort-Switch
CSWI3702BK
Für weitere Informationen beachten
Sie die erweiterte Anleitung online:
ned.is/cswi3702bk
Bestimmungsgemäße Verwendung
Das Produkt ist ausschließlich zum Umschalten
zwischen DisplayPort-Signalen bestimmt.
Das Produkt ist nicht für den professionellen
Einsatz gedacht.
Jegliche Modikation des Produkts kann Folgen
für die Sicherheit, Garantie und ordnungsgemäße
Funktionalität haben.
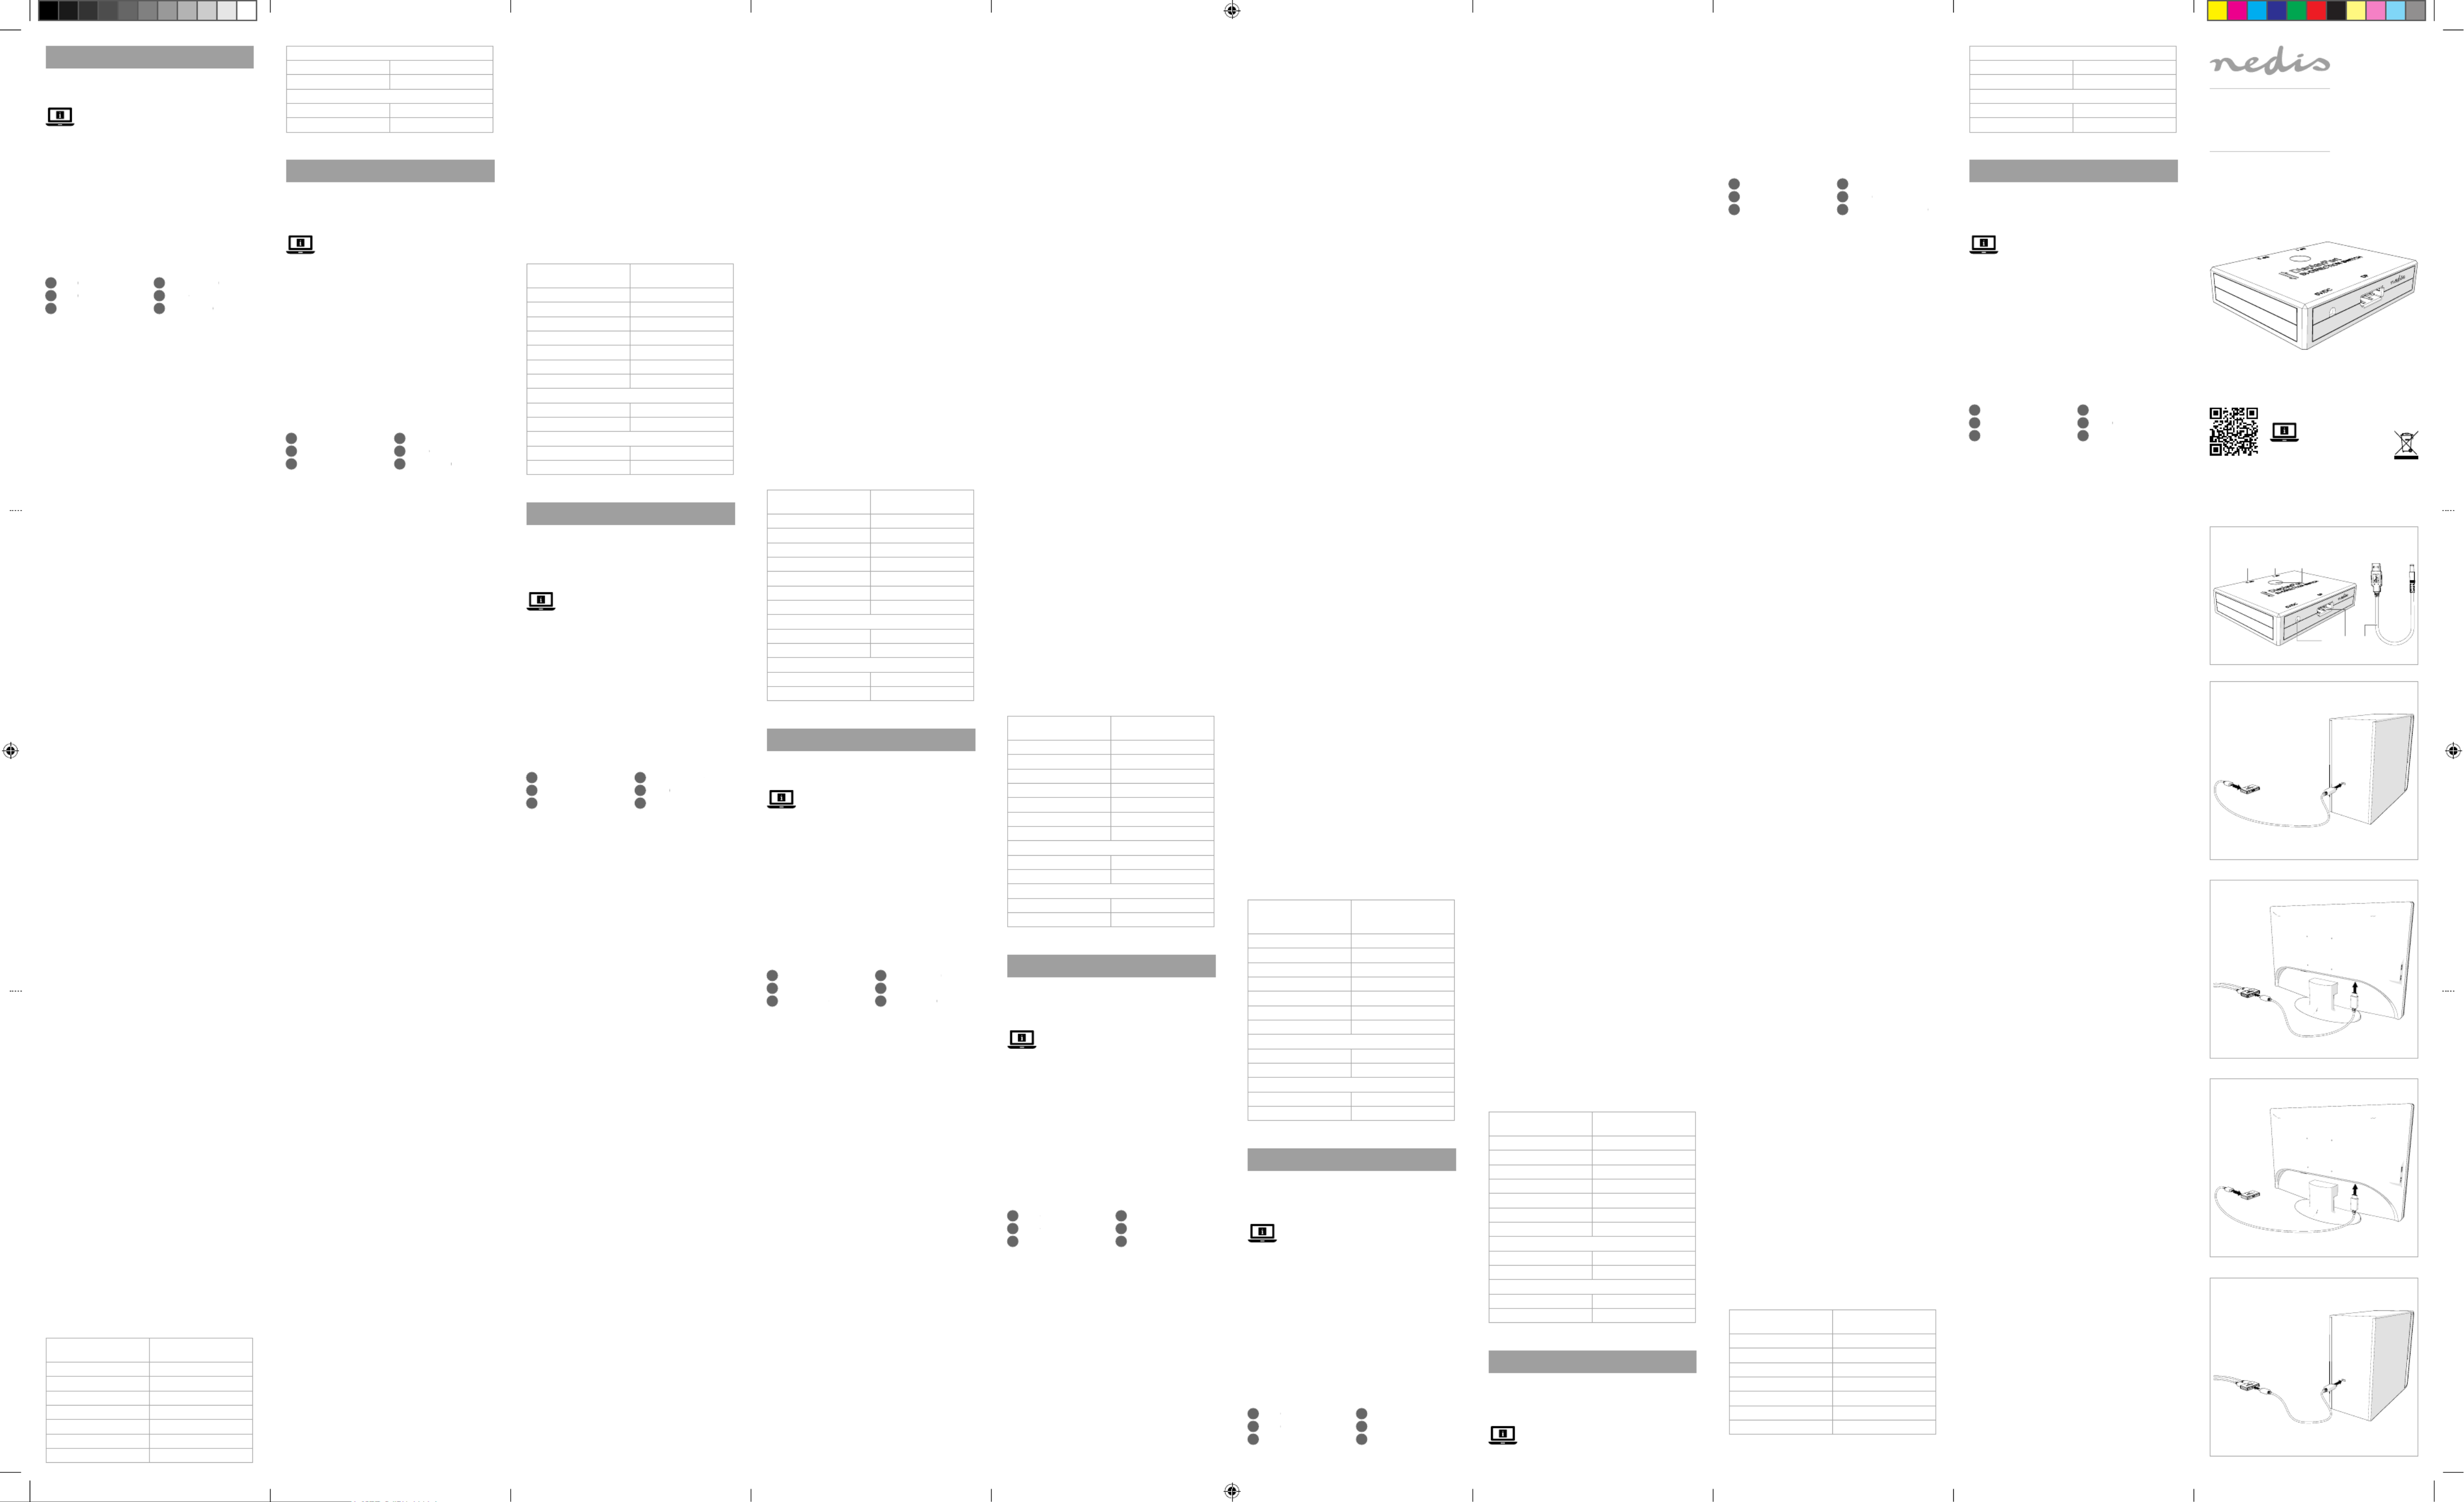
Teileliste [Abbildung A]
DP 2
DP 1
Umschalter
Adapterstecker
DP
Stromkabel
Sicherheitshinweise
-
WARNUNG
• Verwenden Sie das Produkt nur wie in dieser
Anleitung beschrieben.
• Verwenden Sie keinesfalls ein beschädigtes
Produkt.
• Setzen Sie das Produkte keiner direkten
Sonneneinstrahlung, oenen Flammen oder
Hitze aus.
• Setzen Sie das Produkt keinem Wasser oder
Feuchtigkeit aus.
• Stellen Sie das Produkt auf eine stabile, ebene
Oberäche.
• Lassen Sie das Produkt nicht herunterfallen und
vermeiden Sie Kollisionen.
• Önen Sie das Produkt nicht.
• Halten Sie das Produkt stets von Kindern fern.
• Erstellen Sie vor der ersten Verwendung ein
Backup Ihrer Daten.
Verbinden des bidirektionalen 2-Port
DisplayPort-Switch
4Abhängig von der gewünschten Konguration
befolgen Sie die entsprechenden Anweisungen.
Konguration A [Abbildung B+C]
4Stellen Sie sicher, dass alle Geräte, die Sie
verbinden wollen, ausgeschaltet sind.
1. Schließen Sie ein DisplayPort-Kabel am
DP 1-Anschluss 2 des bidirektionalen
DisplayPort-Switch an.
2. Verbinden Sie das andere Ende des DisplayPort-
Kabels mit dem PC.
4Wiederholen Sie diese Schritte für jede Quelle,
die Sie verbinden möchten.
3. Schließen Sie ein DisplayPort-Kabel am DP-
Anschluss 5 des bidirektionalen DisplayPort-
Switch an.
4. Verbinden Sie das andere Ende des DisplayPort-
Kabels mit dem Monitor.
Konguration B [Abbildung D+E]
4Stellen Sie sicher, dass alle Geräte, die Sie
verbinden wollen, ausgeschaltet sind.
1. Schließen Sie ein DisplayPort-Kabel am
DP 1-Anschluss 2 des bidirektionalen
DisplayPort-Switch an.
2. Verbinden Sie das andere Ende des DisplayPort-
Kabels mit dem Monitor.
4Wiederholen Sie diese Schritte für jede Quelle,
die Sie verbinden möchten.
3. Schließen Sie ein DisplayPort-Kabel am DP-
Anschluss 5 des bidirektionalen DisplayPort-
Switch an.
4. Verbinden Sie das andere Ende des DisplayPort-
Kabels mit dem PC.
Mit dem Stromnetz verbinden
1. Schließen Sie das Stromkabel
6 am DC-
Anschluss 4 an.
2. Schließen Sie das Stromkabel
6 am Netzteil oder
an einer funktionierenden USB-A-Buchse an.
3. Wird ein Netzteil verwendet, stecken Sie das
Netzteil am Stromnetz an.
Verwendung des bidirektionalen 2-Port
DisplayPort-Switch
4In der Konguration B kann nur ein Monitor
gleichzeitig verwendet werden.
Conguração A
Entrada 2x DisplayPort fêmea
Saída 1x DisplayPort fêmea
Conguração B
Entrada 1x DisplayPort fêmea
Saída 2x DisplayPort fêmea
e Snabbstartsguide
2-ports DisplayPort
dubbelriktad
omkopplare
CSWI3702BK
För ytterligare information, se
den utökade manualen online:
ned.is/cswi3702bk
Avsedd användning
Produkten är uteslutande avsedd att användas för
växling mellan DisplayPort-signaler.
Produkten är inte avsedd för yrkesmässig användning.
Modiering av produkten kan medföra konsekvenser
för säkerhet, garanti och korrekt funktion.
Dellista [Bild A]
DP 2
DP 1
Växlingsknapp
DC-kontakt
DP
Strömkabel
Säkerhetsanvisningar
-
VARNING
• Använd produkten endast enligt anvisningarna
i denna bruksanvisning.
• Använd inte en skadad produkt.
• Utsätt inte produkten för direkt solljus, öppen
eld eller värme.
• Exponera inte produkten till vatten eller fukt.
• Placera produkten på en stabil och plan yta.
• Tappa inte produkten och skydda den mot slag.
• Öppna inte produkten.
• Förvara produkten utom räckhåll för barn.
• Säkerhetskopiera dina data före första
användningen.
Ansluta den 2-portars DisplayPort
dubbelriktade omkopplaren
4Följ anvisningarna beroende på den
konguration du önskar använda.
Konguration A [Bild B+C]
4Se till att alla enheter som du vill ansluta är
avstängda.
1. Anslut en DisplayPort-kabel till DP
1-porten 2 på den dubbelriktade
DisplayPort-omkopplaren.
2. Anslut DisplayPort-kabelns andra ända till datorn.
4Upprepa dessa steg för varje källa du vill ansluta.
3. Anslut en DisplayPort-kabel till DP-
porten 5 på den dubbelriktade
DisplayPort-omkopplaren.
4. Anslut DisplayPort-kabelns andra ända till
monitorn.
Konguration B [Bild D+E]
4Se till att alla enheter som du vill ansluta är
avstängda.
1. Anslut en DisplayPort-kabel till DP
1-porten 2 på den dubbelriktade
DisplayPort-omkopplaren.
2. Anslut DisplayPort-kabelns andra ända till monitorn.
4Upprepa dessa steg för varje källa du vill ansluta.
3. Anslut en DisplayPort-kabel till DP-
porten 5 på den dubbelriktade
DisplayPort-omkopplaren.
4. Anslut DisplayPort-kabelns andra ända till datorn.
Ansluta till elnätet
1. Anslut kraftkabeln 6 till DC-kontakten 4.
2. Anslut nätsladden 6 till en nätadapter eller en
fungerande USB-A hon-port.
3. Anslut nätadapter till ett eluttag om en
nätadapter används.
Att använda den 2-portars DisplayPort
dubbelriktade omkopplaren
4Endast en monitor åt gången kan användas i
konguration B.
Konguration A
1. Slå på datorerna och monitorn.
En av datorerna kommer nu att visas på den
anslutna monitorn.
2. Växla mellan datorerna med användning av
växlingsknappen 3.
Konguration B
1. Slå på datorn och monitorerna.
En av monitorerna kommer nu att visa datorns ingång.
2. Växla mellan monitorerna med användning av
växlingsknappen 3.
Utilização prevista
O produto destina-se exclusivamente à comutação
entre sinais DisplayPort.
O produto não se destina a utilização prossional.
Qualquer alteração do produto pode ter
consequências em termos de segurança, garantia
e funcionamento adequado.
Lista de peças [Imagem A]
DP 2
DP 1
Botão de comutação
Conetor DC
DP
Cabo de alimentação
Instruções de segurança
-
AVISO
• Utilize o produto apenas conforme descrito
neste manual.
• Não utilize um produto danicado.
• Não exponha o produto à luz solar direta,
chamas expostas ou calor.
• Não exponha o produto à água ou humidade.
• Coloque o produto sobre uma superfície
estável e plana.
• Não deixe cair o produto e evite impactos.
• Não abra o produto.
• Mantenha o produto fora do alcance das crianças.
• Faça um backup dos seus dados antes da
primeira utilização.
Ligue comutador bidirecional DisplayPort de
2 portas
4Dependendo da conguração que pretende
utilizar, siga as instruções em conformidade.
Conguração A [Imagem B+C]
4Certique-se de que todos os dispositivos que
pretende ligar foram desligados.
1. Ligue um cabo DisplayPort à porta DP 1 2 do
comutador bidirecional DisplayPort.
2. Ligue a outra extremidade do cabo DisplayPort
ao PC.
4Repita estes passos para cada fonte que
pretende ligar.
3. Ligue um cabo DisplayPort à porta DP 5 do
comutador bidirecional DisplayPort.
4. Ligue a outra extremidade do cabo DisplayPort
ao monitor.
Conguração B [Imagem D+E]
4Certique-se de que todos os dispositivos que
pretende ligar foram desligados.
1. Ligue um cabo DisplayPort à porta DP 1 2 do
comutador bidirecional DisplayPort.
2. Ligue a outra extremidade do cabo DisplayPort
ao monitor.
4Repita estes passos para cada fonte que
pretende ligar.
3. Ligue um cabo DisplayPort à porta DP 5 do
comutador bidirecional DisplayPort.
4. Ligue a outra extremidade do cabo DisplayPort
ao PC.
Ligar à rede elétrica
1. Ligue o cabo de alimentação 6 ao conector CC 4.
2. Ligue o cabo de alimentação 6 a um
adaptador de potência ou a uma porta fêmea
USB-A em funcionamento.
3. Ligue o adaptador de potência à corrente,
quando for utilizado um adaptador de
potência.
Use o comutador bidirecional DisplayPort de
2 portas
4Na conguração B, apenas pode ser utilizado
um monitor de cada vez.
Conguração A
1. Ligue os PC e o monitor.
Um dos PC irá aparecer no monitor ligado.
2. Alterne entre os PC utilizando o botão de
comutação 3.
Conguração B
1. Ligue o PC e os monitores.
Um dos monitores irá exibir a entrada dos PC.
2. Alterne entre os monitores utilizando o botão
de comutação 3.
Especicações
Produto Comutador bidirecional
DisplayPort de 2 portas
Número de artigo CSWI3702BK
Dimensões (c x l x a) 80 x 60 x 17 mm
Resolução Até 4K2K a 60 Hz
Taxa de dados 5,4 Gbps
Tensão de entrada 5 V
Corrente de entrada 0,5 A
Comprimento do cabo 1 m
Collegamento del commutatore bidirezionale
DisplayPort a 2 porte
4A seconda della congurazione che si desidera
utilizzare, seguire le rispettive istruzioni.
Congurazione A [Immagine B+C]
4Assicurarsi che tutti i dispositivi che si desidera
collegare siano stati spenti.
1. Collegare un cavo DisplayPort alla porta DP 1
2 del commutatore bidirezionale DisplayPort.
2. Collegare l’altra estremità del cavo DisplayPort
al PC.
4Ripetere questi passaggi per ogni sorgente che
si desidera collegare.
3. Collegare un cavo DisplayPort alla porta DP 5
del commutatore bidirezionale DisplayPort.
4. Collegare l’altra estremità del cavo DisplayPort
al monitor.
Congurazione B [Immagine D+E]
4Assicurarsi che tutti i dispositivi che si desidera
collegare siano stati spenti.
1. Collegare un cavo DisplayPort alla porta DP 1
2 del commutatore bidirezionale DisplayPort.
2. Collegare l’altra estremità del cavo DisplayPort
al monitor.
4Ripetere questi passaggi per ogni sorgente che
si desidera collegare.
3. Collegare un cavo DisplayPort alla porta DP 5
del commutatore bidirezionale DisplayPort.
4. Collegare l’altra estremità del cavo DisplayPort
al PC.
Collegamento alla rete elettrica
1. Collegare il cavo di alimentazione 6 nel
connettore CC 4.
2. Collegare il cavo di alimentazione 6 in un
adattatore di alimentazione o in una porta
USB-A femmina funzionante.
3. Collegare l’adattatore di alimentazione alla rete
elettrica, se ne viene utilizzato uno.
Utilizzo del commutatore bidirezionale
DisplayPort a 2 porte
4In congurazione B, è possibile utilizzare un
solo monitor alla volta.
Congurazione A
1. Accendere i PC e il monitor.
Uno dei PC viene ora visualizzato sul monitor collegato.
2. Commutare fra i PC con il pulsante di
commutazione 3.
Congurazione B
1. Accendere il PC e i monitor.
Ora uno dei monitor visualizzerà l’ingresso dei PC.
2. Commutare fra i monitor con il pulsante di
commutazione 3.
Speciche
Prodotto Commutatore
bidirezionale DisplayPort
a 2 porte
Numero articolo CSWI3702BK
Dimensioni (p x l x a) 80 x 60 x 17 mm
Risoluzione Fino a 4K2K a 60 Hz
Velocità dati 5,4 Gbps
Tensione in ingresso 5 V
Corrente in ingresso 0,5 A
Lunghezza del cavo 1 m
Congurazione A
Ingresso 2x DisplayPort femmina
Uscita 1x DisplayPort femmina
Congurazione B
Ingresso 1x DisplayPort femmina
Uscita 2x DisplayPort femmina
h Guía de inicio rápido
Conmutador bidirec-
cional DisplayPort
para el puerto 2
CSWI3702BK
Para más información, consulte
el manual ampliado en línea:
ned.is/cswi3702bk
Uso previsto por el fabricante
El producto está diseñado exclusivamente para
conmutar entre señales DisplayPort.
El producto no está diseñado para un uso profesional.
Cualquier modicación del producto puede tener
consecuencias para la seguridad, la garantía y el
funcionamiento adecuado.
Lista de piezas [Imagen A]
DP 2
DP 1
Botón conmutar
Conector CC
DP
Cable de alimentación
Instrucciones de seguridad
-
ADVERTENCIA
• Utilice el producto únicamente tal como se
describe en este manual.
• Nunca utilice un producto dañado.
• No exponga el producto a la luz solar directa, a
llamas abiertas ni al calor.
• No exponga el producto al agua o a la humedad.
• Coloque el producto en una supercie estable y
plana.
• No deje caer el producto y evite que sufra golpes.
• No abra el producto.
• Mantenga el producto fuera del alcance de los niños.
• Antes de utilizarlo por primera vez, haga una
copia de seguridad de sus datos.
Conecte el conmutador DisplayPort
bidireccional al puerto 2
4En función de la conguración que desee
utilizar, siga las instrucciones correspondientes.
Conguración A [Imagen B+C]
4Asegúrese de que todos los dispositivos que
quiere conectar se hayan apagado.
1. Enchufe un cable DisplayPort en el puerto DP 1
2 del conmutador DisplayPort bidireccional.
2. Enchufe el otro extremo del cable DisplayPort
en el ordenador.
4Repita estos pasos para cada fuente que desee
conectar.
3. Enchufe un cable DisplayPort en el puerto DP
5 del conmutador DisplayPort bidireccional.
4. Enchufe el otro extremo del cable DisplayPort
en el monitor.
Conguración B [Imagen D+E]
4Asegúrese de que todos los dispositivos que
quiere conectar se hayan apagado.
1. Enchufe un cable DisplayPort en el puerto DP 1
2 del conmutador DisplayPort bidireccional.
2. Enchufe el otro extremo del cable DisplayPort
en el monitor.
4Repita estos pasos para cada fuente que desee
conectar.
3. Enchufe un cable DisplayPort en el puerto DP
5 del conmutador DisplayPort bidireccional.
4. Enchufe el otro extremo del cable DisplayPort
en el ordenador.
Conectar a la red eléctrica
1. Enchufe el cable de alimentación
6 en el
conector CC 4.
2. Enchufe el cable de alimentación
6 en un adaptador
de corriente o en un puerto hembra USB-A.
3. Si utiliza un adaptador de corriente, enchúfelo
a la red eléctrica.
Uso del conmutador DisplayPort bidireccional
al puerto 2
4En la conguración B, solo se puede usar un
monitor a la vez.
Conguración A
1. Encienda los PC y el monitor.
Se mostrará uno de los PC en el monitor conectado.
2. Alterne entre los PC utilizando el botón de
conmutar 3.
Conguración B
1. Encienda el PC y los monitores.
Ahora, uno de los monitores mostrará la entrada del PC.
2. Alterne entre los monitores utilizando el botón
de conmutar 3.
Especicaciones
Producto Conmutador bidireccional
DisplayPort para el puerto 2
Número de artículo CSWI3702BK
Dimensiones (L x An x Al) 80 x 60 x 17 mm
Resolución Hasta 4K2K a 60 Hz
Tasa de datos 5,4 Gbps
Tensión de entrada 5 V
Corriente de entrada 0,5 A
Longitud del cable 1 m
Conguración A
Entrada 2x DisplayPort hembra
Salida 1x DisplayPort hembra
Conguración B
Entrada 1x DisplayPort hembra
Salida 2x DisplayPort hembra
i Guia de iniciação rápida
Comutador bidire-
cional DisplayPort
de 2 portas
CSWI3702BK
Para mais informações, consulte a
versão alargada do manual on-line:
ned.is/cswi3702bk
3. Steek een DisplayPort-kabel in de DP-poort
5
van de DisplayPort bi-richtingschakelaar.
4. Sluit het andere uiteinde van de DisplayPort-
kabel aan op de monitor.
Conguratie B [Afbeelding D+E]
4Controleer of alle apparaten die u wilt
aansluiten zijn uitgeschakeld.
1. Steek een DisplayPort-kabel in de DP 1-poort
2 van de DisplayPort bi-richtingschakelaar.
2. Sluit het andere uiteinde van de DisplayPort-
kabel aan op de monitor.
4Herhaal deze stappen voor elke bron die u wilt
aansluiten.
3. Steek een DisplayPort-kabel in de DP-poort
5
van de DisplayPort bi-richtingschakelaar.
4. Sluit het andere uiteinde van de DisplayPort-
kabel aan op de PC.
Aansluiten op het lichtnet
1. Steek de voedingskabel
6 in de DC-connector 4.
2. Steek de voedingskabel 6 in een
voedingsadapter of in een werkende
vrouwelijke USB-A poort.
3. Steek de voedingsadapter in het stopcontact
wanneer u een voedingsadapter gebruikt.
De 2-poort DisplayPort bi-richtingschakelaar
gebruiken
4In conguratie B, kan slechts een monitor
tegelijkertijd worden gebruikt.
Conguratie A
1. Zet de PC's en de monitor aan.
Een van de PC's wordt nu op de aangesloten
monitor weergegeven.
2. Schakel tussen de PC's met behulp van de
schakelknop 3.
Conguratie B
1. Zet de PC en de monitoren aan.
Een van de monitoren geeft nu de ingangen van
de PC's weer.
2. Schakel tussen de monitoren met behulp van
de schakelknop 3.
Specicaties
Product 2-poort DisplayPort
bi-richtingschakelaar
Artikelnummer CSWI3702BK
Afmetingen (l x b x h) 80 x 60 x 17 mm
Resolutie Maximaal 4K2K bij 60 Hz
Gegevenssnelheid 5,4 Gbps
Ingangsspanning 5 V
Ingangsstroom 0,5 A
Kabellengte 1 m
Conguratie A
Ingang 2x DisplayPort vrouwelijk
Uitgang 1x DisplayPort vrouwelijk
Conguratie B
Ingang 1x DisplayPort vrouwelijk
Uitgang 2x DisplayPort vrouwelijk
j Guida rapida all’avvio
Commutatore
bidirezionale
DisplayPort a 2 porte
CSWI3702BK
Per maggiori informazioni
vedere il manuale esteso online:
ned.is/cswi3702bk
Uso previsto
Il prodotto è inteso esclusivamente per la
commutazione di segnali DisplayPort.
Il prodotto non è inteso per utilizzi professionali.
Eventuali modiche al prodotto possono
comportare conseguenze per la sicurezza, la
garanzia e il corretto funzionamento.
Elenco parti [Immagine A]
DP 2
DP 1
Pulsante di commutazione
Connettore CC
DP
Cavo di alimentazione
Istruzioni di sicurezza
-
ATTENZIONE
• Utilizzare il prodotto solo come descritto nel
presente manuale.
• Non utilizzare un prodotto danneggiato.
• Non esporre il prodotto alla luce diretta del
sole, a amme libere o al calore.
• Non esporre il prodotto all’acqua o all’umidità.
• Posizionare il prodotto su una supercie piana
e stabile.
• Non far cadere il prodotto ed evitare impatti.
• Non aprire il prodotto.
• Tenere il prodotto lontano dalla portata dei bambini.
• Eseguire un backup dei dati prima del primo utilizzo.
du commutateur DisplayPort bidirectionnel.
4. Branchez l'autre extrémité du câble DisplayPort au PC.
Connexion au secteur
1. Branchez le câble d'alimentation
6 dans le
connecteur CC 4.
2. Branchez le câble d'alimentation
6 dans un
adaptateur secteur ou dans un port USB-A
femelle qui fonctionne.
3. Branchez l'adaptateur secteur sur le secteur
lorsqu'un adaptateur secteur est utilisé.
Utiliser le commutateur DisplayPort
bidirectionnel 2 ports
4En conguration B, un seul écran peut être
utilisé simultanément.
Conguration A
1. Mettez en marche les PC et l’écran.
L’un des PC sera maintenant aché sur l’écran
connecté.
2. Basculez entre les PC à l’aide du bouton de
commutation 3.
Conguration B
1. Mettez en marche le PC et les écrans.
L’un des écrans va maintenant acher l’entrée PC.
2. Basculez entre les écrans à l’aide du bouton de
commutation 3.
Spécications
Produit Commutateur DisplayPort
bidirectionnel 2 ports
Article numéro CSWI3702BK
Dimensions (L x l x H) 80 x 60 x 17 mm
Résolution Jusqu'à 4K2K à 60 Hz
Débit de données 5,4 Go/s
Tension d’entrée 5 V
Courant d'entrée 0,5 A
Longueur de câble 1 m
Conguration A
Entrée 2x DisplayPort femelle
Sortie 1x DisplayPort femelle
Conguration B
Entrée 1x DisplayPort femelle
Sortie 2x DisplayPort femelle
d Verkorte handleiding
2-poort DisplayPort
bi-richtingschakelaar
CSWI3702BK
Zie voor meer informatie de
uitgebreide handleiding online:
ned.is/cswi3702bk
Bedoeld gebruik
Het product is uitsluitend bedoeld voor het
schakelen tussen DisplayPort-signalen.
Het product is niet bedoeld voor professioneel
gebruik.
Elke wijziging van het product kan gevolgen hebben
voor veiligheid, garantie en correcte werking.
Onderdelenlijst [Afbeelding A]
DP 2
DP 1
Schakelknop
DC-connector
DP
Stroomkabel
Veiligheidsvoorschriften
-
WAARSCHUWING
• Gebruik het product alleen zoals beschreven in
deze handleiding.
• Neem een beschadigd product niet in gebruik.
• Stel het product niet bloot aan direct zonlicht,
open vuur of hitte.
• Stel het product niet bloot aan water of vocht.
• Plaats het product op een stabiele en vlakke
ondergrond.
• Laat het product niet vallen en voorkom stoten.
• Open het product niet.
• Houd het product buiten bereik van kinderen.
• Maak voor het eerste gebruik een back-up van
uw gegevens.
Sluit de 2-poort DisplayPort bi-
richtingschakelaar aan
4Volg de instructies overeenkomstig de
conguratie die u wilt gebruiken.
Conguratie A [Afbeelding B+C]
4Controleer of alle apparaten die u wilt
aansluiten zijn uitgeschakeld.
1. Steek een DisplayPort-kabel in de DP 1-poort
2 van de DisplayPort bi-richtingschakelaar.
2. Sluit het andere uiteinde van de DisplayPort-
kabel aan op de PC.
4Herhaal deze stappen voor elke bron die u wilt
aansluiten.
Konguration A
1. Schalten Sie die PCs und den Monitor ein.
Einer der PCs wird nun auf dem angeschlossenen
Monitor ausgegeben.
2. Wechseln Sie zwischen den PCs mithilfe von
Schalter 3.
Konguration B
1. Schalten Sie den PC und die Monitore ein.
Einer der Monitore wird nun den Eingang des PC
anzeigen.
2. Wechseln Sie zwischen den Monitoren mithilfe
von Schalter 3.
Spezikationen
Produkt Bidirektionaler 2-Port
DisplayPort-Switch
Artikelnummer CSWI3702BK
Größe (L x B x H) 80 x 60 x 17 mm
Auösung Bis zu 4K2K bei 60 Hz
Datenrate 5,4 Gbps
Eingangsspannung 5 V
Eingangsstrom 0,5 A
Kabellänge 1 m
Konguration A
Eingang 2x DisplayPort-Buchse
Ausgang 1x DisplayPort-Buchse
Konguration B
Eingang 1x DisplayPort-Buchse
Ausgang 2x DisplayPort-Buchse
b Guide de démarrage rapide
Commutateur
DisplayPort
bidirectionnel 2
ports
CSWI3702BK
Pour plus d'informations, consultez
le manuel détaillé en ligne :
ned.is/cswi3702bk
Utilisation prévue
Le produit est exclusivement destiné à commuter
entre des signaux DisplayPort.
Le produit n’est pas destiné à un usage professionnel.
Toute modication du produit peut avoir des
conséquences sur la sécurité, la garantie et le bon
fonctionnement.
Liste des pièces [Image A]
DP 2
DP 1
Bouton de commutation
Connecteur CC
DP
Câble d'alimentation
Consignes de sécurité
-
AVERTISSEMENT
• Utilisez le produit uniquement comme décrit
dans le présent manuel.
• Ne pas installer ou utiliser un appareil endommagé.
• N'exposez pas le produit aux rayons directs du
soleil, aux ammes ou à la chaleur.
• Ne pas exposer le produit à l'eau ou à
l'humidité.
• Placez le produit sur une surface stable et plane.
• Ne pas laisser tomber le produit et éviter de le
cogner.
• Ne pas ouvrir le produit.
• Gardez le produit hors de portée des enfants.
• Eectuez une sauvegarde de vos données
avant la première utilisation.
Connectez le commutateur DisplayPort
bidirectionnel 2 ports
4Selon la conguration que vous souhaitez
utiliser, suivez les instructions en conséquence.
Conguration A [Image B+C]
4Assurez-vous que tous les appareils que vous
souhaitez connecter soient hors tension.
1. Branchez un câble DisplayPort au port DP 1 2
du commutateur DisplayPort bidirectionnel.
2. Branchez l'autre extrémité du câble DisplayPort au PC.
4Répétez ces étapes pour chaque source que
vous souhaitez connecter.
3. Branchez un câble DisplayPort au port DP 5
du commutateur DisplayPort bidirectionnel.
4. Branchez l'autre extrémité du câble DisplayPort
à l’écran.
Conguration B [Image D+E]
4Assurez-vous que tous les appareils que vous
souhaitez connecter soient hors tension.
1. Branchez un câble DisplayPort au port DP 1 2
du commutateur DisplayPort bidirectionnel.
2. Branchez l'autre extrémité du câble DisplayPort
à l’écran.
4Répétez ces étapes pour chaque source que
vous souhaitez connecter.
3. Branchez un câble DisplayPort au port DP 5
a Quick start guide
2-port DisplayPort
bi-direction switch
CSWI3702BK
For more information see the extended
manual online: ned.is/cswi3702bk
Intended use
The product is exclusively intended for switching
between DisplayPort signals.
The product is not intended for professional use.
Any modication of the product may have
consequences for safety, warranty and proper
functioning.
Parts list [Image A]
DP 2
DP 1
Switch button
DC connector
DP
Power cable
Safety instructions
-
WARNING
• Only use the product as described in this manual.
• Do not use a damaged product.
• Do not expose the product to direct sunlight,
naked ames or heat.
• Do not expose the product to water or moisture.
• Place the product on a stable and at surface.
• Do not drop the product and avoid bumping.
• Do not open the product.
• Keep the product out of reach from children.
• Make a backup of your data prior to rst use.
Connect the 2-port DisplayPort bi-direction switch
4Depending on the conguration you want to
use, follow the instructions accordingly.
Conguration A [Image B+C]
4Make sure all the devices you want to connect
have been turned o.
1. Plug a DisplayPort cable into the DP 1 port 2
of the DisplayPort bi-direction switch.
2. Plug the other end of the DisplayPort cable
into the PC.
4Repeat these steps for every source you want
to connect.
3. Plug a DisplayPort cable into the DP port 5 of
the DisplayPort bi-direction switch.
4. Plug the other end of the DisplayPort cable into
the monitor.
Conguration B [Image D+E]
4Make sure all the devices you want to connect
have been turned o.
1. Plug a DisplayPort cable into the DP 1 port 2
of the DisplayPort bi-direction switch.
2. Plug the other end of the DisplayPort cable into
the monitor.
4Repeat these steps for every source you want
to connect.
3. Plug a DisplayPort cable into the DP port 5 of
the DisplayPort bi-direction switch.
4. Plug the other end of the DisplayPort cable
into the PC.
Connect to the mains
1. Plug the power cable
6 into the DC connector 4.
2. Plug the power cable 6 into a power adapter
or into a working USB-A female port.
3. Plug the power adapter into the mains, when a
power adapter is used.
Using the 2-port DisplayPort bi-direction
switch
4In conguration B, only one monitor can be
used simultaneously.
Conguration A
1. Switch on the PCs and the monitor.
One of the PCs will now be shown on the
connected monitor.
2. Switch between the PCs using the switch
button 3
.
Conguration B
1. Switch on the PC and the monitors.
One of the monitors will now show the PCs input.
2. Switch between the monitors using the switch
button 3
.
Specications
Product 2-port DisplayPort bi-
direction switch
Article number CSWI3702BK
Dimensions (l x w x h) 80 x 60 x 17 mm
Resolution Up to 4K2K at 60 Hz
Data rate 5.4 Gbps
Input voltage 5 V
Input current 0.5 A
Cable length 1 m
2-Port DisplayPort
Switch
Bi-directional
CSWI3702BK
ned.is/cswi3702bk
Nedis BV
De Tweeling 28, 5215 MC ’s-Hertogenbosch
The Netherlands 08/19