Netgear RN31662D Manual
Læs nedenfor 📖 manual på dansk for Netgear RN31662D (92 sider) i kategorien I DEN. Denne guide var nyttig for 7 personer og blev bedømt med 4.5 stjerner i gennemsnit af 2 brugere
Side 1/92
Software Manual
ReadyNAS OS 6.10
NETGEAR, Inc.
350 E. Plumeria DriveMay 2019
San Jose, CA 95134, USA202-11207-18

Support
Thank you for purchasing this NETGEAR product. You can visit www.netgear.com/support
to register your product, get help, access the latest downloads and user manuals, and
join our community. We recommend that you use only ofcial NETGEAR support
resources.
Trademarks
©NETGEAR, Inc., NETGEAR and the NETGEAR Logo are trademarks of NETGEAR, Inc.
Any non-NETGEAR trademarks are used for reference purposes only.
Compliance
For regulatory compliance information, visit http://www.netgear.com/about/regulatory.
See the regulatory compliance document before connecting the power supply.
2
ReadyNAS OS 6.10

Contents
Chapter 1 Getting Started
Start Using Your ReadyNAS System.................................................10
Additional Documentation................................................................10
Supported ReadyNAS Systems.........................................................11
Supported Operating Systems.........................................................12
Supported Browsers...........................................................................12
Diskless Systems.................................................................................13
Basic Installation.................................................................................13
Upgrade Pre-6.2 ReadyNAS Firmware for Use With
ReadyCLOUD 14......................................................................................
Discover and Set Up Your ReadyNAS Using ReadyCLOUD.........16
Local Setup Wizard.............................................................................17
Admin Page.........................................................................................18
Access the Local Admin Page...........................................................20
Register Your System.........................................................................20
Five Levels of Protection....................................................................21
The ReadyNAS Community...............................................................22
Safe Mode...........................................................................................22
Chapter 2 Volume Conguration
Basic Volume and RAID Concepts...................................................24
Volumes 24...........................................................................................
RAID 24.................................................................................................
ReadyTIER, Tiers, Data, and Metadata.............................................28
Manage Volumes................................................................................29
Change RAID Mode.......................................................................29
View the Status of a Volume.........................................................31
Congure the Checksum Function..............................................33
Format Disks...................................................................................34
Create and Encrypt a Volume......................................................35
Delete a Volume.............................................................................36
Name a USB Drive..........................................................................38
Expand Storage Capacity.............................................................39
Add Protection to a Volume.........................................................42
Add Protection to a Flex-RAID Volume.......................................43
Add a Group to a Flex-RAID Volume..........................................44
3

Delete a RAID Group.....................................................................45
Use the Volume Management Wizard to Create a Volume......46
Add a Tier to a Volume.................................................................47
Enable or Disable Quotas on Volumes.......................................50
Maintain Volumes...............................................................................52
Balance a Volume..........................................................................53
Trim a Volume................................................................................54
Export a Volume.............................................................................55
Schedule Volume Maintenance...................................................56
Chapter 3 Shares
Basic Share Concepts.........................................................................59
Data Organization..........................................................................59
Share Defaults................................................................................60
File and Folder Names..................................................................60
File-Sharing Protocols and File Services.....................................60
Quotas on Shares...........................................................................62
Bit Rot Protection...........................................................................62
Home Folders.................................................................................62
Manage Shares...................................................................................63
Create a Share................................................................................63
View and Change the Properties of a Share...............................64
Delete a Share................................................................................66
Browse a Share...............................................................................67
Set or Change Bit Rot Protection.................................................68
Share Access Rights...........................................................................69
User and Group Authentication...................................................69
Set Network Access Rights to Shares for Common Protocols..70
Set Network Access Rights to Shares..........................................71
Squash, Map, Host IDs to ReadyNAS IDs....................................83
Set Up Access Rights to Files and Folders..................................85
Access Shares From a Network-Attached Device..........................89
Use a Web Browser........................................................................89
Use a Windows Device..................................................................90
Use a macOS Device.....................................................................90
Use a Linux or Unix Device...........................................................91
Use FTP and FTPS..........................................................................92
Use Rsync........................................................................................93
Chapter 4 LUNs
Basic LUN Concepts...........................................................................95
Thin and Thick Provisioning..........................................................95
Default LUN Settings.....................................................................96
Manage LUNs......................................................................................96
4
ReadyNAS OS 6.10

Create a LUN..................................................................................96
View and Change the Properties of a LUN.................................99
Expand the Size of a LUN............................................................101
Delete a LUN................................................................................102
LUN Groups and Access Rights......................................................103
Create a LUN Group....................................................................104
Assign a LUN to a LUN Group....................................................105
Remove a LUN From a LUN Group...........................................105
Delete a LUN Group....................................................................106
Manage Access Rights for LUN Groups....................................107
Access LUN Groups From an iSCSI-Attached Device..................113
Set Up Initiator Access................................................................113
Use iSNS........................................................................................120
Initialize and Format LUNs..........................................................120
Chapter 5 Snapshots
Basic Snapshot Concepts................................................................125
Smart Snapshot Management....................................................126
Rolling Back..................................................................................126
Clones 126...........................................................................................
View and Change Share Snapshot Properties..............................126
Manually Take a Snapshot...............................................................127
Browse Snapshots Using Recovery Mode.....................................128
Roll Back to a Snapshot Using Recovery Mode............................130
Clone Snapshots...............................................................................131
Delete Snapshots.............................................................................133
Delete Snapshots Using Recovery Mode......................................133
Recover Data From a Snapshot......................................................134
Recover Data From a Snapshot to a Network-Attached
Device 134............................................................................................
Recover Data From a Snapshot to an iSCSI-Attached Device.135
Chapter 6 Users and Groups
User and Group Accounts...............................................................137
Home Folders...................................................................................137
User and Group Account Limitations.............................................138
User and Group Management Modes...........................................138
User Accounts...................................................................................141
Congure Default User Settings................................................141
Create User Accounts..................................................................142
Edit User Accounts......................................................................143
Delete User Accounts..................................................................145
Change User Passwords.............................................................145
Group Accounts................................................................................146
5
ReadyNAS OS 6.10

Create Groups..............................................................................147
Edit Groups...................................................................................148
Delete Groups..............................................................................150
Cloud Users.......................................................................................150
Grant Access to Cloud Users......................................................151
Cloud User Access Rights...........................................................151
Chapter 7 Use Cloud Services
Use ReadyCLOUD............................................................................153
Join ReadyCLOUD.......................................................................153
Use ReadyCLOUD to Share Folders Through Email...............154
Use ReadyCLOUD to Share Folders With ReadyCLOUD Users 158.
Delete ReadyCLOUD Users........................................................160
Manage Permissions for ReadyCLOUD Users.........................161
Access Your System Using ReadyCLOUD................................162
Sync With Amazon Drive.................................................................163
Sync With Amazon S3......................................................................165
Sync With Azure................................................................................166
Sync With Dropbox..........................................................................168
Sync With Google Drive..................................................................170
Sync With Microsoft OneDrive.......................................................172
ReadyNAS Vault................................................................................174
Sync With Your Wasabi Storage.....................................................177
Adjust Cloud Transfer Sessions and Settings...............................179
ReadyNAS Replicate........................................................................179
Enable ReadyNAS Replicate.......................................................179
Chapter 8 System Settings
Customize the Basic System Settings............................................183
Set the Clock................................................................................183
Select the Language....................................................................184
Set the Administrator Password.................................................185
Congure System Alerts.............................................................186
Congure the Host Name...........................................................188
Enable Antivirus...........................................................................188
Enable File Search.......................................................................190
Enable the Use of the Mac Finder to Search Files...................190
Congure the Network Settings.....................................................191
Basic Network Concepts.............................................................191
Congure the Ethernet Interfaces.............................................193
Congure Bonded Adapters......................................................196
Congure Static Routes..............................................................203
Create a VLAN..............................................................................204
Add Global Proxy Settings.........................................................205
6
ReadyNAS OS 6.10

Congure Global Settings for System Services............................206
Basic File-Sharing Concepts.......................................................206
Supported System Services........................................................206
Congure System Services.........................................................208
Download an SSH Public Key File..................................................216
Congure a User Account to Use SSH...........................................217
Congure Media Services...............................................................218
ReadyDLNA 219..................................................................................
iTunes Streaming Server.............................................................222
Congure Discovery Services.........................................................223
Back Up or Restore System Conguration....................................224
Chapter 9 System Power
Manage Power Usage......................................................................227
Enable Power Timer....................................................................227
Enable Wake on LAN..................................................................229
What Is Disk Spin-Down..............................................................229
Set or Change Disk Spin-Down..................................................230
Optional Uninterruptible Power Supplies.....................................231
Uninterruptible Power Supplies.................................................231
UPS Congurations.....................................................................231
Manage UPS Devices..................................................................232
Chapter 10 Install and Manage Apps
Install Apps........................................................................................238
Manage Installed Apps....................................................................238
Chapter 11 System Monitoring
System and Disk Health Information..............................................241
System Real-Time and Historical Monitoring................................241
System Logs, Auditing, and Active Connections.........................245
View and Display System Logs.......................................................246
Congure Auditing..........................................................................247
View Active Network Connections.................................................248
Downloading Logs...........................................................................249
SNMP Monitoring.............................................................................250
Chapter 12 System Maintenance
Update Firmware..............................................................................254
Reset the Firmware to Factory Defaults.........................................256
Recover the Administrator Password.............................................258
Shut Down or Restart the System...................................................259
7
ReadyNAS OS 6.10

Chapter 13 Backup and Recovery
Backup Concepts.............................................................................262
Recovery Concepts..........................................................................263
Secure Cloud Backups.....................................................................264
Backup Protocols..............................................................................264
Backups Compared to ReadyDR Backups....................................265
Back Up Files.....................................................................................266
Backup Job Recommendations.................................................266
Create a Backup Job...................................................................266
Create a Recovery Job................................................................270
Modify a Backup or Recovery Job.............................................274
Manually Start a Backup or Recovery Job................................285
Delete a Backup or Recovery Job.............................................286
View or Clear a Job Log..............................................................287
Congure the Backup Button.....................................................288
Backup Snapshots With ReadyDR..................................................290
Load System Access Key Before Using ReadyDR....................290
Seed a ReadyDR Job...................................................................292
Create a ReadyDR Job................................................................292
Monitor and Change ReadyDR Jobs.........................................295
Recovery Using ReadyDR Snapshots........................................296
Back Up a Camera or Other Media Device...................................296
Back Up Using Time Machine.........................................................297
Back Up Your Mac Using a Private Time Machine...................298
Back Up Your Mac Using a Shared Time Machine..................300
Increase Your Shared Time Machine Backup Capacity..........302
8
ReadyNAS OS 6.10

1 Getting Started
This manual describes how to congure and manage your ReadyNAS® storage system.
To congure and manage your ReadyNAS storage system, you can use any of the
following methods:
• ReadyCLOUD®. Use this online service to discover your ReadyNAS system on your
local area network and access the Admin Page.
• Admin Page. Use this browser-based interface to congure and manage your
ReadyNAS system.
• RAIDar application.
• Insight app.
This chapter includes the following sections:
• Start Using Your ReadyNAS System
• Additional Documentation
• Supported ReadyNAS Systems
• Supported Operating Systems
• Supported Browsers
• Diskless Systems
• Basic Installation
• Upgrade Pre-6.2 ReadyNAS Firmware for Use With ReadyCLOUD
• Discover and Set Up Your ReadyNAS Using ReadyCLOUD
• Local Setup Wizard
• Admin Page
• Access the Local Admin Page
• Register Your System
• Five Levels of Protection
• The ReadyNAS Community
• Safe Mode
Note: For more information about the topics covered in this manual, visit the support
website at www.netgear.com/support.
9

•RR2312
•RR3312
•RR4312S
•RR4312X
•RR4360S
•RR4360X
• EDA 500
Supported Operating Systems
The ReadyNAS supports the following operating systems:
• Microsoft Windows 10 (32 and 64 bit)
• Microsoft Windows 8.1 (32 and 64 bit)
• Microsoft Windows 8 (32 and 64 bit)
• Microsoft Windows 7 (32 and 64 bit)
• Microsoft Windows Server 2012 (64 bit)
• Microsoft Windows Server 2008 R2 (64 bit)
• Microsoft Windows Server 2016 (64 bit)
• Microsoft Windows Server 2019
• Apple macOS 10.7 or later
• Linux, Unix, Solaris
• Apple iOS
• Google Android
Supported Browsers
The ReadyNAS Admin Page supports the following browsers:
• Microsoft Edge
• Microsoft Internet Explorer 9.0 and later
• Apple Safari 5.0 and later
Software Manual12Getting Started
ReadyNAS OS 6.10

• Google Chrome 20 and later
• Mozilla Firefox 14 and later
If you experience difculty accessing the Admin Page or if you notice unexpected
behavior, try using another browser.
Diskless Systems
If you own a diskless ReadyNAS, you must rst install and format at least one disk before
you can discover your system with ReadyCLOUD or save conguration settings set
through the Admin Page. We recommend you use supported disks. For a list of
supported disks, visit http://www.netgear.com/readynas-hcl.
You can add disks while your ReadyNAS is running. If you add blank disks, you can
either use the Admin Page to congure the disks into a volume, or reboot the system.
If you reboot the system, a volume is automatically created. If you add previously
formatted disks, you can use the Admin Page to format them and then create a volume.
To format disks, see Format Disks on page 34. To create a volume, see Create and
Encrypt a Volume on page 35.
The details of installation for both new and previously formatted disks depend on the
model. For detailed instructions, see the hardware manual for your system, which is
available at http://www.netgear.com/support/product/ReadyNAS_OS_6.aspx.
For basic conguration information, see Basic Installation on page 13.
For information about disk formats, see RAID on page 24.
Basic Installation
After you follow these instructions, your ReadyNAS system is ready to use in a production
environment. Setup takes approximately 15 minutes.
To install your storage system:
1. Install all available disks that you want to use in your storage system.
Note: You can manage the status of the drives now with Safe Mode.
For a list of supported disks, see the Hardware Compatibility List at
http://www.netgear.com/readynas-hcl.
For information about installing disks, see the hardware manual for your system.
2. Place your system in a location that provides adequate ventilation.
Software Manual13Getting Started
ReadyNAS OS 6.10

High-capacity disks can produce considerable heat. It is important to ensure that
the fan exhausts are unobstructed.
For a complete list of placement considerations, see the hardware manual for your
system.
3. Connect the power adapter to the power cord.
4. Connect the power adapter to the back of the system and plug the power cord into
a wall outlet, a PDU connected to a UPS device, or a power strip.
5. Use an Ethernet cable to connect an Ethernet port on the storage system to your
network.
6. If necessary, press the button to turn on the system.Power
7. Wait for the Power LED to turn solid blue or for the status display screen to display
the system’s IP address, if equipped.
8. Use ReadyCLOUD to discover and set up your system on the network.
See Discover and Set Up Your ReadyNAS on page 16.
Upgrade Pre-6.2 ReadyNAS Firmware for
Use With ReadyCLOUD
On some models of ReadyNAS running releases prior to ReadyNAS OS 6.2, you need
to upgrade to RN OS 6.2 before upgrading to later releases. If you log in to
ReadyCLOUD, you see a message about needing to upgrade the ReadyNAS system
rmware.
The models are:
• ReadyNAS 102
• ReadyNAS 104
• ReadyNAS 202
• ReadyNAS 204
• ReadyNAS 212
• ReadyNAS 214
• ReadyNAS 2120
• ReadyNAS 2120 v2
If your ReadyNAS is one of these models, and is connected to ReadyCLOUD, when you
log in to ReadyCLOUD, are prompted to upgrade your system software. Follow the
onscreen instructions to download and upgrade your software.
Software Manual14Getting Started
ReadyNAS OS 6.10

ReadyCLOUD now includes major new features, but these features require new firmware
on the ReadyNAS system. When you log in to ReadyCLOUD from a ReadyNAS system,
ReadyCLOUD checks to see if the ReadyNAS system rmware is recent enough to work
with the new ReadyCLOUD. If it is not, you see the message and the Upgrade Now
button. Click the button to start the download and automatic restart.
During the download you see the following page:
When the download and restart complete, you see the following page:
Click the button to dismiss the message and continue to ReadyCLOUD.OK
Your system is now upgraded to ReadyNAS OS 6.2, and you can use the normal
procedure to upgrade to more recent releases.
Software Manual15Getting Started
ReadyNAS OS 6.10

The setup wizard guides you through the initial configuration process to help you quickly
integrate your ReadyNAS storage system into your network. Follow the setup wizard’s
prompts to congure the following settings:
• Time and date. For more information, see Set the Clock on page 183.
• Alert contact. For more information, see Congure System Alerts on page 186.
• Host name. For more information, see Congure the Host Name on page 188.
• Administrator password and password recovery. For more information, see Set
the Administrator Password on page 185.
Admin Page
The Admin Page is a browser-based interface that you use to congure and manage
your ReadyNAS system. When you visit the Admin Page, the Overview page displays,
as shown in the following gure.
Figure 2. Admin Page (Overview page)
To navigate through the Admin Page, use the navigation bar across the top of the page
and the navigation icons below it.
Software Manual18Getting Started
ReadyNAS OS 6.10

2 Volume Conguration
This chapter describes how to congure and manage the volumes in your ReadyNAS
storage system. It includes the following sections:
• Basic Volume and RAID Concepts
• ReadyTIER, Tiers, Data, and Metadata
• Manage Volumes
• Maintain Volumes
23
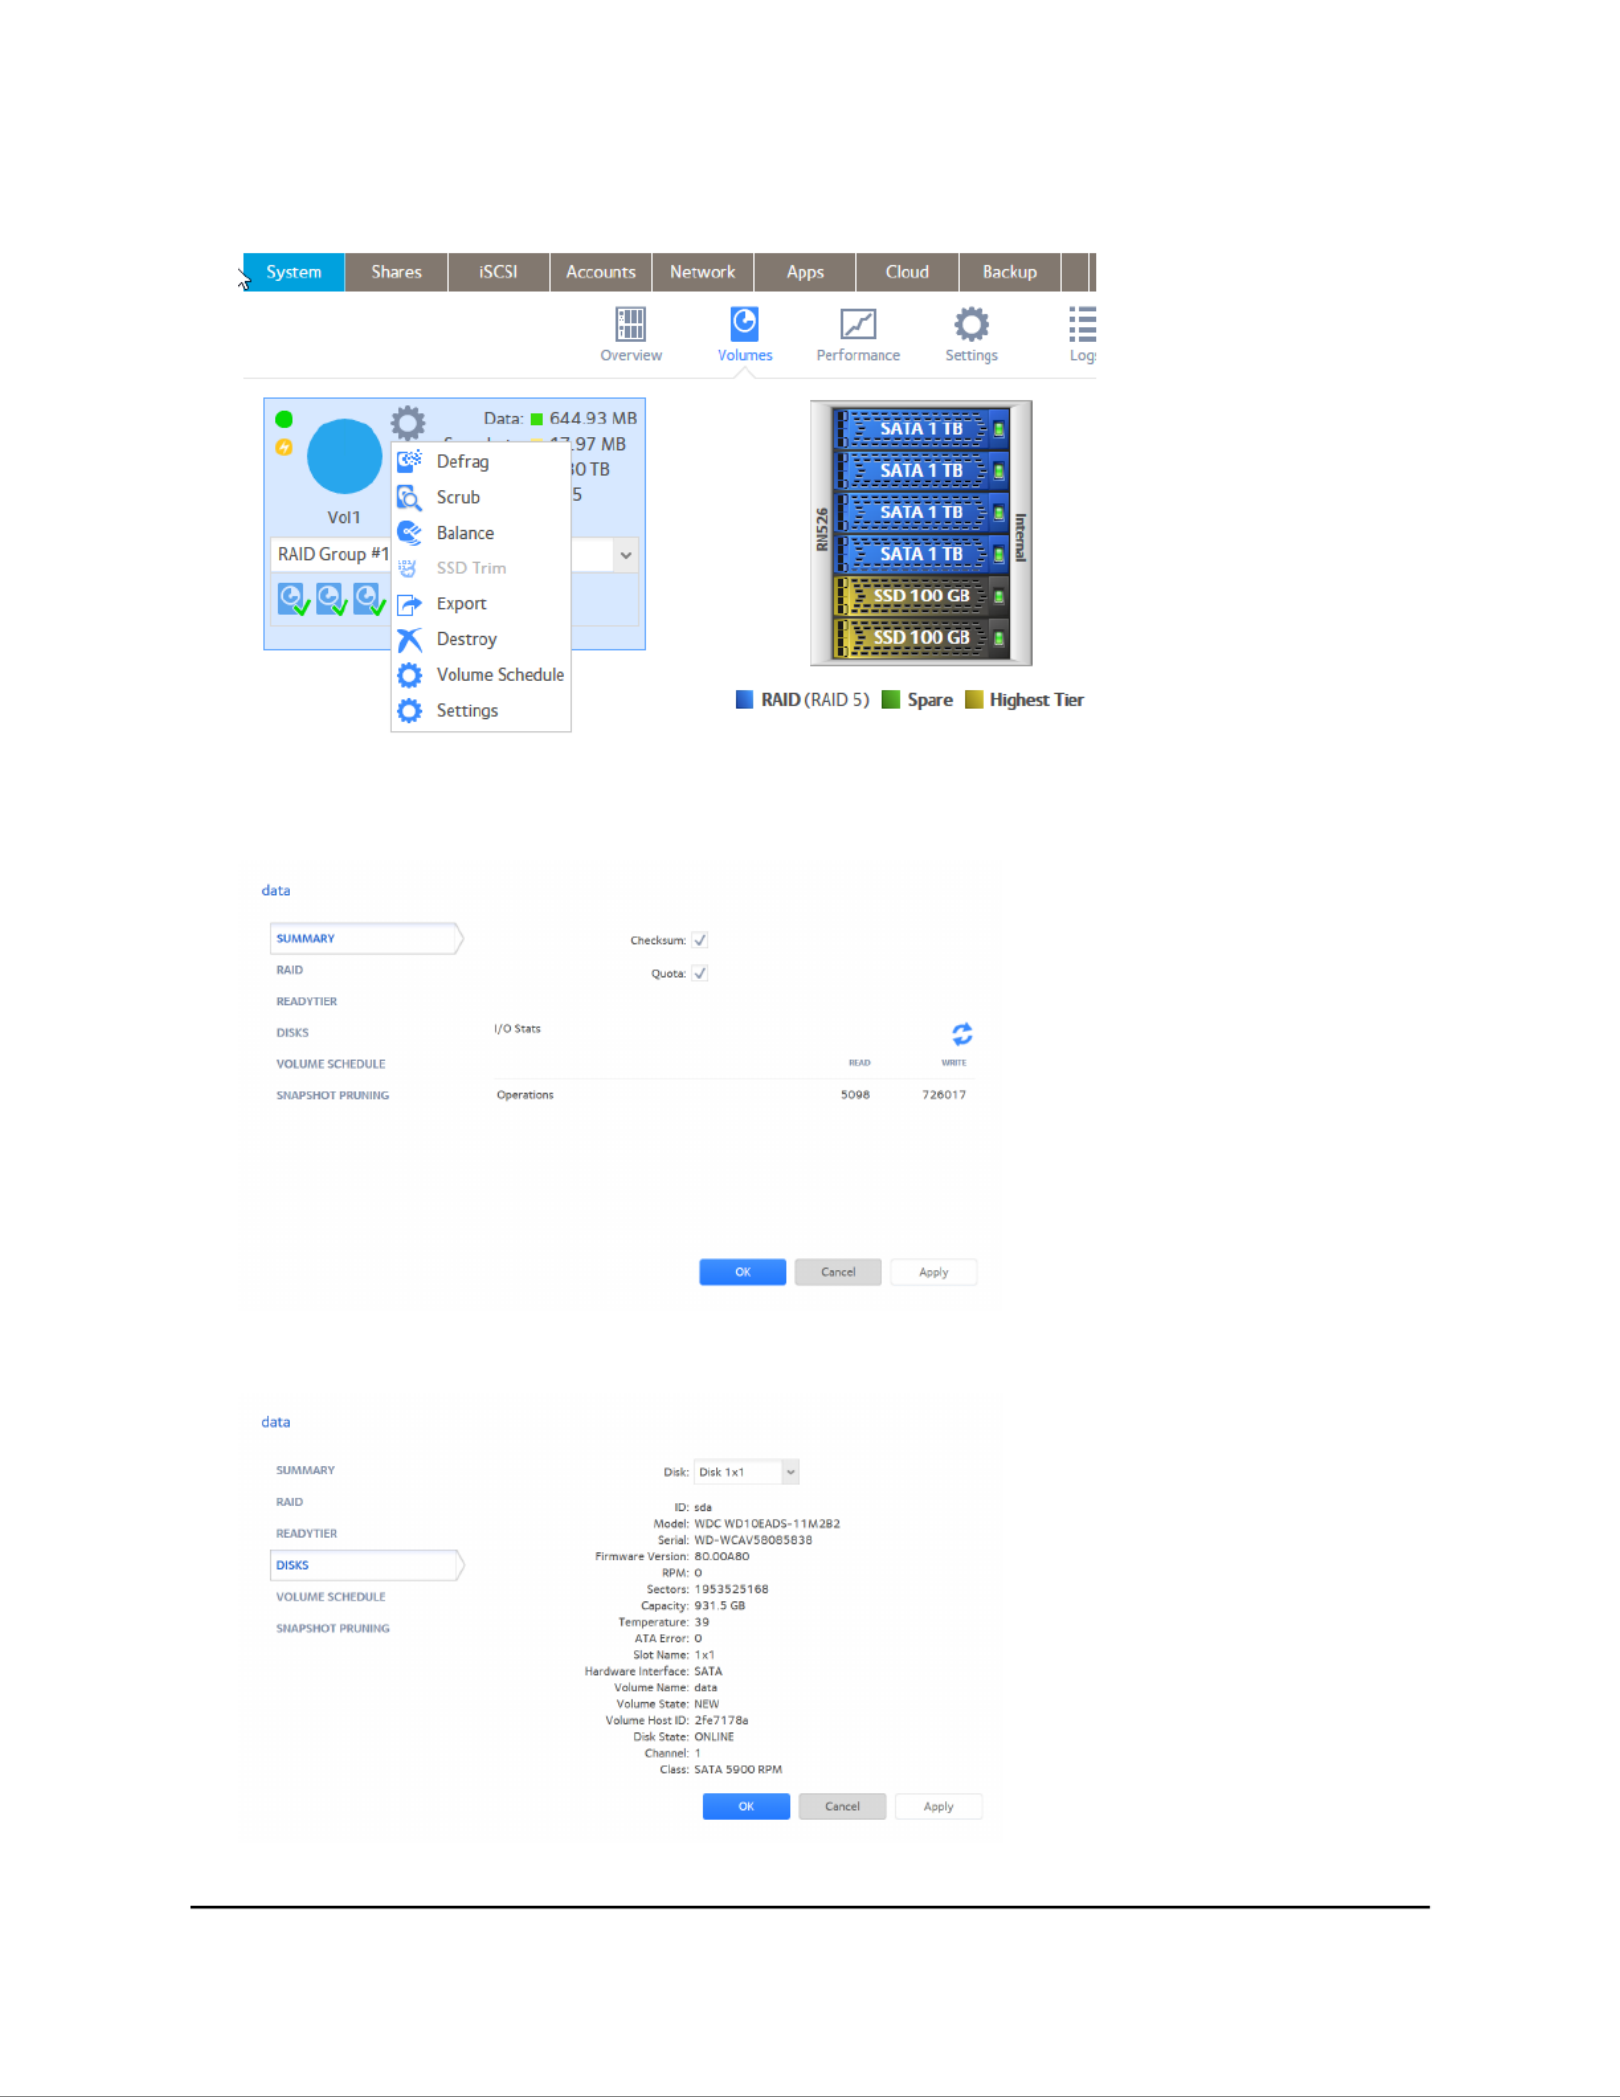
4. Click the icon.gear
5. Click the button in the pop-up menu.Settings
6. Click the tab.Disks
Software Manual32Volume Conguration
ReadyNAS OS 6.10

4. Click the button at the right of the page.New Volume
5. Congure the following settings:
• Name. Enter a name for the volume. The volume must not use the same name
as a folder in the root folder system. The volume names home , apps , and job_
are reserved and cannot be used.
• Protection Level. Use the drop down menu to select the protection level (RAID
level).
• Encryption. (optional) Select this check box to enable encryption on the volume.
When the volume is created, a key is generated. If you lose your key, the data on
the volume will be irrecoverable.
• USB to store key. If you enabled encryption, select a USB storage device from
the menu to store the generated key.
• Send key by Email. If you enabled encryption, select this check box to specify
that the generated key be sent to a email address associated with the admin
account. Make sure that you set the email account before creating the volume.
6. Click the button.Create
The new volume is created and appears in the list of volumes at the left of the page.
Delete a Volume
Before you delete a volume, make sure that you back up any data (folders and LUNs)
that you want to save to another volume or another storage device.
Note: DestroyThe option is not available when the ReadyNAS uses a single volume
X-RAID conguration. The option is available if you use at least two volumes,Destroy
or the volume is a Flex-RAID volume.
Software Manual36Volume Conguration
ReadyNAS OS 6.10
Produkt Specifikationer
| Mærke: | Netgear |
| Kategori: | I DEN |
| Model: | RN31662D |
Har du brug for hjælp?
Hvis du har brug for hjælp til Netgear RN31662D stil et spørgsmål nedenfor, og andre brugere vil svare dig
I DEN Netgear Manualer

10 Oktober 2024
15 August 2024
5 August 2024
5 August 2024
5 August 2024
3 August 2024
31 Juli 2024
31 Juli 2024
31 Juli 2024
30 Juli 2024
I DEN Manualer
- I DEN QNAP
- I DEN Samsung
- I DEN LG
- I DEN Apple
- I DEN HP
- I DEN D-Link
- I DEN Asus
- I DEN Toshiba
- I DEN Abus
- I DEN Buffalo
- I DEN Medion
- I DEN Seagate
- I DEN Western Digital
- I DEN Dell
- I DEN Mustang
- I DEN ZyXEL
- I DEN Synology
- I DEN Sandisk
- I DEN Asustor
- I DEN LaCie
- I DEN Veritas
- I DEN Promise Technology
- I DEN Sitecom
- I DEN Allnet
- I DEN Maxdata
- I DEN IoSafe
- I DEN CRU
- I DEN Approx
- I DEN Raidsonic
- I DEN Infortrend
- I DEN Origin Storage
Nyeste I DEN Manualer

23 Januar 2025
23 Januar 2025
23 Januar 2025
23 Januar 2025

12 Januar 2025
14 Oktober 2024
9 Oktober 2024
6 Oktober 2024
2 Oktober 2024
18 September 2024