Netgear WAX214 Manual
Netgear
Adgangspunkt
WAX214
Læs nedenfor 📖 manual på dansk for Netgear WAX214 (151 sider) i kategorien Adgangspunkt. Denne guide var nyttig for 12 personer og blev bedømt med 4.5 stjerner i gennemsnit af 2 brugere
Side 1/151

User Manual
WiFi 6 AX1800/AX3600 Dual Band
PoE/PoE+ Access Points
Models
WAX214
WAX218
NETGEAR, Inc.
350 E. Plumeria DriveDecember 2020
San Jose, CA 95134, USA202-12175-01

Support and Community
Visit netgear.com/support to get your questions answered and access the latest
downloads.
You can also check out our NETGEAR Community for helpful advice at
community.netgear.com.
Regulatory and Legal
Si ce produit est vendu au Canada, vous pouvez accéder à ce document en français
canadien à https://www.netgear.com/support/download/.
(If this product is sold in Canada, you can access this document in Canadian French at
https://www.netgear.com/support/download/.)
For regulatory compliance information including the EU Declaration of Conformity, visit
https://www.netgear.com/about/regulatory/.
See the regulatory compliance document before connecting the power supply.
For NETGEAR’s Privacy Policy, visit https://www.netgear.com/about/privacy-policy.
By using this device, you are agreeing to NETGEAR’s Terms and Conditions at
https://www.netgear.com/about/terms-and-conditions. If you do not agree, return the
device to your place of purchase within your return period.
Do not use this device outdoors. The PoE source is intended for intra building connection
only.
Trademarks
© NETGEAR, Inc., NETGEAR, and the NETGEAR Logo are trademarks of NETGEAR, Inc.
Any non-NETGEAR trademarks are used for reference purposes only.
Revision History
CommentsPublish DatePublication Part
Number
First publication.December 2020202-12175-01
2
NETGEAR WiFi 6 AX1800/AX3600 Dual Band PoE/PoE+ Access Points, WAX214 and WAX218

Contents
Chapter 1 Introduction
Unique features for each model.........................................................8
Additional documentation...................................................................8
Safety instructions and warnings for an indoor access point..........9
Chapter 2 Hardware Overview Model WAX214
Unpack model WAX214....................................................................12
Top panel with LEDs for model WAX214........................................12
Hardware interfaces model WAX214..............................................13
Label model WAX214........................................................................15
Chapter 3 Hardware Overview Model WAX218
Unpack model WAX218....................................................................17
Top panel with LEDs for model WAX218........................................17
Hardware interfaces model WAX218..............................................18
Label model WAX218........................................................................20
Chapter 4 Installation and Initial Log-in
Set up the access point in your network..........................................22
Set up the access point with a PoE or PoE+ network
connection 22......................................................................................
Set up the access point with a non-PoE network connection...24
Initial log-in process...........................................................................26
Connect directly to the access point over WiFi and log in for the
rst time...........................................................................................26
Connect to the access point over the LAN and log in for the rst
time 29..................................................................................................
When to use aplogin.net and when to use the assigned IP
address 32................................................................................................
Find the IP address of the access point...........................................33
Find the IP address of the access point with the NETGEAR Insight
mobile app..........................................................................................34
Log in to the access point after you complete the initial log-in
process 35.................................................................................................
Change the language........................................................................36
Join a WiFi network on the access point.........................................37
3

Chapter 5 Manage the Wired Network Settings
Specify a static IPv4 address.............................................................40
Specify a link-local IPv6 address.......................................................41
Reenable the DHCP client of the access point...............................42
Manage the STP settings...................................................................43
Chapter 6 Manage the Basic Radio and WiFi Settings
Change the device name..................................................................47
Change the country and region of operation.................................48
Congure a WiFi network that is open or secured with WPA2 or
WAP3 personal security.....................................................................49
Congure a WiFi network that is secured with WPA2 or WAP3
enterprise security..............................................................................53
Congure a guest network on an SSID............................................57
2.4 GHz management SSID...............................................................58
Change the passphrase for the 2.4 GHz management SSID....59
Disable the idle time-out for the 2.4 GHz management SSID...60
Disable the 2.4 GHz management SSID.....................................61
Chapter 7 Manage the Advanced WiFi and Radio Settings
Manage the channel high throughput mode.................................64
Manage the channel or channels.....................................................65
Manage the radio transmit power....................................................67
Change the minimum bit rate...........................................................68
Manage client limits...........................................................................70
Manage the multicast and unicast streams to WiFi clients............71
Scan for neighboring access points and WiFi routers...................72
Manage the 802.11ax mode for the 2.4 GHz radio........................74
Set up a WiFi on/off schedule for an SSID.......................................75
Set up band steering for an SSID.....................................................77
Set up a RADIUS accounting server.................................................79
Congure Network Access Server settings.....................................80
Congure trafc shaping...................................................................82
Set up a MAC lter for an SSID.........................................................84
Manually block a WiFi client or connection from an SSID.............86
Change the DHCP server settings for guest WiFi networks..........87
Chapter 8 Maintain the access point
Upgrade the rmware........................................................................90
Reboot the access point from the local browser UI.......................91
Schedule the access point to reboot...............................................92
Back up or restore the conguration le.........................................93
Back up the access point conguration settings.......................93
4
NETGEAR WiFi 6 AX1800/AX3600 Dual Band PoE/PoE+ Access Points, WAX214 and WAX218

Restore the access point conguration settings........................94
Reset the access point to factory default settings..........................95
Manage the date and time settings.................................................97
SNMPv1, SNMPv2, and SNMPv3......................................................98
Enable SNMPv1 and SNMPv2 and manage the settings..........99
Enable SNMPv3 and manage the settings...............................100
Logs 102....................................................................................................
View and manage the system log..............................................102
Set up a remote log server.........................................................104
Set up email alerts............................................................................105
Change the local device password................................................107
Specify an existing management VLAN........................................108
Control the LEDs..............................................................................109
Chapter 9 Monitor the access point and its Network Connections
Display the access point device, memory, LAN, and WiFi status
information 112........................................................................................
Display the WiFi connections..........................................................116
Display the CPU, SSID, and LAN trafc loads...............................118
Chapter 10 Perform Diagnostics and Troubleshooting
Send a ping.......................................................................................121
Send a traceroute request...............................................................122
Send a name server lookup request..............................................123
Perform a speed test........................................................................124
Quick tips for WiFi troubleshooting...............................................125
Troubleshoot with the LEDs............................................................126
Power LED remains off................................................................127
2.4 GHz WLAN LED, 5 GHz WLAN LED, or both WLAN LEDs are
off 128...................................................................................................
LAN LED is off in a setup with a power adapter......................128
Troubleshoot the WiFi connectivity...............................................129
A WiFi device cannot connect to the access point..................129
You cannot connect over the 2.4 GHz management SSID.....130
Troubleshoot Internet browsing.....................................................131
You cannot log in to the access point over a LAN connection....132
Changes are not saved in the local browser UI............................133
Troubleshoot your network using the ping utility of your computer
or mobile device...............................................................................133
Test the LAN path from a Windows-based computer to the access
point 133..............................................................................................
Test the path from a Windows-based computer to a remote
device 134............................................................................................
5
NETGEAR WiFi 6 AX1800/AX3600 Dual Band PoE/PoE+ Access Points, WAX214 and WAX218

1
Introduction
This manual is for the following NETGEAR WiFi 6 Dual Band Access Point models:
•WAX214: NETGEAR WiFi 6 AX1800 Dual Band PoE Access Point.
•WAX218: NETGEAR WiFi 6 AX3600 Dual Band PoE+ Access Point.
Models WAX214 and WAX218, in this manual referred to as the access point, provide
802.11ax high-performance WiFi connectivity for a small office/home office and supports
dual-band concurrent WiFi 6 operations at 2.4 GHz and 5 GHz.
This chapter contains the following sections:
• Unique features for each model
• Additional documentation
• Safety instructions and warnings for an indoor access point
Note: For more information about the topics that are covered in this manual, visit the
support website at netgear.com/support/.
Note: Firmware updates with new features and bug xes are made available from time
to time at netgear.com/support/download/. You can check for and download new
rmware manually. If the features or behavior of your product does not match what is
described in this manual, you might need to update the rmware.
Note: In this manual, means the same as SSID (service set identier orWiFi network
WiFi network name). That is, when we refer to a WiFi network we mean an individual
SSID.
7

Unique features for each model
The following table shows the main differences between model WAX214 and model
WAX218:
Table 1. Model WAX214 and model WAX218 main differences
Model WAX218Model WAX214Feature
3600 Mbps total:
1200 Mbps at 2.4 GHz
2400 Mbps at 5 GHz.
1800 Mbps total:
600 Mbps at 2.4 GHz
1200 Mbps at 5 GHz
Approximate combined
throughput
PoE+ (802.at)PoE (802.af)Power over Ethernet1
2.5 Gbps1 GbpsMaximum speed LAN port
8.0 x 8.0 x 1.37 in.
(205.7 x 205.7 x 35.8 mm)
6.33 x 6.33 x 1.31 in.
(160.9 x 160.9 x 33.3 mm)
Form factor (L x W x H):
1If used without a power adapter.
Additional documentation
The following documents are available at netgear.com/support/download/:
•Installation guides
•Data sheets
User Manual8Introduction
NETGEAR WiFi 6 AX1800/AX3600 Dual Band PoE/PoE+ Access Points, WAX214 and WAX218

2
Hardware Overview Model WAX214
The NETGEAR WiFi 6 AX1800 Dual Band PoE Access Point Model WAX214 is an indoor,
standalone access point.
The access point provides 802.11ax high-performance WiFi connectivity for a small
ofce/home ofce and supports dual-band concurrent WiFi 6 operations at 2.4 GHz
and 5 GHz with a combined throughput of 1.8 Gbps (about 600 Mbps at 2.4 GHz and
1200 Mbps at 5 GHz).
A single Gigabit PoE LAN port lets you connect the access point to a PoE (802.3af)
switch. If you use a regular switch, the access point requires a power adapter, which is
supplied for model WAX214PA. (For model WAX214, a power adapter is an option that
you can purchase.)
The chapter contains the following sections:
• Unpack model WAX214
• Top panel with LEDs for model WAX214
• Hardware interfaces model WAX214
• Label model WAX214
11

Unpack model WAX214
The package contains the following items:
•WAX214 access point
•Mounting bracket with screw holes for mounting to a solid ceiling or 15/16 in.
(23.8 mm) T-bar
•Two screws and anchors for ceiling mounting or wall-mounting
•Installation guide
Note: You power up the access point by connecting it to a PoE switch. Depending on
the product ordered, the package might also include a power adapter. If you ordered
a package without a power adapter, you can still order a power adapter as an option.
For information about the mounting options, see Mount Model WAX214 to a Wall or
Ceiling on page 141.
Top panel with LEDs for model WAX214
The LEDs that provide the status of the access point are located on the top panel of the
access point.
Figure 1. Top panel with LEDs for model WAX214
User Manual12Hardware Overview Model
WAX214
NETGEAR WiFi 6 AX1800/AX3600 Dual Band PoE/PoE+ Access Points, WAX214 and WAX218

Table 2. LED descriptions model WAX214
DescriptionLED Icon
Solid blue: The 5 GHz radio is operating without clients.5 GHz WLAN LED
Blinking blue: The 5 GHz radio is transmitting or receiving data.
Off: The 5 GHz WiFi radio is off.
Solid blue: The 2.4 GHz radio is operating without clients.2.4 GHz WLAN LED
Blinking blue: The 2.4 GHz radio is transmitting or receiving data.
Off: The 2.4 GHz WiFi radio is off.
Solid blue: The LAN/PoE port detects a link with a powered-on device.LAN LED
Blinking blue: The LAN/PoE port is transmitting or receiving data.
Off: Either no powered-on Ethernet device is connected to the
LAN/PoE port, or, if a powered-on Ethernet device is connected, no
Ethernet link is detected.
Solid amber: The access point is powered on.Power LED
Off: No power is supplied to the access point.
Note: For information about troubleshooting with the LEDs, see Troubleshoot with the
LEDs on page 126.
Hardware interfaces model WAX214
The bottom panel of the access point has a LAN/PoE port, Reset button, and DC power
connector for an optional power adapter.
User Manual13Hardware Overview Model
WAX214
NETGEAR WiFi 6 AX1800/AX3600 Dual Band PoE/PoE+ Access Points, WAX214 and WAX218

Figure 2. Hardware interfaces of model WAX214
The bottom panel contains the following components:
•Reset button Reset. You can use the button to restart the access point or to reset
the access point to its factory default settings. To restart the access point, press the
Reset Resetbutton for about two seconds. Pressing the for 10 seconds or longer
resets the access point to factory default settings.
•LAN/PoE port. You can use the LAN/PoE Gigabit Ethernet RJ-45 port to connect
the access point to a PoE switch, or if you use a power adapter, to a non-PoE switch.
The LAN/PoE port supports Ethernet speeds up to 1 Gbps.
•DC power connector. If you do not use a PoE switch to provide power to the access
point, connect an optional power adapter to the DC power connector.
Note: The back panel provides a Kensington lock slot for an optional security cable.
User Manual14Hardware Overview Model
WAX214
NETGEAR WiFi 6 AX1800/AX3600 Dual Band PoE/PoE+ Access Points, WAX214 and WAX218

3
Hardware Overview Model WAX218
The NETGEAR WiFi 6 AX3600 Dual Band PoE Access Point Model WAX218 is an indoor,
standalone access point.
The access point provides 802.11ax high-performance WiFi connectivity for a small
ofce/home ofce and supports dual-band concurrent WiFi 6 operations at 2.4 GHz
and 5 GHz with a combined throughput of 3.6 Gbps (about 1200 Mbps at 2.4 GHz and
2400 Mbps at 5 GHz).
A single 2.5 Gbps PoE LAN port lets you connect the access point to a PoE+ (802.3at)
switch. If you use a regular switch, the access point requires a power adapter, which is
supplied for model WAX218PA. (For model WAX218, a power adapter is an option that
you can purchase.)
The chapter contains the following sections:
• Unpack model WAX218
• Top panel with LEDs for model WAX218
• Hardware interfaces model WAX218
• Label model WAX218
16

Unpack model WAX218
The package contains the following items:
•WAX218 access point
•Mounting bracket with screw holes for mounting to a solid ceiling or 15/16 in.
(23.8 mm) T-bar
•Two screws and anchors for ceiling mounting or wall-mounting
•Installation guide
Note: You power up the access point by connecting it to a PoE+ switch. Depending
on the product ordered, the package might also include a power adapter. If you ordered
a package without a power adapter, you can still order a power adapter as an option.
For information about the mounting options, see Mount Model WAX218 to a Wall or
Ceiling on page 147.
Top panel with LEDs for model WAX218
The LEDs that provide the status of the access point are located on the top panel of the
access point.
Figure 4. Top panel with LEDs for model WAX218
User Manual17Hardware Overview Model
WAX218
NETGEAR WiFi 6 AX1800/AX3600 Dual Band PoE/PoE+ Access Points, WAX214 and WAX218

Table 3. LED descriptions model WAX218
DescriptionLED Icon
Solid blue: The 5 GHz radio is operating without clients.5 GHz WLAN LED
Blinking blue: The 5 GHz radio is transmitting or receiving data.
Off: The 5 GHz WiFi radio is off.
Solid blue: The 2.4 GHz radio is operating without clients.2.4 GHz WLAN LED
Blinking blue: The 2.4 GHz radio is transmitting or receiving data.
Off: The 2.4 GHz WiFi radio is off.
Solid blue: The LAN/PoE+ port detects a link with a powered-on
device.
LAN LED
Blinking blue: The LAN/PoE+ port is transmitting or receiving data.
Off: Either no powered-on Ethernet device is connected to the
LAN/PoE+ port, or, if a powered-on Ethernet device is connected, no
Ethernet link is detected.
Solid amber: The access point is powered on.Power LED
Off: No power is supplied to the access point.
Note: For information about troubleshooting with the LEDs, see Troubleshoot with the
LEDs on page 126.
Hardware interfaces model WAX218
The bottom panel of the access point has a LAN/PoE+ port, Reset button, and DC power
connector for an optional power adapter.
User Manual18Hardware Overview Model
WAX218
NETGEAR WiFi 6 AX1800/AX3600 Dual Band PoE/PoE+ Access Points, WAX214 and WAX218

Figure 5. Hardware interfaces of model WAX218
The bottom panel contains the following components:
•Reset button Reset. You can use the button to restart the access point or to reset
the access point to its factory default settings. To restart the access point, press the
Reset Resetbutton for about two seconds. Pressing the for 10 seconds or longer
resets the access point to factory default settings.
•LAN/PoE+ port. You can use the LAN/PoE+ Gigabit Ethernet RJ-45 port to connect
the access point to a PoE+ switch, or if you use a power adapter, to a non-PoE switch.
The LAN/PoE+ port supports Ethernet speeds up to 2.5 Gbps.
Note: If you do not use a power adapter, use a PoE+ (803.2.at) switch. If you use a
PoE (803.2.af) switch, the access point might not receive sufcient power for normal
operation.
•DC power connector. If you do not use a PoE+ switch to provide power to the access
point, connect an optional power adapter to the DC power connector.
Note: The back panel provides a Kensington lock slot for an optional security cable.
User Manual19Hardware Overview Model
WAX218
NETGEAR WiFi 6 AX1800/AX3600 Dual Band PoE/PoE+ Access Points, WAX214 and WAX218

Label model WAX218
The access point label shows the serial number, MAC address, default WiFi network
name (SSID) for the 2.4 GHz management SSID, and network key (WiFi password) for
the management SSID. The management SSID provides access to the local browser
interface (UI) only. That is, the management SSID is not intended for general WiFi clients
access.
Figure 6. Product label model WAX218
User Manual20Hardware Overview Model
WAX218
NETGEAR WiFi 6 AX1800/AX3600 Dual Band PoE/PoE+ Access Points, WAX214 and WAX218

4
Installation and Initial Log-in
This chapter describes how you can install and access the access point in your network
and go through the initial log-in process.
Note: When you log in to the access point, you connect to the local browser UI.
The chapter contains the following sections:
• Set up the access point in your network
• Initial log-in process
• When to use aplogin.net and when to use the assigned IP address
• Find the IP address of the access point
• Find the IP address of the access point with the NETGEAR Insight mobile app
• Log in to the access point after you complete the initial log-in process
• Change the language
• Join a WiFi network on the access point
21

Figure 8. Set up model WAX218 with a PoE+ connection to your network
Note: The LAN/PoE+ port on model WAX218 supports Ethernet speeds up to 2.5 Gbps.
The previous gure shows a NETGEAR MS510TXPP switch, which supports speeds of
2.5 Gbps and higher. However, if your Internet connection, modem, and switch support
a speed of 1 Gbps (which is a common speed), the access point LAN connection functions
at 1 Gbps.
To set up the access point with a PoE or PoE+ connection to your network:
1. Connect an Ethernet cable to the LAN/PoE (model WAX214) or LAN/PoE+ (model
WAX218) port on the access point.
2. Connect the other end of the Ethernet cable to switch that is connected to your
network and to the Internet.
•Model WAX214: Connect the cable to a PoE port on a PoE (802.3af) switch. You
can also use a PoE+ (802.3at) switch.
•Model WAX218: Connect the cable to a PoE+ port on a PoE+ (802.3at) switch.
We recommend that you do not use a PoE (803.2.af) switch because the provided
power might be insufcient for this model.
3. Check to see that the LEDs light.
User Manual23Installation and Initial Log-in
NETGEAR WiFi 6 AX1800/AX3600 Dual Band PoE/PoE+ Access Points, WAX214 and WAX218
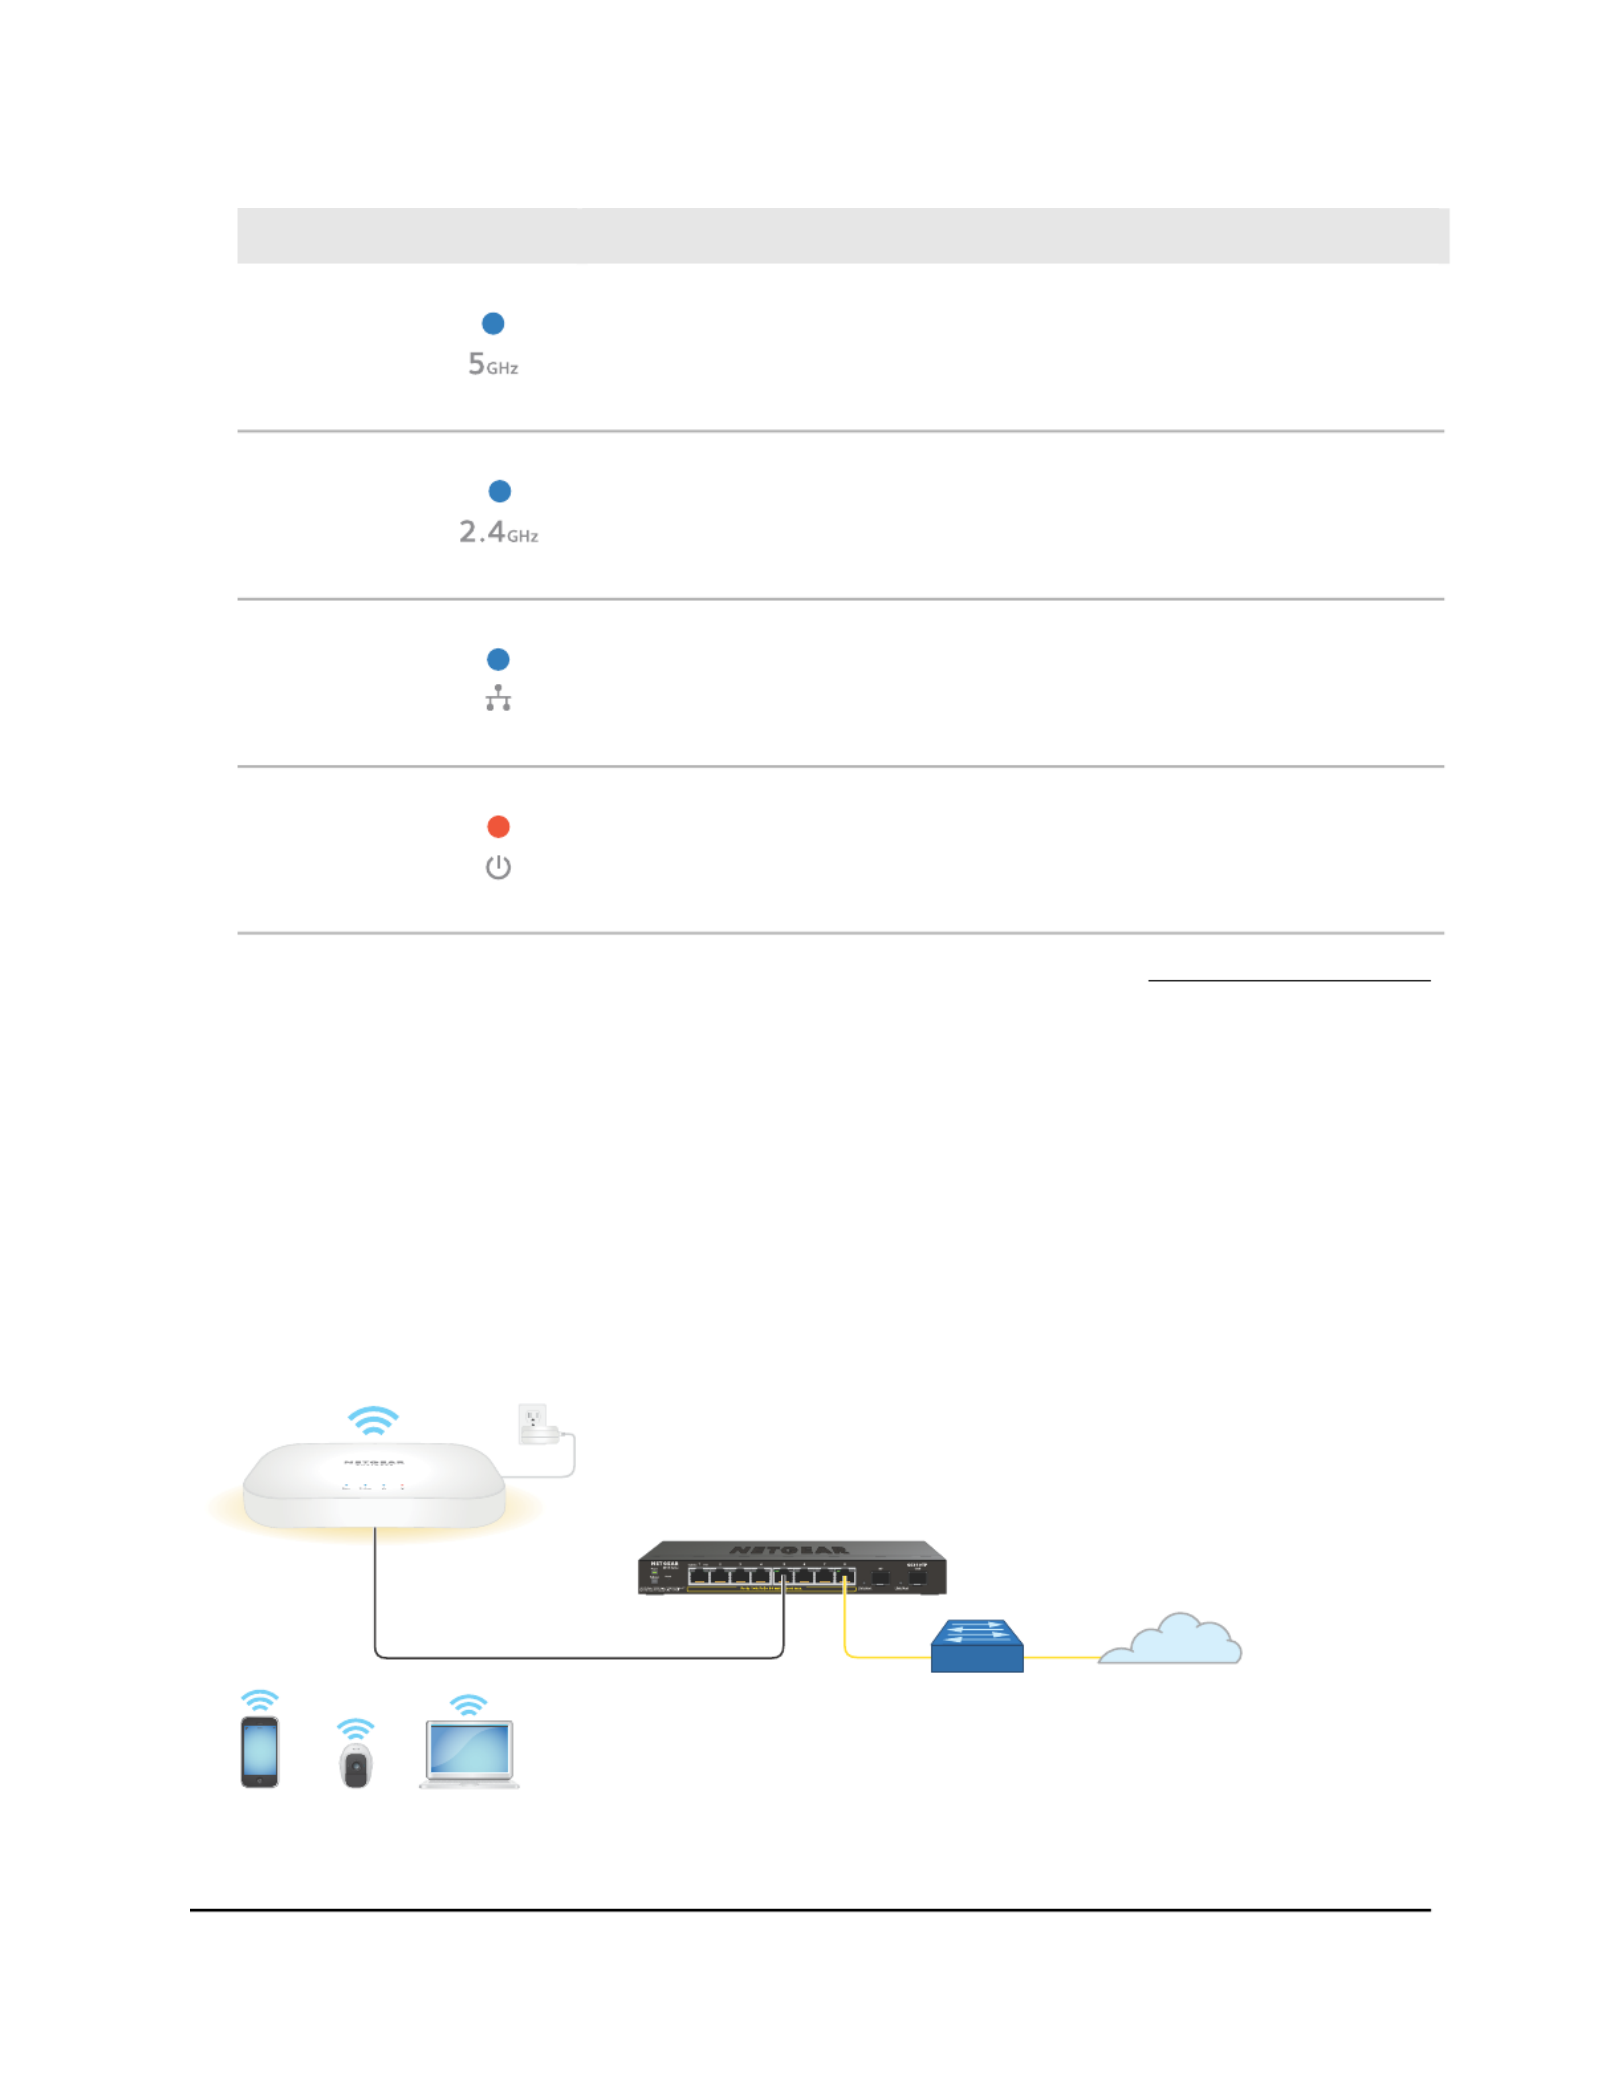
DescriptionLED
The 5 GHz WLAN LED lights solid blue or blinks blue.5 GHz WLAN
The 2.4 GHz WLAN LED lights solid blue or blinks blue.2.4 GHz WLAN
The LAN LED lights solid blue or blinks blue.LAN
The Power LED lights solid amber.Power
You can now access the access point for initial configuration (see Initial log-in process
on page 26).
Set up the access point with a non-PoE network connection
You can connect the access point to a regular switch, that is, a non–Power over Ethernet
switch in your network. The switch must be connected to a network router that is
connected to the Internet. If you use a regular switch, the access point requires a power
adapter, which is supplied for model WAX214PA and model WAX218PA. (For model
WAX214 and model WAX218, a power adapter is an option that you can purchase.)
Figure 9. Set up model WAX214 with a non-PoE connection to your network
User Manual24Installation and Initial Log-in
NETGEAR WiFi 6 AX1800/AX3600 Dual Band PoE/PoE+ Access Points, WAX214 and WAX218

Note: The LAN/PoE port on model WAX214 supports Ethernet speeds up to 1 Gbps.
Most switches support speeds of up to 1 Gbps.
Figure 10. Set up model WAX218 with a non-PoE connection to your network
Note: The LAN/PoE+ port on model WAX218 supports Ethernet speeds up to 2.5 Gbps.
The previous gure shows a NETGEAR MS510TXPP switch, which supports speeds of
2.5 Gbps and higher. However, if your Internet connection, modem, and switch support
a speed of 1 Gbps (which is a common speed), the access point LAN connection functions
at 1 Gbps.
To set up the access point with a non-PoE connection to your network:
1. Connect an Ethernet cable to the LAN/PoE (model WAX214) or LAN/PoE+ (model
WAX218) port on the access point.
2. Connect the other end of the Ethernet cable to a switch that is connected to your
network and to the Internet.
3. Connect the power adapter to the access point and plug it into an electrical outlet.
4. Check to see that the LEDs light.
DescriptionLED
The 5 GHz WLAN LED lights solid blue or blinks blue.5 GHz WLAN
The 2.4 GHz WLAN LED lights solid blue or blinks blue.2.4 GHz WLAN
User Manual25Installation and Initial Log-in
NETGEAR WiFi 6 AX1800/AX3600 Dual Band PoE/PoE+ Access Points, WAX214 and WAX218

(Continued)
DescriptionLED
The LAN LED lights solid blue or blinks blue.LAN
The Power LED lights solid amber.Power
You can now access the access point for initial configuration (see Initial log-in process
on page 26).
Initial log-in process
During the initial log-in process, the access point presents its Day Zero page. You must
dene a local device password that lets you access the local browser UI access point.
You also must dene a new WiFi network name (SSID) and associated WiFi passphrase
(WiFi password).
After you complete the initial-log-in process and attempt to log in to the local browser
UI, the access point no longer presents the Day Zero page but displays the regular login
page that allows you to enter your local device password.
For more information about the initial log-in process, see one of the following sections:
•Connect directly to the access point over WiFi and log in for the rst time on page
26
•Connect to the access point over the LAN and log in for the rst time on page 29
Connect directly to the access point over WiFi and log in
for the rst time
This section describes how to connect a WiFi-enabled computer or mobile device over
the 2.4 GHz management SSID to the access point for the rst time and complete the
initial conguration.
User Manual26Installation and Initial Log-in
NETGEAR WiFi 6 AX1800/AX3600 Dual Band PoE/PoE+ Access Points, WAX214 and WAX218

Figure 11. Connect directly to the access point over WiFi
The previous figure shows the access point (in this example, model WAX214) connected
to a switch, which is connected to a router and the Internet. WiFi devices are directly
connected to the access point.
To connect directly to the access point over WiFi and log in to the local browser
UI for the rst time:
1. On a WiFi-enabled computer or mobile device, find and connect to the access point’s
management SSID.
The management SSID depends on the model and the MAC address. In the following
examples, XXXXXX represents the last six digits of the MAC address of the LAN
interface of the access point:
•WAX214: WAX214XXXXXX-CONFIG-ONLY
•WAX218: WAX218XXXXXX-CONFIG-ONLY
In this manual, we also refer to this management SSID as the “CONFIG-ONLY” SSID.
The default WiFi passphrase for the management SSID, which is a unique WiFi
password, is printed on the access point label.
If you cannot get a WiFi connection to the access point, see You cannot connect
over the 2.4 GHz management SSID on page 130.
2. Launch a web browser and enter (which is the same ashttps://www.aplogin.net
https://192.168.0.100) in the address eld.
The Day Zero login page displays. This page displays only the rst time that you log
in.
IMPORTANT: If your browser does not display the Day Zero login page, see the
following step.
User Manual27Installation and Initial Log-in
NETGEAR WiFi 6 AX1800/AX3600 Dual Band PoE/PoE+ Access Points, WAX214 and WAX218

3. If your browser displays a security message and does not let you proceed, do one
of the following:
•Google Chrome: If Google Chrome displays a Your connection is not private
message, click the link. Then, click theADVANCED Proceed to x.x.x.x (unsafe)
link, in which x.x.x.x represents the IP address of the switch.
•Apple Safari: If Apple Safari displays a message,This connection is not private
click the button. Then, click the link. If a warningShow Details visit this website
pop-up window displays, click the button. If another pop-up windowVisit Website
displays to let you conrm changes to your certicate trust settings, enter your
Mac user name and password and click the button.Update Setting
•Mozilla Firefox: If Mozilla Firefox displays a Your connection is not secure
message, click the button. Then, click the button.ADVANCED Add Exception
In the pop-up window that displays, click the button.Confirm Security Exception
•Microsoft Internet Explorer: If Microsoft Internet Explorer displays a There is a
problem with this website’s security certicate message, click the Continue to
this website (not recommended) link.
•Microsoft Edge: If Microsoft Edge displays a There is a problem with this website’s
security certicate message or a similar warning, select Details > Go on to the
webpage.
4. On the Day Zero page, congure the following settings:
a. In the eld, specify a unique local login password, andAP Login New Password
conrm the password in the eld.Conrm New Password
We recommend that your password meets the following conditions:
•Contains 8 to 32 characters
•Contains no more than two identical characters in a row
In addition, we recommend that your password meets at least three of the
following four conditions:
•At least one uppercase character
•At least one lowercase character
•At least one number
•At least one special character, such as the following characters:
@ # $ % ^ & * ( ) !
b. In the eld, specify a WiFi network name for the main (rst) WiFi network.SSID
This SSID does replace the management SSID (depending on the model,not
WAX214XXXXXX-CONFIG-ONLY or WAX218XXXXXX-CONFIG-ONLY), which
User Manual28Installation and Initial Log-in
NETGEAR WiFi 6 AX1800/AX3600 Dual Band PoE/PoE+ Access Points, WAX214 and WAX218

you can continue to use to log in over a WiFi connection to the local browser UI
of the access point.
In addition to the management SSID, the access point supports four WiFi networks.
By default, only the main WiFi network is enabled.
c. In the eld, specify a passphrase (WiFi password) for the main WiFiPassphrase
network.
This passphrase must be a minimum of 8 characters and can be a maximum of
63 characters.
This passphrase does replace the passphrase for the management SSID,not
which you can continue to use to log in over a WiFi connection to the local browser
UI of the access point.
d. Select the check box to accept NETGEAR’s terms and conditions and acknowledge
that you read the privacy notice.
e. Click the button.Apply
Yous settings are saved. The access point restarts. After about two minutes, the
login page displays.
5. If you are still connected to the management SSID but the login page does not
display, in the address eld of your web browser, enter .https://www.aplogin.net
Note: If your browser displays a security message and does not let you proceed,
see Step 3.
6. In the eld, enter your new local device password, and clickLocal Device Password
the button.Login
The Device Status page displays. You can now congure the access point for your
network and environment.
Connect to the access point over the LAN and log in for
the rst time
The following procedure assumes that your network includes a DHCP server (or router
that functions as a DHCP server) and that the access point and your computer are on
the same LAN. By default, the access point functions as a DHCP client and receives an
IP address from a DHCP server.
User Manual29Installation and Initial Log-in
NETGEAR WiFi 6 AX1800/AX3600 Dual Band PoE/PoE+ Access Points, WAX214 and WAX218

Figure 12. Connect to the access point over the LAN
The previous figure shows the access point (in this example, model WAX218) connected
to a switch, which is connected to a router and the Internet. A computer is connected
to the same switch as the access point. (The computer can connect to the LAN in a
different way, but as long as the computer and the access point are on the same LAN,
the following procedure is applicable.)
To connect to the access point over the LAN and log in for the rst time:
1. Using an Ethernet cable, connect an Ethernet port on your computer to a LAN port
on a switch or hub that is connected to your LAN.
2. If you do not yet know the IP address that is assigned to access point, use one of the
following options, each of which is described in detail in Find the IP address of the
access point on page 33):
•Use the automatic device detection of a Windows-based computer.
•Access your existing router or DHCP server.
•Use the NETGEAR Insight mobile app.
•Use a third-party IP scanner.
3. Launch a web browser and enter the IP address that is assigned to the access point
in the address eld.
The Day Zero login page displays. This page displays only the rst time that you log
in.
If your browser does not display the Day Zero login page but a security message,
see Step 4. However, if you cannot get a LAN connection to the access point at all,
see You cannot log in to the access point over a LAN connection on page 132.
User Manual30Installation and Initial Log-in
NETGEAR WiFi 6 AX1800/AX3600 Dual Band PoE/PoE+ Access Points, WAX214 and WAX218

you can continue to use to log in over a WiFi connection to the local browser UI
of the access point.
In addition to the management SSID, the access point supports four WiFi networks.
By default, only the main WiFi network is enabled.
c. In the eld, specify a passphrase (WiFi password) for the main WiFiPassphrase
network.
This passphrase must be a minimum of 8 characters and can be a maximum of
63 characters.
This passphrase does replace the passphrase for the management SSID,not
which you can continue to use to log in over a WiFi connection to the local browser
UI of the access point.
d. Select the check box to accept NETGEAR’s terms and conditions and acknowledge
that you read the privacy notice.
e. Click the button.Apply
Yous settings are saved. The access point restarts. After about two minutes, the
login page displays.
6. If the login page does not display, in the address eld of your web browser, enter
the IP address that is assigned to the access point.
Note: If your browser displays a security message and does not let you proceed,
see Step 4.
7. In the eld, enter your new local device password, and clickLocal Device Password
the button.Login
The Device Status page displays. You can now congure the access point for your
network and environment.
When to use aplogin.net and when to use
the assigned IP address
Use (which is the same as )https://www.aplogin.net https://192.168.0.100 only
when you connect to the access point over the 2.4 GHz management SSID, that is, over
the ”CONFIG-ONLY“ SSID. For more information, see 2.4 GHz management SSID on
page 58.
For all other types of connections, use the IP address that was assigned to the access
point by your existing router or DHCP server during the setup process (see Initial log-in
process on page 26) to log in to the local browser UI of the access point.
User Manual32Installation and Initial Log-in
NETGEAR WiFi 6 AX1800/AX3600 Dual Band PoE/PoE+ Access Points, WAX214 and WAX218

That means that you must use the assigned IP address in all following situations:
•Your mobile device is connected to one of the SSIDs on the access point but not to
the ”CONFIG-ONLY“ SSID.
•Your wired computer is on the same network as the access point.
•Your mobile device is directly connected to the access point network even if itnot
is on the same network as the access point.
•Your mobile device connected to the ”CONFIG-ONLY“ SSID, but the access pointis
is set up with a static IP address.
•Your network includes another NETGEAR device that is also accessible by using
https://www.aplogin.net https://www.aplogin.net. In such a situation, if you use ,
you might log in to the access point or you might log in to the other NETGEAR device,
depending on your network situation.
If you do not know the IP address that was assigned to the access point, see Find the
IP address of the access point on page 33.
Find the IP address of the access point
If you do not know the IP address that was assigned to the access point, use of theone
following options to nd the IP address of the access point:
•Option 1: Use the automatic device detection of a Windows-based computer.
1. Launch File Explorer (or Windows Explorer).
2. Select from the Navigation pane.Network
3. Right-click the access point device icon, and select .Properties
The access point IP address displays.
•Option 2: Temporarily connect directly over WiFi and log in. If you already
completed the initial log-in, temporarily connect a mobile device directly to the
access pointover WiFi and do the following:
1. Open a web browser from the mobile device that is directly connected to the
access point network.
2. Enter in the address eld.https://www.aplogin.net
The Login page displays.
3. Enter your local device password and click the button.Login
The Device Status page displays.
In the LAN Information - IPv4 section, the IP Address eld displays the IP address
that is assigned to the access point.
User Manual33Installation and Initial Log-in
NETGEAR WiFi 6 AX1800/AX3600 Dual Band PoE/PoE+ Access Points, WAX214 and WAX218

•Option 3: Temporarily connect directly over WiFi and ping the access point. If
you already completed the initial log-in, temporarily connect a mobile device directly
over WiFi to the access point and send a ping to .https://www.aplogin.net
How to send a ping depends on mobile device.
On your mobile device, the eld with the ping results displays the IP address that is
assigned to the access point.
•Option 4: Use the NETGEAR Insight mobile app. To use the NETGEAR Insight
mobile app to discover the IP address of the access point in your network, do the
following:
1. On your iOS or Android mobile device, go to the app store, search for NETGEAR
Insight, and download and install the app.
2. Connect your mobile device to the access point WiFi network.
3. Open the NETGEAR Insight mobile app.
4. Tap to log in to your NETGEAR account.LOG IN
After you log in to your account, the IP address of the access point displays in
the device list.
•Option 5: Access your existing router or DHCP server. Access the DHCP server
information of your existing router, modem (if the modem functions as a DHCP
server), or dedicated DHCP server to see the devices that are connected to it,
including the access point. The IP address that is assigned to the access point is
listed.
•Option 6: Use a third-party IP scanner. Use an IP scanner application (they are
available free of charge on the Internet) in the network of your existing router. The
IP scanner results include the IP address that is assigned to the access point.
If you made a direct connection to the access point, you can now terminate that
connection. Connect your computer or mobile device to the same network as the access
point, and use the discovered IP address to log in to the access point.
Find the IP address of the access point with
the NETGEAR Insight mobile app
The NETGEAR Insight mobile app lets you discover the access point in your network.
Note: Although you can use the NETGEAR Insight mobile app to register the access
point, the access point is already registered automatically after the initial log-in process.
User Manual34Installation and Initial Log-in
NETGEAR WiFi 6 AX1800/AX3600 Dual Band PoE/PoE+ Access Points, WAX214 and WAX218

If you do not know the IP address, see Find the IP address of the access point on
page 33. For more information about the “CONFIG-ONLY” SSID, see 2.4 GHz
management SSID on page 58.
If your browser does not display a login window but displays a security message and
does not let you proceed, see Log in to the access point after you complete the initial
log-in process on page 35.
3. Enter the access point local device password and click the button.Login
The local device password is the one that you specied. The password is
case-sensitive.
The Device Status page displays.
4. In the upper right corner, select a language from the menu.
The page refreshes with the language that you selected.
Join a WiFi network on the access point
You can manually add a WiFi device such as a WiFi-enabled computer, tablet, or
smartphone to a WiFi network of the access point.
On the WiFi device that you want to connect to the access point, use the software
application that manages your WiFi connections.
Note: By default, the access point’s main (rst) WiFi network is enabled but the second,
third, and fourth WiFi networks are disabled. These WiFi networks differ from the
management SSID, which you can use to log in over a WiFi connection to the local
browser UI of the access point.
To connect a device to a WiFi network on the access point:
1. Make sure that the access point is receiving power (its Power LED is lit) and is
connected to the Internet (its LAN LED is lit), and that the WiFi radios are on (its
WLAN LEDs are lit).
2. On the WiFi device, open the software application that manages your WiFi
connections.
This application scans for all WiFi networks in your area.
3. Look for one of the access point’s WiFi networks and select it.
For the main WiFi network, you had to specify the SSID during the initial log-in
process. To connect to the main WiFi network, look for SSID.that
4. Enter the WiFi password for WiFi access.
User Manual37Installation and Initial Log-in
NETGEAR WiFi 6 AX1800/AX3600 Dual Band PoE/PoE+ Access Points, WAX214 and WAX218

For the main WiFi network, you had to specify the WiFi passphrase (WiFi password)
during the initial log-in process. To connect to the main WiFi network, enter that
WiFi passphrase.
5. Click the button.Connect
The device connects to the WiFi network of the access point.
User Manual38Installation and Initial Log-in
NETGEAR WiFi 6 AX1800/AX3600 Dual Band PoE/PoE+ Access Points, WAX214 and WAX218

5
Manage the Wired Network
Settings
This chapter describes how you can manage the wired network settings of the access
point.
The chapter includes the following sections:
• Specify a static IPv4 address
• Specify a link-local IPv6 address
• Reenable the DHCP client of the access point
• Manage the STP settings
39

Specify a static IPv4 address
By default, the DHCP client of the access point is enabled, allowing a DHCP server
(usually, a router) in your network to assign an IPv4 address to the access point. You
can disable the DHCP client and specify static (xed) IP address settings for the access
point.
To specify static IPv4 address settings for the access point:
1. Launch a web browser from a computer or mobile device that is directly connected
over WiFi to the access point or connected to the same network as the access point.
2. Enter the IP address that is assigned to the access point.
If you are directly connected to the “CONFIG-ONLY” SSID, you can enter
https://www.aplogin.net.
A login window displays.
If you do not know the IP address, see Find the IP address of the access point on
page 33. For more information about the “CONFIG-ONLY” SSID, see 2.4 GHz
management SSID on page 58.
If your browser does not display a login window but displays a security message and
does not let you proceed, see Log in to the access point after you complete the initial
log-in process on page 35.
3. Enter the access point local device password and click the button.Login
The local device password is the one that you specied. The password is
case-sensitive.
The Device Status page displays.
4. Under Network, select .Basic
The page that displays shows the IPv4 Settings, IPv6 Settings, and Spanning Tree
Protocol (STP) Settings sections.
5. In the IPv4 Settings section, select the radio button.Static IP
The IPv4 address elds display.
6. Specify the static IPv4 address, subnet mask, gateway IPv4 address, and primary and
secondary DNS addresses.
7. Click the button.Save
Your settings are saved but not yet applied.
A pop-up window displays. The window shows the number of changes to be applied.
8. In the pop-up window, click the button.Apply
User Manual40Manage the Wired Network
Settings
NETGEAR WiFi 6 AX1800/AX3600 Dual Band PoE/PoE+ Access Points, WAX214 and WAX218

Your changes are applied. If the WiFi link must be reestablished, the page displays
the number of seconds before the access point is back online.
Note: To log back in to the access point, you now must use the static IP address that
you assigned.
Specify a link-local IPv6 address
By default, the DHCP client of the access point is enabled, allowing a DHCPv6 server
(usually, a router) in your network to assign an IPv6 address to the access point. You
can disable the DHCP client and specify link-local IPv6 address settings for the access
point. A link-local IPv6 address is an automatically generated IPv6 address that uses the
IPv4 address in the interface portion of its address.
To specify link-local IPv6 address settings for the access point:
1. Launch a web browser from a computer or mobile device that is directly connected
over WiFi to the access point or connected to the same network as the access point.
2. Enter the IP address that is assigned to the access point.
If you are directly connected to the “CONFIG-ONLY” SSID, you can enter
https://www.aplogin.net.
A login window displays.
If you do not know the IP address, see Find the IP address of the access point on
page 33. For more information about the “CONFIG-ONLY” SSID, see 2.4 GHz
management SSID on page 58.
If your browser does not display a login window but displays a security message and
does not let you proceed, see Log in to the access point after you complete the initial
log-in process on page 35.
3. Enter the access point local device password and click the button.Login
The local device password is the one that you specied. The password is
case-sensitive.
The Device Status page displays.
4. Under Network, select .Basic
The page that displays shows the IPv4 Settings, IPv6 Settings, and Spanning Tree
Protocol (STP) Settings sections.
5. In the IPv4 Settings section, select the radio button.Static IP
The check box becomes available.Link-local Address
User Manual41Manage the Wired Network
Settings
NETGEAR WiFi 6 AX1800/AX3600 Dual Band PoE/PoE+ Access Points, WAX214 and WAX218

6. In the IPv6 Settings section, clear the check box.Link-local Address
The IPv6 address elds display.
7. Specify the static IPv6 address, subnet prex length, IPv6 gateway address, and
primary and secondary DNS addresses.
8. Click the button.Save
Your settings are saved but not yet applied.
A pop-up window displays. The window shows the number of changes to be applied.
9. In the pop-up window, click the button.Apply
Your changes are applied. If the WiFi link must be reestablished, the page displays
the number of seconds before the access point is back online.
Note: To log back in to the access point, you now must use the IPv6 address that you
assigned.
Reenable the DHCP client of the access point
If you disabled the DHCP client of the access point, you can reenable it, which affects
both the IPv4 and IPv6 settings.
To reenable the DHCP client of the access point:
1. Launch a web browser from a computer or mobile device that is directly connected
over WiFi to the access point or connected to the same network as the access point.
2. Enter the IP address that is assigned to the access point.
If you are directly connected to the “CONFIG-ONLY” SSID, you can enter
https://www.aplogin.net.
A login window displays.
If you do not know the IP address, see Find the IP address of the access point on
page 33. For more information about the “CONFIG-ONLY” SSID, see 2.4 GHz
management SSID on page 58.
If your browser does not display a login window but displays a security message and
does not let you proceed, see Log in to the access point after you complete the initial
log-in process on page 35.
3. Enter the access point local device password and click the button.Login
The local device password is the one that you specied. The password is
case-sensitive.
The Device Status page displays.
User Manual42Manage the Wired Network
Settings
NETGEAR WiFi 6 AX1800/AX3600 Dual Band PoE/PoE+ Access Points, WAX214 and WAX218

To manage the STP settings:
1. Launch a web browser from a computer or mobile device that is directly connected
over WiFi to the access point or connected to the same network as the access point.
2. Enter the IP address that is assigned to the access point.
If you are directly connected to the “CONFIG-ONLY” SSID, you can enter
https://www.aplogin.net.
A login window displays.
If you do not know the IP address, see Find the IP address of the access point on
page 33. For more information about the “CONFIG-ONLY” SSID, see 2.4 GHz
management SSID on page 58.
If your browser does not display a login window but displays a security message and
does not let you proceed, see Log in to the access point after you complete the initial
log-in process on page 35.
3. Enter the access point local device password and click the button.Login
The local device password is the one that you specied. The password is
case-sensitive.
The Device Status page displays.
4. Under Network, select .Basic
The page that displays shows the IPv4 Settings, IPv6 Settings, and Spanning Tree
Protocol (STP) Settings sections.
5. In the Spanning Tree Protocol (STP) Settings section, specify the settings that are
described in the following table:
DescriptionSetting
Select one of the following radio buttons:
•Enable: STP is enabled. This is the default setting.
•Disable: STP is disabled.
Status
The interval in seconds between handshake packets the access point sends to
communicate information about the topology throughout the entire bridged LAN.
The range is 1–10 seconds. The default is 2 seconds.
Hello Time
The period in seconds within which the access point must receive a hello packet from
another device in the spanning tree before the access point assumes that the device
is inactive.
The range is 6–40 seconds. The default is 20 seconds.
Max Age
User Manual44Manage the Wired Network
Settings
NETGEAR WiFi 6 AX1800/AX3600 Dual Band PoE/PoE+ Access Points, WAX214 and WAX218

(Continued)
DescriptionSetting
The period in seconds that a device spends in each of the listening and learning
states before entering the forwarding state. This delay is provided so that when a
new device enters a busy network, the device analyzes data traffic before participating
in the network.
The range is 4–30 seconds. The default is 15 seconds.
Forward Delay
The priority of the access point in the spanning tree. A smaller number means a
higher priority.
The range is 0–65535. The default is 32768.
Priority
6. Click the button.Save
Your settings are saved but not yet applied.
A pop-up window displays. The window shows the number of changes to be applied.
7. In the pop-up window, click the button.Apply
Your changes are applied. If the WiFi link must be reestablished, the page displays
the number of seconds before the access point is back online.
User Manual45Manage the Wired Network
Settings
NETGEAR WiFi 6 AX1800/AX3600 Dual Band PoE/PoE+ Access Points, WAX214 and WAX218

6
Manage the Basic Radio and WiFi
Settings
This chapter describes how you can manage the basic radio and WiFi settings of the
access point. For information about advanced WiFi and radio settings, see Manage the
Advanced WiFi and Radio Settings on page 63.
The chapter includes the following sections:
• Change the device name
• Change the country and region of operation
• Congure a WiFi network that is open or secured with WPA2 or WAP3 personal
security
• Congure a WiFi network that is secured with WPA2 or WAP3 enterprise security
• Congure a guest network on an SSID
• 2.4 GHz management SSID
46

Change the device name
The device name is also referred to as the AP name or system name. It is the access
point name that displays in the network. By default, the device name is the access point’s
model number. You can change this name.
To change the device name of the access point:
1. Launch a web browser from a computer or mobile device that is directly connected
over WiFi to the access point or connected to the same network as the access point.
2. Enter the IP address that is assigned to the access point.
If you are directly connected to the “CONFIG-ONLY” SSID, you can enter
https://www.aplogin.net.
A login window displays.
If you do not know the IP address, see Find the IP address of the access point on
page 33. For more information about the “CONFIG-ONLY” SSID, see 2.4 GHz
management SSID on page 58.
If your browser does not display a login window but displays a security message and
does not let you proceed, see Log in to the access point after you complete the initial
log-in process on page 35.
3. Enter the access point local device password and click the button.Login
The local device password is the one that you specied. The password is
case-sensitive.
The Device Status page displays.
4. Under Network, select .Wireless
The Wireless Settings page displays.
5. In the eld, enter a new name.AP Name
The name must contain alphanumeric characters, cannot be longer than 15 characters,
and cannot contains spaces. The name contain hyphens, but cannot start or endcan
with a hyphen.
6. Click the button.Save
Your settings are saved but not yet applied.
A pop-up window displays. The window shows the number of changes to be applied.
7. In the pop-up window, click the button.Apply
Your changes are applied. If the WiFi link must be reestablished, the page displays
the number of seconds before the access point is back online.
User Manual47Manage the Basic Radio and
WiFi Settings
NETGEAR WiFi 6 AX1800/AX3600 Dual Band PoE/PoE+ Access Points, WAX214 and WAX218

3. Enter the access point local device password and click the button.Login
The local device password is the one that you specied. The password is
case-sensitive.
The Device Status page displays.
4. Under Network, select .Wireless
The Wireless Settings page displays.
5. Go to the Wireless Settings - Access Point section.
The following information displays:
•Up to four SSIDs are available.
•The check box is selected for the enabled SSIDs and cleared for theEnabled
disabled SSIDs. You can either enable or disable SSIDs.
By default, the main (rst) SSID is enabled for both the 2.4 GHz and 5 GHz radios,
but the second, third, and fourth SSIDs are disabled.
•The SSID elds shows the names for the WiFi networks to which WiFi clients can
connect. You can change the SSID names.
•The Security elds show the types of WiFi security that are enabled for the SSID.
By default, the type of WiFi security is WPA2-Personal.
6. Do one of the following:
•Enabled SSID: To change the settings for a previously enabled SSID, click the
Edit button for the SSID.
•Disabled SSID: To enable and then change the settings for an SSID that is not
yet enabled, select the check box for the SSID, and then click theEnabled Edit
button for the SSID.
A new page displays.
Note: To allow you to focus on the essential SSID settings, the tables in the following
steps do not include information about band steering, RADIUS settings (other than
RADIUS settings for enterprise security), RADIUS accounting, the WiFi MAC lter,
and WiFi trafc shaping. For more information about these advanced settings, see
Manage the Advanced WiFi and Radio Settings on page 63.
7. In the Wireless Setting - Access Point 2.4GHz/5GHz section, specify the radio band,
SSID name, and isolation security settings, as described in the following table.
User Manual50Manage the Basic Radio and
WiFi Settings
NETGEAR WiFi 6 AX1800/AX3600 Dual Band PoE/PoE+ Access Points, WAX214 and WAX218

DescriptionSetting
A legacy open WiFi network does not provide any security. Any WiFi device can join
the network. Clients are not authenticated and traffic is not encrypted. We recommend
that you do use a legacy open WiFi network without any security but congurenot
WiFi security. However, a legacy open network might be appropriate for a WiFi
hotspot.
None
The WiFi network can only accept clients that support the WiFi enhanced open feature,
which is based on opportunistic wireless encryption (OWE). Select this option only
if all the clients in the WiFi network support OWE.
OWE
This option, which is the same as WPA2-PSK, is the default setting. This type of security
enables only WiFi devices that support WPA2 to join the SSID.
WPA2-Personal
This option, which is the same as WPA3-PSK, is the most secure personal
authentication option. WPA3 enables only WiFi devices that support WPA3 to join
the SSID. If your network also includes WPA2 devices, select WPA3/WPA2-Personal
security.
WPA3-Personal
This option, which is the same as WPA3-PSK/WPA2-PSK, enables WiFi devices that
support either WPA2 or WPA3 to join the SSID. WPA2 is less secure than WPA3.
WPA2/WPA3-Personal
9. If you select , , or from theWPA2-Personal WAP3-Personal WPA2/WPA3-Personal
Security Mode menu, congure the following settings:
a. Passphrase: Specify a phrase of 8 to 63 characters. To join the SSID, a user must
enter this passphrase.
b. Group Key Update Interval: Specify a period from 30 to 3600 seconds, which
is the period after which the WiFi network group key changes in the background.
(Connected users are not affected.) The default period is 3600 seconds. To disable
group key changes, specify 0.
10. To enable fast roaming for WPA2-Personal security, in the Fast Roaming section,
select the radio button.Enable
For WPA personal security, fast roaming is available only if you select WPA2-Personal
from the menu. By default, fast roaming is disabled for these typesSecurity Mode
of WiFi security. If your network includes WiFi clients that must be able to roam from
one access point to another, enable fast roaming so that certain client applications
can quickly reassociate with the new access point.
Note: For information about band steering, RADIUS settings (other than RADIUS
settings for enterprise security), RADIUS accounting, the WiFi MAC lter, and WiFi
trafc shaping, see Manage the Advanced WiFi and Radio Settings on page 63.
User Manual52Manage the Basic Radio and
WiFi Settings
NETGEAR WiFi 6 AX1800/AX3600 Dual Band PoE/PoE+ Access Points, WAX214 and WAX218

11. Click the button.Save
Your settings are saved but not yet applied.
A pop-up window displays. The window shows the number of changes to be applied.
12. In the pop-up window, click the button.Apply
Your changes are applied. If the WiFi link must be reestablished, the page displays
the number of seconds before the access point is back online.
Configure a WiFi network that is secured with
WPA2 or WAP3 enterprise security
When you performed the initial conguration on the Day Zero page, you were required
to change the name and WiFi passphrase of the main (rst) WiFi network (SSID) for WiFi
clients. (By default, this SSID is congured for WPA2 personal security.)
The access point supports up to four SSIDs that can broadcast on either a single or both
radios. (These four SSIDs are in addition to the 2.4 GHz management SSID.) By default,
the access point’s rst SSID is enabled and the second, third, and fourth SSIDs are
disabled. You can enable or disable an SSID, change the settings and WiFi security for
an SSID, and perform other conguration tasks.
WPA2 or WPA3 enterprise-level security (or a combination thereof) uses RADIUS for
centralized Authentication, Authorization, and Accounting (AAA) management. The
following procedure includes the steps to congure a RADIUS server.
The type of WPA enterprise security (WPA2, WPA3, or a combination of both) that you
select must depend on the types of devices in your WiFi network and the level of security
that your environment requires. All types of WPA enterprise security function with a
shared key (a WiFi password) that is also dened on the RADIUS server. A WiFi client
can only access the WiFi network with the correct shared key.
To change the settings for an active SSID or enable and congure an SSID that is
secured with WPA2 or WAP3 enterprise security:
1. Launch a web browser from a computer or mobile device that is directly connected
over WiFi to the access point or connected to the same network as the access point.
2. Enter the IP address that is assigned to the access point.
If you are directly connected to the “CONFIG-ONLY” SSID, you can enter
https://www.aplogin.net.
A login window displays.
User Manual53Manage the Basic Radio and
WiFi Settings
NETGEAR WiFi 6 AX1800/AX3600 Dual Band PoE/PoE+ Access Points, WAX214 and WAX218

If you do not know the IP address, see Find the IP address of the access point on
page 33. For more information about the “CONFIG-ONLY” SSID, see 2.4 GHz
management SSID on page 58.
If your browser does not display a login window but displays a security message and
does not let you proceed, see Log in to the access point after you complete the initial
log-in process on page 35.
3. Enter the access point local device password and click the button.Login
The local device password is the one that you specied. The password is
case-sensitive.
The Device Status page displays.
4. Under Network, select .Wireless
The Wireless Settings page displays.
5. Go to the Wireless Settings - Access Point section.
The following information displays:
•Up to four SSIDs are available.
•The check box is selected for the enabled SSIDs and cleared for theEnabled
disabled SSIDs. You can either enable or disable SSIDs.
By default, the main (rst) SSID is enabled for both the 2.4 GHz and 5 GHz radios,
but the second, third, and fourth SSIDs are disabled.
•The SSID elds shows the names for the WiFi networks to which WiFi clients can
connect. You can change the SSID names.
•The Security elds show the types of WiFi security that are enabled for the SSID.
By default, the type of WiFi security is WPA2-Personal.
6. Do one of the following:
•Enabled SSID: To change the settings for a previously enabled SSID, click the
Edit button for the SSID.
•Disabled SSID: To enable and then change the settings for an SSID that is not
yet enabled, select the check box for the SSID, and then click theEnabled Edit
button for the SSID.
A new page displays.
Note: To allow you to focus on the essential SSID settings, the tables in the following
steps do not include information about band steering, RADIUS settings (other than
RADIUS settings for enterprise security), RADIUS accounting, the WiFi MAC lter,
and WiFi trafc shaping. For more information about these advanced settings, see
Manage the Advanced WiFi and Radio Settings on page 63.
User Manual54Manage the Basic Radio and
WiFi Settings
NETGEAR WiFi 6 AX1800/AX3600 Dual Band PoE/PoE+ Access Points, WAX214 and WAX218
Produkt Specifikationer
| Mærke: | Netgear |
| Kategori: | Adgangspunkt |
| Model: | WAX214 |
| Vekselstrømsindgangsspænding: | 12 V |
| Bredde: | 160.9 mm |
| Dybde: | 160.9 mm |
| Højde: | 33.28 mm |
| Vægt: | 380 g |
| Produktfarve: | Hvid |
| Opbevaringstemperatur (T-T): | 0 - 95 °C |
| Relativ luftfugtighed ved drift (H-H): | 0 - 40 % |
| Relativ luftfugtighed ved opbevaring (H-H): | 5 - 95 % |
| Ethernet LAN-porte (RJ-45): | 1 |
| Driftstemperatur (T-T): | -40 - 70 °C |
| Ethernet LAN-datahastigheder: | 10,100,1000 Mbit/s |
| Sikkerhedsalgoritmer: | WPA2, WPA3 |
| Hurtig start guide: | Ja |
| Kabler inkluderet: | LAN (RJ-45) |
| Certificering: | CB, EN60950, EN62368 |
| Placering: | Ceiling, Table, Wall |
| Netværksstandarder: | IEEE 802.11a, IEEE 802.11ac, IEEE 802.11ax, IEEE 802.11b, IEEE 802.11e, IEEE 802.11g, IEEE 802.11n |
| DC-in-stik: | Ja |
| Webbaseret administration: | Ja |
| Knap til nulstilling: | Ja |
| Servicekvalitet support (QoS): | Ja |
| LED-indikatorer: | LAN, Power, WLAN |
| Harmoniseret systemkode (HS): | 85176990 |
| Antal brugere: | 128 bruger(e) |
| Slot til kabellås: | Ja |
| Maksimal dataoverførselshastighed: | 1773.5 Mbit/s |
| Antenne type: | Intern |
| Indgangsstrøm: | 1.5 A |
| Kabellåseslids type: | Kensington |
| Strøm over Ethernet (PoE): | Ja |
| Antal produkter inkluderet: | 1 stk |
| Adgangskontrolliste (ACL): | Ja |
| Filtrering af MAC-adresser: | Ja |
| 2.4 GHz: | Ja |
| 5 GHz: | Ja |
| Antal SSID understøttet: | 4 |
| Niveau for antennestyrke (maks.): | 4 dBi |
| Maksimal dataoverførselshastighed (5 GHz): | 1201 Mbit/s |
| Maksimal dataoverførselshastighed (2,4 GHz): | 573.5 Mbit/s |
| Strømforsyning: | 18 W |
Har du brug for hjælp?
Hvis du har brug for hjælp til Netgear WAX214 stil et spørgsmål nedenfor, og andre brugere vil svare dig
Adgangspunkt Netgear Manualer

1 August 2024
30 Juli 2024
27 Juli 2024
23 Juli 2024
19 Juli 2024
18 Juli 2024
25 November 2023
31 Oktober 2023
17 Oktober 2023
26 September 2023
Adgangspunkt Manualer
- Adgangspunkt Bosch
- Adgangspunkt Aruba
- Adgangspunkt Netis
- Adgangspunkt Moog
- Adgangspunkt TP-Link
- Adgangspunkt HP
- Adgangspunkt D-Link
- Adgangspunkt Asus
- Adgangspunkt AVM
- Adgangspunkt Planet
- Adgangspunkt Belkin
- Adgangspunkt Edimax
- Adgangspunkt Black Box
- Adgangspunkt DataVideo
- Adgangspunkt TRENDnet
- Adgangspunkt Honeywell
- Adgangspunkt Buffalo
- Adgangspunkt Linksys
- Adgangspunkt Cisco
- Adgangspunkt Huawei
- Adgangspunkt Totolink
- Adgangspunkt Digitus
- Adgangspunkt Zebra
- Adgangspunkt Techly
- Adgangspunkt Dell
- Adgangspunkt Alcatel-Lucent
- Adgangspunkt LevelOne
- Adgangspunkt ZyXEL
- Adgangspunkt Fortinet
- Adgangspunkt Tenda
- Adgangspunkt LigoWave
- Adgangspunkt EQ3
- Adgangspunkt Ubiquiti Networks
- Adgangspunkt EnGenius
- Adgangspunkt Devolo
- Adgangspunkt Grandstream
- Adgangspunkt Renkforce
- Adgangspunkt Mikrotik
- Adgangspunkt Eminent
- Adgangspunkt Hercules
- Adgangspunkt V7
- Adgangspunkt Amer Networks
- Adgangspunkt Mercku
- Adgangspunkt EQ-3
- Adgangspunkt Vimar
- Adgangspunkt Dahua Technology
- Adgangspunkt Speco Technologies
- Adgangspunkt StarTech.com
- Adgangspunkt Draytek
- Adgangspunkt Crestron
- Adgangspunkt Lindy
- Adgangspunkt Lancom
- Adgangspunkt Sitecom
- Adgangspunkt AMX
- Adgangspunkt Homematic IP
- Adgangspunkt Intellinet
- Adgangspunkt Kingston
- Adgangspunkt Steren
- Adgangspunkt Media-Tech
- Adgangspunkt Moxa
- Adgangspunkt Allnet
- Adgangspunkt Allied Telesis
- Adgangspunkt Airlive
- Adgangspunkt Macally
- Adgangspunkt Hawking Technologies
- Adgangspunkt INCA
- Adgangspunkt Advantech
- Adgangspunkt Silex
- Adgangspunkt SMC
- Adgangspunkt Cambium Networks
- Adgangspunkt CradlePoint
- Adgangspunkt FlyingVoice
- Adgangspunkt Extreme Networks
- Adgangspunkt Aerohive
- Adgangspunkt Bountiful
- Adgangspunkt WatchGuard
- Adgangspunkt NUVO
- Adgangspunkt Cudy
- Adgangspunkt IP-COM
- Adgangspunkt Mach Power
- Adgangspunkt Syscom
- Adgangspunkt Meru
- Adgangspunkt Amped Wireless
- Adgangspunkt 3Com
- Adgangspunkt Ruckus Wireless
- Adgangspunkt Bintec-elmeg
- Adgangspunkt Brocade
- Adgangspunkt ICC
- Adgangspunkt Insteon
- Adgangspunkt Juniper
- Adgangspunkt Comtrend
- Adgangspunkt Premiertek
- Adgangspunkt Atlantis Land
- Adgangspunkt Mojo
- Adgangspunkt Luxul
- Adgangspunkt Peplink
Nyeste Adgangspunkt Manualer

5 April 2025
20 Marts 2025

15 Januar 2025
13 Januar 2025
13 Januar 2025
13 Januar 2025
12 Januar 2025
30 December 2025

26 December 2024
23 December 2024