Olympus VR-340 Smart Manual
Læs nedenfor 📖 manual på dansk for Olympus VR-340 Smart (77 sider) i kategorien Kamera. Denne guide var nyttig for 37 personer og blev bedømt med 4.5 stjerner i gennemsnit af 2 brugere
Side 1/77

Instruction Manual
VR-360/D-760
VR-360/D-760
VR-360/D-760
VR-360/D-760VR-360/D-760VR-360/D-760
VR-350/D-755
VR-350/D-755
VR-350/D-755
VR-350/D-755VR-350/D-755VR-350/D-755
VR-340/D-750
VR-340/D-750
VR-340/D-750
VR-340/D-750VR-340/D-750VR-340/D-750
DIGITAL CAMERA
● Thank you for purchasing an Olympus digital camera. Before you start to use your new camera, please read these
instructions carefully to enjoy optimum performance and a longer service life. Keep this manual in a safe place for
future reference.
● We recommend that you take test shots to get accustomed to your camera before taking important photographs.
● In the interest of continually improving our products, Olympus reserves the right to update or modify information
contained in this manual.
● The screen and camera illustrations shown in this manual were produced during the development stages and may
differ from the actual product. Unless otherwise specifi ed, the explanation about these illustrations is provided for
VR-360/D-760.

2
EN
Other accessories not shown: warranty card
Contents may vary depending on purchase location.
Checking the contents of the box
Checking the contents of the box
Checking the contents of the box
Checking the contents of the boxChecking the contents of the boxChecking the contents of the box
LI-50B Lithium
Ion Battery
USB cable
(CB-USB7)
OLYMPUS
Setup
CD-ROM
Strap AV cable
(CB-AVC5)
F-2AC
USB-AC adapter
or
Digital camera
Camera unit
5
6
2
1
3
4
11
12
10
8
7
9
1 Connector cover *1
2 HDMI mini connector*1
3 Strap eyelet
4 Multi-connector
5 Battery/card compartment
cover
6 Battery/card compartment
lock
7 Flash
8 Self-timer lamp
AF illuminator
9 Lens
10 Microphone
11
Tripod socket
12 Speaker
Names of
Names of
Names of
Names ofNames of Par
Par
Par
Par Parts
ts
ts
tstsNames of Parts
*1 VR-360/D-760 only

3
EN
3
2
1 4
7
5
6
8
10
9
11
1 buttonn
2 Shutter button
3 Monitor
4 Zoom lever
5 button (shooting movies)R
6 button (switch between q
shooting and playback)
7 Indicator lamp
8 Arrow pad
INFO button (change
information display)
button (erase)
9 button (OK)Q
10
E button (camera guide)
11
button
Attaching the camera strap
Attaching the camera strap
Attaching the camera strap
Attaching the camera strapAttaching the camera strapAttaching the camera strap
Pull the strap tight so that it does not come loose.
4
EN
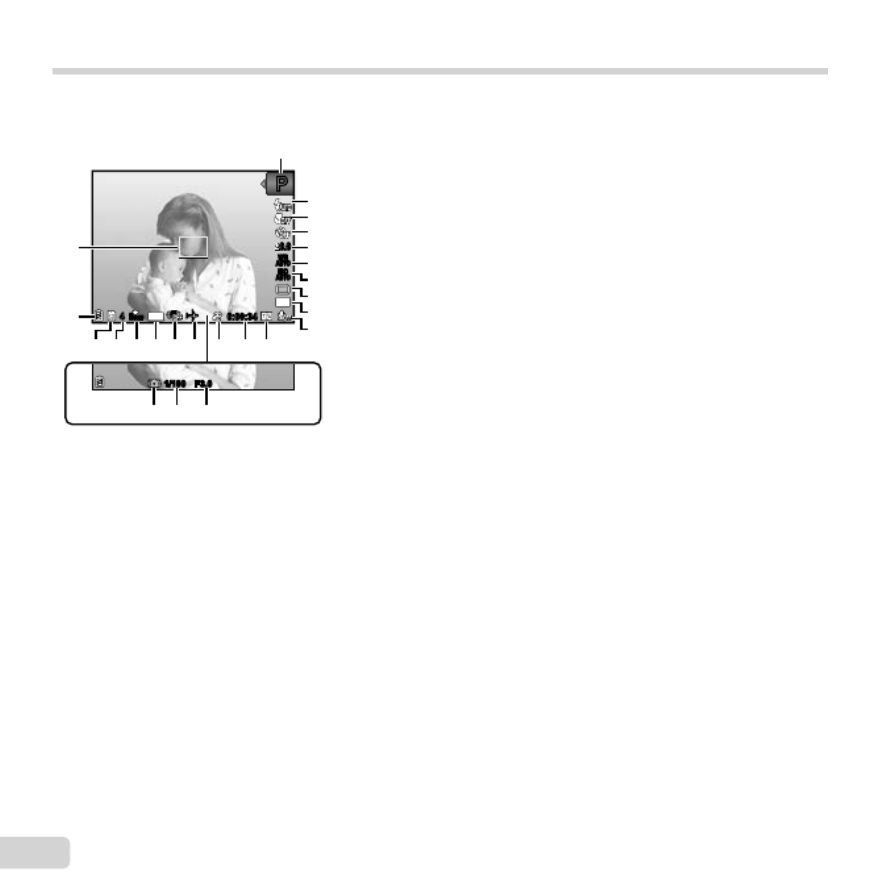
Monitor
Shooting mode display
Shooting mode display
Shooting mode display
Shooting mode displayShooting mode display Shooting mode display
F3.0F3.01/1001/100
0.00.0
AUTO
WB
AUTO
WB
AUTO
ISO
AUTO
ISO
16
M
zz
PP
0:00:340:00:34
Date
44
N
ORM
1
2
3
4
5
6
7
8
9
10
15171819 16 1114 13
20
21
222324
12
1 Shooting mode ....... p. 16, 24
2 Flash ..............................p.19
Flash standby/fl ash charge
.................................... p. 55
3 Macro ........................... p. 30
4 Self-timer ...................... p. 30
5 Exposure compensation
.................................... p. 31
6 White balance ............... p. 31
7 ISO ............................... p. 32
8 Drive ............................. p. 32
9
Image size
(still images)................ p. 33
10
Recording with sound
(movies) ...................... p. 36
11
Image size (movies) ..... p. 34
12
Recording length
(movies) ...................... p. 63
13
Movie recording icon .... p. 17
14
World time .................... p. 48
15
Image Stabilizer
(still images)................ p. 35
16
Date stamp ................... p. 37
17
Compression
(still images)................ p. 34
18
Number of storable pictures
(still images)................ p. 16
19
Current memory ........... p. 61
20
Battery check ................ p. 12
21
AF target mark .............. p. 17
22
Aperture value .............. p. 17
23
Shutter speed ............... p. 17
24
Camera shake warning

5
EN
Playback mode display
Playback mode display
Playback mode display
Playback mode displayPlayback mode displayPlayback mode display
●Normal display 1 Battery check ................ p. 12
2 3D image*1
.................... p. 23
3 Eye-Fi transferred ......... p. 42
4 Protect .......................... p. 41
5 Adding sound ............... p. 39
6 Print reservation/number of
prints ...................p. 53/p. 52
7 Current memory ........... p. 61
8 Frame number/
total number of images
.................................... p. 20
Elapsed time/
total shooting time
(movies) ...................... p. 21
9 P ............................ p. 27
10 Shutter speed ............... p. 17
11 Shooting mode ....... p. 16, 24
12 ISO ............................... p. 32
13 Aperture value .............. p. 17
14 Exposure compensation
.................................... p. 31
15 White balance ............... p. 31
16 File number
17 Compression
(still images)................ p. 34
Frame rate
(movies) ...................... p. 34
18 Date and time ............... p. 15
19 Image size ....................p. 33
20 Volume ......................... p. 44
12:30’12/02/26’1 2 /02/26 12: 30
1010
4/304/30
3D3D
1 8732 4 5 6
18
Still image Movie
00:12/00:3400:12/00:34
1
20
8
●Detailed display
4/304/30
1010
16
M
2.02.0F3.0F3.01/10001/1000
100-0004100-0004
AUTO
WB
AUTO
WB
100
ISO
100
ISO
N
ORM
1
MAGICMAGIC
’1 2 /02/26 12: 30
3D3D
16
M
2.02.0F3.0F3.01/10001/1000
100-0004100-0004
AUTO
WB
AUTO
WB
100
ISO
100
ISO
1
MAGICMAGIC
’12/0 2/26 12:30
N
ORM
32 4 5 61 87 1110 129 13
14
16
18
19
15
1
7
*1 VR-360/D-760 only
7
EN
The symbols displayed for image selections FGHI
and settings indicate that the arrow pad is to be used.
N
ORM
‘12/02/26 12:30
N
ORM
16 M
‘12/02/26 12:30
MENU
Sel. Image Back
Single Print More
4/30
100-0004
4/30
100-0004
02 26 12 30:..
MENU
2012
XBack
Y / M / D
Y M D Time
Operation guides displayed on the screen indicate that the
button, button, or zoom lever can be used.Q
Sel. Image
Erase/Cancel
OK
MENU
(1)
4/30
Operation guide
MENU
Back
MENU
On
On
On
Camera Menu 1
Image Stabilizer
ResetReset
Compression
AF Mode
Digital Zoom
AF Illuminat.
Icon Guide
Normal
Face/iESP
Off
Back
Operation guide
8
EN
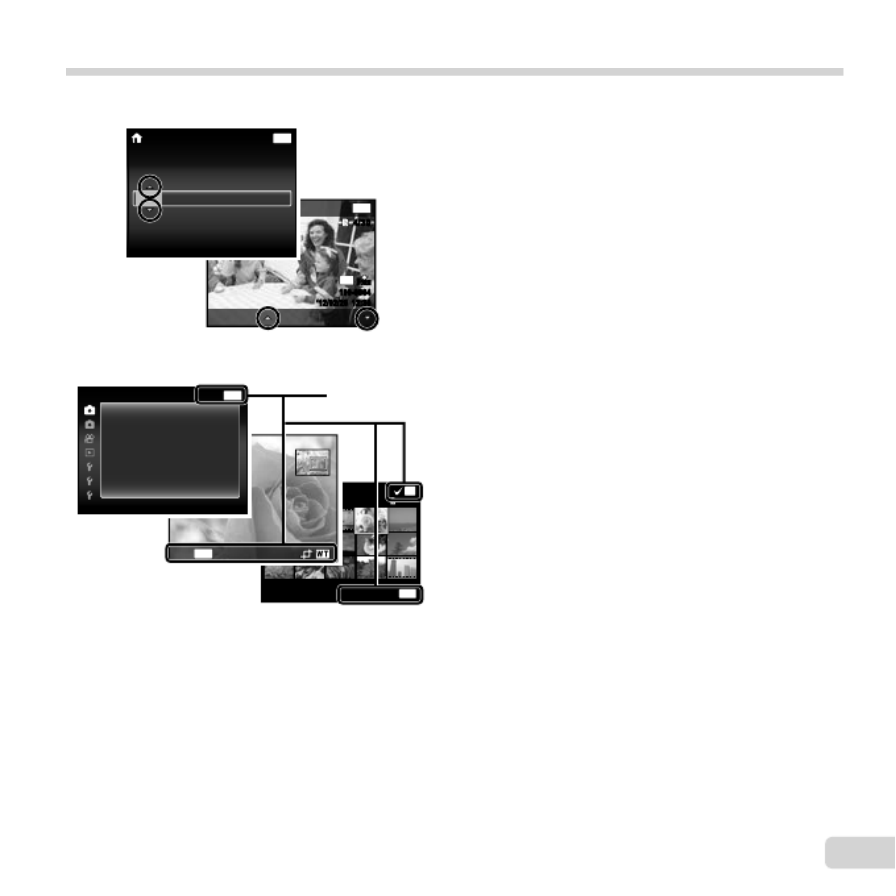
Using the Menu
Using the Menu
Using the Menu
Using the MenuUsing the Menu Using the Menu
Use the menu to change camera settings such as the shooting mode.
There may be menus that are unavailable depending on other related settings or the mode (p. 26).
Function menu
Function menu
Function menu
Function menuFunction menu Function menu
Press during shooting to display the function menu. The function menu is used to choose the shooting mode and H
provides access to frequently used shooting settings.
To select the shooting mode
Use to select a shooting mode and press the button.HI Q
To select the function menu
Use to select a menu and use to select a menu option. Press the FG HI Q
button to set the function menu.
PP
0.00.0
AUTO
WB
AUTO
WB
AUTO
ISO
AUTO
ISO
MENUMENU
Program Auto
16
M
Shooting
Function menu
Shooting mode
PP
Selected option
Setup menu

9
EN
1 Press the button.
●The setup menu is displayed.
MENU
Camera Menu 1 Back
ResetReset
On
On
On
Compression
AF Mode
Digital Zoom
Normal
Face/iESP
Off
Image Stabilizer
AF Illuminat.
Icon Guide
2 Press H FG to highlight the page tabs. Use
to select the desired page tab and press .I
MENU
Settings Menu 2
Pixel Mapping
Back
Power SavePower Save
World TimeWorld Time
TV Out
Bright
English
Off
X’12.02.26 12:30
Page tab
Pixel Mapping
MENU
Settings Menu 2
Power SavePower Save
World TimeWorld Time
TV Out
Back
Bright
English
Off
X’12.02.26 12:30
Submenu 1
3 Use FG to select the desired submenu 1 and
then press the button.Q
Power SavePower Save Off
MENU
Settings Menu 2
Pixel Mapping
Back
World TimeWorld Time
TV Out
Bright
English
X’12.02.26 12:30
Power SavePower Save
Pixel Mapping
MENU
Settings Menu 2 Back
World TimeWorld Time
TV Out
X
On
Off
Submenu 2
4 Use FG to select the desired submenu 2 and
then press the button.Q
●Once a setting is selected, the display returns to
the previous screen.
There may be additional operations.
“Menu Settings” (p. 34 to 49)
Power SavePower Save On
MENU
Settings Menu 2
Pixel Mapping
Back
World TimeWorld Time
TV Out
Bright
English
X’12.02.26 12:30
5 Press the button to complete the setting.
Setup menu
Setup menu
Setup menu
Setup menuSetup menu Setup menu
Press the button during shooting or playback to display the setup menu. The setup menu provides access to a
variety of camera settings, including options not listed in the function menu, display options, and the time and date.

10
EN
Menu Index
1 Shooting mode ...........p. 16, 24
P (Program Auto)
M (iAUTO)
Q (Beauty)
(Scene Mode)
P (Magic Filter)
~ (Panorama)
2 Flash .................................p. 19
3 Macro ...............................p. 30
4 Self-timer ..........................p. 30
5 Exposure compensation ...p. 31
6 White balance ...................p. 31
7 ISO ...................................p. 32
8 Drive .................................p. 32
9 Image Size .......................p. 33
0 (Camera Menu 1) .......p. 34K
Reset
Compression
AF Mode
Digital Zoom
Image Stabilizer
AF Illuminat.
Icon Guide
a (Camera Menu 2) .......p. 37K
Date Stamp
b (Movie menu) ..............p. 34A
Frame Rate
IS Movie Mode
R (Movie sound recording)
c (Playback menu) ........p. 38q
Slideshow
Edit
Erase
Print Order
R (Protect)
y (Rotate)
d (Settings Menu 1) ..........p. 42d
Memory Format/Format
Backup
Eye-Fi
USB Connection
q Power On
Keep K Settings
Sound Settings
e (Settings Menu 2) ..........p. 44d
Pixel Mapping
s (Monitor)
TV Out*1
NTSC/PAL*2
Power Save
W (Language)
X (Date/time)
World Time
f (Settings Menu 3) ..........p. 49d
Beauty Settings
*1 VR-360/D-760 only
*2 VR-350/D-755 and VR-340/D-750 only
PP
0.00.0
AUTO
WB
AUTO
WB
AUTO
ISO
AUTO
ISO
MENUMENU
Program Auto
16
M
MENU
On
On
On
Camera Menu 1
Image Stabilizer
ResetReset
Compression
AF Mode
Digital Zoom
AF Illuminat.
Icon Guide
Normal
Face/iESP
Off
Back
6
7
2
1
5
4
8
9
30
a
b
c
d
e
f

11
EN
Preparing the Camer
Preparing the Camer
Preparing the Camer
Preparing the CamerPreparing the Camera
a
a
aaPreparing the Camera
Inserting the battery and card
1
12
Battery/card
compartment cover
Battery/card compartment lock
2
Write-protect switch
Battery lock
knob
Insert the battery as illustrated with the mark C
toward the battery lock knob.
Damage to the battery exterior (scratches, etc.) may
produce heat or an explosion.
Insert the battery while sliding the battery lock knob in
the direction of the arrow.
Insert the card straight until it clicks into place.
When using the camera, be sure to close the battery/
card compartment cover.
Slide the battery lock knob in the direction of the
arrow to unlock, and then remove the battery.
Turn off the camera before opening the battery/card
compartment cover.
Always use SD/SDHC/SDXC cards or Eye-Fi card
with this camera. Do not insert other types of memory
cards. “Using the card” (p. 61)
Do not touch the contact area of the card directly.
This camera can be used without a card by storing
images in its internal memory.
2
311
“Number of storable pictures (still images)/Recording
length (movies) in the internal memory and cards”
(p. 62)
T
T
T
TTo remove the card
o remove the card
o remove the card
o remove the cardo remove the card To remove the card
21
Press the card in until it clicks and comes out slightly,
then grab the card and pull it out.
Charging the battery with the
included USB-AC adapter
The included F-2AC USB-AC adapter (hereafter referred
to as USB-AC adapter) differs depending on the region
where you purchased the camera. If you received a plug-
in type USB-AC adapter, plug it directly into AC outlet.

12
EN
The included USB-AC adapter has been designed
to be used for charging and playback. Do not take
pictures while the AC adapter is connected to the
camera.
Be sure to unplug the power plug of the USB-AC
adapter from the wall outlet when the charging is
complete or the playback ends.
The battery can be charged while the camera is
connected to the computer. Charging time varies
depending on the performance of a computer. (There
may be cases in which it takes approx. 10 hours.)
Connecting the camera
Connecting the camera
Connecting the camera
Connecting the cameraConnecting the camera Connecting the camera
AC outlet USB connector
(supplied)
Multi-connector
or
Indicator lamp
Indicator lamp
Indicator lamp
Indicator lampIndicator lampIndicator lamp
Indicator lamp
On: Charging
Off: Charged
The battery is not fully charged at the time of
purchase. Before use, be sure to charge the battery
until the indicator lamp turns off (up to 4 hours).
If the indicator lamp does not light, the camera is not
correctly connected or the battery, camera, or USB-
AC adapter may not be functioning as expected.
When to charge the batteries
When to charge the batteries
When to charge the batteries
When to charge the batteriesWhen to charge the batteries When to charge the batteries
Charge the battery when the error message shown below
appears.
Flashes in red
Battery Empty
Setting up using the supplied CD
Installation of [ib] computer software using the
supplied CD is available on Windows computers only.
Windows
Windows
Windows
WindowsWindowsWindows
1 Insert the supplied CD in a CD-ROM drive.
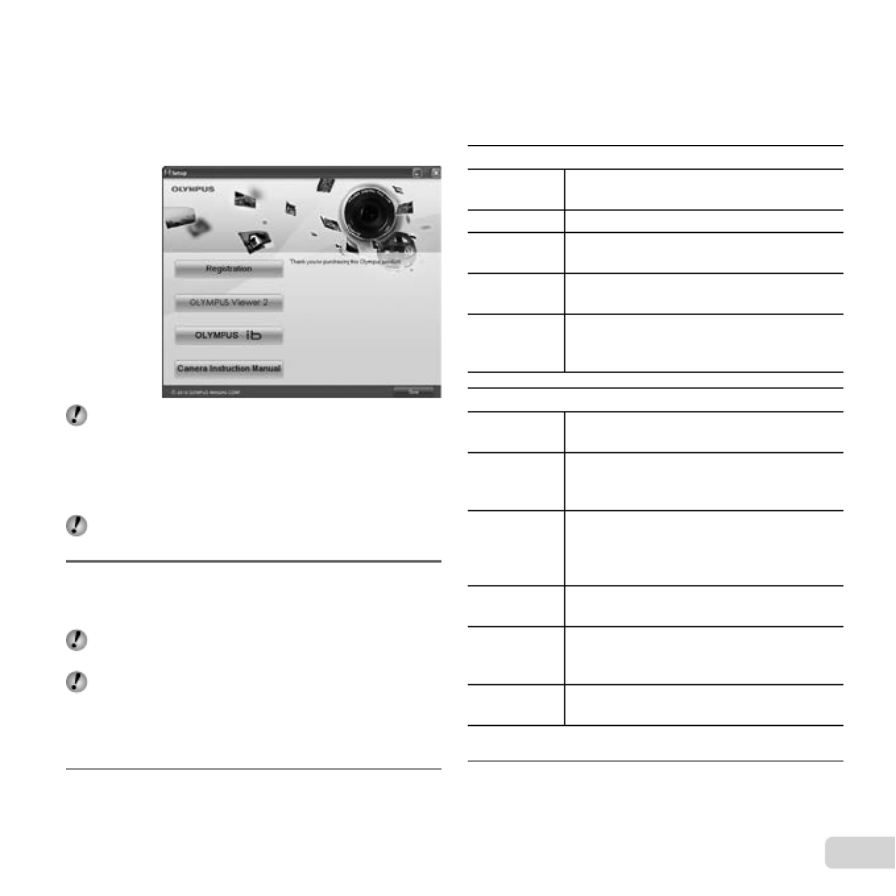
13
EN
Windows XP
●
A “Setup” dialog will be displayed.
Windows Vista/Windows 7
●
An Autorun dialog will be displayed. Click
“OLYMPUS Setup” to display the “Setup” dialog.
If the “Setup” dialog is not displayed, select “My
Computer” (Windows XP) or “Computer” (Windows
Vista/Windows 7) from the start menu. Double-click
the CD-ROM (OLYMPUS Setup) icon to open the
“OLYMPUS Setup” window and then double-click
“Launcher.exe”.
If a “User Account Control” dialog is displayed, click
“Yes” or “Continue”.
2 Register your Olympus product.
●Click the “Registration” button and follow the on-
screen instructions.
To register the camera, it must be connected to the
computer. “Connecting the camera” (p. 12)
If nothing is displayed on the camera screen even
after connecting the camera to the computer, the
battery may be exhausted. Leave the camera
connected to the computer until the battery has
charged, then disconnect and reconnect the camera.
3 Install OLYMPUS Viewer 2 and [ib] computer
software.
●Check the system requirements before beginning
installation.
●
Click the “OLYMPUS Viewer 2” or “OLYMPUS ib”
button and follow the on-screen instructions to
install the software.
OLYMPUS Viewer 2
Operating
System
Windows XP (Service Pack 2 or later) /
Windows Vista / Windows 7
Processor Pentium 4 1.3 GHz or better
RAM 1 GB or more (2 GB or more
recommended)
Free Hard
Drive Space 1 GB or more
Monitor
Settings
1024 × 768 pixels or more
Minimum 65,536 colors
(16,770,000 colors recommended)
[ib]
Operating
System
Windows XP (Service Pack 2 or later) /
Windows Vista / Windows 7
Processor
Pentium 4 1.3 GHz or better
(Pentium D 3.0 GHz or better required
for movies)
RAM
512 MB or more (1 GB or more
recommended)
(1 GB or more required for movies — 2 GB
or more recommended)
Free Hard
Drive Space 1 GB or more
Monitor
Settings
1024 × 768 pixels or more
Minimum 65,536 colors (16,770,000
colors recommended)
Graphics A minimum of 64 MB video RAM with
DirectX 9 or later.
* See online help for information on using the software.
4 Install the camera manual.
●Click the “Camera Instruction Manual” button and
follow the on-screen instructions.

14
EN
Macintosh
Macintosh
Macintosh
MacintoshMacintoshMacintosh
1 Insert the supplied CD in a CD-ROM drive.
●Double-click the CD (OLYMPUS Setup) icon on
the desktop.
●Double-click the “Setup” icon to display the “Setup”
dialog.
2 Install OLYMPUS Viewer 2.
●Check the system requirements before beginning
installation.
●
Click the “OLYMPUS Viewer 2” button and follow
the on-screen instructions to install the software.
You can register via “Registration” in OLYMPUS
Viewer 2 “Help”.
OLYMPUS Viewer 2
Operating
System Mac OS X v10.4.11–v10.6
Processor Intel Core Solo/Duo 1.5 GHz or better
RAM 1 GB or more (2 GB or more
recommended)
Free Hard
Drive Space 1 GB or more
Monitor
Settings
1024 × 768 pixels or more
Minimum 32,000 colors (16,770,000
colors recommended)
* Other languages can be selected from the language
combo box. For information on using the software, see
online help.
3 Copy the camera manual.
●Click the “Camera Instruction Manual” button to
open the folder containing the camera manuals.
Copy the manual for your language to the
computer.
15
EN
Language, date, time, and time zone
You can choose the language for the menus and
messages displayed in the monitor. Also, the date and
time set here are saved to image fi le names, date prints,
and other data.
1 Press the n button to turn on the
camera. Then, use to select your FGHI
language and press the button.A
The menus can be used to change the selected
language. [ ] (Language) (p. 48)W
2 Use FG to select the year for [Y] on the date
and time setting screen.
X
MENU
Back
Y / M / D
Y M D Time
-- -- -- --
:..2012
3 Press I to save the setting for [Y].
X
MENU
Back
Y / M / D
Y M D Time
-- -- -- --
:..2012
4 As in Steps 2 and 3, use to set FGHI
[M] (month), [D] (day), [Time] (hours and
minutes), and [Y/M/D] (date order), and then
press the button.A
For a more accurate setting, press the button Q
when the time signal hits 00 seconds while setting the
minutes.
The menus can be used to change the selected date
and time. [ ] (Date/time) (p. 48)X
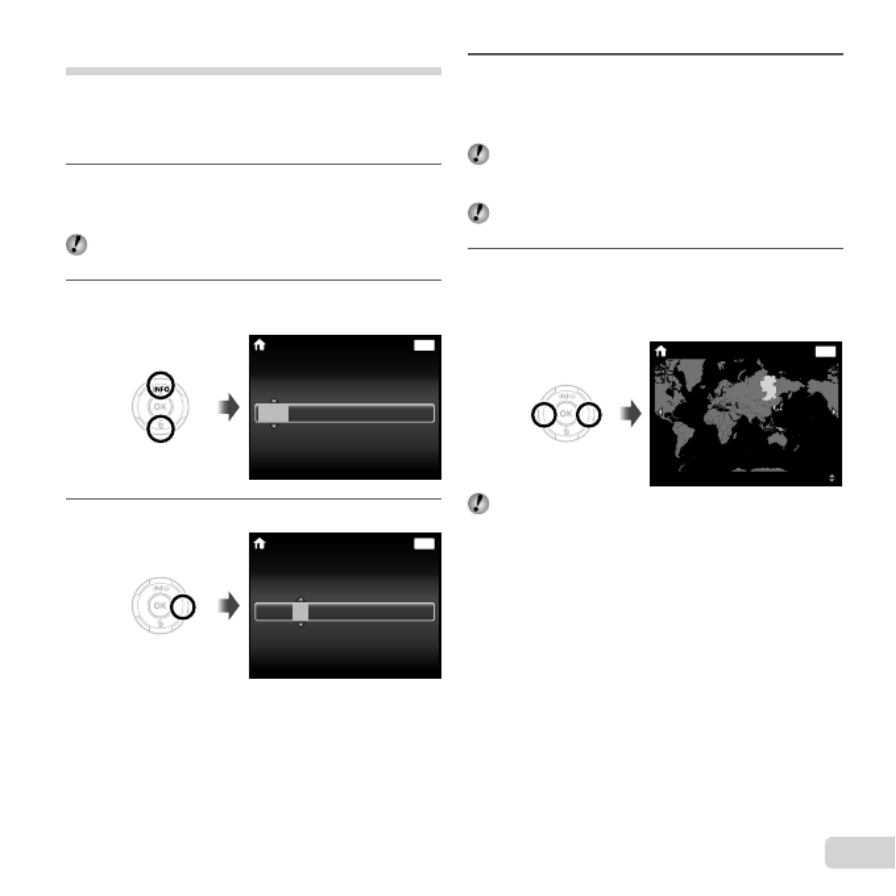
5 Use HI to select your home time zone and
press the button.Q
●Use to turn daylight saving time ([Summer]) FG
on or off.
MENU
Back
Summer
Seoul
Tokyo
’12 .02 .26 12:30
The menus can be used to change the selected time
zone. [World Time] (p. 48)

16
EN
Shooting, Viewing, and Er
Shooting, Viewing, and Er
Shooting, Viewing, and Er
Shooting, Viewing, and ErShooting, Viewing, and Erasing
asing
asing
asingasing Shooting, Viewing, and Erasing
Shooting with the optimum aperture
value and shutter speed
[Program Auto]
In this mode, automatic shooting settings are activated
while also allowing changes to a wide range of
other shooting menu functions, such as exposure
compensation, white balance, etc. as needed.
The default settings of the function are highlighted in
.
1 Press the n button to turn on the
camera.
[Program Auto] indicator
PP
0.00.0
AUTO
WB
AUTO
WB
AUTO
ISO
AUTO
ISO
16
M
44
N
ORM
0:00:340:00:34
Number of storable still pictures (p. 62)
Monitor (standby mode screen)
If the [Program Auto] indicator is not displayed, press
H to display the function menu and then set the
shooting mode to . “Using the Menu” (p. 8)P
Current shooting mode display
PP
0.00.0
AUTO
WB
AUTO
WB
AUTO
ISO
AUTO
ISO
MENUMENU
Program Auto
16
M
Press the n button again to turn off the camera.
2 Hold the camera and compose the shot.
Horizontal grip
Vertical grip
Monitor
When holding the camera, take care not to cover the
fl
ash and the microphone with your
fi ngers, etc.

17
EN
3 Press the shutter button halfway down to
focus on the subject.
●When the camera focuses on the subject, the
exposure is locked (shutter speed and aperture
value are displayed), and the AF target mark
changes to green.
●
The camera was unable to focus if the AF target
mark fl ashes red. Try focusing again.
PP
F3.0F3.01/4001/400
AF target mark
Press halfway
Shutter speed Aperture value
“Focusing” (p. 57)
4 To take the picture, gently press the shutter
button all the way down while being careful
not to shake the camera.
Image review screen
Press fully
T
T
T
TTo view images during shooting
o view images during shooting
o view images during shooting
o view images during shootingo view images during shooting To view images during shooting
Pressing the button enables playback of images. To q
return to shooting, either press the button or press the q
shutter button halfway down.
Shooting movies
1 Press the R button to start recording.
0:00
RECREC
0:00
0:00:340:00:34
0:00:340:00:34
0:000:00
RECREC
Lights up red
when recording
Current length
Continuous recording length
Sound will also be recorded.
The shooting mode selected for still photography
applies to movies (some shooting modes have no
effect).
2 Press the R button again to end recording.
18
EN
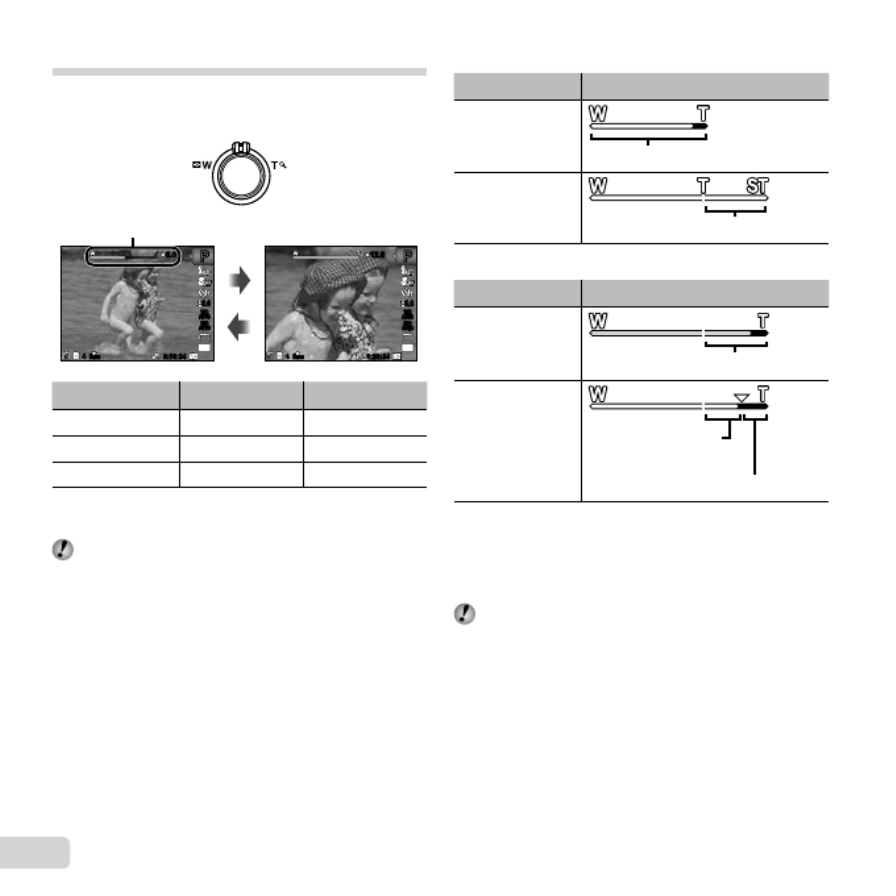
Using the zoom
Turning the zoom lever adjusts the shooting range.
W side T side
PP PP
5.05.0
0.00.0
AUTO
WB
AUTO
WB
AUTO
ISO
AUTO
ISO
16
M
0.00.0
AUTO
WB
AUTO
WB
AUTO
ISO
AUTO
ISO
16
M
12.512.5
0:00:340:00:34
44
N
ORM
0:00:340:00:34
44
N
ORM
Zoom bar
Model No. Optical zoom Digital zoom
VR-360/D-760 12.5 × 4 ×
VR-350/D-755 10 × 4 ×
VR-340/D-750 10 × 4 ×
T
T
T
TTo take larger images [Digital Zoom]
o take larger images [Digital Zoom]
o take larger images [Digital Zoom]
o take larger images [Digital Zoom]o take larger images [Digital Zoom] To take larger images [Digital Zoom]
The type and amount of zoom can be identifi ed from
the appearance of the zoom bar. The display differs
depending on the options selected for [Digital Zoom]
(p. 36) and [Image Size] (p. 33).
[Off] selected for [Digital Zoom]:
Image size Zoom bar
16M
Optical zoom range
Other
Image zoomed and cropped.
*1
[On] selected for [Digital Zoom]:
Image size Zoom bar
16M
Digital zoom range
Other Image zoomed and
cropped.
*1
Digital zoom range
*1 If an image size is less than the full resolution after
reaching the maximum optical zoom, the camera will
automatically resize and crop the image to the selected
image size and enter the digital zoom range if [Digital
Zoom] is [On].
Photographs taken with the zoom bar displayed in
red may appear “grainy.”
19
EN
Using the fl ash
The fl ash functions can be selected to best match the
shooting conditions.
1 Select the fl ash option in the shooting
function menu.
PP
0.00.0
MENUMENU
AUTO
WB
AUTO
WB
AUTO
ISO
AUTO
ISO
Flash Auto
16
M
2 Use HI to select the setting option, and
press the button to set.Q
Option Description
Flash Auto
The fl
ash
fi res automatically in low-
light or backlight conditions.
Redeye Pre-fl ashes are emitted to reduce the
occurrence of red eye in your photos.
Fill In
The fl
ash
fi res regardless of the
available light.
Flash Off The fl ash does not fi re.
Changing the shooting information
display
The display of the screen information can be changed to
best match the situation, for example, the need for a clear
view of the screen or for making a precise composition by
using the grid display.
1 Press F (INFO).
●The displayed shooting information changes in
the order shown below each time the button is
pressed. “Shooting mode display” (p. 4)
PP
N
ORM
PP
PP
0.00.0
AUTO
WB
AUTO
WB
AUTO
ISO
AUTO
ISO
16
M
44
0.00.0
AUTO
WB
AUTO
WB
AUTO
ISO
AUTO
ISO
16
M
N
ORM
44
0:00:340:00:34
0:00:340:00:34
Normal
Detailed
No information

20
EN
Viewing images
1 Press the q button.
Number of frames/Total number of images
12:30’12/02/26’12/02/26 12:30
4/304/30
Playback image
Pictures taken using mode are displayed as a Q
group. Turn the zoom lever to the T side to play back
the image in the group.
2 Use HI to select an image.
Displays
previous image
Displays next
image
Hold I H to fast forward and hold to reverse.
The display size of the images can be changed.
“Index view and close-up view” (p. 22)
T
T
T
TTo play sound recordings
o play sound recordings
o play sound recordings
o play sound recordingso play sound recordingsTo play sound recordings
To play sound recorded with an image, select the image
and press the Q button. A icon appears on images with
which sound has been recorded.
[R] (still images) (p. 39)
During audio playback
Press FG to adjust volume.
T
T
T
TTo play back movies
o play back movies
o play back movies
o play back movieso play back moviesTo play back movies
Select a movie, and press the button.Q
’12/02/26 12:30’12/02/26 12:30
4/304/30
OK
Movie PlayMovie Play
Movie

22
EN
Index view and close-up view
Index view enables quick selection of a desired image.
Close-up view (up to 10× magnifi cation) allows checking
of image details.
1 Turn the zoom lever.
12:30’12/ 02/2 6’12 /02/26 12:30
4/304/30
12:30 ’12 /02/ 26’12/02 /26 12 :30
4/304/30
W T
W
T
’12/02 /26 12 :30
Index view
Single-image view Close-up view
T
T
T
TTo select an image in index view
o select an image in index view
o select an image in index view
o select an image in index viewo select an image in index viewTo select an image in index view
Use to select an image, and press the FGHI Q
button to display the selected image in single-image view.
T
T
T
TTo scroll an image in close-up view
o scroll an image in close-up view
o scroll an image in close-up view
o scroll an image in close-up viewo scroll an image in close-up viewTo scroll an image in close-up view
Use to move the viewing area.FGHI
Changing the image information
display
Shooting information settings displayed on the screen can
be changed.
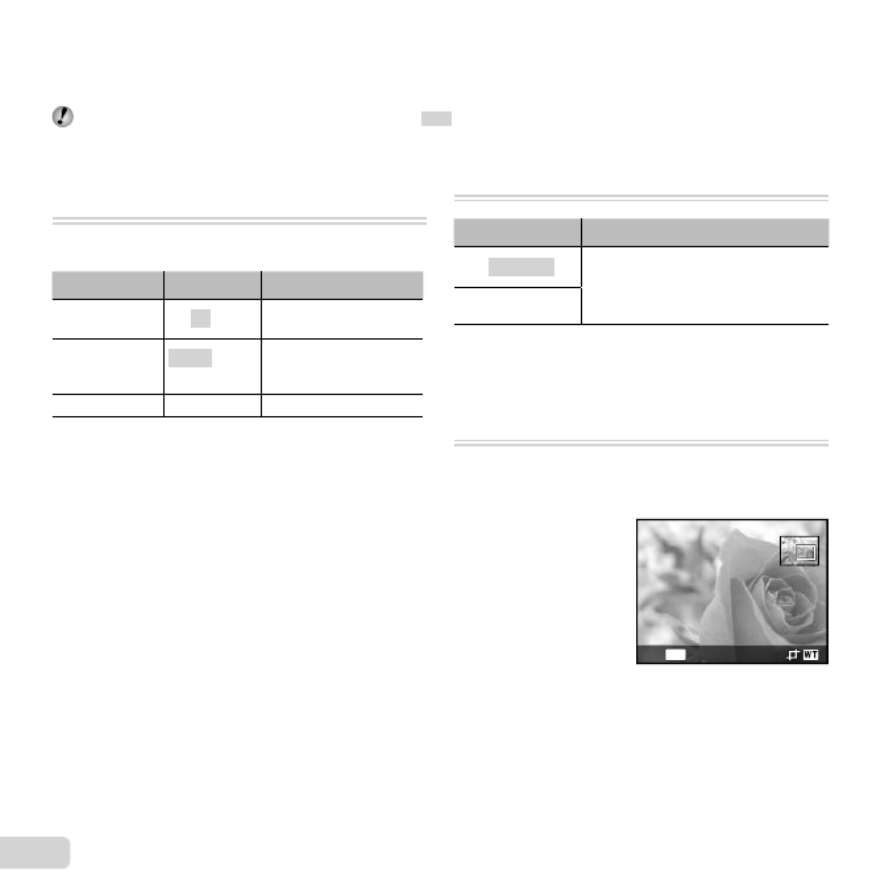
1 Press F (INFO).
●The displayed image information changes in
the order shown below each time the button is
pressed.
’12/02/ 26’12/ 02/26 12: 3012:30
4/304/30
4/304/30
16
M
2.02.0F3.0F3.01/10001/1000
100-0004100-0004
AUTO
WB
AUTO
WB
100
ISO
100
ISO
1
MAGICMAGIC
’ 12/02/26 12:30
N
ORM
10103D3D
10103D3D
Normal
Detailed
No information
23
EN
Playing back 3D images
(VR-360/D-760)
3D images shot with this camera can be played back on
3D-compatible devices connected to this camera using an
HDMI cable (sold separately).
“Shooting 3D images ( mode)” (p. 27)W
When playing back 3D images, read the warnings in
the instruction manual for the 3D-compatible devices
carefully.
1 Connect the 3D-compatible device and
camera using the HDMI cable.
For the connection and setting method, see “Using an
HDMI cable” (p. 46).
2 Use FG to select [3D Show] and then press
the button.Q
3 Use HI to select the 3D image to play back
and then press the button.Q
MENU
OK
SetSlideshow
To start a slideshow, press the button.
To stop the slideshow, press the or button.Q
3D images are composed of JPEG fi les and MPO
fi
les. If any
fi les are deleted on a computer, playback
of 3D images may not be possible.
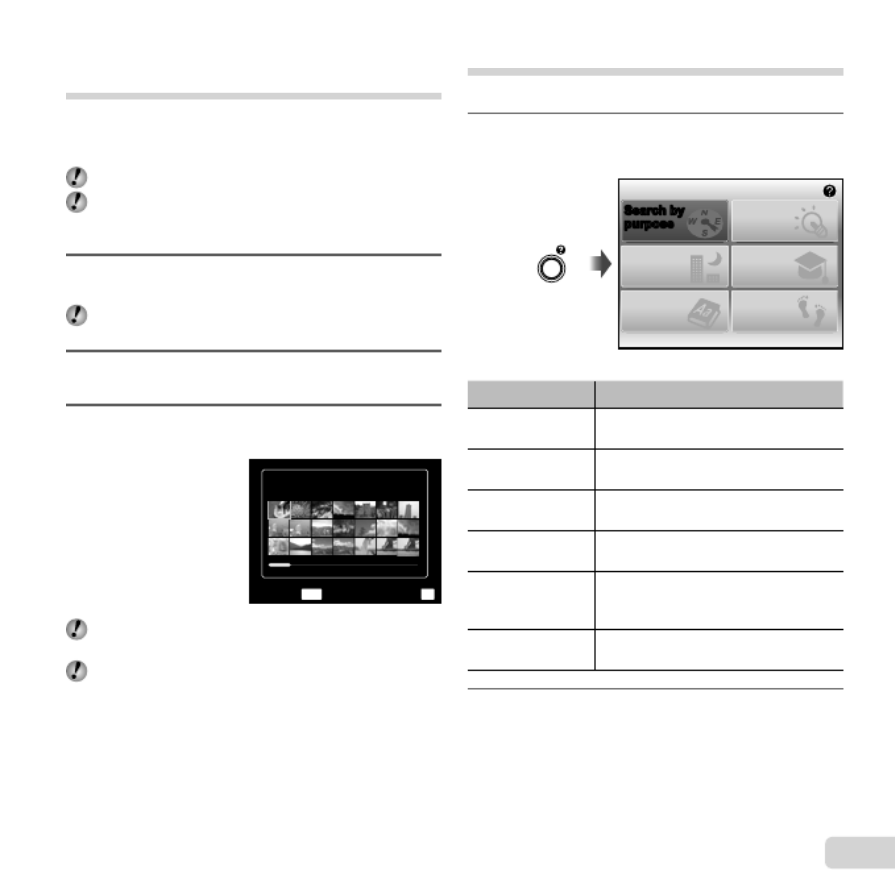
Using the camera guide
Use the camera guide to look up camera operations.
1 Press the E button in the standby mode
screen or the playback screen.
Search for a
solution
Learn about the
camera
History
Search by
situation
Search by
keyword
Search by
purpose
Search by
purpose
Exit
Submenu 2 Application
Search by
purpose
Functions or operating methods can
be searched.
Search for a
solution
A solution can be searched when
having problems during operation.
Search by
situation
Search from shooting/playback
scene.
Search by
keyword Search by the camera keyword.
Learn about the
camera
Information is shown about
recommended functions and basic
operating methods for the camera.
History Searches can be performed from the
search history.
2 Use FGHI to select the desired item.
●Follow the on-screen instructions to search the
desired contents.

25
EN
3 Use HI to select the retouching setting, and
press the button to set.Q
5
M
0:00:340:00:3444
N
ORM
Retouching setting
●[Set 1], [Set 2] or [Set 3] retouches the image
according to the Beauty Settings. [Beauty Settings]
(p. 49)
4 Point the camera toward the subject. Check
the frame appearing around the face detected
by the camera,and then press the shutter
button to take the picture.
The unedited image and edited image are both
saved.
If the image cannot be retouched, only the unedited
image is saved.
The [Image Size] of the retouched image is fi xed at
[ ].n
5 To save the image, select [OK] on the review
screen and press the button. To retouch Q
the image additionally, select [Beauty Fix].
OK
Beauty Fix
●Beauty Fix
1 Select a retouching item, and press the Q button.
MENU
Off
Eye Color Back
2 Press the Q button on the review screen.
●Settings for Beauty Fix can be registered.

27
EN
Shooting with special effects
(
P
mode)
Add an artistic effect to your photo by selecting the
desired magic fi lter.
1 Set the shooting mode to .P
MENUMENU
Magic Filter
0.00.0
AUTO
WB
AUTO
WB
16
M
2 Press G to go to the submenu.
MENUMENU
2 3
Pop Art
1
9
0.00.0
AUTO
WB
AUTO
WB
16
M
T
T
T
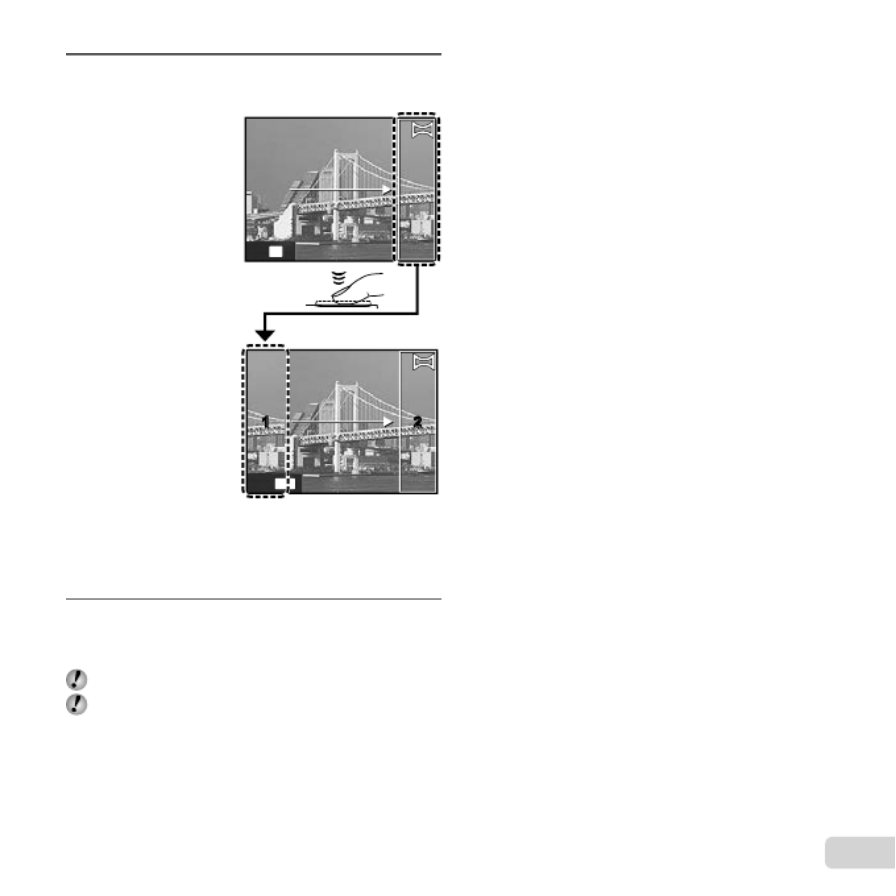
TTo shoot 3D images (
o shoot 3D images (
o shoot 3D images (
o shoot 3D images (o shoot 3D images ( To shoot 3D images (W
mode)
mode)
mode)
mode) mode) mode)
(VR-360/D-760, VR-350/D-755)
(VR-360/D-760, VR-350/D-755)
(VR-360/D-760, VR-350/D-755)
(VR-360/D-760, VR-350/D-755)(VR-360/D-760, VR-350/D-755)(VR-360/D-760, VR-350/D-755)
1 Use HI to select [Auto] or [Manual] and then press
the button to set.Q
Submenu 1 Description
Auto
The user only composes the
shots so that the target marks
and pointers overlap, and the
camera automatically releases
the shutter.
Manual
After shooting the fi rst frame,
move the camera to overlap
the subject with the image in
the screen. Then manually
release the shutter.
Depending on the subject or the situation (if the
distance between the camera and subject is too
short), the image may not look 3D.
The 3D viewing angle varies depending on the
subject, etc.
To exit 3D shooting mode without saving an image,
press the button.
The [Image Size] (p. 33) is fi xed to [ ].0
The zoom ratio is fi xed.
The focus, exposure and the white balance are fi xed
when the fi rst image is taken.
The fl
ash is
fi xed to [ Flash Off].$
Images shot in 3D mode cannot be displayed in 3D
on this camera’s screen. (VR-360/D-760 only)

28
EN
3 Use HI to select the desired effect and then
press the button to set.Q
1
0.00.0
AUTO
WB
AUTO
WB
16
M
0:00:340:00:3444
N
ORM
Icon indicating current modeP
Shooting mode Option
Magic Filter
1 Pop Art
2 Pin Hole
3 Fish Eye
4 Drawing
*1
5 Soft Focus
6 Punk
7 Sparkle
8 Watercolor
*2
9 Refl ection
*2
*1 Two images are saved, an unmodifi ed image and an
image to which the effect has been applied.
*2 VR-360/D-760 and VR-350/D-755 only
In P mode, the optimum shooting settings are
pre-programmed for each effect. For this reason,
some settings cannot be changed in some modes.
Creating panoramic images (
~
mode)
Take pictures that can be joined to form a panorama using
the supplied software.
The focus, exposure, zoom position (p. 18), and white
balance (p. 31) are locked at the fi rst frame.
The fl ash (p. 19) is fi
xed to
$ (Flash Off) mode.
1 Set the shooting mode to , and press the ~
Q button.
MENUMENU
PP
Panorama
0.00.0
AUTO
WB
AUTO
WB
16
M
2 Use FGHI to select the pan direction.
29
EN
3 Press the shutter button to take the fi rst
frame, and then compose the second shot.
1 21 2
MENU
Exit
OK
Set
Before fi rst shot
After fi rst shot
●
After the fi rst shot, the area shown in the white
frame reappears on the side of the display
opposite the pan direction. Frame subsequent
photographs so that they overlap with the
image on the monitor.
4 Repeat Step 3 until the number of desired
frames is taken, and then press the
button when fi nished.
Panorama shooting is possible for up to 10 frames.
For information on creating panoramas, see the
online help for the supplied software.

30
EN
“Using the Menu” (p. 8)
The default settings of the function are highlighted in
.
Shooting closeups (Macro shooting)
This function enables the camera to focus and shoot
subjects at close distances.
1 Select the macro option in the shooting
function menu.
PP
0.00.0
MENUMENU
AUTO
WB
AUTO
WB
AUTO
ISO
AUTO
ISO
Off
16
M
2 Use HI to select the setting option, and
press the button to set.Q
Option Description
Off Macro mode is deactivated.
Macro
This enables shooting as close as
20 cm/7.9 in.*1 (90 cm/35.4 in.*2 ) to
the subject.
Super Macro*3 This enables shooting as close as
1 cm/0.3 in. to the subject.
*1 When the zoom is at the widest (W) position.
*2 When the zoom is at the most telephoto (T) position.
*3 The zoom is automatically fi xed.
The fl ash (p. 19) and zoom (p. 18) cannot be set during
super macro shooting.
Using the self-timer
After the shutter button is pressed all the way down, the
picture is taken after a short delay.
1 Select the self-timer option in the shooting
function menu.
PP
1212
0.00.0
AUTO
WB
AUTO
WB
AUTO
ISO
AUTO
ISO
MENUMENU
22
Y Off
16
M
2 Use HI to select the setting option, and
press the button to set.Q
Option Description
Y Off The self-timer is deactivated.
Y 12 sec
The self-timer lamp turns on for
approx. 10 seconds, then blinks for
approx. 2 seconds, and then the
picture is taken.
Y 2 sec
The self-timer lamp blinks for approx.
2 seconds, and then the picture is
taken.
T
T
T
TTo cancel the self-timer after it starts
o cancel the self-timer after it starts
o cancel the self-timer after it starts
o cancel the self-timer after it startso cancel the self-timer after it startsTo cancel the self-timer after it starts
Press the button.
Using Shooting Functions
Using Shooting Functions
Using Shooting Functions
Using Shooting FunctionsUsing Shooting FunctionsUsing Shooting Functions

31
EN
Adjusting the brightness
(Exposure compensation)
The standard brightness (appropriate exposure) set by
the camera based on the shooting mode ( , , M Q
and excluded) can be adjusted brighter or darker to
obtain a desired shot.
1 Select the exposure compensation option in
the shooting function menu.
Exposure Comp.
PP
MENUMENU
AUTO
WB
AUTO
WB
AUTO
ISO
AUTO
ISO
00
± 0.0
16
M
11 2222 11
2 Use HI to select the desired brightness,
and press the button.Q
Adjusting to a natural color scheme
(White balance)
For more natural coloring, choose a white balance option
suited to the scene.
1 Select the white balance option in the
shooting function menu.
PP
0.00.0
AUTO
ISO
AUTO
ISO
MENUMENU
WB WB Auto
AUTO
WB
AUTO
WB
16
M
2 Use HI to select the setting option, and
press the button to set.Q
Option Description
WB Auto
The camera automatically adjusts
the white balance according to the
shooting scene.
5Sunny For shooting outdoors under a
clear sky.
3Cloudy For shooting outdoors under a
cloudy sky.
1Incandescent For shooting under tungsten
lighting.
>Fluorescent For shooting under white
fl uorescent lighting (offi ces, etc.).
One Touch 1 For setting the subtle shades of
color that cannot be adjusted by
Auto, Sunny, Cloudy, Incandescent,
or Fluorescent.
One Touch 2
Using the one touch white balance
Using the one touch white balance
Using the one touch white balance
Using the one touch white balanceUsing the one touch white balanceUsing the one touch white balance
1 Select the white balance option in the function menu.
2 Use HI to select [ ] or [], and face the camera
toward white paper.
●
Set the paper to fi ll the entire screen, and
make sure that there is no shadow area.
●Setting the zoom to telephoto (T) is
recommended.
●Perform this procedure under the light where
the pictures are actually taken.
3 Press the button.
●The camera releases the shutter and the white
balance is registered.
●The registered white balance is stored in
the camera. The data will not be cleared by
turning off the power.
●When the [] or [] whose white balance
has already been registered is selected in
Step , new white balance will be registered.2

32
EN
When the white area is not large enough or when the
color is too bright, too dark, or loud, the white balance
cannot be registered. Return to Step . Or, set the 2
other white balance.
Selecting the ISO sensitivity
1 Select the ISO setting option in the shooting
function menu.
1/400 F3.0
PP
0.00.0
MENUMENU
ISO Auto
1/400 F3.0
AUTO
WB
AUTO
WB
16
M
AUTO
ISO
AUTO
ISO
HIGH
ISOISO
HIGH
1600
ISOISO
1600 100
ISOISO
100
2 Use HI to select the setting option, and
press the button to set.Q
Option Description
ISO Auto
The camera automatically adjusts the
sensitivity according to the shooting
scene.
High ISO Auto
The camera uses a higher sensitivity
compared to [ISO Auto] to minimize
blur caused by a moving subject or
by camera shake.
Value The ISO sensitivity is fi xed to the
selected value.
In the ISO setting, although smaller values result in
less sensitivity, sharp images can be taken under fully
lit conditions. Larger values result in higher sensitivity,
and images can be taken at fast shutter speeds even
under low light conditions. However, high sensitivity
introduces noise into the resulting picture, which may
give it a grainy appearance.
Sequential shooting (Drive)
Pictures are taken sequentially while the shutter button
is held down.
1 Select the drive option in the shooting
function menu.
PP
0.00.0
MENUMENU
AUTO
WB
AUTO
WB
AUTO
ISO
AUTO
ISO
22
Single
16
M
Option Description
oSingle One frame is shot each time the
shutter button is pressed.
j*1 Sequential
Take sequential shots using the
focus, brightness (exposure) and
white balance set in the fi rst frame.
cHigh-
Speed1
The camera takes sequential shots
at a faster speed than in [ ].j
dHigh-
Speed2
The camera takes sequential shots
at a faster speed than in [ ].c
*1 The shooting speed varies depending on the settings
for [Image Size/Compression] (p. 33/p. 34).

34
EN
Menus for Shooting Functions
Menus for Shooting Functions
Menus for Shooting Functions
Menus for Shooting FunctionsMenus for Shooting Functions Menus for Shooting Functions
The default settings of the function are highlighted in .
For information on using the menus, see “Using the Menu” (p. 8).
Restoring the shooting functions to the default settings [Reset]
Restoring the shooting functions to the default settings [Reset]
Restoring the shooting functions to the default settings [Reset]
Restoring the shooting functions to the default settings [Reset]Restoring the shooting functions to the default settings [Reset]Restoring the shooting functions to the default settings [Reset]
K (Camera Menu 1) Reset
Submenu 2 Application
Yes
Restores the following menu functions to the default settings.
• Shooting mode (p. 24)
• Flash (p. 19)
• Macro (p. 30)
• Self-timer (p. 30)
• Exposure compensation (p. 31)
• White balance (p. 31)
• ISO (p. 32)
• Drive (p. 32)
• Image size (still images) (p. 33)
• Menu functions in z
(Shooting menu)/ A
(Movie menu) (p. 34 to 37)
No The current settings will not be changed.
Selecting the compression for still
Selecting the compression for still
Selecting the compression for still
Selecting the compression for still Selecting the compression for still Selecting the compression for still
images [Compression]
images [Compression]
images [Compression]
images [Compression]images [Compression]images [Compression]
K (Camera Menu 1) Compression
Submenu 2 Application
Fine Shooting at high quality.
Normal Shooting at normal quality.
“Number of storable pictures (still images)/Recording
length (movies) in the internal memory and cards”
(p. 62)
Selecting the image quality for movies
Selecting the image quality for movies
Selecting the image quality for movies
Selecting the image quality for movies Selecting the image quality for movies Selecting the image quality for movies
[Image Size/Frame Rate]
[Image Size/Frame Rate]
[Image Size/Frame Rate]
[Image Size/Frame Rate][Image Size/Frame Rate][Image Size/Frame Rate]
A
(Movie menu)
Image Size/Frame Rate
Submenu 1 Submenu 2 Application
Image Size
720P (1280×720)/
VGA (640×480)/
QVGA (320×240)
Select the image
quality based on
the image size and
frame rate. Higher
frame rates provide
smoother movie
images.
Frame Rate 30fps*1/
15fps*1
*1 frames per second
“Number of storable pictures (still images)/Recording
length (movies) in the internal memory and cards”
(p. 63)

35
EN
Reducing the blur caused by thecamera
Reducing the blur caused by thecamera
Reducing the blur caused by thecamera
Reducing the blur caused by thecamera Reducing the blur caused by thecamera Reducing the blur caused by thecamera
shake when shooting
shake when shooting
shake when shooting
shake when shooting shake when shooting shake when shooting
[Image Stabilizer] (still images)/
[Image Stabilizer] (still images)/
[Image Stabilizer] (still images)/
[Image Stabilizer] (still images)/[Image Stabilizer] (still images)/[Image Stabilizer] (still images)/
[IS Movie Mode] (movies)
[IS Movie Mode] (movies)
[IS Movie Mode] (movies)
[IS Movie Mode] (movies)[IS Movie Mode] (movies)[IS Movie Mode] (movies)
K
(Camera Menu 1) Image Stabilizer
(still images)/
A
(Movie menu)
IS Movie Mode (movies)
Submenu 2 Application
Off
The image stabilizer is deactivated.
This is recommended for shooting
when the camera is fi xed in place on
a tripod or other stable surface.
On The image stabilizer is activated.
The camera’s default settings are [Image Stabilizer]
(still images) to [On] and [IS Movie Mode] (movies) to
[Off].
There may be a noise coming from inside the camera
when the shutter button is pressed with [Image
Stabilizer] (still images) set to [On].
Images may not be stabilized if camera shake is too
severe.
When the shutter speed is extremely slow, such as
when taking pictures at night, [Image Stabilizer] (still
images) may not be as effective.
When shooting while the [IS Movie Mode] (movies)
is set to [On], the image will be enlarged somewhat
before saving.
Selecting the focusing area [AF Mode]
Selecting the focusing area [AF Mode]
Selecting the focusing area [AF Mode]
Selecting the focusing area [AF Mode]Selecting the focusing area [AF Mode] Selecting the focusing area [AF Mode]
K (Camera Menu 1) AF Mode
Submenu 2 Application
Face/iESP
The camera focuses automatically.
(If a face is detected, it is shown by
a white frame*1; when the shutter
button is pressed halfway and the
camera is able to focus, the frame
color is changed to green
*2 if the
camera is able to focus. If no face
is detected, the camera chooses a
subject in the frame and focuses
automatically.)
Spot The camera focuses on the subject
located within the AF target mark.
AF Tracking
The camera tracks the subject
movement automatically to focus on
it continuously.
*1 For some subjects, the frame may not appear or may
take some time to appear.
*2 If the frame blinks in red, the camera is unable to focus.
Try again to press the shutter button halfway.
T
T
T
TTo focus on a moving subject
o focus on a moving subject
o focus on a moving subject
o focus on a moving subject o focus on a moving subject To focus on a moving subject
continuously (AF T
continuously (AF T
continuously (AF T
continuously (AF Tcontinuously (AF Tracking)
racking)
racking)
racking)racking)continuously (AF Tracking)
1 Hold the camera to align the AF target mark on the
subject and press the button.Q
2 When the camera recognizes the subject, the AF
target mark automatically tracks the subject movement
to focus on it continuously.
3 To cancel the tracking, press the button.Q
Depending on the subjects or the shooting conditions,
the camera may be unable to lock the focus or fail to
track the subject movement.
When the camera fails to track the subject movement,
the AF target mark changes to red.
36
EN
Shooting at higher magni
Shooting at higher magni
Shooting at higher magni
Shooting at higher magniShooting at higher magnifi
fi
fi
fifi
cations than
cations than
cations than
cations than cations than Shooting at higher magnifi cations than
optical zoom [Digital Zoom]
optical zoom [Digital Zoom]
optical zoom [Digital Zoom]
optical zoom [Digital Zoom]optical zoom [Digital Zoom]optical zoom [Digital Zoom]
K (Camera Menu 1) Digital Zoom
Submenu 2 Application
Off Disable digital zoom.
On Enable digital zoom.
[Digital Zoom] is not available when [ Super %
Macro] (p. 30) is selected.
The option selected for [Digital Zoom] affects the
appearance of the zoom bar.
“To take larger images [Digital Zoom]” (p. 18)
Recording sound when shooting
Recording sound when shooting
Recording sound when shooting
Recording sound when shooting Recording sound when shooting Recording sound when shooting
movies [
movies [
movies [
movies [movies [movies [R
R
R
RRR]
]
]
]]]
A (Movie menu) R
Submenu 2 Application
Off No sound is recorded.
On Sound is recorded.
Using the
Using the
Using the
Using the Using the AF illuminator to focus on a
AF illuminator to focus on a
AF illuminator to focus on a
AF illuminator to focus on a AF illuminator to focus on a Using the AF illuminator to focus on a
shadowed subject [AF Illuminat.]
shadowed subject [AF Illuminat.]
shadowed subject [AF Illuminat.]
shadowed subject [AF Illuminat.]shadowed subject [AF Illuminat.]shadowed subject [AF Illuminat.]
K (Camera Menu 1) AF Illuminat.
Submenu 2 Application
Off The AF illuminator is not used.
On
When the shutter button is pressed
halfway down, the AF illuminator
turns on to aid focusing.
AF illuminator

37
EN
Displaying icon guides [Icon Guide]
Displaying icon guides [Icon Guide]
Displaying icon guides [Icon Guide]
Displaying icon guides [Icon Guide]Displaying icon guides [Icon Guide]Displaying icon guides [Icon Guide]
K (Camera Menu 1) Icon Guide
Submenu 2 Application
Off No icon guide is displayed.
On
The explanation of the selected icon
will be displayed when a shooting
mode or shooting function menu
icon is selected (position the cursor
on the icon for a while to display the
explanation).
Icon guide
PP
0.00.0
AUTO
WB
AUTO
WB
AUTO
ISO
AUTO
ISO
MENUMENU
Program Auto
Functions can be
changed manually.
16
M
Imprinting the date of recording
Imprinting the date of recording
Imprinting the date of recording
Imprinting the date of recording Imprinting the date of recording Imprinting the date of recording
[Date Stamp]
[Date Stamp]
[Date Stamp]
[Date Stamp][Date Stamp][Date Stamp]
K (Camera Menu 2) Date Stamp
Submenu 2 Application
Off Do not imprint the date.
On Stamp new photographs with the
date of recording.
[Date Stamp] is not available if the clock has not been
set. “Language, date, time, and time zone” (p. 15)
The date stamp can not be deleted.
[Date Stamp] is not available in or 3D mode or ~
during sequential shooting.
38
EN
Menus for Playbac
Menus for Playbac
Menus for Playbac
Menus for PlaybacMenus for Playback, Editing, and Printing Functions
k, Editing, and Printing Functions
k, Editing, and Printing Functions
k, Editing, and Printing Functionsk, Editing, and Printing Functions Menus for Playback, Editing, and Printing Functions
The default settings of the function are highlighted in .
Playing back pictures automatically
Playing back pictures automatically
Playing back pictures automatically
Playing back pictures automatically Playing back pictures automatically Playing back pictures automatically
[Slideshow]
[Slideshow]
[Slideshow]
[Slideshow][Slideshow][Slideshow]
q (Playback menu) Slideshow
T
T
T
TTo start a slideshow
o start a slideshow
o start a slideshow
o start a slideshowo start a slideshowTo start a slideshow
Submenu 2 Submenu 3 Application
BGM Off/On Selects the background
music options.
Type
Normal/Fader/
Zoom
Selects the type of
transition effect used
between slides.
Start ―Starts the slideshow.
1 Select the desired [BGM] and [Type].
2 Select [Start] and press the button.Q
Single-frame advance/rewind
Single-frame advance/rewind
Single-frame advance/rewind
Single-frame advance/rewindSingle-frame advance/rewindSingle-frame advance/rewind
During a slideshow, press to skip ahead one frame or I
press to go back one frame.H
T
T
T
TTo stop the slideshow
o stop the slideshow
o stop the slideshow
o stop the slideshowo stop the slideshowTo stop the slideshow
Press the button or the button.Q
Changing the image size [
Changing the image size [
Changing the image size [
Changing the image size [Changing the image size [Changing the image size [Q
Q
Q
QQQ]
]
]
]]]
q Q (Playback menu) Edit
Submenu 2 Application
7 640 × 480 This saves a high-resolution image
as a separate image with a smaller
size for use in e-mail attachments
and other applications.
320 × 240
1 Use HI to select an image.
2 Use FG to select the size, and press the button.Q
Cropping images [
Cropping images [
Cropping images [
Cropping images [Cropping images [Cropping images [P
P
P
PPP]
]
]
]]]
q P (Playback menu) Edit
1 Use HI to select an image, and press the button.Q
2 Use the zoom lever to choose the crop size and
FGHI to move the crop position.
MENU
Back
3 Press the Q button.
●The edited image will be saved as a separate image.

39
EN
Adding sound to still images [
Adding sound to still images [
Adding sound to still images [
Adding sound to still images [Adding sound to still images [ Adding sound to still images [R
R
R
RRR]
]
]
]]]
q (Playback menu) Edit R
1 Use HI to select an image.
2 Aim the microphone toward the sound source.
Microphone
3 Press the Q button.
●Recording starts.
●The camera adds (records) sound for approx.
4 seconds while playing back the image.
Retouching faces on still images
Retouching faces on still images
Retouching faces on still images
Retouching faces on still images Retouching faces on still images Retouching faces on still images
[Beauty Fix]
[Beauty Fix]
[Beauty Fix]
[Beauty Fix][Beauty Fix][Beauty Fix]
q (Playback menu) Edit Beauty Fix
Depending on the picture, the editing may not be
effective.
1 Use HI to select an image, and press the button.Q
2 Use FG to select a retouching item, and press the
Q button.
3 Select [OK] or [Beauty Fix] on the review screen, and
press the button to save or retouch the image Q
additionally.
●The retouched image is saved as a separate image.
OK
Beauty Fix
The [Image Size] of the retouched image is fi xed at
[ ].n
Beauty Fix
Beauty Fix
Beauty Fix
Beauty FixBeauty FixBeauty Fix
1 Select a retouching item, and press the button.Q
MENU
Off
Eye Color Back
2 Press the Q button on the review screen.
Brightening areas that are dark due
Brightening areas that are dark due
Brightening areas that are dark due
Brightening areas that are dark due Brightening areas that are dark due Brightening areas that are dark due
to backlight, insuf
to backlight, insuf
to backlight, insuf
to backlight, insufto backlight, insuffi
fi
fi
fifi
cient light or other
cient light or other
cient light or other
cient light or other cient light or other to backlight, insuffi cient light or other
reasons [Lighting Fix]
reasons [Lighting Fix]
reasons [Lighting Fix]
reasons [Lighting Fix]reasons [Lighting Fix]reasons [Lighting Fix]
q (Playback menu) Edit Lighting Fix
Depending on the picture, the editing may not be
effective.
The retouching process may lower the image
resolution.
1 Use HI to select an image, and press the button.A
●The edited image is saved as a separate image.
40
EN
Retouching red eyes in
Retouching red eyes in
Retouching red eyes in
Retouching red eyes in Retouching red eyes in fl
fl
fl
flfl
ash shooting
ash shooting
ash shooting
ash shooting ash shooting Retouching red eyes in fl ash shooting
[Redeye Fix]
[Redeye Fix]
[Redeye Fix]
[Redeye Fix][Redeye Fix][Redeye Fix]
q (Playback menu) Edit Redeye Fix
Depending on the picture, the editing may not be
effective.
The retouching process may lower the image
resolution.
1 Use HI to select an image, and press the button.A
●The edited image is saved as a separate image.
Erasing images [Erase]
Erasing images [Erase]
Erasing images [Erase]
Erasing images [Erase]Erasing images [Erase] Erasing images [Erase]
q (Playback menu) Erase
Submenu 1 Application
All Erase All images in the internal memory or
card will be erased.
Sel. Image Images are individually selected and
erased.
Erase Deletes the image displayed.
When erasing pictures in a internal memory, do not
insert the card into the camera.
T
T
T
TTo erase all images [All Erase]
o erase all images [All Erase]
o erase all images [All Erase]
o erase all images [All Erase]o erase all images [All Erase] To erase all images [All Erase]
1 Use FG to select [All Erase], and press the
Q button.
2 Use FG to select [Yes], and press the button.Q
T
T
T
TTo individually select and erase images
o individually select and erase images
o individually select and erase images
o individually select and erase images o individually select and erase images To individually select and erase images
[Sel. Image]
[Sel. Image]
[Sel. Image]
[Sel. Image][Sel. Image][Sel. Image]
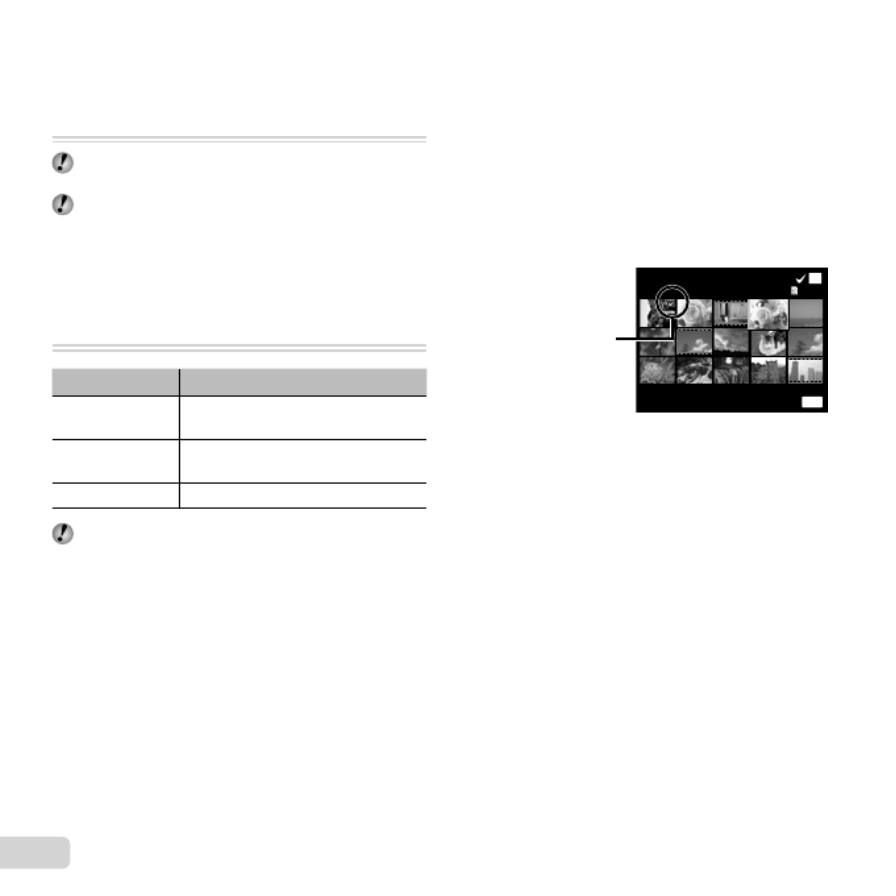
1 Use FG to select [Sel. Image], and press the
Q button.
2 Use HI to select the image to be erased, and press
the button to add a mark to the image.QR
●Turn the zoom lever to the W end to display an index
view. Images can be quickly selected using the
FGHI
buttons. Turn to the T end to return to the
single frame display.
Sel. Image
Erase/Cancel
OK
MENU
(1)
4/30
R mark
3 Repeat Step 2 to select the images to be erased,
and then press the button to erase the selected
images.
4 Use FG to select [Yes], and press the button.Q
●The images with a mark are erased.R

43
EN
Selecting a method for connecting the
Selecting a method for connecting the
Selecting a method for connecting the
Selecting a method for connecting the Selecting a method for connecting the Selecting a method for connecting the
camera to other devices
camera to other devices
camera to other devices
camera to other devices camera to other devices camera to other devices
[USB Connection]
[USB Connection]
[USB Connection]
[USB Connection][USB Connection][USB Connection]
d (Settings Menu 1) USB Connection
Submenu 2 Application
Auto
When the camera is connected to
another device, the settings selection
screen is displayed.
Storage
Select when transferring images to a
computer or when using the supplied
software with the camera connected
to a computer.
MTP
Select when transferring images to
a computer running Windows Vista
or Windows 7 without using the
supplied software.
Print Select when connecting to a
PictBridge-compatible printer.
System requirements
System requirements
System requirements
System requirementsSystem requirementsSystem requirements
Windows Windows XP (Service Pack 1 or later) /
Windows Vista / Windows 7
Macintosh Mac OS X v10.3 or later
Even if a computer has USB ports, proper operation
is not guaranteed in the following cases.
●computers with USB ports installed using an
expansion card, etc.
●computers without a factory-installed OS and
home-built computers
T
T
T
TTurning on the camera with the
urning on the camera with the
urning on the camera with the
urning on the camera with the urning on the camera with the Turning on the camera with the q
q
q
qqq
button [
button [
button [
button [button [button [q
q
q
qqq Power On]
Power On]
Power On]
Power On] Power On] Power On]
d (Settings Menu 1) Power Onq
Submenu 2 Application
No
The camera is not turned on. To turn
on the camera, press the n
button.
Yes Press and hold the button to turn q
the camera on in the playback mode.
Saving the mode when the camera is
Saving the mode when the camera is
Saving the mode when the camera is
Saving the mode when the camera is Saving the mode when the camera is Saving the mode when the camera is
turned off [Keep
turned off [Keep
turned off [Keep
turned off [Keep turned off [Keep turned off [Keep
K
K
K
KKK Settings]
Settings]
Settings]
Settings] Settings] Settings]
d (Settings Menu 1) Keep K Settings
Submenu 2 Application
Yes
The shooting mode is saved when
the camera is turned off and is
reactivated the next time the camera
is turned on.
No The shooting mode is set to mode P
when the camera is turned on.

44
EN
Selecting the camera sound and its
Selecting the camera sound and its
Selecting the camera sound and its
Selecting the camera sound and its Selecting the camera sound and its Selecting the camera sound and its
volume [Sound Settings]
volume [Sound Settings]
volume [Sound Settings]
volume [Sound Settings] volume [Sound Settings] volume [Sound Settings]
d (Settings Menu 1) Sound Settings
Submenu 2 Submenu 3 Application
Sound Type 1/2/3
Choose the sound
made by camera
controls.
Volume
OFF (No Sound)
or 5 levels of
volume
Choose the volume
of the sound
made by camera
controls.
q Volume
OFF (No Sound)
or 5 levels of
volume
Adjusts the image
playback volume.
Adjusting the CCD and the image
Adjusting the CCD and the image
Adjusting the CCD and the image
Adjusting the CCD and the image Adjusting the CCD and the image Adjusting the CCD and the image
processing function [Pixel Mapping]
processing function [Pixel Mapping]
processing function [Pixel Mapping]
processing function [Pixel Mapping]processing function [Pixel Mapping]processing function [Pixel Mapping]
d (Settings Menu 2) Pixel Mapping
This function has already been adjusted at factory
shipping, and no adjustment is needed right
after purchase. Approximately once a year is
recommended.
For best results, wait at least one minute after taking
or viewing pictures before performing pixel mapping.
If the camera is turned off during pixel mapping, be
sure to perform it again.
T
T
T
TTo adjust the CCD and the image
o adjust the CCD and the image
o adjust the CCD and the image
o adjust the CCD and the image o adjust the CCD and the image To adjust the CCD and the image
processing function
processing function
processing function
processing functionprocessing functionprocessing function
Press the button when [Start] (Submenu 2) is Q
displayed.
●The camera checks and adjusts the CCD and the
image processing function at the same time.
Adjusting the brightness of the monitor
Adjusting the brightness of the monitor
Adjusting the brightness of the monitor
Adjusting the brightness of the monitor Adjusting the brightness of the monitor Adjusting the brightness of the monitor
[
[
[
[[[s
s
s
sss]
]
]
]]]
d (Settings Menu 2) s
Submenu 2 Application
Bright/Normal
Selects the monitor brightness
depending on the surrounding
brightness.

45
EN
Viewing images on a TV [TV Out] (VR-360/D-760)
Viewing images on a TV [TV Out] (VR-360/D-760)
Viewing images on a TV [TV Out] (VR-360/D-760)
Viewing images on a TV [TV Out] (VR-360/D-760)Viewing images on a TV [TV Out] (VR-360/D-760)Viewing images on a TV [TV Out] (VR-360/D-760)
d (Settings Menu 2) TV Out
Submenu 2 Submenu 3 Application
NTSC/PAL
NTSC Choose when connecting the camera to TVs in countries or regions
where NTSC is used (e.g., North America, Taiwan, Korea, and Japan).
PAL Choose when connecting the camera to TVs in countries or regions
where PAL is used (e.g., Europe and China).
HDMI Out 480p/576p/720p/1080i Choose an HDMI output format.
HDMI Control
Off Playback operations are performed using camera controls.
On Playback operations are performed using the TV remote control.
Camera factory defaults vary with the country or region of sale.
Viewing images on a TV
Viewing images on a TV
Viewing images on a TV
Viewing images on a TVViewing images on a TVViewing images on a TV
Using an AV cable
1 Match the camera video signal format ([NTSC]/[PAL]) to that used by the TV.
2 Connect the camera to the TV.
Connect to the TV video
input jack (yellow) and
audio input jack (white).
AV cable (supplied)
Multi-connector

46
EN
Using an HDMI cable
1 Match the camera digital signal format ([480p/576p]/[720p]/[1080i]) to that used by the TV.
2 Connect the camera to the TV.
3 Turn the TV on and select the HDMI input to which the camera is connected.
4 Turn the camera on and use to view images.FGHI
Different countries and regions use different video signal standards. Before connecting the camera, choose a video
signal standard that matches that used by the TV.
Do not connect the HDMI cable when the camera is connected to a computer or other device using the USB cable.
Connect to the HDMI
connector on the TV.
HDMI mini connector
HDMI cable
Connector cover
See the instruction manual provided with your TV for more information.
When the camera and TV are connected by both an AV cable and an HDMI cable, the HDMI cable will take priority.
Images and other information may be cropped for display on the TV.
Using a remote control
Using a remote control
Using a remote control
Using a remote controlUsing a remote controlUsing a remote control
1 Select [On] for [HDMI Control] and turn the camera off.
2 Connect the camera to the TV using an HDMI cable. “Using an HDMI cable” (p. 46)
3 First turn on the TV, and then turn on the camera.
●Follow the on-screen guide displayed by the TV to operate the camera.
With some TVs, operations cannot be performed with the TV remote control even though the operation guide is
displayed on the screen.
If operations cannot be performed with the TV remote control, set [HDMI Control] to [Off] and use the controls on the
camera.
Produkt Specifikationer
| Mærke: | Olympus |
| Kategori: | Kamera |
| Model: | VR-340 Smart |
Har du brug for hjælp?
Hvis du har brug for hjælp til Olympus VR-340 Smart stil et spørgsmål nedenfor, og andre brugere vil svare dig
Kamera Olympus Manualer

30 December 2025
19 August 2024
10 August 2024
7 August 2024
6 August 2024
5 August 2024
4 August 2024
3 August 2024
30 Juli 2024
29 Juli 2024
Kamera Manualer
- Kamera Bosch
- Kamera SilverCrest
- Kamera Acer
- Kamera Ozito
- Kamera Denver
- Kamera Sony
- Kamera Canon
- Kamera Samsung
- Kamera GE
- Kamera Panasonic
- Kamera TP-Link
- Kamera Philips
- Kamera Lenco
- Kamera Gigaset
- Kamera Braun
- Kamera Logitech
- Kamera Epson
- Kamera Daewoo
- Kamera Technaxx
- Kamera HP
- Kamera Sanyo
- Kamera Easypix
- Kamera Grundig
- Kamera D-Link
- Kamera Arlo
- Kamera Bushnell
- Kamera Pyle
- Kamera Fujifilm
- Kamera Nikon
- Kamera Kodak
- Kamera Lenovo
- Kamera Nedis
- Kamera Zorki
- Kamera Optoma
- Kamera Creative
- Kamera Azden
- Kamera Casio
- Kamera Trevi
- Kamera Trust
- Kamera Laserliner
- Kamera Blaupunkt
- Kamera JVC
- Kamera Leica
- Kamera Hitachi
- Kamera Medion
- Kamera Exakta
- Kamera EZVIZ
- Kamera König
- Kamera Gembird
- Kamera Powerfix
- Kamera Alpine
- Kamera Netgear
- Kamera Maginon
- Kamera Avaya
- Kamera Nest
- Kamera Vtech
- Kamera BenQ
- Kamera Bresser
- Kamera Anker
- Kamera Sigma
- Kamera Pentax
- Kamera Rollei
- Kamera Xiaomi
- Kamera Moultrie
- Kamera Viewsonic
- Kamera Imou
- Kamera Polaroid
- Kamera Ricoh
- Kamera Aida
- Kamera Konica-Minolta
- Kamera Foscam
- Kamera Kyocera
- Kamera GoPro
- Kamera Lorex
- Kamera Cobra
- Kamera Velleman
- Kamera FLIR
- Kamera Swann
- Kamera Eufy
- Kamera Celestron
- Kamera Ring
- Kamera Fluke
- Kamera Hikvision
- Kamera AVerMedia
- Kamera Reolink
- Kamera EVE
- Kamera Prixton
- Kamera Marshall Electronics
- Kamera General Electric
- Kamera SPC
- Kamera Hanwha
- Kamera ARRI
- Kamera BirdDog
- Kamera Bauhn
- Kamera MuxLab
- Kamera Spypoint
- Kamera Vivitar
- Kamera Ansco
- Kamera Vimar
- Kamera Oregon Scientific
- Kamera Dahua Technology
- Kamera SereneLife
- Kamera Lexibook
- Kamera Intel
- Kamera SJCAM
- Kamera Scosche
- Kamera Speco Technologies
- Kamera Joy-It
- Kamera Kogan
- Kamera Levenhuk
- Kamera Emerson
- Kamera Minox
- Kamera Burris
- Kamera Silvergear
- Kamera Elmo
- Kamera AViPAS
- Kamera UniView
- Kamera AquaTech
- Kamera Alfatron
- Kamera BZBGear
- Kamera PTZ Optics
- Kamera Daitsu
- Kamera Agfa
- Kamera AgfaPhoto
- Kamera Argus
- Kamera Lumens
- Kamera Yashica
- Kamera Sygonix
- Kamera Mamiya
- Kamera Zenit
- Kamera Fuji
- Kamera Minolta
- Kamera EverFocus
- Kamera RunCam
- Kamera SeaLife
- Kamera Aplic
- Kamera FIMI
- Kamera Meade
- Kamera Contax
- Kamera Sinji
- Kamera Traveler
- Kamera Digital Watchdog
- Kamera Getac
- Kamera Ikegami
- Kamera Pelco
- Kamera ZeissIkon
- Kamera Dorr
- Kamera HOLGA
- Kamera Praktica
- Kamera Hasselblad
- Kamera Moto Mods (Motorola)
- Kamera Fantasea Line
- Kamera Brinno
- Kamera Z CAM
- Kamera General
- Kamera Ergoguys
- Kamera Strex
- Kamera Berger & Schröter
- Kamera Leitz Focomat IIc
- Kamera Cosina
- Kamera Videology
- Kamera InfiRay
- Kamera Videotec
- Kamera GoXtreme
- Kamera IOptron
- Kamera Cambo
- Kamera Kobian
- Kamera Kyocera Yashica
- Kamera Red Digital Cinema
- Kamera Konica
- Kamera Akaso
- Kamera Seek Thermal
- Kamera Ikelite
- Kamera Adeunis
- Kamera Hoppstar
- Kamera PatrolEyes
- Kamera Camouflage
- Kamera HuddleCamHD
- Kamera Linhof
- Kamera Aquapix
- Kamera KanDao
Nyeste Kamera Manualer

29 Marts 2025
29 Marts 2025
27 Marts 2025
12 Marts 2025
12 Marts 2025

14 Januar 2025

13 Januar 2025
12 Januar 2025
11 Januar 2025
11 Januar 2025