Panasonic KX-TGF353A2 Manual
Læs nedenfor 📖 manual på dansk for Panasonic KX-TGF353A2 (64 sider) i kategorien Telefon. Denne guide var nyttig for 30 personer og blev bedømt med 4.5 stjerner i gennemsnit af 2 brugere
Side 1/64

Operating Instructions
Corded/Cordless Telephone with Digital Answering Machine
Model No. KX-TGF353
Before initial use, see “Getting Started” on
page 9.
Thank you for purchasing a Panasonic product.
Please read these operating instructions before using the unit and save them for future
reference.
Consulte “Guía Rápida Española”, página 56.
For assistance, visit our Web site: http://shop.panasonic.com/support for customers in the
U.S.A.
Please register your product: http://shop.panasonic.com/support
TGF353_HSN_(en)_0803_ver011.pdf 1 2017/08/03 10:47:38

Introduction
Accessory information ........................................3
Graphical symbols for use on equipment and their
descriptions .........................................................5
Important Information
For your safety ....................................................6
Important safety instructions ...............................7
For best performance .........................................7
Other information ................................................7
Specifications ......................................................8
Getting Started
Setting up ............................................................9
Controls 12............................................................
Display icons .....................................................13
Language settings 13............................................
Date and time 14...................................................
Recording your greeting message 14....................
Other settings 14...................................................
Making/Answering Calls
Making calls 15......................................................
Answering calls 16.................................................
Useful features during a call 16.............................
Intercom
Intercom 19............................................................
Call Block
Using the button 20M NCALL BLOCK ....................
Storing unwanted callers 20..................................
Phonebook
Phonebook ........................................................23
Speed dial 25.........................................................
One-touch dial buttons ......................................26
Programming
Menu list 28...........................................................
Alarm 33................................................................
Silent mode 34.......................................................
Baby monitor .....................................................34
Other programming ...........................................36
Registering a unit 37..............................................
Caller ID Service
Using Caller ID service 38.....................................
Caller list 38...........................................................
Answering System
Answering system .............................................40
Turning the answering system on/off 40................
Greeting message 40............................................
Listening to messages 41......................................
Advanced new message alerting features 42........
Remote operation 44.............................................
Answering system settings 45...............................
Useful Information
Voicemail service 46..............................................
Wall mounting 47...................................................
Error messages 49................................................
Troubleshooting 49................................................
FCC and other information 54...............................
Guía Rápida Española
Guía Rápida Española ......................................56
Appendix
Customer services 60............................................
Limited Warranty (ONLY FOR U.S.A.) 61.............
Index
Index 63..................................................................
2
Table of Contents
TGF353_HSN_(en)_0803_ver011.pdf 2 2017/08/03 10:47:39

Accessory information
Supplied accessories
No. Accessory item/Part number Quantity
AAC adaptor/PNLV226-0X 1
BTelephone line cord/PNJA1193Z 1
CDesk stand/Wall mounting adaptor
*1/PNKL1051Z2 1
DCorded handset*2 1
ECorded handset cord/PNJA1107Z 1
FRechargeable batteries
*3 6
GHandset cover*4/PNYNTGFA21RR 3
HBelt clip/PNKE1268Z3 3
ICharger*5 3
*1 The desk stand/wall mounting adaptor comes attached to the base unit.
*2 PNLXP1012Y (Champagne gold), PNLXP1014Y (Rose gold)
*3 See page 3 for replacement battery information.
*4 The handset cover comes attached to the handset.
*5 PNLC1040ZN4 (Champagne gold), PNLC1040ZG4 (Rose gold)
A B C D E
F G H I
Additional/replacement accessories
Please contact your nearest Panasonic dealer for sales information (page 60).
Accessory item Model number/Specifications
Rechargeable batteries HHR-4DPA*1
RTo order, please visit http://shop.panasonic.com/support
Battery type:
– Nickel metal hydride (Ni-MH)
– 2 x AAA (R03) size for each handset
Headset KX-TCA93, KX-TCA430
Range extender KX-TGA405*2
Key detector KX-TGA20*3
*1 Replacement batteries may have a different capacity from that of the supplied batteries.
For assistance, please visit http://shop.panasonic.com/support 3
Introduction
TGF353_HSN_(en)_0803_ver011.pdf 3 2017/08/03 10:47:39
*2 By installing this unit, you can extend the range of your phone system to include areas where
reception was previously not available. This product can be purchased online. Please visit our Web
site: http://shop.panasonic.com/support
*3 By registering the key detector (4 max.) to a Panasonic Digital Cordless Phone and attaching it to an
easy-to-lose item in advance, you can locate and find the mislaid item to which the key detector is
attached. Please visit our Web site: http://www.panasonic.com/tga20
Other information
RDesign and specifications are subject to change without notice.
RThe illustrations in these instructions may vary slightly from the actual product.
Expanding your phone system
Handset (optional): KX-TGFA30
You can expand your phone system by registering optional
handsets (6 max.) to a single base unit.
ROptional handsets may be a different color from that of
the supplied handsets.
4For assistance, please visit http://shop.panasonic.com/support
Introduction
TGF353_HSN_(en)_0803_ver011.pdf 4 2017/08/03 10:47:39

Graphical symbols for use on equipment and their
descriptions
Symbol Explanation Symbol Explanation
Alternating current
(A.C.)
Class P equipment
(equipment in which
protection against
electric shock relies on
Double Insulation or
Reinforced Insulation)
Direct current (D.C.) “ON” (power)
Protective earth “OFF” (power)
Protective bonding earth Stand-by (power)
Functional earth “ON”/“OFF” (power;
push-push)
For indoor use only Caution, risk of electric
shock
For assistance, please visit http://shop.panasonic.com/support 5
Introduction
TGF353_HSN_(en)_0803_ver011.pdf 5 2017/08/03 10:47:39
For your safety
To prevent severe injury and loss of life/property, read this
section carefully before using the product to ensure
proper and safe operation of your product.
WARNING
Power connection
RUse only the power source marked on the product.
RDo not overload power outlets and extension cords.
This can result in the risk of fire or electric shock.
RCompletely insert the AC adaptor/power plug into the
power outlet. Failure to do so may cause electric shock
and/or excessive heat resulting in a fire.
RRegularly remove any dust, etc. from the AC adaptor/
power plug by pulling it from the power outlet, then
wiping with a dry cloth. Accumulated dust may cause
an insulation defect from moisture, etc. resulting in a
fire.
RUnplug the product from power outlets if it emits
smoke, an abnormal smell, or makes an unusual noise.
These conditions can cause fire or electric shock.
Confirm that smoke has stopped emitting and contact
us at http://shop.panasonic.com/support
RUnplug from power outlets and never touch the inside
of the product if its casing has been broken open.
RNever touch the plug with wet hands. Danger of
electric shock exists.
Installation
RTo prevent the risk of fire or electrical shock, do not
expose the product to rain or any type of moisture.
RDo not place or use this product near automatically
controlled devices such as automatic doors and fire
alarms. Radio waves emitted from this product may
cause such devices to malfunction resulting in an
accident.
RDo not allow the AC adaptor or telephone line cord to
be excessively pulled, bent or placed under heavy
objects.
Operating safeguards
RU
nplug the product from power outlets before cleaning.
Do not use liquid or aerosol cleaners.
RDo not disassemble the product.
RDo not spill liquids (detergents, cleansers, etc.) onto
the telephone line cord plug, or allow it to become wet
at all. This may cause a fire. If the telephone line cord
plug becomes wet, immediately pull it from the
telephone wall jack, and do not use.
RDo not excessively pull the corded handset cord from
the base unit. This may cause the base unit to fall,
resulting in injury.
Medical
RC
onsult the manufacturer of any personal medical
devices, such as pacemakers or hearing aids, to
determine if they are adequately shielded from external
RF (radio frequency) energy. (The product operates in
the frequency range of 1.92 GHz to 1.93 GHz, and the
RF transmission power is 115 mW (max.).)
RDo not use the product in health care facilities if any
regulations posted in the area instruct you not to do so.
Hospitals or health care facilities may be using
equipment that could be sensitive to external RF
energy.
CAUTION
Installation and location
RNever install telephone wiring during an electrical
storm.
RNever install telephone line jacks in wet locations
unless the jack is specifically designed for wet
locations.
RNever touch uninsulated telephone wires or terminals
unless the telephone line has been disconnected at the
network interface.
RUse caution when installing or modifying telephone
lines.
RThe AC adaptor is used as the main disconnect device.
Ensure that the AC outlet is installed near the product
and is easily accessible.
RThis cordless handset is unable to make calls when:
– the handset batteries need recharging or have failed.
– there is a power failure.
Ni-MH rechargeable batteries
RWe recommend using the batteries noted on page 3.
USE ONLY rechargeable Ni-MH batteries AAA
(R03) size.
RDo not mix old and new batteries.
RDo not open or mutilate the batteries. Released
electrolyte from the batteries is corrosive and may
cause burns or injury to the eyes or skin. The
electrolyte is toxic and may be harmful if swallowed.
RExercise care when handling the batteries. Do not
allow conductive materials such as rings, bracelets, or
keys to touch the batteries, otherwise a short circuit
may cause the batteries and/or the conductive material
to overheat and cause burns.
RCharge the batteries provided with or identified for use
with this product only, in accordance with the
instructions and limitations specified in this manual.
ROnly use a compatible base unit (or charger) to charge
the batteries. Do not tamper with the base unit (or
charger). Failure to follow these instructions may cause
the batteries to swell or explode.
Attention:
A nickel metal hydride battery that is recyclable powers
the product you have purchased.
Please call 1-800-8-BATTERY (1-800-822-8837) for
information on how to recycle this battery.
6For assistance, please visit http://shop.panasonic.com/support
Important Information
TGF353_HSN_(en)_0803_ver011.pdf 6 2017/08/03 10:47:39
Note when using alkaline batteries for power backup
RThe batteries should be used correctly, otherwise the
unit may be damaged due to battery leakage.
RDo not charge, short-circuit, disassemble, or heat the
batteries.
RDo not dispose of batteries in a fire.
RRemove all the batteries when replacing.
RDo not mix old, new or different types of batteries.
RIt is recommended that batteries are replaced annually.
RIt is recommended that batteries are replaced after a
power outage.
Important safety instructions
When using your product, basic safety precautions should
always be followed to reduce the risk of fire, electric
shock, and injury to persons, including the following:
1. Do not use this product near water for example, near
a bathtub, washbowl, kitchen sink, or laundry tub, in a
wet basement or near a swimming pool.
2. Avoid using a telephone (other than a cordless type)
during an electrical storm. There may be a remote risk
of electric shock from lightning.
3. Do not use the telephone to report a gas leak in the
vicinity of the leak.
4. Use only the power cord and batteries indicated in this
manual. Do not dispose of batteries in a fire. They
may explode. Check with local codes for possible
special disposal instructions.
SAVE THESE INSTRUCTIONS
For best performance
Base unit location/avoiding noise
The base unit and other compatible Panasonic units use
radio waves to communicate with each other.
RFor maximum coverage and noise-free
communications, place your base unit:
– at a convenient, high, and central location with no
obstructions between the cordless handset and
base unit in an indoor environment.
– away from electronic appliances such as TVs,
radios, personal computers, wireless devices, or
other phones.
– facing away from radio frequency transmitters, such
as external antennas of mobile phone cell stations.
(Avoid putting the base unit on a bay window or
near a window.)
RCoverage and voice quality depends on the local
environmental conditions.
RIf the reception for a base unit location is not
satisfactory, move the base unit to another location for
better reception.
Environment
RK
eep the product away from electrical noise generating
devices, such as fluorescent lamps and motors.
RThe product should be kept free from excessive
smoke, dust, high temperature, and vibration.
RThe product should not be exposed to direct sunlight.
RDo not place heavy objects on top of the product.
RWhen you leave the product unused for a long period
of time, unplug the product from the power outlet.
RThe product should be kept away from heat sources
such as heating devices, cooking appliances, etc. It
should not be placed in rooms where the temperature
is less than 0 °C (32 °F) or greater than 40 °C (104 °F).
Damp basements should also be avoided.
RThe maximum calling distance may be shortened when
the product is used in the following places: Near
obstacles such as hills, tunnels, underground, near
metal objects such as wire fences, etc.
ROperating the product near electrical appliances may
cause interference. Move away from the electrical
appliances.
Routine care
RWipe the outer surface of the product with a soft
moist cloth.
RDo not use benzine, thinner, or any abrasive powder.
Other information
CAUTION: Risk of explosion if battery is replaced by an
incorrect type. Dispose of used batteries according to the
instructions.
Notice for product disposal, transfer, or return
RThis product can store your private/confidential
information. To protect your privacy/confidentiality, we
recommend that you erase information such as
phonebook or caller list entries from the memory
before you dispose of, transfer, or return the product.
Notice
For assistance, please visit http://shop.panasonic.com/support 7
Important Information
TGF353_HSN_(en)_0803_ver011.pdf 7 2017/08/03 10:47:39

Compliance with TIA-1083 standard:
Telephone handsets identified with this logo have
reduced noise and interference when used with T-Coil
equipped hearing aids and cochlear implants.
T
Compatible with
Hearing Aid T-Coil
TIA-1083
Specifications
RS
tandard:
DECT 6.0 (Digital Enhanced
Cordless Telecommunications 6.0)
RFrequency range:
1.92 GHz to 1.93 GHz
RRF transmission power:
115 mW (max.)
RPower source:
120 V AC, 60 Hz
RPower consumption:
Base unit:
Standby: 0.7 W
Maximum: 3.0 W
Charger:
Standby: 0.1 W
Maximum: 1.8 W
ROperating conditions:
0 °C – 40 °C (32 °F – 104 °F), 20 % – 80 % relative air
humidity (dry)
8For assistance, please visit http://shop.panasonic.com/support
Important Information
TGF353_HSN_(en)_0803_ver011.pdf 8 2017/08/03 10:47:39

Setting up
Connections
n
n
n
nn Base unit
Connect the AC adaptor to the unit by
pressing the plug firmly.
Connect the telephone line cord to the unit
until you hear a click.
Fasten the AC adaptor cord and the telephone
line cord by hooking it.
Connect the AC adaptor to the power outlet.
Connect the telephone line cord to the
single-line telephone jack (RJ11C) until you
hear a click.
A DSL/ADSL filter (not supplied) is required if
you have a DSL/ADSL service.
Connect the corded handset cord to the
corded handset and the base unit until you
hear a click.
7
7
1
4 6
5
12
3 3
3
Note:
RUse only the supplied Panasonic AC adaptor
PNLV226.
RFollow the directions on the display to set up
the unit.
n
n
n
nn Charger
Connect the AC adaptor to the power outlet.
1
Handset battery installation
RUSE ONLY rechargeable Ni-MH batteries AAA
(R03) size (
1
).
RDo NOT use alkaline/manganese/Ni-Cd
batteries.
RConfirm correct polarities ( , ).
1
RFollow the directions on the display to set up
the unit.
For assistance, please visit http://shop.panasonic.com/support 9
Getting Started
TGF353_HSN_(en)_0803_ver011.pdf 9 2017/08/03 10:47:39
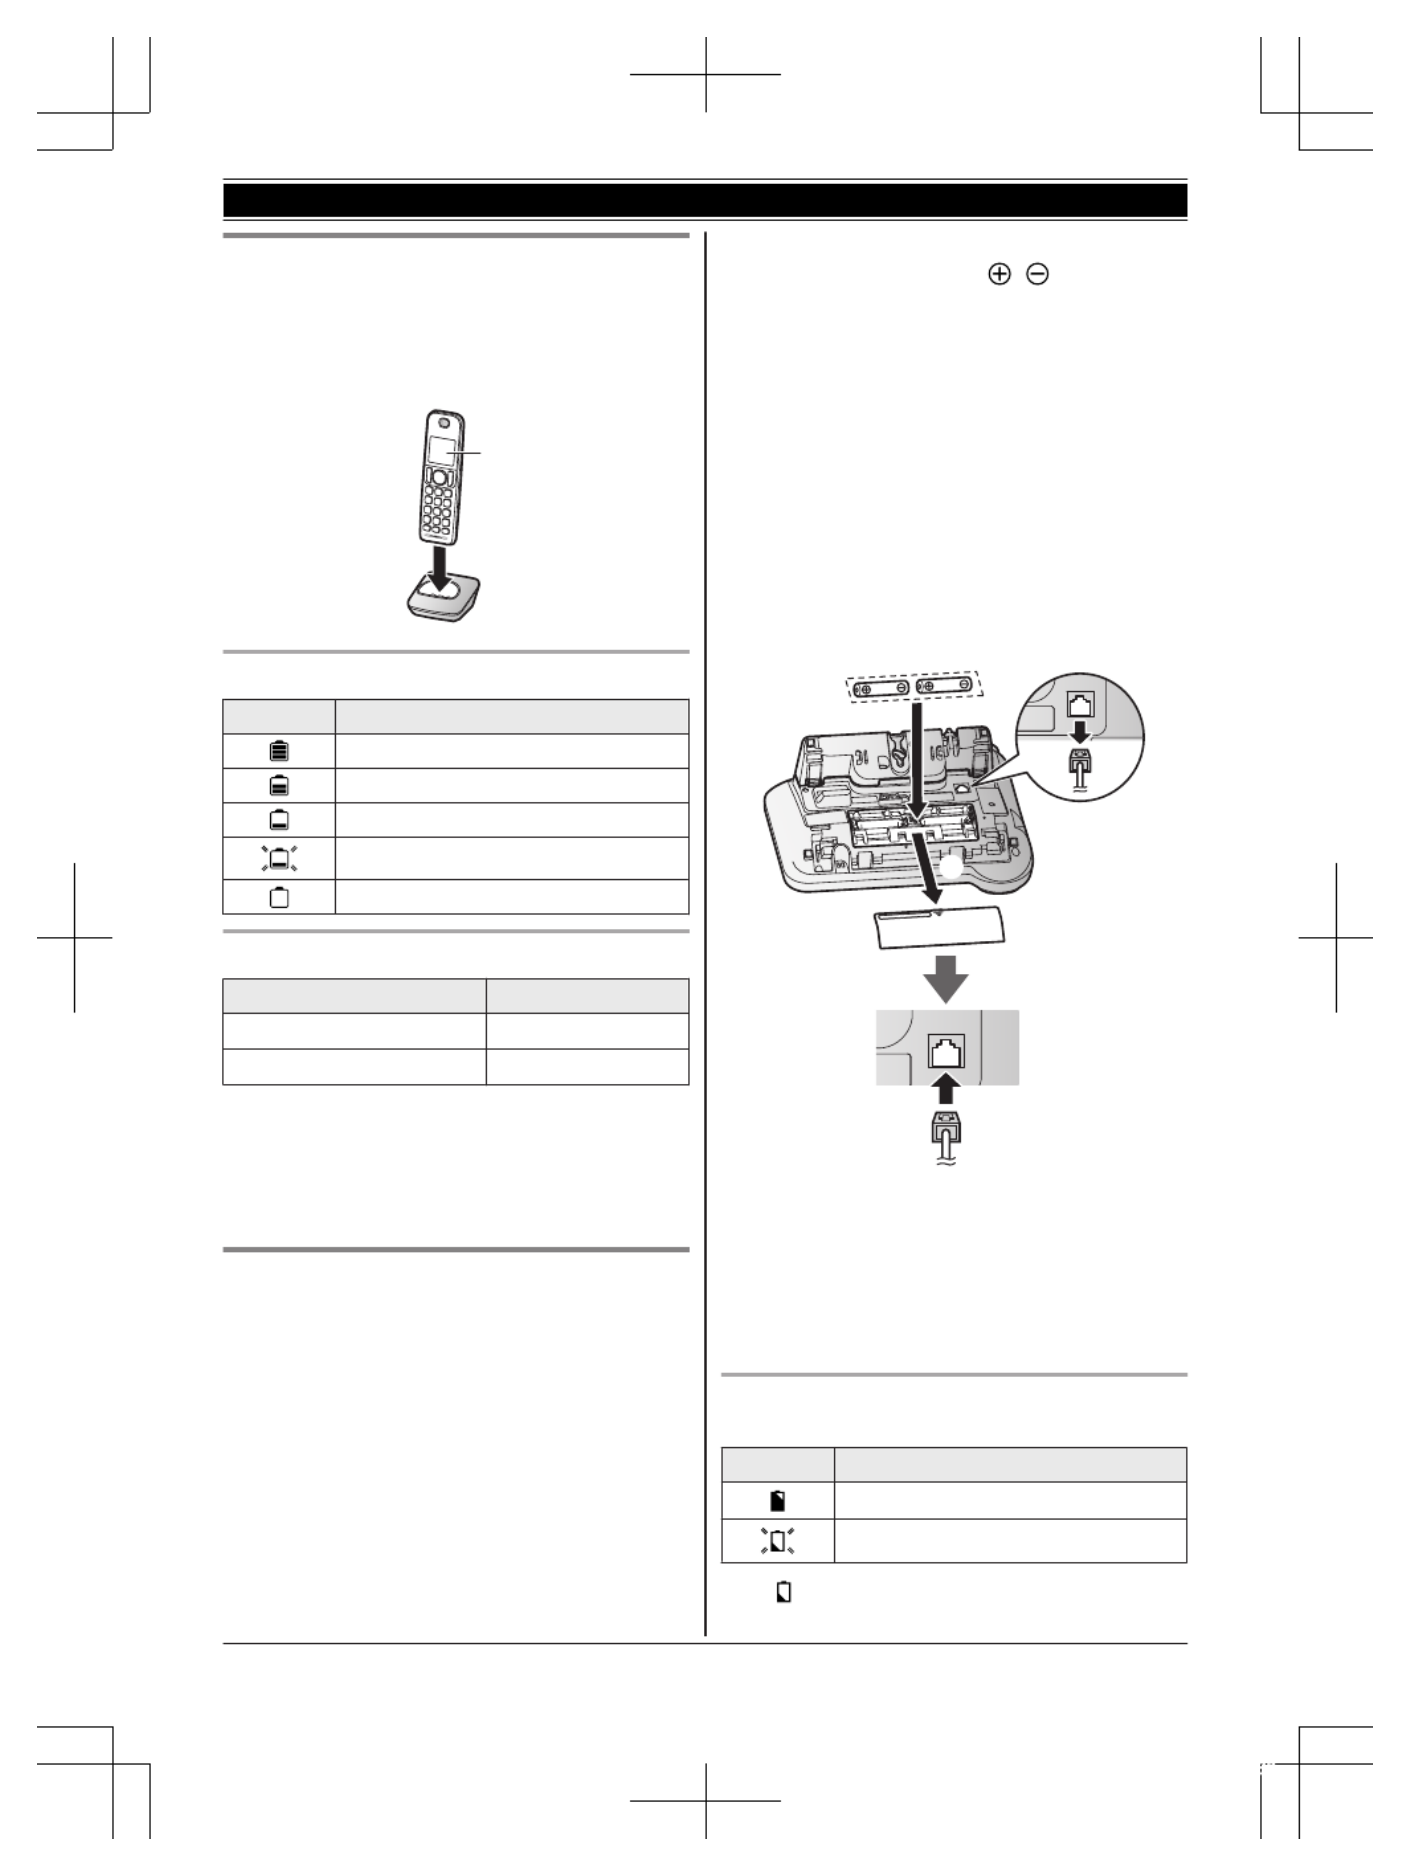
Handset battery charging
Charge for about 7 hours.
RConfirm “Charging” is displayed (
1
).
RWhen the batteries are fully charged, “Fully
charged” is displayed.
1
Handset battery level
Icon Battery level
High
Medium
Low
Needs charging.
Empty
Ni-MH battery performance (supplied batteries)
Operation Operating time
In continuous use 13 hours max.*1
Not in use (standby) 6 days max.*1
*1 If eco mode is on.
Note:
RActual battery performance depends on usage
and ambient environment.
Base unit battery installation (for
power backup)
You can insert 2 AAA (R03) batteries (not
supplied) into the base unit that will power the unit
temporarily in the event of a power failure.
Important:
RThe following batteries can be used with the
base unit:
– Rechargeable Ni-MH batteries
*1, *2 (including
the batteries used in your handset(s))
– Standard (non-rechargeable) alkaline
batteries
*3
RDo NOT use manganese batteries.
RConfirm correct polarities ( , ).
*1 The base unit can fully charge Ni-MH batteries
in about 15 hours.
*2 We recommend using HHR-4DPA batteries
(page 3).
*3 Only insert alkaline batteries once a power
failure occurs. Remove the alkaline batteries
when power is restored.
1Disconnect the telephone line cord (A).
2Open the battery cover (B).
3Install the batteries in the battery compartment
( ).C
4Close the cover, then reconnect the telephone
line cord (D).
B
C
D
A
Note:
RIf your phone service provider requires
additional devices in order to make and receive
calls, such as a modem, you may still not be
able to make and receive calls even if the base
unit’s backup power feature is functioning.
Base unit battery status when a power failure
occurs
Icon Battery status
Power backup mode is on.
Battery power is low.*1
*1 If begins flashing on the base unit, replace
the batteries with new ones as soon as
10 For assistance, please visit http://shop.panasonic.com/support
Getting Started
TGF353_HSN_(en)_0803_ver011.pdf 10 2017/08/03 10:47:39

possible. If you replace Ni-MH batteries with
alkaline batteries, insert the Ni-MH batteries
into the base unit again after the power is
restored so that they will be recharged.
Battery saving mode setting
This feature allows the base unit to reduce its
power consumption by limiting the available
functions and therefore extend battery life during a
power failure.
The following settings are available:
–“ ”On : The unit will work as a standard
telephone. Only the corded handset can be
used to make and receive calls. (You cannot
use the base unit display, phonebook,
one-touch dial, answering system,
speakerphone, etc.)
The base unit display is blank.
–“Off” (default): You can use the full functions
of the base unit, but battery life is not extended.
The brightness level for the base unit display is
lowered.
Base unit
1MMENUN#150
2M N
b
b
b
bb : Select the desired setting.
3MSAVEN a M EXITN
Note:
ROnce the battery saving mode is set to “On”,
the unit rings with the volume level 1 even if the
ringer volume for the base unit is set to “Off” to
let you know an incoming call is being received.
Panasonic Ni-MH battery performance
(optional batteries) when operating on backup
battery power
Operation Saving mode
Off On
In continuous use 2 hours
max.
7 hours
max.
Not in use (standby) 3 hours
max.
8 hours
max.
Note:
RBattery performance depends on the type of
batteries.
RActual battery performance depends on usage
and ambient environment.
Note when setting up
Note for connections
RThe AC adaptor must remain connected at all
times. (It is normal for the adaptor to feel warm
during use.)
RThe AC adaptor should be connected to a
vertically oriented or floor-mounted AC outlet.
Do not connect the AC adaptor to a horizontally
oriented AC outlet that faces the floor, such as
an AC outlet installed on a ceiling or under a
table, as the weight of the adaptor may cause it
to become disconnected.
Note for Ni-MH battery installation
RHandset: Use the supplied rechargeable
batteries.
RHandset/Base unit: For replacement, we
recommend using the Panasonic rechargeable
batteries noted on page 3, 6.
Note for battery charging
RIt is normal for the handset to feel warm during
charging.
RClean the charge contacts of the handset and
charger with a soft and dry cloth once a month.
Before cleaning the unit, disconnect from power
outlets and any telephone line cords. Clean
more often if the unit is exposed to grease, dust,
or high humidity.
Intelligent eco mode
This feature automatically reduces handset power
consumption by suppressing handset transmission
power when the handset is close to the base unit.
RWhen this feature is activated, is displayed.
REco mode is turned off when the clarity booster
is activated (page 17).
For assistance, please visit http://shop.panasonic.com/support 11
Getting Started
TGF353_HSN_(en)_0803_ver011.pdf 11 2017/08/03 10:47:39

Controls
Handset
I
K
L
H
M
J
A
B
E
D
C
F
G
Belt clip holes
Speaker
M
M
M
MM N
N
N
NN (TALK)
Headset jack
Dial keypad
*
*
*
**: Temporary tone dialing
M N
Z
Z
Z
ZZ (SP-PHONE: Speakerphone)
Microphone
Receiver
Display
MOFFN
MFLASHN M CALL WAITN
MCALL BLOCKN
Charge contacts
n
n
n
nn Control type
Soft keys
By pressing a soft key, you can select the
feature shown directly above it on the display.
Navigator key
– , M N
D
D
D
DD MC
C
C
CCN M, F
F
F
FFN, or ME
E
E
EEN: Scroll through various
lists and items.
– VOL. (Volume: MD
D
D
DDN or MC
C
C
CCN): Adjust the
receiver or speaker volume while talking.
– M N
F
F
F
FF : View the phonebook entry.
– M N
E
E
E
EE REDIAL: View the redial list.
– CID (Caller ID): View the caller list.M N
C
C
C
CC
Base unit
A
G
H
I
EA B DC
F
F
U
N
L
B
P
R
S
T
K
M
JO
Corded handset
Receiver
Speaker
Display
RThe display can be moved back and forth to
select the desired angle.
ONE-TOUCH DIAL buttons
Microphone
M
M
M
MMSPEED DIALN
N
N
NN
MFLASHN MCALL WAITN
M
M
M
MMHOLDN
N
N
NN
MLOCATORN M INTERCOMN
RYou can locate a misplaced handset by
pressing MLOCATORN.
Dial keypad ( :
*
*
*
** TONE)
M
M
M
MMEXITN
N
N
NN
MREDIALN MPAUSEN
MMUTEN
M N
Z
Z
Z
ZZ (
SP-PHONE: Speakerphone)
SP-PHONE indicator
MCALL LOGN
RYou can access the caller list/redial list by
pressing MCALL LOGN.
12 For assistance, please visit http://shop.panasonic.com/support
Getting Started
TGF353_HSN_(en)_0803_ver011.pdf 12 2017/08/03 10:47:39

MCALL BLOCKN
M
M
M
MM N
N
N
NN (ANSWER ON/OFF)
ANSWER ON/OFF indicator
MERASEN
M
M
M
MM N
N
N
NN
(PLAY/STOP)
Message indicator
Desk stand/Wall mounting adaptor
RThe adaptor is a removable attachment for
desk stand or wall mounting use
(page 47).
n
n
n
nn Control type
Soft keys
By pressing a soft key, you can select the
feature shown directly above it on the display.
Navigator key
– ,M N
D
D
D
DD M N
C
C
C
CC , M N, or M N: Scroll through
various lists and items.
– VOL. (Volume: MD
D
D
DDN or MC
C
C
CCN): Adjust the
receiver or speaker volume while talking.
–M N M N/ : Repeat/skip messages during
playback.
Display icons
Handset display items
Item Meaning
Within base unit range
Out of base unit range
The line is in use.
RWhen flashing:
The call is put on hold.
RWhen flashing rapidly: An
incoming call is now being
received.
Eco mode is on. (page 11)
Noise reduction is set. (page 17)
Equalizer is set. (page 17)
ZSpeakerphone is on. (page 15)
Ringer volume is off. (page 30)
Silent mode is on. (page 34)
Call sharing mode is off.
(page 32)
Alarm is on. (page 33)
Handset number
Battery level
Item Meaning
Blocked call (page 20)
Clarity booster is on. (page 17)
Baby monitor is activated. The
name/number displayed next to the
icon indicates the monitoring unit.
(page 34)
In use Answering system is being used by
another unit.
Line in
use
Someone is using the line.
Base unit display items
Item Meaning
The line is in use.
RWhen flashing:
The call is put on hold.
RWhen flashing rapidly: An
incoming call is now being
received.
Ringer volume is off. (page 30)
Silent mode is on. (page 34)
Call sharing mode is off.
(page 32)
“Greeting only” is selected.
Caller messages are not recorded.
(page 45)
Power backup mode is on.
(page 10)
Blocked call (page 20)
In use Answering system is being used by
a handset.
Line in
use
Someone is using the line.
Language settings
Display language
Handset / Base unit
1MMENUN#110
2M N
b
b
b
bb : Select the desired setting. a MSAVEN
3Proceed with the operation for your unit.
Handset: MOFFN
For assistance, please visit http://shop.panasonic.com/support 13
Getting Started
TGF353_HSN_(en)_0803_ver011.pdf 13 2017/08/03 10:47:40

Base unit: MEXITN
Voice guidance language
You can select either “English” or “Español”
as the voice guidance language of the answering
system. The default setting is “English”.
You can configure this setting using either the
base unit or one of the handsets.
Handset / Base unit
1MMENUN#112
2M N
b
b
b
bb : Select the desired setting. a M SAVEN
3Proceed with the operation for your unit.
Handset: MOFFN
Base unit: MEXITN
Date and time
You can configure this setting using either the
base unit or one of the handsets.
Handset / Base unit
1MMENUN#101
2Enter the current month, date, and year by
selecting 2 digits for each.
Example: July 12, 2017
07 12 17
3M NOK
4Enter the current hour and minute (12-hour
clock format) by selecting 2 digits for each.
Example: 9:30
09 30
5Proceed with the operation for your unit.
Handset: : Select *“AM” or “PM”.
Base unit: MAM/PMN: Select “AM” or “PM”.
6MSAVEN
7Proceed with the operation for your unit.
Handset: MOFFN
Base unit: MEXITN
Note:
RWhen English is selected as the display
language, 12-hour clock format is used. When
Spanish is selected, 24-hour clock format is
used.
Recording your greeting
message
You can record your own greeting message
instead of using a pre-recorded greeting message.
See page 40 for details.
You can configure this setting using either the
base unit or one of the handsets.
Handset / Base unit
1MMENUN#302
2M N
b
b
b
bb : “Yes” a M SELECTN
3Record a greeting message. a MSTOPN
4Proceed with the operation for your unit.
Handset: MOFFN
Base unit: MEXITN
Other settings
Dialing mode
If you cannot make calls, change this setting
according to your telephone line service. The
default setting is “Tone”.
“Tone”: For tone dial service.
“Pulse”: For rotary/pulse dial service.
You can configure this setting using either the
base unit or one of the handsets.
Handset / Base unit
1MMENUN#120
2M N
b
b
b
bb : Select the desired setting. a M SAVEN
3Proceed with the operation for your unit.
Handset: MOFFN
Base unit: MEXITN
14 For assistance, please visit http://shop.panasonic.com/support
Getting Started
TGF353_HSN_(en)_0803_ver011.pdf 14 2017/08/03 10:47:40

Making calls
Using the handset
1Lift the handset and then dial the phone
number.
RTo correct a digit, press MCLEARN.
2MN
3When you finish talking, press MOFFN or place
the handset on the charger.
Using the speakerphone
1Dial the phone number and press M N
Z
Z
Z
ZZ .
2When you finish talking, press MOFFN.
Note:
RTo switch back to the receiver, press MZ
Z
Z
ZZN M/N.
Making a call using the redial list
The last 5 phone numbers dialed are stored in the
redial list (each 48 digits max.).
1M N
E
E
E
EE REDIAL
2M N
b
b
b
bb : Select the desired entry.
3MN
Erasing a number in the redial list
1M N
E
E
E
EE REDIAL
2M N
b
b
b
bb : Select the desired entry. a M ERASEN
3M N
b
b
b
bb : “Yes” a M SELECTN
4MOFFN
Using the base unit
1Dial the phone number.
RTo correct a digit, press MCLEARN.
2Lift the corded handset.
3When you finish talking, place the corded
handset on the cradle.
Note:
RYou can also dial the phone number after lifting
the corded handset.
RWhile on a call, you can switch from the base
unit to the cordless handset as follows.
The call sharing mode must be on (page 32).
A Handset: Press M N.
B Base unit: Place the corded handset on the
cradle. When the speakerphone is used, press
M N
Z
Z
Z
ZZ .
Using the speakerphone
1During a conversation with the corded
handset, press M N
Z
Z
Z
ZZ to turn on the
speakerphone.
RYou can place the corded handset on the
cradle.
RSpeak into the base unit microphone.
2When you finish talking, press M N
Z
Z
Z
ZZ .
Note:
RTo switch to the receiver, lift the corded handset.
Making a call using the redial list
The last 10 phone numbers dialed are stored in
the redial list (each 48 digits max.).
1MREDIALN
2M N
b
b
b
bb : Select the desired entry.
3Lift the corded handset.
Note:
RIn step 1, you can also access the redial list as
follows:
MCALL LOGN a M b
b
b
bbN: “Outgoing call” a
MSELECTN
Erasing a number in the redial list
1MREDIALN
2M N
b
b
b
bb : Select the desired entry. a M ERASEN
3M N
b
b
b
bb : “Yes” a M SELECTN a MEXITN
Adjusting the receiver or speaker
volume
Handset / Base unit
Press M N
D
D
D
DD or M N
C
C
C
CC repeatedly while talking.
Pause (for PBX/long distance service
users)
A pause is sometimes required when making calls
using a PBX or long distance service. When
storing a calling card access number and/or PIN in
the phonebook, a pause is also needed
(page 25).
Example: If you need to dial the line access
number “9” when making outside calls with a PBX:
For assistance, please visit http://shop.panasonic.com/support 15
Making/Answering Calls
TGF353_HSN_(en)_0803_ver011.pdf 15 2017/08/03 10:47:40

Handset
19 a M N
D
D
D
DD (Pause)
2Dial the phone number. a M N
Base unit
19 a MPAUSEN
2Dial the phone number.
3Lift the corded handset.
Note for handset and base unit:
RA 3.5 second pause is inserted each time you
press MD
D
D
DDN (Pause) on the handset or MPAUSEN
on the base unit.
Answering calls
Using the handset
1Lift the handset and then press M N or MZ
Z
Z
ZZN
when the unit rings.
2When you finish talking, press MOFFN or place
the handset on the charger.
Any key answer: You can answer the call by
pressing any dial key.
Auto talk: You can answer calls simply by lifting
the handset (page 31).
Temporary ringer off: You can turn the ringer off
temporarily by pressing M N.
Using the base unit
1Lift the corded handset or press MZ
Z
Z
ZZN when the
unit rings.
2When you finish talking, place the corded
handset on the cradle. When the
speakerphone is used, press MZ
Z
Z
ZZN.
Temporary ringer off: You can turn the ringer off
temporarily by pressing M N.
Adjusting the ringer volume
Handset / Base unit
Press MD
D
D
DDN or M N
C
C
C
CC repeatedly to select the desired
volume while ringing.
Useful features during a call
Hold
Handset
1Press MMENUN during an outside call.
2M N
b
b
b
bb : “Hold” a MSELECTN
3To release hold, press MN.
RAnother handset user can take the call by
pressing M N.
RThe base unit user can take the call by
lifting the corded handset.
Base unit
1Press MHOLDN during an outside call.
RIf you are using the corded handset, you
can place it on the cradle.
2To release hold, lift the corded handset.
RA handset user can take the call by
pressing M N.
Note for handset and base unit:
RWhile an outside call is on hold, the SP-PHONE
indicator flashes.
RAfter holding for 10 minutes, the call is
disconnected.
Mute
Handset / Base unit
1Press MMUTEN during a call.
2To return to the call, press MMUTEN.
Note:
R MMUTEN is a soft key visible on the display
during a call.
Flash
Handset / Base unit
MFLASHN allows you to use the special features of
your host PBX such as transferring an extension
call, or accessing optional telephone services.
Note:
RTo change the flash time, see page 32.
16 For assistance, please visit http://shop.panasonic.com/support
Making/Answering Calls
TGF353_HSN_(en)_0803_ver011.pdf 16 2017/08/03 10:47:40

For call waiting or Call Waiting Caller
ID service users
To use call waiting or Call Waiting Caller ID, you
must first subscribe with your phone service
provider.
This feature allows you to receive calls while you
are already talking on the phone. If you receive a
call while on the phone, you will hear a call waiting
tone.
If you subscribe to both Caller ID and Call
Waiting with Caller ID services, the 2nd caller’s
information is displayed on the unit that is in use
after you hear the call waiting tone.
Handset / Base unit
1Press MCALL WAITN to answer the 2nd call.
2To switch between calls, press MCALL WAITN.
Note:
RPlease contact your phone service provider for
details and availability of this service in your
area.
Temporary tone dialing (for rotary/
pulse service users)
Handset / Base unit
Press before entering access numbers which*
require tone dialing.
Handset clarity booster
This feature can improve sound clarity when the
handset is used in an area where there may be
interference. During an outside call, this feature is
turned on automatically when necessary.
RWhen this feature is turned on, is
displayed.
Handset noise reduction
This feature allows you to hear the voice of the
person you are talking to more clearly, by reducing
the surrounding noise coming from the other
party’s telephone.
1Press MMENUN while talking.
2M N
b
b
b
bb : “Noise reduction on” or “Noise
reduction off” a M SELECTN
Note:
RDepending on the environment where this
handset is being used, this feature may not be
effective.
RThis feature is not available while using the
speakerphone.
Handset equalizer
This feature clarifies the voice of the person you
are talking to, producing a more natural-sounding
voice that is easier to hear and understand.
1Press MMENUN while talking.
2M N
b
b
b
bb : “Equalizer” a MSELECTN
3M N
b
b
b
bb : Select the desired setting.
4Press MOKN to exit.
Note:
RDepending on the condition and quality of your
telephone line, this feature may emphasize
existing line noise. If it becomes difficult to hear,
turn this feature off.
RThis feature is not available while using the
speakerphone.
RWhen both the “Equalizer” setting and noise
reduction are activated, is shown on the
display.
Call share
You can join an existing outside call.
Handset
To join the conversation, press M N when the
other unit is on an outside call.
Base unit
To join the conversation, lift the corded handset
when the handset is on an outside call.
Note for handset and base unit:
RA maximum of 3 parties (including 1 outside
party) can join a conversation. (3-way
conference)
RTo prevent other users from joining your
conversations with outside callers, turn call
sharing mode off (page 32).
Transferring calls, conference calls
Outside calls can be transferred or a conference
call with an outside party can be made:
For assistance, please visit http://shop.panasonic.com/support 17
Making/Answering Calls
TGF353_HSN_(en)_0803_ver011.pdf 17 2017/08/03 10:47:40

– between handsets
– between a handset and the base unit
Handset
1During an outside call, press MMENUN.
2M N
b
b
b
bb : “Intercom” a MSELECTN
3M N
b
b
b
bb : Select the desired unit. a M SELECTN
4Wait for the paged party to answer.
RIf the paged party does not answer, press
MBACKN to return to the outside call.
5To complete the transfer:
Press MOFFN.
To establish a conference call:
MMENUN a M b
b
b
bbN: “Conference” a
MSELECTN
RTo leave the conference, press MOFFN. The
other 2 parties can continue the
conversation.
RTo put the outside call on hold: MMENUN a
M N
b
b
b
bb : “Hold” a MSELECTN
To resume the conference: MMENUN a
M N
b
b
b
bb : “Conference” a MSELECTN
RTo cancel the conference: MMENUN a M b
b
b
bbN:
“Stop conference” a MSELECTN
You can continue the conversation with the
outside caller.
Base unit
1During an outside call, press MINTERCOMN.
When 2 or more handsets are registered:
M N
b
b
b
bb : Select the desired unit. a M SELECTN
RTo page all handsets, press or wait for a0
few seconds.
2Wait for the paged party to answer.
RIf paged party does not answer, press
MINTERCOMN to return to the outside call.
3To complete the transfer:
Place the corded handset on the cradle.
RThe outside call is being routed to the
handset.
To establish a conference call:
Press MCONFN.
RTo leave the conference, place the corded
handset on the cradle. The other 2 parties
can continue the conversation.
RTo put the outside call on hold, press
MHOLDN. To resume the conference, press
MCONFN.
18 For assistance, please visit http://shop.panasonic.com/support
Making/Answering Calls
TGF353_HSN_(en)_0803_ver011.pdf 18 2017/08/03 10:47:40

Intercom
Intercom calls can be made:
– between handsets
– between a handset and the base unit
Note:
RWhen paging unit(s), the paged unit(s) beeps
for 1 minute.
RIf you receive an outside call while talking on the
intercom, the interrupt tone sounds.
–Handset: To finish intercom, press MOFFN.
To answer the call, press M N.
–Base unit: To finish intercom, place the
corded handset on the cradle. If the
speakerphone is used, press M N
Z
Z
Z
ZZ . To answer
the call, lift the corded handset. If the
speakerphone is used, press M N
Z
Z
Z
ZZ .
Making an intercom call
Handset
1MMENUN a M N
b
b
b
bb : “Intercom” a M SELECTN
2M N
b
b
b
bb : Select the desired unit. a MSELECTN
3When you finish talking, press MOFFN.
Note:
RYou can also use the MINTERCOMN soft key, if
displayed, to make intercom calls.
Base unit
1Press MINTERCOMN.
When 2 or more handsets are registered:
M N
b
b
b
bb : Select the desired unit. a MSELECTN
RTo page all handsets, press 0 or wait for a
few seconds.
RLift the corded handset if needed.
2When you finish talking, press M N
Z
Z
Z
ZZ or place
the corded handset on the cradle.
Answering an intercom call
Handset
1Press M N to answer the page.
2When you finish talking, press MOFFN.
Base unit
1Press M N
Z
Z
Z
ZZ or lift the corded handset to answer
the page.
2When you finish talking, press MZ
Z
Z
ZZN or place
the corded handset on the cradle.
Turning auto intercom on/off
This feature allows the handset and base unit to
answer intercom calls automatically when it is
called. You do not need to press M N, lift the
corded handset, or press MZ
Z
Z
ZZN. When this feature
is set to “On”, the monitoring handset or base unit
for the baby monitor feature (page 36) will also
answer baby monitor calls automatically. The
default setting is “Off”.
Handset / Base unit
1MMENUN#273
2M N
b
b
b
bb : Select the desired setting. a MSAVEN
3Proceed with the operation for your unit.
Handset: MOFFN
Base unit: MEXITN
For assistance, please visit http://shop.panasonic.com/support 19
Intercom
TGF353_HSN_(en)_0803_ver011.pdf 19 2017/08/03 10:47:40

Using the M
M
M
MMCALL BLOCKN
N
N
NN
button
You can press the MCALL BLOCKN button in the
following situations to disconnect the current call
and add a phone number to the call block list:
– when an incoming call is being received
– when an incoming call is being recorded by the
answering system
– when talking on an outside call
Once a phone number has been added to the call
block list, the unit will block calls from that phone
number in the future.
Handset / Base unit
1Press MCALL BLOCKN under the situations
shown above.
2Confirm the call block number and press
MYESN.
RThe call block number is stored in the call
block list, “Caller blocked” is displayed,
and then the call is disconnected.
Note:
RIf the call has no phone number, the call is
blocked but it is not stored in the call block list.
RThe call block feature is not available for
intercom calls or calls received by call waiting.
RBlocked calls are logged in the caller list.
Storing unwanted callers
The unit can block calls by storing the desired
items in the call block list beforehand (Caller ID
subscribers only).
–“Block a single number”: The unit blocks
calls from specific phone numbers stored in the
call block list.
–“Block range of numbers”: The unit
blocks calls that begin with a number stored in
the call block list, such as a toll-free phone
number prefix or certain area codes.
–“Block unknown CID”: The unit blocks calls
that have no phone number.
Single phone numbers and ranges of numbers can
be stored in the call block list up to 250 items in
total.
Blocking unwanted callers:
When a call is received, the unit rings once
*1 while
caller information is being received.
If the caller’s phone number matches an entry in
the call block list, the unit emits no sound to the
caller, and disconnects the call.
*1 If you do not want this one ring to sound,
select “ ”No in “Turning the first ring on/off”
(page 21).
Storing a single phone number
Important:
RWe recommend storing 10 digits (including the
area code). If only 7 digits are stored, all
numbers that have the same last 7 digits will be
blocked.
Adding call blocked numbers from the caller
list
Handset
1M N
C
C
C
CC CID
2M N
b
b
b
bb : Select the entry to be blocked.
RTo edit the number: MMENUN a Mb
b
b
bbN:
“Edit” a M SELECTN
Press MEDITN repeatedly until the phone
number is shown in the 10-digit format. a
MSAVEN a M b
b
b
bbN: “Call block” a
MSELECTN a Go to step 4.
3MCALL BLOCKN
4M N
b
b
b
bb : “Yes” a M SELECTN
5Edit the phone number if necessary (24 digits
max.). a M SAVEN a MOFFN
Base unit
1MCIDN
2M N
b
b
b
bb : Select the entry to be blocked.
RTo edit the number: Press MEDITN
repeatedly until the phone number is shown
in the 10-digit format.
3MCALL BLOCKN
4M N
b
b
b
bb : “Yes” a M SELECTN
5Edit the phone number if necessary (24 digits
max.). a M SAVEN a MEXITN
Adding call blocked numbers manually
Handset
1MCALL BLOCKN
2M N
b
b
b
bb : “Block a single number” a
MSELECTN
3MMENUN a M b
b
b
bbN: “Add” a MSELECTN
20 For assistance, please visit http://shop.panasonic.com/support
Call Block
TGF353_HSN_(en)_0803_ver011.pdf 20 2017/08/03 10:47:40
4Enter the phone number (24 digits max.). a
MSAVEN a M OFFN
Base unit
1MCALL BLOCKN
2M N
b
b
b
bb : “Block a single number” a
MSELECTN a MADDN
3Enter the phone number (24 digits max.). a
MSAVEN a M EXITN
Storing a range of number
Handset
1MCALL BLOCKN
2M N
b
b
b
bb : “Block range of numbers” a
MSELECTN
3MMENUN a M b
b
b
bbN: “Add” a MSELECTN
4Enter the desired number (2-8 digits). a
MSAVEN a M OFFN
Base unit
1MCALL BLOCKN
2M N
b
b
b
bb : “Block range of numbers” a
MSELECTN
3MADDN
4Enter the desired number (2-8 digits). a
MSAVEN a M EXITN
Blocking incoming calls that have no
phone number
You can block calls when no phone number is
provided, such as private callers or out of area
calls.
Handset / Base unit
1MCALL BLOCKN
2M N
b
b
b
bb : “Block unknown CID” a MSELECTN
3M N
b
b
b
bb : Select the desired setting. a M SAVEN
4Proceed with the operation for your unit.
Handset: MOFFN
Base unit: MEXITN
Turning the first ring on/off
You can choose whether the first ring sounds
when a call is received.
“Yes” (default): The first ring for all calls will be
heard, including calls from blocked phone
numbers.
“ ”No : The first ring is muted for all calls. If this
setting is selected, the unit will never ring for calls
from blocked phone numbers.
Handset / Base unit
1MCALL BLOCKN
2M N
b
b
b
bb : “One ring for blocked call” a
MSELECTN
3M N
b
b
b
bb : Select the desired setting. a M SAVEN
4Proceed with the operation for your unit.
Handset: MOFFN
Base unit: MEXITN
Viewing/editing/erasing call block
numbers
Handset
1MCALL BLOCKN
2M N
b
b
b
bb : “Block a single number” or “Block
range of numbers” a MSELECTN
3M N
b
b
b
bb : Select the desired entry.
RAfter viewing, press MOFFN to exit.
4To edit a number:
MEDITN a Edit the number. a M SAVEN a
MOFFN
To erase a number:
MERASEN a Mb
b
b
bbN: “Yes” a MSELECTN a
MOFFN
Base unit
1MCALL BLOCKN
2M N
b
b
b
bb : “Block a single number” or “Block
range of numbers” a MSELECTN
3M N
b
b
b
bb : Select the desired entry.
RAfter viewing, press MEXITN to exit.
4To edit a number:
MEDITN a Edit the number. a M SAVEN a
MEXITN
To erase a number:
MERASEN a Mb
b
b
bbN: “Yes” a MSELECTN a
MEXITN
Note:
RWhen editing, press the desired dial key to add
digits and press MCLEARN to erase digits.
For assistance, please visit http://shop.panasonic.com/support 21
Call Block
TGF353_HSN_(en)_0803_ver011.pdf 21 2017/08/03 10:47:40

Erasing all call block numbers
Handset / Base unit
1MCALL BLOCKN
2M N
b
b
b
bb : “Block a single number” or “Block
range of numbers” a M SELECTN
3Proceed with the operation for your unit.
Handset: MMENUN a M N
b
b
b
bb : “Erase all” a
MSELECTN
Base unit: MERASEN
4M N
b
b
b
bb : “Yes” a M SELECTN
5M N
b
b
b
bb : “Yes” a M SELECTN
6Proceed with the operation for your unit.
Handset: MOFFN
Base unit: MEXITN
22 For assistance, please visit http://shop.panasonic.com/support
Call Block
TGF353_HSN_(en)_0803_ver011.pdf 22 2017/08/03 10:47:40
Phonebook
You can add 100 names (16 characters max.) and
phone numbers (24 digits max.) to the phonebook,
and assign each phonebook entry to the desired
group (page 24).
Important:
R All entries can be shared by the base unit and
any registered handset.
Adding phonebook entries
Handset / Base unit
1Proceed with the operation for your unit.
Handset: MF
F
F
FFN a MM ENUN
Base unit: M N a MM ENUN
2M N
b
b
b
bb : “Add new entry” a MSELECTN
3Enter the party’s name. a M OKN
4Enter the party’s phone number. a M OKN
5M N
b
b
b
bb : Select the desired group. a M SELECTN
2 times
6Proceed with the operation for your unit.
Handset: MOFFN
Base unit: MEXITN
Note for base unit:
R You can also add entries as follows:
Press M N. a MADDN Go to step 3.a
Character table for entering names
While entering characters, you can switch
between uppercase and lowercase by pressing *
(A a).®
Key Character
1 H& ’ ( ) ,
– . / 1
2 A B C 2
a b c 2
3 D E F 3
d e f 3
4 G H I 4
g h i 4
5 J K L 5
j k l 5
Key Character
6 M N O 6
m n o 6
7 P Q R S 7
p q r s 7
8 T U V 8
t u v 8
9 W X Y Z 9
w x y z 9
00
# #
R T o enter another character that is located on the
same dial key:
Handset: Press M N
E
E
E
EE to move the cursor to the
next space.
Base unit: Press M N
to move the cursor to
the next space.
R If you do not press any dial key within 2
seconds after entering a character, the
character is fixed and the cursor moves to the
next space.
R in the above table represents a single space.
Erasing the character or number
Handset: Press M N
F
F
F
FF or ME
E
E
EEN. a M CLEARN
Base unit: Press M N or M N. a MCLEARN
R Press and hold MCLEARN to erase all characters
or numbers.
Storing a redial list number to the phonebook
P hone numbers of up to 24 digits can be stored in
the phonebook.
Handset / Base unit
1Proceed with the operation for your unit.
Handset: ME
E
E
EEN REDIAL
Base unit: MREDIALN
2M N
b
b
b
bb : Select the desired entry. a M SAVEN
3To store the name, continue from step 3,
“Editing entries”, page 24.
Storing caller information to the phonebook
Handset
1M N
C
C
C
CC CID
2M N
b
b
b
bb : Select the desired entry. a M MENUN
R To edit the number: M N
b
b
b
bb : “Edit” a
MSELECTN
For assistance, please visit http://shop.panasonic.com/support 23
Phonebook
TGF353_HSN_(en)_0803_ver011.pdf 23 2017/08/03 10:47:40

Press MEDITN repeatedly until the phone
number is shown in the desired format. And
then, press MSAVEN. Go to step 4.
3M N
b
b
b
bb : “Save caller ID” a MSELECTN
4M N
b
b
b
bb : “Phonebook” a MSELECTN
5Continue from step 3, “Editing entries”,
page 24.
Base unit
1MC
IDN
2M N
b
b
b
bb : Select the desired entry.
R To edit the number, press MEDITN
repeatedly until the phone number is shown
in the desired format.
3MSAVEN
4M N
b
b
b
bb : “Phonebook” a MSELECTN
5Continue from step 3, “Editing entries”,
page 24.
Groups
Groups can help you find entries in the phonebook
quickly and easily. You can change the names of
groups assigned for phonebook entries (“Friends”,
“Family”, etc.). By assigning different ringer tones
for different groups of callers, you can identify who
is calling (ringer ID), if you have subscribed to
Caller ID service.
Changing group names/setting ringer ID
The default group name is “Group 1” to
“Group 9”.
Handset / Base unit
1Proceed with the operation for your unit.
Handset: MF
F
F
FFN a MM ENUN
Base unit: M N a MM ENUN
2M N
b
b
b
bb : “Group” a MSELECTN
3M N
b
b
b
bb : Select the desired group. a M SELECTN
4To change group names
M N
b
b
b
bb : “Group name” a MSELECTN a Edit
the name (10 characters max.). a M SAVEN
5To set group ringer tone (handset)
M N
b
b
b
bb : Select the current setting of the group
ringer tone. a MSELECTN a M N
b
b
b
bb : Select the
desired ringer tone. a MSAVEN
6Proceed with the operation for your unit.
Handset: MOFFN
Base unit: MEXITN
Finding and calling from a
p honebook entry
Handset / Base unit
1Proceed with the operation for your unit.
Handset: MF
MF
MF
MFMFN
N
N
NN W
W
W
WW
Base unit: M N
W
W
W
WW
2To scroll through all entries
M N
b
b
b
bb : Select the desired entry.
To search by first character
Press the dial key (0 to 9, or ) which#
contains the character you are searching
for (page 23).
M N
b
b
b
bb :
Scroll through the phonebook if
necessary.
To search by group
MGROUPN
M N
b
b
b
bb : Select the desired group. a
MSELECTN
M N
b
b
b
bb :
Scroll through the phonebook if
necessary.
3Proceed with the operation for your unit.
Handset: M
M
M
MM N
N
N
NN
Base unit: Lift the corded handset.
Editing entries
Handset
1Find the desired entry (page 24).
2MMENUN a M b
b
b
bbN: “Edit” a MSELECTN
3Edit the name if necessary. a M NOK
4Edit the phone number if necessary. a M NOK
5M N
b
b
b
bb : Select the desired group (page 24). a
MSELECTN 2 times a MOFFN
Base unit
1Find the desired entry (page 24).
2MEDITN
3Edit the name if necessary. a M NOK
4Edit the phone number if necessary. a M NOK
5M N
b
b
b
bb : Select the desired group (page 24). a
MSELECTN 2 times a MEXITN
24 For assistance, please visit http://shop.panasonic.com/support
Phonebook
TGF353_HSN_(en)_0803_ver011.pdf 24 2017/08/03 10:47:40

Erasing entries
Erasing an entry
Handset
1Find the desired entry (page 24).
2MMENUN a M b
b
b
bbN: “Erase” a M SELECTN
3M N
b
b
b
bb : “Yes” a M SELECTN a M OFFN
Base unit
1Find the desired entry (page 24).
2MERASEN a Mb
b
b
bbN: “Yes” a MSELECTN a
MEXITN
Erasing all entries
Handset / Base unit
1Proceed with the operation for your unit.
Handset: MF
F
F
FFN a M MENUN
Base unit: M N a MM ENUN
2M N
b
b
b
bb : “Erase all” a MSELECTN
3M N
b
b
b
bb : “Yes” a M SELECTN
4M N
b
b
b
bb : “Yes” a M SELECTN
5Proceed with the operation for your unit.
Handset: MOFFN
Base unit: MEXITN
Chain dial
This feature allows you to dial phone numbers in
the phonebook while you are on a call. This
feature can be used, for example, to dial a calling
card access number or bank account PIN that you
have stored in the phonebook, without having to
dial manually.
Handset / Base unit
1Proceed with the operation for your unit.
Handset: During an outside call, press MF
F
F
FFN
.
Base unit: During an outside call, press M N.
2M N
b
b
b
bb :
Select the desired entry.
3Press MCALLN to dial the number.
Note:
R When storing a calling card access number and
your PIN in the phonebook as one phonebook
entry, press MD
D
D
DDN (Pause) on the handset or
MPAUSEN on the base unit to add pauses after
the number and PIN as necessary (page 15).
R If you have rotary/pulse service, you need to
press * (TONE) before pressing MF
F
F
FFN on
the handset or M N
on the base unit in step 1
to change the dialing mode temporarily to tone.
When adding entries to the phonebook, we
recommend adding * (TONE) to the beginning
of phone numbers you wish to chain dial
(page 23).
Speed dial
You can store phone numbers to the base unit and
handset separately:
– Handset: up to 9 entries.
– Base unit: up to 9 entries.
Adding phone numbers to speed dial
keys
Handset
You can assign 1 phone number to each of the
dial keys (1 to ).9
n
n
n
nn By entering phone numbers:
1Press and hold the desired speed dial key
( to 1 9). a MADDN
2M N
b
b
b
bb : “Manual” a MSELECTN
3Enter the party’s name (16 characters
max.). a M OKN
4Enter the party’s phone number (24 digits
max.). a M OKN a M SELECTN a M OFFN
n
n
n
nn From the phonebook:
1Press and hold the desired speed dial key
( to 1 9). a MADDN
2M N
b
b
b
bb : “Phonebook” a MSELECTN
3M N
b
b
b
bb : Select the desired entry. a MSAVEN
a M OFFN
Base unit
n
n
n
nn B y entering phone numbers:
1MSPEED DIALN
2M N
b
b
b
bb : Select the desired speed dial key. a
MEDITN
3Enter the party’s name (16 characters
max.). a M OKN
4Enter the party’s phone number (24 digits
max.). a M OKN a M SELECTN a M EXITN
For assistance, please visit http://shop.panasonic.com/support 25
Phonebook
TGF353_HSN_(en)_0803_ver011.pdf 25 2017/08/03 10:47:40
n
n
n
nn From the phonebook:
1MSPEED DIALN
2M N
b
b
b
bb : Select the desired speed dial key. a
M N
3M N
b
b
b
bb : Select the desired entry. a M SAVEN
a M EXITN
Note for handset and base unit:
RIf you edit a phonebook entry which is assigned
to a speed dial key, the edited entry does not
transfer to the speed dial key.
Note for base unit:
RYou can also select the desired entry as follows:
– Press and hold the desired speed dial key (1
to 9).
– Press MSPEED DIALN and then enter the
desired speed dial key (1 to 9).
Editing an entry
Handset
1Press and hold the desired speed dial key (1
to 9). a M MENUN
2M N
b
b
b
bb : “Edit” a MSELECTN
3Edit the name if necessary. a M NOK
4Edit the phone number if necessary. a M NOK
a M SELECTN a M OFFN
Base unit
1MS
PEED DIALN
2M N
b
b
b
bb : Select the desired entry. a M DETAILN
3MEDITN
4Edit the name if necessary. a M NOK
5Edit the phone number if necessary. a M NOK
a M SELECTN a M EXITN
Erasing an entry
Handset
1Press and hold the desired speed dial key (1
to 9). a M MENUN
2M N
b
b
b
bb : “Erase” a MSELECTN
3M N
b
b
b
bb : “Yes” a M SELECTN
4MOFFN
Base unit
1MSPEED DIALN
2M N
b
b
b
bb : Select the desired entry. a M DETAILN
3MERASEN
4M N
b
b
b
bb : “Yes” a M SELECTN
5MEXITN
Viewing an entry/Making a call
Handset
1Press and hold the desired speed dial key (1
to 9).
2To make a call, press MN.
Base unit
1MSPEED DIALN
2M N
b
b
b
bb : Select the desired entry.
3Lift the corded handset.
Note for base unit:
RYou can dial phone numbers in the speed dial
while you are on a call.
One-touch dial buttons
You can store phone numbers or extension
numbers to the base unit’s one-touch dial buttons
(1 to 3).
– phone numbers for outside calls
– extension numbers for handsets
Note:
RYou can transfer a call to a handset. While you
are on an outside call, press the one-touch dial
button with an extension number stored. The
line is put on hold and the base unit pages the
handset. After the handset answers the page,
place the corded handset on the cradle to
complete the transfer.
Adding phone numbers for outside
calls
Base unit
n
n
n
nn By entering phone numbers:
1Press and hold the desired one-touch dial
button (1 to 3). a MEDITN
2Enter the party’s name (16 characters
max.). a M OKN
26 For assistance, please visit http://shop.panasonic.com/support
Phonebook
TGF353_HSN_(en)_0803_ver011.pdf 26 2017/08/03 10:47:40

3Enter the party’s phone number (24 digits
max.). a M OKN
4MSELECTN a MEXITN
n
n
n
nn From the phonebook:
1Press and hold the desired one-touch dial
button (1 to 3).
2MN
3M N
b
b
b
bb : Select the desired entry.
4MSAVEN a M EXITN
Note:
RIf you edit a phonebook entry which is assigned
to a one-touch dial button, the edited entry does
not transfer to the one-touch dial button.
Adding extension numbers for
handsets
Base unit
1Press and hold the desired one-touch dial
button (1 to 3). a MEDITN
2Press MINTN.
3M N
b
b
b
bb : Select the desired unit. a M SELECTN 2
times a MEXITN
Viewing/editing/erasing an entry
Base unit
1Press and hold the desired one-touch dial
button (1 to 3).
RAfter viewing, press MEXITN to exit.
2To edit an entry
MEDITN a Edit the name if necessary. a
M NOK Edit the phone number if necessary.a
a M OKN a M SELECTN a M EXITN
To erase an entry
MERASEN a Mb
b
b
bbN: “Yes” a MSELECTN a
MEXITN
Making a call
Base unit
Press the desired one-touch dial button (1 to 3),
then lift the corded handset.
Note:
RYou can dial phone numbers in the one-touch
dial while you are on a call.
For assistance, please visit http://shop.panasonic.com/support 27
Phonebook
TGF353_HSN_(en)_0803_ver011.pdf 27 2017/08/03 10:47:40

Menu list
To access the features, there are 2 methods.
Handset / Base unit
n
n
n
nn Scrolling through the display menus
1MMENUN
2Press MC
C
C
CCN or MD
D
D
DDN to select the desired main menu. a MSELECTN
3Press MC
C
C
CCN or MD
D
D
DDN to select the desired item from the next sub-menus. a MSELECTN
4Press MC
C
C
CCN or MD
D
D
DDN to select the desired setting. a M SAVEN
n
n
n
nn Using the direct command code
1MMENUN a Enter the desired code.
Example: Press MMENUN#101.
2Select the desired setting. a M SAVEN
Note:
RThe unit column shows the unit(s) that can be used to program the item.
: Only the handset can program the item.
: Only the base unit can program the item.
/ : Both the handset and base unit can program the item.
RTo exit the operation, press MOFFN on the handset or MEXITN on the base unit.
RIn the following table, < > indicates the default settings.
RIn the following table, indicates the reference page number.
RDisplay menu order and sub-menu may vary depending on your model.
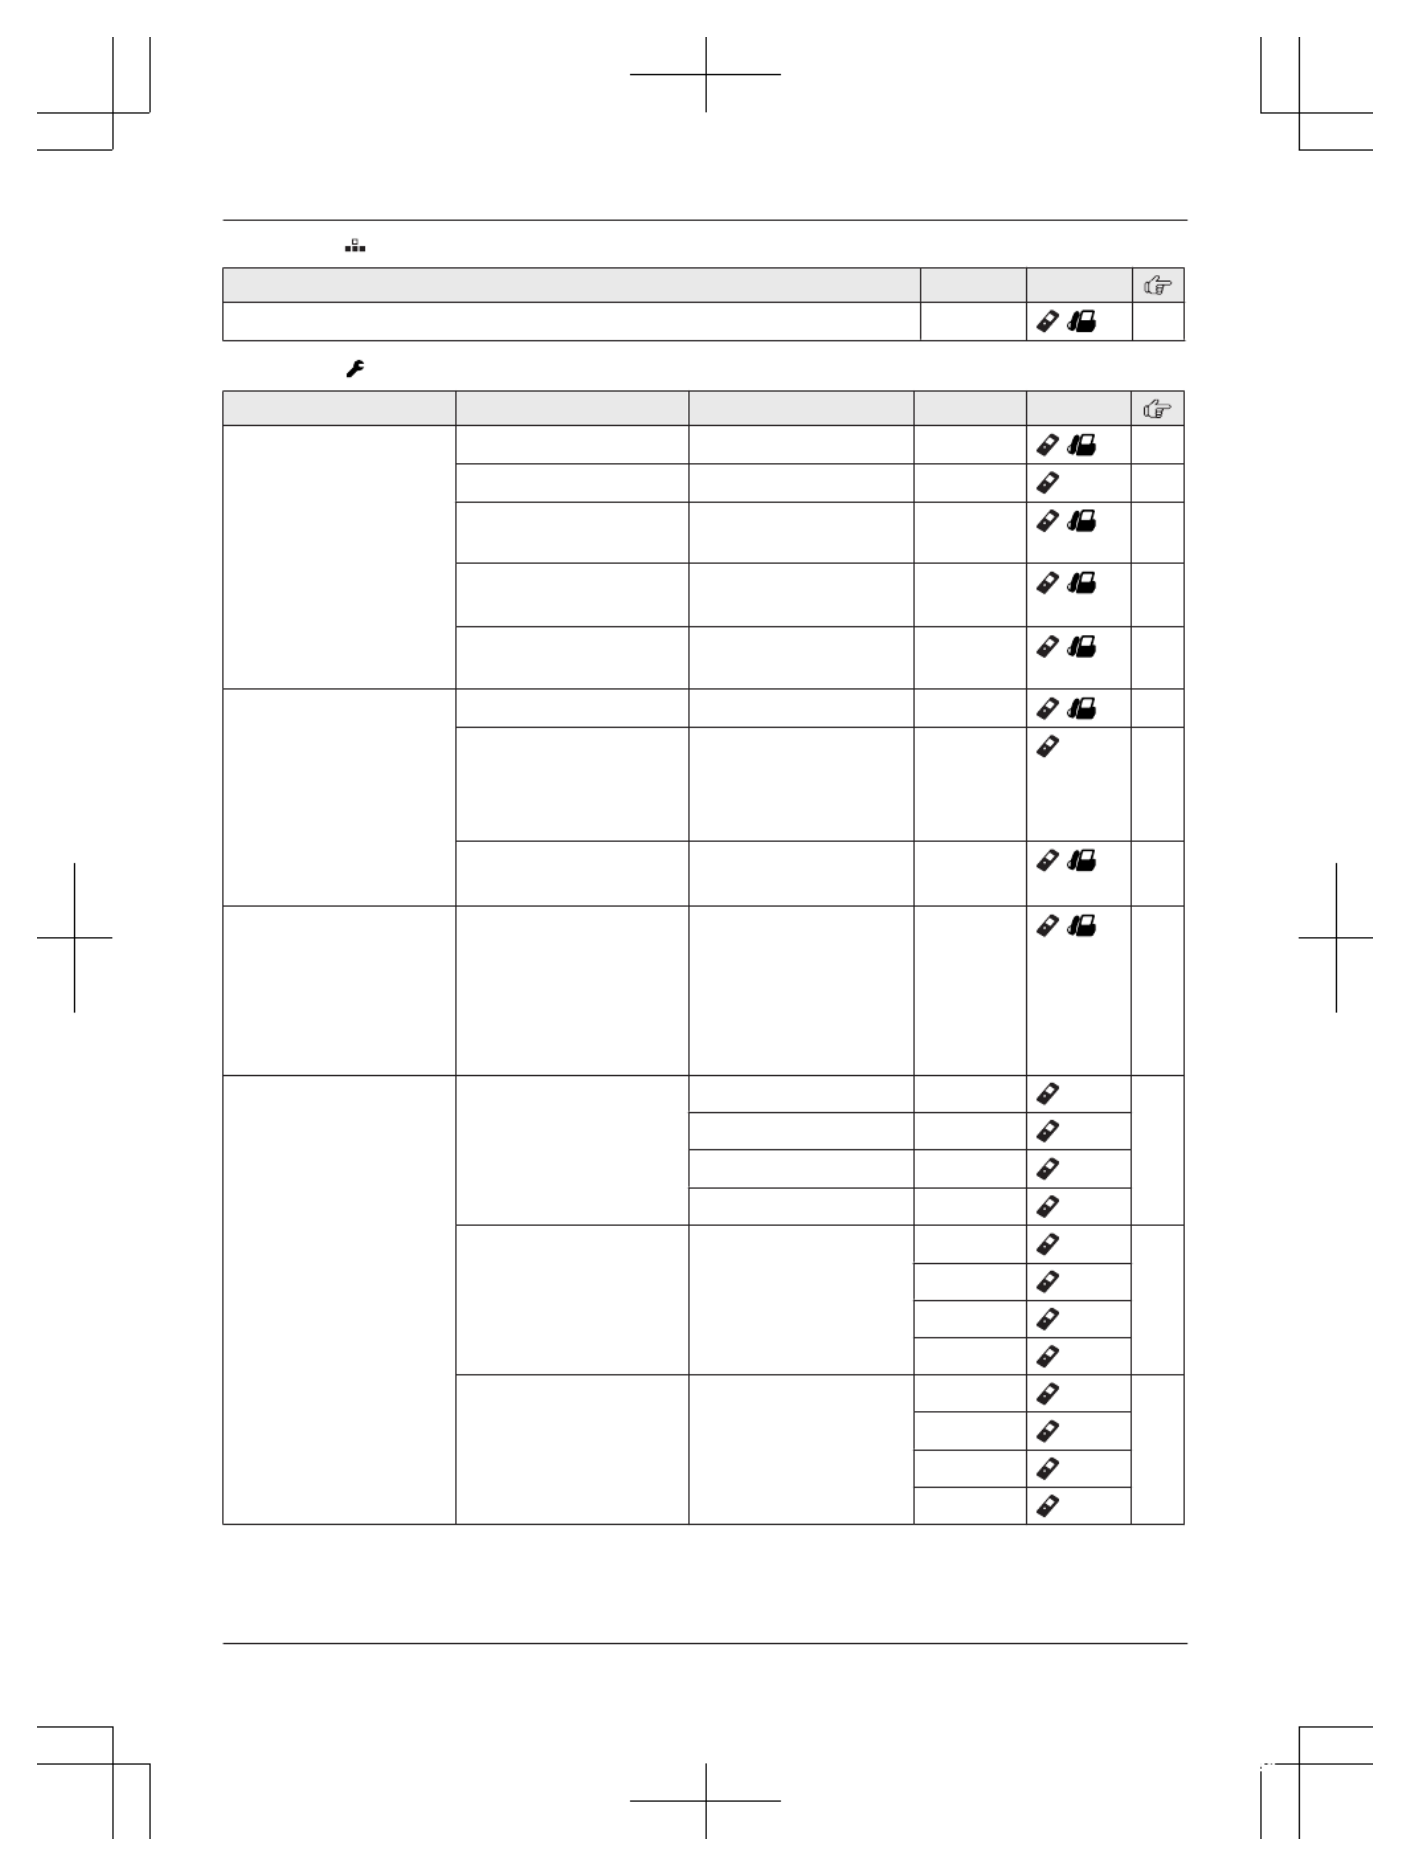
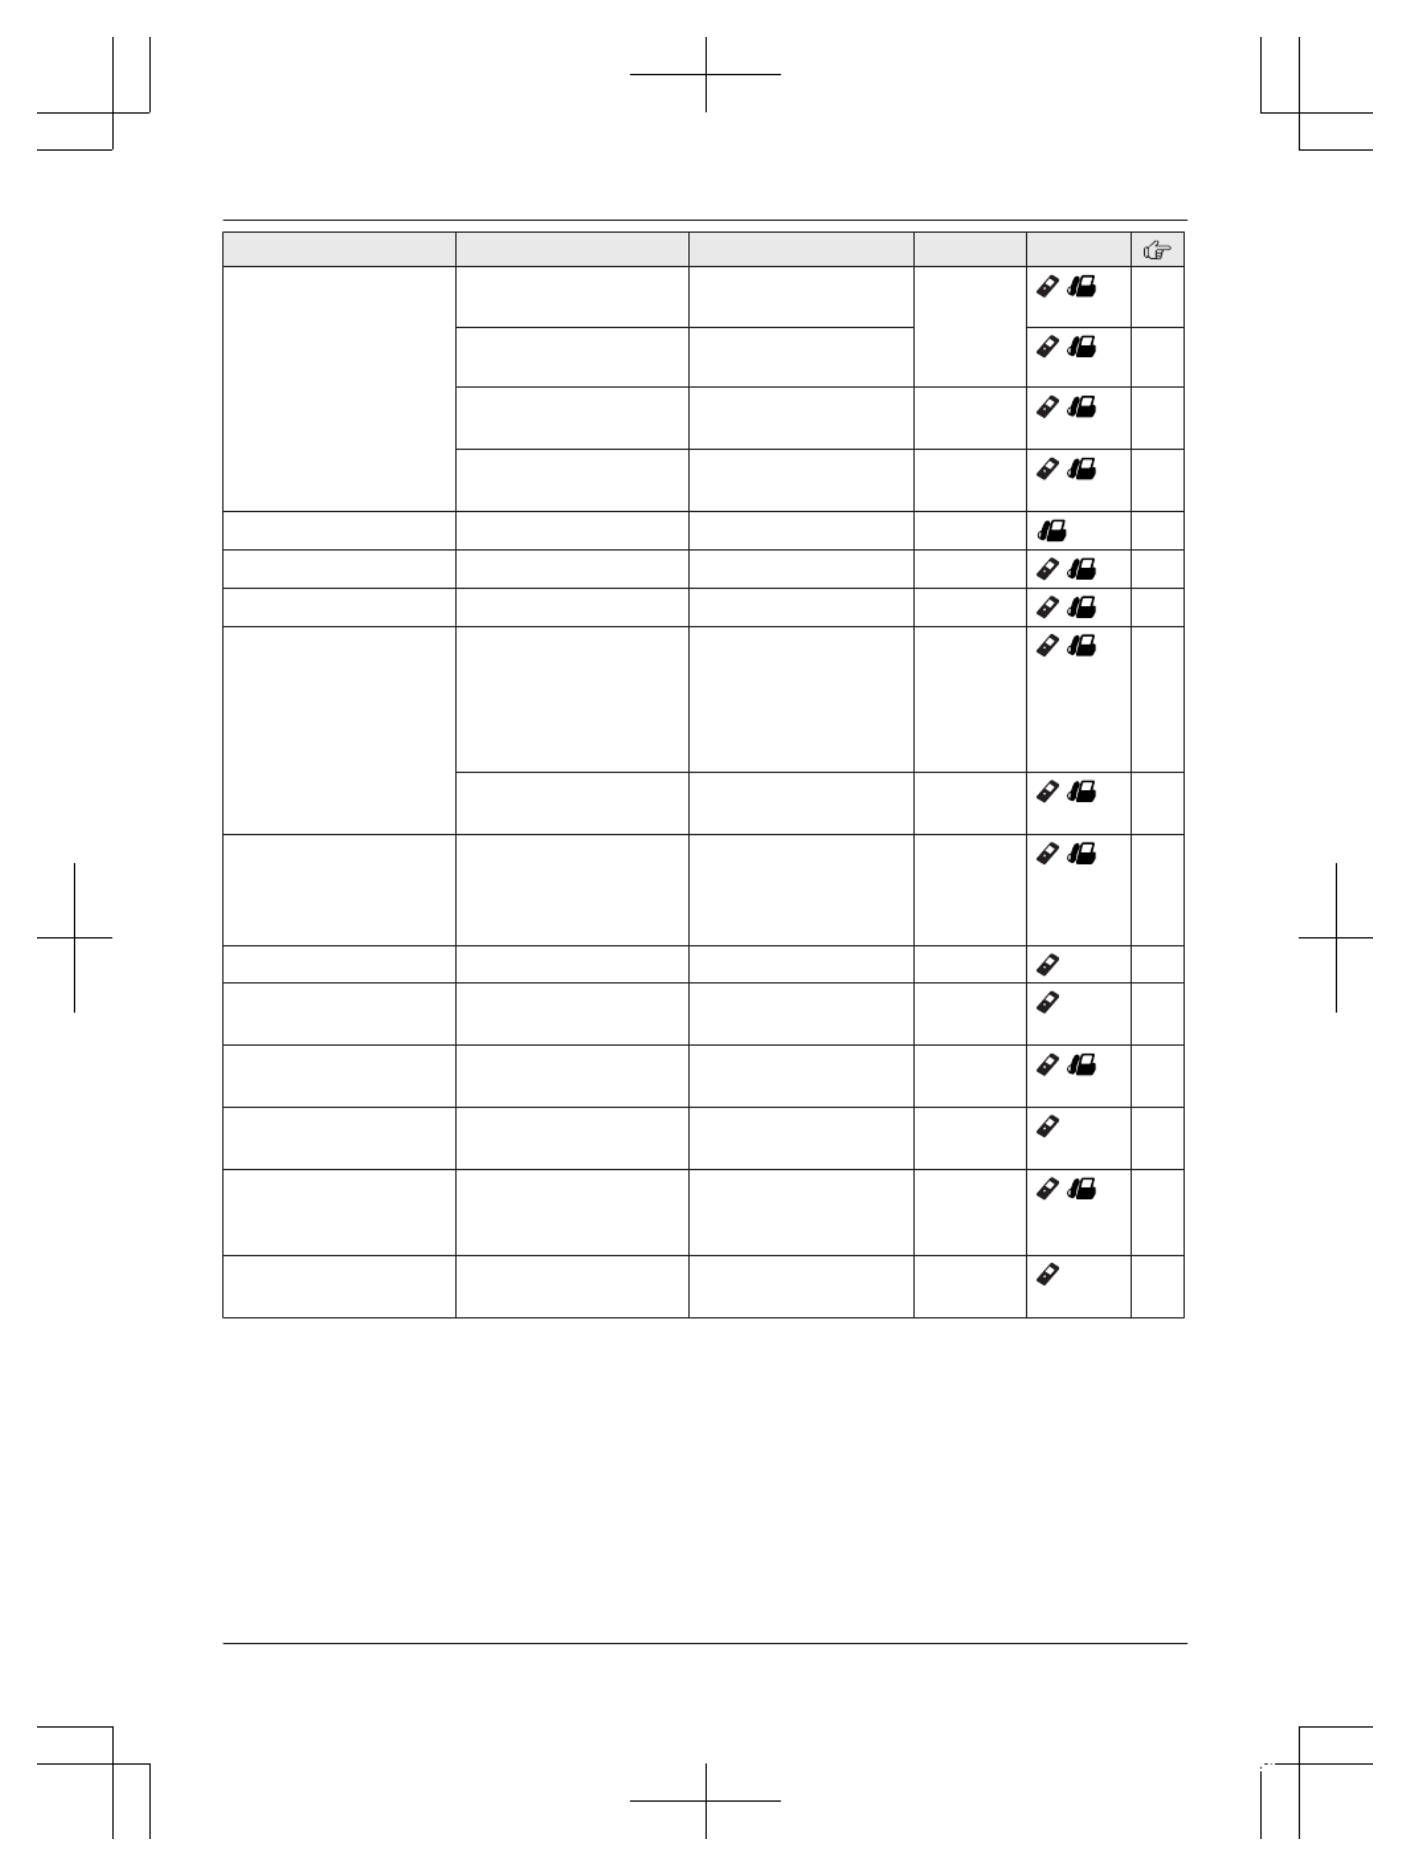
Display menu tree and direct command code table
Main menu: “Phonebook”
Operation Code Unit
Viewing the phonebook entry. #280 /24
Main menu: “Caller list”
Operation Code Unit
Viewing the caller list. #213 /38
Main menu:
Handset: “Answering device”
Base unit: “Answering device”
Sub-menu 1 Sub-menu 2 Settings Code Unit
Play new message – – #323 41
Play all message – – #324 41
Erase all
message*1
– – #325 42
28 For assistance, please visit http://shop.panasonic.com/support
Programming
TGF353_HSN_(en)_0803_ver011.pdf 28 2017/08/03 10:47:40

Sub-menu 1 Sub-menu 2 Settings Code Unit
Greeting Record greeting*1 –#302 /40
Check greeting –#303 /41
Pre-recorded*1
(Reset to pre-recorded
greeting)
–#304 /40
New message
alert*1
Outgoing call
–On/Off
On
<Off>
#338 /42
Outgoing call
–Notification to
–
Outgoing call
–Remote code
Activate
<Inactivate>
Base unit beep On
<Off>
#339 /42
Settings Ring count*1 Toll saver
2-7 rings
<4 rings>
#211 /45
Recording time*1 <3 min>
1 min
Greeting only*2
#305 /45
Remote code*1 <111>#306 /44
Screen call <On>
Off
#310 /45
Answer on*1 – – #327 40
Answer off*1 – – #328 40
Main menu: “Voicemail access”
Operation Code Unit
Listening to voicemail messages. #330 /47
Main menu: “Intercom”
Operation Code Unit
Paging the desired unit. 19#274
Main menu: “Set date & time”
Sub-menu 1 Sub-menu 2 Settings Code Unit
Date and time*1 – – #101 14
Memo alarm Alarm1-3 <Off>
Once
Daily
Weekly
#720 33
Time
adjustment*1, *3
– <Caller ID auto>
Manual
#226 –
For assistance, please visit http://shop.panasonic.com/support 29
Programming
TGF353_HSN_(en)_0803_ver011.pdf 29 2017/08/03 10:47:40
Main menu: “Speed dial”
Operation Code Unit
Viewing the speed dial entry. #261 /25
Main menu: “Settings”
Sub-menu 1 Sub-menu 2 Settings Code Unit
Ring adjustments Ringer volume Off-6 <6> #160 /–
Ringer tone*4, *5 <Tone 1>#161 –
Silent mode
–On/Off
On
<Off>
#238 /34
Silent mode
–Start/End
<11:00 PM/06:00
AM>
#237 /34
Silent mode
–Select group
Group 1-9 #241 /34
Set date & time Date and time*1 –#101 /14
Memo alarm
–Alarm1-3
<Off>
Once
Daily
Weekly
#720 33
Time
adjustment*1, *3
<Caller ID auto>
Manual
#226 /–
Talking caller ID –Handset:
<On>
Off
Base unit:*1
On
<Off>
#162 /38
Key detector
setting*6
–1:Add new
device
(for Detector1)*7
–2:Add new
device
(for Detector2)
–3:Add new
device
(for Detector3)
–4:Add new
device
(for Detector4)
Change name*1 Detector1 #6561 –
Detector2*8 #6562*8
Detector3*8 #6563*8
Detector4*8 #6564*8
Registration –#6571 –
#6572*8
#6573*8
#6574*8
Deregistration –#6581 –
#6582*8
#6583*8
#6584*8
30 For assistance, please visit http://shop.panasonic.com/support
Programming
TGF353_HSN_(en)_0803_ver011.pdf 30 2017/08/03 10:47:40
Sub-menu 1 Sub-menu 2 Settings Code Unit
Call block*1 Block a single
number
–#217 /20
Block range of
numbers
–/21
Block unknown CID
(CID: Caller ID)
Block
<Unblock>
#240 /21
One ring for
blocked call
<Yes>
No
#173 /21
One-touch dial – – #247 26
Speed dial – – #261 /25
Record greeting*1 – – #302 /40
Voicemail Save VM
access#*1, *9
( : Voicemail)VM
Save Voicemail
access#*1, *10
–#331 /46
VM tone detect*1 <On>
Off
#332 /46
LCD contrast
(Display contrast)
–Handset:
Level 1-4 <2>
Base unit:
Level 1-6 <3>
#145 /–
Handset name – – 36#104
Display name –On
<Off>
#105 36
Auto intercom –On
<Off>
#273 /19
Key tone O– < n>
Off
#165 –
Caller ID edit
(Caller ID number auto
edit)
– <On>
Off
#214 /39
Auto talk*11 –On
<Off>
#200 16
For assistance, please visit http://shop.panasonic.com/support 31
Programming
TGF353_HSN_(en)_0803_ver011.pdf 31 2017/08/03 10:47:40

Sub-menu 1 Sub-menu 2 Settings Code Unit
Set tel line*1 Set dial mode <Tone>
Pulse
#120 /14
Set flash time*12 80 ms
90 ms
100 ms
110 ms
160 ms
200 ms
250 ms
300 ms
400 ms
600 ms
<700 ms>
900 ms
#121 /16
Set line mode*13 A
< >B
#122 /–
Call sharing*1 – <On>
Off
#194 /17
Registration Register handset –#130 37
Deregistration*2 –#131 37
Deregistration*2 – – #131 37
Battery saving
mode
–On
<Off>
#150 11
Change language Display <English>
Español
#110 /13
Voice prompt*1 <English>
Español
#112 /14
Main menu: “Customer support”
Operation Code Unit
Displaying customer support Web address. #680 /–
Main menu: “Baby monitor”
Sub-menu 1 Sub-menu 2 Settings Code Unit
On/Off –On
<Off>
#268 35
Sensitivity level – Low
<Middle>
High
#269 36
Main menu: “Key detector”*6
Sub-menu 1 Sub-menu 2 Settings Code Unit
Search – – #655 –
Battery check – –
32 For assistance, please visit http://shop.panasonic.com/support
Programming
TGF353_HSN_(en)_0803_ver011.pdf 32 2017/08/03 10:47:40

*1 If you program these settings using one of the units, you do not need to program the same item using
another unit.
*2 This menu is not displayed when scrolling through the display menus. It is only available in direct
command code.
*3 This feature allows the unit to automatically adjust the date and time each time caller information
including date and time is received.
To turn this feature on, select “Caller ID auto”. To turn this feature off, select “Manual”. (Caller
ID subscribers only)
To use this feature, set the date and time first (page 14).
*4 The preset melodies in this product (“Tone 3” - “Melody 10”) are used with permission of © 2009
Copyrights Vision Inc.
*5 If you subscribe to a distinctive ring service (such as IDENTA-RING), select a tone (tone 1 or 2). If
you select a melody, you cannot distinguish lines by their ringers.
*6 This setting is available when you have the key detector (KX-TGA20). Read the installation manual
for more information on the key detector.
*7 For models with supplied key detectors, the display shows “1:Detector1”.
*8 If you register 2 or more key detectors.
*9 Handset
*10 Base unit
*11 If you subscribe to a Caller ID service and want to view the caller’s information after lifting up the
handset to answer a call, turn off this feature.
*12 The flash time depends on your telephone exchange or host PBX. Contact your PBX supplier if
necessary. The setting should stay at “700 ms” unless pressing MFLASHN fails to pick up the
waiting call.
*13 Generally, the line mode setting should not be changed. This setting automatically maintains receiver
volume at the proper level depending on the current telephone line condition. Set the line mode to
“ ”A if telephone line condition is not good.
Alarm
An alarm sounds at the set time for 1 minute and
is repeated 5 times at 5 minute intervals (snooze
function). A text memo can also be displayed for
the alarm. A total of 3 separate alarm times can be
programmed for each handset. You can set one of
3 different alarm options (once, daily, or weekly)
for each alarm time.
Important:
RMake sure the unit’s date and time setting is
correct (page 14).
Handset
1MMENUN#720
2M N
b
b
b
bb : Select the desired alarm. a M SELECTN
3M N
b
b
b
bb : Select the desired alarm option. a
MSELECTN
“Off”Turns alarm off. Go to step 10.
“Once”An alarm sounds once at the
set time.
“Daily”An alarm sounds daily at the set
time. Go to step 5.
“Weekly”Alarm sounds weekly at the set
time(s).
4Proceed with the operation according to your
selection in step 3.
n
n
n
nn Once:
Enter the desired month and date. a M OKN
n
n
n
nn Weekly:
M N
b
b
b
bb : Select the desired day of the week and
press MSELECTN. a MOKN
5Set the desired time.
6*: Select “AM” or “ ”PM . a M NOK
7Enter a text memo (10 characters max.). a
M NOK
For assistance, please visit http://shop.panasonic.com/support 33
Programming
TGF353_HSN_(en)_0803_ver011.pdf 33 2017/08/03 10:47:40

8M N
b
b
b
bb :
Select the desired alarm tone. a
MSELECTN
RWe recommend selecting a different ringer
tone from the one used for outside calls.
9M N
b
b
b
bb : Select the desired snooze setting. a
MSAVEN
10 MSELECTN a MOFFN
Note:
RPress MSTOPN to stop the alarm completely.
RWhen the handset is in use, the alarm will not
sound until the handset is in standby mode.
RPress any dial key or MSNOOZEN to stop the
sound but keep the snooze function activated.
RIf you want to make an outside call when the
snooze function is activated, please stop the
snooze function before making the call.
Silent mode
Silent mode allows you to select a period of time
during which the handset and/or base unit will not
ring for outside calls. This feature is useful for time
periods when you do not want to be disturbed, for
example, while sleeping. Silent mode can be set
for each unit.
Using the phonebook’s group feature (page 24),
you can also select groups of callers whose calls
override silent mode and ring the unit (Caller ID
subscribers only).
Important:
RMake sure the unit’s date and time setting is
correct (page 14).
RIf you have set the alarm, the alarm sounds
even if the silent mode is turned on.
Turning silent mode on/off
Handset
1MMENUN#238
2M N
b
b
b
bb : Select the desired setting. a MSAVEN
RIf you select “Off”, press MOFFN to exit.
3Enter the desired hour and minute you wish to
start this feature.
4*: Select “AM” or “PM”. a M NOK
5Enter the desired hour and minute you wish to
end this feature.
6*: Select “AM” or “PM”.
7MSAVEN a M OFFN
Base unit
1MMENUN#238
2M N
b
b
b
bb : Select the desired setting. a MSAVEN
RIf you select “Off”, press MEXITN to exit.
3Enter the desired hour and minute you wish to
start this feature.
4MAM/PMN: Select “AM” or “PM”. a M OKN
5Enter the desired hour and minute you wish to
end this feature.
6MAM/PMN: Select “AM” or “PM”.
7MSAVEN a M EXITN
Changing the start and end time
Handset / Base unit
1MMENUN#237
2Continue from step 3 for handset or step 3 for
base unit, “Turning silent mode on/off”,
page 34.
Selecting groups to bypass silent mode
Handset / Base unit
1MMENUN#241
2M N
b
b
b
bb : Select the desired group. a M SELECTN
R“” is displayed next to the selected group
numbers.
RTo cancel the selected group:
M N
b
b
b
bb : Select the group. a Press MSELECTN
again. “ ” disappears.
3MSAVEN
4Proceed with the operation for your unit.
Handset: OFF
M
M
M
MM N
N
N
NN
Base unit: M
M
M
MMEXITN
N
N
NN
Baby monitor
This feature allows you to listen in on a room
where another handset is located, allowing you to
easily monitor from different areas of the house or
even while away from home. The monitored
handset (placed in a baby’s room, for example) will
automatically call the monitoring handset, base
unit, or the phone number stored when it detects
sound.
Important:
RBefore using this feature, we recommend that
you test this feature and adjust the baby monitor
34 For assistance, please visit http://shop.panasonic.com/support
Programming
TGF353_HSN_(en)_0803_ver011.pdf 34 2017/08/03 10:47:40

sensitivity as needed, especially if you plan to
monitor from outside.
RThis feature should not be used as a substitute
for a medical or caregiver’s supervision. It is the
caregiver’s responsibility to stay close enough
to handle any eventuality.
Note:
RIf the unit is connected to a PBX system, you
cannot set the baby monitor.
RDuring the monitoring mode, battery
consumption is faster than usual. We
recommend leaving the monitored handset on
charger.
RThe monitored handset never rings while it is
being monitored. If the base unit is placed near
the monitored handset, we recommend turning
off the base unit ringer volume (page 30).
Setting the baby monitor
Perform the setting operation with the handset to
be monitored (for example, the handset placed in
a baby’s room).
To monitor with a unit
The internal baby monitor feature is available:
– between handsets
– between a handset and the base unit
Handset
1MMENUN#268
2M N
b
b
b
bb : “On” a MSELECTN
3M N
b
b
b
bb : Select the desired unit’s number to
monitor with. a MSAVEN
R“Baby monitor” will be displayed.
RThe registered unit’s name/number is
displayed.
Note:
RWhen this feature is on, another handset or the
base unit can hear the monitored handset by
making an intercom call.
To monitor from an outside line
If you enable this feature, the unit will call a
pre-programmed phone number when the handset
detects sound. After you answer the call, you can
listen in on the room where the handset is located.
Handset
n
n
n
nn From the phonebook:
1MMENUN#268
2M N
b
b
b
bb : “On” a MSELECTN
3M N
b
b
b
bb : Select “Outgoing call” to monitor
from an outside. a MEDITN a M ADDN
4M N
b
b
b
bb : “Phonebook” a MSELECTN
5M N
b
b
b
bb : Select the phonebook entry. a MSAVEN
R“Baby monitor” will be displayed.
Note:
RIf you edit a phonebook entry which is assigned
for monitoring, the edited entry does not transfer
to the monitor.
n
n
n
nn By entering phone numbers:
1MMENUN#268
2M N
b
b
b
bb : “On” a MSELECTN
3M N
b
b
b
bb : Select “Outgoing call” to monitor
from an outside. a MEDITN a M ADDN
4M N
b
b
b
bb : “Manual” a MSELECTN
5Enter the desired name. a M N OK
6Enter the desired number. a M OKN a
MSELECTN
R“Baby monitor” will be displayed.
Note:
RThe registered name/number is displayed.
Turning off the baby monitor
The monitored handset cannot be used while baby
monitor is set to “ ”On .
Handset
1Press MMENUN on the handset being
monitored.
2M N
b
b
b
bb : “On/Off” a MSELECTN
3M N
b
b
b
bb : “Off” a M SELECTN a M OFFN
Editing an outside monitoring number
Handset
1Press MMENUN on the handset being
monitored.
2M N
b
b
b
bb : “On/Off” a MSELECTN
3M N
b
b
b
bb : “On” a MSELECTN
4M N
b
b
b
bb : Select the outside line. a M EDITN
For assistance, please visit http://shop.panasonic.com/support 35
Programming
TGF353_HSN_(en)_0803_ver011.pdf 35 2017/08/03 10:47:40
5MMENUN a Mb
b
b
bbN: “Edit” a MSELECTN
6Edit the name if necessary. a M OKN
7Edit the phone number if necessary. a M OKN
a M SELECTN
Erasing an outside monitoring number
Handset
1Press MMENUN on the handset being
monitored.
2M N
b
b
b
bb : “On/Off” a MSELECTN
3M N
b
b
b
bb : “On” a MSELECTN
4M N
b
b
b
bb : Select the outside line. a MEDITN
5MMENUN a M N
b
b
b
bb : “Erase” a MSELECTN
6M N
b
b
b
bb : “Yes” a MSELECTN a MOFFN
Baby monitor sensitivity
You can adjust the sensitivity of the baby monitor.
Increase or decrease the sensitivity to adjust the
sound level needed to trigger the baby monitor
feature.
RThis feature cannot be set during a monitoring
call.
Handset
1Press MMENUN on the handset being
monitored.
2M N
b
b
b
bb : “Sensitivity level” a MSELECTN
3M N
b
b
b
bb : Select the desired setting. a M SAVEN
a M OFFN
Answering the baby monitor
n
n
n
nn When monitoring with a unit:
Handset: Press M N to answer a call.
Base unit: Press M N
Z
Z
Z
ZZ to answer a call.
If you want to respond from the monitoring unit,
press MMUTEN.
RThe monitoring unit will answer calls
automatically when the auto intercom feature
is set to “On” (page 19).
Note:
RIf you receive an outside call when
communicating with the monitored handset,
the interrupt tone sounds.
– To answer the call with the handset, press
MOFFN, then press M N.
– To answer the call with the base unit, press
M N
Z
Z
Z
ZZ 3 times.*1
*1 If MMUTEN is pressed, press MZ
Z
Z
ZZN 2 times.
n
n
n
nn When monitoring from an outside line:
Answer the call.
If you want to respond from your monitoring
phone, press #1 using tone dialing.
You can turn off the baby monitor feature by
pressing .#0
Note:
RThe unit disconnects the call automatically
after 2 minutes.
Other programming
Changing the handset name
The default handset name is “Handset 1” to
“Handset 6”. You can customize the name of
each handset (“Bob”, “Kitchen”, etc.). This is useful
when you make intercom calls between handsets.
To display the handset name in standby mode,
turn on the handset name display feature
(page 36).
Handset
1MMENUN#104
2Enter the desired name (10 characters max.).
a M SAVEN a MOFFN
Displaying the handset name
You can select whether or not the handset name
is displayed in standby mode. The default setting
is “Off”.
Handset
1MMENUN#105
2M N
b
b
b
bb : Select the desired setting. a M SAVEN
a M OFFN
36 For assistance, please visit http://shop.panasonic.com/support
Programming
TGF353_HSN_(en)_0803_ver011.pdf 36 2017/08/03 10:47:40

Registering a unit
Operating additional units
Additional handsets
Up to 6 handsets can be registered to the base
unit.
Important:
RSee page 4 for information on the available
model.
Registering a handset to the base unit
The supplied handset and base unit are
pre-registered. If for some reason the handset is
not registered to the base unit, re-register the
handset.
1Handset:
MMENUN#130
2Base unit:
Press and hold MLOCATORN for about 5
seconds.
RIf all registered handsets start ringing, press
MLOCATORN again to stop, then repeat this
step.
3Handset:
Press MOKN, then wait until a long beep
sounds.
Deregistering a handset
A handset can cancel its own registration to the
base unit, or other handsets registered to the
same base unit. This allows the handset to end its
wireless connection with the system.
Handset / Base unit
1MMENUN#131
RAll handsets registered to the base unit are
displayed.
2M N
b
b
b
bb : Select the handset you want to cancel.
a M SELECTN
3M N
b
b
b
bb : “Yes” a M SELECTN
4Proceed with the operation for your unit.
Handset: MOFFN
Base unit: MEXITN
For assistance, please visit http://shop.panasonic.com/support 37
Programming
TGF353_HSN_(en)_0803_ver011.pdf 37 2017/08/03 10:47:41

Using Caller ID service
Important:
RThis unit is Caller ID compatible. To use Caller
ID features, you must subscribe to a Caller ID
service. Contact your phone service provider for
details.
Caller ID features
Handset / Base unit
When an outside call is being received, the caller
information is displayed.
Caller information for the last 50 callers is logged
in the caller list from the most recent call to the
oldest.
RIf the unit cannot receive caller information, the
following is displayed:
–“Out of area”: The caller dials from an
area which does not provide a Caller ID
service.
–“Private caller”: The caller requests not
to send caller information.
–“Long distance”: The caller makes a long
distance call.
RIf the unit is connected to a PBX system, caller
information may not be properly received.
Contact your PBX supplier.
Missed calls
Handset / Base unit
If a call is not answered, the unit treats it as a
missed call. The display shows “Missed call”.
Note:
REven when there are unviewed missed calls,
“Missed call” disappears from the standby
display if the following operation is performed by
one of the units:
– A handset is replaced on the charger.
– Pressing MOFFN on a handset.
– Pressing MEXITN on the base unit.
Phonebook name display
When caller information is received and it matches
a phone number stored in the phonebook, the
stored name in the phonebook is displayed and
logged in the caller list.
Talking Caller ID
Handset / Base unit
This feature lets you know who is calling without
looking at the display.
To use this feature, you must:
– subscribe to a Caller ID service of your phone
service provider.
– turn this feature on (page 30).
When caller information is received, the handsets
and/or base unit announce the caller’s name or
phone number received from your phone service
provider following every ring.
The unit announces in English only.
RName pronunciation may vary. This feature may
not pronounce all names correctly.
RCaller ID service has a limit of how many
characters can be displayed. If the caller’s name
is too long, the unit may not be able to display or
announce the entire name.
Phonebook name announcement
When caller information is received and it matches
a phone number stored in the phonebook, the
stored name in the phonebook is announced.
Caller list
Important:
RMake sure the unit’s date and time setting is
correct (page 14).
Viewing the caller list and calling back
Handset / Base unit
1Proceed with the operation for your unit.
Handset: CIDM N
C
C
C
CC
Base unit: MCIDN
2Press MC
C
C
CCN to search from the most recent call,
or MD
D
D
DDN to search from the oldest call.
3Proceed with the operation for your unit.
Handset:
– To call back, press M N.
–To exit, press M NOFF .
Base unit:
– To call back, lift the corded handset.
– To exit, press M NEXIT .
38 For assistance, please visit http://shop.panasonic.com/support
Caller ID Service
TGF353_HSN_(en)_0803_ver011.pdf 38 2017/08/03 10:47:41

Note for handset and base unit:
RIf the entry has already been viewed or
answered, “ ” is displayed.
RIn step 1, you can also access the caller list as
follows:
Base unit:
MCALL LOGN a M b
b
b
bbN: “Incoming call” a
MSELECTN
Editing a caller’s phone number
You can edit a phone number in the caller list by
removing its area code and/or the long distance
code “1”.
Handset
1M N
C
C
C
CC CID
2M N
b
b
b
bb : Select the desired entry. a MMENUN
3M N
b
b
b
bb : “Edit” a MSELECTN
4Press MEDITN repeatedly until the phone
number is shown in the desired format.
5MN
Base unit
1MCIDN
2M N
b
b
b
bb : Select the desired entry.
3Press MEDITN repeatedly until the phone
number is shown in the desired format.
4Lift the corded handset.
Caller ID number auto edit feature
Handset / Base unit
Once you call back an edited number, the unit
which was used to call back remembers the area
code and format of the edited number. The next
time someone calls from the same area code,
caller information is customized by the unit as
follows:
– When the call is being received, the Caller ID
number is displayed in the same format as the
edited number.
– After the call has ended, the caller’s phone
number is displayed in the same format as the
edited number, when reviewed from the caller
list.
For example, you can use this feature to set the
unit to ignore the area code of callers in your area,
so that you can call these local numbers using
caller information without dialing the area code.
To activate this feature, you must edit an entry in
the caller list, then call that number. After that,
phone numbers from that caller’s area code are
edited automatically.
This feature can be set for each unit (page 31).
The default setting is “On”.
Note:
RPhone numbers from the 4 most recently edited
area codes are automatically edited.
Erasing selected caller information
Handset / Base unit
1Proceed with the operation for your unit.
Handset: MC
C
C
CCN CID
Base unit: MCIDN
2M N
b
b
b
bb : Select the desired entry.
3MERASEN a Mb
b
b
bbN: “Yes” a MSELECTN
4Proceed with the operation for your unit.
Handset: OFF
M
M
M
MM N
N
N
NN
Base unit: MEXITN
Erasing all caller information
Handset / Base unit
1Proceed with the operation for your unit.
Handset: MC
C
C
CCN CID
Base unit: MCIDN
2MERASEN a Mb
b
b
bbN: “Yes” a MSELECTN
3Proceed with the operation for your unit.
Handset: OFF
M
M
M
MM N
N
N
NN
Base unit: MEXITN
For assistance, please visit http://shop.panasonic.com/support 39
Caller ID Service
TGF353_HSN_(en)_0803_ver011.pdf 39 2017/08/03 10:47:41

Answering system
The answering system can answer and record
calls for you when you are unavailable to answer
the phone.
You can also set the unit to play a greeting
message but not to record caller messages by
selecting “Greeting only” as the recording
time setting (page 45).
Important:
RMake sure the unit’s date and time setting is
correct (page 14).
Memory capacity (including your
greeting message)
The total recording capacity is about 17 minutes. A
maximum of 64 messages can be recorded.
Note:
RWhen message memory becomes full:
–“Messages full” is shown on the handset
and base unit display.
– on the base unit flashes rapidly if the
answering system is turned on.
– If you use the pre-recorded greeting
message, the unit automatically switches to
another pre-recorded greeting message
asking callers to call again later.
– If you recorded your own greeting message,
the same message is still announced to
callers even though their messages are not
recorded.
Turning the answering
system on/off
Base unit
P
ress M N to turn on/off the answering system.
Handset
1To turn on:
MMENUN#327
To turn off:
MMENUN#328
2MOFFN
Note for base unit and handset:
RWhen the answering system is turned on,
on the base unit lights up.
Greeting message
When the unit answers a call, a greeting message
is played to callers.
You can use either:
– your own greeting message
– a pre-recorded greeting message
Recording your greeting message
You can configure this setting using either the
base unit or one of the handsets.
Handset / Base unit
1MMENUN#302
2M N
b
b
b
bb : “Yes” a M SELECTN
3After a beep sounds, speak clearly about
20 cm (8 inches) away from the microphone (2
minutes max.).
4Press MSTOPN to stop recording.
5Proceed with the operation for your unit.
Handset: MOFFN
Base unit: MEXITN
Using a pre-recorded greeting
message
The unit provides 2 pre-recorded greeting
messages:
– If you reset to pre-recorded greeting or do not
record your own greeting message, the unit
plays a pre-recorded greeting asking callers to
leave a message.
– If the message recording time (page 45) is set
to “Greeting only”, callers’ messages are
not recorded and the unit plays a different
pre-recorded greeting message asking callers to
call again.
Resetting to a pre-recorded greeting message
Use this procedure to erase your greeting
message and use a pre-recorded one.
You can configure this setting using either the
base unit or one of the handsets.
40 For assistance, please visit http://shop.panasonic.com/support
Answering System
TGF353_HSN_(en)_0803_ver011.pdf 40 2017/08/03 10:47:41
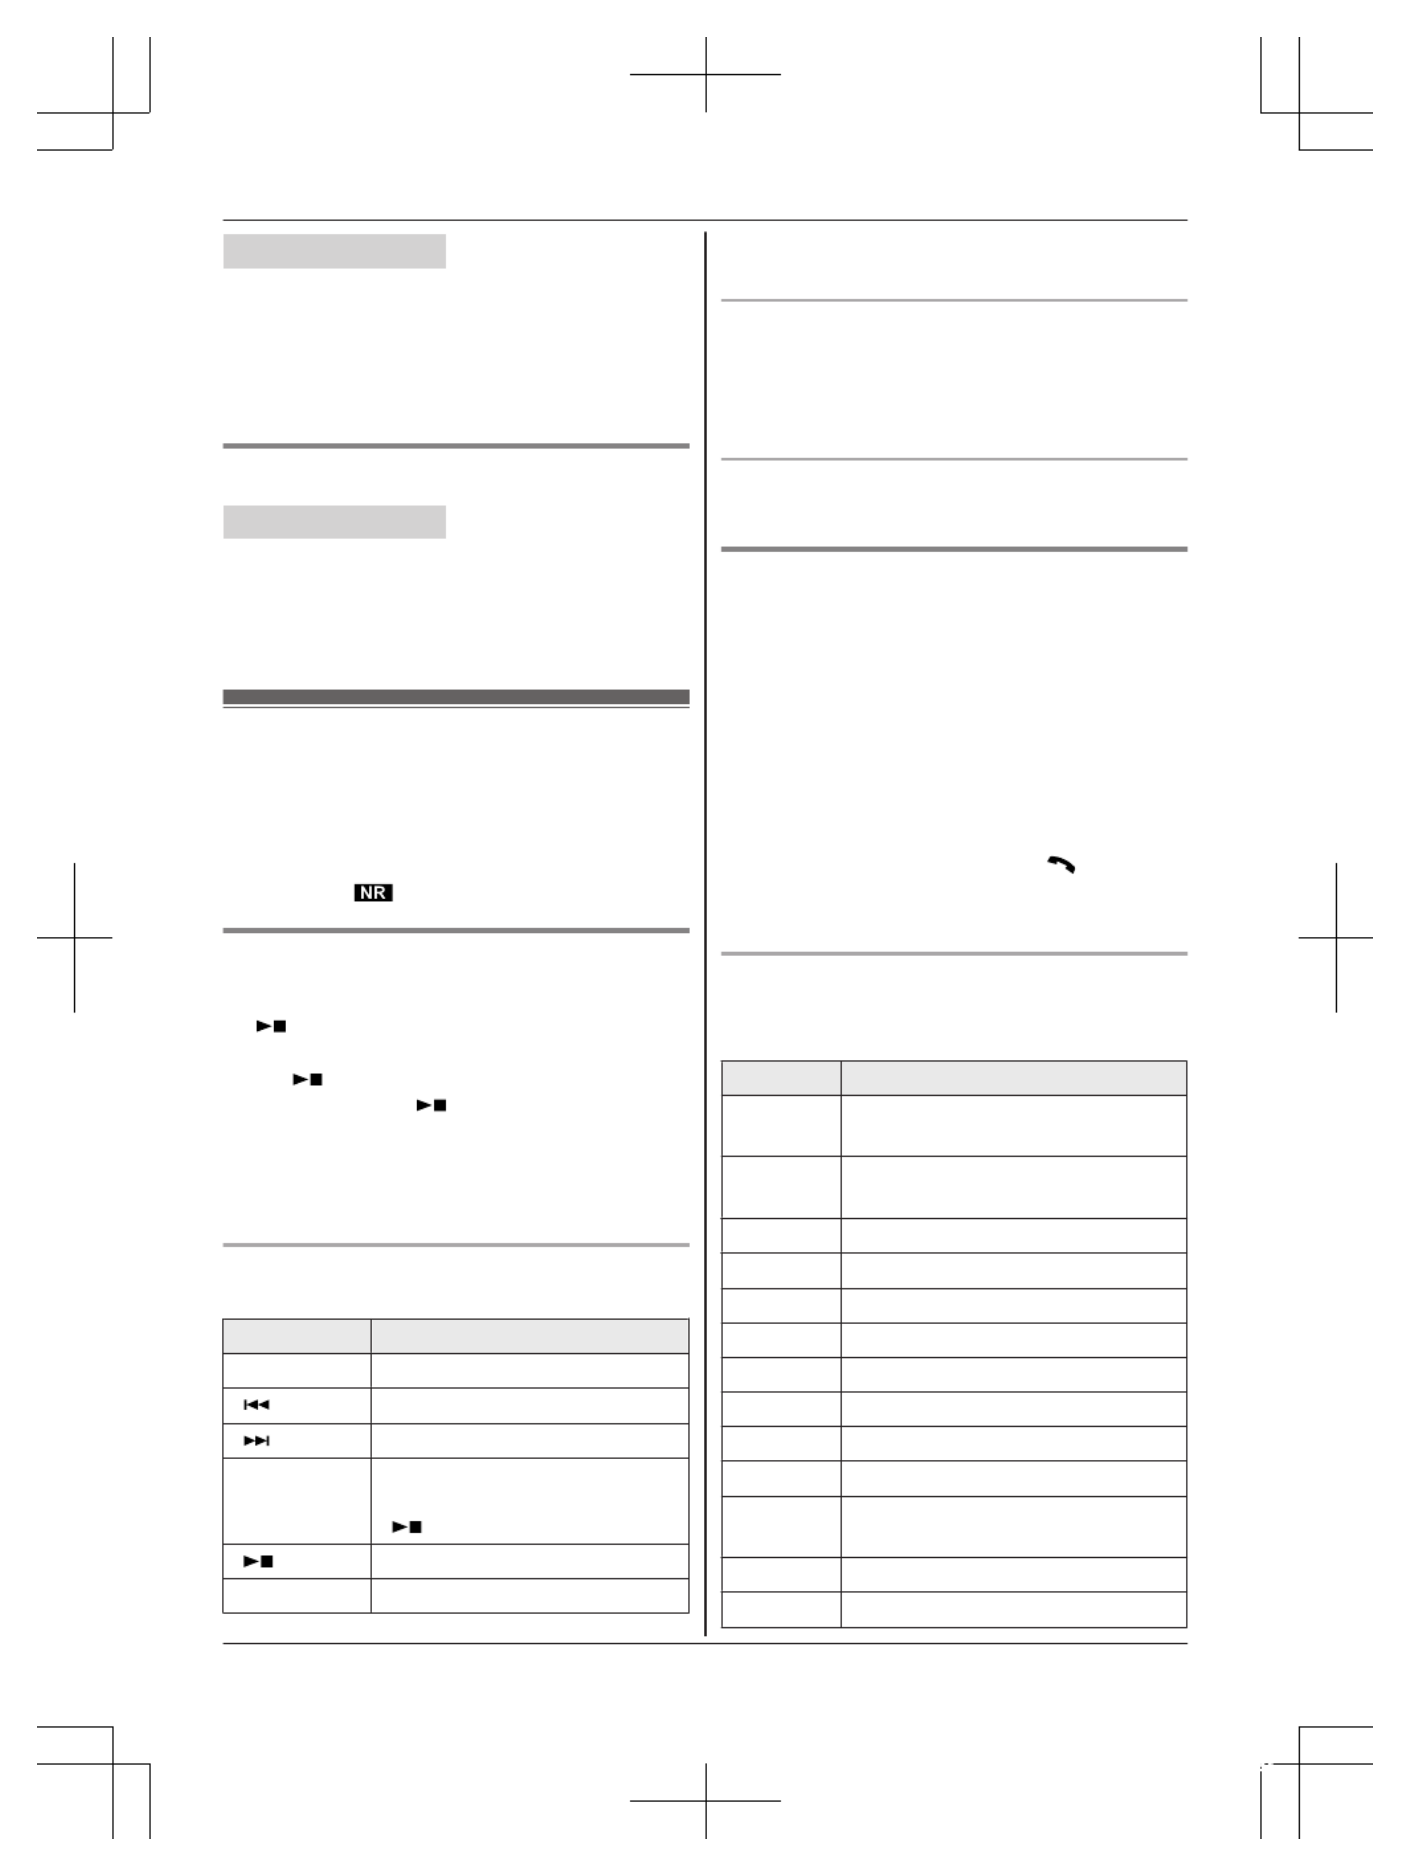
Handset / Base unit
1MMENUN#304
2MYESN
3Proceed with the operation for your unit.
Handset: MOFFN
Base unit: MEXITN
Playing back the greeting message
Handset / Base unit
1MMENUN#303
2Proceed with the operation for your unit.
Handset: To exit, press MOFFN.
Base unit: To exit, press MEXITN.
Listening to messages
Important:
RWhen using the base unit or handset to listen to
messages, the noise reduction feature
(page 17) is activated automatically in spite of
the setting ( is not displayed).
Using the base unit
When new messages have been recorded:
–M N on the base unit flashes.
–“New message” is displayed.
Press M N (PLAY).
RDuring playback, on the base unit lights.M N
RIf new messages have been recorded, the base
unit plays back new messages.
RIf there are no new messages, the base unit
plays back all messages.
Operating the answering system during
playback
Key Operation
M N
D
D
D
DD or MC
C
C
CCN Adjust the speaker volume
M N Repeat message*1
M N Skip message
MPAUSENPause message
To resume playback, press
M N.
M N (STOP) Stop playback
MERASENErase currently playing message
*1 If pressed within the first 5 seconds of a
message, the previous message is played.
Calling back (Caller ID subscribers only)
Lift the corded handset during playback.
RTo edit the number before calling back, press
MEDITN repeatedly until the phone number is
shown in the desired format (page 39).
Erasing all messages
Press MERASEN 2 times while the unit is not in use.
Using the handset
When new messages have been recorded, “New
message” is displayed.
1To listen to new messages:
MMENUN#323
To listen to all messages:
MMENUN#324
2When finished, press MOFFN.
Note:
RTo switch to the receiver, press M N.
RYou can also use the M NPLAY soft key, if
displayed, to play new messages.
Operating the answering system
MMENUN a M N
b
b
b
bb : “Answering device” a
MSELECTN
Key Operation
M N
D
D
D
DD or MC
C
C
CCN Adjust the receiver/speaker volume
(during playback)
1 or MF
F
F
FFN Repeat message (during
playback)*1
2 or ME
E
E
EEN Skip message (during playback)
3Enter the “S
ettings” menu
4Play new messages
5Play all messages
6Play greeting message
76 Record greeting message
8Turn answering system on
MPAUSENPause message*2
9
or
MSTOPN
Stop recording
Stop playback
0Turn answering system off
*4
*3 Erase currently playing message
For assistance, please visit http://shop.panasonic.com/support 41
Answering System
TGF353_HSN_(en)_0803_ver011.pdf 41 2017/08/03 10:47:41

Key Operation
*5 Erase all messages
*6 Reset to a pre-recorded greeting
message
*1 If pressed within the first 5 seconds of a
message, the previous message is played.
*2 To resume playback:
M N
b
b
b
bb : “Playback” a MSELECTN
*3 You can also erase as follows:
MPAUSEN a M b
b
b
bbN: “Erase” a M SELECTN
a M b
b
b
bbN: “Yes” a MSELECTN
Calling back (Caller ID subscribers only)
1Press MPAUSEN during playback.
2M N
b
b
b
bb : “Call back” a MSELECTN
Editing the number before calling back
1Press MPAUSEN during playback.
2M N
b
b
b
bb : “Edit & Call” a M SELECTN
3Press MEDITN repeatedly until the phone
number is shown in the desired format
(page 39). a M N
Erasing all messages
1MMENUN#325
2M N
b
b
b
bb : “Yes” a M SELECTN a MOFFN
Advanced new message
alerting features
Audible message alert
This feature allows the base unit to beep to inform
you of a new message arrival when new
messages are recorded. The base unit beeps 2
times every minute until you listen to the
messages, if the “Base unit beep” setting is
turned on. The default setting is “Off”.
You can configure this setting using either the
base unit or one of the handsets.
Handset / Base unit
1MMENUN#339
2M N
b
b
b
bb : Select the desired setting. a MSAVEN
3Proceed with the operation for your unit.
Handset: MOFFN
Base unit: MEXITN
New message alert by a call
This feature allows you to receive a notification by
phone when new messages are recorded. The
base unit calls a phone number you specify. You
can then operate the answering system remotely
to listen to the new message.
To use this feature, you must:
– store a phone number to which the unit makes
the call to.
– turn on the new message alert setting.
After you answer the new message alert call, you
can listen to messages from that call (page 43).
You can configure this setting using either the
base unit or one of the handsets.
Important:
RA new message alert is stopped 1 minute after
the unit starts to call. The unit will not retry the
call even if the call is not answered.
Storing a phone number to which the unit
makes an alert call
Handset
n
n
n
nn From the phonebook:
1MMENUN#338
2M N
b
b
b
bb : “Notification to” a M SELECTN
a M ADDN
3M N
b
b
b
bb : “Phonebook” a MSELECTN
4M N
b
b
b
bb : Select the desired phonebook entry.
a M SAVEN a MOFFN
n
n
n
nn By entering a phone number:
1MMENUN#338
2M N
b
b
b
bb : “Notification to” a M SELECTN
a M ADDN
3M N
b
b
b
bb : “Manual” a MSELECTN
4Enter the desired name (16 characters
max.). a M OKN
5Enter the desired number (24 digits max.).
a M OKN a M SELECTN a MOFFN
Base unit
n
n
n
nn F rom the phonebook:
1MMENUN#338
42 For assistance, please visit http://shop.panasonic.com/support
Answering System
TGF353_HSN_(en)_0803_ver011.pdf 42 2017/08/03 10:47:41
2M N
b
b
b
bb : “Notification to” a M SELECTN
a M N
3M N
b
b
b
bb : Select the desired phonebook entry.
a M SAVEN a MEXITN
n
n
n
nn By entering a phone number:
1MMENUN#338
2M N
b
b
b
bb : “Notification to” a M SELECTN
a M EDITN
3Enter the desired name (16 characters
max.). a M OKN
4Enter the desired number (24 digits max.).
a M OKN a M SELECTN a MEXITN
Turning on/off the new message alert setting
Handset / Base unit
1MMENUN#338
2M N
b
b
b
bb : “On/Off” a MSELECTN
3M N
b
b
b
bb : Select the desired setting. a MSAVEN
4Proceed with the operation for your unit.
Handset: MOFFN
Base unit: MEXITN
Editing the set phone number
Handset
1MMENUN#338
2M N
b
b
b
bb : “Notification to” a M SELECTN
3MMENUN a Mb
b
b
bbN: “Edit” a MSELECTN
4Edit the name if necessary (16 characters
max.). a M OKN
5Edit the phone number if necessary (24 digits
max.). a M OKN a MSELECTN a MOFFN
Base unit
1MMENUN#338
2M N
b
b
b
bb : “Notification to” a M SELECTN a
MEDITN
3Edit the name if necessary (16 characters
max.). a M OKN
4Edit the phone number if necessary (24 digits
max.). a M OKN a MSELECTN a MEXITN
Erasing the set phone number
Handset
1MMENUN#338
2M N
b
b
b
bb : “Notification to” a M SELECTN
3MMENUN a M N
b
b
b
bb : “Erase” a MSELECTN
4M N
b
b
b
bb : “Yes” a M SELECTN a MOFFN
RThe new message alert setting is turned off.
Base unit
1MMENUN#338
2M N
b
b
b
bb : “Notification to” a M SELECTN a
MERASEN
3M N
b
b
b
bb : “Yes” a M SELECTN a MEXITN
RThe new message alert setting is turned off.
Activating/inactivating the remote access code
to play messages
If you activate this feature, you must enter the
remote access code (page 44) to play the new
message from the new message alert call. This is
so that unauthorized parties cannot listen to your
messages. The default setting is “Inactivate”.
–“Inactivate”: You can listen to the message
by pressing 4 to play new messages (without
entering the remote access code).
–“Activate”: You must enter your remote
access code and then press 4 to play new
message.
Handset / Base unit
1MMENUN#338
2M N
b
b
b
bb : “Remote code” a M SELECTN
3M N
b
b
b
bb : Select the desired setting. a MSAVEN
4Proceed with the operation for your unit.
Handset: MOFFN
Base unit: MEXITN
Listening to messages
After you answer the new message alert, you can
listen to the messages as follows.
n
n
n
nn When the remote access code is set to
“Inactivate”:
Press 4 to play the new message during the
announcement.
n
n
n
nn When the remote access code is set to
“Activate”:
1Enter the remote access code (page 44)
during the announcement.
2Press 4 to play the new message.
For assistance, please visit http://shop.panasonic.com/support 43
Answering System
TGF353_HSN_(en)_0803_ver011.pdf 43 2017/08/03 10:47:41
Note:
RWithin 10 seconds after listening to new
messages, you can press #9 during the call
to turn off the new message alert by a call
feature.
REven if the unit makes a new message alert call,
the handset redial list does not show the record.
However, on the base unit redial list it is shown
as “Message alert”.
Remote operation
Using a touch-tone phone, you can call your
phone number from outside and access the unit to
listen to messages or change answering system
settings. The unit’s voice guidance prompts you to
press certain dial keys to perform different
operations.
Remote access code
A 3-digit remote access code must be entered
when operating the answering system remotely.
This code prevents unauthorized parties from
listening to your messages remotely. The default
setting is “111”.
You can configure this setting using either the
base unit or one of the handsets.
Important:
RTo prevent unauthorized access to this product,
we recommend that you regularly change the
remote code.
Handset / Base unit
1MMENUN#306
2Enter the desired 3-digit remote access code.
a M SAVEN
3Proceed with the operation for your unit.
Handset: MOFFN
Base unit: MEXITN
Deactivating remote operation
Press in step 2 on “Remote access code”,*
page 44.
RThe entered remote access code is deleted.
Using the answering system remotely
1Dial your phone number from a touch-tone
phone.
2After the greeting message starts, enter your
remote access code.
3Follow the voice guidance prompts as
necessary or control the unit using remote
commands (page 44).
4When finished, hang up.
Voice guidance
n
n
n
nn When the English voice guidance is selected
During remote operation, the unit’s voice
guidance starts and prompts you to press 1 to
perform a specific operation, or press 2 to
listen to more available operations.
n
n
n
nn When the Spanish voice guidance is selected
To start the voice guidance, press 9. The voice
guidance announces the available remote
commands (page 44).
Note:
RIf you do not press any dial keys within 10
seconds after a voice guidance prompt, the unit
disconnects your call.
Remote commands
You can press dial keys to access certain
answering system functions without waiting for the
voice guidance to prompt you.
Key Operation
1Repeat message (during playback)
*1
2Skip message (during playback)
4Play new messages
5Play all messages
9Stop playback*2
Start voice guidance
*3
0Turn answering system off
*4 Erase currently playing message
*5 Erase all messages
*# End remote operation
(or hang up)
*1 If pressed within the first 5 seconds of a
message, the previous message is played.
*2 For English voice guidance only
*3 For Spanish voice guidance only
44 For assistance, please visit http://shop.panasonic.com/support
Answering System
TGF353_HSN_(en)_0803_ver011.pdf 44 2017/08/03 10:47:41

Turning on the answering system
remotely
1Dial your phone number from a touch-tone
phone.
2Let the phone ring 15 times.
RA long beep is heard.
3Enter your remote access code within 10
seconds after the long beep.
RThe greeting message is played back.
RYou can either hang up, or enter your
remote access code again and begin
remote operation (page 44).
Answering system settings
Call screening
Handset / Base unit
While a caller is leaving a message, you can listen
to the call through the unit’s speaker.
To adjust the speaker volume, press M N
D
D
D
DD or M N
C
C
C
CC
repeatedly.
You can answer the call by:
– lifting the corded handset from the base unit, or
– pressing M N on the handset.
Call screening can be set for each unit. The
default setting is “ ”On .
1MMENUN#310
2M N
b
b
b
bb : Select the desired setting. a MSAVEN
3Proceed with the operation for your unit.
Handset: OFF
M
M
M
MM N
N
N
NN
Base unit: MEXITN
Number of rings before the unit
answers a call
You can change the number of times the phone
rings “Ring count” before the unit answers
calls. You can select 2 to 7 rings, or “Toll
saver”.
The default setting is “4 rings”.
“Toll saver”: The unit’s answering system
answers at the end of the 2nd ring when new
messages have been recorded, or at the end of
the 5th ring when there are no new messages. If
you call your phone from outside to listen to new
messages (page 44), you know that there are no
new messages when the phone rings for the 3rd
time. You can then hang up without being charged
for the call.
You can configure this setting using either the
base unit or one of the handsets.
Handset / Base unit
1MMENUN#211
2M N
b
b
b
bb : Select the desired setting. a MSAVEN
3Proceed with the operation for your unit.
Handset: MOFFN
Base unit: MEXITN
Caller’s recording time
You can change the maximum message recording
time allowed for each caller. The default setting is
“3 min”.
You can configure this setting using either the
base unit or one of the handsets.
Handset / Base unit
1MMENUN#305
2M N
b
b
b
bb : Select the desired setting. a MSAVEN
3Proceed with the operation for your unit.
Handset: MOFFN
Base unit: MEXITN
Selecting “Greeting only”
You can select “Greeting only” which sets the
unit to announce a greeting message to callers but
not record messages.
Select “Greeting only” in step 2 on “Caller’s
recording time”, page 45.
Note:
RWhen you select “Greeting only”:
– If you do not record your own message, the
unit will play the pre-recorded greeting-only
message asking callers to call again later.
– If you use your own message, record the
greeting-only message asking callers to call
again later (page 40).
For assistance, please visit http://shop.panasonic.com/support 45
Answering System
TGF353_HSN_(en)_0803_ver011.pdf 45 2017/08/03 10:47:41
Voicemail service
In addition to your unit’s answering system
you may also have voicemail service from your
phone service provider. Voicemail is an
answering service that may be offered by your
phone service provider. This service can also
record calls when you are unavailable to answer
the phone or when your line is busy.
Messages are recorded on the phone company
system and not on the unit’s answering system.
RTo use the voicemail service rather than the
unit’s answering system, turn off the answering
system (page 40).
If you have unit’s answering system set to on and
also the voicemail enabled, the system with least
amount of rings will record the message first.
Example:
If the unit’s answering system is set to 4 rings
(page 45) and the voicemail answering system
provided by your phone company is set to 6 rings
(call your service provider), the unit’s answering
system will record the incoming call first.
Storing the voicemail (VM) access
number
In order to listen to your voicemail messages, you
must dial your phone service provider’s voicemail
access number. Once you have stored your
voicemail access number, you can dial it
automatically (page 47).
You can configure this setting using either the
base unit or one of the handsets.
Handset / Base unit
1MMENUN#331
2Enter your access number (24 digits max.). a
MSAVEN
3Proceed with the operation for your unit.
Handset: MOFFN
Base unit: MEXITN
Note:
RWhen storing your voicemail access number
and your mailbox password, press MD
D
D
DDN (Pause)
on the handset or MPAUSEN on the base unit to
add pauses (page 15) between the access
number and the password as necessary.
Contact your phone service provider for the
required pause time.
Example:
1-222-333-4444
VM access
number
Pauses Password
PPPP 8888
To erase the voicemail access number
Handset / Base unit
1MMENUN#331
2Press and hold MCLEARN until all digits are
erased. a M SAVEN
3Proceed with the operation for your unit.
Handset: MOFFN
Base unit: MEXITN
Voicemail (VM) tone detection
Handset / Base unit
Your phone service provider sends special signals
(sometimes called “voicemail tones” or “stutter
tones”) to the unit to let you know you have new
voicemail messages. If you hear a series of dial
tones followed by a continuous dial tone after you
press M N on the handset or lift the corded
handset, you have new voicemail messages. Soon
after you hang up a call or after the phone stops
ringing, your unit checks the phone line to see if
new voicemail messages have been recorded.
Turn this feature off when:
– You do not subscribe to voicemail service.
– Your phone service provider does not send
voicemail tones.
– Your phone is connected to a PBX.
If you are not sure which setting is required,
contact your phone service provider.
Turning VM tone detection on/off
The default setting is “On”.
You can configure this setting using either the
base unit or one of the handsets.
Handset / Base unit
1MMENUN#332
2M N
b
b
b
bb : Select the desired setting. a MSAVEN
3Proceed with the operation for your unit.
Handset: MOFFN
Base unit: MEXITN
46 For assistance, please visit http://shop.panasonic.com/support
Useful Information
TGF353_HSN_(en)_0803_ver011.pdf 46 2017/08/03 10:47:41
Produkt Specifikationer
| Mærke: | Panasonic |
| Kategori: | Telefon |
| Model: | KX-TGF353A2 |
Har du brug for hjælp?
Hvis du har brug for hjælp til Panasonic KX-TGF353A2 stil et spørgsmål nedenfor, og andre brugere vil svare dig
Telefon Panasonic Manualer

4 Januar 2025
21 December 2024
21 December 2024
14 December 2024
21 November 2024
21 November 2024
2 Oktober 2024
18 September 2024
14 September 2024
10 September 2024
Telefon Manualer
- Telefon SilverCrest
- Telefon Acer
- Telefon Amplicomms
- Telefon Denver
- Telefon Sencor
- Telefon Sony
- Telefon Siemens
- Telefon Samsung
- Telefon GE
- Telefon Philips
- Telefon LG
- Telefon AEG
- Telefon Audio-Technica
- Telefon Doro
- Telefon Gigaset
- Telefon AT&T
- Telefon Pioneer
- Telefon Apple
- Telefon Logitech
- Telefon Daewoo
- Telefon Sennheiser
- Telefon Emporia
- Telefon OpenVox
- Telefon Grundig
- Telefon Akuvox
- Telefon D-Link
- Telefon Motorola
- Telefon Roland
- Telefon Asus
- Telefon Toshiba
- Telefon Pyle
- Telefon Brother
- Telefon Lenovo
- Telefon Yamaha
- Telefon Infiniton
- Telefon OnePlus
- Telefon AVM
- Telefon Logik
- Telefon Planet
- Telefon Hama
- Telefon Thomson
- Telefon Nokia
- Telefon JBL
- Telefon TriStar
- Telefon TRENDnet
- Telefon Trevi
- Telefon Trust
- Telefon Fysic
- Telefon Topcom
- Telefon Flex
- Telefon Blaupunkt
- Telefon Sandstrøm
- Telefon Uniden
- Telefon Hitachi
- Telefon Medion
- Telefon Sweex
- Telefon Linksys
- Telefon Cisco
- Telefon Huawei
- Telefon Ranex
- Telefon Bang And Olufsen
- Telefon Geemarc
- Telefon Jabra
- Telefon Loewe
- Telefon Crosley
- Telefon Netgear
- Telefon EnVivo
- Telefon Lifetec
- Telefon Avaya
- Telefon Parrot
- Telefon Telefunken
- Telefon Vtech
- Telefon Microsoft
- Telefon Jacob Jensen
- Telefon Alcatel
- Telefon Anker
- Telefon Zebra
- Telefon Olympia
- Telefon Plantronics
- Telefon Xiaomi
- Telefon Krüger&Matz
- Telefon RugGear
- Telefon CAT
- Telefon Marmitek
- Telefon Oppo
- Telefon Crosscall
- Telefon NEC
- Telefon Alcatel-Lucent
- Telefon MT Logic
- Telefon Kyocera
- Telefon Xblitz
- Telefon Bogen
- Telefon LevelOne
- Telefon Marshall
- Telefon ArtDio
- Telefon Binatone
- Telefon Honor
- Telefon ZyXEL
- Telefon Tiptel
- Telefon Sagem
- Telefon Fortinet
- Telefon Overmax
- Telefon Archos
- Telefon Yealink
- Telefon RCA
- Telefon Ubiquiti Networks
- Telefon AVerMedia
- Telefon Currys Essentials
- Telefon EnGenius
- Telefon Grandstream
- Telefon MaxCom
- Telefon Patton
- Telefon Renkforce
- Telefon SPC
- Telefon ZTE
- Telefon Mikrotik
- Telefon Switel
- Telefon Brondi
- Telefon HTC
- Telefon Escene
- Telefon BlackBerry
- Telefon Evolveo
- Telefon Audioline
- Telefon BT
- Telefon XD Enjoy
- Telefon Mitel
- Telefon GPO
- Telefon Wiko
- Telefon Telstra
- Telefon Aastra
- Telefon Snom
- Telefon Mackie
- Telefon Vimar
- Telefon Oricom
- Telefon Oregon Scientific
- Telefon Lexibook
- Telefon Scosche
- Telefon Prestigio
- Telefon MyPhone
- Telefon Draytek
- Telefon Realme
- Telefon Crestron
- Telefon Lindy
- Telefon MXL
- Telefon Cortelco
- Telefon Legrand
- Telefon CTA Digital
- Telefon Steren
- Telefon Neat
- Telefon Tecdesk
- Telefon Dnake
- Telefon Gamdias
- Telefon Lewitt
- Telefon Allview
- Telefon Alcon
- Telefon Airlive
- Telefon AGFEO
- Telefon Amplicom
- Telefon Ascom
- Telefon Proximus
- Telefon BeeWi
- Telefon Sonim
- Telefon Sunstech
- Telefon Sylvania
- Telefon Swissvoice
- Telefon Marquant
- Telefon Nordmende
- Telefon KPN
- Telefon Belgacom
- Telefon Auerswald
- Telefon Profoon
- Telefon Teledex
- Telefon Valcom
- Telefon Innovaphone
- Telefon Hagenuk
- Telefon Essentiel B
- Telefon Logicom
- Telefon Peaq
- Telefon Vogtec
- Telefon T-Mobile
- Telefon Fanvil
- Telefon Spectralink
- Telefon VXi
- Telefon Unify
- Telefon Sagemcom
- Telefon Edenwood
- Telefon Premier
- Telefon HUMANTECHNIK
- Telefon Polycom
- Telefon Primare
- Telefon Mobotix
- Telefon Edge-Core
- Telefon ClearOne
- Telefon Clarity
- Telefon Syco
- Telefon SMC
- Telefon Pixel
- Telefon Digium
- Telefon FlyingVoice
- Telefon Davolink
- Telefon KONFTEL
- Telefon Mitsai
- Telefon Clear Sounds
- Telefon ALLO
- Telefon Oukitel
- Telefon On-Q
- Telefon Canyon
- Telefon HMD
- Telefon Tecno
- Telefon Olitech
- Telefon Dopod
- Telefon Hamlet
- Telefon Sedna
- Telefon Cubot
- Telefon AudioCodes
- Telefon 3Com
- Telefon British Telecom
- Telefon CyberData Systems
- Telefon Bintec-elmeg
- Telefon Wantec
- Telefon Algo
- Telefon Future Call
- Telefon 4family
- Telefon Tador
- Telefon CSL
- Telefon POCO
- Telefon Liam&Daan
- Telefon Lively
- Telefon EMeet
- Telefon Cyber Acoustics
Nyeste Telefon Manualer

9 April 2025

1 Marts 2025
1 Marts 2025
25 Februar 2025
22 Februar 2025
22 Februar 2025
11 Februar 2025
7 Februar 2025
30 Januar 2025
24 Januar 2025