Panasonic NV-VZ10ENH Manual
Panasonic
Videobåndoptager
NV-VZ10ENH
Læs nedenfor 📖 manual på dansk for Panasonic NV-VZ10ENH (74 sider) i kategorien Videobåndoptager. Denne guide var nyttig for 4 personer og blev bedømt med 4.5 stjerner i gennemsnit af 2 brugere
Side 1/74

VHS-C Movie Camera
VQT9065
Before use, please read these instructions completely.
NV-VZ9EN/EU
NV-VZ10EN/
ENH/ENC/A
NV-RZ9EN/
ENC/EU
LCD Monitor
Remote Contoller
NV-RZ10EN/A
ЖКИ видеомонитор
Устройство дистанционного
управления
Model No.
NV-VZ9EN/EU
NV-VZ10EN/ENH/ENC/A
NV-RZ9EN/ENC/EU
NV-RZ10EN/A
Operating Instructions
Инструкция по эксплуатации
Перед использованием прочитайте, пожалуйста, эту
инструкцию полностью.
!"
sepJ` !
!"#$%&'()*+
qOGA« «œU—≈
d« ¨Â«b²Ýô« q³d ¡Uł—ù« Ác¼ …¡«ÆqUJUÐ «œUý
d*« WU W«
LCD
!"#$
bF s rJ« ÕUH

-2-
ENGLISH
Information for Your Safety
WARNING
To reduce the risk of fire or shock hazard and
annoying interference, use only the recommended
accessories and do not expose this equipment to
rain or moisture.
Do not remove the cover (or back); there are no
user serviceable parts inside. Refer servicing to
qualified service personnel.
Movie Camera
The rating plate is on the underside of the Movie
Camera.
AC Adaptor
The rating plate is on the underside of the AC
Adaptor.
As this equipment gets hot during use, operate it in
a well ventilated place; do not install this
equipment in a confined space such as a bookcase
or similar unit.
∫Carefully read the Operating Instructions and
use the Movie Camera correctly.
Injury or material damage resulting from any kind of use
that is not in accordance with the operating procedures
explained in these Operating Instructions are the sole
responsibility of the user.
These Operating Instructions apply to models NV-VZ9,
NV-VZ10, NV-RZ9 and NV-RZ10. However, all illustrations
show the model NV-VZ10.
Please note that the actual controls and components,
menu items, etc. of your Movie Camera may look
somewhat different from those shown in the illustrations
in these Operating Instructions.
∫Try out the Movie Camera.
Be sure to try out the Movie Camera before recording
your first important event and check that it records
properly and functions correctly.
∫The manufacturer is not liable for loss of
recorded contents.
The manufacturer shall in no event be liable for the loss
of recordings due to malfunction or defect of this Movie
Camera, its accessories or cassettes.
∫Carefully observe copyright laws.
Recording of pre-recorded tapes or discs or other
published or broadcast material for purposes other than
your own private use may infringe copyright laws. Even
for the purpose of private use, recording of certain
material may be restricted.
!"#
!"#$%&'()*+,-./0)1234
!"#$%&'()*+,-.
!" !" !"#$%&'() *
!"#$%&'( !)*+
!
!"#$%&'()*+
!"
!"#$%&'()*+,
!"#$%&'()*+,*-#./01234
!"#$%&'()*+,-./0123456
∫ !"#$%&'()*+"#,-./0
!"#$%&'()*+,-./012-.34567
!"#$%!&'()*+,-
!"#$ %ksJswV ksJswNM ksJowV ksJowNM
!"#$%&'()*+,-./0 ksJswNM !
!"#$%&'(#)*+,-./012345678
!"#$%&'()*+,-
∫ !"#$
!"#$%&'()*+ !"#$%&'() !
!"#$%
∫ !"#$%&'()*+,-.
!"#$%&'()*#$+,-./*0123456
!"#$%&'()*+,-
∫ !"#$%&
!"#$%&'()*+ (,-./0123/456
!"#$%&'()*+,-./012"3452
!"#$%&'()

-4-
ENGLISH
Contents
If you want to start using the Movie Camera immediately, be
sure to read at least the pages marked with ♠.
Preparations
Standard Accessories ...................................................... 10
Controls and Components ............................................... 12
♠ The 3 Types of Power Suppy ............................................ 18
≥Supplying Power from an AC Mains Socket .................. 18
≥Supplying Power with the Battery .................................. 20
Using the LCD Monitor ..................................................... 26
Using the Menus .............................................................. 28
Menu Functions ................................................................ 30
Adjusting the Brightness and Colour
Level of the LCD Monitor/Finder ...................................... 38
♠ Inserting/Ejecting the Cassette ........................................ 40
≥Selecting the Correct Tape Length ................................ 42
≥Confirming the Remaining Tape Time ........................... 42
Adjusting the Finder ......................................................... 44
Adjusting the Grip Belt ..................................................... 44
Attaching the Lens Cap .................................................... 44
Inserting the Button-type Battery ..................................... 46
Setting the Date and Time ............................................... 48
≥Recording with the Date/Time/Title
Superimposed in the Picture ......................................... 50
Basic Operations
♠♠♠♠
♠ Recording in the Full Auto Mode ...................................... 52
Checking the End of a Recorded Scene
(Recording Check Function) ............................................ 56
≥Viewing Recorded Scenes During Recording Pause
(Camera Search Function) ............................................ 56
Recording Backlit Scenes (Backlight Mode) .................... 56
Zooming In/Out................................................................. 58
≥Voice Zoom .................................................................... 58
≥Recording Extra Close-up Shots of Small Subjects
(Macro Close-up Function) ............................................ 58
♠♠
♠♠
♠ Playback ........................................................................... 60
≥Watching Playback on the Movie Camera ..................... 60
≥Playing Back on a VCR
(Using the Supplied Cassette Adaptor) ......................... 62
≥High-Speed Rewinding .................................................. 64
≥Eliminating Picture Distortions
(Manual Tracking Adjustment) ....................................... 64
≥Cue Playback ................................................................. 66
≥Review Playback ............................................................ 66
≥Still Playback .................................................................. 66
Watching Playback on a TV ............................................. 68
After Use ........................................................................... 68
≥Cleaning the Finder........................................................ 68
≥Cleaning the LCD Monitor ............................................. 68
≥Cleaning the Movie Camera Body ................................. 68
≥Cleaning the Lens .......................................................... 68
!"#$%&'()*+,-./ !"#
! KKKKKKKKKKKKKKKKKKKKKKKKKKKKKKKKKKKKKKKKKKKKKKKKKKKKKKKKKKKKKKKKKKKKKKKKKKKK NM
!" KKKKKKKKKKKKKKKKKKKKKKKKKKKKKKKKKKKKKKKKKKKKKKKKKKKKKKKKKKKKKKKKKKKKKKKK NO
! KKKKKKKKKKKKKKKKKKKKKKKKKKKKKKKKKKKKKKKKKKKKKKKKKKKKKKKKKKKKKKKKKKKKKKKKKKK =NU
≥ !"#$%! KKKKKKKKKKKKKKKKKKKKKKKKKKKKKKKKKKKKKKKKKKKKKKKKKKKKKKK NU
≥ ! KKKKKKKKKKKKKKKKKKKKKKKKKKKKKKKKKKKKKKKKKKKKKKKKKKKKKKKKKKKKKKKKKKKKK OM
!"#$%&' KKKKKKKKKKKKKKKKKKKKKKKKKKKKKKKKKKKKKKKKKKKKKKKKKKKKK =OS
!"# KKKKKKKKKKKKKKKKKKKKKKKKKKKKKKKKKKKKKKKKKKKKKKKKKKKKKKKKKKKKKKKKKKKK =OU
! KKKKKKKKKKKKKKKKKKKKKKKKKKKKKKKKKKKKKKKKKKKKKKKKKKKKKKKKKKKKKKKKKKKKKKKKKKK =PM
!"#$%& L !"#$%&'() KKKKKKKK =PU
L KKKKKKKKKKKKKKKKKKKKKKKKKKKKKKKKKKKKKKKKKKKKKKKKKKKKKKKKKK =QM !"#
≥ !"#$%&' KKKKKKKKKKKKKKKKKKKKKKKKKKKKKKKKKKKKKKKKKKKKKKKKKKK QO
≥ !"#$%$ KKKKKKKKKKKKKKKKKKKKKKKKKKKKKKKKKKKKKKKKKKKKKKKKKKKKKKK QO
!"#$ KKKKKKKKKKKKKKKKKKKKKKKKKKKKKKKKKKKKKKKKKKKKKKKKKKKKKKKKKKKKKKKKK QQ
!"# KKKKKKKKKKKKKKKKKKKKKKKKKKKKKKKKKKKKKKKKKKKKKKKKKKKKKKKKKKKKKKKKKKKKK QQ
!" KKKKKKKKKKKKKKKKKKKKKKKKKKKKKKKKKKKKKKKKKKKKKKKKKKKKKKKKKKKKKKKKKKKKKKKK QQ
!"#$ KKKKKKKKKKKKKKKKKKKKKKKKKKKKKKKKKKKKKKKKKKKKKKKKKKKKKKKKKKKKKKKKK QS
!"#$ KKKKKKKKKKKKKKKKKKKKKKKKKKKKKKKKKKKKKKKKKKKKKKKKKKKKKKKKKKKKKKKK =QU
≥ !"#$% L L KKKKKKKKKKKKKKKKKKKKKK RM !"#$
!
!"#$%&'( KKKKKKKKKKKKKKKKKKKKKKKKKKKKKKKKKKKKKKKKKKKKKKKKKKK RO
!"#$%&' !"#$%KKKKKKKKKKKKKKKKKKKKKKKKKKKKK RS
≥ !"#$%&'()= !"#!$%&KKKKKKKKKK RS
!"#$ !"#KKKKKKKKKKKKKKKKKKKKKKKKKKKKKKKKKKKKKKKKKKKKKKK RS
L KKKKKKKKKKKKKKKKKKKKKKKKKKKKKKKKKKKKKKKKKKKKKKKKKKKKKKKKKKKKKKKKKKK RU !
≥ ! KKKKKKKKKKKKKKKKKKKKKKKKKKKKKKKKKKKKKKKKKKKKKKKKKKKKKKKKKKKKKKKKKKKKKKKKK RU
≥ !"#$%&'() !"#$%KKKKKKKKKKKKKKKKKK RU
KKKKKKKKKKKKKKKKKKKKKKKKKKKKKKKKKKKKKKKKKKKKKKKKKKKKKKKKKKKKKKKKKKKKKKKKKKKKKKKKKKK SM
≥ !"#$%&!' KKKKKKKKKKKKKKKKKKKKKKKKKKKKKKKKKKKKKKKKKKKKKKK SM
≥ !"# $ !"#$"%&'(KKKKKKKKKKKKKKKKKK SO
≥ ! KKKKKKKKKKKKKKKKKKKKKKKKKKKKKKKKKKKKKKKKKKKKKKKKKKKKKKKKKKKKKKKKKKKKKKKKK SQ
≥ !"#$ !"#$%KKKKKKKKKKKKKKKKKKKKKKKKKKKKKKKKKKKK SQ
≥ !"!# KKKKKKKKKKKKKKKKKKKKKKKKKKKKKKKKKKKKKKKKKKKKKKKKKKKKKKKKKKKKKK SS
≥ !"!# KKKKKKKKKKKKKKKKKKKKKKKKKKKKKKKKKKKKKKKKKKKKKKKKKKKKKKKKKKKKKK SS
≥ !" KKKKKKKKKKKKKKKKKKKKKKKKKKKKKKKKKKKKKKKKKKKKKKKKKKKKKKKKKKKKKKKKKKKKK SS
!"#$%&' KKKKKKKKKKKKKKKKKKKKKKKKKKKKKKKKKKKKKKKKKKKKKKKKKKKKKK SU
! KKKKKKKKKKKKKKKKKKKKKKKKKKKKKKKKKKKKKKKKKKKKKKKKKKKKKKKKKKKKKKKKKKKKKKKKKKKK SU
≥ !"#$ KKKKKKKKKKKKKKKKKKKKKKKKKKKKKKKKKKKKKKKKKKKKKKKKKKKKKKKKKKKKKK SU
≥ !"#$%& KKKKKKKKKKKKKKKKKKKKKKKKKKKKKKKKKKKKKKKKKKKKKKKKKKKKKKK SU
≥ !!"#$ KKKKKKKKKKKKKKKKKKKKKKKKKKKKKKKKKKKKKKKKKKKKKKKKKKKKKKKKKK SU
≥ ! KKKKKKKKKKKKKKKKKKKKKKKKKKKKKKKKKKKKKKKKKKKKKKKKKKKKKKKKKKKKKKKKKKKKKKKKK SU

-6-
ENGLISH
Advanced Operations
Fading In/Out .................................................................... 70
Using Special Effects (Digital Effects) ............................. 72
≥Selecting a Desired Digital Effect .................................. 72
≥Digital Effects 1 [EFFECT1] .......................................... 74
≥Digital Effects 2 [EFFECT2] .......................................... 76
≥Using the Super Image Stabilizer Function ................... 78
≥Using the Digital Zoom Function ................................... 80
≥Digital Fade .................................................................... 82
Motion-Sensor-Controlled Recording .............................. 84
Recording in Dark Places Without Any
Illumination (0 Lux Night View Function) ......................... 88
Recording with Manual White Balance Adjustment ......... 90
≥Colour Temperature and
White Balance Adjustment ............................................ 92
Recording with Manual Focus Adjustment ...................... 94
Recording in Special Situations (Programme AE) .......... 96
!
L KKKKKKKKKKKKKKKKKKKKKKKKKKKKKKKKKKKKKKKKKKKKKKKKKKKKKKKKKKKKKKKKKKKKKKKKKK TM
!"# !"#KKKKKKKKKKKKKKKKKKKKKKKKKKKKKKKKKKKKKKKKKKKKKKKKKK TO
≥ !"#$%& KKKKKKKKKKKKKKKKKKKKKKKKKKKKKKKKKKKKKKKKKKKKKKKKKKKKKKK TO
≥ ! Nxbccb`qNz KKKKKKKKKKKKKKKKKKKKKKKKKKKKKKKKKKKKKKKKKKKKKKKKKKKKK TQ
≥ ! Oxbccb`qOz KKKKKKKKKKKKKKKKKKKKKKKKKKKKKKKKKKKKKKKKKKKKKKKKKKKKK TS
≥ !"#$%&'() KKKKKKKKKKKKKKKKKKKKKKKKKKKKKKKKKKKKKKKKKKKK TU
≥ !"#$%&' KKKKKKKKKKKKKKKKKKKKKKKKKKKKKKKKKKKKKKKKKKKKKKKKKKK UM
≥ !"# KKKKKKKKKKKKKKKKKKKKKKKKKKKKKKKKKKKKKKKKKKKKKKKKKKKKKKKKKKKKKKKKK UO
!"#$%& KKKKKKKKKKKKKKKKKKKKKKKKKKKKKKKKKKKKKKKKKKKKKKKKKKKKKKKKKK UQ
!"#$%&'()*+M=iìñ !"KKKKKKKKKKKK UU
!"#$%&'()*+ KKKKKKKKKKKKKKKKKKKKKKKKKKKKKKKKKKKKKKKK VM
≥ !"#$% KKKKKKKKKKKKKKKKKKKKKKKKKKKKKKKKKKKKKKKKKKKKKKKKKKKKKKK VO
!"#$%&'() KKKKKKKKKKKKKKKKKKKKKKKKKKKKKKKKKKKKKKKKKKKKKKK VQ
!"#$% ^bKKKKKKKKKKKKKKKKKKKKKKKKKKKKKKKKKKKKKKKKKKKKK VS

-8-
ENGLISH
Advanced Operations
Using the Remote Controller ......................................... 100
≥Inserting the Batteries into the Remote
Controller ..................................................................... 102
Recording Yourself with the LCD Monitor Facing
Forward .......................................................................... 104
Recording with Pre-programmed Titles Inserted
in the Picture .................................................................. 108
Creating Your Own Titles and Inserting Them During
Recording (Digital Superimposer Function) .................. 112
≥Inserting Your Own Title at the Beginning of a
Recording ..................................................................... 114
≥Inserting Your Own Title During Recording ................. 114
Using the Tape Counter Indication ................................. 116
≥Checking the Elapsed Tape Time ................................ 116
≥Using the Memory Stop Function ................................ 120
Dubbing (Copying) ......................................................... 122
Precautions, Technical Information, etc.
Precautions .................................................................... 124
≥Precautions for the Movie Camera .............................. 124
≥Precautions for the AC Adaptor ................................... 124
≥Precautions for the Battery .......................................... 126
≥Precautions for the Cassette ....................................... 126
≥Causes of Condensation and Remedy ....................... 128
≥Video Head Clogging and Remedy ............................. 128
How the White Balance (Tint) Adjustment Works .......... 130
How the Focus Adjustment Works ................................. 130
Indications ...................................................................... 132
≥Demonstration Mode ................................................... 138
Optional Accessories ..................................................... 140
Specifications ................................................................. 142
Before Requesting Service (Problems & Solutions) ...... 144
!
!" KKKKKKKKKKKKKKKKKKKKKKKKKKKKKKKKKKKKKKKKKKKKKKKKKKKKKKKKKKKKKKKKKKKKKK NMM
≥ !"#$% KKKKKKKKKKKKKKKKKKKKKKKKKKKKKKKKKKKKKKKKKKKKKKKKKKKKKKKK NMO
!"#$%&'()*+,-./0 KKKKKKKKKKKKKKKKKKKK NMQ
!"#$%&'()*+,-. KKKKKKKKKKKKKKKKKKKKKKKKKKK NMU
!"#$%&'()*+, !"#$%KKKKKKKKK NNO
≥ !"#$%&'()*!+, KKKKKKKKKKKKKKKKKKKKKKKKKKK NNQ
≥ !"#$%&'()*+ KKKKKKKKKKKKKKKKKKKKKKKKKKKKKKKKKKK NNQ
!"#$%&# KKKKKKKKKKKKKKKKKKKKKKKKKKKKKKKKKKKKKKKKKKKKKKKKKKKK NNS
≥ !"#$%&% KKKKKKKKKKKKKKKKKKKKKKKKKKKKKKKKKKKKKKKKKKKKKKKKK NNS
≥ !"#$%& KKKKKKKKKKKKKKKKKKKKKKKKKKKKKKKKKKKKKKKKKKKKKKKKKKKKK NOM
!KKKKKKKKKKKKKKKKKKKKKKKKKKKKKKKKKKKKKKKKKKKKKKKKKKKKKKKKKKKKKKKKKKKKKK NOO
!"#$%&'
! KKKKKKKKKKKKKKKKKKKKKKKKKKKKKKKKKKKKKKKKKKKKKKKKKKKKKKKKKKKKKKKKKKKKKKKKKK NOQ
≥ !"#$%& KKKKKKKKKKKKKKKKKKKKKKKKKKKKKKKKKKKKKKKKKKKKKKKKKKKKK NOQ
≥ !"#$%&' KKKKKKKKKKKKKKKKKKKKKKKKKKKKKKKKKKKKKKKKKKKKKKKKK NOQ
≥ !"#$ KKKKKKKKKKKKKKKKKKKKKKKKKKKKKKKKKKKKKKKKKKKKKKKKKKKKKKKKKKKK NOS
≥ !"#$% KKKKKKKKKKKKKKKKKKKKKKKKKKKKKKKKKKKKKKKKKKKKKKKKKKKKKKKK NOS
≥ !"#$%&'() KKKKKKKKKKKKKKKKKKKKKKKKKKKKKKKKKKKKKKKKKK NOU
≥ !"#$%&'( KKKKKKKKKKKKKKKKKKKKKKKKKKKKKKKKKKKKKKKKKKKKK NOU
! ! !"#$ KKKKKKKKKKKKKKKKKKKKKKKKKKKKKKKKKKKKK NPM
!"#$%& KKKKKKKKKKKKKKKKKKKKKKKKKKKKKKKKKKKKKKKKKKKKKKKKKKKKKKKK NPM
!" KKKKKKKKKKKKKKKKKKKKKKKKKKKKKKKKKKKKKKKKKKKKKKKKKKKKKKKKKKKKKKKKKKKKKK NPO
! KKKKKKKKKKKKKKKKKKKKKKKKKKKKKKKKKKKKKKKKKKKKKKKKKKKKKKKKKKKKKKKKKKKKKKKKKK NQM
KKKKKKKKKKKKKKKKKKKKKKKKKKKKKKKKKKKKKKKKKKKKKKKKKKKKKKKKKKKKKKKKKKKKKKKKKKKKKKKKK NQO
!"# !"#$%&KKKKKKKKKKKKKKKKKKKKKKKKKKKKKKKKKKKKK NQ
≥ ! KKKKKKKKKKKKKKKKKKKKKKKKKKKKKKKKKKKKKKKKKKKKKKKKKKKKKKKKKKKKKKKKKKKKKKK NPU
Q
-10-
ENGLISH
1. 2. 3.
4. 5. 6.
7. 8.
[A] [B] [C]
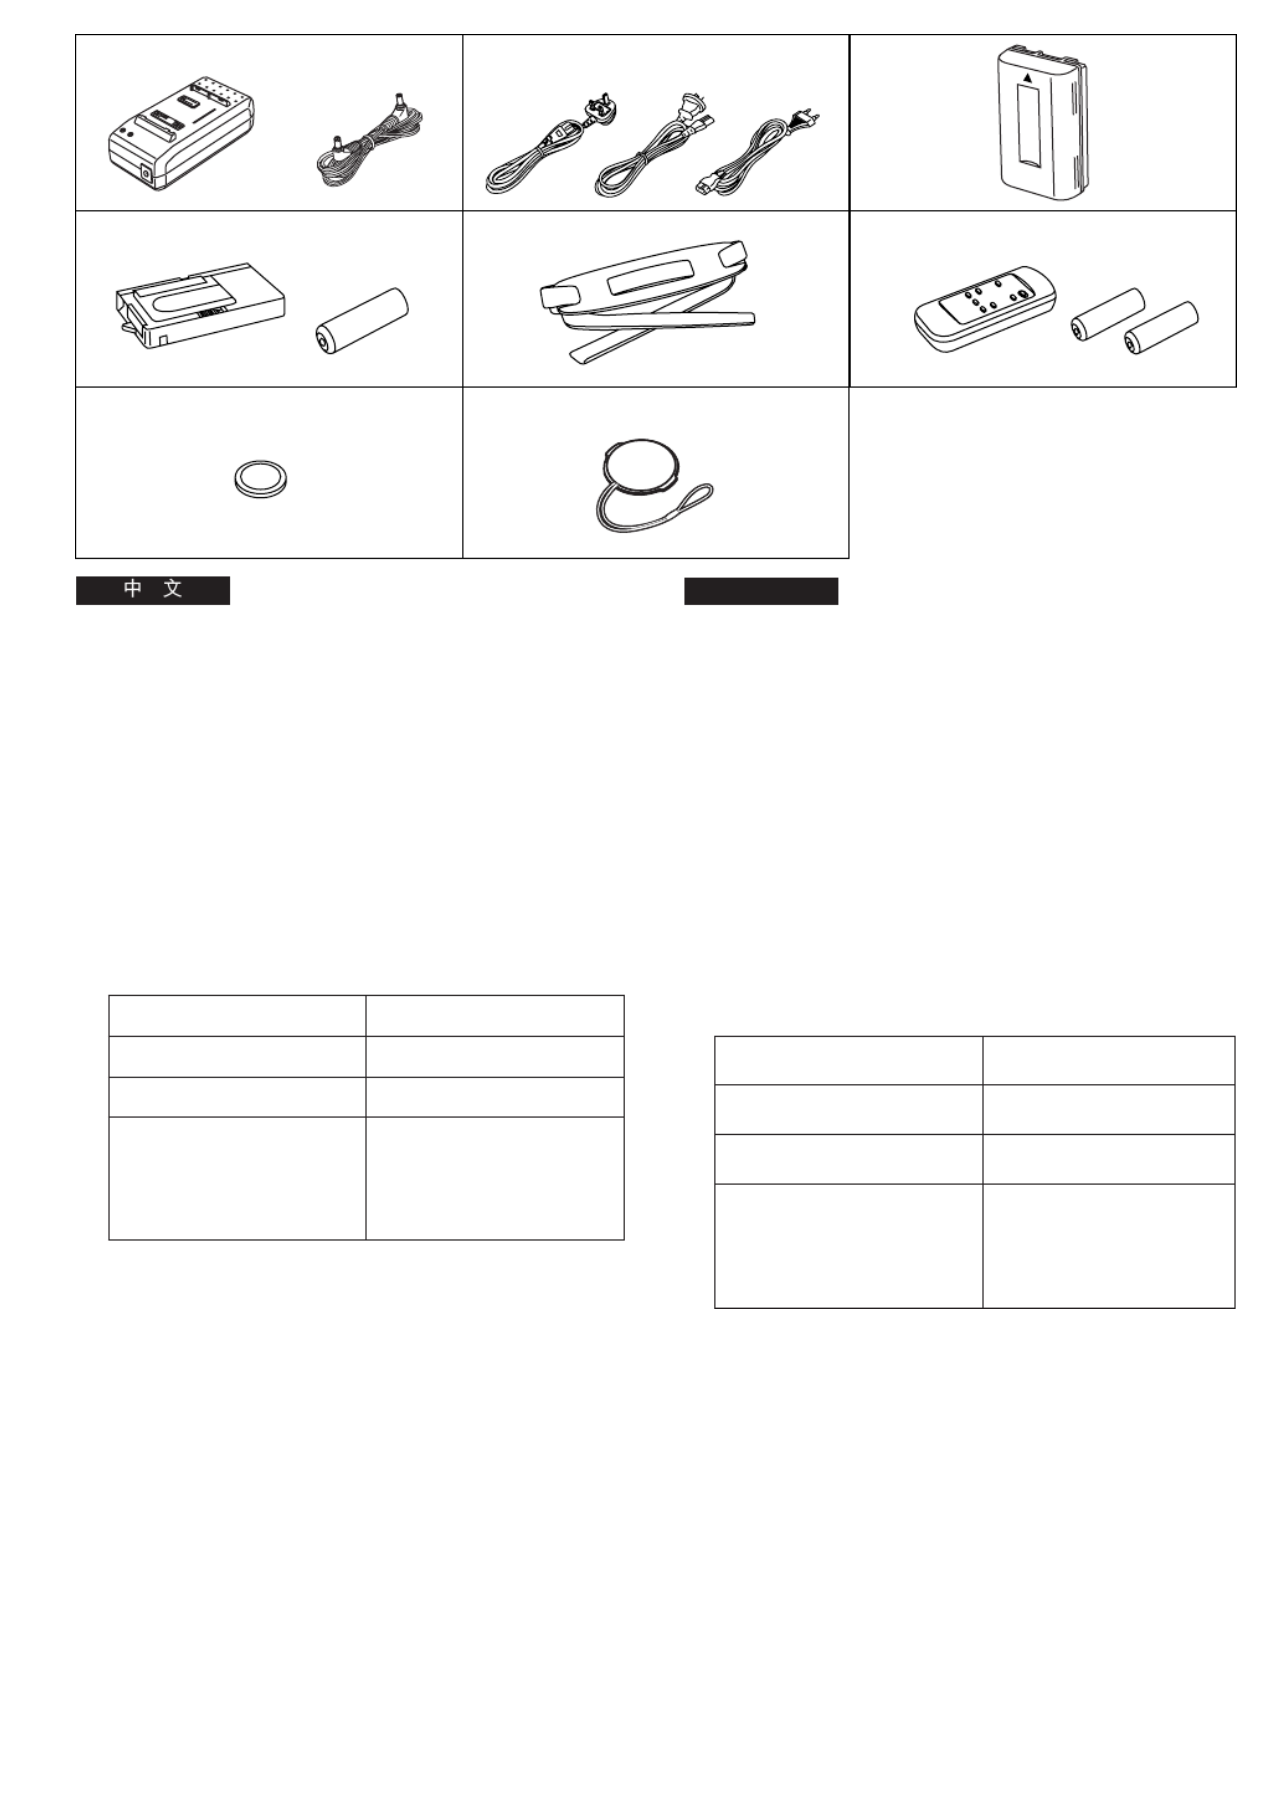
Standard Accessories
1. AC Adaptor (l 18, 20, 124)
To supply power to the Movie Camera and to charge the
Battery.
DC Input Lead (l 18)
To connect the AC Adaptor to the Movie Camera.
2. AC Mains Lead (l 18, 20)
To connect the AC Adaptor to an AC mains socket.
[A] Hong Kong Special Administrative Region of China
[B] Australia and New Zealand
[C] Areas other than Hong Kong Special Administrative
Region of China, Australia and New Zealand
°The supplied AC Mains Lead depends on Movie
Camera Model
3. Battery (l 20, 126)
To supply power to the Movie Camera.
4. Cassette Adaptor and Battery (l 62)
5. Shoulder Strap (l 16)
6. Remote Controller and Batteries for Remote Controller
(l 100, 102) (NV-VZ10/RZ10 only)
7. Button-Type Battery (l 46)
To supply power to the Movie Camera’s built-in clock.
8. Lens Cap (l 44)
Model No.
NV-VZ10ENH
NV-VZ10A, NV-RZ10A
NV-VZ10EN/ENC,
NV-VZ9EN/EU,
NV-RZ10EN,
NV-RZ9EN/ENC/EU
Type of Mains Lead
[A]
[B]
[C]
!
NK
!" lNUOMNOQ
!"#$%&$'($)
!"# lNU
!"#$"%&'()*
OK
!"# lNUOM
!"#$"% &'()*
x^z !"#$%&
x_z !"#$%
x`z !"#$%&'()*+,-./01234'
G !"#$%&'()*+,-./012
!"# !"#
ksJswNMbke x^z
ksJswNM^ksJowNM^ x_z
ksJswNMbkLbk`
ksJswVbkLbr
ksJowNMbk x`z
ksJowVbkLbk`Lbr
PK
lOMNOS
!"#$%
QK
!"#$% lSO
RK
! lNS
SK
!" #$%&' lNMMNMO
! ksJswNMLowNM
TK
!" lQS
!"#$%&'()*
UK
l=QQ

-12-
ENGLISH
Controls and Components
11 Super Image Stabilizer Indication Lamp [[]
(l 72, 78)
12 Digital Effect Indication Lamp [© l] ( 72, 80, 82)
13 Camera Mode Lamp [CAMERA] (l 52)
14 VCR Mode Lamp [VCR] (l 60)
15 0-Lux Recording Switch [0 LUX OFF/ON] (l 88)
16 White Balance Sensor (l 130)
17 Remote Control Sensor (l 100) (NV-VZ10/RZ10 only)
18 Built-in Infra-red Beam Emitters (l 88)
19 Lens Cap Holder (l 44)
10 Microphone
11 Tally Lamp (l 54)
12 Fade Button [FADE] (l 70, 82)
13 Focus Button [FOCUS] (l 94)
Item Set Button [SET] (l 28)
Tracking Button (l 64)
14 Multi-Function Dial [34/MF/TRACKING] (l 28, 64, 94)
15 Menu Button [MENU] (l 28)
16 Auto Exposure Selector Button [PROG. AE]
(l 52, 90, 94, 96)
17 Digital Image Store Button [STORE] (l 112)
Digital Image Superimposer Button [OFF/ON]
(l 112, 114)
18 Colour Selector Button for Digital Fade/Digital Image
[COLOUR] (l 82, 112)
19 Eyecup
5
1514 16 17 18
12 13
19
1110
6, 7, 8
1 2 3 4
INFO-
WINDOW
CAMERA
V C R
9
!"
N x !"#$%& [z lTOTU
O x !"#$ ©z lTOUMUO
P !"#$x`^jbo^z lRO
Q xs`oz !"# lSM
R MJiìñ xM=iru=lccLlkz ! lUU
S !"#$ lNPM
T !" lNMM ! ksJswNMLowNM
U !"#$%&' lUU
V ! lQQ
NM
NN lRQ
NO xc^abz lTMUO
NP xcl`rpz lVQ
!"xpbqz lOU
!" lSQ
NQ !x34LjcL qo^`hfkdz lOUSQVQ
NR xjbkrz lOU
NS !"#$xmoldK ^bz lROVMVQVS
NT !"#$xpqlobz lNNO
!"#$xlccLlkz lNNONNQ
NU ! L x`lilroz !"#$%& lUONNO
NV

-14-
ENGLISH
20 Reverse Search Button [sSEARCH] (l 56)
Rewind/Review/High-Speed Rewind Button [6]
(l 60, 64, 66)
Recording Check Button [S] (l 56)
21 Stop Button [∫] (l 60)
22 Forward Search Button [SEARCHr] (l 56)
Fast Forward/Cue Button [5] (l 66)
23 White Balance Button [W.B] (l 90)
Pause Button [;] (l 66)
24 Playback Button [1] (l 60)
Backlight Button [BLC] (l 56)
25 LCD Monitor Open Lever [3OPEN] (l 26)
(NV-VZ9/VZ10 only)
26 LCD Monitor (l 26, 38, 68) (NV-VZ9/VZ10 only)
Due to limitations in LCD production technology, there
may be some tiny bright or dark spots on the LCD
Monitor screen. However, this is not a malfunction and
does not affect the recorded picture.
27 Cassette Compartment Lock Button [LOCK] (l 40)
28 DC Input Socket [DC IN] (l 18)
29 Finder (l 44, 68)
Due to limitations in LCD production technology, there
may be some tiny bright or dark spots on the Finder
screen, the whole screen may have a slight colour
cast, and flickering may occur. However, this is not a
malfunction and does not affect the recorded picture.
30 Cover of the Button-type Battery’s Compartment
[BACKUP BATTERY] (l 46)
31 Battery Holder (l 20)
32 Battery Eject Lever [2BATTERY EJECT] (l 20)
2725 26 28
30
31
32
29
20
21
22
24
23
s rSEARCH SEARCH
BLC
;W.B
∫ 1
6 5
S
OM !"xpb^o`ez lRS
L L x z ! !" 6 lSMSQSS
!"x Sz lRS
ON x z∫ lSM
OO !"xpb^o`e z lRS
L x z !" 5 lSS
OP !"xtK_z lVM
x z; lSS
OQ x z1 lSM
x_i`z lRS
OR !"#$%&'x3lmbkz lOS
! ksJswVLswNM
OS !"#$ lOSPUSU ! ksJswVLswNM
!"#$%&'()* !+,-./0123
!"#$%&'()'*+,-./012-3
!"#$%&'()
OT !"#$xil`hz lQM
OU !"#xa`=fkz lNU
OV !" lQQSU
!"#$%&'()*+,-./012345
!"#$%&'%()*+,-./01#2
!"#$"%&'()*+,-./012
!"#$%
PM !"#!"$%x_^`hrm=_^qqbovz lQS
PN ! lOM
PO !"x2 _^qqbov=bgb`qz lOM
-18-
ENGLISH
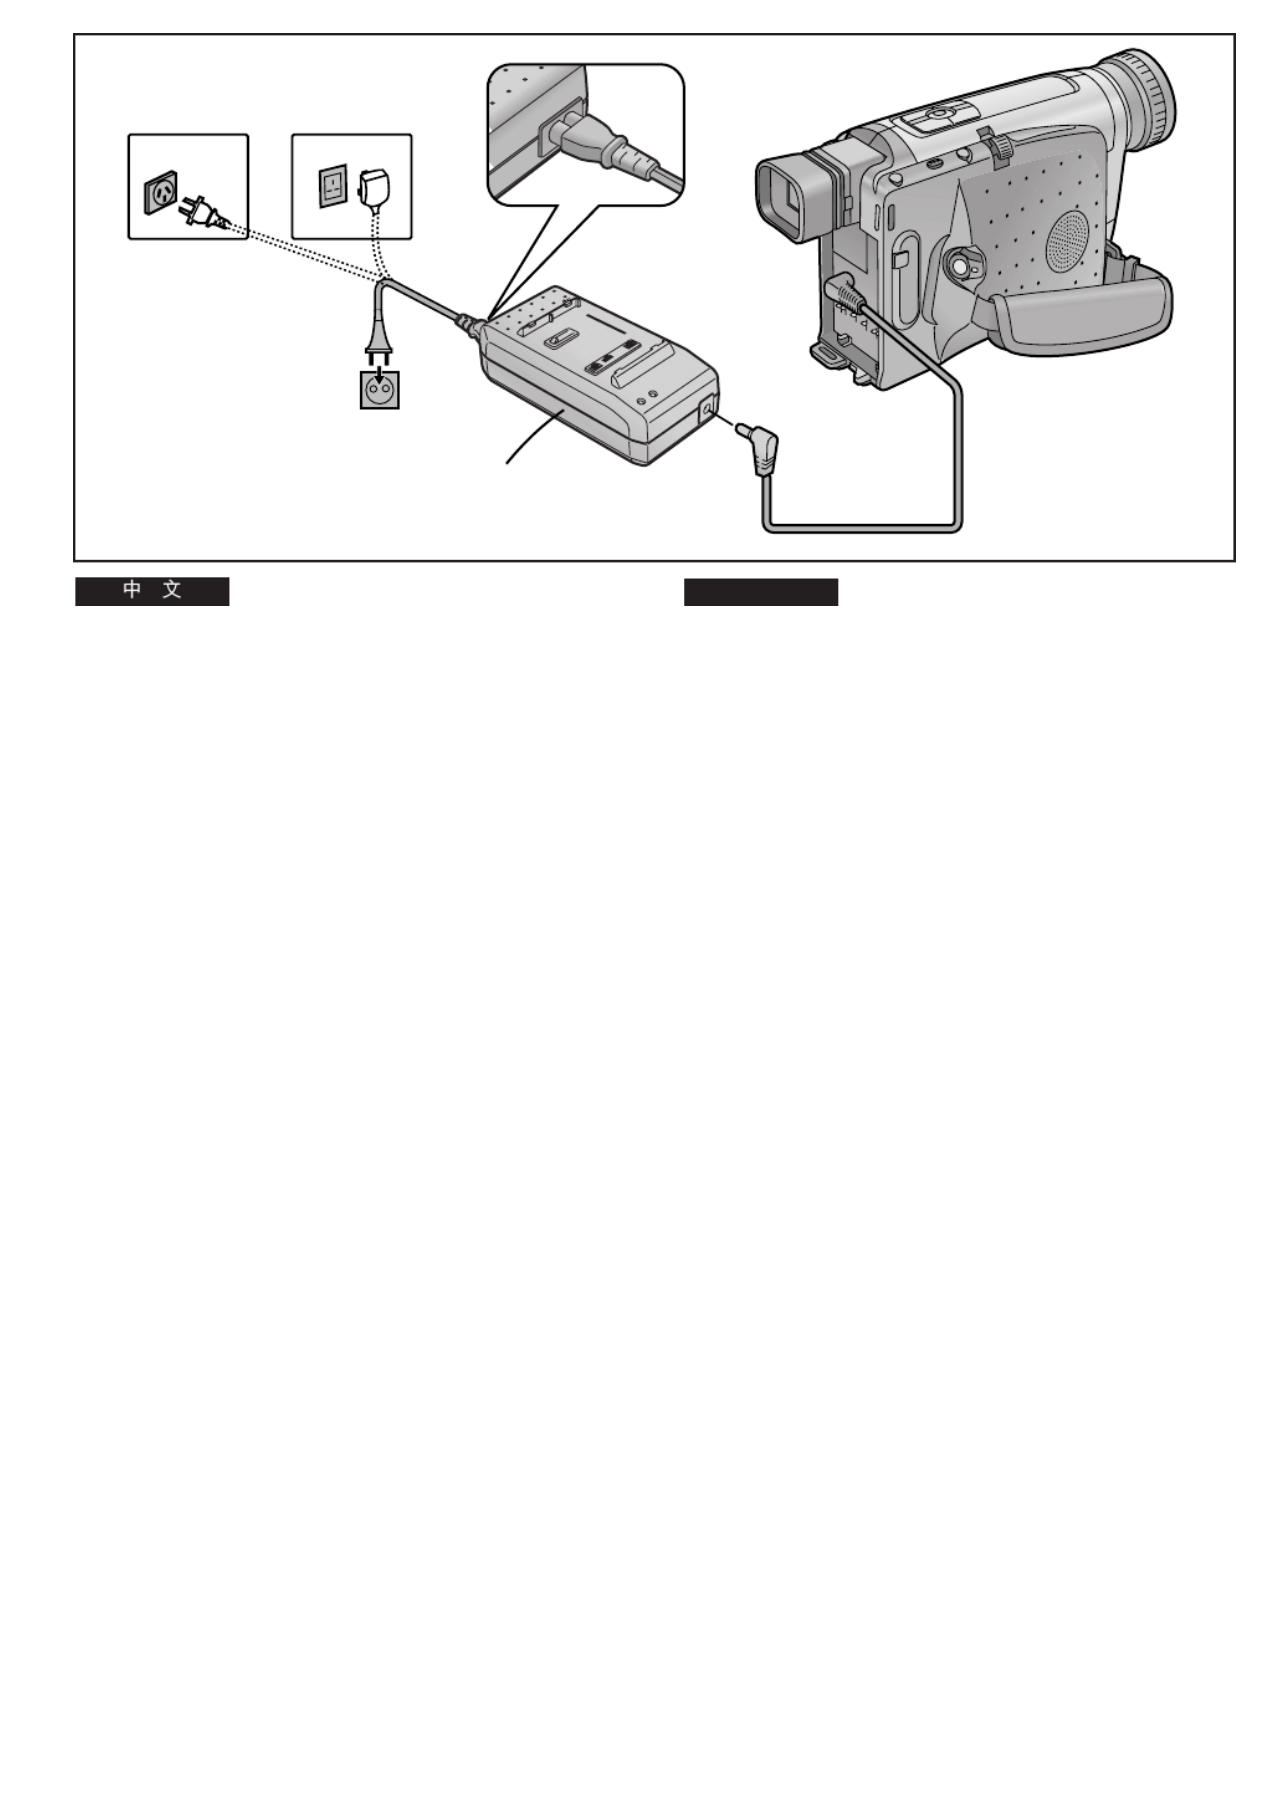
The 3 Types of Power Supply
1) AC Adaptor 1 (supplied) to supply power from an AC
mains socket
2) Car Battery Charger (optional) to supply power from the
cigarette lighter socket in a vehicle
3) Battery (supplied) (l 20)
Supplying Power from an AC Mains Socket
1Connect the DC Input Lead to the
[DC IN] Socket on the Movie Camera.
2Connect the other end of the cable to the
[DC OUT] Socket on the AC Adaptor.
3Connect the AC Mains Lead to the AC Adaptor
and to an AC mains socket.
≥The AC Mains Lead’s outlet plug cannot be pushed
fully into the AC Adaptor socket. A gap will remain as
shown above.
A: Australia and New Zealand
B: Hong Kong Special Administrative Region of China
≥Before connecting the DC Input Lead to the Movie Camera,
be sure to set the [CAMERA/OFF/VCR] Switch to [OFF].
≥The AC Adaptor features automatic universal voltage
adjustment (AC 100–240 V, 50/60 Hz), therefore, there is no
need for any manual voltage adjustment for use in other
countries.
1
A B
2
1
3
!
N !" 1 ! !"#$%!&
O !" # !" !"#$%&'()*
P ! l=
OM
!"#$%!
1
!"#$%&'()*+,- x
a`=fk z
2
!"#$%&'()*+'," x
a`=lrq z
3
!"#$%&' (&)* !"+,-
≥ !"#$%&'()*+,-./01&23
!"#$%&'()
A !"#$%
B !"#$
≥ !"#$%&'()*+,-./0x`^jbo^LlccL
s`oz xlccz !"
≥ !"#$%&'()*+,-./0 NMM –OQMs
RMLSMeò !"#$%&'()*+,-./0123

-20-
ENGLISH
Supplying Power with the Battery
Charge the Battery before using it.
1Attach the Battery.
≥Align the Battery with line 1 and push it in the
direction of the arrow while holding it down.
≥When charging, do not connect the DC Input Lead to
the AC Adaptor.
2Connect the AC Mains Lead to the AC Adaptor
and an AC mains socket.
≥The [POWER] Lamp 2 and the [CHARGE] Lamp 3
light and charging starts.
≥If the [CHARGE] Lamp 3 does not light even though
the Battery is attached, remove the Battery and then
re-attach it.
3Remove the Battery by sliding it in the
opposite direction of Step 1 above.
4Insert the Battery with its top (so that the arrow
points upward) into the top Battery Holder and
press the bottom of it toward the Movie
Camera until it locks with a click.
Removing the Battery from the Movie Camera
Hold the Battery firmly to prevent it from dropping and pull it
off while sliding the [ BATTERY EJECT] Lever 2 4 in the
direction of the arrow.
≥Before removing the Battery, set the [CAMERA/OFF/VCR]
Switch to [OFF].
∫ Charging Lamp [CHARGE]
Lit: During charging
Off: The Battery is fully charged.
≥When first charging a Battery that is completely discharged
as a result of being in storage for an extended period of
time, etc., the [POWER] Lamp and the [CHARGE] Lamp
both flash.
≥ oCharge the Battery at a room temperature between 10 C
and 30oC.
≥During recording or charging, the Battery becomes warm.
However, this is normal.
≥To ensure precise indication of the remaining battery power,
always use a fully charged Battery when attaching a Battery.
4
2
2
1
1
3
4
3
!
!"#$%&'(!)
1
!"
≥ !"# 1 !"#$%&'()*+,-
!"
≥ !"#$%&'()*+,-'./01/2
2
!"#$%&' (&)* !"+,-
≥ xmltboz ! 2x`e^odbz ! 3
!"#$%
≥ !"#$%&'()&*x`e^odbz 3
!"#$%&'()*+,-.
3
!" N !"#$%&'#()*+,
4
!"#$%&'( )*!"# !"
!"#$%&' !"#$
!"#$%&'(
!"#$%&'()*%+,-./012x2 _^qqbov
bgb`qz 4 !"#$%
≥ !"#$%&x`^jbo^LlccLs`oz !"xlccz
∫ !" x`e^odb z
!"#$
!"#$%!&
≥ !"#$%&'()*+&,-./012'34'
xmltbozx`e^odbz !"#
≥ !"#$%&' NM
–PM
≥ !"#$%#&'()%*+,-./0
≥ !"#$% &'()*'+,-./0'(1.23
!"#$#%&

-22-
ENGLISH
∫Charging Time and Maximum Continuous
Recording Time in the Manual Recording Mode
A Charging Time for a Full Charge
B Maximum Continuous Recording Time
≥“ ” “ ”1 h 10 min. stands for 1 hour and 10 minutes .
≥The Battery Model CGR-V14 is supplied.
≥The times shown in the above chart are approximations. The
figures in parentheses show the recording time when using
the °LCD Monitor.
°LCD Monitor: NV-VZ9/VZ10 only
Maximum Continuous Recording Time means the duration of
continuous recording performed at an ambient temperature of
25oC and 60% relative humidity. In actual recording, however,
the use of the zoom and other functions increases the power
consumption, and higher or lower temperatures reduce the
Battery’s ability to generate electricity. Therefore, the actual
recording time per Battery may be approximately 30%–50%
shorter than listed above.
CGR-V26S
CGR-V53S
CGR-V14
CGR-V14S A
B
A
B
A
B
2 h 40 min.
4 h 50 min.
10 h 20 min.
NV-VZ9/VZ10
2 h. (1 h 20 min.)
4 h. (2 h 40 min.)
8 h. (5 h 20 min.)
NV-RZ9/RZ10
2 h.
2 h 40 min.
4 h.
4 h 50 min.
8 h.
10 h 20 min.
!"#$%&'( )*+,-%& !
A !
B !"#$%
≥N Ü NM ãáåK N NM
≥ `doJsNQ !"#$
≥ !"#$%&'()*+,-./01 G !"
!"# $%
G !"#$% ksJswVLswNM
!"#$%&'()*+OR !"#SM !"#
!"#$%&'()*+,!"-)./0123456
!"#$%&'()*+,-.,/0( 12#345
!"#$%&'( )*+,-.%/!0123#
!" PM–RM

-26-
ENGLISH
11
3
OPEN
Using the LCD Monitor
(NV-VZ9/VZ10 only)
Improved LCD backlight transmission makes the picture extra
bright. In addition, special coating of the LCD s surface’
diffuses the light from outside to minimize light reflection, so
the picture has vivid colours and is easy to see.
1Slide the [3OPEN] Lever to the left and
simultaneously open the LCD Monitor in the
direction of the arrow approximately 90x.
Closing the LCD Monitor
Turn the LCD Monitor back toward the Movie Camera body
until it locks with a click.
≥The picture seen on the LCD Monitor looks slightly stretched
vertically, however, the actually recorded picture remains
unaffected by this.
≥Return the LCD Monitor to its vertical position before closing
it. Also, make sure that the Cassette Compartment is
securely closed before closing the LCD Monitor.
≥Opening the LCD Monitor automatically turns the Finder off.
However, when you turn the LCD Monitor so that is faces
forward, the Finder turns on again.
≥When the Movie Camera is very cold when turning it on, the
picture on the LCD Monitor is darker than normally.
However, as it reaches normal temperature, it regains its
normal brightness.
≥To remove fingerprints, wipe the LCD Monitor with a soft
cloth.
≥Do not expose the LCD Monitor to direct sunlight. When
sunlight falls onto the LCD Monitor, it may be difficult to view
the picture.
Extremely high precision technology is employed to
produce the LCD Monitor. The result is more than
99.99% active pixels with a mere 0.01% of the pixels
inactive or always lit. However, this is not a malfunction
and does not affect the recorded picture.
!"#$%&'
!ksJswVLswNM
!"#$%&'()*+,-./0123405"#$
!"#$%&'()*+,-./+0123-456
!"#$%&'
1
x3lmbkz !"#$%&'()*
!"#$ VM
!"#$%&'
!"#$%&'()*+,-./012345678
≥ !"#$% !&'()*+,-./0%12345
!"#$%&'()*+,-./
≥ !"#$%&'()*+,-./012*34
!"#$%&'()*+,-./01234
≥ !"#$%&'()*+,-./01&234(56
!"#$%&'()*+,-./%01234
≥ !"#$%&'()*+,-./01,234567
!"#$%&'()*+,-./0&123+456
!"#
≥ !"#$%&'()*+,-./01
≥ !"#$%&'()*+,-./01,-2+) !
!"#$%&'()*+,-./
!"#$%&'()*+,-./0&1234
!VVKVV !"#$%& MKMN !"#
!"#$%&'()$*+,-./01234
-28-
ENGLISH
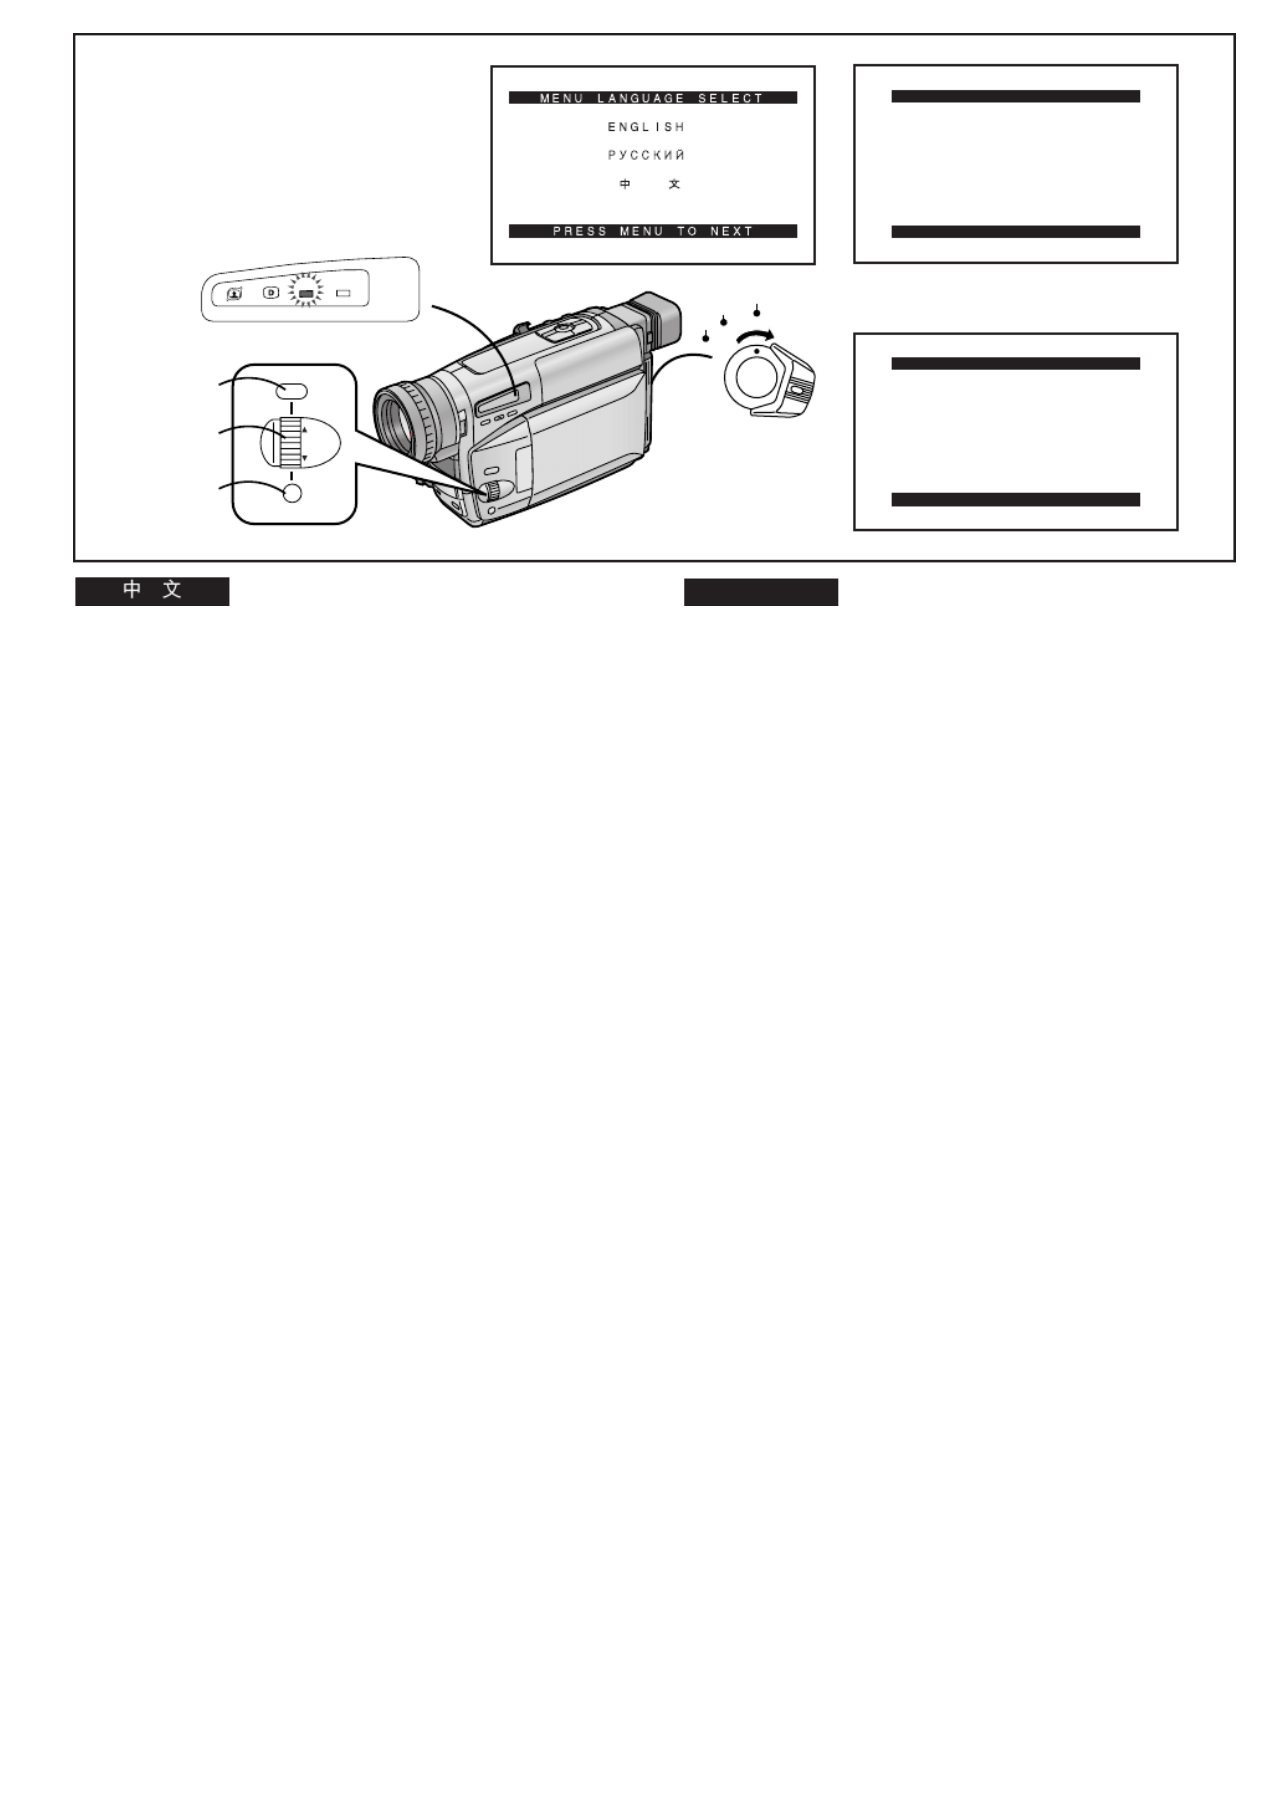
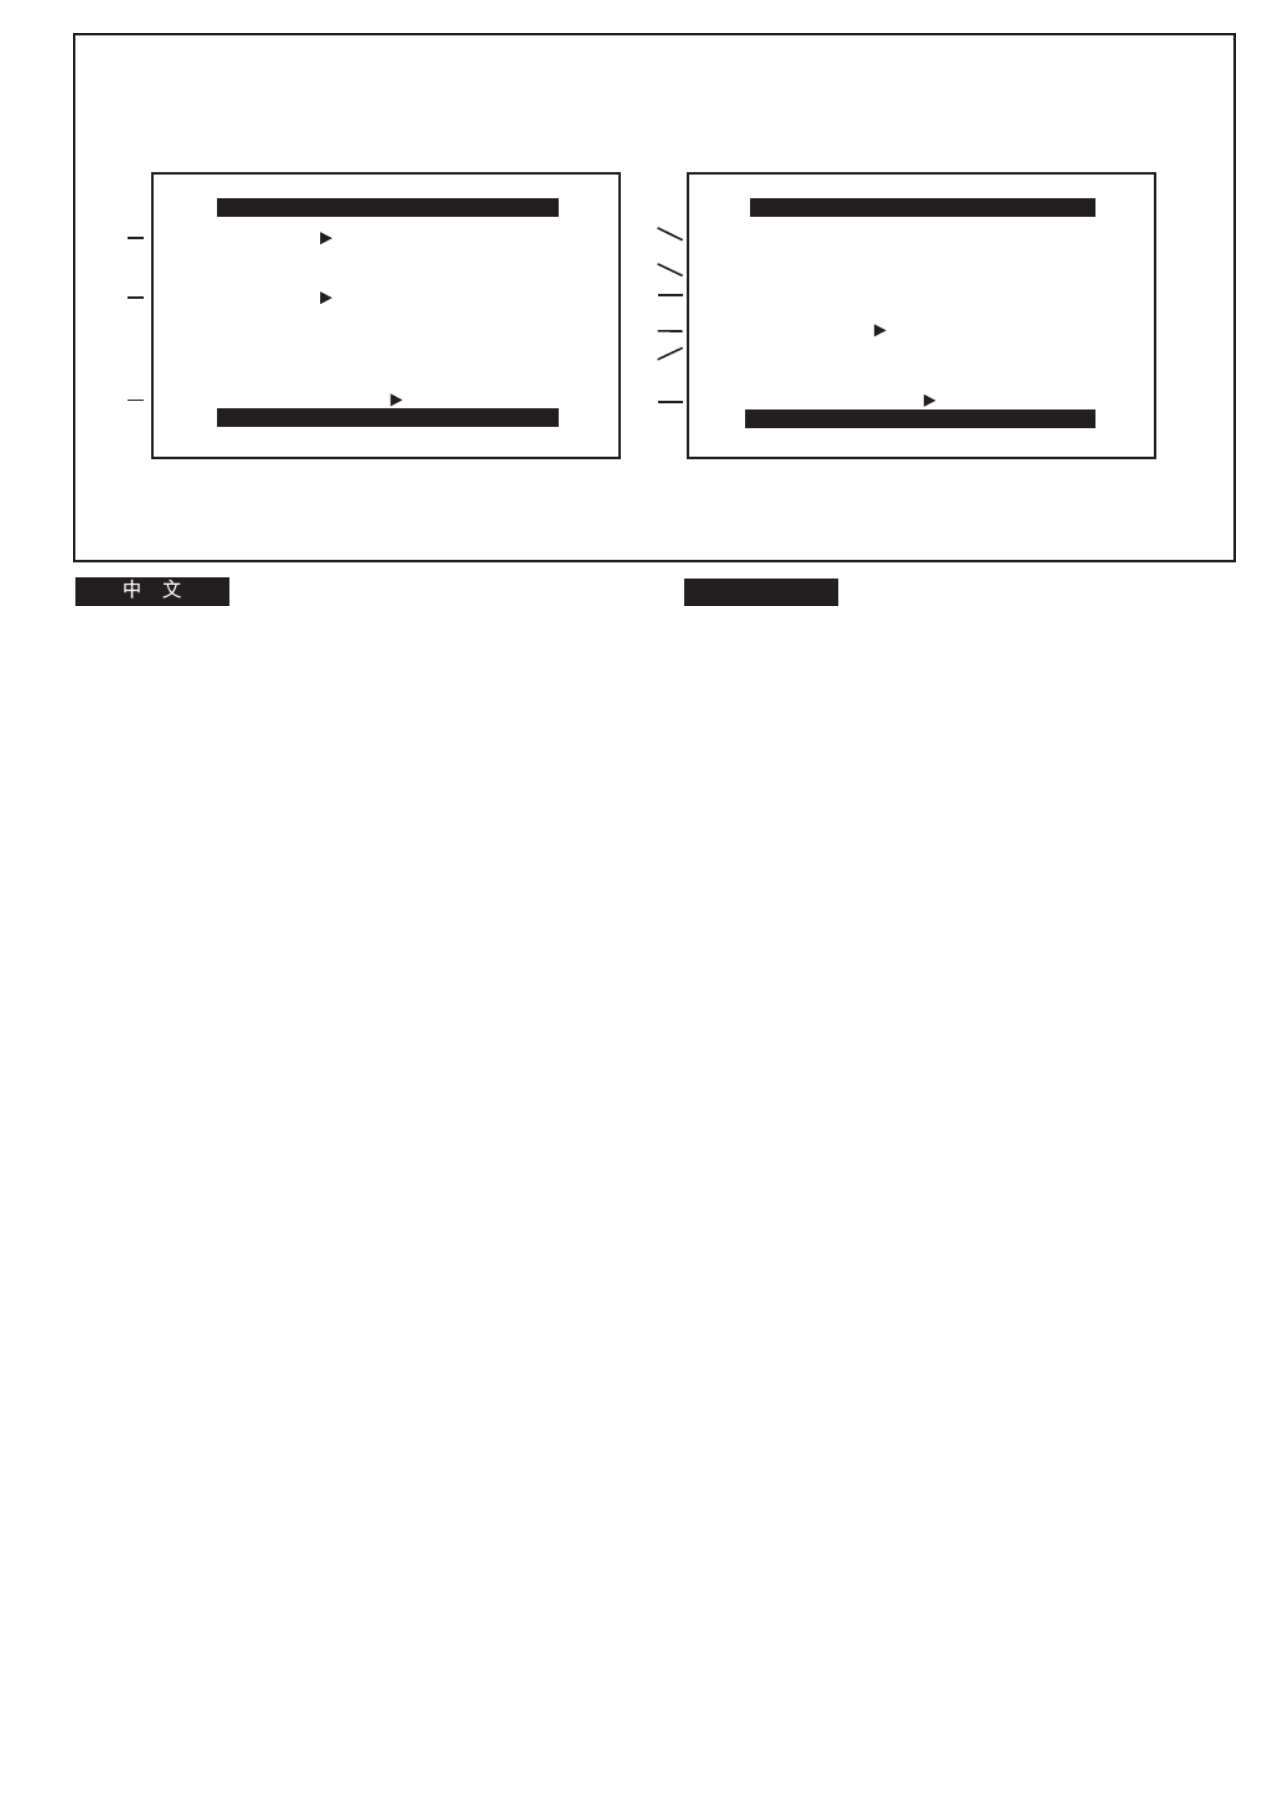
Using the Menus
This Movie Camera displays the settings of various functions
in menus to make it easy to select the desired functions and
settings.
1Set the [CAMERA/OFF/VCR] Switch either to
[CAMERA] or [VCR] while keeping the [MENU]
Button pressed.
≥The [MENU LANGUAGE SELECT] Menu 1 appears.
2Press the [SET] Button to select the desired
language.
≥Even if you select Chinese, the sub-menus are
displayed in English.
3Press the [MENU] Button.
≥When you press this button while the [CAMERA] Lamp
is lit in red, the Camera Mode Menu 2 appears.
When you press this button while the [VCR] Lamp is lit
in green, the VCR Mode Menu 3 appears.
4Turn the [34] Dial to select the desired
sub-menu.
≥Turning the [34] Dial changes the highlighted item.
5Press the [SET] Button to display the selected
sub-menu.
6Turn the [34] Dial to select the item to be set.
7Press the [SET] Button to set the selected item
to the desired mode.
Exiting the Menu
Press the [MENU] Button again.
≥The method for making settings on the [DATE/TIME
SETUP] Sub-Menu (l 48) and [LCD/EVF SETUP] Sub-
Menu (l 38) differs slightly from that of other Sub-Menus.
≥You can display the menu during playback, but not during
recording. Also, it is possible to start playback while the
menu is displayed, but if you start recording, the displayed
menu disappears.
≥Do not turn off the power while performing a menu
operation.
1 2
3
CAMERA FUNCTIONS
PRESS MENU TO EXIT
1.
CAMERA SETUP
2.
DIGITAL EFFECT
3.
TITLE SETUP
4.
DATE/TIME SETUP
5.
DISPLAY SETUP
6.
LCD/EVF SETUP
7.
OTHER FUNCTIONS
VCR FUNCTIONS
PRESS MENU TO EXIT
1.
DISPLAY SETUP
2.
LCD/EVF SETUP
INFO-
WINDOW
CAMERA
V C R
MENU
FOCUS / SET
MF/
TRACKING
2, 5, 7
4, 6
1, 3 1
CAMERA
OFF
VCR
!"#
!"#$%&'()*+,-./012345-6&7
!"#$%&'()
1
!"#xjbkrz
! !"x`^jbo^L
lccLs`oz !"#x`^jbo^z
!"#
xs`oz
!"
≥ xjbkr=i^kdr^db=pbib`qz !"#$%
1
2
xpbqz
! !"#$%&'
≥ !"#$%&'()*+,-./01
3
xjbkrz
≥ x`^jbo^z !"#$%&'()*+,-.
!"#2
xs`oz !"#$%&'()*+,-./0
3
4
x34 z !"#$%&'()*+
≥x34z !"#$%&'
5
xpbqz !"#$%&'(
6
x34 z !"#$%&'()
7
xpbqz !"#$%&'()*#+,-
!"
xjbkrz
≥xa^qbLqfjb=pbqrmzL l=QUxi`aLbsc
pbqrmzi`aLbsc l PU !"#$%&'
!"#$%&'(
≥ !"#$%&'()*+,-./0!12'()*
!"#$%&'"()*+,-./01"2345
!"#$%&'()*+,-./
≥ !"#$%&'()*+,
-30-
ENGLISH
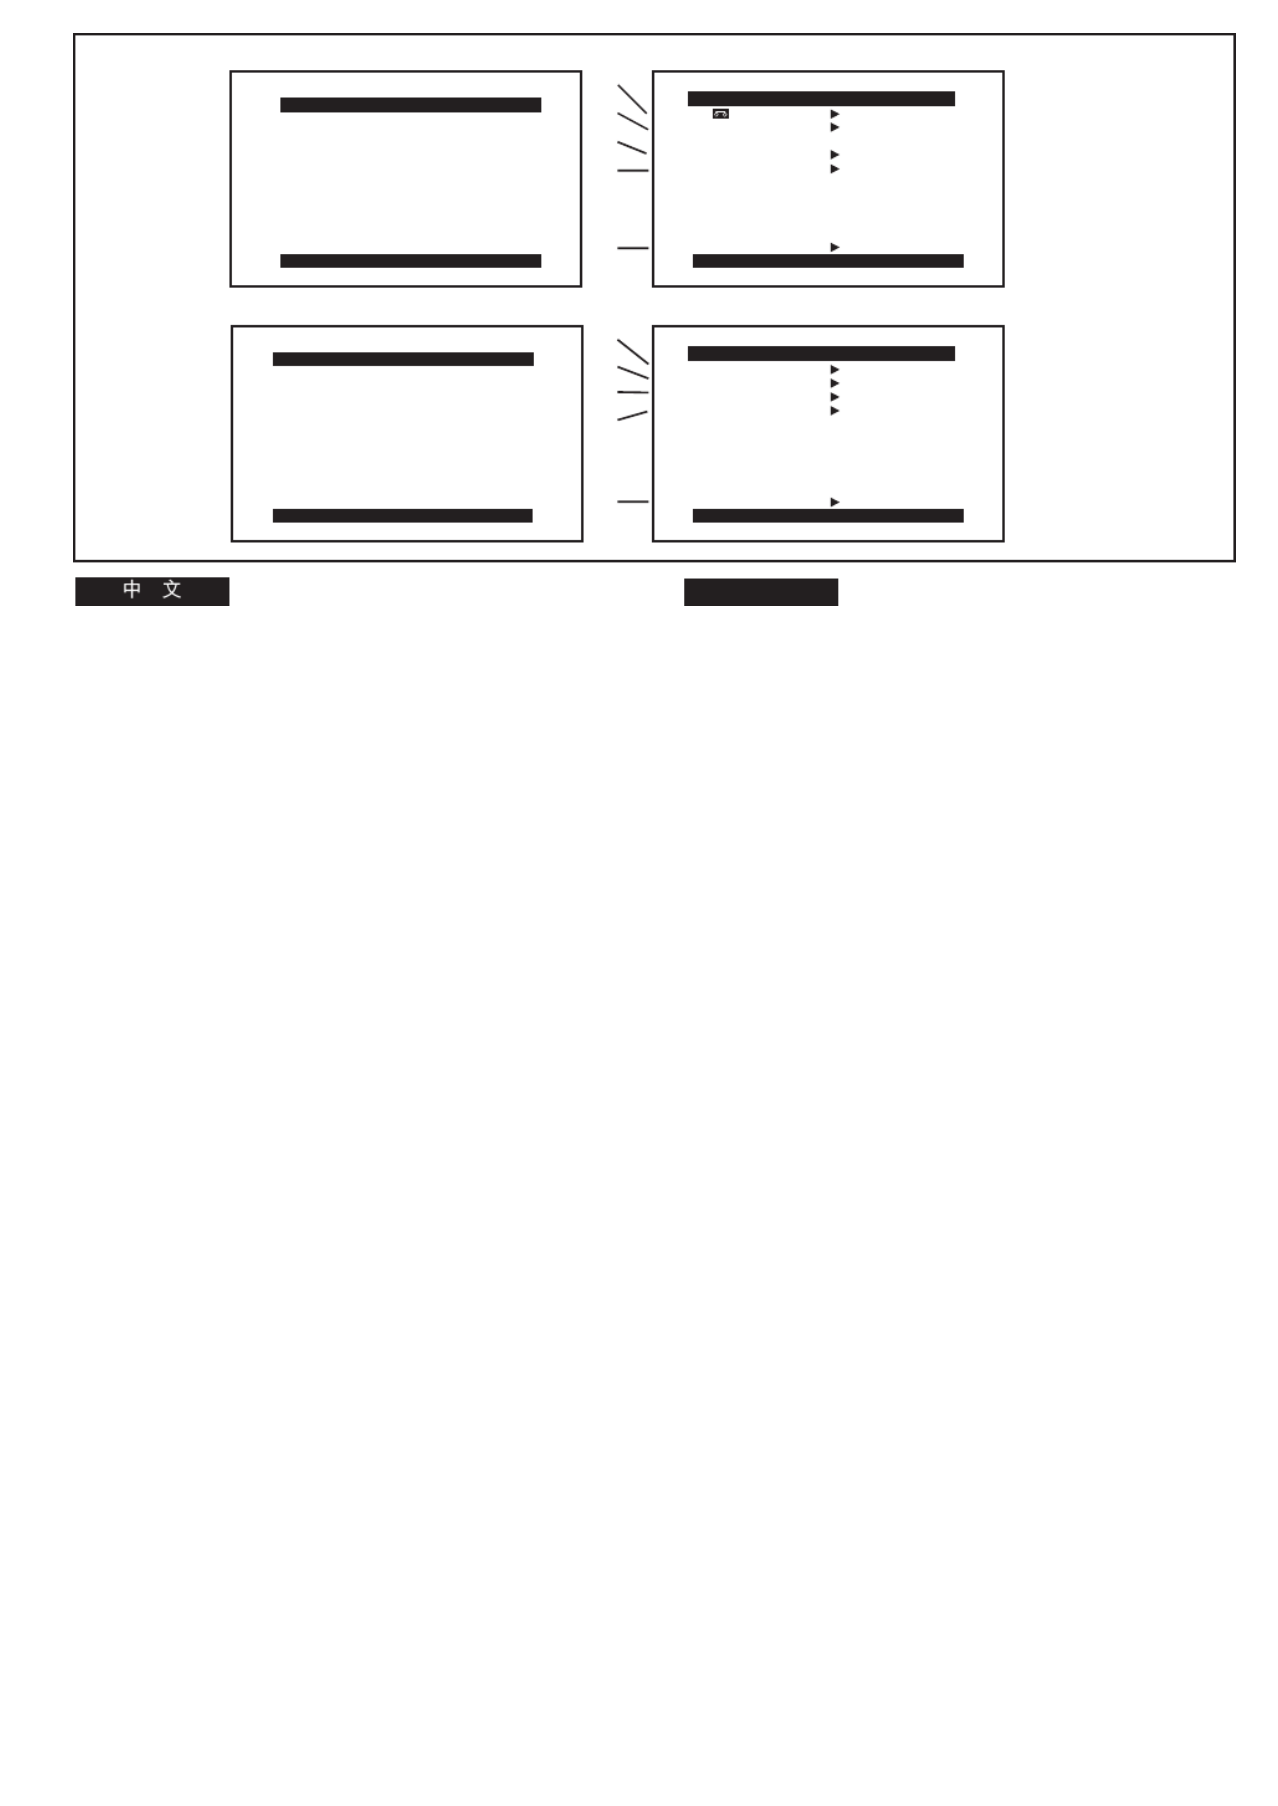
Menu Functions
The illustrations of the menus are for explanation purposes
only and the actual menus may be somewhat different.
Camera Mode Main-Menu [CAMERA FUNCTIONS]
1. CAMERA SETUP
2. DIGITAL EFFECT
3. TITLE SETUP
4. DATE/TIME SETUP
5. DISPLAY SETUP
6. LCD/EVF SETUP (NV-VZ9/VZ10)
EVF SETUP (NV-RZ9/RZ10)
7. OTHER FUNCTIONS
[CAMERA SETUP] Sub-Menu 1
1Motion-Sensor-Controlled Recording [M.SENSOR]
(l 84)
2Digital Zoom [D.ZOOM] (l 80)
3Returning to the Main-Menu [RETURN]
If you set [RETURN] to [YES], the menu changes back to
the Main-Menu.
3
CAMERA SETUP
PRESS MENU TO EXIT
M.SENSOR OFF ON
D.ZOOM 45 100 250
RETURN ---- YES
1
1
2
CAMERA FUNCTIONS
PRESS MENU TO EXIT
1.
CAMERA SETUP
2.
DIGITAL EFFECT
3.
TITLE SETUP
4.
DATE/TIME SETUP
5.
DISPLAY SETUP
7.
OTHER FUNCTIONS
6.
LCD/EVF SETUP
!
!"#$%&'()*+,-'./(01*
!"#$%& x
`^jbo^=crk`qflkp z
1. `^jbo^=pbqrm
2. afdfq^i=bccb`q !
3. qfqib=pbqrm !
4. a^qbLqfjb=pbqrm L
5. afpmi^v=pbqrm !
6. i`aLbsc=pbqrmi`aLbsc ksJswVLswNM
bsc=pbqrmbsc ksJowVLowNM
7. lqebo=crk`qflkp !"#
x`^jbo^=pbqrmz 1
1 !"#$%&xjKpbkploz lUQ
2 !xaKwlljz lUM
3 !"xobqrokz !
!xobqrokz ! xvbpz !"#$
-32-
ENGLISH
Camera Mode Main-Menu [CAMERA FUNCTIONS]
(Continued)
[DIGITAL EFFECT] Sub-Menu 2
4Digital Effects 1 [EFFECT1] (l 72, 74)
5Digital Effects 2 [EFFECT2] (l 72, 76)
6Returning to the Main-Menu [RETURN]
[TITLE SETUP] Sub-Menu 3
7Date/Time/Title Indication [DATE/TITLE] (l 50)
8Title [TITLE] (l 108)
9Language of the Title [LANGUAGE FOR TITLE] (l 108)
:Size of the Title [SIZE] (l 110)
;Colour of the Date/Time/Title Indication [COLOUR]
(l 108)
<Returning to the Main-Menu [RETURN]
7
8
9
:
;
<
TITLE SETUP
PRESS MENU TO EXIT
DATE/TITLE
SIZE YELLOWCOLOUR
DATE TIME TITLE
LANGUAGE
TITLE
FOR TITLE NORMAL LARGE
HAPPY BIRTHDAY
RETURN ---- YES
ENGLISH
6
5
4
2 3
DIGITAL EFFECT
PRESS MENU TO EXIT
EFFECT1 OFF SIS D.ZOOM
EFFECT2 OFF NEGA SOLARI
SEPIA B/W D.FADE1
D.FADE2 D.FADE3
SIS+D.ZOOM MOSAIC
STRETCH
RETURN ---- YES
!"#$%& x
`^jbo^=crk`qflkp z
xafdfq^i=bccb`qz ! 2
4 ! Nxbccb`qNz lTOTQ
5 ! Oxbccb`qOz lTOTS
6 !"xobqrokz
xqfqib=pbqrmz ! 3
7 L L xa^qbLqfqibz ! L lRM
8xqfqibz lNMU
9 !"#xi^kdr^db=clo=qfqibz lNMU
: !"xpfwbz lNNM
; L L x`lilroz !"#$ lNMU
< !"xobqrokz
-34-
ENGLISH
Camera Mode Main-Menu [CAMERA FUNCTIONS]
(Continued)
[DATE/TIME SETUP] Sub-Menu 4 (l 48)
[DISPLAY SETUP] Sub-Menu 5
=Tape Length [TAPE2 l] ( 42)
>Counter Display Mode [DISPLAY] (l 118)
?Counter Reset [C.RESET] (l 116)
@Self-Recording [SELF SHOOT] (l 104)
(NV-VZ9/VZ10 only)
AReturning to the Main-Menu [RETURN]
[LCD/EVF SETUP] Sub-Menu 6 (l 38)
(LCD Monitor adjustment is only for models NV-VZ9 and
NV-VZ10.)
[OTHER FUNCTIONS] Sub-Menu 7
BRecording Speed Mode [REC SPEED]
You can select the desired recording speed (SP Mode or
LP Mode) by selecting the corresponding setting for [REC
SPEED] on the [OTHER FUNCTIONS] Sub-Menu.
≥[SP] means Standard Play. [LP] means Long Play.
CRecording Lamp [TALLY LAMP] (l 54)
DVoice Zoom [VOICE ZOOM] (l 58)
EDemonstration Mode [DEMO MODE] (l 138)
FReturning to the Main-Menu [RETURN]
4 5
?
>
=
@
A
6
PRESS MENU TO RETURN
LCD/EVF SETUP
LCD BRIGHTNESS
[-]||||----[+]
LCD COLOUR
[-]||||----[+]
EVF BRIGHTNESS
[-]||||----[+]
DISPLAY SETUP
PRESS MENU TO EXIT
TAPE 30 45 60
SELF SHOOT NOR. MIR.
DISPLAY ALL MEMORY
REC SPEED SP LP
PARTIAL OFF
C.RESET ---- YES
RETURN ---- YES
7
C
B
D
E
F
OTHER FUNCTIONS
PRESS MENU TO EXIT
TALLY LAMP OFF ON
VOICE ZOOM OFF ON
DEMO MODE OFF ON
RETURN ---- YES
DATE/TIME SETUP
PRESS MENU TO RETURN
YEAR 2001
MONTH 2
DATE 28
HOUR 15
MIN. 30
!"#$%&x`^jbo^=crk`qflkpz
xa^qbLqfjb=pbqrmzL 4
l=QU
xafpmi^v=pbqrmz ! 5
= !"xq^mb 2=zl=QO
> !"#$xafpmi^vzlNNU
? !"x`KobpbqzlNNS
@xpbic=pellqzl
=
NMQ ! ksJswVLswNM
A !"xobqrokz
xi`aLbsc=pbqrmzi`aLbsc 6
l=PU
!"#$%&'()*+, ksJswV ksJswNM
xlqebo=crk`qflkpz !"# 7
B !"#xob`=pmbbaz
xlqebo= crk`qflkpz !"# !xob`
pmmbaz !"# !"#$%&'()&*+$,-
pm im
≥xpmz ximz !"#$% !"#$%&
C xq^iiv=i^jmzl=RQ
D !xslf`b=wlljzl=RU
E !xabjl=jlabzlNPU
F !"xobqrokz
-36-
ENGLISH
1 2
DISPLAY SETUP
PRESS MENU TO EXIT
TAPE 30 45 60
DISPLAY ALL MEMORY
OFF
C.RESET ---- YES
RETURN ---- YES
PRESS MENU TO RETURN
LCD/EVF SETUP
LCD BRIGHTNESS
[-]||||----[+]
LCD COLOUR
[-]||||----[+]
EVF BRIGHTNESS
[-]||||----[+]
VCR FUNCTIONS
PRESS MENU TO EXIT
1.
DISPLAY SETUP
2.
LCD/EVF SETUP
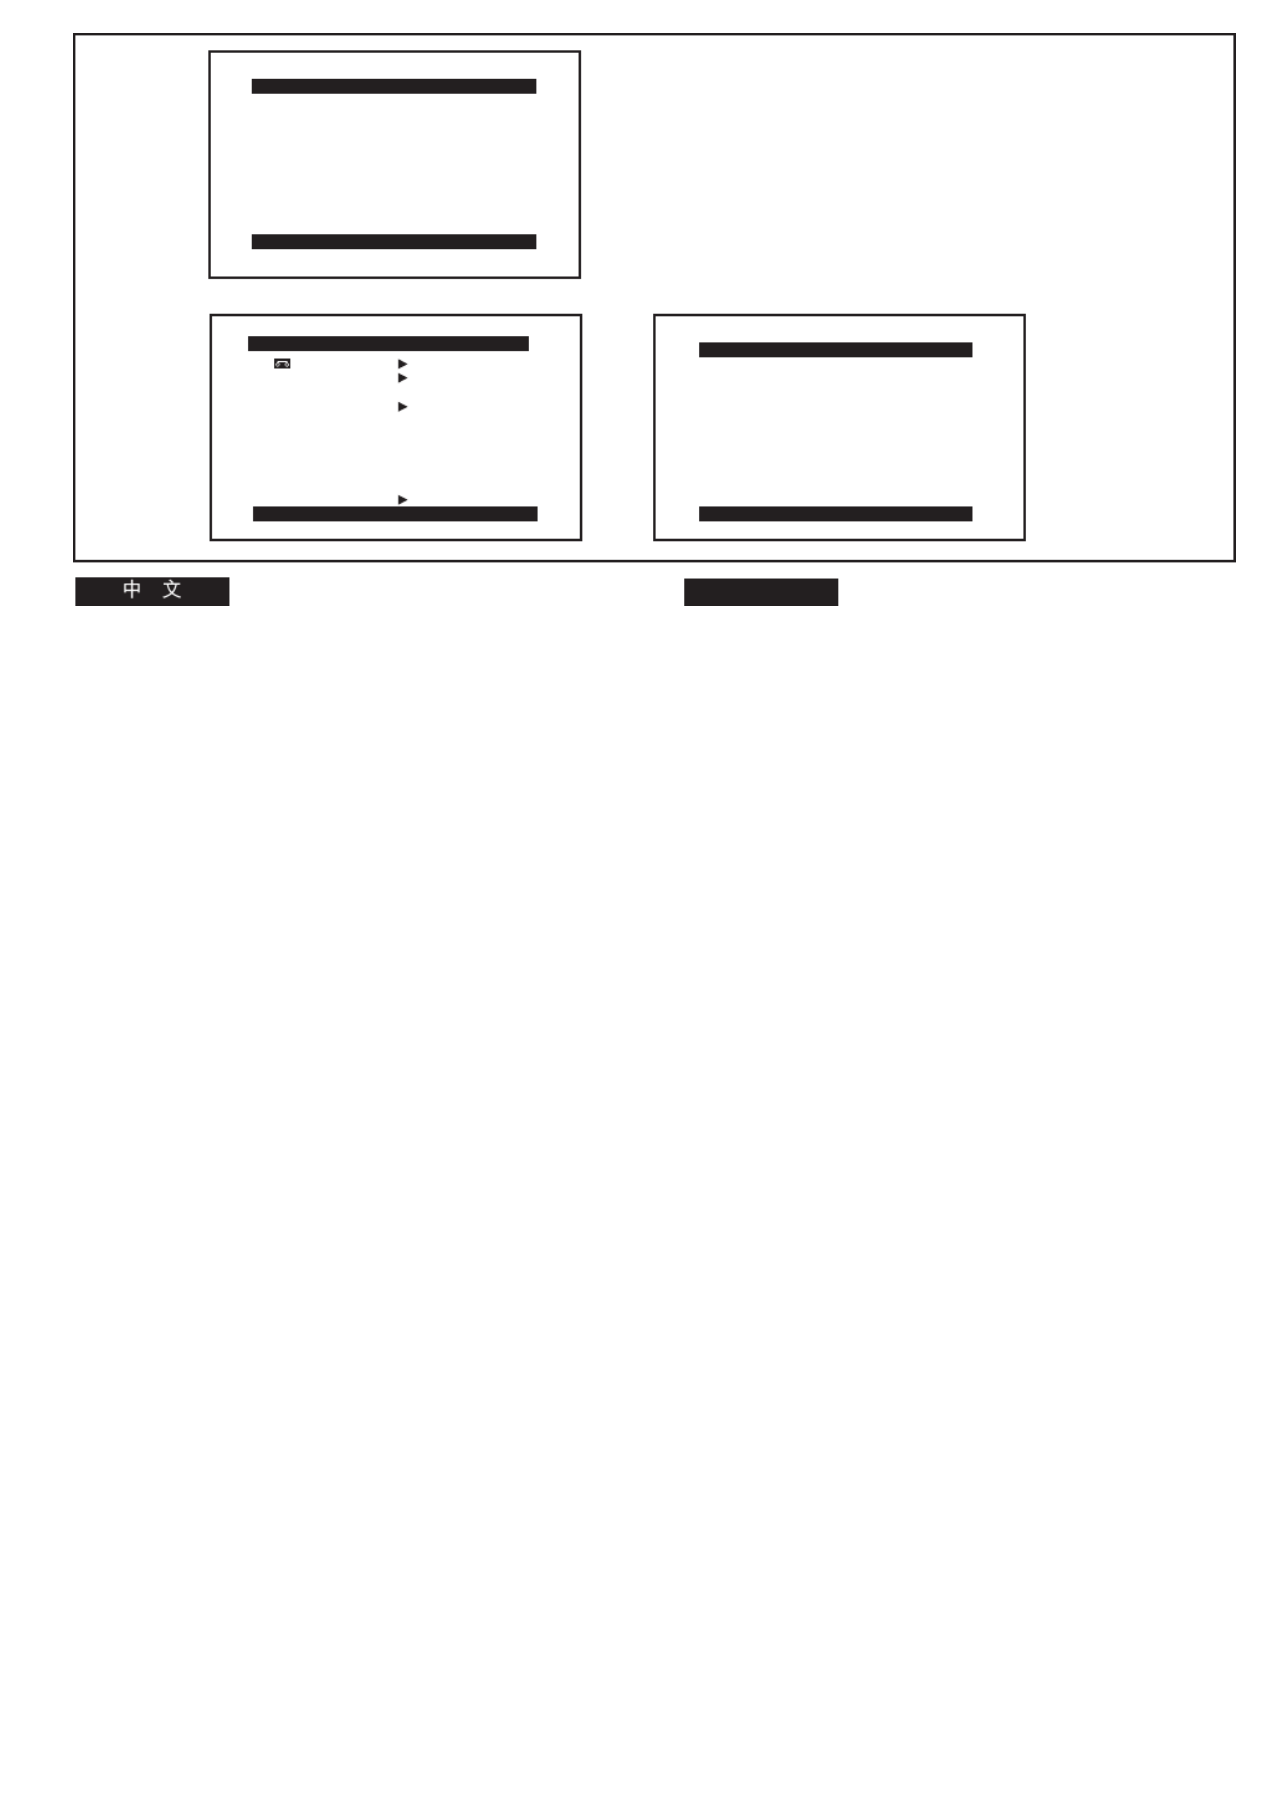
VCR Mode Main-Menu [VCR FUNCTIONS]
1. DISPLAY SETUP
2. LCD/EVF SETUP (NV-VZ9/VZ10)
EVF SETUP (NV-RZ9/RZ10)
[DISPLAY SETUP] Sub-Menu 1
All items on the [DISPLAY SETUP] Sub-Menu are the same
as those on the [DISPLAY SETUP] Sub-Menu of the
[CAMERA FUNCTIONS] Main-Menu.
[LCD/EVF SETUP] Sub-Menu 2 (l 38)
(LCD Monitor adjustment is only for models NV-VZ9 and
NV-VZ10.)
!"#$%xs`o=crk`qflkpz
1. afpmi^v=pbqrm !
2. i`aLbsc=pbqrmi`aLbsc ksJswVLswNM
bsc=pbqrmbsc ksJowVL owNM
xafpmi^v=pbqrmz ! !"#$%&'
x`^jbo^=crk`qflkpz !xafpmi^v=pbqrmz
! !"#$%&'()
xi`aLbsc=pbqrmz
i`aLbsc
2
l=PU
!"#$%&'()*+, ksJswV ksJswNM
xafpmi^v=pbqrmz ! 1

-38-
ENGLISH
180 u
90 u
A
B
PRESS MENU TO RETURN
LCD/EVF SETUP
LCD BRIGHTNESS
[-]||||----[+]
LCD COLOUR
[-]||||----[+]
EVF BRIGHTNESS
[-]||||----[+]
MENU
FOCUS / SET
MF/
TRACKING
1
2
Adjusting the Brightness and Colour
Level of the LCD Monitor/Finder
(LCD Monitor adjustment is only for models
NV-VZ9 and NV-VZ10.)
If you select the [LCD/EVF SETUP] or the [EVF SETUP] Sub-
Menu of the [VCR FUNCTIONS] or the [CAMERA
FUNCTIONS] Main-Menu, the following items are displayed.
LCD Brightness [LCD BRIGHTNESS]
To adjust the brightness of the picture on the LCD screen.
LCD Colour Level [LCD COLOUR]
To adjust the colour saturation of the picture on the LCD
screen.
Finder Brightness [EVF BRIGHTNESS]
To adjust the brightness of the picture in the Finder.
1Press the [SET] Button to select the item that
you want to adjust.
2Turn the [34] Dial to increase or decrease the
vertical bars of the Bar Indication.
≥The Bar Indication is divided into 8 steps. The more
vertical bars are shown, the stronger is the brightness
or colour saturation.
Exiting the Menu
Press the [MENU] Button twice.
≥These adjustments have no influence on the actual picture
recorded.
∫Adjusting the Angle of the LCD Monitor
The LCD Monitor rotates upward a maximum of 180o 1 and
downward a maximum of 90o 2 from its normal vertical
position. Trying to forcefully rotate it beyond this range could
seriously damage the Movie Camera.
!"#$%&L !"#
!"#$
!"#$%&'()*+,ksJswV ksJ
swNM
!xs`o= crk`qflkpz !x`^jbo^
crk`qflkpz !"#xi`aLbsc=pbqrmzi`aL
bsc !xbsc=pbqrmzbsc !"#$%&
!"#$%&xi`a=_ofdeqkbppz
!"#$%&'()*+,-
!"#$%&'(xi`a=`lilroz
!"#$%&'()*+,-./
!"#$xbsc=_ofdeqkbppz
!"#$%&'()*+,
1xpbqz !
!"#$%&'()*
2x34z !"#$%&'()*+%&,
≥ !"#U !"#$%&'()*+,-%
!"#$%
!"
xjbkrz !
≥ !"#$%&'()*+,-./012
∫ !"#$%&'()
!"#$%&'()*+, !"#$NUM
1
!VM
2
!"#$%&'()*+,-./012
!"#$%&'()

-40-
ENGLISH
1
2
5
3
4
1
<
EJECT
3
OPEN
2
6
LOCK
3
4
Inserting/Ejecting the Cassette
1Connect the AC Adaptor or attach a charged
Battery. (l 18, 20)
2Turn the cog wheel 1 to tighten the tape.
3Slide the [3OPEN] Lever to the left and
simultaneously open the LCD Monitor in the
direction of the arrow approximately 90x.
(NV-VZ9/VZ10 only)
≥Be sure to keep the LCD Monitor in its vertical position,
so that the Cassette Compartment Cover, when it
opens, does not hit the LCD Monitor.
4Press the [< EJECT] Button.
5Insert the cassette with the cassette window 2
facing outward and push it all the way in.
6Close the Cassette Compartment by pressing
the [LOCK] Button.
≥If the AC Adaptor or Battery is used to supply power, it is
possible to insert or eject the cassette without turning on the
Movie Camera.
≥If a cassette with broken out erasure prevention tab is
inserted, the [Y] Indication flashes.
∫Preventing Accidental Erasure of Recordings
≥Recording on a previously recorded cassette erases the
existing scenes and sound.
≥To protect important recordings against accidental erasure,
use a screwdriver to break out the tab 3 on the cassette
(some cassettes have sliding-type tabs).
≥To be able to record again on a protected cassette, firmly
cover the hole where the tab was with two layers of
adhesive tape 4.
L !"#
1
!"#$%&'()*)+,
lNUOM
2
!
1
!"#$
3
!x3lmbkz !"#$%&'()*
!"#$ VM ! ksJswVLswNM
≥ !"#$%&'()*+,-./-012345
!"#$%&'()*+,-.
4
x<bgb`qz
!
5
!"#$ !"%&'
2
!"#$%&
6
!"#$%&'(xil`hz
≥ !"#$%&'"()*'+,-./0123456
!"#$%&
≥ !"#$%&'()*+,-./xYz !"#
∫ !"#$%&'(
≥ !"#$%&'()"%*+,-./0#1234
≥ !"#$%&'()*+,-./012345678
! 3
!"#$%&'()*
≥ !"#$%&'()*+,- ./0%1 4
!"#$%&'(
-42-
ENGLISH
DISPLAY SETUP
TAPE 30 45 60
MENU
FOCUS / SET
MF/
TRACKING
1
2
1
2
PRESS MENU TO EXIT
DISPLAY ALL
C.RESET ----
RETURN ----
PRESS MENU TO EXIT
TAPE 30 45 60
DISPLAY ALL
C.RESET ----
SELF SHOOT NOR.
RETURN ----
4
P
P
30 3R 0:30
DISPLAY SETUP
[30] [45] [60]
[230] [245] [260]
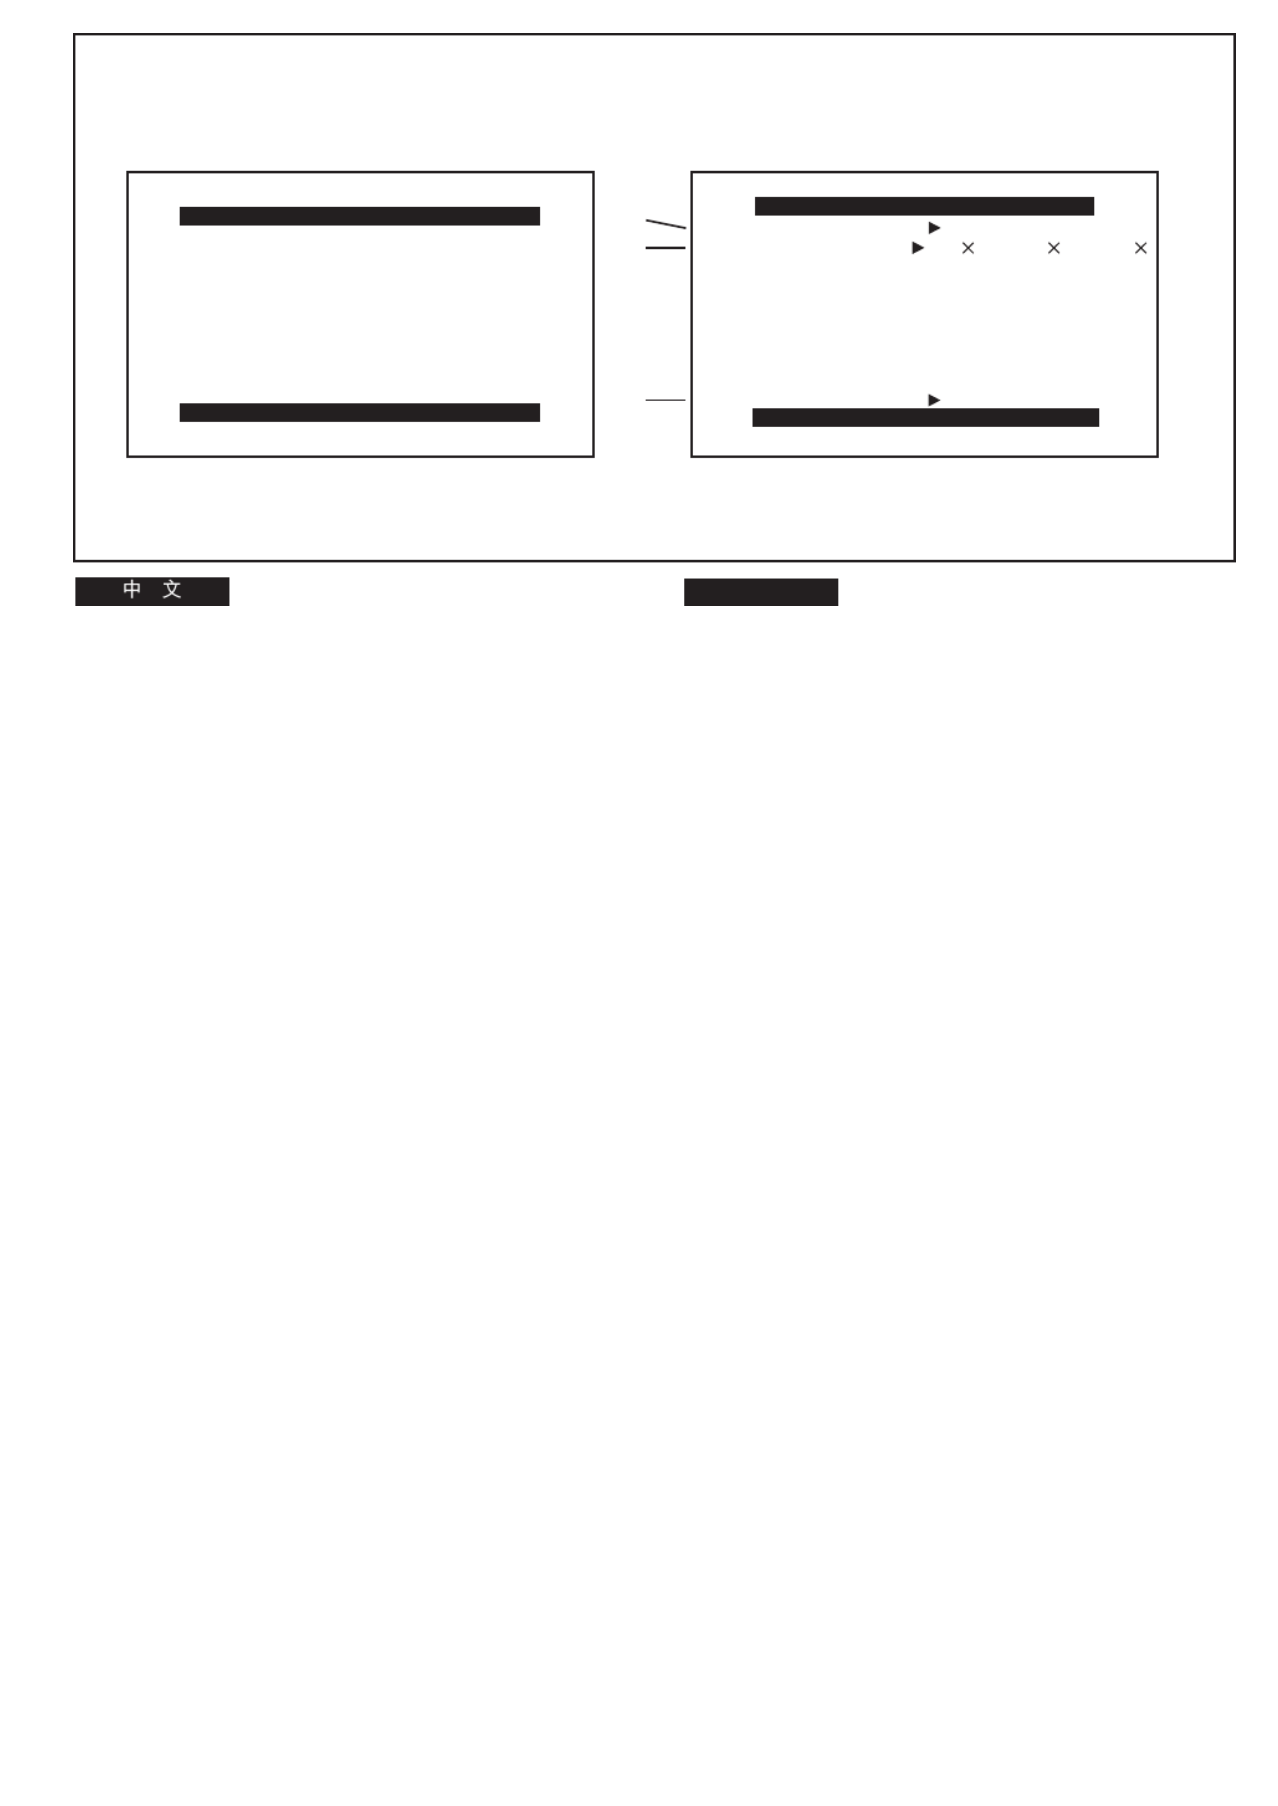
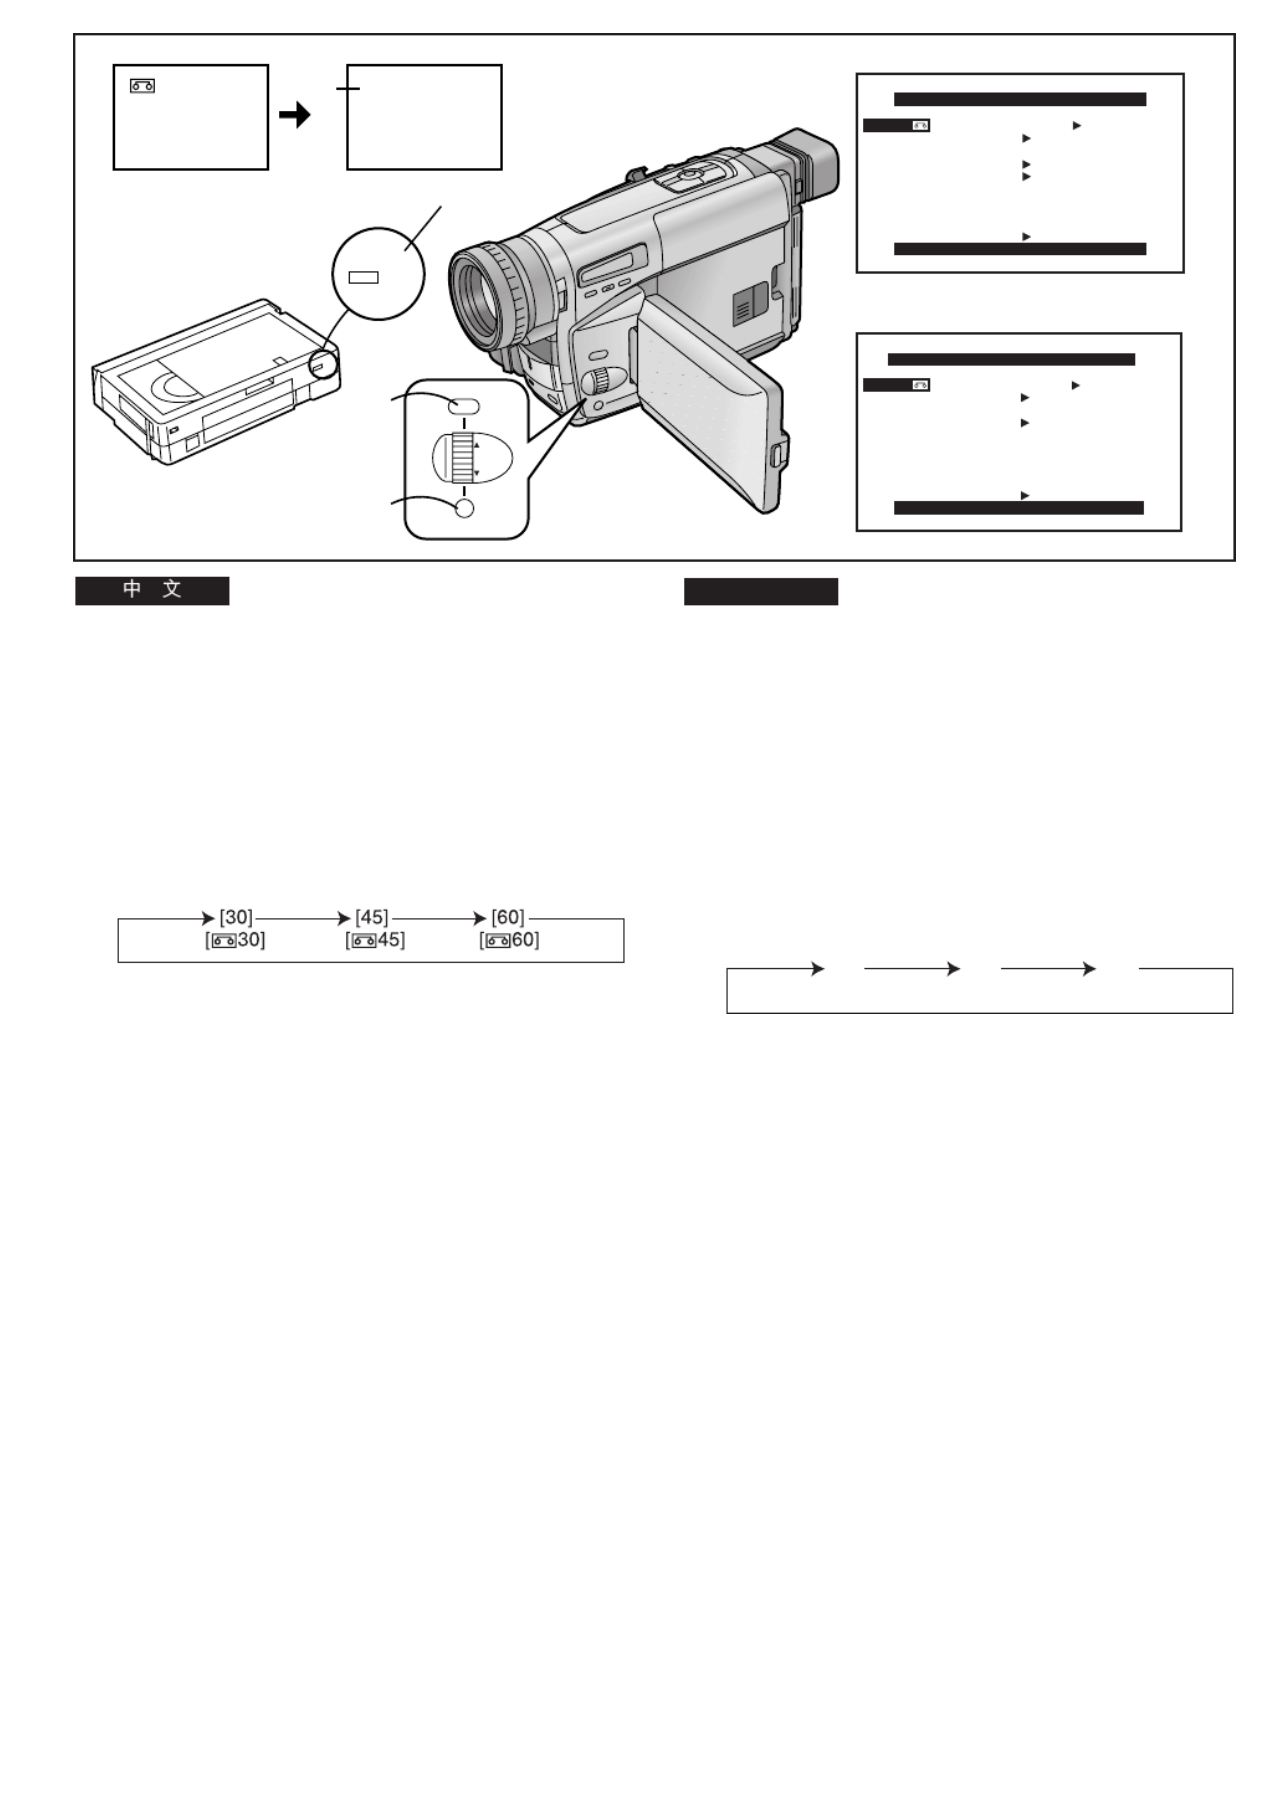
Selecting the Correct Tape Length
To ensure that the Remaining Tape Time Indication displayed
during recording and playback is correct, you need to set the
tape length that matches that of the inserted cassette.
After selecting [TAPE2] on the [DISPLAY SETUP] Sub-
Menu... (l 28)
1Press the [SET] Button to select the correct
tape length.
≥ 1The selected tape length is marked with the [ ] Mark.
≥The Tape Length Indications change in the following
order:
2Press the [MENU] Button to exit the menu.
1:Camera Mode
2:VCR Mode
Confirming the Remaining Tape Time
During recording and playback, the Remaining Tape Time
Indication 3 is automatically displayed, so you always know
how much time you have left on the cassette. However, to
ensure correct display of the remaining tape time, the tape
length of the cassette being used must be set correctly on the
Movie Camera.
≥When recording or playback starts, the Tape Length
Indication disappears, and in its place the [R] Indication 3
flashes while the remaining tape time is being calculated. A
few seconds later, the Remaining Tape Time Indication
appears. ([R] means Remaining.)
≥When the remaining tape time is less than 2 minutes, the [R]
Indication and the Remaining Tape Time Indication start to
flash.
When you use a cassette bearing the [P] mark 4 or other
special types of cassettes, the Remaining Tape Time
Indication may not be very precise.
!"#$%&'
!"#$%&'()*+,-./0!12 34567
!"#$%&'()*+,-
xafpmi^v=pbqrmz ! !" xq^mb2z
lOU
1xpbqz
! !"#$%&'()
≥ !"#$%&'()x1z !"
≥ !"#$%&'()*+,
2xjbkrz
! !"#
1
!"#$
2
!"#
!"#$%$
!"#$%&'()*+,-./0)3 !"
!"#$%&'()*+,-./0 123$'(
!"#$%&'()*+,"#-./01)*2!32
≥ !"#$%&'()*+,-./01234'(56
!xoz 3 !"#$%&'()*+,-.
!"#$%&'(xoz !"#$
≥ !"#$%O !x o z !"#$%&
!"#$
!"#xmz4 !"#$%&'() !
!"#$%&'()*+,
Produkt Specifikationer
| Mærke: | Panasonic |
| Kategori: | Videobåndoptager |
| Model: | NV-VZ10ENH |
Har du brug for hjælp?
Hvis du har brug for hjælp til Panasonic NV-VZ10ENH stil et spørgsmål nedenfor, og andre brugere vil svare dig
Videobåndoptager Panasonic Manualer

5 April 2025
23 August 2024
23 August 2024
17 August 2024
2 August 2024
19 Juli 2024
28 Juni 2024
1 Februar 2024
5 Oktober 2023
28 August 2023
Videobåndoptager Manualer
- Videobåndoptager SilverCrest
- Videobåndoptager Sony
- Videobåndoptager Philips
- Videobåndoptager Mitsubishi
- Videobåndoptager Sharp
- Videobåndoptager Daewoo
- Videobåndoptager Sanyo
- Videobåndoptager Grundig
- Videobåndoptager Toshiba
- Videobåndoptager AKAI
- Videobåndoptager JVC
- Videobåndoptager Hitachi
- Videobåndoptager Bang And Olufsen
- Videobåndoptager Loewe
- Videobåndoptager ION
- Videobåndoptager Proline
- Videobåndoptager Funai
- Videobåndoptager Seg
- Videobåndoptager Skytronic
- Videobåndoptager Meridian
Nyeste Videobåndoptager Manualer

13 Januar 2025

3 Oktober 2024

29 September 2024
22 September 2024
22 September 2024
19 September 2024

17 September 2024
16 September 2024
2 September 2024

1 September 2024