Pelco Sarix Professional IWP232-1ERS Manual
Pelco
Overvågningskamera
Sarix Professional IWP232-1ERS
Læs nedenfor 📖 manual på dansk for Pelco Sarix Professional IWP232-1ERS (70 sider) i kategorien Overvågningskamera. Denne guide var nyttig for 16 personer og blev bedømt med 4.5 stjerner i gennemsnit af 2 brugere
Side 1/70

Operations Manual
C6628M (08/19)
Sarix® Professional 3 Series
IMP
Indoor |
Environmental
Vandal Dome
IBP
Environmental
IR Bullet
IXP
Indoor ABF Box
IWP
Rugged
Environmental
Wedge Dome
IMP131-1ERS
IMP231-1ERS
IMP331-1ERS
IMP231-1IS
IMP331-1IS
IMP531-1ES
IMP531-1IS
IMP231-1ES
IMP331-1ES
IMP131-1IRS
IMP231-1IRS
IMP331-1IRS
IMP531-1ERS
IMP531-1IRS
IBP131-1ER
IBP231-1ER
IBP331-1ER
IBP5 -1ER 31
IBP232-1ER
IBP532-1ER
IBP -1ER 235
IBP -1ER 335
IXP13
IXP23
IXP33
IXP53
IWP133-1ERS
IWP233-1ERS
IWP232-1ERS
IWP234-1ERS
IWP236-1ERS
IWP333-1ERS
IWP532-1ERS
IWP533-1ERS

2
Contents
Important Notices ......................................................................................................................................................................... 4
Regulatory Notices [FCC CLASS A] .................................................................................................................................... 4
Radio and Television Interference ....................................................................................................................................... 4
Legal Notice [Audio Notice] 4..................................................................................................................................................
Video Quality Caution .......................................................................................................................................................... 4
Frame Rate Notice Regarding User Selected Options 4........................................................................................................
Open Source Software 5........................................................................................................................................................
Korean Class A EMC ........................................................................................................................................................... 5
ESD Warning ....................................................................................................................................................................... 5
Warranty .............................................................................................................................................................................. 5
Network Topology Statement ............................................................................................................................................... 5
Preface ......................................................................................................................................................................................... 6
1. Installation and Connection .......................................................................................................................................... 7
1.1 Installation ...................................................................................................................................................................... 7
1.1.1 Network Topology 7..............................................................................................................................................
1.1.2 System Requirements ........................................................................................................................................ 7
1.2 Connection ..................................................................................................................................................................... 9
1.2.1 Default IP address .............................................................................................................................................. 9
1.2.2 Connecting From a Computer & Viewing Preparation ........................................................................................ 9
2. Administration and Configuration .............................................................................................................................. 11
2.1 Live .............................................................................................................................................................................. 11
2.1.1 Zoom and Focus Controls ................................................................................................................................ 12
2.1.2 Pixel Count ....................................................................................................................................................... 12
2.2 Settings ........................................................................................................................................................................ 13
2.2.1 System ............................................................................................................................................................. 13
2.2.2 Network & Security ........................................................................................................................................... 18
2.2.3 Imaging .............................................................................................................................................................32
2.2.4 A/V Streams ..................................................................................................................................................... 43
2.2.5 Event Source .................................................................................................................................................... 57

3
2.2.6 Event Handler ................................................................................................................................................... 59
Pelco Troubleshooting Contact Information ...............................................................................................................................69

4
Important Notices
REGULATORY NOTICES [FCC CLASS A]
This device complies with Part 15 of the FCC Rules. Operation is subject to the following two conditions: (1) this device may not
cause harmful interference, and (2) this device must accept any interference received, including interference that may cause
undesired operation.
RADIO AND TELEVISION INTERFERENCE
This equipment has been tested and found to comply with the limits of a Class A digital device, pursuant to Part 15 of the FCC
rules. These limits are designed to provide reasonable protection against harmful interference when the equipment is operated
in a commercial environment. This equipment generates, uses, and can radiate radio frequency energy and, if not installed and
used in accordance with the instruction manual, may cause harmful interference to radio communications. Operation of this
equipment in a residential area is likely to cause harmful interference in which case the user will be required to correct the
interference at his own expense.
Changes and Modifications not expressly approved by the manufacturer or registrant of this equipment can void your authority
to operate this equipment under Federal Communications Commission’s rules.
This Class A digital apparatus complies with Canadian ICES-003.
Cet appareil numérique de la classe A est conforme à la norme NMB-003 du Canada.
LEGAL NOTICE [AUDIO NOTICE]
SOME PELCO EQUIPMENT CONTAINS, AND THE SOFTWARE ENABLES, AUDIO/VISUAL AND RECORDING
CAPABILITIES, THE IMPROPER USE OF WHICH MAY SUBJECT YOU TO CIVIL AND CRIMINAL PENALTIES.
APPLICABLE LAWS REGARDING THE USE OF SUCH CAPABILITIES VARY BETWEEN JURISDICTIONS AND MAY
REQUIRE, AMONG OTHER THINGS, EXPRESS WRITTEN CONSENT FROM RECORDED SUBJECTS. YOU ARE SOLELY
RESPONSIBLE FOR INSURING STRICT COMPLIANCE WITH SUCH LAWS AND FOR STRICT ADHERENCE TO ANY/ALL
RIGHTS OF PRIVACY AND PERSONALTY. USE OF THIS EQUIPMENT AND/OR SOFTWARE FOR ILLEGAL
SURVEILLANCE OR MONITORING SHALL BE DEEMED UNAUTHORIZED USE IN VIOLATION OF THE END USER
SOFTWARE AGREEMENT AND RESULT IN THE IMMEDIATE TERMINATION OF YOUR LICENSE RIGHTS
THEREUNDER.
NOTE: Improper use of audio/visual recording equipment may subject you to civil and criminal penalties. Applicable laws
regarding the use of such capabilities vary between jurisdictions and may require, among other things, express written consent
from the recorded subjects. You are solely responsible for insuring strict compliance with such laws and for strict adherence to
any/all right of privacy and personality.
VIDEO QUALITY CAUTION
FRAME RATE NOTICE REGARDING USER SELECTED OPTIONS
Pelco systems are capable of providing high quality video for both live viewing and playback. However, the systems can be
used in lower quality modes, which can degrade picture quality, to allow for a slower rate of data transfer and to reduce the
amount of video data stored. The picture quality can be degraded by either lowering the resolution, reducing the picture rate, or
both. A picture degraded by having a reduced resolution may result in an image that is less clear or even indiscernible. A picture
degraded by reducing the picture rate has fewer frames per second, which can result in images that appear to jump or move
more quickly than normal during playback. Lower frame rates may result in a key event not being recorded by the system.
Judgment as to the suitability of the products for users' purposes is solely the users' responsibility. Users shall determine the
suitability of the products for their own intended application, picture rate and picture quality. In the event users intend to use the
video for evidentiary purposes in a judicial proceeding or otherwise, users should consult with their attorney regarding any
particular requirements for such use.

5
OPEN SOURCE SOFTWARE
This product includes certain open source or other software originated from third parties that is subject to the GNU General
Public License (GPL), GNU Library/Lesser General Public License (LGPL) and different and/or additional copyright licenses,
disclaimers, and notices.
The exact terms of GPL, LGPL, and some other licenses are provided to you with this product. Please refer to the exact terms
of the GPL and LGPL at http://www.fsf.org (Free Software Foundation) or http://www.opensource.org (Open Source Initiative)
regarding your rights under said license. You may obtain a complete corresponding machine-readable copy of the source code
of such software under the GPL or LGPL by sending your request to digitalsupport@pelco.com; the subject line should read
Source Code Request. You will then receive an email with a link for you to download the source code.
This offer is valid for a period of three (3) years from the date of the distribution of this product by Pelco.
KOREAN CLASS A EMC
ESD WARNING
WARNING: This product is sensitive to Electrostatic Discharge (ESD). To avoid ESD damage to this product,
use ESD safe practices during installation. Before touching, adjusting or handling this product, correctly attach an
ESD wrist strap to your wrist and appropriately discharge your body and tools. For more information about ESD
control and safe handling practices of electronics, please refer to ANSI/ESD S20.20-1999 or contact the
Electrostatic Discharge Association (www.esda.org).
WARRANTY
For information about Pelco’s product warranty and thereto related information, refer to . www.pelco.com/warranty
NETWORK TOPOLOGY STATEMENT
IMPORTANT NOTE. PLEASE READ. The network implementation is shown as a general representation only and is not
intended to show a detailed network topology. Your actual network will differ, requiring changes or perhaps additional network
equipment to accommodate the system as illustrated. Please contact your local Pelco representative to discuss your specific
requirements.

7
1. Installation and Connection
1.1 Installation
1.1.1 Network Topology
The unit, which is equipped with Ethernet RJ-45 network interface, can deliver video images in real time via either Internet or
Intranet. Please refer to the skeleton drawings shown below to aid your understanding.
F 1-1: N T IGURE ETWORK OPOLOGY
1.1.2 System Requirements
The table below lists the minimum requirements to implement and operate a unit. Network and processor bandwidth limitations
might cause the video stream to pause or appear pixilated when additional Web-interface users connect to the camera.
Decrease the images per second (ips), resolution, compression, or bit rate settings of the Web interface video streams to
compensate for network/processor limitations.
T 1- S R ABLE 1: YSTEM EQUIREMENTS
System Hardware
CPU
Intel® Pentium® 4 microprocessor, 2.4GHz or equivalent
RAM
1 GB or above
Monitor
Minimum of 1024 x 768 resolution, 16- or 32-bit pixel color resolution
Network Interface
100 megabits (or greater)
System Software
Operating System
Microsoft Windows 8/7
Browser
Google Chrome 61.0 (or later), Internet Explorer® 8.0 (or later) or Firefox 3.5 (or later)
M Player edia
VLC: 1.1.11 or above, QuickTime: 7 or above
Unit
Power Supply
PoE / AC 24V /DC 12V

8
Note
1. All the installation and operations should comply with your local electricity safety rules.
2. This product is not compatible with QuickTime version 7.6.4 for Windows XP or Windows Vista. If
you have this version installed on your PC, you will need to upgrade to QuickTime version 7.6.5.
3. Network and processor bandwidth limitations might cause the video stream to pause or appear
pixelated when additional Web-interface users connect to the camera. Decrease the images per
second (ips), resolution, compression, or bit rate settings of the Web interface video streams to
compensate for network or processor limitations.

9
1.2 Connection
1.2.1 Default IP address
The unit’s default IP address is 192.168.0.20 255.255.255.0and sub mask is . When setting default IP address of 192.168.0.20
the camera will check to see if that address is already in use and will bump the last octet of the address by 1 if it is. The bump
last octet of IP Address by 1 will continue until an unused IP address is found.
However, if you have a DHCP server in your network, the unit would obtain an IP address automatically from the DHCP server
so that you don’t need to change the camera’s IP address. The factory default is DHCP and 192.168.0.20 assignment only On
occurs when camera is set for DHCP but a DHCP server does not respond to request for an IP address.
1.2.2 Connecting From a Computer & Viewing Preparation
1.2.2.1 Using Pelco Device Utility Software ess to Get Camera’s IP Addr
Pelco Device Utility software is a utility program that helps users to manage and configure the camera. Use the utility to find the
IP address since the default option is to obtain an IP address via DHCP and therefore the IP address will NOT be known. Steps
to get the utility program running are listed below.
1. Finish installing the Device Utility to the computer according to the installation instructions.
2. In the window, enter the default user Log in to the Device Utility by entering the camera’s User name and Password.
name: and password: , then click button to log in. admin admin Enter
3. In the Manage Devices page, you can click Refresh Device List or Add New Device to search for the devices.
4. From the Device List, you can get series information about camera, IP Address included.
For more information about using the Device Utility, click this green icon " " on the upper-right corner of the Device Utility
page.
1.2.2.2 Connecting from a computer
1. Check if there is networking available between the unit and the computer by executing ping the default IP address. Start a
command prompt (Windows: from the Start Menu, select Program. Select Accessories and choose Command Prompt.),
and type “Ping 192.168.0. 0”. If the message “Reply from…” appears, it means the c2 onnection is available.
2. Start Internet Explorer and enter IP address: . A login window should pop up. In the window, enter the 192.168.0.20
default user name: and password: to log in. admin admin
NOTE: If you do not know the camera’s IP address, you can locate it using the Pelco Device Utility software (refer to 2.4.2.1
Using Pelco Device Utility Software to Get Camera’s IP Address).
Further administration on the unit can be found in Administration and Configuration “3. ".
F 1-2: L WIGURE OGIN INDOW

10
1.2.2.3 Viewing Preparation
Images of the unit can be viewed through Microsoft Internet Explorer 9 or later. Before viewing, follow these steps to enable the
display.
1. Enable Cookies On the tab, move the settings slider to or . Privacy Low Accept All Cookies
2. Change Security in and click to open the Internet options Custom Level Security Settings Internet Zone – screen.
NOTE: Intranet If the camera operates inside of the intranet, click the icon. If the camera operates outside of the intranet,
click the icon. Internet
3. Scroll down to the ActiveX controls and plug-ins radio buttons and set as follows:
【
【
【
【【 】
】
】
】】Download signed ActiveX controls Prompt (recommended)
【
【
【
【【 】
】
】
】】Download unsigned ActiveX controls Prompt
【
【
【
【【Automatic prompting for ActiveX controls Enable
】
】
】
】】
【
【
【
【【 】
】
】
】】Run ActiveX controls and plug-ins Enable
【
【
【
【【 】
】
】
】】Script ActiveX controls marked safe for scripting* Enable
4. Press to save the settings. OK
5. Close all Microsoft Internet Explorer Windows and restart a new window. This will allow the new settings taking effect.
6. Type your setting IP address into the browser.
7. Then you should be able to see the camera image screen.

11
2 Administration and Configuration .
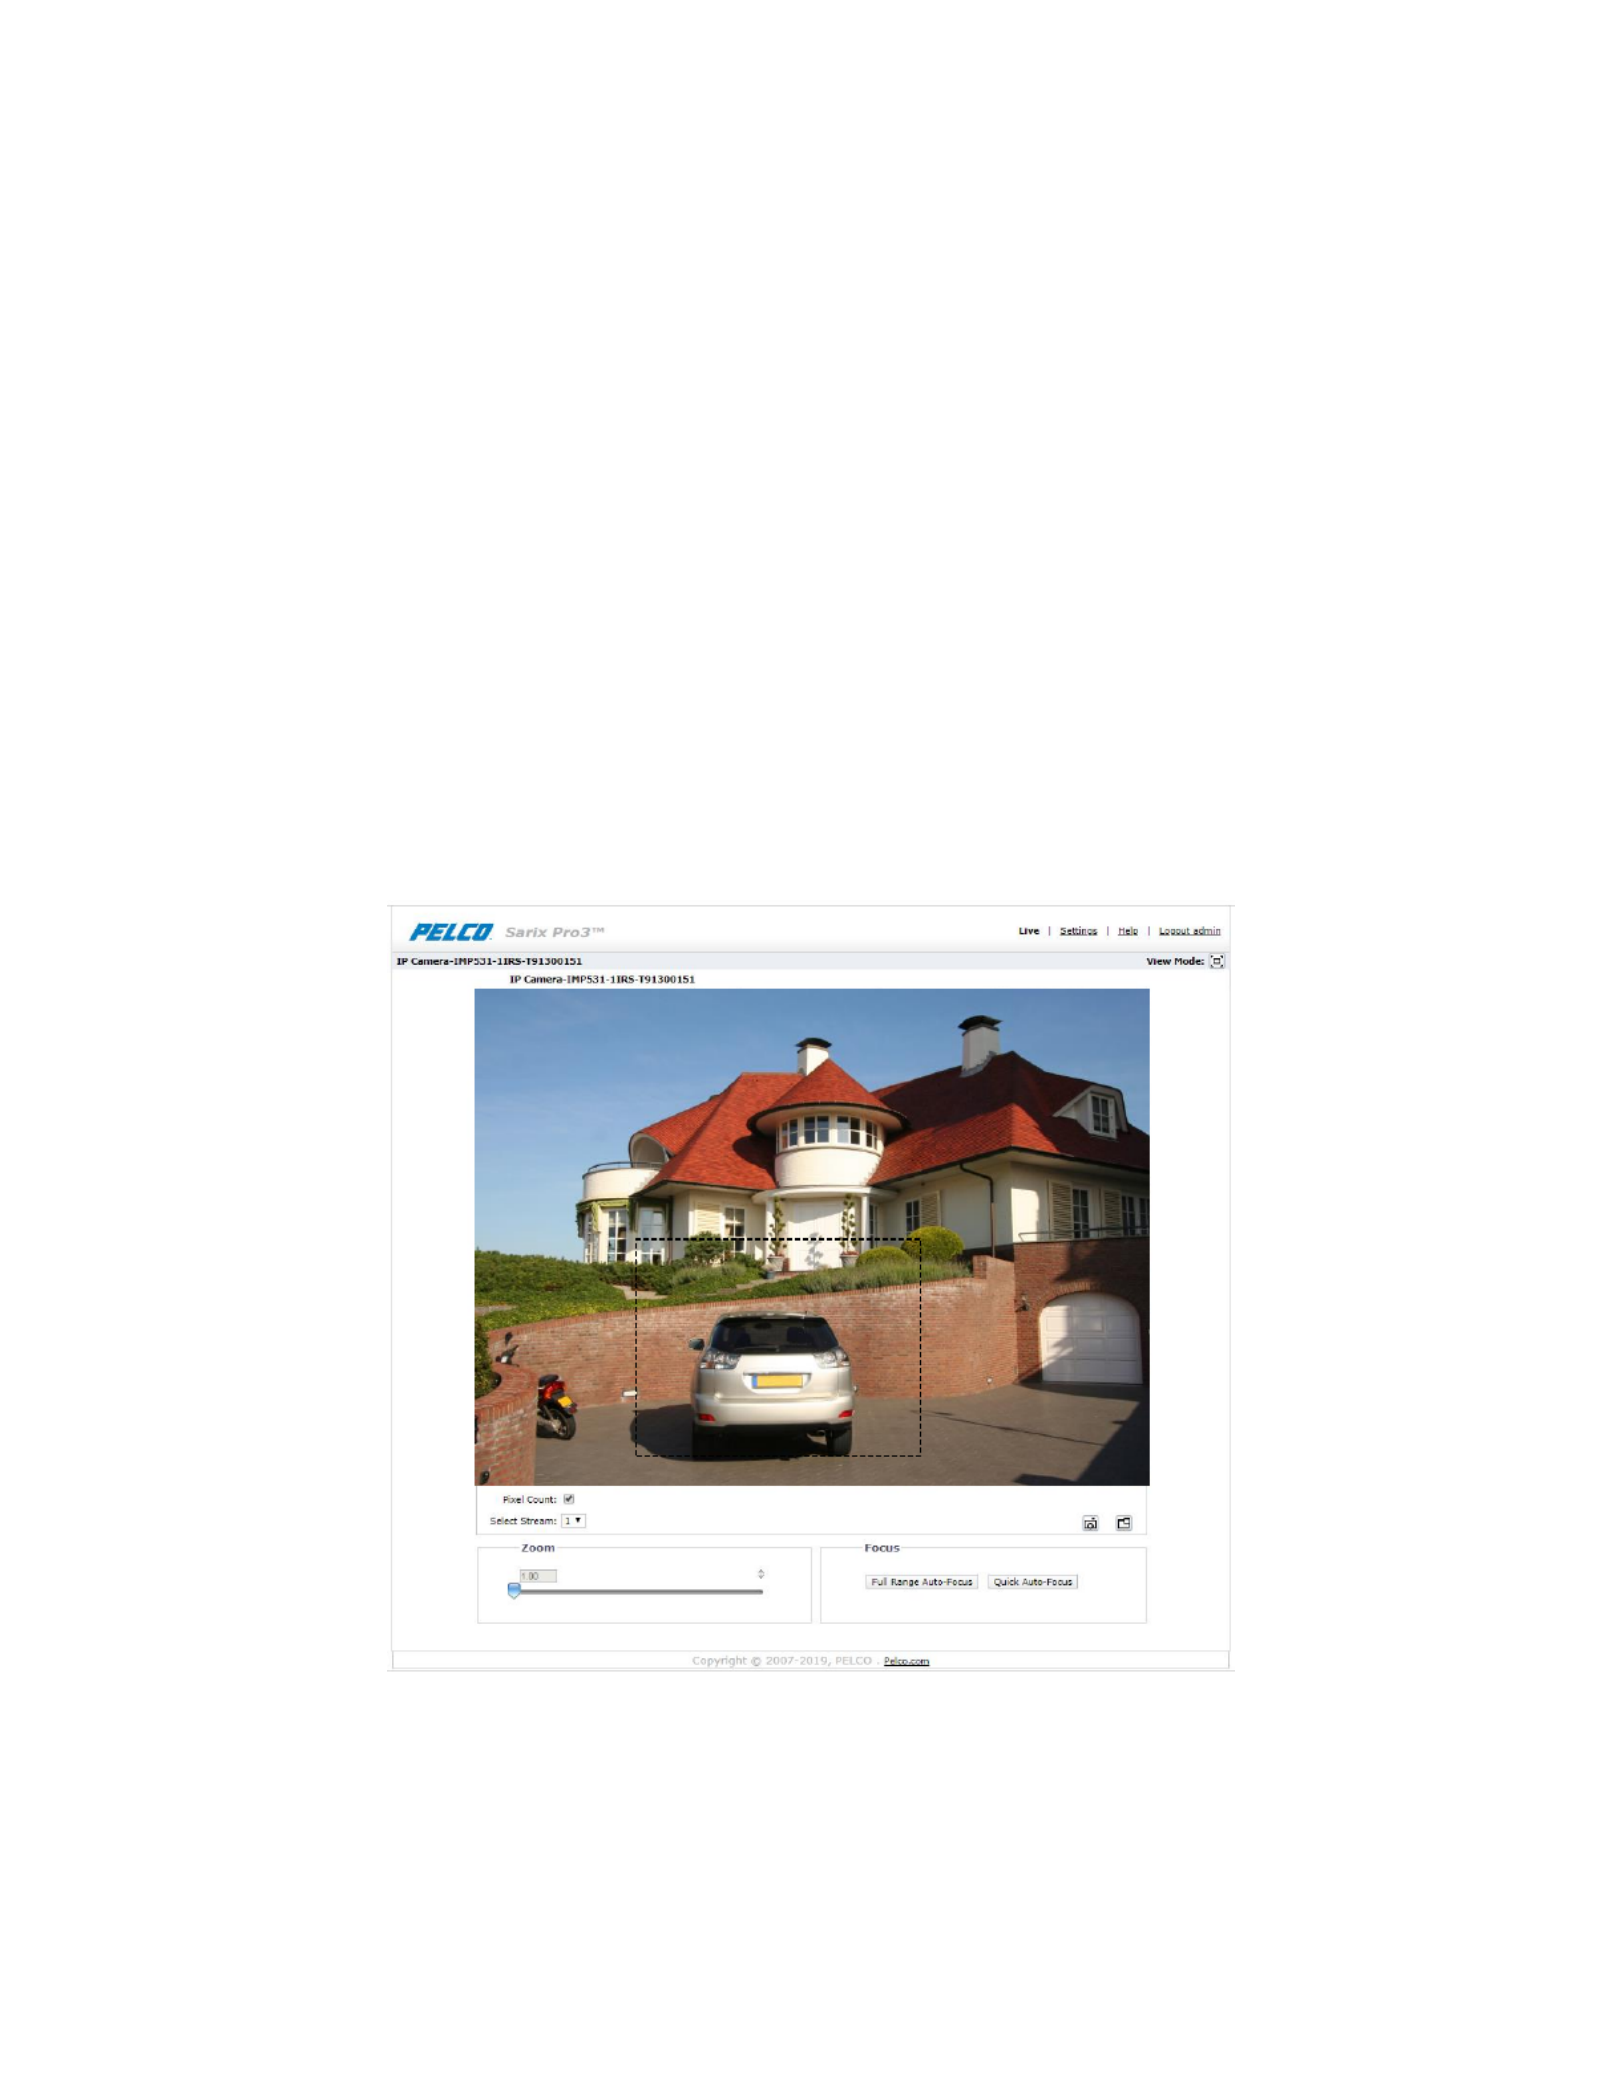
2.1 Live
Simply click on on the top right side of the browser window while accessing the IP address of the unit, and a live video is Live
displayed directly in the browser window. When clicked on , a window will pop up for configuring Settings “System Network ”, “
& Security”, “ ” “ ” “Imaging , A/V Streams , and Event Source Event Handler” and “ ”. Please refer to 2.2 Settings on page for 13
more information. The current logged in identity appears to the right of the Click on Help. Logout admin of the administration
window and configuration will return to the camera image screen.
* Figures of are taken from the 3MP model for web interface introduction purposes. 3. Administration and Configuration
Options within each item may differ slightly among series products and the differences will be marked in a . NOTE
Options on the window include: Live
Maximize Viewing Area: Scales the image to the full size of the browser. To resize the video pane to normal
view, click the Show Toolbar button in the upper-right corner of the window.
Open Stream in New Window: Opens the video in a scalable, independent window. Opening the video in a
separate window allows you to view the video while other applications are running. This window can be
minimized, maximized, or closed using the title bar buttons of the active window. The window can also be
resized to your specifications by dragging the lower-right corner of the window.
Snapshot: Capture a screenshot of what appears currently on the live view image. A prompt message appears,
after clicking the icon, to allow user to either open the screenshot or save the screenshot to a designated path.
F 2-1: L V IGURE IVE IEW
12
2.1.1 Zoom and Focus Controls
Zoom
: Click and drag the slider right to zoom the lens in. Zoom In
: Click and drag the slider left to zoom the lens out. Zoom Out
Focus
: Click the button for the camera to start a full-range search to find the optimal focal point for Full Range Auto-Focus
the scene.
: Click the button for the camera to start a quick search to find the optimal focal point for the scene. Quick Auto- cusFo
NOTE: The Zoom function is available in motorized models only.
2.1.2 Pixel Count
When setting up the camera, use pixel count technology to validate your operational requirements.
Your operational requirements could be identification of an object of known size while being able to see as much of the scene
as possible.
Pixel count is the rectangular aid displayed in the camera’s live view, with a counter showing the box’s width and height. Pixel
count can be adjusted and moved around the image with drag- -drop. and
For example; to ensure the identification of a 1 meter object in a scene, you can set pixel count to 500 pixels, and then adjust
the camera so that the object fits inside the pixel counter.
F 2-2: P C S IGURE IXEL OUNT ETTINGS
Pixel Count Pixel Count: Check button to enable pixel count feature for selected stream.
Select Stream: Selects the video stream that is displayed in live view (primary, secondary or tertiary) to be used with pixel
count technology.
(1024,768)
13
2.2 Settings
Click on , a window will pop for configuring , Settings up “ ”, “ ”System Network & Security “ ”Imaging , “ ”A/V Streams , and
“ ”Events .
F 2-3: S S IGURE YSTEM ETTINGS
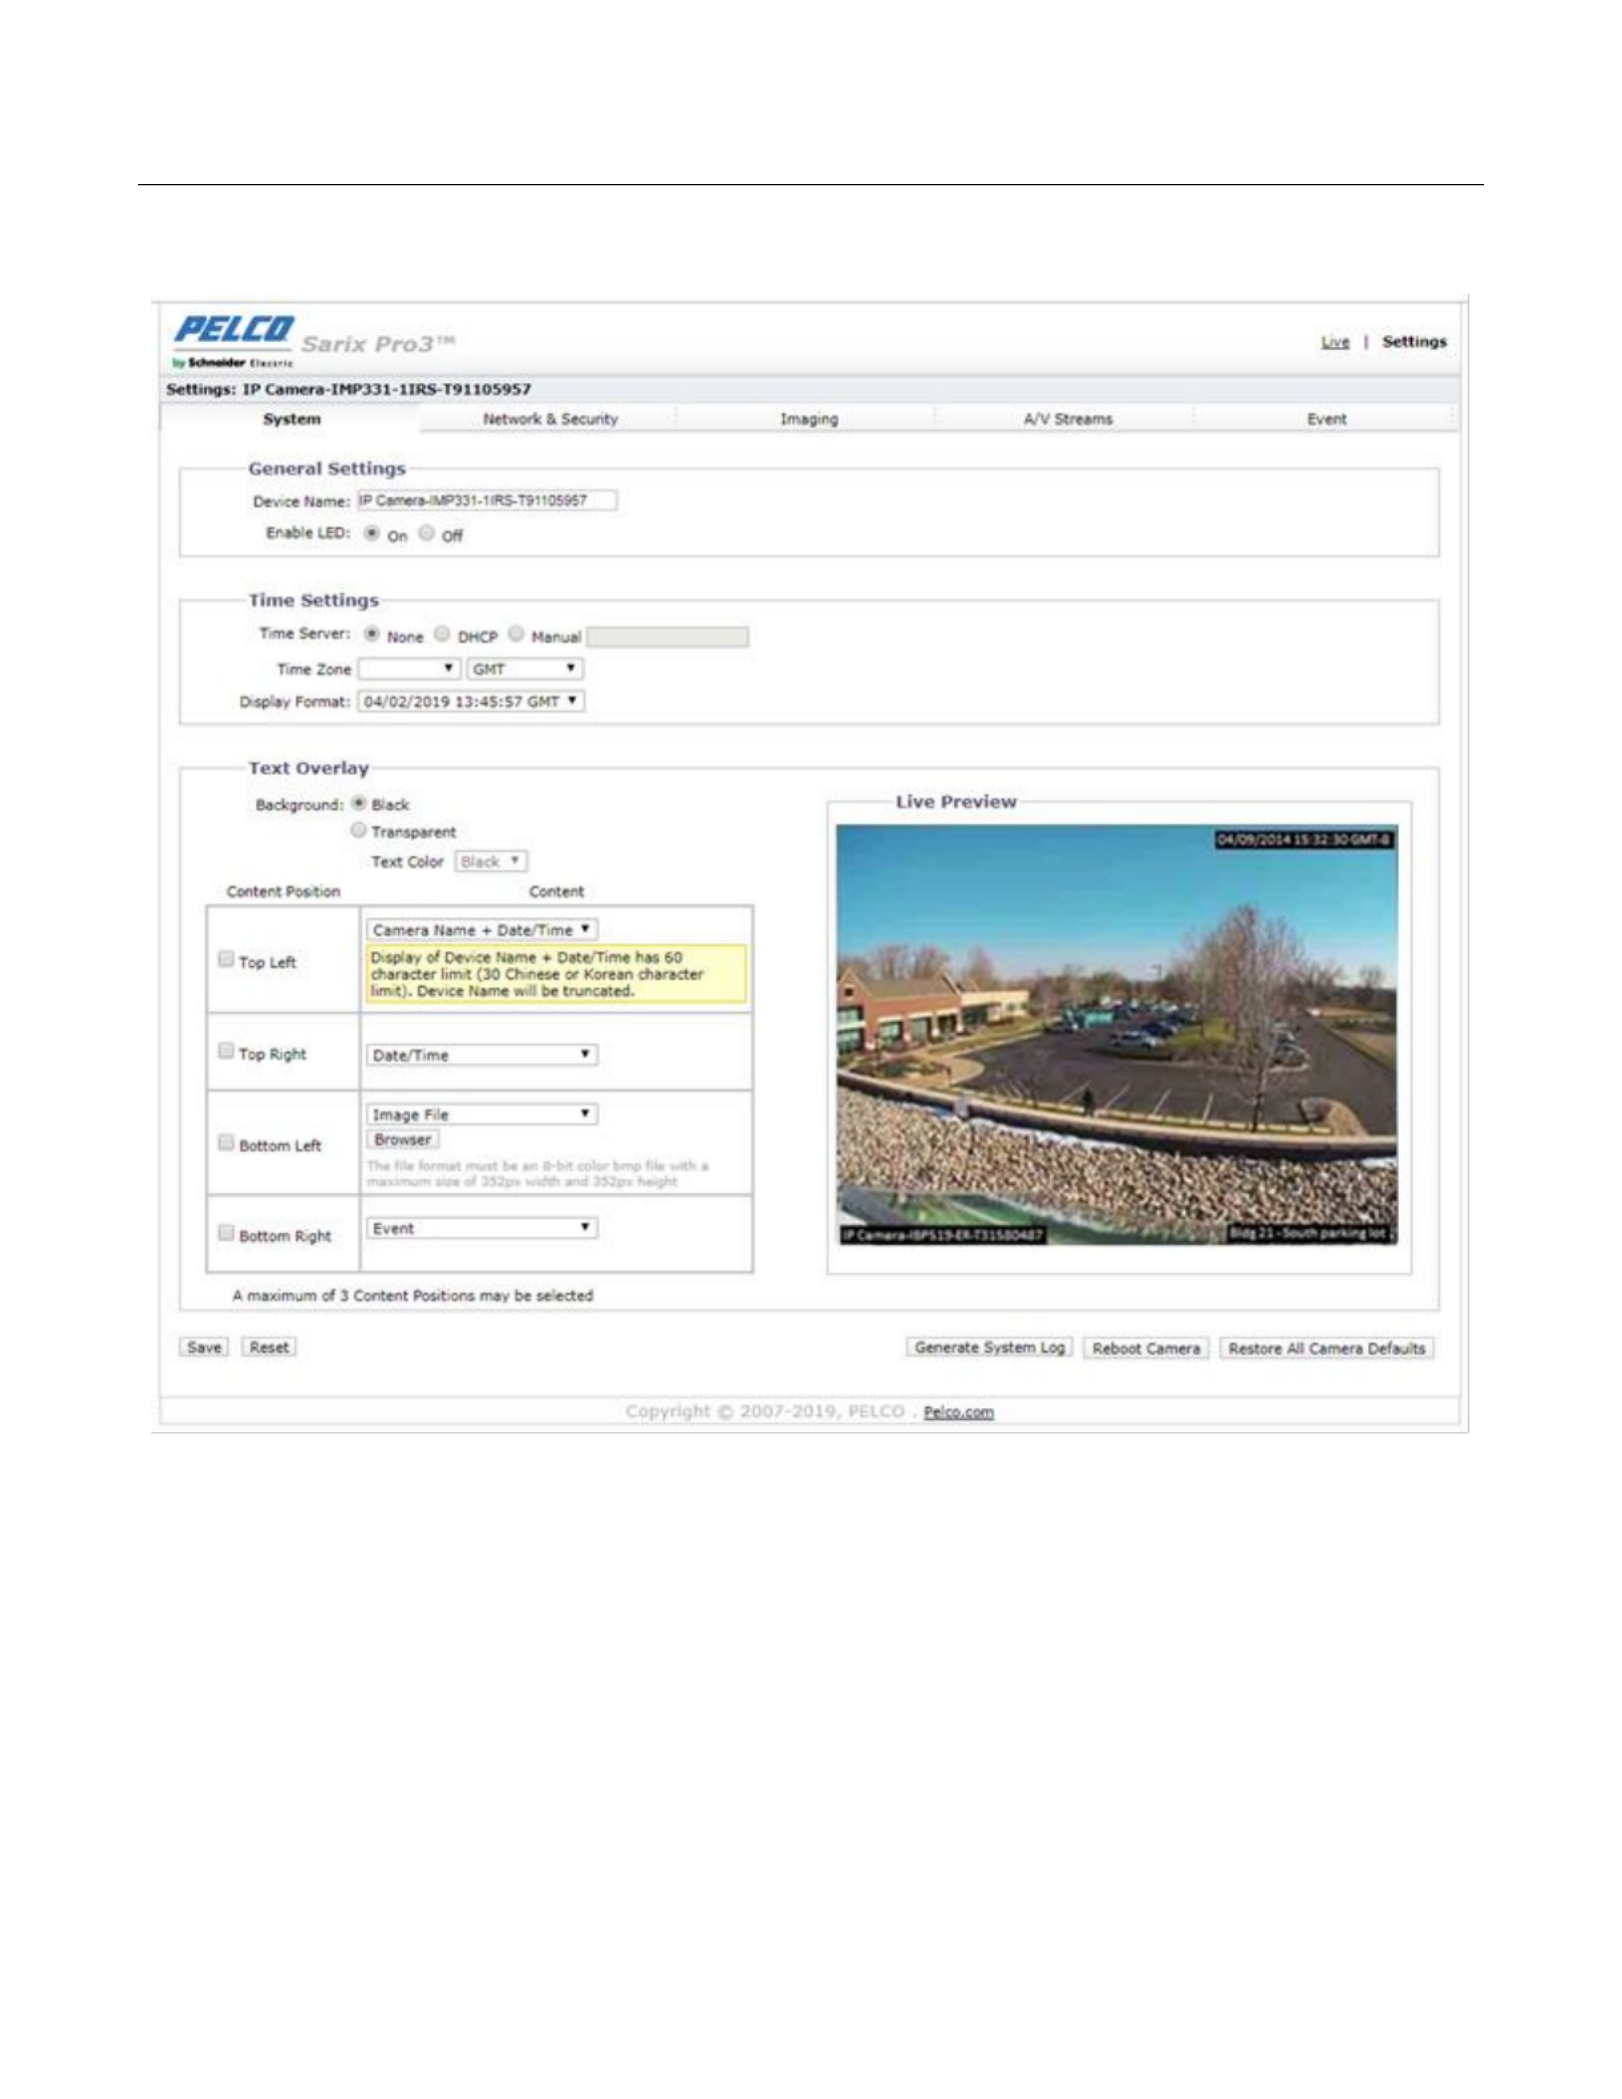
2.2.1 System
Use the System tab to change the device name, configure the time settings, set up the text overlay for the live view, get backup,
display system information update firmware version, get information about inserted SD card and pixel count. You can also use ,
the System tab to generate a system log, reboot the camera, or to restore the camera's factory default settings.
14
F 2-4: S S IGURE YSTEM ETTINGS
Generate System L og
1. Click the System tab.
2. Click the Generate System Log button to create a system log that can be used by Pelco Product Support for
troubleshooting.
Contact Pelco Product Support at 1- -289-9100 (USA and Canada) or +1- - -1981 (international). 800 559 292
Reboot Camera
1. Click the System tab.
2. Click the Reboot Camera button to restart the camera. Rebooting the camera does not change the configured
camera settings.
Restore All Camera Defaults
This process cannot be undone; all user and custom settings will be lost.
1. Click the System tab.
2. Click the Restore All Camera Defaults button to restore the camera’s factory default settings.
NOTE: If the camera is not connected to a Dynamic Host Configuration Protocol (DHCP) network, the IP address settings
for the camera will be lost and the server will not recognize the camera. DHCP On is the default setting for the camera IP
address.

15
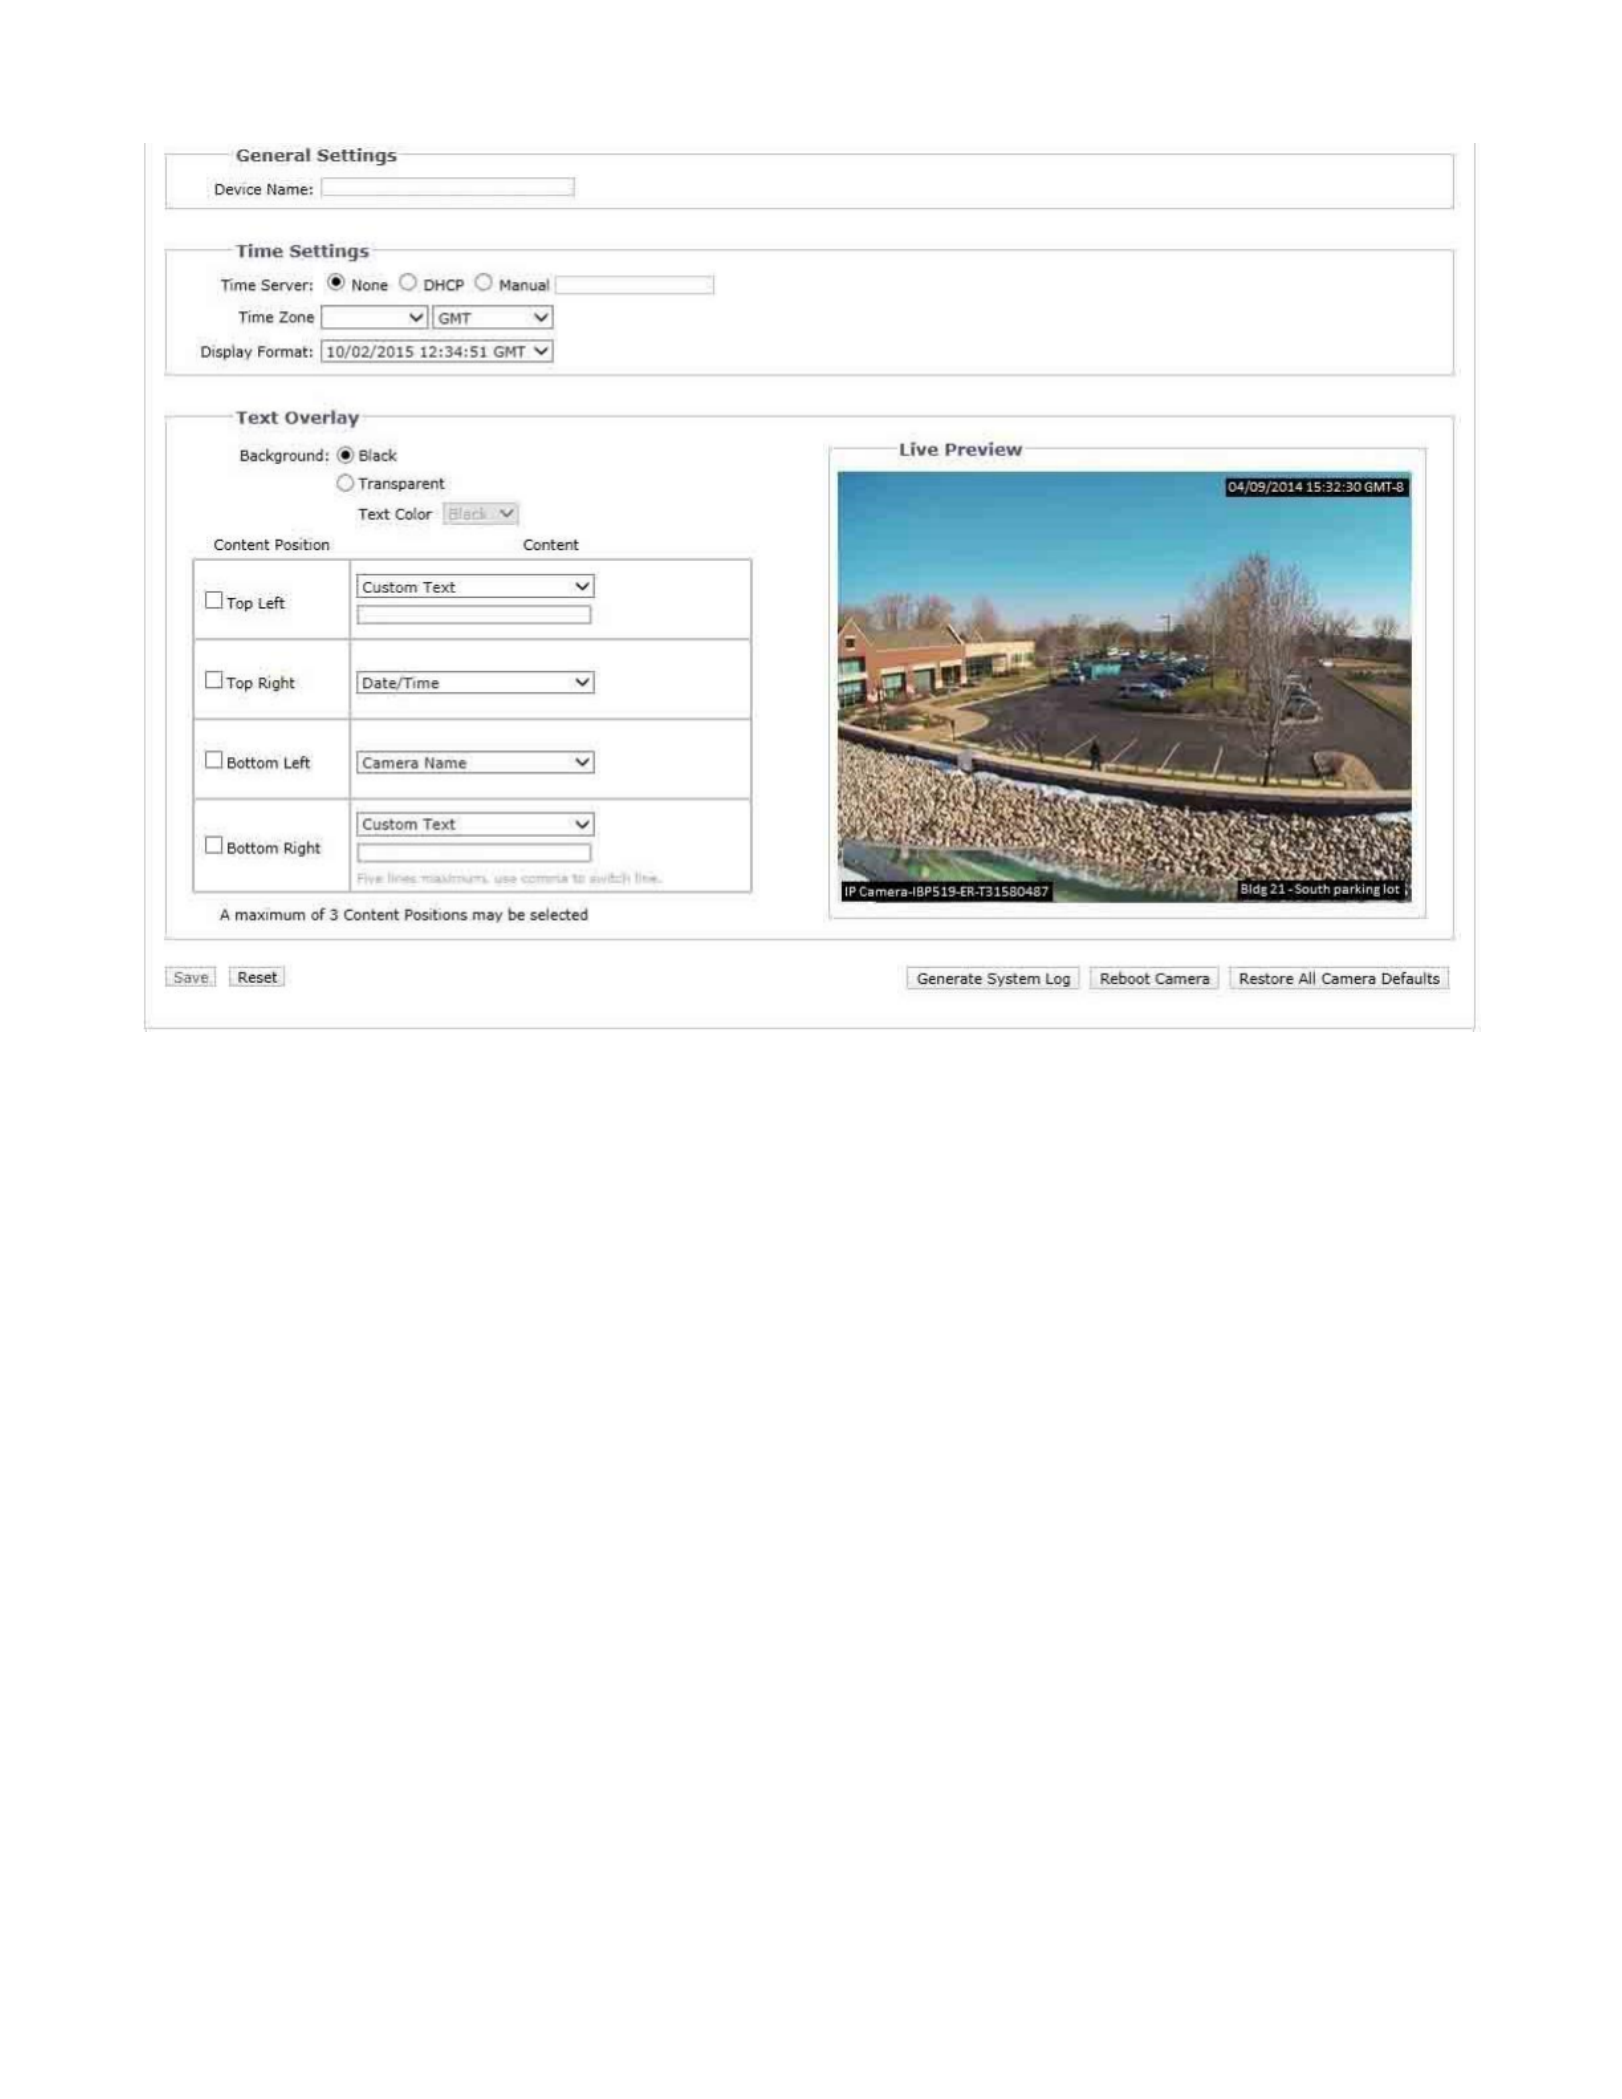
2.2.1.1 General Settings
F 2-5: G S IGURE ENERAL ETTINGS
Device Name
To change the Device Name, follow these steps:
1. Click the box and highlight the text. Device Name
2. Type a user-friendly name into the box (2 to 64 characters). A user-friendly name makes it easier to Device Name
recognize the device on the network. Examples of user-friendly names are Front Door, Lobby, or Parking Lot.
3. Click Save to save the new device name, or click Reset to restore to the previously saved device name.
Time Settings
If the camera is connected to a network that has time server properties Dynamic Host Configuration Protocol (DHCP)
configured, the camera will synchronize automatically with the time server. If the DHCP network’s time server properties are not
configured, or the network does not have a time server, you need to configure the time settings manually.
1. Type the IP address of the time server in the field. The time server is an external server that uses Time Server
Network Time Protocol (NTP) to synchronize the camera date and time settings.
2. Select the option. Select the continent and the region that are closest to the camTime Zone era’s location from the
Time Zone drop-down menus.
NOTE: If your location observes a form of daylight saving time, the system will automatically change the time on the
associated dates.

16
3. Select the format in which the date and time will appear from the Display Format drop-down field if you have opted to
show the Date/Time Overlay.
4. Click the Save button to save the settings, or click the Reset button to clear all of the information you entered without
saving it.
Text Overlay
1. Configure the text overlay settings:
Set the background color for the text overlay as black or transparent. Text color for the Background:
transparent background can be also customized from the drop-down menu when the transparent background
option is selected.
Six content options can be selected to display from the drop-down menu: Date/Time, Camera Name, Content:
Camera Name + Date/Time, Custom Text, Image and Event. The blank text field, which is for inputting desired
text by users, shows only when Custom Text option is selected.
NOTE: Multiple content options can display simultaneously.
Four positions can be selected to display content overlays: Top Left, Top Right, Bottom Left, Content Position:
and Bottom Right. For Bottom Right position, a note that informs that a maximum of five lines with commas to
switch between them would appear under the text field once Custom Text option is selected.
NOTE: A maximum of 3 content positions can be displayed simultaneously.
2. Click the Save button to save the settings, or click the Reset button to clear all of the information you entered without
saving it.
2.2.1.2 Backup & Restore
F 2-6: B R S IGURE ACKUP AND ESTORE ETTINGS
Backup
Once the camera settings have been configured for optimal scene display, use the backup feature to save the camera settings.
Restore
If the camera settings are changed and inadvertently result in a less desirable image, use the restore setting to restore the
camera to the previously saved settings.
NOTE: This feature is not intended for the configuration of multiple units or for firmware upgrades.

17
2.2.1.3 Firmware
System Information
The System Information page fields are read-only and include the firmware version, hardware version, model number, and
serial number of the system are revealed here as below figure. This information is typically required by Pelco Product Support
for troubleshooting purposes.
F 2-7: S I IGURE YSTEM NFORMATION
Firmware Update
Users can update system firmware if available. All camera motions will shut down during firmware update. Please close any
other screens before firmware update. Never disconnect power or LAN cable during the firmware update process. a
Disconnecting power during a firmware update will cause the update to fail. It takes approximately 3 minutes for the unit to
reboot after firmware update process.
F 2-8: F U IGURE IRMWARE PDATE
2.2.1.4 Storage Management
Device Information
The detailed information of an inserted SD card will be shown in this page where the device type, total capacity, free space and
status are presented explicitly for users to preview.
F 2-9: S M S IGURE TORAGE ANAGEMENT ETTINGS
Device Setting
T function is deployed here for further employment. Select either the he “Format Device” “vFAT” or “ext4” option from the
Format Device dropdown menu, depending on preferred preference, and click on “ ” button to Format format an SD card.

18
2.2.2 Network & Security
Use the Network tab to change the camera’s general network settings, select the Transport Layer Security(TLS) settings,
enable Secure Shell (SSH), configure 802.1x port security settings, choose SNMP Server, Firewall mode enable FTP access ,
to this camera, activate RTP stream settings and VMS Connectivity with the specific server.
NOTE: NTCIP 1205 ARP RTCP -DiscoveryOther underlying protocols such as , , , and WS are supported by all models.
NOTE: SNMP 2.2.2.6 SNMPEnabling protocol (refer to ) will automatically enable . NTCIP 1205
2.2.2.1 Network
Set the General Network Settings for network communication settings.
F 2-10: G N S IGURE ENERAL ETWORK ETTINGS
System Settings
Settings under the System Settings are Hostname, HTTP Port, HTTPS Port, and RTSP Port. Contact your network
administrator before changing port settings to ensure that your port settings do not conflict with your network infrastructur e.
Hostname
1. Click in the box and highlight the text.Hostname
2. Type a user-friendly name into the Hostname box (1 to 21 characters) using any combination of alphanumeric
characters. A user-friendly name makes it easier to recognize the device on the network.
3. Click the Save button to save the settings, or click the Reset button to clear all of the information you entered without
saving it.

19
HTTP Port
NOTE: The HTTP port number must remain at the default setting (80) when connecting to a Pelco video management
system (VMS) platform. If connecting to a Pelco VMS, do not change the HTTP port setting.
1. Click in the box and highlight the text. HTTP Port
2. Type the new port number in the field. The default port for HTTP communications is . HTTP Port 80
3. Click the Save button to save the settings, or click the Reset button to clear all of the information you entered without
saving it.
HTTPS Port
NOTE: The HTTPS port is not configurable unless you have set TLS Mode to Optional or Required and installed a security
certificate.
1. Click in the box and highlight the text. HTTPS Port
2. Type the new port number in the field. The default port for HTTPS communications is . HTTPS Port 443
3. Click Save. If you have changed the setting in error, you can click reset to revert to the previously saved setting.
RTSP Port
1. Click in the box and highlight the text. RTSP Port
2. Type the new port number in the field. The default port for RTSP communications is . RTSP Port 554
3. Click the Save button to save the settings, or click the Reset button to clear all of the information you entered without
saving it.
IPv4 Settings
Enable or disable the Dynamic Host Configuration Protocol (DHCP) server. DHCP automatically assigns an IP address to
the device if there is a DHCP server on the network.
the IP address, subnet mask, gateway, and DNS server settings are read-only text. If DHCP is set to On,
these settings must be manually changed. If DHCP is set to Off,
Change the following network settings as required:
1. The address of the camera connected to the network. IP Address:
2. The address that determines the IP network that the camera is connected to (relative to its address). Subnet Mask:
3. The router that accesses other networks. Gateway:
4. The addresses of the dedicated servers that translate the names for Web sites and hostnames into DNS Servers:
numeric IP addresses.
5. Click the Save button to save the settings, or click the Reset button to clear all of the information you entered without
saving it.

20
Configuring IPv6 Settings
Your Sarix device supports IPv6 in conjunction with IPv4 configurations; the device does not support IPv6-only network
deployments. The device will accept up to sixteen IPv6 addresses, three IPv6 DNS servers, and three IPv6 gateways.
There are two configuration modes for IPv6 address assignments:
Auto: Enables automatic configuration using router advertisement. Additional configuration can be provided over DHCPv6 (if
available on your network). Selecting Auto mode still allows you to manually configure additional IPv6 addresses, DNS servers,
and gateways.
Manual Only: Provides a link-local IPv6 address for the device and allows you to assign up to 16 static IPv6 addresses to the
device.
1. Place your mouse pointer over the Network tab.
2. Select General from the drop-down menu.
3. Select On for IPv6.
4. Select a Configuration Mode from the drop-down box. Selecting Auto allows the device to configure the remaining IPv6
settings automatically, rendering the remaining steps optional.
5. (Optional) Provide static, unicast addresses in the Manual IP Addresses box. Each address requires a prefix, and it must be
input using the format prefix/IPv6Address. Manual IP addresses without prefix information will be rejected.
6. (Optional) Provide the addresses of DNS servers that are not configured automatically in the Manual DNS Servers box.
7. (Optional) Provide the addresses of gateways that are not configured automatically in the Manual Gateways box.
NOTES:
• The device will not accept multicast, localhost, or undefined IPv6 addresses.
• Link-local addresses are not supported for DNS.
• Manually specified DNS servers supersede automatically discovered DNS servers.
• Manually specified DNS servers are not validated by the device; verify any manually specified DNS servers before saving IPv6
settings.
• Manually specified gateways must be on the same network as the devices’ IPv6 addresses. Behavior for a gateway that is not
on the same network as the device’s IPv6 addresses is undefined.
• Some video management systems (VMS), including Pelco VMS systems, do not support connections to cameras and
encoders over IPv6.
2.2.2.2 Users & Security
Use the Users & Security tab to create and manage user accounts and to change the way the camera manages the user
settings.
User Management
User accounts are created to limit the permissions of individuals who are logged onto the camera. The User Management page
also includes four predefined access level settings that include Administrators, Managers, Operators, and Viewers permissions.

21
F 2-11: U & S IGURE SERS ECURITY
Creating a New User
Click button below the left box and Select the Access Level for the new user. New User
Access Level
1. Select the Access Level for the user.
This is the only defined group that cannot be deleted. This group has access to all permissions. Admins:
This defined group can be modified or deleted. This group has access to all permissions except the Managers:
permissions of access to the Users page and the restore factory defaults.
This defined group can be modified or deleted. The default permissions for this group are video Operators:
stream view, PTZ manipulation as well as the use of API.
NOTE: PTZ manipulation permission varies by applicable models.
This defined group can be modified or deleted. The default permissions for this group are limited Viewers:
within the video stream view and the use of API.
2. Click the Save button to save the settings and create a new user. The new user profile appears in the box on the left
side of the page. Click the Reset button to clear all of the information you entered without saving it.
Username
Click in the Username box and type a user name (2 to 23 alphanumeric characters). User names are case-sensitive.
Password
Click in the Password box and type a password (4 to 16 alphanumeric characters). Passwords are case-sensitive.
Re-type Password
Click in the Retype Password box and retype your password.
Click the Save button to save the settings and create a new user (the new user profile appears in the box on the left side of the
page), or click the Reset button to clear all of the information you entered without saving it.
Deleting a User
1. Click the user profile that you want to delete from the defined users section located in the box on the left side of the
page.

22
2. Click the Delete User button. A dialog box appears with the message “Are you sure you want to delete this user?”
3. Click OK. The user profile is deleted from the defined user profiles section.
NOTE: adminThe default “ ” user cannot be deleted.
Security
Pelco API
Select ing “Closed Authentication” will request video clients to conform to Pelco API (Application Programming Interface)
protocol in order to access to the camera, while selecting “Open Authentication” will make API protocol of the camera fully
open to various intrusions, which is not suggested due to security concerns.
RTSP/JPEG
Select ing “Require Authentication” will request video clients to conform to RTSP (Real Time Streaming Protocol) or JPEG
protocol in order to access to the camera, while selecting “Open Authentication” will make RTSP/JPEG protocol of the
camera fully open to various intrusions, which is not suggested due to security concerns.
2.2.2.3 TLS
To ensure security on the Internet, all Web browsers provide several security levels that can be adjusted for sites that use TLS
technology to transmit data. encrypts communications, making it difficult for unauthorized users to intercept and view user TLS
names and passwords.
TLS requires signed certificates to determine if the Web browser accessing the camera has the required authentication. The
camera can generate a certificate signing request (CSR) that can be sent to a certificate authority for a signature (for example,
VeriSign® ), or it can generate a self-signed certificate using the option. Generate Self-Signed Certificate
F 2-12: C IGURE TLS ONFIGURATION
TLS Configuration
Select one of the following modes:
A signed Transport Layer Security (TLS) certificate must be installed, and a secure URL that begins with the Required:
protocol name “https:” must be used to access the camera. Sensitive data is always encrypted during transmission. A URL
that begins with the “http:” protocol rather than the “https:” protocol will be redirected to the secure URL automatically.
A signed TLS Optional: certificate must be installed, but a secure URL that begins with the protocol name “https:” is
optional when accessing the camera. You can also access the camera using a standard URL with the “http:” protocol, but
sensitive data is not encrypted during transmission. To ensure that sensitive data is encrypted, you must use a secure
URL with the “https:” protocol.
Turns off access to the Web client throu TLS. Sensitive data will not be encrypted during Disabled (default): gh
transmission.

23
NOTE: If the TLS mode is set to disabled, you cannot access the camera using a URL that begins with an “https:” protocol.
Your Web browser displays an error message if you do not type the camera URL correctly.
Refer to the following sections for more information:
• Generating Self-Signed Certificate
• Generating Certificate Request
Certificate
Generating Self-Signed Certificate
1. Click the button located at the bottom of the Configuration page. The Select Certificate Install New Certificate TLS
Install Method option buttons appear on the page.
F 2-13: S C IIGURE ELECT ERTIFICATE NSTALL ETHOD OPTIONM
2. Select the “ ” option, and then click . The “Generate Self-signed Certificate Next Self-signed Certificate
Information Form” opens.
F 2-14: GIGURE ENERATING ELF IGNED ERTIFICATE ONFIGURATIONS -S C C
3. Fill in all of the fields, and then click . The following progress message appears on the page: Generate Certificate
“ …” After Loading data a while, the certificate is uploaded to the device.
4. After the certificate is uploaded, select the desired mode.
5. Click Save.
NOTE: Self-signed certificates are valid for one year. The certificate’s expiration date is listed in the Installed Certificate
information section. If the certificate has expired and you attempt to access the camera using a secure URL, the Web
browser displays a message. Repeat this procedure to generate and upload a new certificate.
Generating Certificate Request
1. Click the button located at the bottom of the TLS Configuration page. The Select Certificate Install New Certificate
Install Method option buttons appear on the page.
2. Select , and then click Generate Certificate Request Next Certificate Request Form. The “ ” opens.
Produkt Specifikationer
| Mærke: | Pelco |
| Kategori: | Overvågningskamera |
| Model: | Sarix Professional IWP232-1ERS |
Har du brug for hjælp?
Hvis du har brug for hjælp til Pelco Sarix Professional IWP232-1ERS stil et spørgsmål nedenfor, og andre brugere vil svare dig
Overvågningskamera Pelco Manualer

21 August 2024
21 August 2024
21 August 2024
21 August 2024
21 August 2024
21 August 2024
21 August 2024
21 August 2024
20 August 2024
20 August 2024
Overvågningskamera Manualer
- Overvågningskamera Bosch
- Overvågningskamera Denver
- Overvågningskamera Sony
- Overvågningskamera Canon
- Overvågningskamera Netis
- Overvågningskamera Samsung
- Overvågningskamera Panasonic
- Overvågningskamera Extech
- Overvågningskamera Moog
- Overvågningskamera TP-Link
- Overvågningskamera Philips
- Overvågningskamera Vitek
- Overvågningskamera Gigaset
- Overvågningskamera Pioneer
- Overvågningskamera Mitsubishi
- Overvågningskamera Braun
- Overvågningskamera Logitech
- Overvågningskamera Emos
- Overvågningskamera Google
- Overvågningskamera Technaxx
- Overvågningskamera HP
- Overvågningskamera Waeco
- Overvågningskamera Garmin
- Overvågningskamera Sanyo
- Overvågningskamera Grundig
- Overvågningskamera D-Link
- Overvågningskamera Arlo
- Overvågningskamera Motorola
- Overvågningskamera Asus
- Overvågningskamera Toshiba
- Overvågningskamera Pyle
- Overvågningskamera Kodak
- Overvågningskamera Furrion
- Overvågningskamera InFocus
- Overvågningskamera Nedis
- Overvågningskamera Friedland
- Overvågningskamera Abus
- Overvågningskamera Planet
- Overvågningskamera Adj
- Overvågningskamera Hama
- Overvågningskamera Creative
- Overvågningskamera Thomson
- Overvågningskamera Belkin
- Overvågningskamera Edimax
- Overvågningskamera Burg Wächter
- Overvågningskamera Clas Ohlson
- Overvågningskamera DataVideo
- Overvågningskamera Strong
- Overvågningskamera TRENDnet
- Overvågningskamera Smartwares
- Overvågningskamera Trevi
- Overvågningskamera Trust
- Overvågningskamera Laserliner
- Overvågningskamera Blaupunkt
- Overvågningskamera JVC
- Overvågningskamera Honeywell
- Overvågningskamera Uniden
- Overvågningskamera Buffalo
- Overvågningskamera Linksys
- Overvågningskamera Megasat
- Overvågningskamera Cisco
- Overvågningskamera EZVIZ
- Overvågningskamera König
- Overvågningskamera Elro
- Overvågningskamera Gembird
- Overvågningskamera Powerfix
- Overvågningskamera Alpine
- Overvågningskamera Netgear
- Overvågningskamera Maginon
- Overvågningskamera Yale
- Overvågningskamera Withings
- Overvågningskamera Nest
- Overvågningskamera Kerbl
- Overvågningskamera Vtech
- Overvågningskamera Exibel
- Overvågningskamera Genie
- Overvågningskamera Vaddio
- Overvågningskamera Bresser
- Overvågningskamera Western Digital
- Overvågningskamera Anker
- Overvågningskamera Digitus
- Overvågningskamera Zebra
- Overvågningskamera Jensen
- Overvågningskamera Alecto
- Overvågningskamera Flamingo
- Overvågningskamera Rollei
- Overvågningskamera Olympia
- Overvågningskamera Xiaomi
- Overvågningskamera Niceboy
- Overvågningskamera Aiptek
- Overvågningskamera Schneider
- Overvågningskamera B/R/K
- Overvågningskamera Marmitek
- Overvågningskamera Tesla
- Overvågningskamera Imou
- Overvågningskamera Ricoh
- Overvågningskamera Nexxt
- Overvågningskamera Aida
- Overvågningskamera APC
- Overvågningskamera Foscam
- Overvågningskamera Lorex
- Overvågningskamera Ikan
- Overvågningskamera Velleman
- Overvågningskamera LevelOne
- Overvågningskamera Marshall
- Overvågningskamera FLIR
- Overvågningskamera Perel
- Overvågningskamera Swann
- Overvågningskamera Vivotek
- Overvågningskamera Joblotron
- Overvågningskamera JUNG
- Overvågningskamera ORNO
- Overvågningskamera Binatone
- Overvågningskamera ZyXEL
- Overvågningskamera Fortinet
- Overvågningskamera Netatmo
- Overvågningskamera Tenda
- Overvågningskamera Eufy
- Overvågningskamera Ring
- Overvågningskamera M-e
- Overvågningskamera Overmax
- Overvågningskamera Somfy
- Overvågningskamera Y-cam
- Overvågningskamera Hikvision
- Overvågningskamera Monacor
- Overvågningskamera ION
- Overvågningskamera Raymarine
- Overvågningskamera Ubiquiti Networks
- Overvågningskamera AVerMedia
- Overvågningskamera EnGenius
- Overvågningskamera Reolink
- Overvågningskamera Grandstream
- Overvågningskamera Trebs
- Overvågningskamera EVE
- Overvågningskamera Renkforce
- Overvågningskamera Marshall Electronics
- Overvågningskamera Manhattan
- Overvågningskamera SPC
- Overvågningskamera Caliber
- Overvågningskamera Pentatech
- Overvågningskamera Switel
- Overvågningskamera AVtech
- Overvågningskamera LogiLink
- Overvågningskamera Orion
- Overvågningskamera Eminent
- Overvågningskamera Kramer
- Overvågningskamera QSC
- Overvågningskamera Hanwha
- Overvågningskamera Brilliant
- Overvågningskamera Lanberg
- Overvågningskamera Hive
- Overvågningskamera Siedle
- Overvågningskamera BirdDog
- Overvågningskamera Evolveo
- Overvågningskamera Genius
- Overvågningskamera KJB Security Products
- Overvågningskamera Valueline
- Overvågningskamera Provision-ISR
- Overvågningskamera Quantum
- Overvågningskamera Axis
- Overvågningskamera ACTi
- Overvågningskamera CRUX
- Overvågningskamera Avanti
- Overvågningskamera Vimar
- Overvågningskamera Aluratek
- Overvågningskamera Dahua Technology
- Overvågningskamera Chacon
- Overvågningskamera SereneLife
- Overvågningskamera ZKTeco
- Overvågningskamera AG Neovo
- Overvågningskamera Stabo
- Overvågningskamera EtiamPro
- Overvågningskamera First Alert
- Overvågningskamera Speco Technologies
- Overvågningskamera Boss
- Overvågningskamera Broan
- Overvågningskamera Conceptronic
- Overvågningskamera Avidsen
- Overvågningskamera Crestron
- Overvågningskamera Lindy
- Overvågningskamera Kogan
- Overvågningskamera AVMATRIX
- Overvågningskamera Delta Dore
- Overvågningskamera Promise Technology
- Overvågningskamera Sitecom
- Overvågningskamera DiO
- Overvågningskamera Minox
- Overvågningskamera Intellinet
- Overvågningskamera V-TAC
- Overvågningskamera Qian
- Overvågningskamera August
- Overvågningskamera IDIS
- Overvågningskamera Geovision
- Overvågningskamera Schwaiger
- Overvågningskamera Steren
- Overvågningskamera Elmo
- Overvågningskamera AViPAS
- Overvågningskamera UniView
- Overvågningskamera Equip
- Overvågningskamera Alfatron
- Overvågningskamera REVO
- Overvågningskamera Aqara
- Overvågningskamera Ernitec
- Overvågningskamera Setti+
- Overvågningskamera BZBGear
- Overvågningskamera PTZ Optics
- Overvågningskamera AVer
- Overvågningskamera Ferguson
- Overvågningskamera Moxa
- Overvågningskamera Inovonics
- Overvågningskamera Bea-fon
- Overvågningskamera Profile
- Overvågningskamera WyreStorm
- Overvågningskamera Allnet
- Overvågningskamera Aldi
- Overvågningskamera Airlive
- Overvågningskamera Aritech
- Overvågningskamera ACME
- Overvågningskamera KlikaanKlikuit
- Overvågningskamera Marquant
- Overvågningskamera Ednet
- Overvågningskamera Lumens
- Overvågningskamera Hombli
- Overvågningskamera Naxa
- Overvågningskamera Miniland
- Overvågningskamera Xavax
- Overvågningskamera Gira
- Overvågningskamera Interlogix
- Overvågningskamera DSC
- Overvågningskamera Boyo
- Overvågningskamera Iget
- Overvågningskamera EverFocus
- Overvågningskamera Adesso
- Overvågningskamera Satel
- Overvågningskamera Notifier
- Overvågningskamera Monoprice
- Overvågningskamera Beafon
- Overvågningskamera Chuango
- Overvågningskamera MicroView
- Overvågningskamera ETiger
- Overvågningskamera Videcon
- Overvågningskamera INSTAR
- Overvågningskamera Advantech
- Overvågningskamera Digital Watchdog
- Overvågningskamera Moen
- Overvågningskamera Ganz
- Overvågningskamera MEE Audio
- Overvågningskamera Mobotix
- Overvågningskamera Kwikset
- Overvågningskamera Ikegami
- Overvågningskamera Leviton
- Overvågningskamera Approx
- Overvågningskamera ClearOne
- Overvågningskamera Ebode
- Overvågningskamera Oplink
- Overvågningskamera Dorr
- Overvågningskamera Sonic Alert
- Overvågningskamera Linear PRO Access
- Overvågningskamera Summer Infant
- Overvågningskamera SMC
- Overvågningskamera Topica
- Overvågningskamera Iiquu
- Overvågningskamera Verint
- Overvågningskamera Brinno
- Overvågningskamera Rostra
- Overvågningskamera Caddx
- Overvågningskamera Spyclops
- Overvågningskamera EKO
- Overvågningskamera Kguard
- Overvågningskamera Woonveilig
- Overvågningskamera Accsoon
- Overvågningskamera Mobi
- Overvågningskamera Surveon
- Overvågningskamera Hollyland
- Overvågningskamera Epcom
- Overvågningskamera Indexa
- Overvågningskamera Lutec
- Overvågningskamera Whistler
- Overvågningskamera ClearView
- Overvågningskamera VideoComm
- Overvågningskamera IMILAB
- Overvågningskamera 3xLOGIC
- Overvågningskamera Inkovideo
- Overvågningskamera Weldex
- Overvågningskamera SecurityMan
- Overvågningskamera Mach Power
- Overvågningskamera Canyon
- Overvågningskamera CNB Technology
- Overvågningskamera Tapo
- Overvågningskamera Aigis
- Overvågningskamera Exacq
- Overvågningskamera Brickcom
- Overvågningskamera Laxihub
- Overvågningskamera Securetech
- Overvågningskamera EFB Elektronik
- Overvågningskamera NetMedia
- Overvågningskamera Videotec
- Overvågningskamera Illustra
- Overvågningskamera Atlona
- Overvågningskamera Nivian
- Overvågningskamera Arenti
- Overvågningskamera E-bench
- Overvågningskamera Blow
- Overvågningskamera Syscom
- Overvågningskamera Tecno
- Overvågningskamera Night Owl
- Overvågningskamera Guardzilla
- Overvågningskamera Astak
- Overvågningskamera Blink
- Overvågningskamera Milestone Systems
- Overvågningskamera Zavio
- Overvågningskamera Campark
- Overvågningskamera IPX
- Overvågningskamera Dedicated Micros
- Overvågningskamera Hamlet
- Overvågningskamera Annke
- Overvågningskamera Qoltec
- Overvågningskamera Digimerge
- Overvågningskamera Feelworld
- Overvågningskamera Wisenet
- Overvågningskamera Infortrend
- Overvågningskamera Epiphan
- Overvågningskamera HiLook
- Overvågningskamera Compro
- Overvågningskamera Vimtag
- Overvågningskamera Sonoff
- Overvågningskamera Gewiss
- Overvågningskamera Alula
- Overvågningskamera Insteon
- Overvågningskamera Costar
- Overvågningskamera ALC
- Overvågningskamera Security Labs
- Overvågningskamera Comtrend
- Overvågningskamera Seneca
- Overvågningskamera Avigilon
- Overvågningskamera American Dynamics
- Overvågningskamera Vosker
- Overvågningskamera Sentry360
- Overvågningskamera Owltron
- Overvågningskamera Petcube
- Overvågningskamera Enabot
- Overvågningskamera Luis Energy
- Overvågningskamera Sir Gawain
- Overvågningskamera VisorTech
- Overvågningskamera Atlantis Land
- Overvågningskamera B & S Technology
- Overvågningskamera I3International
- Overvågningskamera Ecobee
- Overvågningskamera Turing
- Overvågningskamera Wasserstein
- Overvågningskamera Qolsys
- Overvågningskamera Control4
- Overvågningskamera Milesight
- Overvågningskamera GVI Security
- Overvågningskamera Conbrov
- Overvågningskamera HuddleCamHD
- Overvågningskamera Defender
- Overvågningskamera IOIO
- Overvågningskamera BIRDFY
- Overvågningskamera I-PRO
- Overvågningskamera DVDO
- Overvågningskamera TCP
- Overvågningskamera Bolin Technology
- Overvågningskamera Nextech
- Overvågningskamera Tuya
- Overvågningskamera Bolide
- Overvågningskamera Telycam
- Overvågningskamera Arecont Vision
- Overvågningskamera Schlage
Nyeste Overvågningskamera Manualer
7 April 2025
7 April 2025
6 April 2025
29 Marts 2025
28 Marts 2025
20 Marts 2025
20 Marts 2025
20 Marts 2025
13 Marts 2025
8 Marts 2025