Philips 42PFL5332D Manual
Læs nedenfor 📖 manual på dansk for Philips 42PFL5332D (124 sider) i kategorien TV. Denne guide var nyttig for 38 personer og blev bedømt med 4.5 stjerner i gennemsnit af 2 brugere
Side 1/124

User Manual 26PFL5302D
26PFL5322D
32PFL5322D
32PFL5332D
37PFL5332D
42PFL5332D
42PFP5332D
50PFP5332D
For Customer Use /
À l’usage du client /
Para Uso del Cliente
AE: Enter below the Serial No. which is located on the rear
of the cabinet. Retain this information for future reference.
FR: Entrez ci-dessous le numéro de série qui se trouve à
l’arrière du boîtier du dispositif. Conservez ces informations
pour référence ultérieure.
ES: Escriba a continuación el Nº de serie, el cual se
encuentra en la parte posterior del gabinete. Guarde esta
información para referencia futura.
Model / Modèle / Modelo : ____________________________
Serial / Série / Serie: _________________________________
www.philips.com/welcome
or call
1-888-PHILIPS (744-5477)
while with your product
(and Model / Serial number)
Français English
Español
Guía del usuario
Manuel de l’utilisateur
Philips vous remercie de
votre conance.
Besoin d'une aide
rapide?
Les Guide d'utilisation rapide et
Manuel de l'utilisateur regorgent
d'astuces destinées à simplier
l'utilisation de votre produit Philips.
Toutefois, si vous ne parvenez
pas à résoudre votre problème,
vous pouvez accéder à
notre aide en ligne à l'adresse
www.philips.com/welcome
ou formez le
1-800-661-6162 (Francophone)
1-888-PHILIPS (744-5477)
(English speaking)
Veillez à avoir votre produit à
portée de main
(et model / serial nombre)
ARRÊT
AR
AR
AR
ARRÊ
RÊ
RÊ
RÊT
T
T
T
Gracias por escoger Philips
Necesita ayuda
inmediata?
Lea primero la Guía de uso rápido o el
Manual del usuario, en donde encon-
trará
consejos que le ayudarán a disfrutar
plenamente de su producto Philips.
Si después de leerlo aún necesita ayuda,
consulte nuestro servicio de
asistencia en línea en
www.philips.com/welcome
o llame al teléfono
1-888-PHILIPS (744-5477)
y tenga a mano el producto
(y número de modelo / serie)
ALTO!
A
A
A
AL
L
L
LT
T
T
TO
O
O
O!
!
!
!


Registering your model with PHILIPS makes you eligible for all of the valuable benefits listed below, so don't miss out.
Complete and return your Product Registration Card at once, or register online at www.philips.com/welcome
to ensure:
Return your Product Registration Card or register online at
www.philips.com/ today to get the very most from your purchase.welcome
Visit our World Wide Web Site at http://www.philips.com/welcome
Congratulations on your purchase,
and welcome to the “family!”
Dear PHILIPS product owner:
Thank you for your confidence in PHILIPS.You’ve selected one of
the best-built, best-backed products available today.We’ll do every-
thing in our power to keep you happy with your purchase for many
years to come.
As a member of the PHILIPS “family,” you’re entitled to protection
by one of the most comprehensive warranties and outstanding
service networks in the industry.What’s more, your purchase guar-
antees you’ll receive all the information and special offers for which
you qualify, plus easy access to accessories from our convenient
home shopping network.
Most importantly, you can count on our uncompromising commit-
ment to your total satisfaction.
All of this is our way of saying welcome - and thanks for investing
in a PHILIPS product.
P.S. To get the most from your PHILIPS purchase, be
sure to complete and return your Product Registration
Card at once, or register online at:
www.philips.com/welcome
For Customer Use
Enter below the Serial No. which is locat-
ed on the rear of the cabinet. Retain this
information for future reference.
Model No.__________________________
Serial No. ________________________
Know these
safetysymbols
This “bolt of lightning” indicates unin-
sulated material within your unit may
cause an electrical shock. For the safety of
everyone in your household, please do not
remove product covering.
The “exclamation point” calls atten-
tion to features for which you should
read the enclosed literature closely to pre-
vent operating and maintenance problems.
WARNING: To r educe the risk of fire or
electric shock, this apparatus should not be
exposed to rain or moisture and objects
filled with liquids, such as vases, should not
be placed on this apparatus.
CAUTION: To prevent electric shock,
match wide blade of plug to wide slot, fully
insert.
ATTENTION: Pour éviter les choc élec-
triques, introduire la lame la plus large de la
fiche dans la borne correspondante de la
prise et pousser jusqu’au fond.
CAU T I ON
RISK OF ELECTRIC SHOCK
DO NOT OPEN
CAUTION: TO REDUCE THE RISK OF ELECTRIC SHOCK, DO NOT
REMOVE COVER (OR BACK). NO USER-SERVICEABLE PARTS
INSIDE. REFER SERVICING TO QUALIFIED SERVICE PERSONNEL.
t
s
*Proof of
Purchase
Returning the enclosed card guarantees
that your date of purchase will be on file,
so no additional paperwork will be
required from you to obtain warranty
service.
*Product Safety
Notification
By registering your product, you'll receive
notification - directly from the manufac-
turer - in the rare case of a product
recall or safety defect.
*Additional Benefits
Registering your product guarantees that
you'll receive all of the privileges to
which you're entitled, including special
money-saving offers.

IMPORTANT SAFETY INSTRUCTIONS
Read before operating equipment
1. Read these instructions.
2. Keep these instructions.
3. Heed all warnings.
4. Follow all instructions.
5. Do not use this apparatus near water.
6. Clean only with a dry cloth.
7. Do not block any of the ventilation openings. Install in accordance with
the manufacturers instructions.
8. Do not install near any heat sources such as radiators, heat registers,
stoves, or other apparatus (including amplifiers) that produce heat.
9. Do not defeat the safety purpose of the polarized or grounding-type plug.
A polarized plug has two blades with one wider than the other. A
grounding type plug has two blades and third grounding prong. The wide
blade or third prong are provided for your safety. When the provided
plug does not fit into your outlet, consult an electrician for replacement
of the obsolete outlet.
10. Protect the power cord from being walked on or pinched particularly at
plugs, convenience receptacles, and the point where they exit from the
apparatus.
11. Only use attachments/accessories specified by the manufacturer.
12. Use only with a cart, stand, tripod, bracket, or table specified by
the manufacturer, or sold with the apparatus. When a cart is
used, use caution when moving the cart/apparatus combination
to avoid injury from tip-over.
13. Unplug this apparatus during lightning storms or when unused for long
periods of time.
14. Refer all servicing to qualified service personnel. Servicing is required
when the apparatus has been damaged in any way, such as power-supply
cord or plug is damaged, liquid has been spilled or objects have fallen
into apparatus, the apparatus has been exposed to rain or moisture,
does not operate normally, or has been dropped.
15. This product may contain lead or mercury. Disposal of these materials
may be regulated due to environmental considerations. For disposal or
recycling information, please contact your local authorities or the
Electronic Industries Alliance:www.eiae.org.
16. - The appliance should be serviced by Damage Requiring Service
qualified service personnel when:
A. The power supply cord or the plug has been damaged; or
B. Objects have fallen, or liquid has been spilled into the appliance; or
C. The appliance has been exposed to rain; or
D. The appliance does not appear to operate normally or exhibits a
marked
change in performance; or
E. The appliance has been dropped, or the enclosure damaged.
17. - All televisions must comply with recommended Tilt/Stability
international global safety standards for tilt and stability properties of its
cabinets design.
• Do not compromise these design standards by applying excessive pull
force to the front, or top, of the cabinet which could ultimately
overturn the product.
• Also,do not endanger yourself, or children, by placing electronic
equipment/toys on the top of the cabinet. Such items could
unsuspectingly fall from the top of the set and cause product damage
and/or personal injury.
18. - The appliance should be mounted to a Wall or Ceiling Mounting
wall or ceiling only as recommended by the manufacturer.
19. - An outdoor antenna should be located away from Power Lines
power lines.
20. - If an outside antenna is connected to Outdoor Antenna Grounding
the receiver, be sure the antenna system is grounded so as to provide
some protection against voltage surges and built up static charges.
Section 810 of the National Electric Code, ANSI/NFPA No. 70-1984,
provides information with respect to proper grounding of the mats and
supporting structure grounding of the lead-in wire to an antenna-
discharge unit, size of grounding connectors, location of antenna-
discharge unit, connection to grounding electrodes and requirements for
the grounding electrode. See Figure below.
21. - Care should be taken so that objects do Objects and Liquid Entry
not fall and liquids are not spilled into the enclosure through openings.
a) Warning: To reduce the risk of fire or electric shock, this apparatus
should not be exposed to rain or moisture and objects filled with
liquids, such as vases should not be placed on this apparatus.
22. - To prevent battery leakage that may Battery Usage CAUTION
result in bodily injury, property damage, or damage to the unit:
• Install all batteries correctly, with + and - alignment as marked on the
unit.
• Do not mix batteries (old and new or carbon and alkaline, etc.)
• Remove batteries when the unit is not used for a long time.
EXAMPLE OF ANTENNA GROUNDING AS PER
NATIONAL ELECTRICAL CODE (NEC)
GROUND CLAMP ANTENNA LEAD IN WIRE
ANTENNA DISCHARGE UNIT
( 810-20)NEC SECTION
GROUNDING CONDUCTORS
( 810-21)NEC SECTION
GROUND CLAMPS
POWER SERVICE GROUNDING
ELECTRODE SYSTEM
( 250, )NEC ART PART H
ELECTRIC SERVICE EQUIPMENT
Note to the CATV system installer: this reminder is provided to call the CATV system installer’s attention to Article 820-40 of
the NEC that provides guidelines for proper grounding and, in particular, specifies that the cable ground shall be connected to the
grounding system of the building, as close to the point of cable entry as practical.

1
Contents
° End of life directives
Philips is paying a lot of attention to produce environmentally-friendly products in green focal areas. Your new TV
contains materials which can be recycled and reused. At the end of its life specialized companies can dismantle the
discarded TV to concentrate the reusable materials and to minimize the amount of materials to be disposed off.
Please ensure you dispose off your old TV according to local regulations.
Care of the screen
See Tips, p. 2 .7
Recycling
The materials used in your set are either reusable or can be recycled.
To minimise environmental waste,specialist companies collect used
appliances and dismantle them after retrieving any materials that can
be used again (ask your dealer for further details).
°
A Guide to Digital TV ........................................................................ 2
Preparation ........................................................................................... 2
First time installation ......................................................................... 5
Use of the remote control ................................................................ 6
Control Buttons on the TV .............................................................. 7
TV settings ............................................................................................ 8
Settings assistant ...................................................................................8
Standard settings ...................................................................................8
To use the menus ................................................................................ 9
..........................................................................................9Introduction
How to navigate through the TV menus ............................................9
Demo....................................................................................................... 9
Picture menu ..................................................................... 10
- Contrast ....................................................................................... 10
- Brightness ..................................................................................... 10
- Color ............................................................................................ 10
- Tint ............................................................................................... 10
- Sharpness...................................................................................... 10
- Color temperature ...................................................................... 10
- Custom color temperature ......................................................... 10
- Pixel Plus ...................................................................................... 10
- Dynamic contrast ......................................................................... 11
- DNR (Digital Noise Reduction) .................................................. 11
- MPEG artifact reduction .............................................................. 11
- Color enhancement ..................................................................... 11
- Active Control ............................................................................. 11
- Picture format .............................................................................. 11
Sound menu ....................................................................... 12
- Equalizer ...................................................................................... 12
- Volume ........................................................................................ 12
- Balance ........................................................................................ 12
- Digital Audio Language
............................................................... 12
- Alternate audio ........................................................................... 12
- Mono/Stereo ............................................................................... 12
- Sound mode ................................................................................ 12
- Headphone volume .................................................................... 12
- AVL (Automatic Volume Leveler) ............................................. 12
- Delta volume ............................................................................... 12
- Auto surround ............................................................................ 12
Features menu ................................................................... 13
- Closed captions .......................................................................... 13
- Caption service ........................................................................... 13
- Digital caption service ................................................................ 13
- Digital caption options ............................................................... 14
- Sleeptimer ................................................................................... 14
Child lock menu ................................................................................. 14
- Lock after .................................................................................. 15
- Channel lock ............................................................................... 15
- TV ratings lock ............................................................................ 15
- Movie ratings lock....................................................................... 16
- Region ratings lock ..................................................................... 16
- Set/Change PIN ........................................................................... 16
- On timer ..................................................................................... 17
Installation menu ...............................................................................17
.................................................................. 17Select the menu language
Channel menu ....................................................................................17
Store TV channels ............................................................................. 17
Installation update .............................................................................. 18
Weak channel installation ................................................................. 18
Installation mode ............................................................................... 18
Uninstall channels ............................................................................ 18
Preferences menu .............................................................. 19
- Location ........................................................................................ 19
- OSD .............................................................................................. 19
- Show emergency alerts (EAS) ..................................................... 19
- Download rating table ................................................................. 20
Connections ....................................................................... 20
Clock .................................................................................. 20
- Auto clock mode ......................................................................... 20
- Auto clock channel ...................................................................... 20
- Time - Day ................................................................................... 20
- Time zone .................................................................................... 20
- Daylight saving ............................................................................. 20
Reset AV settings ............................................................... 21
Software upgrade ............................................................... 21
Connect Accessory Devices ...........................................................21
Set Top Box to TV ............................................................................ 21
DVD Player/Recorder to TVProgressive Scan ............................ 22
DVD Player/DVD Recorder/VCR to TV ......................................... 22
Video Camera/Games Console to TV ............................................. 23
Side connections - USB/Headphone .......................................... 23
Digital Surround receiver ............................................................ 23
Multimedia browser .........................................................................24
Multimedia Browser menu ................................................................ 24
Record with your recorder .............................................................25
Record a TV program ........................................................................ 25
To select connected devices ..........................................................25
Troubleshooting Tips ....................................................................... 26
Tips ........................................................................................................27
Glossary ................................................................................................ 28
Specifications ...................................................................................... 29
Annex 1 - Philips TV software upgrade
with portable memory ...................................................... 31
Annex 2 - Philips TV Slideshow Format
with background music..................................................... 33
Annex 3 - Philips TV USB .................................................................... 35
EnglishFrançaiseEspañol

2
Do not insert the power plug in a wall socket before all connections
are made.
Place the TV on a solid surface or place the TV on the supplied stand. For
the mounting instructions of the stand, see the Quick Start Guide.
For ventilation, leave at least 4” to 6” free all around the TV. Do not
place the TV on a carpet. To prevent any unsafe situations, no naked flame
sources, such as lighted candles, should be placed in the vicinity.
Avoid heat, direct sunlight and exposure to rain or water. The equipment
shall not be exposed to dripping or splashing.
Mounting the TV on the wall
This TV is compatible with the VESA wall mounting standard. Please
contact your local electronics retailer for a VESA compliant bracket to wall
mount this TV.
Caution: Installing the TV requires special skill that should only be
performed by qualified personnel. You should not attempt to do
the work yourself. Philips bears no responsibility for improper
mounting or mounting that results in accident or injury.
Preparation
What is Digital Television (DTV) ?
Digital Television (DTV) is relatively new type of broadcasting that promises to transform television viewing into a whole new experience. Digital
technology is used to capture images and sound to deliver a better picture quality. DTV technology is also capable of multicasting and interactive
capabilities.
There are many levels of digital television quality. The most common are:
Standard Definition TV (SDTV)
SDTV is the basic level of quality display and resolution for both analog and digital. Transmission of SDTV can be in the traditional (4:3) or
widescreen (16:9) format.
Enhanced Definition TV (EDTV)
EDTV is better in picture quality than analog television. The formats for EDTV are 480p widescreen (16:9) or traditional (4:3). EDTV is in the
middle range quality between SDTV and HDTV.
High Definition TV (HDTV)
HDTV has the highest quality for digital broadcast formats. Its resolution is widescreen format (16:9). Combined with digitally enhanced sound
technology, HDTV sets new standards for sound and picture quality in television.
DTV is by far a more flexible and efficient technology than the analog broadcast system. Analog broadcasts can only provide one program at
a time. Digital television can broadcast a high definition program or more than one standard definition program at the same time. This is often
referred to as "multicasting". Digital television can also give you interactive video and data services through a single digital channel.
A Guide to Digital TV
EnglishFrançaiseEspañol
Note : Use only a soft cloth to clean the front of the TV.
Warning concerning stationary images on the TV screen (only for Plasma Displays)
A characteristic of Plasma Display Panels is that displaying the same image for a long time can cause a permanent
after-image to remain on the screen. This is called phosphor burn in.
Normal use of the TV should involve the showing of pictures that contain constantly moving and changing images that
fill the screen.
Please refer to pg 27 for details.
THIS IS NOT INCLUDED IN THE PHILIPS LIMITED WARRANTY.

3
Watching Cable TV programs that don’t
require the cable box
Since you’ve connected the cable TV signal
directly to the TV’s tuner, you can also watch the
unscrambled programs by simply tuning to the
desired channel. You must first use Autoprogram,
however, to store channels in the TV’s memory.
Note: This connection will supply stereo sound to
the TV if it is being broadcast by the station you are
watching.
75
CABLE
HDMI 1 HDMI 2
75
Set-Top Box
OUTPUT
TV
IN
CABLE
3
Back of the TV
2
& Basic connections to the TV
Your integrated digital TV automatically decodes and displays the four basic DTV
picture resolution standards.
- SDTV (Standard Definition TV) are broadcast as 480i (480-line interlaced) or
480p (480-line progressive scan) video.
- HDTV (High-Definition TV) are broadcast either in the 1080i or 720p formats,
always with a widescreen picture.
Note: Progressive scan video (p) is more like that you see in a movie theater. Images are
much more distinct and free of flicker, and motion is smoother.
Next to analog NTSC broadcast reception, your TV has an integrated High
Definition TV tuner which receives, decodes and displays terrestrial ATSC and
unscrambled cable (QAM) signals.
HDTV quality is only reproduced when a broadcaster or cable provider broadcasts
HDTV signals.
There are 2 ways to get HDTV content:
- via cable,
- via antenna.
Note: This drawing is used wherever you can connect cable or antenna.
- Cable TV
Connect the cable TV signal to the CABLE/ANTENNA 75 Ω : jack at the bottom
of the TV.
Note: this connection will supply stereo sound to the TV if it is being broadcast by the
station you are watching.
- Cable box with RF IN/OUT
• Connect the incoming cable TV signal to the cable IN jack on the back of 1
the cable box.
• Connect a coaxial cable (not supplied) from the
TO TV jack on the back of the
cable box to the CABLE/ANTENNA 75 Ω : jack 2 at the bottom of the TV.
Note: Your cable box may have a different label for the TO TV jack, such as
OUTPUT OUT or .
• Set the OUTPUT CH CH 3 switch 3 of the cable box to or (whichever is 4
correct for your cable box), then tune the TV to the corresponding channel.
Once tuned, change channels at the cable box, not the TV.
Note: This connection will not supply stereo sound to the TV. The reason is that the RF
output on a cable box - labeled TO TV, OUT or OUTPUT for example - will not send a
stereo signal to the tuner (VHF/UHF) input on a TV.
- Cable box with A/V outputs
• Connect the incoming cable TV signal 1 to a signal splitter (not supplied). The
signal splitter enables you to avoid having to use the TO TV jack on the back of
the cable box. This jack will not supply stereo sound to the TV.
Note: Your cable box may have a different label for the TO TV jack, such as
OUTPUT OUT or .
• Connect a coaxial cable (not supplied) to a connector on the signal splitter and
to the CABLE/ANTENNA 75 Ω : jack 2 on the TV.
• Connect another coaxial cable (not supplied) to a connector on the signal
splitter and to the cable IN jack 3 on the back of the cable box.
• Connect A/V cables (not supplied) to the
VIDEO R and AUDIO L and outputs
on the back of the cable box and to the AV2 VIDEO video (labeled ) and
AUDIO L R (labeled and ) jacks 4 on the back of the TV.
• To view programs from your cable box, first press the SOURCE button on the
remote control.
• Press the cursor down or up buttons until the AV2 signal source is selected.
• Press the OK AV2 button to confirm your selection. The input source
becomes current for the viewing of cable TV programs through your cable box.
Note: If your cable box Audio/Video outputs will not supply video and stereo audio to
the TV, you will need to make the connection shown above in the example “Cable box
with ”.RF IN/OUT
EnglishEspañol
T
CABL E / ANT ENNA
SIG N AL
SP LIT T ER
Set-Top Box
OUT IN
3
2
CABLE
1
AV1 :
4
L + R + VIDEO
HD MI 2 H DM I 1

8
TV settings
Settings assistant
Each time you have made a selection, press the green color button to confirm
your selection.
& Select Settings assistant and press the cursor right.
Note: By means of several split screens/full screens you are prompted to
select your preferred picture, sound and ambilight settings to finally arrive
at a complete setting which satisfies you.
é Press the green color button to return to the TV menu again.
Reset to standard
This allows you to reset your settings for viewing and listening to predefined
factory settings.
& Select Reset to standard and press the cursor right.
A menu appears which allows you to select one of the standard settings for
viewing and listening.
Current: shows your current settings for viewing and listening.
Natural : allows you to set your picture and sound settings to the
recommended standard values. In most cases this will give the
best balanced viewing experience.
Vivid : allows you to set your picture and sound settings to rich values,
making use of the TV capabilities to its full extend.
Subtle : allows you to set your picture and sound settings to the purest
representation of the original source content.
é Press the green color button to store the selected setting.
TV settings Reset to standard
Picture
Current
Natural
TV menu
Settings assistant
Reset to standard
Info
Vivid
Subtle
Sound
EnglishFrançaiseEspañol
10
Press the button on the remote control to summon the TV menu. The TV MENU
menu gives you an overview of the menus you can select.
Note: Depending on the input signal, one or more menu items may not be selectable.
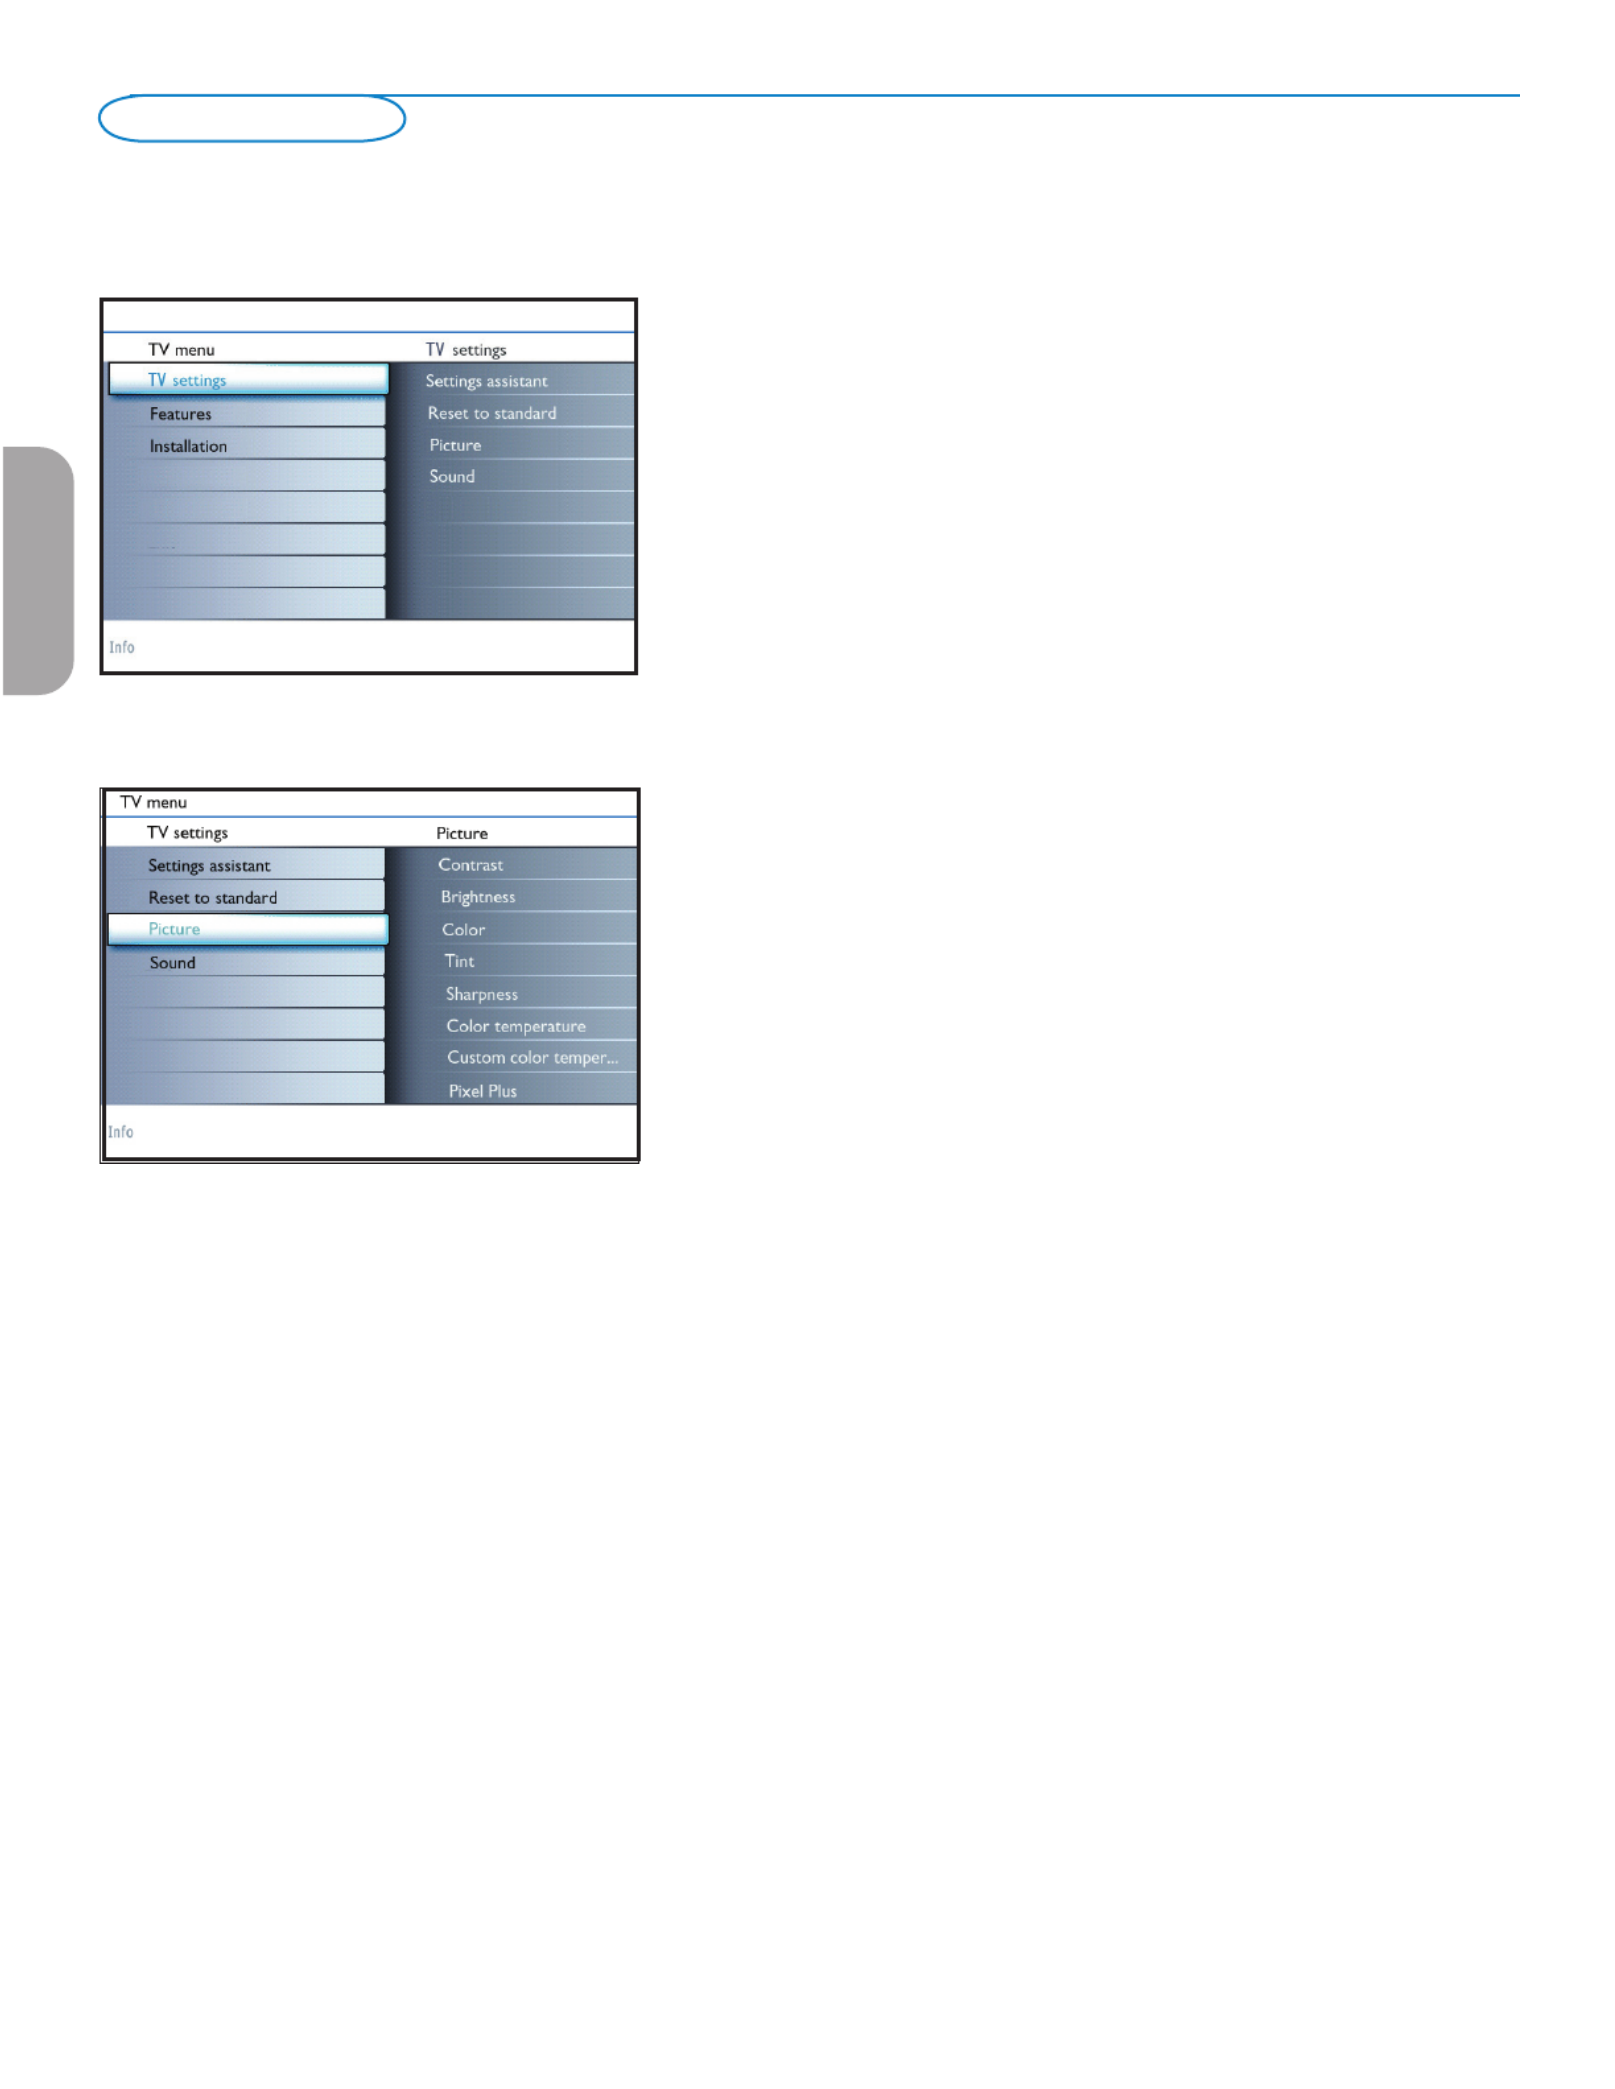
Picture menu
Note: Some menu items are not available in case of HD sources.
& Press the cursor right to select Picture.
é Press the cursor right again to enter the Picture menu.
“ Select the menu items with the cursor up/down.
‘ Adjust the settings with the cursor left/right or enter the list of submenu items
with the cursor right. Select a submenu item with the cursor up/down.
Contrast
This will adjust the intensity of bright parts in the picture but keep the dark
parts unchanged.
Brightness
This will adjust the light output of the complete picture, which will mainly affect
the darker areas of the picture.
Color
This will adjust the saturation level of the colors to suit your personal
preference.
Tint
Allows you to select the color mix (hue) of the picture.
Sharpness
This will adjust the sharpness of fine details in the picture.
Color temperature
This will increase or decrease Warm Cool (red) and (blue) colors to suit
personal preferences.
Select Cool Normal to give the white colors a blue tint, to give the white
colors a neutral, Warm to give the white colors a red tint.
Custom color temperature (only when Color temperature is set to Custom)
Fine tunes the white point (WP) (BL) and black level of the picture.
& Select Custom color temperature and press the cursor right.
é Use the cursor buttons to select and adjust the settings of:
R-WP: allows you to customize the color temperature by adjusting the red
whitepoint of the picture.
G-WP: allows you to customize the color temperature by adjusting the green
whitepoint of the picture.
B-WP: allows you to customize the color temperature by adjusting the blue
whitepoint of the picture.
R-BL : allows you to customize the color temperature by adjusting the red
blacklevel of the picture.
G-BL : allows you to customize the color temperature by adjusting the green
blacklevel of the picture.
“ Use the color button to reset to the predefined settings.
‘ Press the cursor left to return to the Picture menu.
Pixel Plus
for everyday viewing, Pixel Plus is the most ideal setting, as it fully processes
the image to make every single pixel the best it can be, improving contrast,
sharpness, picture depth, and color reproduction and brilliance from every
source, including High Definition.
Picture menu
EnglishFrançaiseEspañol
12
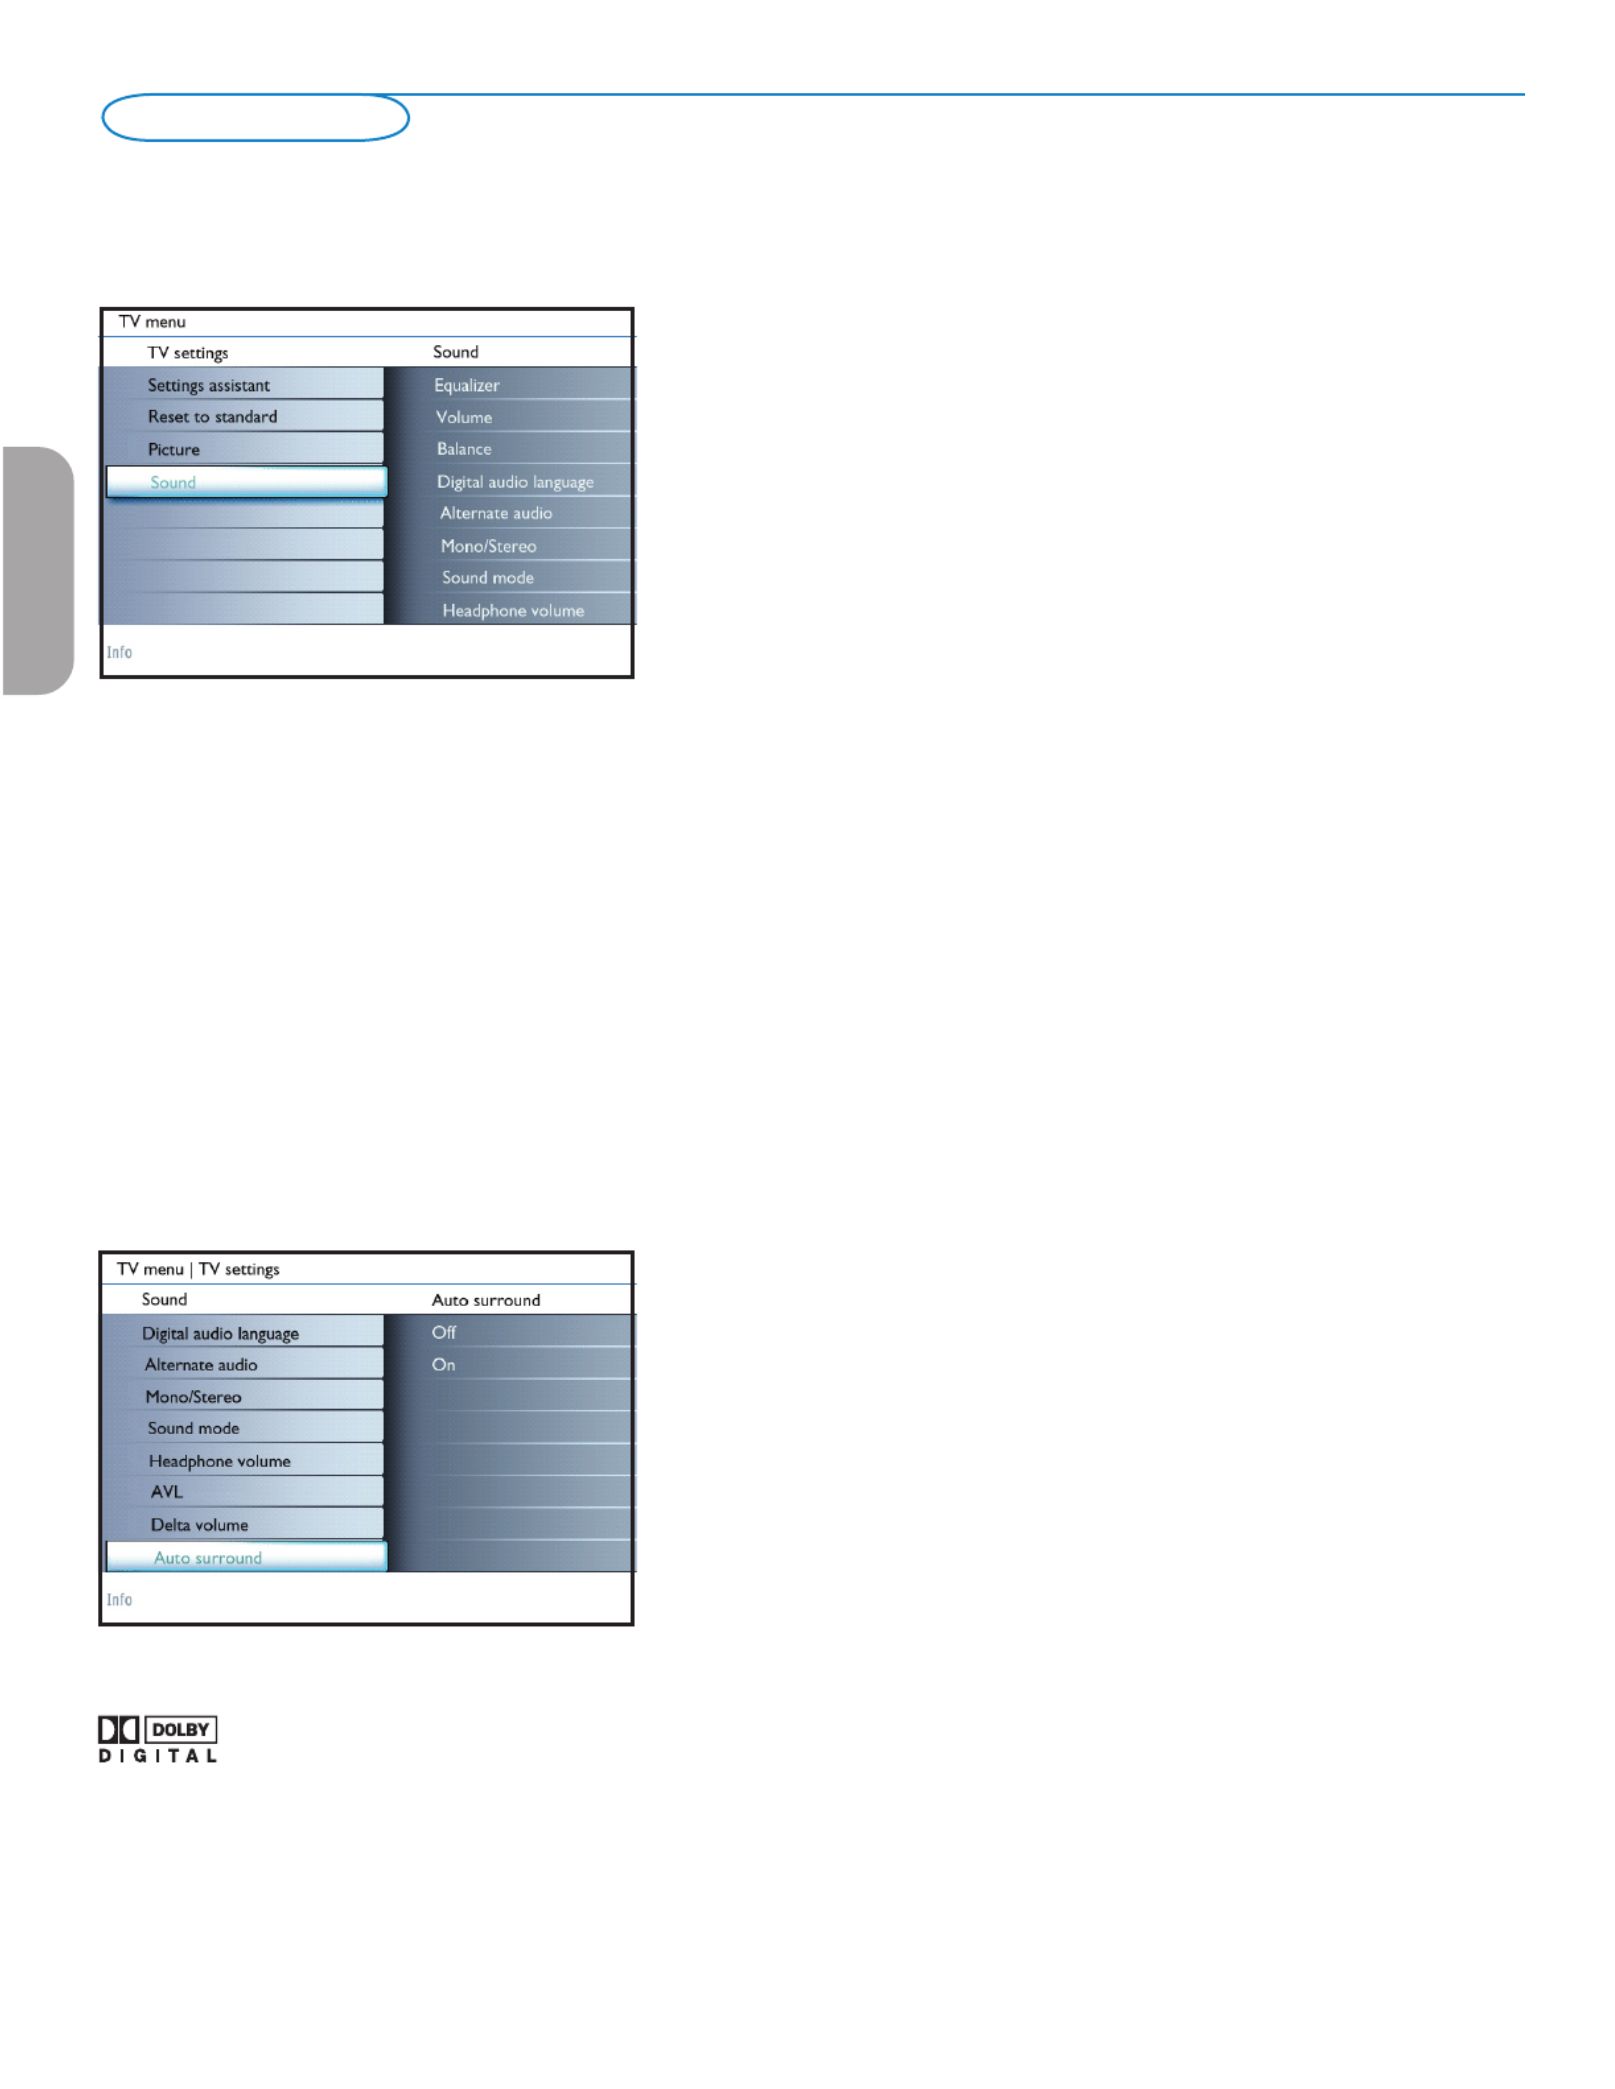
Sound menu
& Select Sound in the TV Settings menu.
é Press the cursor right to enter the sound menu.
“ Select the menu items with the cursor up/down and adjust the settings with the
cursor left/right.
Remember, control settings are at normal mid-range levels when the bar scale is
entered.
Equalizer
Allows you to change the frequency response of the sound to match your
personal taste.
Volume
This will adjust the sound output level.
Balance
This will adjust the output of the right and left speakers to obtain the best
stereo reproduction for your listening position.
Digital audio language (only selectable with digital broadcast signals)
This allows you to select your language preference in case of multilingual audio
track programs if available with digital broadcast signal.
Note: The default language for the digital channels is the installed menu language.
Alternate audio (only selectable with analog broadcast signals)
This gives you the possibility to swap between the Main and Second audio
Program (SAP) when it is available.
Mono/Stereo
This selects, per TV channel, Mono or Stereo sound when analog stereo
broadcasts are available.
Sound menu
Sound mode
This selects the modes for stereo or surround sound reproduction dependent
on the broadcast signals or signals from external inputs received.
Headphone volume
This controls the level of sound through the headphones.
AVL (Automatic Volume Leveler) (only available with analog broadcast and non-
Digital signals)
This automatically reduces the volume differences between channels and
programs, providing a more constant overall level. This will also reduce the
dynamics of sound.
Delta volume
This allows you to correct for any permanent volume differences between TV
channels or external sources.
Auto surround
Sometimes the broadcaster transmits special signals for Surround sound
encoded programs. The TV automatically switches to the best surround sound
mode when Auto surround is switched On.
Manufactured under license from Dolby Laboratories.
‘Dolby’ and the double-D symbol are trademarks of
Dolby Laboratories.
EnglishFrançaiseEspañol

14
Digital caption options
This allows you to modify how digital captions are displayed on your TV.
Select from the following options to change the visual characteristics of your
TV’s digital captioning.
• Reset to default
Select this option to reset the digital caption options back to the captions
provider default settings.
Press the OK button to confirm.
• Size
Select this option to select the size of caption display according to your own
preference.
Select Default (Automatic Small Standard Large), , or and press the OK
button to confirm.
• Style
Select this option to select the font style of caption display according to your
own preference.
Select Default Serif Sans , Monospaced serif, , Monospaced sans serif,
serif, , ...Casual Cursive or Small caps
• Text
Select this option to select the text color or the opacity of the text box of
caption display according to your own preference.
Select a color and one of the opacity options.
• Background
Select this option to select the character background color or one of
the background opacity options of caption display according to your own
preference.
Select a color and one of the opacity options.
• Edge
Select this option to select the edge color or type options of caption display
according to your own preference.
Select a color and one of the type options.
Features Digital caption options
Reset to default
Size
TV menu
Closed captions
Sleeptimer
Digital caption options
Info
Change PIN
Style
Text color
Digital caption service
Caption service
On timer
Child lock
Text opacity
Background color
Background opacity
Edge type
Sleeptimer
This sets a time period after which the TV automatically turns to standby.
& Select Sleeptimer.
é Press the cursor right.
“ Select a value with the cursor up/down. The list will have values from 0 180 to
minutes.
When 0 is selected, the sleeptimer is turned off.
You can always turn off your TV earlier or select another time set.
Child lock menu
This menu can control special functions for the TV channels.
& Select Child lock in the Features menu with the cursor up/down.
é Press the cursor right to enter the child lock menu.
“ You will be summoned to enter your PIN (See below). Follow the instructions
on screen.
Set/Change PIN
& Select Set or Change PIN with the cursor down.
é If no PIN-code exists yet, the menu item is set to . Follow the Set PIN
instructions on screen.
If a PIN-code has previously been entered, the menu item is set to
Change PIN. Follow the instructions on screen.
All number combinations from 0000 to 9999 are valid numbers.
“ The Menu preferences menu reappears with a message confirming that
the PIN has been created.
Child lock menu
EnglishFrançaiseEspañol
Produkt Specifikationer
| Mærke: | Philips |
| Kategori: | TV |
| Model: | 42PFL5332D |
| Strøm: | 240 W |
| Skærm diagonal: | 42 " |
| Skærmopløsning: | 1366 x 768 pixel |
| Skærmens lysstyrke: | 500 cd/m² |
| Responstid: | 8 ms |
| Synsvinkel, horisontal: | 176 ° |
| Synsvinkel, vertikal: | 176 ° |
| Skærm diagonal (metrisk): | 107 cm |
| Understøttede videotilstande: | 480i |
| Udgangseffekt (RMS): | 2 W |
| Strømforbrug (standby): | 1 W |
| Skærmopløsning (numerisk): | 1366 pixel |
| Billedformat: | 16:9 |
| Dimensioner (BxDxH) (efter britisk standard): | 41.2 x 4.6 x 27 " |
| Produktvægt: | 72 Pund |
Har du brug for hjælp?
Hvis du har brug for hjælp til Philips 42PFL5332D stil et spørgsmål nedenfor, og andre brugere vil svare dig
TV Philips Manualer

13 Marts 2025
10 Marts 2025
10 Marts 2025
21 Februar 2025
8 Februar 2025
8 Februar 2025
7 Februar 2025
7 Februar 2025
31 Januar 2025
12 Januar 2025
TV Manualer
- TV Acer
- TV Denver
- TV Sencor
- TV TCL
- TV Sony
- TV Samsung
- TV Panasonic
- TV VOX
- TV Lenco
- TV OK
- TV LG
- TV AEG
- TV Electrolux
- TV Pioneer
- TV Mitsubishi
- TV Sharp
- TV Daewoo
- TV Arçelik
- TV AOC
- TV Sanyo
- TV Grundig
- TV Nikkei
- TV Toshiba
- TV Pyle
- TV Furrion
- TV InFocus
- TV Lenovo
- TV Infiniton
- TV Matsui
- TV Logik
- TV Optoma
- TV Westinghouse
- TV Muse
- TV Element
- TV Thomson
- TV Hyundai
- TV Aiwa
- TV Nokia
- TV Casio
- TV AKAI
- TV Hisense
- TV Strong
- TV Brandt
- TV Hannspree
- TV Trevi
- TV Blaupunkt
- TV JVC
- TV BEKO
- TV Sandstrøm
- TV Uniden
- TV Clatronic
- TV Hitachi
- TV Medion
- TV Citizen
- TV Megasat
- TV Haier
- TV TechniSat
- TV United
- TV Bang And Olufsen
- TV Vivax
- TV Loewe
- TV Sunny
- TV Arena
- TV Finlux
- TV Prosonic
- TV Telefunken
- TV Kernau
- TV BenQ
- TV Jensen
- TV Xiaomi
- TV Zenith
- TV Peerless-AV
- TV Krüger&Matz
- TV Viewsonic
- TV Dell
- TV Schneider
- TV Tesla
- TV Polaroid
- TV NEC
- TV Soundmaster
- TV Yasin
- TV Energy Sistem
- TV Bush
- TV Dual
- TV Aspes
- TV Salora
- TV Sagem
- TV Nevir
- TV Techwood
- TV Vivo
- TV Marantz
- TV Oceanic
- TV SVAN
- TV Sogo
- TV Alba
- TV RCA
- TV Currys Essentials
- TV ECG
- TV Harper
- TV Onn
- TV Orion
- TV ITT
- TV Cecotec
- TV TV Star
- TV VIZIO
- TV XD Enjoy
- TV Technika
- TV Seiki
- TV TechLine
- TV Bauhn
- TV V7
- TV Voxicon
- TV Vestel
- TV Continental Edison
- TV RevolutionHD
- TV CHiQ
- TV GoGen
- TV Kogan
- TV Graetz
- TV Insignia
- TV Manta
- TV SunBriteTV
- TV JTC
- TV Orava
- TV Reflexion
- TV QBell Technology
- TV SYLVOX
- TV Dyon
- TV Schaub Lorenz
- TV Daitsu
- TV Ferguson
- TV Aconatic
- TV Alphatronics
- TV AYA
- TV Mitchell & Brown
- TV Funai
- TV Saba
- TV Proscan
- TV Nabo
- TV Coby
- TV Listo
- TV Cello
- TV Irradio
- TV Mystery
- TV Magnavox
- TV Mach Power
- TV Engel
- TV Coocaa
Nyeste TV Manualer

6 April 2025

3 April 2025
3 April 2025

3 April 2025

27 Marts 2025

18 Marts 2025
18 Marts 2025
16 Marts 2025

12 Marts 2025
12 Marts 2025