Philips 75PUT7966 Manual
Philips
televisión
75PUT7966
Læs nedenfor 📖 manual på dansk for Philips 75PUT7966 (55 sider) i kategorien televisión. Denne guide var nyttig for 6 personer og blev bedømt med 4.5 stjerner i gennemsnit af 2 brugere
Side 1/55

Register your product and get support at
www.philips.com/TVsupport
User Manual
50PUT7966
55PUT7966
65PUT7966
70PUT7966
75PUT7966
7906 Series

Contents
1 Home Screen 4
1.1 Home Screen and Channels 4
1.2 Open the Home Screen 4
1.3 Home Screen Update 4
2 Setting Up 6
2.1 Read Safety 6
2.2 TV Stand and Wall Mounting 6
2.3 Tips on Placement 6
2.4 Power Cable 6
2.5 Antenna Cable 7
3 Remote Control 8
3.1 Key Overview 8
3.2 Pair Your Remote Control to TV 9
3.3 Voice Search 9
3.4 IR Sensor 9
3.5 Batteries 10
3.6 Cleaning 10
4 Switching On and O 11
5 Channel Installation 12
5.1 First Time to Install Channels 12
5.2 Install Digital or Analogue Channels 12
5.3 Antenna 12
5.4 Channel Installation Options 12
6 Channels 14
6.1 About Channels and Switch Channels 14
6.2 Channel Lists 14
6.3 Watching channels 15
6.4 Favorite Channels 15
6.5 Interactive TV 16
7 Connect Devices 17
7.1 About Connections 17
7.2 Home Theatre System - HTS 18
7.3 Video Device 18
7.4 Audio Device 18
7.5 USB Hard Drive 19
7.6 USB Flash Drive 20
7.7 Computer 20
8 Bluetooth 21
8.1 What You Need 21
8.2 Pairing a Device 21
8.3 Select a Device 21
8.4 Rename a Device 21
8.5 Remove a Device 21
9 Connect your Android TV 23
9.1 Network and Internet 23
9.2 Google Account 24
10 Apps 25
10.1 About Apps 25
10.2 Google Play 25
10.3 Start or Stop an App 26
10.4 Manage Apps 26
11 Sources 27
11.1 Switch to a device 27
12 Settings 28
12.1 Picture Settings 28
12.2 Sound Settings 29
12.3 Power Settings 30
12.4 Advanced Options 30
12.5 Other settings 31
12.6 Reboot 32
12.7 Factory Reset 32
12.8 Clock and Language Settings 32
12.9 Accessibility Settings 33
13 Ambilight 35
13.1 Ambilight Style 35
13.2 Custom colour 35
13.3 Brightness and Saturation 35
13.4 Wall Colour Behind the TV 35
13.5 TV Switch O 35
14 Videos, Photos, Music & Text 36
14.1 From a USB Connection 36
14.2 Play your Videos 36
14.3 View your Photos 36
14.4 Play your Music 37
14.5 View your Text 37
15 TV Guide 38
15.1 TV Guide Data 38
15.2 Using the TV Guide 38
16 Recording and Time Shift 39
16.1 Record Options 39
16.2 Recording 39
16.3 Time Shift 40
17 Smartphones and Tablets 41
17.1 Google Cast 41
18 Netix 42
19 Software 43
19.1 Update Software 43
19.2 Software Version 43
19.3 Open Source Licenses 43
20 Specications 44
20.1 Environmental 44
20.2 Power 44
20.3 Operating System 44
20.4 Reception 44
20.5 Display Type 44
20.6 Display Input Resolution 44
20.7 Connectivity 45
20.8 Sound 45
2

20.9 Multimedia 45
21 Help and Support 46
21.1 Register your TV 46
21.2 Troubleshooting 46
21.3 Online Help 48
21.4 Support and Repair 48
22 Safety and Care 49
22.1 Safety 49
22.2 Screen Care 50
23 Terms of Use 51
24 Copyrights 52
24.1 HDMI 52
24.2 Dolby Vision and Dolby Atmos 52
24.3 DTS-HD 52
24.4 Wi-Fi Alliance 52
24.5 Kensington 52
24.6 Other Trademarks 52
25 Disclaimer regarding services
and/or software oered by third
parties
53
Index 54
3

1
Home Screen
1.1
Home Screen and Channels
The Home launcher
To enjoy the benets of your Android TV, connect the
TV to the Internet. Press on your remoteHome
control to get your new Android Home screen. Like on
your Android smartphone or tablet, the Home screen
is the centre of your TV. From here you can decide
what to watch by browsing entertainment options
from app and live TV. Your Home has channels to let
you discover great contents from your favourite apps.
You can also add additional channels or nd new
apps to get more contents.
The Home screen is organized in channels. Apps may
populate their recommendation (if available)
according to their own choice as an individual
channels in the home screen.
Apps
Your favourite Apps are placed on the rst row. This
row contains number of apps pre-installed. The order
of these apps are according to business agreements
with content service providers. You can also add more
apps as favourite from the Apps page, such as the
Live TV and MMP (MultiMediaPlayer). The Apps page
can be opened by clicking the Apps icon at the left
end of the row.Apps
Live TV
The Live TV row shows the currently running
programmes from the installed channels. It contains
up to 10 channels as the recommendation for you to
select the TV channels. The rst channel on Live TV
row is the channel you are watching, and the
following channels will be the channels on your
favourite list*.
* Note: If there are still more spaces available on Live
TV row, it will include the channels from your DTV
(digital TV) source.
Play Next channel
You can always know what to watch next from Play
Next channel on the Home screen. Start watching
from where you left o and get notications about
new episodes in the channel. Press andPlay Next
hold Select on a movie or TV show to add it directly
to the channel.Play Next
Google Play Movies & TV channel
Rent movies or TV shows on this channel from
Google Play Movies & TV.
YouTube channel
This channel contains your Recommended,
Subscriptions or Trending YouTube videos.
Customize channels
Click the button to add andCustomize channels
remove channels from your Home screen.
See also www.support.google.com/androidtv
Accessing settings from Home
You can access menu via the icon at the topSettings
right corner.
Accessing USB ash drive from Home
To view the les from the USB ash drive, you need
to add the MMP (MultiMediaPlayer) app to the Home
page rst. Press , clicking the Apps icon at theHome
left end of the Apps row. You can add appsMMP
from the Apps page.
System bar on Home screen
The System bar on the top of Home screen contains
following features.
- Search button: to trigger Google search with voice*
or text input. The search result and its order are
rendered according to business agreements with
content service providers.
- Notications: to provide you the messages about
your Smart TV system.
- Input source: to launch the input source list and
switch to any of the connected devices.
- Settings: to access all setting menu and adjust the
TV settings.
- Clock: to indicate the system clock.
* Note: In order to take advantage of Google Assistant
in case of a remote control without microphone,
please use the Android TV Remote Control app
available in Google Play Store for Android and Apple
App store for iOS devices.
1.2
Open the Home Screen
To open the Home screen and open an item…
1 - Press .Home
2 - Select an item and press to open or start it.OK
3 - Press continuously or press canBack Home
go back to Home screen.
When opening the Home screen, the background
application/content playback will stop. You have to
select the application or content from the Home
screen to resume.
4

1.3
Home Screen Update
You may receive the update notication from Google
and have new version of Home launcher installed.
With the new Home launcher, you will have a new
look and features on TV’s Home screen.
New highlights on your home screen
With multiple tabs like , , and Home Discover Apps
Search, you can discover movies and shows from
your services and popular apps. Sign in to your
Google Account to get personalised
recommendations from your streaming services
based on what you have watched and what interests
you.
New look, new navigation
Decide what to watch next with easy-to-use
navigation. Browse your personalised
recommendations, pick up where you left o, or
quickly nd a certain app using the new tab system.
Discover personalised recommendations
Browse shows and movies that you will love on all
your favourite media services. Sign in to your Google
Account to get started.
Get recommendations across Google
Your services are saved to your Google Account so
you can get better recommendations across Google.
5

2
Setting Up
2.1
Read Safety
Read the safety instructions rst before you use the
TV.
To read the safety instructions, go to Safety and Care
section on this Help manual for the information.
2.2
TV Stand and Wall Mounting
TV Stand
You can nd the instructions for mounting the TV
stand in the Quick Start Guide that came with the TV.
In case you lost this guide, you can download it
from .www.philips.com/TVsupport
Use the model number of the TV to look for
the to download.Quick Start Guide
Wall Mounting
Your TV is also prepared for a VESA-compliant wall
mount bracket (sold separately).
Use the following VESA code when purchasing the
wall mount . . .
• 50PUT79x6
VESA MIS-F 200x300, M6 (Min.: 10mm, Max.: 16mm)
• 55PUT79x6
VESA MIS-F 200x300, M6 (Min.: 10mm, Max.: 16mm)
• 65PUT79x6
VESA MIS-F 300x300, M6 (Min.: 12mm, Max.:
20mm)
• 70PUT79x6
VESA MIS-F 300x300, M8 (Min.: 12mm, Max.: 25mm)
• 75PUT79x6
VESA MIS-F 300x300, M8 (Min.: 12mm, Max.: 25mm)
Caution
Wall mounting the TV requires special skills and
should only be performed by qualied personnel. The
TV wall mounting should meet safety standards
according to the TVs weight. Also read the safety
precautions before positioning the TV.
TP Vision Europe B.V. bears no responsibility for
improper mounting or any mounting that results in
accident or injury.
2.3
Tips on Placement
• Position the TV where light does not shine directly
on the screen.
• Dim lighting conditions in the room for best
Ambilight eect.
• The ideal distance to watch TV is 2 to 5 times its
diagonal screen size. When seated, your eyes should
be level with the centre of the screen.
• When wall mounted, position the TV up to 15 cm
away from the wall.
Note:
Please keep the TV away from dust-producing
sources such as stoves. It is suggested to clean the
dust regularly to avoid getting dust into the TV.
2.4
Power Cable
• Insert the power cable into the connectorPOWER
on the back of the TV.
• Make sure the power cable is securely inserted in
the connector.
• Make sure that the power plug, in the wall socket, is
accessible at all times.
• When you unplug the power cable, always pull the
plug, never pull the cable
6
Although this TV has a very low standby power
consumption, unplug the power cable to save energy
if you do not use the TV for a long period of time.
2.5
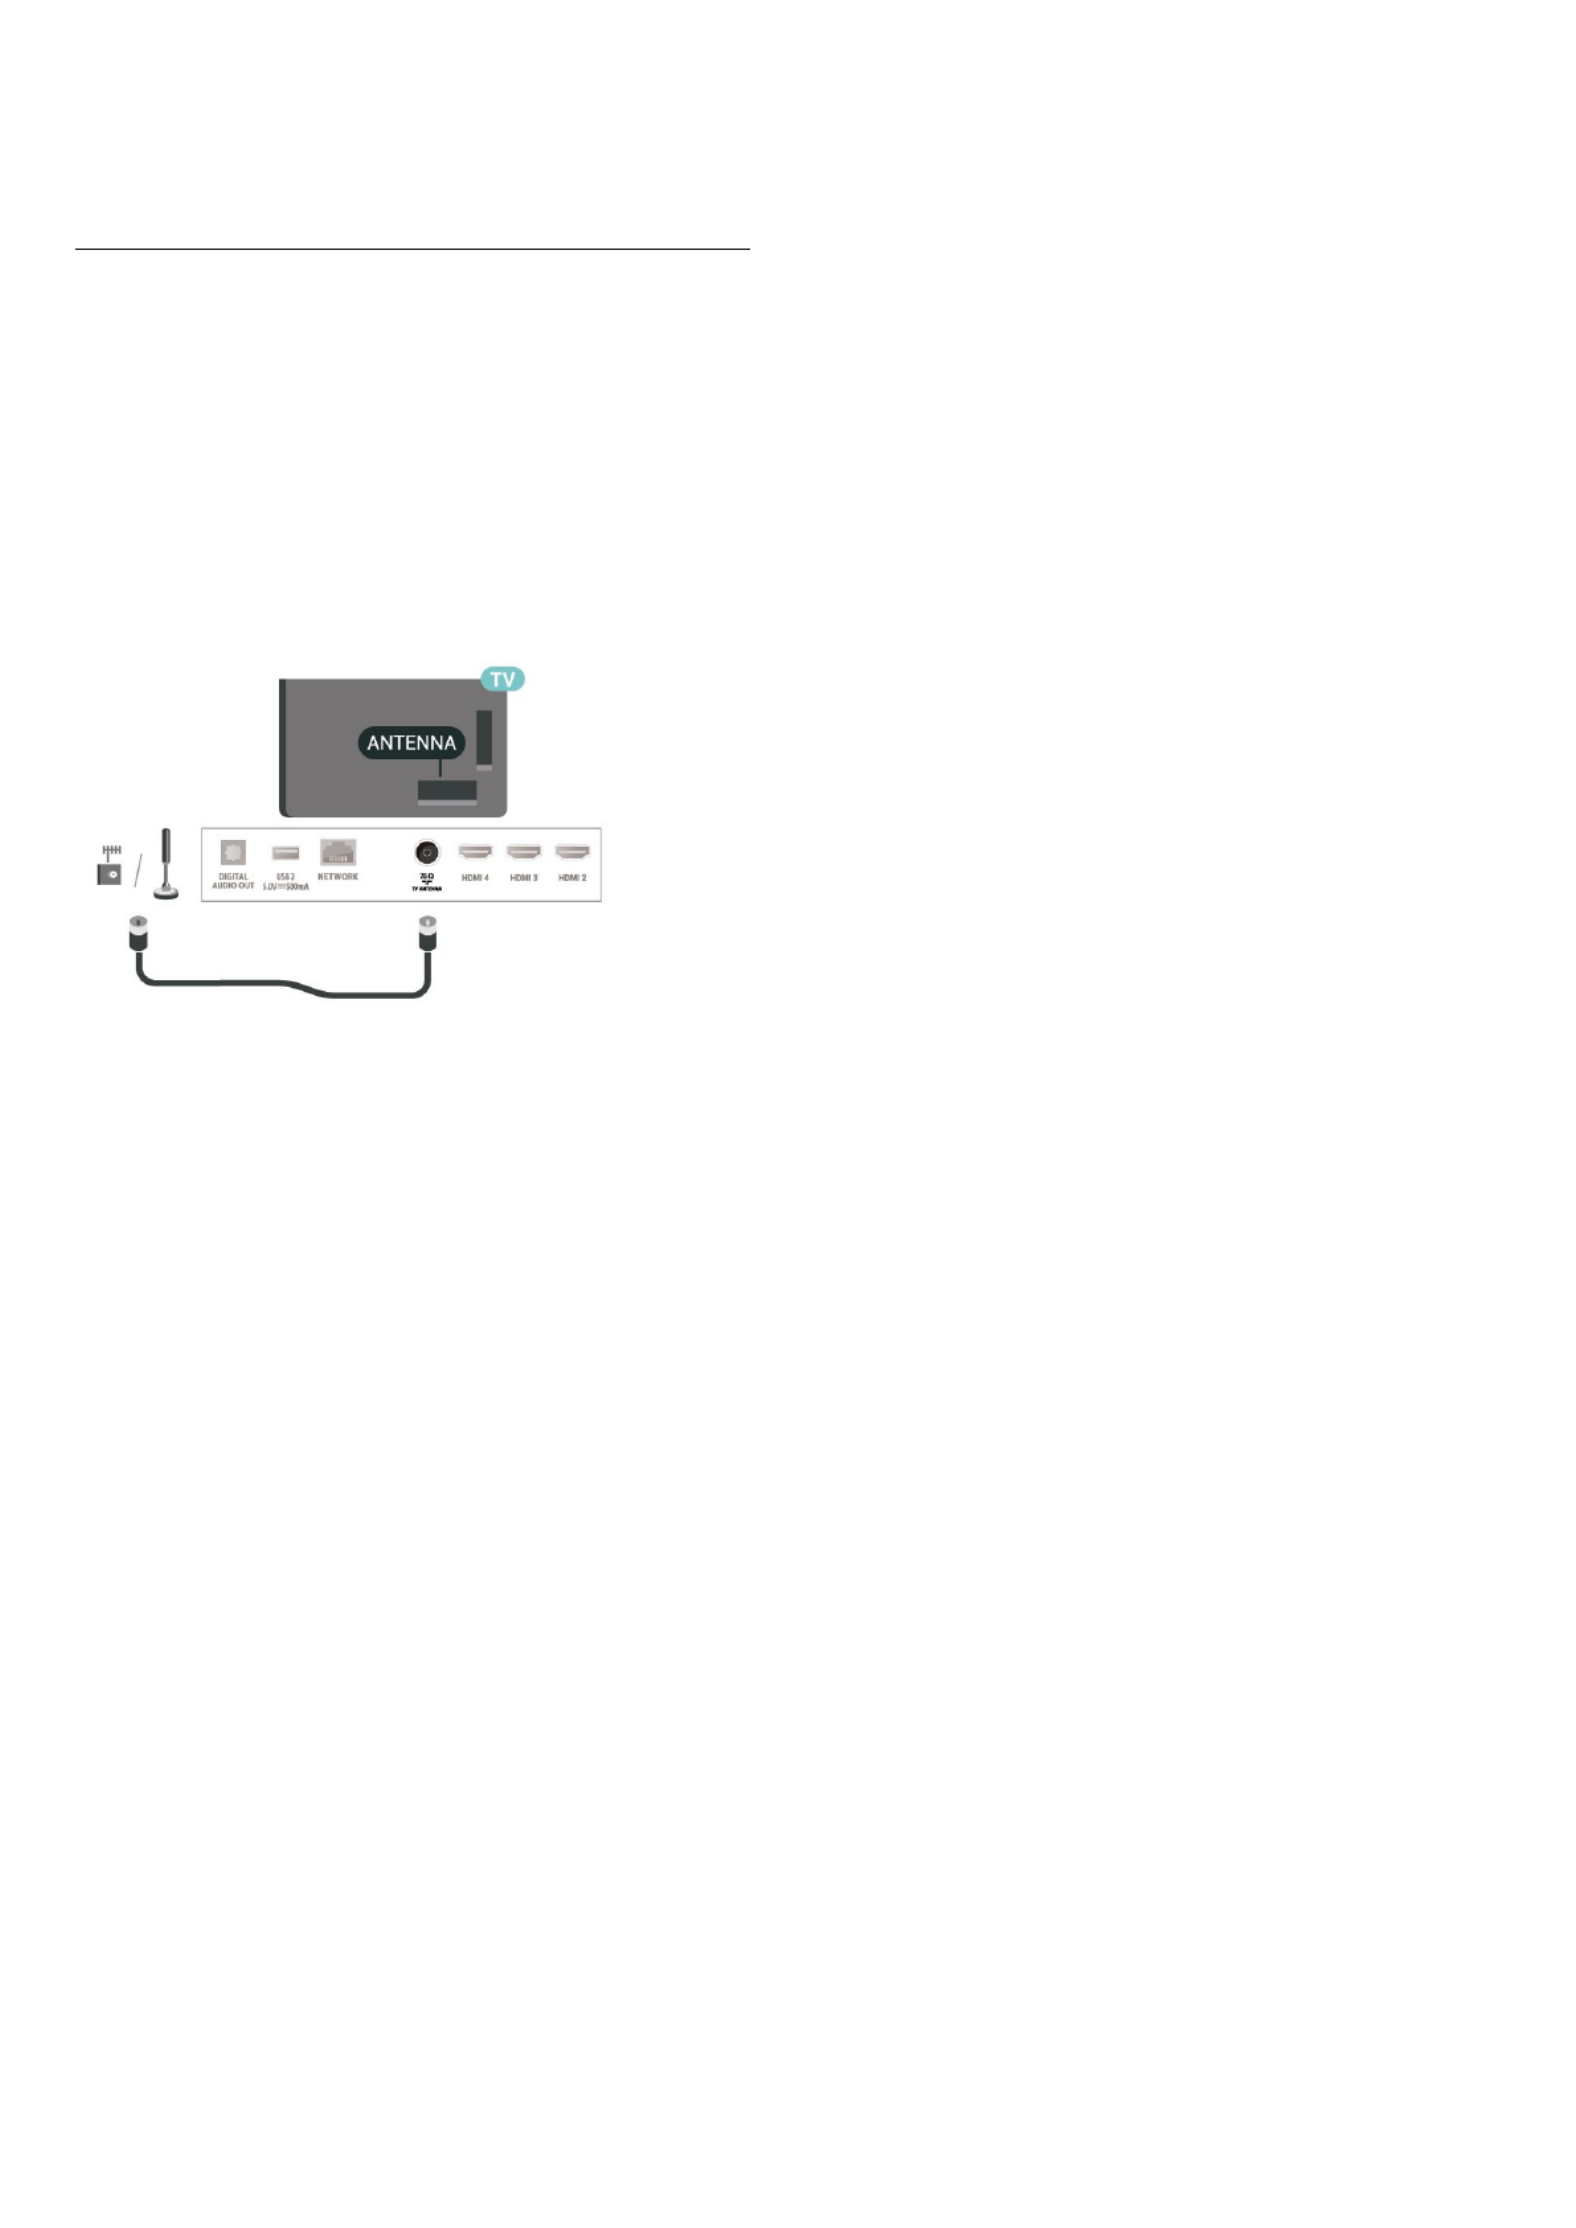
Antenna Cable
Insert the antenna plug rmly into
the socket at the back of the TV.Antenna
You can connect your own antenna or an antenna
signal from an antenna distribution system. Use an
IEC Coax 75 Ohm RF antenna connector.
Use this antenna connection for antenna digital or
analogue input signals.
7

3
Remote Control
3.1
Key Overview
Top
1 Power - (Standby / On)
To switch the TV on or back to Standby.
2 VOICE - microphone
3 Ambilight -
To select one of the Ambilight style.
4 Amazon Prime Video -
To launch the Amazon Prime Video App.
5 NETFLIX -
To launch the Netix App with the TV switched on or
from standby.
• If you have a Netix membership subscription, you
can enjoy Netix on this TV. Your TV must be
connected to the Internet.
• To open Netix, press the key to open theNETFLIX
Netix App. You can open Netix immediately from a
TV in standby.
6 MENU -
To open the TV Menu with typical TV functions.
7 Google Play -
To launch the Google Play App.
8 YouTube -
To launch the YouTube App.
9 SOURCES - / PAIR
• To open or close the Sources menu.
• To pair the remote control to the TV.
10 Google Assistant™ -
To launch the Google Assistant™.
Middle
1 OK key -
To conrm a selection or setting. To open the channel
list while watching TV.
2 Back -
• To return to previous menu or TV source.
• To go back to the previous App.
3 Playback and Record -
• , to playback.Play
• , to pause playbackPause
• , to stop playbackStop
• , to rewindRewind
• , to go fast forwardFast forward
• , to start recordingRecord
4 Colour keys -
Follow the on-screen instructions to select more
options or operations.
Press on Home screen to open the .Blue key Help
5 Navigation keys -
To navigate up, down, left or right.
6 Home -
To open the Home menu.
7 TV GUIDE -
To open or close the TV Guide.
Bottom
8

1 EXIT -
To leave from current menu or App.
2 Volume -
Press or to adjust the volume level.+ -
3 Number keys -
To select a channel directly.
4 AD / INFO -
AD - To access the Audio Description and toggle to
switch on and o.
INFO - Long press to open the programme
information screen.
5 Channel -
Press or to switch to the next or previous+ -
channel in the channel list. To open the next or
previous page in Text/Teletext.
6 Mute -
Press to mute the sound or to restore it.
7 SUBTITLE -
To open Subtitle page.
3.2
Pair Your Remote Control to
TV
This remote control uses both Bluetooth and IR
(infrared) to send its commands to the TV.
• You can use this remote control via IR (infrared) for
most operations.
• To use advanced operation like voice search and
remote control keyboard, you need to pair (link) the
TV with the remote control.
When you start the initial TV installation, the TV
invites you to long press the key until you seePAIR
the light pulsing on the remote. By doing so, the
pairing will be done.
Note:
1 - Once the remote control has entered pairing
mode successfully, the blue LED indicator ring around
the microphone on the front side of the remote
control starts blinking.
2 - The remote control must be kept close to the TV
(within 1m distance) during pairing in order to ensure
success.
3 - If the TV does not launch the voice control
eld when press , pairing wasGoogle Assistant™
unsuccessful.
4 - It is advisable to wait until the set has fully started
up and launched all background processes before
pairing mode is entered as the toast message
containing further instructions may appear too late,
thereby negatively impacting the pairing procedure.
Pairing again
If the pairing with the remote control was lost, you
can pair the TV with the remote control again. Press
the key until you see the light pulsing on thePAIR
remote for pairing.
Unpair
Press and hold and key on the remote0 Mute
control until you see the light pulsing on the remote.
3.3
Voice Search
You can search for videos, music or anything else on
the Internet by simply using your voice. You can
speak into the microphone on the remote control.
You need to pair the remote control to the TV before
use voice search.
To use Voice...
1 - Press on remote control, theGoogle Assistant™
blue light on the remote control lights up and the
search eld opens, the microphone is active.
2 - Speak out what you are looking for with clear
pronunciation. You can speak for 10 seconds before
the microphone switches o. It might take some time
for the results to appear.
3 - In the list of search results, you can select the
item you want.
3.4
IR Sensor
The TV can receive commands from a remote control
that uses IR (infrared) to send commands. If you use
such a remote control, always make sure you point
the remote control at the infrared sensor on the front
of the TV.
9

Warning
Do not put any objects in front of IR sensor of the TV,
it may block the IR signal.
3.5
Batteries
If the TV does not react on a key press on the remote
control, the batteries might be empty.
To replace the batteries, open the battery
compartment on the back-bottom of the remote
control.
1 - Slide the battery door in the direction shown by
the arrow.
2 - Replace the old batteries with 2 type AAA-1.5V
batteries. Make sure the + and the - ends of the
batteries line up correctly.
3 - Reposition the battery door and slide it back until
it clicks.
Remove the batteries if you are not using the remote
control for a long time.
Safely dispose of your old batteries according to the
end of use directions.
For more information, in , select andHelp Keywords
look up .End of use
3.6
Cleaning
Your remote control is treated with a scratch-resistant
coating.
To clean the remote control, use a soft damp cloth.
Never use substances such as alcohol, chemicals or
household cleaners on the remote control.
10
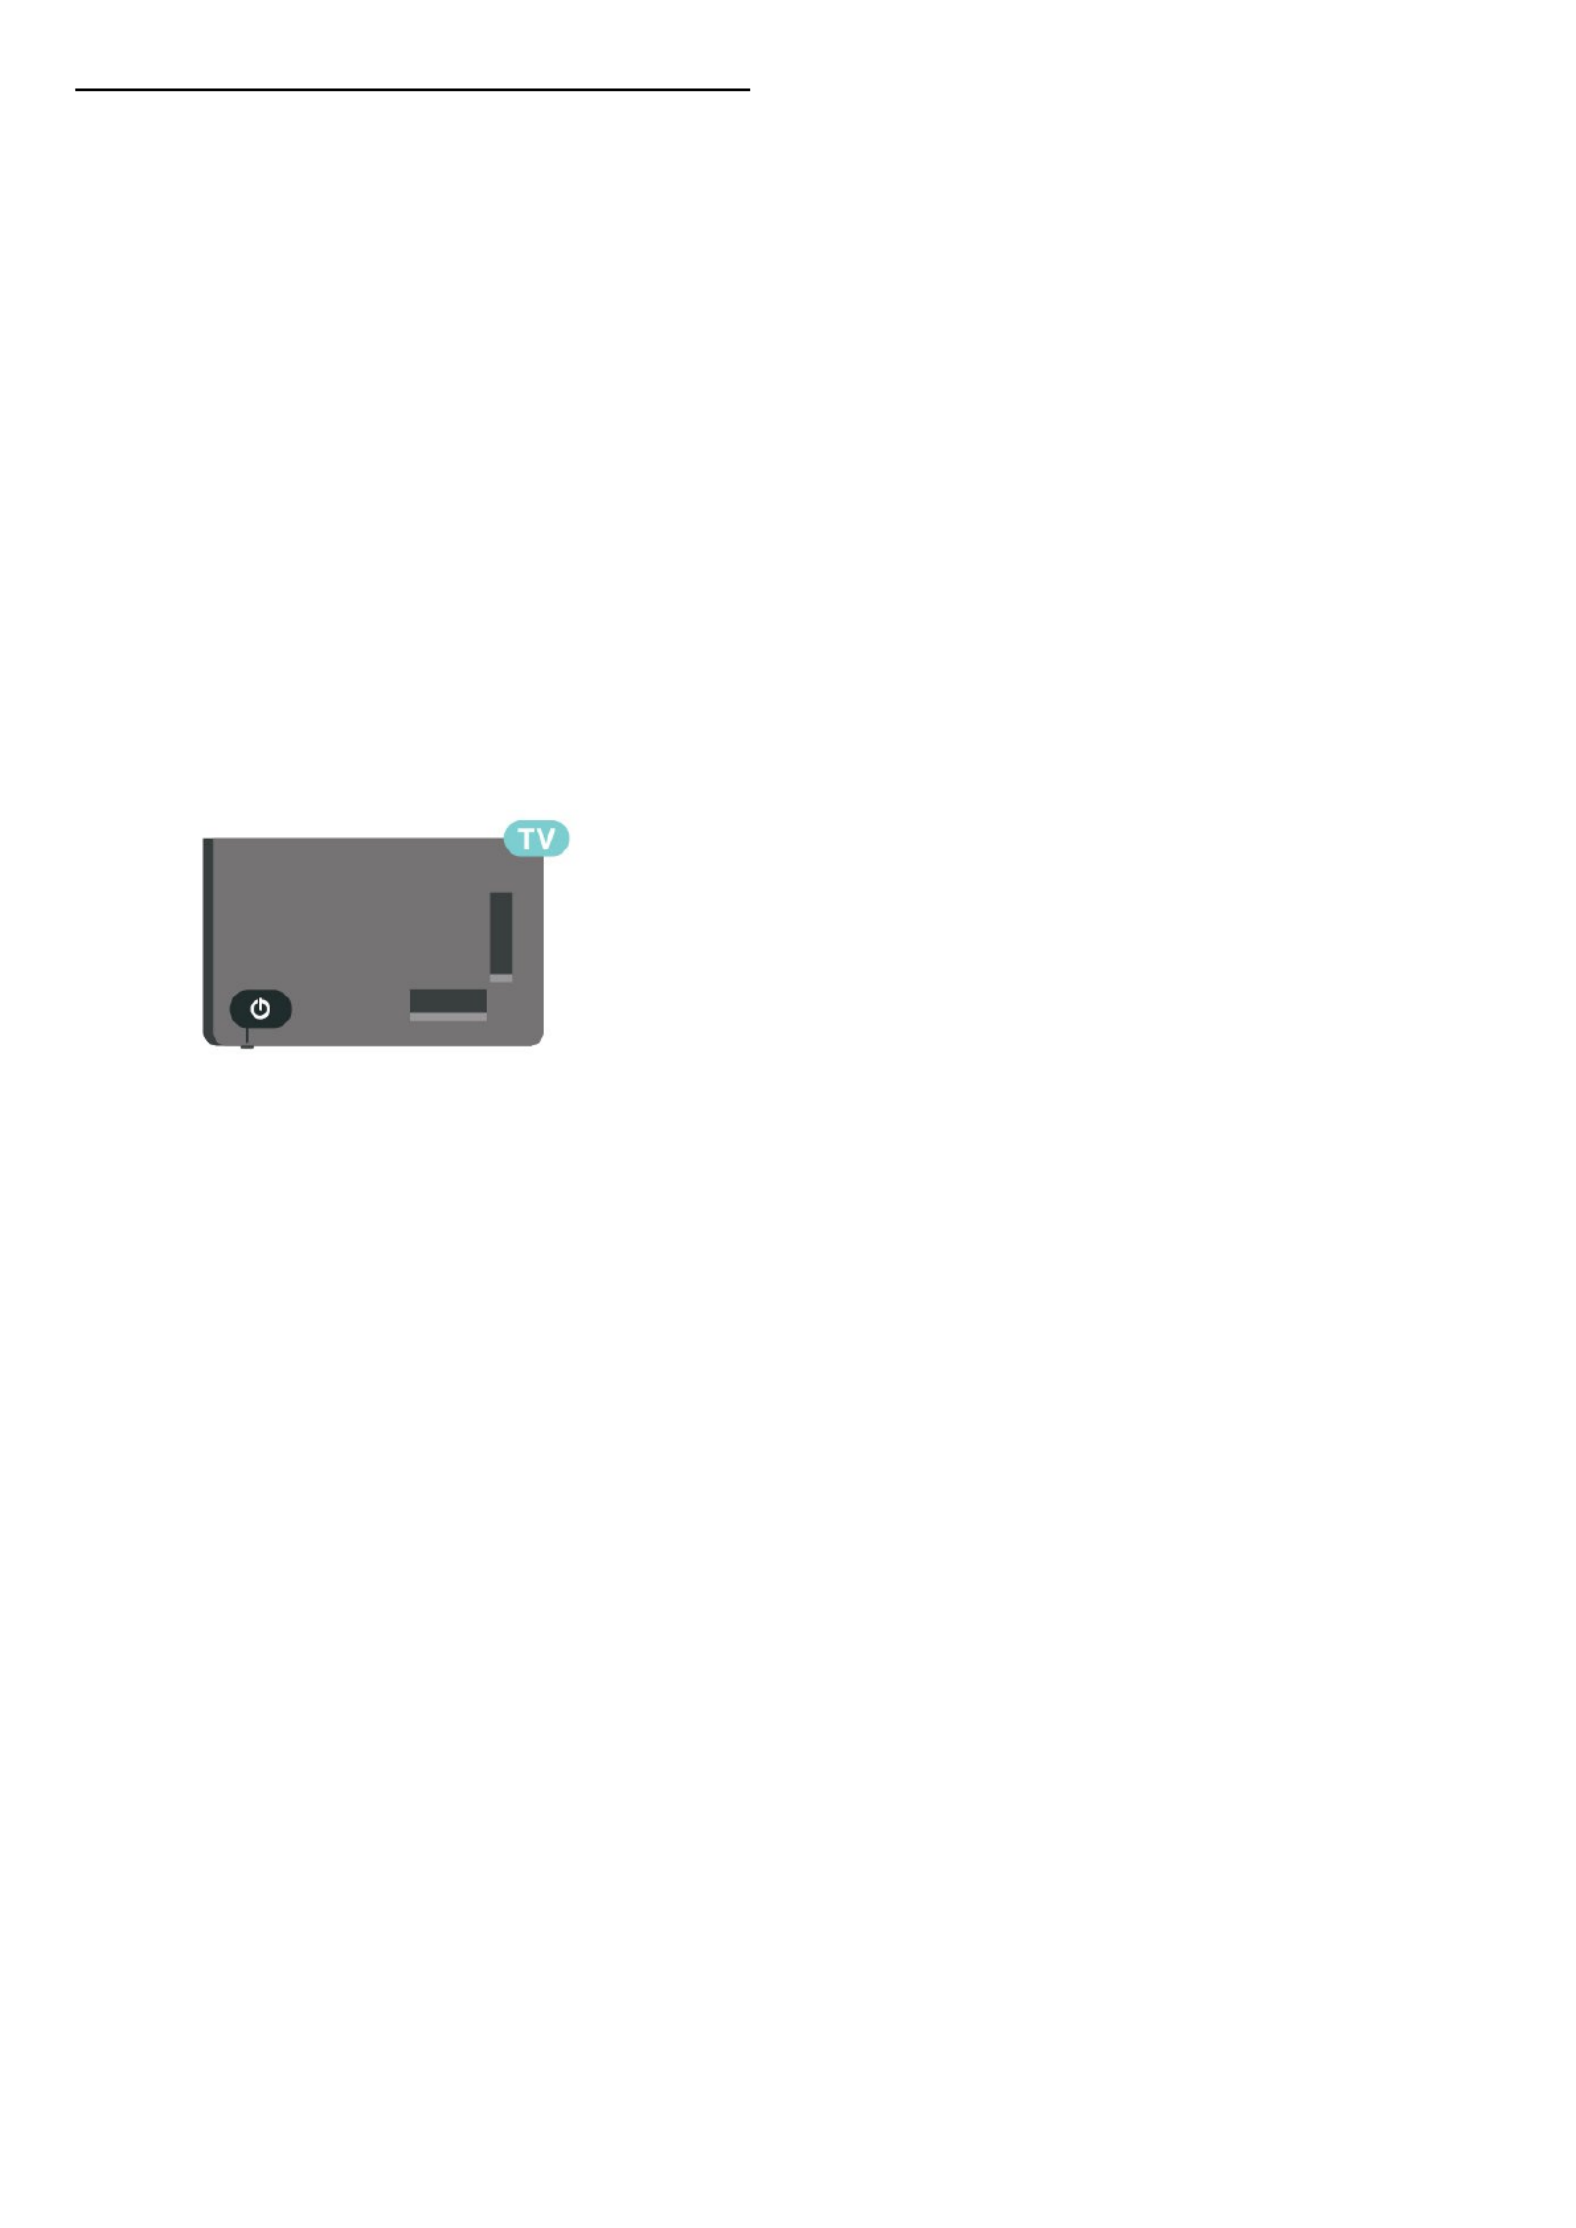
4
Switching On and
O
Make sure the TV is connected to the mains AC
power. The indicator light at the bottom of the TV
lights up.
Switch on
Press on the remote control to switch the TVPower
on. You can also press the small joystick key on the
bottom of the TV to switch the TV on in case you can't
nd the remote control or its batteries are empty.
Switch to standby
To switch the TV to standby, press on thePower
remote control. You can also press the small joystick
key on the bottom of the TV.
In standby mode, the TV is still connected to the
mains power but consumes very little energy.
To switch o the TV completely, disconnect the
power plug.
When disconnecting the power plug, always pull the
power plug, never the cord. Ensure that you have full
access to the power plug, power cord and outlet
socket at all times.
11

5
Channel Installation
5.1
First Time to Install Channels
Install channels during the rst TV installation
On the rst TV installation, you can follow on-screen
instructions to set the menu language, network
connection, sign in Google account, select your
country and complete other basic settings for the TV.
Moreover, you can also install channels during the
rst TV installation.
To install channels during the rst TV installation…
1 - The rst TV installation starts from Welcome
screen with language setting options, follow on-
screen instruction to complete multiple TV settings
until the channel installation part.
2 - Select or Digital and Analog Channels Only
Digital Channels Skip to install channels. Select to
skip the channel installation.
3 - Follow on-screen instructions to complete one of
the channel installation types as your selection. You
can install other types of channel installation later
on > > > . MENU TV options Settings Channel
For more details about channel installation, please
refer to respective installation instruction sections.
5.2
Install Digital or Analogue
Channels
When scan and install channels, only current TV
source channels will be scanned. If you current TV
source is , the channel scan applied to digitalDTV
channels. If you current TV source is , the channelATV
scan applied to analogue channels.
To set or change TV source, press andSOURCES
select or .DTV ATV
5.3
Antenna
Antenna Installation
Please note that before installing channels, you
should rst change the toChannel Installation Mode
the one you want to install. For the Antenna channel
installation, you need to change Channel Installation
Mode Antenna to rst and then start the installation.
To install Antenna channels…
1 - Press > > > Home Settings Channel Channel
Installation Mode OK and press .
2 - Select and then go back to .Antenna Channel
3 - Select > andChannels Channel Scan
press . OK
Alternatively, while watching a TV channel, you can
perform the channel scan by...
MENU Navigation Keys > up
> > Channels Channel
5.4
Channel Installation Options
Channel Skip
You can skip the channels you do not want to watch.
To set the skipped channels ...
1 - While watching TV, press > MENU TV
options Settings Channel Channels > > > and
press .OK
2 - Select * and press .Channel Skip OK
3 - Select the channels you want to skip and
press . The check mark is shown.OK
4 - Press , repeatedly if necessary, to close theBack
menu.
* Note: You cannot skip the current watching channel.
Channel Edit
You can edit the channels from the channel list.
To edit the channels ...
1 - While watching TV, press > MENU TV
options Settings Channel Channels > > > and
press .OK
2 - Select and press .Channel Edit OK
3 - Use the to select the channelNavigation keys
and press for .Yellow key Select
4 - Edit the channel number* and channel name.
5 - Press , repeatedly if necessary, to close theBack
menu.
* Note: Depending on your installation country or
operator setting, channel number editing is not
always available.
12

Analogue Channel Fine Tune
Analogue TV channels can be manually ne tuned.
To ne tune a channel...
1 - While watching TV, press > MENU TV
options Settings Channel Channels > > > and
press .OK
2 - Select andAnalogue Channel Fine-tune
press .OK
3 - You can ne tune the channel.
4 - Press , repeatedly if necessary, to close theBack
menu.
13

6
Channels
6.1
About Channels and Switch
Channels
To watch TV channels
• Press and select to watch digitalSOURCES DTV
channels or to watch analogue channels.ATV
• Alternatively, you can Press > andHome Live TV
press to watch current TV source channels. IfOK
Live TV is not on your Apps row, you can press icon+
on the end of the row to add the app.
To switch TV channels
• Press or to switch channels. Channel + Channel -
• If you know the channel number, type in the number
with the number keys. Press after you enteredOK
the number to switch channels.
To switch to a channel from a channel list
• While watching a TV channel, press to open theOK
channel lists. The channel list only includes the
channels from current broadcast source like Antenna
or . Cable
• To view dierent channel list from other broadcast
source, press > up > MENU Navigation Keys Channels
> > and selectChannel Channel Installation Mode
other broadcast source you want to watch channels
and view the channel list.
• The channel list can have several pages with
channels. To view the next or previous page, follow
the on-screen instruction.
• To close the channel lists without switching
channels, press . Back
Radio channels
If digital broadcasting is available, digital radio
stations are installed during installation. Switch to a
radio channel just like you switch to a TV channel.
TV may not work properly with some operators of
digital television , non-compliance with requirements
of the standard in full.
6.2
Channel Lists
About Channel Lists
After a channel installation, channels appear on the
channel list. The channels displayed in All Channel list
is listed based on TV source. Channels are shown with
their name if this information is available.
With a channel list selected, press Navigation keys
up or down to select a channel, then press toOK
watch the selected channel.
TV may not work properly with some operators of
digital television , non-compliance with requirements
of the standard in full.
Open a Channel List
Next to the list with all channels, you can select a
ltered list or you can select one of the favourite lists
you created.
To open the current channel list…
1 - While watching TV, press to open the currentOK
channel list.
2 - The channel list only includes the channels from
current broadcast source.
3 - Press to close the channel list. Back
To change the type of channel list…
1 - While watching TV, press to open the currentOK
channel list.
2 - Press for and then select Yellow key Select More
Select Type Broadcast Favourites (for example, or ) to
immediately change the channel list to your preferred
list.
3 - Press to close the channel list.Back
Search for a Channel
You can search for a channel to nd it in a long list of
channels.
To search for a channel…
1 - Press to open the current channel list.OK
2 - Press for .Yellow key Select More
3 - Select > and press to openOperation Find OK
a text eld. You can use the remote control keyboard
(if available) or the on-screen keyboard to enter text.
4 - Enter a number, a name or part of a name and
press . The TV will search for matching channelOK
names in the list you selected.
Search results are listed with current channel list type
you have selected (for example, or Broadcast
Favourites). The search will return the matching
channel name with the result arranged in alphabetical
order. The search results disappear once you select
another channel list or close the list with search
14

results.
Channel List Sorting
You can do channel list sorting with all channels. You
can set the channel list to show only TV channels or
only Radio stations. For Antenna channels you can
set the list to show the Free or the Scrambled
channels.
To set a lter on a list with all channels…
1 - Press to open the current channel list.OK
2 - Press for .Yellow key Select More
3 - Select > and press .Operation Sort OK
4 - Select the lter you want and press toOK
activate. The name of the lter appears as part of the
channel list name on top of the channel list.
5 - Press to close the channel list.Back
6.3
Watching channels
Tune to a Channel
To start watching TV channels, press . TheSOURCES
TV tunes to the channel you last watched.
Alternatively, you can select from the HomeLive TV
screen.
Switch Channels
To switch channels, press or . Channel + Channel -
If you know the channel number, type in the number
with the number keys. Press after you enteredOK
the number to switch immediately.
You can also tune to channels from a Channel List
by pressing .OK
Parental Controls
Lock and Unlock a Channel
To prevent children from watching a channel, you can
lock a channel. To watch a locked channel, you must
enter the 4 digit PIN code rst. You cannot lock
programmes from connected devices.
To lock or unlock a channel…
1 - Press > > > MENU Settings Channel Parental
Controls OK and press .
2 - Enter your PIN code if necessary.
3 - Select and press .Channels Blocked OK
4 - Press up or down to select theNavigation keys
channel you want to lock or unlock, and press OK.
5 - A locked channel is marked with a lock icon.
6 - Press , repeatedly if necessary, to close theBack
menu.
Programme Restrictions
To prevent children from watching a programme that
may not suitable for them, you can set a rating.
Digital channels can have their programmes rated.
When the rating of a programme is equal to or higher
than the rating you have set, the programme will be
locked. To watch a locked programme, you must
enter the PIN code rst.
To set a rating…
1 - Press > > > MENU Settings Channel Parental
Controls OK and press .
2 - Enter your PIN code if necessary.
3 - Select and press .Programme Restrictions OK
4 - Select to set the rating.On
5 - Select and press Ratings OK.
6 - Set the restrictions for your children.
7 - Press , repeatedly if necessary, to close theBack
menu.
To switch o the parental rating, select .None
However, in some countries you must set a rating.
For some broadcasters/operators, the TV only locks
programmes with a higher rating. The parental rating
is set for all channels.
Inputs Blocked
To prevent from using connected devices, you can
lock an input source. To connect a locked input
source, you must enter the 4 digit PIN code rst.
To lock or unlock an input source…
1 - Press > > > MENU Settings Channel Parental
Controls OK and press .
2 - Enter your PIN code if necessary.
3 - Select and press .Input Blocked OK
4 - Press up or down to select theNavigation keys
source you want to lock or unlock, and press OK.
5 - A locked source is marked with a lock icon.
6 - Press , repeatedly if necessary, to close theBack
menu.
Change PIN
Set new or reset PIN code. The PIN code is used to
lock or unlock channels or programmes.
1 - Press > > > MENU Settings Channel Parental
Controls and press OK.
2 - Enter your PIN code if necessary.
3 - Select and press .Change PIN OK
4 - Enter the current PIN code and new PIN code.
5 - Press , repeatedly if necessary, to close theBack
menu.
15

6.4
Favorite Channels
About Favorite Channels
In a favorite channel list, you can collect the channels
you like.
You can create 4 dierent lists of favorite channels for
easy channel zapping.
With a Favorites List selected, press the Navigation
keys up or down to select a channel, then
press to watch the selected channel.OK
Edit a Favorites List
To add a channel to the favorite list…
1 - While watching TV, press to open the currentOK
channel list.
2 - Press up or down to select aNavigation keys
channel.
3 - Press to add the channel to a favoritesBlue key
list (default list is ). Press againFavortites1 Blue key
will remove the channel from the favurite list.
4 - Press to close the menu. Back
To create a favorite channels list…
1 - While watching TV, press to open the currentOK
channel list.
2 - Press for .Yellow key Select More
3 - Select > and then press Select Type Favorites
Navigation keys up or down to select a list of
Favorites1 Favorites4 to that you want to add.
4 - Press for and then select Yellow key Select More
Select Type to change the channel list to your
preferred list.
5 - Press to add the channel to theBlue key
favorites list you just selected. Press againBlue key
will remove the channel from the favorite list.
6 - Press to close the menu. Back
To move or remove a channel from the favorites
list…
1 - Select a list of to you wantFavorites1 Favorites4
to edit.
2 - Press for .Yellow key Select More
3 - Select > to move the channelOperation Move
positions on the favorite channel list.
4 - Select > to remove theOperation Delete
channels from the favorite channel list.
5 - Press , repeatedly if necessary, to close theBack
menu.
6.5
Interactive TV
About iTV
With interactive TV, some digital broadcasters
combine their normal TV programme with information
or entertainment pages. On some pages, you can
respond to a programme or vote, do online shopping
or pay for a video-on-demand programme.
Interactive TV is sometimes referred to as Digital Text
or Red button. But each system is distinct.
Visit the broadcaster's Internet website for more
information.
What You Need
Interactive TV is only available on digital TV channels.
To enjoy the full benets of Interactive TV, you need
a high-speed (broadband) Internet connection to the
TV.
HbbTV
If a TV channel oers HbbTV pages, you must rst
switch on HbbTV in the TV settings to view the pages.
To switch on the HBBTV support
MENU TV options Advanced options HbbTV > > >
settings
Use iTV
Open iTV pages
Most channels that oer HbbTV or iTV invite you to
press the colour key or key to open theirOK
interactive programme.
Navigate iTV pages
You can use the arrow and colour keys, the number
keys and the key to navigate the iTV pages.Back
You can use the , and keys toPlay Pause Stop
watch videos within iTV pages.
Close iTV pages
Most iTV pages inform you which key to use to close.
To force an iTV page to close, switch to the next TV
channel and press . Back
16

7
Connect Devices
7.1
About Connections
Connectivity Guide
Always connect a device to the TV with the highest
quality connection available. Also, use good quality
cables to ensure a good transfer of picture and
sound.
When you connect a device, the TV recognizes its
type and gives each device a correct type name. You
can change the type name if you wish. If a correct
type name for a device is set, the TV automatically
switches to the ideal TV settings when you switch to
this device in the Sources menu.
Antenna port
If you have a Set-top box (a digital receiver) or
Recorder, connect the antenna cables to run the
antenna signal through the Set-top box and/or
Recorder rst before it enters the TV. In this way, the
antenna and the Set-top box can send possible
additional channels to the Recorder to record.
HDMI ports
HDMI Quality
An HDMI connection has the best picture and sound
quality. One HDMI cable combines video and audio
signals. Use an HDMI cable for High Denition (HD)
TV signals.
For best signal quality transfer, use a High speed
HDMI cable and do not use an HDMI cable longer
than 5 m.
Copy protection
HDMI ports support HDCP 2.2 (High-bandwidth
Digital Content Protection). HDCP is a copy protection
signal that prevents copying content from a DVD disc
or Blu-ray Disc. Also referred to as DRM (Digital
Rights Management).
HDMI ARC
Only connection on the TV has HDMI 1 HDMI
ARC (Audio Return Channel).
If the device, typically a Home Theatre System (HTS),
also has the HDMI ARC connection, connect it to
HDMI 1 on this TV. With the HDMI ARC connection,
you do not need to connect the extra audio cable
that sends the sound of the TV picture to the HTS.
The HDMI ARC connection combines both signals.
HDMI CEC
Connect HDMI CEC-compatible devices to your TV,
you can operate them with the TV remote control.
HDMI CEC (Consumer Electronic Control) must be
switched on on the TV and the connected device.
Switch on CEC
Allow the TV to control HDMI device.
Home Settings Device Preferences Inputs > > > >
HDMI control.
Device auto power o
Turn o the HDMI devices with the TV.
Home Settings Device Preferences Inputs > > > >
Device auto power o.
TV auto power on
Power on the TV with HDMI devices.
17

Home Settings Device Preferences Inputs TV > > > >
auto power on.
HDMI EDID Version
Check the HDMI EDID version number.
Home Settings Device Preferences Inputs > > >
> .HDMI EDID Version
CEC Device List
Check the connected HDMI CEC device list.
Home Settings Device Preferences Inputs > > >
> .CEC device list
Note:
• HDMI CEC might not work with devices from other
brands.
• The HDMI CEC functionality has dierent names on
dierent brands. Some examples are: Anynet, Aquos
Link, Bravia Theatre Sync, Kuro Link, Simplink and
Viera Link. Not all brands are fully compatible with
EasyLink. Example HDMI CEC branding names are
property of their respective owners.
7.2
Home Theatre System - HTS
Connect with HDMI ARC
Use an HDMI cable to connect a Home Theatre
System (HTS) to the TV. You can connect a Philips
Soundbar or an HTS with a built-in disc player.
HDMI ARC
If your Home Theatre System has an HDMI ARC
connection, you can use HDMI ARC connection on
the TV to connect. With HDMI ARC, you do not need
to connect the extra audio cable. The HDMI ARC
connection combines both signals.
Since HDMI 1 on the TV can oer the Audio Return
Channel (ARC) signal, the TV can only send the ARC
signal to this HDMI connection.
Audio to video synchronisation (sync)
If the sound does not match the video on screen, you
can set a delay on most Home Theatre Systems with
a disc player to match the sound with the video.
Connect with HDMI
Use an HDMI cable to connect a Home Theatre
System (HTS) to the TV. You can connect a Philips
Soundbar or an HTS with a built-in disc player.
If the Home Theatre System has no HDMI ARC
connection, add an optical audio cable to send the
sound of the TV picture to the Home Theatre System.
Audio to video synchronisation (sync)
If the sound does not match the video on screen, you
can set a delay on most Home Theatre Systems with
a disc player to match the sound with the video.
7.3
Video Device
HDMI
Use a cable to connect with bestHigh speed HDMI
picture and sound quality.
For best signal quality transfer, use a High speed
HDMI cable and do not use an HDMI cable longer
than 5 m, and also connect devices supporting HDR
on any one of HDMI connections.
Copy protection
HDMI ports support HDCP (High-bandwidth Digital
Content Protection). HDCP is a copy protection signal
that prevents copying content from a DVD disc or Blu-
ray Disc. Also referred to as DRM (Digital Rights
Management).
18

7.4
Audio Device
Digital Audio Out - Optical
Audio Out - Optical is a high quality sound
connection.
This optical connection can carry 5.1 audio channels.
If your device, typically a Home Theatre System
(HTS), has no HDMI ARC connection, you can use this
connection with the Audio In - Optical connection on
the HTS. The Audio Out - Optical connection sends
the sound from the TV to the HTS.
Headphones
You can connect a set of headphones to the
headphone connector on the back of the TV. The
connection is a mini-jack 3.5mm.
* Note: TV Speakers will be muted when the
Headphones are plugged in.
7.5
USB Hard Drive
Installation
Before you can pause or record a broadcast, you
must connect and format a USB Hard Drive.
Formatting removes all les from the USB Hard Drive.
1 - Connect the USB Hard Drive to one of
the connections on the TV. Do not connectUSB
another USB device to the other USB ports when
formatting.
2 - Switch on the USB Hard Drive and the TV.
3 - When the TV is tuned to a digital TV channel,
press . Trying to pause will start the formatting. Pause
Follow the instructions on screen.
When the USB Hard Drive is formatted, leave it
connected permanently.
Warning
The USB Hard Drive is formatted exclusively for this
TV, you cannot use the stored recordings on another
TV or PC. Do not copy or change recording les on
the USB Hard Drive with any PC application. This will
corrupt your recordings. When you format another
USB Hard Drive, the content on the former will be lost.
A USB Hard Drive installed on your TV will need
reformatting for use with a computer.
Formatting
Before you can pause or record a broadcast, or store
apps, you must connect and format a USB Hard
Drive*. Formatting removes all les from the USB Hard
Drive.
Warning
The USB Hard Drive is formatted exclusively for this
TV, you cannot use the stored recordings on another
TV or PC. Do not copy or change recording les on
the USB Hard Drive with any PC application. This will
corrupt your recordings.
19

* Connect the USB Hard Drive with size less than 2TB
and make sure the available space is more than 1
GB.
To format a USB Hard Drive…
1 - Connect the USB Hard Drive to one of the USB
connections on the TV. Do not connect another USB
device to the other USB ports when formatting.
2 - Switch on the USB Hard Drive and the TV.
3 - Press while watching TV, thenMENU
press down to > . Navigation keys Record Device info
4 - Select the device you want to format and press
OK.
5 - Select to star the formatting. All les andFormat
data will be removed after formatting.
6 - When the USB Hard Drive is formatted, suggest to
leave it connected permanently.
To assign the storage device for PVR and Time
shift…
1 - Once the formatting is done, you can assign the
storage device for PVR or Time shift functions.
2 - Press while watching TV, thenMENU
press down to > . Navigation keys Record Device info
3 - Select the device you want to assign and press
OK.
4 - Select to assign the device for TimeSet timeshift
shift data storage. The device will be marked with
TSHIFT Device info on list.
5 - Select to assign the device for recordingSet PVR
data storage. The device will be marked with on PVR
Device info list.
7.6
USB Flash Drive
You can view photos or play your music and videos
from a connected USB ash drive.
Insert a USB ash drive in one of
the connections on the TV while the TV isUSB
switched on.
To view the les from the USB ash drive, you need
to add the MMP (MultiMediaPlayer) app to the Home
screen rst. Press , clicking the Apps icon at theHome
left end of the Apps row. You can add MMP apps
from the Apps page.
To stop watching the USB ash drive content,
press or select another activity. Exit the MMPEXIT
app before you disconnect the ash drive.
To remove the USB ash drive safely…
1 - Press .HOME
2 - Select the icon from the top-rightNotications
corner and press .OK
3 - Select your ash drive and press .OK
4 - Select and press .Eject OK
5 - Wait until the eject procedure is nished and then
pull out the ash drive.
Ultra HD on USB
You can view photos in Ultra HD resolution from a
connected USB device or ash drive. The TV will
downscale the resolution if the resolution of the
photo is higher.
7.7
Computer
You can connect your computer to the TV using a
high quality HDMI cable and use the TV as a PC
monitor.
* Note for AMD Graphics card users:
If you connect your computer to TV via HDMI, please
ensure following settings in graphics card used to
have proper performance.
- If graphics card output video is 4096 x 2160p or
3840 x 2160p and RGB pixel format is used, RGB 4:4:4
pixel format studio (limited RGB) shall be set in
computer graphic card.
20

8
Bluetooth
8.1
What You Need
You can connect a wireless device with Bluetooth® to
this TV – a wireless speaker or headphones*.
To play the TV sound on a wireless speaker, you must
pair the wireless speaker with the TV. The TV can only
play the sound on one speaker at a time.
Attention - Audio to Video synchronisation
Many Bluetooth speaker systems have a high, so
called, 'latency'. High latency means that the audio
lags behind the video, causing unsynchronised 'lip
sync'. Before you purchase a wireless Bluetooth
speaker system, inform yourself about the newest
models and look for a device with a low latency
rating. Ask your dealer for advice.
* Note: The Bluetooth on TV may not work properly
with cable free true wireless headphones.
8.2
Pairing a Device
Position the wireless speaker within a distance of 5
meters from the TV. Read the user manual of the
device for specic information on pairing and on
wireless range. Make sure the Bluetooth setting on TV
is switched on.
Once a wireless speaker is paired, you can select it to
play the TV sound. When a device is paired, you do
not need to pair it again unless you remove the
device.
To pair a bluetooth device with the TV…
1 - Switch on the bluetooth device and place it within
range of the TV.
2 - Press > MENU TV
options Settings Remote & Accessories > > and
press .OK
3 - Follow the instructions on screen. You will pair
the device with the TV and the TV will store the
connection. You might need to unpair a paired device
rst if the maximum number of paired devices was
reached.
4 - Press , repeatedly if necessary, to close theBack
menu.
8.3
Select a Device
To select a wireless device…
1 - Press > MENU TV
options Settings Remote & Accessories > > and
press .OK
2 - In the list, select the wireless device and
press OK.
3 - Press , repeatedly if necessary, to close theBack
menu.
8.4
Rename a Device
To rename a wireless device…
1 - Press > MENU TV
options Settings Remote & Accessories > > and
press .OK
2 - In the list, select the wireless device and
press .OK
3 - Select and press .Change name OK
4 - Enter a new name for the device.
5 - Press , repeatedly if necessary, to close theBack
menu.
8.5
Remove a Device
You can disconnect a wireless Bluetooth device. Once
the Bluetooth device is disconnected, the audio
output device will go back to TV speakers.
To disconnect a wireless device…
1 - Press > MENU TV
options Settings Remote & Accessories > > and
press .OK
2 - In the list, select the wireless device and
press .OK
3 - Select and press .Disconnect OK
4 - Press , repeatedly if necessary, to close theBack
menu.
You can also remove a wireless Bluetooth device. If
you remove a Bluetooth device, the device will be
unpaired.
To remove a wireless device…
1 - Press > MENU TV
options Settings Remote & Accessories > > and
press .OK
2 - In the list, select the wireless device and
press .OK
3 - Select and press .Unpair OK
21

4 - Press , repeatedly if necessary, to close theBack
menu.
22

9
Connect your
Android TV
9.1
Network and Internet
Home Network
To enjoy the full capabilities of your Philips Android
TV, your TV must be connected to the Internet.
Connect the TV to a home network with a high-speed
Internet connection. You can connect your TV
wirelessly or wired to your network router.
Connect to Network
Wireless Connection
What You Need
To connect the TV to the Internet wirelessly, you need
a Wi-Fi router with a connection to the Internet.
Use a high-speed (broadband) connection to the
Internet.
Turn Wi-Fi On or O
MENU TV options Settings Network & > > >
internet Wi-Fi > .
Make the Connection
MENU TV options Settings Network & > > >
internet Wi-Fi > .
1 - In the list of found networks, select on your
wireless network. If your network is not in the list
because the network name is hidden (you switched
o the SSID broadcast of the router), select Add new
network to enter the network name yourself.
2 - Follow the on-screen instruction.
3 - A message will be shown when the connection is
successful.
Problems
Wireless network not found or distorted
• Microwave ovens, DECT phones or other Wi-Fi
802.11b/g/n devices in your proximity might disturb
the wireless network.
• Make sure that the rewalls in your network allow
access to the TV's wireless connection.
• If the wireless network does not work properly in
your home, try the wired network installation.
Internet does not work
• If the connection to the router is OK, check the
router connection to the Internet.
The PC and Internet connection are slow
• Look in your wireless router's user manual for
information on indoor range, transfer rate and other
factors of signal quality.
• Use a high-speed (broadband) Internet connection
for your router.
DHCP
• If the connection fails, you can check the DHCP
(Dynamic Host Conguration Protocol) setting of the
router. DHCP should be switched on.
Wired Connection
What You Need
What You Need
To connect the TV to the Internet, you need a
network router with a connection to the
Internet. Use a high-speed (broadband) connection
to the Internet.
Make the Connection
1 - Connect the router to the TV with a network cable
(Ethernet cable**).
2 - Make sure that the router is switched on.
3 - The TV constantly searches for the network
connection.
4 - A message will be shown when the connection is
23

successful.
If the connection fails, you can check the DHCP
setting of the router. DHCP should be switched on.
**To fulll EMC regulations, use a shielded FTP Cat.
5E Ethernet cable.
Network Settings
Proxy settings
MENU TV options Settings Network & > > >
internet Proxy settings > .
Enter a valid proxy hostname manually by selecting
Manual.
Network Conguration - IP settings
MENU TV options Settings Network & > > >
internet IP settings > .
If the connection fails, you can check the DHCP
setting of the router.
Alternatively, if you are an advanced user and want to
install your network with static IP addressing, set the
TV to Static IP.
9.2
Google Account
Sign In
To enjoy the full capabilities of your Philips Android
TV, you can sign in to Google with your Google
Account.
By signing in you'll be able to play your favourite
games across phone, tablet and TV. You'll also get
customized video and music recommendations on
your TV home screen as well as access to YouTube,
Google Play and other apps.
Sign In
Use your existing to sign in toGoogle Account
Google on your TV. A Google Account consists of an
email address and a password. If you don't have a
Google Account yet, use your computer or tablet to
create one (accounts.google.com). To play games
with Google Play, you need a Google+ prole. If you
did not sign in during the rst TV installation, you can
always sign in later.
To sign in after you did the TV installation…
1 - Select .Settings
2 - Select and press .Account & Sign-In OK
3 - Select and press .Sign In OK
4 - Select and press .Use your remote OK
5 - With the on-screen keyboard, enter your email
address and press .OK
6 - Enter your password and press to sign in.OK
7 - Press left repeatedly ifNavigation keys
necessary, to close the menu.
Android Settings
You can set or view several Android specic settings
or information. You can nd the list of apps installed
on your TV and the storage space they need. You can
congure the onscreen keyboard or allow apps to use
your location. Explore the dierent Android settings.
You can go
to www.support.google.com/androidtv for more
information on these settings.
To open these settings…
1 - Select and press .Settings OK
2 - Explore the dierent Android settings.
3 - Press if necessary, to close the menu.Back
24

10
Apps
10.1
About Apps
You can nd your favourite Apps on row in theApps
Home menu.
Like apps on your smartphone or tablet, the apps on
your TV oer specic functions for an enriched TV
experience. Apps like YouTube, games, video stores
or weather forecasts (a.o.).
Apps can come from the Google Play™ Store . To
get you started, some practical apps are pre-installed
on your TV.
To install apps from the Google Play™ Store , the TV
must be connected to the Internet. You must sign in
with a Google Account to use the Google Play apps
and Google Play™ Store .
10.2
Google Play
Movies and TV
With , you can rent or buyGoogle Play Movies & TV
movies and TV shows to watch on TV.
What You Need
• your TV must be connected with the Internet
• you must sign in with your Google Account on TV
• add a credit card to your Google Account to
purchase movies and TV shows
To rent or buy a movie or TV show…
1 - Press .Home
2 - Select .Google Play Movies & TV
3 - Select a movie or TV show and press .OK
4 - Select the purchase you want and press . YouOK
will be taken through the purchase procedure.
To watch a rented or bought movie or TV show…
1 - Press .Home
2 - Select .Google Play Movies & TV
3 - Select the movie or TV show from your library in
the app, select the title and press .OK
4 - You can use the , , or Stop Pause Rewind Fast
forward keys on the remote control.
5 - To stop the Movies & TV
app, press repeatedly or press . Back EXIT
If the App is not on you Home screen, you can add
via the Apps page or by the Add app to favourites
item on the row. Some Google Play productsApps
and features aren't available in all countries.
Find more information
on www.support.google.com/androidtv
Music
With YouTube Music you can play your favourite
music on TV and buy new music on your computer or
mobile device. Or, on your TV, you can sign up for All
Access, the YouTube Music
subscription. Alternatively, you can play the music
you already own, stored on your computer.
What You Need
• your TV must be connected with the Internet
• you must sign in with your Google Account on TV
• add a credit card to your Google Account to take a
music subscription
To start YouTube Music…
1 - Press .Home
2 - Select .YouTube Music
3 - Select the music you want and press .OK
4 - To stop the Music app, press repeatedly orBack
press . EXIT
If the App is not on you Home screen, you can add
via the Apps page or by the Add app to favourites
item on the row. Some Google Play productsApps
and features aren't available in all countries.
Find more information
on www.support.google.com/androidtv
Games
With Google Play Games, you can play games on TV.
Online or oine.
You can see what your friends are playing currently or
you can join the game and compete. You can track
your achievements or start wherever you left o.
What You Need
• your TV must be connected with the Internet
• you must sign in with your Google Account on TV
• add a credit card to your Google Account to
purchase new games
Start the Google Play Games app to select and install
new game apps on your TV. Some games are free of
charge. A message appears if a particular game needs
a gamepad to play the game.
To start or stop a Google Play Game…
1 - Press .Home
2 - Select .Google Play Games
3 - Select a game to play or select a new game to
install and press .OK
4 - When done, press repeatedly orBack
press or stop the app with its dedicatedEXIT
25

exit/stop button.
If the App is not on you Home screen, you can add
via the Apps page or by the Add app to favourites
item on the row. Some Google Play productsApps
and features aren't available in all countries.
Find more information
on www.support.google.com/androidtv
Google Play Store
From the Google Play Store you can download and
install new apps. Some apps are free of charge.
What You Need
• your TV must be connected with the Internet
• you must sign in with your Google Account on TV
• add a credit card to your Google Account to
purchase apps
To install a new app…
1 - Press .Home
2 - Select and press .Google Play Store OK
3 - Select the app you want to install and press .OK
4 - To close the ,Google Play Store
press repeatedly or press .Back EXIT
Parental controls
In the Google Play Store, you can hide apps
according to users/buyers maturity. You need to enter
a PIN code to select or change the level of maturity.
To set the parental control…
1 - Press .Home
2 - Select and press .Google Play Store OK
3 - Select > .Settings Parental controls
4 - Select the level of maturity you want.
5 - On request, enter the PIN code.
6 - To close the ,Google Play Store
press repeatedly or press . Back EXIT
If the App is not on you Home screen, you can add
via the Apps page or by the Add app to favourites
item on the row. Some Google Play productsApps
and features aren't available in all countries.
Find more information
on www.support.google.com/androidtv
Payments
To make a payment on Google Play on TV, you must
add a form of payment - a credit card (outside the
United States) - to your Google Account. When you
purchase a movie or TV show, you will be charged on
this credit card.
To add a credit card …
1 - On your computer, go to accounts.google.com
and sign in with the Google Account you will use with
Google Play on TV.
2 - Go to wallet.google.com to add a card to your
Google Account.
3 - Enter your credit card data and accept the terms
and conditions.
10.3
Start or Stop an App
You can start an app from the Home screen.
To start an app…
1 - Press .Home
2 - Move to row, select the app you want andApps
press .OK
3 - To stop an app, press or press orBack EXIT
stop the app with its dedicated exit/stop button.
When opening the Home screen, the background
application/content playback will stop. You have to
select the application or content from the Home
screen to resume.
A note to start the Live TV app
If you have installed the Live TV app on Home screen,
please note that the HDMI sources are regard as
App’s sources. When the Live TV app is started, it will
open with current source, which includes TV and
HDMI sources.
10.4
Manage Apps
If you stop an app and return to the Home menu, the
app is not really stopped. The app is still running in
the background to be readily available when you start
it again. To run uently, most apps need to save some
data in the cache memory of the TV. It might be good
to stop an app completely or clear the cache data of
a particular app to optimise the overall performance
of apps and to keep memory usage low on your
Android TV. Also, it is best to uninstall apps that you
are not using anymore.
26

11
Sources
11.1
Switch to a device
From the list of Sources, you can switch to any of the
connected devices. You can switch to a tuner to
watch TV or switch to your connected devices to
watch their programme, a digital receiver or a Blu-ray
Disc player.
To switch to a connected device…
1 - Press to open the Sources menu.SOURCES
2 - Select one of the item in the source list and
press . The TV will show the programme orOK
content of the device.
One Touch Play
With the TV in standby, you can switch on a disc
player with your TV remote control.
To switch on both disc player and TV from standby
and start playing the disc immediately,
press on the TV remote control. The devicePlay
must be connected with an HDMI cable and both TV
and device must have HDMI CEC switched on.
27

12
Settings
12.1
Picture Settings
Picture Mode
Select a style
MENU TV options Picture Picture mode > > > .
For easy picture adjustment, you can select a preset
picture style.
• User - The picture preferences you set during the
rst start up.
• Standard - Most energy conscious setting - Factory
setting
• Vivid - Ideal for daylight viewing
• Sport - Ideal for sport
• Movie - Ideal for watching movies with original
studio eect
• Game* - Ideal for playing games
* Picture mode - Game is not available for some
video sources.
When TV receives Dolby Vision HDR signal, select a
picture style below:
• Dolby Vision Bright
• Dolby Vision Dark
• Dolby Vision Vivid
Dolby Vision Notication
MENU TV options Picture Dolby Vision > > >
Notication OK and press .
Switch or the Dolby Vision noticationOn O
when Dolby Vision content begins to play on your TV.
Display Mode
If the picture is not lling the whole screen, if black
bars are showing on the top or bottom or at both
sides, you can adjust the picture to ll the screen
completely.
To select one of the basic settings to ll the screen…
MENU TV options Picture Display mode > > > .
Automatic
Automatically zooms in the picture to t the screen
with original aspect ratio. No content lost visible.
Super zoom
Remove the black bars on the sides of 4:3 broadcasts.
Not recommended for HD or PC.
4:3
Display the classic 4:3 format.
Movie expand 14:9
Scale 4:3 format to 14:9. Not recommended for HD or
PC.
Movie expand 16:9
Scale 4:3 format to 16:9. Not recommended for HD or
PC.
Wide screen
Stretches the picture to a 16:9 format.
Full
Automatically enlarges the picture to ll the screen.
Picture distortion is minimal, subtitles remain visible.
Not suitable for PC input. Some extreme picture
content can still show black bars. Picture content
aspect ratio may change.
Original
Provide maximum detail for PC.
Other Picture Settings
MENU TV options Picture OK > > and press .
Backlight
Adjust the video backlight intensity.
Brightness
Set the level of brightness of the picture signal.
Note: Setting of brightness much away from
reference value (50) may result lower contrast.
Contrast
Adjust the contrast value of the picture.
Saturation
Adjust the colour saturation value of the picture.
Hue
Adjust the hue value of the picture.
Sharpness
Adjust the level of sharpness in ne detail of the
picture.
Gamma
Set a non-linear setting for picture luminance and
contrast. This is a setting intended for expert users.
Color Temperature
28

Set the picture to a preset colour temperature or
adjust the setting yourself.
Light sensor
Select to adjust the picture settings automaticallyOn
to the lighting conditions of the room.
Advanced Video
Set the advance settings.
• DNR
Digital Noise Reduction, image noise reduction lters
to reduces the image noise.
• MPEG NR
MPEG Noise Reduction feature to improve the quality
of pictures by reducing the noise without
compromising the picture resolution.
• Adaptive Luma Control
Dynamic video contrast enhancement to adjust the
Luma level of the picture signal automatically. If the
PC Mode setting is On, this feature will be o.
• Local Contrast Control
Enhance the contrast level in local area for the image.
• Game Mode
Switch TV to Game mode to have fast response time.
• PC Mode
Switch TV to PC mode to have original picture look.
• HDMI Auto Game Mode
Allow TV to automatically switch to Game mode
when the game content is notied by source.
• Motion styles (Only available for 70" and 75"
models)
Motion styles provides optimised motion setting
modes for dierent video contents. Select one of the
motion styles ( , , , ) to haveO Movie Standard Smooth
dierent viewing experience on motion video.
Colour Tuner
Fine tune the color setting yourself.
11 Point White Balance Alignment
Customize the whitepoint balance based on the
selected color temperature of the picture.
Reset to Default
Reset the current picture settings to default.
12.2
Sound Settings
Sound Mode
MENU TV options Sound Sound Mode > > > > and
press .OK
For easy sound adjustment, you can select a preset
setting with sound mode.
• Game - Ideal for gaming
• Movie - Ideal for watching movies
• Music - Ideal for listening to music
• Dialogue - Ideal for speech
• AI mode - Select AI mode for intelligent switching
of sound mode base on audio content.
• User - The sound preferences you set during the
rst start up
Other Sound Settings
MENU TV options Sound OK > > and press .
Speakers
Set the TV to play the sound on TV or on the
connected audio system.
You can select where you want to hear the TV sound
and how you want to control it.
• If you select , you permanentlyTV speakers o
switch o the TV speakers.
• If you select , the TV speakers areTV speakers
always on.
With an audio device connected with HDMI CEC,
select . The TV will switch oHDMI sound system
the TV speakers when the device is playing the
sound.
* Note: TV Speakers will be muted when the
Headphones are plugged in.
USB Audio
Turn or for the audio output through USBOn O
audio device if there is a USB audio peripheral
attached to the TV USB port.
Digital Output
Digital output settings are available for optical and
HDMI ARC sound signals.
Set the audio out signal of the TV to t the sound
capabilities of the connected Home Theatre System.
Digital Output Delay
For some Home Theatre Systems you might need to
adjust the audio sync delay to synchronise the audio
to the video. Select 0 if a sound delay is set on your
Home Theatre System.
DTS night mode
Select DTS night Mode for a more comfortable quiet
listening experience when watching content with DTS
29

Master Audio.
Dolby audio processing
Set the advance settings.
• Volume Leveler: select to adjust the volumeOn
automatically.
• Dialogue Enhancer: select to get an improved sound
quality for speech programme.
• Surround Virtualizer: select to create a virtualOn
surround sound experience.
• Dolby Atmos: select to enable Dolby Atmos,On
which can add height dimension in sound. With
height dimension, sound can be precisely placed and
moved in three-dimensional space.
Reset to Default
Reset the current sound settings to default.
12.3
Power Settings
MENU TV options Power > > .
Set Sleep timer
Power Sleep timer > .
TV switches to standby mode automatically after a
preset time. You may stop the timer when the
notication pop-up at last two minutes.
Set screen o to save energy consumption
Power Picture o > .
Select Picture o, the TV screen is switched o, to
switch the TV screen back on, press any key on the
remote control.
Set TV switch o timer
Power Switch o timer > .
Select Switch o timer, the TV switches o
automatically at a preset time to save energy. The
timer will not stop unless the setting is changed to
O.
No signal auto power o
Power No signal auto power o > .
Press up or down to set theNavigation keys
value. Select to deactivate the automatic switchO
o.
* If you use the TV as a monitor or use a digital
receiver to watch TV (a Set-Top Box - STB) and you
do not use the remote control of the TV, you should
deactivate this automatic switch o, to set the value
to .O
Set auto sleep timer
Power Auto sleep > .
TV switches to standby mode automatically after a
preset time if the TV does not receive any command
from remote control.
12.4
Advanced Options
Audio
Set audio preference language
MENU TV options Advanced Options Audio > > >
Language Primary Audio Secondary Audio Audio/ / or
Channel.
The TV channels can broadcast audio with several
spoken languages for a programme. You can set a
preferred primary and secondary audio language. If
audio in one of these languages is available, the TV
will switch to this audio.
Blue Mute
MENU TV options Advanced Options Blue > > >
Mute.
Switch the blue mute on or o.
HBBTV Settings
MENU TV options Advanced > >
Options HBBTV settings > .
Switch on HbbTV
HBBTV settings > On.
Set the HbbTV History Tracking
HBBTV settings > Do Not Track.
Set the options according to your preference.
Set the HbbTV Cookies
HBBTV settings > Cookie Settings.
Set the options according to your preference.
Set other options
30

HBBTV settings > Persistent Storage, Block Tracking
Sites, or Device ID.
Select one of the options and switch it to on or o.
Reset HbbTV Device ID
HBBTV settings > Reset Device ID.
You can reset your TV unique device identier. A new
identier will be created. This will replace your Device
ID with a new identier.
Subtitle
MENU TV options Advanced > >
Options Subtitle > .
Digital channels can oer several subtitle languages
for a programme. You can set a preferred primary and
secondary subtitle language. If subtitles in one of
these languages are available, the TV will show the
subtitles you selected.
Press key on the remote control toSUBTITLE
display the subtitle page.
Teletext
MENU TV options Advanced > >
Options Teletext > .
Some digital TV broadcasters have several Text
languages available.
Text language and decoding
To set your Text language . . .
1 - Select > > MENU TV options Advanced
Options Teletext OK > and press .
2 - Select to set the TextDigital Teletext Language
language settings.
3 - Select to set theDecoding Page Language
language decoding.
4 - On your preferred languages settings, press toOK
set.
5 - Press , repeatedly if necessary, to close theBack
menu.
TTX Presentation Level
If available, Level 2.5 oers more colours and better
graphics.
To switch between Level 2.5 and Level 1.5 . . .
1 - Select > > MENU TV options Advanced
Options Teletext TTX Presentation Level > > and
press . OK
2 - Select the level from andTTX Presentation Level
press to set.OK
3 - Press , repeatedly if necessary, to close theBack
menu.
System information
MENU TV options Advanced > >
Options System information > .
To check the system information, including Signal
level, Frequency, Service ID, and etc.
12.5
Other settings
Device Preferences
Home Settings Device Preferences > > .
System update
Update TV software from local update or from the
Internet.
About
To show the information about this TV or perform
Factory reset operation for the TV.
Date & time
Adjust the date and time settings.
Timer
Set TV switch on or o timer.
Language
Set or change the menu language.
Keyboard
Set the on-screen keyboard type.
Inputs
Rename the Inputs name and adjust the settings for
Consumer Electronic Control (CEC).
Power
Set the timers for saving energy.
31

Picture
Adjust the picture settings.
Sound
Adjust the sound settings.
Ambilight
Adjust the Ambilight settings.
* Ambilight setting is only for models which support
Ambilight function.
Storage
Check the device storage.
Home screen
Customize the home screen. You can enable or
disable the video and audio previews. Reorder the
apps and games. Read the Open-source licenses.
Retail mode
Switch or the retail mode. If you set the retailOn O
mode to on. You can set the retail message type and
demo.
Google Assistant
Adjust the settings for Google Assistant. You can also
view the Open-source licenses.
Chromecast built-in
Adjust the settings for Chromecast built-in. You can
view the Open-source licenses and the version
number.
Screen saver
Adjust the screen saver setting for your preference.
Location
Set the location status.
Usage & Diagnostics
Set to on for automatically send diagnostic
information to Google, such as crash reports and
usage data from your device, apps and Chromecast
built in.
Accessibility
Activate special functions for hearing and visually
impaired people.
Reboot
Reboot your TV for better performance when needed.
Remote and Accessories
Home Settings Remote and Accessories > > .
You can select the stored bluetooth connection from
the list.
If you cannot nd your accessory, select Add
accessory to search for bluetooth connections.
12.6
Reboot
Home Settings Device Preferences Reboot > > > .
Note:
• Disconnect the external USB hard disc before
rebooting.
• Wait for few seconds, the TV restart automatically.
This will remove unnecessary data and information in
the memory.
If your TV runs low performance when using Apps,
such as the video and audio are not synchronised or
the App is running slow, reboot your TV for better
performance.
12.7
Factory Reset
Reset all settings value to original TV settings
Home Settings Device Preferences About > > > >
Factory reset.
This will erase all data from your device's internal
storage, including: your Google account, system app
data, download apps, and settings. All settings will
be reset and installed channels will be erased.
32

12.8
Clock and Language Settings
Menu Language
Change the language of the TV menu
Home Settings Device > >
Preferences Language > .
1 - Press to go to Home screen.Home
2 - Select > .Device Preferences Language
3 - Select your language and press .OK
4 - Press or repeatedly to close theBack EXIT
menu.
Audio Language
Set audio preference language
MENU TV options Advanced Options Audio > > >
Language Primary Audio Secondary Audio Audio/ / or
Channel.
The TV channels can broadcast audio with several
spoken languages for a programme. You can set a
preferred primary and secondary audio language. If
audio in one of these languages is available, the TV
will switch to this audio.
Subtitle Language
Digital broadcasts can have subtitles for their
programmes.
Set subtitle preference language
MENU TV options Advanced > >
Options Subtitle > .
Digital channels can oer several subtitle languages
for a programme. You can set a preferred primary and
secondary subtitle language. If subtitles in one of
these languages are available, the TV will show the
subtitles you selected.
Press key on the remote control to displaySUBTITLE
the subtitle page.
Set the subtitle language settings
• Digital Subtitle
• Subtitle Tracks
• Digital Subtitle Language
• 2nd Digital Subtitle Language
• Subtitle Type
Set teletext preference language
MENU TV options Advanced > >
Options Teletext > .
Some digital TV broadcasters have several Text
languages available.
Clock
Home Settings Device Preferences Date & > > >
time.
Correct clock automatically
Automatic date & time Use network-provided >
time.
• The standard setting for the TV clock is automatic.
The time information comes from the broadcasted
UTC - Coordinated Universal Time information.
Correct clock manually
Automatic date & time O > .
Select and to adjust the value.Set date Set time
Note:
If none of the automatic settings display the time
correctly, you can set the time manually.
Set time zone or set a time oset for your region
Date & time Set time zone > .
Select the time zone of your preference.
Set the time format to 24-hour
Date & time Use 24-hour format > .
Enable to show the system time in 24-hour format,
else show in 12-hour format time.
Timer
Set TV switch on or o timer
Home Settings Device Preferences Timer > > > .
Set or to or Power on time type Power o type On
Once.
33

12.9
Accessibility Settings
The TV is prepared for use of the deaf, hard of
hearing, blind or partially sighted people.
Accessibility for blind or partially sighted people
Home Settings Device Preferences > > >
Accessibility Audio Type > .
Digital TV channels can broadcast special audio
commentary describing what is happening on screen.
You can set the audio type with below settings.
• Normal
• Audio Description
• Spoken Subtitle
• Hearing Impaired
• Audio Description and Spoken Subtitle
Visually Impaired
When Audio Description is on, more Visually Impaired
options are available. Set the speaker, headphone
volume of the normal audio with the audio
commentary or set the extra audio eects in the
commentary audio. You can adjust th eect with
below settings.
• Speaker
• Headphone
• Volume
• Pan and Fade
• Audio for Visually Impaired
• Fader Control
AC4 Dialogue Enhancement
Turn on/o or set the level of dialogue enhancement
to increase the intelligibility of dialogue and
commentary when the audio stream is AC4 type.
34

13
Ambilight
13.1
Ambilight Style
You can set Ambilight to follow the video dynamics of
a TV programme. Alternatively, you can set Ambilight
to show a preset colour style or you can switch
Ambilight o.
Follow Video
If you select , you can select one of theFollow Video
styles that follow the dynamics of the picture on your
TV screen.
To set the Ambilight Style…
1 - Press key.ambilight
2 - Enable the Ambilight.
3 - You can select from and Follow Video Lounge
light styles.
4 - Select the style you want and press . OK
The available styles are…Follow Video
• - Ideal for day to day TV watchingStandard
• - Follows the picture or sound as truthfulNatural
as possible
• - Ideal for sports programmeSports
• - Ideal for daylight conditionsVivid
• - Ideal for gaming Game
The available styles are…Lounge light
• - Red colour variationsHot Lava
• - Blue colour variationsDeep Water
• - Green colour variationsFresh Nature
• - Static colourWarm white
• - Static colourCool white
• - Static colour of your choice. To setCustom colour
the colour for Ambilight static light, go to Home
> > > >Settings Device Preferences Ambilight
Custom colour and pick a colour you like.
13.2
Custom colour
Custom colour
Home Settings Device Preferences > > >
Ambilight Custom colour > .
To set the colour for Ambilight static light of your
choice. You can pick a colour you like from the colour
palette.
To set the colour for Ambilight static light…
1 - Press key.ambilight
2 - Enable the Ambilight.
3 - Set Ambilight style to Custom colour.
4 - Go to > > > Home Settings Device Preferences
Ambilight Custom colour > to pick a colour.
5 - Select a colour you want and press .OK
13.3
Brightness and Saturation
Adjust the Ambilight brightness
Home Settings Device Preferences > > >
Ambilight Brightness > .
When Ambilight is enabled, press the arrows right or
left to set the level of Ambilight brightness.
Adjust the Ambilight saturation
Home Settings Device Preferences > > >
Ambilight Saturation > .
When Ambilight is enabled, press the arrows right or
left to set the level of Ambilight saturation.
13.4
Wall Colour Behind the TV
Set the wall colour behind the TV
Home Settings Device Preferences > > >
Ambilight Wall colour behind the TV > .
You can select your wall colour to compensate
Ambilight colours so that the perceived Ambilight
colours are correct again.
13.5
TV Switch O
Set the wall colour behind the TV
Home Settings Device Preferences > > >
Ambilight TV switch O > .
Select or to let the AmbilightFade out Immediate
slowly fade out or turn o immediately when TV is
switching o.
35

14
Videos, Photos,
Music & Text
14.1
From a USB Connection
You can view your photos or play your music and
videos from a connected USB ash drive.
With the TV switched on, plug in a USB ash drive to
one of the USB connections.
1 - Press , select from the Apps list andHome MMP
press .OK
2 - Use to select the le type.Navigation keys
3 - Follow the on-screen instructions to play the
les.
14.2
Play your Videos
Play a video
1 - Press , select from the Apps list andHome MMP
press .OK
2 - Use to select .Navigation keys Video
3 - Select one of the videos, and press to play. OK
During the video playback...
• Press to show the options.MENU
Play, Pause
Press to play or pause the video.OK
Repeat
Play videos repeatedly or once.
Show Info
Display the information of the video le.
Display Mode
Adjust the display mode.
Picture
Adjust the picture settings.
Sound
Adjust the sound settings.
Sound Tracks
Display the soundtracks.
Last Memory
When set to , you can play the video where youOn
left last time. Set to to turn o the function.O
14.3
View your Photos
View Photos
View a photo
1 - Press , select from the Apps list andHome MMP
press .OK
2 - Use to select .Navigation keys Photo
3 - Select one of the photos, and press . OK
When browsing photo thumbnails, press to...MENU
Sort
Sort the photo les by your preference.
Media type
Sort the les by media type.
Thumbnail size
Change the thumbnail viewing size.
Copy
Copy the le and place it to your prefered folder.
Paste
Place the copied le to your prefered folder.
Delete
Delete the selected le.
Recursive parser
Select from the or .Recursive parser Normal parser
Photo Frame
Select to start the Photo Frame mode.
Photo Options
When viewing photo les, press to...MENU
Pause
Press to pause the photos.OK
Repeat
View the pictures repeatedly or once only.
Shue on, Shue o
View the pictures in sequential order, or at random.
Duration
Set the speed of the slideshow.
Eect
Set the transition from one picture to the next.
Show info
36

Display the information of the picture le.
Photo Frame image
Set the picture as Photo Frame image.
Picture
Adjust the picture settings.
14.4
Play your Music
Play music
1 - Press , select from the Apps list andHome MMP
press .OK
2 - Use to select .Navigation keys Audio
3 - Select one of the audio, and press to play. OK
During the audio playback...
• Press to show the options.MENU
Play, Pause
Press to play or pause the music.OK
Repeat
Play music repeatedly or once.
Shue On, Shue O
Play audio in sequential order, or at random.
Show Info
Display the information of the music le.
Lyric Options
Select the options when the lyrics are available.
Picture O
Close the screen when play the music for energy
saving.
Sound
Adjust the sound settings.
14.5
View your Text
View text
1 - Press , select from the Apps list andHome MMP
press .OK
2 - Use to select .Navigation keys Text
3 - Select one of the text le, and press toOK
preview.
During the preview...
• Each le lasts 3 seconds for preview. Press toOK
pause the preview to read.
• Press to show the options.MENU
Play, Pause
Press to play or pause the text le preview.OK
Repeat
Preview the text les repeatedly or once.
Shue On, Shue O
Preview the text les in sequential order, or at
random.
Font
Adjust the text , , and .Size Style Colour
Show Info
Display the information of the text le.
37

15
TV Guide
15.1
TV Guide Data
With the TV Guide you can view a list of the current
and scheduled TV programmes of your channels. Not
all channels oer TV Guide information.
The TV Guide receives information (data) from
broadcasters. The TV can collect TV Guide
information for the channels that are installed on the
TV. The TV cannot collect the TV Guide information
for channels viewed from a digital receiver or
decoder.
15.2
Using the TV Guide
To open the TV Guide, press key on theTV GUIDE
remote control. The TV Guide shows the channels of
the selected tuner. Press again to closeTV GUIDE
Alternately, while watching TV, press > MENU
Navigation keys up Channels Program Guide > >
to open the TV Guide.
The TV Guide receives information (data) from
broadcasters. In some regions and for some channels,
TV Guide information might not be available.
38

16
Recording and Time
Shift
16.1
Record Options
Press while watching TV, then press MENU
Navigation keys down and select one of below
menus.
Record List
You can view and manage your recordings in the list
of recordings.
Device Info
Check the information about the storage device for
TV recording. You can also format or test the speed of
the device.
Schedule List
You can schedule a recording of an upcoming
programme and view the scheduled list.
Time Shift Mode
Turn on/o Time Shift Mode. When the mode is on
and your storage device is ready for the time shift
recording, you can pause a TV broadcast and resume
watching it a bit later.
16.2
Recording
What You Need
You can record a digital TV broadcast and watch it
later.
To record a TV programme you need…
• a connected USB storage device formatted to FAT32
• digital TV channels installed on this TV
• to receive channel information for the on screen TV
Guide
• a reliable TV clock setting. If you reset the TV clock
manually, recordings may fail.
A storage device need to be assigned as the
recording data storage before you can start the
recording.
To assign a storage device for recording…
1 - Press while watching TV, thenMENU
press down to > . Navigation keys Record Device info
2 - Select the device you want to assign and press
OK.
3 - Select to assign the device for recordingSet PVR
data storage. The device will be marked with on PVR
Device info list.
You cannot record when you are using Time shift
function.
In terms enforcement of copyright legislation, some
channel providers can apply dierent restriction by
means of DRM (Digital Right Management)
technology. In case of broadcasting protected
channels, recording, record validity or number of
views may be restricted. Recording may be
completely prohibited. In case of trying to record a
protected broadcasting or play back an expired
recording, an error message can appear.
Note:
Recording function is only for digital TV broadcast. It
is not possible to record content from external
devices (e.g. HDMI).
Record a Programme
Record Now
To record the programme you are watching right now,
press key on the remote control. TheRecord
recording will start immediately.
To stop the recording, press key on the remoteStop
control.
* Note: The instant recording will be stopped when a
reminder or scheduled recording is triggered.
Schedule a Recording or Reminder
You can schedule a recording or reminder of an
upcoming programme for today or a few days from
today (maximum of 8 days away). The TV will use the
data from the TV Guide to start and end the
recording.
To record a programme…
1 - Press > down > > MENU Navigation keys Record
Schedule list OK and press .
2 - Press key on the remote control.Record
3 - Follow the on-screen instruction. Use Navigation
keys to select and set the settings.
4 - Select and press .Add OK
5 - If you need to set a reminder, go to Schedule
Type Reminder and change the setting to .
39
Produkt Specifikationer
| Mærke: | Philips |
| Kategori: | televisión |
| Model: | 75PUT7966 |
Har du brug for hjælp?
Hvis du har brug for hjælp til Philips 75PUT7966 stil et spørgsmål nedenfor, og andre brugere vil svare dig
televisión Philips Manualer

15 Januar 2025
15 Januar 2025
15 Januar 2025
15 Januar 2025
15 Januar 2025
15 Januar 2025
15 Januar 2025
15 Januar 2025
11 Januar 2025
30 December 2025
televisión Manualer
- televisión SilverCrest
- televisión Acer
- televisión Denver
- televisión Sencor
- televisión TCL
- televisión Sony
- televisión Siemens
- televisión Samsung
- televisión Panasonic
- televisión VOX
- televisión Lenco
- televisión OK
- televisión LG
- televisión AEG
- televisión Pioneer
- televisión Mitsubishi
- televisión Sharp
- televisión Daewoo
- televisión Arçelik
- televisión AOC
- televisión Sanyo
- televisión Grundig
- televisión Nikkei
- televisión Toshiba
- televisión Pyle
- televisión Furrion
- televisión Lenovo
- televisión Infiniton
- televisión Nedis
- televisión Logik
- televisión Abus
- televisión Optoma
- televisión Westinghouse
- televisión Element
- televisión Thomson
- televisión Hyundai
- televisión Aiwa
- televisión Nokia
- televisión Casio
- televisión AKAI
- televisión Hisense
- televisión Strong
- televisión Brandt
- televisión Hannspree
- televisión Trevi
- televisión Blaupunkt
- televisión JVC
- televisión BEKO
- televisión Uniden
- televisión Clatronic
- televisión Hitachi
- televisión Medion
- televisión Sweex
- televisión Citizen
- televisión Megasat
- televisión Haier
- televisión TechniSat
- televisión Innoliving
- televisión NewStar
- televisión Bang And Olufsen
- televisión Luxor
- televisión Vivax
- televisión Loewe
- televisión Walker
- televisión Sunny
- televisión Finlux
- televisión Telefunken
- televisión Kernau
- televisión BenQ
- televisión Packard Bell
- televisión Xiaomi
- televisión Peerless-AV
- televisión Krüger&Matz
- televisión Viewsonic
- televisión Schneider
- televisión Fujitsu
- televisión Oppo
- televisión Zalman
- televisión Tesla
- televisión Polaroid
- televisión NEC
- televisión TERRIS
- televisión OKI
- televisión MT Logic
- televisión Yasin
- televisión Bush
- televisión Dual
- televisión Aspes
- televisión Salora
- televisión Sagem
- televisión Nevir
- televisión Teac
- televisión Nextbase
- televisión Techwood
- televisión Vivo
- televisión Albrecht
- televisión SVAN
- televisión Sogo
- televisión Alba
- televisión RCA
- televisión ECG
- televisión AudioSonic
- televisión Manhattan
- televisión Proline
- televisión JGC
- televisión Orion
- televisión ITT
- televisión ILive
- televisión Intenso
- televisión Fantec
- televisión Cecotec
- televisión Roadstar
- televisión VIZIO
- televisión XD Enjoy
- televisión Wharfedale
- televisión Technika
- televisión Seiki
- televisión TechLine
- televisión Monster
- televisión Bauhn
- televisión V7
- televisión Airis
- televisión Majestic
- televisión Star-Light
- televisión Vestel
- televisión Continental Edison
- televisión Iiyama
- televisión RevolutionHD
- televisión GPX
- televisión CHiQ
- televisión MBM
- televisión Orima
- televisión SereneLife
- televisión Lexibook
- televisión AG Neovo
- televisión Philco
- televisión Kunft
- televisión GoGen
- televisión Kogan
- televisión Graetz
- televisión Emerson
- televisión Kemo
- televisión Insignia
- televisión Xoro
- televisión Manta
- televisión SunBriteTV
- televisión JTC
- televisión Reflexion
- televisión Planar
- televisión QBell Technology
- televisión SYLVOX
- televisión Dyon
- televisión Schaub Lorenz
- televisión Daitsu
- televisión Xiron
- televisión Alden
- televisión Alphatronics
- televisión Aldi
- televisión Allview
- televisión AYA
- televisión Aristona
- televisión Apex
- televisión Ziggo
- televisión Icy Box
- televisión Palsonic
- televisión Funai
- televisión Saba
- televisión Antarion
- televisión Tevion
- televisión Proscan
- televisión Tucson
- televisión Sunstech
- televisión Nabo
- televisión Sylvania
- televisión Marquant
- televisión Nordmende
- televisión AudioAffairs
- televisión Magnum
- televisión Kubo
- televisión Coby
- televisión Seg
- televisión Metz
- televisión Qilive
- televisión Changhong
- televisión Naxa
- televisión Mpman
- televisión Cello
- televisión Mx Onda
- televisión Peaq
- televisión Humax
- televisión Superior
- televisión Difrnce
- televisión Grunkel
- televisión Avtex
- televisión Odys
- televisión NPG
- televisión Bluesky
- televisión Videocon
- televisión Durabase
- televisión HKC
- televisión Edenwood
- televisión Woxter
- televisión Premier
- televisión Teleco
- televisión Opera
- televisión LTC
- televisión Horizon
- televisión Elements
- televisión Viewpia
- televisión CGV
- televisión Online
- televisión Doffler
- televisión DirecTV
- televisión Tele 2
- televisión Mystery
- televisión Telesystem
- televisión Jay-tech
- televisión EKO
- televisión E-motion
- televisión Mitsai
- televisión Selfsat
- televisión High One
- televisión Tve
- televisión ISymphony
- televisión Pantel
- televisión Magnavox
- televisión ATYME
- televisión HCI
- televisión Inno-Hit
- televisión Lin
- televisión Engel
- televisión Digihome
- televisión Englaon
- televisión Reflex
- televisión Astar
- televisión Visco
- televisión Tivax
- televisión H&B
- televisión Norcent
- televisión TELE System
- televisión TIM
- televisión Oyster
- televisión Belson
- televisión Vision Plus
- televisión Sbr
- televisión Voxx
- televisión Rm 2000
- televisión Hoher
- televisión Felson
- televisión Elbe
- televisión Axing
- televisión FFalcon
- televisión Smart Tech
- televisión Séura
- televisión Mitzu
- televisión Caratec
- televisión JTC24
- televisión Kivi
- televisión Smart Brand
- televisión FOX Electronics
Nyeste televisión Manualer

20 Februar 2025

19 Februar 2025
19 Februar 2025

10 Februar 2025
5 Februar 2025
30 Januar 2025

30 Januar 2025

15 Januar 2025
15 Januar 2025
15 Januar 2025