Philips DVP5505S Manual
Philips
DVD afspiller
DVP5505S
Læs nedenfor 📖 manual på dansk for Philips DVP5505S (41 sider) i kategorien DVD afspiller. Denne guide var nyttig for 22 personer og blev bedømt med 4.5 stjerner i gennemsnit af 2 brugere
Side 1/41

8239 300 34351
DVD VIDEO PLAYER DVP5500S
DVP5505S
User manual
Thank you for choosing Philips.
Need help fast?
Read your User’s Manual rst for quick tips that make using
your Philips product more enjoyable.
If you have read your instructions and still need assistance,
you may access our online help at www.philips.com/support
01-41 DVP5505S_EU_008 20/01/2005, 4:48 PM1

8239 300 34351
Important notes for users in the
U.K.
Mains plug
This apparatus is tted with an approved 13
Amp plug. To change a fuse in this type of plug
proceed as follows:
1Remove fuse cover and fuse.
2Fix new fuse which should be a BS1362 5 Amp,
A.S.T.A. or BSI approved type.
3Ret the fuse cover.
If the tted plug is not suitable for your jack
outlets, it should be cut o and an appropriate
plug fitted in its place.
If the mains plug contains a fuse, this should
have a value of 5 Amp. If a plug without a fuse
is used, the fuse at the distribution board
should not be greater than 5 Amp.
Note: The severed plug must be disposed to
avoid a possible shock hazard should it be
inserted into a 13 Amp jack elsewhere.
How to connect a plug
The wires in the mains lead are coloured with
the following code: blue = neutral (N),
brown = live (L).
¶As these colours may not correspond with the
colour markings identifying the terminals in
your plug, proceed as follows:
– Connect the blue wire to the terminal
marked N or coloured black.
– Connect the brown wire to the terminal
marked L or coloured red.
– Do not connect either wire to the earth
terminal in the plug, marked E (or ) ore
coloured green (or green and yellow).
Before replacing the plug cover, make certain
that the cord grip is clamped over the sheath
of the lead - not simply over the two wires.
Copyright in the U.K.
Recording and playback of material may
require consent. See Copyright Act 1956 and
The Performer’s Protection Acts 1958 to 1972.
CAUTION
Use of controls or adjustments or
performance of procedures other
than herein may result in hazardous
radiation exposure or other unsafe
operation.
VAROITUS
Muiden kuin tässä esitettyjen
toimintojen säädön tai asetusten
muutto saattaa altistaa vaaralliselle
säteilylle tai muille vaarallisille
toiminnoille.
01-41 DVP5505S_EU_008 20/01/2005, 4:49 PM2
8239 300 34351
DK
Advarsel: Usynlig laserstråling ved
åbning når sikkerhedsafbrydere er ude
af funktion. Undgå utsættelse for
stråling.
Bemærk: Netafbryderen er sekundært
indkoblet og ofbryder ikke strømmen
fra nettet. Den indbyggede netdel er
derfor tilsluttet til lysnettet så længe
netstikket sidder i stikkontakten.
S
Klass 1 laseraparat
Varning! Om apparaten används på
annat sätt än i denna bruksanvisning
specificerats, kan användaren utsättas
för osynlig laserstrålning, som
överskrider gränsen för laserklass 1.
Observera! Stömbrytaren är sekundärt
kopplad och bryter inte strömmen från
nätet. Den inbyggda nätdelen är
därför ansluten till elnätet så länge
stickproppen sitter i vägguttaget.
SF
Luokan 1 laserlaite
Varoitus! Laitteen käyttäminen muulla
kuin tässä käyttöohjeessa mainitulla
tavalla saattaa altistaa käyttäjän
turvallisuusluokan 1 ylittävälle
näkymättömälle lasersäteilylle.
Oikeus muutoksiin varataan. Laite ei
saa olla alttiina tippu-ja roiskevedelle.
Huom. Toiminnanvalitsin on kytketty
toisiopuolelle, eikä se kytke laitetta irti
sähköverkosta. Sisäänrakennettu
verkko-osa on kytkettynä
sähköverkkoon aina silloin, kun pistoke
on pistorasiassa.
‘CONSUMERS SHOULD NOTE THAT NOT
ALL HIGH DEFINITION TELEVISION SETS
ARE FULLY COMPATIBLE WITH THIS
PRODUCT AND MAY CAUSE ARTIFACTS
TO BE DISPLAYED IN THE PICTURE. IN
CASE OF 525 OR 625 PROGRESSIVE SCAN
PICTURE PROBLEMS, IT IS RECOMMENDED
THAT THE USER SWITCH THE
CONNECTION TO THE ‘STANDARD
DEFINITION’ OUTPUT. IF THERE ARE
QUESTIONS REGARDING OUR TV SET
COMPATIBILITY WITH THIS MODEL 525p
AND 625p DVD PLAYER, PLEASE CONTACT
OUR CUSTOMER SERVICE CENTER.’
The apparatus shall not be exposed to dripping
or splashing and no objects filled with liquids,
such as vases, shall be placed on apparatus.
Due to the inconsistency of disc formats
provided by various disc manufacturers, your
DVD system may require a playability
enhancement or upgrade. As DVD technology
advances, these enhancements will become
common and will be easy to complete.
Go to www.philips.com/support for
software upgrade.
01-41 DVP5505S_EU_008 20/01/2005, 4:49 PM3
8239 300 34351
General Information
CAUTION
(WARNING LOCATION: ON THE
BACKPLATE OF THE SET)
NEVER MAKE OR CHANGE
CONNECTIONS WITH THE
POWER SWITCHED ON.
This DVD player is in conformity
with the EMC directive and low-
voltage directive.
Manufactured under license from Dolby
Laboratories. “Dolby”, “Pro Logic” and the
double-D symbol are trademarks of Dolby
Laboratories.
Laser safety
This unit employs a laser. Due to possible
eye injury, only a qualied service person
should remove the cover or attempt to
service this device.
NOTE:
PICTURES SHOWN MAYBE
DIFFERENT BETWEEN
COUNTRIES.
LASER
Type Semiconductor laser
GaAlAs
Wave length 650 nm (DVD)
780 nm (VCD/CD)
Output Power 7 mW (DVD)
10 mW (VCD/CD)
Beam divergence 60 degree
For Customer Use:
Read carefully the information located at
the rear of your DVD VIDEO player and
enter below the Serial No. Retain this
information for future reference.
Model No. DVP 5500S / DVP 5505S
Serial No. _______________
Environmental Information
All unnecessary packaging has been
omitted. The packaging has been made
easy to separate into two materials:
cardboard (box, buffer) and polyethylene
(bags, protective foam sheet).
Your DVD player consists of materials
which can be recycled and reused if
disassembled by a specialised company.
Please observe the local regulations
regarding the disposal of packaging
materials, exhausted batteries and old
equipment.
Important Note:
Due to the numerous versions of new
CD-Audio copy protection or
enhanced CD-Audio protection
recently available on certain discs,
Philips is unable to guarantee that
this DVD Player is fully compatible
with such new discs. Should you have
difficulty playing any such CD-Audio
discs, kindly refer them to your CD-
Audio disc retailer.
DivX, DivX Certified, and
associated logos are
trademarks of
DivXNetworks, Inc and
are used under license.
“DTS”, and “DTS Digital Surround” are
registered trademarks of Digital Theater
Systems, Inc.
01-41 DVP5505S_EU_008 20/01/2005, 4:49 PM4

8239 300 34351
Eng lish
Franç ais
Deutsc h
Nederlands
5
Index
CAUTION
VISIBLE AND INVISIBLE LASER
RADIATION WHEN OPEN.
AVOID EXPOSURE TO BEAM.
ADVARSEL
SYNLIG OG USYNLIG
LASERSTRÅLING VED ÅBNING
UNDGÅ UDSÆTTELSE FOR STRÅLING
VARNING
SYNLIG OCH OSYNLIG
LASERSTRÅLNING NÄR DENNA DEL
ÄR ÖPPNAD BETRAKTA EJ STRÅLEN
VARO!
AVATTAESSA OLET ALTTIINA
NÄKYVÄLLE JA NÄKYMÄTTÖMÄLLE
LASER SÄTEILYLLE. ÄLÄ KATSO
SÄTEESEEN
VORSICHT
GEFAHR VON SICHTBARER UND
UNSICHTBARER LASERSTRAHLUNG
BEI GEÖFFNETEM GEHÄUSE.
ATTENTION
RAYONNEMENT LASER VISIBLE ET
INVISIBLE EN CAS D’OUVERTURE
EXPOSITION DANGEREUSE AU
FAISCEAU
English --------------------------------------- 6
Français------------------------------------ 42
Deutsch ------------------------------------ 78
Nederlands ------------------------------114
01-41 DVP5505S_EU_008 20/01/2005, 4:49 PM5

8239 300 34351
Eng lish
7
DVD Menu Options
General Setup menu ............................... 26-27
Locking/Unlocking the disc for viewing ... 26
Dimming system’s display screen .............. 26
Programming disc tracks .......................26-27
OSD Language ............................................... 27
Screen Saver - turning on/o ..................... 27
Sleep ................................................................ 27
DivX VOD registration code ..................... 27
Audio Setup Menu ................................... 28-29
Analogue output ........................................... 28
Digital Audio Setup ....................................... 28
Sound Mode ................................................... 29
Speaker setup ................................................ 29
CD Upsampling ............................................. 29
Night Mode - turning on/off....................... 29
Video Setup Menu ...................................30-32
TV Type ........................................................... 30
Setting the TV Display ................................. 30
Progressive - turning on/o ........................ 31
Picture Setting ........................................ 31-32
Switching the YUV/RGB .............................. 32
Preference Page ........................................ 33-35
Audio, Subtitle, Disc Menu .......................... 33
Restricting playback by Parental Control .....
.................................................................. 33-34
PBC .................................................................. 34
MP3/JPEG Menu - turning on/o............... 34
Changing the Password ............................... 35
Setting the DivX Subtitle font ................... 35
Restoring to original settings ..................... 35
Sound and Volume Controls
Setting the speakers’ channels ....................36
Selecting surround sound ............................ 37
Selecting digital sound eects ..................... 37
Volume control .............................................. 37
Troubleshooting ......................... 38–39
Specications ...................................... 40
Glossary ...................................................................... 41
Contents
01-41 DVP5505S_EU_008 20/01/2005, 4:49 PM7

8239 300 34351
Eng lish
8
Supplied accessories
Remote Control
and
two AA batteries
Introduction
Care and safety information
●Power consumption
– When the system is switched to
Standby mode, it is still consuming power.
To disconnect the system from the power
supply completely, remove the AC power
plug from the wall jack.
●Avoid high temperatures, moisture,
water and dust
– Do not expose the player, batteries or
discs to humidity, rain, sand or excessive
heat (caused by heating equipment or
direct sunlight.)
●Avoid condensation problem
– The lens may cloud over when the
player is suddenly moved from cold to
warm surroundings, making it impossible
to play a disc. Leave the player in the
warm environment until the moisture
evaporates.
PREVI EW
PREVI EW
PREVI EW
PREVI EW
PREVI EW
MUTE
MUTE
MUTE
MUTE
MUTE
SOUND
SOUND
SOUND
SOUND
SOUND
SURROUND
SURR
SURR
SURR
SURR
OUND
OUND
OUND
OUND
SLEEP
SLEEP
SLEEP
SLEEP
SLEEP
DIM
DIM
DIM
DIM
DIM
●Do not block the vents
– Do not operate the DVD Player in an
enclosed cabinet, allow about 10 cm (4
inch) of free space all around the player
for adequate ventilation.
10 cm
(4 inches)
10 cm
(4 inches) 10 cm
(4 inches)
PHILIPS
●Care of the cabinet
– Use a soft cloth slightly moistened with
a mild detergent solution. Do not use a
solution containing alcohol, spirits,
ammonia or abrasives.
●Finding a suitable location
– Place the player on a at, hard, and
stable surface.
●Disc handling
– To clean a CD, wipe it in a
straight line from the center
towards the edge using a soft,
lint-free cloth. A cleaning
agent may damage the disc!
– Write only on the printed
side of a CDR(W) and only with a soft felt-
tipped pen.
– Handle the disc by its edge, do not
touch the surface.
01-41 DVP5505S_EU_008 20/01/2005, 4:49 PM8

8239 300 34351
Eng lish
9
Connections
Connecting TV
AUDIO
IN
S-VIDEO
IN
VIDEO IN
TV IN
AUDIO
IN
S-VIDEO
IN
VIDEO IN
TV IN
1
IMPORTANT!
– You only need to make one video
connection from the following
options, depending on the
capabilities of your TV system.
– Connect the DVD system directly
to the TV.
– A SCART connection will let you
use features both Audio and Video
on the DVD Player.
Using SCART jack
●Use the SCART cable (black) to connect
the DVD Player’s SCART jack (TV OUT)
to the corresponding Scart input jacks on
the TV (cable not supplied).
Helpful Hint:
– Ensure that the “TV” indication on
SCART cable is connected to the TV
set and “DVD” indication on SCART
cable is connected to the DVD Player.
AUDIO
IN
S-VIDEO
IN
VIDEO IN
TV IN
AUDIO
IN
S-VIDEO
IN
VIDEO IN
TV IN
2
1
Using Composite Video jacks
(CVBS)
1Use the composite video cable (yellow) to
connect the DVD Player’s CVBS (VIDEO)
jack to the video input jack (or labeled as
A/V In, Video In, Composite or Baseband)
on the TV (cable not supplied).
2To hear the sound of this DVD Player
through your TV, use the audio cables
(white/red) to connect AUDIO OUT
[FRONT (L/R)] jacks of the DVD Player
to the corresponding AUDIO IN jacks on
the TV (cable not supplied).
01-41 DVP5505S_EU_008 20/01/2005, 4:49 PM9

8239 300 34351
Eng lish
10
Connections
AUDIO
IN
V (Pr/Cr)
U (Pb/Cb)
Y
VIDEO IN
COMPONENT
VIDEO IN
AUDIO
IN
V (Pr/Cr)
U (Pb/Cb )
Y
S-VIDEO
IN
VIDEO IN
COMPONENTVIDEO IN
2
1
IMPORTANT!
– The progressive scan video
quality is only possible when using Y
Pb Pr and a progressive scan TV is
required.
Using Component Video jacks
(Y Pb Pr)
1Use the component video cables (red/
blue/green) to connect the DVD system’s
Y Pb Pr jacks to the corresponding
Component video input jacks (or labeled
as Y Pb Pr) on the TV (cable not supplied).
2To hear the sound of this DVD Player
through your TV, use the audio cables
(white/red) to connect AUDIO OUT
[FRONT (L/R)] jacks of the DVD Player
to the corresponding AUDIO IN jacks on
the TV (cable not supplied).
3Proceed to page 16 for detailed
Progressive Scan set up.
IMPORTANT!
– If your TV only has a single
Antenna In jack (or labeled as 75
ohm or RF In,) you will need an RF
modulator in order to view the DVD
playback on the TV. See your
electronics retailer or contact
Philips for details on RF modulator
availability and operations.
Using an accessory RF modulator
1Use the composite video cable (yellow) to
connect the DVD Player’s VIDEO OUT
jack to the video input jack on the RF
modulator.
2Use the RF coaxial cable (not supplied) to
connect the RF modulator to your TV’s
RF jack.
AUDIO IN
R L
VIDEO
IN
TO TVINT IN
CH3 CH4
2
1
RF coaxial cable to TV
Back of RF Modulator
(example only)
Antenna or
Cable TV signal
01-41 DVP5505S_EU_008 20/01/2005, 4:49 PM10

8239 300 34351
Eng lish
12
Connections
Stereo system has Dolby Pro Logic
or Right / Left Audio In jack
1Select one of the video connections
(CVBS VIDEO IN, SCART or
COMPONENT VIDEO IN) depending on
the options available on your TV.
2Use the audio cables (white/red) to
connect AUDIO OUT [FRONT (L/R)]
jacks of the DVD Player to the
corresponding AUDIO IN jacks on the
stereo system (cable not supplied).
AUDIO
IN
STEREO
DIGITAL
Optional: Connecting to an
Audio System
Optional: Connecting Digital AV
Receiver
Receiver has a PCM, Dolby Digital,
or MPEG2 decoder
1Select one of the video connections
(CVBS VIDEO IN, SCART or
COMPONENT VIDEO IN) depending on
the options available on your TV.
2Connect the COAXIAL jack of the DVD
Player to the corresponding Digital Audio
In jack on your Receiver (cable not
supplied).
3Set the DVD Player’s Digital Output to
PCM-ONLY or ALL depending on the
capabilities of your Receiver (see page 28
“Digital Output”).
Helpful Hint:
– If the audio format of the Digital Output
does not match the capabilities of your
receiver, the receiver will produce a strong,
distorted sound or no sound at all.
AUDIO
IN
DIGITAL
AV Receiver
01-41 DVP5505S_EU_008 20/01/2005, 4:49 PM12

8239 300 34351
Eng lish
13
Functional Overview
Front and Rear Panels
TV OUT
– Connect to Scart input of a TV
Multichannel Audio Out
– Center speaker, subwoofer, front
and rear speakers multichannel
connection
COAXIAL (Digital audio out)
– Connect to coaxial AUDIO input of a
digital audio equipment
Mains (AC Power Cord)
– Connect to a standard AC outlet
VIDEO OUT (CVBS)
– Connect to CVBS Video input of a TV
YPbPr (Component Video Out)
– Connect to YPbPr input of a TV
T NEXT
– To search or select next chapter or track
PREV S
– To search or select previous chapter or
track
9 STOP
– To stop playback
2; PLAY
– To start or interrupt playback
IR Sensor
– Point the remote control towards this
sensor
STANDBY-ON B
– To switch the DVD Player to Standby
mode or ON
Disc tray
OPEN/CLOSE /
– Open/Close the disc tray
Display
– Shows the current status of the DVD
Player
Caution: Do not touch the inner pins of the jacks on the rear panel.
Electrostatic discharge may cause permanent damage to the unit.
01-41 DVP5505S_EU_008 20/01/2005, 4:49 PM13
8239 300 34351
Eng lish
14
Functional Overview
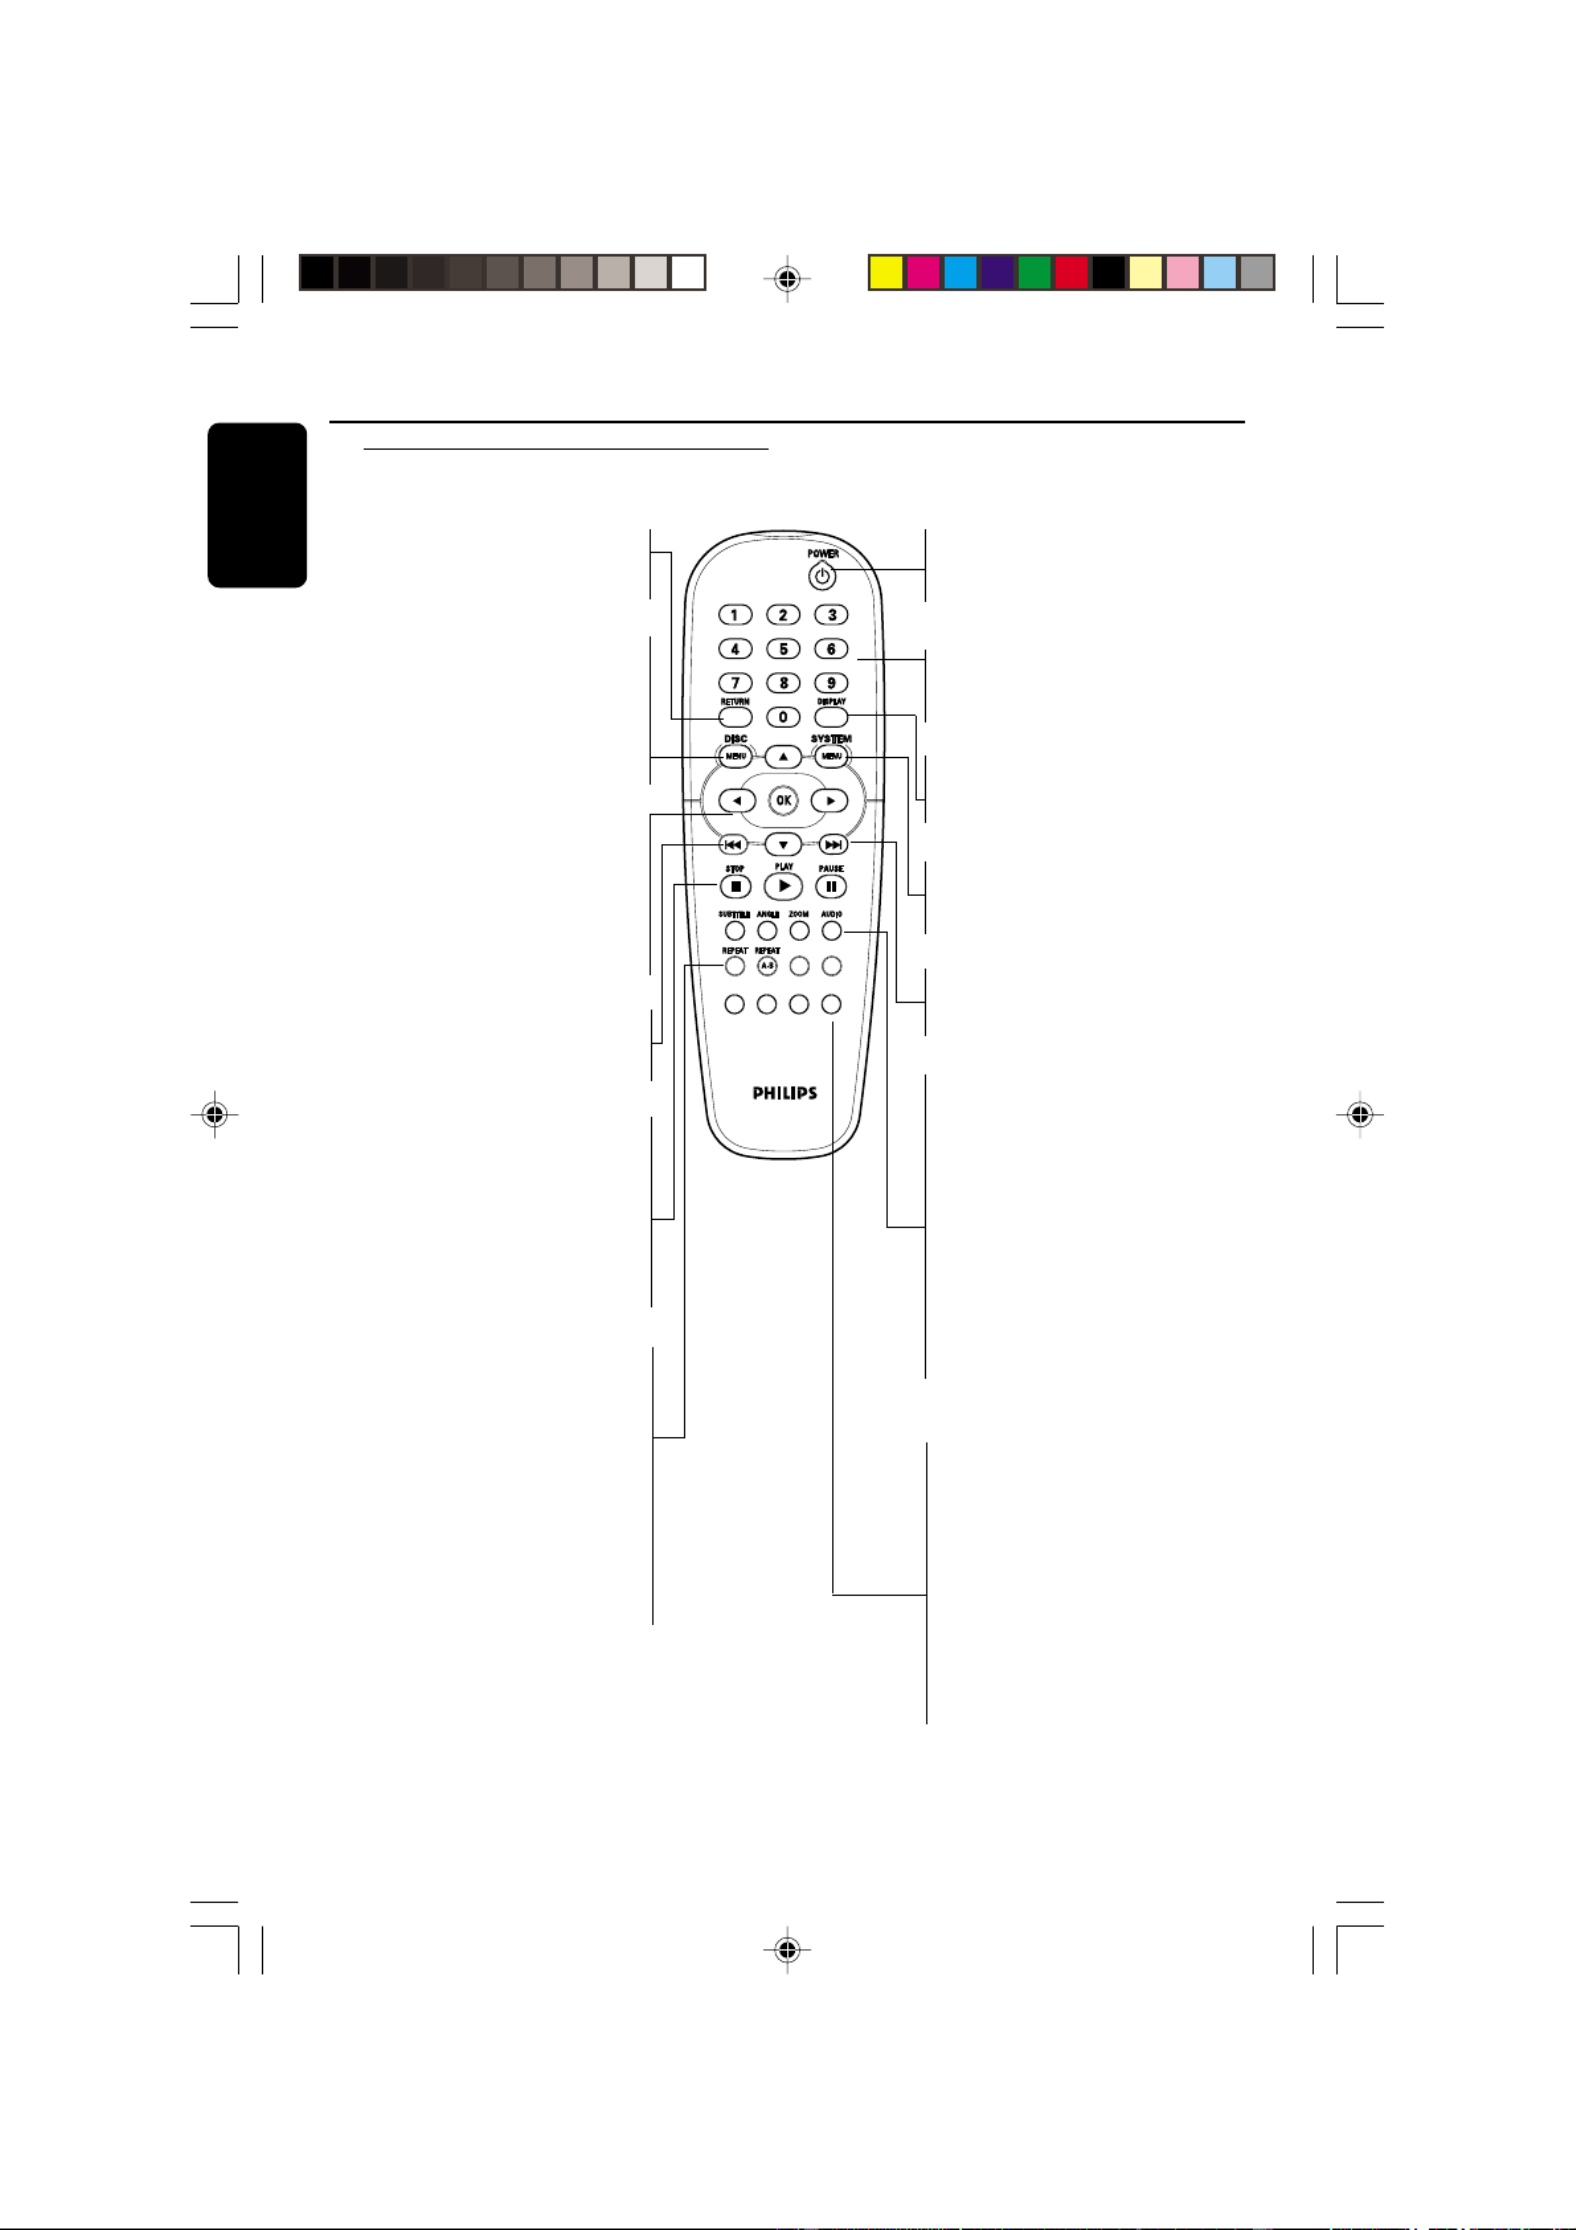
Remote Control
PREVIEW
PRE VI
PRE VI
PRE VI
PRE VIEW
EW
EW
EW
MUTE
MUT E
MUT E
MUT E
MUT E
SOUND
SO
SO
SO
SO
UND
UND
UND
UND
SURROUND
SU
SU
SU
SUR
R
R
R
RO
RO
RO
RO
UN
UN
UN
UND
D
D
D
SLEEP
SLEEP
SLEEP
SLEEP
SLEEP
DIM
DIM
DIM
DIM
DIM
RETURN/TITLE
– To go back to previous menu/ show
title menu
DISC MENU
– Enters or exits the disc contents
menu
– Switches on or off the playback
control mode (for VCD version
2.0 only)
1 2 3 4
– Selects an item in the menu/
fast forward/backward, slow forward/
backward
OK
– Acknowledge menu selection
S
– To search or select previous
chapter or track
STOP ( 9 )
– To stop playback
PLAY ( B )
– To start playback
PAUSE ( ; )
– To pause playback temporarily /
frame-by-frame playback
REPEAT
– Selects various repeat modes
REPEAT (A-B)
– Repeats playback a specific section
on a disc
PREVIEW
– To preview the content of a track
or whole disc
MUTE
– Disables or enables sound output
POWER B
– To switch the DVD player to
standby mode or ON
0-9 numerical key pad
– Selects numbered items in a
menu
DISPLAY
– Displays information on TV
screen during playback
SYSTEM MENU
– Access or exit DVD Player’s
system menu
T
– To search or select next chapter
or track
SUBTITLE
– To access subtitle language
system menu
ANGLE
– Selects a DVD camera angle
ZOOM
– Enlarge a picture on the TV
screen
AUDIO
– To access audio language system
menu
DIM
– Selects different levels of
brightness for display panel
SLEEP
– Sets the sleep timer function.
SOUND
– Selects a sound effect.
SURROUND
– Selects multichannel surround or
stereo mode.
Helpful Hint:
Press “STOP” for about 2 seconds to
OPEN or CLOSE disc tray.
01-41 DVP5505S_EU_008 20/01/2005, 4:49 PM14

8239 300 34351
Eng lish
15
PREVIEW
PREVIEW
PREVIEW
PREVIEW
PREVIEW MUTE
MUTE
MUTE
MUTE
MUTE
Getting Started
Step 1: Inserting batteries into
the Remote Control
1
3
2
1Open the battery compartment.
2Insert two batteries type R06 or AA,
following the indications ( ) inside+-
the compartment.
3Close the cover.
Using the Remote Control to
operate the Player
1Aim the Remote Control
directly at the remote
sensor (IR) on the front
panel.
2Do not put any objects
between the Remote
Control and the DVD
Player while operating
the DVD Player.
CAUTION!
–Remove batteries if they are
exhausted or if the Remote Control
is not being used for a long time.
–Do not use old and new or
different types of batteries in
combination.
–Batteries contain chemical
substances, so they should be
disposed properly.
Step 2: Setting up the TV
IMPORTANT!
Make sure you have completed all
the necessary connections. (See
pages 9-10 “ ”Connecting TV ).
1Turn on the TV and set to the correct
video-in channel. You should see the
Philips DVD background screen on the
TV.
2Usually these channels are between the
lowest and highest channels and may be
called FRONT, A/V IN, or VIDEO. See your
TV manual for more details.
➜Or, you may go to channel 1 on your
TV, then press the Channel down button
repeatedly until you see the Video In
channel.
➜Or, the TV Remote Control may have a
button or switch that chooses dierent
video modes.
➜Or, set the TV to channel 3 or 4 if you
are using an RF modulator.
3If you are using external equipment, (eg.
audio system or receiver), turn it on and
select the appropriate input source for
the DVD Player output. Refer to the
equipment owner’s manual for detail.
01-41 DVP5505S_EU_008 20/01/2005, 4:49 PM15

8239 300 34351
Eng lish
16
Setting up Progressive Scan feature
(for Progressive Scan TV only)
The progressive scan display twice the
number of frames per seconds than
interlaced scanning (ordinary normal TV
system). With nearly double the number
of lines, progressive scan oers higher
picture resolution and quality.
IMPORTANT!
Before enabling the progressive scan
feature, you must ensure:
1) Your TV can accept progressive signals,
a progressive scan TV is required.
2) You have connected the DVD player to
your TV using Y Pb Pr (see page 10.)
1Turn on your TV.
2Turn o your TV progressive scan mode
or turn on interlaced mode (refer to your
TV user manual.)
3Press POWER on the remote control to
turn on the DVD player.
4Select the correct Video Input channel.
(See page 15).
➜The DVD background screen appears
on the TV.
5Press SYSTEM MENU.
6Press repeatedly to select {VIDEO2
SETUP PAGE}.
Set P-SCAN On/Off
- - Video Setup Page - -
TV Type
TV Display
Progressive On
Picture Setting Off
Component
7Select {PROGRESSIVE} to {ON}, then OK
to confirm.
➜The instruction menu appears on the
TV.
1) ENSURE YOUR TV HAS PROGRESSIVE SCAN.
2) CONNECT WITH YPBPR (GBR) VIDEO CABLE.
3) IF THERE IS A DISTORTED PICTURE, WAIT
Cancel
OK
ACTIVATING PROGRESSIVE:
15 SECONDS FOR AUTO RECOVERY.
8Press 1 to highlight
OK
in the menu
and press to conrm.OK
There will be a distorted picture on
your TV at this state until you turn
on the progressive scan mode on
your TV.
9Turn on your TV progressive scan mode
(refer to your TV user manual.)
➜The below menu appears on the TV.
CONFIRM AGAIN TO USE PROGRESSIVE
SCAN. IF THE PICTURE IS GOOD,
PRESS OK BUTTON ON REMOTE
Cancel
OK
0Press 1 to highlight
OK
in the menu
and press to conrm.OK
➜The set up is complete now and you
can start enjoy the high quality picture.
Getting Started
TIPS: To return to the previous menu, press .1
To remove the menu, press SYSTEM MENU.
01-41 DVP5505S_EU_008 20/01/2005, 4:49 PM16

8239 300 34351
English
18
Step 3: Setting language
preference
You can select your preferred language
settings. This DVD Player will
automatically switch to the language for
you whenever you load a disc.
Setting the OSD Language
The On-screen language for the system
menu will remain as you set it, regardless
of various disc languages.
Set OSD Language English(UK)
- - General Setup Page - -
Disc Lock
Display Dim
Program
OSD Language ENGLISH(UK)
Screen Saver FRANÇAIS
Sleep DEUTSCH
DIVX(R) Vod Code NEDERLANDS
1Press SYSTEM MENU.
2Press 2 to select {GENERAL SETUP
PAGE}.
3Press 3 4 to highlight {OSD
LANGUAGE}, then press 2.
4Press 3 4 to select a language and press
OK.
Getting Started
Setting the Audio, Subtitle and Disc
menu language
You can choose your own preferred
language or soundtrack from audio,
subtitles and disc menu languages. If the
language selected is not available on the
disc, the disc’s default language will be
used instead.
Set Preference To English
Audio English
Subtitle French
Disc Menu Spanish
Parental Chinese
PBC Japanese
Mp3 / Jpeg Nav Korean
Password Setup Russian
- - Preference Page - -
1Press STOP twice then, press SYSTEM
MENU.
2Press 2 repeatedly to select
{PREFERENCE PAGE}.
3Press to highlight one of the options 3 4
below at a time, then press 2.
– ‘Audio’ (disc’s soundtrack)
– ‘Subtitle’ (disc’s subtitles)
– ‘Disc Menu’ (disc’s menu)
4Press 3 to select a language and press4
OK.
If the language you want is not in the
list, then select {OTHERS},
then use the numeric keypad (0-9) on
the remote to enter the 4-digit language
code ‘XXXX’ (see page 150 “Language
Code”) and press OK.
5Repeat steps 3 4~ for other language
settings.
TIPS: To return to the previous menu, press 1.
To remove the menu, press SYSTEM MENU.
01-41 DVP5505S_EU_008 20/01/2005, 4:49 PM18
8239 300 34351
English
19
Disc Operations
IMPORTANT!
– øIf the inhibit icon ( ) appears on
the TV screen when a button is
pressed, it means the function is not
available on the current disc or at
the current time.
– Depending on the DVD or VIDEO
CD, some operations may be
different or restricted.
– Do not push on the disc tray or
put any objects other than disc on
the disc tray. Doing so may cause
the disc player malfunction.
Playable Discs
Your DVD Player will play:
– Digital Video Discs (DVDs)
– Video CDs (VCDs)
– Super Video CDs (SVCDs)
– Super Audio CDs (SACDs)
– Digital Video Discs +
Recordable[Rewritable] (DVD+R[W])
– Compact Discs (CDs)
– MP3/WMA discs, picture (Kodak, JPEG)
files on CD-R(W).
– JPEG/ISO 9660 format
– Maximum 30 characters display.
– Supported sampling frequencies :
32 kHz, 44.1 kHz, 48 kHz (MPEG-1)
16 kHz, 22.05 kHz, 24 kHz (MPEG-2)
– Supported Bit-rates : 32~256 kbps
(MPEG-1), 8~160 kbps (MPEG-2)
variable bitrates
– MPEG-4 disc on CD-R(W):
– Simple profile
– Advanced simple profile (640-480)
– DivX disc on CD-R[W]/DVD+R[W]:
– DivX 3.11, 4.x and 5.x
– Q-pel accurate motion compensation
– Global Motion Compensation (GMC) playback
SUPER VIDEO
Region Codes
DVD discs must be labeled for ALL
regions or Region 2 in order to
play on this Player. You cannot play
Discs that are labeled for other
regions.
Helpful Hints:
– It may not be possible to play CD-R/RW
or DVD-R/RW in all cases due to the type of
disc or condition of the recording.
– If you are having trouble playing a
certain disc, remove the disc and try a
different one. Improper formatted disc will
not play on this DVD Player.
TIPS: The operating features described here might not be possible for certain discs. Always refer
to the instructions supplied with the discs.
Playing discs
1Connect the power cords of the DVD
Player and TV (and any optional stereo or
AV receiver) to a power outlet.
2Turn on the TV power and set to the
correct Video In channel. (See page 15
“Setting up the TV”).
3Press STANDBY-ON on the DVD Player
front panel.
➜You should see the Philips DVD
background screen on the TV.
4Press button to openOPEN/CLOSE 0
the disc tray and load in a disc, then press
the same button again to close the disc
tray.
➜Make sure the label side is facing up.
For double-sided discs, load the side you
want to play facing up.
5Playback will start automatically. If not
press PLAY B.
➜If a disc menu appears on the TV, see
page 21 “Using the Disc Menu”.
➜If the disc is locked by parental control,
you must enter your six-digit password.
(See page 35).
ALL
ALL
ALL
ALLALL
2
2
2
22
01-41 DVP5505S_EU_008 20/01/2005, 4:49 PM19

8239 300 34351
English
20
Disc Operations
Basic playback controls
Unless otherwise stated, all operations
described are based on Remote Control
use.
Pausing playback
1During playback, press PAUSEÅ.
➜Playback will pause and sound will be
muted.
2To resume normal playback, press
PLAY .B
Selecting track/chapter
●Press / or use the numericS T
keypad (0-9) to key in a track/chapter
number.
➜If repeat mode is active, pressing /S
T will replay the same track/chapter.
Searching backward/forward
●Press and hold , then press 1 / 2 PLAY
B to resume normal playback.
➜While searching, pressing / 1 2
repeatedly again will decrease/increase
the search speed.
Stopping playback
●Press Ç.
TIPS: The operating features described here might not be possible for certain discs. Always refer
to the instructions supplied with the discs.
Selecting various repeat/shuffle
functions
Repeat play mode
●While playing a disc, press REPEAT
continuously to choose a ‘Play Mode’.
CHAPTER (DVD)
– to repeat playback of the current
chapter.
TRACK/TITLE (CD/SVCD/VCD/DVD)
– to repeat playback of the current
track (CD/SVCD/VCD)/title (DVD).
ALL
– to repeat playback of all the disc and
all the programmed tracks.
Helpful Hint:
– For VCD, repeat playback is not possible
if the PBC mode is switched on.
Repeating a section within a
chapter/track
1While playing a disc, press REPEAT A-B
at your chosen starting point.
2Press REPEAT A-B again at your chosen
end point.
➜The section A and B can be set only
within the same chapter/track.
➜The section will now repeat
continuously.
3To exit the sequence, press REPEAT
A-B.
01-41 DVP5505S_EU_008 20/01/2005, 4:49 PM20

8239 300 34351
English
21
Operations for video playback
(DVD/VCD/SVCD)
Using the Disc Menu
Depending on the disc, a menu may
appear on the TV screen once you load in
the disc.
To select a playback feature or item
●Use keys or 1 2 3 4 numeric keypad
(0-9) on the remote, then press toOK
start playback.
To access or remove the menu
●Press on the remote.DISC MENU
Zooming in
This function allows you to enlarge the
picture on the TV screen and to pan
through the enlarged picture.
1During playback, press ZOOM
repeatedly to display the picture with
different scales.
➜Use keys to pan through the1 2 3 4
enlarged picture.
➜Playback will continue.
2Press ZOOM repeatedly to return to
the original size.
Using the OSD menu
OSD menu shows the disc playback
information (for example, title or chapter
number, elapsed playing time, audio/
subtitle language), a number of operations
can be done without interrupting disc
playback.
1During playback, press DISPLAY.
➜A list of available disc information
appears on the TV screen.
Menu
Bitrate 61 Title Remain 0:48:59
Title 01/01
Chapter 09/12
Audio 2CH CHI
Subtitle Off
Menu
Bitrate 71 Total Elapsed 0:01:32
Track 01/01
Disc Time 0:48:53
Track Time 0:48:53
Repeat Off
2Press to view the information and3 4
press OK to access.
3Press 2 or OK to select an option.
4Use the numeric keypad (0-9) to input
the number/time or press to make3 4
the selection, then press to confirm.OK
➜Playback will change to the chosen
time or to the selected title/chapter/
track.
TIPS: The operating features described here might not be possible for certain discs. Always refer
to the instructions supplied with the discs.
Disc Operations
Resuming playback from the last
stopped point
Resume playback of the last 5 discs is
possible, even if the disc was ejected or
the power switched off.
●Load one of the last 5 discs.
➜ “LOAD” appears.
●Press PLAY B and the disc will be played
back from the last point.
To cancel resume mode
●In stop mode, press STOP 9 again.
Slow Motion
1Press 3 4 during playback to select the
required speed: 1/2, 1/4, 1/8 or 1/16
(backward or forward).
➜Sound will be muted.
2To return to normal speed, press PLAY B.
Helpful Hint:
– Slow backward is not possible on VCDs.
01-41 DVP5505S_EU_008 20/01/2005, 4:50 PM21

8239 300 34351
English
22
Disc Operations
Special DVD Features
Playing a Title
1Press DISC MENU.
➜The disc title menu appears on the TV
screen.
2Use 3 4 1 2 keys or numeric keypad
(0-9) to select a play option.
3Press key to confirm.OK
Camera Angle
●Press repeatedly to selectANGLE
different desired angle.
Changing the Audio Language
For DVD
●Press AUDIO repeatedly to select
different audio languages.
Changing the Audio Channel
For VCD
●Press AUDIO to select the available
audio channels provided by the disc (LEFT
MONO, RIGHT MONO, MIX-MONO,
STEREO).
Subtitles
●Press repeatedly to selectSUBTITLE
different subtitle languages.
Special VCD & SVCD Features
Playback Control (PBC)
For VCD with Playback Control (PBC)
feature (version 2.0 only)
●Press DISC MENU to toggle between
‘PBC ON’ and ‘PBC OFF’.
➜If you select ‘PBC ON’, the disc menu
(if available) will appear on the TV.
➜Use the S T / or the numeric
keypad (0-9) to select a play option.
●During playback, pressing RETURN/
TITLE will return to the menu screen (if
PBC is on).
If you want to skip the index menu
and playback directly from the
beginning,
●Press key on the remoteDISC MENU
control to switch to PBC off.
TIPS: The operating features described here might not be possible for certain discs. Always refer
to the instructions supplied with the discs.
Preview Function (DVD/VCD)
The preview function allows you to
reduce the picture of 6 tracks enough to
display in a full screen.
1Press PREVIEW.
➜The preview menu appears on the TV
screen.
Select Digest Type:
Track Di
g
es
t
Disc Interval
Track Interval
Select Digest Type:
Title Di
g
es
t
Chapter Digest
Title Interval
Chapter Interval
(DVD example) (Video CD example)
01-41 DVP5505S_EU_008 20/01/2005, 4:50 PM22

8239 300 34351
English
23
Disc Operations
TIPS: The operating features described here might not be possible for certain discs. Always refer
to the instructions supplied with the discs.
Playing a DivX disc
This DVD player supports the DivX
movie playback that you download from
your computer onto a CD-R/RW (see
page 27 for more information).
1Load a DivX disc.
➜Playback will start automatically. If not
press PLAY B.
2If the DivX movie contains external
subtitles, the subtitle menu will appear on
the TV screen for your selection.
●In this case, pressing SUBTITLE on the
remote control will turn on or off the
subtitle.
●If multilingual subtitles are embedded on
the DivX disc, pressing SUBTITLE will
change the subtitle language during
playback.
Helpful Hints:
– Subtitle files with the following filename
extensions (.srt, .smi, .sub, .ssa, .ass) are
supported but do not appear on the file
navigation menu.
– The subtitle filename have to be the
same as the filename of the movie.
Playing Super Audio CD (SACD)
There are three types of SACD discs:
single layer, double layer or hybrid disc.
The hybrid disc contains both Super
Audio CD and standard audio CD layers,
only the SACD layer is possible to
playback on this DVD player.
1Load a SACD.
➜The disc menu appears on the TV
screen.
2Playback will start automatically.
➜If the SACD consists of multi-channel
and stereo tracks, multi-channel tracks
will have the priority for playback.
➜To playback stereo tracks, use 3 4 keys
to make your selection from the disc
menu, then press PLAY B.
Helpful Hints:
– SURROUND button is not functional
for SACD playback. You have to access to the
disc menu in order to select between multi-
channel and stereo tracks.
– Programme SACD tracks is not possible.
2Press 3 4 to select the type,PREVIEW
then press OK.
➜The picture of each segment will
appear on the screen.
A B C
D E F
(example for 6 thumbnail pictures display)
3Press 3 4 1 2 to select a track and input
your selected track number using the
numeric keypad (0-9), then press OK.
➜ Playback will start automatically on the
selected track.
●For CDDA (Musical CD)
➜ Press to listen to the firstPREVIEW
10 seconds of each sound track in the
disc.
01-41 DVP5505S_EU_008 20/01/2005, 4:50 PM23

8239 300 34351
English
24
Disc Operations
TIPS: The operating features described here might not be possible for certain discs. Always refer
to the instructions supplied with the discs.
Selecting a folder and track/file
1Press 3 4 to select the folder and press
OK to open the folder.
2Press to select a track/file.3 4
3Press S / T to go to previous/next
page.
4Press OK to confirm.
➜Playback will start from the selected
file to the end of the folder.
●To select another folder from the current
disc, press to return to the root menu,1
then press to make your selection3 4
and press OK to confirm.
During playback, you can;
●Press S / T to select another track/
file in the current folder.
●Press REPEAT continuously to access
different ‘Play Mode’.
➜FOLDER: files will be played back once.
➜REPEAT ONE: one file being played
repeatedly.
➜REPEAT FOLDER: all files in one folder
being played repeatedly.
➜SHUFFLE: all files in the current folder
being played at random order.
●Press Å to pause playback.
Helpful Hints:
– It may not be possible to play certain
MP3/WMA/JPEG/DivX/MPEG-4 disc due to
the configuration and characteristics of the
disc or condition of the recording.
– It is normal to experience an occasional
“skip” while listening to your MP3/WMA
disc.
– It is normal to experience an occasional
pixelation during MPEG-4/DivX playback
due to poor clarity of digital contents during
internet downloading.
– For multi-session discs with different
formats, only the first session will be available.
Playing MP3/WMA/MPEG-4/
JPEG/Kodak Picture CD
IMPORTANT!
You have to turn on your TV and set to
the correct Video In channel. (See page
15 “Setting up the TV”).
General Operation
1Load a disc.
➜The disc reading time may exceed 30
seconds due to the complexity of the
directory/file configuration.
➜The data disc menu appears on the TV
screen.
2Playback will start automatically. If not
press PLAY B.
01:42 04:40
001/020
Coco - Before
Coco - I love
Coco - Jazz
Before
- - - - - -
ALBUM - - - - - -
2002
--
Coco Lee
MP3
MP3
MP3
01-41 DVP5505S_EU_008 20/01/2005, 4:50 PM24

8239 300 34351
English
25
Playing MP3/WMA music and JPEG
picture simultaneously
1Load a disc that contains music and
picture.
➜The disc menu appears on the TV
screen.
2Select an MP3/WMA track.
3During MP3/WMA music playback, select
a picture from the TV screen and press
PLAY .B
➜The picture files will be played back
one after another until end of the folder.
4To quit simultaneous playback, press
Çfollowed by DISC MENU.
Helpful Hint:
– Some files on Kodak or JPEG disc may
be distorted during playback due to the
configuration and characteristics of the disc.
Disc Operations
TIPS: The operating features described here might not be possible for certain discs. Always refer
to the instructions supplied with the discs.
Zoom picture
1During playback, press ZOOM repeatedly
to display the picture with different scales.
2Use keys to view the zoomed1 2 3 4
picture.
Playback with multi-angles
●During playback, press to rotate3 4 1 2
the picture on the TV screen.
3: flip the picture vertically
4: flip the picture horizontally
1: rotate the picture anti-clockwise
2: rotate the picture clockwise
Scan Effect
●Press repeatedly to chooseANGLE
different scan effect.
➜Various scan effect appears on the top
left hand corner on the TV screen.
Special picture disc features
IMPORTANT!
You have to turn on your TV and set to
the correct Video In channel. (See page
15 “Setting the TV”).
●Load a Picture disc (Kodak Picture CD,
JPEG).
➜For Kodak disc, the slide show will
begin.
➜For JPEG disc, the picture menu
appears on the TV screen. Press PLAY B
to start the slide-show playback.
Preview Function (JPEG)
This function shows the content of the
current folder or the whole disc.
1Press STOP during playback.
➜12 thumbnail pictures will appear on
the TV screen.
2Press S / T to display the other
pictures on the previous/next page.
3Use to highlight one of the1 2 3 4
picture and press OK to start playback.
4Press DISC MENU to return to Picture
CD menu.
01-41 DVP5505S_EU_008 20/01/2005, 4:50 PM25

8239 300 34351
English
26
DVD Setup Menu Options
TIPS: To return to the previous menu, press .1
To remove the menu, press SYSTEM MENU.
This DVD Player setup is carried out via
the TV, enabling you to customise the
DVD Player to suit your particular
requirements.
General Setup menu
1In disc mode, press SYSTEM MENU.
2Press 1 2 to select ‘General Setup’ icon.
3Press OK to confirm.
Go to General Setup Page
Disc Lock
Display Dim
Program
OSD Language
Screen Saver
Sleep
DIVX(R) Vod Code
- - General Setup Page - -
Locking/Unlocking the disc for
viewing
Not all discs are rated or coded by the
disc maker. You can prevent a specific disc
from playing by locking the disc. Up to 40
discs can be locked.
1In ‘GENERAL SETUP PAGE’, press 3 to4
highlight {DISC LOCK}, then press 2.
LOCK
Select this to block the playback of the
current disc. Subsequent access to a
locked disc requires six-digit password.
The default password is ‘136 900’ (see
page 35 “Changing the password”).
UNLOCK
Select this to unlock the disc and allow
future playback.
2Press 3 4 to select a setting, then press
OK to confirm your selection.
Dimming player’s display panel
You can select different levels of
brightness for the display screen.
1In ‘GENERAL SETUP PAGE’, press 3 to4
highlight {DISPLAY DIM}, then press 2.
100% – Select this for full brightness.
70% – Select this for medium brightness.
40% – Select this for dimming the display.
2Press 3 4 to select a setting, then press
OK to confirm your selection.
Programming disc tracks (not for
Picture CD/MP3/WMA/SACD)
You can play the contents of the disc in
the order you want by programming the
tracks to be played. Up to 20 tracks can
be stored.
1In ‘GENERAL SETUP PAGE’, press 3 4
to highlight {PROGRAM}, then press 2
to select {INPUT MENU}.
2Press OK to confirm.
1 04
2 10
4 __ 9 __
8 __
7 __
6 __
5 __ 10 __
3 11
Exit START NEXT
Programme : Track (01 - 17)
To input your favourite tracks/chapter
3Use the numeric keypad (0-9) to enter
a valid track/chapter number.
4Use 1 2 3 4 keys to move the cursor to
the next position.
➜If the track number is more than ten,
press T to open the next page and
proceed with programming or,
➜Use 1 2 3 4 keys to highlight {NEXT}
on the programme menu, then press OK.
5Repeat steps 3 4~ to input another
track/chapter number.
01-41 DVP5505S_EU_008 20/01/2005, 4:50 PM26

8239 300 34351
English
27
DVD Setup Menu Options
TIPS: To return to the previous menu, press 1.
To remove the menu, press SYSTEM MENU.
If you want to remove a track
6Use 1 2 3 4 keys to move the cursor to
the track you want to remove.
7Press OK to remove this track from the
programme menu.
To start programme playback
8Use 1 2 3 4 keys to highlight {START}
on the programme menu, then press OK.
➜Playback will start with the selected
tracks under the programmed sequence.
To exit programme playback
9Use 1 2 3 4 keys to highlight {EXIT} on
the programme menu, then press OK.
OSD Language
This menu contains various language
options for display language on the screen.
For details, see page 18.
Screen Saver - turning on/off
The screen saver will help to prevent your
TV display device from becoming
damaged.
1In ‘GENERAL SETUP PAGE’, press 3 4 to
highlight {SCREEN SAVER}, then press 2.
ON
Select this if you wish to turn off the TV
screen when disc playback is stopped or
paused for more than 15 minutes.
OFF
Select this to disable the screen saver
function.
2Press 3 4 to select a setting, then press
OK to confirm your selection.
Sleep
Sleep function allows you to turn off the
DVD Player automatically after a preset
time.
1In ‘GENERAL SETUP PAGE’, press 3 4 to
highlight {SLEEP}, then press 2.
15 Mins
Turn off the DVD Player after 15 minutes.
30 Mins
Turn off the DVD Player after 30 minutes.
45 Mins
Turn off the DVD Player after 45 minutes.
60 Mins
Turn off the DVD Player after 60 minutes.
OFF
Turn off the sleep function.
2Press 3 4 to select a setting, then press
OK to confirm your selection.
DivX(R) VOD registration code
Philips provide you the DivX® VOD
(Video On Demand) registration code
that allows you to rent and purchase
videos using the DivX® VOD service.
For more information, visit us at
www.divx.com/vod.
1In ‘GENERAL SETUP PAGE’, press 3 4 to
highlight {DIVX(R) VOD CODE}, then
press 2.
➜The registration code will appear.
2Press OK to exit.
3Use the registration code to purchase or
rent the videos from DivX ® VOD service
at www.divx.com/vod. Follow the
instructions and download the video onto
a CD-R for playback on this DVD player.
Helpful Hints:
– All the downloaded videos from DivX
®
VOD can only be played back on this DVD
player.
– Time search feature is not available
during DivX movie playback.
01-41 DVP5505S_EU_008 20/01/2005, 4:50 PM27

8239 300 34351
English
29
DVD Setup Menu Options
TIPS: To return to the previous menu, press .1
To remove the menu, press SYSTEM MENU.
Sound Mode
The options included in Sound Mode
Setup are: ‘3D’, ‘Movie Mode’ and ‘Music
Mode’.
1In ‘AUDIO SETUP PAGE’, press 3 4 to
highlight {SOUND MODE}, then press 2.
2Press the 3 4 keys to highlight an option.
3Enter its submenu by pressing .2
4Press 3 4 to select a setting, then press
OK to confirm your selection.
3D
This function provides a virtual surround
sound experience using just two speakers.
➜Off, Living Room, Hall, Arena and
Church
Movie Mode
Select a Sound Mode that matches the
type of music you are playing. These
preset Sound Modes adjust the frequency
bands of the video to enhance your
favourite movie sound track.
➜ Off, Sci-Fic, Action, Drama and
Concert
Music Mode
Select a Sound Mode that matches the
type of music you are playing. These
preset Sound Modes adjust the frequency
bands of the audio to enhance your
favourite music.
➜ Off, Digital, Rock, Classic and Jazz
CD Upsampling
This feature allows you to convert your
music CD to a higher sampling rate using
sophisticated digital signal processing for
better sound quality. If you have activated
the upsampling, the player will
automatically switch to stereo mode.
1In ‘AUDIO SETUP PAGE’, press 3 4 to
highlight {CD UPSAMPLING}, then press 2.
OFF
Select this to disable CD-upsampling.
88.2 kHz (X2)
Select this to convert the sampling rate of
the CDs twice higher than the original.
176.4 kHz (X4)
Select this to convert the sampling rate of
the CDs four times higher than the
original.
2Press 3 4 to select a setting, then press
OK to confirm your selection.
Helpful Hint:
– CD upsampling feature is only applicable
to stereo output setting.
Night Mode - turning on/off
In this mode, the high volume outputs are
softened and low volume outputs are
brought upward to an audible level. It is
useful for watching your favourite action
movie without disturbing others at night.
1In ‘AUDIO SETUP PAGE’, press 3 4 to
highlight {NIGHT MODE}, then press .2
ON
Select this to level out the volume. This
feature is only available for movies with
Dolby Digital mode.
OFF
Select this when you want to enjoy the
surround sound with its full dynamic
range.
2Press 3 4 to select a setting, then press
OK to confirm your selection.
Speaker Setup
This menu contains setup options for
your audio output which makes the
speaker setup system reproduce high
quality surround sound. For details, see
page 36-37.
01-41 DVP5505S_EU_008 20/01/2005, 4:50 PM29
8239 300 34351
English
30
DVD Setup Menu Options
TIPS: To return to the previous menu, press 1.
To remove the menu, press SYSTEM MENU.
Video Setup Menu
1In disc mode, press SYSTEM MENU.
2Press 1 2 to select ‘Video Setup’ icon.
3Press OK to confirm.
Go To Video Setup Page
TV Type
TV Display
Progressive
Picture Setting
Component
- - Video Setup Page - -
TV Type
This menu contains the options for
selecting the colour system that matches
the connected TV. For details, see page
17.
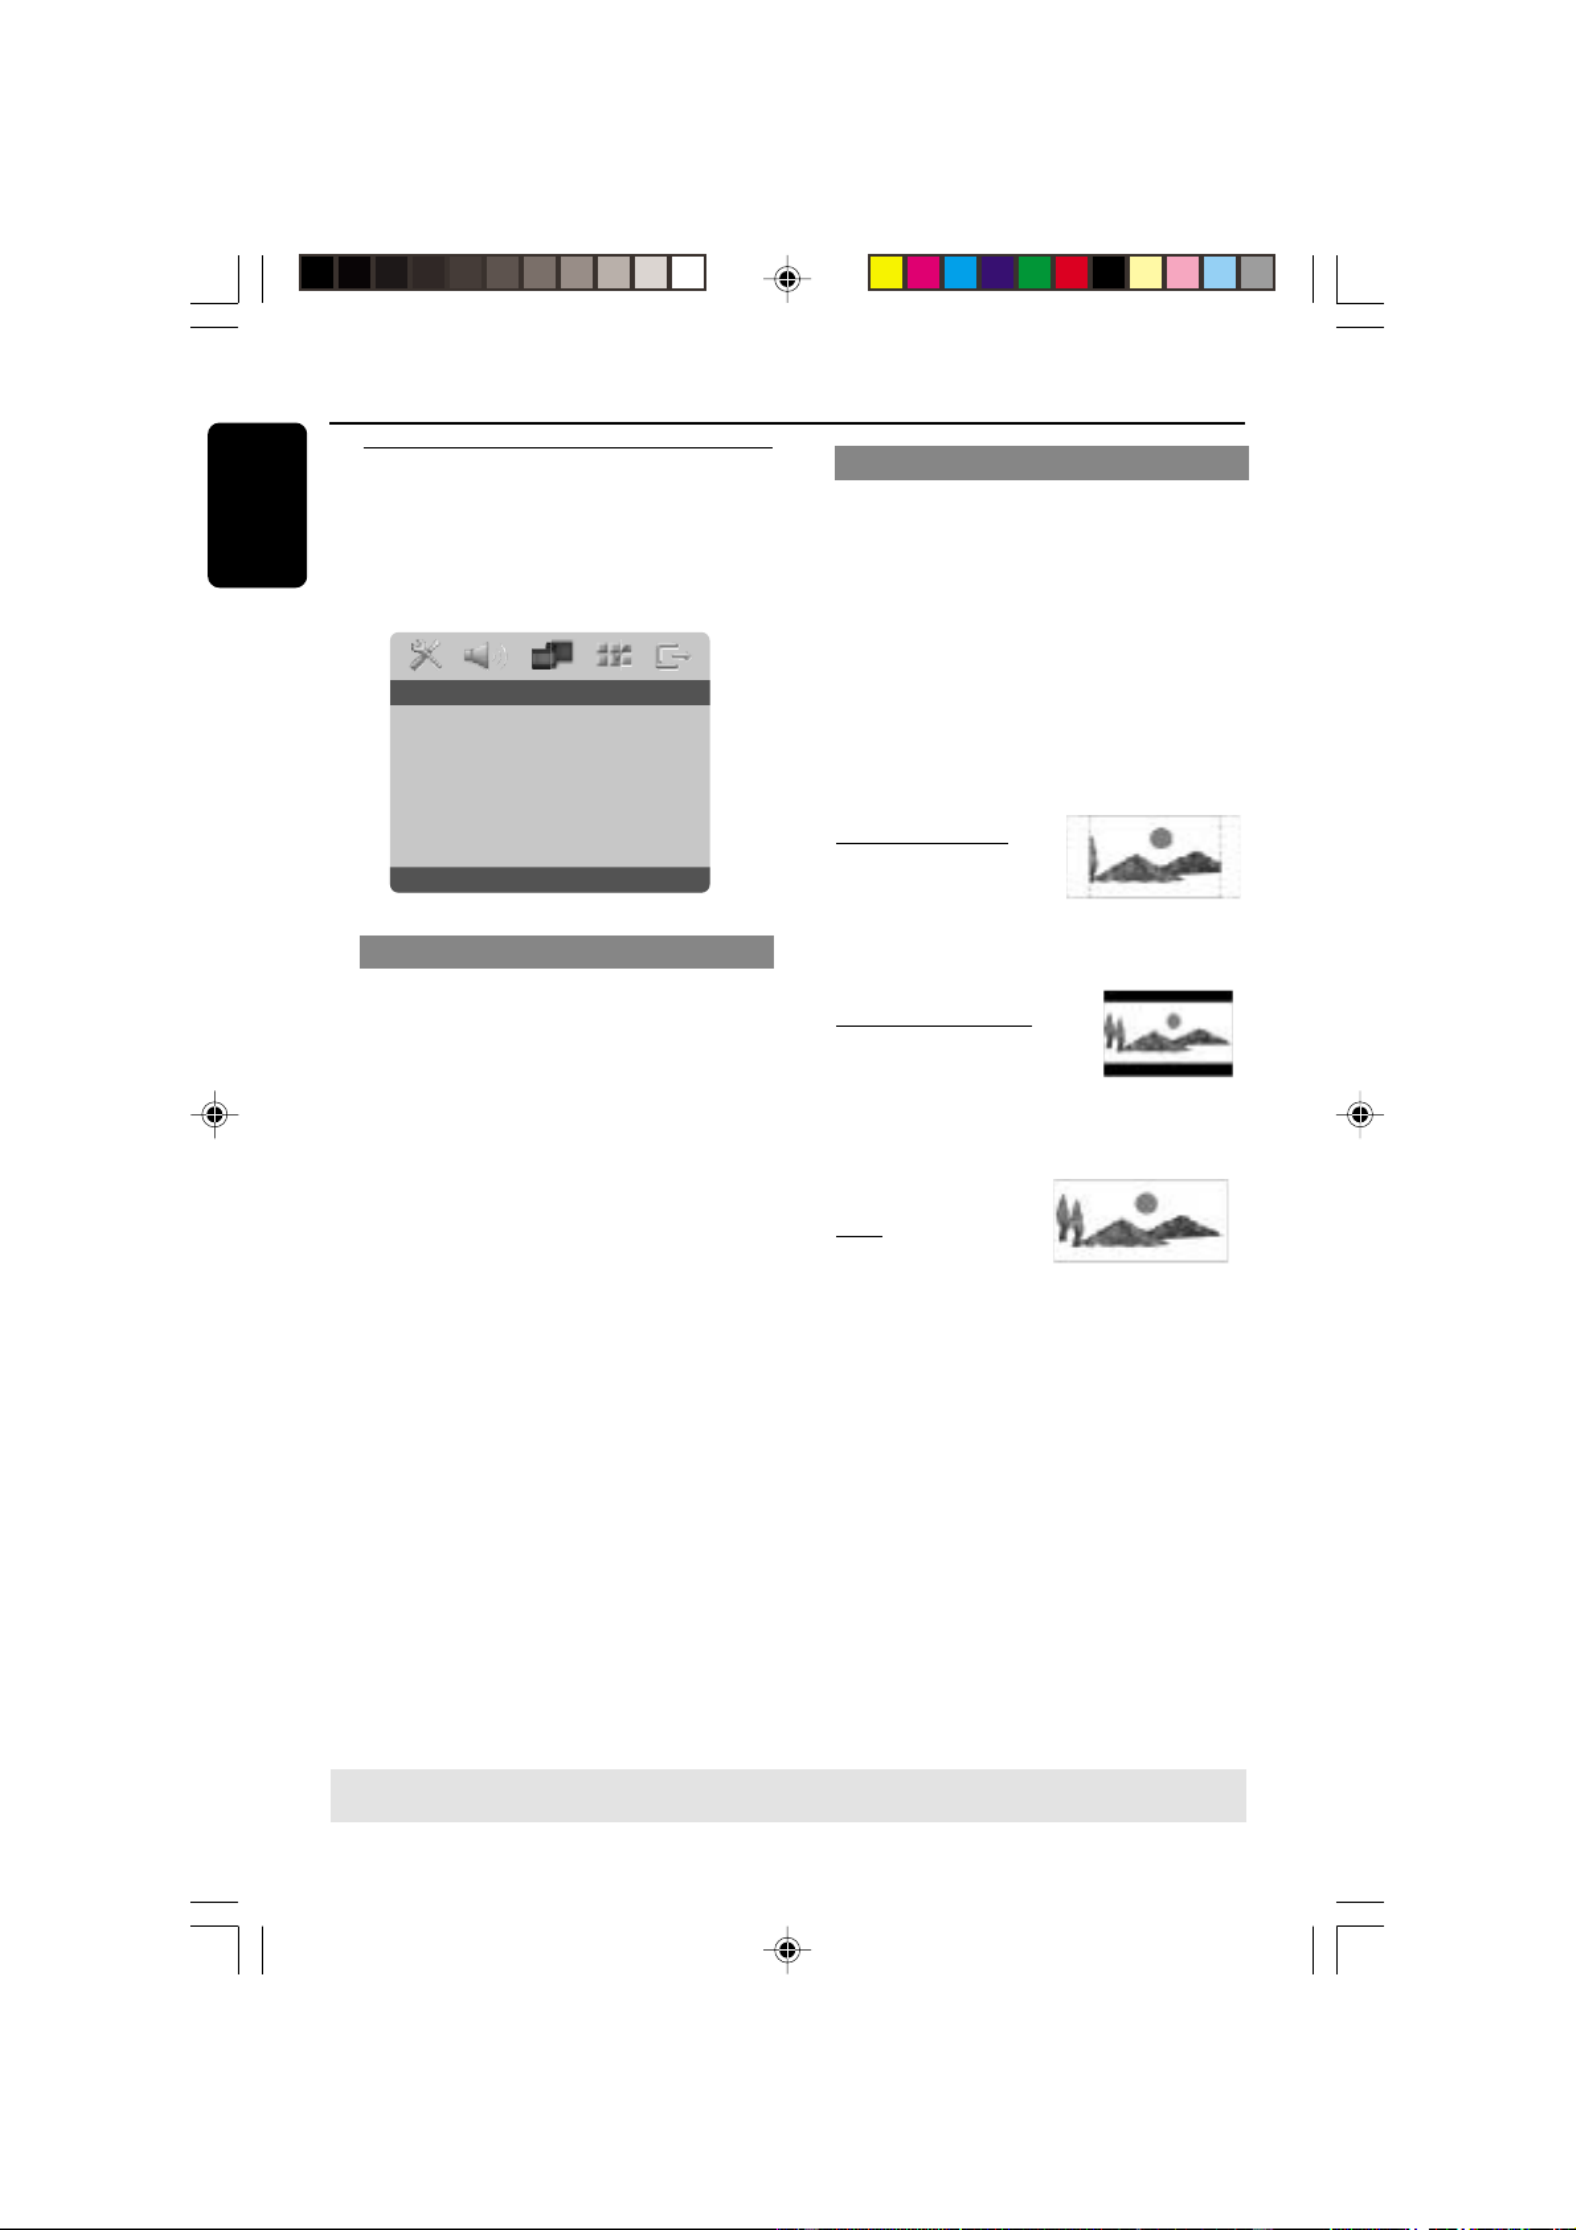
Setting the TV Display
Set the aspect ratio of the DVD Player
according to the TV you have connected.
The format you select must be available
on the disc. If it is not, the setting for TV
display will not affect the picture during
playback.
1In ‘VIDEO SETUP PAGE’, press 3 to4
highlight {TV DISPLAY}, then press 2.
2Press 3 4 to highlight one of the options
below:
4:3 PAN SCAN –
Select this if you have
a normal TV and want
both sides of the
picture to be trimmed or formatted to fit
your TV screen.
4:3 LETTER BOX –
Select this if you have a
normal TV. In this case, a
wide picture with black
bands on the upper and lower portions of
the TV screen will
be displayed.
16:9 – Select this if
you have a wide-
screen TV.
3Select an item and press .OK
01-41 DVP5505S_EU_008 20/01/2005, 4:50 PM30

8239 300 34351
English
31
TIPS: To return to the previous menu, press 1.
To remove the menu, press SYSTEM MENU.
DVD Setup Menu Options
Progressive - turning on/off
In the progressive scan mode, you can
enjoy the high quality picture with less
flickers. It only works when you have
connected the DVD player’s Y Pb Pr jacks
to your TV that supports the progressive
video input. Otherwise, the a distorted
picture will appear on the TV. For proper
progressive scan set up, see page 16.
1In ‘VIDEO SETUP PAGE’, press 3 4 to
highlight {PROGRESSIVE}, then press 2.
OFF
To disable Progressive Scan function.
ON
To enable Progressive Scan function.
2Press 3 4 to select a setting, then press
OK to confirm your selection.
➜Follow the instructions shown on the
TV to confirm the selection (if any).
➜If a distorted picture appears on the TV
screen, wait for 15 seconds for auto
recovery.
Picture Setting
This DVD Player provides three
predefined sets of picture colour settings
and one personal setting which you can
define yourself.
1In ‘VIDEO SETUP PAGE’, press 3 4 to
highlight {PICTURE SETTING}, then press
2.
STANDARD
Select this for standard picture setting.
BRIGHT
Select this will make the TV picture
brighter.
SOFT
Select this will make the TV picture softer.
PERSONAL
Select this to personalise your picture
colour by adjusting the brightness,
contrast, tint and colour (saturation).
2Press 3 4 to select a setting, then press
OK to confirm your selection.
01-41 DVP5505S_EU_008 20/01/2005, 4:50 PM31
8239 300 34351
English
33
TIPS: To return to the previous menu, press .1
To remove the menu, press SYSTEM MENU.
DVD Setup Menu Options
Preference Page
1Press twice to stop playback (if any),Ç
then press SYSTEM MENU.
2Press 1 2 to select ence Setup’the ‘Prefer
icon.
3Press OK to confirm.
Go To Preference Page
Audio
Subtitle
Disc Menu
Parental
PBC
Mp3 / Jpeg Nav
Password Setup
- - Preference Page - -
Audio, Subtitle, Disc Menu
These menus contain various language
options for audio, subtitle and disc menu
which may be recorded on the DVD. For
details, see page 18.
Restricting playback by Parental
Control
Some DVDs may have a parental level
assigned to the complete disc or to
certain scenes on the disc. This feature
lets you set a playback limitation level.
The rating levels are from 1 to 8 and are
country dependent. You can prohibit the
playing of certain discs that are not
suitable for your children or have certain
discs played with alternative scenes.
1In ‘PREFERENCE PAGE’, press 3 4 to
highlight {PARENTAL}, then press 2.
Set KID SAFE
Audio 1 KID SAFE
Subtitle 2 G
Disc Menu 3 PG
Parental 4 PG 13
PBC 5 PGR
Mp3 / Jpeg Nav 6 R
Password Setup 7 NC17
- - Preference Page - -
2Press 3 4 to highlight a rating level for
the disc inserted and press .OK
➜To disable Parental controls and have
all Discs play, select {8 ADULT}.
01-41 DVP5505S_EU_008 20/01/2005, 4:50 PM33

8239 300 34351
English
34
DVD Setup Menu Options
TIPS: To return to the previous menu, press 1.
To remove the menu, press SYSTEM MENU.
PBC
You can set the PBC to ON or OFF. This
feature is available only on Video CD 2.0
with playback control (PBC) feature. For
details, see page 22.
MP3/JPEG Menu - turning on/off
MP3/JPEG Navigator can be set only if the
disc is recorded with menu. It allows you
to select different display menus for easy
navigation.
1In ‘PREFERENCE PAGE’, press 3 4 to
highlight {MP3/JPEG NAV}, then press 2.
WITHOUT MENU
Select this to display all the files contained
in the MP3/Picture CD.
WITH MENU
Select this to display only the folder menu
of the MP3/Picture CD.
2Press 3 4 to select a setting, then press
OK to confirm your selection.
Changing the Password - cont’d
3Use the numeric keypad (0-9) to enter
the six-digit password (see page 35
“Changing the password”).
➜DVDs that are rated above the level
you selected will not play unless you enter
your six-digit password.
Helpful Hints:
– VCD, SVCD, CD have no level indication,
so parental control function has no effect on
these type of discs. This applies to most illegal
DVD discs.
– Some DVDs are not encoded with a
rating though the movie rating may be
printed on the Disc cover. The rating level
feature does not work for such Discs.
01-41 DVP5505S_EU_008 20/01/2005, 4:50 PM34

8239 300 34351
English
35
Setting the DivX Subtitle font
You can set the font type that supports
the recorded DivX subtitle.
1In ‘PREFERENCE PAGE’, press 3 4 to
highlight {DivX SUBTITLE}, then press 2.
STANDARD
A standard list of English subtitle fonts
provided by this DVD Player.
CYRILLIC
Select this to display a cyrillic subtitle fonts.
2Press 3 4 to select a setting, then press
OK to confirm your selection.
DVD Setup Menu Options
TIPS: To return to the previous menu, press 1.
To remove the menu, press SYSTEM MENU.
Restoring to original settings
Setting the DEFAULT function will reset
all options and your personal settings to
the factory defaults, except your
password for Parental Control and Disc
Lock.
1In ‘PREFERENCE PAGE’, press 34 to
highlight {DEFAULT}, then press 2 to
select {RESET}.
2Press OK to confirm.
➜All settings will now reset to factory
defaults.
Changing the Password
The same password is used for both
Parental Control and Disc Lock. Enter
your six-digit password when prompted
on the screen. The default password is
136 900.
1In ‘PREFERENCE PAGE’, press 3 4 to
highlight {PASSWORD}, then press 2 to
select {CHANGE}.
Change Password
Password Change
- - Password Setup Page - -
2Press to enter the ‘Password ChangeOK
Page’.
Old Password
New Password
Confirm PWD
OK
3Use the numeric keypad (0-9) to enter
your old six-digit password.
➜When doing this for the first time, key
in ‘136 900’.
➜If you forget your old six-digit
password, key in ‘136 900’.
4Enter the new six-digit password.
5Enter the new six-digit password a second
time to confirm.
➜The new six-digit password will now
take effect.
6Press OK to confirm.
01-41 DVP5505S_EU_008 20/01/2005, 4:50 PM35

8239 300 34351
English
36
Sound and Volume Controls
Setting the speakers channels’
You can adjust the delay times (centre
and surround only) and volume level for
individual speakers. These adjustments let
you optimise the sound according to your
surroundings and setup.
IMPORTANT!
The speaker settings only available on
Multi-channel audio outputs. You can
also press SURROUND button on the
remote to select Multi-channel.
1Press STOP then, press SYSTEM
MENU.
2Press 2 repeatedly to select {AUDIO
SETUP PAGE}.
3Press 34 to highlight {SPEAKER SETUP},
then press 2.
Analog Output
Digital Audio Setup
Sound Mode
Speaker Setup
CD Upsampling
Night Mode
- - Audio Setup Page - -
Front Speakers Large
Center Speaker Small
Rear Speakers
Subwoofer
Speakers Volume
Speakers Delay
- - Speaker Setup Page - -
4Enter its submenu by pressing 2.
5Press to highlight one of the options 34
below at a time, then press 2.
{FRONT SPEAKERS, CENTER SPEAKER,
REAR SPEAKERS}
OFF – when no speaker is connected.
LARGE – when connected speakers can
produce low frequency signals below
120Hz.
SMALL – when connected speakers
cannot produce low frequency signals
below 120Hz.
{SUBWOOFER}
ON – when a subwoofer is connected.
OFF – when no subwoofer is connected.
{SPEAKER VOLUME} – Volume level
setting for individual speakers (-6dB ~
+6dB).
Front Left
Front Right
Center
Subwoofer
Rear Right
Rear Left
0dB0
0dB0
0dB0
0dB0
0dB0
0dB0
- - Speakers Volume Setup - -
{SPEAKER DELAY} – Delay times setting
in relation to the listening position/
distance for centre and surround
speakers (1m ~ 10m).
Center
Subwoofer
Rear Right
Rear Left
1.0M
1.0M
1.0M
1.0M
- - Speakers Distance Setup - -
6Press 1 2 to adjust the setting that best
suit your surround sound needs.
7Press OK to confirm.
Helpful Hints:
– Use the longer delay time settings when
the rear speakers are closer to the listener
than the front speakers.
– The test tone will be automatically
generated to help you judge the sound level
of each speaker.
TIPS: To return to the previous menu, press .1
To remove the menu, press SYSTEM MENU.
01-41 DVP5505S_EU_008 20/01/2005, 4:50 PM36

8239 300 34351
English
37
Sound and Volume Controls
Selecting surround sound
●Press SURROUND on the remote to
select : MULTI-CHANNEL or STEREO.
➜The availability of the various surround
sound modes depends on the number of
speakers used and the sound available on
the disc.
➜The centre and rear speakers operate
only in Multi-channel surround mode.
➜The available output modes for Multi-
channel include: Dolby Digital, DTS
(Digital Theater Systems) Surround and
Dolby Pro Logic II.
➜Stereo broadcasts or recordings will
produce some surround channel effects
when played in a surround mode.
However, mono (single channel sound)
sources will not produce any sound from
the rear speakers.
Helpful Hints:
– The SURROUND button is not
functional for SACD playback. You have to
access the disc menu in order to select
between multi-channel and stereo tracks, see
page 29.
– You are not able to select the surround
sound mode if the system setup menu is
turned on
Selecting digital sound effects
Select a preset digital sound effects that
matches your disc’s content or that
optimises the sound of the musical style
you are playing.
●Press SOUND to select the available
sound effect.
When playing movie discs, you can select :
CONCERT, DRAMA, ACTION or SCI-FI.
When playing music discs, you can select :
ROCK, DIGITAL, CLASSIC or JAZZ.
Helpful Hint:
– For flat sound output, select CONCERT
or CLASSIC.
Volume control
To turn off the volume temporarily
●Press on the remote.MUTE
➜Playback will continue without sound
and " " appears.MUTE
➜To restore the volume, press MUTE
again, or increase the volume level.
01-41 DVP5505S_EU_008 20/01/2005, 4:50 PM37
Produkt Specifikationer
| Mærke: | Philips |
| Kategori: | DVD afspiller |
| Model: | DVP5505S |
Har du brug for hjælp?
Hvis du har brug for hjælp til Philips DVP5505S stil et spørgsmål nedenfor, og andre brugere vil svare dig
DVD afspiller Philips Manualer

17 Marts 2025
16 Januar 2025
21 December 2024
21 December 2024
21 December 2024
21 December 2024
21 December 2024
6 December 2024
4 December 2024
4 December 2024
DVD afspiller Manualer
- DVD afspiller SilverCrest
- DVD afspiller BMW
- DVD afspiller Denver
- DVD afspiller Sencor
- DVD afspiller Sony
- DVD afspiller Samsung
- DVD afspiller Panasonic
- DVD afspiller Lenco
- DVD afspiller OK
- DVD afspiller LG
- DVD afspiller AEG
- DVD afspiller Pioneer
- DVD afspiller Mitsubishi
- DVD afspiller Braun
- DVD afspiller Apple
- DVD afspiller Sharp
- DVD afspiller Kenwood
- DVD afspiller Daewoo
- DVD afspiller Harman Kardon
- DVD afspiller Sanyo
- DVD afspiller Grundig
- DVD afspiller Asus
- DVD afspiller Toshiba
- DVD afspiller Denon
- DVD afspiller Yamaha
- DVD afspiller Matsui
- DVD afspiller Logik
- DVD afspiller Muse
- DVD afspiller Thomson
- DVD afspiller Hyundai
- DVD afspiller Aiwa
- DVD afspiller JBL
- DVD afspiller AKAI
- DVD afspiller TriStar
- DVD afspiller DataVideo
- DVD afspiller Trevi
- DVD afspiller Blaupunkt
- DVD afspiller JVC
- DVD afspiller Clatronic
- DVD afspiller Hitachi
- DVD afspiller Medion
- DVD afspiller Linksys
- DVD afspiller Cambridge
- DVD afspiller Gembird
- DVD afspiller Loewe
- DVD afspiller Alpine
- DVD afspiller Yarvik
- DVD afspiller Micromaxx
- DVD afspiller Jensen
- DVD afspiller Zenec
- DVD afspiller Oppo
- DVD afspiller Soundmaster
- DVD afspiller TERRIS
- DVD afspiller NAD
- DVD afspiller Tascam
- DVD afspiller Energy Sistem
- DVD afspiller Bush
- DVD afspiller Dual
- DVD afspiller Salora
- DVD afspiller Onkyo
- DVD afspiller Nevir
- DVD afspiller Nextbase
- DVD afspiller Marantz
- DVD afspiller Scott
- DVD afspiller Sogo
- DVD afspiller Alba
- DVD afspiller RCA
- DVD afspiller Currys Essentials
- DVD afspiller Transcend
- DVD afspiller Proline
- DVD afspiller JGC
- DVD afspiller Audica
- DVD afspiller Eltax
- DVD afspiller Eminent
- DVD afspiller Rotel
- DVD afspiller Airis
- DVD afspiller Majestic
- DVD afspiller Audiovox
- DVD afspiller Vestel
- DVD afspiller GPX
- DVD afspiller Lenoxx
- DVD afspiller Lexibook
- DVD afspiller Boss
- DVD afspiller Supermicro
- DVD afspiller Arcam
- DVD afspiller Xoro
- DVD afspiller Manta
- DVD afspiller Reflexion
- DVD afspiller Schaub Lorenz
- DVD afspiller Ferguson
- DVD afspiller Aconatic
- DVD afspiller Xiron
- DVD afspiller Aristona
- DVD afspiller Apex
- DVD afspiller Funai
- DVD afspiller Sunstech
- DVD afspiller Sylvania
- DVD afspiller Marquant
- DVD afspiller Magnum
- DVD afspiller Coby
- DVD afspiller Vieta
- DVD afspiller Laser
- DVD afspiller Naxa
- DVD afspiller Sherwood
- DVD afspiller Mpman
- DVD afspiller Targa
- DVD afspiller Mx Onda
- DVD afspiller Provision
- DVD afspiller Autovision
- DVD afspiller Qmedia
- DVD afspiller Difrnce
- DVD afspiller Emtec
- DVD afspiller Elta
- DVD afspiller Odys
- DVD afspiller Soundstream
- DVD afspiller Durabase
- DVD afspiller Woxter
- DVD afspiller Opera
- DVD afspiller Tesco-Technika
- DVD afspiller Hiteker
- DVD afspiller Mustek
- DVD afspiller Bluetech
- DVD afspiller Sevic
- DVD afspiller EKO
- DVD afspiller Magnavox
- DVD afspiller AC Ryan
- DVD afspiller Planet Audio
- DVD afspiller Koda
- DVD afspiller Belson
- DVD afspiller Yakumo
- DVD afspiller Voxx
- DVD afspiller Best Buy
Nyeste DVD afspiller Manualer

5 Marts 2025

26 Januar 2025

14 Januar 2025
14 Januar 2025
13 Januar 2025
10 Januar 2025
10 Januar 2025
9 Januar 2025
8 Januar 2025
8 Januar 2025