Pioneer MEH-P6550 Manual
Læs nedenfor 📖 manual på dansk for Pioneer MEH-P6550 (80 sider) i kategorien Modtager. Denne guide var nyttig for 23 personer og blev bedømt med 4.5 stjerner i gennemsnit af 2 brugere
Side 1/80

Operation Manual
Manual de instruções
Multi-CD control DSP High power MD player with FM/
AM tuner
MD player de alta potência com sintonizador de FM/
AM, DSP e controle de Multi-CD
MEH-P6550
English Português (B)

Thank you for buying this Pioneer product.
Please read through these operating instructions so you will know how to operate
your model properly. After you have finished reading the instructions, put them away
in a safe place for future reference.
Before You Start
About this manual 4
Precautions 4
Playback of MDs featuring long
recordings 4
Use and care of the remote control 4
Installing the batteries 4
Using the remote control 5
Protecting your unit from theft 5
Removing the front panel 5
Attaching the front panel 6
What s What
Head unit 7
Remote control 7
Power ON/OFF
Turning the unit on 9
Selecting a source 9
Turning the unit off 9
Tuner
Listening to the radio 10
Introduction of advanced tuner
operation 11
Storing and recalling broadcast
frequencies 11
Tuning in strong signals 11
Storing the strongest broadcast
frequencies 12
Built-in MD Player
Playing a MD 13
Introduction of advanced built-in MD player
operation 14
Repeating play 14
Playing tracks in a random order 14
Scanning tracks of a MD 14
Pausing MD playback 15
Displaying disc titles 15
Scrolling titles in the display 15
Multi-CD Player
Playing a CD 16
50-disc multi-CD player 16
Introduction of advanced multi-CD player
operation 17
Repeating play 17
Playing tracks in a random order 17
Scanning CDs and tracks 18
Pausing CD playback 18
Using ITS playlists 18
Creating a playlist with ITS
programming 18
Playback from your ITS playlist 19
Erasing a track from your ITS
playlist 19
Erasing a CD from your ITS
playlist 19
Using disc title functions 20
Entering disc titles 20
Displaying disc titles 21
Selecting discs from the disc title
list 21
Using CD TEXT functions 21
Displaying titles on CD TEXT
discs 21
Scrolling titles in the display 21
Using compression and bass emphasis 21
Audio Adjustments
Introduction of audio adjustments 23
Using balance adjustment 23
Adjusting loudness 23
Using subwoofer output 24
Adjusting subwoofer (low pass filter)
settings 24
Contents
En
2

Adjusting low pass filter attenuation
slope 24
Using the high pass filter 24
Adjusting high pass filter attenuation
slope 25
Using non fading output 25
Adjusting non fading output level 25
Adjusting source levels 26
Digital Signal Processor
Using the digital signal processor 27
Using sound field control and BBE
sound 27
Recalling sound field programs 27
Adjusting BBE sound level 28
Using the graphic equalizer 28
Recalling equalizer curves 28
Adjusting equalizer curves 29
Adjusting 9-band graphic
equalizer 29
Using the position selector 29
Using automatic sound levelizer 30
Initial Settings
Adjusting initial settings 31
Setting the clock 31
Setting the FM tuning step 31
Setting the AM tuning step 32
Switching the warning tone 32
Switching the auxiliary setting 32
Switching the dimmer setting 32
Switching the RCA output setting 32
Selecting the digital attenuator 33
Switching the telephone muting/
attenuation 33
Other Functions
Turning the clock display on or off 34
Using the AUX source 34
Selecting AUX as the source 34
Setting the AUX title 34
Setting the level indicator 34
Additional Information
Understanding built-in MD player error
messages 35
MD player and care 35
Specifications 37
En 3
English
Contents

About this manual
This unit features a number of sophisticated
functions ensuring superior reception and op-
eration. All the functions have been designed
for the easiest possible use, but many are not
self-explanatory. This operation manual will
help you benefit fully from this products po-
tential and to maximize your listening enjoy-
ment.
We recommend that you familiarize yourself
with the functions and their operation by read-
ing through the manual before you begin
using this unit. It is especially important that
you read and observe precautions on this
page and in other sections.
Precautions
CAUTION:
USE OF CONTROL OR ADJUSTMENT OR
PERFORMANCE OF PROCEDURES
OTHER THAN THOSE SPECIFIED HEREIN
MAY RESULT IN HAZARDOUS RADIATION
EXPOSURE.
CAUTION:
THE USE OF OPTICAL INSTRUMENTS
WITH THIS PRODUCT WILL INCREASE
EYE HAZARD.
!Keep this manual handy as a reference for
operating procedures and precautions.
!Always keep the volume low enough so you
can hear sounds outside of the car.
!Protect this product from moisture.
!If the battery is disconnected or dis-
charged, the preset memory will be erased
and must be reprogrammed.
!If this unit does not operate properly, con-
tact your dealer or nearest authorized Pio-
neer Service Station.
Playback of MDs featuring
long recordings
This unit is MDLP compatible, so you can play-
back MDs featuring long recordings.
!MDLP is a data compression system that
lets you record on regular MDs for 2 or 4
times the length of time previously possi-
ble.
Use and care of the remote
control
Installing the batteries
Remove the cover on the back of the remote
control and insert the batteries with the plus
(+) and minus ( ) poles pointing in the proper
direction.
CAUTION
!Use only or batteries.AAA IEC R03 1.5 V
!Remove the batteries if the remote control is
not used for a month or longer.
!Do not attempt to recharge the supplied bat-
teries.
!Do not mix new and used batteries.
!If the event of battery leakage, wipe the remote
control completely clean and install new bat-
teries.
Before You Start
En
4
Section
01
HHHHHHHHHHHHHH

!When disposing of used batteries, please
comply with governmental regulations or en-
vironmental public institution s rules that
apply in your country/area.
Using the remote control
Point the remote control in the direction of the
front panel to operate.
Important
!Do not store the remote control in high tem-
peratures or direct sunlight.
!The remote control may not function properly
in direct sunlight.
!Do not let the remote control fall onto the
floor, where it may become jammed under the
brake or accelerator pedal.
!When the remote control is not in use, attach
it firmly to the provided mounting base.
!If you press on the remote controlFUNCTION
while pressing at the same time, the re-BAND
mote control will not function properly. To can-
cel this setting, press on the remoteAUDIO
control while pressing at the sameBAND
time to return to the previous setting.
Protecting your unit from
theft
The front panel can be detached from the
head unit and stored in the protective case
provided to discourage theft.
!If the front panel is not detached from the
head unit within five seconds of turning off
the ignition, a warning tone will sound.
!You can turn off the warning tone. See
Switching the warning tone on page 32.
Important
!Never use force or grip the display and the
buttons tightly when removing or attaching.
!Avoid subjecting the front panel to excessive
shocks.
!Keep the front panel out of direct sunlight and
high temperatures.
Removing the front panel
1 Press OPEN to open the front panel.
2 Grip the left side of the front panel and
pull it gently outward.
Take care not to grip it tightly or drop it.
3 Put the front panel into the protective
case provided for safe keeping.
Before You Start
En 5
English
Section
01
HHHHHHHHHHHHHH

Attaching the front panel
%Replace the front panel by holding it
upright to this unit and clipping it securely
into the mounting hooks.
Before You Start
En
6
Section
01
HHHHHHHHHHHHHH
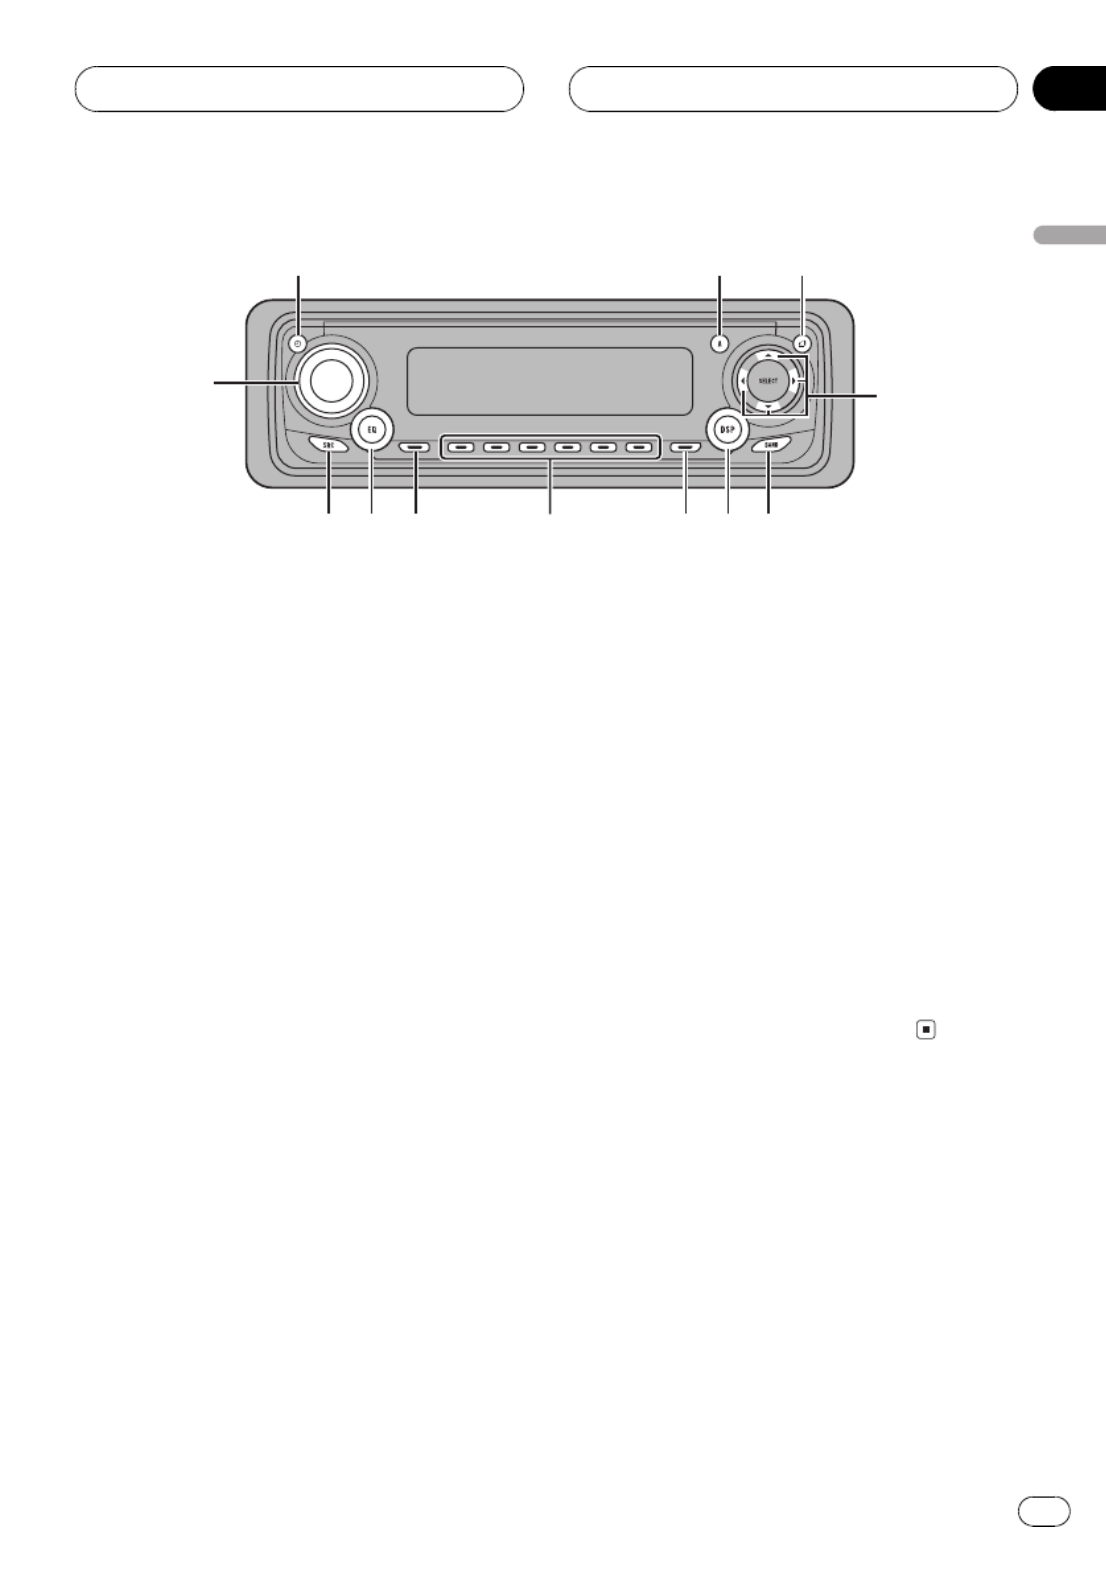
Head unit
1CLOCK button
Press to change to the clock display.
2AUDIO button
Press to select various sound quality con-
trols.
3OPEN button
Press to open the front panel.
4a b c d/ / / buttons
Press to do manual seek tuning, fast for-
ward, reverse and track search controls.
Also used for controlling functions.
5BAND button
Press to select among three FM and one
AM bands and cancel the control mode of
functions.
6DSP button
Press to select sound field functions.
7FUNCTION button
Press to select functions.
81 6 buttons
Press for preset tuning and disc number
search when using a multi-CD player.
9DISPLAY button
Press to select different displays.
aEQ button
Press to select various equalizer curves.
bSOURCE button
This unit is turned on by selecting a source.
Press to cycle through all of the available
sources.
c VOLUME
When you press , it extends out-VOLUME
ward so that it becomes easier to turn. To re-
tract , press it again. Rotate toVOLUME
increase or decrease the volume.
Remote control
Operation is the same as when using the but-
ton on the head unit.
dATT button
Press to quickly lower the volume level, by
about 90%. Press once more to return to the
original volume level.
eVOLUME button
Press to increase or decrease the volume.
1 2 3
4
56
78
9
a
b
c
Whats What
En 7
English
Section
02
HHHHHHHHHHHHHH

fCD button
Press to select the multi-CD player as the
source.
gMD button
Press to select the built in MD player as the
source.
hTUNER button
Press to select the tuner as the source.
4
h
5
d
e
f
g
6
2
7
Whats What
En
8
Section
02
HHHHHHHHHHHHHH

Turning the unit on
%Press SOURCE to turn the unit on.
When you select a source the unit is turned
on.
Selecting a source
You can select a source you want to listen to.
To switch to the built-in MD player, load a disc
in this unit (refer to page 13).
%When using the head unit, press
SOURCE to select a source.
Press repeatedly to switch betweenSOURCE
the following sources:
Tuner Television CD player Multi-CD
player Built-in MD player External unit
1 External unit 2 AUX
%When using the remote control, press
TUNER, MD or CD to select a source.
Press each button repeatedly to switch be-
tween the following sources:
TUNER Tuner Television Sources off:
MD Built-in MD player Sources off:
CD CD player Multi-CD player Sources:
off
Notes
!In the following cases, the sound source will
not change:
When a unit corresponding to each source
is not connected to this unit.
When no disc is set in this unit.
When no magazine is set in the multi-CD
player.
When no disc is set in the CD player.
When the AUX (auxiliary input) is set to off
(refer to page 32).
!External unit refers to a Pioneer product (such
as one available in the future) that, although
incompatible as a source, enables control of
basic functions by this unit. Two external units
can be controlled by this unit. When two exter-
nal units are connected, the allocation of
them to external unit 1 or external unit 2 is
automatically set by this unit.
!When this unit s blue/white lead is connected
to the car s auto-antenna relay control term-
inal, the car s antenna extends when this
units source is turned on. To retract the an-
tenna, turn the source off.
Turning the unit off
%Press SOURCE and hold until the unit
turns off.
Power ON/OFF
En 9
English
Section
03
HHHHHHHHHHHHHH

Listening to the radio
1
2
3 4
These are the basic steps necessary to operate
the radio. More advanced tuner operation is
explained starting on the next page.
Important
If you are using this unit in North, Central or
South America, reset the AM tuning step (see
Setting the AM tuning step on page 32).
1Stereo ( ) indicator5
Shows that the frequency selected is being
broadcast in stereo.
2Band indicator
Shows which band the radio is tuned to, AM
or FM.
3Frequency indicator
Shows to which frequency the tuner is
tuned.
4Preset number indicator
Shows what preset has been selected.
1 Press SOURCE to select the tuner.
Press until you see dis-SOURCE TUNER
played.
2 Use VOLUME to adjust the sound level.
Rotate to increase or decrease the volume.
3 Press BAND to select a band.
Press until the desired band is dis-BAND
played, , , for FM orF1 F2 F3 AM.
4 To perform manual tuning, press orc
dwith quick presses.
The frequencies move up or down step by
step.
5 To perform seek tuning, press and hold
c dor for about one second and release.
The tuner will scan the frequencies until a
broadcast strong enough for good reception is
found.
#You can cancel seek tuning by pressing either
c dor with a quick press.
#If you press and hold or you can skipc d
broadcasting stations. Seek tuning starts as soon
as you release the buttons.
Note
When the frequency selected is being broadcast
in stereo the stereo ( ) indicator will light.5
Tuner
En
10
Section
04
HHHHHHHHHHHHHH
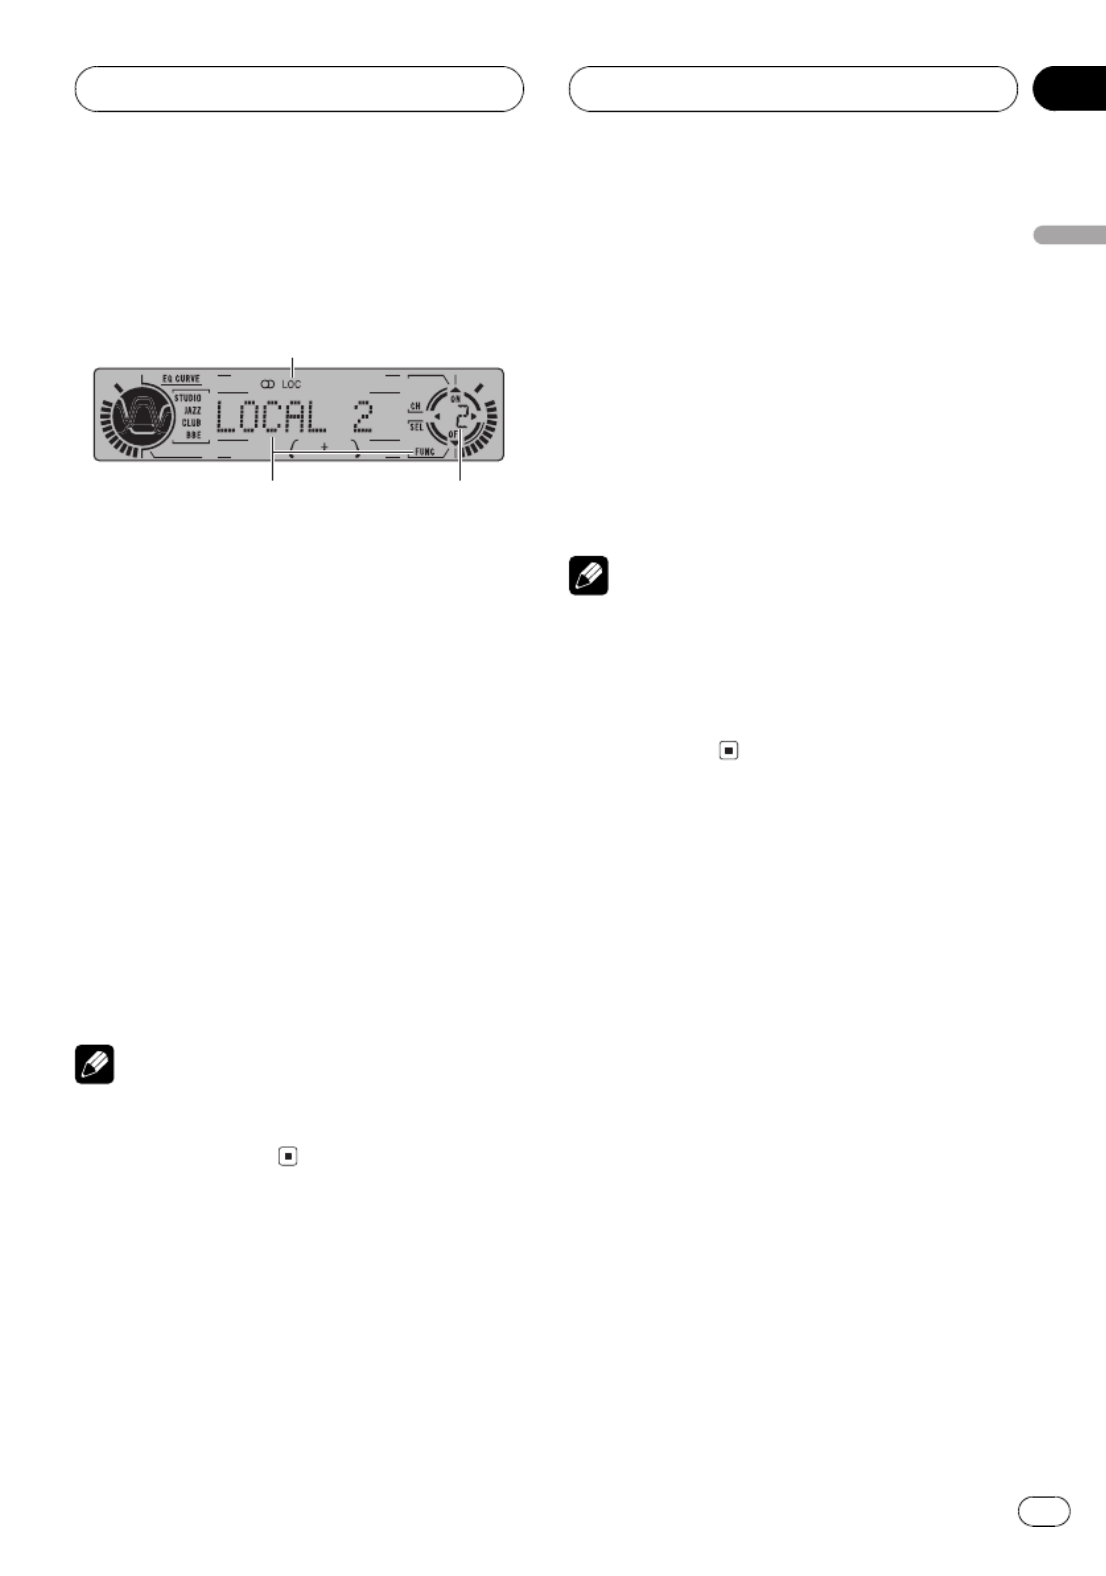
Introduction of advanced
tuner operation
2
1
3
1LOC indicator
Shows when local seek tuning is on.
2Function display
Shows the function status.
3Preset number indicator
Shows what preset has been selected.
%Press FUNCTION to display the function
names.
Press repeatedly to switch be-FUNCTION
tween the following functions:
BSM LOCAL(best stations memory)(local
seek tuning)
#To return to the frequency display, press
BAND.
Note
If you do not operate the function within about 30
seconds, the display is automatically returned to
the frequency display.
Storing and recalling
broadcast frequencies
If you press any of the preset tuning buttons
1 6you can easily store up to six broadcast
frequencies for later recall with the touch of a
button.
%When you find a frequency that you
want to store in memory press a preset
tuning button 1 6 and hold until the preset
number stops flashing.
The number you have pressed will flash in the
preset number indicator and then remain lit.
The selected radio station frequency has been
stored in memory.
The next time you press the same preset tun-
ing button the radio station frequency is1 6
recalled from memory.
Notes
!Up to 18 FM stations, 6 for each of the three
FM bands, and 6 AM stations can be stored in
memory.
!You can also use and to recall radio sta-a b
tion frequencies assigned to preset tuning
buttons .1 6
Tuning in strong signals
Local seek tuning lets you tune in only those
radio stations with sufficiently strong signals
for good reception.
1 Press FUNCTION to select LOCAL.
Press until appears in theFUNCTION LOCAL
display.
2 Press to turn local seek tuning on.a
Local seek sensitivity (e.g., ) appearsLOCAL 2
in the display.
3 Press orc d to set the sensitivity.
There are four levels of sensitivity for FM and
two levels for AM:
FM: LOCAL 1 LOCAL 2 LOCAL 3
LOCAL 4
AM: LOCAL 1 LOCAL 2
Tuner
En 11
English
Section
04
HHHHHHHHHHHHHH

The setting allows reception of onlyLOCAL 4
the strongest stations, while lower settings let
you receive progressively weaker stations.
4 When you want to return to normal
seek tuning, press to turn local seek tun-b
ing off.
LOCAL:OFF appears in the display.
Storing the strongest
broadcast frequencies
BSM (best stations memory) lets you automa-
tically store the six strongest broadcast fre-
quencies under preset tuning buttons and1 6
once stored there you can tune in to those fre-
quencies with the touch of a button.
1 Press FUNCTION to select BSM.
Press until appears in theFUNCTION BSM
display.
2 Press to turn BSM on.a
BSM BSMbegins to flash. While is flashing
the six strongest broadcast frequencies will be
stored under preset tuning buttons in1 6
order of their signal strength. When finished,
BSM stops flashing.
#To cancel the storage process, press b.
Note
Storing broadcast frequencies with BSM may re-
place broadcast frequencies you have saved
using .1 6
Tuner
En
12
Section
04
HHHHHHHHHHHHHH

Playing a MD
2
1
3
These are the basic steps necessary to play a
MD with your built-in MD player. More ad-
vanced MD operation is explained starting on
the next page.
1MDLP indicator (×2 or ×4)
Shows when an MD featuring long record-
ing is playing.
2Play time indicator
Shows the elapsed playing time of the cur-
rent track.
3Track number indicator
Shows the track currently playing.
1 Press OPEN to open the front panel.
MD loading slot appears.
#After a MD has been inserted, press SOURCE
to select the built-in MD player.
2 Insert a MD into the MD loading slot.
Playback will automatically start.
MD loading slot
EJECT button
#You can eject a MD by pressing .EJECT
#To avoid a malfunction, make sure that no
metal object comes into contact with the term-
inals when the front panel is open.
3 Close the front panel.
4 Use VOLUME to adjust the sound level.
Rotate to increase or decrease the volume.
5 To perform fast forward or reverse,
press and hold or .c d
6 To skip back or forward to another
track, press or .c d
Pressing skips to the start of the next track.d
Pressing once skips to the start of the cur-c
rent track. Pressing again will skip to the pre-
vious track.
Notes
!Do not insert anything other than a MD into
the MD loading slot.
!An MD left partially inserted after ejection
may incur damage or fall out.
!Load an MD after confirming the MD shutter
(refer to on page 35) isMD player and care
closed.
!When you load a disc, this unit reads informa-
tion recorded on the disc such as the number
of tracks. While the disc is being read,
TOC Read is indicated in the display.
!If the built-in MD player does not operate
properly, an error message such as ERROR-11
may be displayed. Refer to Understanding
built-in MD player error messages on page 35.
!When you play MDs featuring long record-
ings, or indicator is displayed.×2 ×4
!When a MD is inserted, the disc and track ti-
tles begin to scroll to the left automatically.
Built-in MD Player
En 13
English
Section
05
HHHHHHHHHHHHHH

Introduction of advanced
built-in MD player operation
1
2
4
3
1Function display
Shows the function status.
2RPT indicator
Shows when repeat play is turned on.
3MDLP indicator (×2 or ×4)
Shows when an MD featuring long record-
ing is playing.
4Track number indicator
Shows the track currently playing.
%Press FUNCTION to display the function
names.
Press repeatedly to switch be-FUNCTION
tween the following functions:
RPT RDM Scan(repeat play)(random play)
(scan play)PAUSE (pause)
#To return to the playback display, press BAND.
Note
If you do not operate the function within about 30
seconds, the display is automatically returned to
the playback display.
Repeating play
Repeat play lets you hear the same track over
again.
1 Press FUNCTION to select RPT.
Press until appears in the dis-FUNCTION RPT
play.
2 Press ato turn repeat play on.
RPT :ON appears in the display. The track cur-
rently playing will play and then repeat.
3 Press bto turn repeat play off.
RPT :OFF appears in the display. The track cur-
rently playing will continue to play and then
play the next track.
Note
If you perform track search or fast forward/re-
verse, repeat play is automatically cancelled.
Playing tracks in a random
order
Random play lets you play back tracks on the
MD in a random order.
1 Press FUNCTION to select RDM.
Press until appears in theFUNCTION RDM
display.
2 Press ato turn random play on.
RDM :ON appears in the display. Tracks will
play in a random order.
3 Press bto turn random play off.
RDM :OFF appears in the display. Tracks will
continue to play in order.
Scanning tracks of a MD
Scan play lets you hear the first 10 seconds of
each track on the MD.
Built-in MD Player
En
14
Section
05
HHHHHHHHHHHHHH

1 Press FUNCTION to select Scan.
Press until appears in theFUNCTION Scan
display.
2 Press ato turn scan play on.
Scan:ON appears in the display. The first 10
seconds of each track is played.
3 When you find the desired track press
bto turn scan play off.
Scan:OFF appears in the display. The track will
continue to play.
#If the display has automatically returned to
the playback display, select again by press-Scan
ing .FUNCTION
Note
After scanning of a MD is finished, normal play-
back of the tracks will begin again.
Pausing MD playback
Pause lets you temporarily stop playback of
the MD.
1 Press FUNCTION to select PAUSE.
Press untilFUNCTION PAUSE appears in the
display.
2 Press to turn pause on.a
PAUSE:ON appears in the display. Play of the
current track pauses.
3 Press to turn pause off.b
PAUSE:OFF appears in the display. Play will re-
sume at the same point that you turned pause
on.
Displaying disc titles
When playing an MD, you can switch text dis-
play such as disc title and track title.
%Press DISPLAY.
Press DISPLAY repeatedly to switch between
the following settings:
Play time (disc title)DISC TTL TRK TTL
(track title)
#If no title has been entered for the currently
playing disc, NO DATA is displayed.
Scrolling titles in the display
This unit can display the first 8 letters only of
DISC TTL TRK TTLand . When the recorded in-
formation is longer than 8 letters, you can
scroll the text to the left so that the rest of the
title can be seen.
%Press DISPLAY and hold until the title
begins to scroll to the left.
The rest of the title will appear in the dis-
play.
Built-in MD Player
En 15
English
Section
05
HHHHHHHHHHHHHH

Playing a CD
1 2 3
You can use this unit to control a multi-CD
player, which is sold separately.
These are the basic steps necessary to play a
CD with your multi-CD player. More advanced
CD operation is explained starting on the next
page.
1Disc number indicator
Shows the disc currently playing.
2Play time indicator
Shows the elapsed playing time of the cur-
rent track.
3Track number indicator
Shows the track currently playing.
1 Press SOURCE to select the multi-CD
player.
Press until you see dis-SOURCE Multi-CD
played.
2 Use VOLUME to adjust the sound level.
Rotate to increase or decrease the volume.
3 Select a disc you want to listen to with
the 1 6 buttons.
For discs located at 1 to 6, press the corre-
sponding number button.
If you want to select a disc located at 7 to 12,
press and hold the corresponding numbers
such as for disc 7, until the disc number ap-1
pears in the display.
#You can also sequentially select a disc by
pressing / .a b
4 To perform fast forward or reverse,
press and hold or .c d
5 To skip back or forward to another
track, press or .c d
Pressing skips to the start of the next track.d
Pressing once skips to the start of the cur-c
rent track. Pressing again will skip to the pre-
vious track.
Notes
!When the multi-CD player performs the pre-
paratory operations, is displayed.Ready
!If the multi-CD player does not operate prop-
erly, an error message such as ERROR-11
may be displayed. Refer to the multi-CD player
owner s manual.
!If there are no discs in the multi-CD player ma-
gazine, is displayed.No Disc
!When you select a CD TEXT disc on a CD TEXT
compatible multi-CD player, the disc and track
titles begin to scroll to the left auto-
matically.
50-disc multi-CD player
Only those functions described in this manual
are supported for 50-disc multi-CD players.
Multi-CD Player
En
16
Section
06
HHHHHHHHHHHHHH

Introduction of advanced
multi-CD player operation
1
2
3
1RPT indicator
Shows when repeat range is selected to cur-
rent track.
2Function display
Shows the function status.
3Track number indicator
Shows the track currently playing.
%Press FUNCTION to display the function
names.
Press repeatedly to switch be-FUNCTION
tween the following functions:
RPT TTL LIST(repeat play)(disc title list)
RDM (random play) Scan (scan play)
ITS.P (ITS play) PAUSE COMP(pause)
(compression and DBE)
#To return to the playback display, press BAND.
Note
If you do not operate the function within about 30
seconds, the display is automatically returned to
the playback display.
Repeating play
There are three repeat play ranges for the
multi-CD player: (multi-CD player re-MCD
peat), (one-track repeat) and (disc re-TRK DSC
peat).
1 Press FUNCTION to select RPT.
Press until appears in the dis-FUNCTION RPT
play.
2 Press or to select the repeat range.c d
Press or until the desired repeat range ap-c d
pears in the display.
!MCD Repeat all discs in the multi-CD
player
!TRK Repeat just the current track
!DSC Repeat the current disc
Notes
!If you select other discs during repeat play,
the repeat play range changes to .MCD
!If you perform track search or fast forward/re-
verse during , the repeat play rangeTRK
changes to .DSC
Playing tracks in a random
order
Random play lets you play back tracks in a
random order within the repeat range, MCD
and .DSC
1 Select the repeat range.
Refer to on this page.Repeating play
2 Press FUNCTION to select RDM.
Press until appears in theFUNCTION RDM
display.
3 Press ato turn random play on.
RDM :ON appears in the display. Tracks will
play in a random order within the previously
selected or ranges.MCD DSC
4 Press bto turn random play off.
RDM :OFF appears in the display. Tracks will
continue to play in order.
Multi-CD Player
En 17
English
Section
06
HHHHHHHHHHHHHH

Note
If you turn random play on during and thenDSC
return to the playback display, appears inDRDM
the display.
Scanning CDs and tracks
While you are using , the beginning ofDSC
each track on the selected disc plays for about
10 seconds. When you are using , the be-MCD
ginning of the first track of each disc is played
for about 10 seconds.
1 Select the repeat range.
Refer to on the previous page.Repeating play
2 Press FUNCTION to select Scan.
Press until appears in theFUNCTION Scan
display.
3 Press ato turn scan play on.
Scan :ON appears in the display. The first 10
seconds of each track of the current disc (or
the first track of each disc) is played.
4 When you find the desired track (or
disc) press bto turn scan play off.
Scan :OFF appears in the display. The track (or
disc) will continue to play.
#If the display has automatically returned to
the playback display, select again by press-Scan
ing .FUNCTION
Notes
!After track or disc scanning is finished, nor-
mal playback of the tracks will begin again.
!If you turn scan play on during and thenDSC
return to the playback display, appearsDSCN
in the display.
Pausing CD playback
Pause lets you temporarily stop playback of
the CD.
1 Press FUNCTION to select PAUSE.
Press untilFUNCTION PAUSE appears in the
display.
2 Press to turn pause on.a
PAUSE:ON appears in the display. Play of the
current track pauses.
3 Press to turn pause off.b
PAUSE:OFF appears in the display. Play will re-
sume at the same point that you turned pause
on.
Using ITS playlists
ITS (instant track selection) lets you make a
playlist of favorite tracks from those in the
multi-CD player magazine. After you have
added your favorite tracks to the playlist you
can turn on ITS play and play just those selec-
tions.
Creating a playlist with ITS
programming
You can use ITS to enter and playback up to 99
tracks per disc, up to 100 discs (with the disc
title). (With multi-CD players sold before the
CDX-P1250 and CDX-P650, up to 24 tracks can
be stored in the playlist.)
1 Play a CD that you want to program.
Press or to select a CD.a b
2 Press FUNCTION and hold until Title In
appears in the display, then press
FUNCTION to select ITS.
After is displayed, press re-Title In FUNCTION
peatedly, the following functions appear in the
display:
Multi-CD Player
En
18
Section
06
HHHHHHHHHHHHHH

Title In ITS(disc title input)(ITS program-
ming)
#When playing a CD TEXT disc on a CD TEXT
compatible multi-CD player, you cannot switch to
Title In. The disc title will have already been re-
corded on a CD TEXT disc.
3 Select a desired track by pressing cor
d.
4 Press ato store the currently playing
track in the playlist.
ITS IN is displayed briefly and the currently
playing selection is added to your playlist. The
display then shows again.ITS
5 Press BAND to return to the playback
display.
Note
After data for 100 discs has been stored in mem-
ory, data for a new disc will overwrite the oldest
one.
Playback from your ITS playlist
ITS play lets you listen to the tracks that you
have entered into your ITS playlist. When you
turn on ITS play, tracks from your ITS playlist
in the multi-CD player will begin to play.
1 Select the repeat range.
Refer to on page 17.Repeating play
2 Press FUNCTION to select ITS.P.
Press until appears in theFUNCTION ITS.P
display.
3 Press ato turn ITS play on.
ITS.P:ON appears in the display. Playback be-
gins of those tracks from your playlist within
the previously selected or ranges.MCD DSC
#If no tracks in the current range are pro-
grammed for ITS play then is dis-ITSempty
played.
4 Press bto turn ITS play off.
ITS.P:OFF appears in the display. Playback will
continue in normal order from the currently
playing track and CD.
Erasing a track from your ITS
playlist
When you want to delete a track from your ITS
playlist, you can if ITS play is on.
If ITS play is already on, skip to step 2. If ITS
play is not already on, press .FUNCTION
1 Play a CD you want to delete a track
from your ITS playlist, and turn ITS play on.
Refer to on thisPlayback from your ITS playlist
page.
2 Press FUNCTION and hold until Title In
appears in the display, then press
FUNCTION to select ITS.
After is displayed, pressTitle In FUNCTION
until appears in the display.ITS
3 Select a desired track by pressing cor
d.
4 Press to erase a track from your ITSb
playlist.
The currently playing selection is erased from
your ITS playlist and playback of the next track
from your ITS playlist begins.
#If there are no tracks from your playlist in the
current range, is displayed and normalITSempty
play resumes.
5 Press BAND to return to the playback
display.
Erasing a CD from your ITS playlist
When you want to delete all tracks of a CD
from your ITS playlist, you can if ITS play is off.
1 Play a CD that you want to delete.
Press or to select a CD.a b
Multi-CD Player
En 19
English
Section
06
HHHHHHHHHHHHHH

2 Press FUNCTION and hold until Title In
appears in the display, then press
FUNCTION to select ITS.
After is displayed, pressTitle In FUNCTION
until appears in the display.ITS
3 Press to erase all tracks on the cur-b
rently playing CD from your ITS playlist.
All tracks on the currently playing CD are
erased from your playlist and is dis-ITSclear
played.
4 Press BAND to return to the playback
display.
Using disc title functions
You can input CD titles and display the title.
Then you can easily search for and select a de-
sired disc for play.
Entering disc titles
Disc title input lets you input CD titles up to 8
letters long and up to 100 disc titles (with ITS
playlist) into the multi-CD player.
1 Play a CD that you want to enter the
title.
Press or to select a CD.a b
2 Press FUNCTION and hold until Title In
appears in the display.
After is displayed, press re-Title In FUNCTION
peatedly, the following functions appear in the
display:
Title In ITS(disc title input)(ITS program-
ming)
#When playing a CD TEXT disc on a CD TEXT
compatible multi-CD player, you cannot switch to
Title In. The disc title will have already been re-
corded on a CD TEXT disc.
3 Press 1 numbered button to select the
desired character type.
Press numbered button repeatedly to switch1
between the following character type:
Alphabet (upper case), numbers and symbols
Alphabet (lower case)
#You can select to input numbers and symbols
by pressing numbered button.2
4 Press or to select a letter of the al-a b
phabet.
Each press of will display a letter of the al-a
phabet in , numbers and sym-A B C ... X Y Z
bols in order. Each press of will1 2 3 ... | } ¯ b
display a letter in the reverse order, such as Z
Y X ... C B A order.
5 Press to move the cursor to the nextd
character position.
When the letter you want is displayed, press d
to move the cursor to the next position and
then select the next letter. Press to movec
backwards in the display.
6 Move the cursor to the last position by
pressing after entering the title.d
When you press one more time, the enteredd
title is stored in memory.
7 Press BAND to return to the playback
display.
Notes
!Titles remain in memory, even after the disc
has been removed from the magazine, and
are recalled when the disc is reinserted.
!After data for 100 discs has been stored in
memory, data for a new disc will overwrite the
oldest one.
Multi-CD Player
En
20
Section
06
HHHHHHHHHHHHHH

Displaying disc titles
You can display the title of any disc that has
had a disc title entered.
%Press DISPLAY.
Press DISPLAY repeatedly to switch between
the following settings:
Play time (disc title)DISC TTL
When you select , the title of the cur-DISC TTL
rently playing disc is shown in the display.
#If no title has been entered for the currently
playing disc, is displayed.NO TITLE
Selecting discs from the disc
title list
Disc title list lets you see the list of disc titles
that have been entered into the multi-CD
player and select one of them to playback.
1 Press FUNCTION to select TTL LIST.
Press until appears in theFUNCTION TTL LIST
display.
2 Press or to scroll through the list ofc d
titles that have been entered.
#If no title has been entered for a disc, title is
not displayed.
3 Press ato play your favorite CD title.
That selection will begin to play.
Using CD TEXT functions
You can use these functions only with a CD
TEXT compatible multi-CD player.
Some discs have certain information encoded
on the disc during manufacture. These discs
may contain such information as the CD title,
track title, artist s name and playback time
and are called CD TEXT discs. Only these spe-
cially encoded CD TEXT discs support the
functions listed below.
Displaying titles on CD TEXT discs
%Press DISPLAY.
Press DISPLAY repeatedly to switch between
the following settings:
Play time (disc title)DISC TTL DISC ART
(disc artist name) (track title)TRK TTL
TRK ART (track artist name)
#If specific information has not been recorded
on a CD TEXT disc, will be displayedNO XXXX
(e.g., NO T-TTL).
Scrolling titles in the display
This unit can display the first 8 letters only of
DISC TTL DISC ART TRK TTL TRK ART, , and .
When the recorded information is longer than
8 letters, you can scroll the text to the left so
that the rest of the title can be seen.
%Press DISPLAY and hold until the title
begins to scroll to the left.
The rest of the title will appear in the dis-
play.
Using compression and
bass emphasis
You can use these functions only with a multi-
CD player that supports them.
Using COMP (compression) and DBE (dy-
namic bass emphasis) functions let you adjust
the sound playback quality of the multi-CD
player. Each of the functions have a two-step
adjustment. The COMP function balances the
output of louder and softer sounds at higher
volumes. DBE boosts bass levels to give play-
back a fuller sound. Listen to each of the ef-
fects as you select through them and use the
one that best enhances the playback of the
track or CD that you are listening to.
Multi-CD Player
En 21
English
Section
06
HHHHHHHHHHHHHH

1 Press FUNCTION to select COMP.
Press until appears in theFUNCTION COMP
display.
#If the multi-CD player does not support
COMP/DBE, is displayed when you at-NO COMP
tempt to select it.
2 Press or to select your favorite set-a b
ting.
Press or repeatedly to switch between thea b
following settings:
COMP OFF COMP 1 COMP 2
COMP OFF DBE 1 DBE 2
Multi-CD Player
En
22
Section
06
HHHHHHHHHHHHHH

Introduction of audio
adjustments
1
2 3
1Audio display
Shows the audio adjustments status.
2Loudness indicator
Appears in the display when loudness is
turned on.
3SW indicator
Shows when the subwoofer output is turned
on.
%Press AUDIO to display the audio func-
tion names.
Press repeatedly to switch betweenAUDIO
the following audio functions:
FAD (balance adjustment) (loudness)Loud
Phase (subwoofer) 80 (subwoofer setting)
SLOPE (subwoofer slope) F-HPF (front
high pass filter) (rear high pass filter)R-HPF
#When the RCA output setting is ,P/O :FUL
Phase 80 SLOPE NoFAD, and change to (non
fading) function.
#When the front high pass filter is turned on,
you can select (front high pass filter slope).F-SLP
#When the rear high pass filter is turned on,
you can select (rear high pass filter slope).R-SLP
#To return to the display of each source, press
BAND.
Note
If you do not operate the audio function within
about 30 seconds, the display is automatically re-
turned to the source display.
Using balance adjustment
You can select a fader/balance setting that
provides an ideal listening environment in all
occupied seats.
1 Press AUDIO to select FAD.
Press until appears in the display.AUDIO FAD
#If the balance setting has been previously ad-
justed, will be displayed.BAL
2 Press or to adjust front/rear speak-a b
er balance.
Each press of or moves the front/reara b
speaker balance towards the front or the rear.
FAD :F25 FAD :R25is displayed as the front/
rear speaker balance moves from front to rear.
#FAD : 0 is the proper setting when only two
speakers are used.
3 Press or to adjust left/right speakerc d
balance.
When you press or , is displayed.c d BAL : 0
Each press of or moves the left/rightc d
speaker balance towards the left or the right.
BAL :L25 BAL :R25is displayed as the left/
right speaker balance moves from left to
right.
Adjusting loudness
Loudness compensates for deficiencies in the
low- and high-sound ranges at low volume.
1 Press AUDIO to select Loud.
Press until appears in the dis-AUDIO Loud
play.
2 Press to turn loudness on.a
Loud :ON appears in the display.
3 Press to turn loudness off.b
Loud :OFF appears in the display.
Audio Adjustments
En 23
English
Section
07
HHHHHHHHHHHHHH

Using subwoofer output
This unit is equipped with a subwoofer output
which can be turned on or off. When a sub-
woofer is controlled with this unit, first, switch
the RCA output setting to subwoofer, then
turn the subwoofer output on. For more de-
tails, see onSwitching the RCA output setting
page 32.
1 Press AUDIO to select Phase.
When the RCA output setting is ,P/O :S/W
you can select . Press untilPhase AUDIO
Phase appears in the display.
2 Press to turn subwoofer output on.a
Phase:NOR appears in the display. Subwoofer
output is now on.
#To turn subwoofer output off, press b.
3 Press or to select the phase of sub-c d
woofer output.
Press to select reverse phase andc
Phase:REV is displayed. Press to select nor-d
mal phase and is displayed.Phase:NOR
Adjusting subwoofer (low pass
filter) settings
When the subwoofer output is on, you can ad-
just the cut-off frequency and the output level
of the subwoofer.
1 Press AUDIO to select the subwoofer
setting.
When the subwoofer output is on, you can se-
lect the subwoofer setting. Press untilAUDIO
80 appears in the display.
#If the subwoofer setting has been previously
adjusted, the frequency of that previously se-
lected will be displayed instead of 80.
2 Press orc d to select cut-off frequency.
Each press of or selects cut-off frequen-c d
cies in the following order:
50 63 80 100 125 (Hz)
Only frequencies lower than those in the se-
lected range are output from the subwoofer.
3 Press or to adjust the output levela b
of the subwoofer.
Each press of or increases or decreasesa b
the level of the subwoofer (e.g., to ).+6 24
Press or until you see the desired valuea b
displayed.
Adjusting low pass filter
attenuation slope
When the subwoofer output is on, you can ad-
just the continuity of sound between speaker
units.
1 Press AUDIO to select the slope setting.
Press until appears in the dis-AUDIO SLOPE
play.
2 Press or to select slope.c d
Press and is displayed. Press andc12 d18
is displayed.
Note
When slope of subwoofer and high pass filter are
12, and same cut-off frequency, the phase is re-
versed 180 degrees at the cut-off frequency. In
this case, reversing the phase assures improved
sound continuity.
Using the high pass filter
When you do not want low sounds from the
subwoofer output frequency range to play
from the front or rear speakers, turn the HPF
(high pass filter) on. Only frequencies higher
than those in the selected range are output
from the front or rear speakers. You can set up
front and rear separately.
Audio Adjustments
En
24
Section
07
HHHHHHHHHHHHHH
Produkt Specifikationer
| Mærke: | Pioneer |
| Kategori: | Modtager |
| Model: | MEH-P6550 |
Har du brug for hjælp?
Hvis du har brug for hjælp til Pioneer MEH-P6550 stil et spørgsmål nedenfor, og andre brugere vil svare dig
Modtager Pioneer Manualer

10 Oktober 2024
14 September 2024
2 September 2024
24 August 2024
24 August 2024
21 August 2024
20 August 2024
19 August 2024
18 August 2024
16 August 2024
Modtager Manualer
- Modtager Bosch
- Modtager SilverCrest
- Modtager Denver
- Modtager Sencor
- Modtager Sony
- Modtager Fenton
- Modtager Panasonic
- Modtager Hager
- Modtager VOX
- Modtager Pro-Ject
- Modtager Anthem
- Modtager Philips
- Modtager IFM
- Modtager Musway
- Modtager Audio-Technica
- Modtager Peavey
- Modtager TOA
- Modtager Hifonics
- Modtager Sharp
- Modtager Qtx
- Modtager Dynacord
- Modtager Logitech
- Modtager Behringer
- Modtager Emos
- Modtager Kenwood
- Modtager Neumann
- Modtager Sandberg
- Modtager MB Quart
- Modtager Smart
- Modtager Sennheiser
- Modtager Harman Kardon
- Modtager Garmin
- Modtager Grundig
- Modtager Motorola
- Modtager Roland
- Modtager Asus
- Modtager Golden Age Project
- Modtager Pyle
- Modtager Argon
- Modtager Roksan
- Modtager Denon
- Modtager Yamaha
- Modtager Bowers & Wilkins
- Modtager Matsui
- Modtager Scansonic
- Modtager AVM
- Modtager Nedis
- Modtager Sonoro
- Modtager Kicker
- Modtager Optoma
- Modtager Renegade
- Modtager LD Systems
- Modtager Hama
- Modtager Auna
- Modtager Thomson
- Modtager Aiwa
- Modtager Nokia
- Modtager Rega
- Modtager Yorkville
- Modtager Belkin
- Modtager Pyle Pro
- Modtager JBL
- Modtager AKAI
- Modtager Teufel
- Modtager DataVideo
- Modtager Strong
- Modtager Audio Pro
- Modtager RCF
- Modtager Optex
- Modtager Smartwares
- Modtager Chandler
- Modtager Trevi
- Modtager Trust
- Modtager Blaupunkt
- Modtager JVC
- Modtager Hilti
- Modtager Crunch
- Modtager Skytec
- Modtager Medion
- Modtager Vivanco
- Modtager Megasat
- Modtager Cambridge
- Modtager Tangent
- Modtager Cisco
- Modtager König
- Modtager Metronic
- Modtager TechniSat
- Modtager Meliconi
- Modtager Bang And Olufsen
- Modtager Bose
- Modtager Geemarc
- Modtager Jabra
- Modtager Klipsch
- Modtager Alpine
- Modtager Salus
- Modtager Triax
- Modtager Tripp Lite
- Modtager Exibel
- Modtager Mercury
- Modtager Genie
- Modtager Vaddio
- Modtager Goobay
- Modtager KEF
- Modtager Technics
- Modtager Summit Audio
- Modtager Jensen
- Modtager Alecto
- Modtager Icom
- Modtager Astro
- Modtager Plantronics
- Modtager HQ
- Modtager Krüger&Matz
- Modtager Canal Digital
- Modtager DJI
- Modtager Marmitek
- Modtager Zalman
- Modtager PreSonus
- Modtager Kopul
- Modtager Godox
- Modtager Kathrein
- Modtager Sonos
- Modtager NAD
- Modtager AJA
- Modtager Tascam
- Modtager Bogen
- Modtager Omnitronic
- Modtager Velleman
- Modtager Marshall
- Modtager Sonance
- Modtager Telestar
- Modtager Vivotek
- Modtager Zoom
- Modtager Bush
- Modtager JUNG
- Modtager Fostex
- Modtager MIPRO
- Modtager Dual
- Modtager Electro-Voice
- Modtager HQ Power
- Modtager Fredenstein
- Modtager RME
- Modtager Sagem
- Modtager Onkyo
- Modtager Focal
- Modtager Line 6
- Modtager HK Audio
- Modtager Teac
- Modtager GlobalSat
- Modtager Imperial
- Modtager Autotek
- Modtager Magnat
- Modtager Saramonic
- Modtager Thorens
- Modtager Marantz
- Modtager ELAC
- Modtager Hartke
- Modtager McIntosh
- Modtager Hertz
- Modtager American Audio
- Modtager ART
- Modtager Bluesound
- Modtager Yaesu
- Modtager Polk
- Modtager Monacor
- Modtager Samson
- Modtager Audizio
- Modtager JL Audio
- Modtager Raymarine
- Modtager Sogo
- Modtager Rupert Neve Designs
- Modtager Jamo
- Modtager Chamberlain
- Modtager FiiO
- Modtager DBX
- Modtager Warm Audio
- Modtager Devolo
- Modtager Simrad
- Modtager Radial Engineering
- Modtager Galaxy Audio
- Modtager Renkforce
- Modtager Marshall Electronics
- Modtager Chord
- Modtager Alto
- Modtager Maxview
- Modtager Manhattan
- Modtager Aquatic AV
- Modtager Caliber
- Modtager Audiolab
- Modtager Deaf Bonce
- Modtager Music Hall
- Modtager APart
- Modtager LogiLink
- Modtager Brondi
- Modtager Kramer
- Modtager Rotel
- Modtager Metra
- Modtager QSC
- Modtager Black Lion Audio
- Modtager Naim
- Modtager Solid State Logic
- Modtager Citronic
- Modtager Thomann
- Modtager RDL
- Modtager NAV-TV
- Modtager TV Star
- Modtager Edision
- Modtager Clarion
- Modtager Sound Devices
- Modtager Wharfedale
- Modtager Universal Audio
- Modtager Valueline
- Modtager Fender
- Modtager TIC
- Modtager Vision
- Modtager Majestic
- Modtager Zgemma
- Modtager MuxLab
- Modtager Panduit
- Modtager Morel
- Modtager Cerwin-Vega
- Modtager Axis
- Modtager Mackie
- Modtager Avalon
- Modtager Wavtech
- Modtager Xantech
- Modtager Reloop
- Modtager Crest Audio
- Modtager Oculus VR
- Modtager Lindell Audio
- Modtager Audio Limited
- Modtager ATen
- Modtager Shure
- Modtager Sangean
- Modtager Vimar
- Modtager Power Dynamics
- Modtager Rockford Fosgate
- Modtager Grace Design
- Modtager Smart-AVI
- Modtager Martin Logan
- Modtager Dahua Technology
- Modtager Fosi Audio
- Modtager Terratec
- Modtager Vivolink
- Modtager Phoenix Gold
- Modtager Memphis Audio
- Modtager Vonyx
- Modtager Scosche
- Modtager Speco Technologies
- Modtager Reely
- Modtager Boss
- Modtager Ibanez
- Modtager Nexa
- Modtager Klark Teknik
- Modtager StarTech.com
- Modtager S.M.S.L
- Modtager FBT
- Modtager InLine
- Modtager Focusrite
- Modtager Blackstar
- Modtager Crestron
- Modtager DAP-Audio
- Modtager Revel
- Modtager SPL
- Modtager Ground Zero
- Modtager Vincent
- Modtager Lindy
- Modtager GoGen
- Modtager Kogan
- Modtager Arcam
- Modtager Russound
- Modtager Audison
- Modtager Crown
- Modtager AVMATRIX
- Modtager Kanto
- Modtager Lumantek
- Modtager Elektrobock
- Modtager Rolls
- Modtager Cyrus
- Modtager Fusion
- Modtager Definitive Technology
- Modtager Kemo
- Modtager Delta Dore
- Modtager Insignia
- Modtager Adastra
- Modtager Lectrosonics
- Modtager Audac
- Modtager JETI
- Modtager Konig & Meyer
- Modtager FSR
- Modtager CYP
- Modtager Atlas Sound
- Modtager AKG
- Modtager AEA
- Modtager DiO
- Modtager AMX
- Modtager Homematic IP
- Modtager MXL
- Modtager August
- Modtager Xoro
- Modtager AudioControl
- Modtager Mooer
- Modtager Audiotec Fischer
- Modtager Bugera
- Modtager Audix
- Modtager Ibiza Sound
- Modtager Steren
- Modtager Ocean Matrix
- Modtager Comprehensive
- Modtager Orava
- Modtager Intelix
- Modtager Match
- Modtager Alfatron
- Modtager HiFi ROSE
- Modtager Classé
- Modtager Audioengine
- Modtager Musical Fidelity
- Modtager Advance Acoustic
- Modtager NuPrime
- Modtager REL Acoustics
- Modtager Artsound
- Modtager BZBGear
- Modtager Key Digital
- Modtager Ram Audio
- Modtager KanexPro
- Modtager Sonifex
- Modtager Gefen
- Modtager Cranborne Audio
- Modtager TV One
- Modtager Whirlwind
- Modtager Apantac
- Modtager Ferguson
- Modtager SRS
- Modtager Inovonics
- Modtager Blustream
- Modtager C2G
- Modtager WyreStorm
- Modtager Advance
- Modtager IFi Audio
- Modtager Cabasse
- Modtager DLS
- Modtager Ampeg
- Modtager Amplicom
- Modtager Amiko
- Modtager Hirschmann
- Modtager Palsonic
- Modtager Stinger
- Modtager Brigmton
- Modtager Sunstech
- Modtager Redline
- Modtager Marquant
- Modtager Matrox
- Modtager Mac Audio
- Modtager Denson
- Modtager Valcom
- Modtager Rocketfish
- Modtager Naxa
- Modtager Sherwood
- Modtager Conrad
- Modtager Zehnder
- Modtager Mx Onda
- Modtager Swissonic
- Modtager Pure Acoustics
- Modtager Iriver
- Modtager Lanzar
- Modtager Humax
- Modtager Pinnacle
- Modtager Graupner
- Modtager BOYA
- Modtager Integra
- Modtager Revox
- Modtager Comica
- Modtager Audient
- Modtager Hegel
- Modtager PAC
- Modtager Luxman
- Modtager Infinity
- Modtager Linn
- Modtager Monitor Audio
- Modtager Monoprice
- Modtager Aplic
- Modtager Axton
- Modtager Proel
- Modtager DB Technologies
- Modtager Neets
- Modtager OSD Audio
- Modtager Mark Levinson
- Modtager Soundstream
- Modtager Block
- Modtager PSB
- Modtager Formuler
- Modtager SVS
- Modtager LTC
- Modtager JB Systems
- Modtager Dreambox
- Modtager James
- Modtager HUMANTECHNIK
- Modtager SIIG
- Modtager PSSO
- Modtager Primare
- Modtager Kali Audio
- Modtager Wet Sounds
- Modtager Televés
- Modtager MTX Audio
- Modtager Astell&Kern
- Modtager Hughes & Kettner
- Modtager Manley
- Modtager MEE Audio
- Modtager Extron
- Modtager PureLink
- Modtager Ashly
- Modtager HEOS
- Modtager Legamaster
- Modtager Benchmark
- Modtager Madison
- Modtager Leviton
- Modtager Ebode
- Modtager Medeli
- Modtager Nubert
- Modtager Palmer
- Modtager Vocopro
- Modtager Phonocar
- Modtager Xtrend
- Modtager Helix
- Modtager Winegard
- Modtager Laney
- Modtager Devialet
- Modtager Xsarius
- Modtager EA
- Modtager DirecTV
- Modtager Octagon
- Modtager GOgroove
- Modtager Avantree
- Modtager LYYT
- Modtager Antelope Audio
- Modtager CE Labs
- Modtager Pharos
- Modtager Accell
- Modtager Jolida
- Modtager Intertechno
- Modtager Shanling
- Modtager GigaBlue
- Modtager Black Hydra
- Modtager RetroSound
- Modtager Ecler
- Modtager Viscount
- Modtager Ashdown Engineering
- Modtager Synq
- Modtager Parasound
- Modtager Roswell
- Modtager Velodyne
- Modtager Epcom
- Modtager Sunfire
- Modtager Selfsat
- Modtager Skytronic
- Modtager Topp Pro
- Modtager Whistler
- Modtager ESX
- Modtager Karma
- Modtager Dimavery
- Modtager AMS Neve
- Modtager Powersoft
- Modtager LinksPoint
- Modtager Lotronic
- Modtager Esoteric
- Modtager Markbass
- Modtager IMG Stage Line
- Modtager Wireless Solution
- Modtager Aurel
- Modtager NUVO
- Modtager Phoenix Audio
- Modtager AVPro Edge
- Modtager Comtek
- Modtager Fishman
- Modtager Pyramid
- Modtager LEA
- Modtager Sound Ordnance
- Modtager Canyon
- Modtager FiveO
- Modtager Planet Audio
- Modtager SureCall
- Modtager Elipson
- Modtager Lyngdorf
- Modtager FoneStar
- Modtager Phonic
- Modtager Koda
- Modtager Atlona
- Modtager Hotone
- Modtager Trace Elliot
- Modtager Bang Olufsen
- Modtager JTS
- Modtager AER
- Modtager Dynavox
- Modtager Modelcraft
- Modtager Fontastic
- Modtager Simaudio
- Modtager Niles
- Modtager Knoll
- Modtager Aguilar
- Modtager Creek
- Modtager Mobile Crossing
- Modtager The T.amp
- Modtager DAP
- Modtager Krell
- Modtager Edwards Signaling
- Modtager ANKARO
- Modtager A-NeuVideo
- Modtager Bellari
- Modtager CAD Audio
- Modtager Polsen
- Modtager Triangle
- Modtager Lab Gruppen
- Modtager AmpliVox
- Modtager Audiofrog
- Modtager CyberData Systems
- Modtager Williams Sound
- Modtager SoundTube
- Modtager Glemm
- Modtager WesAudio
- Modtager AudioSource
- Modtager Stewart
- Modtager Leema
- Modtager Axing
- Modtager Seco-Larm
- Modtager Camille Bauer
- Modtager Mosconi
- Modtager Crest
- Modtager TechLogix Networx
- Modtager Audibax
- Modtager Meridian
- Modtager Quad
- Modtager BC Acoustique
- Modtager Gold Note
- Modtager IOTAVX
- Modtager Shinybow
- Modtager Rexing
- Modtager Inter-M
- Modtager Sinus Live
- Modtager Soundtrack
- Modtager Canor
- Modtager Unison Research
- Modtager Universal Remote Control
- Modtager BMB
- Modtager Inateck
- Modtager Cloud
- Modtager Taga Harmony
- Modtager Datapath
- Modtager Antelope
- Modtager PTN-electronics
- Modtager Clare Controls
- Modtager Loxjie
- Modtager Cayin
- Modtager Technical Pro
- Modtager VMV
- Modtager CSL
- Modtager DVDO
- Modtager Henry Engineering
- Modtager Line Magnetic
- Modtager ButtKicker
- Modtager Atoll
- Modtager SmartSystem
- Modtager Pearstone
- Modtager Streacom
Nyeste Modtager Manualer

4 April 2025
4 April 2025
4 April 2025
4 April 2025
4 April 2025
4 April 2025
4 April 2025
29 Marts 2025
29 Marts 2025
28 Marts 2025