Planar PQ1710M Manual
Læs nedenfor 📖 manual på dansk for Planar PQ1710M (21 sider) i kategorien overvåge. Denne guide var nyttig for 9 personer og blev bedømt med 4.5 stjerner i gennemsnit af 2 brugere
Side 1/21

USER’S GUIDE
www.planar.com
PQ1710M
LCD Monitor

2
Planar Systems, Inc
Planar Systems, Inc
Planar Systems, Inc
Planar Systems, Inc Planar Systems, Inc
1195 NW Compton Drive
Beaverton, OR 97006-1992
www.planar.com
Customer Servic
Customer Servic
Customer Servic
Customer ServicCustomer Service
e
e
e e
Planar provides the following technical support services:
Inter
Inter
Inter
InterInternet
net
net
netnet Sup
Sup
Sup
Sup Support
port
port
portport
For support available 24/7 visit Planar's Online Technical Support at
www.planar.com/support. Our Online Technical Support is where you'll find
solutions to many common problems, download documentation, view answers to
frequently asked questions (FAQs) and get troubleshooting advice, or email
Planar your support question.
Talk to a Customer Servic
Talk to a Customer Servic
Talk to a Customer Servic
Talk to a Customer ServicTalk to a Customer Service Representative
e Representative
e Representative
e Representative e Representative
To contact Planar's Customer First(TM) Technical Support Service call
1.866.PLANAR.1 (866.752.6271). This service is available 5am - 5pm Pacific Time,
8am - 8pm Eastern Time, Monday through Friday.
Contact Us
24x7 Online Technical Support: http://www.planar.com/support
Email: PlanarSupport@planar.com
Tel: 1-866-PLANAR1 (866) 752-6271
Hours:
Hours:
Hours:
Hours:Hours: M-F, 5am
M-F, 5am
M-F, 5am
M-F, 5am M-F, 5am - 5pm Paci
- 5pm Paci
- 5pm Paci
- 5pm Paci- 5pm Pacific Time,
fic Time,
fic Time,
fic Time,fic Time, 8am - 8pm Eas
8am - 8pm Eas
8am - 8pm Eas
8am - 8pm Eas 8am - 8pm Eastern
tern
tern
terntern

3
The information contained in this document is subject to change without notice. This
document contains proprietary information that is protected by copyright. All rights are
reserved. No part of this document may be reproduced, translated to another language or
stored in a retrieval system, or transmitted by any means, electronic, mechanical,
photocopying, recording, or otherwise, without prior written permission. Windows is a
registered trademark of Microsoft Inc. Other brand or product names are trademarks of
their respective holders.

4

5
TABLE OF CONTENTS
FOR YOUR SAFETY
For Your Safety -------------------------------------------------------------------------------------4
GENERAL NOTES
1. Introduction--------------------------------------------------------------------------------------6
1.1 General Information
1.2 Features
1.3 Check List
2. Installation --------------------------------------------------------------------------------------7
2.1 Installing the base
2.2 Installing the monitor
2.3 Self test pattern
2.4 Adjusting picture
3. Operation of the monitor ------------------------------------------------------------------9
3.1 Power on/off switch
3.2 Power LED indicator
3.3 OSD control keys
3.4 Safety mode
3.5 Timing guide
3.6 Plug & Play
3.7 Power management
3.8 Volume adjust
4. Specifications ---------------------------------------------------------------------------------15
5. Simple Troubleshooting -------------------------------------------------------------------16

6
FOR YOUR SAFETY
Before operating the monitor, please read this manual thoroughly. This manual should be
retained for future reference.
FCC Class B Radio Frequency Interference Statement
WARNING: (FOR FCC CERTIFIED MODELS)
NOTE: This equipment has been tested and found to comply with the limits for a Class B
digital device, pursuant to Part 15 of the FCC Rules. These limits are designed to provide
reasonable protection against harmful interference in a residential installation. This
equipment generates, uses and can radiate radio frequency energy, and if not installed and
used in accordance with the instructions, may cause harmful interference to radio
communications.
However, there is no guarantee that interference will not occur in a particular installation. If
this equipment does cause harmful interference to radio or television reception, which can
be determined by turning the equipment off and on, the user is encouraged to try to correct
the interference by one or more of the following measures:
1. Reorient or relocate the receiving antenna.
2. Increase the separation between the equipment and receiver.
3. Connect the equipment into an outlet on a circuit different from that to which the receiver
is connected.
4. Consult the dealer or an experienced radio/TV technician for help.
LAMP(S) INSIDE THIS PRODUCT CONTAIN MERCURY AND MUST BE
RECYCLED OR DISPOSED OF ACCORDING TO LOCAL, STATE OR
FEDERAL LAWS. FOR MORE INFORMATION, CONTACT THE ELECTRONIC
INDUSTRIES ALLIANCE AT WWW.EIAE.ORG. FOR LAMP SPECIFIC
DISPOSAL INFORMATION CHECK WWW.LAMPRECYCLE.ORG.
NOTICE:
1. The changes or modifications not expressly approved by the party responsible for
compliance could void the user's authority to operate the equipment.
2. Shielded interface cables and AC power cord, if any, must be used in order to comply
with the emission limits.
3. The manufacturer is not responsible for any radio or TV interference caused by
unauthorized modification to this equipment. It is the responsibilities of the user to
correct such interference.
WARNING:
To prevent fire or shock hazard, do not expose the monitor to rain or moisture.
Dangerously high voltages are present inside the monitor. Do not open the
cabinet. Refer servicing to qualified personnel only.

7
PRECAUTIONS
1. Unplug the monitor from the power source when you clean the monitor. Do
not use liquid cleaners or aerosol cleaners. Use a cloth to clean it. If that
doesn’t do, please use LCD screen cleaners.
2. Do not use attachments not recommended as they may cause hazards.
3. Please grasp the plug to unplug the connector from the wall outlet. Do not pull
the power cord to unplug it.
4. Do not place anything on the power cord or step on it
5. Do not place the monitor near water such as bathtub, washbowl, sink, laundry
tub, swimming pool etc.
6. The slots are designed for ventilation they keep the monitor both workable
and protect it from overheating. For the same reason, please do not place the
monitor on a bed, sofa, carpets or other similar surface. Do not place the
monitor near or over a heat source, or place in a enclosed structure/area.
7. Keep the monitor at least 2 inches (5 cm) away from the wall or other goods.
8. This monitor can only use the power source indicated on the label. If you
have questions, please consult your dealer.
9. As a safety measure, this monitor is equipped with a three-wire ground style
plug. If you can not insert the plug into outlet, contact your electrician to install
the correct outlet, or use an adapter to ground the appliance safely. Do not
bypass the safety purpose of the grounding-type plug.
10. Please make sure that the outlet and power cord can support the total
electricity use of the products.
11. Place the monitor in safe place where the cord will not be easily tripped over.
12. Follow all the warnings and instructions illustrated in the manual.
13. Don’t overload the wall outlets and extension cords as this can result in fire or
electric shocks.
14. Do not remove or open the cover to service this monitor yourself. It may
expose you to dangerous voltage or other hazards. Please refer all servicing
to qualified service personnel.
15. Unplug this monitor from the outlet and refer servicing to qualified service
personnel under the following conditions.
A. The power cord is frayed or damaged.
B. The monitor has been dropped or the cabinet has been damaged
C. When the monitor displays a distinct change in performance, this
indicates a need for service.
16. The power cord is the main device to disconnect the power.
17. Unplug the power cord when you do not use the monitor for a long time.
18. Place the monitor in a well ventilated area and protect it from strong light,
overheating and moisture.
19. This monitor must be stored in a room in between the temperature of –20°C ~
+55°C. Storing outside this range may cause permanent damage.

8
GENERAL NOTES
1.Introduction
1.1 General Information
This monitor is a high-performance intelligent multi-scanning color monitor
utilizing active matrix TFT LCD display that uses amorphous silicon TFT as a
switching device. With very low radiation, anti-glare surface treatment and small
footprint, it is very suitable for home and office applications.
1.2 Features
LCD TFT 17" monitor
Built-in multimedia speakers
Multi-language OSD interface
Auto adjusting imaging
White and black reference voltage auto-calibration
Compliant with EPA energy star, VESA DPMS
Plug & Play
1.3 Check List
Check the list before operating this monitor. Please make sure that all of the
following items are included.
LCD monitor
Base + mounting screw
AC adapter
Power cord
VGA Signal cable
DVI cable
Audio cable
User’s manual
If any of the above listed items are missing, please contact your dealer for
technical support or customer service.

9
Register Your Planar Products Today
Thank you for choosing Planar. To assure you receive all the benefits of your
Planar product and services, register your Planar product today. Visit our website
to register your product at http://www.planar.com/support/product_registration.html
Cables, Replacement Lamps and Accessories
To find cables, replacement lamps and accessories for your Planar projector,
LCD monitor, touchscreen or other Planar products visit our online store at
www.PlanarOnline.com or find other stores who carry Planar products at
http://www.planar.com/howtobuy
10
2. Installation
The following chapters explain how to install the base and connect the monitor to
your personal computer.
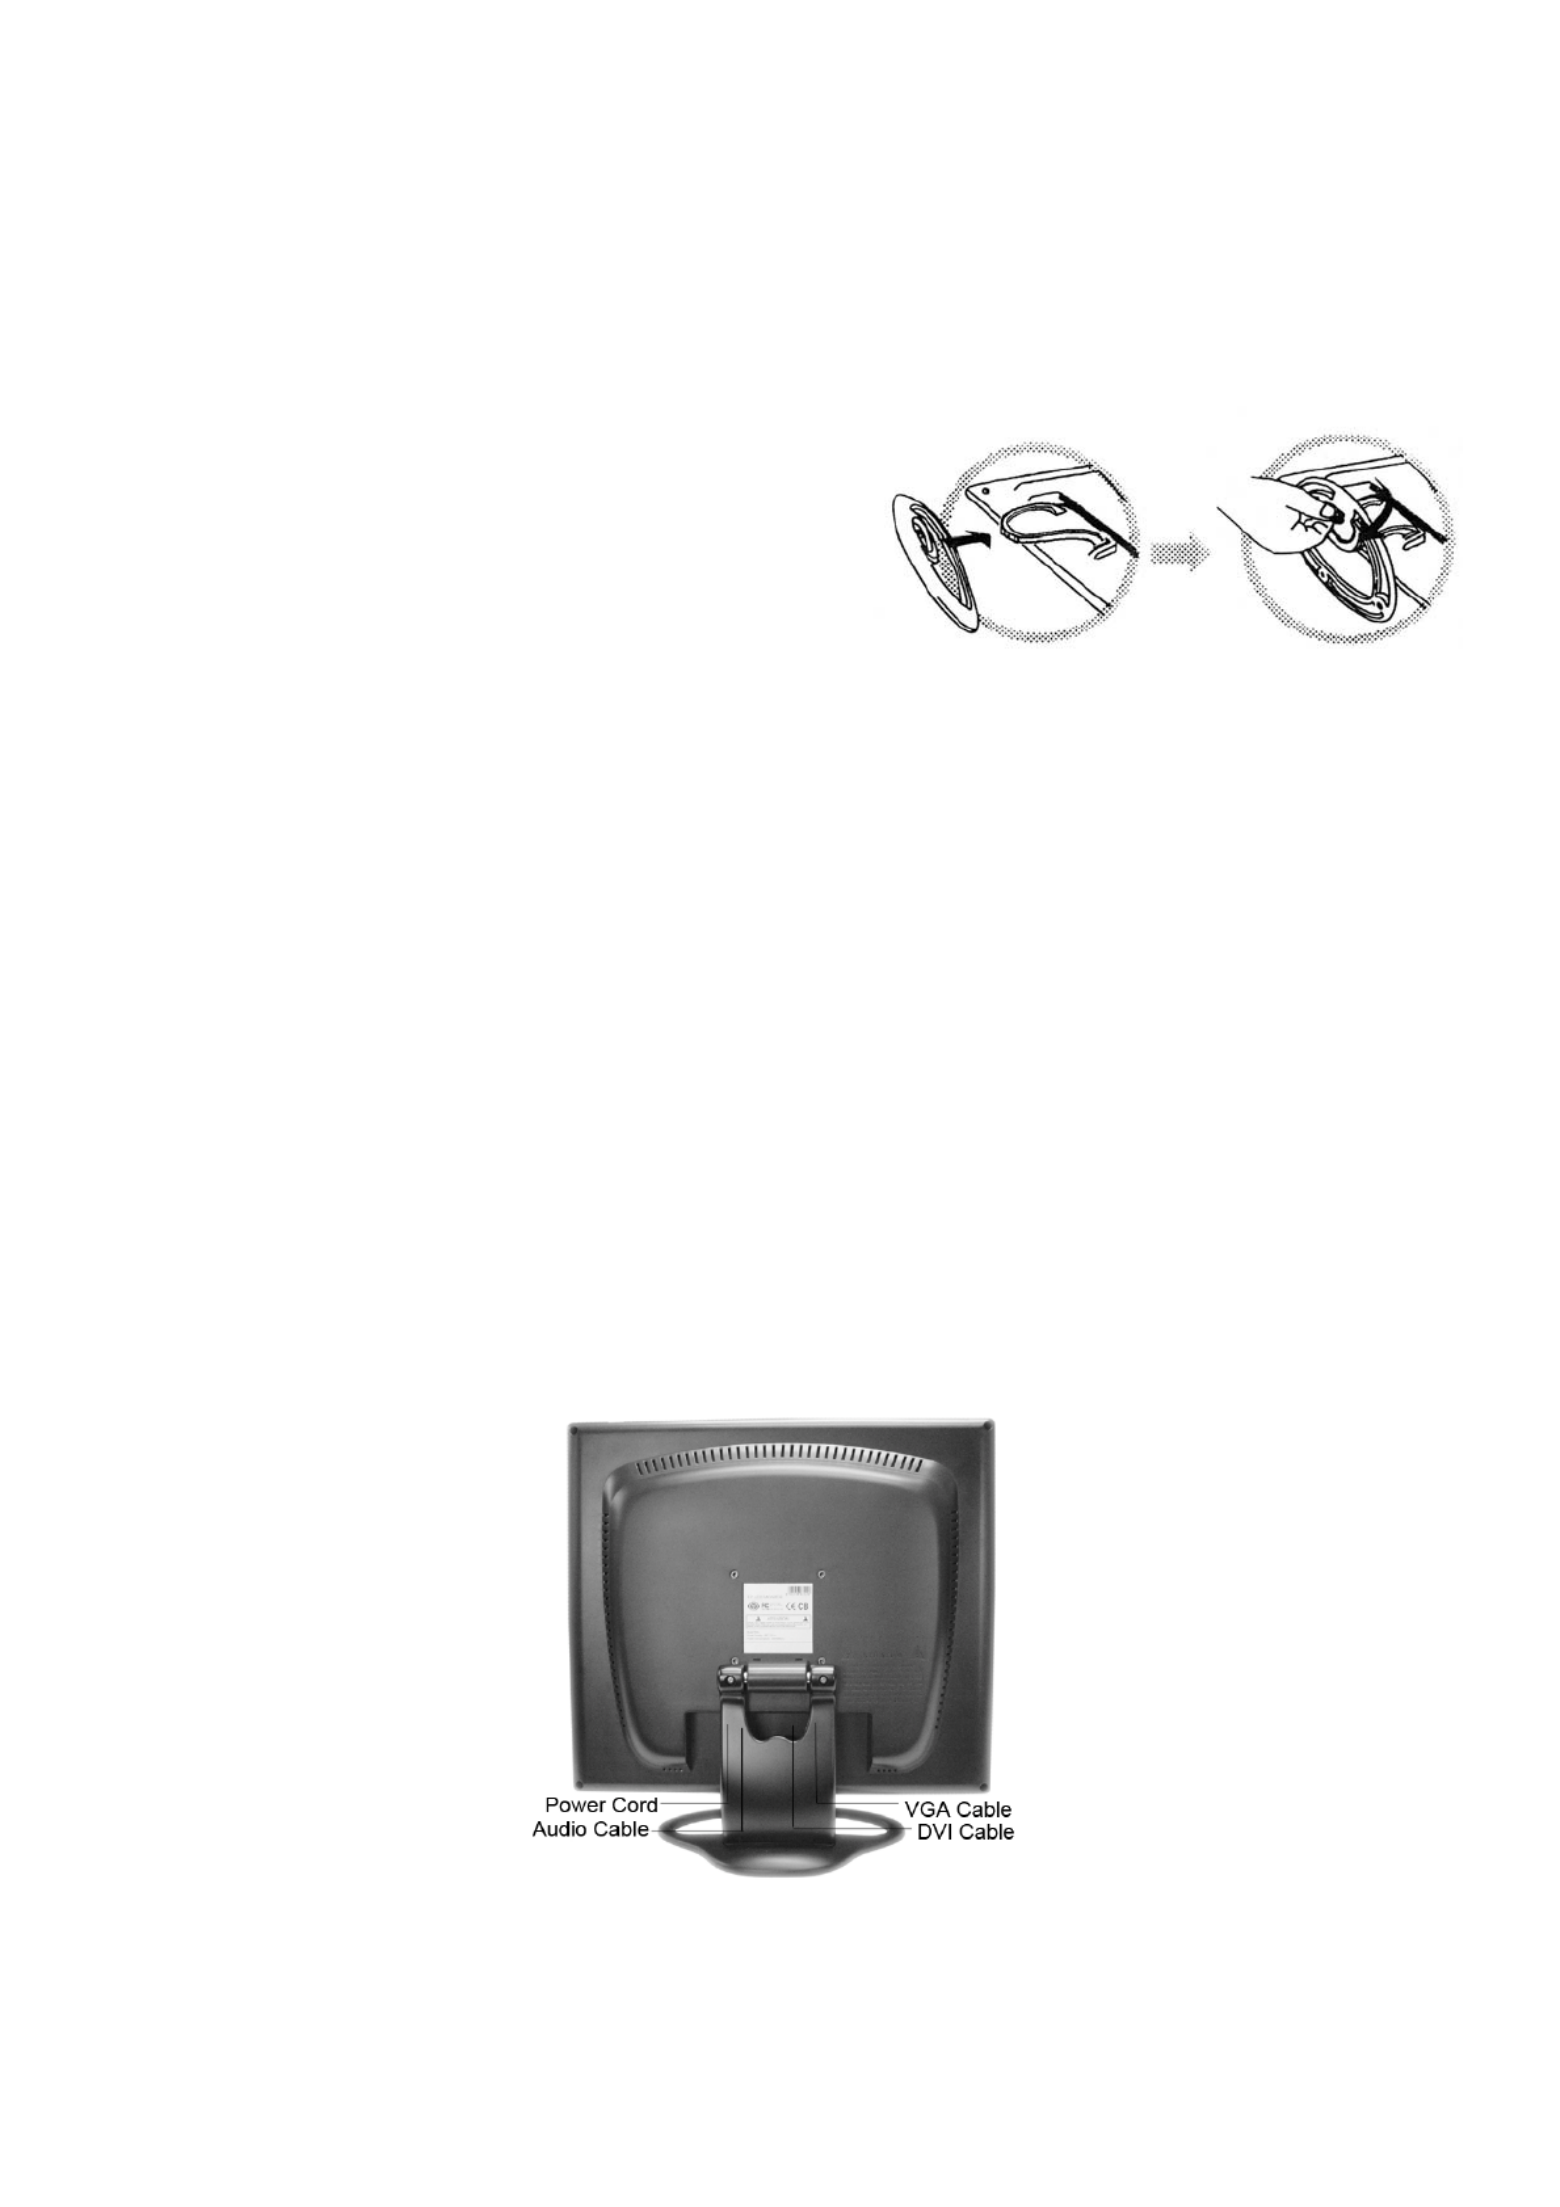
2.1 Installing the Base
Follow these steps to install the base:
1. Lay the monitor face down.
2. Assemble the base to the arm with screw.
3. Tighten the screw with a coin.
2.2 Installing the Monitor
Before starting, make sure that the computer and monitor’s power are both turned
off. Please follow the steps to install your LCD monitor:
1. Signal cable connection: Plug one end of the signal cable into computer and
lock the two bolts. Then plug the other end into the monitor and lock the two
bolts. Make sure connections are secure.
2. Power cord connection: connect the AC adapter with the DC power cord.
Next connect the AC adapter output to the power input of the monitor. Then
connect the DC power cord to an electrical outlet.
3. Audio cable connection: Insert one end of the audio cable to the audio output
of the PC audio card and the other to the audio input of LCD monitor.
4. Power on: turn on both the monitor and computer. After the monitor is
powered on, the LED lights up green, If the LED starts flashing red, please
check the video signal cable. If LED is off, please press power on switch.

11
2.3 Self Test Pattern
If there is no horizontal or vertical signal, your monitor will display the self test
pattern to indicate no signal input. After a few seconds, the monitor will enter into
waiting and saving power mode. The LED will be red and flashing. Once the
monitor receives the video signal, it will return to normal mode.
2.4 Adjusting Picture
In order to obtain the best visual display, you must adjust it, please refer to
chapter 3 “Operation of the monitor”.

12
3. Operation of the monitor
3.1 Power On/Off Switch
This is a light-touch digital-control key. It is used to turn the monitor on or off.
3.2 Power LED Indicator
When the monitor is working, the power LED is green. If the monitor is in saving
power mode, the power LED will be red and flashing. If you turn off the computer,
the power LED is off. When the LED is off, the monitor is off, but the power
adapter is on. For added safety, you should unplug the power adapter when you
don’t use the monitor for an extended period of time.
3.3 OSD Control Keys
3.3.1 Auto Key
This key is used to complete auto adjusting function in VGA mode.
3.3.2 +/- Key
These two keys will complete the right (increase) or left (decrease) adjustment
and choose the menu function. The volume can be set by +/- key directly.
3.3.3 Enter Key
Activates the OSD menu and acts as an enter function.
3.3.4 OSD Menu
The function list of the menu:
1. Auto adjustment
2. Brightness
3. Contrast
4. H-position
5. V-position
6. Clock
7. Phase
8. Signal source
9. Color adjustment
10. Volume
11. Sharpness
DVI Model
12. OSD position/transparency
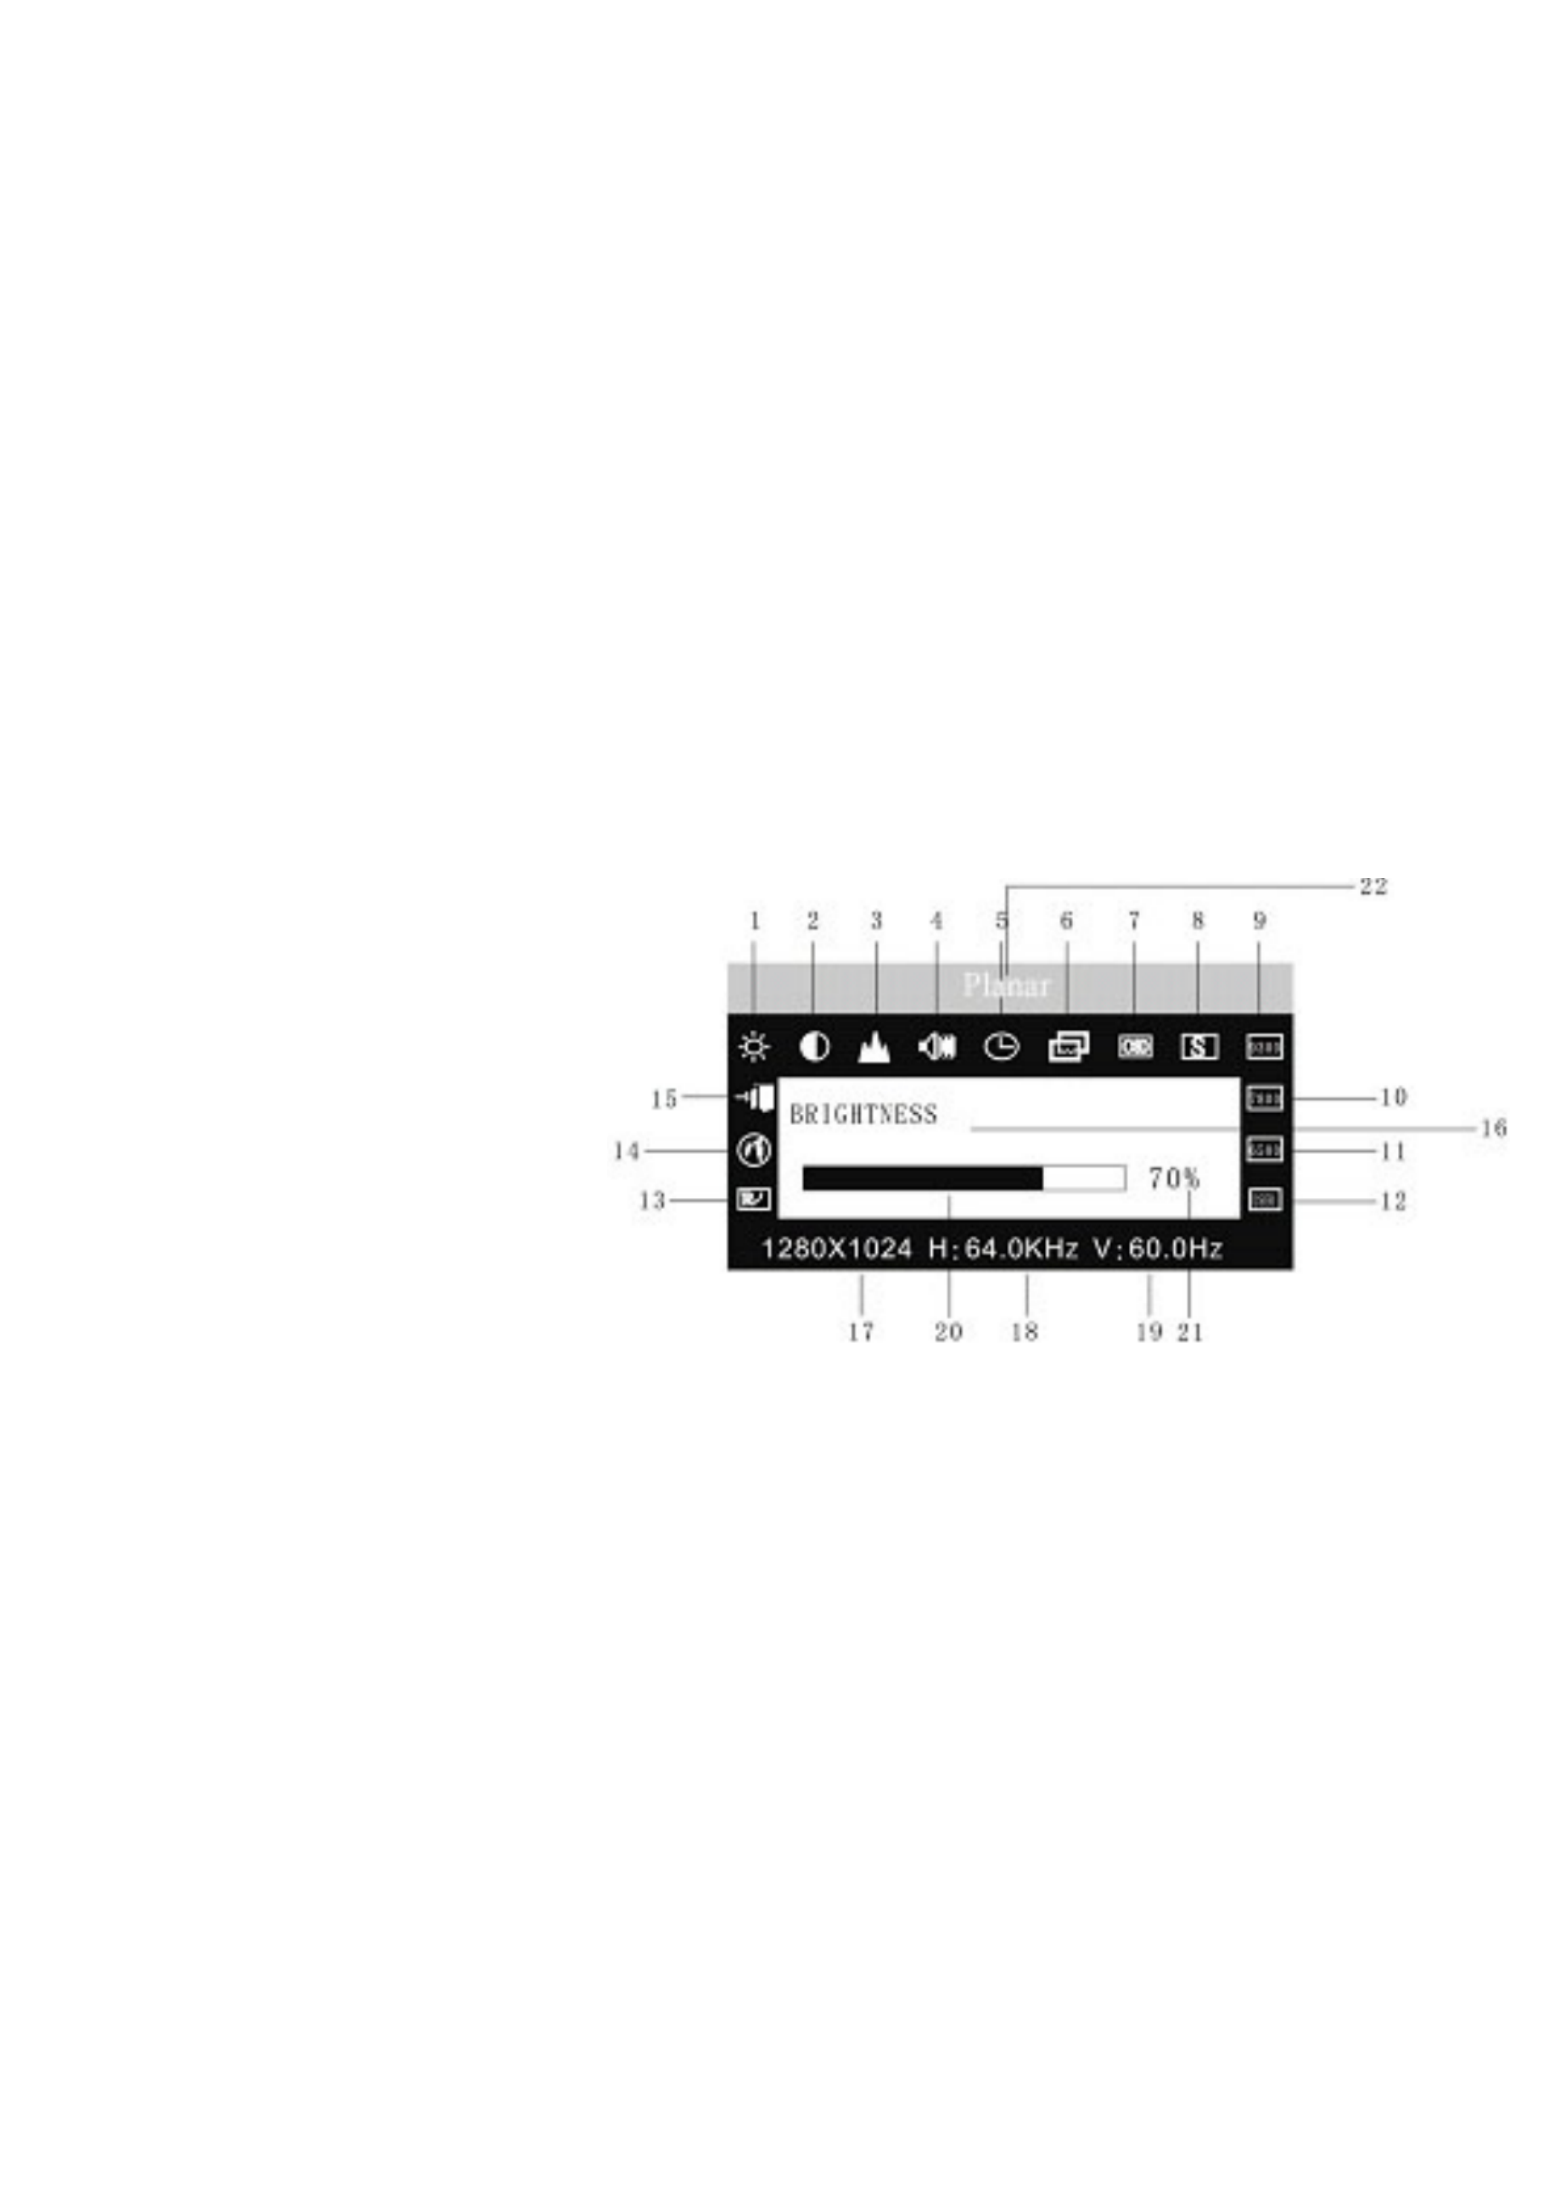
13
13. Recall
14. Languages
15. Exit
16. Selected function name
17. Resolution
18. H-frequency
19. V-frequency
20. Progressive bar of adjustment
21. Percentage of adjustment
22. Planar LOGO
3.3.5 Meaning of the Menu in DVI Mode
1. Brightness
2. Contrast
3. Sharpness
4. Volume
5. OSD menu display time
6. Transparency
7. OSD position
8. Signal source
9. 9300k
10. 7800k
11. 6500k
12. User
13. Recall
14. Language
15. Exit
16. Selected function name
17. Resolution
18. H-frequency
19. V-frequency
20. Progressive bar of adjustment
21. Percentage of adjustment
22. Planar LOGO

14
3.3.6 Function Table
Display contents Function
AUTO ADJUSTMENT Automatically adjust to obtain the best
setting
BRIGHTNESS Adjust the brightness
CONTRAST Adjust the contrast
H-POSITION Move the screen toward left or right
V-POSITION Move the screen upward or downward
CLOCK Adjust the frequency of pixel
PHASE Adjust the phase of pixel clock
SHARPNESS Adjust the sharpness of the picture
COLOR Adjust the colors of the picture
9300K COLOR TEMPERATURE Set 9300k color temperature
7800K COLOR TEMPERATURE Set 7800k color temperature
6500K COLOR TEMPERATURE Set 6500k color temperature
USER MODE Set user mode
AUTO COLOR BALANCE Auto color balance
VOLUME Adjust the volume
OSD DISPLAY TIME Adjust the OSD display time
OSD ADJUSTMENT Adjust the parameter of OSD
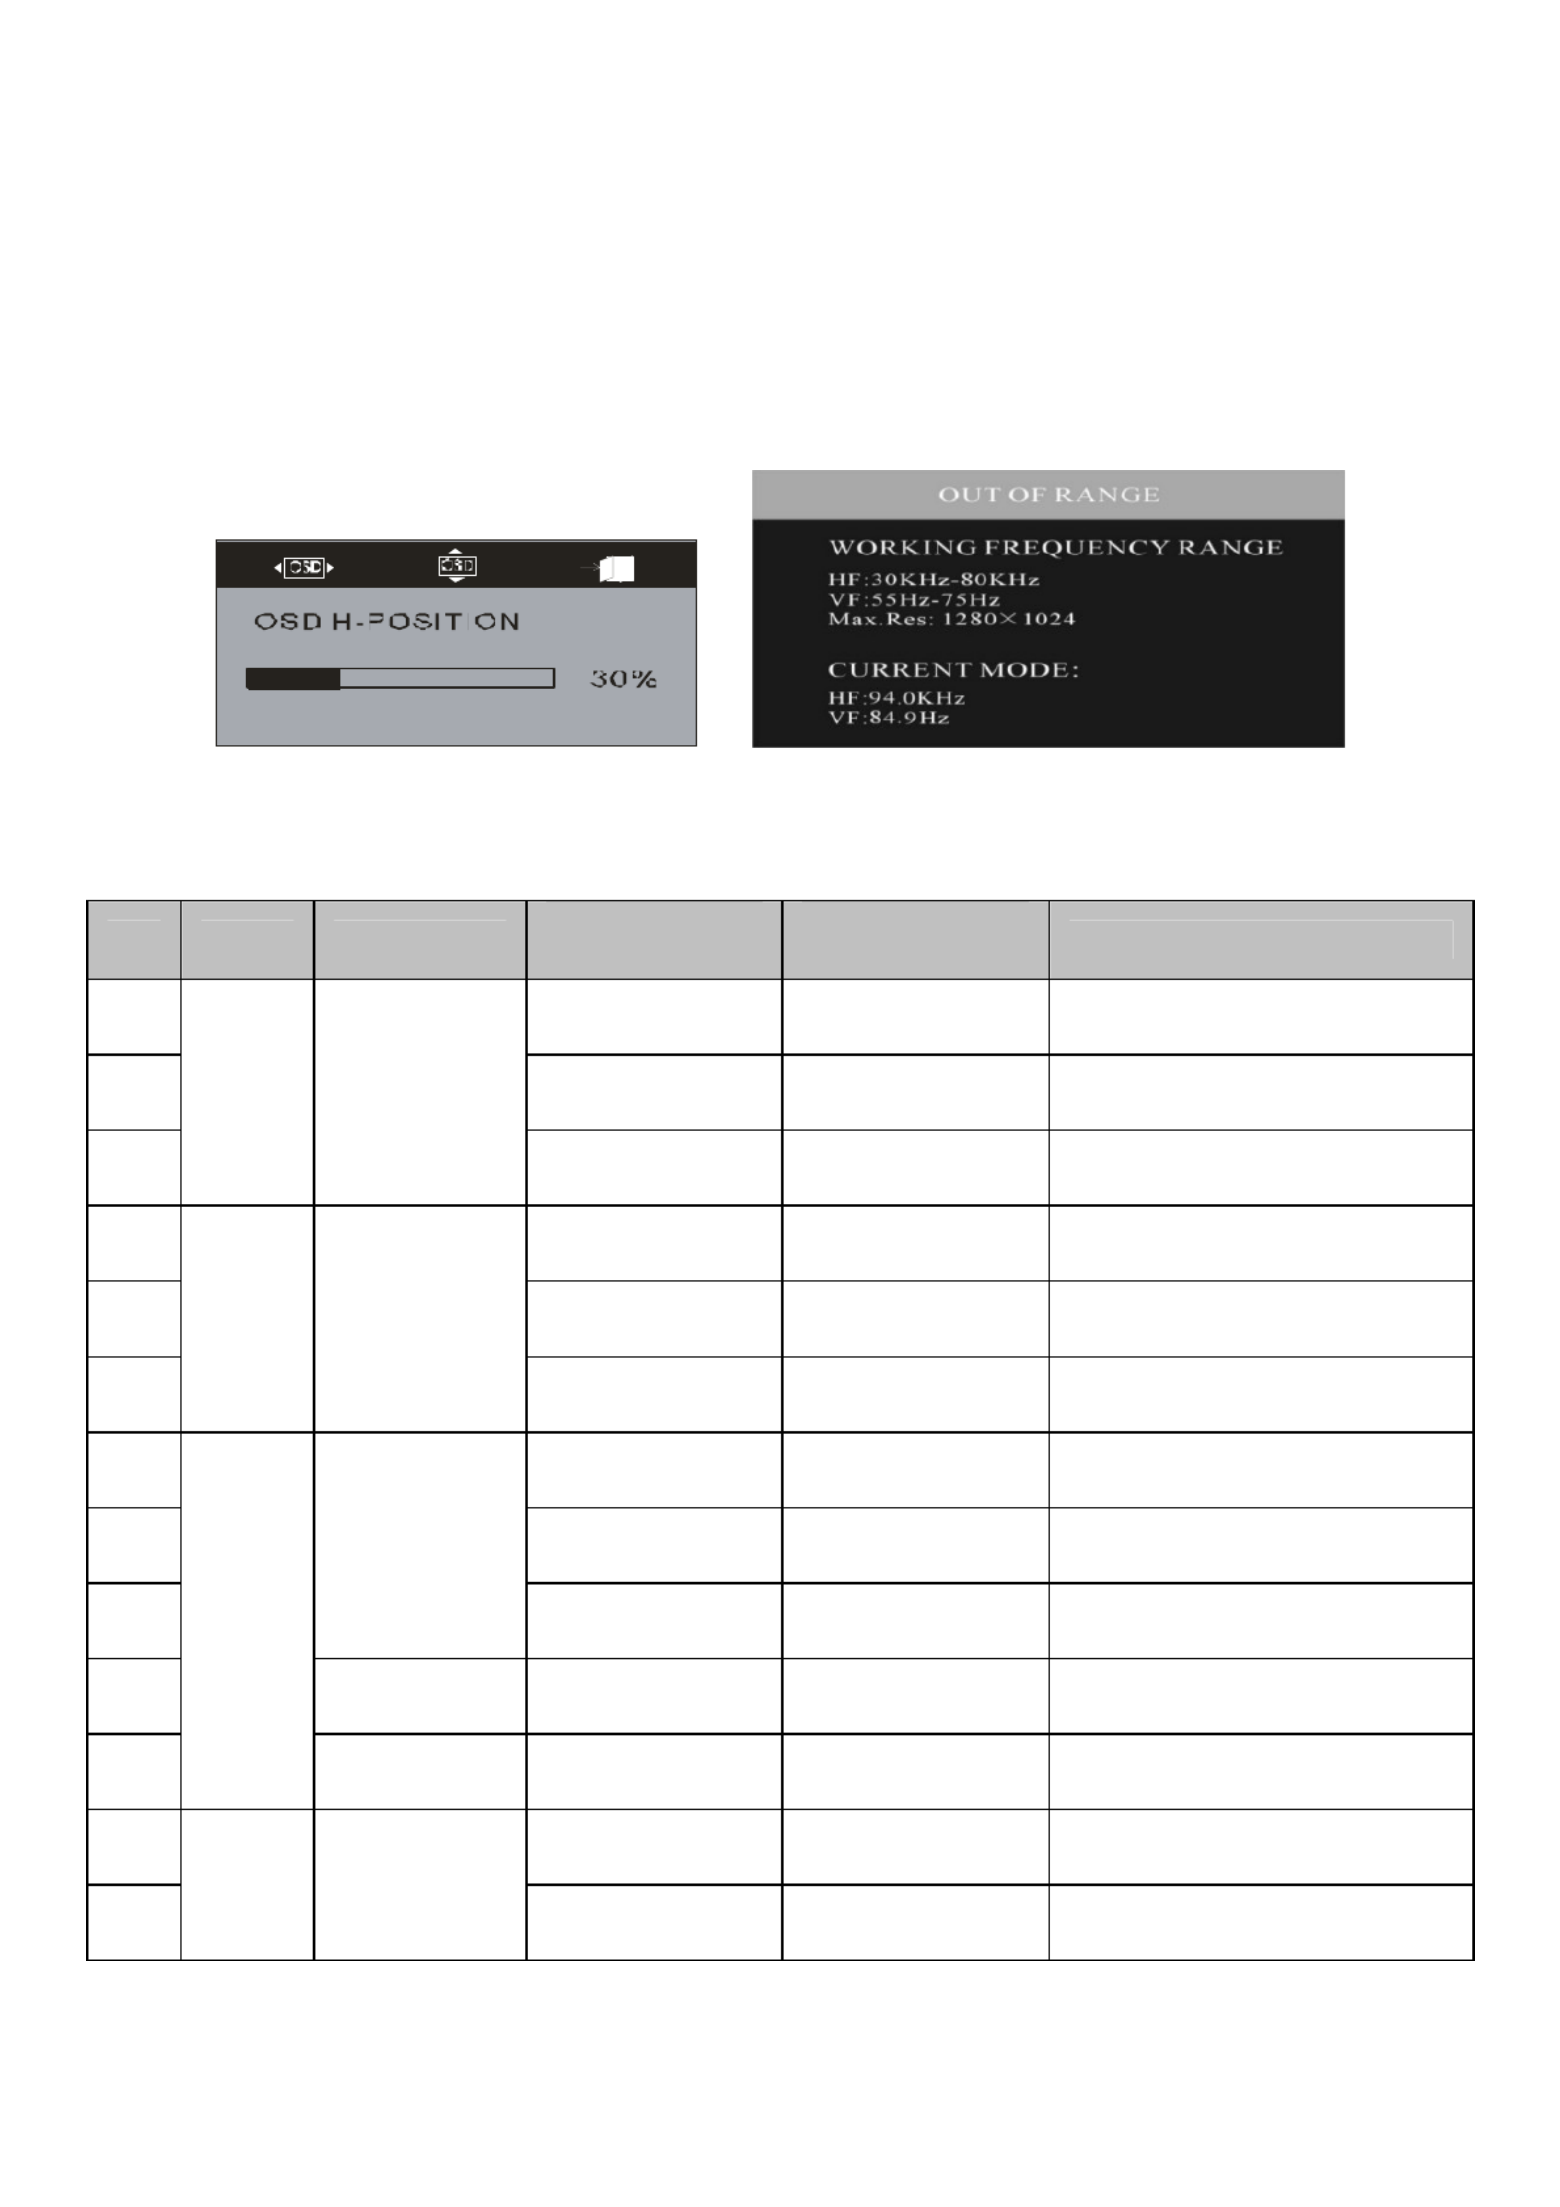
OSD H-POSITION Move the menu toward left or right
OSD V-POSITION Move the menu upward or downward
OSD TRANSPARENCY OSD transparency setting
Signal source Exchange signal mode between VGA and
DVI
RECALL Reset factory setting
LANGUAGE Language selection
EXIT Exit the menu

15
3.3.7 Special Functions
Auto Adjustment ( )
When you choose this function, the monitor will
enter into automatically adjustment mode. After a
few seconds, the monitor will be in the best visual
display mode.
Color Adjustment ( ):
When the function is selected, the monitor will come into the sub-menu, there are
five functions that can be selected:
9300k, 7800k, 6500k, USER,W-B. Selecting USER you will enter user mode and
you can make adjustment to R/G/B obtain your satisfying color. Selecting W-B the
monitor will adjust the white-black color reference voltage optimal color balance.
R/G/B Adjustment ( ):
When in “User’s mode”, the monitor will automatically enter into R/G/B adjustment
mode, push the ENTER key ,the relative options will flash, then adjust it by
pressing “+/-“ key. push ENTER again to exit.
Language ( ).
There are six languages to select:
PYC.: Russian
ENG.: English
FRE.: French
DEU.: German
ITA.: Italian
ESP.: Spanish
Position of OSD Menu ( ):
When you select the item, you can adjust H-position and
V-position of OSD menu and transparence.
Sharpness Adjustment ( ):
Adjust the sharpness of the picture on the screen.
16
3.4 Safety Mode
When the video signal exceeds the frequency range of the monitor, the monitor
MCU will stop horizontal and vertical scanning in order to protect the monitor the
following image will be displayed on the screen. After a few seconds, the monitor
will enter turn-off mode. You must restart the computer and reset the frequency
range.
3.5 Timing guide
No. Mode Resolution V-Frequency
(Hz)
H-Frequency
(KHz) Available Input Signal
1 60 31.5 Analog RGB,Digital DVI
2 72 37.9 Analog RGB
3
VGA 640 x 480
75 37.5 Analog RGB
4 60 37.9 Analog RGB,Digital DVI
5 72 48.1 Analog RGB
6
SVGA 800 x 600
75 46.9 Analog RGB
7 60 48.4 Analog RGB,Digital DVI
8 70 56.5 Analog RGB
9
1024 x 768
75 60 Analog RGB
10 1280 x 960 60 60 Analog RGB
11
XGA
1152 x 864 75 67.5 Analog RGB
12 60 64 Analog RGB,Digital DVI
13
SXGA 1280x1024
75 80 Analog RGB
17
3.6 Plug & Play
This monitor meets the standard of VESA DDC. When using video card with
VESA DDC1/2B, it will auto-scan video frequency, output power, function and
other data to the PC when computer is on. It will go into the proper video mode
and frequency.
3.7 Power Management
This monitor complies with EPA energy star requirement and meets VESA DPMS
standard. The following is the description of the power indicator for the power
saving mode.
Mode Power Indicator Power Consumption
On Green <40 W
Stand by/suspend Red flashing <5 W
Off Off <2W
3.8 Volume Adjust
Adjust the volume by OSD menu and software of the PC. The volume can be set
by +/- key directly.

19
5. Simple Troubleshooting
Symptom Solution
No picture / no LED Check if the power cord, the monitor and the power plug
are well connected. Check also if the monitor is off.
No picture / Red LED
flashing
Check if the PC video card and signal cable are well
connected and check if signal cable is properly connected
with monitor.
Picture is blurry, to big or
small
In OSD menu select “ ” to make the monitor adjust
automatically.
Picture is too dark Enter OSD menu and adjust contrast and brightness.
Overheating Keep 5 cm away from other goods for ventilation. Don’t put
anything on the monitor.
Picture distortion and flicker Check the PC setting, select the proper resolution and
adjust refresh frequency.
Short of color Check if the signal cable pins are twisted or broken.
Noise Signals at Turning off There may be noise signals turning off the monitor.
This is caused by electrical release and is normal.

20
Produkt Specifikationer
| Mærke: | Planar |
| Kategori: | overvåge |
| Model: | PQ1710M |
Har du brug for hjælp?
Hvis du har brug for hjælp til Planar PQ1710M stil et spørgsmål nedenfor, og andre brugere vil svare dig
overvåge Planar Manualer

11 Januar 2025
8 Januar 2025
8 Januar 2025
16 December 2024
1 Oktober 2024
1 Oktober 2024
1 Oktober 2024
6 September 2024
5 September 2024
3 September 2024
overvåge Manualer
- overvåge Bosch
- overvåge SilverCrest
- overvåge Acer
- overvåge Denver
- overvåge TCL
- overvåge Sony
- overvåge Samsung
- overvåge Panasonic
- overvåge Philips
- overvåge Vitek
- overvåge IFM
- overvåge LG
- overvåge Pioneer
- overvåge Mitsubishi
- overvåge Sharp
- overvåge Behringer
- overvåge Emos
- overvåge Epson
- overvåge Neumann
- overvåge Smart
- overvåge HP
- overvåge AOC
- overvåge Sanyo
- overvåge Akuvox
- overvåge Asus
- overvåge Gigabyte
- overvåge Toshiba
- overvåge Pyle
- overvåge InFocus
- overvåge Lenovo
- overvåge Asrock
- overvåge Yamaha
- overvåge Abus
- overvåge Optoma
- overvåge Da-Lite
- overvåge Westinghouse
- overvåge Element
- overvåge Thomson
- overvåge Hyundai
- overvåge Yorkville
- overvåge JBL
- overvåge Hisense
- overvåge DataVideo
- overvåge RCF
- overvåge Maxell
- overvåge Hannspree
- overvåge Omron
- overvåge Blaupunkt
- overvåge JVC
- overvåge Honeywell
- overvåge Hitachi
- overvåge Medion
- overvåge Citizen
- overvåge Haier
- overvåge Huawei
- overvåge König
- overvåge ProXtend
- overvåge Deltaco
- overvåge NewStar
- overvåge Alpine
- overvåge 3M
- overvåge Festo
- overvåge Danfoss
- overvåge Sunny
- overvåge BlueBuilt
- overvåge Tripp Lite
- overvåge BenQ
- overvåge Packard Bell
- overvåge Mad Catz
- overvåge Jensen
- overvåge Plantronics
- overvåge Xiaomi
- overvåge Peerless-AV
- overvåge Viewsonic
- overvåge Dell
- overvåge Schneider
- overvåge ELO
- overvåge Fujitsu
- overvåge Cooler Master
- overvåge Zalman
- overvåge PreSonus
- overvåge MSI
- overvåge Ricoh
- overvåge NEC
- overvåge Godox
- overvåge APC
- overvåge CTOUCH
- overvåge Ikan
- overvåge AJA
- overvåge GlobalTronics
- overvåge Velleman
- overvåge Marshall
- overvåge JUNG
- overvåge Fostex
- overvåge Salora
- overvåge Focal
- overvåge Genelec
- overvåge KRK
- overvåge NZXT
- overvåge Newline
- overvåge Hikvision
- overvåge Samson
- overvåge Yealink
- overvåge Allen & Heath
- overvåge Midas
- overvåge Simrad
- overvåge Renkforce
- overvåge Marshall Electronics
- overvåge Caliber
- overvåge I3-Technologies
- overvåge Viessmann
- overvåge Brandson
- overvåge Orion
- overvåge QSC
- overvåge BOOX
- overvåge Hanwha
- overvåge LaCie
- overvåge ARRI
- overvåge Onyx
- overvåge ITek
- overvåge Prowise
- overvåge Seiki
- overvåge Ozone
- overvåge M-Audio
- overvåge Bauhn
- overvåge Christie
- overvåge V7
- overvåge Provision-ISR
- overvåge Vorago
- overvåge Atomos
- overvåge EMachines
- overvåge Eurolite
- overvåge Mackie
- overvåge ACTi
- overvåge Faytech
- overvåge Krom
- overvåge Voxicon
- overvåge Chauvet
- overvåge Shure
- overvåge Vimar
- overvåge Continental Edison
- overvåge Dynaudio
- overvåge Iiyama
- overvåge PeakTech
- overvåge Dahua Technology
- overvåge AG Neovo
- overvåge Speco Technologies
- overvåge Prestigio
- overvåge Joy-It
- overvåge Boss
- overvåge IStarUSA
- overvåge Crestron
- overvåge SPL
- overvåge Kogan
- overvåge Barco
- overvåge SMART Technologies
- overvåge Insignia
- overvåge LC-Power
- overvåge AMX
- overvåge Tannoy
- overvåge Qian
- overvåge Xoro
- overvåge HyperX
- overvåge TVLogic
- overvåge Geovision
- overvåge Postium
- overvåge Ernitec
- overvåge Bearware
- overvåge Sonifex
- overvåge TV One
- overvåge AVer
- overvåge Alienware
- overvåge Aputure
- overvåge Maxdata
- overvåge Sunstech
- overvåge Marquant
- overvåge Kubo
- overvåge Swissonic
- overvåge IHealth
- overvåge Peaq
- overvåge Avocor
- overvåge Interlogix
- overvåge Eizo
- overvåge Kindermann
- overvåge EverFocus
- overvåge POSline
- overvåge Peerless
- overvåge Monoprice
- overvåge Promethean
- overvåge Odys
- overvåge HKC
- overvåge Ibm
- overvåge Drawmer
- overvåge Iadea
- overvåge Advantech
- overvåge Kali Audio
- overvåge Ganz
- overvåge Extron
- overvåge Legamaster
- overvåge Ikegami
- overvåge Pelco
- overvåge Approx
- overvåge Belinea
- overvåge Palmer
- overvåge Adam
- overvåge GVision
- overvåge Posiflex
- overvåge Jay-tech
- overvåge MicroTouch
- overvåge X-Rite
- overvåge EKO
- overvåge IBoardTouch
- overvåge Mirai
- overvåge Elite Screens
- overvåge Hollyland
- overvåge Mitsai
- overvåge Skytronic
- overvåge COMMBOX
- overvåge Yiynova
- overvåge Lilliput
- overvåge LightZone
- overvåge AOpen
- overvåge Planet Audio
- overvåge EC Line
- overvåge Datacolor
- overvåge Fluid
- overvåge Atlona
- overvåge HELGI
- overvåge Desview
- overvåge Syscom
- overvåge Allsee
- overvåge Alogic
- overvåge Night Owl
- overvåge ProDVX
- overvåge Varad
- overvåge DoubleSight
- overvåge CTL
- overvåge Game Factor
- overvåge Nixeus
- overvåge Chimei
- overvåge Blue Sea
- overvåge AMCV
- overvåge Hamlet
- overvåge Wyse - Dell
- overvåge SWIT
- overvåge Feelworld
- overvåge GeChic
- overvåge Oecolux
- overvåge ADS-TEC
- overvåge Casalux
- overvåge Positivo
- overvåge Jupiter
- overvåge Transvideo
- overvåge Innocn
- overvåge KeepOut
- overvåge Shimbol
- overvåge Raysgem
- overvåge Motrona
- overvåge AORUS
- overvåge Elvid
- overvåge Wohler
- overvåge Portkeys
- overvåge Mimo Monitors
- overvåge Gamber-Johnson
- overvåge Enttec
- overvåge American Dynamics
- overvåge AIS
- overvåge Eve Audio
- overvåge Wortmann AG
- overvåge Viotek
- overvåge Vidi-Touch
- overvåge KTC
- overvåge CoolerMaster
- overvåge Atlantis Land
- overvåge HEDD
- overvåge Colormetrics
- overvåge Monkey Banana
- overvåge SmallHD
- overvåge UPERFECT
- overvåge Freedom Scientific
- overvåge OSEE
- overvåge CSL
- overvåge Mybeo
- overvåge IOIO
- overvåge DTEN
- overvåge Cocopar
- overvåge Titan Army
- overvåge Delvcam
- overvåge Xenarc
- overvåge Wimaxit
Nyeste overvåge Manualer

4 April 2025
5 Marts 2025
5 Marts 2025

27 Februar 2025

21 Februar 2025

18 Februar 2025
11 Februar 2025
11 Februar 2025
11 Februar 2025
11 Februar 2025