Ricoh G700SE Manual
Læs nedenfor 📖 manual på dansk for Ricoh G700SE (197 sider) i kategorien Kamera. Denne guide var nyttig for 13 personer og blev bedømt med 4.5 stjerner i gennemsnit af 2 brugere
Side 1/197

Camera User Guide
The serial number of this product
is given on the bottom face of the
camera.
Basic Operations
If you are using the camera for the first time, read this section.
This section provides a basic overview of how to turn on the camera, take
pictures and play back pictures.
Advanced Operations
Read this section when you want to learn more about the different camera
functions.
This section provides more detailed information about the functions used to
take pictures and play back pictures, as well as information on how to customize
the camera settings, print pictures, and use the camera with a computer.
The rechargeable battery needs to be charged before use. The battery is not
charged at the time of purchase.

2
Safety Precautions
Warning Symbols
Various symbols are used throughout this instruction manual and on the
product to prevent physical harm to you or other people and damage to
property. The symbols and their meanings are explained below.
Danger This symbol indicates matters that may lead to imminent risk of death or
serious injury if ignored or incorrectly handled.
Warning This symbol indicates matters that may lead to death or serious injury if
ignored or incorrectly handled.
Caution This symbol indicates matters that may lead to injury or physical damage if
ignored or incorrectly handled.
Sample Warnings
The symbol alerts you to actions that must be performed.
The symbol alerts you to prohibited actions.
The symbol may be combined with other symbols to indicate that a specific
action is prohibited.
● Examples
Do not touch Do not disassemble
Observe the following precautions to ensure safe use of this equipment.
Danger
● Do not attempt to disassemble, repair or alter the equipment yourself. The high-
voltage circuitry in the equipment poses significant electrical hazard.
● Do not attempt to disassemble, alter or directly solder the battery.
● Do not put the battery in a fire, attempt to heat it, use it in a high temperature
environment such as next to a fire or inside a car, or abandon it. Do not put it into
water or the sea or allow it to get wet.
● Do not attempt to pierce, hit, compress, drop, or subject the battery to any other
severe impact or force.
● Do not use a battery that is significantly damaged or deformed.

3
Warning
● Turn off the power immediately in the event of abnormalities such as smoke
or unusual odors being emitted. Remove the battery as soon as possible,
being careful to avoid electric shocks or burns. If you are drawing power from a
household electrical outlet, be sure to unplug the power cord from the outlet to
avoid fire or electrical hazards. Discontinue use of the equipment immediately if it
is malfunctioning. Contact the nearest service center at your earliest convenience.
● Turn off the power immediately if any metallic object, water, liquid or other
foreign object gets into the camera. Remove the battery and memory card
as soon as possible, being careful to avoid electric shocks or burns. If you are
drawing power from a household electrical outlet, be sure to unplug the power
cord from the outlet to avoid fire or electrical hazards. Discontinue use of the
equipment immediately if it is malfunctioning. Contact the nearest service center
at your earliest convenience.
● Avoid any contact with the liquid crystal inside the picture display, should the
monitor be damaged. Follow the appropriate emergency measures below.
• SKIN: If any of the liquid crystal gets on your skin, wipe it off and rinse the
affected area thoroughly with water, then wash well with soap.
• EYES: If it gets in your eyes, wash your eyes with clean water for at least 15
minutes and seek medical advice immediately.
• INGESTION: If any of the liquid crystal is ingested, rinse the mouth out thoroughly
with water. Have the person drink a large amount of water and induce vomiting.
Seek medical assistance immediately.
● Follow these precautions to prevent the battery from leaking, overheating,
igniting or exploding.
• Do not use a battery other than those specifically recommended for the
equipment.
• Do not carry or store together with metal objects such as ballpoint pens,
necklaces, coins, hairpins, etc.
• Do not put the battery into a microwave or high pressure container.
• If leakage of battery fluid or a strange odor, color change, etc. is noticed during
use or during charging, remove the battery from the camera or battery charger
immediately and keep it away from fire.
● Please observe the following in order to prevent fire, electrical shock or cracking
of the battery while charging.
• Use only the indicated power supply voltage. Also avoid the use of multi-socket
adapters and extension cords.
• Do not damage, bundle or alter power cords. Also, do not place heavy objects on,
stretch or bend power cords.
• Do not connect or disconnect the power plug with wet hands. Always grip the
plug section when disconnecting a power cord.
• Do not cover equipment while charging.
● Keep the battery and SD memory card used in this equipment out of the reach
of children to prevent accidental ingestion. Consumption is harmful to human
beings. If swallowed, seek medical assistance immediately.

4
● Keep the equipment out of the reach of children.
● Do not touch the internal components of the equipment if they become
exposed as a result of being dropped or damaged. The high-voltage circuitry in
the equipment could lead to an electric shock. Remove the battery as soon as
possible, being careful to avoid electric shocks or burns. Take the equipment to
your nearest dealer or service center if it is damaged.
● When the camera is used in kitchens or in other locations where it will be
exposed to steam or high levels of humidity, care should be taken to prevent
moisture accumulating inside the device. Failure to observe this precaution could
result in fire or electric shock.
● Do not use the equipment near flammable gases, gasoline, benzene, thinner or
similar substances to avoid the risk of explosion, fire or burns.
● Do not use the equipment in locations where usage is restricted or prohibited as
this may lead to disasters or accidents.
● Wipe off any dust that accumulates on the electrical plug as this may lead to fire.
● Use only the specified AC adapter in household electrical outlets. Other adapters
pose the risk of fire, electric shock or injury.
● To avoid the risk of fire, electric shock or injury, do not use the battery charger or
AC adapter with commercially available electronic transformers when traveling
abroad.
Observe the following precautions to ensure safe use of this unit.
Caution
● Contact with fluid leaking from a battery can lead to burns. If part of your body
comes in contact with a damaged battery, rinse the area with water immediately
(Do not use soap).
If a battery starts to leak, remove it immediately from the equipment and wipe
the battery chamber thoroughly before replacing it with a new battery.
● Plug the power cords securely into the electrical outlets. Loose cords pose a fire
hazard.
● Do not expose the interior of the camera to moisture or allow water to enter
the camera when handling the device with wet hands. Failure to observe these
precautions could result in electric shock.
● Do not fire the flash at drivers of vehicles, as this may cause the driver to lose
control and result in a traffic accident.
Safety Precautions
for Accessories
When using optional products, carefully read the instructions provided
with the product before using that product.

7
Advanced Operations 49
1 ADJ. Button Functions 50
Selecting Shooting Menu Options Assigned to the ADJ./MEMO Button ....50
Shifting the AE and AF Targets ............................................................................................51
2 Taking Pictures in Scene Mode 52
Scene Mode Options .........................................................................................52
Using Skew Correction Mode ..............................................................................................54
3 Shooting and Viewing Movies 55
Shooting Movies .................................................................................................55
Playing Back Movies ...........................................................................................56
4 Memos 57
Adding Memos to New Photos .......................................................................................... 57
Viewing Memos ............................................................................................................................58
5 Using Custom Help 59
Creating Custom Help .......................................................................................59
Viewing Custom Help ........................................................................................61

9
7 Playback Menu 72
Using the Menu ...................................................................................................72
Playback Menu Options ....................................................................................73
Resize: Creating Small Copies of Images ....................................................................... 73
Trim: Creating Cropped Copies .......................................................................................... 73
Contrast Correction: Creating Copies with Modified Brightness
and Contrast ..........................................................................................................................73
Skew Correction: Reducing the Effects of Perspective .......................................... 73
Protect: Protecting Images from Accidental Deletion .............................................73
Slide Show: Automatic Playback ...................................................................................... 73
Copy to Card from Internal Memory: Copying Pictures from Internal
Memory to a Memory Card .............................................................................................73
DPOF: Selecting Pictures for Printing .............................................................................. 73
Recover File: Restoring Deleted Files ..............................................................................74
File Send: Wireless Upload...................................................................................................74
Trim ......................................................................................................................................................75
Contrast Correction .................................................................................................................... 77
Skew Correction ...........................................................................................................................78
Protect ................................................................................................................................................79
DPOF ...................................................................................................................................................80
Viewing Pictures on TV .....................................................................................81

11
SD WORM: Disabling Password Protection for SD WORM Cards ........................ 93
Menus: Adding Password Protection to the Menus ................................................. 93
9 Camera Memo Menu 94
Using the Menu ...................................................................................................94
Camera Memo Menu Options ........................................................................95
Camera Memo Mode: Choosing a Memo Mode ....................................................95
Memo Skip: Skipping Memo Combinations ............................................................... 95
Mark Memo Added to Photos: Displaying Memos That Have Been Added
to Photos .................................................................................................................................95
Remove Memo Marking: Removing Marking from Memos That Have Been
Added to Photos .................................................................................................................. 95
Memo Warning: Displaying an Empty Description Warning .............................. 95
Display Memo at Startup: Displaying the Camera Memo Dialog
at Startup................................................................................................................................. 96
Memo Increment: Incrementing Numerical Memo Descriptions .................... 96
Camera Memo Imprint: Imprinting Memos on Photos ....................................... 96
Camera Memo 1 Auto Delete: Automatically Deleting the First
Description .............................................................................................................................96
Barcode Type: Choosing a Barcode Type ......................................................................97
Barcode Mode: Choosing a Destination for Barcode Data ...................................97
Scan Time: Choosing a Barcode Scan Time ................................................................. 97

14
14 Barcode Reader 142
The BR-1 Barcode Reader ..............................................................................142
15 Direct Printing 144
About the Direct Print Function ................................................................. 144
Connecting the Camera to a Printer ......................................................... 144
Printing Still Images ........................................................................................ 145
Printing One or All Still Images ........................................................................................ 145
Printing Several Still Images ...............................................................................................147
Printing Reports ......................................................................................................................... 148
16 Copying Pictures to a Computer via USB 149
For Windows ...................................................................................................... 149
System Requirements for Using the Supplied CD-ROM .................................. 149
CD-ROM Setup ...........................................................................................................................150
Copying Pictures to Your Computer ............................................................................. 155
For Macintosh .................................................................................................... 157
Copying Pictures to Your Computer ............................................................................. 157
17 Appendices 159
Troubleshooting ............................................................................................... 159
Error Messages ...........................................................................................................................159
Camera Troubleshooting ..................................................................................................... 163
Available Settings ............................................................................................ 169
Specifications .................................................................................................... 171
Number of Images That Can Be Stored .................................................... 174
Defaults Settings/Functions Whose Defaults Are Restored
When the Camera Is Turned Off ............................................................. 176
Using a Wide Conversion Lens .................................................................... 179
Optional Filters..................................................................................................179
Using the External Flash ................................................................................ 180
Using Your Camera Abroad .......................................................................... 181
Cautions on Use ................................................................................................182
Care and Storage ..............................................................................................184
Warranty and Servicing ................................................................................. 186
Index .................................................................................................................... 192
16
If you are using the camera for the first time, read this section.
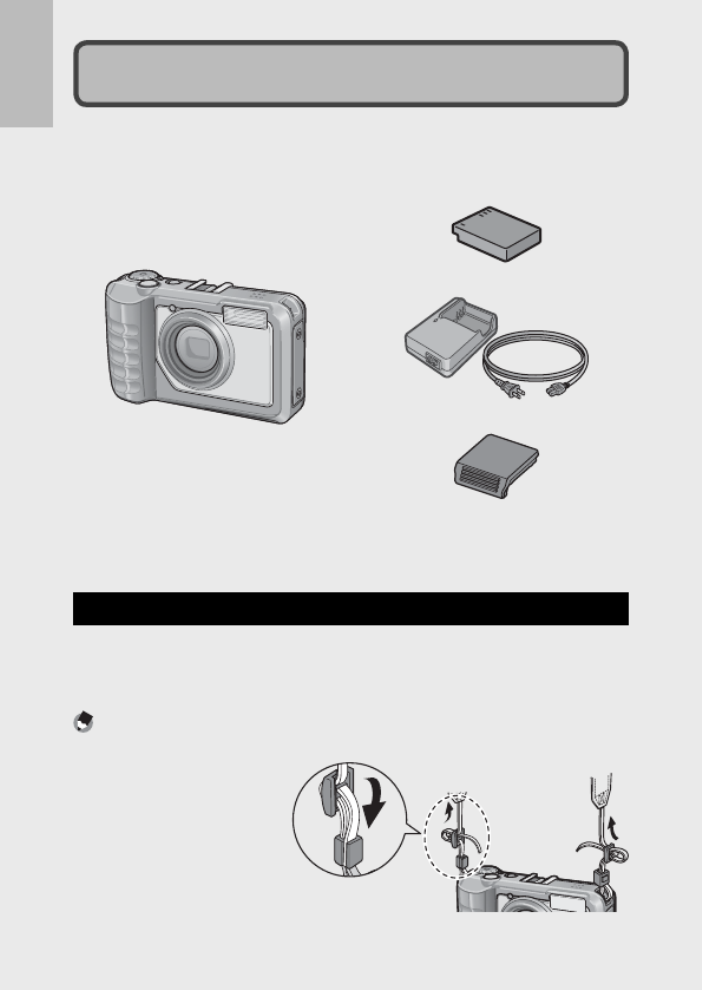
Packing List
Open the package and make sure all the items are included.
* The actual appearance of items included may differ.
• G700SE
The serial number of the camera
is provided on the bottom face of
the camera.
• Rechargeable Battery
• Battery Charger
• Accessory Shoe Cover
• USB Cable (Mini B cable)
• AV Cable
• Neck Strap
• Warranty
• Camera User Guide
• CD-ROM (GP.149)
Optional Accessories
• Rechargeable Battery (DB-65)
• Battery Charger (BJ-6)
• Soft Case (SC-700)
Used to store your camera.
• Wide Conversion Lens (DW-5)
Note -------------------------------------------------------------------------------------
Attaching the Neck Strap to the Camera
Thread the small end of
the strap through the strap
eyelet on the camera and
loop the ends as shown.
• For the latest information on optional accessories, see the Ricoh website (http://
www.ricohpmmc.com/).

17
If you are using the camera for the first time, read this section.
How to Use the Mode Dial
Set the mode dial to
the desired mode
before shooting still
images or movies.
Mode Dial Symbols and Descriptions
Symbol Function Description Refer to
V
CALS Mode Quality and size are adjusted to
produce photographs suitable for
public works photography. Picture
quality and size can be selected
from six options using the [CALS
Pic Quality] item in the setup menu
( P.87).G
P.37
5 Auto Shooting Mode Automatically sets the optimal
aperture value and shutter speed
depending on the subject.
P.31
T,
U
My Settings Mode You can shoot using the settings
registered in [Reg. My Settings].
P.37
W Scene Mode Optimize settings for the current
subject or scene or shoot movies.
P.52
19
If you are using the camera for the first time, read this section.
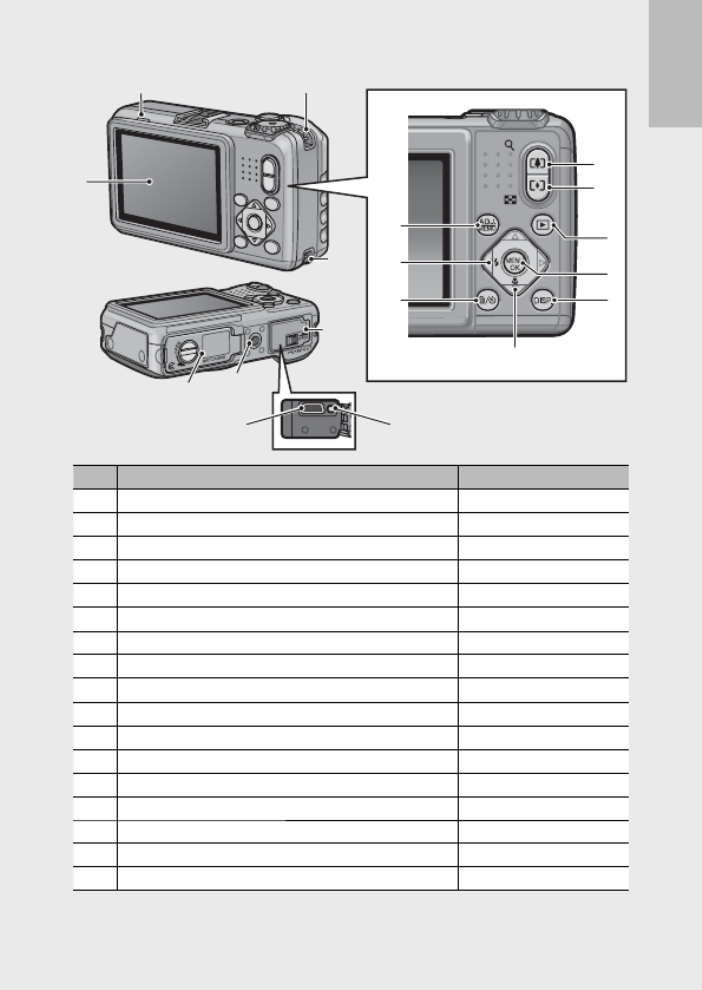
Rear View
1
2 3
7
6
4
5
8
3
13
9
12
10
11
16
15 14
17
Item Name Refer to
1 Picture Display P.20
2 Auto Focus/Flash Lamp P.32, 35
3 Strap Eyelet P.16
4z (Telephoto)/8 (Enlarged View) Button P.33, 38, 40
5Z 9 (Wide-angle)/ (Thumbnail View) Button P.33, 38, 40
66 ( Playback) Button P.38
7 MENU/OK Button P.62, 72, 82, 94
8 DISP. Button P.40, 44
9" N/ ( Macro) Button P.34
10 D ( Delete)/t ( Self-timer) Button P.36, 41
11 # F/ ( Flash) Button P.35
12 ADJ./MEMO Button P.50, 57
13 Terminal Cover P.81, 144, 155, 157
14 AV Output Terminal P.81
15 USB Terminal P.144, 155, 157
16 Tripod Screw Hole —
17 Battery/Card Cover P.27, 179
20
If you are using the camera for the first time, read this section.
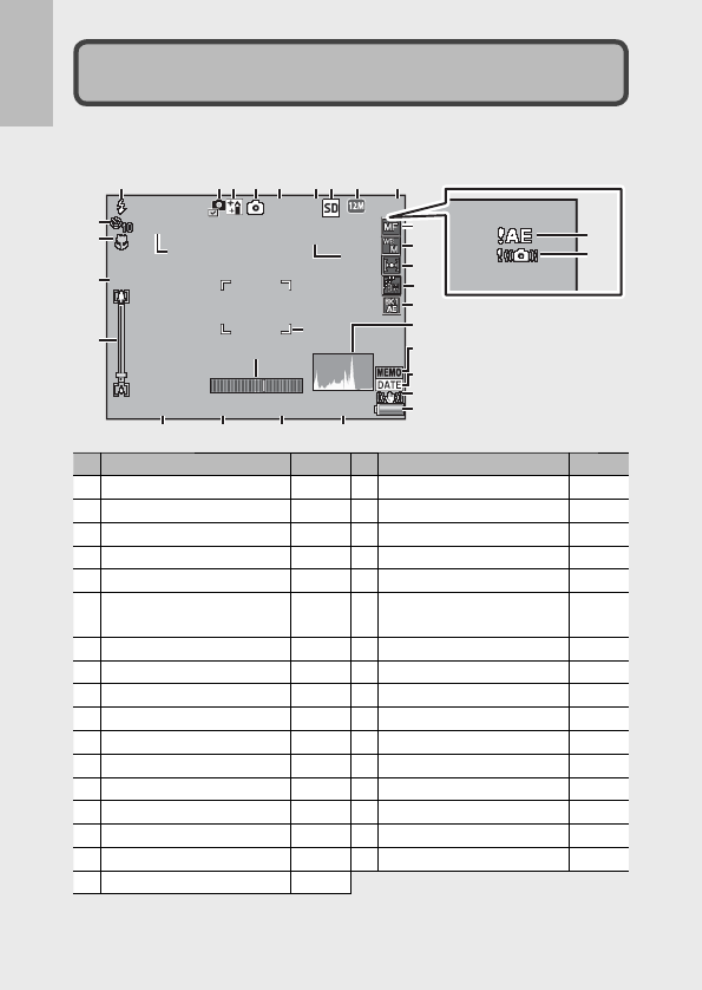
Picture Display
Example of Picture Display when Shooting Pictures
F3.5
F3.5
F3.5
F3.5
F3.5
F3.5
F3.5
F3.5
F3.5
F3.5
1 Sec
1 Sec
1 Sec
1 Sec
1 Sec
1 Sec
1 Sec
1 Sec
1 Sec
1 Sec
4
4
4
44:
:
:
::
3 F
3 F
3 F
3 F
3 F
4:
4:
4:
4 : 3 F
3 F
3 F
3 F
4: 3 F
4
4
4
44
4
4
4
4
4ΜΥ1
ΜΥ1
ΜΥ1
ΜΥ1
ΜΥ1
ΜΥ1
ΜΥ1
ΜΥ1
ΜΥ1
ΜΥ1
Interval
I
I
I
In
n
n
nt
t
t
te
e
e
er
r
r
rv
v
v
va
a
a
al
l
l
l
I
I
I
In
n
n
nt
t
t
te
e
e
er
r
r
rv
v
v
va
a
a
al
l
l
l
Interval
X4.8
X4.8
X4.8
X4.8
X4.8
X4.8
X4.8
X4.8
X4.8
X4.8
1
1
1
11
/
/
/
//
1000
1000
1000
1000
1000
1
1
1
1
/
/
/
/
1000
1000
1000
1000
1
/
1000
EV
EV
EV
EV
EV
+
+
+
++
0.7
0.7
0.7
0.7
0.7
EV
EV
EV
EV
+
+
+
+
0.7
0.7
0.7
0.7
EV
+
0.7 ISO 100
ISO 100
ISO 100
ISO 100
ISO 100
ISO 100
ISO 100
ISO 100
ISO 100
ISO 100
1
1
1
11
1
2
2
2
22
2
3
3
3
33
3
4
4
4
44
4
5
5
5
55
5
6
6
6
66
6
7
7
7
77
7
8
8
8
88
8
9
9
9
99
9
10
10
10
10
10
10
11
11
11
11
11
11
12
12
12
12
12
12
13
13
13
13
13
13
14
14
14
14
14
14
15
15
15
15
15
15
16
16
16
16
16
16
17
17
17
17
17
17
18
18
18
18
18
18
19
19
19
19
19
19
20
20
20
20
20
20
21
21
21
21
21
21
22
22
22
22
22
22
23
23
23
23
23
23
24
24
24
24
24
24
25
25
25
25
25
25
26
26
26
26
26
26 27
27
27
27
27
27 28
28
28
28
28
28 29
29
29
29
29
29
30
30
30
30
30
30
31
31
31
31
31
31
32
32
32
32
32
32
33
33
33
33
33
33
Still Image Mode
Item Name
Refer to
Item Name
Refer to
1
Flash Mode P.35
18
Camera Shake Correction P.65
2
Edit Detection P.6
19
Battery Symbol P.22
3
Scene Mode/Multi-shot P.52, 64
20
Time Exposure P.64
4
Shooting Mode Types P.17
21
Self-timer P.36
5
My Settings Mode P.37
22
Macro Shooting P.34
6
Remaining Number of Still
Images
P.174
23
Digital Zoom Magnification/
Auto Resize Zoom
P.34, 89
7
Recording Destination P.25
24
Zoom Bar P.33
8
Image Size P.63
25
Interval Shooting P.65
9
Picture Quality P.63
26
Aperture P.171
10
Focus Mode P.63
27
Shutter Speed P.171
11
White Balance P.70
28
Exposure Compensation P.69
12
Exposure Metering P.63
29
ISO Setting P.71
13
Image Settings P.64
30
Level Indicator P.47
14
Auto Bracket P.64
31
AF Frame P.31
15
Histogram P.48
32
Exposure Warning Indicator P.69
16
Memo indicator P.94
33
Camera Shake Warning Symbol
P.33, 65
17
Date Imprint P.65

22
If you are using the camera for the first time, read this section.
Note -------------------------------------------------------------------------------------
• The picture display may display messages to inform you of operational
instructions or the camera’s status while in use.
• Additional information can be viewed by pressing the DISP. button ( P.44).G
4
4
4
44:
:
:
::
3 F
3 F
3 F
3 F
3 F
4 :
4 :
4 :
4 : 3 F
3 F
3 F
3 F
4 : 3 F
10
10
10
10
10
/
/
/
//
20
20
20
20
20
10
10
10
10
/
/
/
/
20
20
20
20
10
/
20100-0273
100-0273
100-0273
100-0273
100-0273
100-0273
100-0273
100-0273
100-0273
100-0273
2010
2010
2010
2010
2010
/
/
/
//
01
01
01
01
01
/
/
/
//
01
01
01
01
01
2010
2010
2010
2010
/
/
/
/
01
01
01
01
/
/
/
/
01
01
01
01
2010
/
01
/
01 0
0
0
0
00
0
0
00:
:
:
::
00
00
00
00
00
00
00
00
00 :
:
:
:00
00
00
00
00 : 00
F5.5
F5.5
F5.5
F5.5
F5.5
F5.5
F5.5
F5.5
F5.5
F5.5
1
1
1
11
/
/
/
//
60
60
60
60
60
1
1
1
1
/
/
/
/
60
60
60
60
1
/
60
ISO 100
ISO 100
ISO 100
ISO 100
ISO 100
ISO 100
ISO 100
ISO 100
ISO 100
ISO 100
28
28
28
28
28
mm
mm
mm
mm
mm
28
28
28
28 mm
mm
mm
mm
28 mm
Blue
Blue
Blue
Blue
Blue
Blue
Blue
Blue
Blue
Blue
EV
EV
EV
EV
EV
+
+
+
++
0.7
0.7
0.7
0.7
0.7
EV
EV
EV
EV
+
+
+
+
0.7
0.7
0.7
0.7
EV
+
0.7
F5.5
F5.5
F5.5
F5.5
F5.5
F5.5
F5.5
F5.5
F5.5
F5.5
1
1
1
11
/
/
/
//
60
60
60
60
60
1
1
1
1
/
/
/
/
60
60
60
60
1
/
60
ISO 100
ISO 100
ISO 100
ISO 100
ISO 100
ISO 100
ISO 100
ISO 100
ISO 100
ISO 100
28
28
28
28
28
mm
mm
mm
mm
mm
28
28
28
28
mm
mm
mm
mm
28
mm
Blue
Blue
Blue
Blue
Blue
Blue
Blue
Blue
Blue
Blue
EV
EV
EV
EV
EV
+
+
+
++
0.7
0.7
0.7
0.7
0.7
EV
EV
EV
EV
+
+
+
+
0.7
0.7
0.7
0.7
EV
+
0.7
1
1
1
11
1
2
2
2
22
2
4
4
4
44
4
5
5
5
55
5
3
3
3
33
3
6
6
6
66
6
8
8
8
88
8
12
12
12
12
12
12
14
14
14
14
14
14
10
10
10
10
10
10
7
7
7
77
7
9
9
9
99
9
11
11
11
11
11
11
13
13
13
13
13
13
15
15
15
15
15
15
Item Name
Refer to
Item Name
Refer to
1
Shooting Mode —
9
Flash Mode P.35
2
Continuous Mode P.64
10
Focal Length of the Zoom P.33
3
Aperture P.171
11
Macro Shooting P.34
4
Shutter Speed P.171
12
Focus Mode P.63
5
ISO Setting P.71
13
Auto Bracket P.64
6
Exposure Compensation P.69
14
Image Settings P.64
7
Exposure Metering P.63
15
Memo indicator P.94
8
White Balance P.70
Battery Level Indication
A battery symbol appears at the lower right of the picture display to
indicate the battery level. Recharge the battery before it is depleted.
Battery Symbol Description
Green Battery is sufficiently charged.
Battery partially discharged. Recharging is recommended.
Orange
Battery level is low. Recharge the battery.
Caution ---------------------------------------------------------------------------------
Depending on battery make and condition, the level of AAA NiMH batteries may
not be shown correctly.

25
If you are using the camera for the first time, read this section.
About Formatting -------------------------------------------------------------------
Before using a memory card for the first time or after using a memory card
in other devices, be sure to format it with this camera. Memory cards can be
formatted using the [Format [Card]] item ( P.83) in the setup menu ( P.82).G G
Where images are recorded -------------------------------------------------------
When no SD memory card is loaded, the camera records images to the internal
memory (t); when an SD memory card is loaded, it records images to the SD
memory card ( ).u
Where images are played back from --------------------------------------------
When no SD memory card is loaded, the camera plays back from the internal
memory (t). When an SD memory card is loaded, it plays back from the SD
memory card ( ).u
Caution ---------------------------------------------------------------------------------
• If an SD memory card is loaded, the camera does not record to the internal
memory, even if the card is full.
• Take care not to get the contacts of the card dirty.
Write-protecting your images ----------------------------------------------------
Move the write-protection switch on the SD memory card
to LOCK to prevent your still images from being accidentally
erased or the card from being formatted.
Note that you cannot shoot images on a locked card because
no data can be recorded to the card. Unlock the card before
shooting. Although SD WORM cards do not have a write-
protection switch, they can not be formatted, and data can not be deleted from
SD WORM cards.
Note -------------------------------------------------------------------------------------
• The [Copy to Card from Internal Memory] item (GP.73) in the playback menu
(GP.72) can be used to copy the pictures in internal memory to a memory
card.
• An SD/SDHC memory card with a Speed Class of 6 or better is recommended
when recording movies with [x 1280] selected for [Movie Size] ( P.63).G

26
If you are using the camera for the first time, read this section.
Charging the Rechargeable Battery (DB-65)
DB-65 Li-ion batteries must be charged before use.
1 Insert the battery into the battery charger, making sure that
the and markings on the battery match those on the r s
battery charger.
• The battery label should face up.
Caution ---------------------------------------------------------------------------------
Be careful not to reverse the r s and sides.
2 Plug the power cable into an outlet.
• Use the battery charger (BJ-6) to recharge the battery.
• Charging starts. Charging status is indicated by the charger lamp as
shown in the table below. Once charging has finished, unplug the
battery charger from the power outlet.
Charger Lamp Description
Lit Charging
Off Charging complete
Flashing The battery charger terminal may be soiled or the battery
charger/battery may be faulty. Unplug the battery charger
from the power outlet, and remove the battery.
• The approximate time needed to recharge a fully-exhausted battery
is shown below.
Rechargeable Battery Charging Time
DB-65 Approx. 150 min. (25 °C)
27
If you are using the camera for the first time, read this section.
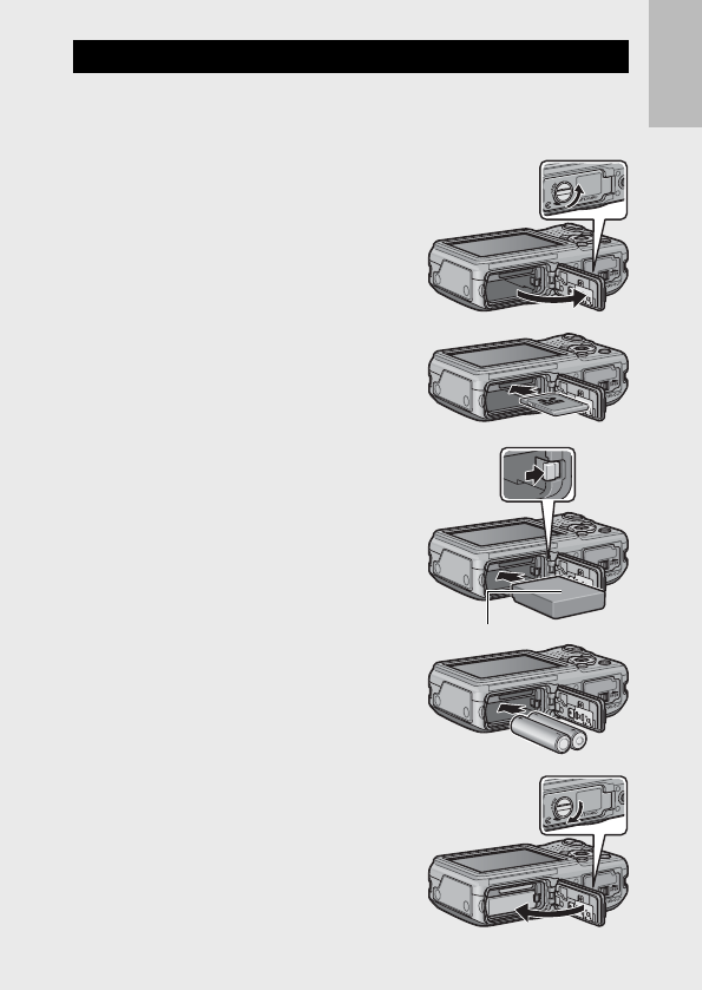
Loading the Battery and SD Memory Card
After recharging the rechargeable battery, load the battery and the SD
memory card. Be sure the camera is off before removing the battery or
the SD memory card.
1 Turn the battery/card cover knob
toward the mark to open the M
cover.
2 Insert the rechargeable battery and
SD memory card.
• Make sure the SD memory card is
facing the right way and then push the
card all the way in until it clicks.
• When the rechargeable battery is
loaded in place, it is locked with the
hook shown in the figure.
Logo side
Loading the specified dry cell batteries
(available in stores)
• Insert the batteries in the direction
shown.
3 Close and knob the battery/card
cover.
• Close the battery/card cover and rotate
the knob to the position opposite the
M icon.

30
If you are using the camera for the first time, read this section.
Setting the Date and Time
1 Press the !"#$ buttons to set the year, month, date, time
and format.
• Change the setting with and move !"
the item with .#$
• You can cancel the setting by pressing
the DISP. button.
2 Check the information on the screen and then press the
MENU/OK button.
• The confirmation screen appears.
3 Press the MENU/OK button.
• The date and time are set.
• If the battery is low, a warning will be displayed. Use of a fully-
charged battery is recommended; to clear the warning from the
display, press MENU/OK.
Note -------------------------------------------------------------------------------------
• The language, date, and time can be changed at any time using the [Language/
N G] and [Date Settings] items ( P.86) in the setup menu ( P.82).G
• The [Date Imprint] item (GP.65) in the shooting menu ( P.62) can be used G
to stamp photographs with the date and time of recording.
• If the battery is removed for more than three days, the date and time settings
will be lost. These settings must be made again.
• To retain the date and time settings, load a battery with adequate remaining
power for more than ten hours.
Produkt Specifikationer
| Mærke: | Ricoh |
| Kategori: | Kamera |
| Model: | G700SE |
Har du brug for hjælp?
Hvis du har brug for hjælp til Ricoh G700SE stil et spørgsmål nedenfor, og andre brugere vil svare dig
Kamera Ricoh Manualer

27 September 2024
24 August 2024
23 August 2024
23 August 2024
22 August 2024
6 August 2024
4 August 2024
3 August 2024
1 August 2024
29 Juli 2024
Kamera Manualer
- Kamera Bosch
- Kamera SilverCrest
- Kamera Acer
- Kamera Ozito
- Kamera Denver
- Kamera Sony
- Kamera Canon
- Kamera Samsung
- Kamera GE
- Kamera Panasonic
- Kamera TP-Link
- Kamera Philips
- Kamera Lenco
- Kamera Gigaset
- Kamera Braun
- Kamera Logitech
- Kamera Epson
- Kamera Daewoo
- Kamera Technaxx
- Kamera HP
- Kamera Sanyo
- Kamera Easypix
- Kamera Grundig
- Kamera D-Link
- Kamera Arlo
- Kamera Bushnell
- Kamera Pyle
- Kamera Fujifilm
- Kamera Nikon
- Kamera Kodak
- Kamera Lenovo
- Kamera Olympus
- Kamera Nedis
- Kamera Zorki
- Kamera Optoma
- Kamera Creative
- Kamera Azden
- Kamera Casio
- Kamera Trevi
- Kamera Trust
- Kamera Laserliner
- Kamera Blaupunkt
- Kamera JVC
- Kamera Leica
- Kamera Hitachi
- Kamera Medion
- Kamera Exakta
- Kamera EZVIZ
- Kamera König
- Kamera Gembird
- Kamera Powerfix
- Kamera Alpine
- Kamera Netgear
- Kamera Maginon
- Kamera Avaya
- Kamera Nest
- Kamera Vtech
- Kamera BenQ
- Kamera Bresser
- Kamera Anker
- Kamera Sigma
- Kamera Pentax
- Kamera Rollei
- Kamera Xiaomi
- Kamera Moultrie
- Kamera Viewsonic
- Kamera Imou
- Kamera Polaroid
- Kamera Aida
- Kamera Konica-Minolta
- Kamera Foscam
- Kamera Kyocera
- Kamera GoPro
- Kamera Lorex
- Kamera Cobra
- Kamera Velleman
- Kamera FLIR
- Kamera Swann
- Kamera Eufy
- Kamera Celestron
- Kamera Ring
- Kamera Fluke
- Kamera Hikvision
- Kamera AVerMedia
- Kamera Reolink
- Kamera EVE
- Kamera Prixton
- Kamera Marshall Electronics
- Kamera General Electric
- Kamera SPC
- Kamera Hanwha
- Kamera ARRI
- Kamera BirdDog
- Kamera Bauhn
- Kamera MuxLab
- Kamera Spypoint
- Kamera Vivitar
- Kamera Ansco
- Kamera Vimar
- Kamera Oregon Scientific
- Kamera Dahua Technology
- Kamera SereneLife
- Kamera Lexibook
- Kamera Intel
- Kamera SJCAM
- Kamera Scosche
- Kamera Speco Technologies
- Kamera Joy-It
- Kamera Kogan
- Kamera Levenhuk
- Kamera Emerson
- Kamera Minox
- Kamera Burris
- Kamera Silvergear
- Kamera Elmo
- Kamera AViPAS
- Kamera UniView
- Kamera AquaTech
- Kamera Alfatron
- Kamera BZBGear
- Kamera PTZ Optics
- Kamera Daitsu
- Kamera Agfa
- Kamera AgfaPhoto
- Kamera Argus
- Kamera Lumens
- Kamera Yashica
- Kamera Sygonix
- Kamera Mamiya
- Kamera Zenit
- Kamera Fuji
- Kamera Minolta
- Kamera EverFocus
- Kamera RunCam
- Kamera SeaLife
- Kamera Aplic
- Kamera FIMI
- Kamera Meade
- Kamera Contax
- Kamera Sinji
- Kamera Traveler
- Kamera Digital Watchdog
- Kamera Getac
- Kamera Ikegami
- Kamera Pelco
- Kamera ZeissIkon
- Kamera Dorr
- Kamera HOLGA
- Kamera Praktica
- Kamera Hasselblad
- Kamera Moto Mods (Motorola)
- Kamera Fantasea Line
- Kamera Brinno
- Kamera Z CAM
- Kamera General
- Kamera Ergoguys
- Kamera Strex
- Kamera Berger & Schröter
- Kamera Leitz Focomat IIc
- Kamera Cosina
- Kamera Videology
- Kamera InfiRay
- Kamera Videotec
- Kamera GoXtreme
- Kamera IOptron
- Kamera Cambo
- Kamera Kobian
- Kamera Kyocera Yashica
- Kamera Red Digital Cinema
- Kamera Konica
- Kamera Akaso
- Kamera Seek Thermal
- Kamera Ikelite
- Kamera Adeunis
- Kamera Hoppstar
- Kamera PatrolEyes
- Kamera Camouflage
- Kamera HuddleCamHD
- Kamera Linhof
- Kamera Aquapix
- Kamera KanDao
Nyeste Kamera Manualer

29 Marts 2025
29 Marts 2025
27 Marts 2025
12 Marts 2025
12 Marts 2025

14 Januar 2025

13 Januar 2025
12 Januar 2025
11 Januar 2025
11 Januar 2025