Ricoh SP C220N Manual
Læs nedenfor 📖 manual på dansk for Ricoh SP C220N (122 sider) i kategorien Printer. Denne guide var nyttig for 28 personer og blev bedømt med 4.5 stjerner i gennemsnit af 2 brugere
Side 1/122

Operating Instructions
Hardware Guide
Read this manual carefully before you use this machine and keep it handy for future reference. For safe and correct use, be sure to read “Safety
Information” before using the machine.
Guide to the Printer
Installing the Printer and Options
Connecting the Printer
Paper and Other Media
Replacing Consumables
Cleaning the Printer
Troubleshooting
Removing Misfed Paper
Appendix
1
2
3
4
5
6
7
8
9

Introduction
This manual contains detailed instructions and notes on the operation and use of this machine. For your
safety and benefit, read this manual carefully before using the machine. Keep this manual in a handy
place for quick reference.
Important
Contents of this manual are subject to change without prior notice. In no event will the company be li-
able for direct, indirect, special, incidental, or consequential damages as a result of handling or oper-
ating the machine.
Do not copy or print any item for which reproduction is prohibited by law.
Copying or printing the following items is generally prohibited by local law:
bank notes, revenue stamps, bonds, stock certificates, bank drafts, checks, passports, driver's licens-
es.
The preceding list is meant as a guide only and is not inclusive. We assume no responsibility for its
completeness or accuracy. If you have any questions concerning the legality of copying or printing cer-
tain items, consult with your legal advisor.
Notes:
Some illustrations in this manual might be slightly different from the machine.
Certain options might not be available in some countries. For details, please contact your local dealer.
Depending on which country you are in, certain units may be optional. For details, please contact your
local dealer.
Caution:
Use of controls or adjustments or performance of procedures other than those specified in this manual
might result in hazardous radiation exposure.
For good print quality, the supplier recommends that you use genuine toner, maintenance kits and parts
from the supplier.
The supplier shall not be responsible for any damage or expense that might result from the use of con-
sumables (toner, maintenance kits and parts) other than genuine consumables from the supplier with
your office products.
i
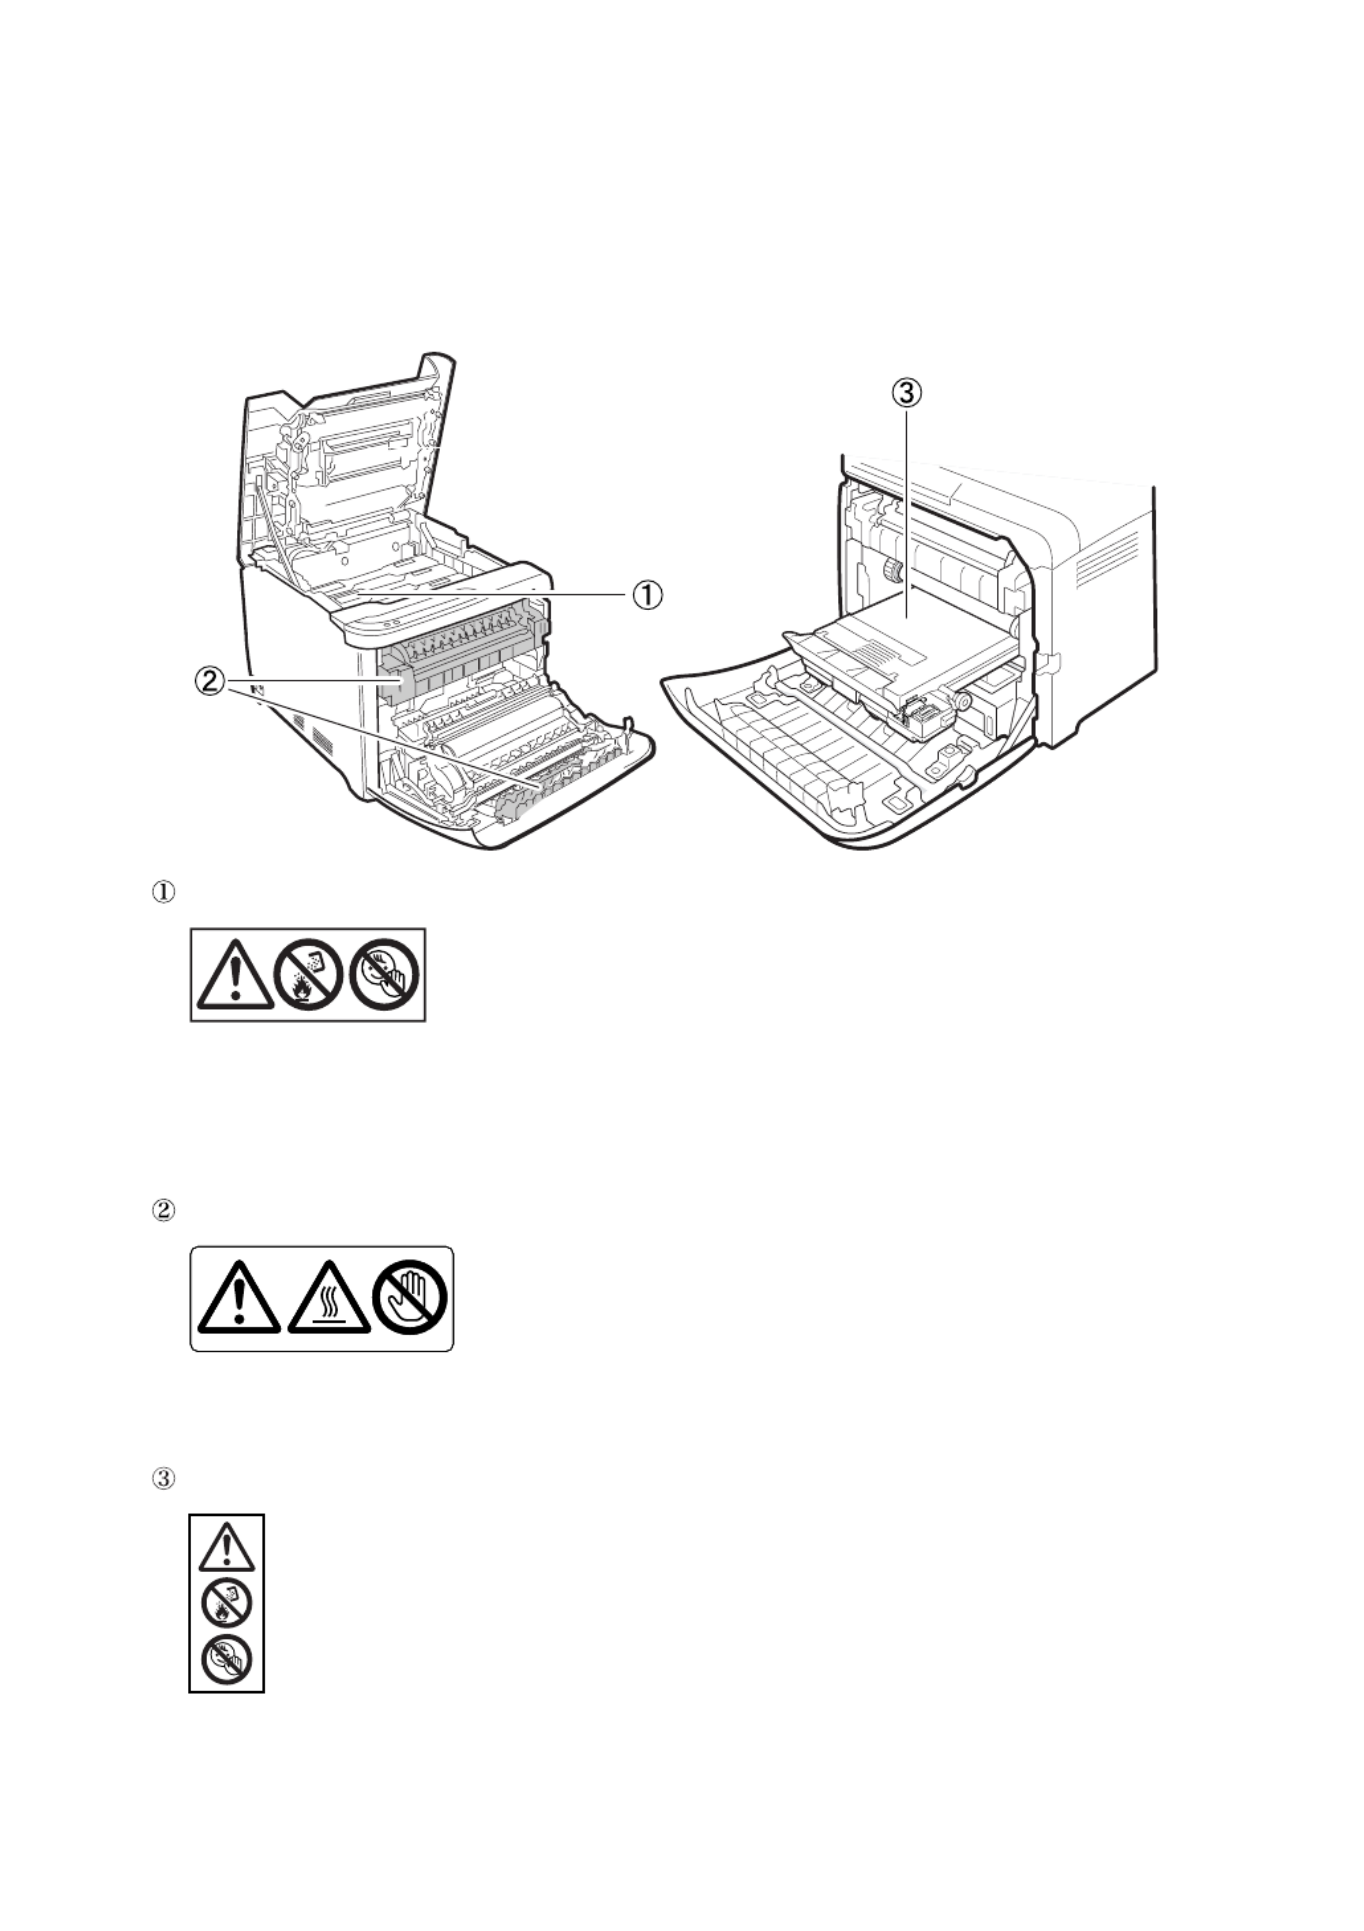
Positions of RWARNING and RCAUTION
labels
This machine has labels for RWARNING and RCAUTION at the positions
shown below. For safety, please follow the instructions and handle the machine
as indicated.
Do not incinerate used toner or toner containers. Toner dust might ignite when
exposed to an open flame. Disposal should take place at an authorized dealer or
an appropriate collection site.
Keep toner (used or unused) and toner containers out of reach of children.
Do not touch labelled gray areas.
The areas can get very hot.
Do not incinerate spilled toner or used toner. Toner dust is flammable and might
ignite when exposed to an open flame. Disposal should take place at an author-
ized dealer or an appropriate collection site.
Keep toner (used or unused) and toner containers out of reach of children.
ASH075S

ii
Manuals for This Printer
For particular functions, see the relevant parts of the manual.
❖ Safety Information
Provides information on safe usage of this machine.
To avoid injury and prevent damage to the machine, be sure to read this.
❖ Quick Installation Guide
Contains procedures for removing the printer from its box, and connecting it
to a computer.
❖ Hardware Guide
Contains information about paper and procedures such as installing options,
replacing consumables, responding to error messages, and resolving jams.
❖ Software Guide
Contain procedures for using this machine in a network environment, utiliz-
ing the software, and using security functions.

iii
How to Read This Manual
Symbols
This manual uses the following symbols:
Indicates important safety notes.
Ignoring these notes could result in serious injury or death. Be sure to read these
notes. They can be found in the “Safety Information” section of Hardware
Guide.
Indicates important safety notes.
Ignoring these notes could result in moderate or minor injury, or damage to the
machine or to property. Be sure to read these notes. They can be found in the
“Safety Information” section of Hardware Guide.
Indicates points to pay attention to when using the machine, and explanations
of likely causes of paper misfeeds, damage to originals, or loss of data. Be sure
to read these explanations.
Indicates supplementary explanations of the machine’s functions, and instruc-
tions on resolving user errors.
This symbol is located at the end of sections. It indicates where you can find fur-
ther relevant information.
[ ]
Indicates the names of keys that appear on the machine’s display panel.
{ }
Indicates the names of keys on the machine’s control panel.

iv
Description for the Specified Model
In this manual, the following items explain about the printer for the specified
models:
This explains about the 220–240 V model printer. You can identify the model by
checking the label on the rear of the printer.
Read if you purchase this model.
This explains about the 120 V model printer. You can identify the model by
checking the label on the rear of the printer.
Read if you purchase this model.
Note
❒ If you do not know your model, check the model code on the printer's name-
plate.
ASH074S

v
Installing the Operating Instructions
The CD-ROM provided with the printer contains an HTML Operating Instruc-
tions Manual in HTML version. Follow this instructions to install it.
Important
❒ System Requirements :
• Windows 2000/XP/Vista, or Windows Server 2003/2003 R2.
• 800 × 600 or higher monitor resolution.
❒ Web Browsers :
• Microsoft Internet Explorer 5.5 SP2 or higher
• Firefox 1.0 or higher
A Quit all applications currently running.
B Insert the CD-ROM into the CD-ROM drive.
The installer starts.
Auto Run may not work under certain operating system setting. If this is the
case, launch “Setup.exe” on the CD-ROM root directory.
C Select an interface language, and then click [ ]OK .
D Click [ ]Install Manuals .
E Follow the instructions on the screen to complete the installation.
F Click [ ]Finish when the installation is completed.
G Click [ ]Exit .
Note
❒ Auto Run may not work under certain operating system setting. If this is
the case, copy all data on the CD-ROM root directory to your hard disk
drive, and then launch “Setup.exe” to start the installation.
❒ To uninstall the Operating Instructions Manual, select [ ]Programs in the
[ ]Start menu, select your printer driver, and then click [ ]uninstall . You can
uninstall each Manual Guide separately.
❒ If you are using an incompatible Web browser and the simpler version of
the Operating Instructions Manual does not display correctly, open the
folder “MANUAL \ LANG \ (language) \ (manual name) \ unv \” on the
CD-ROM, and then double-click on “index.htm”.

vi
TABLE OF CONTENTS
Positions of CAUTION labels ...............................................iRWARNING and R
Manuals for This Printer........................................................................................ii
How to Read This Manual ....................................................................................iii
Symbols .................................................................................................................... iii
Description for the Specified Model....................................................................iv
Installing the Operating Instructions ...................................................................v
1. Guide to the Printer
Exterior: Front View...............................................................................................1
Exterior: Rear View ................................................................................................2
Inside.......................................................................................................................3
Control Panel..........................................................................................................4
2. Installing the Printer and Options
Installing the Printer ..............................................................................................5
Where to Put the Printer.............................................................................................5
Unpacking ..................................................................................................................7
Turning the Power On ..............................................................................................13
Installing Options.................................................................................................14
Attaching Paper Feed Unit TK1010 .........................................................................14
Attaching Memory Unit Type F 256MB (DDR-SDRAM Module) ..............................16
3. Connecting the Printer
Network Connection ............................................................................................19
Reading the LED Lamps ..........................................................................................20
USB Connection...................................................................................................21
4. Paper and Other Media
Paper and Other Media Supported by This Printer...........................................23
Paper Recommendations....................................................................................25
Loading Paper..........................................................................................................25
Storing Paper ...........................................................................................................25
Types of Paper and Other Media .............................................................................26
Paper Not Supported by This Printer .......................................................................31
Print Area .................................................................................................................32
Loading Paper......................................................................................................34
Loading Paper in Tray 1.............................................. ................................. ............34
Loading Paper in the Optional Paper Feed Unit ......................................................46
Loading Paper in the Bypass Tray .............................. ................................. ............48
5. Replacing Consumables
Replacing the Print Cartridge .............................................................................51
Replacing the Waste Toner Bottle......................................................................56

vii
6. Cleaning the Printer
Cautions to Take When Cleaning .......................................................................63
Cleaning the Toner Density Sensor ...................................................................64
Cleaning the Friction Pad and the Paper Feed Roller ......................................66
Cleaning the Registration Roller ........................................................................69
7. Troubleshooting
Error & Status Messages on Smart Organizing Monitor..................................71
Panel Indicator .....................................................................................................77
Printer Does Not Print .........................................................................................78
When the Printer is Directly Connected to a Computer via USB Ca
ble ................... 79
Other Printing Problems .....................................................................................82
Additional Troubleshooting ................................................................................88
8. Removing Misfed Paper
When Paper is Jammed.......................................................................................89
When Paper Jams inside the Fusing Unit ................................................................90
When Paper Jams Inside the Tray...........................................................................92
When Paper Jams inside the Transfer Unit .............................................................94
9. Appendix
If the Printer is Not Going to Be Used for a Long Time....................................95
Preparing the Printer For a Long Period of Inactivity ...............................................95
Using the Printer Again after it has been Inactive for a Long Period .......................98
Moving and Transporting the Printer...............................................................100
Moving the Printer ..................................................................................................101
Consumables .....................................................................................................102
Print Cartridge ........................................................................................................102
Waste Toner Bottle ................................................................................................103
Specifications.....................................................................................................104
Main Unit ................................................................................................................104
Options...................................................................................................................107
INDEX.................................. .......................................................... ........... 108

viii
1
1. Guide to the Printer
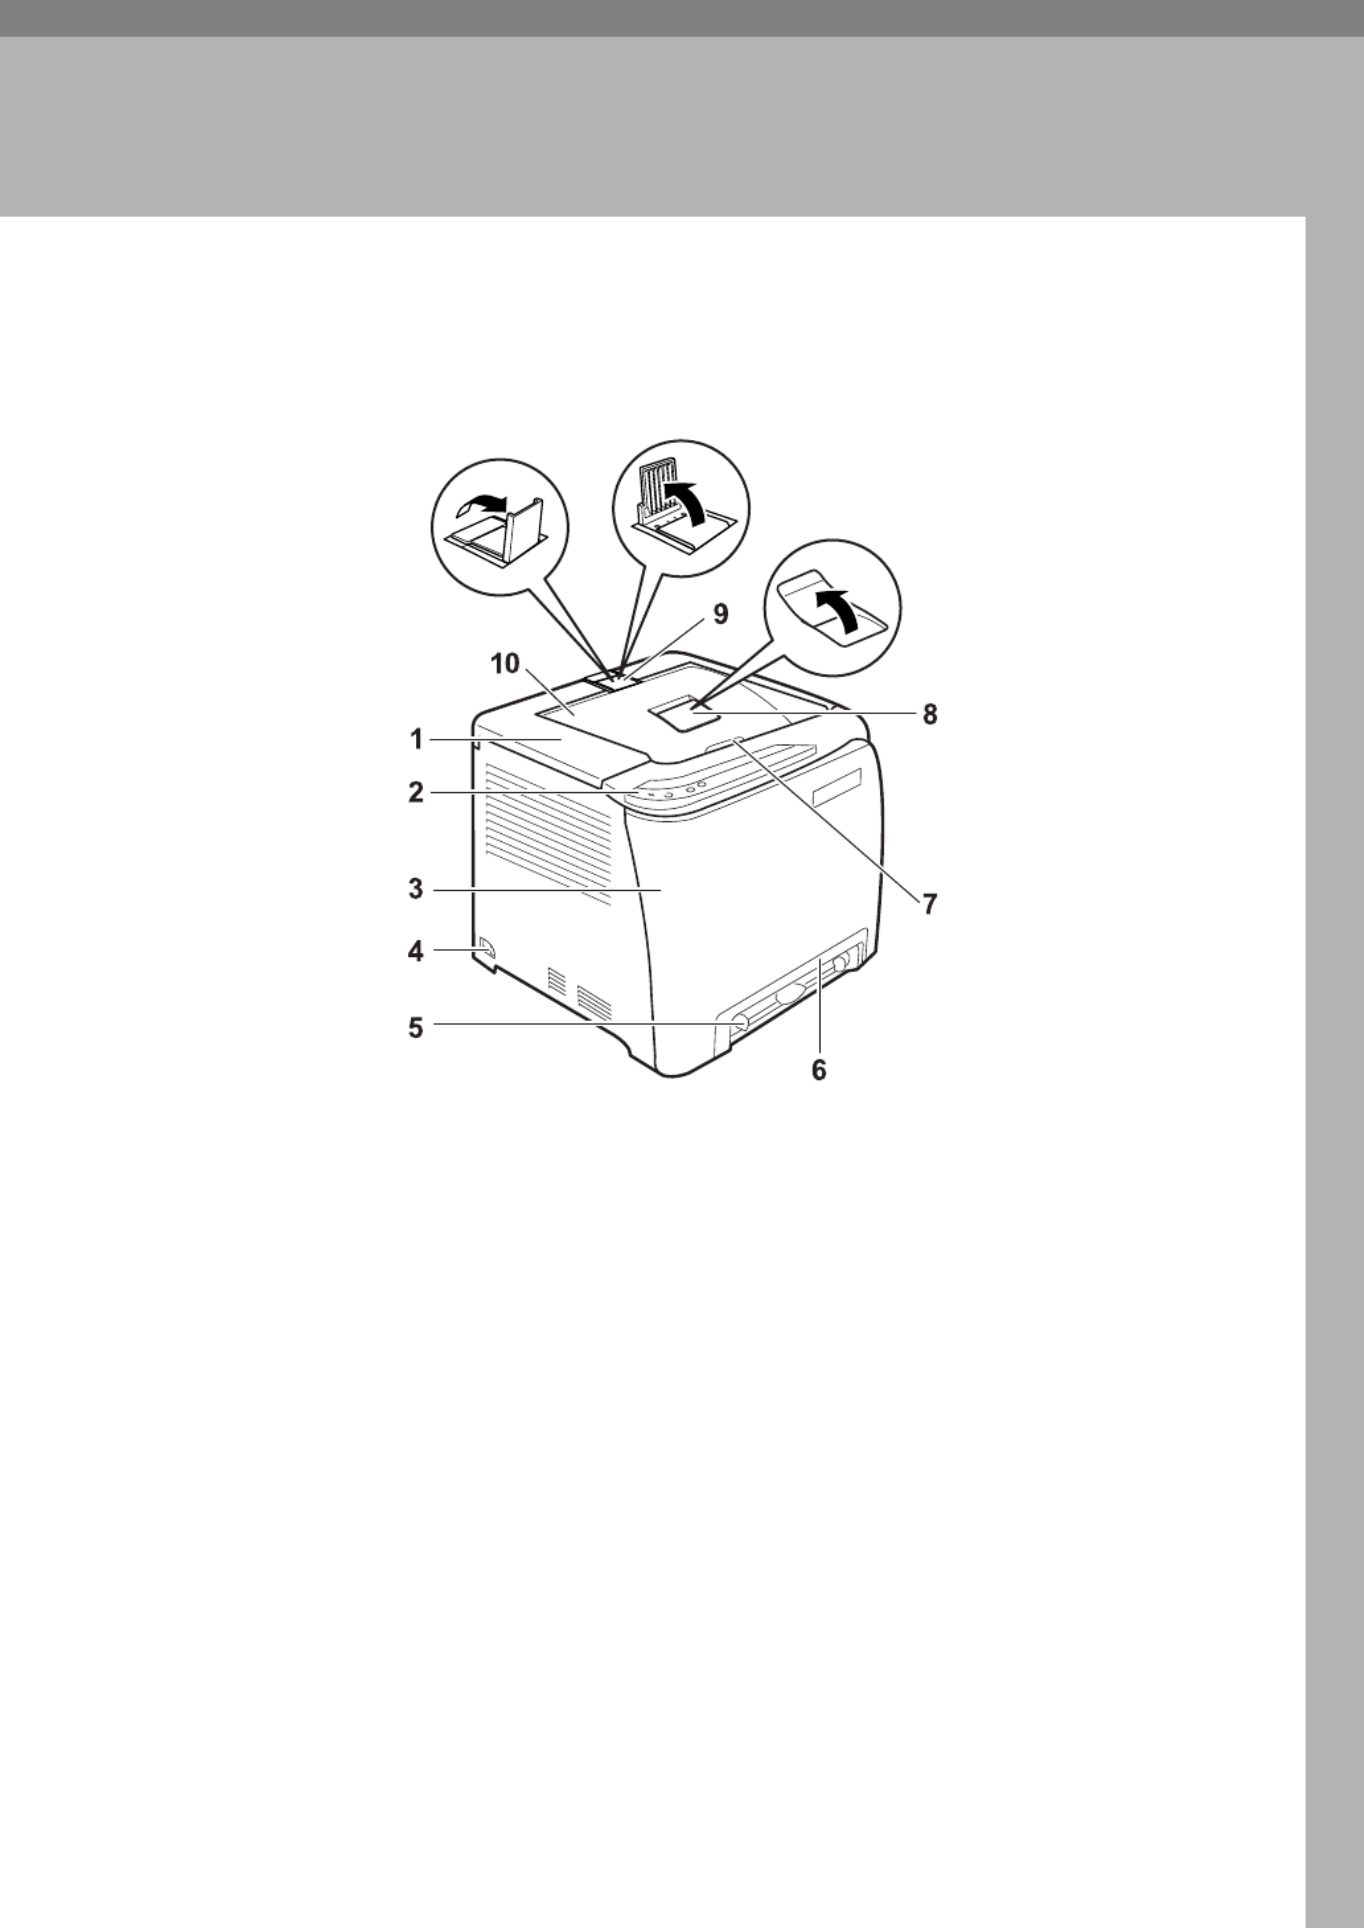
Exterior: Front View
1. Top Cover
Open this cover to replace the print car-
tridge.
2. Control Panel
Contains keys for printer control and in-
dicators that shows the printer status.
3. Front Cover
Open this cover to replace the waste ton-
er bottle or remove jammed paper.
To open this cover, pull the lever on the
right side of the printer.
4. Power Switch
Use this switch to turn the power on and
off.
5. Bypass Tray
Load paper sheet by sheet.
6. Tray 1
Up to 250 sheets of plain paper can be
loaded.
7. Top Cover Open Lever
8. Standard tray extension
Use this to support sheets that come out
curled after they are printed.
Flip open the extension by pushing down
on the end that is toward the rear of the
machine.
9. Stop Fences
Use these to stop legal-size or A4-size
prints falling behind the machine.
For legal-size prints, raise the rear fence.
For A4-size prints, raise the forward
fence.
10. Standard Tray
Output is stacked here with the print side
down.
ASH022S

Guide to the Printer
2
1
Exterior: Rear View
1. Front Cover Open Lever
2. Cable cover
3. Memory cover
Remove this cover to install the additional
memory unit (option).
4. Power Socket
5. Rear cover
Remove this cover when you load paper
larger than A4 in the paper tray.
6. Ethernet Port
Use a network interface cable to connect
the printer to the network.
7. USB Host Interface
Use a USB cable to connect the digital
camera to the printer. You can print im-
ages directly from a digital camera, with-
out having to connect to a computer.
8. USB Port
Use a USB cable to connect the printer to
the host computer.
Note
❒ Make sure the digital camera you connect to the printer for PictBridge and di-
rect printing supports PictBridge.
❒ You cannot add memory unit to the SP C220N model printer.
❒ USB Host Interface is installed only for the SP C222DN model printer.
ASH023S

Inside
3
1
Inside
1. Print Cartridge
Loads from the printer rear, in the order
of cyan (C), magenta (M), yellow (Y), and
black (K).
If a toner end indicator on the control
panel lights up, replace the print car-
tridge of the indicated color.
2. Fusing Unit
Fuses toner to the paper.
You might have to handle this unit to
check for or remove jammed paper.
3. Waste Toner Bottle
Collects toner that is wasted during
printing.
If the message “Waste Toner Bottle
Full. The Waste Toner Bottle is
full. Open the indicated cover,
and then replace the Waste Ton-
er Bottle. Front Cover: [Waste
Toner Bottle].” appears on the Smart
Organizing Monitor dialog box, replace
the waste toner bottle.
4. Transfer unit
Removes to change a waste toner bottle.
Reference
For details about the messages which appear on the screen to prompt you to
replace the units, see p.71 “Error & Status Messages on Smart Organizing
Monitor”.
ASH024S

Guide to the Printer
4
1
Control Panel
1. Alert Indicator
Lights up whenever a printer error oc-
curs. Use Smart Organizing Monitor to
check the error.
2. Ready Indicator
Lights up when the printer is ready to re-
ceive data from a computer. Flashes
when the printer is warming up or re-
ceiving data.
3. { }Stop/Start key
If you press this key, the printer stops re-
ceiving data, and printing is not possible.
Press the { }Stop/Start key again to return
to the ready condition.
You can also use this key to print the con-
figuration page. To print the configura-
tion page, turn the printer off and then,
while pressing and holding this key
down, turn the printer back on, keeping
the key pressed until the Ready indicator
flashes once. The configuration page will
then print out.
4. { }Job Reset key
Press this key to cancel a job that is print-
ing out.
You can also use this key to print a test
page. To print the test page, turn the
printer off and then, while pressing and
holding this key down, turn the printer
back on, keeping the key pressed until
the Alert indicator flashes once. The test
page will then print out.
5. Load Paper Indicator
Lights up when a paper tray is empty or
unattached.
6. Replace Print Cartridge Indicator
The indicator under each toner icon
flashes when there is little toner remain-
ing. The indicator remains lit when there
is no toner left.
LED color corresponds to Toner color.
Note
❒ To print the configuration page using the { }Stop/Start key is not available for
the SP C220N model printer.
Reference
For printing the configuration page, see Software Guide.
ASH021S

5
2. Installing the Printer and
Options
Installing the Printer
This section describes how to install the printer and perform settings after instal-
lation.
Where to Put the Printer
The printer’s location should be carefully chosen because environmental condi-
tions greatly affect its performance.
R
WARNING:
R
CAUTION:
• The supplied power cord is for use with this equipment only. Do not
use with other appliances. Doing so may result in fire, electric shock,
or injury.
• Keep the machine away from flammable liquids, gases, and aerosols.
A fire or an electric shock might occur.
• The wall outlet shall be installed near the machine and shall be easily
accessible.
• Connect the machine only to the power source described in this man-
ual. Connect the power cord directly into a wall outlet and do not use
an extension cord. Do not damage, break or make any modifications
to the power cord. Do not place heavy objects on it. Do not pull it hard
nor bend it more than necessary. These actions could cause an elec-
tric shock or fire.
• Keep the machine away from humidity and dust. Otherwise a fire or an
electric shock might occur. Do not place the machine on an unstable or tilt-
ed surface. If it topples over, an injury might occur.
• Keep the machine in an area that is within optimum environmental condi-
tions. Operating the machine in an environment that is outside the recom-
mended ranges of humidity and temperature can cause an electrical fire
hazard. Keep the area around the socket free of dust. Accumulated dust
can become an electrical fire hazard.
• Make sure the room where you are using the machine is well ventilated and
spacious. Good ventilation is especially important when the machine is
used heavily.

Installing the Printer and Options
6
2
❖ Space Required for Installation
The recommended (or minimum) space requirements are as follows:
❖ Optimum Environmental Conditions
Permissible and recommended temperature and humidity ranges are as fol-
lows:
• White area: Permissible Range
• Gray area: Recommended Range
Note
❒ When you use this machine for a long time in a confined space without
good ventilation, you may detect an odd smell. To keep the workplace
comfortable, we recommend that you keep it well ventilated.
ASH200S
ASH201S

Installing the Printer
7
2
❖ Environments to Avoid
Important
❒ Areas exposed to direct sunlight or strong light
❒ Dusty areas
❒ Areas with corrosive gases
❒ Areas that are excessively cold, hot, or humid
❒ Locations near air conditioners or humidifiers
❒ Locations near other electronic equipment
❒ Locations subject to frequent strong vibration
❖ Power Source
Connect the power cable to a power source of the following specification:
• 220 - 240 V, 50/60 Hz, 6 A or more
• 120 V, 60 Hz, 11 A or more
Unpacking
To protect it from shock and vibration during transit, this printer comes pack-
aged in cushioning foam and secured with tape. Remove these protective mate-
rials after bringing the machine to where it will be installed.
R
WARNING:
R
CAUTION:
• Do not incinerate used toner or toner containers. Toner dust might ig-
nite when exposed to an open flame. toner containers Dispose of used
in accordance with local regulations.
• Do not store toner, used toner, or toner containers in a place with an
open flame. The toner might ignite and cause burns of a fire.
• Keep toner (used or unused) and toner containers out of reach of children.
• If toner or used toner is inhaled, gargle with plenty of water and move into
a fresh air environment. Consult a doctor if necessary.
• If toner or used toner gets into your eyes, flush thoroughly with eyewash or
water. Consult a doctor if necessary.
• If toner or used toner is swallowed, dilute by drinking a large amount of wa-
ter. Consult a doctor if necessary.
• When moving the printer, use the inset grips on both sides. The printer will
break or cause injury if dropped.

Installing the Printer and Options
8
2
Important
❒ Removed tape is dirty. Be careful not to let it touch your hands or clothes.
❒ Leave the tape holding the paper feed tray and cover in place while moving
the printer.
❒ Lower the machine slowly and carefully to prevent trapping your hands.
❒ Do not grip on the tray area when lifting the printer.
❒ Do not allow paper clips, staples, or other small metallic objects to fall inside
the machine.
❒ Keep the uncovered print cartridge away from direct sunlight.
❒ Do not touch the print cartridge's photo conductor.
A Remove the plastic bag.
B Lift the printer with two people by using the inset grips on both sides of
the printer.
ASH100S
ASH051S
Installing the Printer
9
2
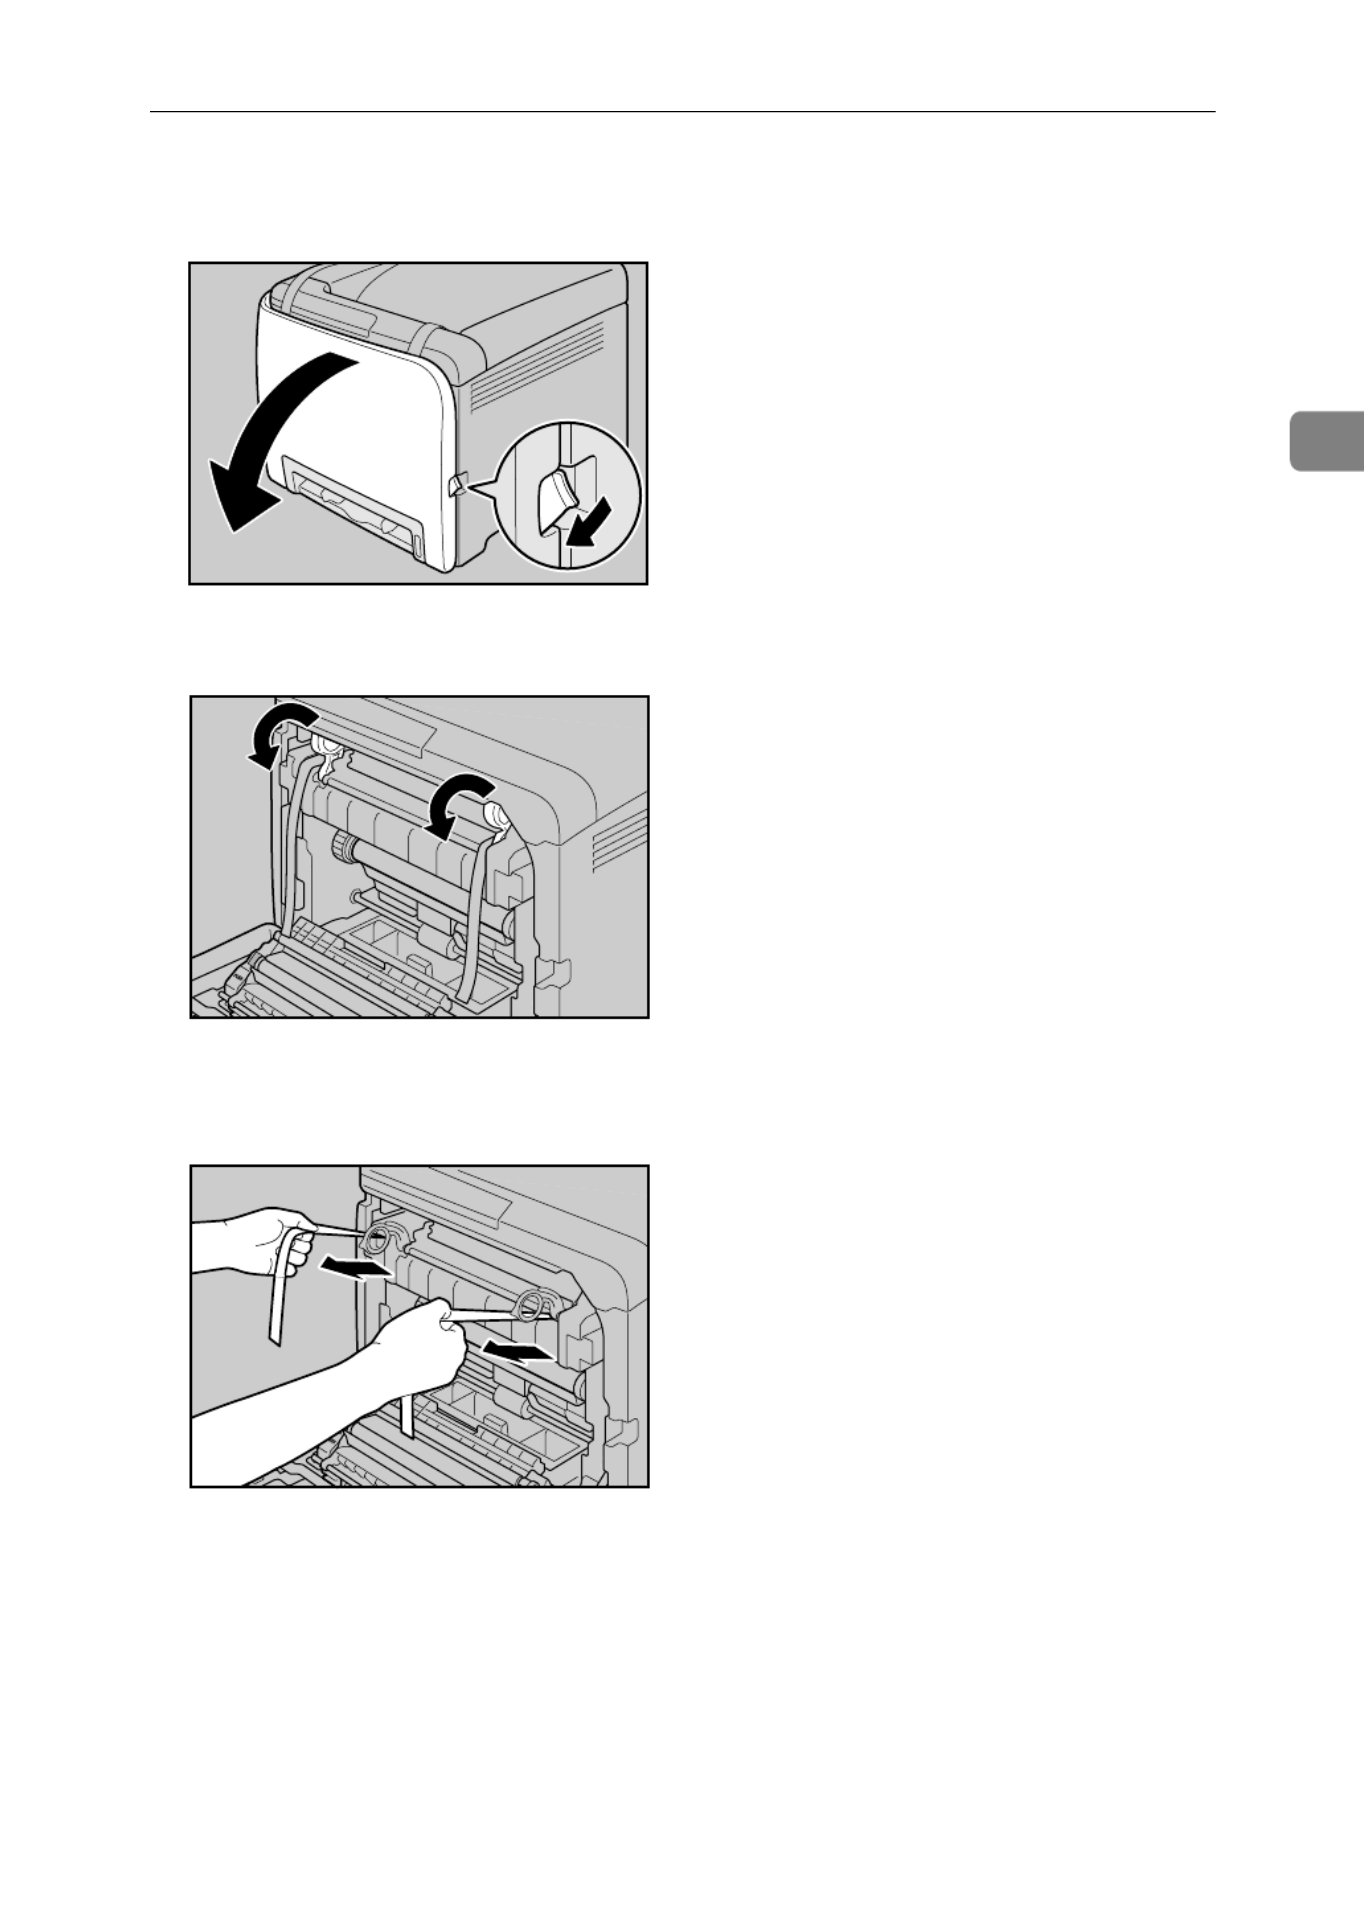
C Pull Front Cover Open Lever, and then open the front cover with both
hands carefully.
D Lower the blue fusing unit lever.
E Hold each tape near its joint, and then pull both tapes gently upward to re-
move them from the printer at the same time.
ASH107S
ASH108S
ASH109S

Installing the Printer and Options
10
2
F Carefully lift the blue fusing unit levers.
G Close the front cover with both hands carefully.
H Pull up Top Cover Open Lever to open the top cover.
ASH049S
ASH111S
ASH112S

Installing the Printer
11
2
I Remove the protection tape.
J Take each print cartridge out.
Gripping its center, carefully pull the print cartridge upward and out.
When taking out the black print cartridge, be sure to remove the protection
sheet also.
ASH110S
ASH005S
ASH087S
ASH088S

Installing the Printer and Options
12
2
K Hold the print cartridge and shake it from side to side five or six times.
L Check the toner color and location correspond, and then carefully insert the
print cartridge vertically.
M Close the top cover with both hands carefully.
ASH113S
ASH009S
ASH010S

Installing the Printer
13
2
Turning the Power On
Follow the procedure below to turn the power on.
R
WARNING:
Important
❒ Make sure the power cable is plugged securely into the wall outlet.
❒ Turn the power switch off when plugging and unplugging the power plug.
❒ Do not turn off the power switch until initializing is completed. Doing so re-
sults in malfunction.
A Plug in the power cable.
B Turn the power switch to On.
The Ready indicator on the control panel lights up.
Note
❒ Wait until the Ready indicator turns on.
❒ The machine may make a noise while initializing. This noise does not indi-
cate a malfunction.
• Plug and unplug the power cable with dry hands, or an electric shock
could occur.
ASH071S
ASH072S

Installing the Printer and Options
14
2
Installing Options
This section describes how to install options.
By installing options, you can improve the printer performance and have an ex-
panded variety of features to use. For the specifications of each option, see p.104
“Specifications”.
Attaching Paper Feed Unit TK1010
When installing multiple options, install Paper Feed Unit TK1010 first.
R
CAUTION:
Important
❒ Tray 1 is required to print using the optional paper feed unit. Without Tray 1,
paper jams will occur.
❒ The optional paper feed unit can be installed on the SP C221N and SP
C222DN model printers.
❒ Certain options might not be available in some countries. For details, contact
your local dealer.
❒ The printer should always be lifted by two people.
❒ Do not grip on the tray area when lifting the printer.
A Check the package contains Paper Feed Unit TK1010.
• The printer weighs approximately 23 kg (50.6 lb.). When moving the printer,
use the inset grips on both sides, and lift slowly in pairs. The printer will
break or cause injury if dropped.
• Lifting the paper feed unit carelessly or dropping may cause injury.
• It is dangerous to handle the plug with wet hands. Doing this may result in
receiving an electric shock.
• Before moving the machine, unplug the power cord from the wall outlet. If
the cord is unplugged abruptly, it could become damaged. Damaged plugs
or cords can cause an electrical or fire hazard.
ASH001S

Installing Options
15
2
B Turn off the printer's power switch, and then unplug the printer's power
cord from the wall outlet.
C Remove the adhesive tape from the optional paper feed unit.
D Lift the printer using the inset grips on both sides of the printer.
E There are three upright pins on the optional paper feed unit. Align them
with the holes on the underside of the printer, and then carefully lower the
printer.
F After installing the option, print the configuration page to confirm the in-
stallation.
ASH025S
ASH051S
ASH003S

Installing the Printer and Options
16
2
Note
❒ When moving the printer, remove the optional paper feed unit.
❒ Before using the optional paper feed unit, you can make settings in the
printer driver.
❒ If the new device is listed in the column of configuration options, then it
has been properly installed.
❒ If the optional paper feed unit is not installed properly, reinstall it follow-
ing this procedure. If you cannot install it properly even after attempting
reinstallation, contact your sales or service representative.
Reference
For printing the configuration page, see Software Guide.
For loading paper into the paper tray, see p.34 “Loading Paper”.
When adjusting the printing position, see Software Guide.
Attaching Memory Unit Type F 256MB (DDR-SDRAM Module)
R
CAUTION:
Important
❒ Before touching the memory unit, ground yourself by touching something
metal to discharge any static electricity. Static electricity can damage the
memory unit.
❒ You can install the memory unit in the SP C221N and SP C222DN model
printers.
❒ Do not subject the memory unit to physical shocks.
A Turn off the power, and then unplug the power cable.
B Remove the memory cover.
• Before installing the memory unit, turn off the printer's power switch and un-
plug the power cable. After installing the memory unit, be sure to close the
memory unit cover, and then turn the machine back on. Do not turn on the
machine before closing the memory unit cover.
ASH026S

Installing Options
17
2
C Loosen the screw securing the inner cover by using a coin.
D Be sure to install the memory unit as shown.
E To install the recommended memory, align the notch of the recommended
memory with the protruding part of the vacant slot, and then carefully in-
sert the module at an angle.
ASH027S
ASH028S
ASH029S

Installing the Printer and Options
18
2
F Keeping the module at an angle, press it down until it clicks into place.
G Attach the inner cover, and then fasten the screw.
H Attach the memory cover.
I After installing the option, print the configuration page to confirm the in-
stallation.
If it is installed properly, the memory capacity will appear under “Total
Memory” on the configuration page.
Note
❒ Before using the new memory unit, make settings in the printer driver.
❒ If the memory unit is not properly installed, repeat this procedure. If you
cannot install it properly even after reinstallation, contact your sales or
service representative.
Reference
For printing the configuration page, see Software Guide.
ASH030S
ASH031S
19
3. Connecting the Printer
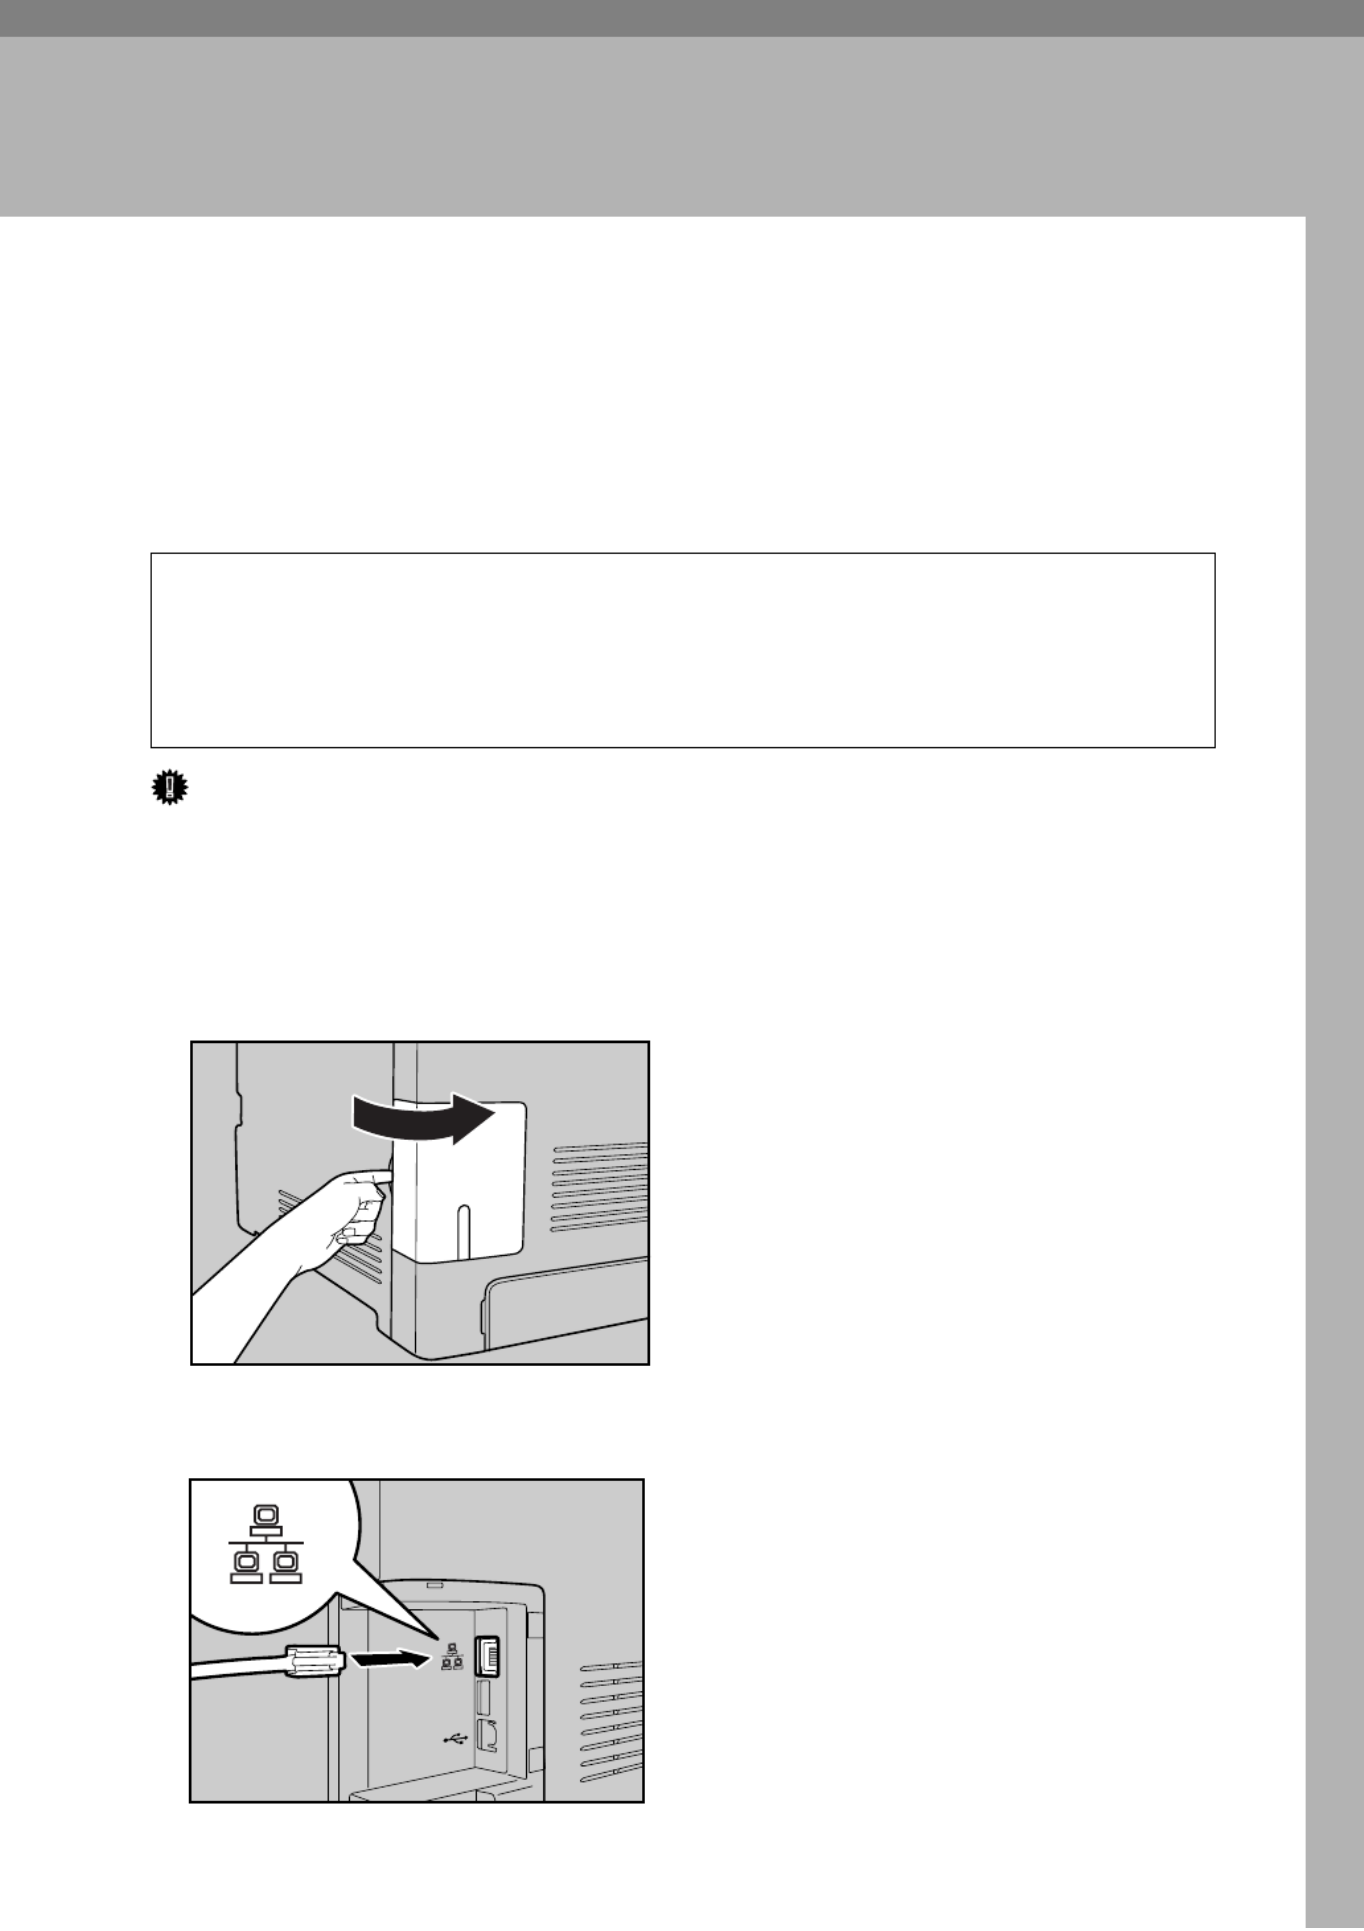
Network Connection
Follow the procedure below to connect the printer to the computer through the
network. Prepare a hub, straight-through Ethernet cable, and any other neces-
sary network devices before connecting the 10BASE-T or 100BASE-TX cable to
the printer's Ethernet port.
R
CAUTION:
Important
❒ Use shielded Ethernet cable. Unshielded cables create electromagnetic inter-
ference that could cause malfunctions.
❒ The Ethernet cable is not supplied with this printer. Select your cable accord-
ing to the network environment.
A Remove the cable cover.
B Connect the Ethernet cable to the Ethernet port.
• Connect only an approved network interface board to this printer. A voltage
over load can occur if you connect an incorrect network interface board,
such as a telephone line interface, to the printer. Voltage overloads can
cause fire, electric shock, and burns. Doing so may result in fire, electric
shock, or injury.
ASH090S
ASH052S

Connecting the Printer
20
3
C Connect the other end of the cable to the printer's network, such as a hub.
D Attach the cable cover.
Reference
For details about network environment settings, see Software Guide.
Reading the LED Lamps
1. Yellow: comes on when 100BASE-
TX is being used. It comes off when
10BASE-T is being used.
2. Green: comes on when the printer
is properly connected to the net-
work.
ASH091S
AQC070S

USB Connection
21
3
USB Connection
Important
❒USB2.0 interface cable is not supplied. Obtain it separately, according to the
computer you are using.
❒USB connection is possible under Windows 2000/XP/Vista, Windows Server
2003/2003 R2, and Mac OS X.
❒USB connection with Macintosh is only possible via the printer's USB port.
A Remove the cable cover.
B Connect the square-shaped connector of the USB2.0 cable to the USB port.
C Connect the opposite end's flat connector to devices such as your compu-
ter's USB interface.
ASH090S
ASH053S

Connecting the Printer
22
3
D Attach the cable cover.
Reference
For details about settings for USB connection printing, see Software Guide.
ASH091S

23
4. Paper and Other Media
Paper and Other Media Supported by This
Printer
This section describes the paper size, feed direction, and the maximum amount
of paper that can be loaded into each paper tray in this printer.
Note
❒ The optional paper feed unit can be installed on the SP C221N and SP C222DN
model printers.
❒ All paper must be set vertically, regardless of the paper size.
❖ Input Paper Sizes (Metric version)
In this manual On the display Paper feed direction
K ↑ (Feed direction) A4
8 1/2 × 11 Short-edge feed direction
Size (mm)
Size (inch)
Standard Input Tray 1
Paper Feed Unit TK1010
(Tray 2)
Bypass Tray
Duplex
A4 210 × 297 8.26 ” × 11.69 ”
B5 182 × 257 7.17 ” × 10.12 ”
A5 148 × 210 5.83 ” × 8.26 ”
A6 105 × 148 4.13 ” × 5.63 ”
Legal 216 × 356 8.5 ” × 14 ”
Letter 216 × 279 8.5 ” × 11 ”
Executive 184 × 276 7.25 ” × 10.5 ”
F/GL 203 × 330 8 ” × 13 ”
Foolscap 216 × 330 8.5 ” × 13 ”
Folio 210 × 330 8.25 ” × 13 ”
Com10 Env 104.8 × 241.3 4.25” × 9.5”
C5 Env 162 × 229 6.38” × 9.02”
C6 Env 114 × 162 4.49” × 6.38”
DL Env 110 × 220 4.33” × 8.66”
Monarch Env 98.4 × 190.5 3.875” × 7.5”
16K 195 × 267 7.68 ” × 10.5 ”
Custom Paper Size - -

Paper and Other Media
24
4
•
Select a size using Smart Organizing Monitor.
•
Set a size as a custom size using Smart Organizing Monitor.
The following sizes are supported:
Tray 1: approximately 90 - 216 mm in width, and 148 - 356 mm in length.
Bypass Tray: approximately 90 - 216 mm in width, and 148 - 356 mm in
length.
•
Select a size using the printer driver.
•
Set a size as a custom size using the printer driver.
The following sizes are supported:
Tray 1: approximately 90 - 216 mm in width, and 148 - 356 mm in length.
Bypass Tray: approximately 90 - 216 mm in width, and 148 - 356 mm in
length.
•
The size is not supported.
❖ Paper weight and number of sheets to be set
Check that the top of the stack is not higher than the limit mark inside the
tray.
Supported paper weight Maximum number of
sheets (plain paper)
Tray 1 60 - 160 g/m2 (16 - 42 lb.) 250 (80 g/m2, 20 lb.)
Bypass Tray 60 - 160 g/m2 (16 - 42 lb.) 1
Paper Feed Unit (Tray 2) 60 - 105 g/m2 (16 - 28 lb.) 500 (80 g/m2, 20 lb.)
Produkt Specifikationer
| Mærke: | Ricoh |
| Kategori: | Printer |
| Model: | SP C220N |
| Vægt: | 23000 g |
| Wi-Fi: | Ingen |
| Ethernet LAN: | Ja |
| Udskrivningsteknologi: | Laser |
| Maksimal opløsning: | 2400 x 600 dpi |
| Udskrivningshastighed (sort, normal kvalitet, A4/amerikansk papirformat): | 16 sider pr. minut |
| Medietyper til papirbakke: | Envelopes,Labels,Plain paper,Recycled paper,Transparencies |
| Maksimal ISO A-serie papirstørrelse: | A4 |
| ISO A-serie, størrelser (A0...A9): | A4,A5,A6 |
| Ikke-ISO udskriftsmedier størrelse: | Executive (184 x 267mm),Legal (media size),Letter (media size) |
| Samlet inputkapacitet: | 250 ark |
| Samlet outputkapacitet: | 150 ark |
| Maksimal driftscyklus: | 30000 sider pr. måned |
| Intern hukommelse: | 64 MB |
| Dimensioner (BxDxH): | 400 x 450 x 320 mm |
| Strømforbrug (strømbesparelse): | 15 W |
| Effektkrav: | 220 - 240 V, 50/60 Hz |
| Duplex udskrivning: | Ingen |
| Maksimal indgangskapacitet: | 251 ark |
| Mac kompabilitet: | Ja |
| Processorfrekvens: | 192 Mhz |
| Maksimal intern hukommelse: | - MB |
| Strømforbrug (udskrivning): | 1300 W |
| Kompatible operativsystemer: | Win 2000, XP, Server 2003, Vista \nMac v.10.2 – 10.4 |
| Farve: | Ja |
| Tid til første side (sort, normal): | 14 sek./side |
| Antal printer skrifttyper: | 80 |
| Netværk klar: | Ja |
| Opvarmningstid: | 51 sek./side |
| Medie vægt (tray 1): | 60 - 160 g/m² |
| Standby-LED: | Ja |
| Emuleringer: | PCL5c/PCL6, PostScript 3 |
| Skrifttyper inkluderet: | Ja |
Har du brug for hjælp?
Hvis du har brug for hjælp til Ricoh SP C220N stil et spørgsmål nedenfor, og andre brugere vil svare dig
Printer Ricoh Manualer

14 November 2024
21 September 2024
20 September 2024
3 September 2024
3 September 2024
3 September 2024
2 September 2024
2 September 2024
25 August 2024
23 August 2024
Printer Manualer
- Printer Nilox
- Printer Sony
- Printer Canon
- Printer Samsung
- Printer Panasonic
- Printer LG
- Printer Mitsubishi
- Printer Sharp
- Printer Lexmark
- Printer Epson
- Printer HP
- Printer D-Link
- Printer Roland
- Printer Toshiba
- Printer Fujifilm
- Printer Nikon
- Printer Kodak
- Printer Brother
- Printer Lenovo
- Printer Olympus
- Printer Triumph-Adler
- Printer AVM
- Printer Dymo
- Printer Thomson
- Printer JVC
- Printer Honeywell
- Printer Citizen
- Printer Olivetti
- Printer Huawei
- Printer Seiko
- Printer Digitus
- Printer Zebra
- Printer Olympia
- Printer Xiaomi
- Printer Dell
- Printer Intermec
- Printer Fujitsu
- Printer MSI
- Printer Polaroid
- Printer NEC
- Printer Konica-Minolta
- Printer OKI
- Printer Kyocera
- Printer Avision
- Printer Velleman
- Printer Bixolon
- Printer Sagem
- Printer Pantum
- Printer Xerox
- Printer Renkforce
- Printer Testo
- Printer Ultimaker
- Printer Primera
- Printer Star Micronics
- Printer Star
- Printer Panduit
- Printer ZKTeco
- Printer StarTech.com
- Printer Kogan
- Printer CUSTOM
- Printer Godex
- Printer Equip
- Printer Royal Sovereign
- Printer Argox
- Printer Minolta
- Printer DNP
- Printer Oce
- Printer Metapace
- Printer Ibm
- Printer Tomy
- Printer Approx
- Printer Toshiba TEC
- Printer Frama
- Printer Vupoint Solutions
- Printer Evolis
- Printer Builder
- Printer Fargo
- Printer Brady
- Printer Posiflex
- Printer Datamax-O'neil
- Printer Dascom
- Printer HiTi
- Printer GG Image
- Printer Elite Screens
- Printer DTRONIC
- Printer Phoenix Contact
- Printer Videology
- Printer TSC
- Printer EC Line
- Printer Colop
- Printer Fichero
- Printer Raspberry Pi
- Printer Unitech
- Printer IDP
- Printer Microboards
- Printer Tally Dascom
- Printer CSL
- Printer Nisca
- Printer Epson 7620
- Printer Sawgrass
- Printer Mimaki
Nyeste Printer Manualer

9 April 2025

8 April 2025

2 April 2025

29 Marts 2025
29 Marts 2025
29 Marts 2025

9 Marts 2025
9 Marts 2025
5 Marts 2025
5 Marts 2025