Samsung WB1101F Manual
Læs nedenfor 📖 manual på dansk for Samsung WB1101F (147 sider) i kategorien Kamera. Denne guide var nyttig for 4 personer og blev bedømt med 4.5 stjerner i gennemsnit af 2 brugere
Side 1/147

This user manual includes detailed usage instructions for
your camera. Please read this manual thoroughly.
Click a topic
Basic troubleshooting Quick reference Contents
Basic functions Extended functions Shooting options
Playback/Editing Wireless network Settings
Appendixes Index

1
Health and safety information
Always comply with the following precautions and usage tips to avoid dangerous situations and ensure peak performance of your camera.
Prevent damage to subjects’ eyesight.
Do not use the ash in close proximity (closer than 1 m/3 ft) to people or animals.
If you use the ash too close to your subject’s eyes, this can cause temporary or
permanent eyesight damage.
Keep your camera away from small children and pets.
Keep your camera and all accessories out of the reach of small children and animals.
Small parts may cause choking or serious injury if swallowed. Moving parts and
accessories may present physical dangers as well.
Do not expose the camera to direct sunlight or high temperatures for an
extended period of time.
Prolonged exposure to sunlight or extreme temperatures can cause permanent
damage to your camera’s internal components.
Warning—situations that could cause injury to yourself or others
Do not disassemble or attempt to repair your camera.
You can damage the camera and expose yourself to the risk of an electric shock.
Do not use your camera near ammable or explosive gases and liquids.
This may cause a fire or explosion.
Do not insert ammable materials into the camera or store these materials
near the camera.
This may cause a fire or electric shock.
Do not handle your camera with wet hands.
This may result in an electric shock.

2
Avoid covering the camera or charger with blankets or clothes.
The camera may overheat, which may distort the camera or cause a re.
Do not handle the power supply cord or the charger during a thunderstorm.
This may result in electric shock.
If liquid or foreign objects enter your camera, immediately disconnect all
power sources, such as the battery or charger, and then contact a Samsung
service center.
Comply with any regulations that restrict the use of a camera in a certain area.
•
Avoid interference with other electronic devices.
•
Turn o the camera when in an aircraft. Your camera can cause interference with
aircraft equipment. Follow all airline regulations and turn o your camera when
directed by airline personnel.
•
Turn o the camera near medical equipment. Your camera can interfere with
medical equipment in hospitals or health care facilities. Follow all regulations,
posted warnings, and directions from medical personnel.
Avoid interference with pacemakers.
Maintain a safe distance between this camera and all pacemakers to avoid potential
interference, as recommended by the manufacturer and research groups. If you
have any reason to suspect that your camera is interfering with a pacemaker
or other medical device, turn o the camera immediately and contact the
manufacturer of the pacemaker or medical device for guidance.
Health and safety information

3
Caution—situations that could cause damage to your camera or other
equipment
Remove the batteries from your camera when storing it for an extended period
of time.
Installed batteries may leak or corrode over time and cause serious damage to your
camera.
Use only authentic, manufacturer-recommended, Lithium-ion replacement
batteries. Do not damage or heat the battery.
Inauthentic, damaged, or heated batteries may cause a re or personal injury.
Use only Samsung-approved batteries, chargers, cables and accessories.
•
Using unauthorized batteries, chargers, cables or accessories can cause batteries
to explode, damage your camera, or cause injury.
•
Samsung is not responsible for damage or injuries caused by unapproved
batteries, chargers, cables or accessories.
Use the battery only for its intended purpose.
Misusing the battery may cause a re or electric shock.
Do not touch the ash while it res.
The ash is very hot when red and may burn your skin.
When you use the AC charger, turn o the camera before you disconnect the
power to the AC charger.
Failing to do so may result in re or electric shock.
Disconnect the charger from the wall socket when not in use.
Failing to do so may result in re or electric shock.
Do not use a damaged power supply cord, plug, or loose outlet when you
charge batteries.
This may cause a re or electric shock.
Do not allow the AC charger to come in contact with the +/- terminals on the
battery.
This may cause a re or electric shock.
Do not drop or subject the camera to strong impacts.
Doing so may damage the screen or external or internal components.
Exercise caution when you connect cables or adapters and install batteries and
memory cards.
If you force the connectors, improperly connect cables, or improperly install
batteries and memory cards, you can damage ports, connectors, and accessories.
Health and safety information

4
Keep cards with magnetic strips away from the camera case.
Information stored on the card may be damaged or erased.
Never use a damaged charger, battery, or memory card.
This may result in electric shock or camera malfunction or cause a re.
Do not place the camera in or near magnetic elds.
Doing so may cause the camera to malfunction.
Do not use the camera if the screen is damaged.
If the glass or acrylic parts are broken, visit a Samsung Electronics Service Center to
have the camera repaired.
Check that the camera is operating properly before use.
The manufacturer takes no responsibility for any loss of les or damage that may
result from camera malfunction or improper use.
You must plug the small end of the USB cable into your camera.
If the cable is reversed, it may damage your les.
The manufacturer is not responsible for any loss of data.
Avoid interference with other electronic devices.
Your camera emits radio frequency (RF) signals that may interfere with unshielded
or improperly shielded electronic equipment, such as pacemakers, hearing aids,
medical devices, and other electronic devices in homes or vehicles. Consult the
manufacturers of your electronic devices to solve any interference problems you
experience. To prevent unwanted interference, use only Samsung-approved devices
or accessories.
Use your camera in the normal position.
Avoid contact with your camera’s internal antenna.
Data transference and your responsibilities
•
Data transferred via WLAN could be leaked, so avoid transferring sensitive data in
public areas or on open networks.
•
The camera manufacturer is not liable for any data transfers that infringe on
copyrights, trademarks, intellectual property laws, or public decency ordinances.
Health and safety information

5
Copyright information
•
Microsoft Windows and the Windows logo are registered trademarks of the
Microsoft Corporation.
•
Mac and Apple App Store are registered trademarks of the Apple
Corporation.
•
Google Play Store is a registered trademark of Google, Inc.
•
Wi-Fi®, the Wi-Fi CERTIFIED logo, and the Wi-Fi logo are registered
trademarks of the Wi-Fi Alliance.
•
Trademarks and trade names used in this manual are the property of their
respective owners.
•
Camera specications or contents of this manual may be changed
without prior notice due to upgrade of camera functions.
•
We recommend using your camera within the country where you
purchased.
•
Use this camera responsibly and adhere to all laws and regulations
concerning its use.
•
You are not allowed to reuse or distribute any part of this manual
without prior permission.
Outline of the User Manual
Basic functions 19
Learn about your camera’s layout, icons, and basic functions for
shooting.
Extended functions 43
Learn how to capture a photo and record a video by selecting
a mode.
Shooting options 53
Learn how to set the options in Shooting mode.
Playback/Editing 74
Learn how to play back photos or videos, and edit photos or videos.
Also, learn how to connect your camera to your computer or TV.
Wireless network 92
Learn to connect to wireless local area networks (WLANs) and use
functions.
Settings 109
Refer to options to congure your camera’s settings.
Appendixes 115
Get information about error messages, specications, and
maintenance.

6
Indicators used in this manual
Shooting mode Indicator
Smart Auto
Program
Smart
Panorama
Magic Plus
Settings
Movie
Wi-Fi
Shooting mode icons
These icons appear in the text when a function is available in a mode. See the
example below.
Note: The or mode may not support functions for all scenes or modes.
For example:
Adjusting the exposure manually (EV
Depending on the intensity of the ambient light, y be too bright or
dark. In these cases, you can adjust the exposure to get a better photo.
Darker (-)
Neutral (0)
Brighter (+)
Available in Program
and Movie modes
Icons used in this manual
Icon Function
Additional information
Safety warnings and precautions
[ ] Camera buttons. For example, [ ] represents the shutter button.Shutter
( ) Page number of related information
→
The order of options or menus you must select to perform a step; for
example: Select Face Detection →Normal (represents Select Face
Detection Normal, and then select ).
* Annotation

7
Expressions used in this manual
Pressing the shutter
•
Half-press [ ]: Press the shutter halfway downShutter
•
Press [Shutter]: Press the shutter all the way down
Half-press [ Press [Shutter]Shutter]
Subject, background, and composition
•
Subject: The main object in a scene, such as a person, animal, or still life
•
Background: The objects around the subject
•
Composition: The combination of a subject and background
Composition
Background
Subject
Exposure (Brightness)
The amount of light that enters your camera determines the exposure. You can alter
the exposure by changing the shutter speed, aperture value, or ISO sensitivity. By
altering the exposure, your photos will be darker or lighter.
Normal exposure
Overexposure (too bright)

8
Special features of your camera
Reading NFC tag information (Tag & Go)
Install the Samsung SMART CAMERA App on an NFC-enabled device, and then
place the device’s NFC antenna near the camera’s NFC tag. The Samsung SMART
CAMERA App launches automatically. If the app is not installed, a prompt to install
the app will appear.
Using the DIRECT LINK button
Press the DIRECT LINK button to activate the Wi-Fi function that you have
designated.
Setting a DIRECT LINK button option
You can select a Wi-Fi function to launch when you press the DIRECT LINK button.
1 Access Settings.
2 Access the DIRECT LINK button option.
3 Select a Wi-Fi feature from the list.
9
9
Special features of your camera
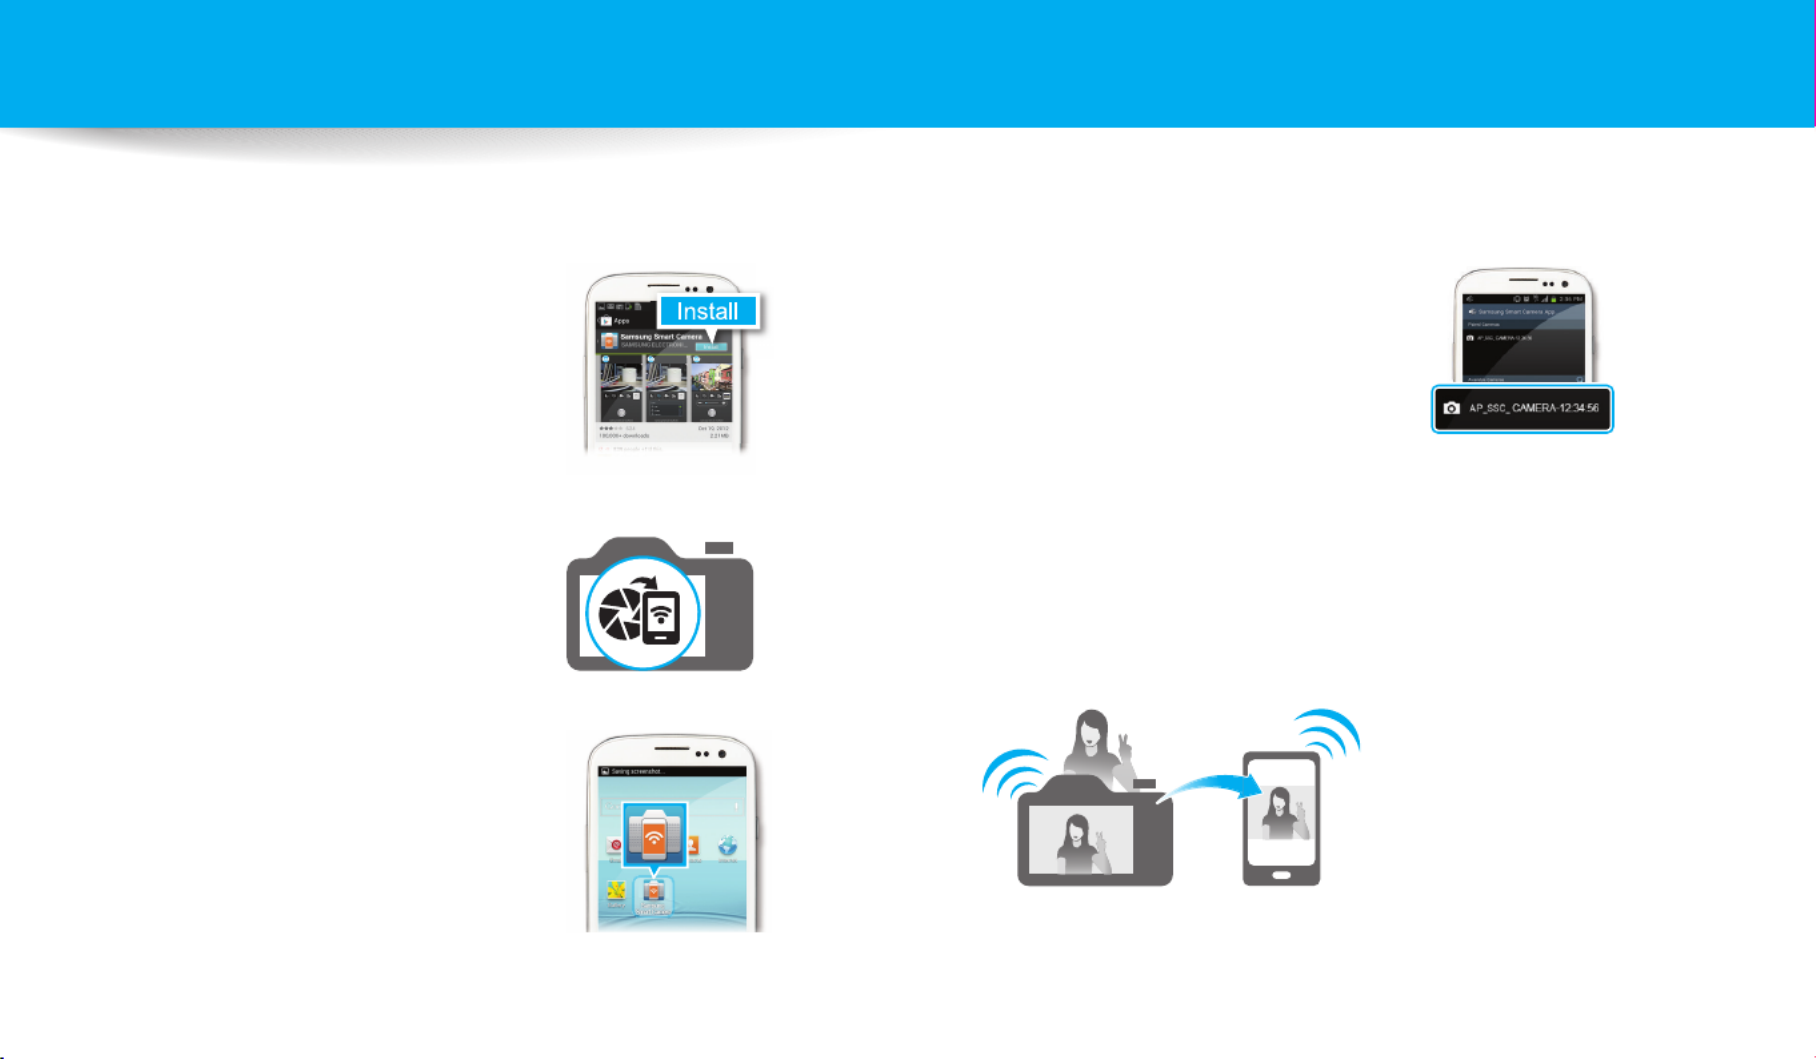
Using AutoShare
When you capture a photo with your camera, the photo is saved to a smart phone automatically. The camera connects to the smart phone wirelessly.
4 Select the camera from the list and
connect the smart phone to the
camera.
•
If a pop-up message appears on your
camera, allow the smart phone to
connect to your camera.
5 Capture a photo.
•
The captured photo is saved to the camera, and then transferred to the
smart phone.
1 Install Samsung SMART CAMERA
App on the smart phone.
2 Turn on the AutoShare feature on
the camera.
3 Launch Samsung SMART CAMERA
App on the smart phone.
10
10
Special features of your camera
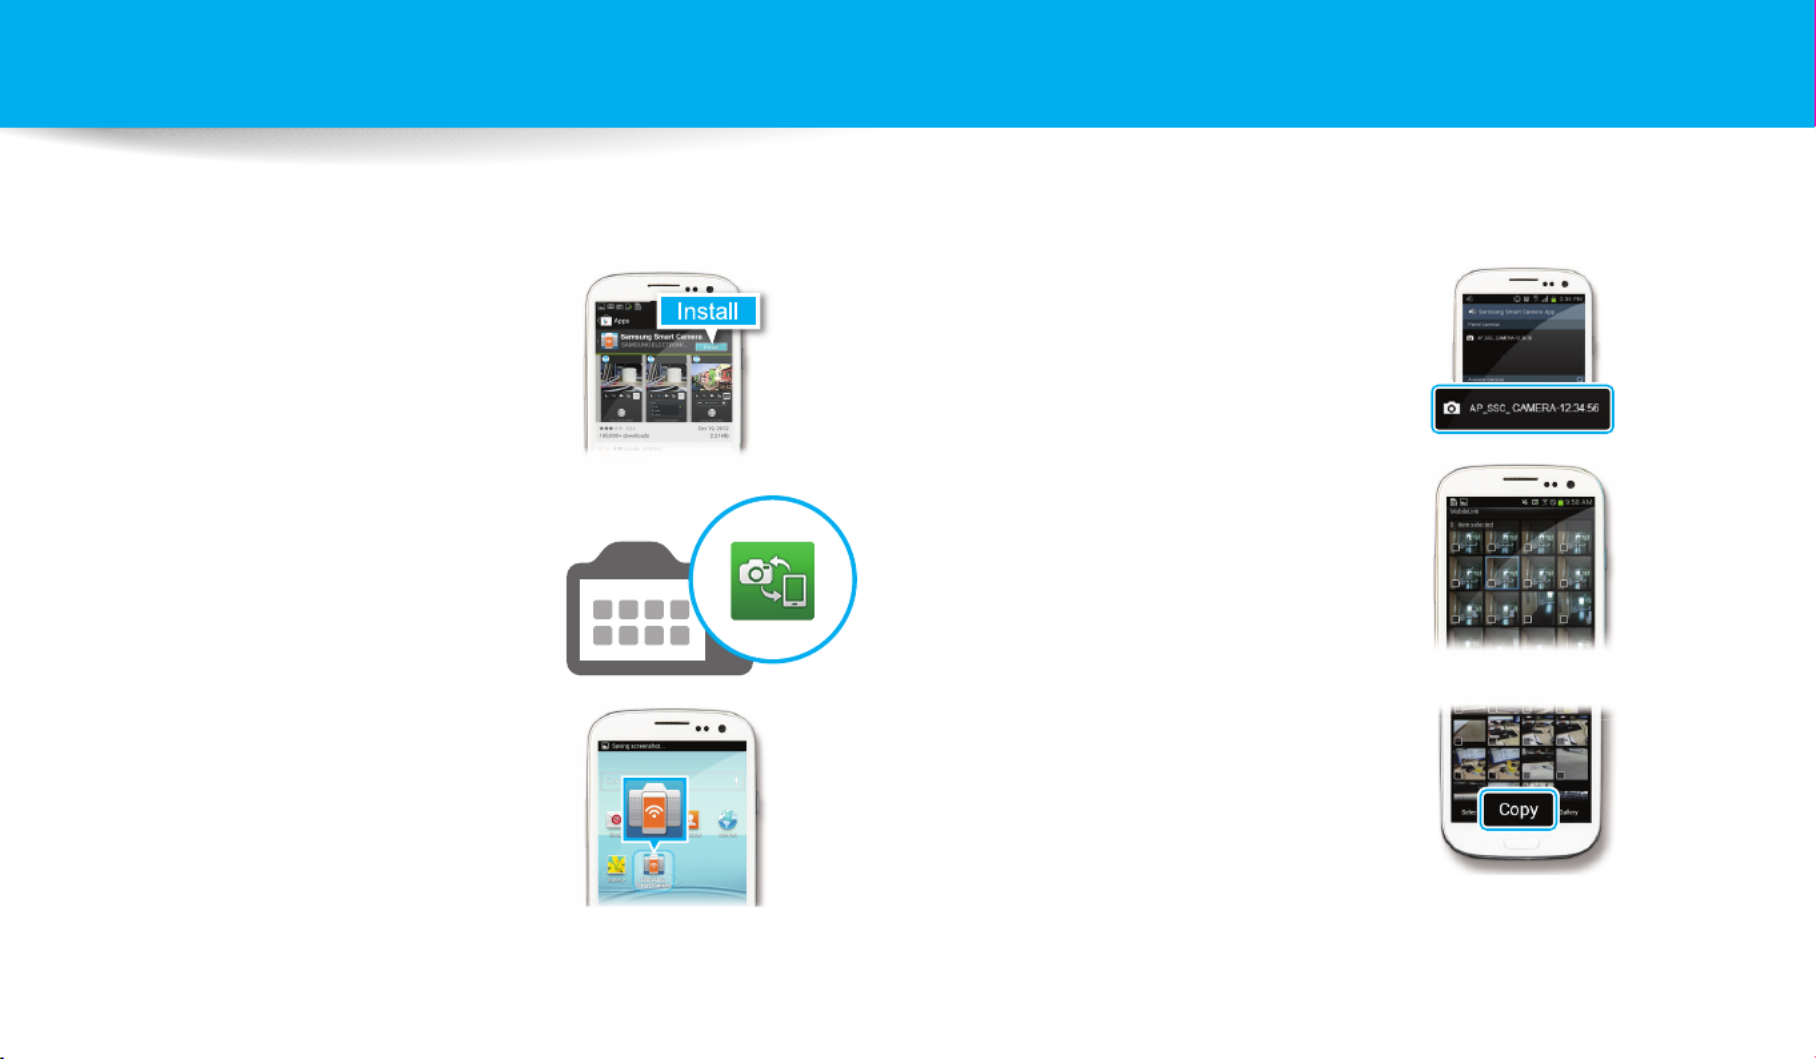
Using MobileLink
You can send les easily from your camera to a smart phone. The camera connects wirelessly to smart phones that support the MobileLink feature.
4 Select the camera from the list and
connect the smart phone to the
camera.
•
If a pop-up message appears on your
camera, allow the smart phone to
connect to your camera.
5 On the smart phone or camera,
select les to transfer from the
camera.
6 On the smart phone, touch the copy
button or on the camera, select
Send.
1 Install the Samsung SMART
CAMERA App on the smart phone.
2 Access the mode on the MobileLink
camera.
•
If a pop-up message appears, select an
option.
3 Launch the Samsung SMART
CAMERA App on the smart phone.

11
Special features of your camera
Using Remote Viewnder
You can remotely control your camera from a smart phone. The camera connects to the smart phone wirelessly. Use the smart phone as a remote shutter release with the
Remote Viewnder feature. The captured photo will appear on the smart phone.
4 Select the camera from the list and
connect the smart phone to the
camera.
•
If a pop-up message appears on your
camera, allow the smart phone to
connect to your camera.
5 Touch and hold to focus, and
then release it to capture a photo.
6 Touch the thumbnail to view the
photo.
1 Install the Samsung SMART
CAMERA App on the smart phone.
2 Access the Remote Viewnder
mode on the camera.
3 Launch the Samsung SMART
CAMERA App on the smart phone.
12
Special features of your camera
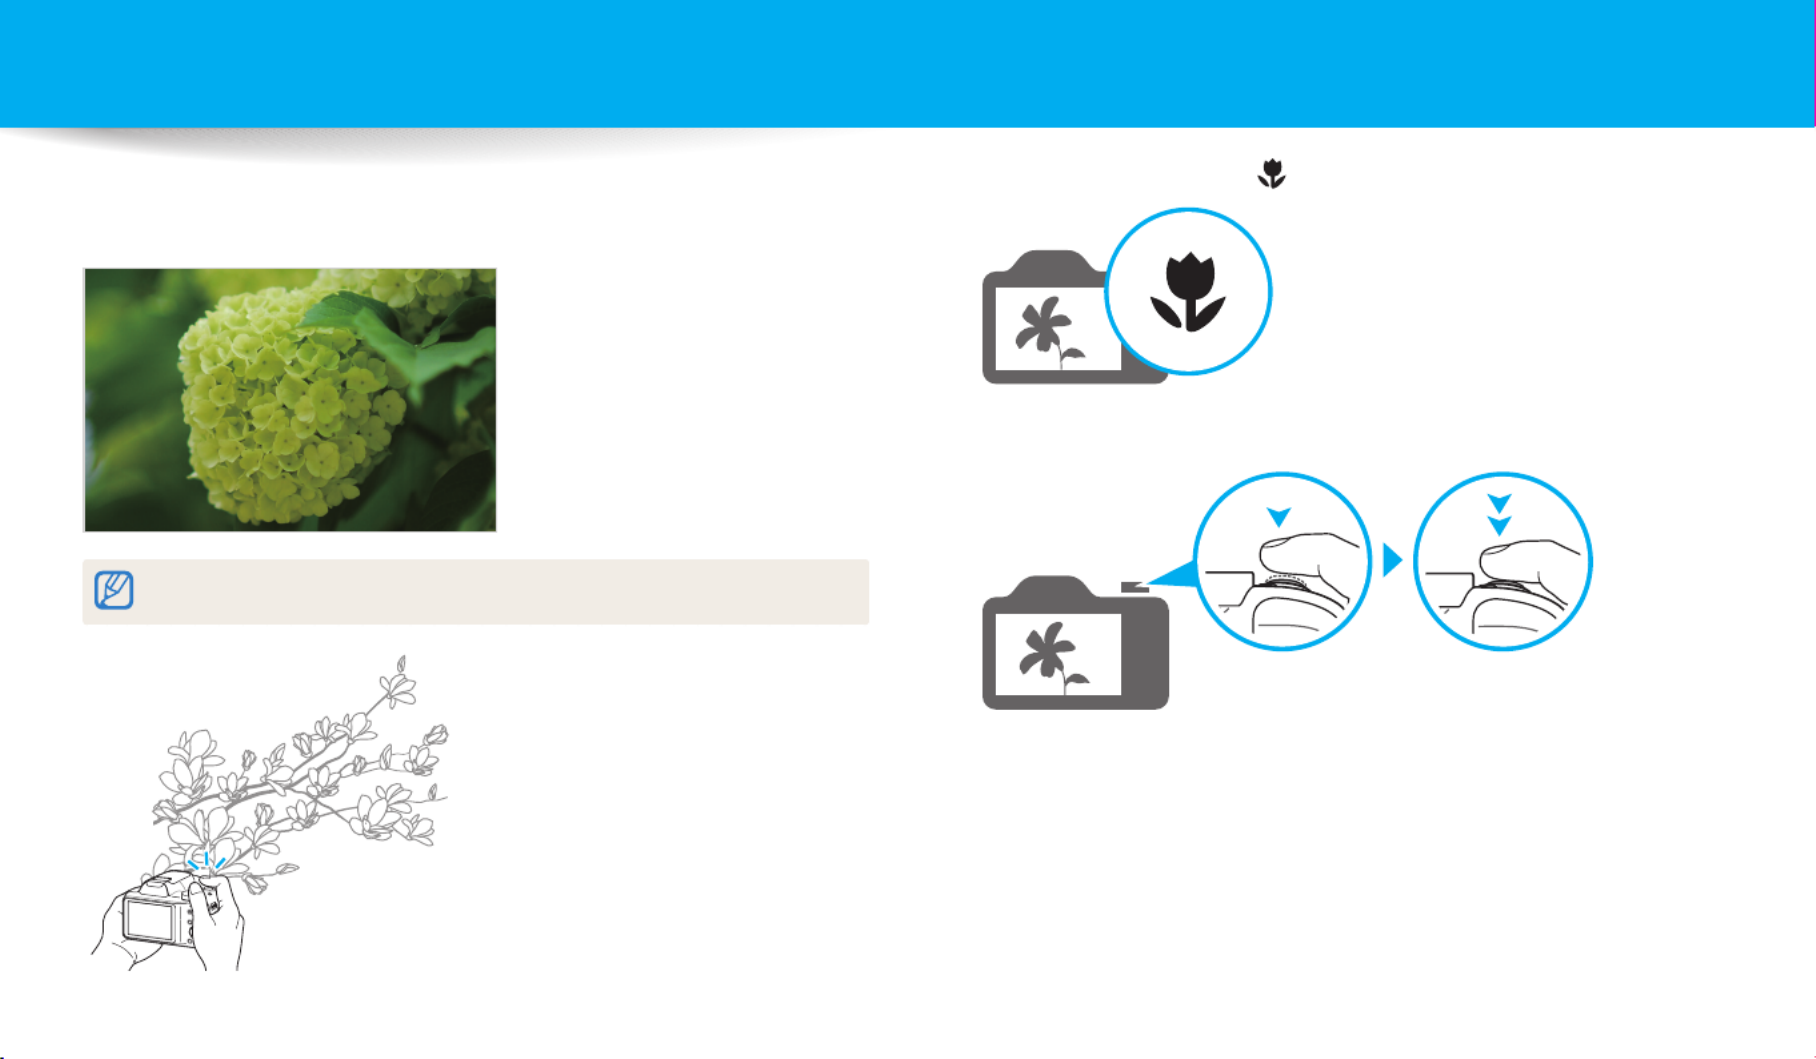
Shooting samples – Macro
You can capture close up shots of a subject or small subjects, such as owers or
insects.
The example image may dier from the actual photo that you capture.
1 Select the macro option ( ).
2 Capture a photo.

14
Quick reference
Adjusting the exposure (brightness)
•
ISO sensitivity (to adjust the sensitivity to light)
59
•
EV (to adjust exposure)
67
•
ACB (to compensate for subjects against bright
backgrounds)
68
•
Metering
68
•
AEB (to capture 3 photos of the same scene with
dierent exposures)
71
Capturing photos of scenery
•
mode > Landscape
47
•
mode
48
Applying eects to photos
•
mode > Photo Filter
50
•
Image Adjust (to adjust Sharpness, Contrast, or
Saturation)
72
Applying eects to videos
•
mode > Movie Filter
51
Capturing photos of people
•
mode > Beauty Face
47
•
Red-eye/Red-eye Fix (to prevent or correct red-eye)
57
•
Face Detection, Self-Portrait
64
•
Smile Shot
65
Capturing photos at night or in the dark
•
mode > Sunset, Silhouette, Fireworks, Light Trace
47
•
Flash options
58
•
ISO sensitivity (to adjust the sensitivity to light)
59
Capturing action photos
•
mode > Action Freeze
47
•
Continuous, Motion Capture
71
Capturing photos of text, insects, or
owers
•
mode > Macro
47
•
Macro
60
Reducing camera shake
•
Optical Image Stabilization (OIS)
40
•
Dual Image Stabilization (Dual IS)
40
Sending and sharing les
•
Using the NFC Feature (Tag & Go)
97
•
Sending photos or videos to a smart phone
99
•
Sending photos or videos via email
102
•
Using photo or video sharing services
105
•
Viewing photos or videos on devices that support
Samsung Link
107
•
Viewing les as thumbnails
76
•
Viewing les by category
77
•
Deleting all les on the memory
79
•
Viewing les as a slide show
81
•
Viewing les on a TV
88
•
Connecting your camera to a computer
89
•
Adjusting sound and volume
111
•
Adjusting the brightness of the display
112
•
Changing the display language
113
•
Setting the date and time
113
•
Before contacting a service center
128

15
Contents
Using the Mode screen ........................................................................................... 31
Selecting a Mode Screen ....................................................................................... 31
Icons on the Mode screen ..................................................................................... 32
Selecting options or menus .................................................................................. 33
Setting the display and sound ............................................................................. 35
Setting the display type ........................................................................................ 35
Setting the sound ................................................................................................... 36
Capturing photos ..................................................................................................... 37
Zooming .................................................................................................................. 38
Changing the zoom speed ................................................................................... 39
Reducing camera shake (OIS) .............................................................................. 40
Tips for getting a clearer photo ........................................................................... 41
Basic functions
................................................................................................................. 19
Unpacking ................................................................................................................... 20
Camera layout ............................................................................................................ 21
Using the DIRECT LINK button ............................................................................. 23
Attaching a strap .................................................................................................... 24
Attaching a lens cap ............................................................................................... 24
Inserting the battery and memory card .......................................................... 25
Charging the battery and turning on your camera ..................................... 26
Charging the battery ............................................................................................. 26
Turning on your camera ........................................................................................ 26
Performing the initial setup ................................................................................. 27
Learning icons ........................................................................................................... 29

16
Contents
Extended functions
....................................................................................................... 43
Using the Smart Auto mode ................................................................................. 44
Using the Program mode ...................................................................................... 46
Using the Smart mode ............................................................................................ 47
Using the Panorama mode ................................................................................... 48
Using the Magic Plus mode ................................................................................. 50
Using the Photo Filter mode ................................................................................ 50
Using the Movie Filter mode ................................................................................ 51
Using the Movie mode ........................................................................................... 52
Shooting options
............................................................................................................ 53
Selecting a resolution and quality ..................................................................... 54
Selecting a resolution ............................................................................................ 54
Setting the photo quality ...................................................................................... 55
Using the timer .......................................................................................................... 56
Shooting in the dark ................................................................................................ 57
Preventing red-eye ................................................................................................. 57
How to use the ash .............................................................................................. 57
Using the ash ........................................................................................................ 58
Adjusting the ISO sensitivity ................................................................................. 59
Changing the camera’s focus .............................................................................. 60
Using macro ............................................................................................................ 60
Changing the focus option ................................................................................... 60
Adjusting the focus area ....................................................................................... 61
Using Face Detection .............................................................................................. 64
Detecting faces ....................................................................................................... 64
Capturing a self portrait shot ............................................................................... 64
Capturing a smile shot ........................................................................................... 65
Detecting eye blinking .......................................................................................... 65
Tips for detecting faces ......................................................................................... 66

17
Contents
Adjusting brightness and color ........................................................................... 67
Adjusting the exposure manually (EV) ............................................................... 67
Compensating for backlighting (ACB) ................................................................ 68
Changing the metering option ............................................................................ 68
Selecting a White Balance setting ....................................................................... 69
Using burst modes (continuous, motion capture, AEB) ............................. 71
Adjusting images ..................................................................................................... 72
Reducing the sound of the zoom ....................................................................... 73
Playback/Editing
............................................................................................................. 74
Viewing photos or videos in Playback mode ................................................. 75
Starting Playback mode ........................................................................................ 75
Viewing photos ....................................................................................................... 79
Playing a video ........................................................................................................ 82
Editing a photo .......................................................................................................... 83
Resizing photos ...................................................................................................... 83
Rotating a photo .................................................................................................... 83
Applying Smart Filter eects ................................................................................ 84
Adjusting your photos ........................................................................................... 85
Editing a video ........................................................................................................... 87
Trimming a video ................................................................................................... 87
Capturing an image from video ........................................................................... 87
Viewing les on a TV ............................................................................................... 88
Transferring les to a computer .......................................................................... 89
Transferring les to your Windows OS computer ............................................. 89
Transferring les to your Mac OS computer ...................................................... 90
System Requirements ............................................................................................. 91
Wireless network
............................................................................................................ 92
Connecting to a WLAN and conguring network settings ....................... 93
Connecting to a WLAN .......................................................................................... 93
Using the login browser ........................................................................................ 94
Network connection tips ...................................................................................... 95
Entering text ............................................................................................................ 96
Using the NFC Feature (Tag & Go) ...................................................................... 97
Using NFC features in Shooting mode ............................................................... 97
Using NFC features in Playback mode (Photo Beam) ....................................... 97
Using NFC features in Wi-Fi mode ....................................................................... 97

18
Contents
Saving les to a smart phone automatically .................................................. 98
Sending photos or videos to a smart phone .................................................. 99
Using a smart phone as a remote shutter release ...................................... 100
Sending photos or videos via email ................................................................ 102
Changing email settings ..................................................................................... 102
Sending photos or videos via email ................................................................. 104
Using photo or video sharing services .......................................................... 105
Accessing a sharing service ................................................................................ 105
Uploading photos or videos .............................................................................. 105
Using Samsung Link to send les ..................................................................... 107
Viewing photos or videos on devices that support Samsung Link .............. 107
Settings
............................................................................................................................. 109
Settings menu ......................................................................................................... 110
Accessing the settings menu ............................................................................. 110
Sound ..................................................................................................................... 111
Display .................................................................................................................... 111
Connectivity .......................................................................................................... 112
General ................................................................................................................... 113
Appendixes
.....................................................................................................................115
Error messages ........................................................................................................ 116
Camera maintenance ............................................................................................ 117
Cleaning your camera .......................................................................................... 117
Using or storing the camera ............................................................................... 118
About memory cards ........................................................................................... 120
About the battery ................................................................................................. 123
Upgrading Firmware ............................................................................................ 127
Before contacting a service center ................................................................... 128
Camera specications ........................................................................................... 131
Glossary ..................................................................................................................... 135
Index ........................................................................................................................... 142

Unpacking
……………………………………… 20
Camera layout
…………………………………… 21
Using the DIRECT LINK button
………………… 23
Attaching a strap
……………………………… 24
Attaching a lens cap
…………………………… 24
Inserting the battery and memory card
……… 25
Charging the battery and turning
on your camera
………………………………… 26
Charging the battery
…………………………… 26
Turning on your camera
……………………… 26
Performing the initial setup
…………………… 27
Learning icons
…………………………………… 29
Using the Mode screen
………………………… 31
Selecting a Mode Screen
……………………… 31
Icons on the Mode screen
……………………… 32
Selecting options or menus
…………………… 33
Setting the display and sound
………………… 35
Setting the display type
………………………… 35
Setting the sound
……………………………… 36
Capturing photos
……………………………… 37
Zooming
……………………………………… 38
Changing the zoom speed
…………………… 39
Reducing camera shake (OIS)
………………… 40
Tips for getting a clearer photo
………………… 41
Basic functions
Learn about your camera’s layout, icons, and basic functions for shooting.

Basic functions
20
Unpacking
The following items are included in your product box.
Camera AC adapter/USB cable
Rechargeable battery Strap
Lens cap/Lens cap strap Quick Start Guide
Optional accessories
Camera case A/V cable Battery charger
Memory card Memory card/Memory card adapter
•
The illustrations may dier slightly from the items shipped with your product.
•
The items included in the box may dier depending on the model.
•
You can purchase optional accessories at a retailer or a Samsung service center.
Samsung is not responsible for any problems caused by using unauthorized
accessories.
Basic functions
21
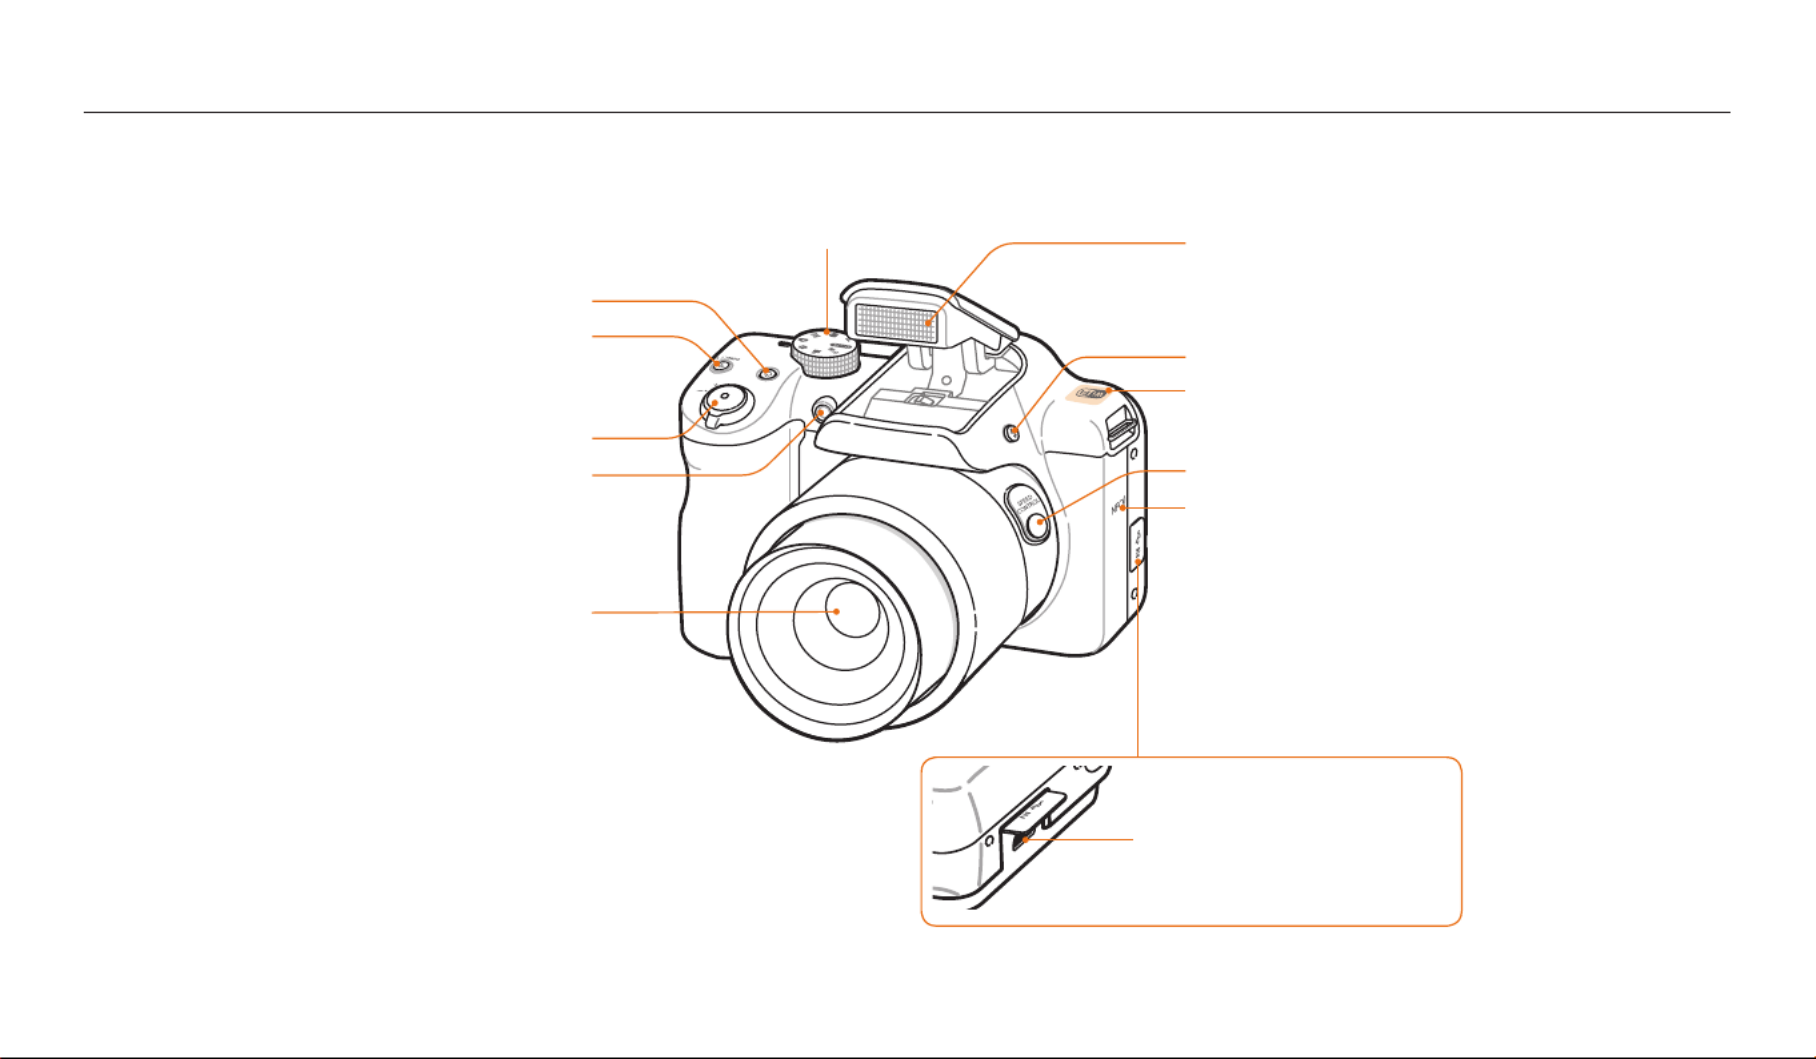
Camera layout
Before you start, familiarize yourself with your camera’s parts and their functions.
Shutter button
DIRECT LINK button
Start a preset Wi-Fi function.
Lens
POWER button
AF-assist light/Timer lamp
NFC Tag
Launch an NFC feature by reading a tag from
an NFC-enabled device. (p. 97)
Mode dial
Flash pop-up button
SPEED CONTROL button (p. 39)
Internal antenna*
* Avoid contact with the internal antenna while using
a wireless network.
Flash*
* While not in use, keep the ash unit closed to
prevent damage. Forcing the ash unit open may
cause damage to your camera.
USB and A/V port
Accepts USB cable and A/V cable.

Camera layout
Basic functions
22
Status lamp
•
Blinking: When the camera is saving
a photo or video, being read by
a computer, when the image is out
of focus, or when the camera is
connecting to WLAN or sending
a photo.
•
Steady: When the camera is
connected to a computer, charging
the battery, or when the image is in
focus.
Zoom button
•
In Shooting mode: Zoom in or out.
•
In Playback mode: Zoom in on part of a photo or
view les as thumbnails, or adjust the volume.
Display
Buttons (p. 23)
Eyelet for camera strap
Microphone
Battery chamber cover
Insert a memory card and battery.
Speaker
Tripod mount
Camera layout
Basic functions
23
Using the DIRECT LINK button
You can turn on the Wi-Fi feature conveniently with [DIRECT LINK].
Press [ ] to activate the Wi-Fi function that you have designated. DIRECT LINK
Press [ ] again to return to the previous mode.DIRECT LINK
Setting a DIRECT LINK button option
You can select a Wi-Fi function to launch when you press [DIRECT LINK].
1 Rotate the mode dial to .
2 Select General → DIRECT LINK (Wi-Fi Button).
3 Select a Wi-Fi feature. (p. 114)
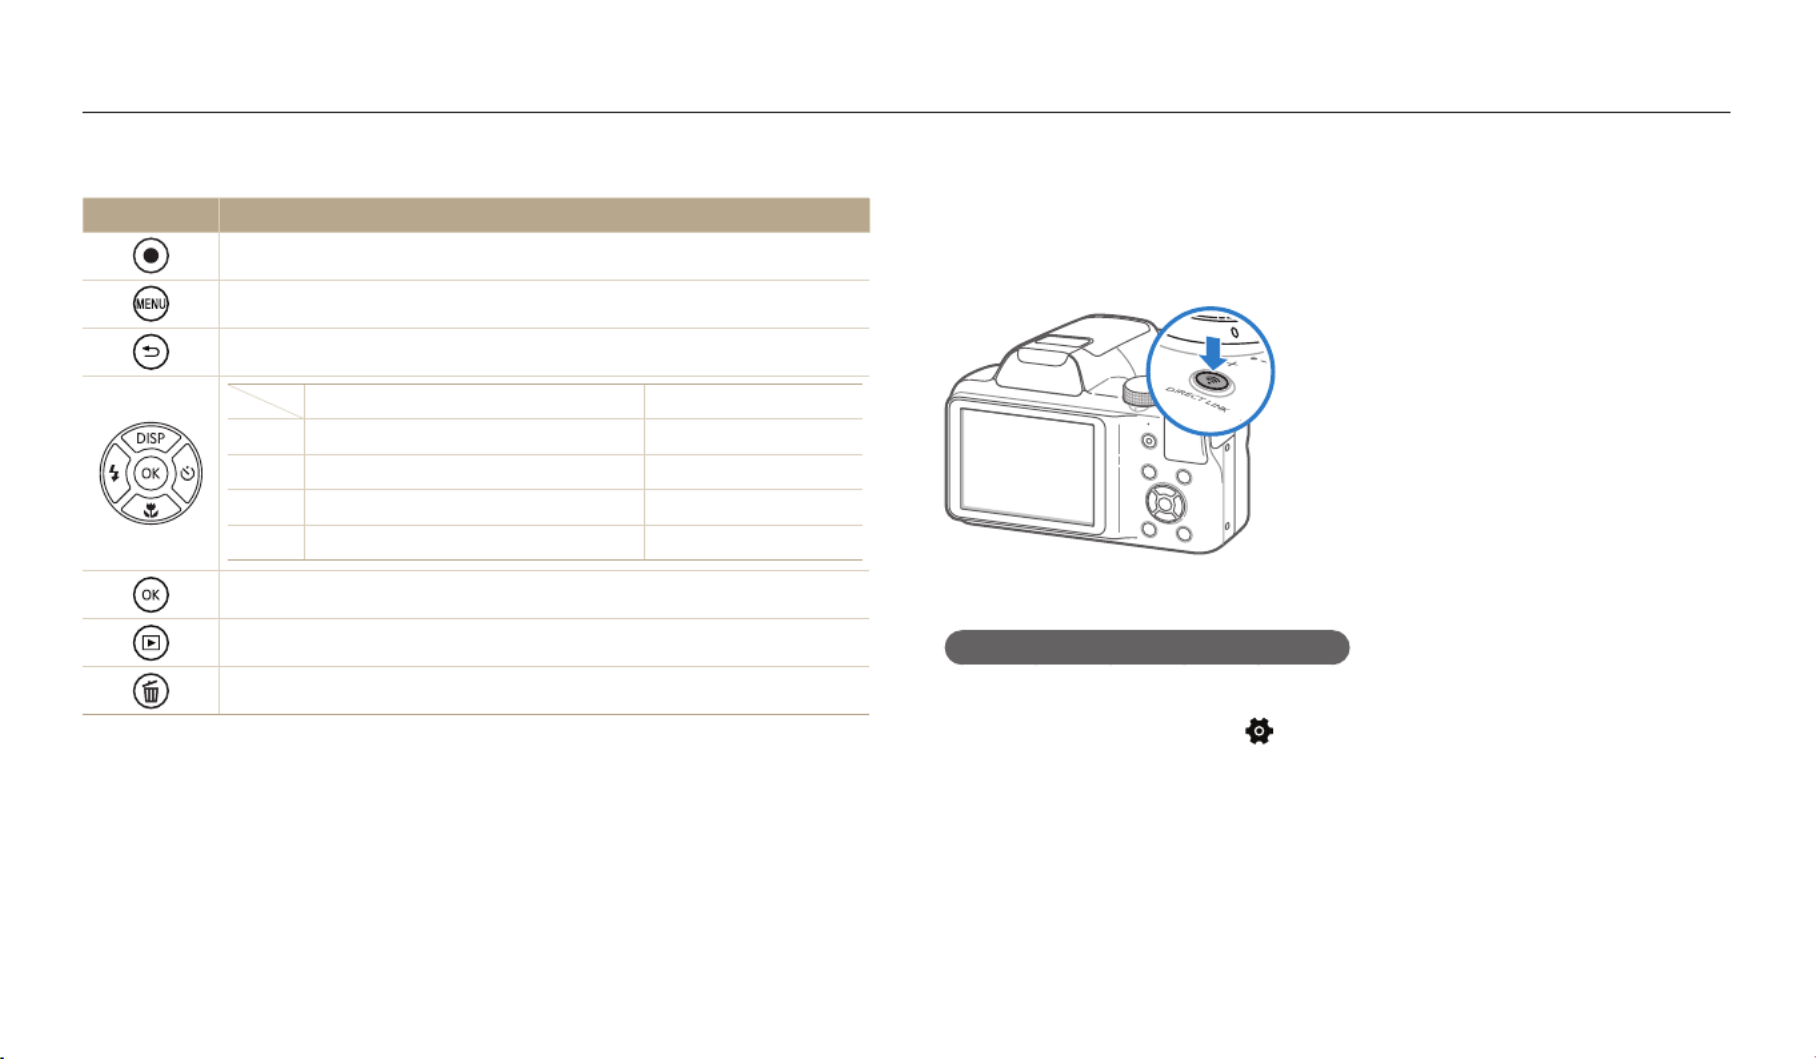
Buttons
Button Description
Start recording a video.
Access options or menus.
Go back.
Basic functions Other functions
D
Change the display option. Move up
c
Change the macro option. Move down
F
Change the ash option. Move left
t
Change the timer option. Move right
Conrm the highlighted option or menu.
Enter Playback mode.
Delete les in Playback mode.

Camera layout
Basic functions
24
Attaching a strap
Attach a strap to carry your camera conveniently.
Attaching a lens cap
Attach a lens cap with a lens cap strap to protect the camera lens.

Basic functions
25
Inserting the battery and memory card
Learn how to insert the battery and an optional memory card into the camera.
Removing the battery and memory card
Rechargeable battery
Battery lock
Slide the lock down to release
the battery.
Memory card
Push the card gently until it disengages
from the camera, and then pull it out of
the slot.
Using the memory card adapter
To use micro memory cards with this product, a PC,
or a memory card reader, insert the card into an adapter.
You can use the internal memory for temporary storage if a memory card is not
inserted.
Memory card
Insert a memory card with the gold-
colored contacts facing up.
Rechargeable battery
Insert the battery with the Samsung logo
facing up.

Basic functions
26
Charging the battery and turning on your camera
Turning on your camera
Press [
X
] to turn your camera on or o.
•
The initial setup screen appears when you turn on the camera for the rst time.
(p. 27)
Turning on your camera in Playback mode
Press [
P
]. The camera turns on and immediately accesses Playback mode.
If you turn on your camera by pressing and holding [
P
], the camera does not
emit any sounds.
Charging the battery
Before you use the camera for the rst time, you must charge the battery. Plug the
small end of the USB cable into your camera, and then plug the other end of the
USB cable into the AC adapter.
Status lamp
•
Red light on: Charging
•
Red light o: Fully charged
Use only the AC adapter and USB cable supplied with your camera. If you use
another AC adapter (such as AD5055), the camera battery may not charge or work
properly.

Basic functions
27
1 Press [
c
] to select Time Zone, and then press [
t
] or [
o
].
2 Press [
F
/
t
] to select a time zone, and then press [
o
].
Cancel Set
Home
London
3 Press [
c
] to select Date/Time Set, and then press [
t
] or [
o
].
Cancel Set
Date/Time Set
Year Month Hour Min DSTDay
4 Press [
F
/
t
] to select an item.
5 Press [
D
/
c
] to set the date, time, and daylight-saving time, and
then press [
o
].
Performing the initial setup
When the initial setup screen appears, follow the steps below to congure the camera’s basic settings. The default language is preset for the country or region where the camera
is sold. You can change the language as desired by selecting Language.

Performing the initial setup
Basic functions
28
6 Press [
c
] to select Date Type, and then press [
t
] or [
o
].
7 Press [
D
/
c
] to select a date type, and then press [
o
].
Date Type
Back Set
YYYY/MM/DD
MM/DD/YYYY
DD/MM/YYYY
8 Press [
c
] to select Time Type, and then press [
t
] or [
o
].
9 Press [
D
/
c
] to select a time type, and then press [
o
].
10
Press [
r
] to nish the initial setup.
The screen may dier depending on the language you selected.

Basic functions
29
Learning icons
The camera displays icons for the mode and options you set. The icons ash yellow for a while if you change options.
1
Icon Description
Current date
Current time
Auto focus frame
Camera shake
Zoom indicator
Photo resolution when the Intelli
zoom is on
Zoom ratio
Histogram
1
Shooting information
Icon Description
Aperture value
Shutter speed
Available recording time
Exposure value
Available number of photos
Memory card inserted
•
: Fully charged
•
: Partially charged
•
: Empty (Recharge)

Learning icons
Basic functions
30
2
Shooting options (left)
Icon Description
Shooting mode
White Balance
Image Adjust
(Sharpness, Contrast Saturation, and )
Focus Area
Focus
Face Detection
Burst option
AutoShare On
3
Shooting options (right)
Icon Description
ISO sensitivity
Video resolution
Flash
Frame Rate (per second)
Photo resolution
Zoom Mute
Intelli zoom on
Optical Image Stabilization (OIS)
Metering
Timer
2
3

Basic functions
31
Selecting a Mode Screen
In Shooting or Playback mode, rotate the mode dial to display a Mode Screen.
You can select an icon on the Mode screen in Magic Plus mode.
1
2
▲ For example: When you select in Magic Plus mode.Photo Filter
No. Description
1
Current Mode screen
•
Rotate the mode dial to go to another mode screen.
2
Mode icons
•
Press [
D
/
c
/
F
/
t
] to scroll to a desired mode, and then press [
o
]
to access the mode.
Using the Mode screen
Use the mode dial to select a shooting mode or function. Rotate the mode dial to a desired mode. You can also select an icon on the Mode screen in some modes.

Using the Mode screen
Basic functions
32
Mode Icon Description
Movie: Customize settings to record a video. (p. 52)
MobileLink: Send photos or videos to a smart phone. (p. 99)
Remote Viewnder: Use a smart phone as a remote shutter
release and see a preview of an image from your camera on
your smart phone. (p. 100)
Email: Send photos or videos stored on the camera via email.
(p. 102)
SNS & Cloud: Upload photos or videos to le sharing services.
(p. 105)
Samsung Link: View les on devices that support Sansung
Link. (p. 107)
Icons on the Mode screen
Mode Icon Description
Smart Auto: Capture a photo with a scene mode selected
automatically by the camera. (p. 44)
Program: Capture a photo with settings you have adjusted
manually. (p. 46)
Smart: Capture a photo with options preset for a specic
scene. (p. 47)
Panorama: Capture and combine a series of photos to create a
panoramic image. (p. 48)
Photo Filter: Capture a photo with various lter eects. (p. 50)
Movie Filter: Record a video with various lter eects. (p. 51)
Photo Editor: Edit photos with various eects. (p. 83)
Settings: Adjust settings to match your preferences. (p. 110)
Basic functions
33
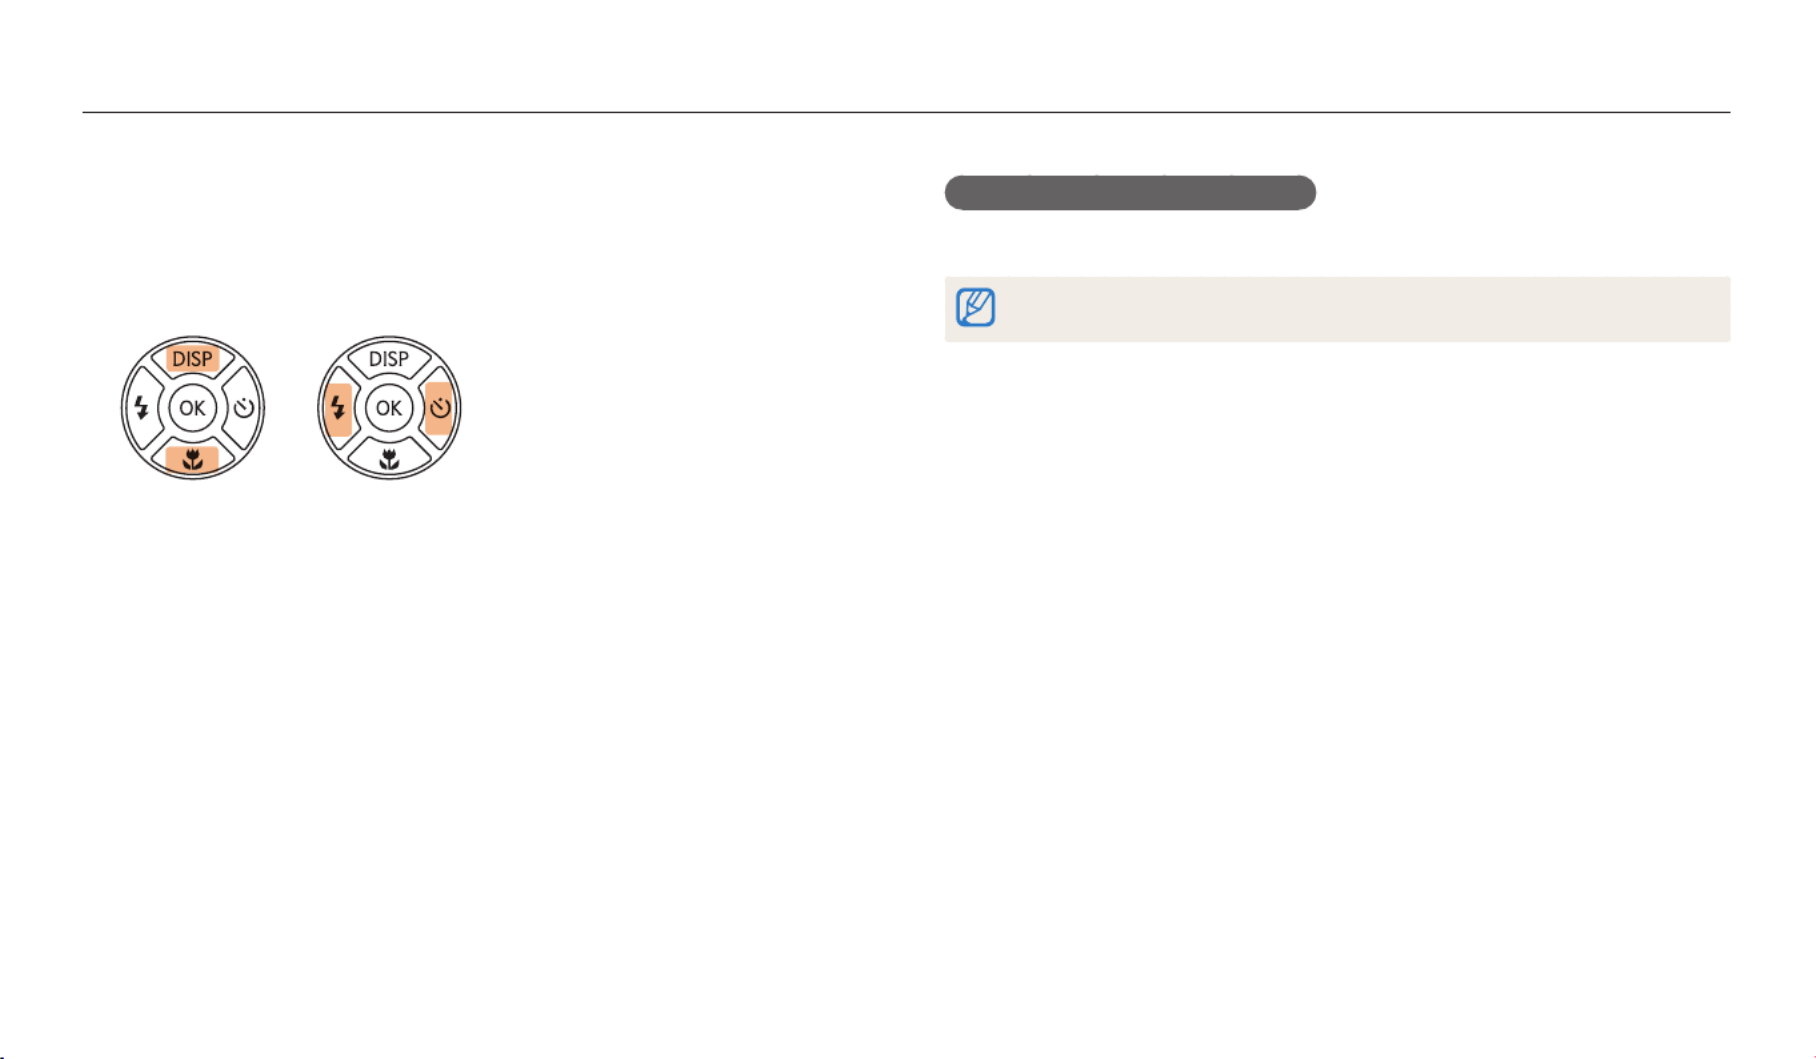
Selecting options or menus
To select an option or a menu, press [
m
], and then press [
D
/
c
/
F
/
t
] or [
o
].
Going back to the previous menu
Press [
r
] to go back to the previous menu.
Half-press [ ] to return to Shooting mode.Shutter
1 In Shooting or Playback mode, press [
m
].
2 Select an option or a menu.
•
To move up or down, press [
D
] or [
c
].
•
To move left or right, press [
F
] or [
t
].
3 Press [
o
] to conrm the highlighted option or menu.
Selecting options or menus
Basic functions
34
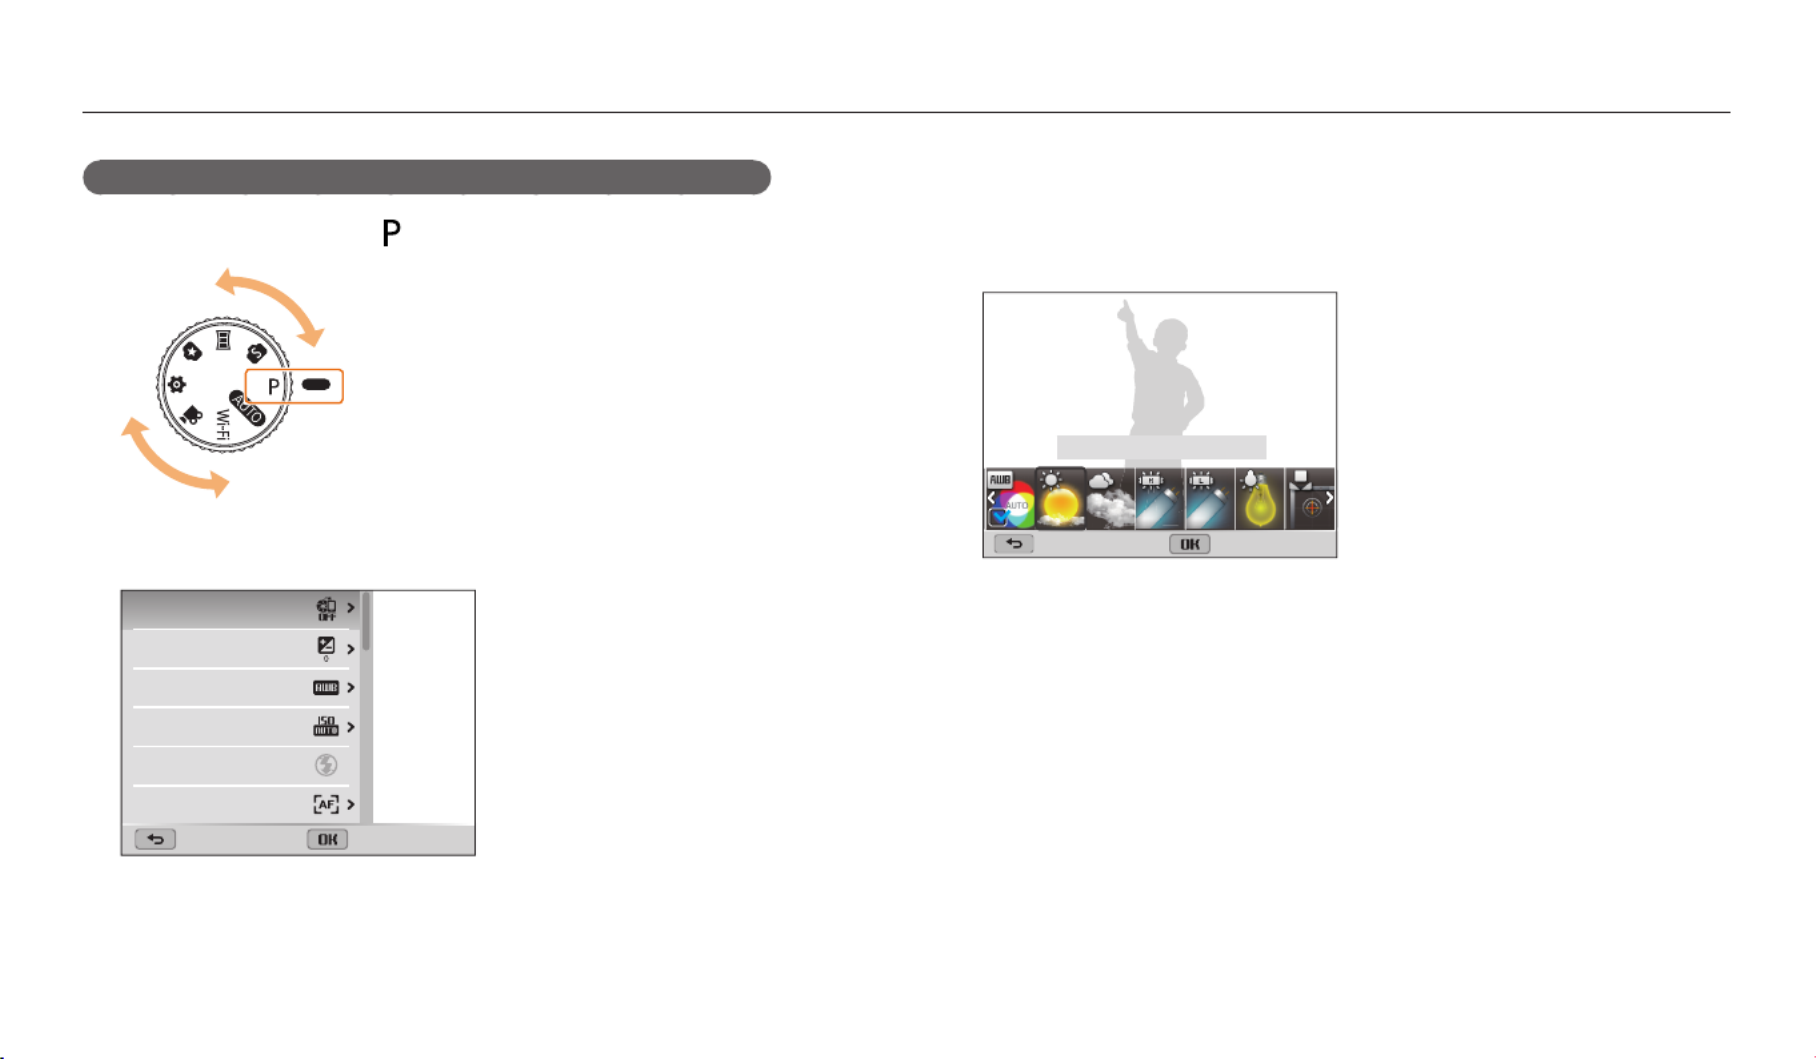
For example, to select a White Balance option in Program mode:
1 Rotate the mode dial to .
2 Press [
m
].
Exit Select
AutoShare
EV
White Balance
ISO
Flash
Focus
3 Press [
D
/
c
] to select , and then press [White Balance
t
] or
[
o
].
4 Press [
F
/
t
] to select a White Balance option.
Back Set
White Balance : Daylight
5 Press [
o
] to save your settings.
Produkt Specifikationer
| Mærke: | Samsung |
| Kategori: | Kamera |
| Model: | WB1101F |
Har du brug for hjælp?
Hvis du har brug for hjælp til Samsung WB1101F stil et spørgsmål nedenfor, og andre brugere vil svare dig
Kamera Samsung Manualer

1 Oktober 2024
23 September 2024
1 September 2024
1 September 2024
31 August 2024
31 August 2024
31 August 2024
31 August 2024
29 August 2024
29 August 2024
Kamera Manualer
- Kamera Bosch
- Kamera SilverCrest
- Kamera Acer
- Kamera Ozito
- Kamera Denver
- Kamera Sony
- Kamera Canon
- Kamera GE
- Kamera Panasonic
- Kamera TP-Link
- Kamera Philips
- Kamera Lenco
- Kamera Gigaset
- Kamera Braun
- Kamera Logitech
- Kamera Epson
- Kamera Daewoo
- Kamera Technaxx
- Kamera HP
- Kamera Sanyo
- Kamera Easypix
- Kamera Grundig
- Kamera D-Link
- Kamera Arlo
- Kamera Bushnell
- Kamera Pyle
- Kamera Fujifilm
- Kamera Nikon
- Kamera Kodak
- Kamera Lenovo
- Kamera Olympus
- Kamera Nedis
- Kamera Zorki
- Kamera Optoma
- Kamera Creative
- Kamera Azden
- Kamera Casio
- Kamera Trevi
- Kamera Trust
- Kamera Laserliner
- Kamera Blaupunkt
- Kamera JVC
- Kamera Leica
- Kamera Hitachi
- Kamera Medion
- Kamera Exakta
- Kamera EZVIZ
- Kamera König
- Kamera Gembird
- Kamera Powerfix
- Kamera Alpine
- Kamera Netgear
- Kamera Maginon
- Kamera Avaya
- Kamera Nest
- Kamera Vtech
- Kamera BenQ
- Kamera Bresser
- Kamera Anker
- Kamera Sigma
- Kamera Pentax
- Kamera Rollei
- Kamera Xiaomi
- Kamera Moultrie
- Kamera Viewsonic
- Kamera Imou
- Kamera Polaroid
- Kamera Ricoh
- Kamera Aida
- Kamera Konica-Minolta
- Kamera Foscam
- Kamera Kyocera
- Kamera GoPro
- Kamera Lorex
- Kamera Cobra
- Kamera Velleman
- Kamera FLIR
- Kamera Swann
- Kamera Eufy
- Kamera Celestron
- Kamera Ring
- Kamera Fluke
- Kamera Hikvision
- Kamera AVerMedia
- Kamera Reolink
- Kamera EVE
- Kamera Prixton
- Kamera Marshall Electronics
- Kamera General Electric
- Kamera SPC
- Kamera Hanwha
- Kamera ARRI
- Kamera BirdDog
- Kamera Bauhn
- Kamera MuxLab
- Kamera Spypoint
- Kamera Vivitar
- Kamera Ansco
- Kamera Vimar
- Kamera Oregon Scientific
- Kamera Dahua Technology
- Kamera SereneLife
- Kamera Lexibook
- Kamera Intel
- Kamera SJCAM
- Kamera Scosche
- Kamera Speco Technologies
- Kamera Joy-It
- Kamera Kogan
- Kamera Levenhuk
- Kamera Emerson
- Kamera Minox
- Kamera Burris
- Kamera Silvergear
- Kamera Elmo
- Kamera AViPAS
- Kamera UniView
- Kamera AquaTech
- Kamera Alfatron
- Kamera BZBGear
- Kamera PTZ Optics
- Kamera Daitsu
- Kamera Agfa
- Kamera AgfaPhoto
- Kamera Argus
- Kamera Lumens
- Kamera Yashica
- Kamera Sygonix
- Kamera Mamiya
- Kamera Zenit
- Kamera Fuji
- Kamera Minolta
- Kamera EverFocus
- Kamera RunCam
- Kamera SeaLife
- Kamera Aplic
- Kamera FIMI
- Kamera Meade
- Kamera Contax
- Kamera Sinji
- Kamera Traveler
- Kamera Digital Watchdog
- Kamera Getac
- Kamera Ikegami
- Kamera Pelco
- Kamera ZeissIkon
- Kamera Dorr
- Kamera HOLGA
- Kamera Praktica
- Kamera Hasselblad
- Kamera Moto Mods (Motorola)
- Kamera Fantasea Line
- Kamera Brinno
- Kamera Z CAM
- Kamera General
- Kamera Ergoguys
- Kamera Strex
- Kamera Berger & Schröter
- Kamera Leitz Focomat IIc
- Kamera Cosina
- Kamera Videology
- Kamera InfiRay
- Kamera Videotec
- Kamera GoXtreme
- Kamera IOptron
- Kamera Cambo
- Kamera Kobian
- Kamera Kyocera Yashica
- Kamera Red Digital Cinema
- Kamera Konica
- Kamera Akaso
- Kamera Seek Thermal
- Kamera Ikelite
- Kamera Adeunis
- Kamera Hoppstar
- Kamera PatrolEyes
- Kamera Camouflage
- Kamera HuddleCamHD
- Kamera Linhof
- Kamera Aquapix
- Kamera KanDao
Nyeste Kamera Manualer

29 Marts 2025
29 Marts 2025
27 Marts 2025
12 Marts 2025
12 Marts 2025

14 Januar 2025

13 Januar 2025
12 Januar 2025
11 Januar 2025
11 Januar 2025