Sanyo Xacti VPC-GH3EX Manual
Sanyo
Videokamera
Xacti VPC-GH3EX
Læs nedenfor 📖 manual på dansk for Sanyo Xacti VPC-GH3EX (77 sider) i kategorien Videokamera. Denne guide var nyttig for 17 personer og blev bedømt med 4.5 stjerner i gennemsnit af 2 brugere
Side 1/77
VPC-GH3EX
VPC-GH3GX
VPC-GH3PX
VPC-GH3TA
VPC-GH4
GUIDE FOR
BASIC OPERATION
Dual Camera
Please read these instructions carefully before using the camera.
Make sure to read and understand the separate booklet “SAFETY MANUAL”.
Keep this manual in a safe place for later reference.
Important note
This manual explains how to safely operate the VPC-GH3EX, VPC-GH3GX,
VPC-GH3PX, VPC-GH3TA and VPC-GH4.
Any information regarding only one of these products will be labeled as such.

i English
HOW TO READ THIS MANUAL
For first-time users
Please read this manual to familiarize yourself with your camera’s
operation.
↓
To use the various camera features
The Instruction Manual that explains the features in detail can be
obtained from our website (page 43).
↓
To use additional features
Visit the Sanyo website to learn how to adjust the camera settings for
various shooting scenes. There you’ll also find information about the
software (page 43).
You may find the answers to questions or problems concerning camera
operation in the sections “COMMONLY ASKED QUESTIONS” (page 50).
Symbols used in this manual
HINT Points giving some extended instructions or special points to pay
attention to.
CAUTION Points that require special attention.
(page xx) Refer to the page indicated for detailed information.
English ii
SHOOT, PLAY BACK AND SAVE
Preparing the camera
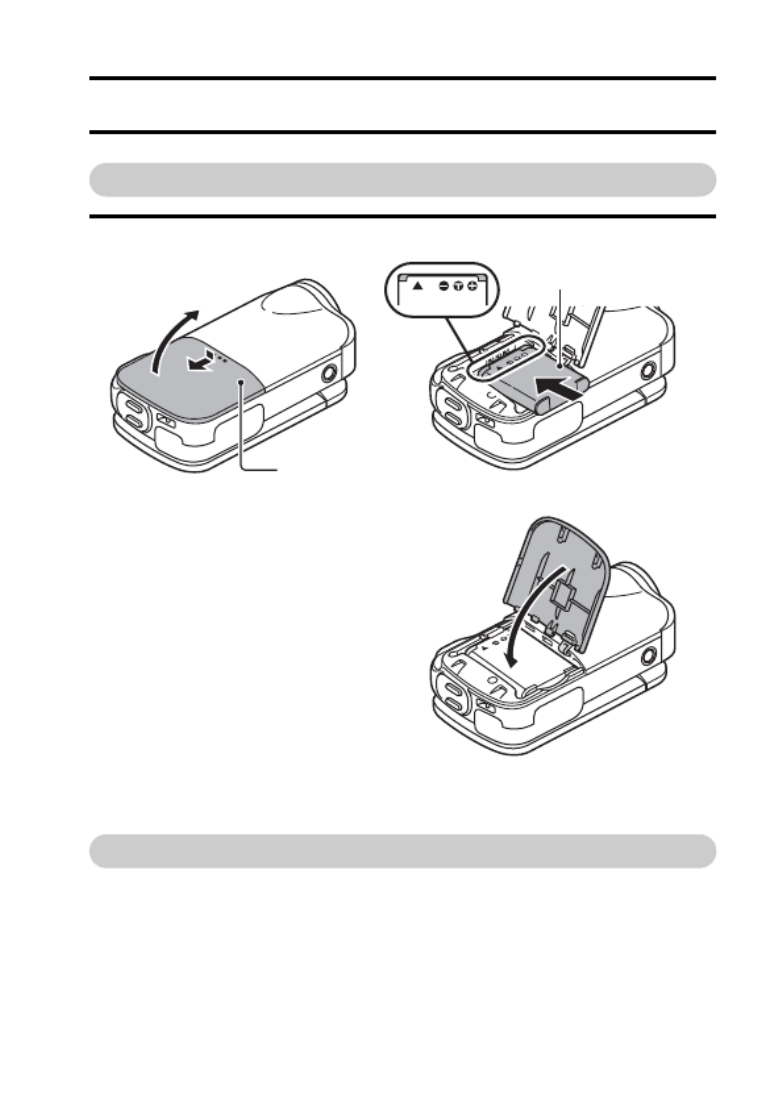
1 Insert the battery pack.
About saving your recorded data
h If you wish to use an SD Memory Card, refer to page 13 to install the
card in the camera.
h An SD Memory Card is not included with your camera. Please
purchase a commercially sold card.
h This camera has an internal memory, so you can shoot and record
without an SD Memory Card installed.
▲
▲
2 Open
3 Insert the battery pack.
4 Close the battery cover.
Battery cover
1 Push out

iii English
Shooting
1 Press the ON/OFF button
for at least 1 second to turn
the camera on.
h If the screen to set the
date and time appears,
press the MENU button 2
times to cancel it.
For how to set the date
and time, see page 21.
2 Record.
To record a video clip:
hPress the [ ] button to
begin recording a video
clip.
hPress the [ ] button
again to end the
recording.
To take a photo:
hPress the [ ] button.
h A still image is captured.
15 000:00:17
Full-HD
10
M
-
S
ON/OFF button
[ ] button
[ ]
button
MENU button

English iv
Before capturing those important shots, be sure to first take a
test shot to confirm that your camera is set up and ready to go
i
Sanyo declines any claim for compensation for recorded contents etc. in case
of photographing or recording failure due to a chance camera or card flaw.
Playback
1
Press the REC/PLAY
button.
h
The display changes to
the Playback Screen.
2
Select the image to play
back.
h Use the arrow keys to
move the orange frame
to the image you wish to
play back.
h The image information
for the framed image is
shown in the bottom part
of the monitor.
3
Press the SET button.
h Playback begins.
<To return to the
recording mode>
h Press the REC/PLAY
button.
Deleting files
1 On the screen in step 2,
move the orange frame to
the file you wish to delete,
and press the MENU
button.
2
Select “DELETE”,
and
press the SET button.
Full-HD
100-0006
00:00:05
6.5MB
OK
REC/PLAY button
Remaining battery
power indication
Orange frame
SET button
Arrow keys

v English
3 Select “DELETE SINGLE”, and press the SET button.
4
Select “DELETE”,
and press the SET button.
h If you press [G] or [H], the screen to delete a different file will appear.
5 When you are finished deleting files, press the MENU button.
h Pressing the MENU button 3 times will return you to the screen in step
2.
When you are finished using the camera...
Press the ON/OFF button for at least 1 second to turn the camera off.

English vi
Copy data from your camera to the computer
Connect your camera to a computer, and copy the desired data to the
computer.
1 Turn on the computer, and use the supplied dedicated USB interface
cable to connect your camera to the computer.
h Connect the cable between the camera’s USB/AV terminal and the
computer’s USB connector.
2 Turn on the camera (page 18).
h The USB Connection Screen appears on the camera’s monitor.
SET
USB CONNECTION
COMPUTER
PRINTER
CANCEL
CANCEL OK
To USB/AV terminal
Supplied dedicated USB interface cable
To USB connector

vii English
3 Select “COMPUTER”, and press the SET button.
h The screen to select the
computer connection mode
appears.
4 Select “CARD READER”, and press the SET button.
h The message [Found New Hardware] appears in the task tray,
showing that the camera is recognized as a drive.
<If the access menu (page 48) appears>
h Click on [Exit] to cancel the access menu.
5 Select an action.
6 Copy files from the camera to a computer.
h The drive name of the card installed in the camera is [Xacti], and that
of the camera’s internal memory is [Xacti_INT].
CAUTION
For VPC-GH3EX
i It is not possible to copy files from the computer side (a hard disk, etc.) to
the camera’s internal memory or installed card.
USB CONNECTION
MTP
CARD READER
SCREEN CAPTURE
PC CAMERA
CANCEL
OK

English viii
Dismounting the camera
CAUTION
i To disconnect your camera, be sure to follow the procedure below. Failure
to follow this procedure may cause faulty operation of your computer or
corrupt the files in your camera.
1 Left-click on the icon for safely removing hardware in the task tray.
h A list appears showing the devices connected to the computer’s USB
connector.
2 Left-click on the camera drive.
h The camera can now be disconnected.
Uploading camera files to a file-sharing website
i Your camera’s internal memory contains the Xacti Simple Uploader
application with which you can upload camera files to a file-sharing
website.
i For information on how to use Xacti Simple Uploader, please refer to the
Xacti Simple Uploader user’s manual, which can be obtained from the
SANYO website.
<How to install Xacti Simple Uploader>
1 Connect your camera to a computer.
2 Turn on the computer and the camera.
3 Select “COMPUTER”, and press the SET button.
4 On the USB Connection Screen, select “CARD READER”, and press the
SET button.
h The window for automatic playback of XACTI_INT (internal memory)
and XACTI (card) opens, and the Access Menu appears.
h If the Access Menu does not appear, double-click “Autorun.Exe” in
XACTI_INT.
5 In the Access Menu, click on [Install Xacti Simple Uploader].
h The Xacti Simple Uploader installation begins.
h Follow the instructions of the installation wizard to complete the
installation.
<How to obtain the manual>
i On the Xacti Simple Uploader screen, click the [?] icon.
Produkt Specifikationer
| Mærke: | Sanyo |
| Kategori: | Videokamera |
| Model: | Xacti VPC-GH3EX |
Har du brug for hjælp?
Hvis du har brug for hjælp til Sanyo Xacti VPC-GH3EX stil et spørgsmål nedenfor, og andre brugere vil svare dig
Videokamera Sanyo Manualer

16 August 2024
16 August 2024
14 August 2024
11 August 2024
10 August 2024
8 August 2024
3 August 2024
3 August 2024
2 August 2024
2 August 2024
Videokamera Manualer
- Videokamera Nilox
- Videokamera SilverCrest
- Videokamera Denver
- Videokamera Sencor
- Videokamera Sony
- Videokamera Canon
- Videokamera Samsung
- Videokamera Panasonic
- Videokamera Extech
- Videokamera Philips
- Videokamera Lenco
- Videokamera OK
- Videokamera Braun
- Videokamera Sharp
- Videokamera Logitech
- Videokamera Kenwood
- Videokamera HP
- Videokamera Garmin
- Videokamera Thinkware
- Videokamera Easypix
- Videokamera Nikkei
- Videokamera Bushnell
- Videokamera Toshiba
- Videokamera Pyle
- Videokamera Fujifilm
- Videokamera Nikon
- Videokamera Kodak
- Videokamera Tracer
- Videokamera Olympus
- Videokamera Nedis
- Videokamera Zorki
- Videokamera Hama
- Videokamera Creative
- Videokamera Hyundai
- Videokamera Milwaukee
- Videokamera DataVideo
- Videokamera Trevi
- Videokamera Trust
- Videokamera Laserliner
- Videokamera Mio
- Videokamera Trotec
- Videokamera JVC
- Videokamera Leica
- Videokamera Uniden
- Videokamera Hitachi
- Videokamera T'nB
- Videokamera Medion
- Videokamera Linksys
- Videokamera Cisco
- Videokamera EZVIZ
- Videokamera König
- Videokamera Gembird
- Videokamera EnVivo
- Videokamera Maginon
- Videokamera Vtech
- Videokamera BenQ
- Videokamera Contour
- Videokamera Bresser
- Videokamera National Geographic
- Videokamera Voigtländer
- Videokamera Rollei
- Videokamera Xiaomi
- Videokamera Moultrie
- Videokamera Aiptek
- Videokamera Viewsonic
- Videokamera DJI
- Videokamera Voltcraft
- Videokamera Polaroid
- Videokamera Ricoh
- Videokamera TomTom
- Videokamera Soundmaster
- Videokamera Aida
- Videokamera Konica-Minolta
- Videokamera Kyocera
- Videokamera GoPro
- Videokamera Ikan
- Videokamera Cobra
- Videokamera Xblitz
- Videokamera Velleman
- Videokamera Marshall
- Videokamera FLIR
- Videokamera Energy Sistem
- Videokamera Swann
- Videokamera Zoom
- Videokamera Salora
- Videokamera Lamax
- Videokamera Overmax
- Videokamera SBS
- Videokamera Veho
- Videokamera Midland
- Videokamera Samson
- Videokamera ION
- Videokamera RCA
- Videokamera Prixton
- Videokamera Renkforce
- Videokamera Navitel
- Videokamera Hazet
- Videokamera Transcend
- Videokamera GoClever
- Videokamera Intenso
- Videokamera ARRI
- Videokamera Evolveo
- Videokamera Genius
- Videokamera Zagg
- Videokamera Airis
- Videokamera Steinberg
- Videokamera Spypoint
- Videokamera Vivitar
- Videokamera Contour Design
- Videokamera Dragon Touch
- Videokamera Vimar
- Videokamera Klein Tools
- Videokamera Oregon Scientific
- Videokamera Magellan
- Videokamera Lexibook
- Videokamera SJCAM
- Videokamera Speco Technologies
- Videokamera Prestigio
- Videokamera Blackmagic Design
- Videokamera Kogan
- Videokamera Drift
- Videokamera Insignia
- Videokamera Minox
- Videokamera Elmo
- Videokamera Agfa
- Videokamera AgfaPhoto
- Videokamera Quintezz
- Videokamera AEE
- Videokamera ATN
- Videokamera Activeon
- Videokamera Coby
- Videokamera TacTic
- Videokamera Macally
- Videokamera Naxa
- Videokamera Mamiya
- Videokamera Tronje
- Videokamera Mpman
- Videokamera Ematic
- Videokamera Minolta
- Videokamera Iget
- Videokamera RunCam
- Videokamera SeaLife
- Videokamera Sakar
- Videokamera Jobo
- Videokamera Mediacom
- Videokamera Kreator
- Videokamera Contax
- Videokamera EE
- Videokamera Traveler
- Videokamera Kaiser Baas
- Videokamera Bluetech
- Videokamera Braun Phototechnik
- Videokamera IOPLEE
- Videokamera Vupoint Solutions
- Videokamera Kitvision
- Videokamera Praktica
- Videokamera MMTC
- Videokamera Flip
- Videokamera Jay-tech
- Videokamera Brinno
- Videokamera BlackVue
- Videokamera Storex
- Videokamera Insta360
- Videokamera DXG
- Videokamera MD 80
- Videokamera Berger & Schröter
- Videokamera Whistler
- Videokamera Curve
- Videokamera PCE Instruments
- Videokamera DOD
- Videokamera CamOne
- Videokamera Mobius
- Videokamera ISAW
- Videokamera Beaulieu
- Videokamera Revier Manager
- Videokamera Kobian
- Videokamera FHD 1080P
- Videokamera RSC
- Videokamera Stealth Cam
- Videokamera Aqua-Vu
- Videokamera Hamlet
- Videokamera Qoltec
- Videokamera Leotec
- Videokamera Replay
- Videokamera Akaso
- Videokamera Hamilton Buhl
- Videokamera FeiyuTech
- Videokamera Best Buy
- Videokamera Rexing
- Videokamera Bolex
- Videokamera Microtek
- Videokamera Teslong
- Videokamera Izzo
- Videokamera Aquapix
- Videokamera Tactacam
Nyeste Videokamera Manualer

3 April 2025

14 Marts 2025
14 Marts 2025
14 Marts 2025
13 Marts 2025
12 Marts 2025
12 Marts 2025
12 Marts 2025
27 Februar 2025
25 Februar 2025