Sharp Aquos LC-70LE650U Manual
Læs nedenfor 📖 manual på dansk for Sharp Aquos LC-70LE650U (66 sider) i kategorien TV. Denne guide var nyttig for 8 personer og blev bedømt med 4.5 stjerner i gennemsnit af 2 brugere
Side 1/66

LIQUID CRYSTAL TELEVISION
TÉLÉVISEUR ACL
TELEVISOR CON PANTALLA DE
CRISTAL LÍQUIDO
OPERATION MANUAL
MODE D’EMPLOI
MANUAL DE OPERACIÓN
IMPORTANT : Please read this operation manual before
starting operating the equipment.
IMPORTANT : Veuillez lire ce mode d’emploi avant de
commencer à utiliser l’appareil.
IMPORTANTE : Lea este manual de operación antes de
comenzar a operar el equipo.
OPERATION MANUAL MODE D'EMPLOI MANUAL DE OPERACIÓN
(for the LE857U, LE757U,
LE755U, LE657U and LE655U models)
ENGLISHFRANÇAISESPAÑOL
LC-80LE857U
LC-70LE857U
LC-60LE857U
LC-80LE757U
LC-70LE757U
LC-60LE757U
LC-70LE755U
LC-60LE755U
LC-90LE657U
LC-80LE657U
LC-70LE657U
LC-60LE657U
LC-70LE655U
LC-60LE655U
LC-80LE650U
LC-70LE650U
LC-60LE650U
LC-70C7500U
LC-60C7500U
LC-80C6500U
LC-70C6500U
LC-60C6500U
(Except for LC-90LE657U)
2013/02/2618:14:46
2013/02/2618:14:46
2013/02/2618:14:46
2013/02/2618:14:462013/02/2618:14:46

10
Antennas
To enjoy a clearer picture, use an outdoor antenna. The following is a brief explanation of the types of
connections that are used for a coaxial cable. If your outdoor antenna uses a 75-ohm coaxial cable with an
F-type connector, plug it into the antenna terminal at the rear of the TV set. For connecting the antenna cable to
the TV, use commercially available cables.
300-ohm twin-lead cable
75-ohm coaxial cable (round)
75-ohm coaxial cable
IN OUT
300-ohm
twin-lead cable
VHF
ANTENNA
UHF
ANTENNA
Combiner To TV antenna
terminal
300/75-ohm
adapter
300-ohm twin-lead
cable (flat)
75-ohm coaxial cable (round)
Cable TV lead-In
Coaxial cable
Coaxial cable
Home Antenna
terminal (75-ohm)
Home Antenna
terminal (75-ohm)
or
or
Connecting Antenna Cable
•Connect the antenna cable to the TV using one of the methods in the illustration as shown ( 1,2,3
or 4).
1Cable without a
CATV converter
3Combination VHF/
UHF antenna
4Separate VHF/UHF
antenna
2VHF/UHF antenna
1. A 75-ohm system is generally a round cable with F-type connector
that can easily be attached to a terminal without tools.
2. A 300-ohm system is a fl at "twin-lead" cable that can be attached
to a 75-ohm terminal through a 300/75-ohm adapter.
NOTICE
F-type connector should be fi nger-tightened only.
When connecting the RF cable to the TV set, do not tighten
F-type connector with tools.
If tools are used, it may cause damage to your TV set. (The
breaking of internal circuit, etc.)
F-type connector
300-ohm twin-lead cable (fl at)
F-type connector
75-ohm coaxial cable (round)
75-ohm coaxial cable
Preparation
Installing Batteries in the Remote
Control Unit
If the remote control fails to operate TV functions,
replace the batteries in the remote control unit.
1 Open the battery cover.
2 Insert two "AAA" size batteries (supplied with the
product).
• Place the batteries with their terminals
corresponding to the (
e) and (f) indications in
the battery compartment.
3 Close the battery cover.
CAUTION
Improper use of batteries can result in chemical leakage
or explosion. Be sure to follow the instructions below.
• Do not mix batteries of different types. Different types
of batteries have different characteristics.
• Do not mix old and new batteries. Mixing old and new
batteries can shorten the life of new batteries or cause
chemical leakage in old batteries.
• Remove batteries as soon as they are worn out.
Chemicals that leak from batteries that come in contact
with skin can cause a rash. If you fi nd any chemical
leakage, wipe thoroughly with a cloth.
• The batteries supplied with this product may have a
shorter life expectancy due to storage conditions.
• If you will not be using the remote control unit for an
extended period of time, remove batteries from it.
Using the Remote Control Unit
Use the remote control unit by pointing it towards the
remote control sensor on the TV. Objects between
the remote control unit and the remote control
sensor may prevent proper operation.
30°
30°
30° *
30°
17´ (5 m)
Remote control sensor
* The angle is 6º when the
stand is attached.
■Cautions regarding the remote control unit
• Do not expose the remote control unit to shock. In
addition, do not expose the remote control unit to
liquids, and do not place it in an area with high humidity.
• Do not install or place the remote control unit under
direct sunlight. The heat may cause deformation of the
remote control unit.
• The remote control unit may not work properly if
the remote control sensor on the TV is under direct
sunlight or strong lighting. In such cases, change the
angle of the lighting or the TV, or operate the remote
control unit closer to the remote control sensor.
IMPORTANT:
IF THE UNIT DOES NOT POWER ON - UNPLUG
THE TELEVISION FROM THE OUTLET AND REPEAT
THE INSTALLATION STEPS.
IF YOU STILL ENCOUNTER NO POWER, PLEASE
CONTACT US AT 1-800-BE-SHARP.
QUICK REFERENCE
LC-80LE857U
̲757U
̲657U
̲E.indd10
LC-80LE857U
̲757U
̲657U
̲E.indd10
LC-80LE857U
̲757U
̲657U
̲E.indd10
LC-80LE857U
̲757U
̲657U
̲E.indd10
LC-80LE857U
̲757U
̲657U
̲E.indd10
2013/02/2113:35:58
2013/02/2113:35:58
2013/02/2113:35:58
2013/02/2113:35:58
2013/02/2113:35:58

12
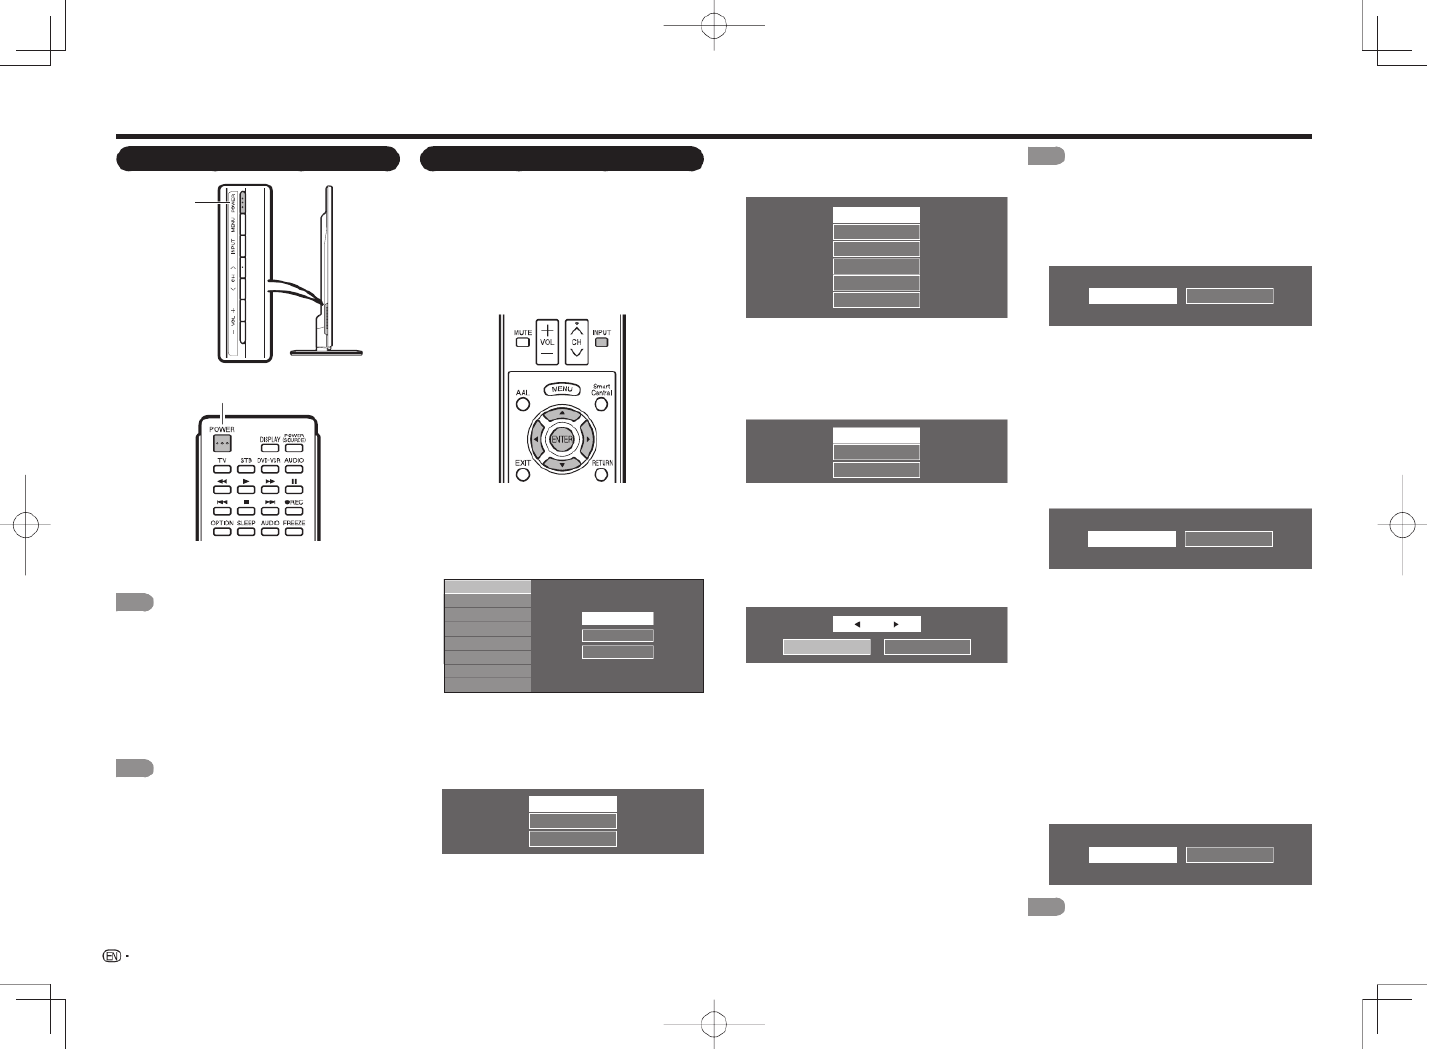
Part Names
Remote Control Unit
13
18
19
20
21
4
3
2
5
23
24
8
7
6
9
25
26
28
29
15
14
12
11
10
16
17
27
22
1
13
30
■LE857U, LE757U,
LE755U, LE657U
and LE655U models
■LE650U, C7500U
and C6500U models
1 POWER: Switch the TV power on or enter
standby. (See page 16.)
2 TV, STB, DVD•VCR, AUDIO: Switches the
remote control for TV, STB, BD, DVD, VCR
and AUDIO operation. (See pages 40 to 41 for
details.)
* To enter the code registration mode, you
need to press an appropriate button ( ,STB
DVD•VCR AUDIO DISPLAY or ) and at the
same time.
3 External equipment operational buttons:
Operate the external equipment.
4 OPTION: Display the Link Operation Menu
screen. This button will function only when
AQUOS LINK is used. (See pages 41 to 43 for
details.)
5 SLEEP: Set the sleep timer. (See page 19.)
6 0– Set the channel. (See page 18.)9:
7 • (DOT): (See pages 18 and 41.)
8 CC: Display captions from a closed-caption
source. (See page 20.)
9
AV MODE: Select an audio or video setting. (See
page 19.)
10 MUTE: Mute the sound. (See page 18.)
11 VOLk/l: Set the volume. (See page 18.)
12 MENU: Display the menu screen. (See page
22.)
13 LE857U, LE757U, LE755U, LE657U and
LE655U models
3D: Select between 3D and 2D image viewing.
(See pages 33 to 34 for details.)
LE650U, C7500U and C6500U models
AAL: Display the AQUOS ADVANTAGE LIVE
screen. (See page 47.)
14 a/b/c/d, Select a desired item on ENTER:
the screen.
15 EXIT: Turn off the menu screen.
16 FAVORITE CH: Set the favorite channels. (See
page 28.)
17 A, B, C, D: Select 4 preset favorite channels in
4 different categories. (See page 28.)
While watching, you can toggle the selected
channels by pressing , , and .A B C D
18 DISPLAY: Display the channel information.
19 POWER (SOURCE): Turns the power of the
external equipment on and off.
20 FREEZE: Set the still image. Press again to
return to normal screen. (See page 18.)
21 AUDIO: Selects the MTS/SAP or the audio
mode during multichannel audio broadcasts. (See
page 19.)
22 ENT: Jumps to a channel after selecting with the
0 9– buttons.
23 FLASHBACK: Return to the previous channel or
external input mode. (See page 18.)
24 VIEW MODE: Select the screen size. (See pages
20 and 21.)
25 INPUT: Select a TV input source. (TV, HDMI1,
HDMI2, HDMI3, HDMI4, COMPONENT, VIDEO1,
VIDEO2, PC IN, Home Network (DLNA), USB)
(See pages 13 and 18.)
26 CHU/V: Select the channel. (See page 18.)
27 SmartCentral: Display the application window.
(See page 18.)
28 RETURN: Return to the previous menu screen.
29 NETFLIX: Display the Netfl ix screen. (See page
19.)
30 FAV APP 1, 2, 3: You can assign your favorite
applications to these buttons. (See pages 47 to
49.)
NOTE
• When using the remote control unit, point it at the TV.
LC-80LE857U
̲757U
̲657U
̲E.indd12
LC-80LE857U
̲757U
̲657U
̲E.indd12
LC-80LE857U
̲757U
̲657U
̲E.indd12
LC-80LE857U
̲757U
̲657U
̲E.indd12
LC-80LE857U
̲757U
̲657U
̲E.indd12
2013/02/2113:35:59
2013/02/2113:35:59
2013/02/2113:35:59
2013/02/2113:35:59
2013/02/2113:35:59
16
Watching TV
Turning On/Off the Power
POWER
POWER (On/Standby)
Press on the TV or on the remote control POWER
unit to turn the power on.
NOTE
• The Initial Installation starts when the TV powers on for
the fi rst time. If the TV has been turned on before, the
Initial Installation will not be invoked. For changing the
settings of the Initial Installation, perform "EZ setup" on
the Initial Setup menu on page 28.
Press on the TV or on the remote control POWER
unit again to turn the power off.
• The TV enters standby and the image on the
screen disappears.
NOTE
• If you are not going to use this TV for a long period
of time, be sure to remove the AC cord from the AC
outlet.
• Weak electric power is still consumed even when the
TV is turned off.
Initial Installation
When you turn on the TV for the fi rst time, it will
automatically memorize the broadcasting channels
available in the region where you live. Perform the
following steps before you press on the POWER
remote control unit.
1. Insert the batteries into the remote control unit.
(See page 10.)
2.
Connect the antenna cable to the TV. (See page 10.)
3.
Plug in the AC cord to the AC outlet. (See page 9.)
Language (Language setting)
Select from among 3 languages: English, French and
Spanish.
1 Press
a/b to select the desired language listed
on the screen, and then press .ENTER
Language
Location & Time
TV Location
Antenna & Cable/STB
Air/Cable
English
Español
Français
CH Search
Network
Completed
Location & Time
Make settings for the country, area and time zone
where you use the TV.
2 Press
a/b to select "United States", "Canada"
or "Mexico", and then press .ENTER
Canada
United States
Mexico
3 Press a/b to select the time zone where you
are using the TV, and then press .ENTER
Example
CST
MST
PST
AKST
HAST
EST
• The time zone differs depending on the selected
country.
• The factory preset value is the time zone for the
capital of the selected country.
4 Press a/b to select the Daylight Savings Time,
and then press .ENTER
Manual
Off
Auto
• "Auto" is the default selection.
TV Location
Select "Home" or "Store" for the location where
you plan to install the TV. This product qualifi es for
ENERGY STAR*1 in Home mode default setting.
5 Press c/dto select "Home" or "Store".
Press ENTER to enter the setting.
Select
StoreHome
Home: "Power Saving" is set to "Advanced", and AV
MODE is set to "STANDARD (ENERGY STAR)*1".
Store: "Power Saving" is set to "Off" and AV MODE
is set to "DYNAMIC (Fixed)". Picture Reset and
Feature Demo can be set.
Picture Reset: AV MODE will be set to
"DYNAMIC (Fixed)" regardless of whether
Picture Reset is "On" or "Off".
• If you select "On" and there is no operation
for 30 minutes:
-
AV MODE will be reset to "DYNAMIC (Fixed)".
- When a 3D signal is detected, 3D images
will switch to 2D images. (For the LE857U,
LE757U, LE755U, LE657U and LE655U
models)
• When "Off" is selected:
- AV MODE will be set to "DYNAMIC (Fixed)".
Feature Demo:
When "On" is selected, after all
the settings are completed, the Feature Demo
screen is displayed if there is no operation for
several minutes.
NOTE
• ENERGY STAR qualifi cation is based on AV MODE
"STANDARD (ENERGY STAR)".*1
Antenna & Cable/STB
Select the type of connection you will use to watch TV.
6 Press c/d to select "Antenna & Cable" or "Set-
top box", and then press .ENTER
Set-top box
Antenna & Cable
To watch TV via an antenna or cable connection
(without using a set-top box):
Select "Antenna & Cable", and then go to step 7.
To watch TV via a set-top box:
1Select "Set-top box", and then press .ENTER
2Please make sure your set-top box is turnd on,
and then press .ENTER
3To watch TV, select the input source
corresponding to the terminal connected to the
set-top box. When doing so, you must make the
setting to skip "TV". Press c/d to select "On",
and then press .ENTER
OffOn
• When this is set to "On", the channel on the TV
cannot be changed using the remote control
unit or menu. (e.g. CH U
/V, Favorite CH,
etc.)
• See page 26 for details on the Input Skip
function.
4Press to select the input source INPUT
corresponding to the terminal connected to the
set-top box. Make the necessary settings on the
connected external equipment.
• See the operation manual of the connected
equipment for setting up the equipment.
Air/Cable (Antenna setting)
Make sure what kind of connection is made with
your TV when selecting "Air" or "Cable".
7 Press c/dto select "Air" or "Cable".
Press ENTER to enter the setting.
CableAir
NOTE
• *1: Except for LC-90LE657U
LC-80LE857U
̲757U
̲657U
̲E.indd16
LC-80LE857U
̲757U
̲657U
̲E.indd16
LC-80LE857U
̲757U
̲657U
̲E.indd16
LC-80LE857U
̲757U
̲657U
̲E.indd16
LC-80LE857U
̲757U
̲657U
̲E.indd16
2013/02/2316:34:43
2013/02/2316:34:43
2013/02/2316:34:43
2013/02/2316:34:43
2013/02/2316:34:43

17
Watching TV
CH Search (Channel search)
Channel auto search makes the TV look for all
channels viewable in the set area.
8When "Air" is selected in Antenna setting:
Press c/d to select "Start", and then press ENTER.
Cancel
Start
When "Cable" is selected in Antenna setting:
1Press a/b to select "Analog & Digital Search
Start" to search both analog and digital
broadcasts, or to select "Analog Search Start" to
search only analog broadcasts, and then press
ENTER.
Analog Search Start
Cancel
Analog & Digital Search Start
• The Channel search will start automatically.
• To exit the Channel search screen, select
"Cancel", and then press .ENTER
2The Channel search results may include
scrambled channels or channels that are not
viewable in the set area. Press c/d to select
"Yes", and then press to remove ENTER
scrambled channels.
No
Yes
Network
When you connect to the Internet on the TV, select
the desired connection method and follow the
instructions shown on the display.
• Wireless LAN connection is possible only when the
WPS (push button) method is used. If any other
method is used, make settings by Initial Setup >
Internet Setup > Network Setup. (See pages 46 to
47.)
9 Press
c/d to select "Yes", and then press
ENTER.
No
Yes
10 Press a/b to select "Wired" or "Wireless", and
then press .ENTER
Wireless
Wired
Connection using an ETHERNET cable:
1Select "Wired" and press .ENTER
2 Confi rm that the TV is properly connected
with the router, and then press "Next". Follow
the instructions on the display to perform the
connection test.
Wireless LAN connection by the WPS method:
1 Select "Wireless" and press .ENTER
2 Follow the instructions on the display, and fi nalize
the connection after testing its viability.
NOTE
• When you change the network settings, refer to Initial
Setup > Internet Setup > Network Setup. (See pages
46 to 47.)
Completed
11 The settings confi rmation screen is displayed.
Confi rm the information displayed on the screen,
and then press .ENTER
Examples of the settings confi rmation screen
When one or more channel is received after
"Antenna & Cable" was selected in step 6 and a
search was carried out.
OK
Language : English
Location & Time : United States/EST/Auto
TV Location : Home
Antenna & Cable/STB : Antenna & Cable
Air/Cable : Air
Search Result : Digital 4ch
Analog 7ch
Network Connection : Not completed
Press the INPUT button,
then the right arrow ,d
to see the list of channels found.
When no channel is received after "Antenna &
Cable" was selected in step 6 and a search was
carried out.
OK
Language : English
Location & Time : United States/EST/Auto
TV Location : Home
Antenna & Cable/STB : Antenna & Cable
Air/Cable : Cable
Search Result : No channel
Network Connection : Not completed
Channel not found.
Antenna/Cable are not properly connected
or Air/Cable setup is incorrect.
Please check your Antenna/Cable connection
and Air/Cable setup.
NOTE
• If no channel is found, confi rm the type of connection
made with your TV and try "EZ Setup" again. (See
page 28.)
• To see the list of channels found during Channel
search, press , and then press INPUT d.
When "Set-top box" was selected in step 6.
OK
Language : English
Location & Time : United States/EST/Auto
TV Location : Home
Antenna & Cable/STB : Set-top box
TV Input Skip : Yes
Network Connection : OK
• Click "OK" to display the confi rmation screen for
input source switching.
Please make sure to select INPUT to the
specific input terminal you are connecting
your set-top box to get the picture.
Closed caption, sub-channel audio
and channel selection need to be selected
with your set-top box.
If you select "Show the Input List", the connection
status of input source will be shown.
Please make sure the input position which your
set-top box is connected.
OKShow the input list
Show the input list: You can check the current
connection status of external equipment. Confi rm
which input terminal is connected to the set-top
box.
OK: Clicking "OK" will complete the EZ Setup
procedure.
OK
HDMI 1 Not Available
HDMI 2 Connected
HDMI 3 Not Available
HDMI 4 Not Available
COMPONENT
Connected
VEDEO 1 Not Available
VEDEO 2 Connected
"Connected" is shown next to the name of input terminal which your
set-top box or any other external equipment are connected to.
• This may not display correctly depending on the
connected equipment.
• This is not displayed correctly when the connected
equipment is off.
• To watch TV using a set-top box, press INPUT
after completing the initial settings, and select the
input to which the set-top box is connected.
NOTE
• For changing the settings of the Initial Installation,
perform "EZ setup" on the Initial Setup menu on page
28.
LC-80LE857U
̲757U
̲657U
̲E.indd17
LC-80LE857U
̲757U
̲657U
̲E.indd17
LC-80LE857U
̲757U
̲657U
̲E.indd17
LC-80LE857U
̲757U
̲657U
̲E.indd17
LC-80LE857U
̲757U
̲657U
̲E.indd17
2013/02/2113:36:00
2013/02/2113:36:00
2013/02/2113:36:00
2013/02/2113:36:00
2013/02/2113:36:00

28
Boot Picture
With this function activated, the SHARP logo will be
displayed when you turn on the TV.
NOTE
• This function is not available when the TV is set to
"Quick Start Mode".
Response Tone
(For the LE857U, LE757U, LE755U and C7500U models)
With this item set to "On", the TV will give off
operation sound when you use the SmartCentral
function.
NOTE
• If an external speaker is used, the operation sound will
not be heard.
Demo Mode
You can select the image from several types of demo
mode.
If you have selected "Auto Play", you need to select
the desired playback type(s), and then set the
playback time.
Continuous: Plays demos continuously.
10 min.: Plays demos every 10 minutes.
20 min.: Plays demos every 20 minutes.
NOTE
• What kinds of setting item are available depends on
the model of your TV.
• This function will be canceled when you press on EXIT
the remote control unit.
• "Demo Mode" may not be selected depending on input
signal type or application status.
• "Demo Mode" may be automatically canceled
depending on input signal type.
Initial Setup
NOTE
• For operating the on-screen display menu, see page 22.
• When you select "EZ Setup", "CH Setup", "Parental
CTRL" or "Reset", you can enter the 4-digit secret
number here. See page 29 for setting a secret number.
EZ Setup
You can run EZ Setup again, even after setting up
the preset channels.
Language: Select from among 3 languages (English,
French and Spanish).
Location & Time: Make settings for the country,
area and time zone where you use the TV.
Select your country: Select either "United
States", "Canada" or "Mexico".
Select your time zone: Select your time zone.
The available settings differ depending on the
selected country.
Select DST (Daylight Savings Time): Select
"Auto", "Manual" or "Off".
TV Location: Select "Home" or "Store" for the
location where you plan to install the TV. This
product qualifi es for ENERGY STAR*
1 in Home
mode default setting.
Home: "Power Saving" is set to "Advanced", and
AV MODE is set to "STANDARD (ENERGY
STAR)"*1.
Store: "Power Saving" is set to "Off" and AV
MODE is set to "DYNAMIC (Fixed)". Picture
Reset and Feature Demo can be set.
Picture Reset: AV MODE will be set to
"DYNAMIC (Fixed)" regardless of whether
Picture Reset is "On" or "Off". If you select
"On", AV MODE will be reset to "DYNAMIC
(Fixed)" if there is no operation for 30
minutes. When "Off" is selected, AV MODE
will be set to "DYNAMIC (Fixed)".
Feature Demo: When "On" is selected, after
all the settings are completed, the Feature
Demo screen is displayed if there is no
operation for several minutes.
• ENERGY STAR qualifi cation is based on AV
MODE "STANDARD (ENERGY STAR)".*1
Antenna & Cable/STB: Select the type of
connection you will use to watch TV.
Air/Cable: Make sure what kind of connection
is made with your TV when selecting "Air" or
"Cable".
CH Search: Channel auto search makes the TV look
for all channels viewable in the set area.
• If "Cable" is selected for Antenna setting,
scrambled channels are removed after the
Channel search has been completed.
Network: When you connect to the Internet on the
TV, confi rm the connection method and make
adjustments.
• Wireless LAN connection is possible only when
the WPS (push button) method is used. If any
other method is used, make settings by Initial
Setup > Internet Setup > Network Setup. (See
pages 46 to 47.)
Completed: The settings confi rmation screen is
displayed. Confi rm the information displayed on
the screen.
NOTE
• *1: Except for LC-90LE657U
• See Initial Installation on pages 16 to 17 for setting
each item.
• If no channel is found, confi rm the type of connection
made with your TV and try "EZ Setup" again.
• If you select "Analog Search Start" and initiate the
channel search, the CH Memory for Cable Digital will
be deleted.
Broadcasting Setup
CH Setup
If Initial Installation does not memorize all the
channels in your region, follow the instructions below
to manually memorize the channels.
Air/Cable: Make sure what kind of connection
is made with your TV when selecting "Air" or
"Cable".
CH Search: Channel auto search makes the TV look
for all channels viewable in the set area.
CH Memory: You can select the channels to skip in
each ANALOG (Air), ANALOG (Cable), DIGITAL
(Air) and DIGITAL (Cable).
On: Skips channels. (Channel selection disabled
using CH U/V.)
Off: Does not skip channels. (Channel selection
enabled using CHU/V.)
Remove Scrambled CH: This function makes the
TV look for and then delete digital cable channels
that are scrambled and so unavailable in the
set area. The process may take more than 20
minutes.
Yes: Starts to remove scrambled channels.
No: This function does not work.
NOTE
• See Initial Installation on pages 16 to 17 for setting
each item.
• If no channel is found, confi rm the type of connection
made with your TV and try channel search again.
• If you select "Analog Search Start" and initiate the
channel search, the CH Memory for Cable Digital will
be deleted.
Favorite CH (Favorite Channel Setting)
This function allows you to program 4 favorite
channels, in 4 different categories. By setting the
favorite channels in advance, you can select your
favorite channels easily.
To register your favorite channel:
Select "Register" and then press . Press ENTER a/
b/c/d to select the position in the category, and
then press to register.ENTER
To delete your favorite channel:
Select "1 Data Clear" and then press .ENTER
Press a/b/c/d to select the channel you want
to delete, and then press . Select "Yes" and ENTER
then press .ENTER
To delete all the favorite channels, select "All Data
Clear".
NOTE
• Before setting the channel, select the channel you
want to register as a favorite channel.
• You can display the "Favorite CH" screen by pressing
FAVORITE CH on the remote control.
Antenna Setup-DIGITAL
In order to receive digital air broadcasts, you need
a digital broadcast antenna. You can confi rm the
antenna confi guration through the "Antenna Setup-
DIGITAL" screen. If necessary, adjust the direction of
the antenna to obtain the maximum signal strength.
Signal Strength: The signal strength of DIGITAL
channel is displayed. The signal information is
based on the current channel.
Channel Strength: Input the 2-digit channel number
to check the signal strength of the selected
channel. Make sure the signal is strong enough
for each channel.
• This function is available for DIGITAL (Air) only.
On-Screen Display Menu
LC-80LE857U
̲757U
̲657U
̲E.indd28
LC-80LE857U
̲757U
̲657U
̲E.indd28
LC-80LE857U
̲757U
̲657U
̲E.indd28
LC-80LE857U
̲757U
̲657U
̲E.indd28
LC-80LE857U
̲757U
̲657U
̲E.indd28
2013/02/2316:35:13
2013/02/2316:35:13
2013/02/2316:35:13
2013/02/2316:35:13
2013/02/2316:35:13

32
You can use special 3D Glasses to watch 3D-supported images on this TV.
• You can enjoy 3D movies on this TV by viewing the movie through SHARP 3D Glasses supplied with the TV or
through optional 3D Glasses sold separately.
• To produce 3D images, liquid crystal shutters in the 3D Glasses alternately open and close imperceptibly fast to
exactly match alternating left and right video images displayed by the TV.
• Not all consumers can experience and enjoy 3DTV. Some people suffer from stereo blindness which prevents
them from perceiving the intended depth of 3D entertainment. Also, some people who watch 3D programming
may experience initial feelings of motion sickness as they adjust to the picture. Others may experience headaches,
eye fatigue or motion sickness. Some viewers might also experience epileptic seizures. Like a roller coaster, the
experience is not for everyone.
CAUTION
•The 3D Glasses are precision equipment. Handle them with care.
•Improper use of the 3D Glasses or failure to follow these instructions can result in eye strain.
•If you experience dizziness, nausea, or other discomfort while viewing 3D images, immediately
discontinue use of the 3D Glasses. Using the 3DTV with incompatible 3D broadcasts or software can
make images appear blurry or create overlapping images.
•When viewing 3D images continuously, be sure to take a break periodically to prevent eye strain.
•If you are nearsighted or farsighted or have astigmatism or a different level of eyesight between the
left and right eyes, you should take the necessary steps, such as wearing eyeglasses, to correct your
eyesight before viewing 3D images. The 3D Glasses can be worn over eyeglasses.
•When viewing 3D images, keep the 3D Glasses horizontally level with the TV screen. If you tilt the
3D Glasses with respect to the TV screen, the images viewed by the left and right eyes may appear
signifi cantly different or images may appear overlapping.
•View 3D images at the appropriate distance from the TV screen. The recommended distance is three
times the effective height of the TV screen.
Examples of recommended distances
90-inch screen: Approx. 11.2 ft (3.4 m)
80-inch screen: Approx. 9.8 ft (3.0 m)
70-inch screen: Approx. 8.5 ft (2.6 m)
60-inch screen: Approx. 7.2 ft (2.2 m)
Viewing should not be done closer than the recommended distance.
•Be careful of your surroundings when viewing 3D images. When you view 3D images, objects may
appear closer or farther than they are. This may cause you to misjudge the distance and possibly result
in injury if you accidentally hit the screen or surrounding objects.
•The 3D Glasses are not recommended for people aged less than 6.
•When children are viewing 3D images, be sure a parent or guardian is present. Monitor children viewing
3D images, and if they show signs of discomfort, immediately discontinue use of the 3D Glasses.
•People with a known history of photosensitivity and people with heart problems or poor health should
not use the 3D Glasses. This can worsen existing health conditions.
•Do not use the 3D Glasses for other purposes (such as general eyeglasses, sunglasses, or protective
goggles).
•Do not use the 3D function or 3D Glasses while walking or moving around. This may result in injuries due
to running into objects, tripping, and/or falling.
•When using the 3D Glasses, take care not to accidentally strike the TV screen or other people. Viewing
3D images may cause you to misjudge the distance to the TV screen and accidentally strike the screen,
resulting in possible injury.
•It is recommended that you do not view 3D images if you are sleep deprived or if you have been drinking
alcohol.
Enjoying 3D Image Viewing (for the LE857U, LE757U, LE755U, LE657U and LE655U models)
■Updating the Software via the Network
1 Press a/bon the Manual Update screen
to select "Network Update", and then press
ENTER.
• The TV connects to the network and checks for
updates.
• To cancel, press .ENTER
Abort
Connecting to Internet..
Checking for the latest software version..
Accessing..
2 The current version of the TV and the latest
version of software are displayed. To update
the TV software, select "Yes", and then press
ENTER.
Latest software version has been found.
A software update is available.
Proceed with update?
Update time may change depending on the network environment
Current Version
XXXXXXXX
Latest Version
XXXXXXXX
Estimated Update Time
XX
NoYes
• When a server connection cannot be established
or an update is not available, a message is
displayed.
If a server connection cannot be established,
check the broadband connection and Internet
Setup.
Cannot reach the server.
Check the network settings and try again.
OK
OK
The TV does not need to be updated.
3 After the update fi le is downloaded, the software
update process begins.
Downloading the latest software..
30%
Abort
Update Version
XXXXXXXX
50%
Do not unplug AC cord.
Remote control operation is disabled during update process.
Updating to the latest software..
Update Version
XXXXXXXX
CAUTION
•Do not unplug the AC cord while the software is
being updated.
4 When the software is successfully updated, a
screen is displayed indicating that the update
process is completed.
A screen indicating that the update is completed
is displayed. 4 seconds later, the TV restarts
automatically.
Software update is complete.
Update Version
XXXXXXXX
• If the software was not updated successfully,
check the broadband connection and Internet
Setup, and then try updating the software again.
OK
Failed to complete update.
Please retry from Software Update menu.
On-Screen Display Menu
LC-80LE857U
̲757U
̲657U
̲E.indd32
LC-80LE857U
̲757U
̲657U
̲E.indd32
LC-80LE857U
̲757U
̲657U
̲E.indd32
LC-80LE857U
̲757U
̲657U
̲E.indd32
LC-80LE857U
̲757U
̲657U
̲E.indd32
2013/02/2618:06:09
2013/02/2618:06:09
2013/02/2618:06:09
2013/02/2618:06:09
2013/02/2618:06:09

33
Viewing 3D Images
NOTE
• The TV screen may temporarily become black when
the TV is trying to detect a 3D image signal and when
switching from 3D to 2D mode.
Receiving a 3D Image Signal That Can
Be Detected Automatically
The image signal may contain a 3D identifi cation
signal. You can enable the TV to automatically detect
the 3D image type by selecting "System Options"
> "3D Setup" > "3D Auto Change" on the TV. (See
page 34.)
1When "3D Auto Change" is set to "Mode 1"
or "Mode 2"
• The 3D image type is detected automatically and
the appropriate 3D image is displayed.
Changed to 3D mode.
Power on the 3D glasses then put them on.
If you are in bad physical conditions
or feel uncomfortable watching 3D picture
please stop watching monitor.
3D
When "3D Auto Change" is set to "Off"
• The following message is displayed. Press .3D
3D picture is detected.
Power on the 3D glasses.
(Need to wear the 3D glasses to watch 3D picture)
• Press c/d to select the "Yes", and then press
ENTER.
2 Turn on the 3D Glasses and place them on your
head.
3 You can now view 3D images.
Switching from 3D to 2D Mode
4 Press 3D during the 3D mode.
Select "Yes" and press to switch to 2D ENTER
mode.
• Take off the 3D Glasses and turn off the power.
Ending 3D Image Viewing
5 Take off the 3D Glasses and turn off the power.
NOTE
• If the input signal switches to 2D, 2D images are
displayed automatically.
• 3D mode is canceled automatically when the setting is
changed, input selection is changed, or the power is
turned off.
Receiving a 3D Image Signal That
Cannot Be Detected Automatically
1 Press 3D.
• A screen appears prompting you to select
between 3D and 2D image viewing.
2 Press c/d to select "3D" or "2D", and then
press .ENTER
•To view in 3D mode: Select "3D", and then go to
step 3.
•To view in 2D mode: Select "2D", and then go to
step 6.
3 Press c/d to select the 3D signal type
("2D➝3D", "Side by Side" or "Top and Bottom")
and then press .ENTER
2D -> 3D Side by Side Top and Bottom
• If you select the same system as that of the input
signal, 3D images are displayed.
4 Turn on the 3D Glasses and place them on your
head.
5 You can now view 3D images.
Switching from 3D to 2D Mode
6 Press c/d to select the 2D signal type ( "Side
by Side" or "Top and Bottom") and then press
ENTER.
Side by Side Top and Bottom
• If you select the same system as that of the input
signal, 2D images are displayed.
• Take off the 3D Glasses and turn off the power.
Ending 3D Image Viewing
7 Take off the 3D Glasses and turn off the power.
Display Methods for 3D and 2D Images
Display method Example display Description
3D mode
(using the
3D Glasses)
2D ➝ 3D • Converts normal 2D images into 3D images.
Side by Side
• Creates 3D images from 3D images displayed side by side.
The image is split into a left and right image, and then the
images are stretched and displayed sequentially to create
a 3D image.
Top and Bottom
• Creates 3D images from 3D images displayed on the
top and bottom. The image is split into a top and bottom
image, and then the images are stretched and displayed
sequentially to create a 3D image.
2D mode
(without
using the
3D Glasses)
Side by Side ➝
2D
• Creates 2D images from 3D images displayed side by side.
Only the left image is stretched and displayed. The image
does not appear in 3D.
Top and Bottom
➝ 2D
• Creates 2D images from 3D images displayed on the
top and bottom. Only the top image is stretched and
displayed. The image does not appear in 3D.
Enjoying 3D Image Viewing (for the LE857U, LE757U, LE755U, LE657U and LE655U models)
LC-80LE857U
̲757U
̲657U
̲E.indd33
LC-80LE857U
̲757U
̲657U
̲E.indd33
LC-80LE857U
̲757U
̲657U
̲E.indd33
LC-80LE857U
̲757U
̲657U
̲E.indd33
LC-80LE857U
̲757U
̲657U
̲E.indd33
2013/02/2113:36:02
2013/02/2113:36:02
2013/02/2113:36:02
2013/02/2113:36:02
2013/02/2113:36:02

39
Enjoying Photo/Music/Video Playback
USB Operation Panel/Home Network
(DLNA) Operation Panel
You can use the operation panel for video playback
operations.
You can call up this operation panel from "System
Options" > "View Option".
Example
Resume
Audio CC
Tit le jump
Buttons for using the USB operation panel
Hold down to go in reverse.
dStarts playback.
Hold down to fast forward.
Video without chapters: Press once to
return to the previous playback point.*
Press twice to return to the previous
fi le.
Video with chapters: Press once to
return to the previous chapter. Press
twice to return to the previous fi le.
)Sets pauses and still pictures.
/Video without chapters: Press once to
advance to the next playback point.*
Press twice to display the next fi le.
Video with chapters: Press once to
advance to the next chapter. Press
twice to display the next fi le.
Audio Change the audio when multiple
audio is available for the video you are
watching.
+Playback stops.
CC Change the Closed Caption display.
Title Displays the title (edition).
Resume
jump
Jump to the scene where playback
was last stopped.
* During playback of a fi le without chapters, playback
points are set automatically. Playback points are set at
intervals of a one-tenth of playback time.
Example for a fi le with a playback time of 100 minutes:
Playback points are set every 10 minutes. Pressing
/
one time after viewing the fi le for 15 minutes
jumps to the 20-minute playback point.
NOTE
• Reverse/fast forward continues from one fi le to another
during continuous playback.
• Use "CC" on the operation panel to change the Closed
Caption display. You can also switch the Closed
Caption display by using "System Options" > "View
Option" > "Change CC" or by pressing on the CC
remote control unit.
• Use "Audio" on the operation panel to change the
audio. You can also switch the audio by using "System
Options" > "View Option" > "Change Audio".
Buttons for using the Home Network (DLNA)
operation panel
dStarts playback.
Go to the beginning of a fi le by pressing
once or to the previous fi le by pressing
twice.
)Sets pauses and still pictures.
/Go to the next fi le.
+Playback stops.
Jump back in a video.
Jump forward in a video.
DivX® Setup
This is the function to confi rm your registration code.
You need to register the code at http://www.divx.
com.
1 Press MENU to display the MENU screen.
2 Press c/d to select "Initial Setup", and then
press .ENTER
3 Press a/b to select "DivX® Setup", and then
press .ENTER
■DivX® VOD Registration
You can fi nd your registration code on this menu.
You need to register the TV at http://www.divx.com
before playing the DivX content.
■DivX® VOD Deregistration
You can fi nd your deregistration code on this menu.
You need to deregister the TV at http://www.divx.
com to release the registration.
NOTE
• This function is available only for the USB mode.
• This function may not work while an Internet
application is being used.
Playing Back Files from a Portable
Device or PC
With the remote playback function, you can use your
portable device to play back pictures, video, and
music on the home network server.
• This TV is a DLNA certifi ed Digital Media Renderer.
(DMR)
• To use the remote playback function, your portable
device must be a DLNA Certifi ed Digital Media
Controller.
• A wireless access point is required to use a
portable device.
Set Up Home Network
Make the settings for remote playback.
1 Press c/d to select "Initial Setup", and then
press .ENTER
2 Press a/b to select "Internet Setup", and then
press .ENTER
3 Press a/b to select "Set Up Home Network",
and then press .ENTER
4 Press a/b to select the specifi c adjustment
item, and then press to set each item.ENTER
■Remote Control Play Settings
This setting allows the TV to perform remote
playback.
Permitted/Not allowed
■Timeout Setup
This sets the time until the TV returns automatically
to TV mode after remote playback ends.
10 sec./60 sec./No
NOTE
• This function may not work while an Internet
application is being used.
• For information on the compatible formats, see
"Home Network (DLNA) Server Compatibility" on
page 36.
LC-80LE857U
̲757U
̲657U
̲E.indd39
LC-80LE857U
̲757U
̲657U
̲E.indd39
LC-80LE857U
̲757U
̲657U
̲E.indd39
LC-80LE857U
̲757U
̲657U
̲E.indd39
LC-80LE857U
̲757U
̲657U
̲E.indd39
2013/02/2113:36:04
2013/02/2113:36:04
2013/02/2113:36:04
2013/02/2113:36:04
2013/02/2113:36:04

54
Troubleshooting
Problem Possible Solution
• No power • Check if you pressed on the remote control unit. POWER Page 16
• Is the AC cord disconnected? Page 9
• Has the power been turned on? Page 16
• Unit cannot be
operated.
• External infl uences such as lightning, static electricity, may cause improper operation.
In this case, operate the unit after fi rst turning off the power of the TV or unplugging
the AC cord and replugging it in after 1 or 2 minutes.
• Remote control unit
does not operate.
• Is the equipment to be operated by the remote control unit set correctly? Press to TV
set the remote control unit to the setting for operating the TV.
• Are batteries inserted with polarity (e,f) aligned? Page 10
• Are batteries worn out? (Replace with new batteries.)
• Are you using it under strong or fl uorescent lighting?
• Is a fl uorescent light illuminated near the remote control sensor?
• Is "RC Control Lock" selected in "Operation Lock Out"? Page 27
• Picture is cut off/with
sidebar screen.
• Is the image position correct? Pages 27 and 44
• Are screen mode adjustments such as picture size made correctly?
Pages 20 and 21
• Strange color,
light color, or color
misalignment
• Adjust the picture tone. Pages 24 and 25
• Is the room too bright? The picture may look dark in a room that is too bright.
• Power is suddenly
turned off.
• Is the sleep timer set? Page 19
• Check the power control settings. Page 26
• The unit's internal temperature has increased. Remove any objects blocking vent or clean.
• No picture • Is connection to other components correct? Pages 13 to 15 and 41
• Is the correct input selected? Pages 13 and 18
• Is "On" selected in "Audio Only"? Page 26
• If the PC image is not displayed, check the following:
- When connecting a laptop PC to the TV, check that display output mode of the PC
is set to external monitor.
-
Check the resolution setting on the PC. Is a non-compatible signal being input?
Page 45
• Picture quality of HD
programs is poor.
• To enjoy HD images from external equipment, you are required to set up HDMI
connection or component connection.
• If the program content is not of HD quality, HD images cannot be displayed. Check
that the program you are viewing provides HD images.
• The HD cable/satellite set-top box may need to be confi gured to output HD images
via cable/satellite.
• The cable/satellite broadcast may not support a signal resolution of 1080p.
• The TV sometimes
makes a cracking
sound.
• This is not a malfunction. This happens when the cabinet slightly expands and
contracts according to change in temperature. This does not affect the TV's
performance.
• The AQUOS
ADVANTAGE LIVE
cannot be displayed.
• Is the ETHERNET cable connected correctly? Page 46
• Check the settings of "Internet Setup". Pages 46 to 47
• Some Internet
functions used on a PC
are not available from
the TV.
• The TV has only limited functions compared with regular PC browsers. Page 48
Problem Possible Solution
• No sound • Is connection to other components correct? Pages 13 to 15 and 41
• Is the volume too low? Page 18
• Is "Variable" selected in "Output Select"? Page 27
• Have you pressed on the remote control unit? MUTE Page 18
• Check the audio output of the connected external equipment. Is the volume too low or
muted?
• When external equipment is connected via an HDMI cable, you may need to confi gure
the audio to be output through the HDMI cable.
• When audio is not output from external equipment connected to the PC IN or HDMI IN
2 terminal, check the "Audio Select" setting. Page 44
• Even when external equipment is connected using an HDMI-certifi ed cable, an audio
cable connection may be required depending on the type of equipment and the media
being played back. In this case, in addition to connecting an HDMI-certifi ed cable to
the HDMI IN 2 terminal, connect a Ø 3.5 mm stereo minijack cable to the AUDIO IN
terminal and set "Audio Select" to "HDMI+Analog". Page 44
• When connecting a PC via an HDMI-certifi ed cable, check the following:
- Is the audio output of the PC confi gured correctly? Check the audio output settings
and output audio format in Sound Properties on the PC.
The audio formats compatible with this TV are PCM, Dolby Digital and DTS. With
other formats, audio cannot be output.
- Depending on the board, only video signals may be output. In this case, in addition
to connecting an HDMI-certifi ed cable to the HDMI IN 2 terminal, connect a Ø
3.5 mm stereo minijack cable to the AUDIO IN terminal and set "Audio Select" to
"HDMI+Analog". Page 44
• If you are using a DVI-HDMI conversion cable to connect external equipment to the
TV, check the following:
- Is an audio cable connected? The DVI-HDMI conversion cable is for video only.
Connect a Ø 3.5 mm stereo minijack cable to listen to the audio.
- Is HDMI IN 2 being used? When the TV is connected to another HDMI IN terminal,
the audio and video are not output together even if a Ø 3.5 mm stereo minijack
cable is connected to the shared AUDIO IN terminal for PC IN and HDMI IN 2.
- Check the "Audio Select" setting. Set "Audio Select" to "HDMI+Analog". Page 44
Troubleshooting - 3D Images (for the LE857U, LE757U, LE755U, LE657U and LE655U models)
Problem Possible Solution
• 3D images are not
displayed.
• Is "3D Auto Change" set to "Off"? Press to switch to 3D mode. 3D Page 33
• If "3D Auto Change" is set to "Mode 1" or "Mode 2" but no 3D images are displayed,
check the display format of the content being viewed. Some 3D image signals may
not be recognized as 3D images automatically. Press to select the appropriate 3D
display format for the 3D image. Pages 33 to 34
• Is the power of the 3D Glasses turned on?
• Are the 3D Glasses set to 2D mode?
For further details, refer to the operation manual of your 3D Glasses.
Appendix
LC-80LE857U
̲757U
̲657U
̲E.indd54
LC-80LE857U
̲757U
̲657U
̲E.indd54
LC-80LE857U
̲757U
̲657U
̲E.indd54
LC-80LE857U
̲757U
̲657U
̲E.indd54
LC-80LE857U
̲757U
̲657U
̲E.indd54
2013/02/2113:36:06
2013/02/2113:36:06
2013/02/2113:36:06
2013/02/2113:36:06
2013/02/2113:36:06
Produkt Specifikationer
| Mærke: | Sharp |
| Kategori: | TV |
| Model: | Aquos LC-70LE650U |
| Vekselstrømsindgangsspænding: | 120 V |
| Vekselstrømsindgangsfrekvens: | 60 Hz |
| Produktfarve: | Sort |
| Skærm diagonal: | 70 " |
| Skærmopløsning: | 1920 x 1080 pixel |
| Wi-Fi: | Ja |
| HD-type: | Fuld HD |
| Naturligt aspektforhold: | 16:9 |
| Responstid: | 4 ms |
| Synsvinkel, horisontal: | 176 ° |
| Synsvinkel, vertikal: | 176 ° |
| LED-baggrundsbelysning type: | Edge-Lit LED |
| 3D: | Ingen |
| Indbyggede højttaler(e): | Ja |
| DLNA-certificeret (Digital Living Network Alliance): | Ja |
| Tuner type: | Analog & digital |
| Format til analogt signal: | NTSC |
| System for digitalt signalformat: | ATSC |
| Smart TV: | Ja |
| Internet TV: | Ja |
| Antal højttalere: | 2 |
| Udgangseffekt (RMS): | 20 W |
| Automatisk lydstyrkejustering: | Ja |
| Antal HDMI-porte: | 4 |
| Mobile High-Definition Link (MHL): | Ja |
| DVI-port: | Ingen |
| Ethernet LAN-porte (RJ-45): | 1 |
| Antal USB 2.0-porte: | 2 |
| Komponentvideo (YPbPr/YCbCr) indgang: | 1 |
| Digital akustisk og optisk udgang: | 1 |
| Fælles grænseflade (CI +): | Ingen |
| Kontrol med forbrugerelektronik (CEC): | Aquos Link |
| Ethernet LAN: | Ja |
| Strømforbrug (standby): | - W |
| Strømforbrug (typisk): | 188 W |
| Bredde (uden stativ): | 1590 mm |
| Dybde (uden stativ): | 83 mm |
| Højde (uden stativ): | 948 mm |
| Vægt (uden stativ): | 34500 g |
| Bredde (med stativ): | 1590 mm |
| Dybde (med stativ): | 360 mm |
| Højde (med stativ): | 973 mm |
| Vægt (med stativ): | 37500 g |
| Oprindelig opdateringshastighed: | 120 Hz |
| Sammensat videoindgang: | 1 |
| Indgang til pc'en (D-Sub): | Ja |
| Fælles grænseflade (CI): | Ingen |
| Fjernbetjening inkluderet: | Ja |
| Bæredygtighedscertifikater: | ENERGY STAR |
| Lyd (L, R) indgang: | 2 |
| Desktop beslag: | Ja |
| Kontrastforhold (dynamisk): | 4000000:1 |
| HDMI-version: | 1.4 |
| RS-232-porte: | 1 |
Har du brug for hjælp?
Hvis du har brug for hjælp til Sharp Aquos LC-70LE650U stil et spørgsmål nedenfor, og andre brugere vil svare dig
TV Sharp Manualer

10 Marts 2025
9 Marts 2025
9 December 2024
9 December 2024
9 December 2024
9 December 2024
9 November 2024
9 November 2024
9 November 2024
9 November 2024
TV Manualer
- TV Acer
- TV Denver
- TV Sencor
- TV TCL
- TV Sony
- TV Samsung
- TV Panasonic
- TV VOX
- TV Philips
- TV Lenco
- TV OK
- TV LG
- TV AEG
- TV Electrolux
- TV Pioneer
- TV Mitsubishi
- TV Daewoo
- TV Arçelik
- TV AOC
- TV Sanyo
- TV Grundig
- TV Nikkei
- TV Toshiba
- TV Pyle
- TV Furrion
- TV InFocus
- TV Lenovo
- TV Infiniton
- TV Matsui
- TV Logik
- TV Optoma
- TV Westinghouse
- TV Muse
- TV Element
- TV Thomson
- TV Hyundai
- TV Aiwa
- TV Nokia
- TV Casio
- TV AKAI
- TV Hisense
- TV Strong
- TV Brandt
- TV Hannspree
- TV Trevi
- TV Blaupunkt
- TV JVC
- TV BEKO
- TV Sandstrøm
- TV Uniden
- TV Clatronic
- TV Hitachi
- TV Medion
- TV Citizen
- TV Megasat
- TV Haier
- TV TechniSat
- TV United
- TV Bang And Olufsen
- TV Vivax
- TV Loewe
- TV Sunny
- TV Arena
- TV Finlux
- TV Prosonic
- TV Telefunken
- TV Kernau
- TV BenQ
- TV Jensen
- TV Xiaomi
- TV Zenith
- TV Peerless-AV
- TV Krüger&Matz
- TV Viewsonic
- TV Dell
- TV Schneider
- TV Tesla
- TV Polaroid
- TV NEC
- TV Soundmaster
- TV Yasin
- TV Energy Sistem
- TV Bush
- TV Dual
- TV Aspes
- TV Salora
- TV Sagem
- TV Nevir
- TV Techwood
- TV Vivo
- TV Marantz
- TV Oceanic
- TV SVAN
- TV Sogo
- TV Alba
- TV RCA
- TV Currys Essentials
- TV ECG
- TV Harper
- TV Onn
- TV Orion
- TV ITT
- TV Cecotec
- TV TV Star
- TV VIZIO
- TV XD Enjoy
- TV Technika
- TV Seiki
- TV TechLine
- TV Bauhn
- TV V7
- TV Voxicon
- TV Vestel
- TV Continental Edison
- TV RevolutionHD
- TV CHiQ
- TV GoGen
- TV Kogan
- TV Graetz
- TV Insignia
- TV Manta
- TV SunBriteTV
- TV JTC
- TV Orava
- TV Reflexion
- TV QBell Technology
- TV SYLVOX
- TV Dyon
- TV Schaub Lorenz
- TV Daitsu
- TV Ferguson
- TV Aconatic
- TV Alphatronics
- TV AYA
- TV Mitchell & Brown
- TV Funai
- TV Saba
- TV Proscan
- TV Nabo
- TV Coby
- TV Listo
- TV Cello
- TV Irradio
- TV Mystery
- TV Magnavox
- TV Mach Power
- TV Engel
- TV Coocaa
Nyeste TV Manualer

8 April 2025
8 April 2025
8 April 2025
8 April 2025
8 April 2025
8 April 2025
8 April 2025
8 April 2025
8 April 2025

6 April 2025