Siemens Gigaset 900 Manual
Læs nedenfor 📖 manual på dansk for Siemens Gigaset 900 (196 sider) i kategorien Telefon. Denne guide var nyttig for 9 personer og blev bedømt med 4.5 stjerner i gennemsnit af 2 brugere
Side 1/196

DE900 IP PRO
DE900
IP PRO

2
Gigaset DE900 IP PRO – More than just a telephone
Gigaset DE900 IP PRO – More than just a telephone
Your Gigaset DE900 IP PROis an IP phone designed for professional use.
uEasy to set up
Use automatic configuration or the default settings for approx. 200 preconfigured
VoIP providers.
uWeb user interfaces for configuration
Operate and configure your telephone from your PC with ease.
uHigh Definition Sound Performance – HDSP
Make phone calls with brilliant sound quality.
uPhone functions for the professional user
Use the call divert, conference call, automatic ringback, call reject and Do Not Disturb
(DND) functions.
uMultiple directories
Manage your personal directory with up to 500 vCards (caller pictures are possible).
Use an LDAP directory or online directories on the Internet.
uNetwork connection
Connect your telephone to the local network via Ethernet. Connect a PC using your tel-
ephone as a gigabit Ethernet switch.
uWireless connection to the local network (WLAN)
Use your telephone in a wireless network.
uNumerous options for mobile communication
Use DECT, Bluetooth or cable to connect a headset. You can connect a handset via
DECT or Bluetooth and a mobile phone via DECT.
uProtect the environment
Reduce environmental pollution with the power-saving power adapter and by auto-
matically deactivating the DECT function. Reduce radiation with Eco Mode+ for DECT.
uGigaset MobileOFFICE™
Do you change workstations? Ensure your PC and phone settings are available wher-
ever you work.
uIndividual settings
Load your own pictures and ringers, subscribe to Internet services and choose how
you want the display to look.
Assign functions or frequently used numbers to the keys.
uVirtually unlimited storage
Connect a USB storage device to save more pictures, ringers and vCards.
Further information about your phone can be found at
www.gigaset.com/pro
3
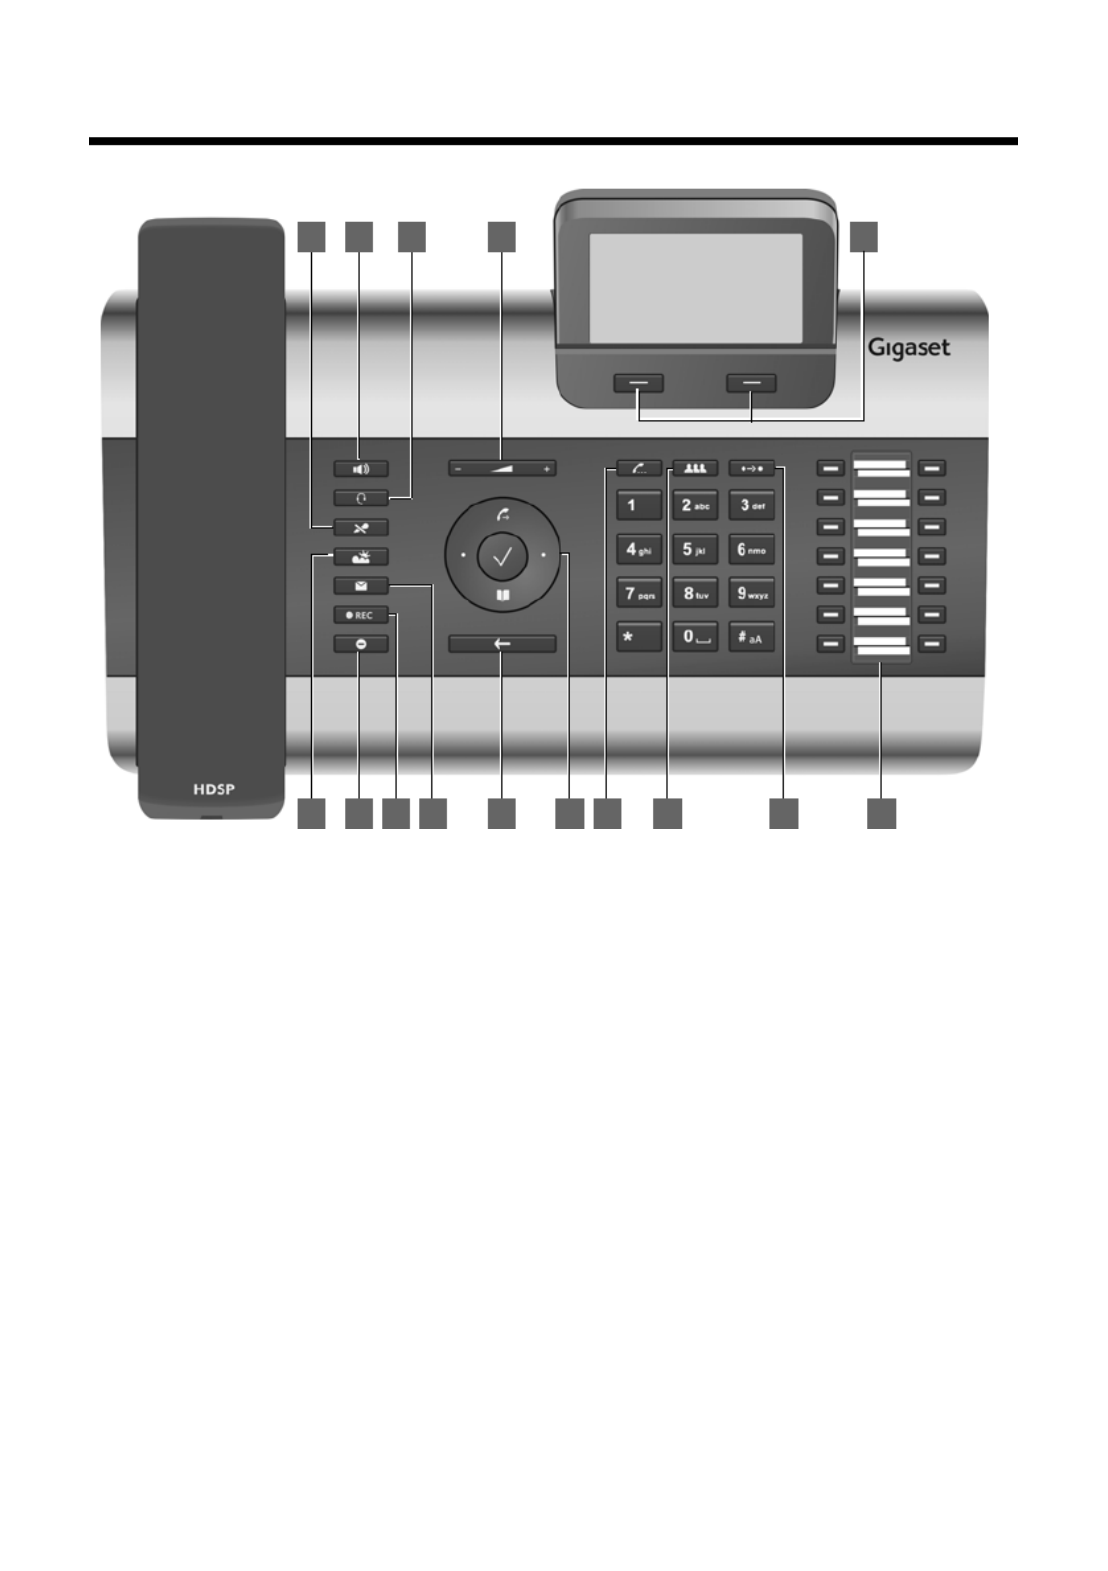
Phone overview
Phone overview
1Mute key Activate/deactivate microphone (mute) £Page 35
2Speaker key Activate/deactivate speaker £Page 35
3Headset key Make call via headset £Page 33
4Volume key Depending on the operating mode: Adjust the volume of the
speaker, receiver, headset or ringer
£Page 34
5Display keys Activate display functions £Page 22
6Information Centre Open the Information Centre £Page 67
7Do Not Disturb key Do Not Disturb (DND) function £Page 35
8Call records key Record a call £Page 36
9Message Centre Open call and message lists £Page 61
10 End call/back key End/reject call; cancel function;
go back one menu level (press briefly);
return to idle status (press and hold)
£Page 26
£Page 24
11 Navigation key Scroll through lists and entries. In idle status: £Page 24
ÈOpen redial list. £Page 42
‰Confirm or start action, select entry £Page 24
ZOpen directory £Page 46
12 Consultation key Initiate/end consultation call £Page 38
13 Conference key Initiate conference call £Page 39
14 Transfer key Transfer call to another party £Page 40
15 Function keys Programmable keys £Page 150
Understanding the keys
21 3 4 5
6 7 8 9 10 11 12 1513 14

4
Phone overview
Understanding Light Emitting Diodes (LEDs)
Understanding the display
Understanding the display symbols
AFlashes Incoming call. £Page 33
Lights up Call is being made via the speaker. £Page 35
BFlashes Incoming call (a headset must be connected). £Page 33
Lights up Call is being made via the headset. £Page 33
CLights up The microphone is muted. £Page 35
EFlashes New message in the Message Centre. £Page 61
FLights up Call is being recorded. £Page 36
GLights up "Do Not Disturb" function is activated. £Page 35
JLights up One or more callers on hold. £Page 38
KLights up Conference call is activated. £Page 39
SFlashes Incoming call on the number programmed to this key. £Page 32
Lights up Call is being made on the number programmed to this key.
«ÐiÑÒ Signal strength of the WLAN connection (device connected via WLAN). £Page 87
ÝUSB storage device is connected. The icon flashes when data is being transferred. £Page 103
¼DECT function is activated. A green icon indicates that Eco Mode+ is also activated. £Page 94
¼ôHeadset connected via DECT. ¼lMobile phone connected via DECT. £Page 90
òBluetooth function (BT) activated. £Page 91
òô Headset connected via BT. òl Mobile phone connected via BT. £Page 90
óRinger deactivated. £Page 70
ÃNew messages on the network mailbox. The number
is displayed to the
right.
£Page 56
™Missed calls. £Page 42
ËNew e-mails. £Page 58
·Alarm clock function activated. The wake-up time is displayed to the right. £Page 64
Other icons may appear depending on the function. These are displayed alongside the corresponding
description.
Call Select Line
Current time
Area of application
Adjustable display, e.g.,
time zone, time, calendar,
picture £Page 73
Display functions
( )Page 22
T
T
T
Display icons
T
Display icons
Date and Time
U
U
You set the time and date
format using the Web
configurator
£Page 155.
Currently used
account £Page 30
U
Call Select Line

5
Contents
Contents
Gigaset DE900 IP PRO – More than just a telephone . . . . . . . . . . . . . . . . . 2
Phone overview . . . . . . . . . . . . . . . . . . . . . . . . . . . . . . . . . . . . . . . . . . . . . . . . . . . 3
Understanding the keys . . . . . . . . . . . . . . . . . . . . . . . . . . . . . . . . . . . . . . . . . . . . . . . . . . . . . . . 3
Understanding Light Emitting Diodes (LEDs) . . . . . . . . . . . . . . . . . . . . . . . . . . . . . . . . . . . 4
Understanding the display . . . . . . . . . . . . . . . . . . . . . . . . . . . . . . . . . . . . . . . . . . . . . . . . . . . . 4
Following safety precautions . . . . . . . . . . . . . . . . . . . . . . . . . . . . . . . . . . . . . . . 8
Using the phone in different scenarios . . . . . . . . . . . . . . . . . . . . . . . . . . . . . . 9
First steps . . . . . . . . . . . . . . . . . . . . . . . . . . . . . . . . . . . . . . . . . . . . . . . . . . . . . . . 11
Check the package contents . . . . . . . . . . . . . . . . . . . . . . . . . . . . . . . . . . . . . . . . . . . . . . . . . 11
Setting up and connecting the device . . . . . . . . . . . . . . . . . . . . . . . . . . . . . . . . . . . . . . . . 12
Setting up the device (for the first time) . . . . . . . . . . . . . . . . . . . . . . . . . . . . . . . . . . . . . . 18
Proceeding . . . . . . . . . . . . . . . . . . . . . . . . . . . . . . . . . . . . . . . . . . . . . . . . . . . . . . . . . . . . . . . . . . 21
Using the phone . . . . . . . . . . . . . . . . . . . . . . . . . . . . . . . . . . . . . . . . . . . . . . . . . 22
Operating via the keypad and display menu . . . . . . . . . . . . . . . . . . . . . . . . . . . . . . . . . . 22
Menu tree . . . . . . . . . . . . . . . . . . . . . . . . . . . . . . . . . . . . . . . . . . . . . . . . . . . . . . . . . . . . . . . . . . . 28
Making calls . . . . . . . . . . . . . . . . . . . . . . . . . . . . . . . . . . . . . . . . . . . . . . . . . . . . . 30
Calling . . . . . . . . . . . . . . . . . . . . . . . . . . . . . . . . . . . . . . . . . . . . . . . . . . . . . . . . . . . . . . . . . . . . . . . 30
Receiving incoming calls . . . . . . . . . . . . . . . . . . . . . . . . . . . . . . . . . . . . . . . . . . . . . . . . . . . . . 33
Ending a call . . . . . . . . . . . . . . . . . . . . . . . . . . . . . . . . . . . . . . . . . . . . . . . . . . . . . . . . . . . . . . . . . 33
Using functions when making a telephone call . . . . . . . . . . . . . . . . . . . . . . . . . . . . . . . 34
Making a call to multiple participants . . . . . . . . . . . . . . . . . . . . . . . . . . . . . . . . . . . . . . . . . 37
Setting up call divert (CD) . . . . . . . . . . . . . . . . . . . . . . . . . . . . . . . . . . . . . . . . . . . . . . . . . . . . 41
Using the call lists . . . . . . . . . . . . . . . . . . . . . . . . . . . . . . . . . . . . . . . . . . . . . . . 42
Viewing entries . . . . . . . . . . . . . . . . . . . . . . . . . . . . . . . . . . . . . . . . . . . . . . . . . . . . . . . . . . . . . . 42
Dialling a number from a list . . . . . . . . . . . . . . . . . . . . . . . . . . . . . . . . . . . . . . . . . . . . . . . . . 43
Copying an entry from the call list to the directory. . . . . . . . . . . . . . . . . . . . . . . . . . . . . 44
Deleting an entry or list . . . . . . . . . . . . . . . . . . . . . . . . . . . . . . . . . . . . . . . . . . . . . . . . . . . . . . 45
Using directories . . . . . . . . . . . . . . . . . . . . . . . . . . . . . . . . . . . . . . . . . . . . . . . . 46
Using the local directory . . . . . . . . . . . . . . . . . . . . . . . . . . . . . . . . . . . . . . . . . . . . . . . . . . . . . 46
Using your local directory on a USB stick . . . . . . . . . . . . . . . . . . . . . . . . . . . . . . . . . . . . . . 50
Using an LDAP directory . . . . . . . . . . . . . . . . . . . . . . . . . . . . . . . . . . . . . . . . . . . . . . . . . . . . . 51
Using online directories . . . . . . . . . . . . . . . . . . . . . . . . . . . . . . . . . . . . . . . . . . . . . . . . . . . . . . 52
Managing messages . . . . . . . . . . . . . . . . . . . . . . . . . . . . . . . . . . . . . . . . . . . . . 56
Managing voice mails on the network mailbox . . . . . . . . . . . . . . . . . . . . . . . . . . . . . . . . 56
Call records . . . . . . . . . . . . . . . . . . . . . . . . . . . . . . . . . . . . . . . . . . . . . . . . . . . . . . . . . . . . . . . . . . 57
Managing e-mail messages . . . . . . . . . . . . . . . . . . . . . . . . . . . . . . . . . . . . . . . . . . . . . . . . . . 58
Accessing messages via the Message Centre . . . . . . . . . . . . . . . . . . . . . . . . . . . . . . . . . . 61

6
Contents
Managing the calendar and alarms . . . . . . . . . . . . . . . . . . . . . . . . . . . . . . . 62
Managing the calendar . . . . . . . . . . . . . . . . . . . . . . . . . . . . . . . . . . . . . . . . . . . . . . . . . . . . . . 62
Displaying alarms . . . . . . . . . . . . . . . . . . . . . . . . . . . . . . . . . . . . . . . . . . . . . . . . . . . . . . . . . . . . 63
Displaying missed alarms . . . . . . . . . . . . . . . . . . . . . . . . . . . . . . . . . . . . . . . . . . . . . . . . . . . . 63
Alarm clock function . . . . . . . . . . . . . . . . . . . . . . . . . . . . . . . . . . . . . . . . . . . . . . . . . . . . . . . . . 64
Using Internet services . . . . . . . . . . . . . . . . . . . . . . . . . . . . . . . . . . . . . . . . . . . 66
Listening to Internet radio . . . . . . . . . . . . . . . . . . . . . . . . . . . . . . . . . . . . . . . . . . . . . . . . . . . . 66
Displaying Internet services in the Information Centre . . . . . . . . . . . . . . . . . . . . . . . . 67
Configuring basic settings . . . . . . . . . . . . . . . . . . . . . . . . . . . . . . . . . . . . . . . 69
Setting the date and time . . . . . . . . . . . . . . . . . . . . . . . . . . . . . . . . . . . . . . . . . . . . . . . . . . . . 69
Setting the ringer . . . . . . . . . . . . . . . . . . . . . . . . . . . . . . . . . . . . . . . . . . . . . . . . . . . . . . . . . . . . 70
Activating/deactivating advisory tones . . . . . . . . . . . . . . . . . . . . . . . . . . . . . . . . . . . . . . . 72
Setting the display . . . . . . . . . . . . . . . . . . . . . . . . . . . . . . . . . . . . . . . . . . . . . . . . . . . . . . . . . . . 73
Setting the language . . . . . . . . . . . . . . . . . . . . . . . . . . . . . . . . . . . . . . . . . . . . . . . . . . . . . . . . . 80
Resetting the device to the default settings . . . . . . . . . . . . . . . . . . . . . . . . . . . . . . . . . . . 80
Configuring settings for the local network . . . . . . . . . . . . . . . . . . . . . . . . 81
LAN settings . . . . . . . . . . . . . . . . . . . . . . . . . . . . . . . . . . . . . . . . . . . . . . . . . . . . . . . . . . . . . . . . . 82
Configuring WLAN settings . . . . . . . . . . . . . . . . . . . . . . . . . . . . . . . . . . . . . . . . . . . . . . . . . . 87
Connecting a mobile phone or headset . . . . . . . . . . . . . . . . . . . . . . . . . . . 90
Connecting a headset via RJ9 . . . . . . . . . . . . . . . . . . . . . . . . . . . . . . . . . . . . . . . . . . . . . . . . 90
Connecting a mobile phone or headset via Bluetooth . . . . . . . . . . . . . . . . . . . . . . . . . 91
Connecting a mobile phone or headset via DECT . . . . . . . . . . . . . . . . . . . . . . . . . . . . . 94
Using the resource directory . . . . . . . . . . . . . . . . . . . . . . . . . . . . . . . . . . . . . 96
Managing screensavers . . . . . . . . . . . . . . . . . . . . . . . . . . . . . . . . . . . . . . . . . . . . . . . . . . . . . . 97
Managing caller pictures . . . . . . . . . . . . . . . . . . . . . . . . . . . . . . . . . . . . . . . . . . . . . . . . . . . . . 98
Managing sounds . . . . . . . . . . . . . . . . . . . . . . . . . . . . . . . . . . . . . . . . . . . . . . . . . . . . . . . . . . . . 99
Checking the capacity of the Resource Directory . . . . . . . . . . . . . . . . . . . . . . . . . . . . . 100
Using a USB connection . . . . . . . . . . . . . . . . . . . . . . . . . . . . . . . . . . . . . . . . . 101
Connecting a USB device . . . . . . . . . . . . . . . . . . . . . . . . . . . . . . . . . . . . . . . . . . . . . . . . . . . . 101
Using a USB storage device to expand the memory . . . . . . . . . . . . . . . . . . . . . . . . . . 102
Using a USB stick for Gigaset MobileOFFICE™ . . . . . . . . . . . . . . . . . . . . . . . . . . . . . . . . 103
Web configurator – configuring the phone on a PC . . . . . . . . . . . . . . . 104
Starting the Web configurator . . . . . . . . . . . . . . . . . . . . . . . . . . . . . . . . . . . . . . . . . . . . . . . 104
Understanding the Web configurator menu tree . . . . . . . . . . . . . . . . . . . . . . . . . . . . . 106
Running the setup assistant . . . . . . . . . . . . . . . . . . . . . . . . . . . . . . . . . . . . . . . . . . . . . . . . . 107
Configuring phone settings via the Web configurator . . . . . . . . . . . . . 116
Network and connectors . . . . . . . . . . . . . . . . . . . . . . . . . . . . . . . . . . . . . . . . . . . . . . . . . . . . 116
Telephony . . . . . . . . . . . . . . . . . . . . . . . . . . . . . . . . . . . . . . . . . . . . . . . . . . . . . . . . . . . . . . . . . . 132
Messaging . . . . . . . . . . . . . . . . . . . . . . . . . . . . . . . . . . . . . . . . . . . . . . . . . . . . . . . . . . . . . . . . . . 141
Services . . . . . . . . . . . . . . . . . . . . . . . . . . . . . . . . . . . . . . . . . . . . . . . . . . . . . . . . . . . . . . . . . . . . 144
Function keys . . . . . . . . . . . . . . . . . . . . . . . . . . . . . . . . . . . . . . . . . . . . . . . . . . . . . . . . . . . . . . . 150
System settings . . . . . . . . . . . . . . . . . . . . . . . . . . . . . . . . . . . . . . . . . . . . . . . . . . . . . . . . . . . . . 152

7
Contents
Checking the status of the phone . . . . . . . . . . . . . . . . . . . . . . . . . . . . . . . . 160
Appendix . . . . . . . . . . . . . . . . . . . . . . . . . . . . . . . . . . . . . . . . . . . . . . . . . . . . . . 162
Caring for your telephone . . . . . . . . . . . . . . . . . . . . . . . . . . . . . . . . . . . . . . . . . . . . . . . . . . . 162
Contact with liquid . . . . . . . . . . . . . . . . . . . . . . . . . . . . . . . . . . . . . . . . . . . . . . . . . . . . . . . . . 162
Using insert strips . . . . . . . . . . . . . . . . . . . . . . . . . . . . . . . . . . . . . . . . . . . . . . . . . . . . . . . . . . . 162
Using Gigaset QuickSync – additional functions for the PC interface . . . . . . . . . . 162
Specifications . . . . . . . . . . . . . . . . . . . . . . . . . . . . . . . . . . . . . . . . . . . . . . . . . . . . . . . . . . . . . . . 163
Service (Customer Care) . . . . . . . . . . . . . . . . . . . . . . . . . . . . . . . . . . . . . . . . . 164
Questions and answers . . . . . . . . . . . . . . . . . . . . . . . . . . . . . . . . . . . . . . . . . . . . . . . . . . . . . 164
Authorisation . . . . . . . . . . . . . . . . . . . . . . . . . . . . . . . . . . . . . . . . . . . . . . . . . . . . . . . . . . . . . . . 164
Protecting our environment . . . . . . . . . . . . . . . . . . . . . . . . . . . . . . . . . . . . . 165
Using free software . . . . . . . . . . . . . . . . . . . . . . . . . . . . . . . . . . . . . . . . . . . . . 166
Accessories . . . . . . . . . . . . . . . . . . . . . . . . . . . . . . . . . . . . . . . . . . . . . . . . . . . . . 173
Glossary . . . . . . . . . . . . . . . . . . . . . . . . . . . . . . . . . . . . . . . . . . . . . . . . . . . . . . . 174
Index . . . . . . . . . . . . . . . . . . . . . . . . . . . . . . . . . . . . . . . . . . . . . . . . . . . . . . . . . . 188

8
Following safety precautions
Following safety precautions
Warning
Be sure to read this user guide and the safety precautions before using your tele-
phone.
Use only the power adapter supplied, as indicated on the underside of
the telephone.
Using your telephone may affect nearby medical equipment. Be aware of
the technical conditions in your particular environment, e.g., doctor's sur-
gery.
Do not install the phone in a bathroom or shower room. The phone is not
splashproof.
Do not use your phone in environments where there is a risk of explosion,
e.g., auto paint shops.
If you give your phone to a third party, make sure you also give them the
user guide.
Remove faulty telephones from use or have them repaired by our Service
team, as they could interfere with other wireless services.
$
ƒ

9
Using the phone in different scenarios
Using the phone in different scenarios
Using your phone in a professional environment with phone system and
server structure
If you use your Gigaset DE900 IP PRO in a corporate network with a telephone infrastruc-
ture, your phone incorporates functions and data from the phone system and servers.
In a corporate environment, the VoIP accounts and most of the settings are configured
centrally by the phone system.
§§1§§ Gigaset IP telephone
§§2§§ Gigaset IP telephone with integrated gigabit switch (Gigaset DE900 IP PRO).
Your PC is connected directly to the phone, providing you with an additional LAN con-
nection in your network.
§§3§§ DECT base for connection to DECT handsets
§§4§§ Ethernet switch
Supports Quality of Service (QoS), Gigabit Ethernet and PoE (Power over Ethernet).
§§5§§ Phone system (e.g., Gigaset T500 PRO)
Forms Internet telephony, ISDN or S2M connections. Analogue devices can be con-
nected. A network connection is established using Ethernet.
§§6§§ Acts as a gateway to the Internet for the connected devices. Routes VoIP calls from the
phone system to the Internet.
§§7§§ File, e-mail and workgroup servers, or NAS systems, can be wirelessly integrated into
the phone system architecture. As a result:
– Invitations to conference calls can be organised via the phone system
– The phone system can be backed up to a server or the system can be started via the
network
– Online directories (LDAP) can be managed centrally
DSL connection
1
2
3
45
6
7
ISDN, S2M

10
Using the phone in different scenarios
Using your phone in a simplified environment without a phone system
You can also use your Gigaset DE900 IP PRO without a phone system.
§§1§§ Gigaset IP telephone with integrated gigabit switch (Gigaset DE900 IP PRO).
Your PC is connected directly to the phone, providing you with an additional LAN con-
nection in your network.
§§2§§ Acts as a gateway to the Internet for the connected devices. Routes VoIP calls from the
phone to the Internet. You establish the connection to the gateway via cable or wire-
lessly via WLAN.
§§3§§ The SIP provider transfers calls from the Internet and establishes a connection with the
standard telephone network.
In this scenario, you must manually configure the VoIP accounts for your phone. You can
create up to 12 VoIP accounts on your phone.
Internet
Connection
ISDN,
S2M
SIP provider
1
3
2

11
First steps
First steps
Check the package contents
Telephone: Gigaset DE900 IP PRO
Receiver with cable for connection to the
phone
Ethernet cable for connection to the local
network (switch/router/gateway)
Power adapter for connecting the phone to
the mains power supply (if required)
with three different plug-in modules
(Europe, Great Britain, USA)
The device is powered by PoE (Power over
Ethernet) if it is connected to a switch with
PoE-functionality (£Page 15).
CD containing Gigaset QuickSync™ PC soft-
ware
and this user guide
Insert strips for labelling
the function keys (with protective film)

12
First steps
Setting up and connecting the device
The phone is designed for use in dry rooms in a temperature range of ±0°C to +45°C.
¤Set up the phone at a central point where a connection to the local network is availa-
ble.
Firmware update
Whenever there are new or improved functions for your Gigaset, firmware updates are
made available for you to download to your phone (Page 158). If this results in opera-
tional changes to your phone, a new version of this user guide or the necessary amend-
ments are published on the Internet at www.gigaset.com/pro.
Select the product to open the relevant product page for your telephone, where you will
find a link to the user guide.
To find out what version of firmware is currently loaded on your phone, see Page 160.
Please note
The following conditions must be observed:
uIf you want to establish a wireless connection using DECT, pay attention to the range
of the base station. This is up to 300 m in unobstructed outdoor areas and up to 50
m inside buildings.
uIf you wish to establish a connection with the local network using WLAN, please
ensure that the device is within range of the access point.
Warning
uNever expose the Gigaset DE900 IP PRO to the following:
heat sources, direct sunlight or other electrical appliances.
uProtect your Gigaset from moisture, dust, corrosive liquids and fumes.
13
First steps
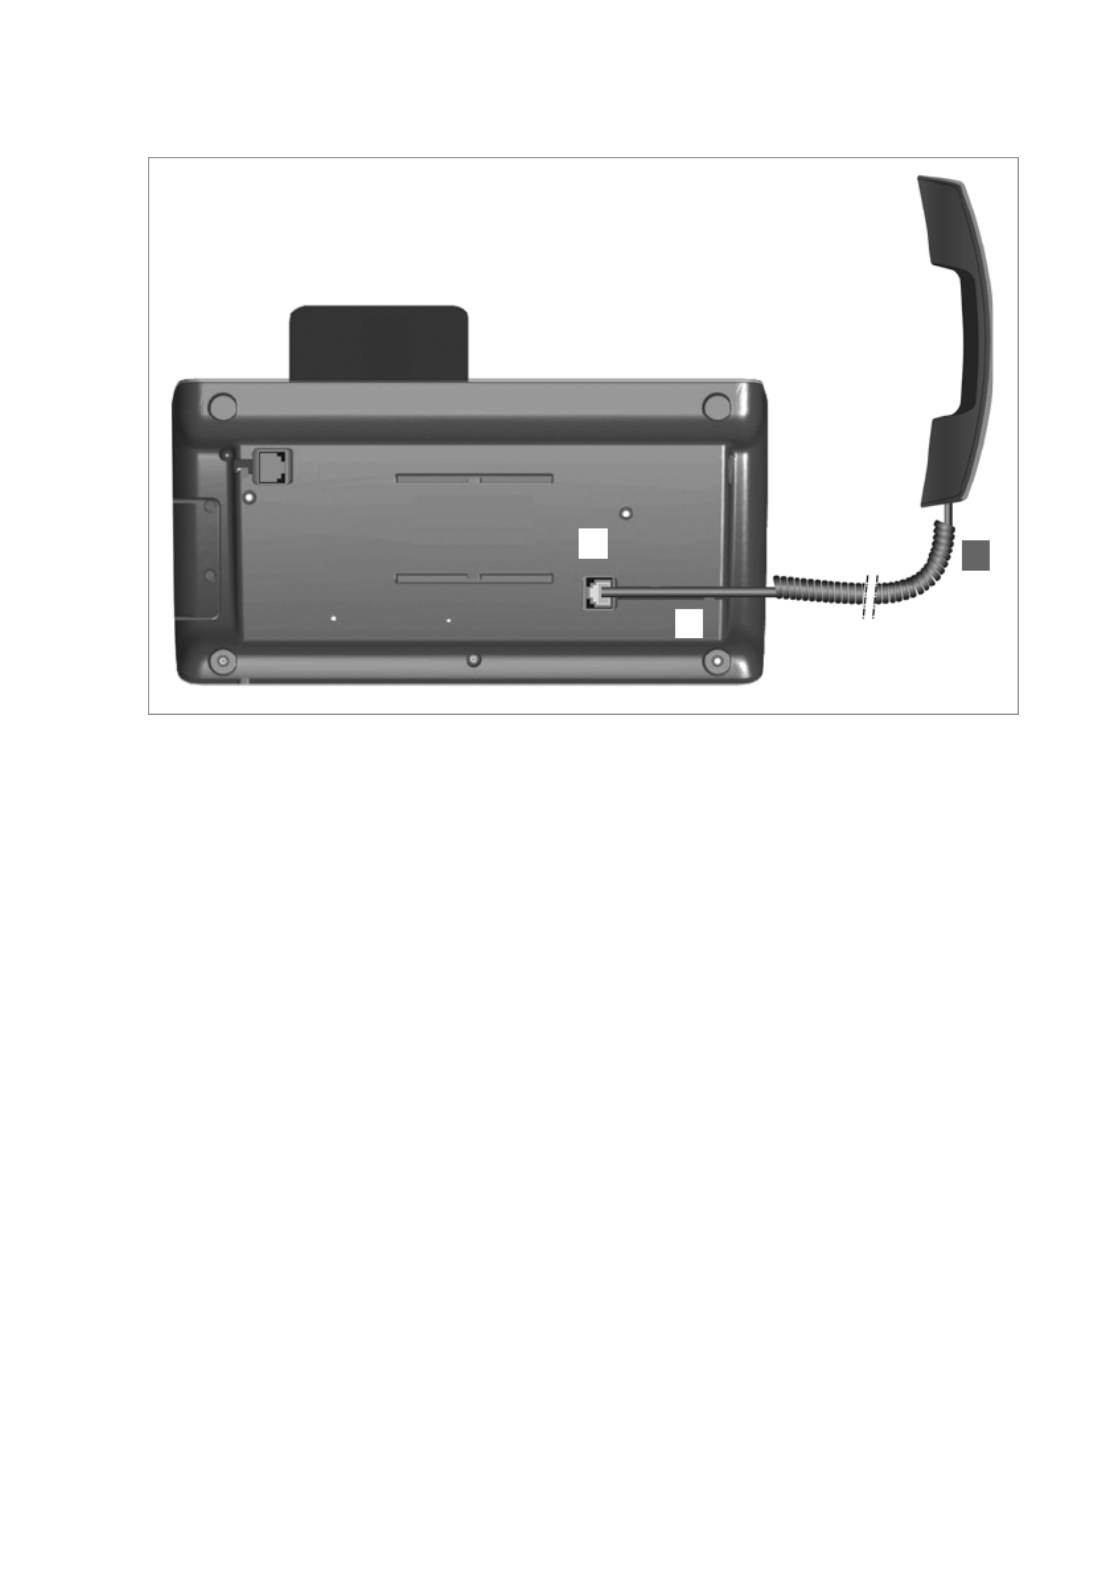
Connecting the receiver
§§1§§ Insert the connector, which can be found on the longer straight end of the connection
cable, into the connection port on the bottom of the phone.
§§2§§ Place the straight part of the cable in the cable recess provided.
3Insert the other jack on the connection cable into the port on the receiver.
1
2
3

14
First steps
Connecting the network cable
To make calls via VoIP, your phone must have Internet access. This connection is estab-
lished in the local network via a gateway.
You connect your phone to the same local network as the gateway. See the Using the
phone in different scenarios section on Page 9 for an overview of the different options.
§§1§§ Attach one end of the Ethernet cable supplied to the right-hand LAN port on
the rear of the phone.
§§2§§ Attach the other end of the Ethernet cable to a LAN port on your network Eth-
ernet switch or on the router itself.
An Ethernet cable is not required if you connect your phone to the local network using
WLAN. However, we recommend that you use a cable the first time you establish a con-
nection.
Warning
If you connect your Gigaset DE900 IP PRO to a PoE-capable Ethernet switch (PoE class
IEEE802.3af), it will be supplied with power via PoE (Power over Ethernet). The PoE net-
work must not exceed the premises boundaries.
21

15
First steps
Connecting the PC
You must connect your Gigaset DE900 IP PRO to a PC to use the Web user interface or to
configure the phone using the Web configurator.
Your phone has an integrated two-port switch. This allows you to connect your PC to the
local network via the phone and avoid using additional connection ports on the switch or
router.
You need an additional Ethernet cable to connect a PC.
§§1§§ Connect an Ethernet cable to the left-hand LAN port on the rear of the phone.
§§2§§ Connect the other end of the Ethernet cable to a LAN port on the PC.
Connecting a device to the mains power supply (if required)
Your Gigaset DE900 IP PRO is supplied with sufficient power by PoE (Power over Ethernet)
and does not need to be connected to the mains power supply. Prerequisite: The device
is connected to an Ethernet switch with PoE functionality (PoE class IEEE802.3af)
(£Page 14).
However, in the following cases you must connect the device to the mains power supply:
uIf you connect the device to the local network using WLAN
uIf you connect additional extension modules to the device (£Page 17).
The power adapter is supplied with three different plug-in modules for Europe, Great Brit-
ain and the USA. First attach the appropriate plug-in module to the power supply unit.
2
1

16
First steps
§§1§§ Slide the required plug-in module into the recess on the underside of the power sup-
ply unit until it clicks into place.
§§2§§ To remove the plug-in module again, press on the button marked Push and pull the
plug-in module out of the power supply unit.
§§1§§ Connect the power adapter to the port on the rear of the phone.
§§2§§ Then insert the plug into the mains socket.
Europe
Geat Britain
USA
1
2
2
1
3
Warning
Use only the power adapter supplied.
Please note
You can safeguard your device against theft by fitting a Kensington lock. The corre-
sponding hole can be found on the rear of the device (§§3§§).

17
First steps
Connecting extension modules (optional)
You can increase the number of programmable keys using extension modules (max.
three; can be ordered as accessories £Page 173). Each module includes 14 additional
programmable keys. The function keys can be programmed using the Web configurator
(£Page 150).
The package contains:
uOne extension module
uOne connection frame with four fastening screws
uOne connection cable
uInsert strips
§§1§§ Position the extension module to the right of the phone (on left when viewed from be-
low), so that the module and phone are the same height and meet in the centre.
§§2§§ Insert the clasps on the connection frame into the respective notches on the phone
and module and push the connection frame upwards until it clicks into place. Secure
the connection frame with the screws provided.
§§3§§ Establish the connections using the cable supplied.
Extension module
1
3
Extension module Gigaset DE900 IP PRO
2

18
First steps
Setting up the device (for the first time)
Your device will start automatically as soon as it is connected to the mains power supply.
Please be aware that the device is powered by PoE (Power over Ethernet). This means that
it is supplied with power as soon as it is connected to an Ethernet switch with PoE-func-
tionality.
The first time you use the device, an installation wizard will start automatically and guide
you through the necessary installation steps.
Configuring language and time zone settings
When you have made your selection, press the end key I to return to the last entry
screen. You can correct your selection if necessary.
¤Use the navigation key to select the
required language. To do this, press
up or down on the navigation key q.
Further information about the navi-
gation key can be found on
£Page 24.
¤Press the display key under §OK§ to
confirm your selection.
You can also use the OK function on
the navigation key (by pressing ‰in
the centre of the key).
¤Use the navigation key to select the
required time zone.
¤Press the display key under §OK§ to
confirm your selection.
Please note
The date and time are automatically set by a time server. You can select a time server
using the Web configurator or deactivate this function (£Page 152).
Select your Language
OK
English
Deutsch
Francais
Italiano
Espanol
Portugues
Nederlands
Select your Time Zone
OK
GMT: Dublin, London
GMT+1: Amsterdam, Berlin, ...
GMT+2: Athens, Cairo, Israel
GMT+3: Bagdahd, Kuweit ...
GMT+4: Abu Dhabi, Mucat
GMT+5: Islamabad, Karachi
GMT+6: Dhaka, Colombo

19
First steps
Establishing a connection to the local network/WLAN
Your phone must be connected to the local network before it can connect to the Internet
and before you can operate it from a PC.
The device checks to see if a network connection already exists. The network connection
is automatically established if the phone has automatically been assigned an IP address
from a DHCP server in the network. If this is the case, the following screen will not appear
and you can skip to £Page 20.
If your phone has no network connection, you will need to configure the network manu-
ally. Depending on the type of network, you will need the following information about
the configuration:
uIf the network uses IP protocol version 4 (IPv4) with a static IP address, you will need:
The device IP address, the network subnet mask, the IP addresses of the standard gate-
way and DNS server.
uIf the network uses IP protocol version 6 (IPv6):
IP addresses automatically: select IPv6 as Network Type. The connection is then estab-
lished automatically.
IP addresses statically: the device IP address, the address prefix length and the DNS
server IP address.
uIf you are using the wireless local network (WLAN), you will need:
The name of the WLAN with which you wish to connect the phone (SSID), network key
If there is still no network connection, you will then be asked whether you wish to config-
ure the connection manually.
¤Select §§Yes§§ if you have the required information.
¤Select §§No§§ if you want to use the display menu to configure the network at a later date
(£Page 81).
Your device is now connected to the local network and can be configured for Internet
telephony.
Please note
The following network configuration is the default setting on your device: LAN with IP
protocol version 4 (IPv4) and DHCP.
If you selected §§Yes§§§, you can configure
the network immediately.
Depending on your selection, additional
screens may be displayed so you can
enter the required information.
More detailed information on LAN/
WLAN configuration can be found on
£Page 81.
¤Once you have configured the set-
tings, press the display key under
§§Save§§.
Local Network
Back Save
Network Type
IPv4
Activated Network:
LAN
IP Address Type:
Static
IP Address:

20
First steps
Configuring Internet telephony
Before you can use the Internet to phone anyone over the Internet, the fixed line network
or the mobile phone network, you need the services of a VoIP provider.
Prerequisite:
– You have a phone system in your network that provides VoIP accounts for your
device, or
– You have registered with a VoIP provider (e.g., via your PC) and set up a VoIP
account.
The device searches the network for a provisioning file and checks whether VoIP accounts
already exist. If the telephone has existing VoIP accounts, these accounts are configured
automatically. You can now make calls with your phone via the Internet.
If the telephone has no existing VoIP accounts, you must configure them manually. The
Web configurator's installation wizard will help you with this (£Page 107).

21
First steps
Proceeding
Now you have successfully set up your phone, you can adapt it to your personal require-
ments. Use the following guide to quickly locate the most important topics.
If you are unfamiliar with menu-driven devices such as other Gigaset telephones, you
should first read the section entitled Using the phone on Page 22.
If you have any questions about using your phone, please read the tips on
troubleshooting (Page 164) or contact our Customer Care team ( £Page 164).
Information on ... ... is located here.
Operating the phone via the keypad and display menu Page 22
Making calls Page 30
Setting up and using directories Page 46
Displaying Internet services Page 66
Setting ringers Page 70
Setting the idle display and screensavers Page 73
Connecting a headset or mobile phone Page 87
Loading your own pictures and sounds Page 96
Setting up VoIP accounts Page 107
U
U
U
U
U
U
U
U
U

22
Using the phone
Using the phone
You have a range of options for operating and configuring your Gigaset DE900 IP PRO in
a way that is convenient for you. For example, you can initiate a phone call or conference
call using the phone's keypad and display menu. You can change your configuration set-
tings using the display menu or the Web configurator.
The option you choose will depend on the situation.
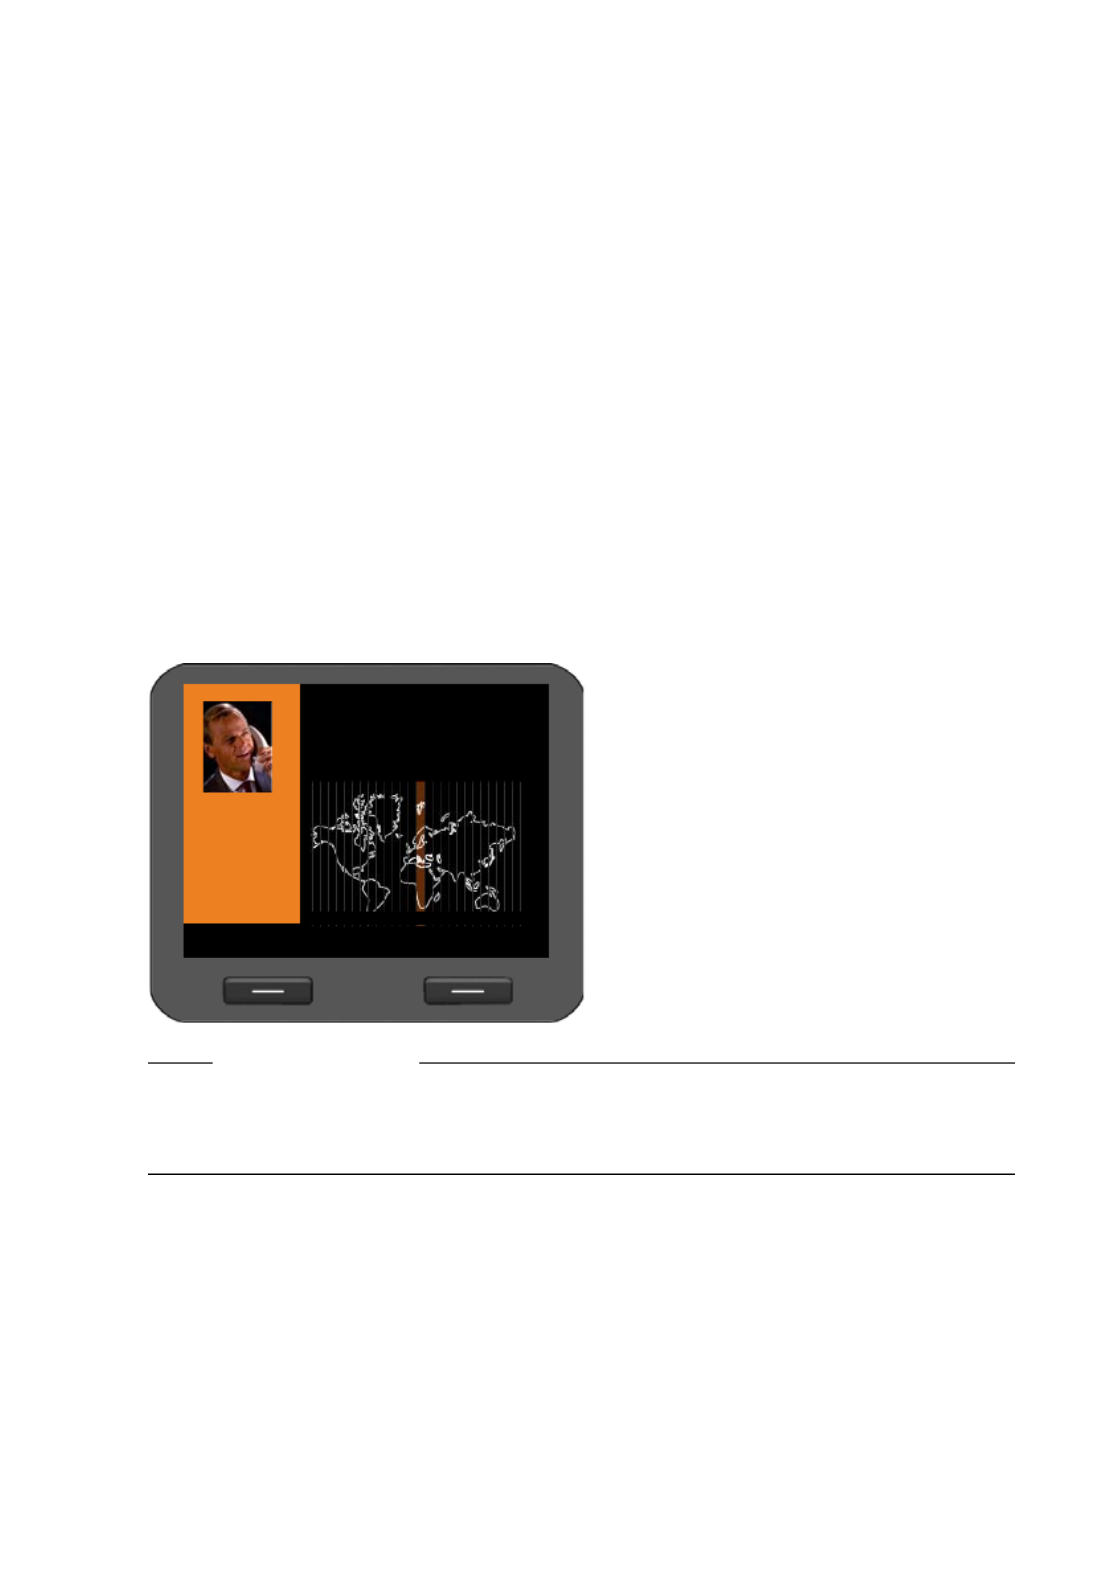
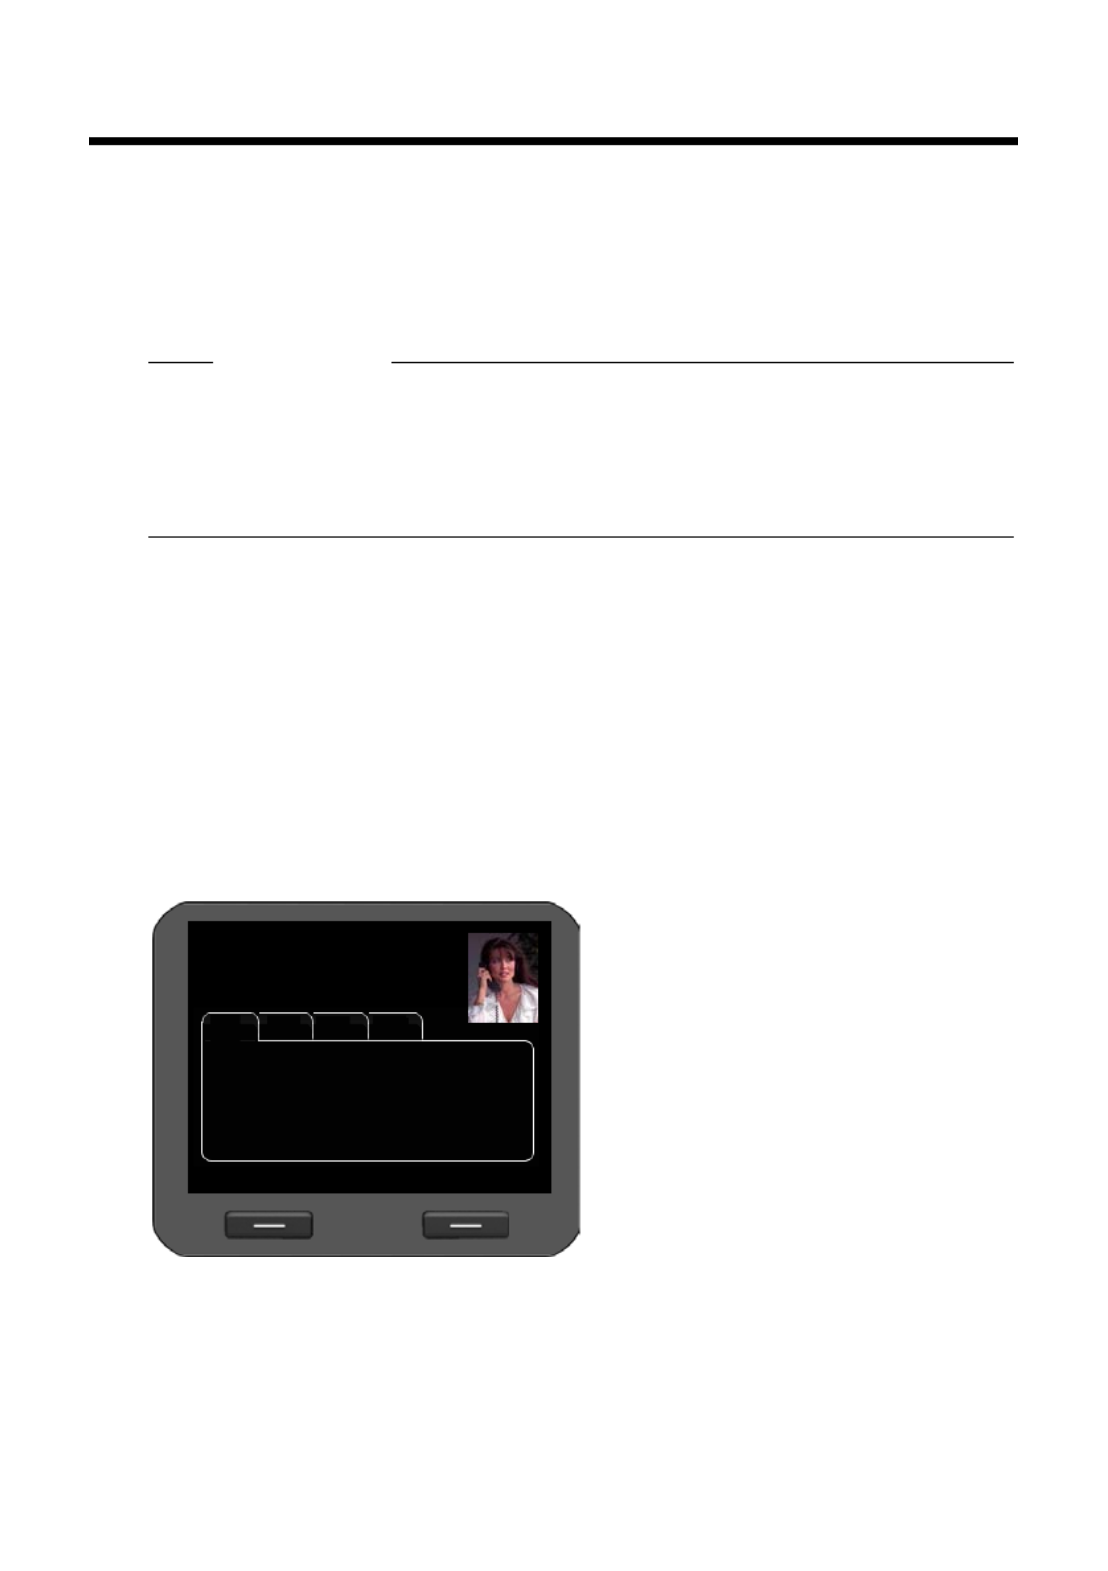
Operating via the keypad and display menu
Display and display keys
The display gives you quick access to all the functions on your phone, particularly the
menu functions.
In idle status, icons on the display indicate the status of your phone ( £Page 4). Alterna-
tively, you can select the information you wish to display, e.g., time, calendar or pictures
(£Page 73).
Use the display keys to activate the phone's functions and to navigate through the menu.
Different functions are available depending on the operating situation. These functions
are displayed at the bottom of the screen.
Example:
Some important display keys:
§§Options§§ Open a menu for further functions.
§§OK§§ Confirm selection.
Delete key: Delete one character at a time from right to left.
§§Back§§ Skip back one menu level or cancel the operation.
§§Save§§ Save entry.
Copy the displayed entry to the directory.
Back OK Current display key functions
Display keys
Û
ß

23
Using the phone
Writing and editing text
A text editor is provided for entering text via the keypad.
Deleting/correcting characters
Press the display key. The character to the left of the cursor is deleted. Press
and hold to delete the word to the left of the cursor.
Entry mode
A range of entry modes are available depending on the operating situation. The current
mode is displayed on the right-hand side of the editor field.
Abc Letters, first letter upper case, others lower case, e.g., for entering names.
abc Lower case only, e.g., for entering e-mail addresses.
123 Digits only for entering numbers.
Switching entry mode
#Press the hash key. The text entry mode will change.
Moving the cursor
rPress the navigation key briefly: moves the cursor one character at a time.
Press and hold the navigation key: moves the cursor word by word.
qPress the navigation key: moves the cursor line by line. The cursor stays in a
horizontal position.
~Enter the text.
Each key between Q O and is
assigned several letters and digits.
Press the relevant key a certain number
of times to enter a particular character.
For example k = 2 x the 5 key.
The characters available are shown in
the editor field. The highlighted char-
acter is inserted to the left of the cursor.
Û ß
j §k§ l 5 abc
Prepare Dialling 11:45
peter.black@k|
Û

26
Using the phone
Reverting to idle status
You can revert to idle status from anywhere in the display menu as follows:
¤Press and hold the end key I.
Or:
¤Do not press any key: After 3 minutes the display will automatically revert to idle
status.
Settings that have not been saved by selecting the display keys §OK§, §Yes§, §Save§ or §Change§
or the navigation key ‰ are lost.
Scrolling through lists
If it is not possible to view all of the func-
tions/list entries at the same time (list is
too long), arrows appear on the right-
hand side. The arrows indicate the direc-
tion in which you need to scroll to view
the rest of the entries in the list.
Copy to Directory
Back OK
Adam
Black, Susan
Brown, Tim
Forster, Fred
Judy
Miller, Peter
White, Phil

27
Using the phone
Understanding the operating steps
The operating steps used to navigate through the display menu are shown in abbreviated
form.
For example, setting the ringer volume
‰ ¢Settings ¢Audio Settings ¢Ringer Settings ¢Volume
means:
¤Press the centre of the navigation key
to open the main menu.
¤Navigate up/down using the naviga-
tion key q until the Settings sub-
menu is selected.
¤Press the display key §OK§ to confirm
your selection.
Back OK
Select Services
Additional Features
Organizer
Messages
Call Lists
Contacts
Settings
¤Continue to navigate t
h
roug
h
t
h
e menu
using the navigation and display key until
you reach the Volume submenu.
Settings
Back OK
Date / Time
Audio Settings
Display
Language
Connectivity
Reset
Audio Settings
Back OK
Ringer Settings
Advisory Tones
Volume
Back Save
Calls:
Ringer Settings
Back OK
Volume
Melodies
Time Control
Anon. Call Silencing

28
Using the phone
Menu tree
The following menu tree shows all the components of the display menu.
Select Services Next Call anonymous £Page 36
All Calls anonymous £Page 36
Call Divert £Page 41
Call Waiting £Page 37
Active Ringbacks £Page 33
Additional Features Internet Radio £Page 66
Resource Directory Screensavers £Page 97
Caller Pictures £Page 98
Sounds £Page 99
Capacity £Page 100
Organizer Calendar £Page 62
Alarm Clock £Page 64
Missed Alarms £Page 63
Messages Voice Mail £Page 56
Call Records £Page 57
E-mail £Page 58
Call Lists All Calls £Page 42
Outgoing Calls £Page 42
Accepted Calls £Page 42
Missed Calls £Page 42
Contacts Directory £Page 46
USB Directory £Page 50
You can choose any name
LDAP Directory £Page 51
Online directories £Page 52 The name of these menu entries
depends on Web configurator
settings £Page 147.
Settings ¢continues on the next page

29
Using the phone
Settings Date / Time £Page 69
Audio Settings Ringer Settings Volume £Page 70
Melodies £Page 71
Anon. Call Silenc-
ing £Page 72
Advisory Tones £Page 72
Display Idle Display £Page 73
Screensaver £Page 77
Backlight £Page 79
Language £Page 80
Connectivity Bluetooth Activation £Page 91
Search for Device £Page 92
Known Device £Page 93
Own Device £Page 94
DECT Activation £Page 94
Register Device £Page 95
De-register Device £Page 95
Eco Mode+ £Page 95
Local Network £Page 82
USB £Page 101
Reset £Page 80

31
Making calls
When entering the phone number:
ÛPress the display key to delete incorrectly entered figures to the left of the
cursor.
ßPress the display key to copy entered phone numbers to the local directory
(£Page 46).
IPress the end key to cancel dialling.
Dialling a number from the directory
You can save up to 500 entries (vCards) in the local directory. You can create directory
entries and manage them using the phone's display menu ( £Page 46).
To dial a number proceed as follows:
ZOpen the directory using the navigation key s.
Or use the display menu
‰ ¢Contacts ¢Directory
qScroll through the list to the
required name.
Press U to show the details for the
entry.
cLift the receiver. The number is
dialled.
qIf more than one number is
assigned to the entry, select the
required number. If you do not
select a number, the default phone
number will be dialled after a brief
period.
Adam
Black, Susan
Brown, Tim
View Options
Miller, Peter
White, Phil
Forster, Fred
Judy
F
B
C
D
E
G
H
I
J

32
Making calls
Dialling a number using a function key
You can assign phone numbers to up to 14 function keys; you then only need to press a
key once to dial the number. You can increase the number of function keys by connecting
extension modules. Use the Web configurator to assign numbers to the function keys
(£Page 150).
S Press the function key.
The number assigned to the function key is dialled.
Dialling a number from the call lists
The following calls are saved:
uOutgoing calls (redial list)
uAccepted calls
uMissed calls
The last 30 numbers are stored in each of the call lists. The name will appear on the display
if you have saved the number in the directory.
You can browse through the entries and dial directly from within the record.
If there are new entries in the missed calls list, the Message Centre key E flashes.
To save numbers from a list in the directory, see ( £Page 42).
Viewing call lists and dialling numbers
Open the required call list:
È tOpen the redial list using the navigation key .
EOpen the list of missed messages in the Message Centre.
Or use the display menu
‰ ¢Call Lists ¢All Calls
‰ ¢Call Lists ¢Outgoing Calls
‰ ¢Call Lists ¢ Missed Calls
‰ ¢Call Lists ¢ Accepted Calls
The last (most recent) call or dialled phone number is shown on the display.
qSelect another entry if necessary.
cLift the receiver.
The number is dialled.
All Calls
View Options
Brown, Tim
via §§1§§Account1
Today, 00:07 Duration: 00:05:20
1/30
š
Brown, Tim
via §§1§§MyOffice
01.05.10, 12:20
š
Miller, Peter
™
33
Making calls
Initiating ringback
if the number you have called is busy. Prerequisite: This function is supported by your
phone system or your provider.
§§Ringback§§ Press the display key to initiate a ringback.
Ringback is initiated as soon as the line is free again.
Deactivating ringback
You can deactivate the ringback for all of the VoIP accounts configured on your phone or
just for certain VoIP accounts.
‰ ¢Select Services ¢Active Ringbacks
Accounts for which ringback is permitted are marked with a tick.
qSelect the required entry.
§§Change§§ Press the display key to remove a tick and to deactivate the ringback.
Receiving incoming calls
You hear the ringer and the speaker key Aflashes.
Deactivating the ringer
§§Silence§§ Press the display key to deactivate the ringer. You can then decide whether
to accept or reject the call.
Rejecting a call
§§Reject§§ Press the display key or the end key Ito reject the call.
Ending a call
&Put down the receiver or press the end key I.
The display shows the caller's number
(where calling line identification is per-
mitted £Page 36) and their name, if
they are saved in the directory. If a pic-
ture is assigned to the caller, this will also
appear.
The account that the call is received on is
also shown.
cLift the receiver. You can speak to
the caller.
Please note
When you receive a call, the phone first of all searches for a corresponding entry in the
local directory. If the number doesn't appear there, the other directories are searched
(if configured) (£Page 147).
Reject Silence
Brown, Tim
§§1§§ Account1
l1234567890
ã
08:00 Amsterdam

35
Making calls
Muting
You can deactivate the microphone for the receiver, the speaker kit and the headset. The
other party can then no longer hear you.
CPress the mute key during the phone call.
Press the key again to reactivate the microphone.
The C key is lit up while the function is activated.
Activating/deactivating speaker mode
Activating via the receiver during a call:
A & Press the speaker key and put down the receiver.
The A key is lit up while the function is activated.
In speaker mode, you hear the caller via the speaker.
Deactivating speaker mode during a call:
cLift the receiver. Continue the call via the receiver.
Do not disturb
You can activate the Do Not Disturb (DND) function if you do not want to receive any calls
and you do not want the phone to ring.
You can still make calls when this function is activated.
GPress the Do Not Disturb key.
Press the same key again to deactivate the function.
The G key is lit up while the function is activated.
Please note
You should tell your caller if you have activated the speaker.
Please note
uYou can permanently deactivate the ringer for anonymous calls (£Page 72).
uYou can use the Web configurator to create a blacklist of unwanted names and
numbers (£Page 140). Once you activate the blacklist function, calls from these
numbers will not be put through.

36
Making calls
Two-way recording
You can record your two-way telephone conversations.
FPress the call records key.
Press the key again to end the call record.
The F key is lit up while the function is activated.
The phone memory can store two-way call records of up to 30 minutes. If you want to
record two-way calls for longer than 30 minutes, you can connect a USB storage device
(£Page 101). The Ý USB icon flashes on the display while a two-way call is being
recorded to the USB device. Calls can also be recorded onto a server ( £Page 140).
Go into the display menu to play back and delete two-way call recordings Messages
¢ £Call Records ( Page 57).
Anonymous calling – withholding caller ID
You can make anonymous calls (CLIR = Calling Line Identification Restriction). Your phone
number will not be displayed when making outgoing calls. You are calling anonymously.
Prerequisite: Anonymous calls are only possible via VoIP connections through providers
that support the "anonymous calling" function. You may have to ask your VoIP provider
to activate this function.
Making an anonymous call
Select:
‰ ¢Select Services ¢Next Call anonymous
Then proceed as normal:
~Enter the phone number.
cLift the receiver.
The number is dialled. Your number is not transferred.
Activating/deactivating "anonymous calling" for all calls
You can permanently activate/deactivate the anonymous call function for all of the VoIP
accounts configured on your phone or just for certain accounts. The anonymous call func-
tion is activated for the phone and any handset that is registered.
‰ ¢Select Services ¢All Calls anonymous
Accounts for which anonymous calling is permitted are marked with a tick.
qSelect the required entry.
§§Change§§ Press the display key to tick the box.
Press the display key again to remove the tick.
Please note
uConference calls cannot be recorded.
uYou should tell your caller if you are recording a two-way conversation.

37
Making calls
Making a call to multiple participants
Initiating a consultation call
During a call, you want to consult a second participant.
JPress the consultation call key during the call.
The call is placed on hold. You can make another call to a second participant. Once the call
has ended, press the consultation key again. You are reconnected to the first participant.
Accepting/rejecting call waiting
You hear the call waiting tone during a phone call.
Accepting a call:
§§Accept§§ Press the display key to accept the call.
Rejecting a call:
§§Reject§§ Press the display key to reject the waiting call.
The display shows the caller's number
(where calling line identification is per-
mitted £Page 36) and their name, if
they are saved in the directory.
The display also shows the subscriber
number used to receive the call and indi-
cates whether this is a ringback.
You are connected to the waiting partici-
pant.
The first participant hears music on hold.
The number is displayed and the à icon
identifies it as the waiting participant.
qSelect the connection.
§§Remove§§ Press the display key to end
the selected connection.
Accept Reject
Tim Brown
lã §§1§§ Account1
1234567890
Ù
Ø
Call Swap 11:45
Remove
...90987654321
via §§1§§ Account1
Add Particip.
W
W
W
WW
09:13
à0981234567890

38
Making calls
Activating/deactivating call waiting
You can deactivate call waiting during a call for all of the accounts configured on your
phone or just for certain accounts.
‰ ¢Select Services ¢Call Waiting
Accounts for which call waiting is permitted are marked with a tick. Callers via other
accounts hear the busy tone.
qSelect the required entry.
§§Change§§ Press the display key to tick the box.
Press the display key again to remove the tick.
Call swapping
You are speaking to one participant and a second is on hold; this may be because you
have accepted a waiting call or have placed one caller on hold.
JPress the consultation call key to swap from one caller to the other.
Initiating a consultation call with a third participant:
§§Add Particip.§§
Press the display key. Both participants are placed on hold.
~Enter the phone number for the third participant.
§§Dial§§ Press the display key. The number is dialled.
To speak to one of the participants on hold again after you have finished the ringback:
qSelect the relevant participant.
JPress the ringback key.

39
Making calls
Initiating a conference
You are speaking to one participant while another is on hold.
qSelect the participant who is on hold.
KPress the conference key to add the waiting participant to a conference.
Or
You are speaking to one or more participants and you wish to add an additional partici-
pant.
KPress the conference key.
~Enter the phone number for the additional participant.
§§Dial§§ Press the display key. The number is dialled.
As soon as the participant answers, they are automatically connected to the conference
call.
§§Add Particip.§§
Press the display key to begin a consultation call with another participant. In
contrast to conference key K. The conference participants are put on
hold.
All the participants in the conference are
listed on the display.
Removing a participant from the con-
ference call:
qSelect the participant.
§§Remove§§ Press the display key to end
the conference for the high-
lighted participant.
Please note
Only participants who share the same VoIP account can participate in a conference
call.
Conference 11:45
Remove
...90987654321
Add Particip.
œ
œ
œ
œœ
09:13 0981234567890
...981234567890

40
Making calls
Transferring a call to another number
You are speaking to one participant and you want to transfer the call to a third participant.
Transfer without consultation:
LPress the transfer key. The call is placed on hold.
~Enter the phone number for the participant to whom you want to transfer the
call.
LPress the transfer key again. The call is transferred to the number you have
dialled. Your connection to the participant is ended.
Transfer with consultation:
Use this function to ensure that the connection is actually established.
LPress the transfer key. The call is placed on hold.
~Enter the phone number for the participant to whom you want to transfer the
call.
§§Dial§§ Press the display key. The number is dialled.
You can now hang up or press the transfer key L to forward the call.
When you call the third participant you can also wait for them to answer and speak to
them, for instance to tell them you are forwarding a call. Then press the transfer key L.
Transfer to participants on hold:
You are speaking to one participant and there are others on hold. You can transfer the cur-
rent call to one of the participants on hold.
qSelect one of the participants on hold.
LPress the transfer key. The chosen participant is connected to the person you
are currently speaking to.
41
Making calls
Setting up call divert (CD)
When you divert a call, the call is forwarded to another connection. Your call divert set-
tings can be specific to a particular connection (i.e., settings for each configured VoIP
account). Prerequisite: The VoIP provider supports call divert.
‰ ¢Select Services ¢Call Divert
The list contains the accounts configured on your telephone.
qSelect the required account.
§§OK§§ Press the display key to confirm the selection.
§§Save§§ Press the display key to save the settings for this account.
rSwitch Activation on/off.
sSelect the entry To Phone
Number.
~Enter the phone number to which
the call should be diverted.
sSelect the entry When.
rSelect when the call divert is to
apply:
All Calls All calls are diverted.
No Answer Calls are diverted if no one accepts the call within several rings.
When Busy Calls are diverted if your line is busy.
Call Divert
Back Save
Activation:
On
To Phone Number:
When:
All Calls
§§1§§Account1

42
Using the call lists
Using the call lists
The following call lists are available:
A maximum of 30 entries is saved in the lists. The next entry overwrites the oldest one.
You can access all of the lists via the display menu.
Viewing entries
You can open a list when the telephone is in idle status via the display menu.
‰ ¢Call Lists ¢All Calls
‰ ¢Call Lists ¢Outgoing Calls
‰ ¢Call Lists ¢Accepted Calls
‰ ¢Call Lists ¢Missed Calls
Information on the entry:
uPhone number of the caller/called party. If the number is saved in the directory, the
name is displayed instead.
uVoIP account on which the call was made/received.
uDate and time of the call. Outgoing calls also include the duration of the connection.
The information displayed is determined by the information transferred by the caller and
whether or not the caller appears in the directory.
If the caller has activated CLIP (Calling Line Identification Presentation), the caller's phone
number is identified. The caller can then be identified by this number if he or she is
already saved in the directory. Prerequisite: The feature is activated for the VoIP account.
All Calls All outgoing, accepted and missed calls.
Outgoing Calls Last dialled numbers (redial list).
Accepted Calls Calls that were accepted.
Missed Calls Calls that were not answered.
If the list contains entries that you have not yet viewed, the dis-
play shows the ™ icon and the number of new entries. You can
also access the list via the Message Centre (£Page 61).
The calls are displayed in chronological
order, from the most recent through to
the oldest.
The number of the selected entry and the
total number of entries in the list (e.g., 1/
30) is displayed in the top right corner.
An icon is shown in front of each entry to
indicate whether it is an outgoing ( š),
accepted (›) or missed (™) call.
All Calls
View Options
Brown, Tim
via §§1§§Account1
Today,, 00:07 Duration: 00:05:20
1/30
š
Brown, Tim
via §§1§§MyOffice
01.05.10, 12:20
š
Black, Susan
™
44
Using the call lists
Or
Copying an entry from the call list to the directory.
qScroll through the list to the
required name.
§§View§§ Press the display key to show
the entry.
cLift the receiver.
Or
§§Dial§§ Press the display key.
The number is dialled.
Back Dial
+49(123)1234567890
•
qScroll through the list to the
required name.
§§Options§§ Press the display key.
qSelect the Copy to Directory
entry.
§§OK§§ Press the display key to con-
firm the action.
The directory is opened.
You can create a new entry in the direc-
tory or edit an existing one.
See directory £Page 47.
Back OK
Copy to Directory
š 00991234567890
Delete Entry
Delete List
via §§1§§Account1
All Calls
Copy to Directory
Back OK
<New Entry>
Black, Susan
Brown, Tim
Forster, Fred
Judy
Miller, Peter
White, Phil

45
Using the call lists
Deleting an entry or list
§§Options§§ Press the display key.
qSelect the required action:
Delete Entry or Delete List
§§OK§§ Press the display key to con-
firm the action.
You must confirm the action again.
Back OK
Copy to Directory
š 00991234567890
Delete Entry
Delete List
via §§1§§Account1
All Calls
46
Using directories
Using directories
The options are:
uLocal directory
uDirectory on USB storage device £Page 50
uLDAP directory £Page 51
uPersonal or public online directory £Page 52
Using the local directory
You can save a total of 500 entries in the local directory. You can expand this number to
an almost unlimited degree by connecting a USB stick.
Directory entries are saved in the form of vCards. These are virtual business cards for
exchanging contact information (file extension .vcf). You can assign a picture to a direc-
tory entry. This must be held in the phone's resource directory ( £Page 98).
You create a personalised directory. If you move workstations, you can save your directory
on a USB stick and access it from another phone ( £Page 127).
Directory entries
An icon in front of a phone number indicates whether it is a home (ä), office (k) or
mobile number ( l).
Please note
The default directory is the local directory. This is the directory that you can open with
the Z key and the directory to which entries are saved using the "Copy to Directory"
function.
You can set a different directory as the default directory via the Web configurator
(£Page 150).
A directory entry contains the following
information:
uFirst name, surname, picture
uUp to seven phone numbers
uE-mail address, Web address, fax
number
uJob title/position, company, address
uBirthday, time zone, further informa-
tion
Susan Black
Teacher
School
Edit Delete
+471(076)4567890123
+49(698)987654321
+345(678)345621
+377(098)1234567890
•» Å Ð
ä
k
l
lV

47
Using directories
Opening the directory
Open the directory in idle status with the Z key (navigation key s)
Or use the display menu
‰ ¢Contacts ¢Directory
Displaying an entry
Creating a new entry
§§Options§§ Press the display key.
§§OK§§ Press the display key to start the New Entry action.
Each directory entry has five tabs.
rScroll from tab to tab.
qNavigate to the required field or to the tab level.
qScroll through the list to the
required name.
§§View§§ Press the display key. The
entry is shown with all tabs
as in the illustration on
Page 46.
UPress the arrow to the right
of the entry. The entry will be
shown as an overview
screen.
Tab 1: Entering the name
~Enter the Name and First Name.
For information on entering text
£Page 23.
Adam
Black, Susan
Brown, Tim
A
View Options
Forster, Fred V
B
C
D
E
New Entry
Back Save
V
• » Å Ð_
First Name:
Surname:
Picture:
Abc

52
Using directories
Using online directories
Online directories are available on the Internet. You can:
uUse public online directories that are available on the Internet, such as KlickTel or the
Yellow Pages and
uCreate a personal online directory if your provider permits this.
Select which public online directory you want to use via the Web configurator
(£Page 147).
uWhite Pages
a public directory provided on the Internet
uYellow Pages
yellow pages provided on the Internet
uPrivate NetDirectory
Some providers offer users the option of creating and managing a personal online
directory on the Internet.
You can use the personal online directory on your phone.
Prerequisite:
– You enter the data for the provider of your personal online directory in the Web
configurator (£Page 147)
– You must create and manage your personal online directory using your PC's Web
browser.
Opening a online directory
You can open a online directory in idle status via the display menu
‰ ¢Contacts ¢Name of directory
Select the required public or private online directory. The directory name depends on the
settings for the directory in the Web configurator. It can be the name the provider uses for
their directory or a name you have chosen yourself.
Searching for an entry in the online directory
You can search for a phone number or a name. Provided that you haven't entered a search
criterion, you can switch between a §§Name Search§§ and a §§Number Search§§.

54
Using directories
Search results
Search results are displayed as a list.
If more than 99 entries are found, a mes-
sage including the number of results
found is displayed. You can then refine
the search or request for the entire list to
be displayed.
Refining a search:
§§Refined Search§§Press the display key.
Specify your search request in the various
fields.
Surname, First name, Category/Name or
Street.
§§Search§§ Press the display key to
restart the search.
Displaying entry details:
qScroll to the required entry.
§§View§§ Press the display key.
The tabs contain the available phone
numbers and address information.
rScroll from tab to tab.
Dialling a number:
qSelect the number.
~Lift the receiver.
Online
View Refined Search
Brown, Albert
Place 1, 12345 London
W
V
Brown, Albert
Street 2, 67890 London
Brown, Andrew
Road 3, 23456 London
Brown, Antony
Online
ÛSearch
Surname:
Brown
V
First Name:
Su|
T §U§ V 8 abc
Online
ßNew Search
+49(698)987654321
+345(678)345621
+377(098)1234567890
• Å
ä
k
l
Produkt Specifikationer
| Mærke: | Siemens |
| Kategori: | Telefon |
| Model: | Gigaset 900 |
Har du brug for hjælp?
Hvis du har brug for hjælp til Siemens Gigaset 900 stil et spørgsmål nedenfor, og andre brugere vil svare dig
Telefon Siemens Manualer

21 September 2024
18 September 2024
16 September 2024
3 September 2024
30 August 2024
12 August 2024
10 August 2024
19 Juli 2024
19 Juli 2024
19 Juli 2024
Telefon Manualer
- Telefon SilverCrest
- Telefon Acer
- Telefon Amplicomms
- Telefon Denver
- Telefon Sencor
- Telefon Sony
- Telefon Samsung
- Telefon GE
- Telefon Panasonic
- Telefon Philips
- Telefon LG
- Telefon AEG
- Telefon Audio-Technica
- Telefon Doro
- Telefon Gigaset
- Telefon AT&T
- Telefon Pioneer
- Telefon Apple
- Telefon Logitech
- Telefon Daewoo
- Telefon Sennheiser
- Telefon Emporia
- Telefon OpenVox
- Telefon Grundig
- Telefon Akuvox
- Telefon D-Link
- Telefon Motorola
- Telefon Roland
- Telefon Asus
- Telefon Toshiba
- Telefon Pyle
- Telefon Brother
- Telefon Lenovo
- Telefon Yamaha
- Telefon Infiniton
- Telefon OnePlus
- Telefon AVM
- Telefon Logik
- Telefon Planet
- Telefon Hama
- Telefon Thomson
- Telefon Nokia
- Telefon JBL
- Telefon TriStar
- Telefon TRENDnet
- Telefon Trevi
- Telefon Trust
- Telefon Fysic
- Telefon Topcom
- Telefon Flex
- Telefon Blaupunkt
- Telefon Sandstrøm
- Telefon Uniden
- Telefon Hitachi
- Telefon Medion
- Telefon Sweex
- Telefon Linksys
- Telefon Cisco
- Telefon Huawei
- Telefon Ranex
- Telefon Bang And Olufsen
- Telefon Geemarc
- Telefon Jabra
- Telefon Loewe
- Telefon Crosley
- Telefon Netgear
- Telefon EnVivo
- Telefon Lifetec
- Telefon Avaya
- Telefon Parrot
- Telefon Telefunken
- Telefon Vtech
- Telefon Microsoft
- Telefon Jacob Jensen
- Telefon Alcatel
- Telefon Anker
- Telefon Zebra
- Telefon Olympia
- Telefon Plantronics
- Telefon Xiaomi
- Telefon Krüger&Matz
- Telefon RugGear
- Telefon CAT
- Telefon Marmitek
- Telefon Oppo
- Telefon Crosscall
- Telefon NEC
- Telefon Alcatel-Lucent
- Telefon MT Logic
- Telefon Kyocera
- Telefon Xblitz
- Telefon Bogen
- Telefon LevelOne
- Telefon Marshall
- Telefon ArtDio
- Telefon Binatone
- Telefon Honor
- Telefon ZyXEL
- Telefon Tiptel
- Telefon Sagem
- Telefon Fortinet
- Telefon Overmax
- Telefon Archos
- Telefon Yealink
- Telefon RCA
- Telefon Ubiquiti Networks
- Telefon AVerMedia
- Telefon Currys Essentials
- Telefon EnGenius
- Telefon Grandstream
- Telefon MaxCom
- Telefon Patton
- Telefon Renkforce
- Telefon SPC
- Telefon ZTE
- Telefon Mikrotik
- Telefon Switel
- Telefon Brondi
- Telefon HTC
- Telefon Escene
- Telefon BlackBerry
- Telefon Evolveo
- Telefon Audioline
- Telefon BT
- Telefon XD Enjoy
- Telefon Mitel
- Telefon GPO
- Telefon Wiko
- Telefon Telstra
- Telefon Aastra
- Telefon Snom
- Telefon Mackie
- Telefon Vimar
- Telefon Oricom
- Telefon Oregon Scientific
- Telefon Lexibook
- Telefon Scosche
- Telefon Prestigio
- Telefon MyPhone
- Telefon Draytek
- Telefon Realme
- Telefon Crestron
- Telefon Lindy
- Telefon MXL
- Telefon Cortelco
- Telefon Legrand
- Telefon CTA Digital
- Telefon Steren
- Telefon Neat
- Telefon Tecdesk
- Telefon Dnake
- Telefon Gamdias
- Telefon Lewitt
- Telefon Allview
- Telefon Alcon
- Telefon Airlive
- Telefon AGFEO
- Telefon Amplicom
- Telefon Ascom
- Telefon Proximus
- Telefon BeeWi
- Telefon Sonim
- Telefon Sunstech
- Telefon Sylvania
- Telefon Swissvoice
- Telefon Marquant
- Telefon Nordmende
- Telefon KPN
- Telefon Belgacom
- Telefon Auerswald
- Telefon Profoon
- Telefon Teledex
- Telefon Valcom
- Telefon Innovaphone
- Telefon Hagenuk
- Telefon Essentiel B
- Telefon Logicom
- Telefon Peaq
- Telefon Vogtec
- Telefon T-Mobile
- Telefon Fanvil
- Telefon Spectralink
- Telefon VXi
- Telefon Unify
- Telefon Sagemcom
- Telefon Edenwood
- Telefon Premier
- Telefon HUMANTECHNIK
- Telefon Polycom
- Telefon Primare
- Telefon Mobotix
- Telefon Edge-Core
- Telefon ClearOne
- Telefon Clarity
- Telefon Syco
- Telefon SMC
- Telefon Pixel
- Telefon Digium
- Telefon FlyingVoice
- Telefon Davolink
- Telefon KONFTEL
- Telefon Mitsai
- Telefon Clear Sounds
- Telefon ALLO
- Telefon Oukitel
- Telefon On-Q
- Telefon Canyon
- Telefon HMD
- Telefon Tecno
- Telefon Olitech
- Telefon Dopod
- Telefon Hamlet
- Telefon Sedna
- Telefon Cubot
- Telefon AudioCodes
- Telefon 3Com
- Telefon British Telecom
- Telefon CyberData Systems
- Telefon Bintec-elmeg
- Telefon Wantec
- Telefon Algo
- Telefon Future Call
- Telefon 4family
- Telefon Tador
- Telefon CSL
- Telefon POCO
- Telefon Liam&Daan
- Telefon Lively
- Telefon EMeet
- Telefon Cyber Acoustics
Nyeste Telefon Manualer

9 April 2025

1 Marts 2025
1 Marts 2025
25 Februar 2025
22 Februar 2025
22 Februar 2025
11 Februar 2025
7 Februar 2025
30 Januar 2025
24 Januar 2025